SENA TECHNOLOGIES SP16 Motorcycle Bluetooth Communication System User Manual
Sena Technologies,Inc. Motorcycle Bluetooth Communication System Users Manual
UserManual.wiki
>
SENA TECHNOLOGIES
>
SP16 User Manual
Users Manual
Navigation menu
Upload a User Manual
Namespaces
Wiki Guide
HTML
PDF
Info
Views
User Manual
Discussion / Help
Navigation
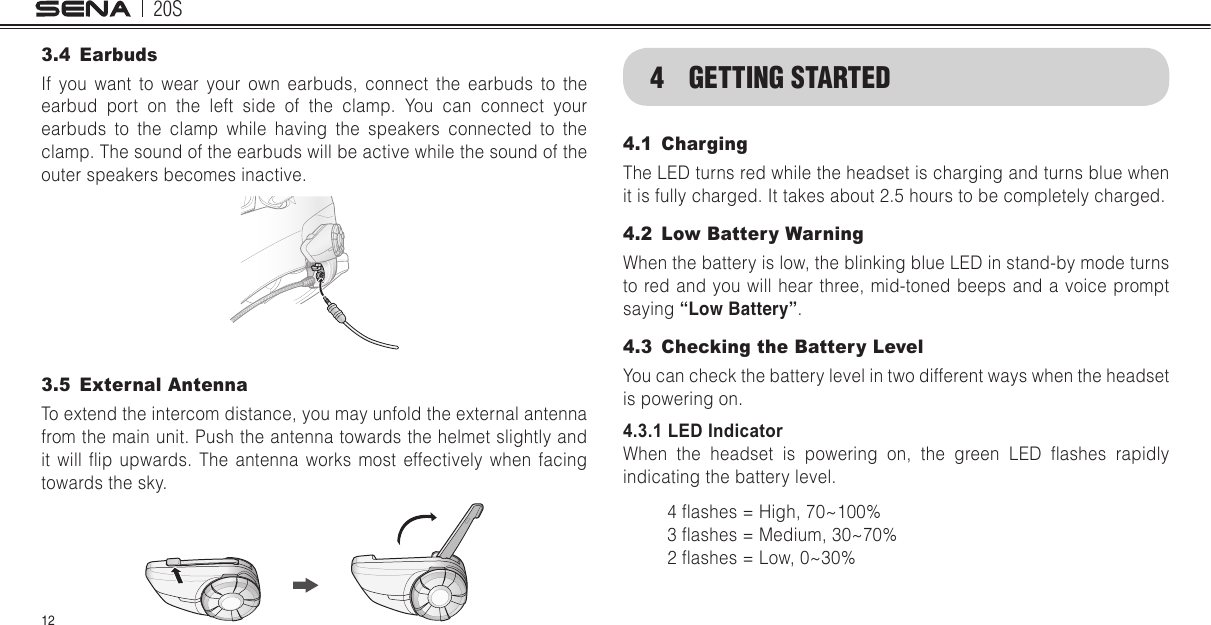


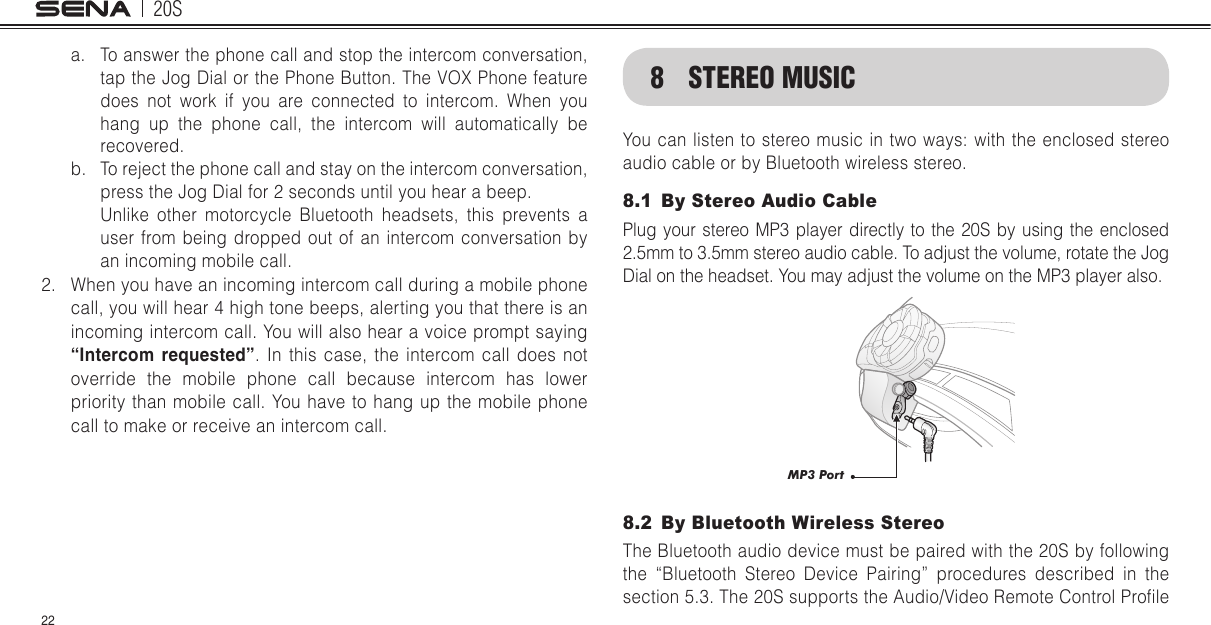

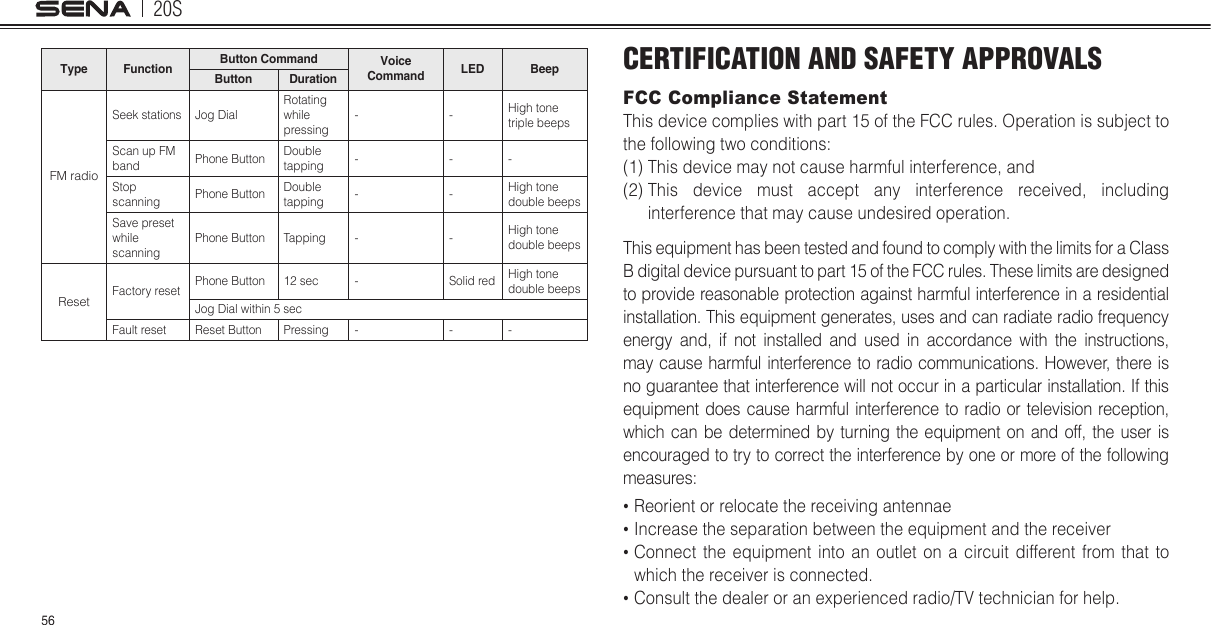
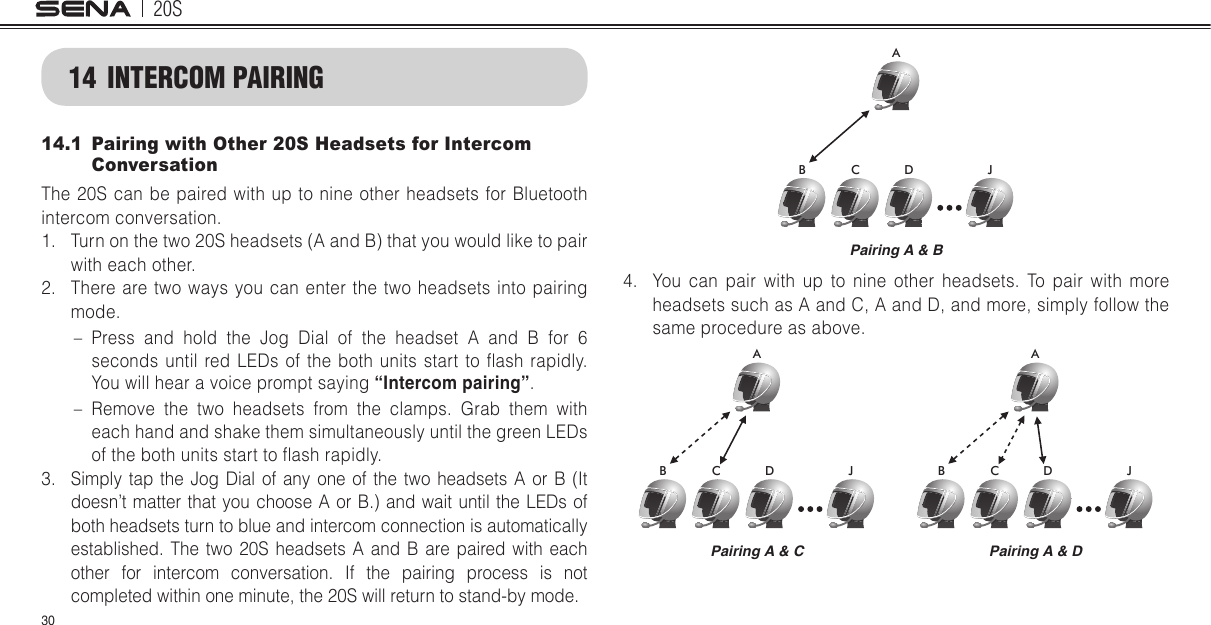
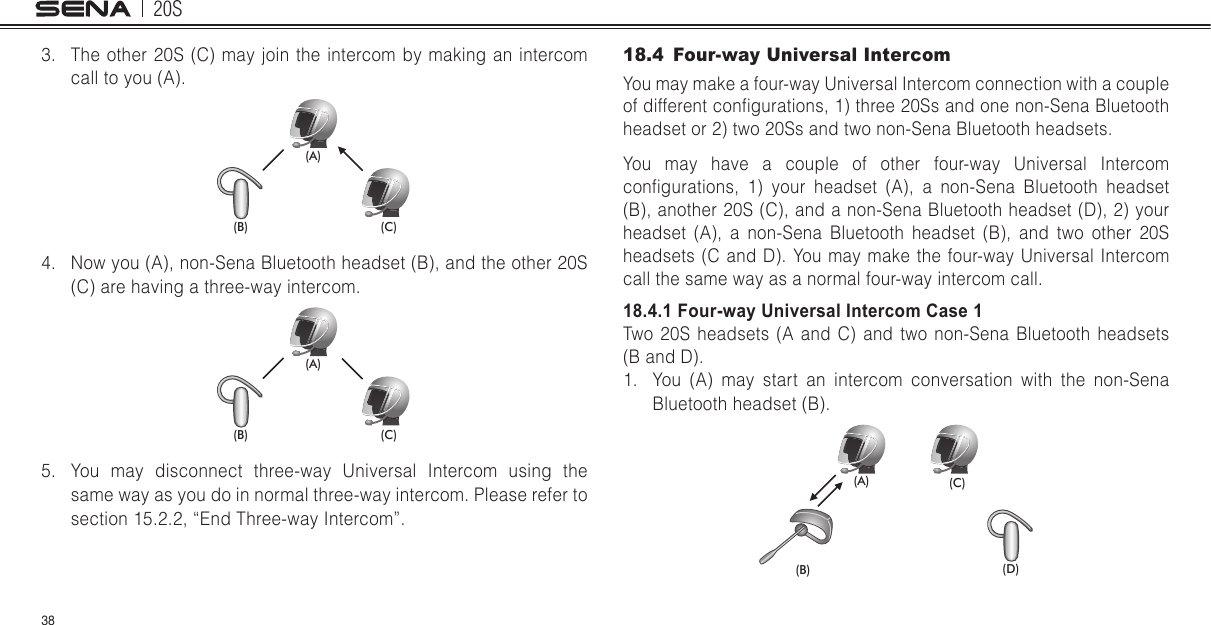
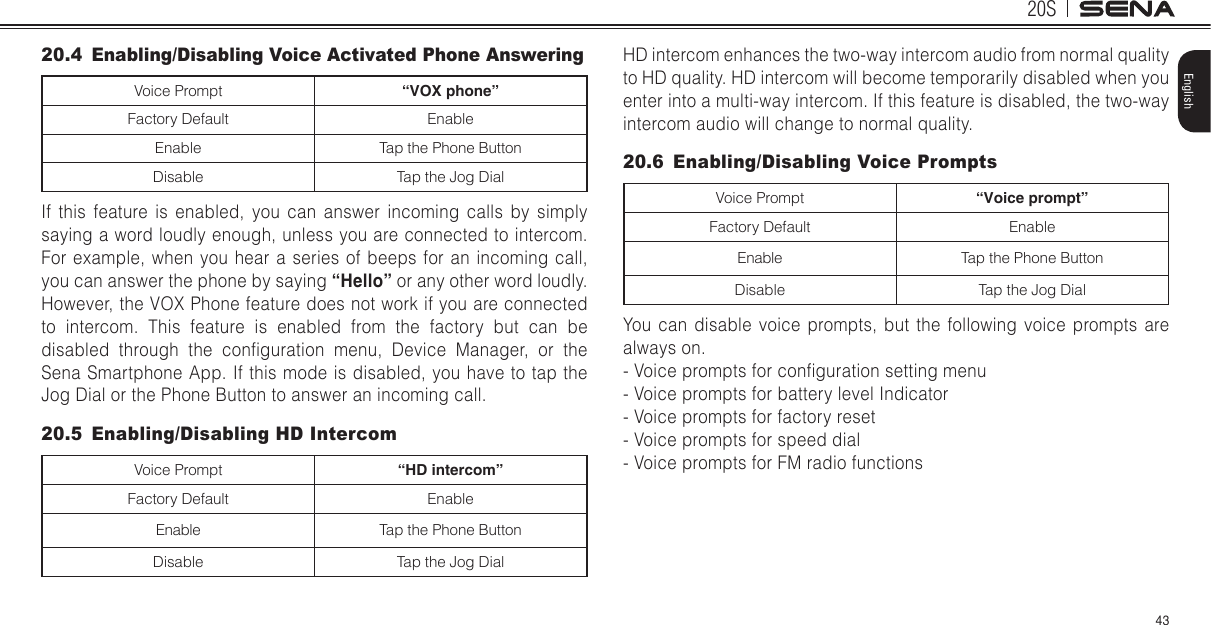
![20S2813 VOICE COMMANDThe voice command of the 20S allows you to operate certain operations by simply using your voice. You can control the 20S completely handsfree using the voice recognition. The voice command function works only with English commands. Voice Command Procedure:1. In stand-by mode, say “Hello Sena” or double tap the surface of the main unit to enter the voice command mode. In non-stand-by modes, double tap the surface to enter the voice command mode.2. Speak a voice command from the table below:Mode Status Function Voice CommandStandby / Music / FM Radio / Intercom call “Intercom [one, two, … , nine]”End intercom “End intercom” Call last intercom “Last intercom”Group intercom “Group intercom”Intercom pairing “Pairing intercom”Cancelling operations “Cancel”12 AMBIENT MODEYou can hear the ambient sound outside of your helmet by activating the Ambient Mode. To activate the Ambient Mode, press the Ambient Mode Button which is placed on the bottom of the clamp unit. To deactivate the Ambient Mode, press the Ambient Mode Button again.Ambient Mode ButtonNote: The ambient mode has the highest priority, so you cannot make or answer phone call, listen to music, or have an intercom conversation if the Ambient Mode is activated.](https://usermanual.wiki/SENA-TECHNOLOGIES/SP16/User-Guide-2312145-Page-28.png)
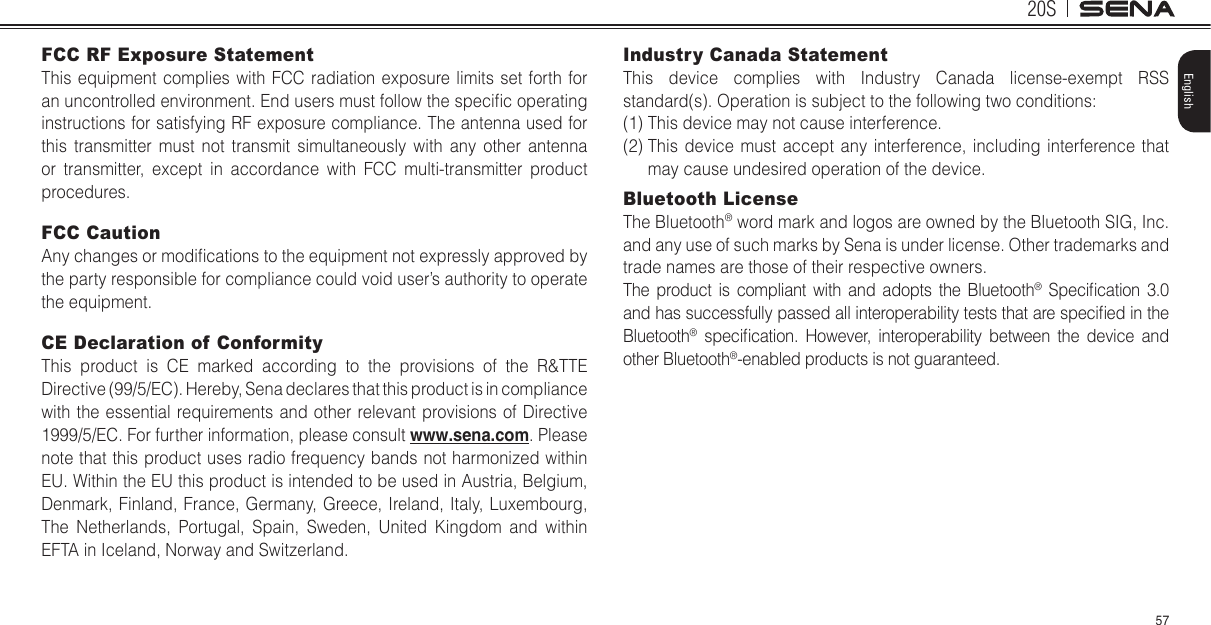
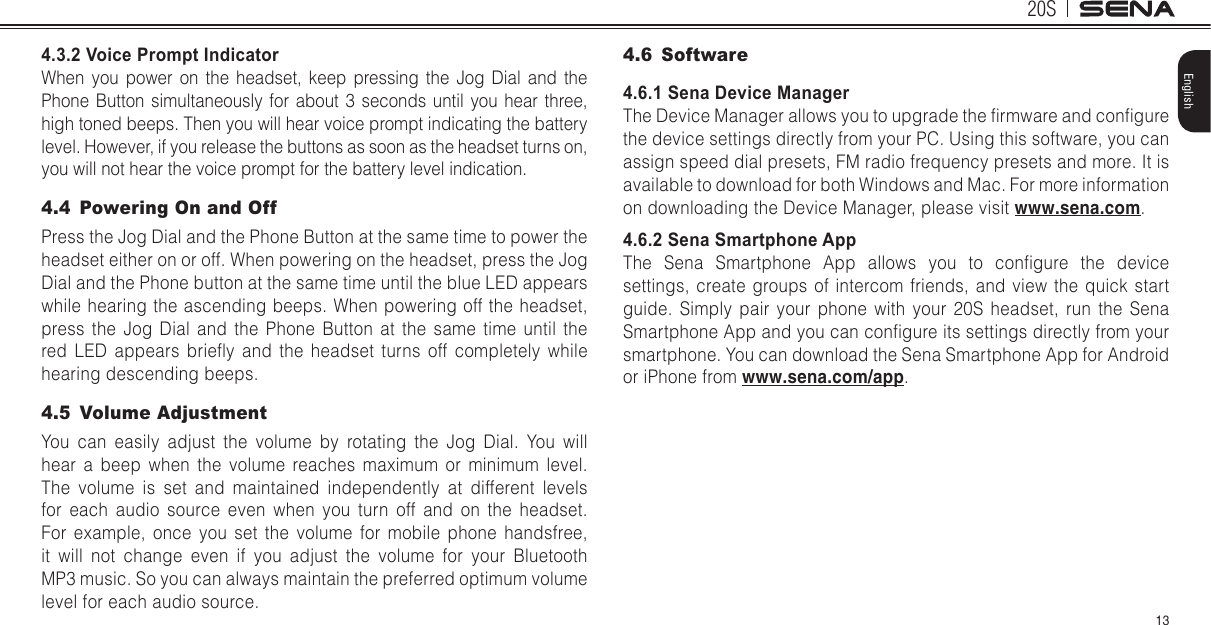
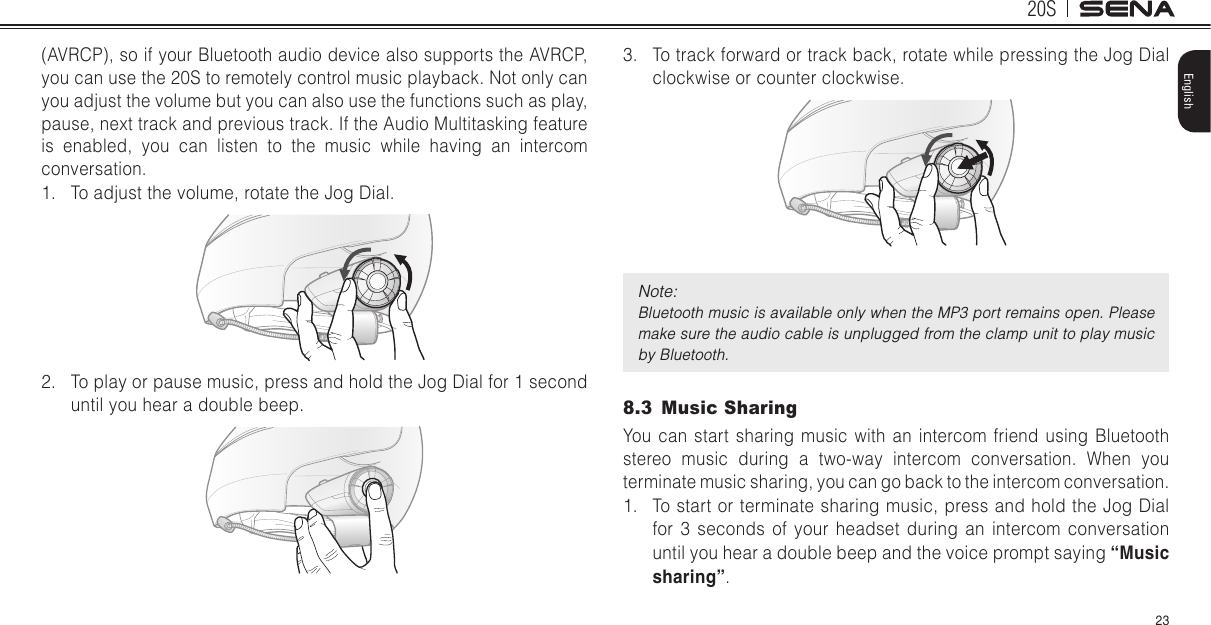
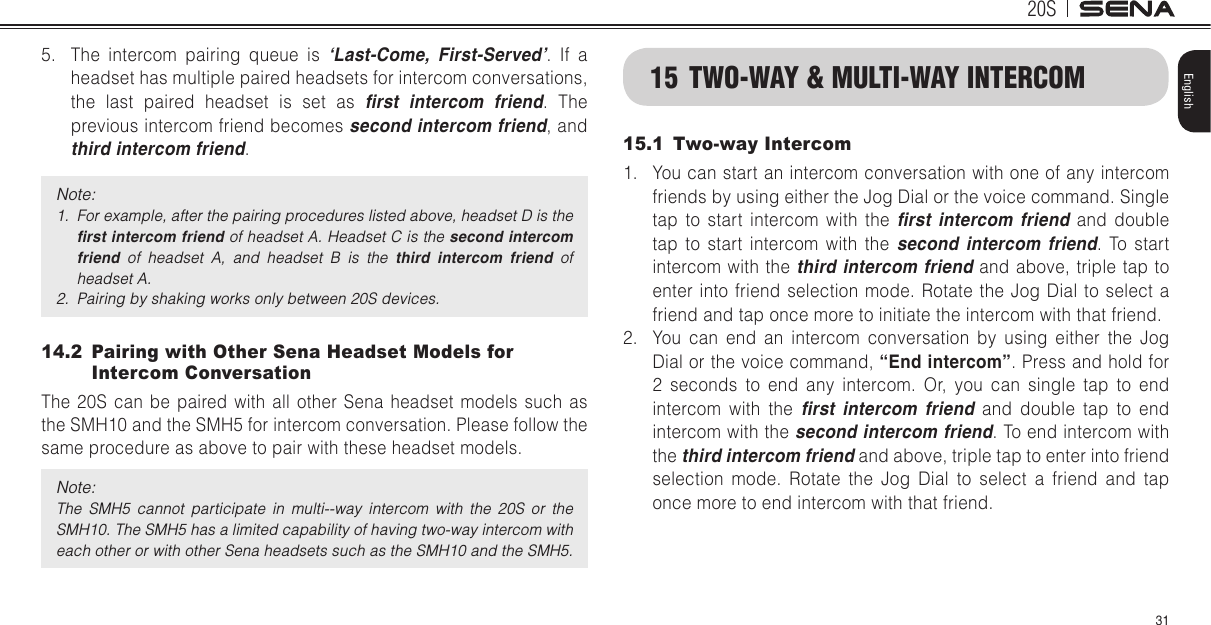
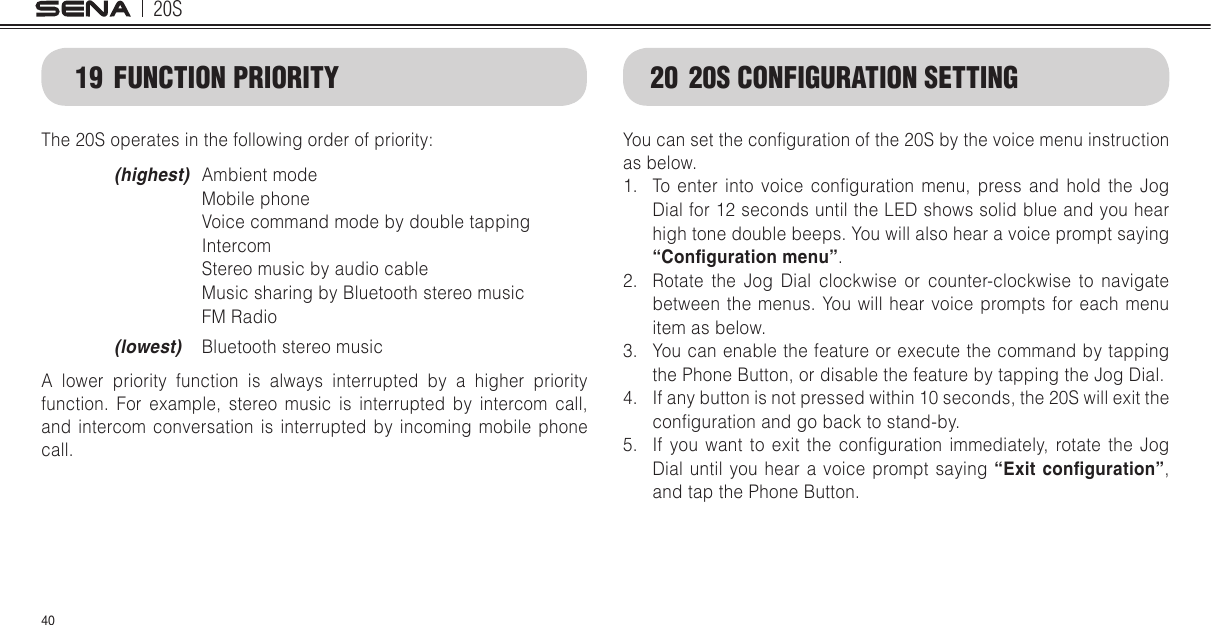
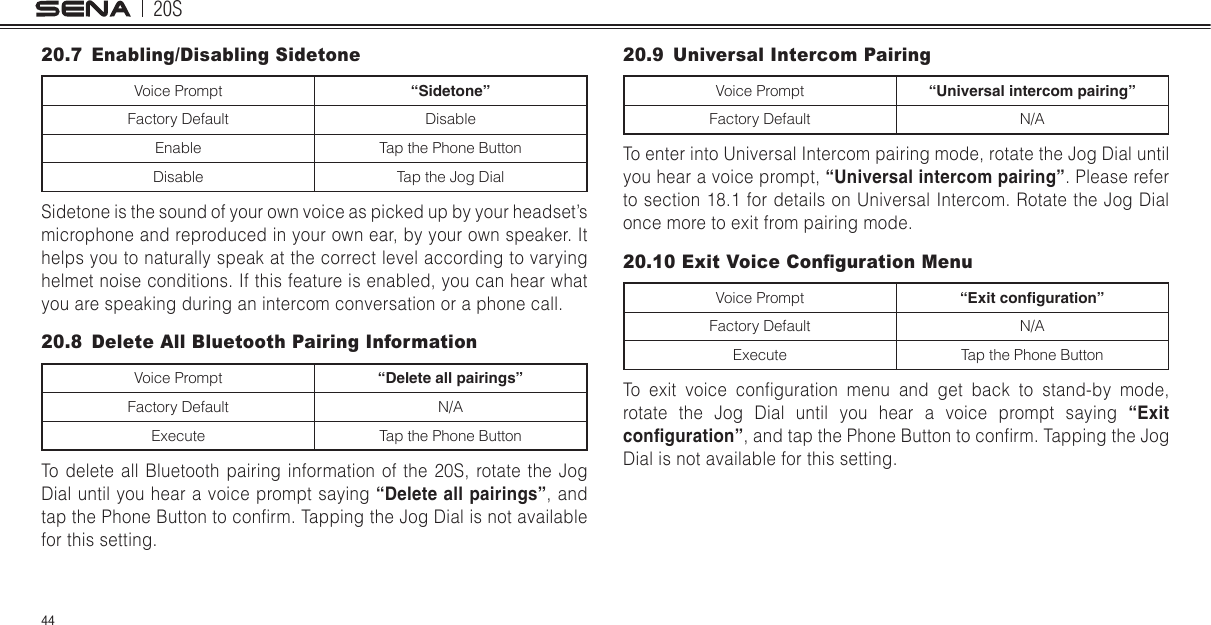
![20S29EnglishMode Status Function Voice CommandStandbyStart music “Music” or “Stereo”Turn on FM radio “FM radio”Check battery “Check battery”Speed dialing “Speed dial [one, two, three]”Redial the last call “Redial”Voice command help “What can I say?”Check connected devices “Connected devices”Conguration menus “Conguration”Music / FM RadioNext track (music) / next preset (FM radio) “Next”Previous track (music) / previous preset (FM radio) “Previous”Stop music / FM Radio “Stop”Note: 1. Voice command performance may vary based on the environmental conditions including riding speed, helmet type and ambient noise. To improve the performance, minimize wind noise on the microphone by using the large microphone sponge and closing the visor.2. To activate the voice command during non-stand-by functions, double tap the surface of the main unit.](https://usermanual.wiki/SENA-TECHNOLOGIES/SP16/User-Guide-2312145-Page-29.png)
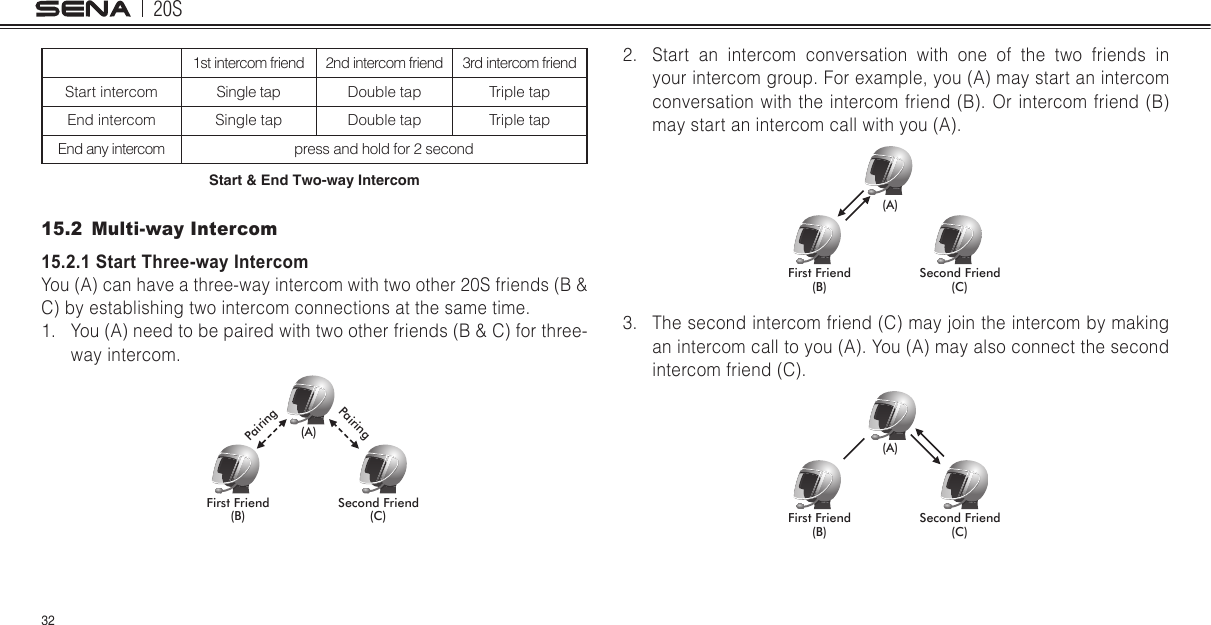


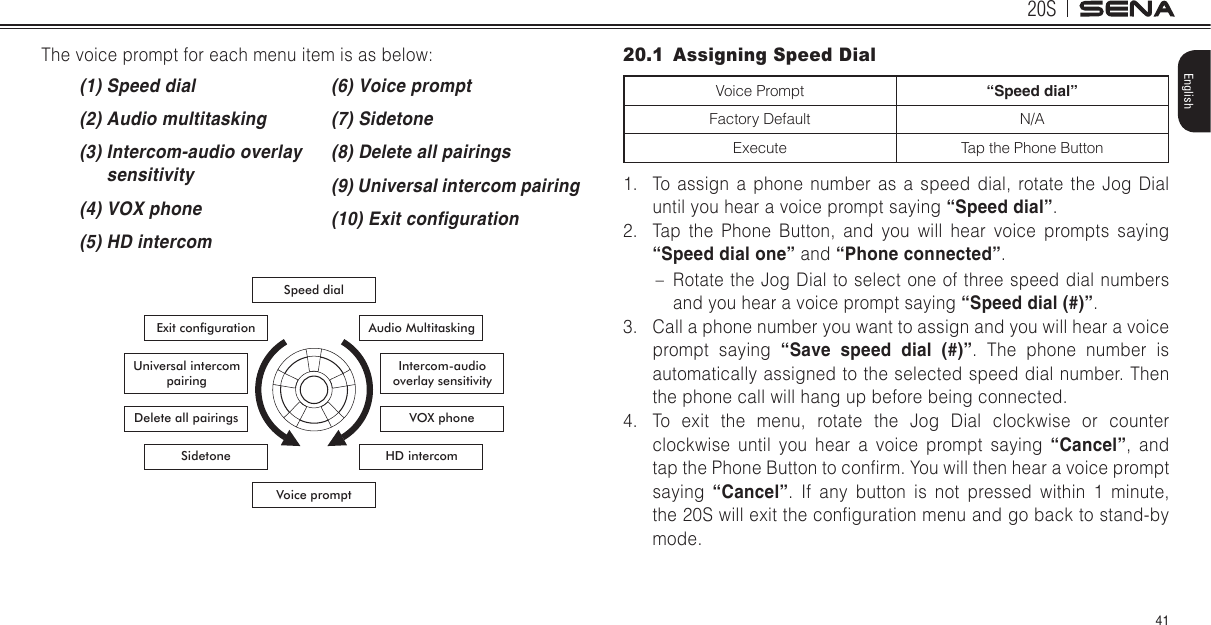
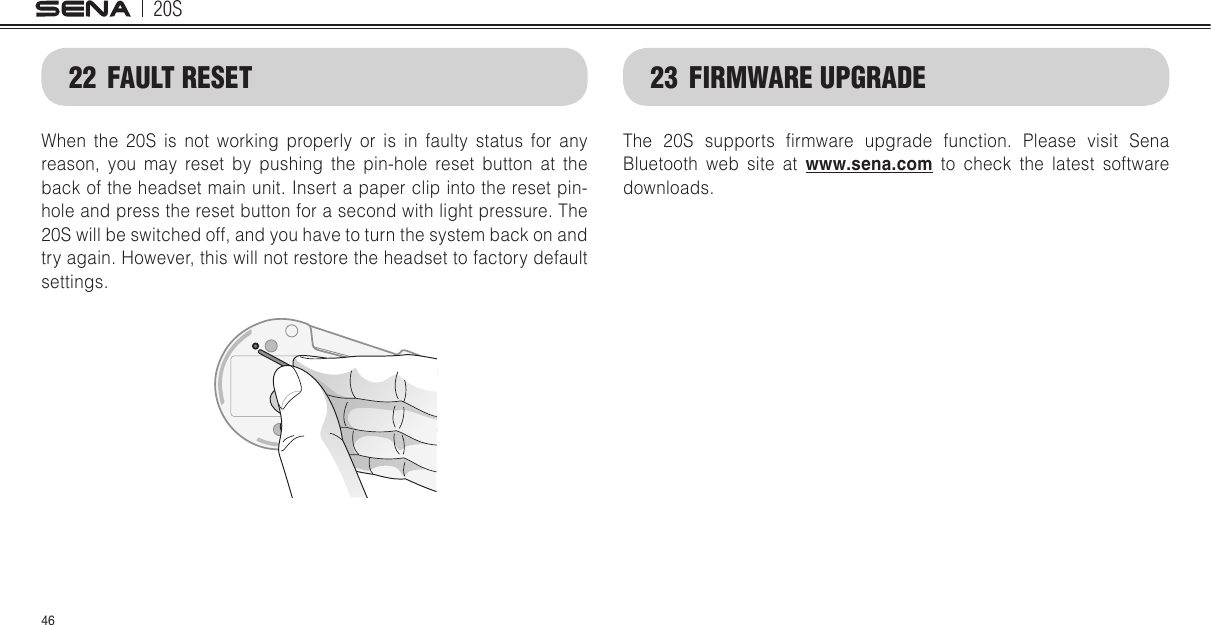

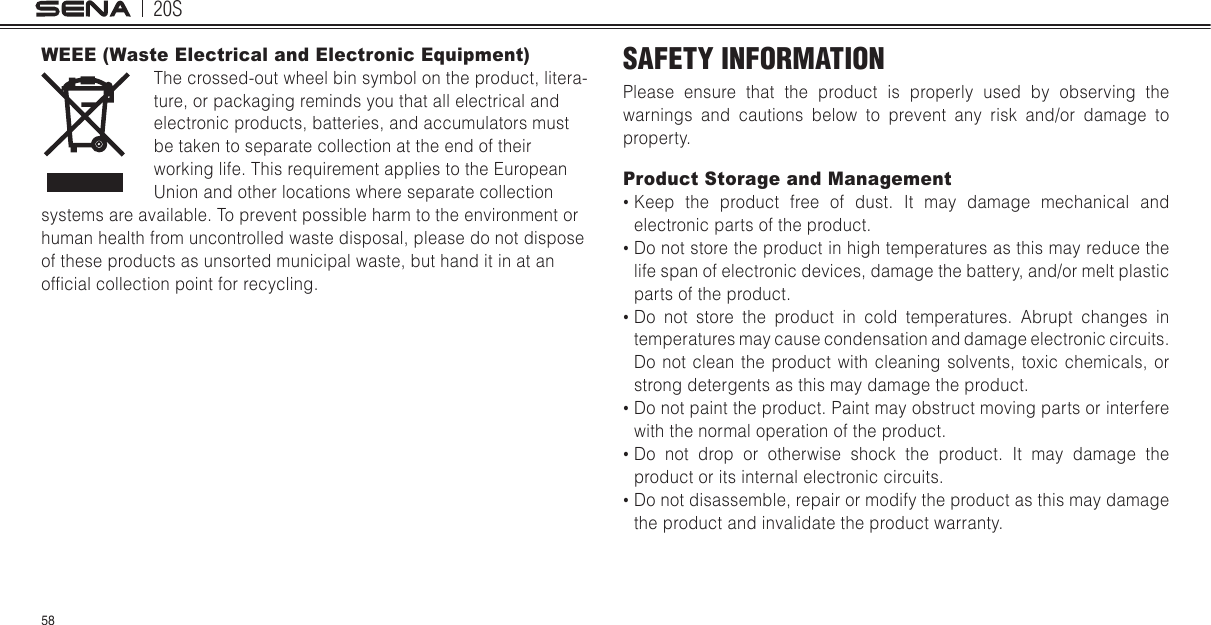
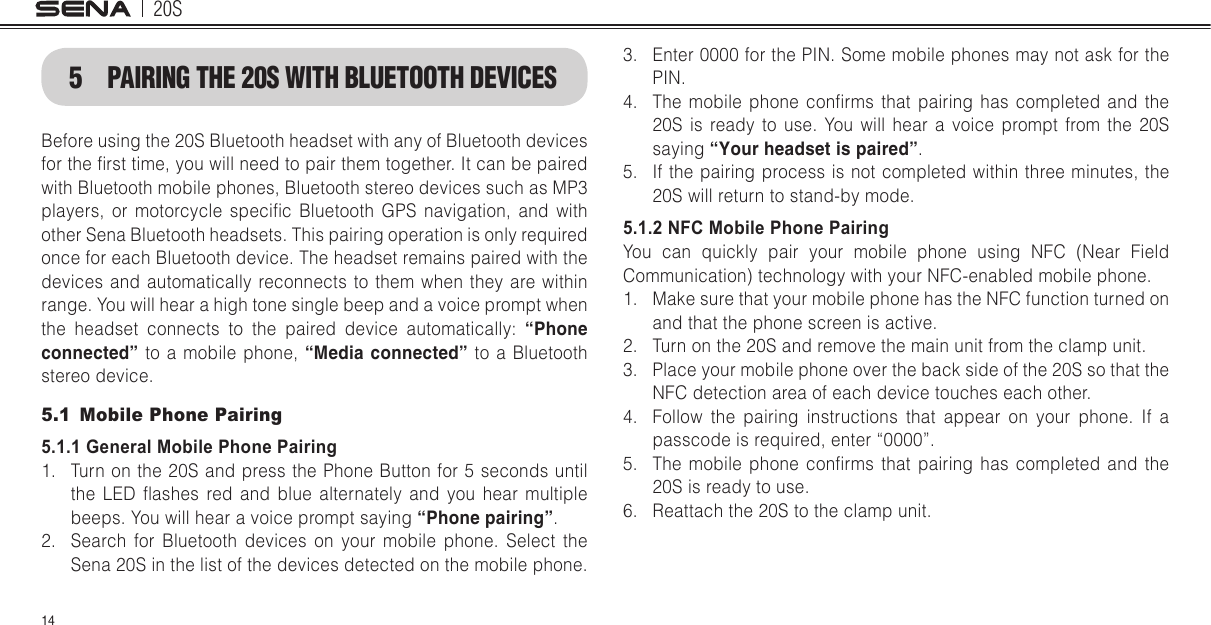
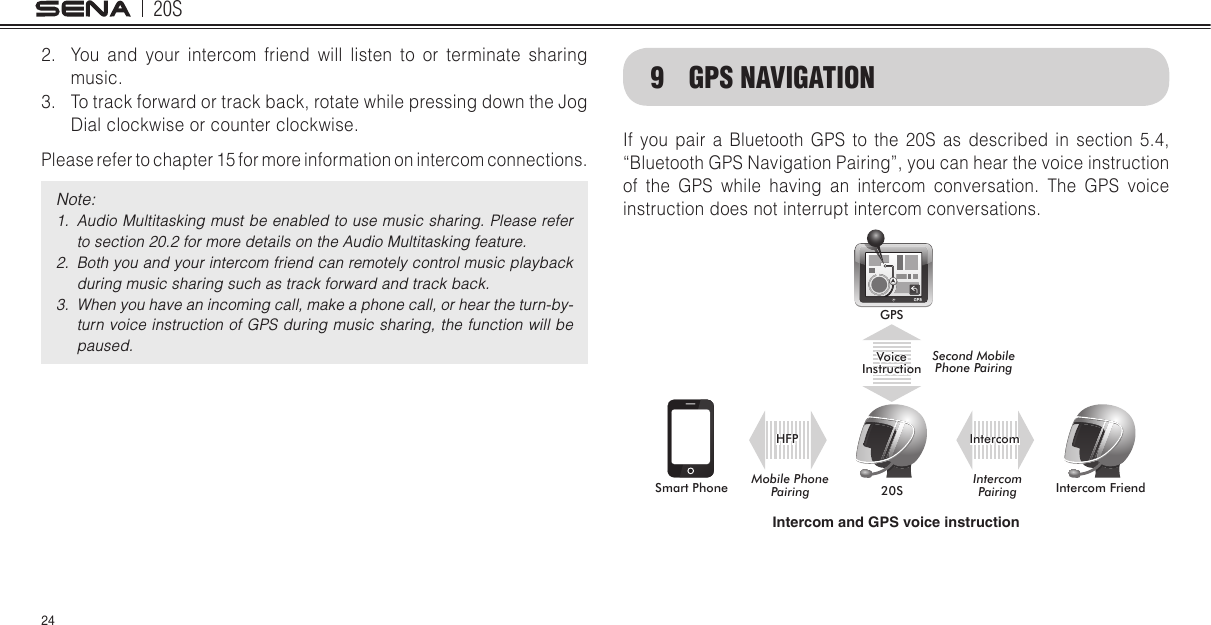
![20S55English25 OPERATION QUICK REFERENCEType Function Button Command Voice Command LED BeepButton DurationBasic FunctionPower-on Phone Button+ Jog Dial 1 sec -Solid blueAscending beepsPower-off Phone Button + Jog Dial Tapping -Solid red Descending beepsVolume adjustment Jog Dial Rotating - - -Voice commandSurface of the main unitDouble tapping “Hello Sena!” Green Flashing -Ambient ModeAmbient Mode Button Pressing -Green flashing -Mobile PhoneMobile phone pairing Phone Button 5 sec -Blue & red alter-natively flashingHigh tone multiple beepsSecond mobile phone pairingJog Dial 6 sec -Red flashingMultiple beepsPhone Button within 2 secCall transfer Phone Button 2 sec - - High tone single beepAnswer & end phone callPhone Button or Jog Dial Tapping - - -Voice dial Phone Button Tapping - - -Type Function Button Command Voice Command LED BeepButton DurationMobile PhoneSpeed dial Phone Button Double tapping“Speed dial [one, two, three]”-Mid-tone single beepReject incoming callJog Dial 2 sec - - -IntercomIntercom pairing Jog Dial 6 sec “Pairing intercom”Red flashingMid-tone single beepJog Dial of any one of the two headsetsStart intercom Jog Dial Tapping “Intercom [one, two … nine]”- -End intercom Jog Dial 2 sec “End intercom”Blue flashingMid-tone single beepStart Group IntercomAmbient Mode Button 1 sec “Group intercom”Green flashing -MusicPlay/pause Bluetooth musicJog Dial 1 sec “Music” -Mid-tone double beepTrack forward/backJog DialRotating while pressing“Next”/“Previous” - -FM radioFM radio on Phone Button 2 sec “FM radio” -Mid-tone double beepsFM radio off Phone Button 2 sec “FM radio”/ “Stop” -Mid-tone double beepsSelect preset Phone Button Tapping “Next” -Mid-tone single beep](https://usermanual.wiki/SENA-TECHNOLOGIES/SP16/User-Guide-2312145-Page-55.png)