SENWA MEXICO DE C V S970 Smart Phone User Manual
SENWA MEXICO,S.A.DE C.V Smart Phone
User manual

使用说明
1
Smart Phone
User Manual
S970

使用说明
2
Contents
1 .Key Description ................................................................................. 3
2. The use of mobile phone memory card as U disk............................. 3
3.W i-Fi .................................................................................................. 4
4.Bluetooth .......................................................................................... 5
5.Phone ................................................................................................ 7
6.E-mail ................................................................................................ 9
7. Calculator ......................................................................................... 9
8. Browser .......................................................................................... 10
9.Sound Recorder ............................................................................... 10
10. Calendar ....................................................................................... 10
11. Settings ......................................................................................... 11
12. Clock ............................................................................................. 15
13. FM Radio ...................................................................................... 15
14. People .......................................................................................... 15
15. Gallery .......................................................................................... 16
16.Camera .......................................................................................... 17
17.Messaging ..................................................................................... 18
18.Music ............................................................................................. 19
19.Security warnings and precautions ............................................... 19
使用说明
3
1 .Key Description
Button Function
Return
•
Press this button to return to the front one interface, or to
close the dialog, the options menu, no
tice panel or screen
keyboard
Home
•
On any application or interface, press this button to return to
the home interface
•
Press and hold this button can open the recently opened
application window
Menu • Access to menu options
Power
• Press this button to lock the screen
• Press and hold this button to open the options menu of the
phone including:Power off, Airplane mode,Silent
mode,Meeting mode,General mode.
Side key • Adjust the volume
2. The use of mobile phone memory card as U disk
To copy music, photos and other files to your memory card from your computer, you
should set the mobile phone memory card to U disk first.
• The phone memory card set to U disk
1) Using the USB cable to connect your phone to the computer.The status bar will
show the notification icon.
2) Open the Notifications panel.
3) In the notification panel, touch USB connection, and then in the pop-up page,
touch the "Turn on USB storage".
4) Connected as USB Storage:USB storage,Media device,Camera(PTP).
• Note: If you connect your phone to your computer selecting "Open the USB
storage" , the phone will not recognize the memory card.You may can not use certain

使用说明
4
applications, such as camera.
• Unistall the U disk from your computer
1)Open the notification panel.
2)In the notification panel touch "off USB storage device", then touch the "Turn off
USB storage" in the pop-up page.
3.W i-Fi
Turn on Wi-Fi and connect to a wireless network:
1) Press the menu button ,then touch System settings> Wireless and network.
2) Select the check box to turn on Wi-Fi.The phone will automatically scan for
available wireless networks.
3) Touch the Wi-Fi settings, then the Wi-Fi network list will show the names and
security settings(open network or WEP, WPA/WPA2 encryption) of the found
wireless network. If you have enabled network notifications in the Wi-Fi settings,
the phone will display this icon ( )in the status bar when finding the available
open wireless network.
4) Touch one of the Wi-Fi network to connect to.When you select an open network,
the phone will automatically connect to it.If you select WEP, WPA/WPA2
encrypted network, you should firstly enter the corresponding password, and
then touch the connection.
Note: When the phone is connected to a wireless network, the status bar will display
Wi-Fi icon (), and shows the approximate signal strength (number of strip lit).If you
touch the wireless network that the phone is currently connected to, it will display the

使用说明
5
name , status, signal strength, security and IP address of the Wi-Fi network.If you want to
remove the wireless network settings of the phone, touch "Forget notwork" in this
window.If you want to connect to this network again, you should re-enter those settings.
Note: Unless you choose "Forget network", otherwise the phone chooses to connect to
the encrypted wireless network previously connected does not need to re-enter the
appropriate password. Wi-Fi will automatically search wireless network, which is the phone
without having to perform additional steps to connect to the network.
Connection to other wireless network
1) On the screen of Wireless&Network touch Wi-Fi settings.The found wireless
network will be showed on the list.
2) Touch other wilreless networks to connect to the network.
Note: In addition, the phone can also surf the Internet through the GPRS. Users can
manually choose to open or close the SIM card data connection by touching "data
connection" through "Settings>SIM card management> data connection".
4.Bluetooth
Turn on Bluetooth or set the phone can be detected:
1) Press the menu button, then touch System settings.
2) Select the Bluetooth check box to turn on the Bluetooth,then the status bar will
show the icon ( ).Touch the "SEARCH FOR DEVICES" to search for Bluetooth
devices within range.
3) Touch the Bluetooth settings, and all discovered devices are displayed on the list
使用说明
6
of AVAILABLE DEVICES.
(Click on the bluetooth name to set it can be detected,so that other Bluetooth
devices within range will be able to find the phone.)
Important: The shortest visibility timeout of the phone is two minutes.
• Pairing and connecting bluetooth headset
1) Press the menu button, then touch Settings.
2) Touch the "SEARCH FOR DEVICES" to search for Bluetooth devices within range.
Note:
a:If the list can not contain your device, touch "SEARCH FOR DEVICES" to re-scan
again.
b:Make sure that you want to pair with Bluetooth devices is set to the detection
mode
3) Touch the headset icon on the device list to match.
• NOTE: Generally most Bluetooth devices need to enter a password to pair,and the
default password most is "0000". When Bluetooth headset is connected to the
phone, the status bar will display the Bluetooth connected icon().Then you can
make or receive calls using the headset.
• Interrupt the connection with the Bluetooth headset
1) Press the Menu button> System settings> Bluetooth Settings.
2) On the list of Bluetooth devices, touch or tap and hold the hands-free headset
connected.
3) Then you choice the "Unpair".

使用说明
7
5. Phone
• Start the dial-up
Open the main application interface and touch the dial. Enter a phone number in the
dial box.
• Call
In the dialer interface, enter the number you want to call.When clicking on the dial
icon,you have to choose to use which SIM card to dial.When input number it will search
local contacts according to the input number,and the connect information of fuzzy matching
will be displayed in the query results.The fuzzy matching includs contact number and
contact name.Clicking on one of the searched results will recall the number.If you want to
call extension,click on the dial-up keyboard and input the extension number after the phone
is connected.Also you can through pressing the menu button and select "Add 2-sec
pause"or "Add wait"to input extension number to call extension.
• Phone call log
The dial out or connected number are all on the call records menu.You can screen call
records according to the call situation:Incoming calls, Dialed out and Missed calls.
Click on the small arrow of the right side one record, you can check the details of
it.Press the menu button in the detail interface you have the following choices: Remove
from call log ,Edit number before call.
使用说明
8
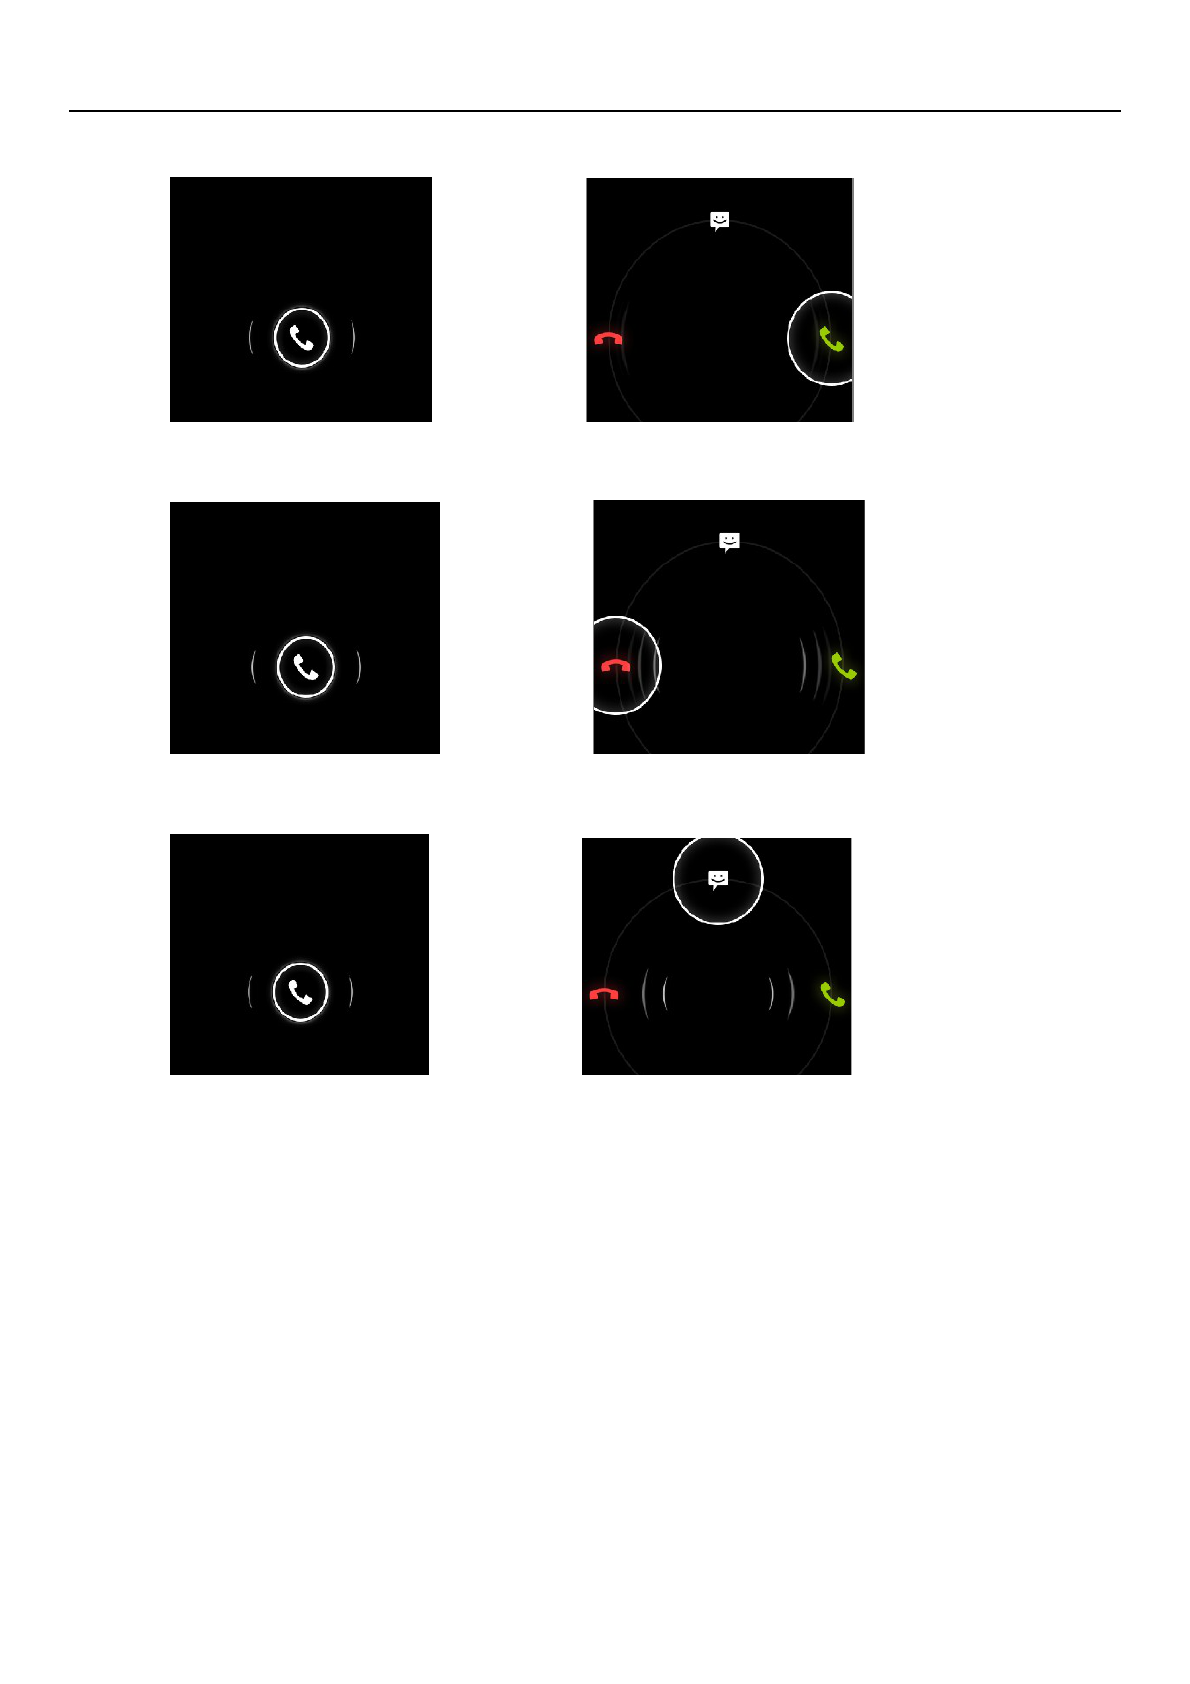
• Answer the phone
• Hung up the phone
• Hung up the phone and send a text message
• Proximity sensor
According to the distance of the phone with your body, automatically adjust the phone
backlight.
During a call, when the phone closes to your ear, the phone screen backlight will
automatically turn off so that it is good for power-saving and preventing inadvertently.
• Two-way call / a multiparty call (conference call)
• Note: This feature requires SIM card multi-party call feature

使用说明
9
1) Phone has been talk all the way
2) Touch the icon( ) again exhale all the way to call, two-way call is established,
the call interface to view to the state.
3)Touch the icon( ) – Two calls merged into a multi-call.
• Phone recording
During a call, press the menu button to start recording the phone calls.
• Call settings
1)Voice Call includes:Voice mail,IP prefix number,Call forwarding,Call barring
2) Video Call
3) Internet Call
4) Other settings
Internet Call:Internet call related settings.
Other settings: Including Fixed Dialing Numbers,Minute Reminder,Quick Responses,TTY
Mode.
6.E-mail
First you need to set the Email account.
Step 1: Enter email address and password.
2: Select account type, choose OK to connect.
7.Calculator
Calculator can carry out some simple arithmetic.

使用说明
10
8.Browser
You can visit the website ,download songs,pictures,video and games and so on using the
b ro w s e r.
9.Sound Recorder
With the recorder you can record sound and can set recorded sound as ringtones.
1) Click on the recorder menu.
2) Keep the cell phone microphone near to the sound source.
3) Click on the recording icon starting to record the sound, click on the pause icon to
pause recording and click on it again to continue recording; click on the stop icon to stop
recording,and chose "Discard" or "Save".
All recordings are saved in the Recording folder in File Mansger.
10.Calendar
Into the calendar program.
The default display to the month the way.
There are four kinds of display mode:
1) Day Display a day's schedule.Or so can flip slide.
2) Week Show a week's schedule.Or so can flip slide.
3) Month The screen displays a monthly schedule (most recently clicked on the
date) slide up and down on a monthly basis flip.
4) Agenda Displays a time space schedule.

使用说明
11
11.Settings
• WIRELESS & NETWORKS
1) SIM management
* Touch to select the SIM card or disable the SIM card, disable the status bar shows the
flight mode.
* the default SIM card, you can choose the voice telephony, video telephony,
information and data
connection is turned on or choose to use that SIM card.
2) Wi-Fi : Touch on/off wifi.Open Wi-Fi will automatically search for available
networks, did not set a password can be connected directly to the need to enter a
password to set a password to connect
Note: Wi-Fi open and then open the offline mode, the Wi-Fi will automatically turn off;
open flight mode and then connect to the Wi-Fi, the Wi-Fi can be used normally.
3) Bluetooth: Touch on/off Bluetooth .
4) Data usage: Open or close the data connection of the SIM card, view the SIM
traffic usage.
5) Airplane mode: Open the airplane mode, the mobile phone mobile network
related services be banned.
6) VPN settings
7) Mobile networks: Enter the interface of the mobile network settings, including:
*data usage *access point names *network mode *network operators.
8) GPRS transfer prefer
使用说明
12
• DEVICE
1)Audio profiles
This option for you provide the mobile phone in incoming call, announcement of the bell
ring set state.include: vibrate,volume,phone ringtone,notification ringtone,feedbace. In
order to adapt to the users in various environment。
* activate: According to the right of the dot, dot heart for the green that open.
* volume:Can manual sliding to choose.
2)Display
* ClearMotion™: Video fluency enhancer
* Lock screen style: Set the default screen or VideoOrb screen
*Lock screen notifications:Show notifications on lock screen
*Wallpaper:Set wallpaper,choose wallpaper from gallery,live wallpapers,video
wallpaper,wallpapers.
* Brightness: The brightness to adjust the screen brightness.
* auto-rotate screen: Rotating the phone changed direction.
* sleep: Screen standby time.
*Daydream:Set up different types of screen saver
* font size: Set the phone to the font size.
3)Storage
* Default write disk:USB storage,SD Card.
* SD card & phone memory usage.
* Unmount SD card and erase SD card.
使用说明
13
4)Battery
Display the battery.
5)Apps
Manage and remove installed applications.
• PERSONAL
1)Location services
* Use wireless networks
* See location in applications(such as Maps)using wireless networks.
2)Security
* Screen unlock: Use pattern, PIN or password lock screen.
* SIM card lock: The SIM card lock to enter the PIN (4-8 digits) can be set
SIM-locked.
The SIM card PIN (Personal Identification Number) is to prevent the illegal use of SIM
card. The PIN code is usually provided with the SIM card. The initial value provided by
the service provider.
Modify the PIN code is locked, you need to open the "SIM lock", then enter the Change
Password interface, the phone will automatically prompt the old PIN code input, and asked
to enter two new PIN code, the last phone will be prompted for your PIN modified
successfully. Three times in a row to enter the PIN code has errors, the SIM card PIN code
will be automatically locked and the PUK code is usually provided with the SIM card. If you
do not, should go to the service provider to obtain this password.
10 times in a row enter the wrong PUK code, the SIM card will be permanently locked.
使用说明
14
3) Language & input
* Select language: The default support 15 language.
4) Backup & reset
* DRM reset:Deletes all DRM licenses.
* Factory data reset:Erases all data on phone.
• ACCOUNTS
Accounts & sync
* Applications can sync,send and receive data at any time
* Applications sync data automatically.
• SYSTEM
1) Data & time
Set a time and date.
2) Schedule power on\off
Set time turns on/off the phone time.
3) Accessibility
* Large text:Set the phone to display the font is large.
* Power button ends call: During a call,pressing power ends call instead of turning
off screen.
* Auto-rotate screen:Rotating the phone changed direction.
* Quick boot: enable\disable quick boot.
4) Developer options

使用说明
15
* USB debugging:USB debugging only for development。Use this function can be in
computer and mobile duplicate data between devices.
* Stay awake: After open charging screen will not be dormancy.
* Allow mock locations
5) About phone
Check status information and use electricity, etc.
12.Clock
In the main application interface,touch the Clock menu and the chose "Set alarm":
1) Desk clock:Return desk clock.
2) Add alarm:Add an effective alarm clock.
3) Settings:Edit the settings of the alarm clock.
13.FM Radio
Through this program, you can listen to FM radio on the device due to the FM radio
through the wired headset as an antenna to receive signals, before the use of this procedure
make sure that access to the original equipment of headphones, listen to when you can
switch the sound output way for a speaker or wired headset.
14.People
• Open the main application interface> People.
1)The default display phone contacts and the SIM card contacts, the contacts are
sorted according to the first letter of the alphabet.

使用说明
16
2)Click the Search icon( ), enter the contact search interface.
3)Click " " sign to create a new contact.
• Search for a contact
1) Enter numbers or letters and the list name part of the agreement will be
displayed in the search results.
2)If there is no search to match the contact, the interface will appear "None
found".
• Speed Dial
1)1 for voice mail.
2)2-9 numbers, click you can add a speed dial number, select the contacts as speed
dial, caller.
state: Successfully set up the dialer interface and long press the number keys to
dial the contact number.
15.Gallery
• Open the gallery
In the main application interface touch Gallery.
In the Camera screen, choose the icon of the lower right corner to into the gallery.
• Use a photo
After taking a picture, you can view the photo or share it with friends.
• View photos
1)On the screen of the picture, touch the album to view pictures in it.

使用说明
17
2)Touch the thumbnails to view pictures full screen.
You can choose to display small or large thumbnails.Hold down the screen to drag to the
left to view the next photo or drag to the right to view the previous photo.
• You can execute the following operations:
1)Set a picture as Contact icon or Wallpaper
2)Cut pictures
3)Share a picture using Bluetooth,Messaging,Email
4)Use video
After shooting video, you can view it or share it with friends.
5) Play videos:
* In the gallery screen,touch the video album,then touch the video you want to
watch so start playing the video.
* Touch screen will display the player control keys.
16.Camera
• Prepared in advance
Installed before using the camera or video camera memory card. All the photos taken
by camera phone or video will be stored in the memory card.
• Turn on the camera
Open the main application interface, touch the camera. If you want to photography,
sliding control is switched to the shooting mode.
Touch the icon( ) switch taken before and after.
• Take a picture
使用说明
18
1)Touch the icon( ).
2)After shooting the photo automatically to the camera time for the file name, save
to library default camera pictures folder.
3)Touch the preview pane button to view photos.
4)Touch the Settings button on the interface of the camera to select camera
settings.
5) In the camera viewfinder mode, press the Menu key, you can choose to video
camera( ), take picture( ),Panoramic photo ( ),Multi-angle shooting( )。
17.Messaging
• Important: The phone's messages to each other's numbers for the title, recorded in
a similar chat "session" is stored, instead of the usual folder structure. Which the
blue dialog box information is received by the machine messages, green dialog box
displays information messages from the machine.
• Send SMS
1) APPS>Messaging,touch the icon( ) to compose new message。
2) Write message:
a. Click the "receiver" input box to start the input method, click the "type message"
input box to start the Input Method, you can input characters.
b. Touch the icon( ),sending the edited information.
c. Touch the icon( ),enter the "people" select contacts.
• Send MMS
The new message, the message defaults to SMS, when reaching one of the following

使用说明
19
automatically be converted to MMS. After the preparation is complete, click "Send" will be
issued to the MMS.
1) "Write message" interface, press the Menu button:
* Add subject:Edit subject.
* Discard:Cancel the edit information.
* Insert quick text:Can choose the quick text.
* Insert contact:Add contact into "people".
* Settings:Set message.
2) Touch the icon( ),can attach many types of attachments, additional
attachment, the message is automatically converted into MMS.
The attachment types include: Photo (supports GIF, JPEG and other formats),
photographs, video (3GP, MP4 format), shooting video and audio (support MIDI, MP3,
WAV and other formats), sound recordings, slides.
Note: At present, the mobile phone mass can only support up to 100 recipients.
18.Music
Music can play digital audio files in the phone memory card. The music supports the
following formats: AMR, M4A, MIDI, MP3, WAV, OGG.
19.Security warnings and precautions
Your phone is a product of superior design and craftsmanship and should be used with
care. The following recommendations can help you comply with the terms of the repair kits
to extend the life of the mobile phone.

使用说明
20
1) Mobile phones and their parts in the reach of children.
2) Phone to keep dry, rain, humidity and all types of liquid can contain minerals that will
corrode electronic circuits.
3) When charging the battery do not use wet hands to reach the phone, it will cause
electric shock, injury to person or damage to the phone.
4) Avoid put the phone in the high temperature environment. High temperatures will
shorten the life of electronic devices, damage batteries, and distort or melt some plastic
parts.
5) Avoid placing the phone in low temperature environment. When the temperature rises
inside the phone will be able to produce water vapor to cause damage to the electronic
circuit.
6) Avoid to put the phone in dusty, dirty place, or cell phone parts may be damaged
7) Avoid phone in the vicinity of lighted cigarettes, open flame or any heat source.
8) Do not disassemble the phone, non-professional approach will result in damage to the
phone.
9) Do not drop, knock, or shake the phone from a height, rough handling can damage
internal circuit boards.
10) Do not paint the phone, as paint can clog the headphones, microphones or other
removable accessories, and lead to not work properly.
11) Use a clean, soft, dry cloth to clean the camera.Prohibit the use of harmful chemicals,
detergents, liquid cleaners mobile phone
12) Such as mobile phones, batteries, charger or mobile phone accessories to failure, to
the nearest qualified service center for inspection.

使用说明
21
13) The service center staff will assist you, and if necessary will arrange for the maintenance
of mobile phones.
FCC Statement
1. This device complies with Part 15 of the FCC Rules. Operation is subject to the following
two conditions:
(1) This device may not cause harmful interference.
(2) This device must accept any interference received, including interference that may cause
undesired operation.
2. Changes or modifications not expressly approved by the party responsible for compliance
could void the user's authority to operate the equipment.
NOTE:
This equipment has been tested and found to comply with the limits for a Class B digital
device, pursuant to Part 15 of the FCC Rules. These limits are designed to provide
reasonable protection against harmful interference in a residential installation.
This equipment generates uses and can radiate radio frequency energy and, if not installed
and used in accordance with the instructions, may cause harmful interference to radio
communications. However, there is no guarantee that interference will not occur in a
particular installation. If this equipment does cause harmful interference to radio or
television reception, which can be determined by turning the equipment off and on, the
user is encouraged to try to correct the interference by one or more of the following
measures:
Reorient or relocate the receiving antenna.
Increase the separation between the equipment and receiver.

使用说明
22
Connect the equipment into an outlet on a circuit different from that to which the receiver
is connected.
Consult the dealer or an experienced radio/TV technician for help.
SAR Information Statement
Your wireless phone is a radio transmitter and receiver. It is designed and manufactured not
to exceed the emission limits for exposure to radiofrequency (RF) energy set by the Federal
Communications Commission of the U.S. Government. These limits are part of
comprehensive guidelines and establish permitted levels of RF energy for the general
population. The guidelines are based on standards that were developed by independent
scientific organizations through periodic and thorough evaluation of scientific studies. The
standards include a substantial safety margin designed to assure the safety of all persons,
regardless of age and health. The exposure standard for wireless mobile phones employs a
unit of measurement known as the Specific Absorption Rate, or SAR. The SAR limit set by
the FCC is 1.6 W/kg. * Tests for SAR are conducted with the phone transmitting at its highest
certified power level in all tested frequency bands. Although the SAR is determined at the
highest certified power level, the actual SAR level of the phone while operating can be well
below the maximum value. This is because the phone is designed to operate at multiple
power levels so as to use only the power required to reach the network. In general, the
closer you are to a wireless base station antenna, the lower the power output. Before a
phone model is available for sale to the public, it must be tested and certified to the FCC
that it does not exceed the limit established by the government adopted requirement for
safe exposure. The tests are performed in positions and locations (e.g., at the ear and worn

使用说明
23
on the body) as required by the FCC for each model. The highest SAR value for this model
phone when tested for use at the ear is 0.373W/Kg and when worn on the body, as
described in this user guide, is 0.706W/Kg(Body-worn measurements differ among phone
models, depending upon available accessories and FCC requirements). The maximum scaled
SAR in hotspot mode is 0.935W/Kg.While there may be differences between the SAR levels
of various phones and at various positions, they all meet the government requirement for
safe exposure. The FCC has granted an Equipment Authorization for this model phone with
all reported SAR levels evaluated as in compliance with the FCC RFexposure guidelines. SAR
information on this model phone is on file with the FCC and can be found under the Display
Grant section of http://www.fcc.gov/ oet/fccid after searching on
FCC ID: 2AAA6-S970 Additional information on Specific Absorption Rates (SAR) can be
found on the Cellular Telecommunications Industry Asso-ciation (CTIA) web-site at
http://www.wow-com.com. * In the United States and Canada, the SAR limit for mobile
phones used by the public is 1.6 watts/kg (W/kg) averaged over one gram of tissue. The
standard incorporates a sub-stantial margin of safety to give additional protection for the
public and to account for any variations in measurements.
Body-worn Operation
This device was tested for typical body-worn operations. To comply with RF exposure
requirements, a minimum separation distance of 10mm must be maintained between the
user’s body and the handset, including the antenna. Third-party belt-clips, holsters, and
similar accessories used by this device should not contain any metallic components.
Body-worn accessories that do not meet these requirements may not comply with RF

使用说明
24
exposure requirements and should be avoided. Use only the supplied or an approved
antenna.