SEOWON INTECH SWC-3100 SIMPLE CPE WIMAX User Manual SWC 3000 Simple CPE Manual
SEOWON INTECH CO., LTD. SIMPLE CPE WIMAX SWC 3000 Simple CPE Manual
UserManual.wiki
>
SEOWON INTECH
>
SWC 3100 User Manual
Users Manual
Navigation menu
Upload a User Manual
Namespaces
Wiki Guide
HTML
PDF
Info
Views
User Manual
Discussion / Help
Navigation

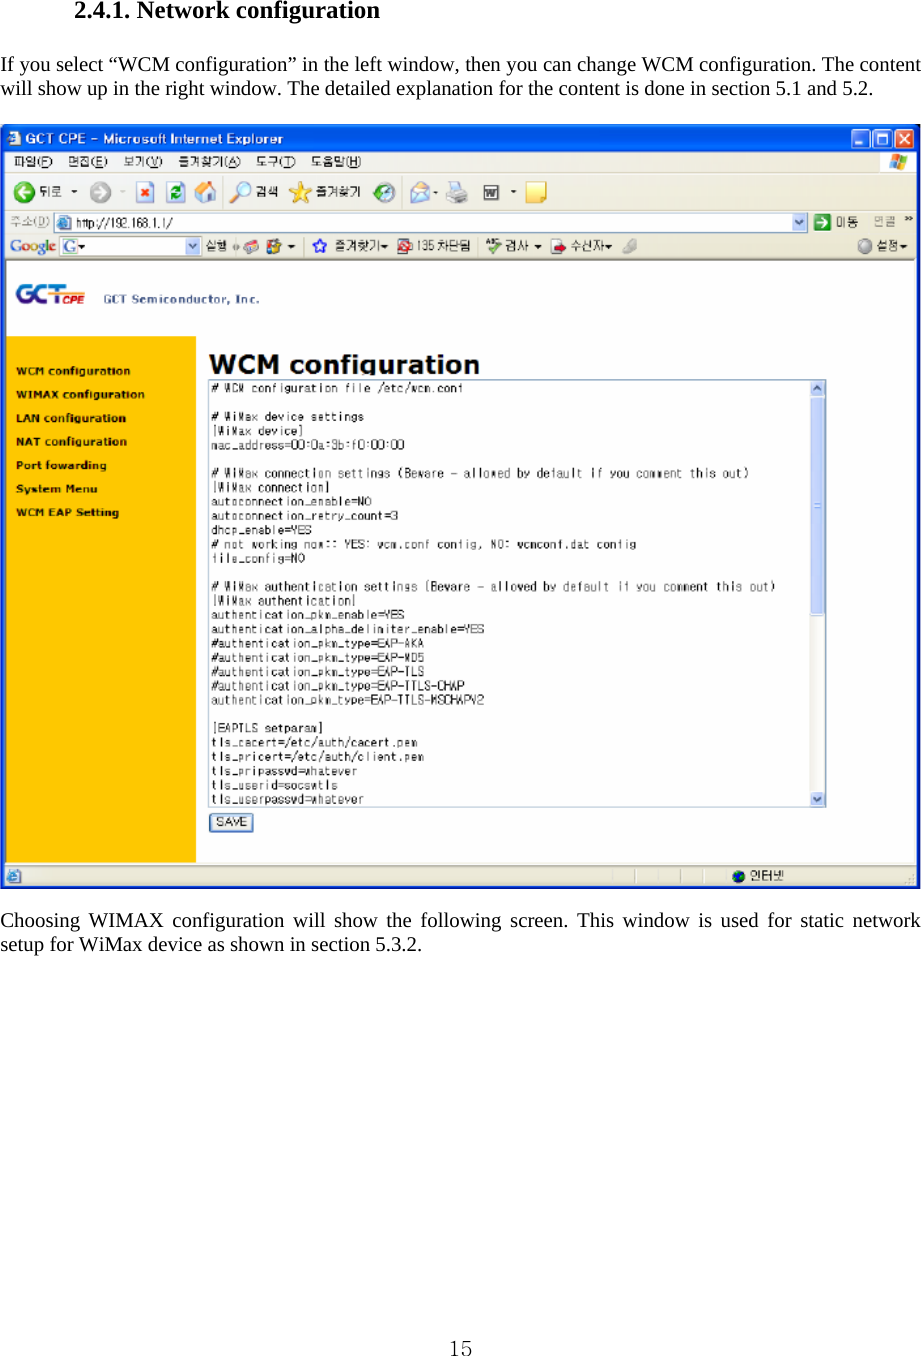
![51.3 Description of Product Functions(Cont’) Simple CPE Rear Side Description Item DetailsExternal Antenna ANT1: WiMAX Diversity ANT2: WiMAX Main Separable external antenna User external type antenna attachable * Antenna Classification - 3: 2.3GHz - 5: 2.5GHz - blank : 3.5GHz Power S/W Power On/Off Switch (On/Off by pressing right or left) DC IN Power Adapter connection (DC 5V)LAN PC or Hub connection Factory Reset Restore the Simple CPE Factory Default [Note] If you lost LOGIN password for router or IP address after change, use the Reset switch to restore its original Factory Default settings. WiMAX Main Antenna WiMAX Diversity Antenna Power Switch Hardware Reset PC Power Adapter](https://usermanual.wiki/SEOWON-INTECH/SWC-3100/User-Guide-1089347-Page-5.png)


![92. A Simple WiMAX gateway Implementation Included in the software development package is the sample WiMAX gateway implementation. The target system has a WiMAX interface at one end and a Ethernet interface at the other end. The embedded connection manager automatically makes a connection to the WiMAX network whenever it detects one. The IP layer is configured to perform NAT so that the host in the inner (private) network can connect to internet via external WiMAX network. The implementation also includes a simple HTTPD daemon so that some of the device configuration can be changed using the web browser from the host in the private network. 2.1. WiMAX Connection Manager The WiMAX connection manager is responsible for the following: Monitor the WiMAX device state Initiate the connection EAP supplicant (in preparation, only limited support for EAP-AKA with USIM) Configure the WiMAX device. IP configuration of WiMAX device. The developer can change various parameters that affect the behavior of WiMAX device and the connection manager. This is done by editing /etc/wcm.conf file. Controlling WiMAX connection manager by this file is explained with example cases in section 5.3. The connection manager reads this file on startup and performs the necessary actions. In addition, one can list up the GCT WiMAX text DM commands in [DM command] section so that the connection manager executes these commands in batch mode. 2.2. Connection Manager User Interface The WiMAX connection manager provides command line user interface, whereby the user can execute WiMAX commands on the terminal. By default, the WiMAX connection manager runs in the “monitoring mode”, where it [WiBro device] mac_address=00:0a:3b:f0:10:50 /* Sets the WiMAX device MAC address */ [WiBro connection] /* The connection manager automatically tries to connect to the network whenever it discovers the available network */ autoconnection_enable=YES /* If dhcp_enable is set to YES, the connection manager runs DHCP client to acquire IP configurations from the network. Otherwise, the IP informations should be statically configured */ dhcp_enable=YES [WiBro authentication] authentication_pkm_enable=YES authentication_alpha_delimiter_enable=YES #authentication_pkm_type=EAP-AKA #authentication_pkm_type=EAP-MD5 #authentication_pkm_type=EAP-TLS #authentication_pkm_type=EAP-TTLS-CHAP authentication_pkm_type=EAP-TTLS-MSCHAPV2](https://usermanual.wiki/SEOWON-INTECH/SWC-3100/User-Guide-1089347-Page-9.png)
![10[DM command] d ver wb_ru keeps showing log messages from the WiMAX MAC. The user can switch it to “interactive mode” by typing in ‘q’ in the console. During interactive mode, all the MAC messages are temporarily suppressed and the connection manager shows the prompt “DM>” for the user to enter commands. The user can also switch back to “monitoring mode” by simply entering “Enter” key. 2.2.1. System Commands 2.2.1.1. param This command shows the parameter block content. 2.2.1.2. version This command shows the version of connection manager. 2.2.1.3. shell This command is used to invoke a system shell (/bin/sh) inside the connection manager. 2.2.1.4. reboot This command is used to reboot the system. 2.2.1.5. help This command displays (not all) commands and their usage. 2.2.2. WiMAX Connection Manager Commands 2.2.2.1. wb_gs This command is used to read the current state the device is in. The device can be in one of the following states: NULL: This is the initial device state when its modem and RF is turned off. OUT OF ZONE: The device cannot locate any available WiMAX network STANDBY: The device has achieved PHY and MAC synchronization and keeps listening to DCD/UDC, DL-MAP, and UL-MAP from the base station. NETENTRY: The device is in network entry procedure. It has the following sub-states: NETENTRY_RANGING: The device is in initial ranging phase. NETENTRY_SBC: The device is in SBC phase. NETENTRY_PKM: The device is in PKM phase. NETENTRY_REG: The device is in Registration phase. NETENTRY_DSX: The device is in ISF creation phase. ACTIVE: The device has successfully made connection to the network. 2.2.2.2. wb_ru This command is used to turn on WiMAX modem and RF. The WiMAX device then starts scanning the WiMAX network on pre-defined channel. If the device finds available WiMAX network, the device state is changed to STANDBY; otherwise to OUT OF ZONE. 2.2.2.3. wb_rd](https://usermanual.wiki/SEOWON-INTECH/SWC-3100/User-Guide-1089347-Page-10.png)
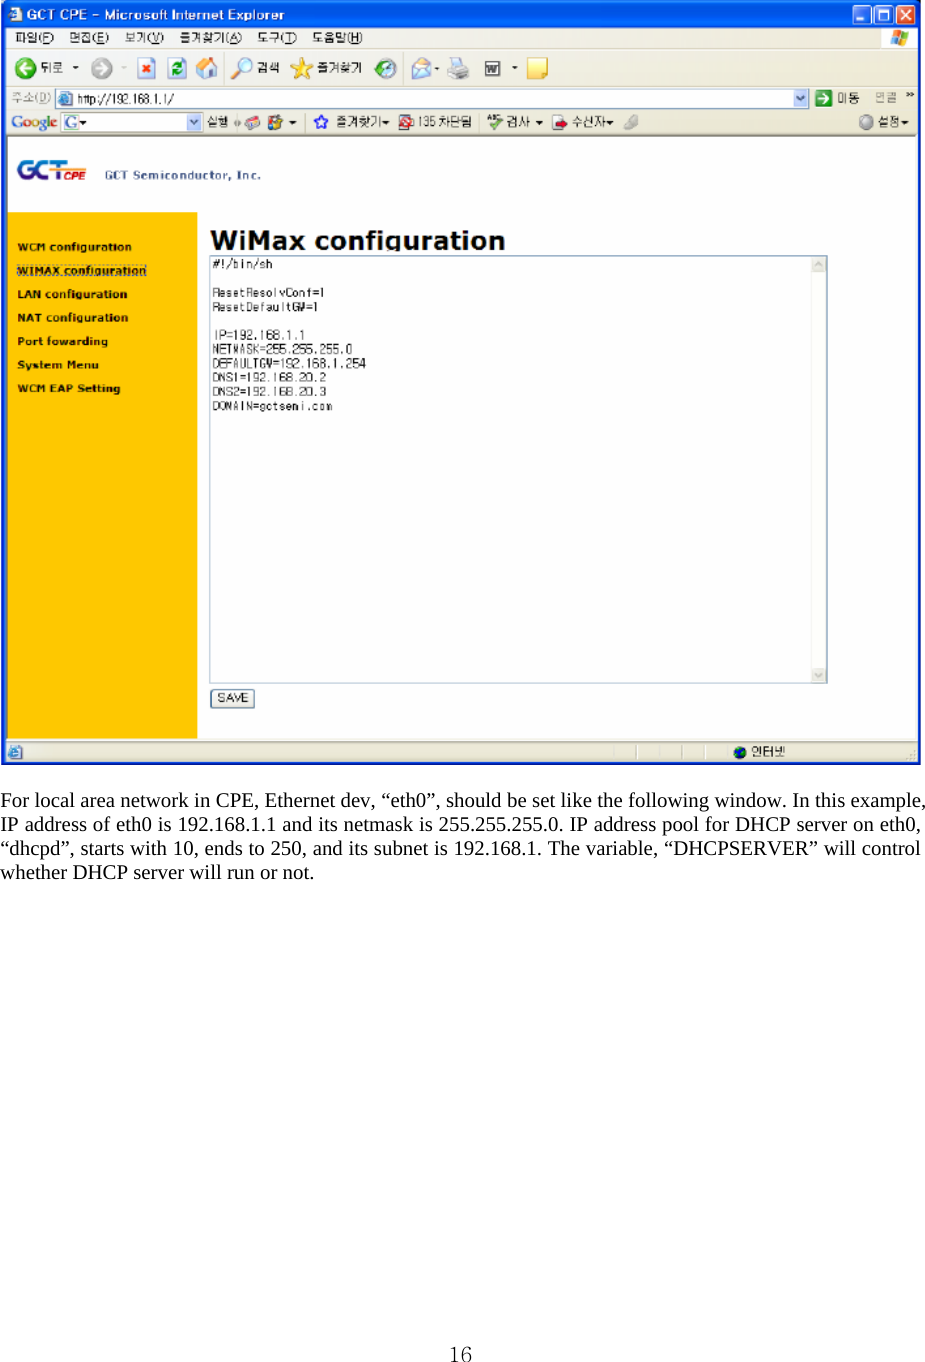
![11This command is used to turn off WiMAX modem and RF. Before doing so, it disconnect from the network if it is already connected. 2.2.2.4. wb_ne This command is used to initiate network entry procedure when the device is in STANDBY state. This command is discarded if the device is in other states. On successful connection, the device state is changed to ACTIVE. Otherwise, it stays in STANDBY state. 2.2.2.5. wb_nd This command is used to disconnect from the network. The device state is changed from ACTIVE to STANDBY. 2.2.2.6. wb_bs This command is for setting the bandwidth field in parameter block. After setting the bandwidth, you should reboot. You can choose 0 for 8.75Mhz, 3 for 5Mhz, 6 for 10Mhz as an argument. 2.2.3. WiMAX Text DM Commands GCT WiMAX MAC provides an easy way to fine-tune a numerous parameters that affect the behavior of WiMAX device. These commands are used to control the low-level MAC behavior. For detailed information, please refer to “GCT WiMAX Text DM Reference Manual”. 2.2.4. Command Batch Processing User can list commands listed above in [DM command] section of WiMAX configuration file (/etc/wibro.conf). The WiMAX connection manager executes these commands automatically, alleviating the need to the same thing repeatedly. For example, we have listed two commands; “d ver” is the WiMAX Text DM commands that shows the MAC-PHY version of the firmware and “wb_ru” turns on the WiMAX modem and RF. The developers can find the MAC and PHY parameters that best fit the targeting WiMAX network by trying WiMAX Text DM commands with different parameters. Once they are found, those settings can be put into the configuration file. 2.3. Control of connection to WiMax network 2.3.1. Connection with dynamic IP allocation WiMax connection manager automatically tries to connect to the WiMax network, if some variables defined in the configuration file for WiMax connection manger (/etc/wcm.conf) are YES, and WiMax modem and RF are turned on. As seen in the example code of /etc/wcm.conf in section 5.1, autoconnection_enable makes it try to connect to the network whenever it discovers the available network, dhcp_enable executes DHCP client to acquire IP configurations from the network service provider, and wb_ru in DM_command section turns on WiMax modem and RF. Two configuration variables and one command enable the WiMax connection manager to try to connect to the WiMax network > cat /etc/wcm.conf](https://usermanual.wiki/SEOWON-INTECH/SWC-3100/User-Guide-1089347-Page-11.png)
![12… [Wibro connection] autoconnection_enable=YES dhcp_enable=YES … [DM command] wb_ru … 2.3.2. Connection with static IP allocation If some base station may not support dynamic IP address allocation, you should set your IP address manually. You can, then, turn off dhcp_enable with NO, to make WiMax connection manager not try to connect. WiMax connection manager set the IP address of WiMax device(wb0) with the value of IP variable in /etc/WM.conf, if dhcp_enable in /etc/wcm.conf is defined as NO. > cat /etc/WM.conf … IP=192.168.2.1 NETMASK=255.255.255.0 DEFAULTGW=192.168.2.254 DNS1=192.168.20.2 DNS2=192.168.20.3 DOMAIN=gctsemi.com … In this example, the IP address of WiMax device will be 192.168.2.1 with 255.255.255.0 of netmask. WiMax connection manager also tries to set default gateway and name server with the predefined values in /etc/WM.conf, so you can modify the file for your own purpose. Some base stations need to know the MAC address of your mobile station before connection, and they maintain ARP list with the IP and MAC address of mobile, so your IP address should be allocated in advance by base stations or service providers. 2.3.3. Enabling authentication mode To enable authentication process while in WiMAX connecting, the variable, “Authentication_pkm_enable”, should be “YES”. Then, WiMAX connection manager tries authentication processing. You can choose the kind of authentication by setting the variable, “Authentication_pkm_type”, which can be “EAP-AKA”, “EAP-TLS”, “EAP-TTLS-CHAP”, and “EAP-TTLS-MSCHAPV2”, etc. After changing the variables, you should reboot the CPE. While EAP-AKA type uses external USIM card which should be distributed by a wireless service provider, other authentication methods uses id/password’s and certificates. Those can be set like as set-param sections in wcm.conf. You can see sections whose name is [EAPTLS setparam], [EAPTTLSCHAP setparam], and [EAPTTLSMSCHAPV2 setparam]. You should write down correct strings which you get from operators in your authentication section. >> cat /etc/wcm.conf … [WiBro authentication] authentication_pkm_enable=YES authentication_alpha_delimiter_enable=YES #authentication_pkm_type=EAP-AKA #authentication_pkm_type=EAP-MD5](https://usermanual.wiki/SEOWON-INTECH/SWC-3100/User-Guide-1089347-Page-12.png)
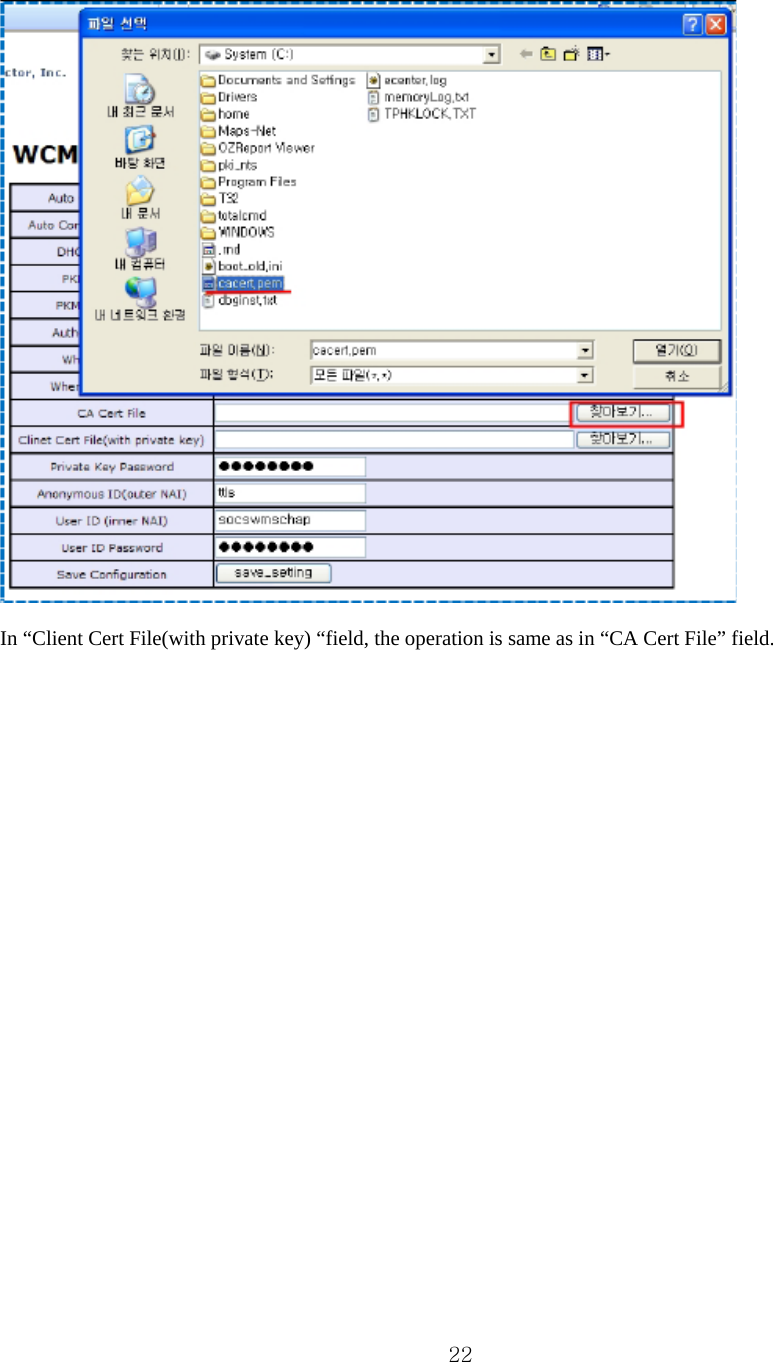
![13#authentication_pkm_type=EAP-TLS #authentication_pkm_type=EAP-TTLS-CHAP authentication_pkm_type=EAP-TTLS-MSCHAPV2 [EAPTLS setparam] tls_cacert=/etc/auth/cacert.pem tls_pricert=/etc/auth/client.pem tls_pripasswd=whatever tls_userid=socswtls tls_userpasswd=whatever [EAPTTLSCHAP setparam] ttls-chap_cacert=/etc/auth/cacert.pem ttls-chap_pricert=/etc/auth/client.pem ttls-chap_pripasswd=whatever ttls-chap_anonyid=ttls ttls-chap_userid=socswchap ttls-chap_passwd=whatever [EAPTTLSMSCHAPV2 setparam] ttls-mschapv2_cacert=/etc/auth/cacert.pem ttls-mschapv2_pricert=/etc/auth/client.pem ttls-mschapv2_pripasswd=whatever ttls-mschapv2_anonyid=ttls ttls-mschapv2_userid=socswmschap ttls-mschapv2_passwd=whatever … [DM command] wb_ru cfg sbc param_set 0 … The setparam sections have some variables, and you should fill them with the data from your service provider. Cacert is root certificate, and you can change file name but you should not modify the path name. Pricert is client client certificate with(or without) a private key. The restrictions for file and path name are same to the cacert. Pripasswd is private key. Anonyid is anonymous id, or outer NAI(Network Access Identifier). Userid is user id, or inner NAI. Passwd is the password for userid. “Authentication_alpha_delimiter_enable” makes the character, “@”, in userid or anonyid as a delimiter or as just a character. If it is YES, “@” is a delimiter, if not, “@” is a character. If your set userid with “aaa@bbb.ccc.com” and the variable is YES, then your userid is just “aaa”. If it is NO, then your userid is “aaa@bbb.ccc.com” . For the time being, because our EAP method support the base64 encoding, you should change the encoding format to base64 if your certificate is encoded by DER method. You can use certificate administrator’s tools in MS Windows for this purpose. You can update certificates files with FTP. That is, you change directory to /etc/auth, get CA certificate and Private certificate by binary mode FTP, and change the name of the files or change filenames in wcm.conf. Another tools for updating certificate files is web access, and it is explained in section 5.4.3. If you want to connect to WiMAX service provider with authentication mode, then you should run a command, “cfg sbc param_set 0”, after RF_UP and before NET_ENTRY. This can be done by inserting the command in “DM command” section in “wcm.conf”, when booting time](https://usermanual.wiki/SEOWON-INTECH/SWC-3100/User-Guide-1089347-Page-13.png)