SEOWON INTECH SWU-3400AN WiMAX USB Dongle User Manual Manual
SEOWON INTECH CO., LTD. WiMAX USB Dongle Manual
UserManual.wiki
>
SEOWON INTECH
>
SWU-3400AN User Manual
>
Manual
Contents
1.
Manual
2.
Users Manual
Manual
Navigation menu
Upload a User Manual
Namespaces
Wiki Guide
HTML
PDF
Info
Views
User Manual
Discussion / Help
Navigation
![6Installing Seowon WiMAX CM6▶ If the installation program does not launch automatically, go to My Computer. Select ‘WiMAX Installation Disk’ and double click it. [Desktop] ▶ [My Computer] ▶ [WIMAX Installation Disk]](https://usermanual.wiki/SEOWON-INTECH/SWU-3400AN.Manual/User-Guide-1586002-Page-7.png)
![7Installing Seowon WiMAX CM7▶ Or you click the RIGHT mouse button on WiMAX CD drive. Select ‘Install WiMAX device’ and then the installation sequence will begin. [Desktop] ▶ [My Computer] ▶ [WIMAX Installation Disk (RIGHT mouse button)] ▶ [Install WiMAX device (Select)]▶ Or select OPEN at the pop-up menu. Double click ‘Launcher’ It will start the installation process.](https://usermanual.wiki/SEOWON-INTECH/SWU-3400AN.Manual/User-Guide-1586002-Page-8.png)
![8Common Operations8 Getting Started▶ To start Seowon WiMAX CM, Double click on the Seowon WiMAX CM icon on your desktop. Click [Seowon WiMAX CM]▶ Or click on the Windows Start menu and select ‘Seowon WiMAX CM’ from the list of programs. [Start] ▶ [Program] ▶ [Seowon WiMAX CM] ▶ [Seowon WiMAX CM]](https://usermanual.wiki/SEOWON-INTECH/SWU-3400AN.Manual/User-Guide-1586002-Page-9.png)
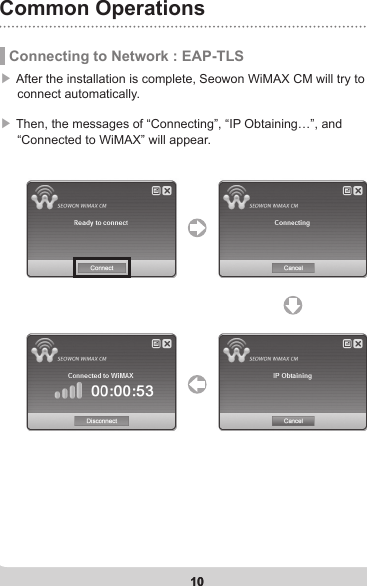
![9Common Operations9 Connecting to Network : EAP-TTLS▶ After the installation is complete, enter your Log-in ID and Password. If “Save login and password” is checked, Seowon WiMAX CM will save your ID and PW. (You just need to click “connect” next time Seowon WiMAX CM launches.)▶ Click the [Connect] button in Compact View. ▶ Then, the messages of "Connecting", “IP Obtaining…”, and “Connected to WiMAX" will appear.](https://usermanual.wiki/SEOWON-INTECH/SWU-3400AN.Manual/User-Guide-1586002-Page-10.png)
![12Common Operations12 Minimizing Compact View window▶ You can minimize the application by clicking on ‘x’ icon in Compact View window. It will then appear in the Windows task bar.▶ To restore Compact View window, click the Right mouse button on Seowon WiMAX tray icon, and select [Open].](https://usermanual.wiki/SEOWON-INTECH/SWU-3400AN.Manual/User-Guide-1586002-Page-13.png)
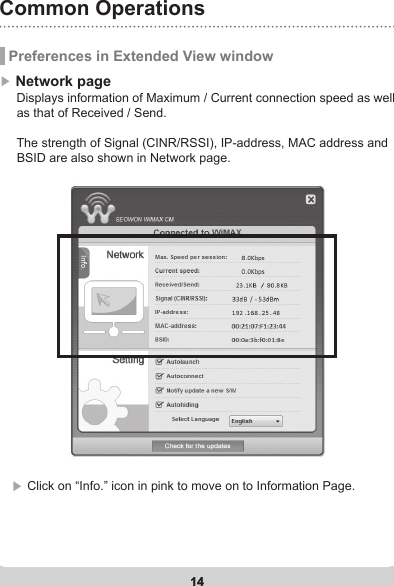
![13Common Operations13 Extending Compact View window▶ Click on ‘ ’, at the upper right side of Compact View window. Or select [Option] on Seowon tray icon. Then, Extended View window will appear.▶ The Extended View window includes three pages: Network, Information, and Setting.](https://usermanual.wiki/SEOWON-INTECH/SWU-3400AN.Manual/User-Guide-1586002-Page-14.png)
![20Common Operations20 Exiting Connection Manager▶ Click the Right mouse button on Seowon WiMAX tray icon, and select [Close]. Click [Close]▶ Click the right mouse button on Seowon WiMAX tray icon. When the Pop-up menu appears, select [Exit].Click [Exit]](https://usermanual.wiki/SEOWON-INTECH/SWU-3400AN.Manual/User-Guide-1586002-Page-21.png)
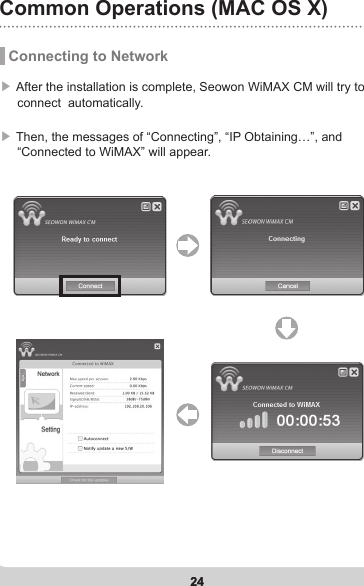
![23Installing Seowon WiMAX CM (MAC OS X)23 Getting Started and Uninstall▶ To start WiMAX CM, Double click on the Seowon WiMAX CM icon on your Applications.Click [WiMAX CM]Click [GdmUninstall]](https://usermanual.wiki/SEOWON-INTECH/SWU-3400AN.Manual/User-Guide-1586002-Page-24.png)