SGS Technologies 01 DRINK MEASURING TRANSMITTER User Manual
SGS Technologies, LLC DRINK MEASURING TRANSMITTER
USERS MANUAL
BarVision™ 1.0
for Palm OS®
A Division of Nuvo Technologies, Inc.
User’s Guide
Draft for Reseller Review Only
Not for Distribution

Draft for Reseller Review Only
Not for Distribution to End Users
BarVision™ 1.0
for Palm OS®
User’s Guide
A Division of Nuvo Technologies, Inc.
Draft for Reseller Review Only
Not for Distribution to End Users
© 2005 by Nuvo Technologies, Inc. All rights reserved.
BarVision for Palm OS® User’s Guide.
No part of this publication may be reproduced, stored in or introduced into a retrieval system, used to create deriv-
ative works, or transmitted, in whole or in part, in any form or by any means (electronic, mechanical, photo-
copying, recording, or otherwise), or for any purpose, without the prior written permission of Nuvo Technologies,
Inc.
The material contained in this publication is furnished for informational use only, is subject to change without
notice, and should not be construed as a commitment by Nuvo Technologies, Inc. Nuvo Technologies, Inc.
assumes no responsibility or liability for any errors or inaccuracies that may appear in this publication and disclaims
all liability in connection with the use of this publication. Nuvo Technologies, Inc. is not engaged in rendering
legal, accounting, or other professional advice. If legal advice or other expert assistance is required, the services of a
competent professional should be sought. NUVO TECHNOLOGIES, INC. MAKES NO WARRANTIES,
EXPRESS OR IMPLIED, AS TO THE INFORMATION IN THIS PUBLICATION.
Nuvo, Nuvo Technologies, the Nuvo Technologies logo, BarVision, the BarVision logo, and all Nuvo product
names, product numbers, and slogans are trademarks of Nuvo Technologies, Inc. All rights reserved. All other
trademarks mentioned in this publication are the property of their respective owners and are used for identification
purposes only.
BarVision is protected by multiple pending patents. Nuvo Technologies, Inc. may have patents, patent applica-
tions, trademarks, copyrights, or other intellectual property rights covering subject matter in this document. Except
as expressly provided in any written license agreement from Nuvo Technologies, Inc., the furnishing of this publi-
cation does not provide any license to these patents, patent applications, trademarks, copyrights, or other intel-
lectual property.
Nuvo Technologies, Inc.
Nuvo Corporate Center
6060 East Thomas Road
Scottsdale, Arizona 85251, USA
phone: +1 480.222.6000
fax: +1 480.222.6001
www.nuvoinc.com
www.barvision.com
Part Number: 469
Rev. 1.0-1

iii
Draft for Reseller Review Only
Not for Distribution to End Users
Contents
Preface
Registration .............................................................................................................xi
Using this guide ....................................................................................................xi
What is in this guide? ..................................................................................xi
Conventions used in this guide ............................................................. xii
Default starting point for software procedures ...................... xii
About security codes ........................................................................ xii
Finding additional resources .......................................................................... xii
Chapter 1 Understanding the BarVision System
Understanding how the system works ..........................................................1
Understanding the system components ......................................................1
Pour spout ........................................................................................................2
Active antenna ...............................................................................................3
Data receiver ...................................................................................................4
Palm® handheld computer ........................................................................6
BarVision for Palm OS® software ..............................................................6
Understanding unit-free operation ................................................................7
Understanding pour rates ..................................................................................7
Overview of using the BarVision system .......................................................8
Chapter 2 Installing the BarVision Software
Installing the software ...................................................................................... 11
Installing the BarVision for Palm OS® software ................................11
Installing the BarVision Conduit for Palm HotSync ........................ 13
System requirements ........................................................................ 14
Configuring the BarVision for Palm OS® software .................................. 14
Configuring peripheral systems and devices ...........................................16
Configuring printers ..................................................................................16
Configuring an infrared printer ..................................................... 16
Configuring a wireless network printer ..................................... 18
Editing the Terminal ID ............................................................................ 20

CONTENTS
iv
Draft for Reseller Review Only
Not for Distribution to End Users
Chapter 3 Understanding the BarVision for Palm OS® Software
Using a Palm® handheld ...................................................................................21
Using the handheld’s serial cable .........................................................21
Using the stylus to navigate, scroll, and select ................................21
Entering text and numbers .....................................................................22
Starting BarVision for Palm OS® .....................................................................22
About the Activity screen ................................................................................23
Navigating the BarVision software ...............................................................25
Software screen hierarchy .......................................................................25
About security codes .................................................................................26
Entering the manager security code ...........................................26
Editing the manager security code ..............................................26
Common on-screen controls ..................................................................27
Viewing event details ........................................................................................28
About the event types ..............................................................................29
Receiver connected ...........................................................................29
Receiver disconnected .....................................................................29
Time marker .........................................................................................29
Container open ...................................................................................31
Container empty .................................................................................31
Container pour ....................................................................................32
Container missing ..............................................................................32
Container found ..................................................................................33
Container variance .............................................................................33
Spout removed ...................................................................................33
Spout reattached ................................................................................34
Events lost .............................................................................................34
Exiting BarVision for Palm OS® .......................................................................35
Chapter 4 Working with Categories
About categories .................................................................................................37
Adding categories ..............................................................................................38
Editing categories ...............................................................................................39
Renaming categories ................................................................................39
Reordering categories ...............................................................................40
Deleting categories ............................................................................................40

v
Draft for Reseller Review Only
Not for Distribution to End Users
Chapter 5 Working with Containers
About containers ................................................................................................43
Container details .........................................................................................43
Product .................................................................................................. 44
Spout ......................................................................................................44
Shape ......................................................................................................44
Category ................................................................................................ 44
Cost ......................................................................................................... 45
Location .................................................................................................45
Remaining % ........................................................................................45
vol. ........................................................................................................... 45
wt. ............................................................................................................ 45
Container size ......................................................................................45
Empty weight ...................................................................................... 45
Unit weight ........................................................................................... 46
Expected pour rate ............................................................................ 46
Actual pour rate .................................................................................. 46
Container options ......................................................................................46
Default container size .......................................................................47
Default shape ......................................................................................47
Default pour rate ................................................................................47
Underyield ............................................................................................ 48
Overyield ...............................................................................................48
Jitter level .............................................................................................. 48
Report missing after ..........................................................................48
Pour delay .............................................................................................48
Improper pour time limit .................................................................49
Improper pour pour rate .................................................................49
Pour spout hardware details .................................................................. 49
Model ......................................................................................................49
Serial ID ..................................................................................................49
Firmware ............................................................................................... 50
Product .................................................................................................. 50
Location .................................................................................................50
Last heard .............................................................................................50
RF signal level ...................................................................................... 50
Expires ....................................................................................................50
Event # .................................................................................................... 50
Age .......................................................................................................... 50
Container status information ................................................................. 50

CONTENTS
vi
Draft for Reseller Review Only
Not for Distribution to End Users
Percent ...................................................................................................50
Volume ...................................................................................................50
Weight ....................................................................................................50
Age ...........................................................................................................51
Pours .......................................................................................................51
Recent .....................................................................................................51
Signal strength ....................................................................................51
Bottle graphic ......................................................................................51
Adding containers ..............................................................................................51
Editing containers ...............................................................................................54
Assigning a new product name to a container ................................55
Assigning a new pour spout to (or removing the current pour
spout assignment from) a container ...............................................57
Assigning a new category to a container ..........................................59
Assigning a new bottle shape to a container ...................................60
Editing container details ..........................................................................61
Editing container options ........................................................................63
Deleting containers ............................................................................................64
Viewing pour spout hardware details .........................................................65
Viewing container status information .........................................................67
Viewing container status information from the Containers screen
67
Viewing container status information from the Activity screen 68
Chapter 6 Working with Serving Sizes
About serving sizes ............................................................................................71
About the Max allowed pour size .........................................................73
Adding serving sizes ..........................................................................................73
Editing serving sizes ...........................................................................................74
Editing the Max allowed pour size ...............................................................75
Deleting serving sizes ........................................................................................76
Chapter 7 Working with Reports
About reports .......................................................................................................79
Report settings ............................................................................................80
Public ......................................................................................................80
Disable date/time range ..................................................................80
Perform maintenance .......................................................................81
Export .....................................................................................................81

vii
Draft for Reseller Review Only
Not for Distribution to End Users
Report sections ............................................................................................ 81
Empty Containers ............................................................................... 81
Empty Containers Count .................................................................82
Exceptions ............................................................................................ 82
Expiring Hardware ............................................................................. 82
Hardware ............................................................................................... 82
Irregular Empty Containers ............................................................82
Journal Detail .......................................................................................82
Missing Hardware ..............................................................................82
Open Containers ................................................................................ 82
Pour Detail ............................................................................................ 82
Pours by Category ..............................................................................83
Pours by Location .............................................................................. 83
Pours by Product ................................................................................ 83
Serving Sizes ........................................................................................ 83
Serving Sizes by Category ...............................................................83
Serving Sizes by Location ................................................................83
Journal options ........................................................................................... 83
Minimum days in journal ................................................................ 84
Prompt for maintenance ................................................................. 84
Back up during maintenance ......................................................... 84
Adding reports ..................................................................................................... 84
Editing reports ..................................................................................................... 86
Renaming a report .....................................................................................86
Editing report settings .............................................................................. 87
Adding report sections .............................................................................88
Reordering report sections .....................................................................89
Deleting report sections .......................................................................... 90
Editing journal options ............................................................................. 91
Running, viewing, and printing reports .....................................................92
Running public reports ............................................................................ 92
Running management reports ..............................................................95
Running the Configuration report ....................................................... 98
Running the Quick View report ............................................................. 99
Deleting reports ................................................................................................102
Chapter 8 Using the BarVision System
Pouring .................................................................................................................105
Changing bottles ..............................................................................................105

CONTENTS
viii
Draft for Reseller Review Only
Not for Distribution to End Users
Cleaning pour spouts ..................................................................................... 106
Chapter 9 Working with Data
About BarVision data ...................................................................................... 107
Exporting data ................................................................................................... 107
Journal data ............................................................................................... 107
Report data ................................................................................................ 108
Export procedure ..................................................................................... 109
Backing up data ................................................................................................ 110
Restoring data ................................................................................................... 111
Maintaining the journal ................................................................................. 113
Erasing the journal ........................................................................................... 115
Chapter 10 Common Questions
Palm® handheld problems ........................................................................... 117
Data receiver problems ................................................................................. 117
Pour spout problems ...................................................................................... 118
Printing problems ............................................................................................ 119
Security code problems ................................................................................. 120
Data loss problems .......................................................................................... 120
Disaster recovery .............................................................................................. 121
Problems with third-party products ......................................................... 122
Customer support ............................................................................................ 122
Appendix A Product Regulatory Information
FCC statement ................................................................................................... 123
Canadian ICES-003 statement ..................................................................... 123
CE compliance statement ............................................................................. 123
Declarations of conformity ........................................................................... 124
Battery warning ................................................................................................ 125
Appendix B Legal Notices
BarVision License Agreement ...................................................................... 127
BarVision Limited Warranty (Active Antenna/Data Receiver) .......... 132
BarVision Limited Warranty (Tag) .............................................................. 135

ix
Draft for Reseller Review Only
Not for Distribution to End Users
Glossary .....................................................................139
Index ......................................................................... 143

CONTENTS
x
Draft for Reseller Review Only
Not for Distribution to End Users

xi
Draft for Reseller Review Only
Not for Distribution to End Users
Preface
elcome, and thank you for purchasing the
BarVision wireless, free-pour liquor
management system. BarVision is an
automatic, real-time inventory management solution.
It replaces your need to do physical inventory by
tracking every pour from every container, automatically
and wirelessly.
BarVision provides full accountability over your liquor
inventory. By monitoring the time, portion size,
location, price category, cost, and brand of every pour,
it effortlessly equips you with the data you need to
manage your pour costs, inventory, and revenue. And
BarVision’s extensive reporting capabilities help you
organize and utilize that data. A BarVision custom
report can easily be compared to your point-of-sale or
cash register report. Plus, with the BarVision Conduit
for Palm HotSync installed, you can download
comprehensive BarVision data to your desktop or
laptop computer for further analysis and safekeeping.
In short, BarVision frees you to do what is most
important—manage your establishment for increased
profits.
Registration
Nuvo Technologies is confident that the BarVision
wireless, free-pour liquor management system will
greatly improve the effectiveness and efficiency of your
establishment’s inventory- and revenue-management
procedures. So that we may continue to provide you
with the highest quality service, please register your
product by filling out and returning the warranty regis-
tration card provided.
Registering your system enables us to inform you about
upgrades, offer you newly developed products and
technologies, and provide you with effective and
efficient warranty support should the need arise.
Important: You must register your BarVision system to
activate the manufacturer’s warranty. Warranty claims on
unregistered products will not be honored.
Using this guide
The BarVision for Palm OS® User’s Guide provides
detailed information about the operation and mainte-
nance of the system. It is designed to be used both as
an instructional guide to help you learn how to use the
system and as a reference tool in your everyday work.
To locate a particular topic of interest, consult the table
of contents or index. In addition to these resources,
each chapter begins with a brief summary of the infor-
mation contained in that section. Use these overviews
to help orient yourself and to survey the material
covered there.
For new users of BarVision, the following sections
contain important information you should review
before you begin working with the system:
• “Understanding how the system works” on page 1
• “Understanding the system components” on page 1
• “Understanding the BarVision for Palm OS®
Software” on page 21
Experienced BarVision users might want to jump
straight to the “Overview of using the BarVision
system” on page 8. This section is intended to get you
up and running and using the system quickly. For this
reason, some familiarity with the equipment, the
software, and the way the system operates is assumed.
What is in this guide?
This User’s Guide describes the hardware, software,
terminology, and concepts that, together, constitute the
BarVision wireless, free-pour liquor management
system. In addition, this document provides both
novice and experienced users of BarVision with step-
W
PREFACE
xii
Draft for Reseller Review Only
Not for Distribution to End Users
by-step, task-oriented procedures. These procedures
guide you through the processes of configuring, using,
and maintaining the BarVision system.
This User’s Guide contains the following chapters:
• Chapter 1, “Understanding the BarVision System”
• Chapter 2, “Installing the BarVision Software”
• Chapter 3, “Understanding the BarVision for Palm
OS® Software”
• Chapter 4, “Working with Categories”
• Chapter 5, “Working with Containers”
• Chapter 6, “Working with Serving Sizes”
• Chapter 7, “Working with Reports”
• Chapter 8, “Using the BarVision System”
• Chapter 9, “Working with Data”
• Chapter 10, “Maintaining the BarVision System”
• Chapter 10, “Common Questions”
Conventions used in this guide
This guide uses the following conventions:
Table 1: User’s guide conventions
Default starting point for software procedures All of
the software-related procedures in this guide use the
Activity screen (see “About the Activity screen” on
page 23) as a default starting point. To avoid
confusion, please navigate to the Activity screen before
attempting to perform these procedures.
About security codes Many of the BarVision for Palm
OS® screens are security code protected in the system’s
standard configuration. For instance, to access the
Options, Categories, or Containers screens of a
typically configured system, you must enter the
manager security code. You might choose, however, to
disable this security (see “About security codes” on
page 26). For that reason—and for the sake of
simplicity—the procedures in this guide do not
attempt to identify those steps that may require you to
enter a security code. If the Enter Security Code screen
appears while you are performing a procedure, simply
enter the security code, tap Enter, and then continue
with the remainder of the procedure.
For example, if a procedure instructs you to choose the
sequence “Mgr > Setup > Options,” the system may
request the manager security code after you tap Mgr.
Simply enter the security code, tap Enter, and then
continue with the procedure sequence by tapping
Setup and then tapping Options.
Finding additional
resources
If you require assistance using the BarVision system,
and cannot find the information you need in these
pages, please contact the dealer who sold you your
Convention Use
Bold Highlights items you can select or mod-
ify in the BarVision software, including
buttons, menus, and text boxes.
Fixed width Highlights default system values and
variable items intended as placeholders.
For example, “in the Category name
text box, enter New Category Name”
means “in the Category name text box,
enter a name of your choosing for the
new category.”
Italic Highlights book titles, items that require
special attention, and terms that are
defined in the glossary.
> Indicates a menu choice or button selec-
tion. For example, “choose Mgr > Setup
> Categories” means “tap the Mgr but-
ton, tap the Setup button, and then tap
Categories.”
Highlights information that provides
time- or effort-saving advice and tips for
novel ways of doing things.
Highlights specific actions and informa-
tion that require careful attention. These
explanatory messages are intended to
eliminate confusion or unexpected con-
sequences.
Convention Use

xiii
BARVISION FOR PALM OS®
User’s Guide
Draft for Reseller Review Only
Not for Distribution to End Users
system. Their familiarity with the details of your
particular installation and configuration will ensure
that you get the support you need.
If you require assistance with the basic operation of
your Palm® handheld computer (such as help entering
characters using PalmSource™ Graffiti®), please refer to
the documentation that accompanied your hardware or
contact the manufacturer directly.

PREFACE
xiv
Draft for Reseller Review Only
Not for Distribution to End Users

1
Draft for Reseller Review Only
Not for Distribution to End Users
Chapter 1: Understanding the BarVision
System
his chapter provides a brief introduction to the
BarVision system. It is intended to familiarize
you with the hardware and concepts that are
vital to understanding how BarVision works. This
chapter describes the function of each BarVision
component, introduces vocabulary and concepts
unique to BarVision, and outlines the procedures
involved in using the system. It contains the following
sections:
• “Understanding how the system works” on page 1
• “Understanding the system components” on page 1
• “Understanding unit-free operation” on page 7
• “Understanding pour rates” on page 7
• “Overview of using the BarVision system” on
page 8
Understanding how the
system works
After the BarVision system is properly installed, it
unobtrusively monitors your establishment’s free-pour
liquor usage. Each pour results in a wireless trans-
mission that identifies its volume, time, brand—even
the bottle from which it was dispensed. These wireless
transmissions ultimately end up as data entries
displayed on a handheld computer. This data can then
be used to help you with the day-to-day operation of
your establishment. For example, you can generate
custom reports for shift close outs, inventory status, or
to identify and manage procurement requirements.
And you can export the data to a personal computer
for in-depth analysis.
To help you further understand the system’s operation,
let’s consider a single pour from a single bottle and
follow the wireless data—from its moment of gener-
ation to its final display on the handheld’s screen.
When a bartender pours from a liquor container
equipped with a BarVision pour spout, the spout
detects the bottle’s tilt, measures the duration of the
pour, and then generates a wireless signal that contains
various details describing the pour. The pour spout’s
wireless signal is received by a BarVision active
antenna. The active antenna acts primarily as a relay
station and is used to increase the system’s wireless
coverage area. It relays the pour spout’s transmission to
the BarVision data receiver. The data receiver collects
the data from the active antenna and downloads it, via
serial cable connection, to a handheld computer
running the BarVision for Palm OS® software. Finally,
the BarVision software organizes and formats the data
for display on the handheld’s screen, enables you to
generate and print reports from that data, and gives
you the ability to download the data to a personal
computer.
Understanding the system
components
The BarVision wireless, free-pour liquor management
system comprises five key components. At a minimum,
the system consists of:
• A wireless, free-pour spout
• Two active antennas
•A data receiver
• A Palm® handheld computer
• The BarVision for Palm OS® software
The following sections describe the functions of these
components in detail.
T
CHAPTER 1
2
Understanding the BarVision System
Draft for Reseller Review Only
Not for Distribution to End Users
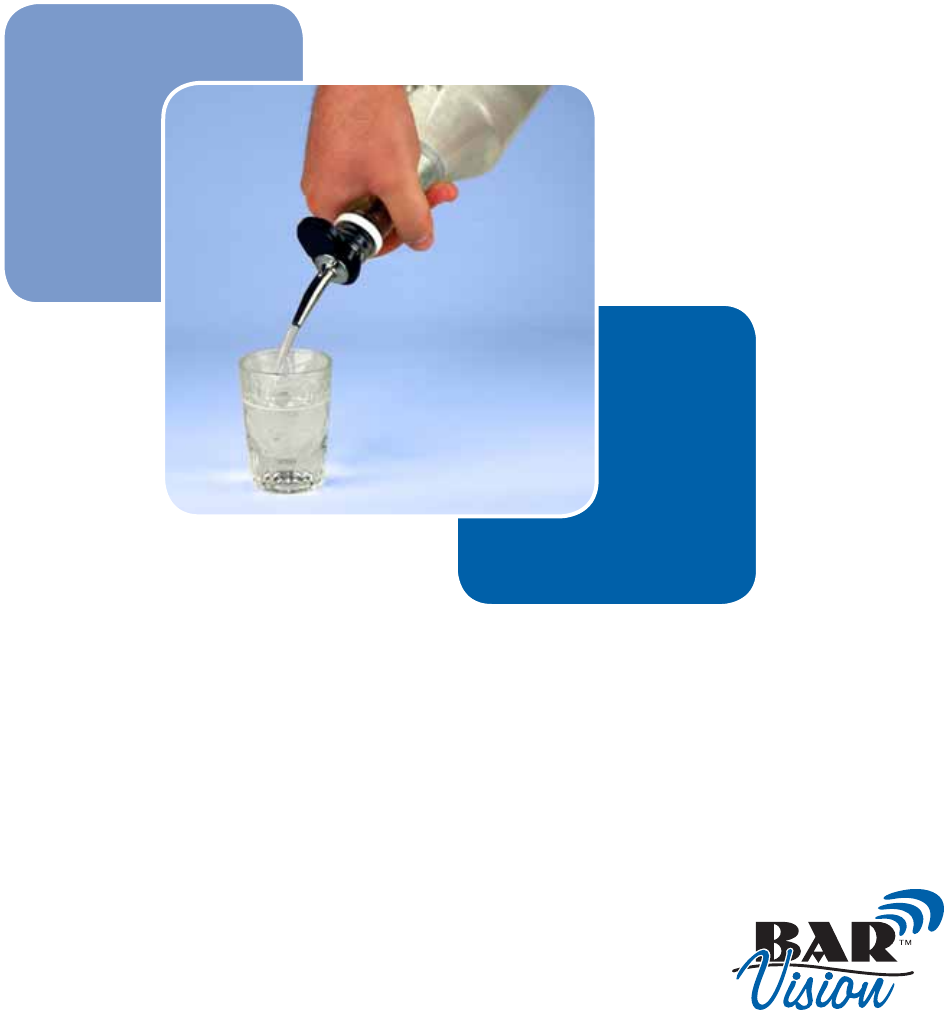
Pour spout
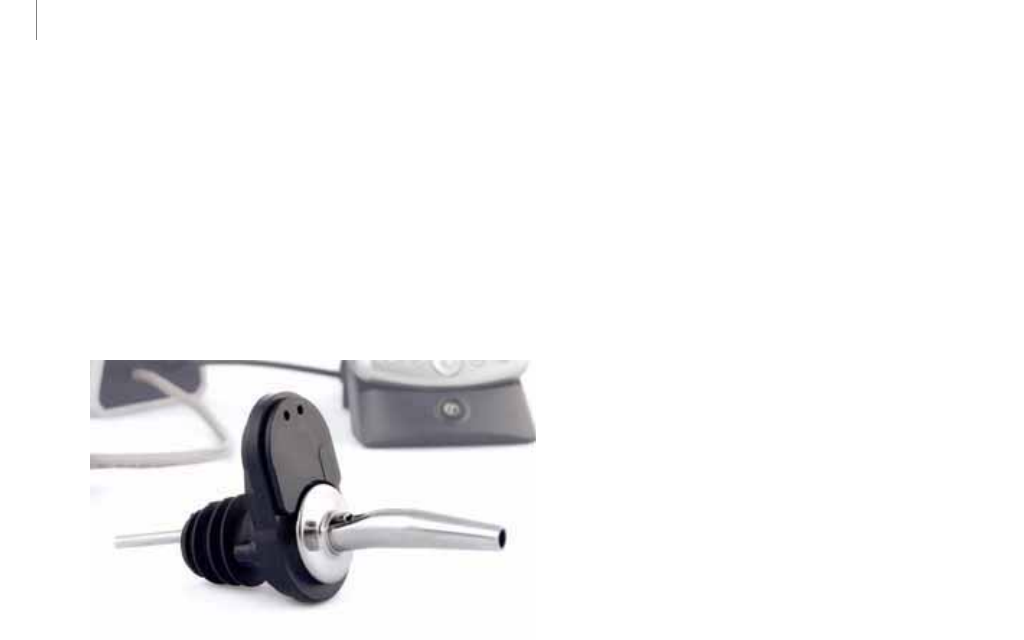
The BarVision wireless, free-pour spout is composed of
a wireless transmitter tag, a plastic cork, a metal nozzle,
and an optional twist-lock collar. The transmitter tag is
one of the components that makes the BarVision pour
spout unique. It houses the electronics that detect
important data and that generate the wireless signals
used to transmit the data to the rest of the system.
BarVision wireless, free-pour spout (Model SPT-101-20)
The BarVision pour spout serves four primary
functions: it measures the duration of each pour
dispensed from the container, it identifies any pours
that occur at a less than optimal bottle tilt angle, it
senses when it has been removed from one bottle and
attached to another, and it generates the wireless signals
that communicate the details of each of these events to
the rest of the system. Every open liquor container in
your establishment, whose contents you wish to track,
should be equipped with a BarVision wireless pour
spout. BarVision uses the term container to refer to an
open bottle of a particular brand at a particular
location.
Each BarVision pour spout is factory programmed
with its own unique identification number. The user
then programs the system to associate a uniquely
numbered pour spout with a specific liquor container.
This association is typically established during the
container addition process (see “Adding containers” on
page 51) when the system is initially installed. After
such a relationship has been established, it is important
that when the spout is removed from an empty bottle it
be attached to a replacement bottle of identical brand
and size at the same storage location. If necessary, the
association between a specific pour spout and a specific
brand of liquor can be removed or changed [see
“Assigning a new pour spout to (or removing the
current pour spout assignment from) a container” on
page 57]. This might be required, for example, if a
pour spout is misplaced or damaged.
BarVision pour spouts communicate using wireless
transmissions. As a result, their communication range
is limited. The range is maximized when there is a clear
line of sight between a pour spout and an active
antenna. Range may be limited or communications
even impossible when there is no clear line of sight. If
necessary, the system’s wireless coverage range can be
expanded by adding additional active antennas. Refer
to the BarVision Hardware Installation Guide for
details.
BarVision pour spouts are equipped with built-in
memory. This memory enables the spout to store infor-
mation about the sixteen most recently occurring
events. For example, each time a serving is poured or
the pour spout is removed from or attached to a bottle,
a new event record is generated and stored in the pour
spout’s memory. Pour spouts periodically transmit the
list of events stored in their memory. This means that
each stored event gets transmitted multiple times. This
redundancy helps ensure the reliability of the system
and protects against data loss and missed communica-
tions.
If a total of more than sixteen events occur while the
pour spout and data receiver are unable to commu-
nicate (for example, if the pour spout is out of wireless
range or the data receiver has lost power), the pour
spout’s sixteen event data storage limit will be exceeded
and data will be lost. If this is to happen, the BarVision
software will indicate that events were lost and identify
the number of lost events.
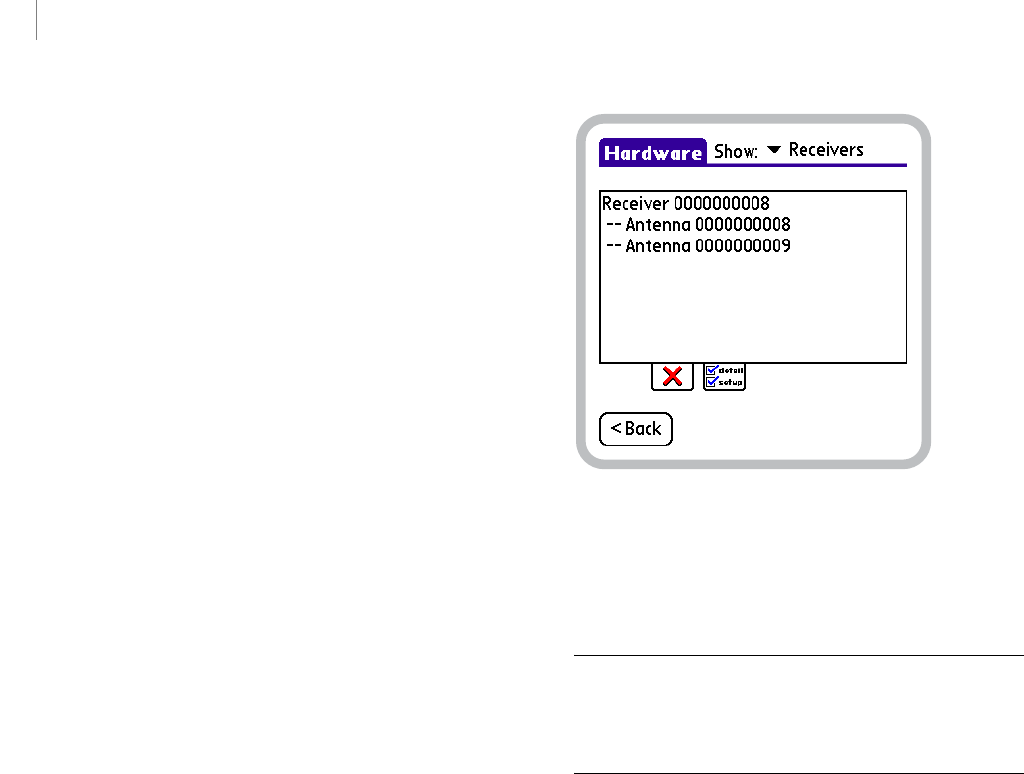
The BarVision for Palm OS® software enables you to
view communications statistics for all of the wireless
pour spouts at a glance. This can be done from the
Hardware screen after system installation is complete.
From the Hardware screen you can view the product
name that has been assigned to each pour spout, the
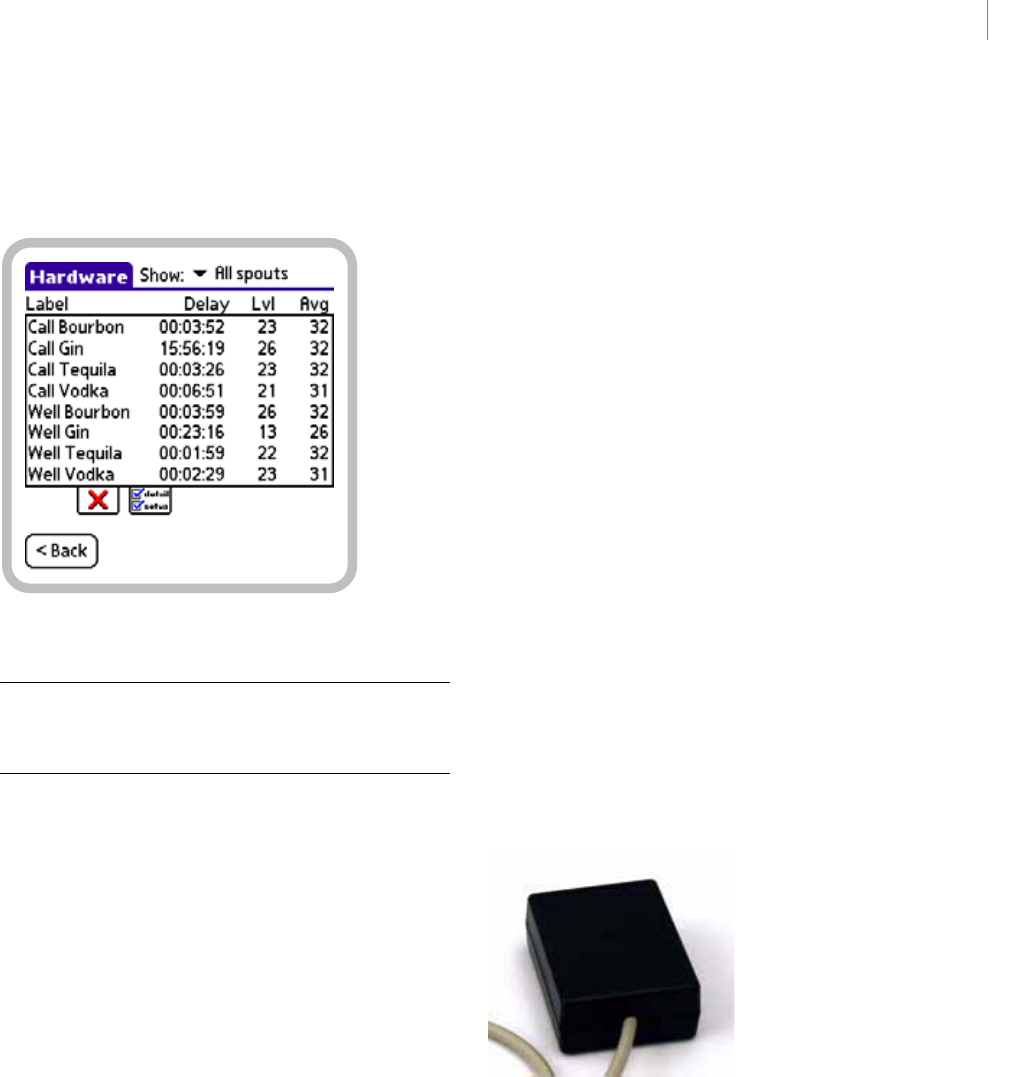
3
BARVISION FOR PALM OS®
User’s Guide
Draft for Reseller Review Only
Not for Distribution to End Users
amount of time elapsed since the last transmission was
received from each pour spout, the signal strength level
of those transmissions, and the average recent strength
of the signals each pour spout has generated.
Hardware screen, all wireless pour spouts shown
Note: For information about accessing and using the
Hardware screen to view pour spout communications
details, see “Scanning for weakest spouts” on page 117.
The transmitter tag portion of the wireless pour spout
assembly is equipped with a spring-loaded bottle detect
button. This button is located on the underside of the
tag and senses when the pour spout is attached to, or
removed from, a bottle. A second, recessed button is
also located on the bottom of the tag. This button
requires a tool (such as the tip of a pencil) to press and
acts as a resume button. You use the resume function
anytime you want to remove the pour spout from a
bottle that is not yet empty (for example, for cleaning)
and then reattach it to that same bottle. Initiating the
transmitter tag’s resume function enables the system to
track the remaining contents of the partially empty
bottle.
Each transmitter tag is also equipped with two LEDs,
one red and one green. These LEDs flash to indicate
the pour spout’s status and to provide bartenders and
managers with visual feedback. When you attach the
pour spout to a bottle, the green LED flashes once to
indicate that the spout is properly seated. When you
pour a drink from a bottle, the red LED begins to flash
at half-second intervals as soon as the bottle reaches a
ninety degree tilt. When the bottle reaches an angle of
135 degrees, the red LED stops flashing and the green
LED begins to flash. This periodic flashing can help
bartenders time the size of their pours. And, finally,
when you remove a pour spout from a bottle, the red
LED flashes. It flashes once each second for three
minutes or until the pour spout is placed back on a
bottle. The flashing red LED can help bartenders and
managers identify a pour spout that is not securely
attached to a bottle and locate a spout that is acciden-
tally misplaced.
BarVision pour spouts are battery operated and expire
after a specific time period or a specified number of
pours, whichever occurs first. For detailed expiration
information for your particular model of spout, refer to
the documentation that accompanied your hardware.
Active antenna
The BarVision active antenna performs a role similar to
that of any other antenna—it gathers airborne wireless
communications and transforms them into signals
capable of being conducted (down a wire, for example).
BarVision active antenna (Model ANT-101)
The active antenna’s primary function is to collect and
decode the wireless signals that the pour spouts
generate. It then relays these signals to the data receiver.
Up to four active antennas can be connected to a single
data receiver in daisy chain configuration. An antenna
can be mounted in a strategic remote location and then
hardwired back to the data receiver (or the antenna
CHAPTER 1
4
Understanding the BarVision System
Draft for Reseller Review Only
Not for Distribution to End Users
that precedes it in the chain). This helps increase the
system’s effective communication range. Typically, one
active antenna is installed at each bartending station
(well) and back bar area.
Because as many as four antennas can be connected, in
series, to a single data receiver, it is possible for two or
more antennas to receive and relay the same pour spout
transmission to the data receiver. If such a situation
occurs, the data receiver will recognize this redundancy
and ignore one of the communications.
Maximum range between an active antenna and a
BarVision pour spout is achieved when there is a clear
line of sight. Range may be severely limited or commu-
nications impossible when there is no clear line of sight
(refer to the BarVision Hardware Installation Guide for
details). By contrast, the communications between the
active antennas and the data receiver travel by way of a
cable. As a result, no line of sight between the two
components is required. Antennas can be installed at
locations far removed from the data receiver (refer to
the BarVision Hardware Installation Guide for details),
enabling a single antenna to monitor a geographically
isolated container storage location. The same cable that
is used as a communications link between the active
antenna and the data receiver is also used to supply
power to the antenna.
The BarVision for Palm OS® software enables you to
verify that the active antennas are properly connected
to, and communicating with, the rest of the system.
You can do this from the Hardware screen after system
installation is complete.
Hardware screen, data receiver and active antennas shown
This screen displays the identification number of each
active antenna currently communicating with the
BarVision data receiver.
Note: For information about accessing and using the
Hardware screen to view active antenna communications
details, see “Checking communication statistics” on
page 118.
BarVision active antennas do not require any software
setup or configuration. After an antenna is connected
to a powered data receiver, communications should be
automatically initiated.
Data receiver
The BarVision data receiver can gather transmissions
from up to four active antennas. The receiver then
stores those transmissions as event records in its built-
in memory. The model RCV-101 data receiver’s
memory is capable of storing up to 6,144 event
records. These event records are then downloaded, by
way of a serial cable connection, to a Palm® handheld
computer running the BarVision software.
5
BARVISION FOR PALM OS®
User’s Guide
Draft for Reseller Review Only
Not for Distribution to End Users
BarVision data receiver (Model RCV-101)
The BarVision data receiver requires a constant power
source. It should be connected to an AC adapter
plugged into a powered electrical outlet. In addition,
six AA batteries should be installed in the data
receiver’s battery backup. In the event of a loss of AC
power, the internal batteries will automatically power
the equipment, providing an uninterrupted source of
energy.
If the data receiver loses power completely (both AC
and DC), the events in its built-in memory are cleared.
Typically, those events will already have been trans-
ferred to the Palm® handheld computer and be stored
there. In addition, each pour spout stores and periodi-
cally retransmits its sixteen most recent events. So a loss
of power to the data receiver will normally only result
in lost data if more than sixteen events occur to a
container before power is restored to the data receiver.
If data loss occurs, BarVision will indicate that events
were lost and identify the number of lost events. To
minimize the risk of data loss, be sure to check and
replace the data receiver’s batteries as recommended
(see “Batteries” on page 117).
Typically, one data receiver should be installed at each
bar area. The BarVision system uses the term bar area
to identify any distinct section of an establishment’s
property or building specifically set aside for preparing
and serving alcoholic beverages. A single room may
contain more than one bar area—one at each end, for
example—and a single bar area usually comprises one
or more bartending stations (wells) and a back bar. The
data receiver can be positioned in any out-of-the-way
location in the bar area, so long as it can be properly
connected to an electrical outlet and to the Palm®
handheld’s serial cable.
The BarVision for Palm OS® software enables you to
verify that the data receiver is properly connected to,
and communicating with, the rest of the system. You
can do this from the Hardware screen after system
installation is complete.
Hardware screen, data receiver and active antennas shown
This screen displays the identification number of the
BarVision data receiver and each active antenna
currently communicating with it.
Note: For information about accessing and using the
Hardware screen to view data receiver communications
details, see “Checking communication statistics” on
page 118.
BarVision data receivers do not require any software
setup or configuration. When the data receiver is
supplied with a power source and connected to both an
active antenna and a Palm® handheld running the
BarVision for Palm OS® software, communications
should be automatically initiated.

CHAPTER 1
6
Understanding the BarVision System
Draft for Reseller Review Only
Not for Distribution to End Users
Palm® handheld computer
The BarVision system uses a Palm® handheld computer
to run the BarVision for Palm OS® software.
Palm® handheld computer
Your Palm® handheld is equipped with a touch-
sensitive screen and special stylus. You use these
features of the handheld computer to interact with the
BarVision for Palm OS® software by entering and
viewing data. The handheld also acts as a data storage
tool and gives you the ability to back up, export, and
beam that data to external hardware devices (such as
SD memory cards, personal computers, and printers).
Cables provide the handheld computer with both a
power source and a communications connection to the
data receiver. The handheld’s AC adapter must be
plugged into a working electrical outlet and its serial
cable/Palm® multiconnector adapter connected to the
data receiver.
After the BarVision system has been installed and
configured, you will generally want to leave your
handheld attached to the data receiver so that your
bartending staff can use the handheld’s display for
feedback. When the handheld is attached to the data
receiver’s serial cable and the BarVision for Palm OS®
software is running, any transmissions collected by the
data receiver are downloaded to the handheld and
displayed on screen.
Temporarily detaching your Palm® handheld from the
data receiver’s serial cable will not disrupt the system’s
data collection activities. However, if communications
between the BarVision for Palm OS® software and the
data receiver are disrupted for an extended period of
time, there could be a possibility of data loss. If more
than 6,144 systemwide events occur before communi-
cations are reestablished, the data receiver’s storage
limit will be exceeded and data will be lost. To
eliminate the risk of data loss, Nuvo Technologies
recommends that you not remove the Palm® handheld
from the serial cable for an extended period of time. In
addition, Nuvo Technologies recommends that you not
exit the BarVision for Palm OS® program except to
install an updated version of the software or perform a
HotSync® operation. These safeguards will help
eliminate the possibility of accidental data loss.
In establishments where multiple data receivers and
handheld computers are installed, it is important that a
one-to-one association between a handheld and a data
receiver be maintained. Only the Palm® handheld used
to add and configure a container can be used to
download the information collected for that container
from a data receiver. For that reason, attaching a Palm®
handheld to the incorrect data receiver’s serial cable
could potentially lead to data loss. The BarVision
software provides a Term i na l I D on the Security
Options screen that enables you to uniquely identify
each handheld. This helps you ensure that its associ-
ation with a particular data receiver can be easily
maintained. (For instructions on setting the Te rm i n al
ID value, see “Configuring the BarVision for Palm OS®
software” on page 14.)
For more detailed information regarding the operation
of your handheld computer, refer to “Using a Palm®
handheld” on page 21.
BarVision for Palm OS® software
The BarVision for Palm OS® software provides the
system with a user-friendly graphical interface. It
enables you to observe, interact with, and configure the
system.
7
BARVISION FOR PALM OS®
User’s Guide
Draft for Reseller Review Only
Not for Distribution to End Users
BarVision for Palm OS® software
The BarVision for Palm OS® software is responsible for
formatting and displaying the transmissions
downloaded to the handheld computer from the data
receiver. Each transmission ultimately results in an
event record displayed on the Activity screen (see
“About the Activity screen” on page 23). Each event
record briefly summarizes the action or event that
generated the record. For example, each time a drink is
poured, a pour spout is removed from a bottle or
attached to one, or the handheld is attached to or
detached from the data receiver’s serial cable, a new
event record appears on the Activity screen.
The Palm® handheld’s Date & Time and Formats
preference settings (both display format and current
time) are used by BarVision to display date and times
and to format numbers. Refer to the documentation
that accompanied your hardware for information on
changing these settings.
In addition to allowing you to monitor system events,
the BarVision for Palm OS® software enables you to
configure the system’s operation. You can control access
to management functions. You can edit system settings.
You can enable or disable public access to reports. And
you can add, edit, and delete system items including
categories, containers, serving sizes, and reports.
In addition, the BarVision software gives you the
ability to organize and print system data (using its
built-in reporting features) or export data for analysis
(via the BarVision Conduit for Palm HotSync).
Understanding unit-free
operation
The BarVision system does not specify (nor does it
limit) the unit of measure for numeric values. As a
result, you are free to use the system of weights and
measures, as well as the monetary unit, of your choice.
However, you must enter values consistently. For
example, if you decide to use metric units, you must
enter both Empty weight and Unit weight values in
the same metric unit of weight.
Nuvo Technologies, Inc. recommends the use of the
following metric units: grams, milliliters, and
milliliters per second.
All predefined values of volume and weight have been
entered in units of the U.S. Customary System. The
following table identifies the unit of measure for each
default system value.
Table 1: Unit of measure for predefined system val-
ues
Understanding pour rates
A pour spout’s pour rate is a measure of the amount of
liquid it dispenses each second. In BarVision, pour
rates are typically expressed in fluid ounces (or milli-
liters) per second. Each type (both brand and model)
System value Unit of measure
Serving sizes U.S. fluid ounces
Max allowed pour size U.S. fluid ounces
Default container size U.S. fluid ounces
Container size U.S. fluid ounces
Empty weight Ounces
Unit weight Ounces
Default pour rate U.S. fluid ounces per second
Expected pour rate U.S. fluid ounces per second
Actual pour rate U.S. fluid ounces per second

CHAPTER 1
8
Understanding the BarVision System
Draft for Reseller Review Only
Not for Distribution to End Users
of pour spout has an average pour rate. This average
rate identifies the amount of liquid the typical pour
spout of that brand and type will dispense. However,
the actual pour rate of a specific pour spout is likely to
be faster or slower than the average. This variability
results from several factors. The main factor is the pour
spout manufacturing process. The difference in actual
pour rates between two identical pour spouts from the
same manufacturer can be 20% or more. In addition, a
number of other factors affect the actual pour rate of a
specific pour spout, including the viscosity of the
liquor, the temperature, and the barometric pressure.
The actual pour rate accounts for all the factors that
cause the pour rate of a specific pour spout to vary
from the average. BarVision uses the actual pour rate of
a specific pour spout to calculate the actual portion size
of each drink that is poured with that specific pour
spout.
Bartenders free-pour drinks by time (how long a bottle
is tipped) or by volume (to a certain level in a glass).
Bartenders cannot be expected to adjust the timing of
their pours based on the actual pour rate of the specific
pour spout on a particular bottle. There is no way for a
bartender to know that, for example, a specific pour
spout pours 5% faster or slower than the average. What
bartenders can do, however, is develop accuracy and
consistency in their timing. For instance, a bartender
can pour all half ounce drinks based on a two count
and all one ounce drinks based on a four count,
regardless of what pour spout they are using (adjust-
ments may be made in the pour count for thicker
liquors or liquor kept in a freezer).
As a result, a bartender’s pour count should be based
on the average pour rate of the pour spout type being
used, not on the actual pour rate. This average pour
rate is called the expected pour rate in BarVision.
BarVision uses the expected pour rate to calculate the
expected portion size, which is the amount of liquor
that is expected to be dispensed based on the average
pour rate of that pour spout type. Unless you know a
specific pour spout pours faster or slower than average,
you would expect it to pour based on the average.
The expected portion size (and expected pour rate) is
used by BarVision to give feedback to bartenders about
how accurately and consistently they are timing their
pours (based on the one factor—timing—that they can
control). It can be compared to a stopwatch. The
actual portion size (and actual pour rate) is used by
BarVision to determine how much liquor was actually
poured in a particular drink for purposes of tracking
inventory usage.
Overview of using the
BarVision system
The following procedure provides a high-level overview
of the major steps required to install, configure, and
use the BarVision system. Each step provides a cross-
reference to the location in this User’s Guide that
describes, in detail, the activities required to perform
the identified action.
To use the BarVision system:
1Conduct a site survey, determine the most appro-
priate locations for the system’s hardware components
(the data receiver, active antennas, and Palm® handheld
computer), make the required cable and electrical
connections for the components, and permanently
mount them.
For details, refer to the BarVision Hardware Installation
Guide.
2Install the BarVision for Palm OS® software on your
Palm® handheld computer.
For details, refer to the BarVision Hardware Installation
Guide.
3Modify the default category names so that they
correspond with the liquor price category designations
your establishment uses. This will ensure that all of the
categories you intend to use are available for selection
during container addition.
For details, see “Working with Categories” on page 37.

9
BARVISION FOR PALM OS®
User’s Guide
Draft for Reseller Review Only
Not for Distribution to End Users
4Adjust the default serving size values to match your
establishment’s desired pour volumes. This will enable
BarVision to accurately assign each pour to the appro-
priate serving size.
For details, see “Working with Serving Sizes” on
page 71.
5Configure each of the open bottles in your estab-
lishment as a BarVision container. Configuring a
BarVision container requires you to enter character-
istics of the bottle (including its brand, size, location,
category, and cost) using the BarVision for Palm OS®
software and associate the bottle with a BarVision
wireless pour spout.
For details, see “Working with Containers” on page 43.
6Back up the system configuration data to an SD
memory card. When you create a backup, the system’s
databases are copied to the SD memory card located in
the handheld’s expansion card slot. Should the need
arise, those databases can then be restored to the
handheld (see “Restoring data” on page 111). This can
spare you from having to recreate all of the categories,
serving sizes, and containers you just created.
For details, see “Backing up data” on page 110.
7Pour drinks for your customers. When pouring
from containers equipped with BarVision wireless pour
spouts, you should tilt the bottle, quickly but
smoothly, to at least a 135 degree angle. This ensures
an efficient pour and maximizes productivity.
For details, see “Pouring” on page 105.
8Change out empty bottles as required. Be sure to
return bottles to an upright position immediately after
they are emptied on the final pour. This helps
maximize the accuracy of their reported yields. Then,
simply remove the BarVision pour spout and attach it
to a full bottle. Each defined container is matched with
a specific wireless pour spout during the container
addition process. As a result, it is important that when
a pour spout is removed from an empty bottle it be
attached to a replacement bottle of identical brand and
size.
For details, see “Changing bottles” on page 105.
9Configure and run reports. For example, you might
want to create a close out report that is run at the end
of each bartender’s shift. Properly configured, you
could use such a report to reconcile the number of
drinks poured (as reported by BarVision) to the
number of drinks rung up (as recorded on your point-
of-sale or cash register system).
For details, see “Working with Reports” on page 79.
10 Periodically, back up the BarVision system data to
an SD memory card. You can manually back up the
system to a memory card via the Back up to SD card
utility, or you can configure the system to generate a
memory card backup automatically each time you run
a report (see “Editing journal options” on page 91). In
either case, a copy of the system’s databases, along with
all your customized settings, will be created on the
handheld’s removable SD memory card.
For details, see “Backing up data” on page 110.

CHAPTER 1
10
Understanding the BarVision System
Draft for Reseller Review Only
Not for Distribution to End Users
11
Draft for Reseller Review Only
Not for Distribution to End Users
Chapter 2: Installing the BarVision
Software
his chapter provides detailed instructions for
installing the BarVision software and config-
uring it for use with any peripheral systems and
devices (such as printers). It contains the following
sections:
• “Installing the software” on page 11
• “Configuring the BarVision for Palm OS® software”
on page 14
• “Configuring peripheral systems and devices” on
page 16
Installing the software
The following procedures lead you through the instal-
lation of the BarVision for Palm OS® software on your
Palm® handheld computer and, optionally, the
BarVision Conduit for Palm HotSync on your personal
computer.
Installing the BarVision for Palm
OS® software
The BarVision for Palm OS® software is provided on
both CD-ROM and SD memory card. Depending
upon your hardware configuration,
Installing the BarVision for Palm OS® software to your
Palm® handheld computer requires one of the
following:
• A properly formatted BarVision for Palm OS®
installation SD memory card
• A personal computer equipped with a Palm® USB
sync cable and PalmSource™ Desktop software, and
the BarVision for Palm OS® installation application
(on CD-ROM)
If you received the BarVision for Palm OS® software on
an SD memory card, refer to the procedure “To install
the BarVision for Palm OS® software from an SD
memory card:” on page 11. If you received the
BarVision for Palm OS® software on CD-ROM, refer
to the procedure “To install the BarVision for Palm
OS® software from a computer using a Palm® USB sync
cable:” on page 12.
To install the BarVision for Palm OS® software from
an SD memory card:
1With your Palm® handheld turned on, insert the
BarVision for Palm OS® software SD memory card into
your handheld’s expansion slot.
2The installation process will automatically be
initiated and the software will be installed.
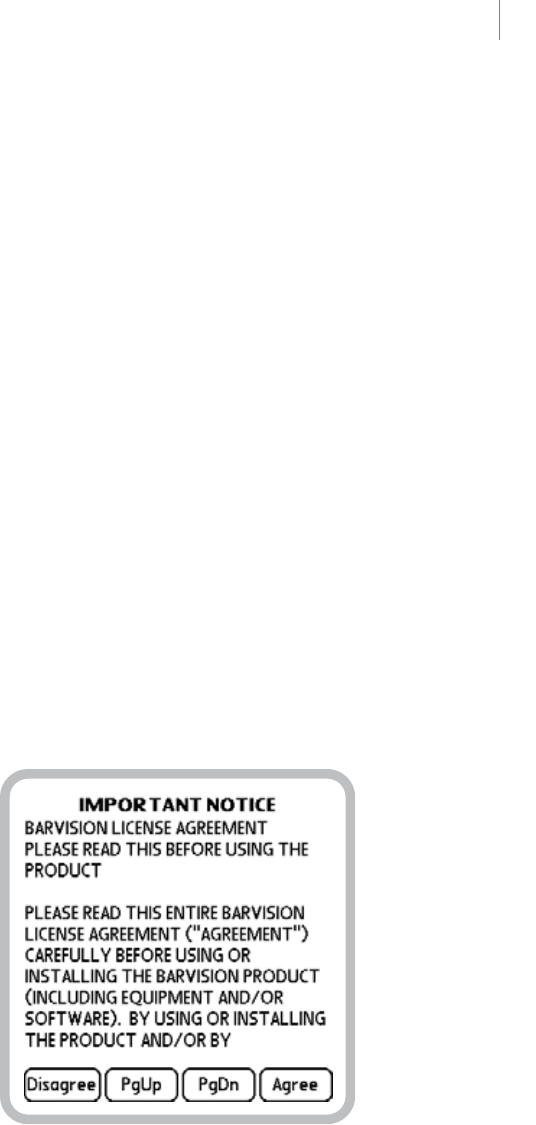
3After the installation is complete, the end user
license agreement will be displayed.
BarVision for Palm OS® end user license agreement
4You must read and agree to the terms of the license
in order to use the software. Tap PgUp or PgDn to
navigate up or down through the pages of the license.
Or, if you prefer, you can read the agreement included
T
CHAPTER 2
12
Installing the BarVision Software
Draft for Reseller Review Only
Not for Distribution to End Users
with this User’s Guide (see “BarVision License
Agreement” on page 127). After you have read the
license, tap Agree to accept its terms.
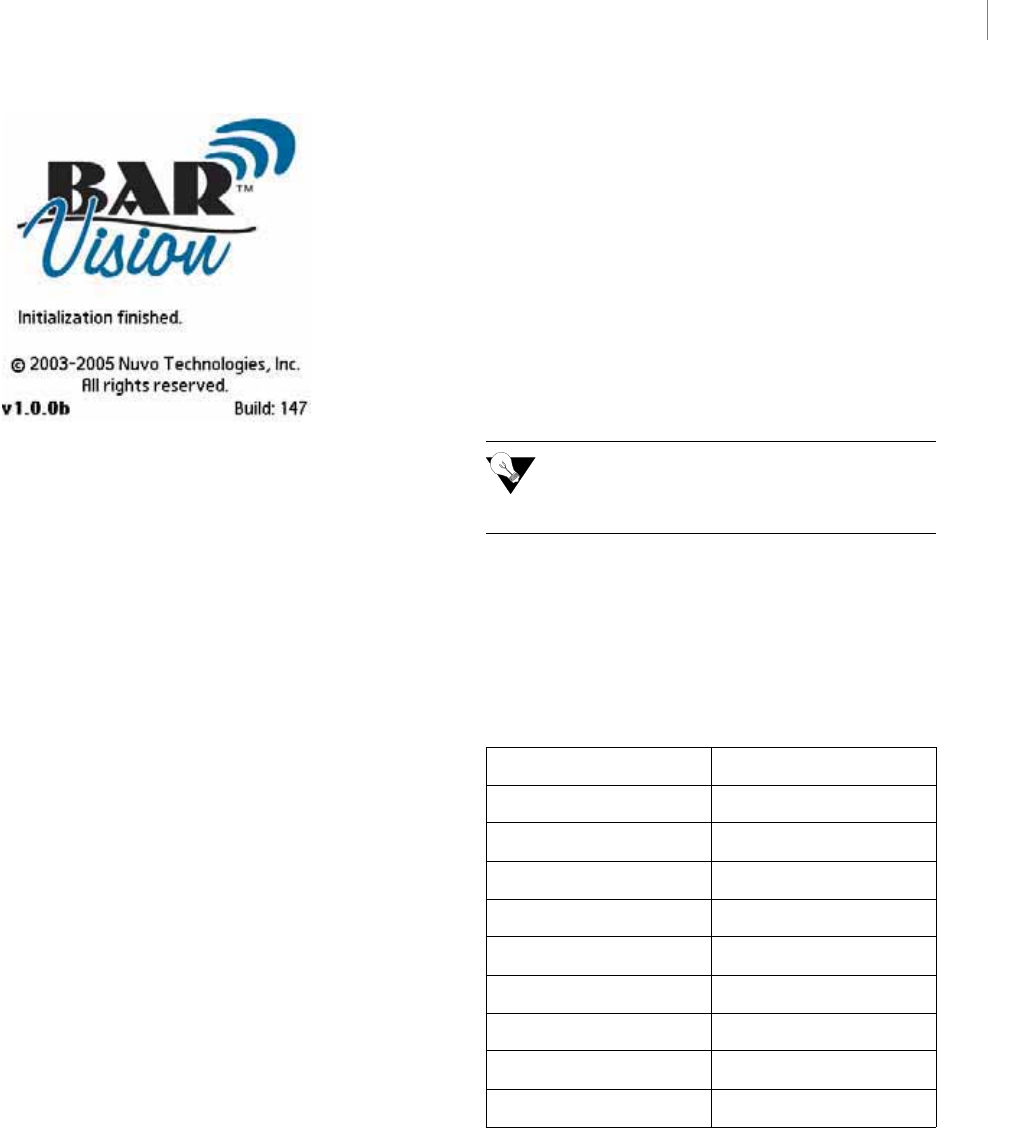
5The BarVision for Palm OS® software will initialize
and the Activity screen will be displayed.
Activity screen
To install the BarVision for Palm OS® software from a
computer using a Palm® USB sync cable:
1If you have not already done so, connect the Palm®
USB sync cable to your personal computer and install
the PalmSource™ Desktop software. Refer to the
documentation that accompanied your handheld
hardware for details.
2Do one of the following:
• If you received the BarVision software on CD-
ROM, insert the CD-ROM into your computer’s
CD-ROM drive.
• If you downloaded the BarVision software, locate
the BarVisionSetup.exe file you
downloaded to your computer and double-click it.
3Follow the on-screen installation instructions.
Note: This installation method enables you to install both
the BarVision for Palm OS® software to your handheld
computer and the BarVision Conduit for Palm HotSync to
your personal computer. Refer to the on-screen instructions
for details.
4After the installation is complete, turn on your
Palm® handheld and attach it to the USB sync cable.
5Press the HotSync® button on the USB sync cable
to transfer the BarVision for Palm OS® software to your
handheld computer.
6After the synchronization is complete, press or tap
Home on your Palm® handheld to display the Applica-
tions View.
Applications View
7Tap the BarVision for Palm OS® software icon.
BarVision for Palm OS® icon
8The BarVision for Palm OS® end user license
agreement will be displayed.

13
BARVISION FOR PALM OS®
User’s Guide
Draft for Reseller Review Only
Not for Distribution to End Users
BarVision for Palm OS® end user license agreement
9You must read and agree to the terms of the license
in order to use the software. Tap PgUp or PgDn to
navigate up or down through the pages of the license.
After you have read the license, tap Agree to accept its
terms.
10 The BarVision for Palm OS® software will
initialize and the Activity screen will be displayed.
Activity screen
Installing the BarVision Conduit for
Palm HotSync
The BarVision Conduit for Palm HotSync gives you
the ability to export BarVision journal and report data
from your Palm® handheld to a personal computer.
This allows you to view, store, and print BarVision data
using your PC. When installed, the conduit software
resides on your desktop or laptop computer. It then
works in the background each time you synchronize
your handheld. (For information about synchronizing
your Palm® handheld computer, refer to the documen-
tation that accompanied your hardware.)
The BarVision Conduit for Palm HotSync lets you
export two separate types of data: journal data and
report data. These two types of data are saved in
different file formats and to different locations on the
target computer’s hard drive.
During synchronization, the conduit creates a comma
separated value (.csv) file containing BarVision journal
data on the computer connected to the handheld. All
of the data collected since the last time you synchro-
nized your handheld is exported. The exported file is
then stored in the default location: C:\Documents
and Settings\User Name\My
Documents\BarVision\Journal. The file’s
name identifies its creation date and the terminal from
which it was exported. The exported file can then be
analyzed using any spreadsheet, database, or report
design program (such as Microsoft® Excel®, Lotus® 1-2-
3, or Crystal Reports®).
Similarly, the conduit exports report data in ASCII text
file (.txt) format. When you run a report that has been
configured for export (see “Export” on page 81), the
system stores the generated report information. The
next time you synchronize your handheld, the system
creates a text file version of the report on the computer
connected to the handheld. Exported reports are stored
in the default location: C:\Documents and
Settings\User Name\My
Documents\BarVision\Reports. Once those
text files have been created, they can be printed, e-
mailed, or archived for permanent storage and record
keeping.
CHAPTER 2
14
Installing the BarVision Software
Draft for Reseller Review Only
Not for Distribution to End Users
For more information, see “Exporting data” on
page 107.
System requirements In order to install the BarVision
Conduit for Palm HotSync, your system must meet the
following minimum requirements:
• PC running Microsoft Windows 2000 or XP
• PalmSource™ Desktop software installed
Installation of the BarVision Conduit for Palm
HotSync cannot occur until the PalmSource™
Desktop software is installed on your system.
To install the BarVision Conduit for Palm HotSync on
your personal computer:
1Place the BarVision Software Installation CD-
ROM in your CD-ROM drive.
2Pause briefly while the CD-ROM’s autoplay menu
loads automatically.
3After the menu appears, click Install the BarVision
Conduit for Palm HotSync.
4The BarVision Conduit Setup Wizard will be
displayed. Follow the instructions that appear on the
screen.
BarVision Conduit Setup Wizard
The setup program requires you to accept the terms of
the BarVision license agreement, prompts you to
choose installation and export directories, gives you the
opportunity to create a Start Menu folder for the
program’s shortcuts, lets you select whether to create
desktop and Quick Launch program icons, and then
performs the software installation.
Configuring the BarVision
for Palm OS® software
After you have installed the BarVision for Palm OS®
software, you need to customize some of its default
settings. For example, if you prefer to use metric
measurements, you need to edit the system’s predefined
volume, weight, and pour rate values. During the
software configuration process, you fine-tune the
system for your particular installation, your preferred
method of working, and the way your business
operates.
To configure the BarVision for Palm OS® software:
1Optionally, set the Ter m i n a l ID . If more than one
BarVision system is to be installed in your business (or
if you are adding another one), you need to pair each
handheld computer with a specific data receiver and
maintain that pairing. You can do this by setting each
handheld computer’s Te r m i n a l I D security option to a
unique number and then labeling each data receiver
with the number you assigned to its corresponding
handheld. You can choose any unique number between
0 and 99. A separate BarVision system is typically
installed at each bar area. But only the Palm® handheld
used to configure a container can be used to download
the information collected for that container by the data
receiver. The Term i na l I D value on the Security
Options screen enables you to uniquely identify each
handheld. This helps ensure that its association with a
particular data receiver can be easily maintained.
For details, see “Editing the Terminal ID” on page 20.
2Set the time marker interval. Time marker event
records are time stamps that are inserted periodically
on the Activity screen to help you locate and review

15
BARVISION FOR PALM OS®
User’s Guide
Draft for Reseller Review Only
Not for Distribution to End Users
data. You can adjust the frequency with which time
marker event records appear by modifying the value of
the Add time marker every field. You set this value
from the Security Options screen.
For details, see “Time marker” on page 29.
3Verify or edit the Max allowed pour size. This value
defines the pour volume above which BarVision
identifies pours as exceptions rather than allocating
them to the largest serving size. This ensures that pours
of an unusually large volume are readily identifiable
and separated out for reporting purposes. You edit the
Max allowed pour size from the Security Options
screen.
For details, see “Editing the Max allowed pour size” on
page 75.
4Verify or edit the default serving sizes. You may
need to adjust the default serving size values to match
your establishment’s desired pour volumes. This will
enable BarVision to accurately assign each pour to the
appropriate serving size. And that will ultimately
enable you to calculate the amount of revenue that
should be collected based on the number of pours per
serving size. You edit serving sizes from the Serving
Sizes screen.
For details, see “Working with Serving Sizes” on
page 71.
5Verify or edit the default categories. You may need
to modify the default price categories to align them
with the designations your business actually uses. This
will ensure that all of the categories you intend to
use—and only those categories you intend to use—are
available for selection during container addition. You
edit categories from the Categories screen.
For details, see “Working with Categories” on page 37.
6Verify or edit the default container options. When
you add a new container to BarVision, several of the
container’s details are initially set to default values. You
may want to adjust these defaults. For example, you
may need to standardize them to your preferred unit of
measure. You edit these values from the pages of the
Container Options screen.
For details, see “Editing container options” on page 63.
7Configure each open container in your estab-
lishment. Configuring a container requires that you
define the characteristics of the bottle (including its
brand, size, location, category, and cost) via the
BarVision for Palm OS® software and equip the bottle
with a BarVision wireless pour spout. You add
containers from the Containers screen.
For details, see “Adding containers” on page 51.
8Verify or edit the default journal options. The
Journal Options screen enables you to configure several
data maintenance-related report options. From this
screen, you can configure: the age at which obsolete
data can be deleted during report-initiated mainte-
nance, the level of user interaction required during
report-initiated maintenance, and the creation of a
system backup on the Palm® handheld’s SD memory
card during report-initiated maintenance.
For details, see “Editing journal options” on page 91.
9Configure any reports. For example, you might
want to create a close out report that is run at the end
of each bartending shift. Properly configured, you can
use such a report to reconcile the number of drinks
poured (as reported by BarVision) to the number of
drinks rung up (as recorded on your POS system or
cash register). You add reports from the Reports screen.
For details, see “Adding reports” on page 84.
10 Optionally, configure a printer. The BarVision for
Palm OS® software enables you to print directly from
your Palm® handheld via network or IR (infrared)
connection. To print BarVision data, you must either
export the data to a personal computer and print it
from there, or configure BarVision for Palm OS® to
print directly from your handheld to a printer. The
Printer Options screen lets you configure BarVision for
use with your particular hardware setup. Depending
upon the equipment and type of connection you
intend to use, you may need to adjust the default
printer options settings.
For details, see “Configuring printers” on page 16.
CHAPTER 2
16
Installing the BarVision Software
Draft for Reseller Review Only
Not for Distribution to End Users
11 Enable the Mgr security code. You can set the
security code to any numeric sequence of up to twelve
digits. After you change the code, record the new one
in a secure location and limit the number of people
you entrust with the code. You edit the Mgr security
code from the Security Options screen.
For details, see “Editing the manager security code” on
page 26.
12 Back up the system configuration data to an SD
memory card. You can do this from the Diagnostics &
Utilities screen by selecting Back up to SD card. When
you create a backup, the system’s databases are copied
to the SD memory card located in the handheld’s
expansion card slot. Should the need arise, those
databases can then be restored to the handheld (see
“Restoring data” on page 111). This can spare you
from having to recreate all of the categories, serving
sizes, containers, and reports you just created.
For details, see “Backing up data” on page 110.
Configuring peripheral
systems and devices
If you would like to print BarVision reports directly
from your handheld computer, you need to adjust
BarVision’s default printer options. Similarly, if more
than one BarVision system is installed in your place of
business, you need to configure each Palm® handheld
for use in a multiple-system environment.
Configuring printers
The BarVision for Palm OS® software enables you to
print directly from your Palm® handheld computer via
network or IR (infrared) connection. To print to a
network printer, you must have access to a properly
configured wireless network, and your Palm® handheld
must be equipped to access that network (typically
using Wi-Fi technology). Infrared printing requires a
printer equipped with an IrDA-compliant infrared
port.
Configuring an infrared printer If your printer is
equipped with an IrDA-compliant infrared port, you
can send BarVision report information directly to the
printer from your Palm® handheld computer. To do so,
you need to configure the BarVision software for
infrared printing.
Note: Performing the following procedure typically
requires the manager security code. See “About security
codes” on page 26.
To configure an infrared printer:
1Choose Mgr > Setup > Options to display the
Options screen.
Options screen, Printer selected
2In the option list, tap Printer, and then tap Select
to display the Printer Options screen.
17
BARVISION FOR PALM OS®
User’s Guide
Draft for Reseller Review Only
Not for Distribution to End Users
Printer Options screen
3Tap th e Printer type field to display the Select
Printer Type screen.
Select Printer Type screen, Letter selected
4Select a printer type from the list. If your printer is
a standard 8½" by 11" printer, tap Letter. If your
printer is a roll-fed receipt printer, tap Receipt.
5Tap Select. The chosen printer type is assigned and
now appears in the Printer type field on the Printer
Options screen.
6Tap th e Connection field to display the Select
Connection Type screen.
Select Connection Type screen, IrDA selected
7Tap IrDA in the connection type list to select it.
8Tap Select. The chosen connection type is assigned
and now appears in the Connection field on the
Printer Options screen.
9Turn the printer on if it is not already.
10 Be sure the IR port of your handheld is aligned
directly opposite to, and within a few inches of, the
infrared port of your printer, and then tap Print Test
Page.
11 The Ready to Print screen is displayed. Tap
Continue to print the test page.
Ready to Print screen
12 After the test page has printed, do one of the
following:

CHAPTER 2
18
Installing the BarVision Software
Draft for Reseller Review Only
Not for Distribution to End Users
• If you printed to a Letter type printer, verify that
the last number printed at the bottom left-hand
side of the page is 60. If it is not, adjust the Lines
per page value on the Printer Options screen by
following the instructions provided on the test
page.
• If you printed to a Receipt type printer, verify
that the last number printed at the top right-hand
side of the page is 0 (the fortieth digit). If it is not,
adjust the Columns value on the Printer Options
screen by following the instructions provided on the
test page.
If you experience any problems while attempting to
print, see “Printing problems” on page 119.
13 Tap Save to store your changes and return to the
Options screen.
Configuring a wireless network printer If your Palm®
handheld computer is equipped with the appropriate
wireless communications capabilities, you can use it to
connect to your wireless network and print to any
available network printer. To do so, you need to
establish a connection to your network and configure
the BarVision software for network printing.
For information on establishing a wireless connection
to your network, refer to the documentation that
accompanied your handheld.
Note: Performing the following procedure typically
requires the manager security code. See “About security
codes” on page 26.
To configure a wireless network printer:
1If you have not already done so, establish a
connection to your wireless network. For details, refer
to the documentation that accompanied your Palm®
handheld computer.
2Choose Mgr > Setup > Options to display the
Options screen.
Options screen, Printer selected
3In the option list, tap Printer, and then tap Select
to display the Printer Options screen.
Printer Options screen
4Tap th e Printer type field to display the Select
Printer Type screen.
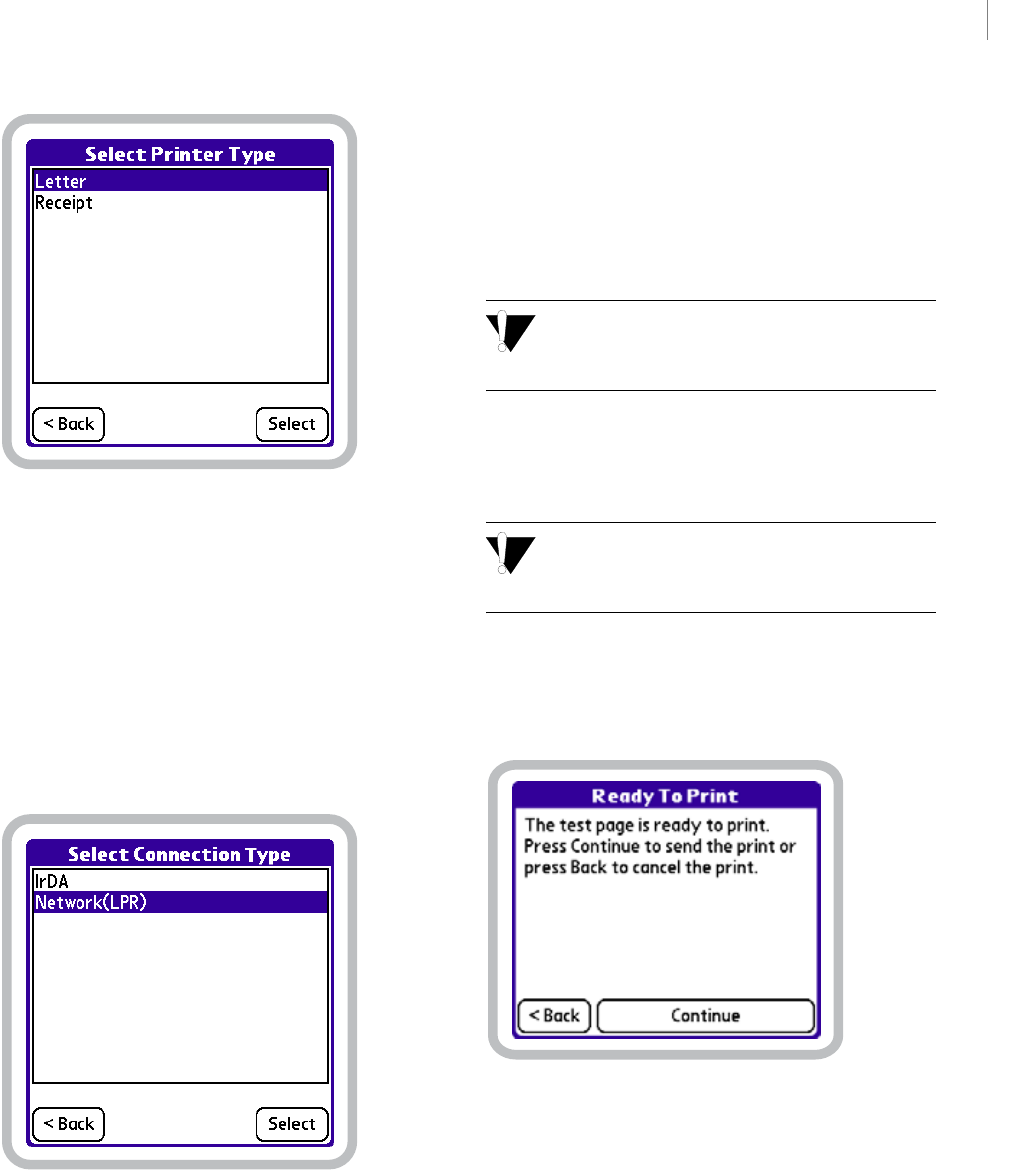
19
BARVISION FOR PALM OS®
User’s Guide
Draft for Reseller Review Only
Not for Distribution to End Users
Select Printer Type screen, Letter selected
5Select a printer type from the list. If your printer is
a standard 8½" by 11" printer, tap Letter. If your
printer is a roll-fed receipt printer, tap Receipt.
6Tap Select. The chosen printer type is assigned and
now appears in the Printer type field on the Printer
Options screen.
7Tap th e Connection field to display the Select
Connection Type screen.
Select Connection Type screen, Network (LPR) selected
8Tap Network (LPR) in the connection type list
to select it.
9Tap Select. The chosen connection type is assigned
and now appears in the Connection field on the
Printer Options screen.
10 Tap th e Name/address text box and enter either
the printer name or the IP address of the printer you
want to print to.
Your network’s configuration determines whether a
printer name or an IP address must be entered.
Consult your network administrator.
11 Tap th e Printer/queue text box and enter the
name of either the printer or the queue you want to
print to.
Your network’s configuration determines whether a
printer or queue name must be entered. Consult
your network administrator.
12 Turn the printer on if it is not already.
13 Tap Print Test Page. The Ready to Print screen is
displayed.
Ready to Print screen
14 Tap Continue to print the test page.
15 After the test page has printed, do one of the
following:
• If you printed to a Letter type printer, verify that
the last number printed at the bottom left-hand
side of the page is 60. If it is not, adjust the Lines
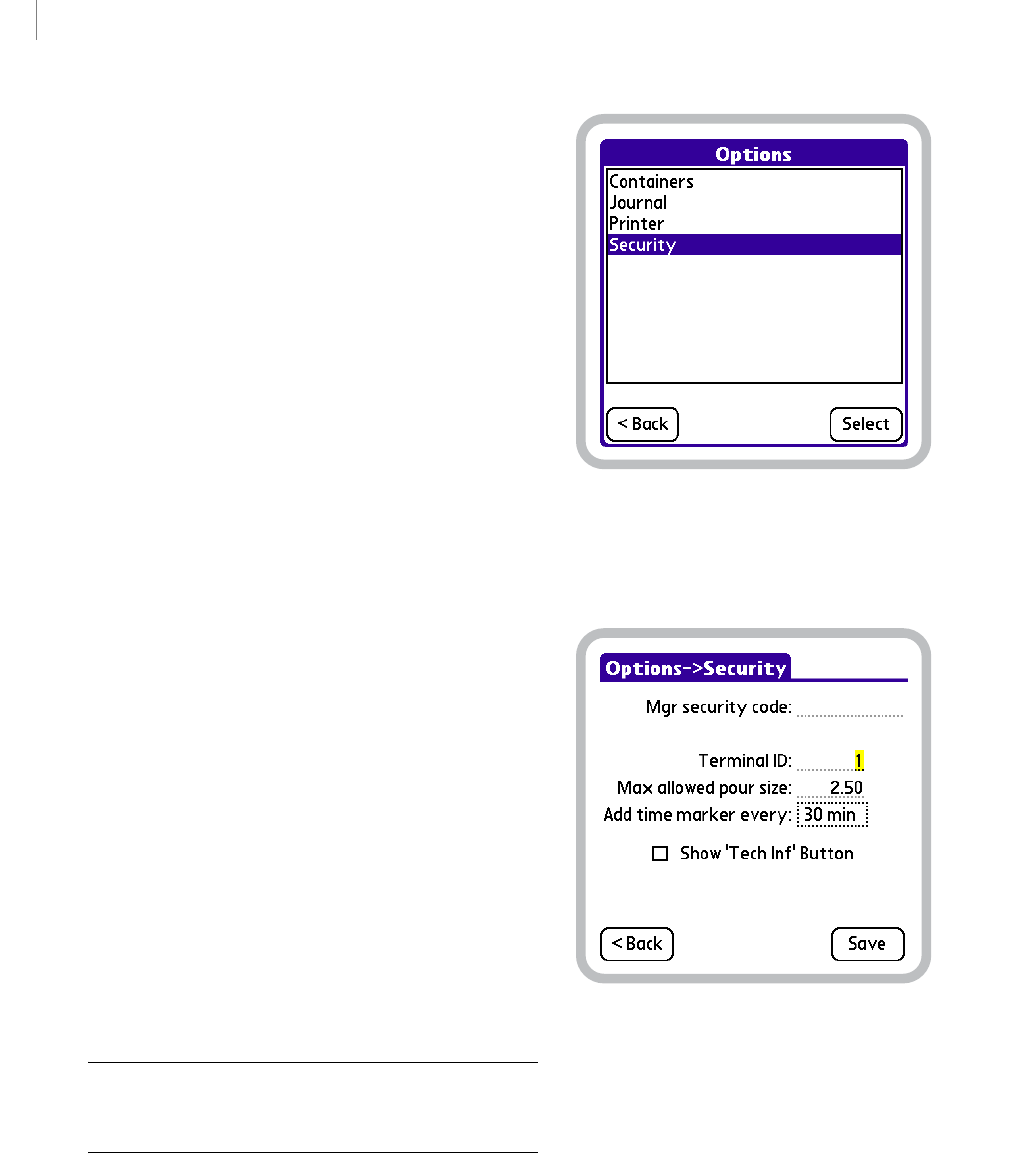
CHAPTER 2
20
Installing the BarVision Software
Draft for Reseller Review Only
Not for Distribution to End Users
per page value on the Printer Options screen by
following the instructions provided on the test
page.
• If you printed to a Receipt type printer, verify
that the last number printed at the top right-hand
side of the page is 0 (the fortieth digit). If it is not,
adjust the Columns value on the Printer Options
screen by following the instructions provided on the
test page.
If you experience any problems while attempting to
print, see “Printing problems” on page 119.
16 Tap Save to store your changes and return to the
Options screen.
Editing the Terminal ID
If more than one BarVision system is to be installed in
your business (or if you are adding another one), you
need to pair each handheld computer with a specific
data receiver and maintain that pairing. You can do this
by setting each handheld computer’s Te r mi na l ID
security option to a unique number and then labeling
each data receiver with the number you assigned to its
corresponding handheld. You can choose any unique
number between 0 and 99. A separate BarVision
system is typically installed at each bar area. But only
the Palm® handheld used to configure a container can
be used to download the information collected for that
container by the data receiver. The Te r m i n a l I D value
on the Security Options screen enables you to uniquely
identify each handheld. This helps ensure that its
association with a particular data receiver can be easily
maintained.
Note: Performing the following procedure typically
requires the manager security code. See “About security
codes” on page 26.
To set the Terminal ID value:
1Choose Mgr > Setup > Options to display the
Options screen.
Options screen, Security selected
2In the option list, tap Security, and then tap Select
to display the Security Options screen.
Security Options screen, Te r m i n a l I D selected for editing
3Drag (or double-tap) to select the current Ter m i na l
ID. The value should appear selected, as does 0 in the
figure above.
4Enter a new Te r m i n a l I D value. Permissible values
are from 0 to 99.
5Tap Save to store your changes and return to the
Options screen.

21
Draft for Reseller Review Only
Not for Distribution to End Users
Chapter 3: Understanding the BarVision
for Palm OS® Software
sing BarVision requires you to interact with the
BarVision for Palm OS® software by way of a
Palm® handheld computer. This chapter
provides tips for entering text, making selections, and
navigating in the BarVision for Palm OS® software
using your handheld. It also includes discussion of
essential elements of the software, such as the Activity
screen, Event Detail screen, and common on-screen
controls. In addition, this chapter includes an overview
of the software’s organization. It contains the following
sections:
• “Using a Palm® handheld” on page 21
• “Starting BarVision for Palm OS®” on page 22
• “About the Activity screen” on page 23
• “Navigating the BarVision software” on page 25
• “Viewing event details” on page 28
• “Exiting BarVision for Palm OS®” on page 35
Using a Palm® handheld
This section provides tips for using your Palm®
handheld computer with the BarVision for Palm OS®
software. If you have not already installed the
BarVision software, please refer to the BarVision
Hardware Installation Guide. If you have not yet famil-
iarized yourself with the basic functionality of your
handheld, please refer to the User Guide which accom-
panied your hardware.
Using the handheld’s serial cable
After you have properly set up and configured the
BarVision system, you should generally leave your
Palm® handheld attached to the serial cable that
connects it to the data receiver. The serial cable
provides the handheld with both a power source and a
data connection so that it can collect any transmissions
received by the data receiver. When your handheld is
properly attached to the data receiver, its battery should
charge and communication between the data receiver
and the BarVision for Palm OS® software should be
automatically intiated.
Temporarily disconnecting your Palm® handheld from
the serial cable will not disrupt the system’s data
collection activities. All the BarVision wireless pour
spouts will continue to track pours and broadcast
information to the active antennas. The antennas, in
turn, will continue to relay information to the data
receiver. And, finally, the data receiver will continue to
gather and store the data transmissions passed on by
the active antennas. When you reattach the handheld
computer to the serial cable that connects it to the data
receiver, all of the stored transmissions are collected
from the data receiver by the handheld and appear as
event records on the Activity screen.
The BarVision Model RCV-101 data receiver has
a storage limit of 6,144 event records. If more
than that number of events occur, systemwide, before
communications are restored between the handheld and
the data receiver, the data receiver’s storage limit will be
exceeded and information will be lost.
Using the stylus to navigate, scroll,
and select
Like using a mouse to click elements on a computer
screen, using the stylus to tap elements on your
handheld screen is the basic action that gets things
done. You tap the handheld screen to perform a
number of operations, such as:
• Navigating from one BarVision screen to another
• Selecting or reordering the items in a list
• Choosing commands
• Selecting options in dialog boxes
U
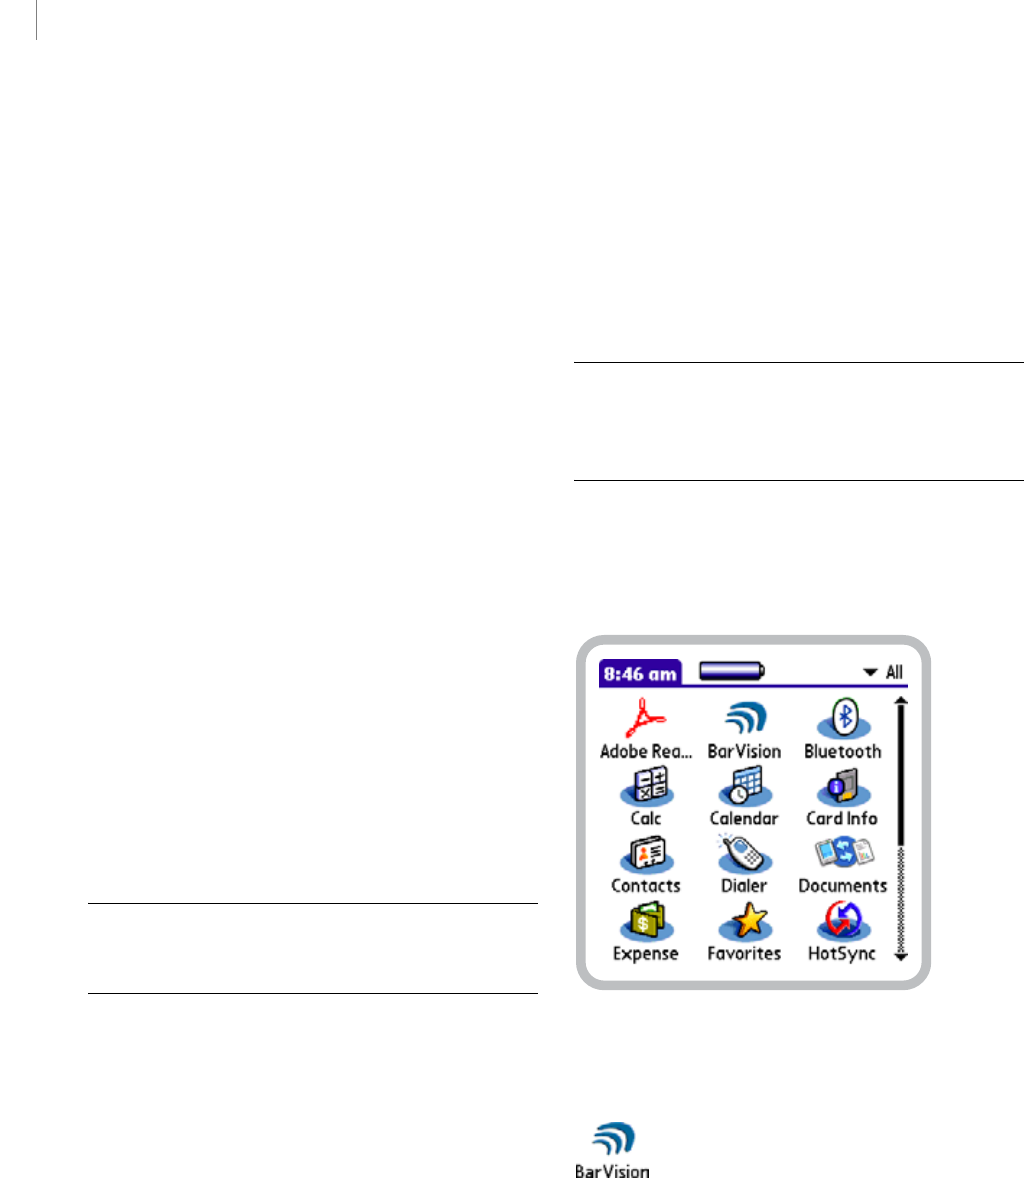
CHAPTER 3
22
Understanding the BarVision for Palm OS® Software
Draft for Reseller Review Only
Not for Distribution to End Users
To tap, you press the screen of the handheld with the
stylus tip and then lift it back up. To double-tap,
perform the same procedure two times in rapid
succession. To triple-tap, do it three times. A double-
tap enables you to select a word or number so that it
can be edited. Triple-tapping enables you to select an
entire line of text for editing. The procedures in the
remaining sections of this guide frequently refer to
these actions.
Just as you can drag the mouse to select text or move
objects on your computer, you can also drag the stylus
to select text or activate the scroll arrows of any scrol-
lable list. To drag, you press the stylus on the
handheld’s screen and then move across, up, or down
the screen without lifting the stylus tip.
Entering text and numbers
You can quickly enter text or numbers in the BarVision
for Palm OS® software using your handheld’s stylus.
Some of BarVision’s data entry fields allow you to enter
both text and numbers. Generally, these fields are the
ones that enable you to name newly created items, such
as categories, containers, and reports. But a vast
majority of BarVision’s fields—such as Container size,
Expected pour rate, Ter mi n a l ID , and Mgr security
code—permit numeric entries only. When editing
these fields, only numeric values are allowed.
Note: The BarVision for Palm OS® software does not
allow the entry of special characters (such as,
!@#$%*<>?).
Starting BarVision for Palm
OS®
After you have properly installed the BarVision for
Palm OS® software, the program launches and
continues to run until you intentionally exit (see
“Exiting BarVision for Palm OS®” on page 35). Nuvo
Technologies, Inc. recommends that you not exit the
BarVision for Palm OS® program except to install an
updated version of the software or perform a HotSync®
operation. This is to help eliminate the possibility of
accidental data loss.
If you do exit the BarVision for Palm OS® software,
you will have to manually launch the program to use it
again. You start BarVision for Palm OS® just as you
would any other Palm OS® application—by tapping its
icon.
Note: The following procedure assumes that the BarVision
for Palm OS® software is currently installed on your
handheld. If it is not, refer to the BarVision Hardware
Installation Guide.
To start BarVision for Palm OS®:
1Press or tap Home on your Palm® handheld to
display the Applications View.
Applications View
2Tap the BarVision for Palm OS® software icon.
BarVision for Palm OS® icon
3The BarVision splash screen will be momentarily
displayed as the system initializes each of its databases.
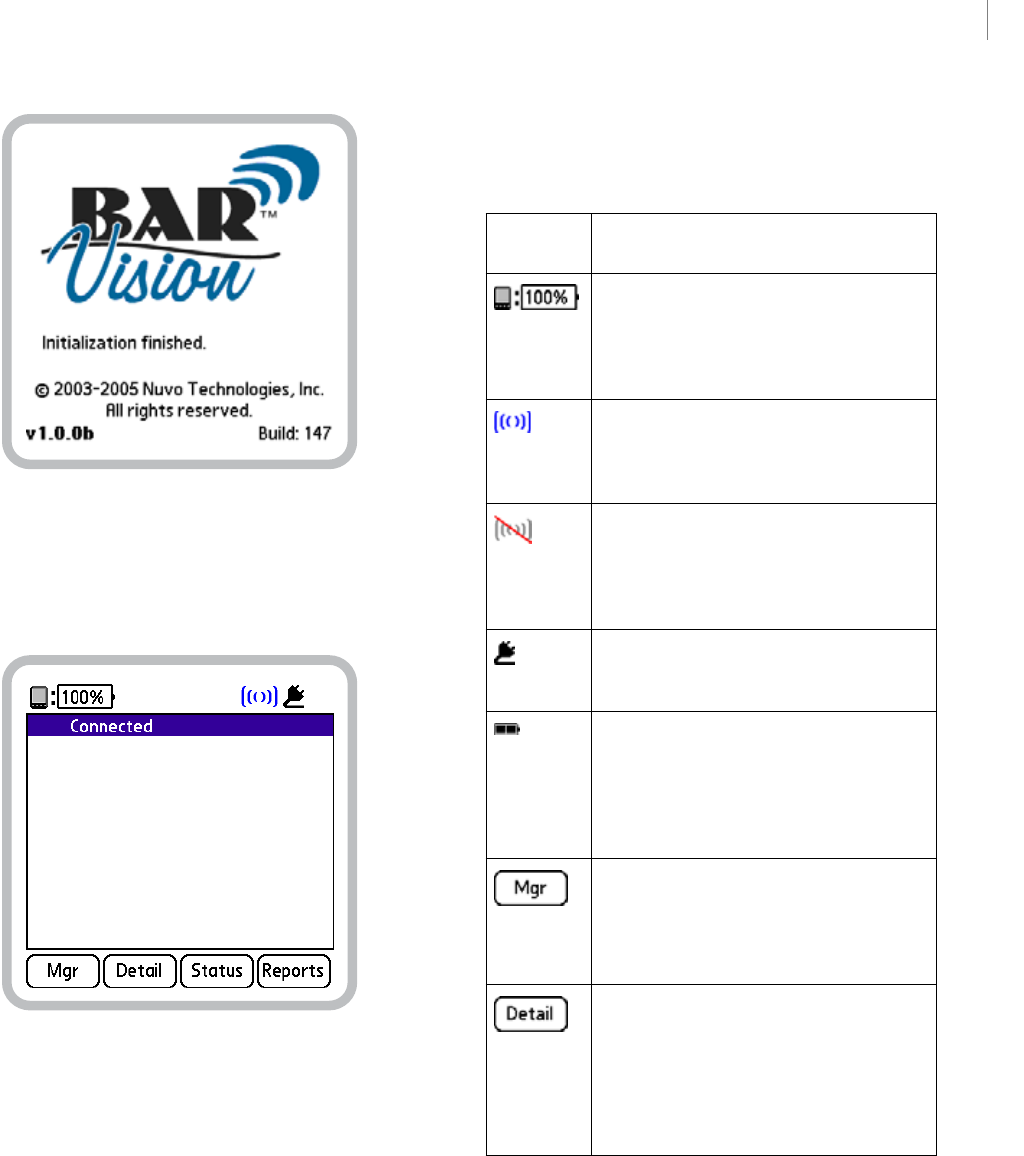
23
BARVISION FOR PALM OS®
User’s Guide
Draft for Reseller Review Only
Not for Distribution to End Users
BarVision for Palm OS® splash screen
4After the system initialization is complete, the
Activity screen will be displayed and the system will be
ready for you to use once again.
Activity screen
About the Activity screen
The Activity screen is BarVision’s default starting point
and the place from which all the system’s functions can
be accessed. From this screen you can see event records
added to the activity list in real time, view the status of
defined containers, run public reports, and access
management setup and configuration functions.
The following graphic symbols and controls appear on
the Activity screen.
Table 1: Activity screen buttons and icons
Button/
Icon
Function
The Handheld battery level icon indicates
the current charge of the handheld’s bat-
tery. The handheld battery charges when
the Palm® handheld is properly connected
to a powered data receiver.
The Connected icon indicates that the
handheld computer is properly connected
to, and communicating with, the data
receiver.
The Disconnected icon indicates that the
handheld computer is not communicating
with the data receiver. For troubleshooting
information, see “Data receiver problems”
on page 117.
The Data receiver AC power icon indicates
that the data receiver is being powered by
an electrical outlet via its AC power adapter.
The Data receiver battery level icon indi-
cates the current charge of the data
receiver’s batteries. This icon only appears
when the data receiver is being powered by
the installed batteries. If this icon appears,
check the AC power adapter’s connections.
The Mgr button navigates to the Manager
Functions screen. This screen provides
access to system setup and configuration
functions and typically requires a security
code to access.
The Detail button navigates to the Event
Detail screen. This screen provides in-depth
information about the event record selected
on the Activity screen. This information can
be useful for troubleshooting or diagnostic
purposes. For information, see “Viewing
event details” on page 28.
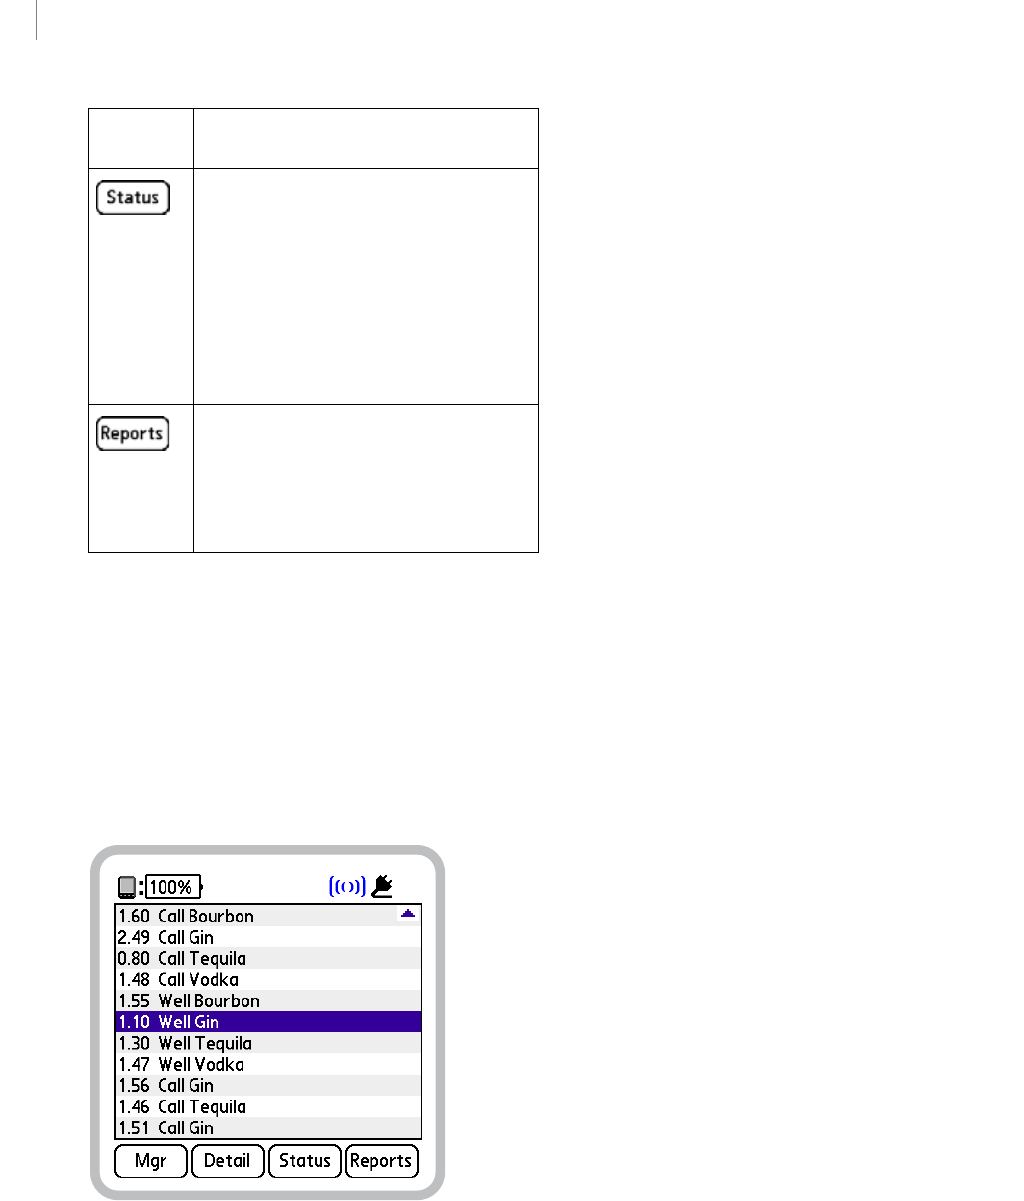
CHAPTER 3
24
Understanding the BarVision for Palm OS® Software
Draft for Reseller Review Only
Not for Distribution to End Users
A large portion of the Activity screen is dedicated to
the event record list. This scrollable list of up to thirty
thousand records provides a real-time display of every
recordable event that occurs to each of the BarVision
system components. For example, each time a drink is
poured from a container equipped with a BarVision
pour spout or the Palm® handheld is attached to or
detached from the serial cable that connects it to the
data receiver, a new event record appears in the list.
Activity screen, 1.10 Well Gin event record selected
The event record list provides bartenders with a
valuable resource. They can use the list as a memory
aid should they ever lose track of what drinks have
been poured. They can use the pour size information
to help them regulate their pour counts in an effort to
achieve consistent pour volumes. And they can use the
event record list information to verify that every drink
they poured resulted in a point-of-sale or register trans-
action.
The following list identifies each of the events that are
recorded on the Activity screen:
• Establishing communications between the
BarVision for Palm OS® software and the data
receiver. (For more information, see “Receiver
connected” on page 29.)
• Disrupting communications between the BarVision
for Palm OS® software and the data receiver. (For
more information, see “Receiver disconnected” on
page 29.)
• Elapsing of the period set for the time marker
interval. (For more information, see “Time marker”
on page 29.)
• Attaching a wireless pour spout to a container. (For
more information, see “Container open” on
page 31.)
• Removing a wireless pour spout from a container.
(For more information, see “Container empty” on
page 31.)
• Pouring from a container equipped with a wireless
pour spout. (For more information, see “Container
pour” on page 32.)
• Moving a container equipped with a wireless pour
spout outside the system’s transmission range for a
duration longer than the value set for the Report
missing after container option. (For more infor-
mation, see “Container missing” on page 32.)
• Returning a container equipped with a wireless
pour spout into the system’s transmission range.
(For more information, see “Container found” on
page 33.)
The Status button navigates to the Con-
tainer Status screen. This screen provides
information about the container (if any)
associated with the event record selected
on the Activity screen. The Container Status
screen typically requires a security code to
access and enables you to conduct a spot
check of open containers. For information,
see “Viewing container status information”
on page 67.
The Reports button navigates to the Public
Reports screen. Public reports can be run,
viewed, and printed from this screen with-
out entering a security code. For informa-
tion, see “Running public reports” on
page 92.
Button/
Icon
Function
25
BARVISION FOR PALM OS®
User’s Guide
Draft for Reseller Review Only
Not for Distribution to End Users
• Manually adjusting the value for either a container’s
current volume of liquid or current weight. (For
more information, see “Container variance” on
page 33.)
• Generating more events for a single container than
the pour spout’s tag is capable of storing, while that
container is outside the system’s wireless trans-
mission range. (For more information, see “Events
lost” on page 34.)
For information about viewing the details for a specific
event record, see “Viewing event details” on page 28.
Navigating the BarVision
software
To help you use BarVision more effectively, this section
describes the organization of the BarVision for Palm
OS® software. All navigation begins from the Activity
screen. It provides access to every other screen.
Occasionally, such access is security code protected.
Software screen hierarchy
The following chart identifies the navigation path you
must follow to access each of the BarVision for Palm
OS® software screens.
BarVision for Palm OS® software screen hierarchy—shaded boxes identify screens that are typically security code protected
Activity
Manager
Functions
Categories
Containers
Diagnostics &
Utilities
Setup
Reports
Public Reports
Container
Status
Event Detail
Security
Options
Printer Options
Journal Options
Container
Options
Options
Serving Sizes
Container
History Report
Hardware
Maintenance
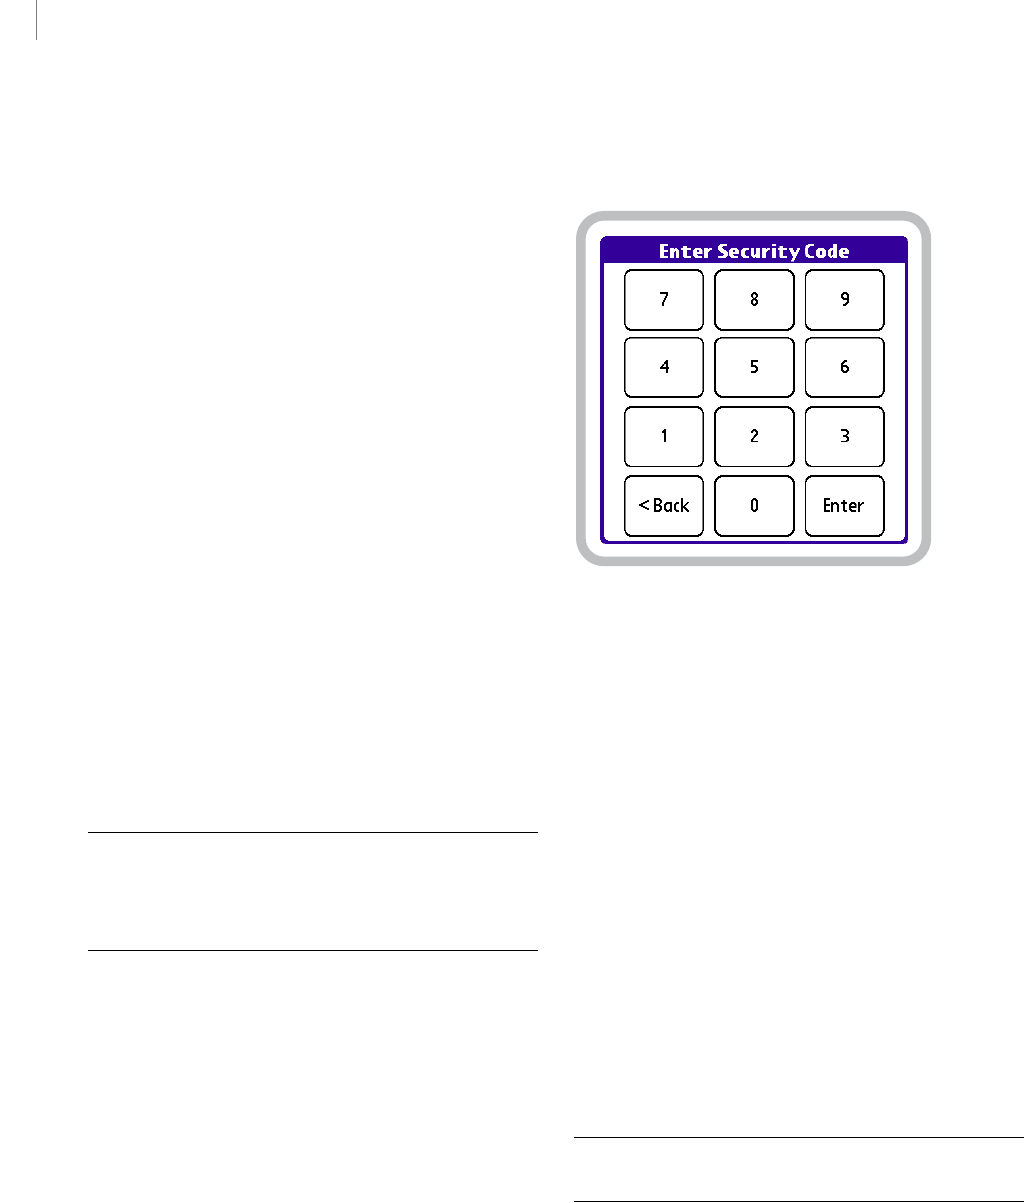
CHAPTER 3
26
Understanding the BarVision for Palm OS® Software
Draft for Reseller Review Only
Not for Distribution to End Users
About security codes
In its standard configuration, the BarVision for Palm
OS® software limits access to system setup and configu-
ration functions. These capabilities can only be
accessed from the Manager Functions screen—which
can typically only be viewed by entering the manager
security code. This protects your categories, serving
sizes, containers, and reports from inadvertent or
unauthorized changes and deletion. In addition, it
provides a way to limit access to confidential business
data.
On a typically configured system, only three of the
BarVision for Palm OS® software screens can be viewed
without entering the manager security code:
• The Activity screen (see “About the Activity screen”
on page 23)
• The Event Detail screen (see “About the event
types” on page 29)
• The Public Reports screen (see “About reports” on
page 79)
Entering the manager security code Attempting to
access any of the other software screens will require you
to enter the manager security code.
Note: If the manager security code has been disabled (by
clearing the Mgr Security Code text box on the Security
Options screen), the Enter Security Code screen will not be
displayed during the following procedure.
To enter the manager security code:
1The manager security code is only requested when
you attempt to access a security code protected screen.
You can do so by performing any one of the following
actions:
•Tap Mgr.
• Select any container-related event record in the
Activity screen’s event record list, and then tap
Status.
2The Enter Security Code screen will be displayed.
Tap the appropriate keys to enter the numeric sequence
of your security code, and then tap Enter.
Enter Security Code screen
3One of the following two things will occur:
• If the security code you entered is correct, the
system will display the screen you attempted to
access.
• If the security code you entered is incorrect, a
message will display indicating this fact. Tap OK
and return to step 2.
Editing the manager security code The Mgr security
code field on the Security Options screen displays the
current manager security code. By default, the manager
security code is disabled (that is, the field is blank). Be
sure to enable the security code by entering a combi-
nation of digits. Then record the new code in a secure
location and limit the number of people you entrust
with it. Permissible values for a security code include
any numeric sequence of up to twelve digits.
Note: Performing the following procedure typically
requires the manager security code.
To edit the manager security code:
1Choose Mgr > Setup > Options to display the
Options screen.
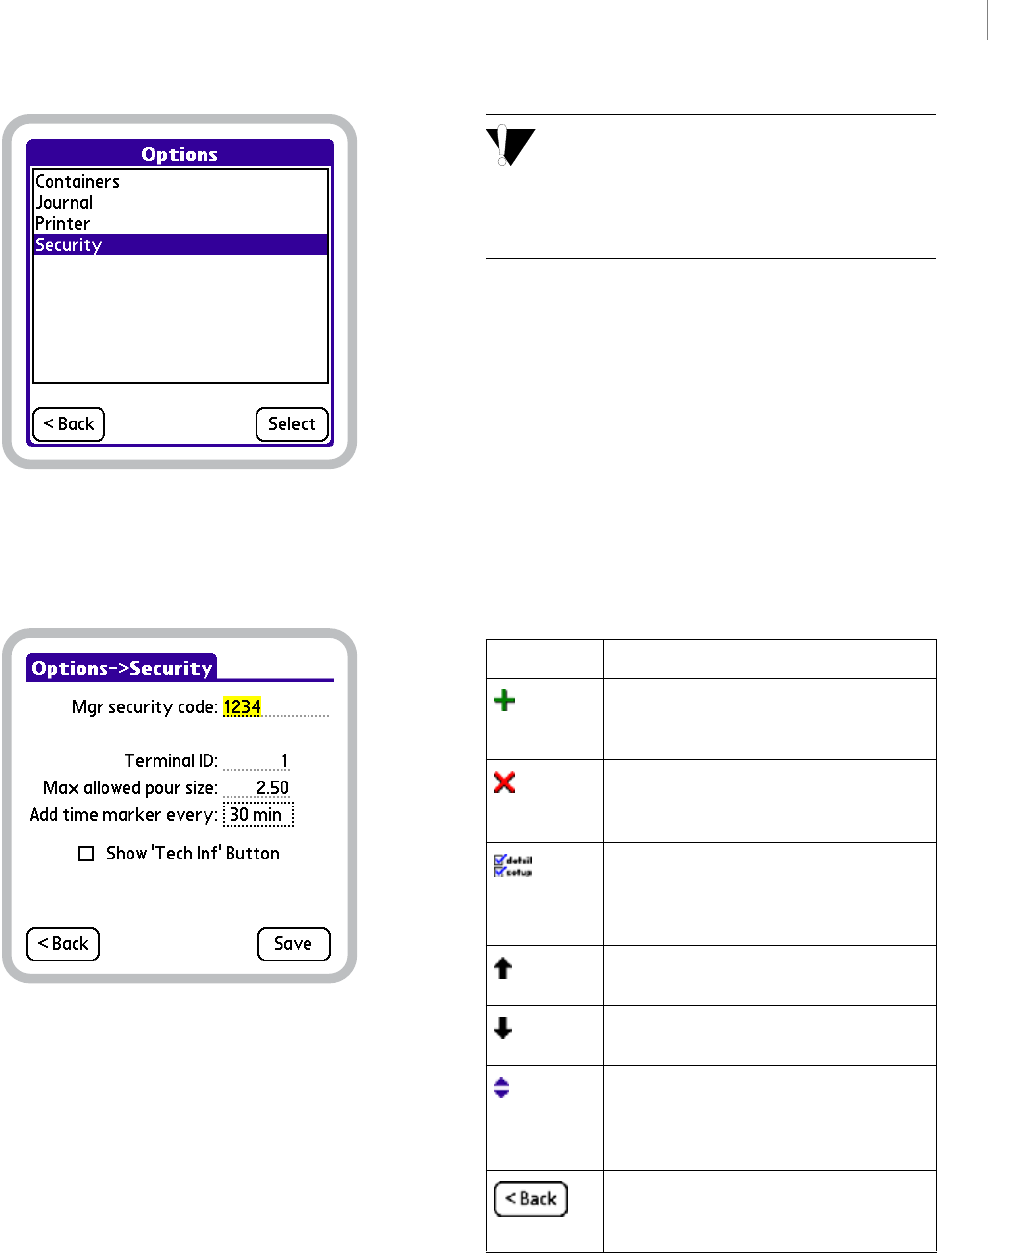
27
BARVISION FOR PALM OS®
User’s Guide
Draft for Reseller Review Only
Not for Distribution to End Users
Options screen
2In the option list, tap Security, and then tap Select
to display the Security Options screen.
Security Options screen, Mgr security code selected for editing
3Drag (or double-tap) to select the current Mgr
security code (if any). The value should appear
selected, as does 1234 in the figure above.
4Enter a new security code value.
Clearing the Mgr security code field disables this
security feature. This may be useful during system
installation and configuration. However, Nuvo Technol-
ogies, Inc. discourages you from operating the system on a
continuing basis without a security code in place.
5Tap Save to store your changes and return to the
Options screen.
Common on-screen controls
The BarVision for Palm OS® software employs several
standardized on-screen controls. These controls
perform consistent functions regardless of the screen on
which they are located. Each of the standard controls is
identified in the table below and presented alongside a
definition of the function that it performs.
Table 2: Functions of on-screen controls
Control Function
Tap Add to add new system items includ-
ing categories, serving sizes, containers,
and reports.
Tap Delete to delete system items includ-
ing categories, serving sizes, containers,
and reports.
Tap Detail to view and edit detailed con-
figuration information for system items
including categories, serving sizes, con-
tainers, and reports.
Tap Move up to shift an item up in any list
that permits reordering.
Tap Move down to shift an item down in
any list that permits reordering.
Drag the Scroll arrows to cause the con-
tents of a displayed list or other scrollable
field to move up or down the handheld’s
screen in order to view additional items.
Tap <Back to return to the previously
viewed screen without saving any of the
changes you may have made.
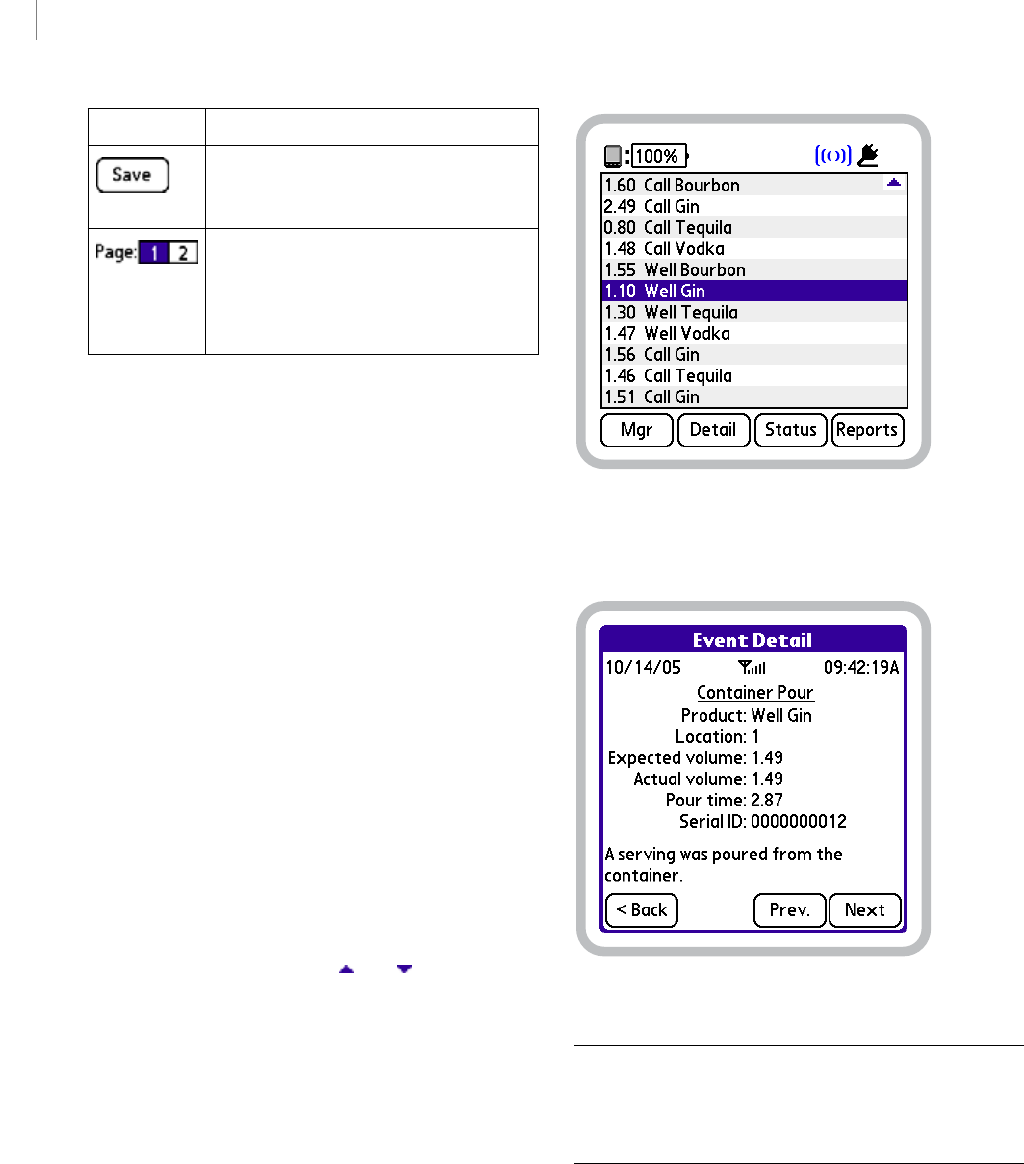
CHAPTER 3
28
Understanding the BarVision for Palm OS® Software
Draft for Reseller Review Only
Not for Distribution to End Users
Viewing event details
You might want to view detailed information or
communication-related data for one of the event
records that appears in the Activity screen’s event list.
The Event Detail screen enables you to do so. This
screen provides event-specific data such as the date and
time at which the event occurred. This screen can also
be useful for troubleshooting or diagnostic purposes.
The amount and type of information provided on the
Event Detail screen depends on the type of event
record selected in the list. For information, see “About
the event types” on page 29.
To view event details:
1In the Activity screen list, tap the event whose
details you want to view. The event record should
appear selected, as does 1.10 Well Gin in the
figure below. If the event record whose details you want
to view is not displayed among the currently visible
items, drag the Scroll Arrows ( and ) at the right-
hand side of the list.
Activity screen, 1.10 Well Gin event record selected
2Tap Detail to display the Event Detail screen.
Container Pour Event Detail screen
Note: The amount and type of information provided on
the Event Detail screen depends on the type of event record
you selected in the Activity screen’s list. For more infor-
mation, see “About the event types” on page 29.
3Optionally, do either of the following:
• To view details for the previous event record in the
activity list, tap Prev.
• To view details for the next event record in the
activity list, tap Next.
Tap Save to store any changes you have
made and return to the previously viewed
screen.
Tap the Page selectors to display addi-
tional pages of multipage screens. The
number that appears selected indicates
the page currently being viewed. In the
example, page 1 is selected.
Control Function
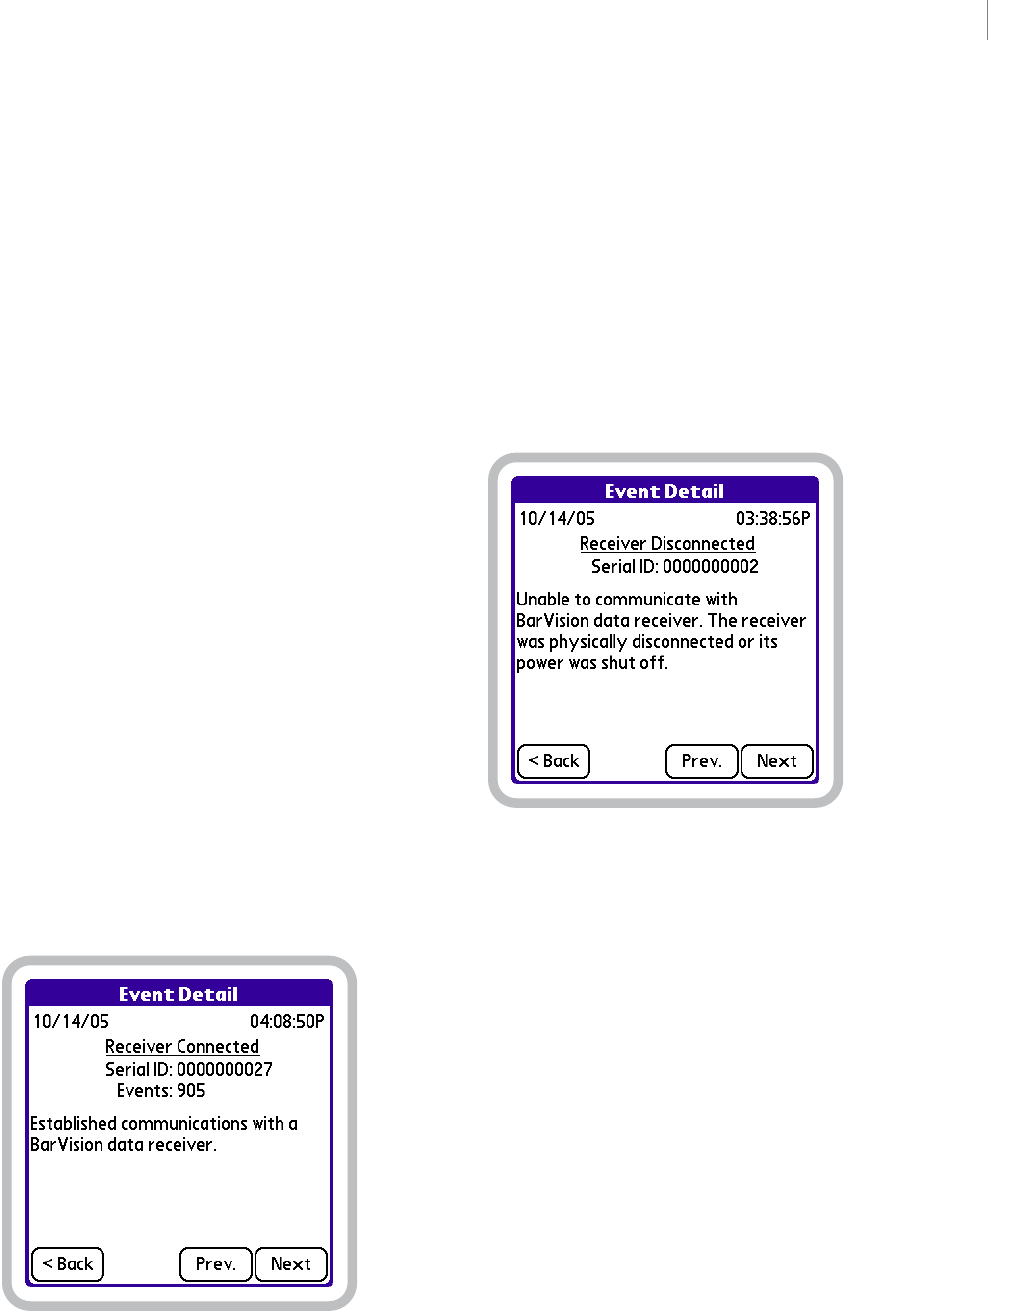
29
BARVISION FOR PALM OS®
User’s Guide
Draft for Reseller Review Only
Not for Distribution to End Users
4After you have finished viewing event record details,
tap <Back to return to the Activity screen.
About the event types
BarVision’s Activity screen can list up to thirty
thousand event records of twelve different types. Some
of these event types provide system information. They
indicate whether or not the system’s components are
communicating. Other event records provide
container-related information. These identify pour,
open, and empty container events, warn you when the
communications with a container’s wireless pour spout
are interrupted, and notify you when a container’s
contents level is manually adjusted. The following
sections describe each of the event record types in
detail.
Receiver connected The system records a
Connected event when communications between
the data receiver and the BarVision for Palm OS®
software are established. This occurs when you connect
the handheld’s serial cable to an operating data receiver,
power up an already connected data receiver, or attach
the handheld to a serial cable connected to an
operating data receiver. The Event Detail screen for
this type of event record provides the following infor-
mation: the date and time communications were estab-
lished, the identification number of the connected data
receiver, and the number of events the data receiver has
collected since it was last powered on.
Receiver Connected Event Detail screen
Receiver disconnected The system records a
Disconnected event when communications
between the data receiver and the BarVision for Palm
OS® software are disrupted. This occurs when you
disconnect the handheld’s serial cable from an
operating data receiver, power down an already
connected data receiver, or detach the handheld from a
serial cable connected to an operating data receiver.
The Event Detail screen for this type of event record
provides the following information: the date and time
communications were disrupted and the identification
number of the data receiver that was disconnected.
Receiver Disconnected Event Detail screen
Depending upon the reason and the amount of time
for which the data receiver is disconnected, there could
be a possibility of data loss. If the data receiver is not
operating and more than sixteen events occur for any
single container, the transmitter tag’s storage limit will
be surpassed and data will be lost. If the data receiver is
still operational but disconnected and more than 6,144
systemwide events occur before communications are
reestablished with the BarVision software, the data
receiver’s storage limit will be exceeded and data will be
lost.
Time marker Time markers provide visual segmen-
tation of the activity list, dividing events into chunks
separated on the quarter-hour, half-hour, or hour. You
can adjust the frequency with which time marker event
records appear by modifying the value of the Add time
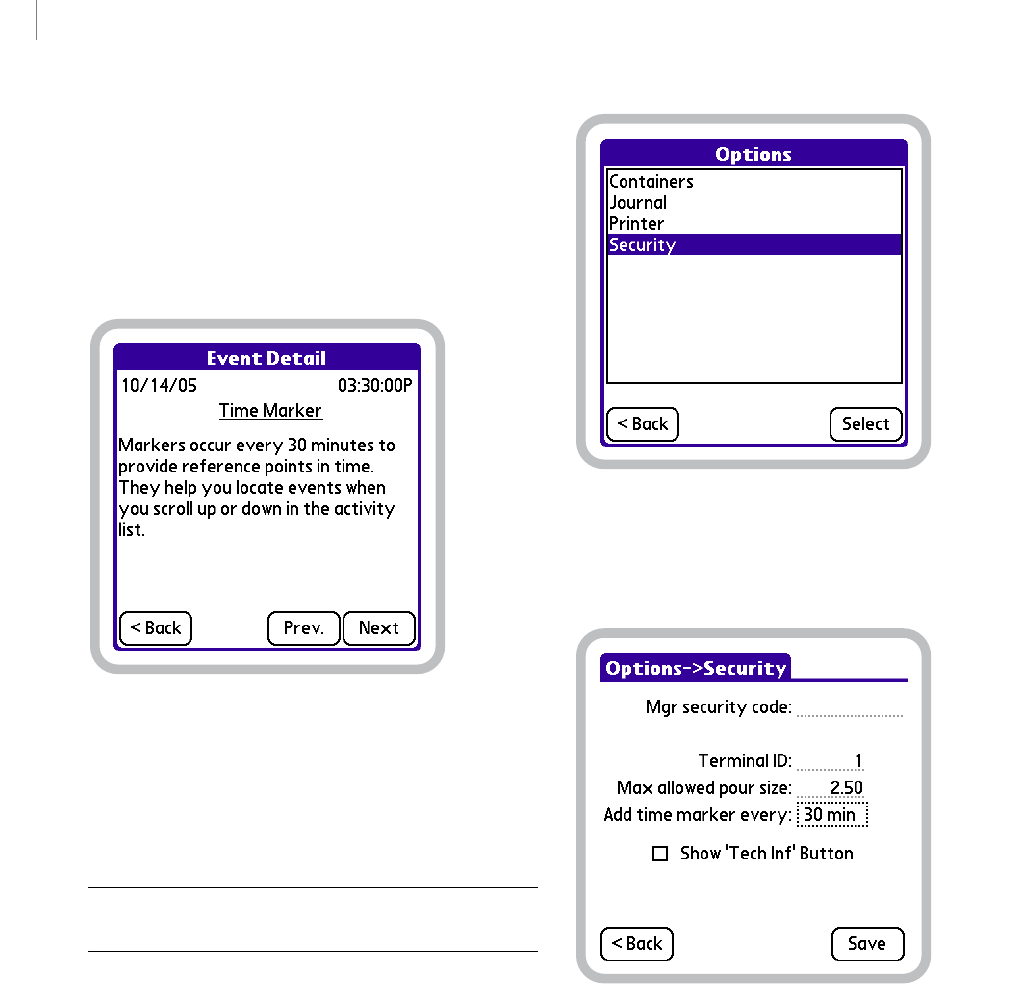
CHAPTER 3
30
Understanding the BarVision for Palm OS® Software
Draft for Reseller Review Only
Not for Distribution to End Users
marker every field. This value can be set from the
Security Options screen. The default system setting for
this option is 30 min. Available settings are Never,
15 min, 30 min, and 60 min. The Event Detail
screen for this type of event record provides the
following information: the date and time the time
marker was recorded.
Time Marker Event Detail screen
You may want to change the value of the Add time
marker every field to control the frequency with which
time marker event records appear. Or, you may want to
disable the time marker feature altogether.
Note: Performing the following procedure typically
requires the manager security code.
To set the time marker interval:
1Choose Mgr > Setup > Options to display the
Options screen.
Options screen
2In the option list, tap Security, and then tap Select
to display the Security Options screen.
Security Options screen
3Tap th e Add time marker every field to display the
Select Time Marker Interval screen.
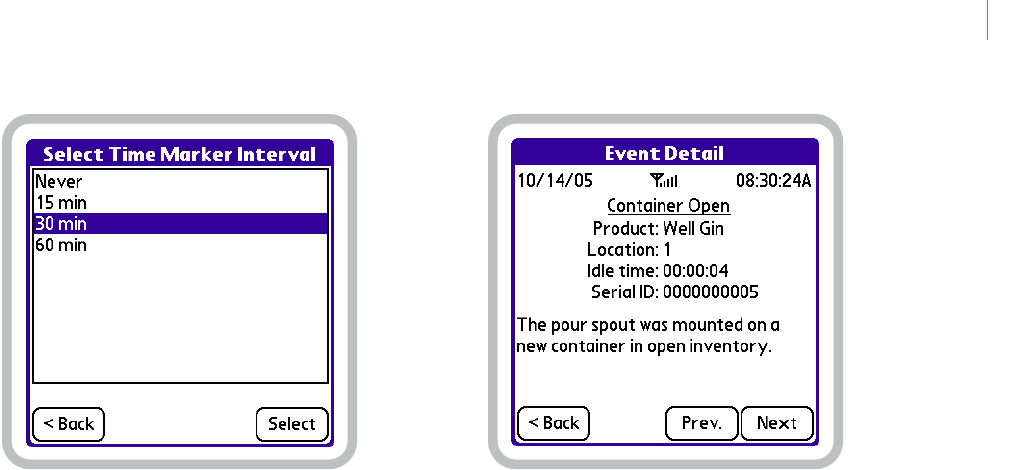
31
BARVISION FOR PALM OS®
User’s Guide
Draft for Reseller Review Only
Not for Distribution to End Users
Select Time Marker Interval screen, 30 min interval selected
4Tap the time marker interval you want to assign.
The value should appear selected, as does 30 min in
the figure above.
5Tap Select. The chosen value is assigned and now
appears in the Add time marker every field on the
Security Options screen.
6Tap Save to store your changes and return to the
Options screen.
Container open Each time a BarVision pour spout is
mounted on a container, the system records a container
open event, such as: Well Gin Open. The Event
Detail screen for this type of event record provides the
following information: the date and time the wireless
pour spout was attached to the container, the signal
strength of the transmission that relayed the event, the
container’s assigned name and location, the amount of
time for which the pour spout was unattached, and the
identification number of the wireless pour spout.
Container Open Event Detail screen
Container empty Each time a BarVision pour spout is
removed from a container, the system records a
container empty event, such as: Well Gin Empty.
The Event Detail screen for this type of event record
provides the following information: the date and time
the wireless pour spout was removed from the
container, the signal strength of the transmission that
relayed the event, the container’s assigned name and
location, the total volume of all the pours from the
container (additionally expressed as a percentage of the
container’s total volume), the amount of time for
which the wireless pour spout was attached to the
container, the number of pours dispensed from the
container, and the identification number of the wireless
pour spout.
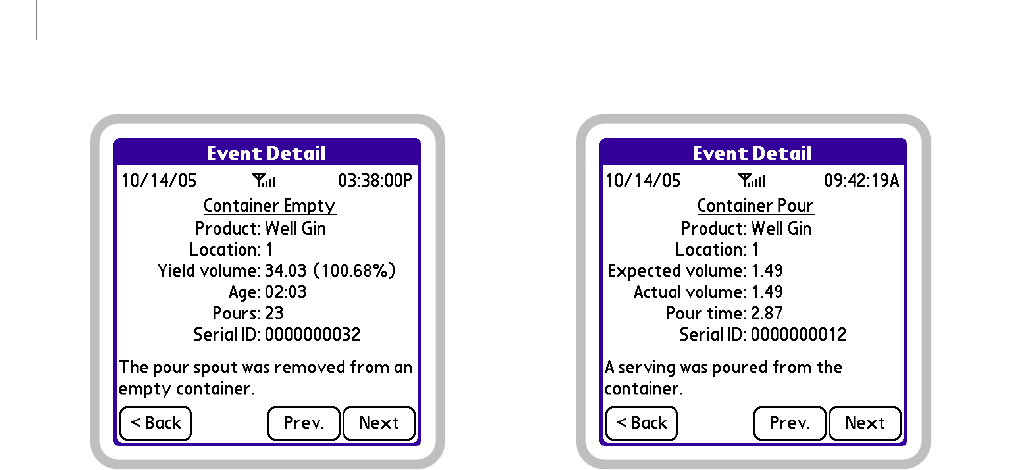
CHAPTER 3
32
Understanding the BarVision for Palm OS® Software
Draft for Reseller Review Only
Not for Distribution to End Users
Container Empty Event Detail screen
Container pour Each time a serving is poured from a
container equipped with a BarVision pour spout, the
system records a container pour event, such as: 1.49
Well Gin Tilt?. This event record indicates that
a pour of 1.49 volumetric units was made from the
Well Gin container. The word Tilt followed by a
question mark will only appear if a pour was made at a
lower than optimal (less than 135 degree) bottle tilt
angle (see, “Pouring” on page 105). Because of the
improper bottle tilt, the provided volume should be
considered a rough approximation. The Event Detail
screen for this type of event record provides the
following information: the date and time the pour
occurred, the signal strength of the transmission that
relayed the event, the container’s assigned name and
location, both the expected and actual volume of the
pour, the duration of the pour (expressed in seconds),
and the identification number of the container’s
wireless pour spout.
Container Pour Event Detail screen
Container missing Each time a container equipped
with a BarVision pour spout is moved outside the
system’s transmission range for a duration longer than
the value set for the Report missing after container
option, the system records a container missing event,
such as: Well Gin Missing. The Report missing
after interval can be set from page 1 of the Container
Options screen (see “Editing container options” on
page 63). The default system setting for this option is
15 minutes. The Event Detail screen for this type of
event record provides the following information: the
date and time the container was determined to be
missing, the container’s assigned name and location,
the time the data receiver last received an event trans-
mission from the container, the time the data receiver
last received a transmission of any sort from the
container, and the identification number of the
container’s wireless pour spout.
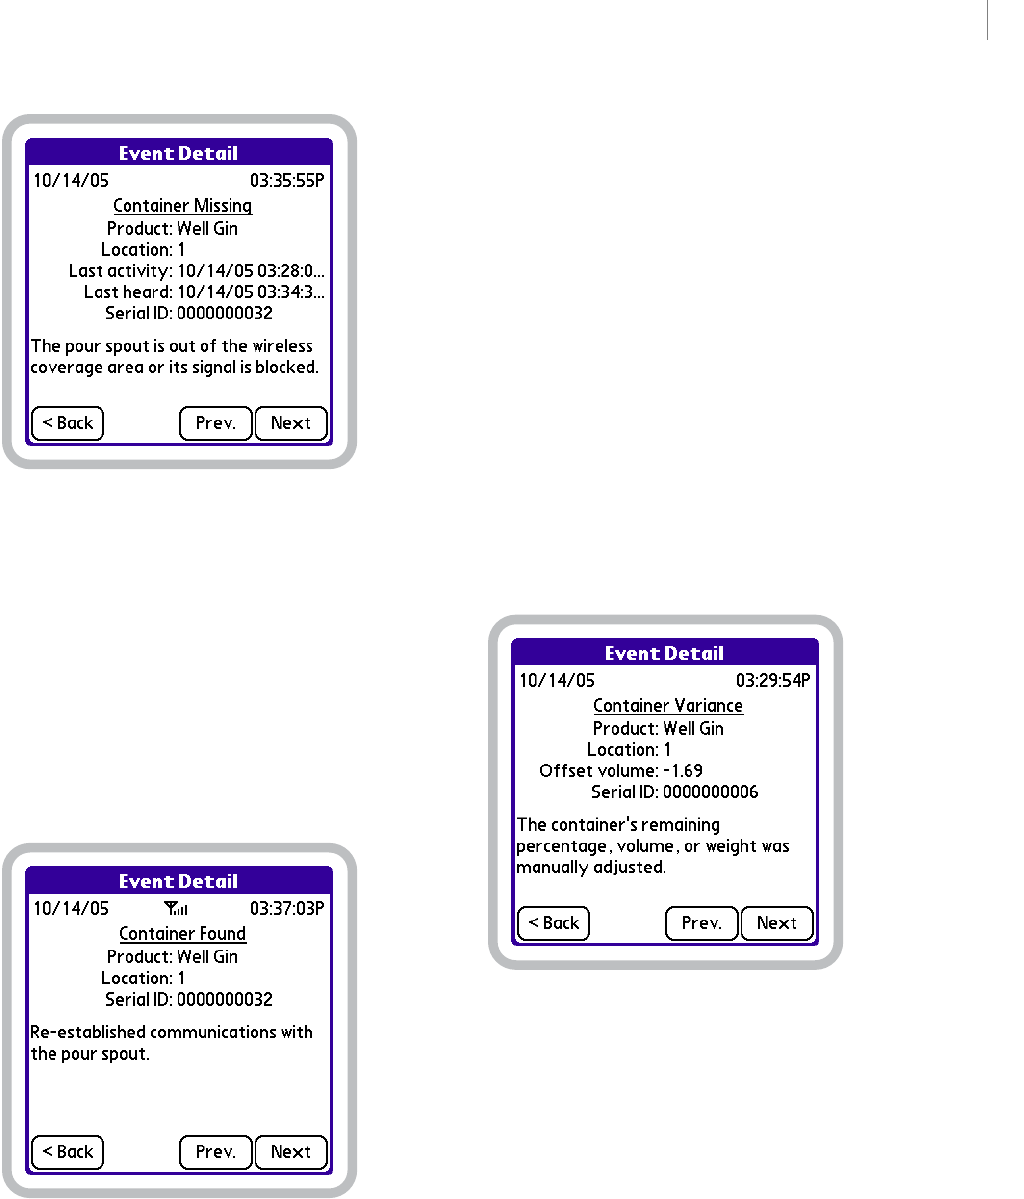
33
BARVISION FOR PALM OS®
User’s Guide
Draft for Reseller Review Only
Not for Distribution to End Users
Container Missing Event Detail screen
Container found When the data receiver receives a
transmission from a container currently classified as
missing, it generates a container found event, such as:
Well Gin Found. The Event Detail screen for this
type of event record provides the following infor-
mation: the date and time the container was found, the
signal strength of the transmission the data receiver
received, the container’s assigned name and location,
and the identification number of the container’s
wireless pour spout.
Container Found Event Detail screen
Container variance Any time you manually adjust a
container’s Remaining %, vol., or wt. values (see
“Editing container details” on page 61), the system
records a container variance event, such as: 1.30
Well Gin Var(-). You might want to directly
edit these container values to add a partially empty
bottle as a new container. For example, to add a half-
empty bottle of vodka as a new container, you might
weigh the bottle and then edit the wt. value to allow
BarVision to accurately track the remaining contents.
The Event Detail screen for this type of event record
provides the following information: the date and time
the container was edited, the container’s assigned name
and location, the volume of the variance (a negative
number indicates the container’s volume was manually
decreased; a positive number indicates it was
increased), and the identification number of the
container’s wireless pour spout.
Container Variance Event Detail screen
Spout removed Any time you remove a pour spout
and then press its recessed function button (see
“Cleaning pour spouts” on page 106), the system
records a spout removed event, such as: Well Gin
Rmv. By pressing the recessed function button, you
indicate to the BarVision software that you intend to
reattach the pour spout to the bottle you just removed
it from. This enables you to remove and reattach a
pour spout from an active bottle without resetting any
values for the container (such as the container’s current
volume and weight). You might do this, for example,
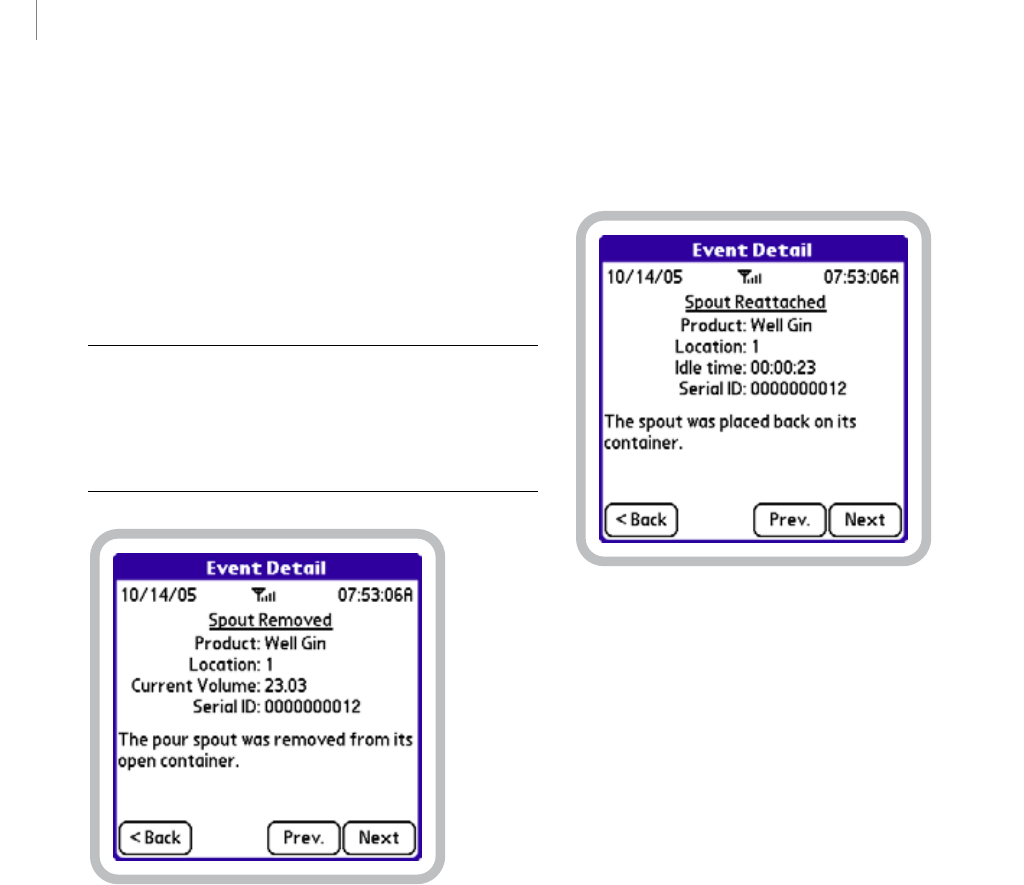
CHAPTER 3
34
Understanding the BarVision for Palm OS® Software
Draft for Reseller Review Only
Not for Distribution to End Users
to clean the pour spout. Pressing the function button
allows BarVision to accurately track the container’s
remaining contents. The Event Detail screen for this
type of event record provides the following infor-
mation: the date and time the pour spout was removed,
the container’s assigned product name and location, the
container’s current volume, and the identification
number of the container’s wireless pour spout.
Note: When the spout is first removed from the bottle, the
system assumes the container is empty and a container
empty event is written to the activity list. After you press
the spout’s recessed function button, the container empty
event is replaced by a spout removed event.
Spout Removed Event Detail screen
Spout reattached When you reattach a pour spout,
after removing it and pressing its recessed function
button (see “Spout removed” on page 33), the system
records a spout reattached event, such as: Well Gin
Reattch. The system will resume monitoring the
container from the point at which the pour spout was
removed. That is, the system will use as a starting point
all of the container values (such as volume, weight,
number of pours, and so forth) that were applicable
when the spout was detached. The Event Detail screen
for this type of event record provides the following
information: the date and time the pour spout was
reattached, the container’s assigned product name and
location, the amount of time the pour spout was off
the container, and the identification number of the
container’s wireless pour spout.
Spout Reattached Event Detail screen
Events lost If a total of more than sixteen pour, open,
or empty container events occur while a container is
missing, the transmitter tag’s sixteen event data storage
limit will be surpassed and data will be lost. This data
loss is indicated by an events lost record in the activity
list, such as: (3) Well Gin EvtLost. The
numeral indicates the number of lost events. The Event
Detail screen for this type of event record provides the
following information: the date and time the system
determined that events were lost, the container’s
assigned name and location, the number of lost events,
and the identification number of the container’s
wireless pour spout.
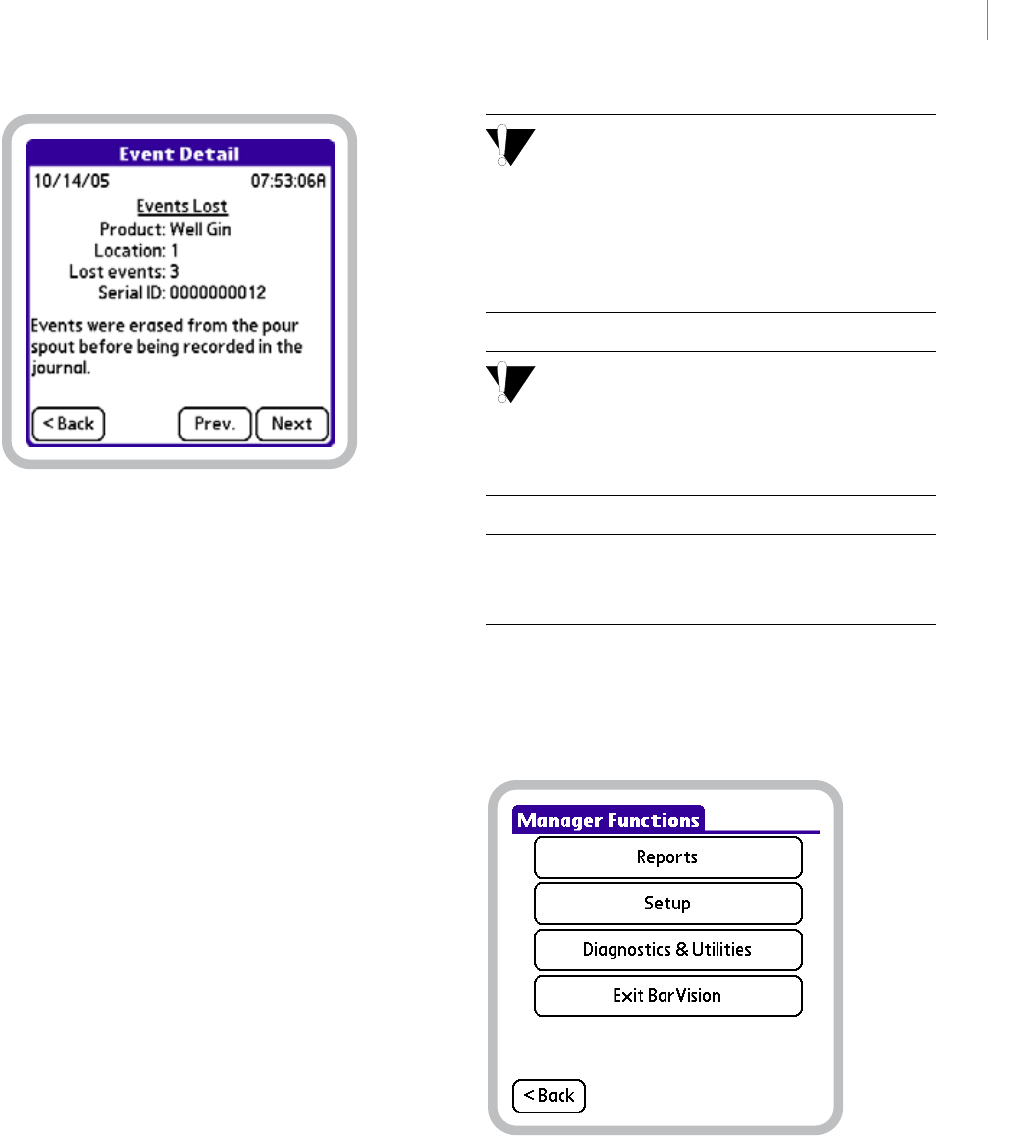
35
BARVISION FOR PALM OS®
User’s Guide
Draft for Reseller Review Only
Not for Distribution to End Users
Events Lost Event Detail screen
Exiting BarVision for Palm
OS®
It may be necessary to exit the BarVision for Palm OS®
program. For example, you might need to install an
updated version of the BarVision software or perform a
HotSync® operation.
Temporarily exiting the BarVision for Palm OS®
software will not disrupt the system’s data collection
activities. All BarVision wireless pour spouts will
continue to track pours and broadcast information to
the active antennas. The antennas, in turn, will
continue to transmit information to the data receiver.
And, finally, the data receiver will continue to gather
and store the data transmissions passed on by the
antennas. After you restart the BarVision for Palm OS®
software and reestablish communications with the data
receiver, all of the stored transmissions will be
downloaded from the data receiver to the handheld
and appear as event records on the Activity screen.
Depending upon the amount of time for which the
BarVision for Palm OS® software and the data
receiver do not communicate, there could be a possibility of
data loss. If more than 6,144 systemwide events occur
before the software is restarted and communications with
the data receiver are restored, the data receiver’s storage
limit will be exceeded and data will be lost.
Nuvo Technologies, Inc. recommends that you not
exit the BarVision for Palm OS® program except to
install an updated version of the software or perform a
HotSync® operation. This is to help eliminate the possi-
bility of accidental data loss.
Note: Performing the following procedure typically
requires the manager security code. See “About security
codes” on page 26.
To exit BarVision for Palm OS®:
1Choose Mgr to display the Manager Functions
screen.
Manager Functions screen
2Tap Exit BarVision to quit the BarVision for Palm
OS® program and display the Applications View.
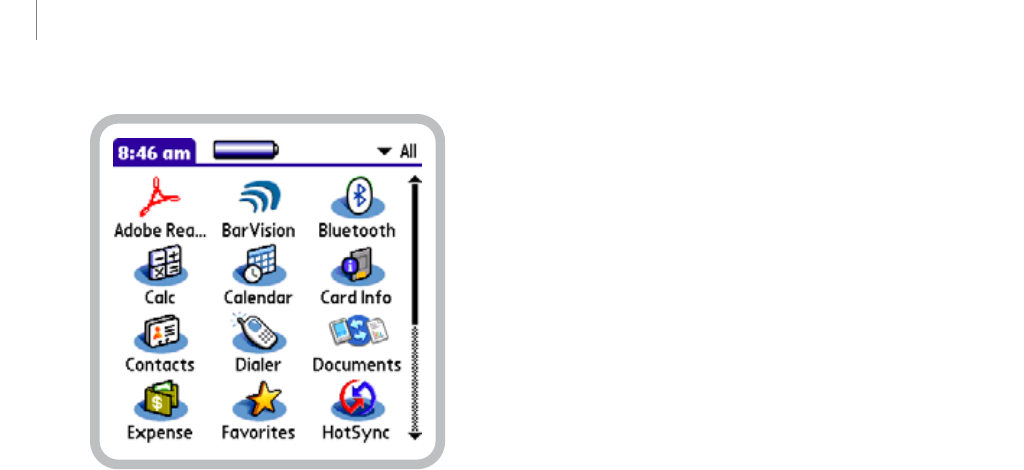
CHAPTER 3
36
Understanding the BarVision for Palm OS® Software
Draft for Reseller Review Only
Not for Distribution to End Users
Applications View

37
Draft for Reseller Review Only
Not for Distribution to End Users
Chapter 4: Working with Categories
he BarVision system uses categories to identify
and organize liquor price classifications. This
chapter explains how the system uses categories
and describes how to add, delete, rename, and reorder
them. It contains the following sections:
• “About categories” on page 37
• “Adding categories” on page 38
• “Editing categories” on page 39
• “Deleting categories” on page 40
About categories
The BarVision software lets you classify your liquor
inventory into price categories. This arrangement
mirrors the way you probably already organize your
liquor for pricing purposes. As an example, if your
establishment is typical, you charge different amounts
for identically sized servings of vodka, depending on
the brand served. However, to simplify your pricing
structure, you probably do not charge a different price
for every single brand of vodka served. Rather, you
organize your inventory under three or four categories
and price servings based on that categorization.
For example, a typical bar might organize their
inventory under the designations well, call, and
premium and charge $3, $4, and $5, respectively, for
an identically sized serving from each of those
groupings. BarVision refers to these liquor price classi-
fications as categories.
Regardless of the particular names your establishment
uses to identify liquor price levels, you will want to re-
create your establishment’s pricing structure in the
BarVision software using categories. Ideally, you will
want to define a category for each liquor price classifi-
cation that your establishment uses. For example, if
your establishment charges different amounts for
superpremium liquors than for premium liquors, you
can add a pricing category to reflect that difference.
Then, you simply classify each liquor container under
the appropriate pricing category during the container
addition process (see “Adding containers” on page 51).
Properly categorizing your inventory helps you to
reconcile BarVision’s reported pour totals to your
point-of-sale (POS) or cash register reports. For
example, you could generate a BarVision report that
provides the total number of pours for each category.
Comparing these totals against your point-of-sale or
cash register report figures will help you verify that
each pour resulted in an equivalent POS or register
transaction. If you find discrepancies, you can generate
more detailed reports to isolate the mismatch to a
particular container or time period. (For information,
see “Working with Reports” on page 79.)
The Categories screen (see example below) displays a
list of the currently defined liquor price categories. To
access the Categories screen, choose Mgr > Setup >
Categories. BarVision is initially configured with four
predefined categories: Well, Call, Premium, and
Top Shelf. You can modify the list in a number of
ways. You can add up to a total of one hundred
categories. You can delete categories so long as at least
one category remains. You can rename categories to
any name of up to fifteen characters in length. And you
can rearrange the order in which categories appear in
the category list. The remaining sections of this chapter
explain how to perform these modifications.
T
CHAPTER 4
38
Working with Categories
Draft for Reseller Review Only
Not for Distribution to End Users
Categories screen
If possible, make all category changes before
adding containers. This will ensure that the
categories you intend to use are available for selection
when you define new containers (see “Adding containers”
on page 51). This can eliminate the necessity of having to
individually recategorize containers later on.
Adding categories
BarVision ships preconfigured with four defined
categories: Well, Call, Premium, and Top
Shelf. But the software can store and track as many
as one hundred different categories.
You may want to add additional categories to align the
BarVision software with the particular liquor price
categories your establishment uses. You may also want
to add categories to track the usage of nonalcoholic
beverages.
For example, if your establishment makes a distinction
between premium and superpremium liquors, and
prices those items differently, you might want to add a
SuperPremium category. Or, if you decide to track
the consumption of juices and mixers by pouring those
items using BarVision wireless pour spouts, you might
want to add both Juices and Mixers categories.
Note: Performing the following procedure typically
requires the manager security code. See “About security
codes” on page 26.
To add a category:
1Choose Mgr > Setup > Categories to display the
Categories screen.
Categories screen
2Tap Add ( ) to display the New Category screen.
The Category name text box will contain the insertion
point (cursor).
New Category screen
3Enter a name for the new category (up to fifteen
characters in length) in the Category name text box.
4Tap Save to store your changes and return to the
Categories screen.
39
BARVISION FOR PALM OS®
User’s Guide
Draft for Reseller Review Only
Not for Distribution to End Users
Editing categories
You can modify each category in the category list. For
example, you can rename categories to match the
names your establishment uses. You can also reorder
the category list to suit your needs: from least to most
expensive, alphabetically, or however you choose.
Modifying the order of the categories also rearranges
the order in which the category information will
appear on your reports.
Renaming categories
You may want to rename a category to make it more
accurately reflect your establishment’s naming conven-
tions. For example, if your establishment refers to its
most expensively priced liquor as Top Grade rather
than Top Shelf, you can rename the Top Shelf
category to match your establishment’s terminology.
When you rename a category, every container assigned
to that category assumes the new, modified category
name. In addition, all of the journal event records
associated with those containers take on the new
category name. These recategorized containers and
events will be listed on all subsequent reports under the
modified category designation.
The software permits category names of up to fifteen
characters in length.
Note: Performing the following procedure typically
requires the manager security code. See “About security
codes” on page 26.
To rename a category:
1Choose Mgr > Setup > Categories to display the
Categories screen.
Categories screen, Premium category selected
2In the category list, tap the category you want to
rename. The category should appear selected, as does
Premium in the figure above. If the category you
want to select is not displayed among the currently
visible items, drag the Scroll Arrows ( and ) at the
right-hand side of the list.
3Tap Detail ( ) to display the Category Detail
screen.
Category Detail screen, Category name selected for editing
4Drag (or triple-tap) to select the current Category
name, and then enter a new one (up to fifteen
characters in length).
5Tap Save to store your changes and return to the
Categories screen.
CHAPTER 4
40
Working with Categories
Draft for Reseller Review Only
Not for Distribution to End Users
Reordering categories
You may want to reorder the categories. By doing so,
you can rearrange the order in which category infor-
mation appears on your reports. For example, you
might want to reorder the categories so that Premium
appears at the top of the category list. This reordering
would also place the Premium category data at the top
of any report containing category-related information.
Note: Performing the following procedure typically
requires the manager security code. See “About security
codes” on page 26.
To reorder categories:
1Choose Mgr > Setup > Categories to display the
Categories screen.
Categories screen, Premium category selected
2In the category list, tap the category you want to
reorder. The category should appear selected, as does
Premium in the figure above. If the category you
want to select is not displayed among the currently
visible items, drag the Scroll Arrows ( and ) at the
right-hand side of the list.
3Do one of the following:
• To shift the selected category up in the list, tap
Move Up ( ). Tap as many times as necessary to
properly position the category.
• To shift the selected category down in the list, tap
Move Down ( ). Tap as many times as necessary
to properly position the category.
4If necessary, repeat steps 2 and 3 to reorder any
additional categories.
Deleting categories
You may want to delete unused or unwanted
categories. This can simplify the container editing
procedure by limiting the number of available category
selections. Eliminating unused categories can also help
minimize the chance of accidentally miscategorizing
containers during system configuration or operation.
For BarVision to function properly, at least one
category must exist. For that reason, if only a single
category remains, the software will not allow you to
delete it.
If you choose to delete a category that containers are
assigned to, you will be prompted to reclassify those
containers under another category before the deletion
takes place. During this process, all of the journal event
records associated with those containers will also be
reclassified. These recategorized containers and events
will be listed on all subsequent reports under their
newly assigned category name.
Note: Performing the following procedure typically
requires the manager security code. See “About security
codes” on page 26.
To delete a category:
1Choose Mgr > Setup > Categories to display the
Categories screen.
41
BARVISION FOR PALM OS®
User’s Guide
Draft for Reseller Review Only
Not for Distribution to End Users
Categories screen, Premium category selected
2In the category list, tap the category you want to
delete. The category should appear selected, as does
Premium in the figure above. If the category you
want to select is not displayed among the currently
visible items, drag the Scroll Arrows ( and ) at the
right-hand side of the list.
3Tap Delete ().
4One of the following two Confirmation screens will
be displayed:
• If no containers have been assigned to the category
you chose to delete, a Confirmation screen similar
to the one below will be displayed. Proceed to step
5.
Category deletion Confirmation screen for an unused category
• If containers have been assigned to the category you
chose to delete, a Confirmation screen similar to
the one below will be displayed. Select a category to
assign to the affected containers by tapping the
Drop-Down List Arrow ( ) and selecting a
category from the list. Proceed to step 5.
Category deletion Confirmation screen for a used category
5Tap Yes to delete the category and return to the
Categories screen.

CHAPTER 4
42
Working with Categories
Draft for Reseller Review Only
Not for Distribution to End Users
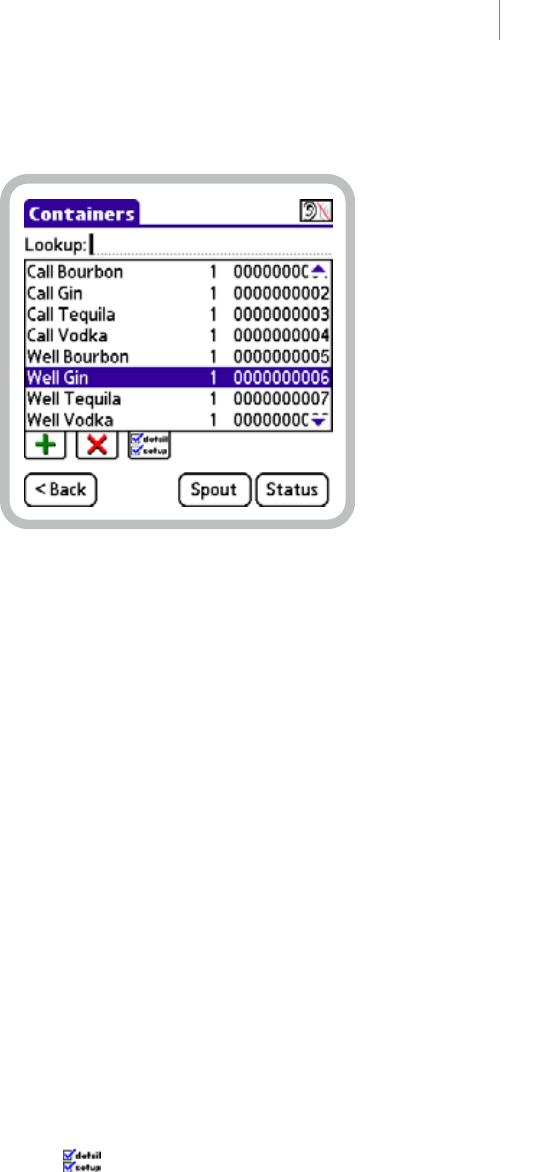
43
Draft for Reseller Review Only
Not for Distribution to End Users
Chapter 5: Working with Containers
n the BarVision system, the term container refers to
any liquor or beverage bottle that has been defined
in the BarVision software and equipped with a
BarVision wireless pour spout. Each properly
configured container is continually monitored by the
BarVision system, ensuring that every pour gets tracked
and that running inventory totals are constantly
maintained. This chapter explains how the system uses
containers and describes how to add, edit, delete, and
monitor them. It contains the following sections:
• “About containers” on page 43
• “Adding containers” on page 51
• “Editing containers” on page 54
• “Deleting containers” on page 64
• “Viewing pour spout hardware details” on page 65
• “Viewing container status information” on page 67
About containers
For BarVision to accurately track your establishment’s
liquor usage, you must define each open liquor bottle
as a container. To configure a BarVision container, you
enter characteristics of the bottle (including its brand,
size, location, category, and cost) and equip the bottle
with a BarVision wireless pour spout. (For details, see
“Adding containers” on page 51.)
The Containers screen (see example below) displays a
list of all currently defined containers. It also indicates
each container’s assigned location (see “Location” on
page 45) as well as the unique identification number of
the wireless pour spout associated with each container.
From this screen, containers can be added, deleted,
edited, and monitored.
Containers screen
Each BarVision container is matched with a single,
specific wireless pour spout. This association is
generally created during the container addition process.
For instance, in the example screen above, the Well
Gin container is associated with the pour spout whose
identification number is 0000000006. As a result, it
is important that when this pour spout is removed
from an empty bottle of Well Gin it be attached to
a replacement bottle of identical brand and size. (To
help eliminate the possibility for error, refer to the
procedure “Changing bottles” on page 105.)
Container details
The pages of the Container Detail screen list the values
that define an individual container, including its brand,
location, current volume, size, weight, shape, and pour
rates. You can access page 1 of the Container Detail
screen (see example below) by choosing Mgr > Setup >
Containers, selecting a container, and then tapping
Detail ().
I
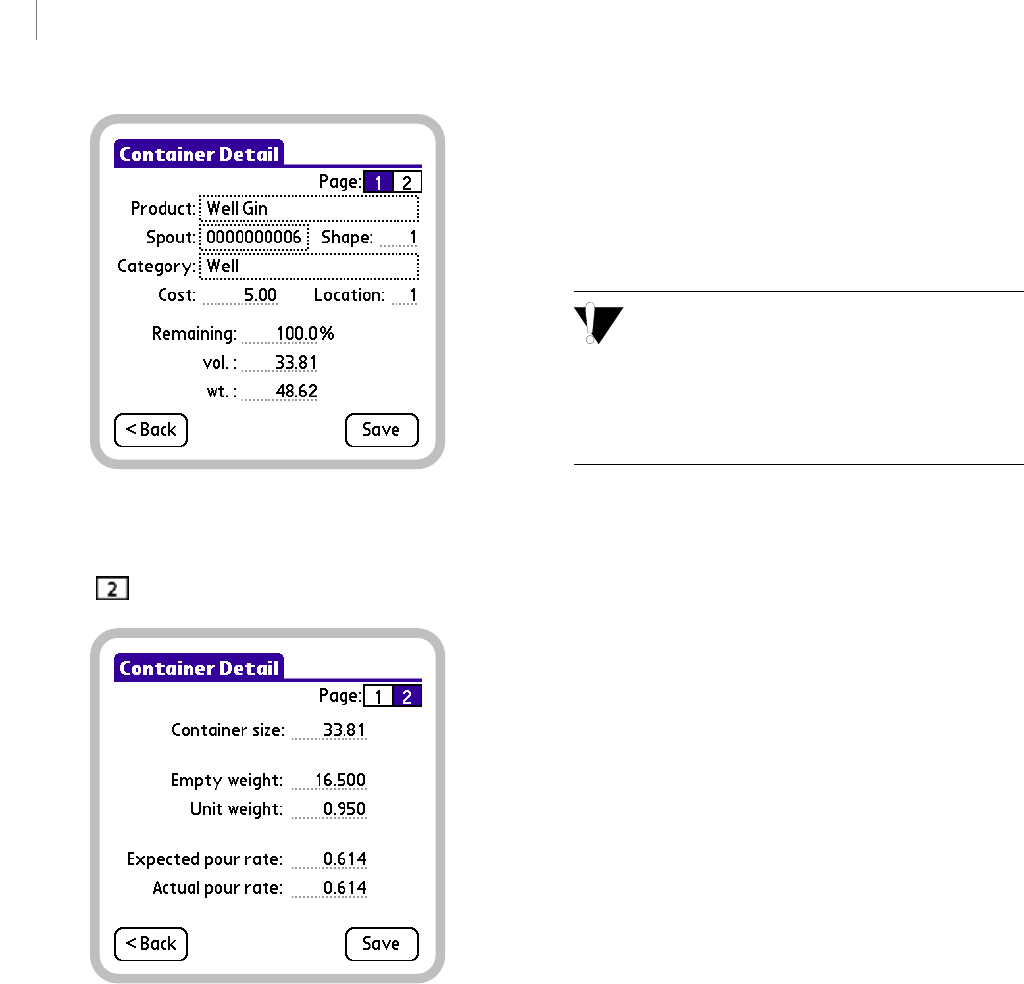
CHAPTER 5
44
Working with Containers
Draft for Reseller Review Only
Not for Distribution to End Users
Container Detail screen, page 1
To access page 2 of the Container Detail screen, tap 2
().
Container Detail screen, page 2
The following sections define the values provided on
the pages of the Container Detail screen. These settings
are container specific. Setting the item only adjusts the
value for the container currently being edited.
Product This field enables you to identify the brand of
liquor, wine, or other beverage inside the container.
You can select a brand name from a predefined list or
enter any name you prefer. However, you cannot give
the same Product name to two containers assigned to
the same location (see “Location” on page 45). For
example, you can only add one container named Well
Gin assigned to location 1. To add a second container
of Well Gin to location 1, modify the container’s
Product name to a unique value (such as Well Gin
B). For information, see “Assigning a new product
name to a container” on page 55.
If possible, select one of the provided product
names rather than entering a unique one. Many
of the most common products are associated with
predefined container values (such as Shape, Empty
weight, and Unit weight) that will automatically be set
for you.
Spout This field displays the identification number of
the pour spout (if any) associated with the container.
The transmitter tag portion of each BarVision pour
spout arrives factory programmed with a unique identi-
fication number. That number displays here after the
pour spout and container have been properly
associated. For more information, see “Adding
containers” on page 51.
Shape This field displays the ID number that corre-
sponds to the bottle shape graphic associated with the
container. This graphic is displayed on the Container
Status screen (see “Viewing container status infor-
mation” on page 67) and provides a visual depiction of
the container’s contents level. When you add a new
container, this field’s value is typically set to the prepro-
grammed ID number associated with the Product
name (see “Product” on page 44) you assign to the
container. However, if no specific preprogrammed
shape ID is associated with the Product name you
assign to the container, the Default shape value is used
(see “Default shape” on page 47). You can edit the
Shape value to associate a specific bottle shape with a
container. For information, see “Assigning a new bottle
shape to a container” on page 60.
Category This field displays the price category
assigned to the container. BarVision uses categories (see
Chapter 4, “Working with Categories”) to classify
containers for pricing purposes. After you assign a
category to a container (see “Assigning a new category
to a container” on page 59), that category name

45
BARVISION FOR PALM OS®
User’s Guide
Draft for Reseller Review Only
Not for Distribution to End Users
displays here. By default, new containers are assigned
to the category currently positioned at the top of the
category list.
Cost This field enables you to enter the wholesale price
paid for the bottle. Providing a Cost value allows
BarVision to automatically estimate the cost of each
pour based on its estimated portion size. This infor-
mation can then be used to calculate your pour cost
percentages—by category, location, brand, shift,
container, or even bottle. By default, this setting
contains no value for new containers. Permissible
values are from 0.00 to 99999.99 in the monetary
unit of your choice.
Location This field enables you to uniquely identify
the place where the container is stored. This setting can
enable a single data receiver to track an entire bar area.
Because a bar area typically includes several bartending
stations (or wells) and a back bar, you should define
each of those places as a separate Location so that the
inventory at each is independently tracked. The default
system value for this setting on all new containers is 1.
Permissible values are from 1 to 99.
Remaining % This field indicates the estimated
percentage of liquid remaining in the container.
BarVision calculates and updates this value after each
pour based on the Container size (see “Container size”
on page 45) and the estimated actual volume of the
pour. It is possible to edit the Remaining % value
directly. You might want to do this to track a partially
empty bottle. For example, to add a half-empty bottle
of vodka as a new container, you might edit the
Remaining % to a value of 50 to enable BarVision to
accurately track the contents. Manually editing this
field will cause the system to record a container
variance event in the activity list (see “Container
variance” on page 33). The default system value for this
setting on all new containers is 100.0. Permissible
values are from 0.0 to 99999.0 percent.
vol. This field indicates the estimated volume of liquid
remaining in the container. BarVision estimates and
updates this value after each pour based on the
Container size (see “Container size” on page 45) and
the estimated ctual size of the pour. It is possible to edit
the vol. value directly. You might want to do this to
track a partially empty bottle. For example, to add a
half-empty bottle of vodka as a new container, you
might edit the vol. to a value of 16.90 to enable
BarVision to accurately track the contents. Manually
editing this field will cause the system to record a
container variance event in the activity list (see
“Container variance” on page 33). The default system
value for this setting on all new containers is the
Default container size option value (see “Default
container size” on page 47). Permissible values are from
0.00 to 9999.99.
wt. This field displays the current estimated weight of
the container. BarVision estimates and updates this
value after each pour based on the Empty weight (see
“Empty weight” on page 45), the Unit weight (see
“Unit weight” on page 46), and the estimated weight
of the pour. It is possible to edit a container’s wt. value
directly (so long as both the Empty weight and Unit
weight have been defined). You might want to do this
to track a partially empty bottle. For example, to add a
half-empty bottle of vodka as a new container, you
might weigh the bottle and then edit the wt. value to
enable BarVision to accurately track the contents.
Manually editing this field will cause the system to
record a container variance event in the activity list (see
“Container variance” on page 33). The default system
value for this setting on all new containers is 0.00.
Permissible values are from 0.00 to 9999.99.
Container size This field indicates the volume of
liquid that the container holds at full capacity. When
you add a new container, this field’s value is automati-
cally set to the Default container size value (see
“Default container size” on page 47). If you add a new
container that is not of default size, you can manually
edit the Container size value. After editing, be sure to
reset the container’s Remaining % to a value of
100.0 or else a container variance event will be
recorded in the activity list (see “Container variance”
on page 33). Permissible values are from 0.10 to
9999.99.
Empty weight This field displays the weight of the
container when it holds no liquid. The most common
Product names are already associated with an Empty
weight value. If you select one of these Product names

CHAPTER 5
46
Working with Containers
Draft for Reseller Review Only
Not for Distribution to End Users
from the preset list when adding a new container, this
value will automatically be set. Otherwise, this field
will be empty. To edit, enter a value in the unit of
weight of your choice. Permissible values are from
0.000 to 9999.999.
Empty weight and Unit weight values must be
entered in the same unit of measure.
Unit weight This field indicates the weight of one
volumetric unit of the liquor, wine, or other beverage
in the container. For example, if you choose to enter
volumes in fluid ounces, the Unit weight should
represent the weight of one fluid ounce of the liquid
(typically, about 0.95 ounces for eighty-proof liquor).
If you prefer to enter volumes in metric units, set the
Unit weight equal to the weight of one milliliter of the
liquid (typically, about 0.95 grams for eighty-proof
liquor). The most common Product names are already
associated with a Unit weight value. If you select one
of these Product names from the preset list when
adding a new container, this value will automatically be
set. To edit, enter a value in the unit of weight of your
choice. Permissible values are from 0.000 to
9999.999.
Empty weight and Unit weight values must be
entered in the same unit of measure.
Expected pour rate The average pour rate of the pour
spout type being used. The Expected pour rate value is
used to calculate the amount of liquor a bartender
expected to dispense when pouring a drink (based on
the average pour rate of the type of pour spout that is
used, as opposed to the specific pour spout on the
container). This value is then displayed on the system’s
Activity screen to give feedback to bartenders about
how accurately and consistently they are timing their
pours. For more information, see “Understanding pour
rates” on page 7.
When you add a new container, this field’s value is
automatically set to the Default pour rate value (see
“Default pour rate” on page 47). To edit, enter a
volume-based flow rate value in the unit of volume of
your choice per second. Permissible values are from
0.100 to 999.999.
Actual pour rate The Actual pour rate accounts for
many of the factors that cause the pour rate of a
specific pour spout to vary from the average (or
expected). These factors include such variables as the
viscosity of the liquor, the temperature, and the
barometric pressure. BarVision uses this value to
calculate how much liquor was actually poured from a
specific pour spout during a particular pour for
purposes of tracking inventory usage. For more infor-
mation, see “Understanding pour rates” on page 7.
When you add a new container, this field’s value is
automatically set to the Default pour rate value (see
“Default pour rate” on page 47). To edit, enter a
volume-based flow rate value in the unit of volume of
your choice per second. Permissible values are from
0.100 to 999.999.
Container options
When you add a new container to BarVision, several of
the container details (defined above) are initially set to
default values. You may want to adjust these defaults.
For example, you may need to standardize them to
your preferred unit of measure. You can do this from
the pages of the Container Options screen. To access
page 1 of the Container Options screen, choose Mgr >
Setup > Options > Containers > Select.
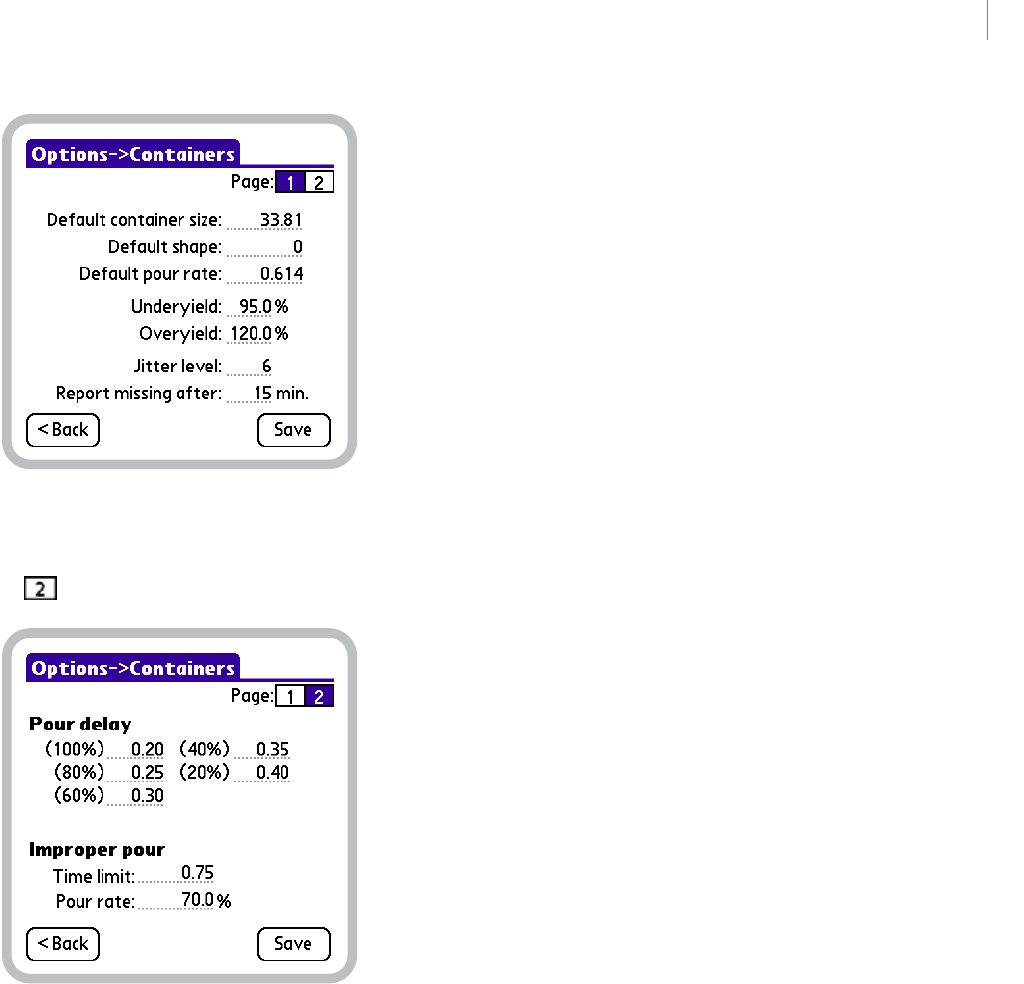
47
BARVISION FOR PALM OS®
User’s Guide
Draft for Reseller Review Only
Not for Distribution to End Users
Page 1 of the Container Options screen
To access page 2 of the Container Options screen, tap
2 ().
Page 2 of the Container Options screen
The following sections explain the function of each
setting provided on the pages of the Container Options
screen. Any changes you make to the three default
container options (Default container size, Default
Shape, and Default pour rate) will only affect the
containers you add to the system from that point
forward. Existing containers are not affected by
changes made to the default container options. By
contrast, all of the other settings on the Container
Options screen will affect not only containers added in
the future but also all current containers. In other
words, editing those items sets the value of the option
for the entire system.
Default container size This is the default value
automatically assigned to a new container’s Container
size field (see “Container size” on page 45). This
default value should be set to the volume of liquid your
containers typically hold at capacity. The preset system
value for this option is 33.81 (the volume, expressed
in U.S. fluid ounces, of a one liter bottle). To edit,
enter a value in the volumetric unit of your choice.
Permissible values are from 0.10 to 9999.99.
Default shape This is the default value automatically
assigned to a new container’s Shape field (see “Shape”
on page 44). This value should be set to the number on
the Bottle Shape Graphic Contact Sheet that corre-
sponds to the bottle shape graphic you want to use as a
default. Each number corresponds with one of the
unique bottle shape graphics used to portray bottles on
the Container Status screen (see “Viewing container
status information” on page 67).
The Default shape value is only used if the Product
name (see “Product” on page 44) you assign to the
container is not associated with a bottle shape graphic.
For example, you might assign a generic name like
Well Gin to a container instead of choosing one of
the defined names from the product list. In that case,
the Default shape will be used as the bottle shape
graphic for that container on the Container Status
screen. The default system value for this option is 0
(which displays no bottle image).
Default pour rate This is the default value automati-
cally assigned to a new container’s Expected pour rate
(see “Expected pour rate” on page 46) and Actual pour
rate fields (see “Actual pour rate” on page 46). These
values are then used to estimate both an expected and
an actual pour size each time a bartender pours a drink.
This value is set to the average dispense rate for
BarVision pour spouts. For more information, see
“Understanding pour rates” on page 7.
The default system value for this option is 0.614 (the
average flow rate, expressed in U.S. fluid ounces per
second, of a standard BarVision pour spout). To edit,

CHAPTER 5
48
Working with Containers
Draft for Reseller Review Only
Not for Distribution to End Users
enter a flow rate value in the unit of volume of your
choice per second. Permissible values are from 0.100
to 999.999.
Underyield This option defines the percentage at
which a bottle’s yield is considered unacceptably low
and the container is flagged as irregular. For example, if
the Underyield value is set to 95.0 percent and the
accumulated volume of the pours from a 33.81 fluid
ounce bottle is less than 32.11 fluid ounces, the yield is
considered exceptionally low and the container desig-
nated as irregular (see “Irregular Empty Containers” on
page 82). A low container yield might indicate that the
pour spout was removed before the container was
emptied, that the container was not full when the pour
spout was attached, that the container’s Actual pour
rate was not accurately set, or that the container was
tampered with. The default system value for this
option is 95.0. Permissible values are from 0.0 to
500.0 percent.
Overyield This option defines the percentage at which
a bottle’s yield is considered unusually high and the
container is flagged as irregular. For example, if the
Overyield value is set to 120.0 percent and the
accumulated volume of the pours from a 33.81 fluid
ounce bottle is more than 40.56 fluid ounces, the yield
is considered exceptionally high and the container
designated as irregular (see “Irregular Empty
Containers” on page 82). An exceptionally high
container yield might indicate that the container was
not returned to an upright position immediately after
it was emptied on the last pour, that several pours from
the container were made at an improper bottle tilt
angle, that the container’s Estimated pour rate was not
accurately set, or that the container was tampered with.
The default system value for this option is 120.0.
Permissible values are from 0.0 to 500.0 percent.
Jitter level This option specifies the value BarVision
uses to determine whether to classify a bottle tilt event
as a pour or an accidental jitter. If a container is tilted
past ninety degrees but does not remain so for a
duration longer than the amount of time represented
by the Jitter level, the system designates the motion
inadvertent and no container pour event (see
“Container pour” on page 32) is recorded. The Jitter
level is expressed in sixteenths of a second. As a result,
if the Jitter level is set to 8 and the container is tipped
for less than one-half of a second (8e16), the system
assumes the container’s motion accidental and no pour
is recorded. The default system value for this option is
6. Permissible values are from 0 to 16 sixteenths of a
second.
Report missing after This option defines the amount
of time the system can go without receiving a signal
from a container’s wireless pour spout before the
system classifies the container as missing. At that point,
a container missing event record appears in the activity
list (see “Container missing” on page 32). For example,
if Report missing after is set to 5 and a container is
taken outside of the system’s wireless range for six
minutes, the system will record a container missing
event in the activity list. When the system next hears
from that missing container, the system records a
container found event in the activity list (see
“Container found” on page 33). The default system
value for this option is 15. Permissible values are from
1 to 200 minutes.
Pour delay This option specifies the values used to
compensate for the delay between tipping a container
and dispensing liquid from the pour spout. This allows
BarVision to more accurately estimate the amount of
liquor dispensed during a pour. This delay results from
the time it takes for the fluid to travel down the neck
of the bottle and out the spout. The delay varies
depending upon the volume of liquid in the container:
the fuller the bottle, the shorter the delay and vice
versa. For that reason, the BarVision system defines
separate delays for several different percentages of
container volume: 100, 80, 60, 40, and 20. If the
bottle is between 100 and 81 percent full, the 100
Pour delay value is in effect. If the bottle is between 80
and 61 percent full, the 80 Pour delay value is used.
And so on. The default system values for this option
are 0.20, 0.25, 0.30, 0.35, and 0.40 seconds
(from 100 to 20 percent, respectively). These values
have been derived and optimized through exhaustive
testing, and Nuvo Technologies, Inc. strongly recom-
mends that they not be altered. Permissible values are
from 0.00 to 64.00 seconds.
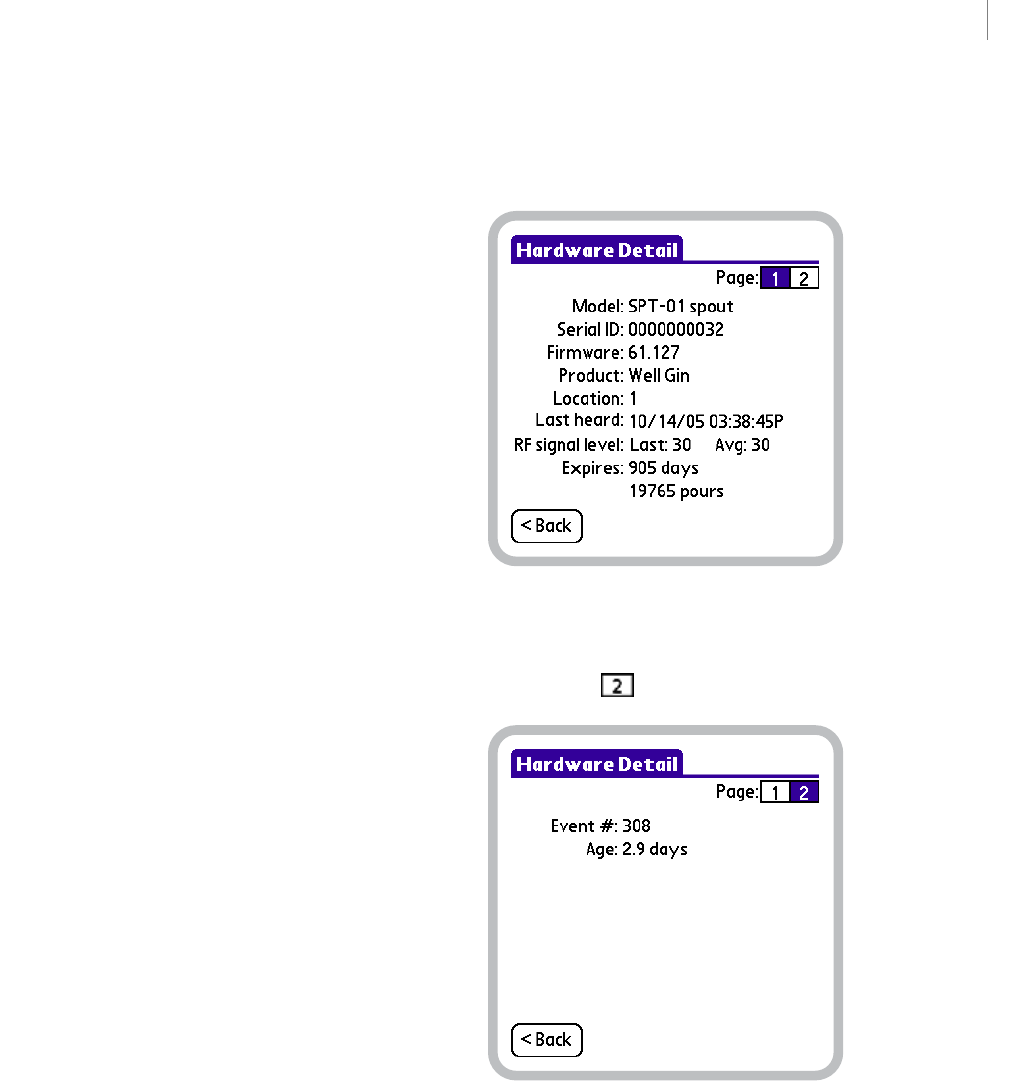
49
BARVISION FOR PALM OS®
User’s Guide
Draft for Reseller Review Only
Not for Distribution to End Users
Improper pour time limit This option defines the
maximum amount of time a container may spend at a
greater than 90 but less than 135 degree bottle tilt
angle during a pour. If this limit is surpassed, the pour
is classified as improper. This value functions to ensure
that bartenders tilt bottles quickly when they pour (and
also that they return bottles quickly to an upright
position). For example, assume that the Improper pour
time limit is set to 0.50 seconds. If it takes the
bartender 0.26 seconds to invert the bottle from 90 to
greater than 135 degrees, and 0.25 seconds to return
the bottle from 135 to less than 90 degrees, the system
classifies the pour as improper. The system identifies
such pours as improper because quickly but smoothly
inverting the bottle ensures an efficient pour and
maximizes the accuracy of the pour sizes that BarVision
reports. The default system value for this option is
0.75. Permissible values are from 0.00 to 64.00
seconds.
Improper pour pour rate This option defines the pour
rate percentage used to estimate the volume of liquor
dispensed when, during a pour, the bottle is tilted at a
greater than 90 but less than 135 degree angle. Until
the bottle is fully inverted, the pour spout will not
achieve its maximum flow. The Improper pour pour
rate compensates for this decreased flow. It scales down
the value of the container’s pour rates. This enables
BarVision to more accurately estimate the amount of
liquid dispensed during those times when the container
is tilted at a less than optimal angle. The default system
value for this option is 70.0. Permissible values are
from 0.0 to 100.0 percent.
Pour spout hardware details
The pages of the pour spout Hardware Detail screen
provide detailed hardware and communication infor-
mation for the wireless pour spout. This information
can be useful for troubleshooting and diagnostic
purposes. For example, you might want to view these
screens to gauge the signal strength of the pour spout’s
most recent communication with the data receiver, to
ensure that the spout has not passed its expiration, or
simply to view the date and time the data receiver last
received a transmission from the pour spout. You can
access page 1 of the pour spout Hardware Detail screen
by choosing Mgr > Setup > Containers, selecting a
container, and then tapping Spout.
Page 1 of the pour spout Hardware Detail screen
To access page 2 of the pour spout Hardware Detail
screen, tap 2 ().
Page 2 of the pour spout Hardware Detail screen
Model Displays the model number of the transmitter
tag. This information is provided for identification and
troubleshooting purposes.
Serial ID Displays the factory programmed serial
identification number of the BarVision transmitter tag.
(For more information, see “Spout” on page 44.)
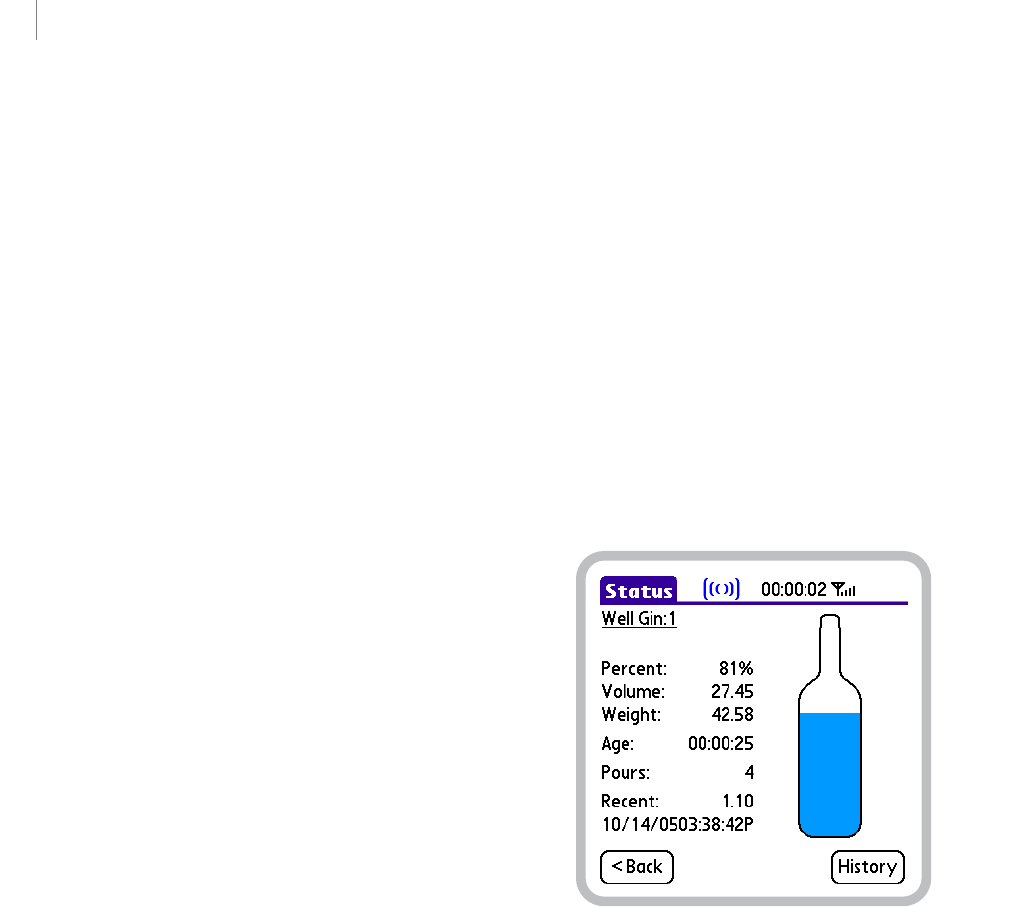
CHAPTER 5
50
Working with Containers
Draft for Reseller Review Only
Not for Distribution to End Users
Firmware Displays the version number of the
programming instructions stored in the transmitter
tag’s read-only memory. This information is provided
for troubleshooting and customer support purposes.
Product Identifies the liquor, wine, or other beverage
assigned to the container that the pour spout has been
associated with. (For more information, see “Product”
on page 44.)
Location Displays the numeric value used to identify
the place where the container is stored. (For more
information, see “Location” on page 45.)
Last heard Displays the date and time of the most
recent communication the data receiver received from
the transmitter tag. This information is provided for
troubleshooting purposes.
RF signal level Identifies the strength of the signal
being received by the data receiver from the transmitter
tag. Both the most recent and the average signal
strength are displayed. This information is provided for
troubleshooting purposes.
Expires Indicates the number of days and pours
remaining until the transmitter tag reaches its
expiration. BarVision transmitter tags expire after a
specified number of days or pours, whichever occurs
first.
Event # Indicates the last event number the system has
registered from the transmitter tag. A transmitter tag
increments this value each time it senses a pour, as well
as each time it is attached to or removed from a
container. The BarVision system uses this value for
error-checking purposes and to ensure against data loss.
Age Indicates the amount of time (in hours or days)
the BarVision wireless pour spout has been attached to
the current container. Each time the spout is removed
from an empty bottle and attached to a new one this
field’s value is reset to 0.
Container status information
The Container Status screen can assist you in the
performance of a weight-based or visual inventory. It
can also be used to conduct a random spot check of the
bottles in your open stock. This screen provides a
summary of vital statistics about the container
(including its current volume, weight, number of
pours, and age) along with a graphic representation of
the bottle’s current fluid level. In addition, from this
screen you can generate a printable container history
report that details every event recorded for the
container.
You can access the Container Status screen in two
ways: from the Activity screen by selecting an appro-
priate event record in the activity list and then tapping
Status; or by choosing Mgr > Setup > Containers,
selecting the name of a container, and then tapping
Status. A manager security code is typically required in
both cases.
Container Status screen
Percent Indicates the estimated percentage of liquid
remaining in the container. (For more information, see
“Remaining %” on page 45.)
Volume Indicates the estimated volume of liquid
remaining in the container. (For more information, see
“vol.” on page 45.)
Weight Displays the current estimated weight of the
container—that is, the weight of the bottle plus any
remaining liquid. (For more information, see “wt.” on
page 45.)
51
BARVISION FOR PALM OS®
User’s Guide
Draft for Reseller Review Only
Not for Distribution to End Users
Age Indicates the amount of time (in hours or days)
the BarVision wireless pour spout has been attached to
the current bottle. Each time the spout is removed
from an empty bottle and attached to a new one this
field’s value is reset to 0.
Pours Displays the number of pours dispensed from
the container since the BarVision wireless pour spout
was attached. The system registers a pour each time the
container is tilted past ninety degrees for a duration
greater than the Jitter level. For example, if the Jitter
level is set to 8 and the container is tipped for more
than one half of a second (8e16), the system registers a
pour.
Recent Displays the size, date, and time of the most
recent pour dispensed from the container. If no pours
have been made from the bottle since it was added to
the system, this field will not be displayed.
Signal strength ( ) Depicts the signal strength of
the most recent transmission received from the
container’s attached wireless pour spout.
Bottle graphic Graphically depicts the current fluid
level of the container using blue shading. It provides a
convenient way to perform a visual inventory. The
image enables you to verify that the fluid level reported
by BarVision matches the actual level of liquid in the
bottle. If the pour spout for the container currently
being viewed is removed (to be cleaned, for example),
the fluid level indication (if any) will transition from
blue to red.
Adding containers
Typically, every open liquor bottle in your estab-
lishment should be defined as a container using the
BarVision software. You add a new container to the
BarVision system by defining some basic characteristics
of the bottle (for example, its brand, location, category,
and cost) and associating the bottle with a wireless
pour spout. After a container has been configured, the
system will record every event that occurs to that
container. Each time a serving is poured, each time the
pour spout is removed or reattached, and each time
wireless communication with the container is lost or
regained, an event record appears in the activity list (see
“About the event types” on page 29).
The container addition process is a one-time setup
procedure. You do not need to add a new container
each time a bottle is emptied and a replacement bottle
put into service. Under those circumstances, you
simply remove the wireless pour spout from the empty
bottle and attach it to a new one (see “Changing
bottles” on page 105). After the initial system setup,
you should only need to add a new container when you
decide to add a new brand of liquor, wine, or other
beverage to your product offering.
If possible, make all category changes (see “Editing
categories” on page 39) before adding containers.
This will ensure that the categories you intend to use are
available for selection when you define new containers.
This can eliminate the necessity of having to individually
recategorize containers later on.
For best results, make any container option edits
(see “Editing container options” on page 63)
before adding containers. Providing appropriate default
option values can eliminate the necessity of having to
individually edit containers later on.
Note: Performing the following procedure typically
requires the manager security code. See “About security
codes” on page 26.
To add a container:
1Choose Mgr > Setup > Containers to display the
Containers screen.
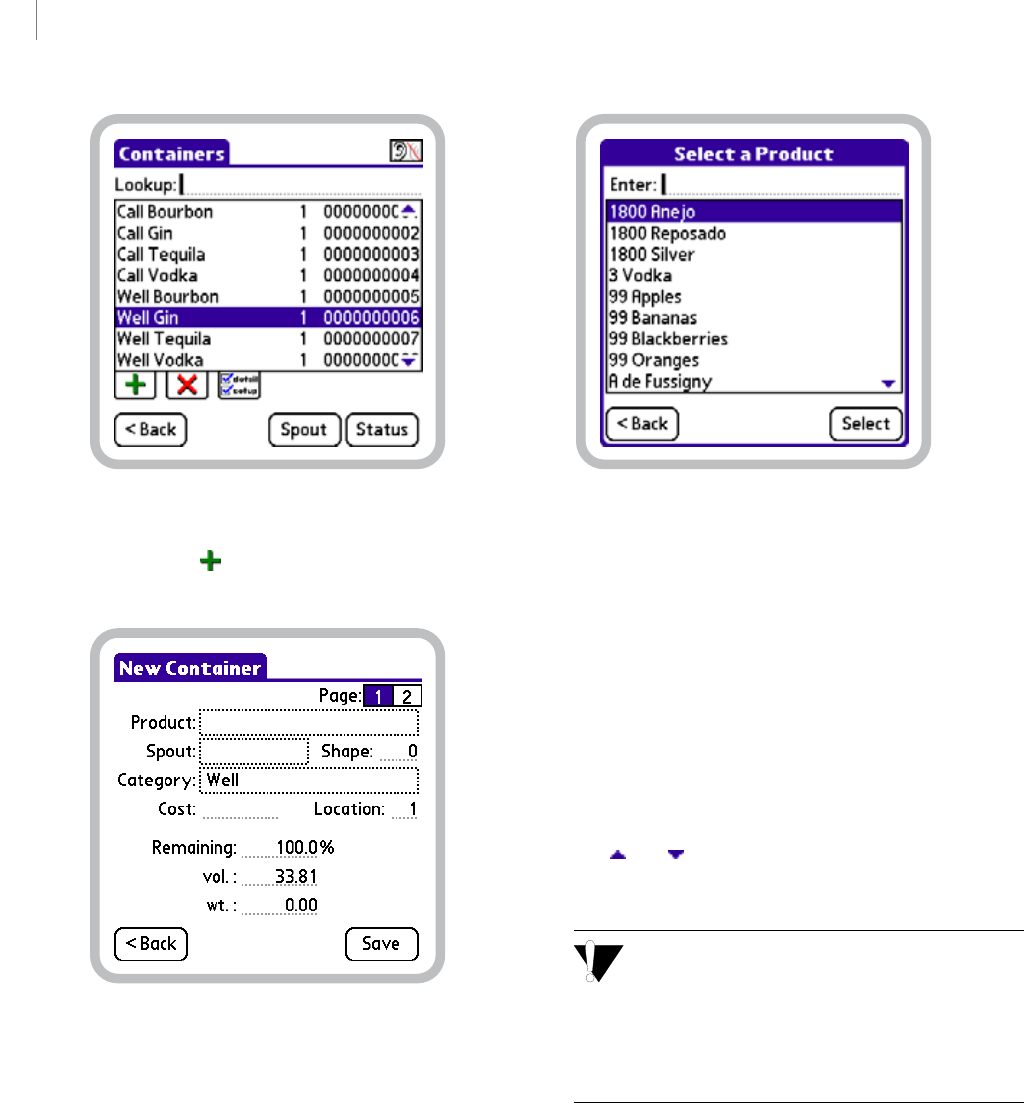
CHAPTER 5
52
Working with Containers
Draft for Reseller Review Only
Not for Distribution to End Users
Containers screen
2Tap Add ( ) to display page 1 of the New
Container screen.
Page 1 of the New Container screen
3Tap th e Product field to display the Select a
Product screen. The Enter text box will contain the
insertion point (cursor).
Select a Product screen
4Select or enter a product name to assign to the
container by doing one of the following:
• Begin entering the name of the product in the
Enter field until the appropriate item becomes
selected in the scroll list. Then, tap the selection so
that the complete product name displays in the
Enter field.
• Tap the name of the product in the scroll list. If the
product you want to select is not displayed among
the currently visible items, drag the Scroll Arrows
( and ) at the right-hand side of the list.
• Enter a product name in the Enter field.
If possible, select one of the provided product
names rather than entering a unique one. Many
of the most common products are associated with
predefined container values (such as Shape, Empty
weight, and Unit weight) that will automatically be set
for you.
5Tap Select. The chosen product name is assigned to
the container and now appears in the Product field on
page 1 of the New Container screen.
6Tap the Spout field to display the Select Pour Spout
screen.
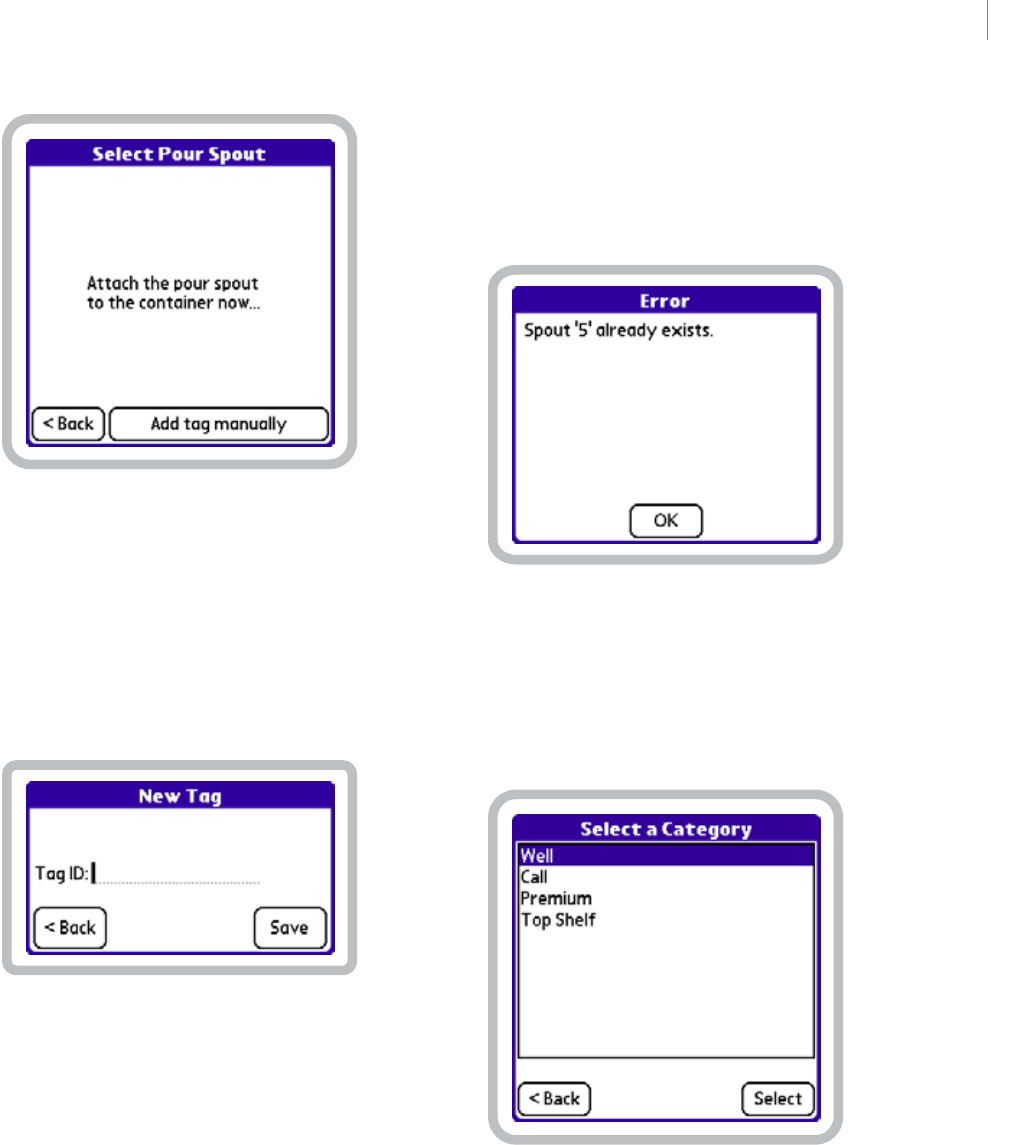
53
BARVISION FOR PALM OS®
User’s Guide
Draft for Reseller Review Only
Not for Distribution to End Users
Select Pour Spout screen
7Do one of the following:
• Attach the BarVision wireless pour spout you want
to associate with the container to the mouth of the
bottle.
•Tap Add tag manually to display the New Tag
screen.
New Tag screen
In the Ta g ID text box, enter the identification
number of the pour spout you want to associate
with the container.
8One of the following two things will occur:
• If the pour spout you attach to the container (or
whose identification number you enter) is not
already associated with another container, page 1 of
the New Container screen will be displayed. The
Spout field will contain the pour spout’s identifi-
cation number. Proceed to step 9.
• If the pour spout you attach to the container (or
whose identification number you enter) is already
associated with another container, a pour spout
selection Error screen similar to the one below will
be displayed.
Pour spout selection Error screen
Tap OK, remove the wireless pour spout from the
bottle (if applicable), and then return to step 7.
9Tap th e Category field to display the Select a
Category screen.
Select a Category screen
10 In the category list, tap the name of the category
you want to assign to the container. The category
should appear selected, as does Well in the figure
above. If the category you want to select is not
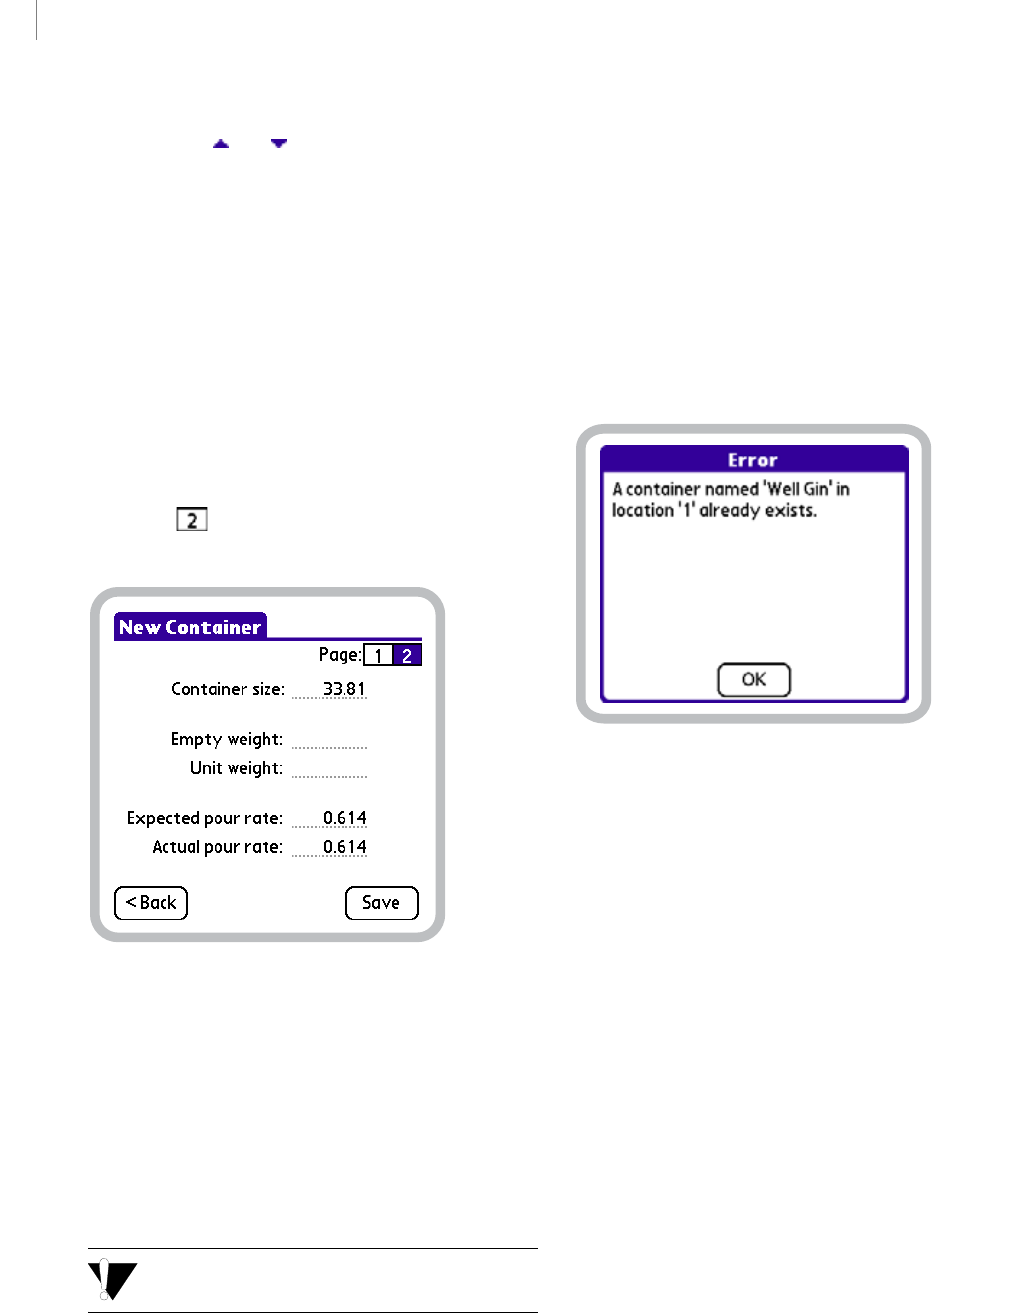
CHAPTER 5
54
Working with Containers
Draft for Reseller Review Only
Not for Distribution to End Users
displayed among the currently visible items, drag the
Scroll Arrows ( and ) at the right-hand side of the
list.
11 Tap Select. The chosen category is assigned to the
container and now appears in the Category field on
page 1 of the New Container screen.
12 Edit the remaining page 1 container details (Shape,
Cost, Location, Remaining %, vol., and wt.) as
desired. To edit these container details, drag (or
double-tap) to select the current value (if any), and
then enter a new one.
For information about the functions of these values, see
“Container details” on page 43.
13 Tap 2 ( ) to display page 2 of the New
Container screen.
Page 2 of the New Container screen
14 Edit the page 2 container details (Container size,
Empty weight, Unit weight, Expected pour rate, and
Actual pour rate) as desired. To edit these container
details, drag (or double-tap) to select the current value
(if any), and then enter a new one.
For information about the functions of these values, see
“Container details” on page 43.
Empty weight and Unit weight values must be
entered in the same unit of measure.
15 Tap Save to store your changes. One of the
following two things will occur:
• If the product name you selected is not currently
assigned to a container at the specified location, the
Containers screen will be displayed. The container
list will now include the newly added container.
• If the product name you selected is already assigned
to a container at the specified location, a container
addition Error screen similar to the one below will
be displayed.
Container addition Error screen
—Tap OK to return to the Container Detail
screen.
— Edit either the container’s Product name or
Location to a unique value. For example, to add
a second container named Well Gin to a
location where a Well Gin container already
exists, modify the container’s Product name to a
unique value (such as Well Gin B).
—Tap Save to store your changes.
Editing containers
Each of the details provided on the pages of the
Container Detail screen can be edited. For example,
you can rename a container. You can disassociate the
container from its currently assigned pour spout or
associate the container with a new one. You can assign
a container to a different category. You can modify its
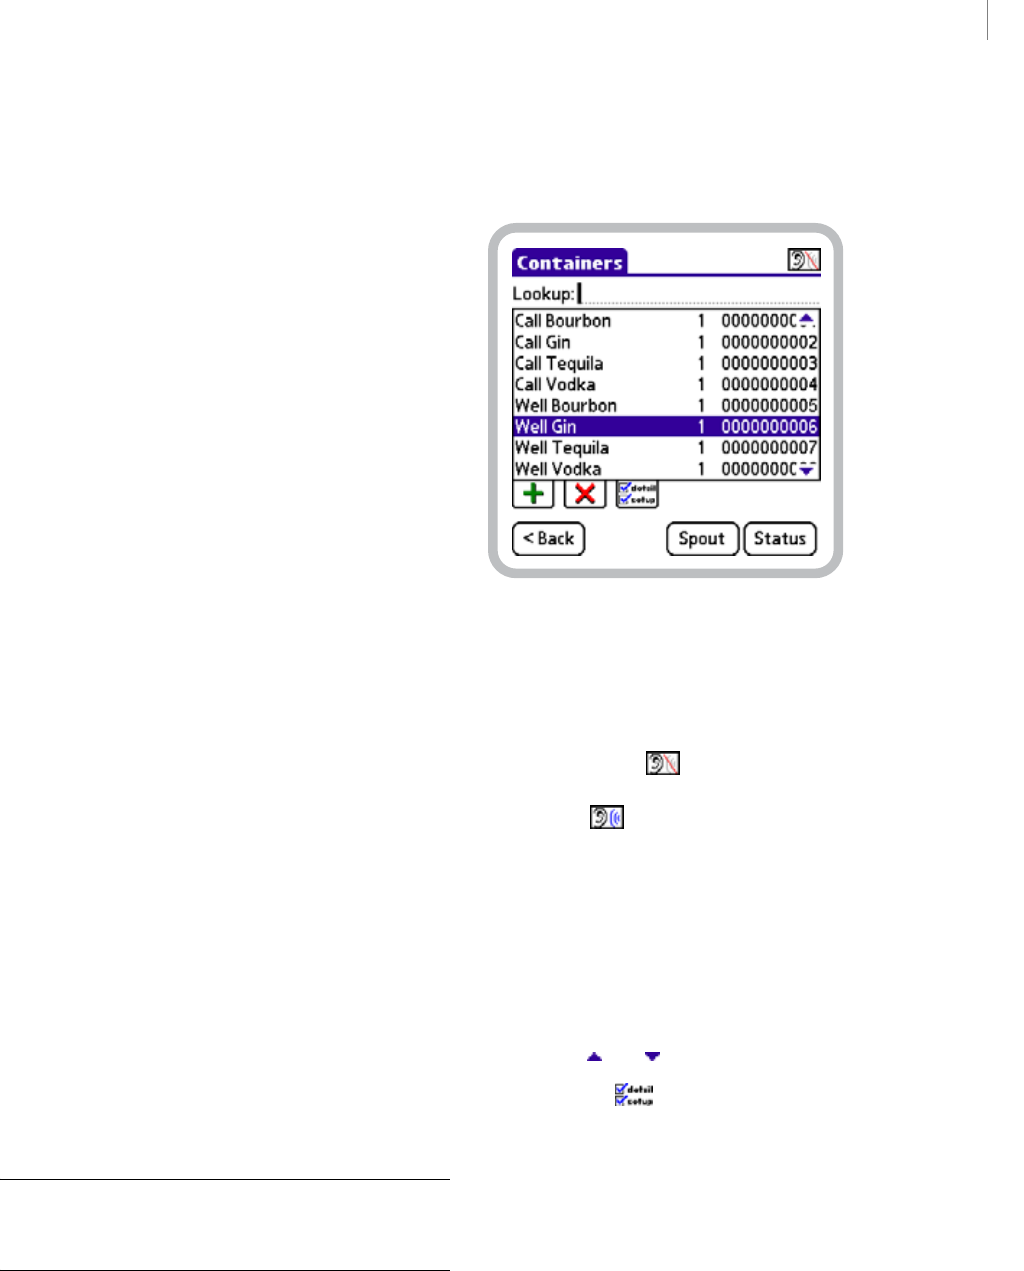
55
BARVISION FOR PALM OS®
User’s Guide
Draft for Reseller Review Only
Not for Distribution to End Users
location or cost. And you can edit its size, weight,
volume, or pour rates. In addition, you can change the
systemwide container options. The remainder of this
section contains detailed procedures that explain how
to perform these modifications.
This section contains the following editing procedures:
• “Assigning a new product name to a container” on
page 55
• “Assigning a new pour spout to (or removing the
current pour spout assignment from) a container”
on page 57
• “Assigning a new category to a container” on
page 59
• “Editing container details” on page 61
• “Editing container options” on page 63
Assigning a new product name to a
container
If you need to edit the product name assigned to a
container, attempt to do so by selecting one of the
provided product names rather than entering a unique
one. Many of the most common products in the
product list are associated with predefined container
values (such as Shape, Empty weight, and Unit
weight). When you select a name from the product list,
all of the preset values associated with that name are
automatically set for the container. Alternatively, if you
edit the Product field by entering a new name (not
choosing one from the list), all the other container
settings will retain their currently assigned values.
Assigning a new name to a container will also reassign
each of the existing event records in the activity list
associated with that container. This is done so that no
pour information will be lost.
Note: Performing the following procedure typically
requires the manager security code. See “About security
codes” on page 26.
To assign a new product name to a container:
1Choose Mgr > Setup > Containers to display the
Containers screen.
Containers screen, Well Gin container selected
2Select a container to assign a new product name to
by doing one of the following:
• Put the data receiver in active listening mode by
tapping Listen ( ) in the upper right-hand
corner of the screen. With active listening mode
enabled ( ), tilt the container until the appro-
priate item becomes selected in the scroll list.
• Begin entering the name of the container in the
Lookup field until the appropriate item becomes
selected in the scroll list.
• Tap the name of the container in the scroll list. If
the container you want to select is not displayed
among the currently visible items, drag the Scroll
Arrows ( and ) at the right-hand side of the list.
3Tap Detail ( ) to display page 1 of the
Container Detail screen.

CHAPTER 5
56
Working with Containers
Draft for Reseller Review Only
Not for Distribution to End Users
Page 1 of the Container Detail screen
4Tap th e Product field to display the Select a
Product screen with the current product name selected
for editing.
Select a Product screen, product name selected for editing
5Select or enter a new product name to assign to the
container by doing one of the following:
• Begin entering the name of the product in the
Enter field until the appropriate item becomes
selected in the scroll list. Then, tap the selection so
that the complete product name displays in the
Enter field.
• Tap the name of the product in the scroll list. If the
product you want to select is not displayed among
the currently visible items, drag the Scroll Arrows
( and ) at the right-hand side of the list.
• Enter a product name in the Enter field.
If possible, select one of the provided product
names rather than entering a unique one. Many
of the most common products are associated with
predefined container values (such as Shape, Empty
weight, and Unit weight) that will automatically be set
for you.
6Tap Select to assign the new product name to the
container and return to page 1 of the Container Detail
screen.
7Tap Save to store your changes. One of the
following two things will occur:
• If the product name you selected is not currently
assigned to a container at the specified location, the
Containers screen will be displayed. The container
list will now include the newly named container.
• If the product name you selected is already assigned
to a container at the specified location, a container
edit Error screen similar to the one below will be
displayed.
Container edit Error screen
—Tap OK to return to page 1 of the Container
Detail screen.
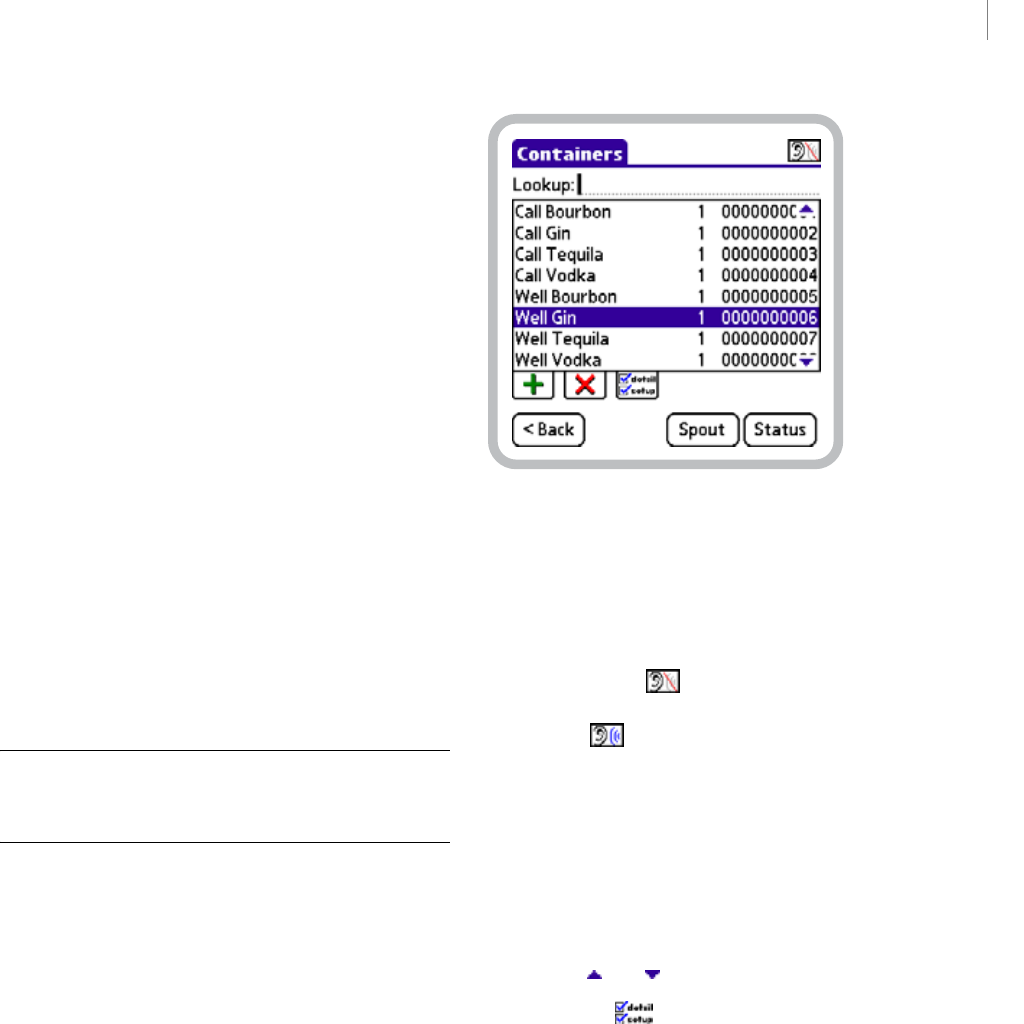
57
BARVISION FOR PALM OS®
User’s Guide
Draft for Reseller Review Only
Not for Distribution to End Users
— Edit either the container’s Product name or
Location to a unique value. For example, to add
a second container named Well Gin to a
location where a Well Gin container already
exists, modify the container’s Product name to a
unique value (such as Well Gin B).
—Tap Save to store your changes.
Assigning a new pour spout to (or
removing the current pour spout
assignment from) a container
You may want to associate a new pour spout with a
container. For example, you may need to do this if the
pour spout is lost, expires, or malfunctions. Or you
might want to disassociate a pour spout from its
current container so that it can be used elsewhere. For
example, you might want to move the pour spout from
one seasonal product to another. Dissociating a pour
spout from a container, or associating a different one
with it, will not affect any existing events in the activity
list that were recorded for the container.
Note: Performing the following procedure typically
requires the manager security code. See “About security
codes” on page 26.
To assign a new pour spout to (or remove the current
pour spout assignment from) a container:
1Choose Mgr > Setup > Containers to display the
Containers screen.
Containers screen, Well Gin container selected
2Select the container to associate a new pour spout
with (or disassociate the current pour spout from) by
doing one of the following:
• Put the data receiver in active listening mode by
tapping Listen ( ) in the upper right-hand
corner of the screen. With active listening mode
enabled ( ), tilt the container until the appro-
priate item becomes selected in the scroll list.
• Begin entering the name of the container in the
Lookup field until the appropriate item becomes
selected in the scroll list.
• Tap the name of the container in the scroll list. If
the container you want to select is not displayed
among the currently visible items, drag the Scroll
Arrows ( and ) at the right-hand side of the list.
3Tap Detail ( ) to display page 1 of the
Container Detail screen.
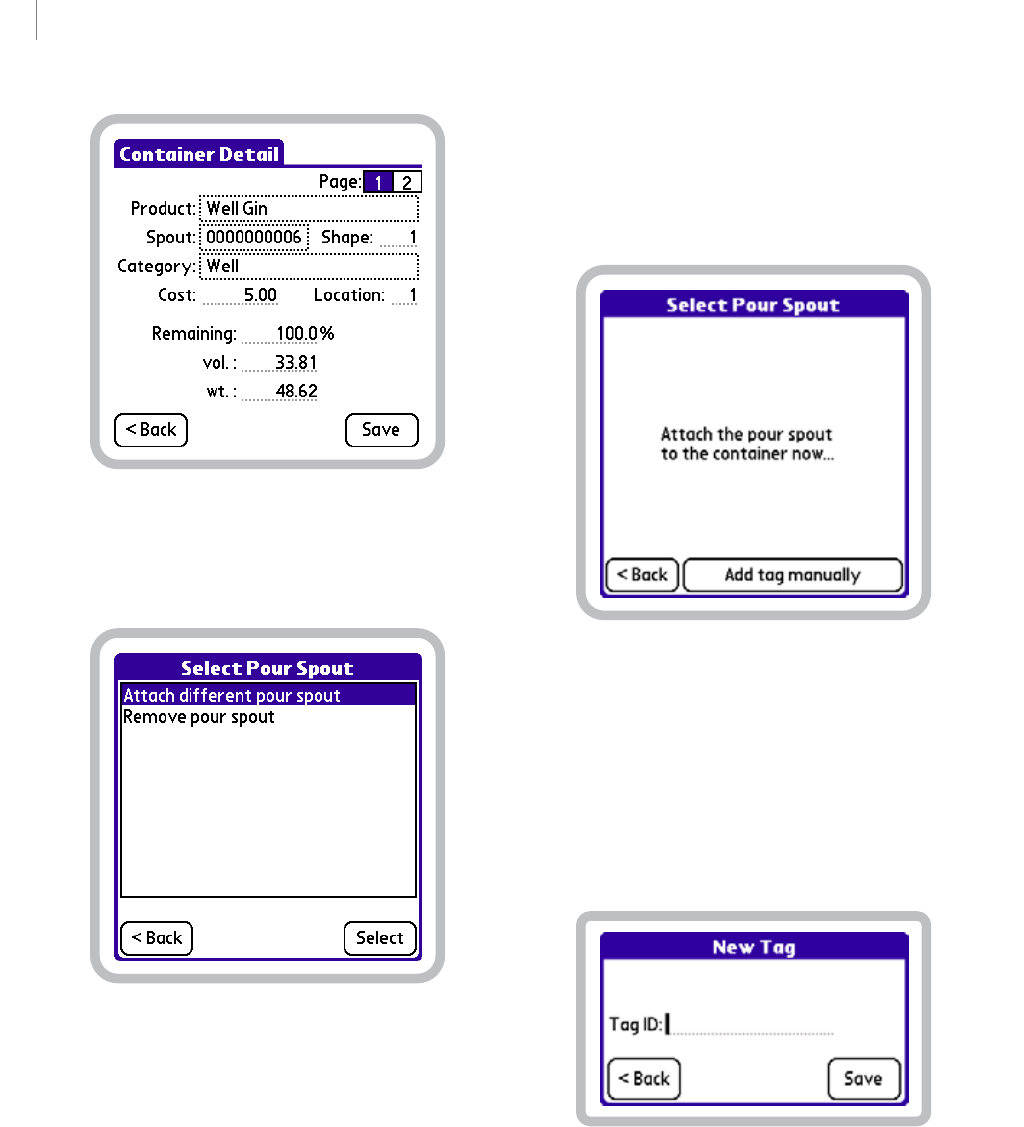
CHAPTER 5
58
Working with Containers
Draft for Reseller Review Only
Not for Distribution to End Users
Page 1 of the Container Detail screen
4Tap the Spout field to display the Select Pour Spout
screen.
Select Pour Spout screen
5Do one of the following:
• To disassociate the current pour spout from the
container, select Remove pour spout, physically
remove the pour spout from the bottle, and then
tap Select. Page 1 of the Container Detail screen
will be displayed with the Spout field now empty.
Proceed to step 8.
• To associate a different pour spout with the
container, select Attach different pour spout, physi-
cally remove the pour spout from the bottle, and
then tap Select. The Select Pour Spout screen will
be displayed. Proceed to step 6.
Select Pour Spout screen
6Do one of the following:
• Attach the BarVision wireless pour spout you want
to associate with the container to the mouth of the
bottle.
•Tap Add tag manually to display the New Tag
screen.
New Tag screen
In the Ta g ID text box, enter the identification
number of the pour spout you want to associate
with the container.
7One of the following two things will occur:
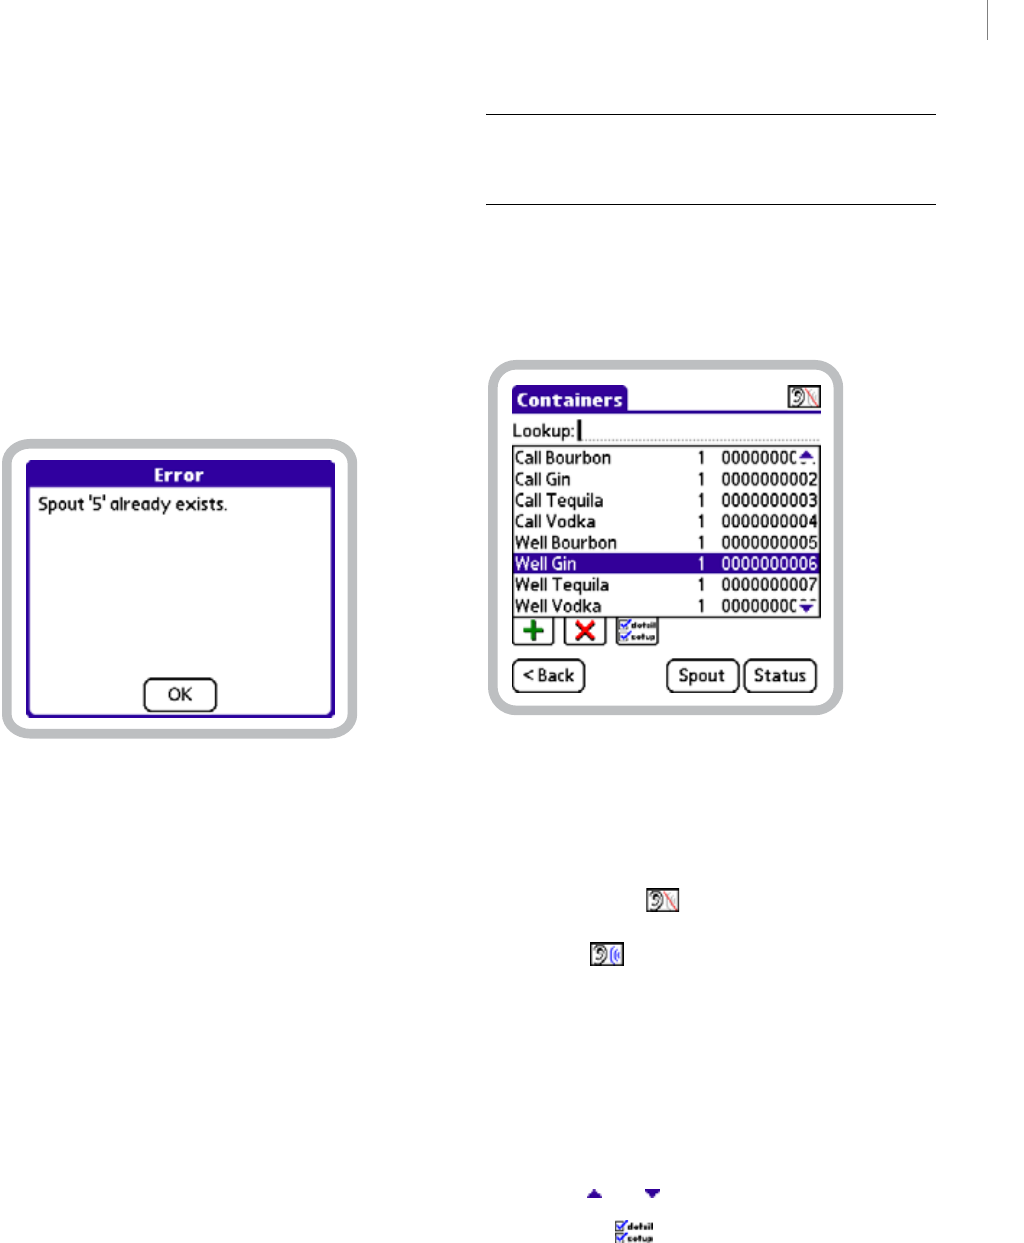
59
BARVISION FOR PALM OS®
User’s Guide
Draft for Reseller Review Only
Not for Distribution to End Users
• If the pour spout you attach to the container (or
whose identification number you enter) is not
already associated with another container, page 1 of
the New Container screen will be displayed. The
Spout field will contain the pour spout’s identifi-
cation number. Proceed to step 8.
• If the pour spout you attach to the container (or
whose identification number you enter) is already
associated with another container, a pour spout
selection Error screen similar to the one below will
be displayed.
Pour spout selection Error screen
Tap OK, remove the wireless pour spout from the
bottle (if applicable), and then return to step 6.
8Tap Save to store your changes and return to the
Containers screen.
Assigning a new category to a
container
You may want to reassign a miscategorized container.
Doing so will also reassign any existing event records in
the activity list that are associated with the container.
For example, if you discover that a Premium bottle of
vodka has been mistakenly categorized as Top
Shelf, you can reassign it. During this process, each
of the existing event records associated with that
container, which were originally assigned to the Top
Shelf category, are reclassified as Premium.
Note: Performing the following procedure typically
requires the manager security code. See “About security
codes” on page 26.
To assign a new category to a container:
1Choose Mgr > Setup > Containers to display the
Containers screen.
Containers screen, Well Gin container selected
2Select the container to assign a new category to by
doing one of the following:
• Put the data receiver in active listening mode by
tapping Listen ( ) in the upper right-hand
corner of the screen. With active listening mode
enabled ( ), tilt the container until the appro-
priate item becomes selected in the scroll list.
• Begin entering the name of the container in the
Lookup field until the appropriate item becomes
selected in the scroll list.
• Tap the name of the container in the scroll list. If
the container you want to select is not displayed
among the currently visible items, drag the Scroll
Arrows ( and ) at the right-hand side of the list.
3Tap Detail ( ) to display page 1 of the
Container Detail screen.
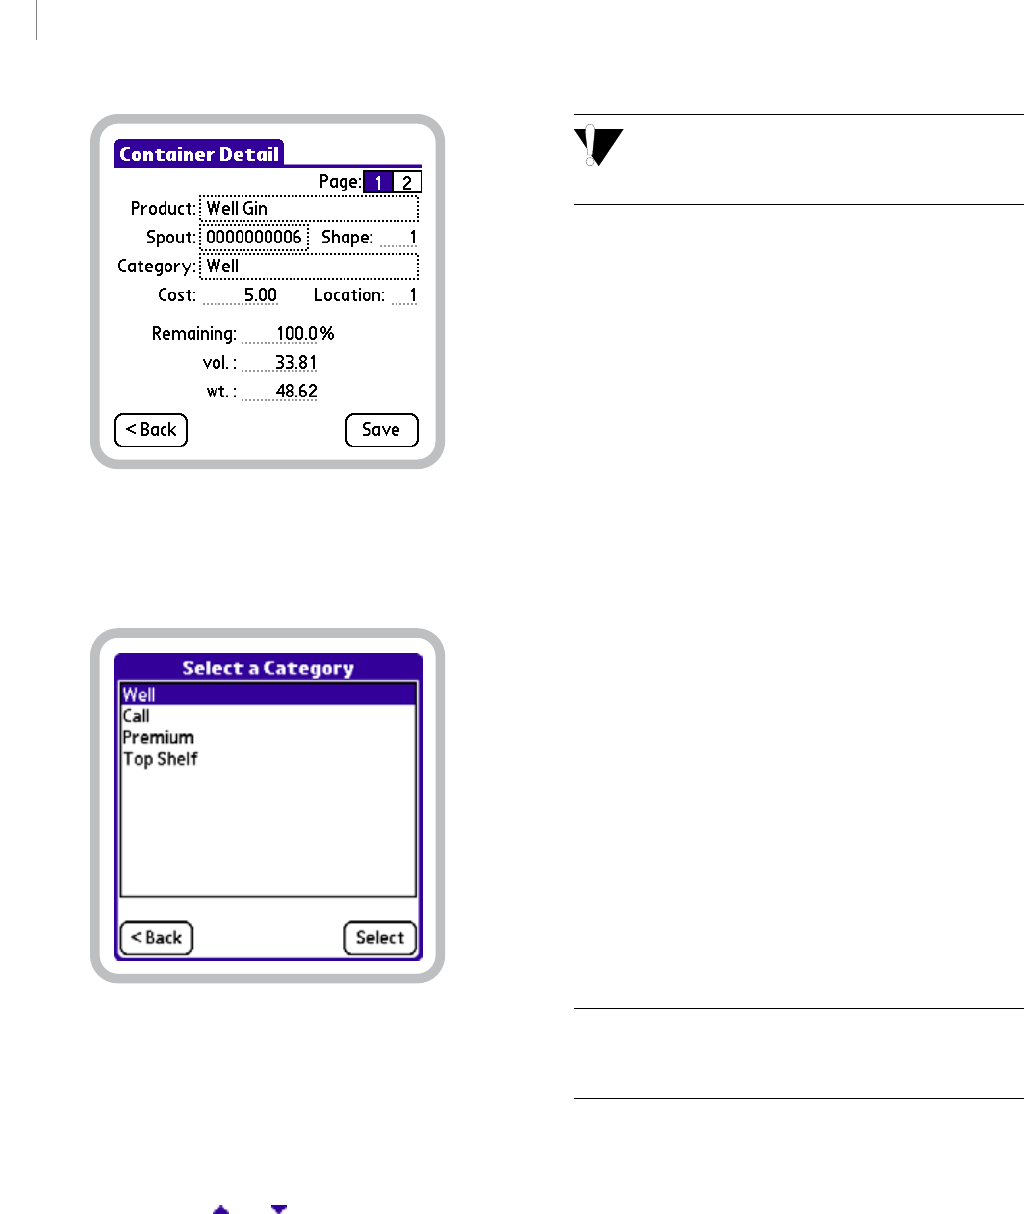
CHAPTER 5
60
Working with Containers
Draft for Reseller Review Only
Not for Distribution to End Users
Page 1 of the Container Detail screen
4Tap th e Category field to display the Select a
Category screen.
Select a Category screen, Well category selected
5In the category list, tap the name of the category
you want to assign to the container. The category
should appear selected, as does Well in the figure
above. If the category you want to select is not
displayed among the currently visible items, drag the
Scroll Arrows ( and ) at the right-hand side of the
list.
Assigning a different category to a container will
also reassign each of the event records in the
activity list that are associated with that container.
6Tap Select. The chosen category is assigned to the
container and now appears in the Category field on
page 1 of the Container Detail screen.
7Tap Save to store your changes and return to the
Containers screen.
Assigning a new bottle shape to a
container
You may want to assign a new bottle shape graphic to a
container. For example, you may have assigned a
generic name like Well Gin to a container rather
than having chosen one of the defined names from the
product list. In that case, the Default shape value
would have been assigned to the container’s Shape field
and used to provide a bottle shape graphic for that
container on the Container Status screen. But the
graphic associated with the Default shape value may
not accurately represent the shape of a specific bottle.
In that case, you might want to review the Bottle Shape
Graphic Contact Sheet, locate the graphic that most
closely resembles the bottle, and assign that graphic’s
ID number to the container’s Shape field. This will
enable you to more accurately check the status of the
container, providing you with the ability to compare
the container’s contents level to BarVision’s graphic
representation of the container’s level.
Note: Performing the following procedure typically
requires the manager security code. See “About security
codes” on page 26.
To assign a new bottle shape to a container:
1Review the Bottle Shape Graphic Contact Sheet to
locate the graphic that most closely resembles the
bottle. Note the graphic’s ID number.
2Choose Mgr > Setup > Containers to display the
Containers screen.
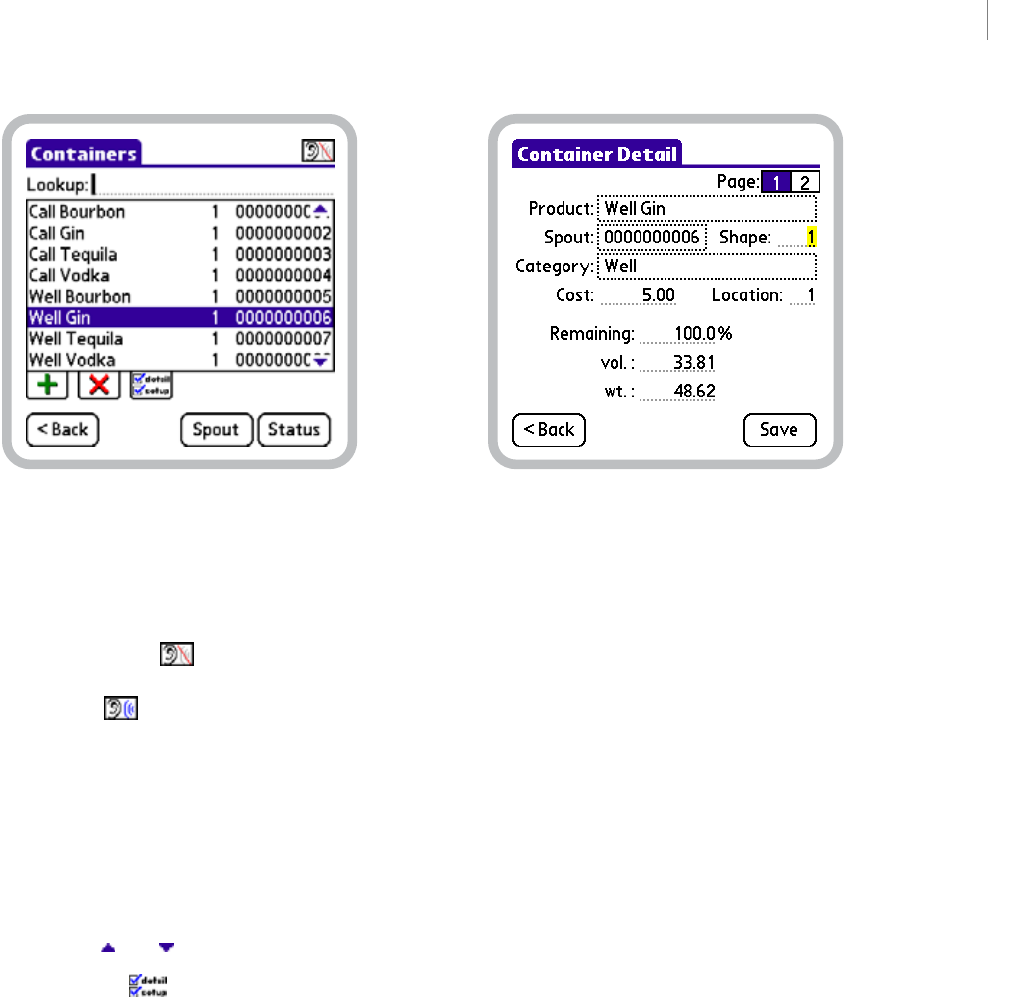
61
BARVISION FOR PALM OS®
User’s Guide
Draft for Reseller Review Only
Not for Distribution to End Users
Containers screen, Well Gin container selected
3Select the container to assign a new bottle shape to
by doing one of the following:
• Put the data receiver in active listening mode by
tapping Listen ( ) in the upper right-hand
corner of the screen. With active listening mode
enabled ( ), tilt the container until the appro-
priate item becomes selected in the scroll list.
• Begin entering the name of the container in the
Lookup field until the appropriate item becomes
selected in the scroll list.
• Tap the name of the container in the scroll list. If
the container you want to select is not displayed
among the currently visible items, drag the Scroll
Arrows ( and ) at the right-hand side of the list.
4Tap Detail ( ) to display page 1 of the
Container Detail screen.
Page 1 of the Container Detail screen, Shape selected for editing
5Drag (or double-tap) to select the current Shape
value, and then enter the ID number of the graphic
selected in step 1.
6Tap Save to store your changes and return to the
Containers screen.
Editing container details
You can change the detail settings for each individual
container by editing the numeric values on the
Container Detail screens. By altering the appropriate
container details, you can:
• Edit the container’s per-bottle cost
• Change the container’s location
• Modify the container’s current fluid level by editing
the Remaining %, vol., or wt. fields
• Configure the container’s size
• Define the weight of the container when empty and
the weight of one volumetric unit of the container’s
contents
• Adjust the container’s pour rates
For more information about the functions of these
settings, see “Container details” on page 43.
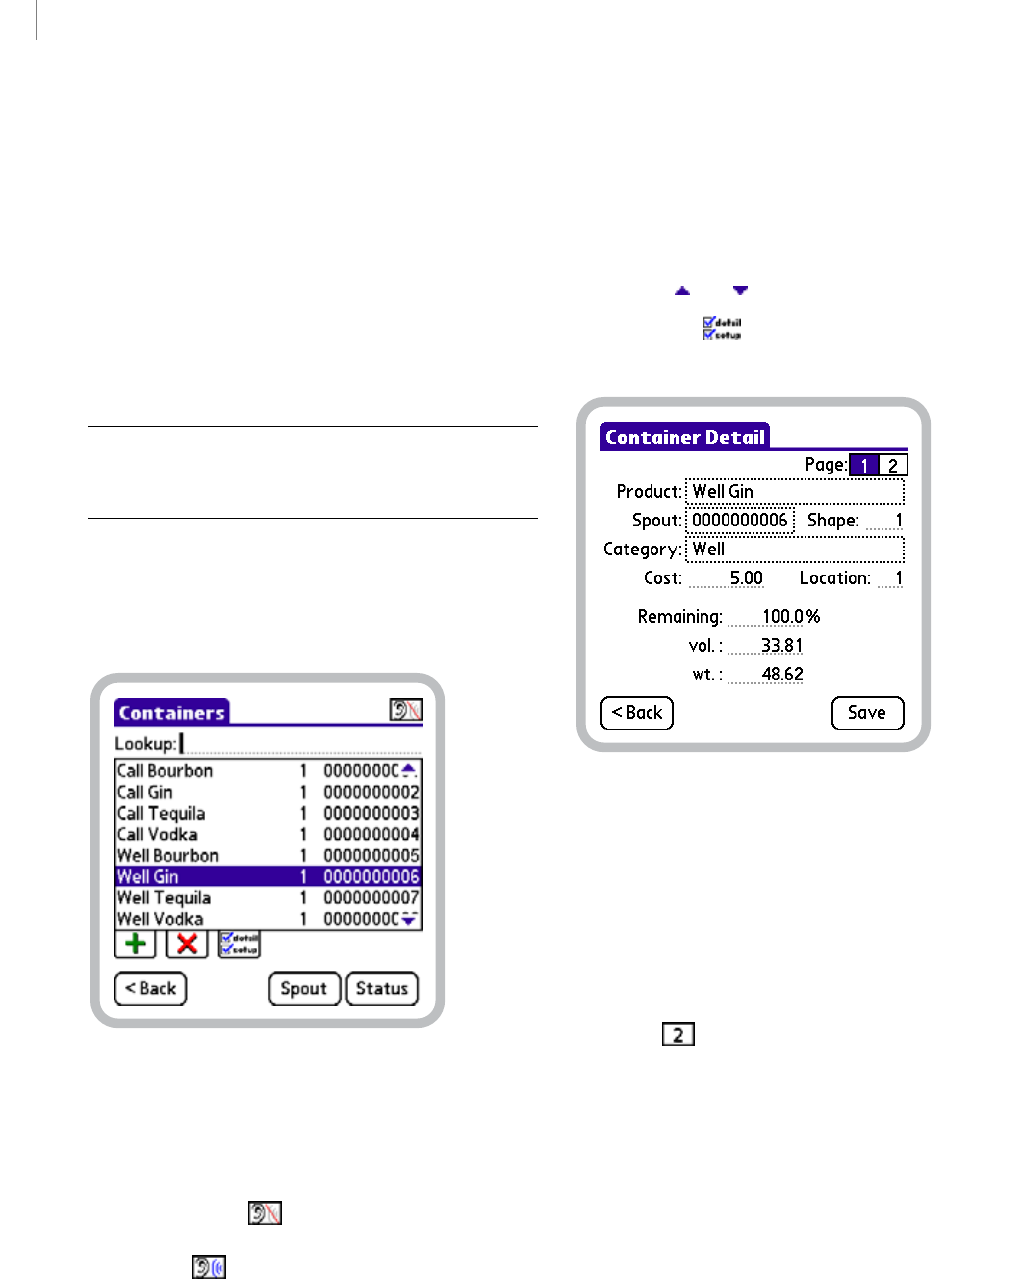
CHAPTER 5
62
Working with Containers
Draft for Reseller Review Only
Not for Distribution to End Users
For information about editing a container’s Product
name, see “Assigning a new product name to a
container” on page 55. For information about
modifying a container’s Spout assignment, see
“Assigning a new pour spout to (or removing the
current pour spout assignment from) a container” on
page 57. For information about editing a container’s
Category, see “Assigning a new category to a
container” on page 59. For information about editing a
container’s Shape, see “Assigning a new bottle shape to
a container” on page 60.
Note: Performing the following procedure typically
requires the manager security code. See “About security
codes” on page 26.
To edit a container’s details:
1Choose Mgr > Setup > Containers to display the
Containers screen.
Containers screen, Well Gin container selected
2Select the container whose details you want to edit
by doing one of the following:
• Put the data receiver in active listening mode by
tapping Listen ( ) in the upper right-hand
corner of the screen. With active listening mode
enabled ( ), tilt the container until the appro-
priate item becomes selected in the scroll list.
• Begin entering the name of the container in the
Lookup field until the appropriate item becomes
selected in the scroll list.
• Tap the name of the container in the scroll list. If
the container you want to select is not displayed
among the currently visible items, drag the Scroll
Arrows ( and ) at the right-hand side of the list.
3Tap Detail ( ) to display page 1 of the
Container Detail screen.
Page 1 of the Container Detail screen
4Edit the page 1 container detail fields (Location,
Cost, Remaining %, vol., and wt.) as desired. To edit
these container details, drag (or double-tap) to select
the current value (if any), and then enter a new one.
For information about the functions of these values, see
“Container details” on page 43.
5Tap 2 ( ) to display page 2 of the Container
Detail screen.
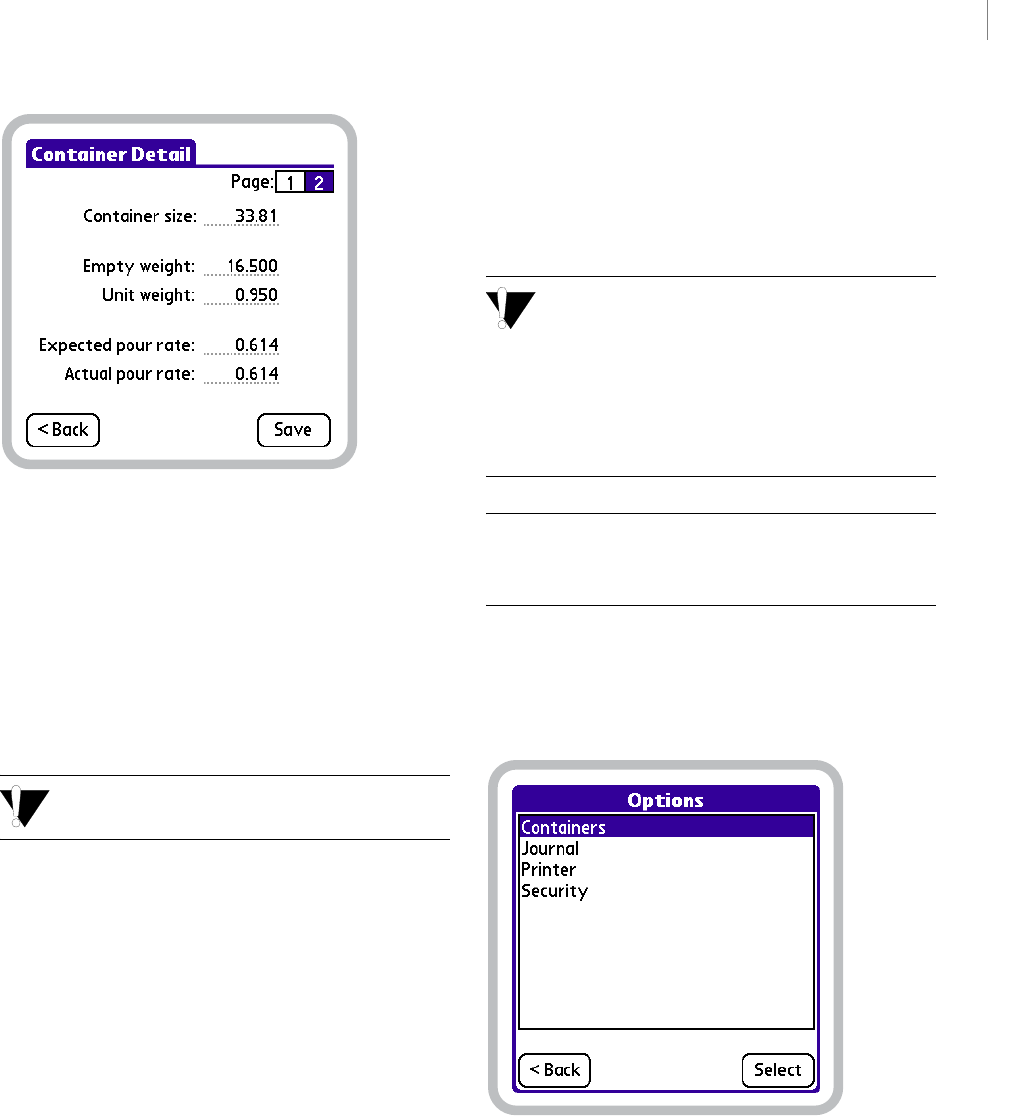
63
BARVISION FOR PALM OS®
User’s Guide
Draft for Reseller Review Only
Not for Distribution to End Users
Page 2 of the Container Detail screen
6Edit the page 2 container detail fields (Container
size, Empty weight, Unit weight, Expected pour rate,
and Actual pour rate) as desired. To edit these
container details, drag (or double-tap) to select the
current value (if any), and then enter a new one.
For information about the functions of these values, see
“Container details” on page 43.
Empty weight and Unit weight values must be
entered in the same unit of measure.
7Tap Save to store your changes and return to the
Containers screen.
Editing container options
You can change the default and systemwide container
options by editing the numeric values on the Container
Options screen. By altering the appropriate container
option, you can:
• Adjust the default values assigned to the settings of
new containers
• Modify the bottle yield percentages at which
containers are flagged as exceptions
• Configure the amount of time for which a
container can be out of contact with the data
receiver before it is reported missing
• Set the values used to compensate for the delay
between tipping a container and dispensing liquid
from the pour spout
For more information about the functions of these
options, see “Container options” on page 46.
Changes made to the default container options
(Default container size, Default Shape, and
Default pour rate) will only affect the containers you add
to the system from that point forward. Existing containers
are not affected by changes to these options. The remaining
container options have a global effect. Editing these items
sets the value for that option systemwide.
Note: Performing the following procedure typically
requires the manager security code. See “About security
codes” on page 26.
To edit the container options:
1Choose Mgr > Setup > Options to display the
Options screen.
Options screen
2In the option list, tap Containers, and then tap
Select to display page 1 of the Container Options
screen.
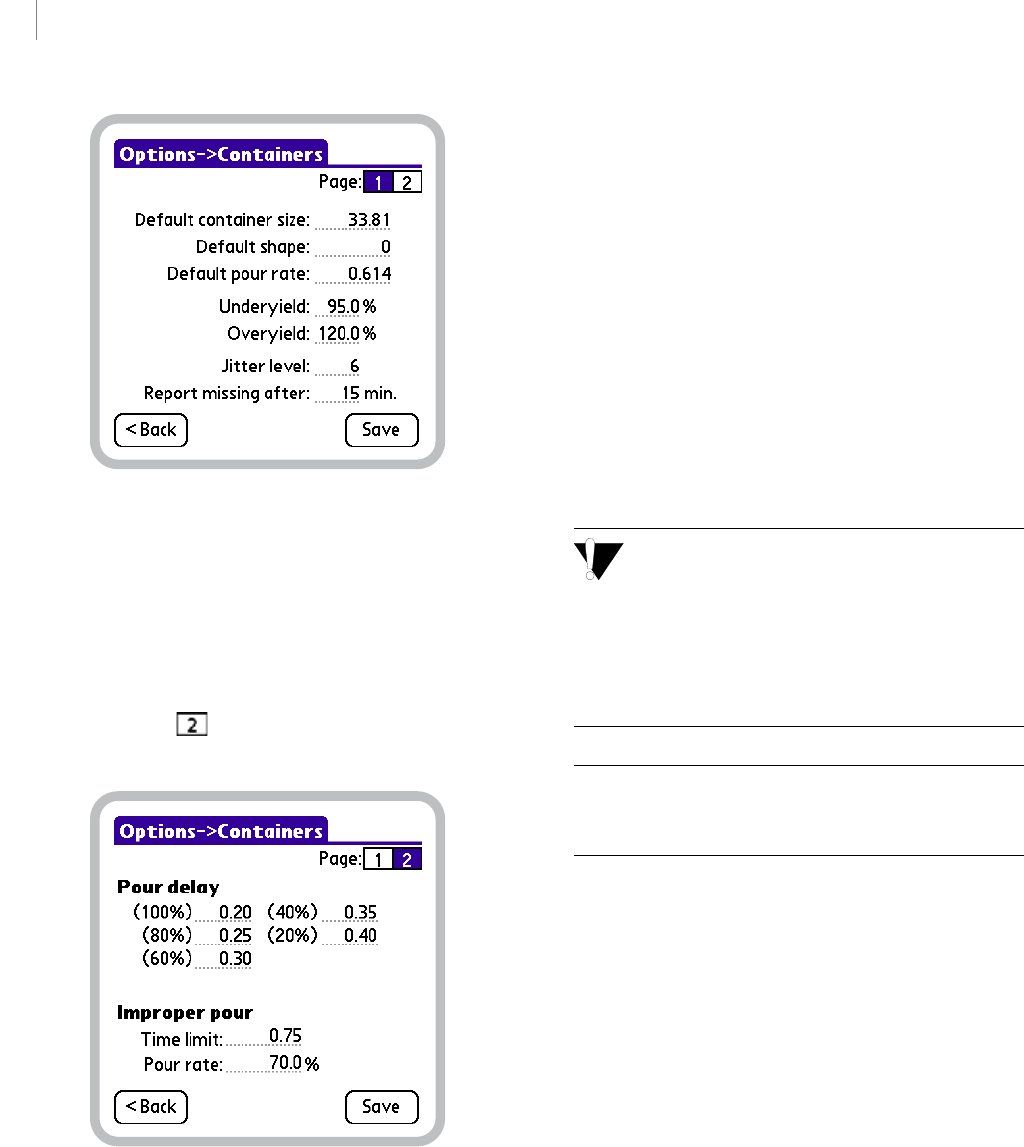
CHAPTER 5
64
Working with Containers
Draft for Reseller Review Only
Not for Distribution to End Users
Page 1 of the Container Options screen
3Edit the page 1 container option fields as desired.
To edit an option, drag (or double-tap) to select the
current value, and then enter a new one.
For information about the functions of these values, see
“Container options” on page 46.
4Tap 2 ( ) to display page 2 of the Container
Options screen.
Page 2 of the Container Options screen
5Edit the page 2 container option fields as desired.
To edit an option, drag (or double-tap) to select the
current value, and then enter a new one.
For information about the functions of these options,
see “Container options” on page 46.
6Tap Save to store your changes and return to the
Options screen.
Deleting containers
You may want to delete unused or unwanted
containers. For example, you might have added a
container by mistake, a product may have been discon-
tinued, or a seasonal product’s phase might be over.
Removing an unused container can help simplify the
information that appears on screen and on reports.
Deleting a container will remove all of the event
records associated with that container from the
activity list. If the information captured for the container
is of use, be sure to run any needed reports (see, “Running,
viewing, and printing reports” on page 92) or export
system data (see, “Exporting data” on page 107) before
deleting the container.
Note: Performing the following procedure typically
requires the manager security code. See “About security
codes” on page 26.
To delete a container:
1Choose Mgr > Setup > Containers to display the
Containers screen.
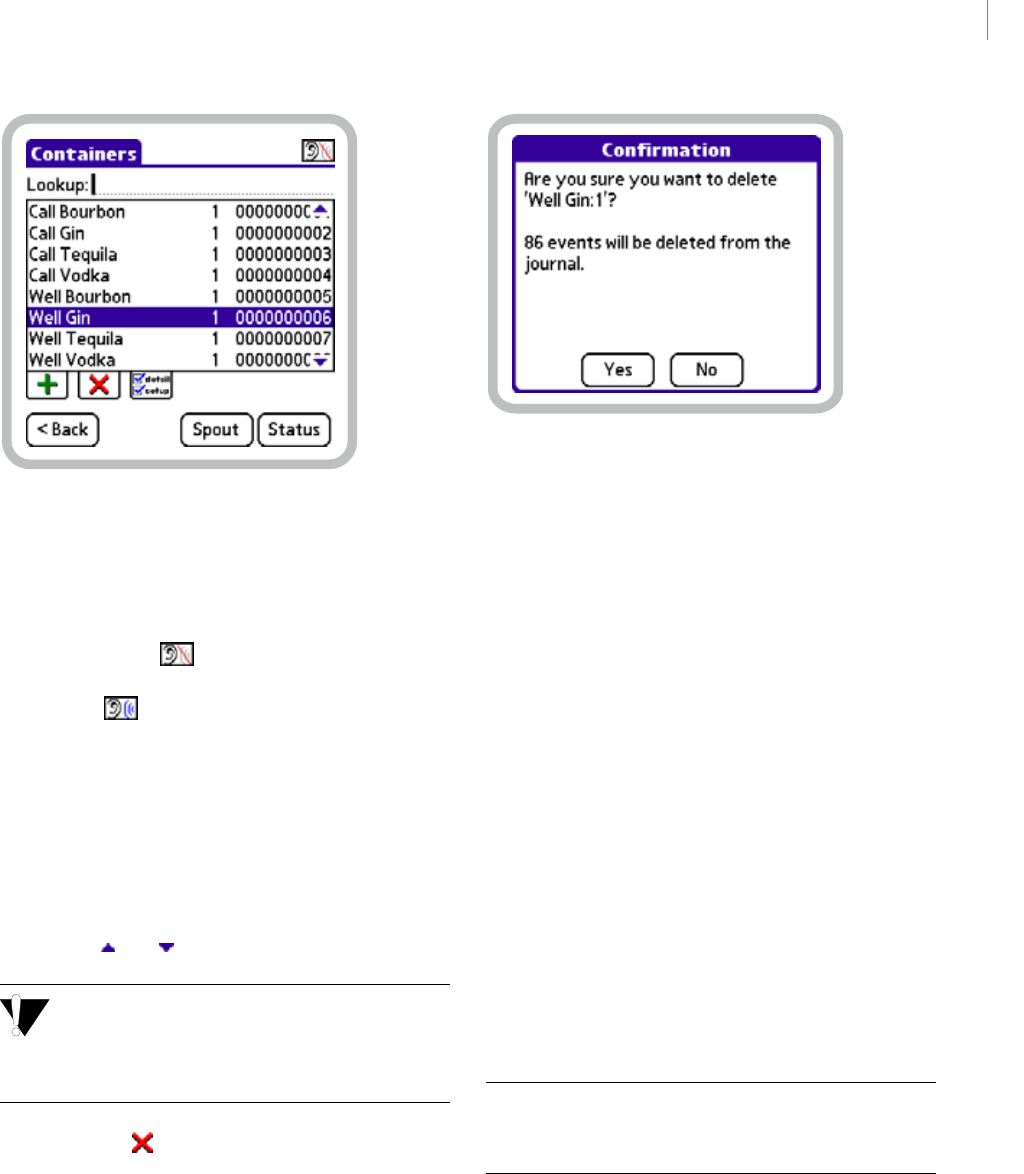
65
BARVISION FOR PALM OS®
User’s Guide
Draft for Reseller Review Only
Not for Distribution to End Users
Containers screen, Well Gin container selected
2Select a container to delete by doing one of the
following:
• Put the data receiver in active listening mode by
tapping Listen ( ) in the upper right-hand
corner of the screen. With active listening mode
enabled ( ), tilt the container until the appro-
priate item becomes selected in the scroll list.
• Begin entering the name of the container in the
Lookup field until the appropriate item becomes
selected in the scroll list.
• Tap the name of the container in the scroll list. If
the container you want to select is not displayed
among the currently visible items, drag the Scroll
Arrows ( and ) at the right-hand side of the list.
Deleting a container will remove all of the event
records associated with that container from the
activity list. Be sure to run any needed reports or export
system data before deleting the container.
3Tap Delete ().
4A Confirmation screen similar to the one below will
be displayed. Tap Yes to delete the container and return
to the Containers screen.
Container deletion Confirmation screen
Viewing pour spout
hardware details
The pour spout Hardware Detail screen provides
detailed troubleshooting and diagnostic information
for the wireless pour spout associated with a container.
This screen identifies the pour spout’s communication
statistics, such as: the strength of the signal being
received from the transmitter tag, the version number
of the firmware stored in the transmitter tag’s read-only
memory, and the date and time the data receiver last
received a transmission from the tag. In addition,
because BarVision transmitter tags expire after a
specified number of days or pours (whichever occurs
first), the Hardware Detail screen identifies the pour
spout’s expiration information.
For information about the details provided on the
Hardware Detail screen, see “Pour spout hardware
details” on page 49.
Note: Performing the following procedure typically
requires the manager security code. See “About security
codes” on page 26.
To view a pour spout’s hardware details:
1Choose Mgr > Setup > Containers to display the
Containers screen.
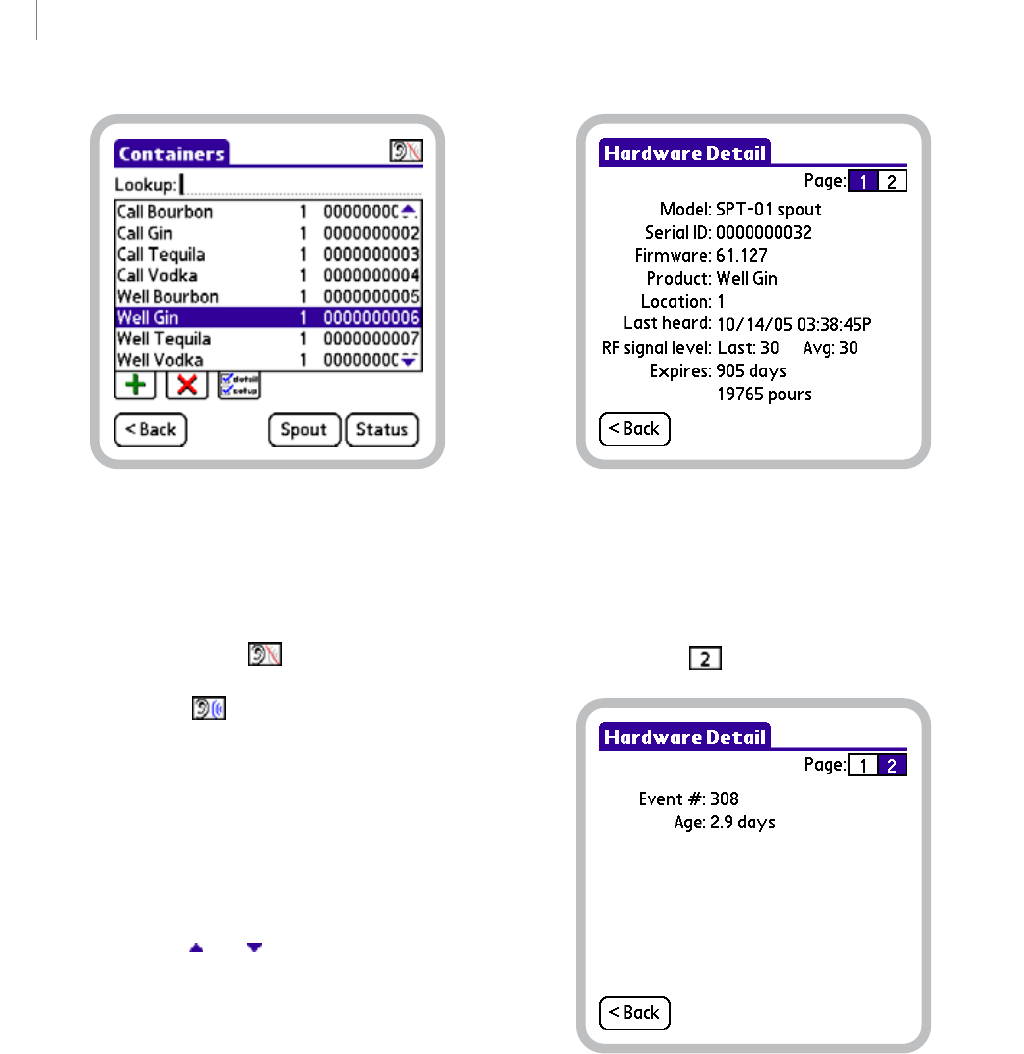
CHAPTER 5
66
Working with Containers
Draft for Reseller Review Only
Not for Distribution to End Users
Containers screen, Well Gin container selected
2Select the container whose pour spout hardware
details you want to view by doing one of the following:
• Put the data receiver in active listening mode by
tapping Listen ( ) in the upper right-hand
corner of the screen. With active listening mode
enabled ( ), tilt the container until the appro-
priate item becomes selected in the scroll list.
• Begin entering the name of the container in the
Lookup field until the appropriate item becomes
selected in the scroll list.
• Tap the name of the container in the scroll list. If
the container you want to select is not displayed
among the currently visible items, drag the Scroll
Arrows ( and ) at the right-hand side of the list.
3Tap Spout to display page 1 of the pour spout
Hardware Detail screen.
Page 1 of the pour spout Hardware Detail screen
For information about the details provided on this
screen, see “Pour spout hardware details” on page 49.
4To access page 2 of the pour spout Hardware Detail
screen, tap 2 ().
Page 2 of the pour spout Hardware Detail screen
5After you have finished viewing the pour spout’s
hardware details, tap <Back to return to the
Containers screen.
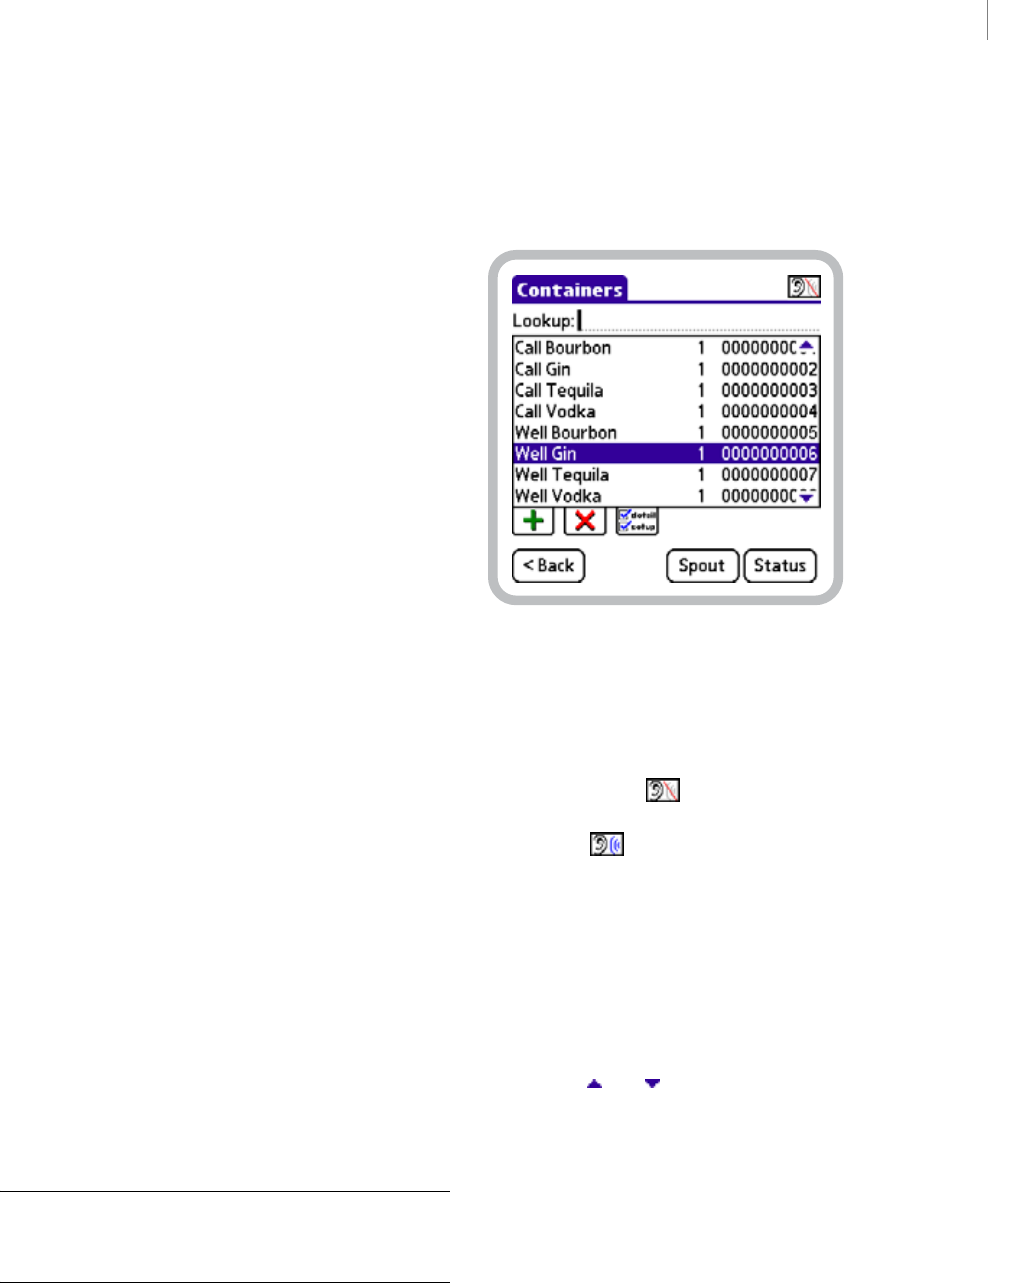
67
BARVISION FOR PALM OS®
User’s Guide
Draft for Reseller Review Only
Not for Distribution to End Users
Viewing container status
information
The container status function provides a convenient
way to conduct a simple spot check of the open
containers in your bar. You might want to view a
container’s status information to compare the
container’s contents level to BarVision’s graphic repre-
sentation of the container’s estimated level, to view
BarVision’s estimated container weight to compare that
value to a scale-obtained weight, to monitor the
container’s age, or to verify that a container has been
fitted with the appropriate wireless pour spout.
You can access the container Status function from
either the Activity or Containers screen. Each status
screen provides identical information. However, from
the Activity screen, you can only view the status of
those containers for which there is a current event
record in the activity list. By contrast, the Containers
screen permits you to view the status for any defined
container. After you have viewed a container’s status
(regardless of from which screen), you can choose to
generate a viewable and printable container history
report.
For information about the details provided on the
Container Status screen, see “Container status infor-
mation” on page 50.
Viewing container status
information from the Containers
screen
From the Containers screen, you can view the status of
any container. You might want to do this to visually
verify that the current fluid level as estimated by
BarVision closely matches the actual amount of liquid
in the container.
Note: Performing the following procedure typically
requires the manager security code. See “About security
codes” on page 26.
To view container status information (from the Con-
tainers screen):
1Choose Mgr > Setup > Containers to display the
Containers screen.
Containers screen, Well Gin container selected
2Select the container whose status information you
want to view by doing one of the following:
• Put the data receiver in active listening mode by
tapping Listen ( ) in the upper right-hand
corner of the screen. With active listening mode
enabled ( ), tilt the container until the appro-
priate item becomes selected in the scroll list.
• Begin entering the name of the container in the
Lookup field until the appropriate item becomes
selected in the scroll list.
• Tap the name of the container in the scroll list. If
the container you want to select is not displayed
among the currently visible items, drag the Scroll
Arrows ( and ) at the right-hand side of the list.
3Tap Status to display the Container Status screen.
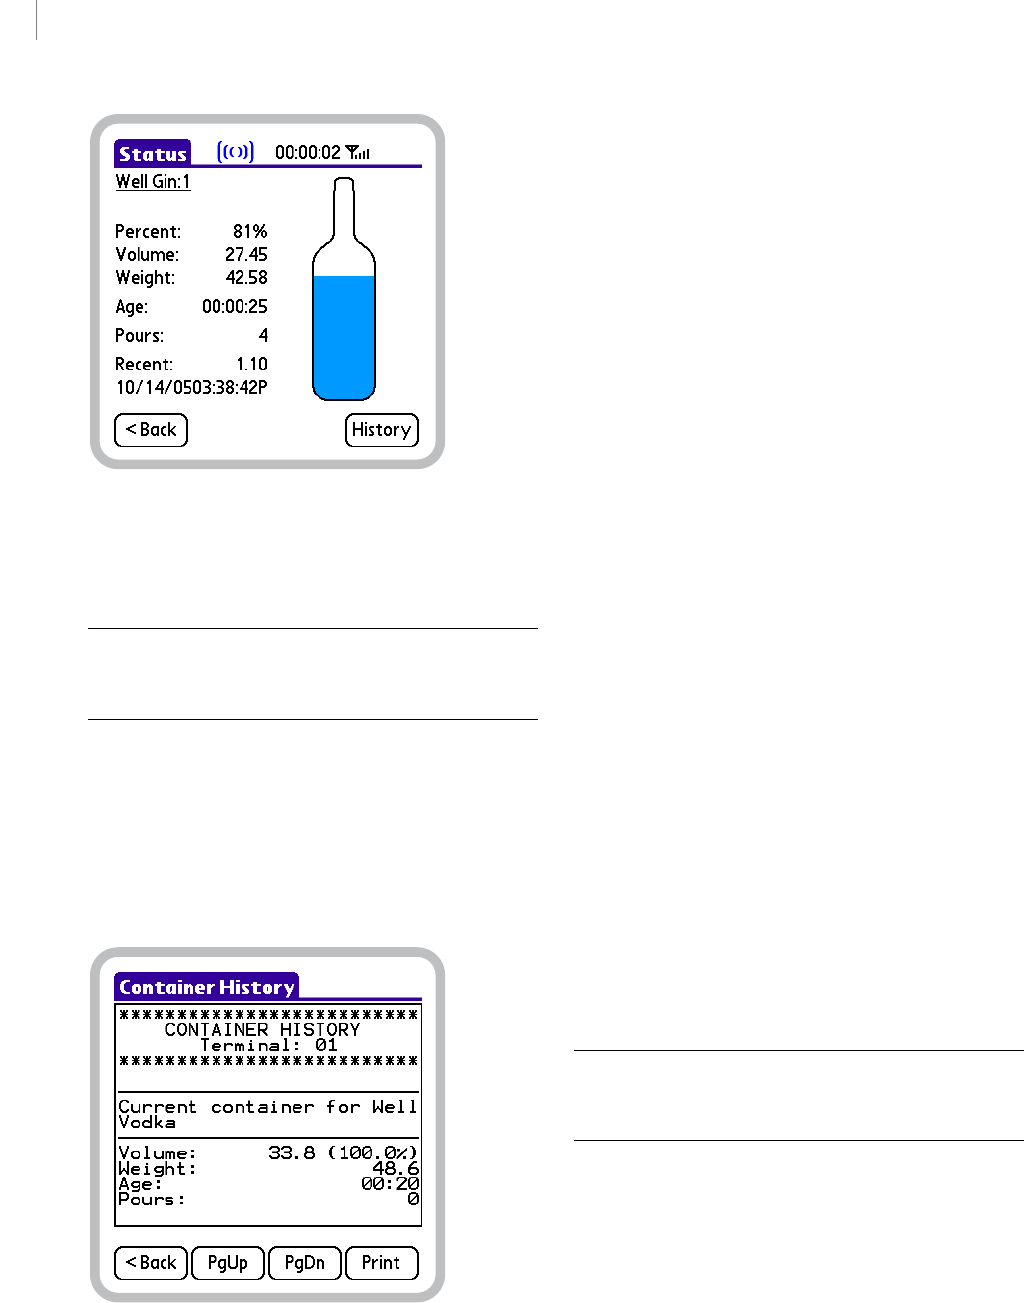
CHAPTER 5
68
Working with Containers
Draft for Reseller Review Only
Not for Distribution to End Users
Container Status screen
For information about the details provided on this
screen, see “Container status information” on page 50.
Note: If you are viewing the status for a container whose
Shape is 0, no bottle shape image will be displayed. For
more information, see “Default shape” on page 47.
4To generate a viewable and printable container
history report including all container-related events,
tap History.
5The Container History screen will be displayed. It
provides an on-screen preview of the container history
report.
Container History screen
Do any of the following:
•Tap PgUp or PgDn to navigate up or down
through the pages of the report.
•Tap Print to print the report. A Printing confir-
mation message will be displayed.
If you experience any problems while attempting to
print a report, see “Printing problems” on page 119.
After you have finished viewing the history report, tap
<Back to return to the Container Status screen.
6When you have finished viewing the container’s
status, tap <Back to return to the Containers screen.
Viewing container status
information from the Activity
screen
From the Activity screen, you can inspect the status of
those containers for which there is a current event
record in the activity list. This gives you the ability to
spot check recently used containers to verify their
volumes, the number of pours, and so forth. Typically,
access to container status information from the Activity
screen is security code protected. This protection is
unique in that if the manager security code has been
entered in the last three minutes, the system does not
require you to reenter it. This enables you to check the
status of several containers from the Activity screen
without having to continually reenter the security code.
Because the Container Status screen does not permit
any editing, all system data, settings, and information
are secure.
Note: Performing the following procedure typically
requires the manager security code. See “About security
codes” on page 26.
To view container status information (from the Activ-
ity screen):
1On the Activity screen, select an event record in the
activity list that is associated with the container whose
status information you want to view.
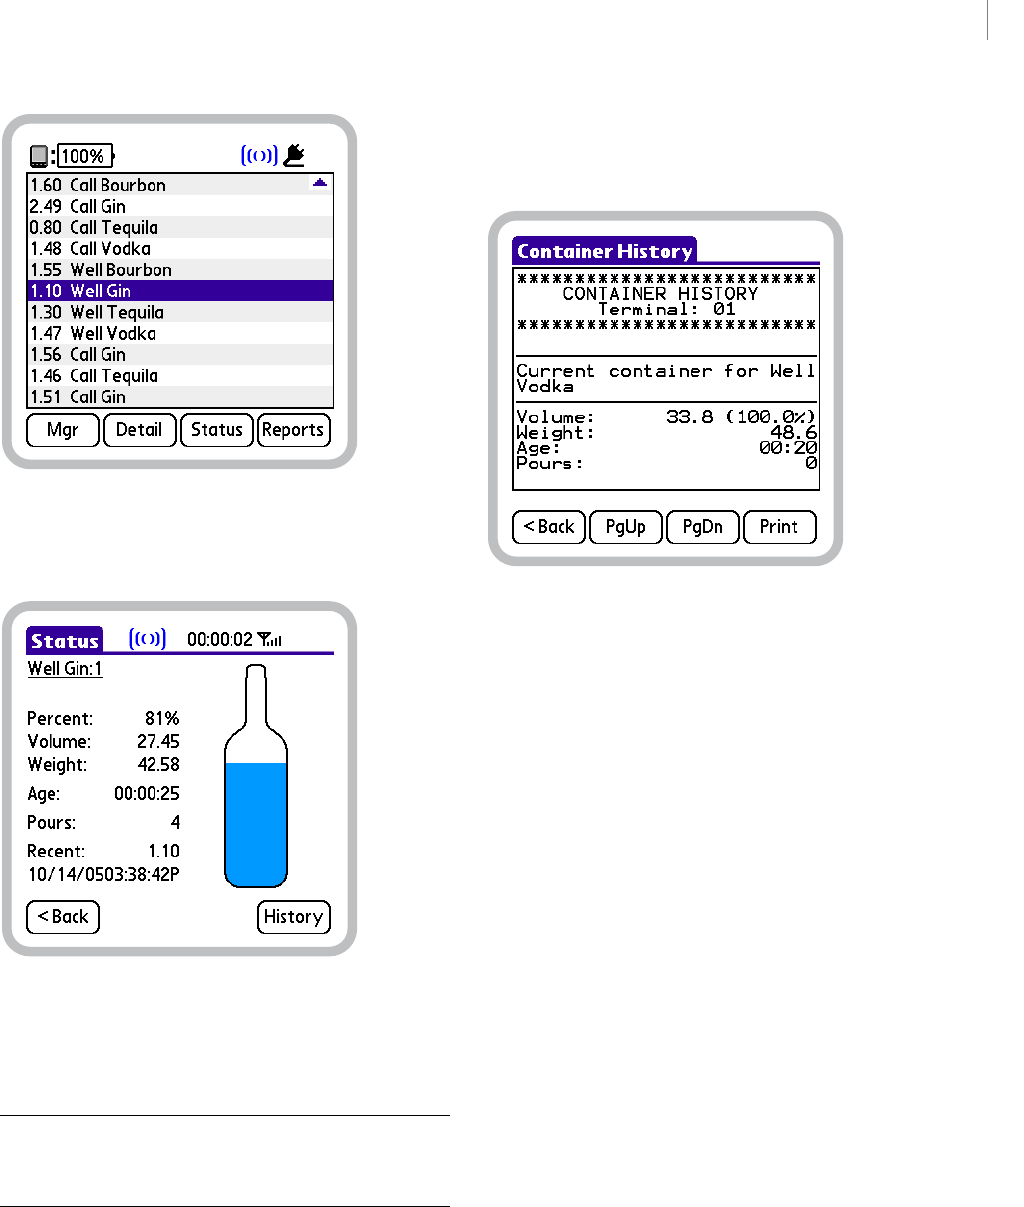
69
BARVISION FOR PALM OS®
User’s Guide
Draft for Reseller Review Only
Not for Distribution to End Users
Activity screen, 1.10 Well Gin event record selected
2Tap Status to display the Container Status screen.
Container Status screen
For information about the details provided on this
screen, see “Container status information” on page 50.
Note: If you are viewing the status for a container whose
Shape is 0, no bottle shape image will be displayed. For
more information, see “Default shape” on page 47.
3To generate a viewable and printable container
history report including all container-related events,
tap History.
4The Container History screen will be displayed. It
provides an on-screen preview of the container history
report.
Container History screen
Do any of the following:
•Tap PgUp or PgDn to navigate up or down
through the pages of the report.
•Tap Print to print the report. A Printing confir-
mation message will be displayed.
If you experience any problems while attempting to
print a report, see “Printing problems” on page 119.
After you have finished viewing the history report, tap
<Back to return to the Container Status screen.
5When you have finished viewing the container’s
status, tap <Back to return to the Activity screen.

CHAPTER 5
70
Working with Containers
Draft for Reseller Review Only
Not for Distribution to End Users

71
Draft for Reseller Review Only
Not for Distribution to End Users
Chapter 6: Working with Serving Sizes
he BarVision system uses serving sizes to
represent your establishment’s desired pour
volumes. This chapter explains how the system
uses serving sizes and describes how to add, edit, and
delete them. It also includes discussion of a feature
closely related to serving sizes—the Max allowed pour
size. This chapter contains the following sections:
• “About serving sizes” on page 71
• “Adding serving sizes” on page 73
• “Editing serving sizes” on page 74
• “Editing the Max allowed pour size” on page 75
• “Deleting serving sizes” on page 76
About serving sizes
In the BarVision system, serving sizes refer to the
volumes of your establishment’s desired portion sizes.
That is, a serving size represents the amount of liquor
you would like to serve in a perfectly poured drink. For
example, a typical bar might determine that an exactly
measured shot of liquor should contain 1 fluid ounce,
that a rocks drink ought to contain 1.5 fluid ounces,
and that a precisely poured martini should contain 2
fluid ounces of liquor. BarVision identifies these
desired pour volumes as serving sizes.
Because different types of alcoholic beverages require
different quantities of liquor, BarVision enables you to
define up to five serving sizes. For example, BarVision’s
default serving sizes include the following: 0.20 U.S.
fluid ounces for a splash of liquor, 0.50 U.S. fluid
ounces for one ingredient of a multi-ingredient drink,
1.00 U.S. fluid ounce for a shot, 1.50 U.S. fluid
ounces for an on-the-rocks drink, and 2.00 U.S. fluid
ounces for a martini or highball drink.
The BarVision software does not specify (nor does
it limit) the unit of measure for numeric values.
However, all predefined values of volume and weight have
been entered in ounces of the U.S. Customary System. For
a discussion of BarVision’s unit-free operation, see “Under-
standing unit-free operation” on page 7.
Regardless of the standard pour volumes or unit of
measure your establishment uses, you should duplicate
those standards in the BarVision software using serving
sizes. Ideally, you should define a serving size for each
desired pour volume that your establishment offers and
delete any unnecessary ones. For example, if your
establishment uses the same desired pour volume for
shots and rocks drinks (for instance, 1.25 fluid ounces),
you may want to edit the predefined 1.00 serving size
to 1.25 and delete the 1.50 serving size.
Adjusting the serving sizes to match your desired pour
volumes enables BarVision to as accurately as possible
assign each pour to the appropriate serving size. This,
in turn, enables you to estimate the amount of revenue
that should have been generated based on the number
of pours for each serving size. BarVision allocates pours
to serving sizes by establishing ranges based on the
midpoints of the serving sizes. For example, assume
that serving sizes of 1.00 and 1.50 have been
defined. If BarVision calculates a pour’s volume as
1.26, the pour is allocated to the 1.50 serving size. If
the pour volume is calculated to be 1.25, the pour is
allocated to the 1.00 serving size.
BarVision calculates pour volumes based on the
container’s pour spout pour rates (see “Expected pour
rate” on page 46 and “Actual pour rate” on page 46). A
pour rate is a measure of the amount of liquid a pour
spout dispenses each second. Each type (both brand
and model) of pour spout has an average pour rate.
This average rate identifies the amount of liquid the
typical pour spout of that brand and model will
dispense. However, the actual pour rate of a specific
pour spout is likely to be faster or slower than the
average. This variability results from several factors.
The main factor is the pour spout manufacturing
T
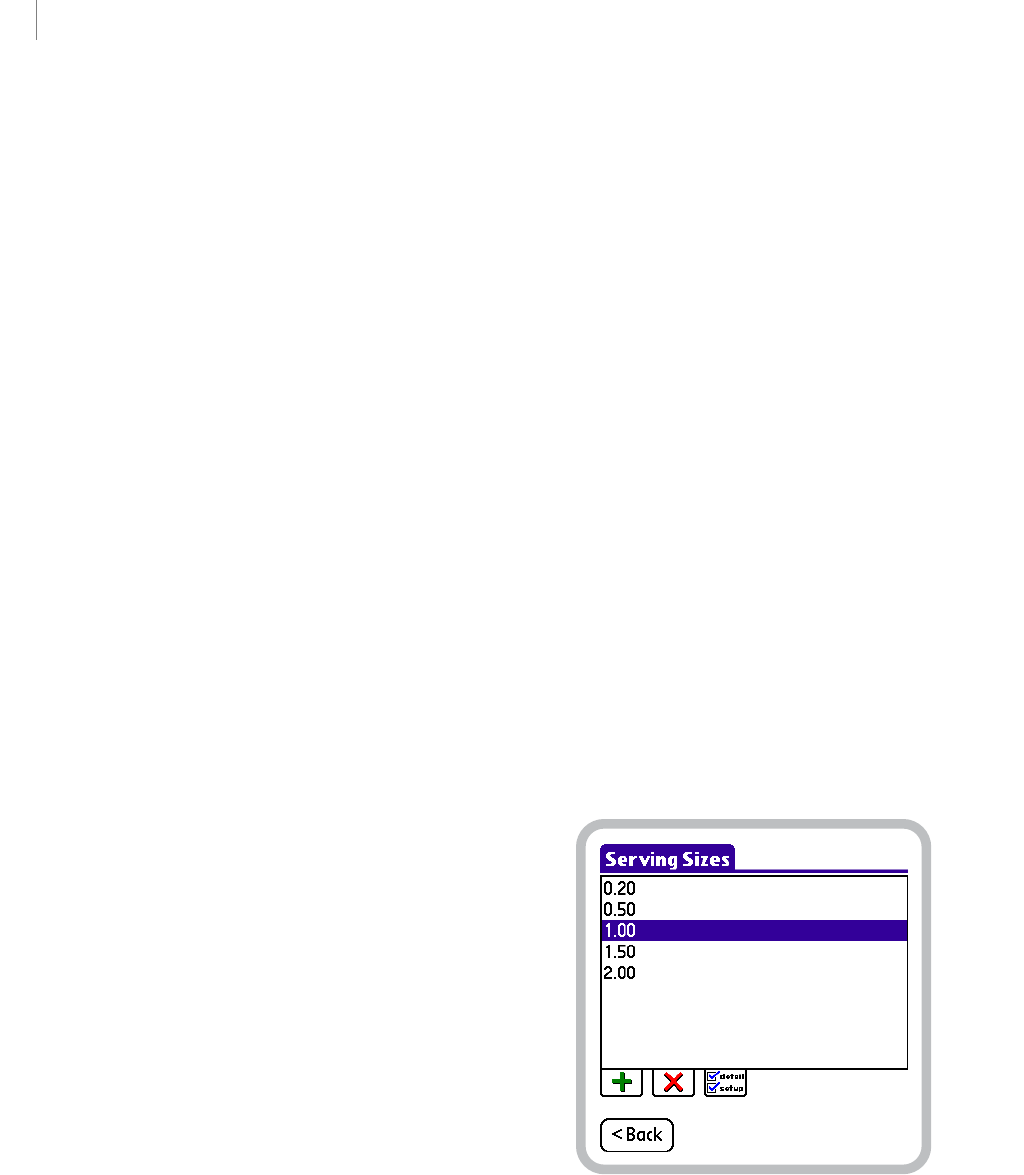
CHAPTER 6
72
Working with Serving Sizes
Draft for Reseller Review Only
Not for Distribution to End Users
process. The difference in actual pour rates between
two identical pour spouts from the same manufacturer
can be 20% or more. In addition, a number of other
factors affect the actual pour rate of a specific pour
spout, including the viscosity of the liquor, the temper-
ature, and the barometric pressure.
The actual pour rate accounts for all the factors that
cause the pour rate of a specific pour spout to vary
from the average. BarVision uses the actual pour rate of
a specific pour spout to calculate the actual portion size
of each drink that is poured with that specific pour
spout.
Bartenders free-pour drinks by time (how long a bottle
is tipped) or by volume (to a certain level in a glass).
Bartenders cannot be expected to adjust the timing of
their pours based on the actual pour rate of the specific
pour spout on a particular bottle. There is no way for a
bartender to know that, for example, a specific pour
spout pours 5% faster or slower than the average. What
bartenders can do, however, is develop accuracy and
consistency in their timing. For instance, a bartender
can pour all half ounce drinks based on a two count
and all one ounce drinks based on a four count,
regardless of what pour spout they are using (adjust-
ments may be made in the pour count for thicker
liquors or liquor kept in a freezer).
As a result, a bartender’s pour count should be based
on the average pour rate of the pour spout type being
used, not on the actual pour rate. This average pour
rate is called the expected pour rate in BarVision.
BarVision uses the expected pour rate to calculate the
expected portion size, which is the amount of liquor
that is expected to be dispensed based on the average
pour rate of that pour spout type. Unless you know a
specific pour spout pours faster or slower than average,
you would expect it to pour based on the average.
The expected portion size (and expected pour rate) is
used by BarVision to give feedback to bartenders about
how accurately and consistently they are timing their
pours (based on the one factor—timing—that they can
control). The expected portion size is also used for the
purpose of assigning a pour to a serving size. The
actual portion size (and actual pour rate) is used by
BarVision to determine how much liquor was actually
poured in a particular drink for purposes of tracking
inventory usage.
By assigning each pour to a serving size, BarVision
enables you to do the following:
• Evaluate the pouring accuracy and consistency of
your bartending staff
• Analyze the number of drinks poured by serving
size
• Calculate expected revenue based on the number of
pours per serving size
The Serving Sizes screen (see example below) displays a
list of the currently defined serving sizes. To access the
Serving Sizes screen, choose Mgr > Setup > Serving
Sizes. From this screen, you can modify the serving size
list in a number of ways. You can add a serving size—
assuming that at least one of the predefined serving
sizes has been deleted. You can edit the serving sizes to
match them to your establishment’s desired pour
volumes. And you can delete as many of the serving
sizes as you like—though by deleting them all, you will
disable the serving size feature and lose the benefits
described above.
Serving Sizes screen
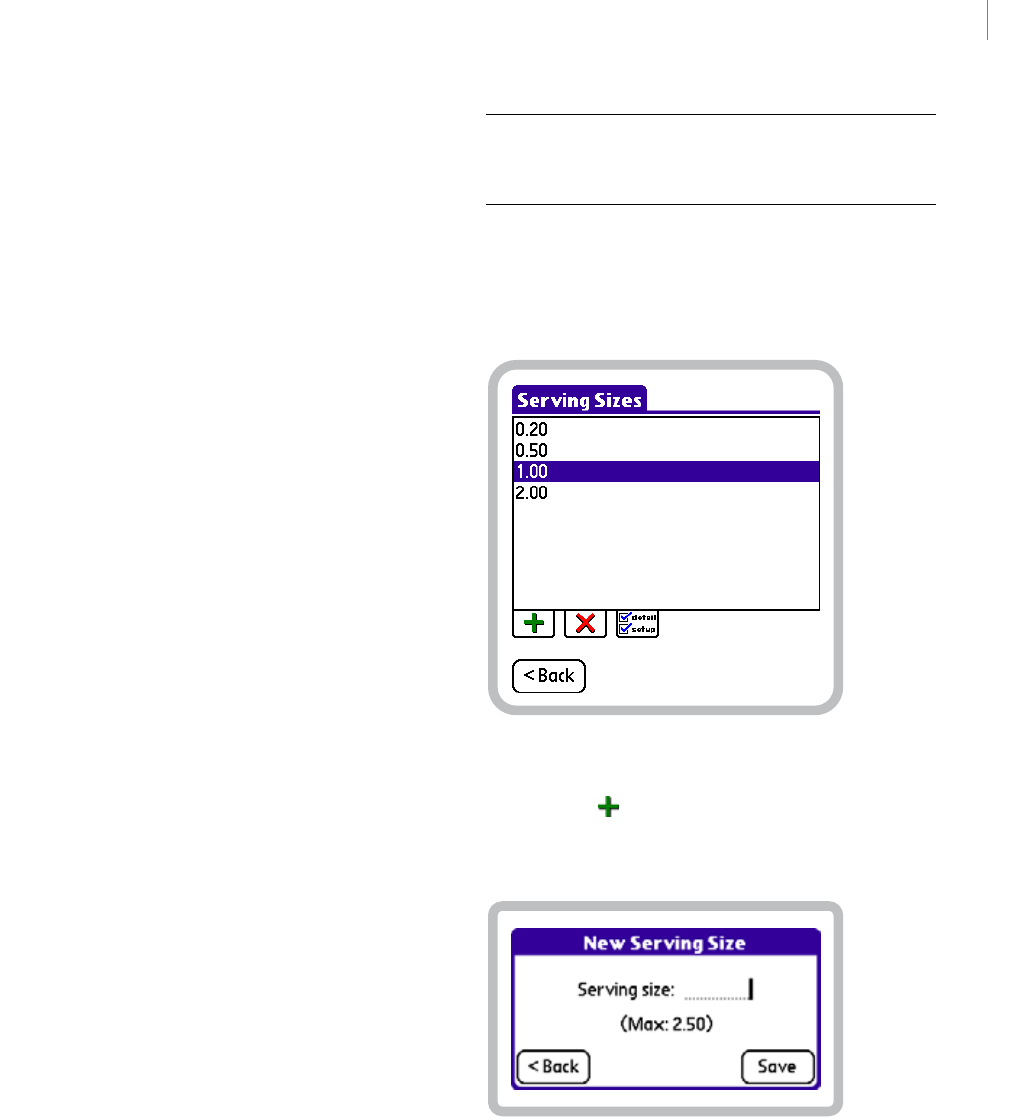
73
BARVISION FOR PALM OS®
User’s Guide
Draft for Reseller Review Only
Not for Distribution to End Users
About the Max allowed pour size
A feature closely related to serving sizes is the Max
allowed pour size option. The Max allowed pour size
defines the expected pour volume above which
BarVision identifies pours as exceptions rather than
allocating them to the largest serving size. For example,
if your largest defined serving size is 1.50 and the
Max allowed pour size is set to 2.20, all pours of an
expected volume less than 2.20 will be allocated to the
1.50 serving size, while pours of an expected volume
greater than or equal to 2.20 are flagged as exceptions.
This ensures that pours of an unusually large expected
volume are easily identifiable and separated out for
reporting purposes.
You can edit the Max allowed pour size from the
Security Options screen. To access the Security
Options screen, choose Mgr > Setup > Options >
Security > Select. The default system value for the Max
allowed pour size is 2.50 U.S. fluid ounces. Permis-
sible values are from 0.01 to 9999.99 in the
volumetric unit of your choice. To view details of those
pours identified as exceptions, include the report
section Exceptions on any report. (For information, see
“Working with Reports” on page 79.)
Adding serving sizes
BarVision ships preconfigured with five defined serving
sizes: 0.20, 0.50, 1.00, 1.50, and 2.00. This is
the maximum number of serving sizes allowed by the
system. As a result, a new serving size can only be
added if one of the predefined serving sizes has been
deleted.
You may want to add a serving size to align BarVision
with a new desired pour volume you have decided to
use in your establishment. Or you may want to add a
serving size to re-create a mistakenly deleted one.
Please note that any serving size value you enter must
be less than or equal to the Max allowed pour size. As
a result, you may need to edit the Max allowed pour
size before adding a serving size. For information, see
“Editing the Max allowed pour size” on page 75.
Note: Performing the following procedure typically
requires the manager security code. See “About security
codes” on page 26.
To add a serving size:
1Choose Mgr > Setup > Serving Sizes to display the
Serving Sizes screen.
Serving Sizes screen
2Tap Add ( ) to display the New Serving Size
screen. The Serving size text box will contain the
insertion point (cursor).
New Serving Size screen
3Enter a value for the new serving size in the Serving
size text box. The value you enter must be less than or
equal to the Max allowed pour size, which is shown on
screen for your reference.
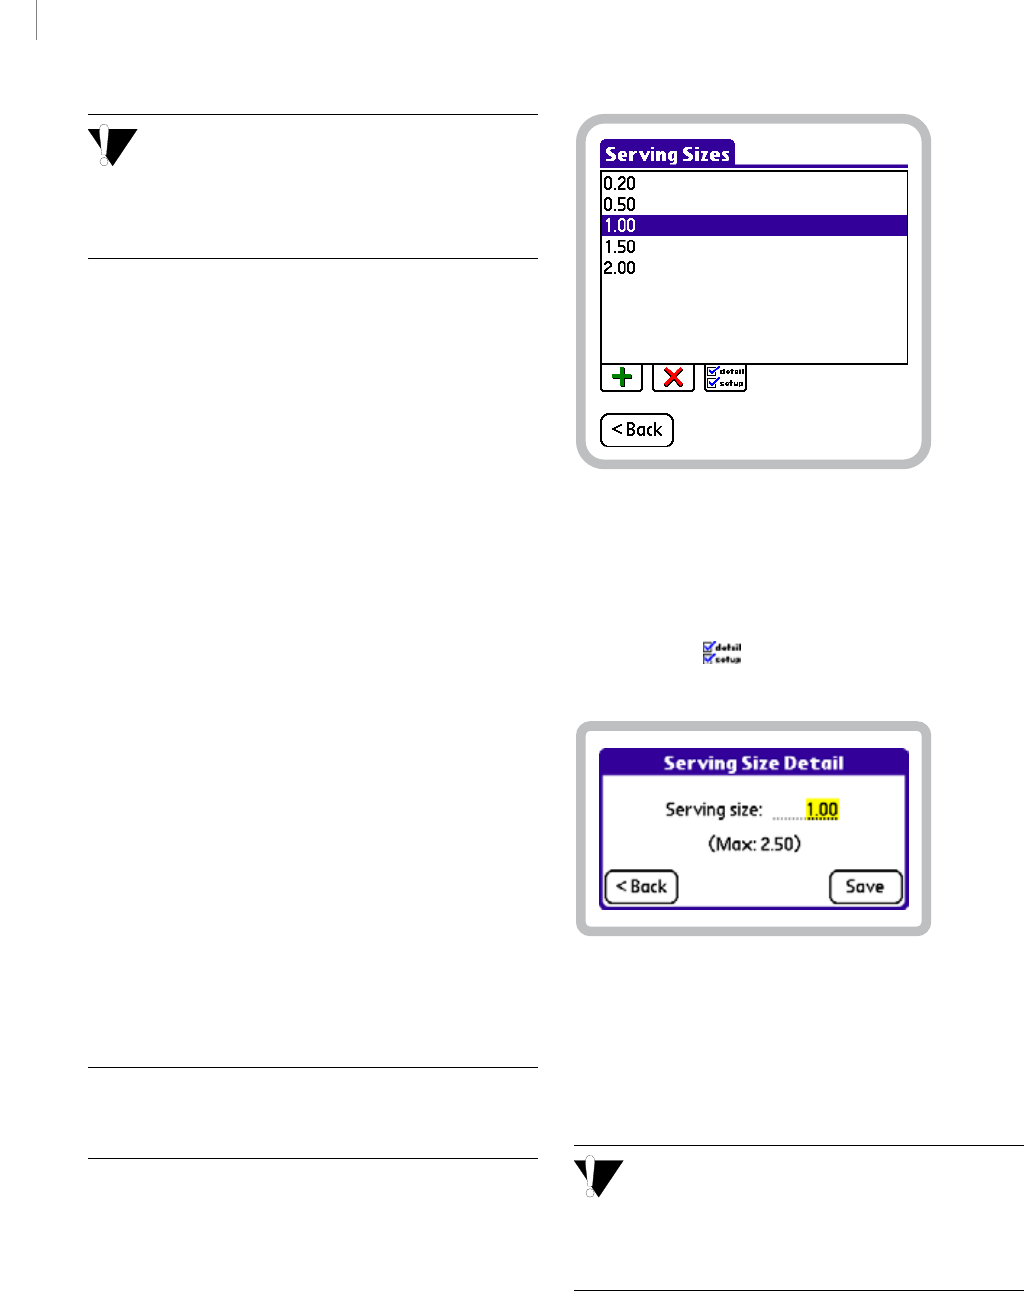
CHAPTER 6
74
Working with Serving Sizes
Draft for Reseller Review Only
Not for Distribution to End Users
If you enter a value with a precision greater than
hundredths of a unit, the software will trim the
number at the second decimal place. For example, if you
enter the value 1.357, the serving size will be set to
1.35.
4Tap Save to store your changes and return to the
Serving Sizes screen.
Editing serving sizes
You can modify each serving size in the serving size list.
You may want to edit serving sizes to standardize them
to your preferred unit of measure or match them to
your establishment’s desired pour volumes.
For example, if you choose to use metric measure-
ments, you may want to edit the predefined serving
sizes to values of 6, 15, 30, 44, and 59—the equiva-
lents, in milliliters, of the default serving size values.
Be aware that BarVision will only allow you to enter
serving size values less than or equal to the Max
allowed pour size. As a result, you may need to edit the
Max allowed pour size before you alter the serving
sizes. For information, see “Editing the Max allowed
pour size” on page 75.
Editing a serving size that pours have already been
allocated to will not affect the journal event records for
those pours. Existing pour events will be listed on all
subsequent reports under the serving size they were
originally assigned to by the system, whether or not
that serving size currently exists.
Note: Performing the following procedure typically
requires the manager security code. See “About security
codes” on page 26.
To edit a serving size:
1Choose Mgr > Setup > Serving Sizes to display the
Serving Sizes screen.
Serving Sizes screen, 1.00 serving size selected
2In the serving size list, tap the serving size you want
to edit. The serving size should appear selected, as does
1.00 in the figure above.
3Tap Detail ( ) to display the Serving Size Detail
screen.
Serving Size Detail screen, Serving size selected for editing
4Drag (or double-tap) to select the current Serving
size, and then enter a new one. The value you enter
must be less than or equal to the Max allowed pour
size, which is shown on screen for your reference.
If you enter a value with a precision greater than
hundredths of a unit, the software will trim the
number at the second decimal place. For example, if you
enter the value 1.357, the serving size will be set to
1.35.
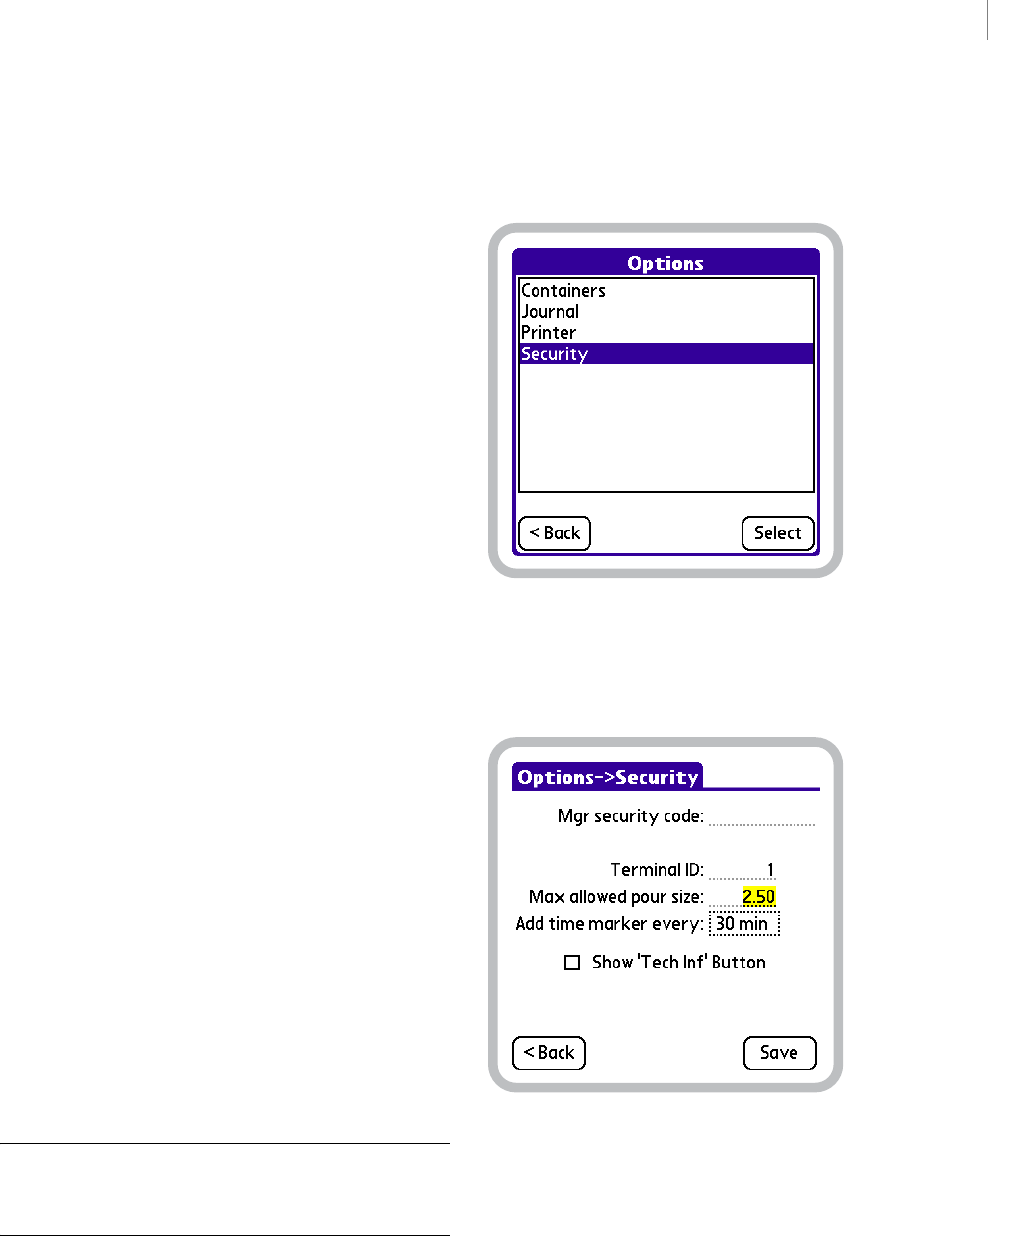
75
BARVISION FOR PALM OS®
User’s Guide
Draft for Reseller Review Only
Not for Distribution to End Users
5Tap Save to store your changes and return to the
Serving Sizes screen.
Editing the Max allowed
pour size
You may want to edit the Max allowed pour size to
adjust the expected pour volume above which
BarVision identifies pours as exceptions. Or you may
need to modify the value to accommodate your
preferred unit of measure.
For example, if your establishment’s largest defined
serving size is 1.50, you may want to decrease the
Max allowed pour size from its default value of 2.50
so that pours of an expected volume greater than 2.00
get flagged as exceptions. Or, if you choose to use
metric measures, you may need to increase the Max
allowed pour size from its default value to enter
serving sizes in milliliters.
Please note that if you attempt to reduce the Max
allowed pour size to a value less than that of an
existing serving size, the system will prompt you for
verification before the change takes place. If you
confirm the change, all serving sizes greater than the
newly entered Max allowed pour size will be deleted.
This action will not delete or in any way affect the
journal event records for any existing pours.
For example, assume that serving sizes of 1.75,
2.00, and 2.25 are currently defined. If you choose
to edit the Max allowed pour size to a value of 2.00,
the 2.25 serving size will be deleted. All the journal
event records for pours that were assigned to the 2.25
serving size will still exist and will be listed on all subse-
quent reports under the 2.25 serving size.
Note: Performing the following procedure typically
requires the manager security code. See “About security
codes” on page 26.
To edit the Max allowed pour size:
1Choose Mgr > Setup > Options to display the
Options screen.
Options screen
2In the option list, tap Security, and then tap Select
to display the Security Options screen.
Security Options screen, Max allowed pour size selected for edit-
ing
3Drag (or double-tap) to select the current Max
allowed pour size, and then enter a new one.
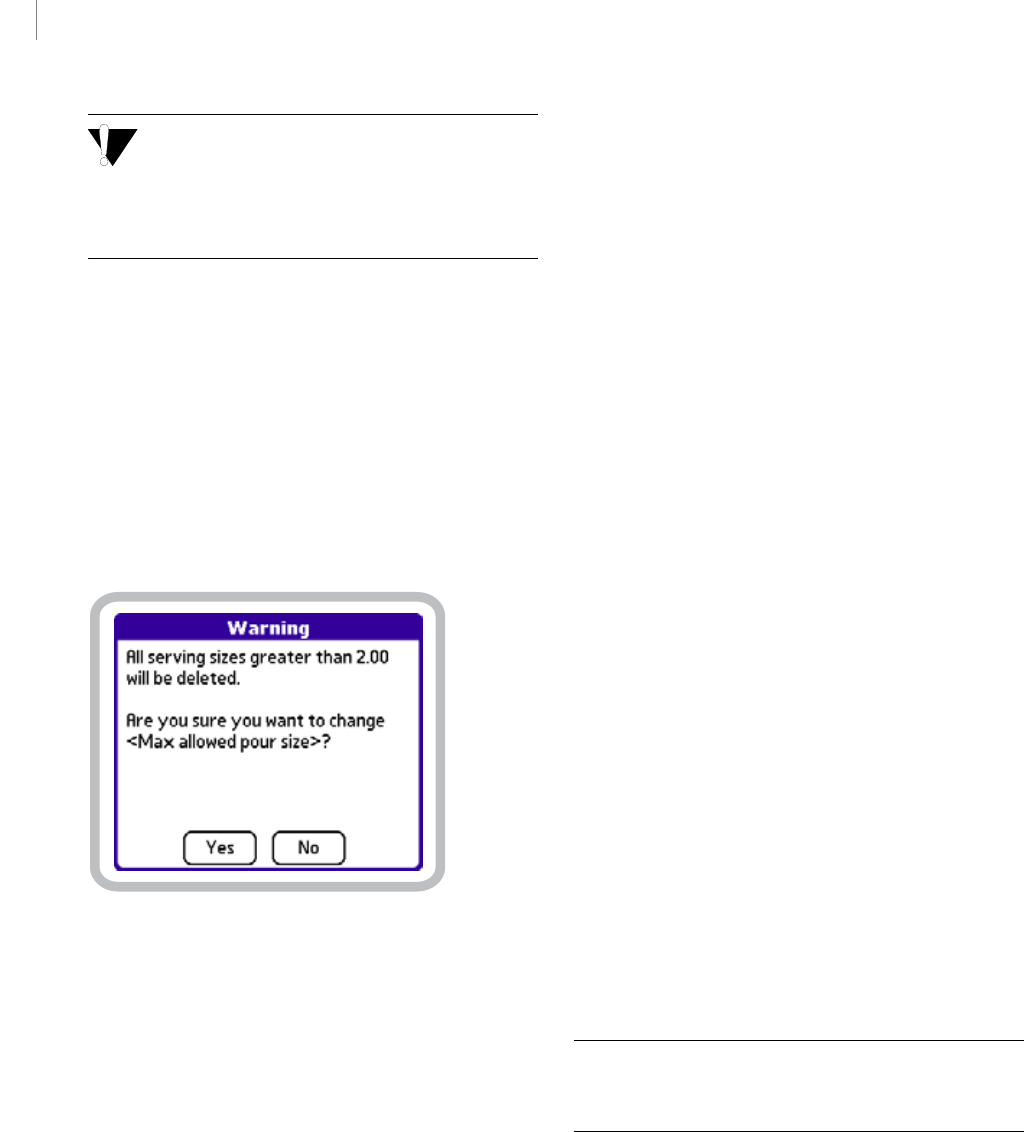
CHAPTER 6
76
Working with Serving Sizes
Draft for Reseller Review Only
Not for Distribution to End Users
If you enter a value with a precision greater than
hundredths of a unit, the software will trim the
number at the second decimal place. For example, if you
enter the value 2.357, the Max allowed pour size will
be set to 2.35.
4Tap Save to store your changes.
5One of the following two things will occur:
• If the value you entered in step 3 is greater than or
equal to the largest serving size, the new Max
allowed pour size will be saved and the Options
screen displayed.
• If the value you entered in step 3 is less than the
largest serving size, a Warning screen similar to the
one below will be displayed.
Serving size deletion Warning screen
—Tap Yes to confirm your change to the Max
allowed pour size, to delete the affected serving
size(s), and to return to the Options screen.
—Tap No to cancel any change and return to the
Security Options screen.
To e d it th e Max allowed pour size to an
alternate value, return to step 3. Otherwise, tap
<Back to return to the Options screen.
Deleting serving sizes
You may want to delete unused or unwanted serving
sizes. This can eliminate the possibility of BarVision
allocating pours to a serving size your establishment
does not use. Also, removing unused serving sizes will
simplify the serving size information that appears on
reports.
For example, if your establishment uses the same
desired pour volume for shots and rocks drinks (for
instance, 1 fluid ounce), you may want to delete the
predefined 1.50 serving size intended to represent a
uniquely sized rocks pour. Deleting the unused serving
size removes the possibility that BarVision will assign
over- or underpours to a serving size that is, for your
establishment, not applicable. This will help ensure
that BarVision generates useful and usable serving size
report information.
Deleting a serving size that pours have been previously
allocated to will not delete or in any way affect the
journal event records for those pours. Existing pour
events will be listed on all subsequent reports under the
serving size they were originally assigned to by the
system, whether or not that serving size currently
exists.
If you choose to delete all of the existing serving sizes,
you will, in effect, disable the serving size feature. This
will diminish your ability to use BarVision to evaluate
the pouring accuracy and consistency of your
bartending staff. In addition, it will hinder your ability
to calculate expected revenue, as the system will assign
all pours to an Unknown serving size.
Note: Performing the following procedure typically
requires the manager security code. See “About security
codes” on page 26.
To delete a serving size:
1Choose Mgr > Setup > Serving Sizes to display the
Serving Sizes screen.
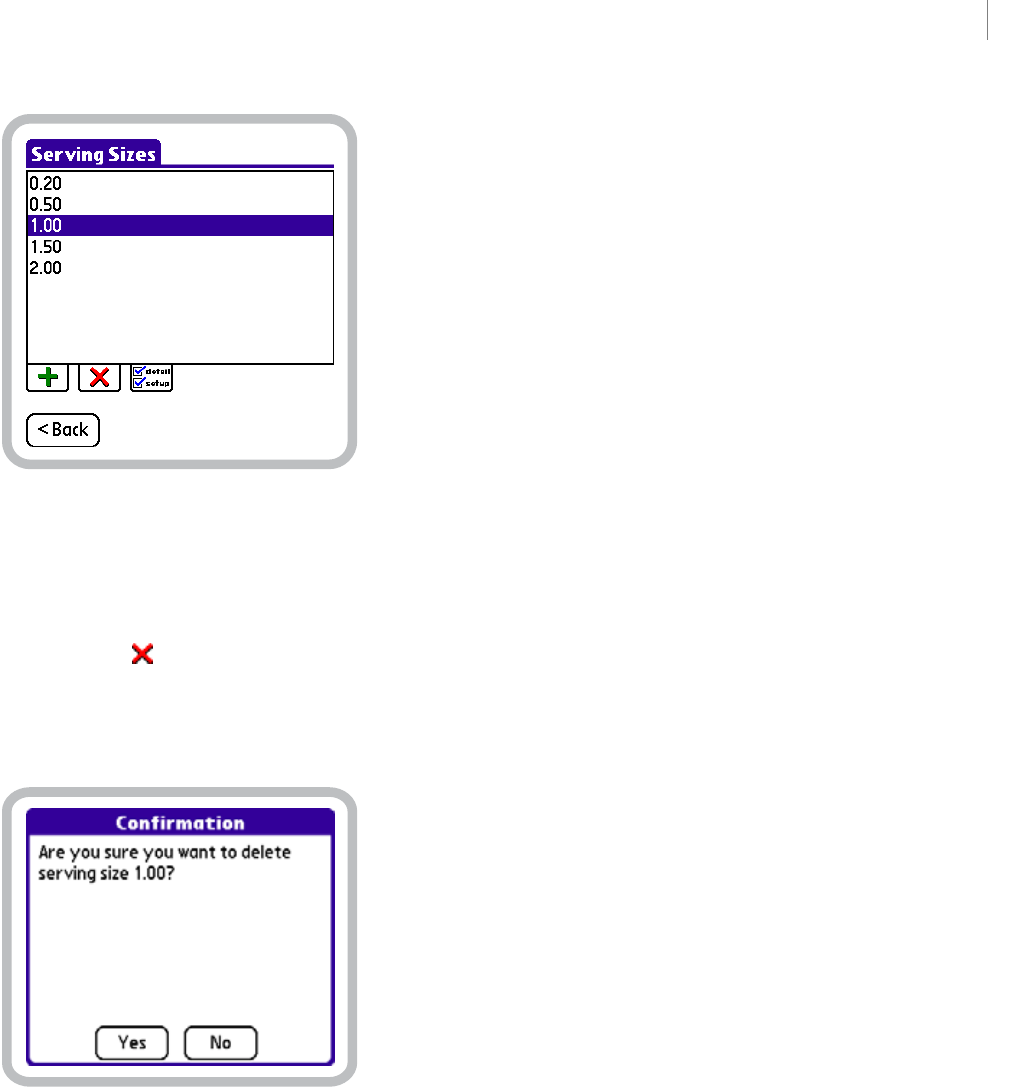
77
BARVISION FOR PALM OS®
User’s Guide
Draft for Reseller Review Only
Not for Distribution to End Users
Serving Sizes screen, 1.00 serving size selected
2In the serving size list, tap the serving size you want
to delete. The serving size should appear selected, as
does 1.00 in the figure above.
3Tap Delete ().
4A Confirmation screen similar to the one below will
be displayed. Tap Yes to delete the serving size and
return to the Serving Sizes screen.
Serving size deletion Confirmation screen

CHAPTER 6
78
Working with Serving Sizes
Draft for Reseller Review Only
Not for Distribution to End Users
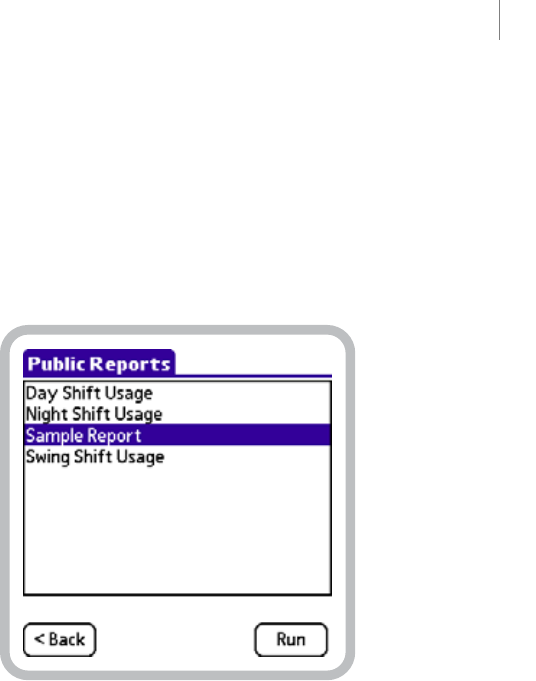
79
Draft for Reseller Review Only
Not for Distribution to End Users
Chapter 7: Working with Reports
eports help you to organize and utilize the data
that the BarVision system captures during the
day-to-day operation of your establishment.
This chapter provides information about using reports
and explains how to add, edit, delete, run, view, and
print them. It contains the following sections:
• “About reports” on page 79
• “Adding reports” on page 84
• “Editing reports” on page 86
• “Running, viewing, and printing reports” on
page 92
• “Deleting reports” on page 102
About reports
The BarVision system provides comprehensive
reporting capabilities. You can create a virtually
unlimited number of reports (65,535) and populate
them with simple, predesigned report sections. Report
sections are built-in subreports that help you quickly
add and organize the data that will appear on your
report. Sections vary in content. Some provide a high-
level summary, while others provide event-specific
detail. (For more information, see “Report sections” on
page 81.) Sections can be added and arranged in any
order, enabling you to easily create reports that make
sense for your establishment: a shift close-out, a weekly
inventory audit, or an up-to-the-minute sales snapshot.
BarVision allows you to create two different types of
reports: public reports that all users can view and print,
and management reports that typically require the entry
of a security code to access. You configure a report as
either public or management by selecting or clearing
the report’s Public report setting (see “Public” on
page 80).
Public reports are available for viewing and printing
from the Public Reports screen (see example below).
You can access this screen from the Activity screen by
choosing Reports. Public reports can be run, viewed,
and printed—but not added, edited, or deleted—from
the Public Reports screen. This enables you to provide
your bartending staff with the ability to run reports
without having to give them unlimited access to the
system.
Public Reports screen—provides view and print access to public
reports
By contrast, the Reports screen (see example below)
provides unlimited access to all your BarVision reports.
On a typically configured BarVision system, accessing
the Reports screen (by choosing Mgr > Reports)
requires the entry of a security code. This protects your
reports from inadvertent or unauthorized changes and
deletion, and provides a way to limit access to sensitive
data.
R
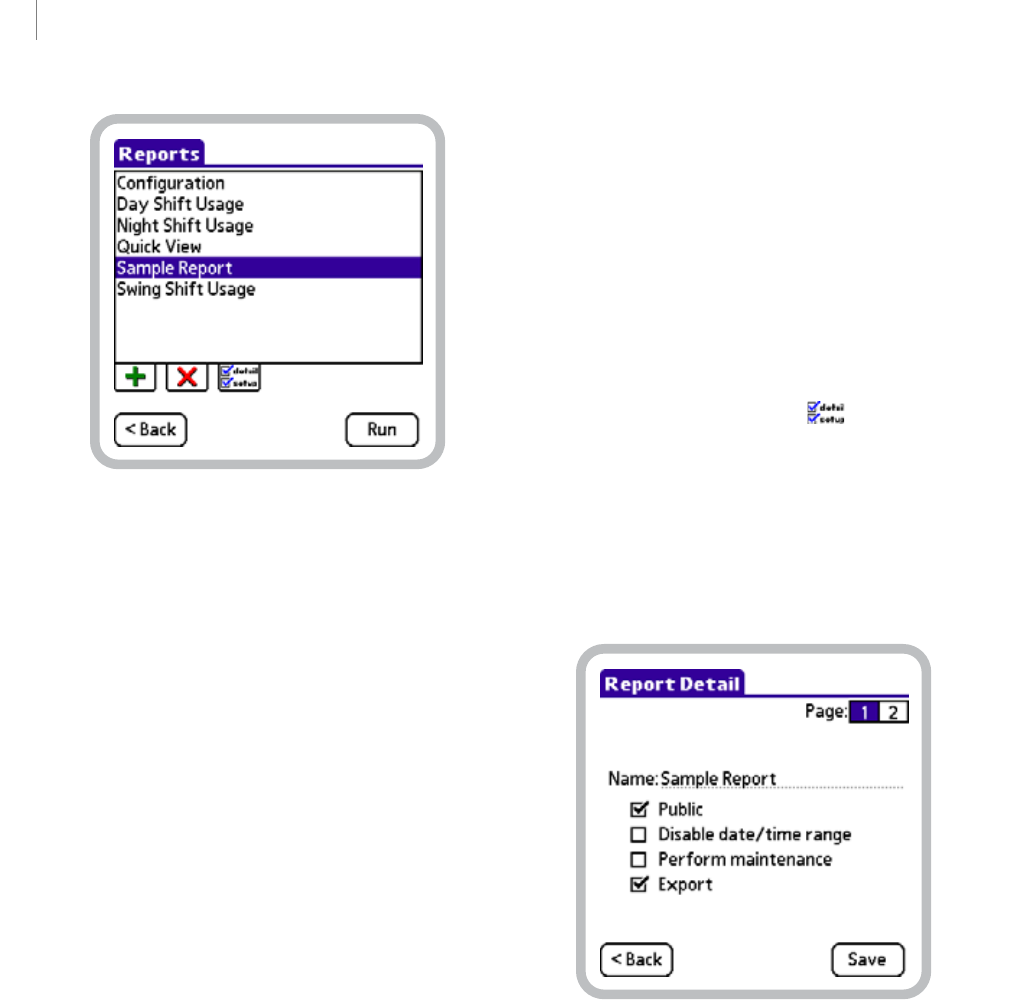
CHAPTER 7
80
Working with Reports
Draft for Reseller Review Only
Not for Distribution to End Users
Reports screen—provides unlimited access to all reports
BarVision includes two predefined reports named
Configuration and Quick View. The built-in
Configuration report provides a summary of your
current system setup and configuration information
(see “Running the Configuration report” on page 98).
The Quick View report lets you define its contents,
on the fly, each time you run it (see “Running the
Quick View report” on page 99).
BarVision reports can be viewed directly on your Palm®
handheld or printed via network or infrared
connection (see “Configuring printers” on page 16).
With the BarVision Conduit for Palm HotSync
installed, you can export report data in ASCII text file
(.txt) format to your desktop or laptop computer. Once
those text files have been created, they can be printed,
e-mailed, or archived for permanent storage and record
keeping. (For information, see “Exporting data” on
page 107.)
When you run a BarVision report, you typically define
the range of data you want to include based on the date
and time of its collection. In BarVision, three data
range options are available. You can choose to include
all existing collected data, data collected since the last
time the report was run, or data collected during any
user-specified date and time range. The date/time
range option allows you to isolate distinct time spans
corresponding to shifts, promotional events, or
inventory audits. It also enables easy comparison of
various time periods, such as week-to-week or month-
to-month.
Report settings
As mentioned above, the reports you create can be
individually configured for public access. You enable or
disable public access to a report from page 1 of the
Report Detail screen (see example below). To access the
Report Detail screen, choose Mgr > Reports, select a
report, and then tap Detail ( ). From this screen,
several report-specific configuration settings can be
enabled or disabled, including public access to the
report. Each of the settings available on page 1 of the
Report Detail screen is specific to that individual
report. Selecting the item only enables the function for
the report currently being edited. Clearing the item
only disables the function for the current report.
Page 1 of the Report Detail screen
Public When selected, this setting enables public access
to the report. Public reports can be run, viewed, and
printed from the Public Reports screen without
entering a security code. By default, this setting is
enabled when you create a new report.
Disable date/time range When selected, this setting
eliminates access to the report’s date/time configuration
when the report is run from the Public Reports screen.
If the date/time range is disabled, running the report
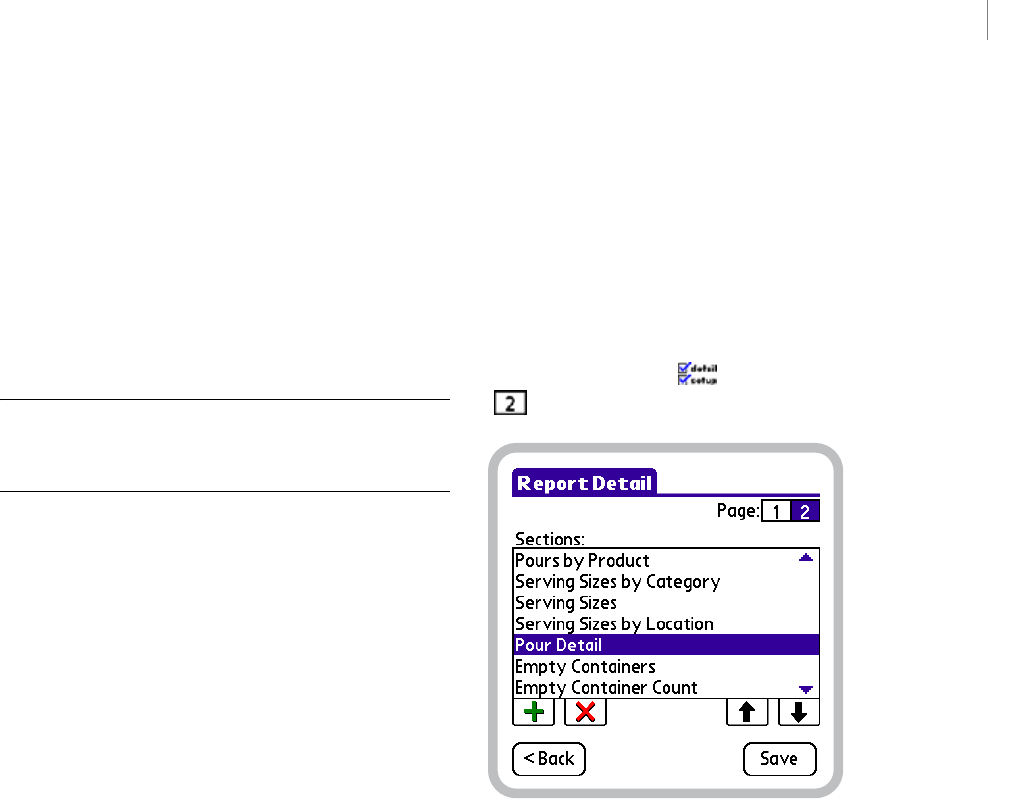
81
BARVISION FOR PALM OS®
User’s Guide
Draft for Reseller Review Only
Not for Distribution to End Users
from the Public Reports screen automatically includes
all data collected since the last time the report was run.
For example, you might want to create a shift close-out
report that your bartenders run at the end of their
shift. By enabling the report’s Disable date/time range
setting, you can ensure that the report will include all
of the data collected since the last time the report was
run (assumedly, at the end of the previous bartender’s
shift). By default, this setting is disabled when you
create a new report.
Note: When you run reports from the Reports screen, the
Disable date/time range setting is ignored and full access
to date and time configuration is permitted.
Perform maintenance When selected, this setting
enables report-initiated data maintenance. During
report-initiated maintenance, the system removes
obsolete data older than the value set for the Minimum
days in journal option (see “Minimum days in journal”
on page 84). By default, the Perform maintenance
setting is disabled when you create a new report.
For more information regarding report-initiated data
maintenance, see “Journal options” on page 83.
Export When you run a report that has the Export
setting enabled, the system designates the report for
export to a text file. The next time you synchronize
your handheld, the system creates an ASCII text file
(.txt) version of the report on the computer connected
to the handheld. Exported reports are stored in the
default location: C:\Documents and
Settings\User Name\My
Documents\BarVision\Reports. Use of the
export function requires installation of the BarVision
Conduit for Palm HotSync. (For information, see
“Installing the BarVision Conduit for Palm HotSync”
on page 13.) By default, the Export setting is enabled
when you create a new report.
Report sections
BarVision reports are composed of sections—simple,
built-in subreports. The sixteen predefined report
sections vary in the information that they contain.
Some provide high-level summaries, while others
provide pour-specific details. Sections can be added to
or removed from any report and arranged in any order,
enabling you to easily customize every report you
create.
Page 2 of the Report Detail screen (see example below)
enables you to view a list of the sections that have been
added to a report. You can access page 2 of the Report
Detail screen by choosing Mgr > Reports, selecting a
report, tapping Detail ( ), and then tapping 2
().
Page 2 of the Report Detail screen
The paragraphs below describe the content of each
report section.
Empty Containers This section provides details of each
liquor bottle emptied during the reporting period. An
asterisk (*) indicates those bottles whose yield was
irregular. This means the container’s yield was outside
the parameters set for either the Underyield (see
“Underyield” on page 48) or Overyield (see
“Overyield” on page 48) container option setting. (See
“Irregular Empty Containers” on page 82.) Infor-
mation provided for each empty container includes:
date and time the bottle’s pour spout was removed,
product name, total number of pours dispensed from
the container, total number of improper pours
dispensed from the container, and the container’s yield
percentage.

CHAPTER 7
82
Working with Reports
Draft for Reseller Review Only
Not for Distribution to End Users
Empty Containers Count This section lists the number
of bottles emptied during the reporting period,
summarized by product name. In addition, an average
bottle yield for each product is calculated and displayed
in this section. Information provided includes: product
name, empty bottle count, average yield percentage,
standard deviation of the yields, and the combined cost
of the emptied containers.
Exceptions This section contains a chronological list
of the irregular events that occurred during the
reporting period. Irregular events include: oversized
pours that could not be assigned to a defined serving
size, container missing and found events, lost container
events, pours made at a less than optimal bottle tilt
angle, manual container variances, and each time a
pour spout was removed from a bottle for cleaning or
maintenance purposes.
Expiring Hardware This section provides a list of the
pour spouts that are nearing their expiration. Infor-
mation provided for each expiring pour spout includes:
model number, firmware revision number, identifi-
cation number, number of days and pours remaining
until expiration, and the product name and location
assigned to the pour spout.
Hardware This section provides detailed hardware
information for each data receiver, active antenna, and
wireless pour spout that has been added to the system.
Information provided includes: hardware model and
firmware revision numbers, identification number for
each component, number of days and pours remaining
until each pour spout expires, and the product name
and location assigned to each wireless pour spout.
Irregular Empty Containers This section provides
details for those empty bottles with a final yield outside
your limitations. Containers are considered irregular if
their yield is outside the parameters set for either the
Underyield (see “Underyield” on page 48) or
Overyield (see “Overyield” on page 48) container
option setting. This report section lists all of the events
recorded for each irregular bottle so that you can
diagnose the cause of the irregular yield. Information
provided for each container event includes: date and
time the event occurred, type of event, and both the
expected and actual volume recorded for any pour
event.
Journal Detail This section contains full detail of every
event recorded in the system’s journal during the
reporting period, organized chronologically. Event
totals for each event type are also displayed. Infor-
mation provided for each recorded event includes: date
and time the event occurred, product name (where
applicable), description of the event type, and both the
expected and actual volume recorded for the event
(where applicable).
Missing Hardware This section provides detailed
communications information for each container the
system has identified as missing (see “Container
missing” on page 32). The system classifies a container
as missing if no transmission is received from the
container’s wireless pour spout for a period longer than
the value set for the Report missing after container
option. Information provided for each missing
container includes: product name, location, pour spout
identification number, date and time the data receiver
last received a transmission from the spout, number of
days and pours remaining until the pour spout expires,
and the number of communication errors reported for
the spout.
Open Containers This section provides a summary for
each bottle in open inventory, organized by container
location. Information provided for each open container
includes: product name, number of pours dispensed,
estimated volume of liquid remaining, estimated
percent of liquid remaining, estimated current weight,
current age, and the percentage by which the
container’s Actual pour rate (see “Actual pour rate” on
page 46) varies from its Expected pour rate (see
“Expected pour rate” on page 46).
Pour Detail This section contains full detail of every
container-related event recorded in the system’s journal
during the reporting period, organized chronologically.
Event totals for each type of container-related event are
also displayed. Information provided for each event
includes: date and time the event occurred, product
name, description of the event type, and both the
expected and actual volume recorded for the event.

83
BARVISION FOR PALM OS®
User’s Guide
Draft for Reseller Review Only
Not for Distribution to End Users
Pours by Category This section provides a summary of
the pours that occurred during the reporting period,
organized by category. Information provided for each
category includes: category name, total number of
pours, total expected volume of fluid dispensed, and
the total cost of the expected volume of fluid
dispensed.
Pours by Location This section provides a summary of
the pours that occurred during the reporting period,
organized by location. Information provided for each
location includes: location designation, total number of
pours, total expected volume of fluid dispensed, and
the total cost of the expected volume of fluid
dispensed.
Pours by Product This section provides a summary of
the pours that occurred during the reporting period,
organized by product. Information provided for each
product includes: product name, total number of
pours, total expected volume of fluid dispensed, and
the total cost of the expected volume of fluid
dispensed.
Serving Sizes This section provides detailed pour
information for each serving size, organized by
category and location. Information provided for each
serving size includes: total number of pours, average
expected pour volumes, standard deviation of the
expected pour volumes, and the total cost of the
expected volume of fluid dispensed.
Serving Sizes by Category This section provides pour
totals for each serving size, organized by category.
Information provided for each serving size in each
category includes: total number of pours, average
expected pour volumes, standard deviation of the
expected pour volumes, and the total cost of the
expected volume of fluid dispensed.
Serving Sizes by Location This section provides pour
totals for each serving size, organized by location.
Information provided for each serving size at each
location includes: total number of pours, average
expected pour volumes, standard deviation of the
expected pour volumes, and the total cost of the
expected volume of fluid dispensed.
Journal options
The Journal Options screen (see example below)
enables you to configure several data maintenance-
related report options. You can access the Journal
Options screen by choosing Mgr > Setup > Options >
Journal > Select. Current Palm® handheld hardware
constraints limit the size of the system journal to a
maximum of thirty thousand event records. To remain
under that limit, BarVision must periodically delete
some of the oldest obsolete records to make room for
new ones. Because reports are generally run at regular
intervals, the system uses the generation of a report as a
trigger for performing data maintenance.
Journal Options screen
During maintenance, the system purges the oldest
obsolete event records from the journal. For an event
record to be considered obsolete, it must meet two
criteria: it must be older than the Minimum days in
journal value, and it must pertain to a bottle whose
pour spout has been removed (presumably, because the
bottle was empty). The system uses this method of
defining data as obsolete to ensure that no active data
gets removed.
Each of the options available on the Journal Options
screen has a global effect. Selecting an item enables the
option systemwide. Clearing the item disables the
option systemwide. The Journal Options screen
enables you to configure:
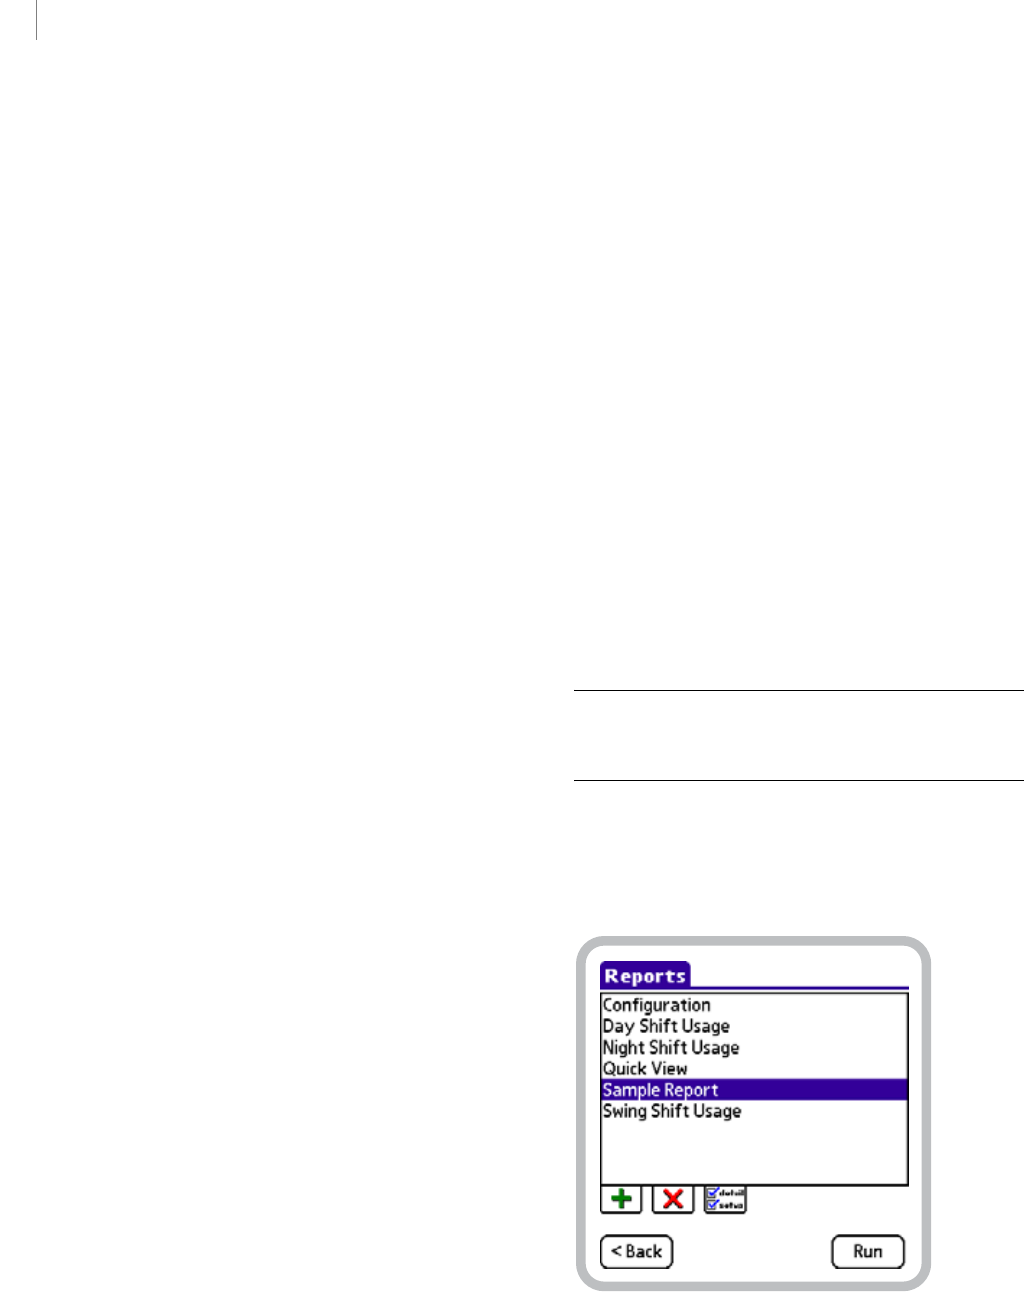
CHAPTER 7
84
Working with Reports
Draft for Reseller Review Only
Not for Distribution to End Users
• The age at which obsolete data can be deleted
during report-initiated maintenance
• The level of user interaction required during report-
initiated maintenance
• The generation of a system backup on the Palm®
handheld’s SD memory card during report-initiated
maintenance
Minimum days in journal This option enables you to
specify the number of days’ worth of journal data you
want to exclude from maintenance. For example,
assume that the Minimum days in journal value is set
to 14. During report-initiated maintenance, the most
recent fourteen days’ worth of event records will be
kept in the journal, whether or not those records relate
to a bottle that is currently in use. Obsolete data older
than fourteen days will be removed. The default system
value for this option is 14. Permissible values are from
1 to 365.
The status of an individual report’s Perform mainte-
nance report setting (see “Perform maintenance” on
page 81) determines whether or not a report initiates
maintenance after it has been run.
Prompt for maintenance When this option is selected,
BarVision prompts you to manually initiate mainte-
nance after you run a report that has its Perform
maintenance setting enabled (see “Perform mainte-
nance” on page 81). This provides users the oppor-
tunity to either accept or decline report-initiated data
maintenance. When this option is cleared and you run
a report that has its Perform maintenance setting
enabled, data maintenance is automatically performed
without any user interaction. The Prompt for mainte-
nance option is enabled in the default BarVision
configuration.
Back up during maintenance When this option is
selected, BarVision creates a backup copy of all your
data and system settings before performing report-
initiated maintenance. The system creates the backup
on the SD memory card currently located in the Palm®
handheld’s expansion slot. If there is no SD memory
card in the expansion slot, no system backup is created.
This option is disabled in the default BarVision config-
uration.
The status of an individual report’s Perform mainte-
nance report setting (see “Perform maintenance” on
page 81) determines whether or not a report initiates
maintenance after it has been run.
Adding reports
BarVision ships preconfigured with two defined reports
(Configuration and Quick View), but the
system can store and track a virtually unlimited
number (65,535).
You will likely need to add additional reports and
configure them to meet your specific business needs.
For example, you might want to create reports
expressly designed to be used as shift close-out reports,
inventory audit reports, and purchasing requirements
reports. After you have added and properly configured
a report, you can run it over and over again without
having to spend time on setup.
Note: Performing the following procedure typically
requires the manager security code. See “About security
codes” on page 26.
To add a report:
1Choose Mgr > Reports to display the Reports
screen.
Reports screen
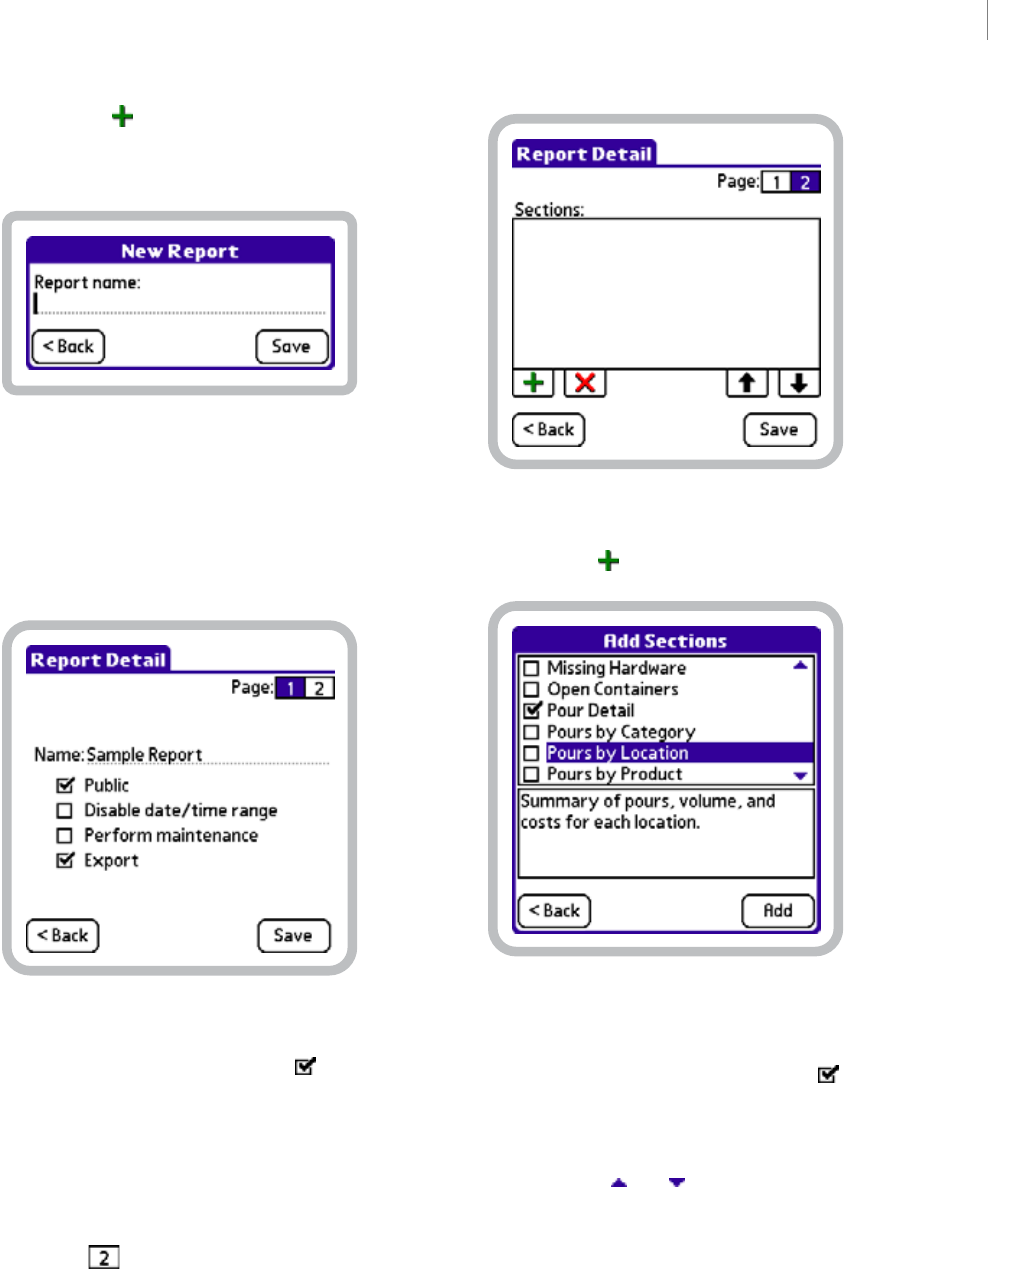
85
BARVISION FOR PALM OS®
User’s Guide
Draft for Reseller Review Only
Not for Distribution to End Users
2Tap Add ( ) to display the New Report screen.
The Report name text box will contain the insertion
point (cursor).
New Report screen
3Enter a name for the new report (up to twenty-two
characters in length) in the Report name text box.
4Tap Save to store your changes and display page 1
of the Report Detail screen.
Page 1 of the Report Detail screen
5Select or clear the Check Boxes ( ) to set the
Public, Disable date/time range, Perform mainte-
nance, and Export report settings to your desired
configuration.
For information about the functions of these settings,
see “Report settings” on page 80.
6Tap 2 ( ) to display page 2 of the Report Detail
screen.
Page 2 of the Report Detail screen
7Tap Add ( ) to display the Add Sections screen.
Add Sections screen, Pour Detail section selected for adding
8In the section list, tap the sections you want to add
to the report. Each section’s Check Box () should
appear selected, as does the Pour Detail section’s in the
figure above. If a section you want to select is not
displayed among the currently visible items, drag the
Scroll Arrows ( and ) at the right-hand side of the
list.
For information about the content of each section, see
“Report sections” on page 81.
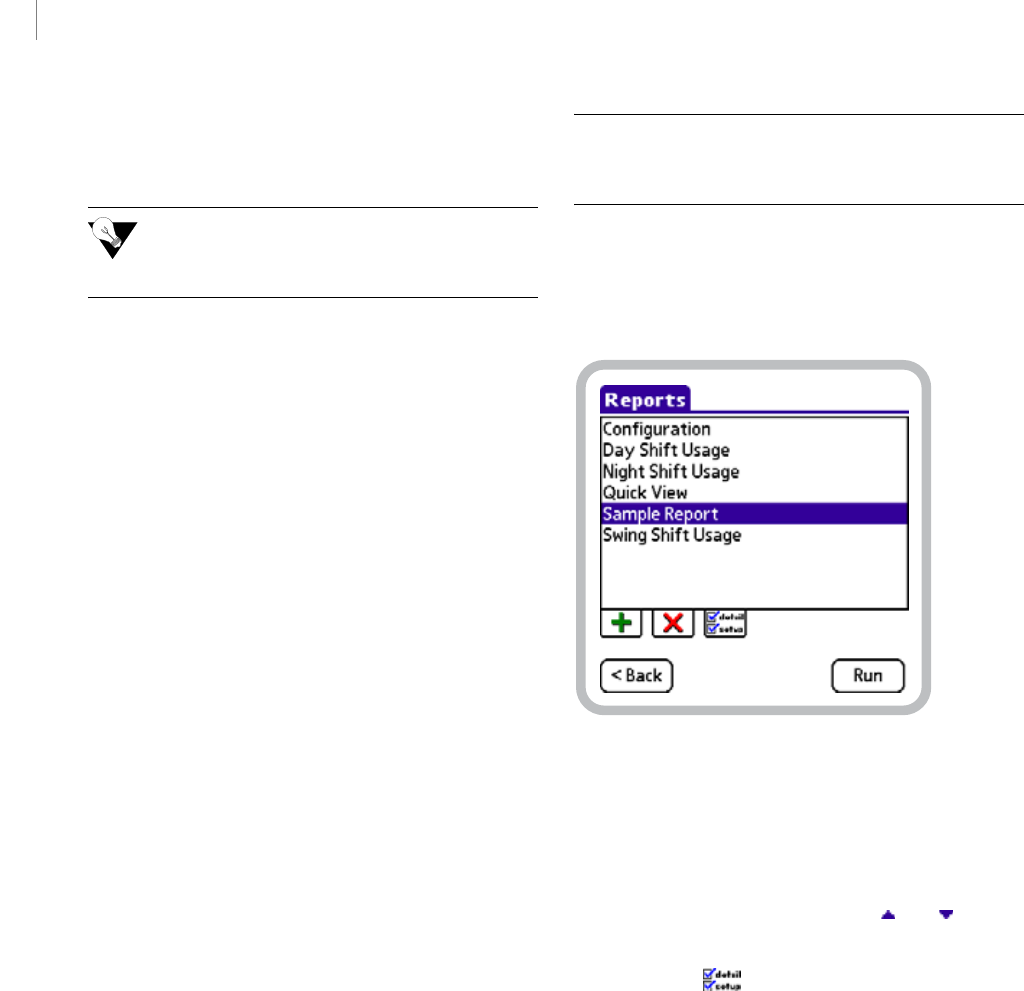
CHAPTER 7
86
Working with Reports
Draft for Reseller Review Only
Not for Distribution to End Users
9Tap Add. The selected sections are added to the
report and now appear in the Sections list on page 2 of
the Report Detail screen.
You can rearrange the order in which sections
appear on a report. For information, see
“Reordering report sections” on page 89.
10 Tap Save to store your changes and return to the
Reports screen.
Editing reports
You can modify any report in the report list (excluding
the built-in Configuration and Quick View
system reports) to customize it to your establishment’s
particular needs. For example, you can rename a
report. You can add, delete, or reorder report sections.
You can reconfigure a report’s settings. And you can
change the systemwide journal options. The remainder
of this section contains detailed procedures that explain
how to perform these modifications.
This section contains the following editing procedures:
• “Renaming a report” on page 86
• “Editing report settings” on page 87
• “Adding report sections” on page 88
• “Reordering report sections” on page 89
• “Deleting report sections” on page 90
• “Editing journal options” on page 91
Renaming a report
You may want to rename reports to make the names
reflect their purpose, the time of day they should be
run, or the employee responsible for running them.
Regardless of the naming convention you choose, you
can easily rename any report (except for the built-in
Configuration and Quick View system
reports).
Note: Performing the following procedure typically
requires the manager security code. See “About security
codes” on page 26.
To rename a report:
1Choose Mgr > Reports to display the Reports
screen.
Reports screen, Sample Report selected
2In the report list, tap the report you want to
rename. The report should appear selected, as does
Sample Report in the figure above. If the report
you want to select is not displayed among the currently
visible items, drag the Scroll Arrows ( and ) at the
right-hand side of the list.
3Tap Detail ( ) to display page 1 of the Report
Detail screen.
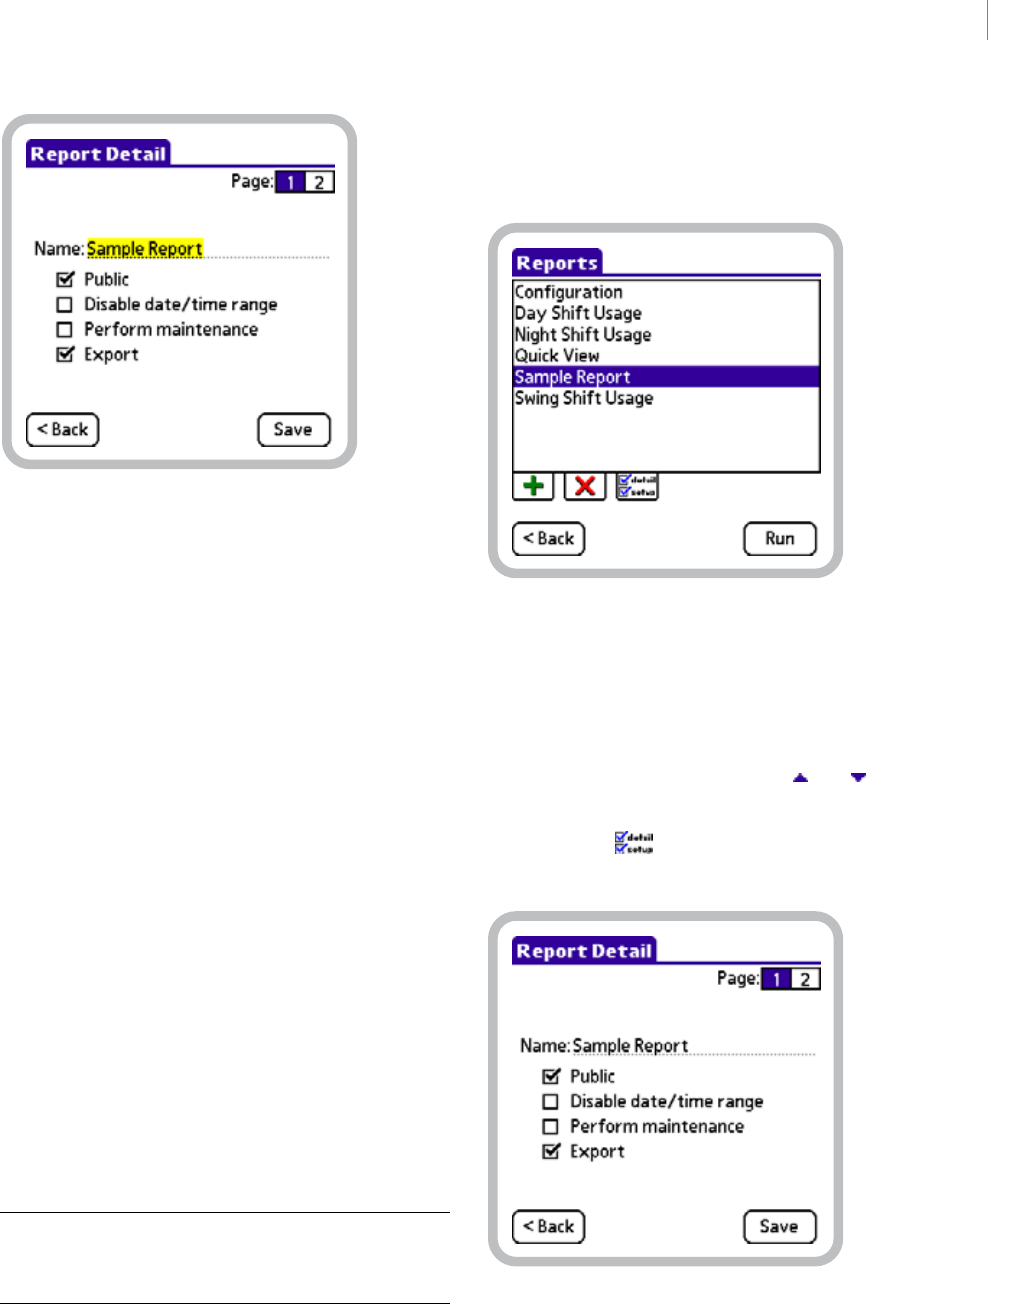
87
BARVISION FOR PALM OS®
User’s Guide
Draft for Reseller Review Only
Not for Distribution to End Users
Page 1 of the Report Detail screen, report name selected for edit-
ing
4Drag (or triple-tap) to select the current report
Name, and then enter a new one (up to twenty-two
characters in length).
5Tap Save to store your changes and return to the
Reports screen.
Editing report settings
You can change a report’s settings by selecting or
clearing the check boxes on page 1 of the Report Detail
screen. By editing the appropriate report setting, you
can:
• Enable or disable public access to the report
• Permit or restrict access to the report’s date and
time configuration when the report is run from the
Public Reports screen
• Enable or disable report-initiated data maintenance
• Configure the report’s export setting
For more information about the functions of these
settings, see “Report settings” on page 80.
Note: Performing the following procedure typically
requires the manager security code. See “About security
codes” on page 26.
To edit a report’s settings:
1Choose Mgr > Reports to display the Reports
screen.
Reports screen, Sample Report selected
2In the report list, tap the report whose settings you
want to edit. The report should appear selected, as does
Sample Report in the figure above. If the report
you want to select is not displayed among the currently
visible items, drag the Scroll Arrows ( and ) at the
right-hand side of the list.
3Tap Detail ( ) to display page 1 of the Report
Detail screen.
Page 1 of the Report Detail screen
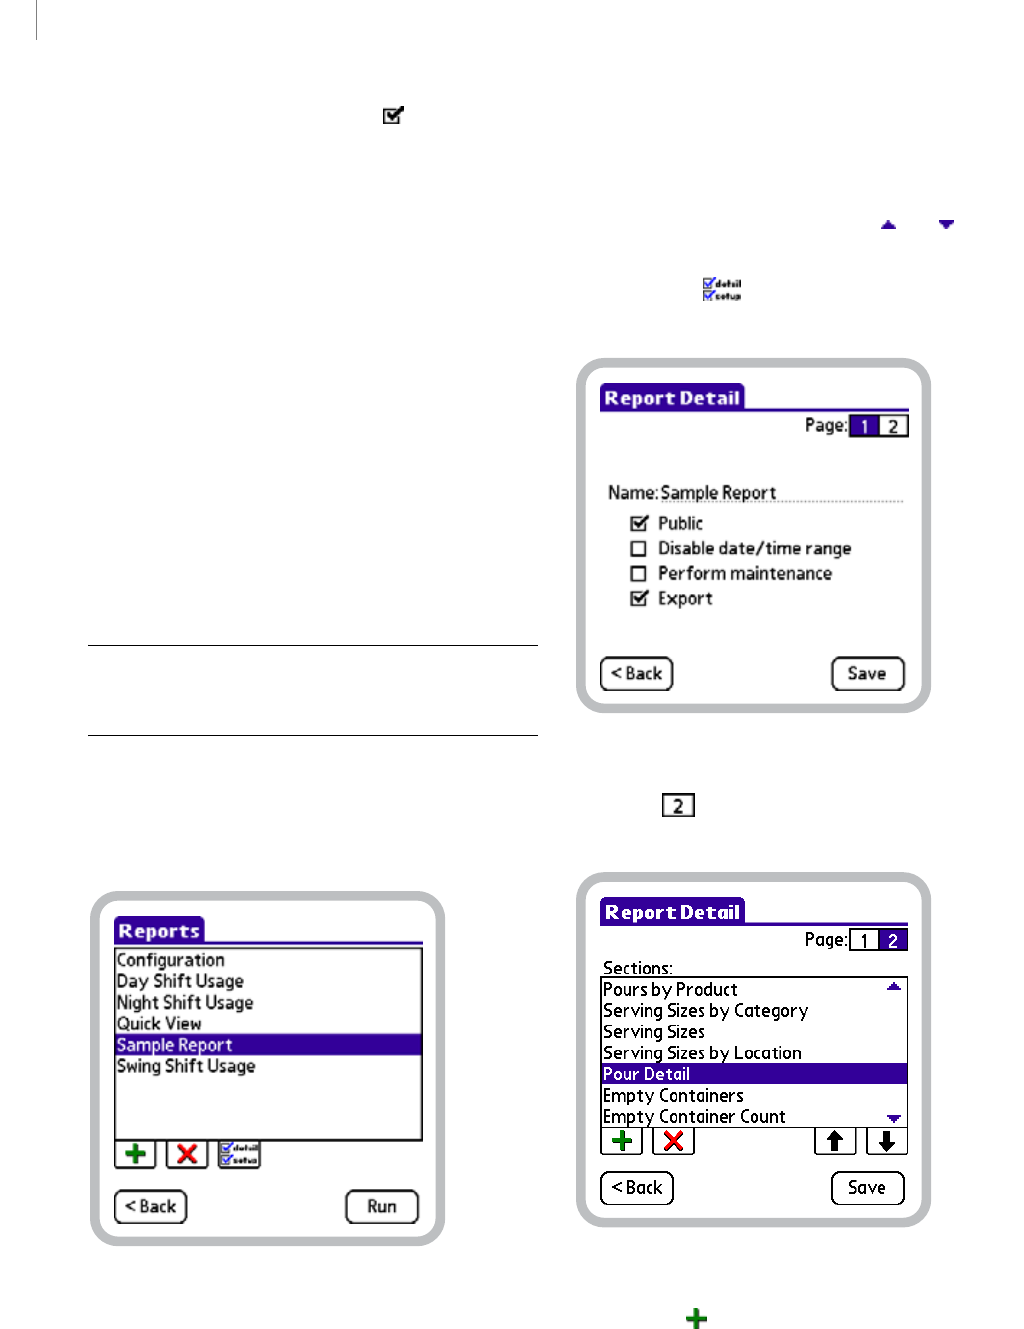
CHAPTER 7
88
Working with Reports
Draft for Reseller Review Only
Not for Distribution to End Users
4Select or clear the Check Boxes ( ) to set the
Public, Disable date/time range, Perform mainte-
nance, and Export report settings to your desired
configuration.
For information about the functions of these settings,
see “Report settings” on page 80.
5Tap Save to store your changes and return to the
Reports screen.
Adding report sections
You may want to add sections to a report. By adding
sections, you can increase both the amount and variety
of data that the report provides. BarVision does not
limit the number of sections you can add to a report,
nor does it limit the number of reports to which you
can add a section. You can add all sixteen sections to
every one of your reports if that suits your needs.
Note: Performing the following procedure typically
requires the manager security code. See “About security
codes” on page 26.
To add sections to a report:
1Choose Mgr > Reports to display the Reports
screen.
Reports screen, Sample Report selected
2In the report list, tap the report you want to add
sections to. The report should appear selected, as does
Sample Report in the figure above. If the report
you want to select is not displayed among the currently
visible items, drag the Scroll Arrows ( and ) at the
right-hand side of the list.
3Tap Detail ( ) to display page 1 of the Report
Detail screen.
Page 1 of the Report Detail screen
4Tap 2 ( ) to display page 2 of the Report Detail
screen.
Page 2 of the Report Detail screen
5Tap Add ( ) to display the Add Sections screen.
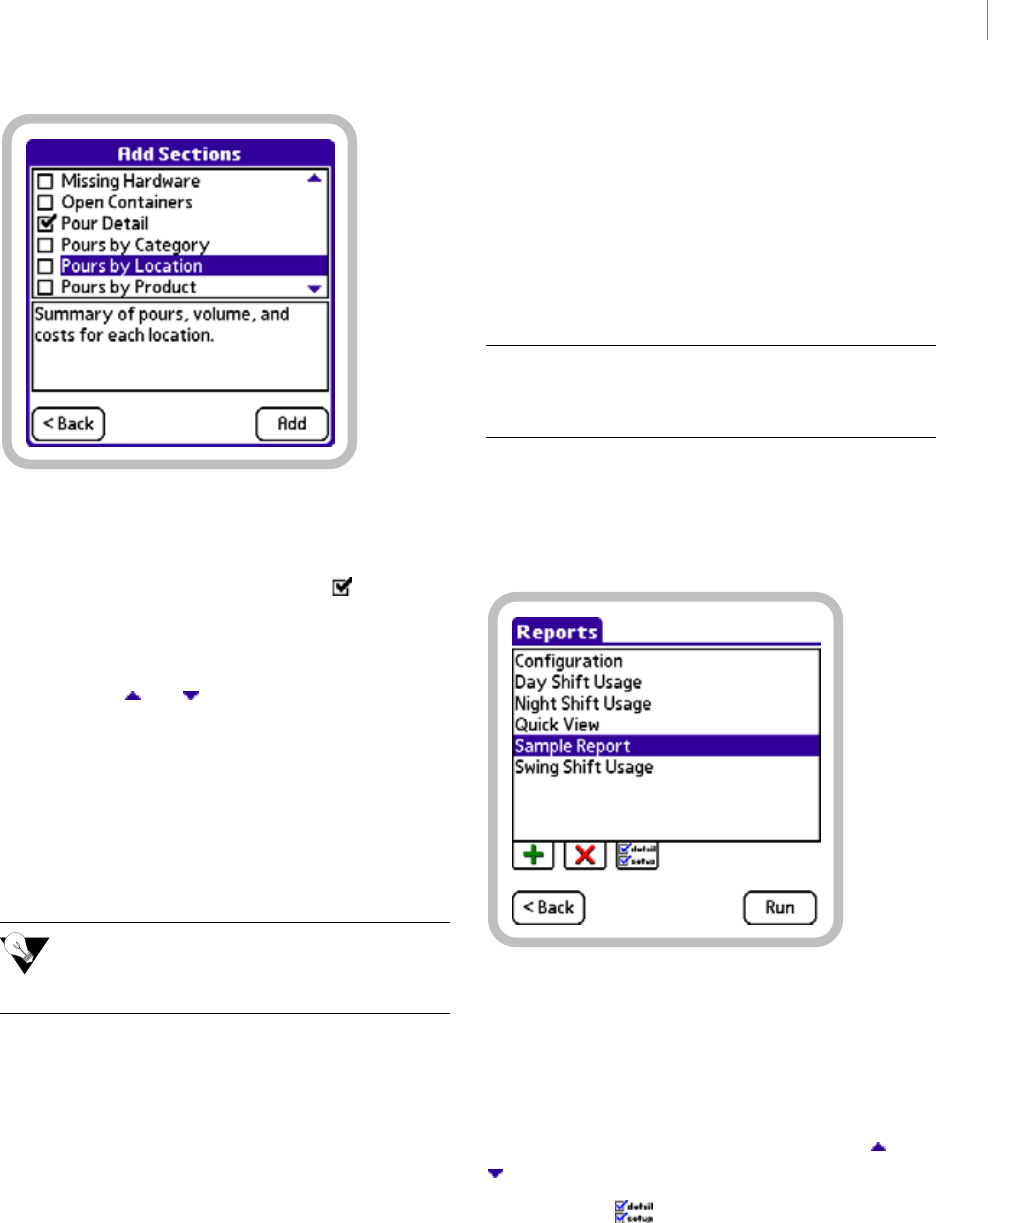
89
BARVISION FOR PALM OS®
User’s Guide
Draft for Reseller Review Only
Not for Distribution to End Users
Add Sections screen, Pour Detail section selected for adding
6In the section list, tap the sections you want to add
to the report. Each section’s Check Box () should
appear selected, as does the Pour Detail section’s in the
figure above. If a section you want to select is not
displayed among the currently visible items, drag the
Scroll Arrows ( and ) at the right-hand side of the
list.
For information about the content of each section, see
“Report sections” on page 81.
7Tap Add. The selected sections are added to the
report and now appear in the Sections list on page 2 of
the Report Detail screen.
You can rearrange the order in which sections
appear on a report. For information, see
“Reordering report sections” on page 89.
8Tap Save to store your changes and return to the
Reports screen.
Reordering report sections
You may want to reorder a report’s sections. By doing
so, you modify the order in which the data appears on
the resulting report—both on screen and in print. This
gives you the ability to organize the data so that it is
most useful for you and your employees.
As an example, assume you create a shift close-out
report containing several report sections. For the
convenience of your bartending staff, you might want
to arrange the report sections so that Pours by
Category appears at the very top. This would enable
bartenders to reconcile BarVision’s category totals to a
point-of-sale or cash register report without having to
scan through several pages of a detailed document.
Note: Performing the following procedure typically
requires the manager security code. See “About security
codes” on page 26.
To reorder the sections in a report:
1Choose Mgr > Reports to display the Reports
screen.
Reports screen, Sample Report selected
2In the report list, tap the report whose sections you
want to reorder. The report should appear selected, as
does Sample Report in the figure above. If the
report you want to select is not displayed among the
currently visible items, drag the Scroll Arrows ( and
) at the right-hand side of the list.
3Tap Detail ( ) to display page 1 of the Report
Detail screen.

CHAPTER 7
90
Working with Reports
Draft for Reseller Review Only
Not for Distribution to End Users
Page 1 of the Report Detail screen
4Tap 2 ( ) to display page 2 of the Report Detail
screen.
Page 2 of the Report Detail screen, Pour Detail section selected
5In the Sections list, tap the section you want to
reorder. The section should appear selected, as does
Pour Detail in the figure above. If the section you want
to select is not displayed among the currently visible
items, drag the Scroll Arrows ( and ) at the right-
hand side of the list.
6Do one of the following:
• To shift the selected section up in the list, tap Move
Up ( ). Tap as many times as necessary to properly
position the section.
• To shift the selected section down in the list, tap
Move Down ( ). Tap as many times as necessary
to properly position the section.
7If necessary, repeat steps 5 and 6 to reorder any
additional sections.
8Tap Save to store your changes and return to the
Reports screen.
Deleting report sections
You may want to delete sections from a report to
simplify the information that the report provides or to
limit access to sensitive business information.
BarVision does not specify a minimum number of
sections that a report must contain. As a result, it is
possible to create an empty report by deleting all of a
report’s sections.
Note: Performing the following procedure typically
requires the manager security code. See “About security
codes” on page 26.
To delete sections from a report:
1Choose Mgr > Reports to display the Reports
screen.
Reports screen, Sample Report selected
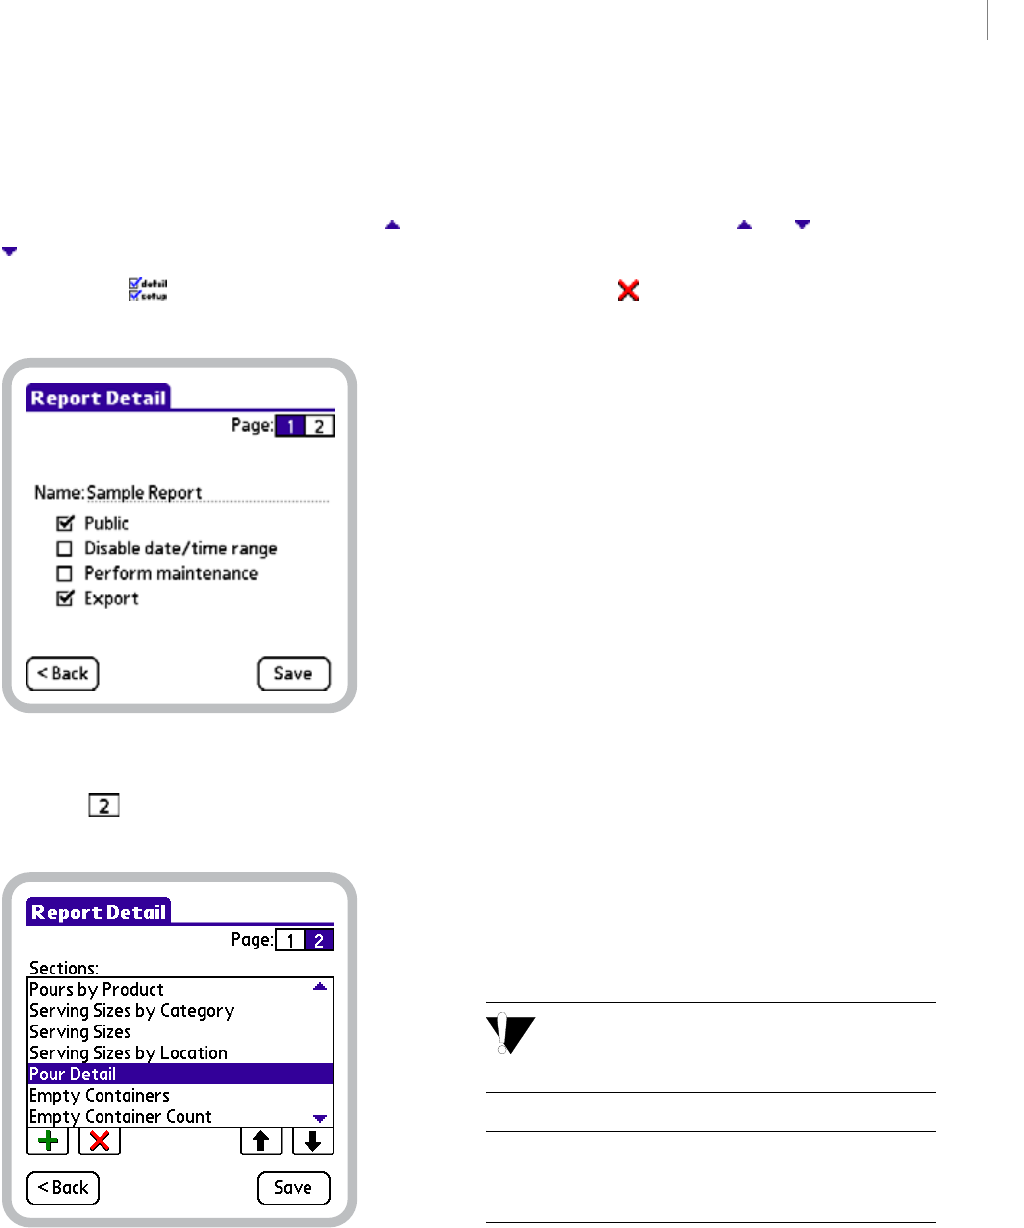
91
BARVISION FOR PALM OS®
User’s Guide
Draft for Reseller Review Only
Not for Distribution to End Users
2In the report list, tap the report you want to delete
sections from. The report should appear selected, as
does Sample Report in the figure above. If the
report you want to select is not displayed among the
currently visible items, drag the Scroll Arrows ( and
) at the right-hand side of the list.
3Tap Detail ( ) to display page 1 of the Report
Detail screen.
Page 1 of the Report Detail screen
4Tap 2 ( ) to display page 2 of the Report Detail
screen.
Page 2 of the Report Detail screen, Pour Detail section selected
5In the report Sections list, tap the section you want
to delete. The section should appear selected, as does
Pour Detail in the figure above. If the section you want
to select is not displayed among the currently visible
items, drag the Scroll Arrows ( and ) at the right-
hand side of the list.
6Tap Delete ( ) to remove the selected section
from the report.
7If necessary, repeat steps 5 and 6 to delete any
additional sections.
8Tap Save to store your changes and return to the
Reports screen.
Editing journal options
You can change the systemwide journal options by
selecting or clearing the check boxes or editing the
numeric value on the Journal Options screen. By
editing the appropriate journal option, you can:
• Limit the amount of data removed from the journal
during report-initiated maintenance
• Enable or disable the data maintenance prompt that
can appear after running a report
• Configure whether or not the system will back up
all of its databases and system settings to the
handheld’s SD memory card during data mainte-
nance
For more information about the functions of these
options, see “Journal options” on page 83.
Each of the journal options has a global effect.
Selecting an item enables the option systemwide.
Clearing the item disables the option systemwide.
Note: Performing the following procedure typically
requires the manager security code. See “About security
codes” on page 26.
To edit the journal options:
1Choose Mgr > Setup > Options to display the
Options screen.
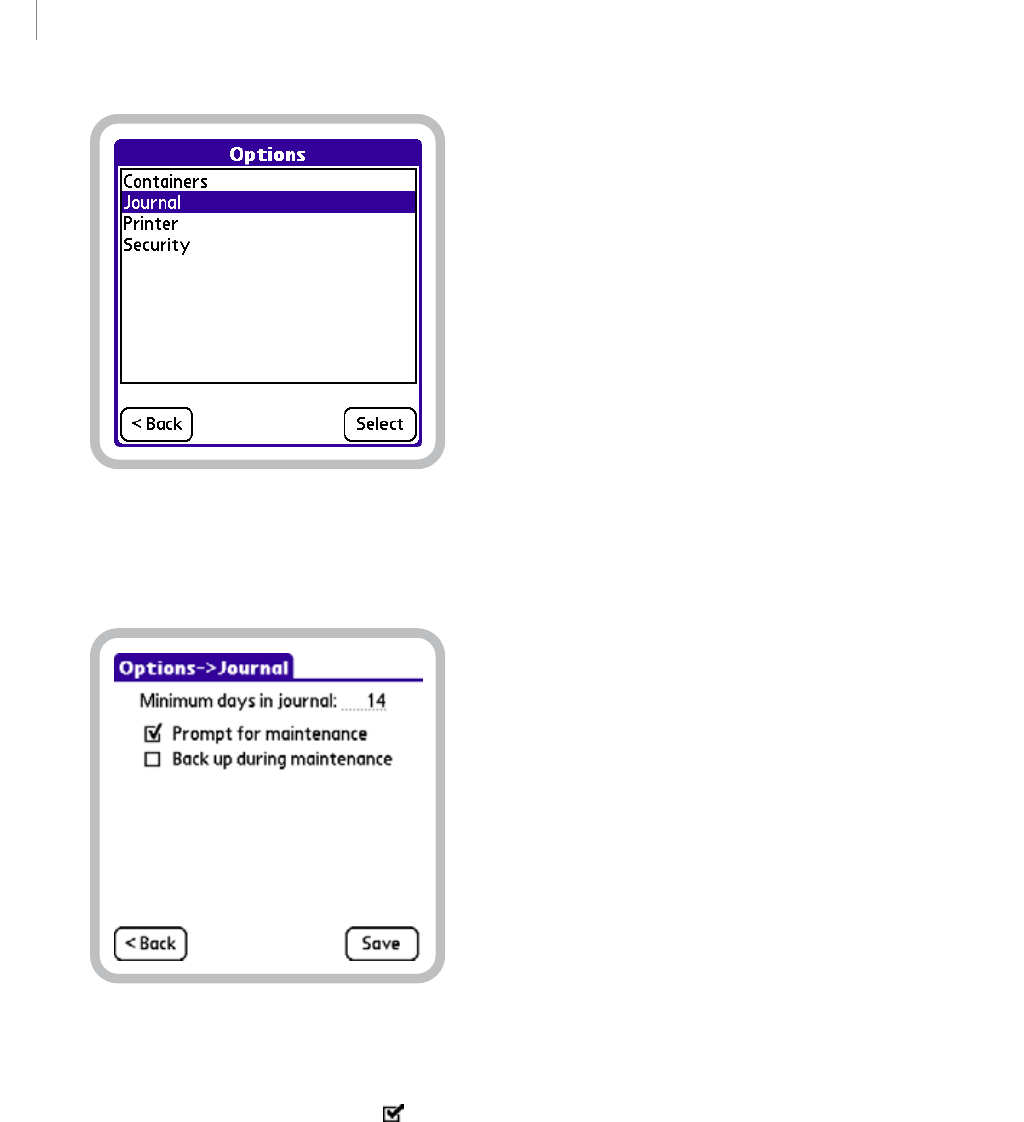
CHAPTER 7
92
Working with Reports
Draft for Reseller Review Only
Not for Distribution to End Users
Options screen, Journal option selected
2In the option list, tap Journal, and then tap Select
to display the Journal Options screen.
Journal Options screen
3Do any of the following:
• Select or clear the Check Boxes ( ) to set the
Prompt for maintenance and Back up during
maintenance journal options to your desired
configuration.
• Drag (or double-tap) to select the current
Minimum days in journal value, and then enter a
new one. The value you enter must be greater than
or equal to 1 and less than or equal to 365.
For information about the functions of these options,
see “Journal options” on page 83.
4Tap Save to store your changes and return to the
Options screen.
Running, viewing, and
printing reports
BarVision enables you and your staff to run, view, and
print reports at your convenience—without disrupting
the system’s data collection operations. No matter the
time of day or how busy your place of business, you
can run reports and access mission-critical information
without fear of data loss. You can run reports at the
end of the day, after every shift, or even during a shift.
Reports will contain all of the events that the system
has received as of the time the report is run, giving you
real-time, up-to-date inventory information.
Depending on whether you want to run a public
report, a management report, or the built-in
Configuration or Quick View system reports,
there are four slightly different report-running
methods. The following sections explain the proce-
dures for running, viewing, and printing each of these
types of reports:
• “Running public reports” on page 92
• “Running management reports” on page 95
• “Running the Configuration report” on page 98
• “Running the Quick View report” on page 99
For information about configuring your handheld to
print via network or infrared connection, see “Config-
uring printers” on page 16. For information about
exporting reports to your personal computer, see
“Exporting data” on page 107.
Running public reports
This User’s Guide employs the term public report to
designate any report explicitly configured for public
access. That is, a public report is one whose Public
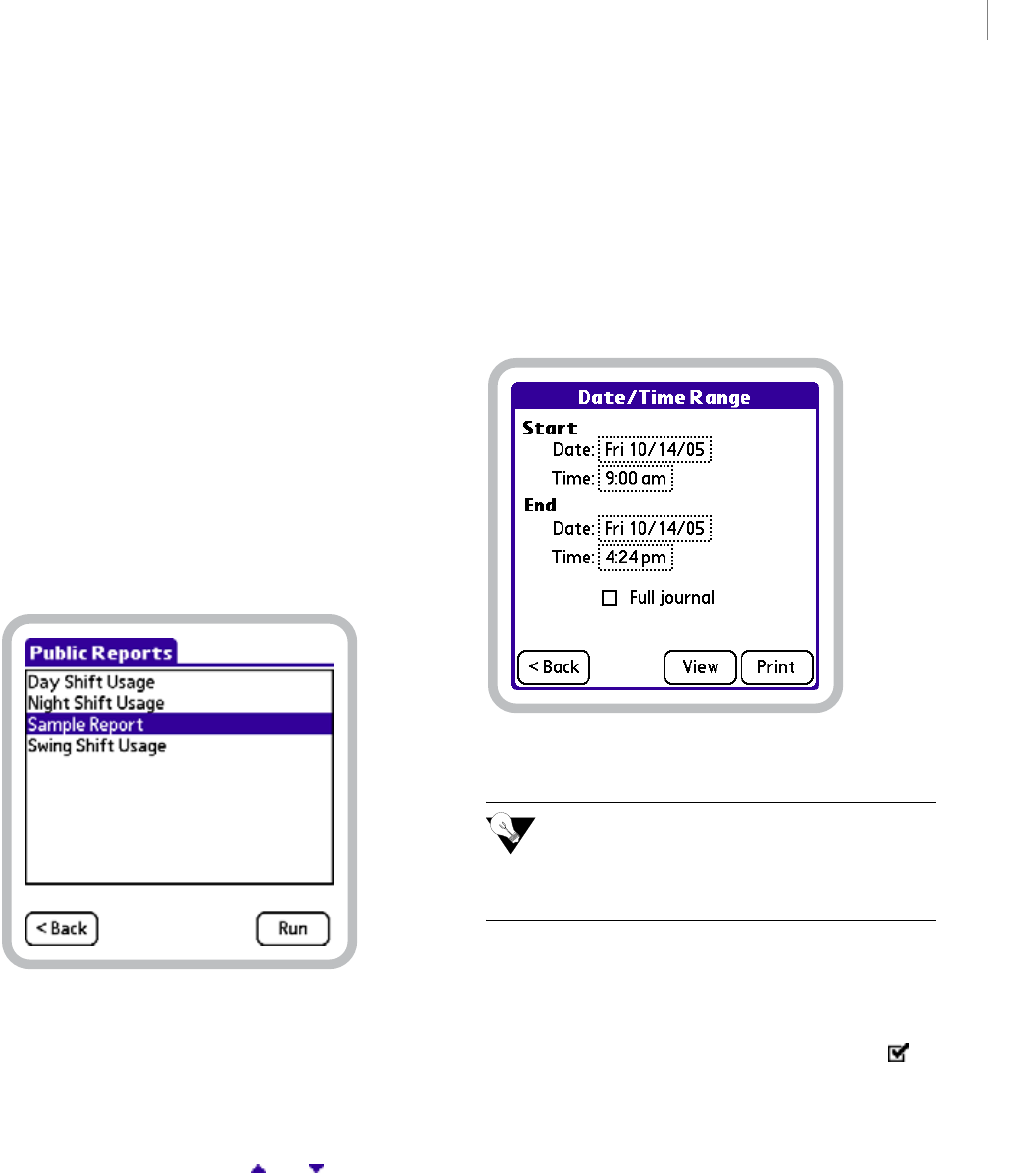
93
BARVISION FOR PALM OS®
User’s Guide
Draft for Reseller Review Only
Not for Distribution to End Users
report setting (see “Public” on page 80) has been
selected. Public reports are listed on the Public Reports
screen and can be run without entering a security code.
You can access the Public Reports screen from the
Activity screen by choosing Reports. This screen
provides view and print access to public reports only.
No report editing is allowed. When you access reports
from the Public Reports screen, any date/time
restriction (see “Disable date/time range” on page 80)
enabled during the report’s configuration cannot be
overridden. Public reports can be viewed on screen or
printed via network or infrared connection (see
“Configuring printers” on page 16).
To run a public report:
1Choose Reports to display the Public Reports
screen.
Public Reports screen, Sample Report selected
2In the report list, tap the report you want to run.
The report should appear selected, as does Sample
Report in the figure above. If the report you want to
select is not displayed among the currently visible
items, drag the Scroll Arrows ( and ) at the right-
hand side of the list.
3Tap Run.
4One of the following two things will occur:
• If the report’s date and time were restricted during
the report’s configuration, the report will be
generated and displayed on screen. Proceed to step
8.
• If the report’s date and time were not restricted
during the report’s configuration, a Date/Time
Range screen similar to the one below will be
displayed. Proceed to step 5.
Date/Time Range screen
The Start Date and Start Time values default to
the End Date and End Time values you selected
the last time you ran the report. The End Date and End
Time values default to the current date and time.
5Do one of the following:
• To run a report for all of the event record data in
the system journal (regardless of when the data was
collected), select the Full journal Check Box ()
and proceed to step 7.
• To run a report for a specific data collection period,
which you want to define, proceed to step 6.
6Specify the date and time range of the data to be
included in the report by doing any of the following:
• To adjust the start date for the report, tap the Start
Date field. The Select Start Date screen will be
displayed. Select a starting year, month, and date
for the report by tapping the appropriate items.
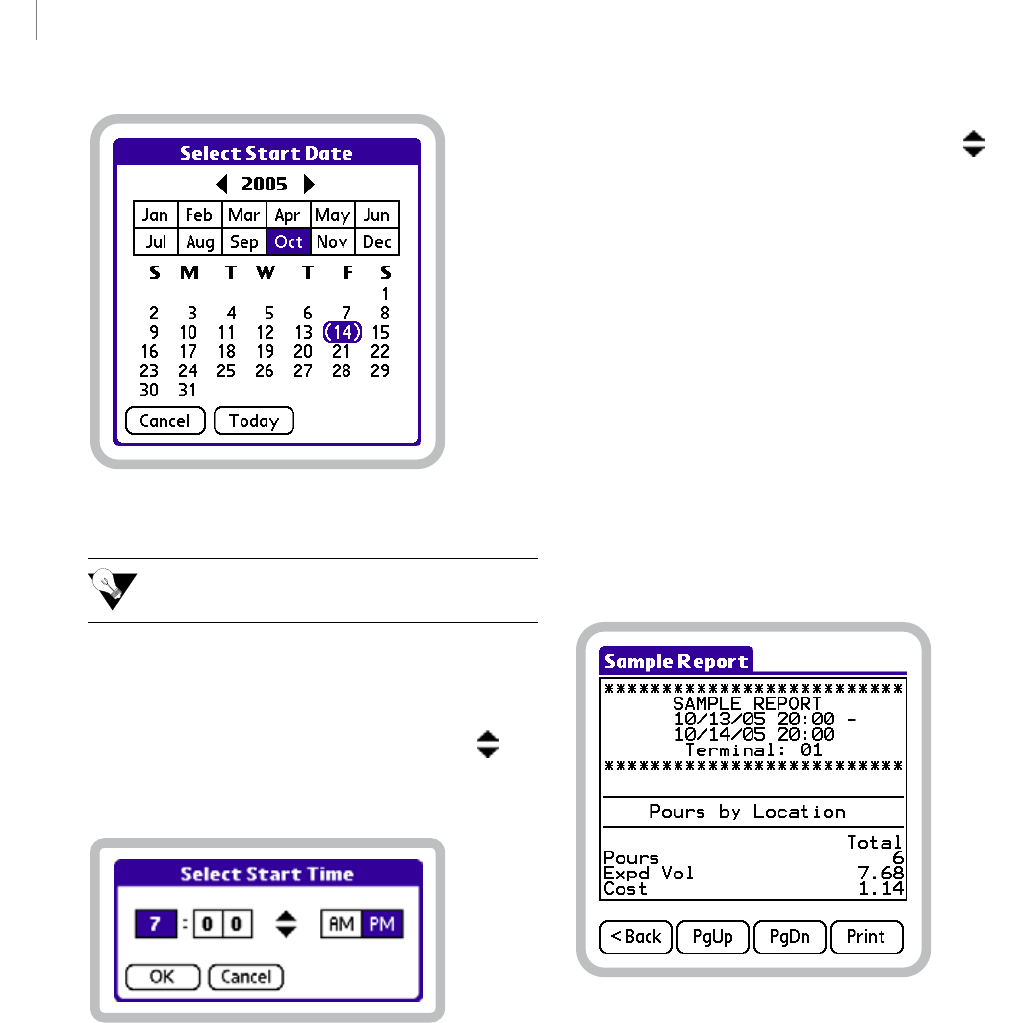
CHAPTER 7
94
Working with Reports
Draft for Reseller Review Only
Not for Distribution to End Users
Select Start Date screen
To quickly select the current year, month, and
date, tap To d ay .
• To adjust the start time for the report, tap the Start
Time field. The Select Start Time screen will be
displayed. Select a start time for the report by
tapping a digit, using the Selection Arrows () to
set the numeral, selecting either AM or PM, and
then tapping OK.
Select Start Time screen
• To adjust the end date for the report, tap the End
Date field. The Select End Date screen (similar to
the Select Start Date screen shown above) will be
displayed. Select an ending year, month, and date
for the report by tapping the appropriate items.
• To adjust the end time for the report, tap the End
Time field. The Select End Time screen (similar to
the Select Start Time screen shown above) will be
displayed. Select an end time for the report by
tapping a digit, using the Selection Arrows () to
set the numeral, selecting either AM or PM, and
then tapping OK.
7With the Date/Time Range screen now appropri-
ately configured, do one of the following:
• To print the report, tap Print. A Printing confir-
mation message will be displayed. After printing has
finished, tap <Back to return to the Date/Time
Range screen. Proceed to step 9.
If you experience any problems while attempting to
print a report, see “Printing problems” on page 119.
• To preview the report, tap View. Proceed to step 8.
8A View Report screen, similar to the one below, will
be displayed. It provides an on-screen preview of the
chosen report.
View Report screen
Do any of the following:
•Tap PgUp or PgDn to navigate up or down
through the pages of the report.
•Tap Print to print the report. A Printing confir-
mation message will be displayed. After printing has
finished, tap <Back to return to the View Report
screen.
If you experience any problems while attempting to
print a report, see “Printing problems” on page 119.
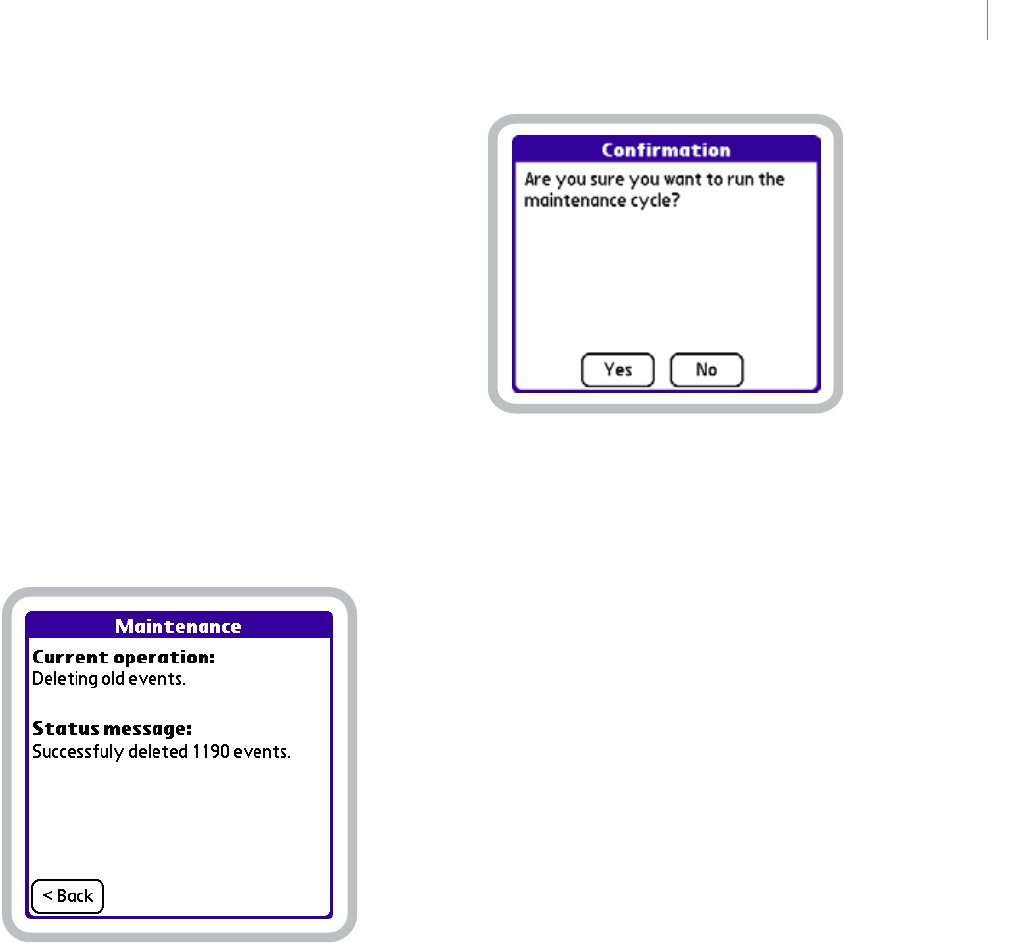
95
BARVISION FOR PALM OS®
User’s Guide
Draft for Reseller Review Only
Not for Distribution to End Users
After you have finished viewing the report, tap <Back
to return to the Date/Time Range screen.
9Tap <Back on the Date/Time Range screen.
10 One of the following three things will occur:
•If the Perform maintenance report setting (see
“Perform maintenance” on page 81) is disabled, the
Reports screen will be displayed.
•If the Perform maintenance report setting (see
“Perform maintenance” on page 81) is enabled and
the Prompt for maintenance journal option (see
“Prompt for maintenance” on page 84) is disabled,
data maintenance will be performed and a Mainte-
nance status screen similar to the one below will be
displayed. Tap <Back to return to the Reports
screen.
Maintenance status screen
• If both the Perform maintenance report setting (see
“Perform maintenance” on page 81) and Prompt
for maintenance journal option (see “Prompt for
maintenance” on page 84) are enabled, the confir-
mation message below will be displayed.
Maintenance cycle Confirmation screen
— To perform data maintenance, tap Yes. After the
maintenance cycle has completed, tap <Back to
return to the Reports screen.
— To return to the Reports screen without
performing data maintenance, tap No.
Running management reports
This User’s Guide employs the term management report
to designate any report not explicitly configured for
public access. That is, a management report is one
whose Public report setting (see “Public” on page 80)
has not been selected. Management reports are not
listed on the Public Reports screen. They can only be
viewed from the Reports screen.
On a typically configured BarVision system, accessing
the Reports screen (by choosing Mgr > Reports)
requires the entry of a security code. This protects your
management reports from unauthorized use and
provides a way to restrict access to sensitive data.
The Reports screen provides unlimited access to both
public and management reports. When you run a
public report from the Reports screen, the system
overrides any date/time restriction (see “Disable date/
time range” on page 80) that may have been enabled
during the report’s configuration. From the Reports
screen, both public and management reports can be
viewed on screen or printed via network or infrared
connection (see “Configuring printers” on page 16).
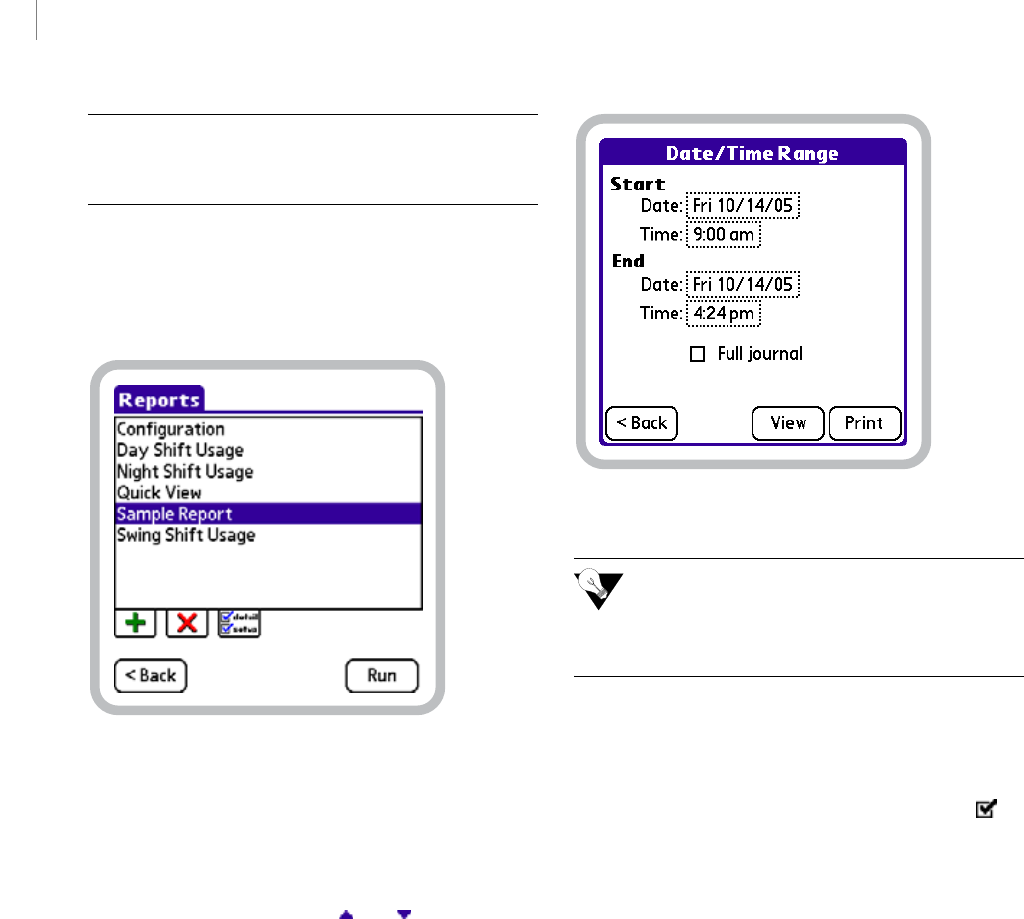
CHAPTER 7
96
Working with Reports
Draft for Reseller Review Only
Not for Distribution to End Users
Note: Performing the following procedure typically
requires the manager security code. See “About security
codes” on page 26.
To run a management report:
1Choose Mgr > Reports to display the Reports
screen.
Reports screen, Sample Report selected
2In the report list, tap the report you want to run.
The report should appear selected, as does Sample
Report in the figure above. If the report you want to
select is not displayed among the currently visible
items, drag the Scroll Arrows ( and ) at the right-
hand side of the list.
3Tap Run to display the Date/Time Range screen.
Date/Time Range screen
The Start Date and Start Time values default to
the End Date and End Time values you selected
the last time you ran the report. The End Date and End
Time values default to the current date and time.
4Do one of the following:
• To run a report for all of the event record data in
the system journal (regardless of when the data was
collected), select the Full journal Check Box ()
and proceed to step 6.
• To run a report for a specific data collection period,
which you want to define, proceed to step 5.
5Specify the date and time range of the data to be
included in the report by doing any of the following:
• To adjust the start date for the report, tap the Start
Date field. The Select Start Date screen will be
displayed. Select a starting year, month, and date
for the report by tapping the appropriate items.
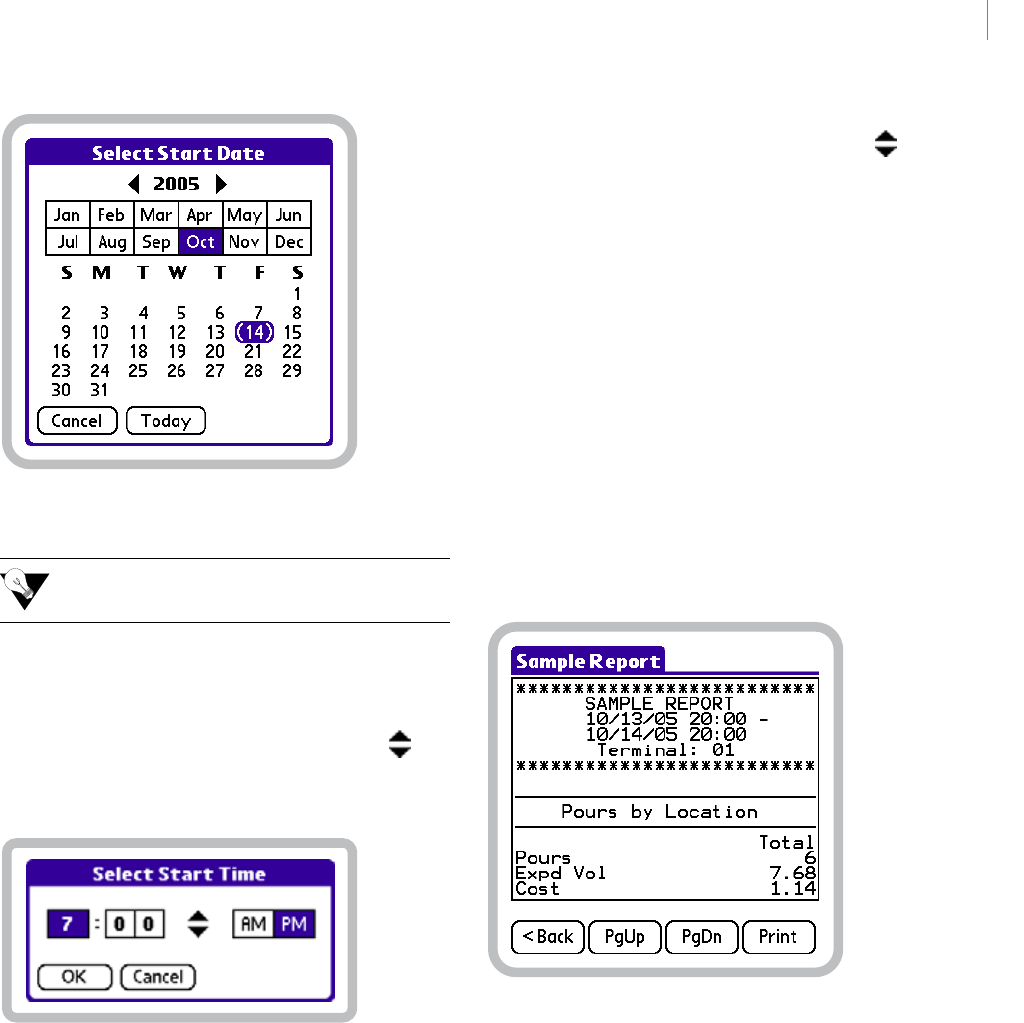
97
BARVISION FOR PALM OS®
User’s Guide
Draft for Reseller Review Only
Not for Distribution to End Users
Select Start Date screen
To quickly select the current year, month, and
date, tap To d ay .
• To adjust the start time for the report, tap the Start
Time field. The Select Start Time screen will be
displayed. Select a start time for the report by
tapping a digit, using the Selection Arrows () to
set the numeral, selecting either AM or PM, and
then tapping OK.
Select Start Time screen
• To adjust the end date for the report, tap the End
Date field. The Select End Date screen (similar to
the Select Start Date screen shown above) will be
displayed. Select an ending year, month, and date
for the report by tapping the appropriate items.
• To adjust the end time for the report, tap the End
Time field. The Select End Time screen (similar to
the Select Start Time screen shown above) will be
displayed. Select an end time for the report by
tapping a digit, using the Selection Arrows () to
set the numeral, selecting either AM or PM, and
then tapping OK.
6With the Date/Time Range screen now appropri-
ately configured, do one of the following:
• To print the report, tap Print. A Printing confir-
mation message will be displayed. After printing has
finished, tap <Back to return to the Date/Time
Range screen. Proceed to step 8.
If you experience any problems while attempting to
print a report, see “Printing problems” on page 119.
• To preview the report, tap View. Proceed to step 7.
7A View Report screen, similar to the one below, will
be displayed. It provides an on-screen preview of the
chosen report.
View Report screen
Do any of the following:
•Tap PgUp or PgDn to navigate up or down
through the pages of the report.
•Tap Print to print the report. A Printing confir-
mation message will be displayed. After printing has
finished, tap <Back to return to the View Report
screen.
If you experience any problems while attempting to
print a report, see “Printing problems” on page 119.
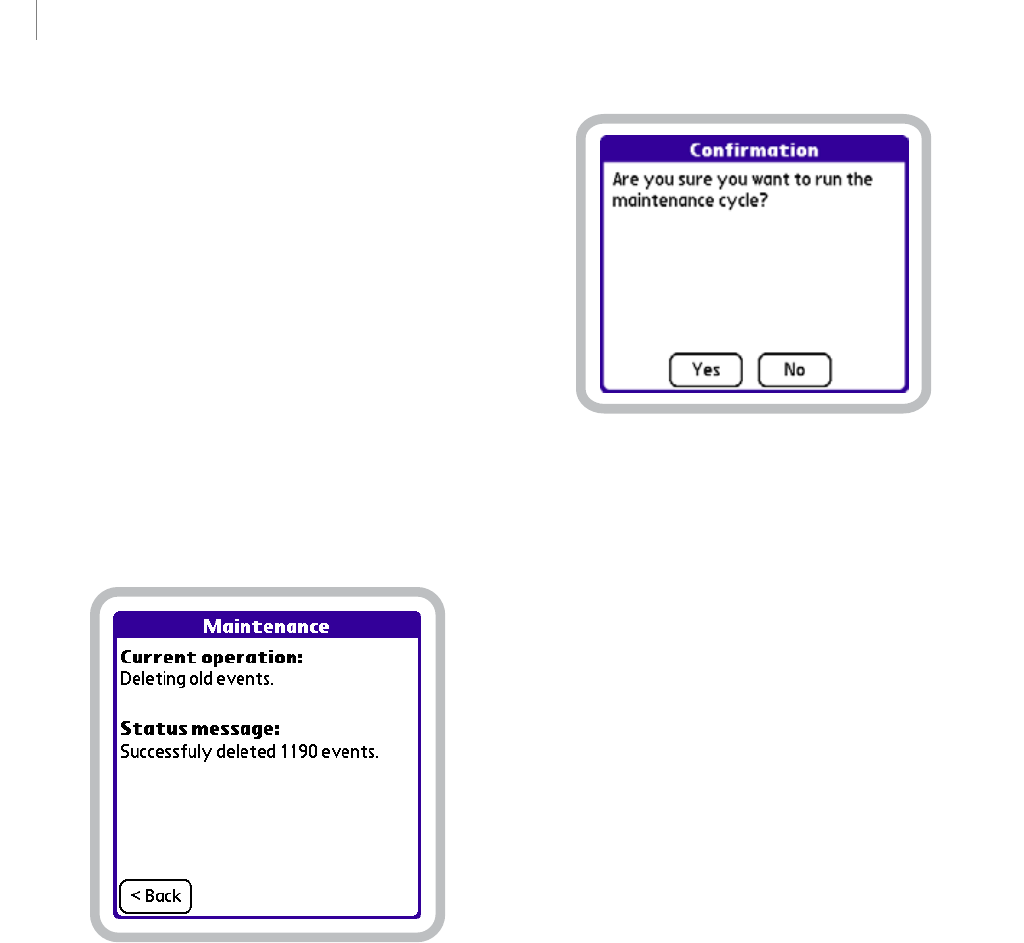
CHAPTER 7
98
Working with Reports
Draft for Reseller Review Only
Not for Distribution to End Users
After you have finished viewing the report, tap <Back
to return to the Date/Time Range screen.
8Tap <Back on the Date/Time Range screen.
9One of the following three things will occur:
•If the Perform maintenance report setting (see
“Perform maintenance” on page 81) is disabled, the
Reports screen will be displayed.
•If the Perform maintenance report setting (see
“Perform maintenance” on page 81) is enabled and
the Prompt for maintenance journal option (see
“Prompt for maintenance” on page 84) is disabled,
data maintenance will be performed and a Mainte-
nance status screen similar to the one below will be
displayed. Tap <Back to return to the Reports
screen.
Maintenance status screen
• If both the Perform maintenance report setting (see
“Perform maintenance” on page 81) and Prompt
for maintenance journal option (see “Prompt for
maintenance” on page 84) are enabled, the confir-
mation message below will be displayed.
Maintenance cycle Confirmation screen
— To perform data maintenance, tap Yes. After the
maintenance cycle has completed, tap <Back to
return to the Reports screen.
— To return to the Reports screen without
performing data maintenance, tap No.
Running the Configuration report
The Configuration report is an unmodifiable,
built-in system report. It provides a summary of your
current system setup and configuration information.
This report lists the current values for all container and
printer option settings and itemizes the configuration
information for each currently defined container.
Configuration data provided for each container
includes: product name, pour spout identification
number, location, category, cost, container size, shape,
empty weight, unit weight, expected pour rate, and
actual pour rate.
The Configuration report can only be accessed
from the Reports screen. On a typically configured
BarVision system, accessing the Reports screen (by
choosing Mgr > Reports) requires the entry of a
security code. This protects the Configuration
report from unauthorized use and provides a way to
restrict access to system setup information. The
Configuration report can be viewed on screen or
printed via network or infrared connection (see
“Configuring printers” on page 16).
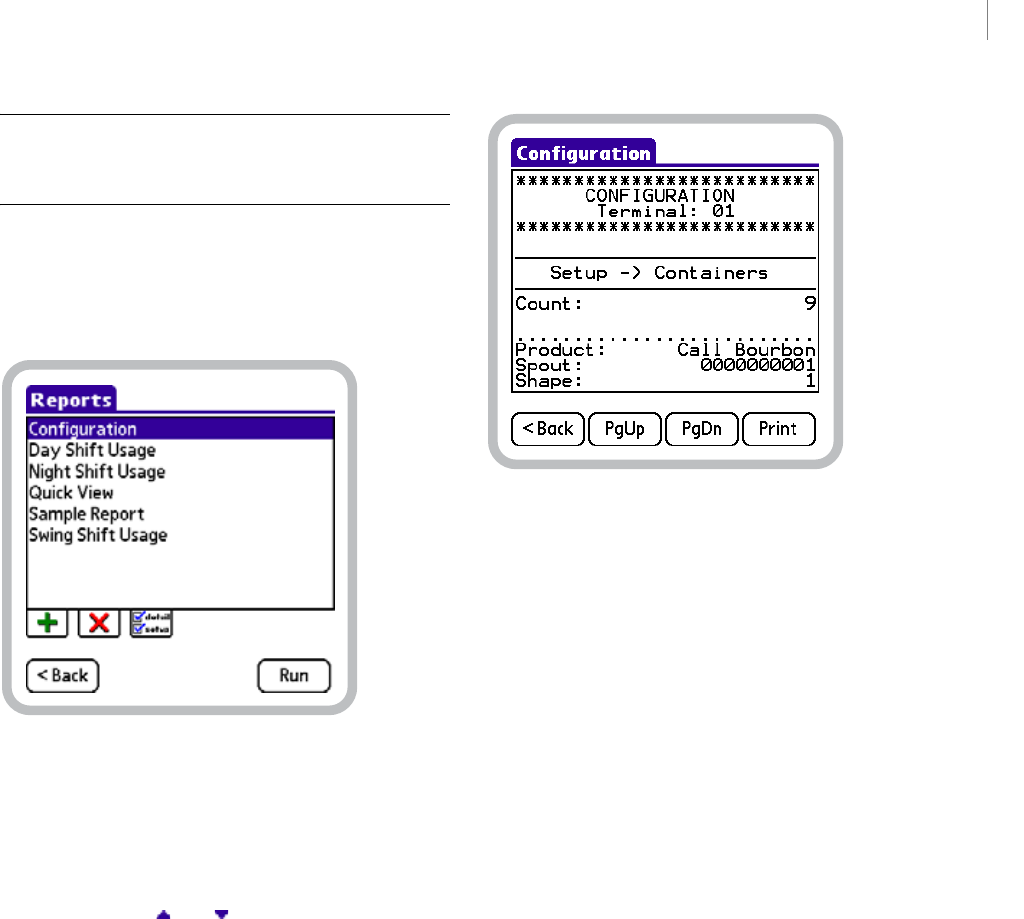
99
BARVISION FOR PALM OS®
User’s Guide
Draft for Reseller Review Only
Not for Distribution to End Users
Note: Performing the following procedure typically
requires the manager security code. See “About security
codes” on page 26.
To run the Configuration report:
1Choose Mgr > Reports to display the Reports
screen.
Reports screen, Configuration report selected
2In the report list, tap the Configuration
report. The report should appear selected, as it does in
the figure above. If the Configuration report is
not displayed among the currently visible items, drag
the Scroll Arrows ( and ) at the right-hand side of
the list.
3Tap Run.
4A View Report screen, similar to the one below, will
be displayed. It provides an on-screen preview of the
Configuration report.
View Report screen
Do any of the following:
•Tap PgUp or PgDn to navigate up or down
through the pages of the report.
•Tap Print to print the report. A Printing confir-
mation message will be displayed. After printing has
finished, tap <Back to return to the View Report
screen.
If you experience any problems while attempting to
print a report, see “Printing problems” on page 119.
After you have finished viewing the report, tap <Back
to return to the Reports screen.
Running the Quick View report
The Quick View report is a flexible, built-in system
report whose contents you configure, on the fly, each
time the report is run. The adaptability of this report
makes it ideal for viewing infrequently referenced
information (such as hardware model and firmware
revision numbers) or for checking up-to-the-minute
sales information (for instance, to help you assess the
popularity of new liquor products, the effectiveness of
an advertising campaign, or the revenue generated by a
special promotion) without having to add and
configure reports specific to these purposes.
CHAPTER 7
100
Working with Reports
Draft for Reseller Review Only
Not for Distribution to End Users
The Quick View report can only be accessed from
the Reports screen. On a typically configured
BarVision system, accessing the Reports screen (by
choosing Mgr > Reports) requires the entry of a
security code. This protects the Quick View report
from unauthorized use and provides a way to limit
access to sensitive data. The Quick View report can
be viewed on screen or printed via network or infrared
connection (see “Configuring printers” on page 16).
Note: Performing the following procedure typically
requires the manager security code. See “About security
codes” on page 26.
To run the Quick View report:
1Choose Mgr > Reports to display the Reports
screen.
Reports screen, Quick View report selected
2In the report list, tap the Quick View report.
The report should appear selected, as it does in the
figure above. If the Quick View report is not
displayed among the currently visible items, drag the
Scroll Arrows ( and ) at the right-hand side of the
list.
3Tap Run to display the Add Sections screen.
Add Sections screen, Pour Detail section selected for adding
4In the section list, tap the sections you want to add
to the report. Each section’s Check Box () should
appear selected, as does the Pour Detail section’s in the
figure above. If a section you want to select is not
displayed among the currently visible items, drag the
Scroll Arrows ( and ) at the right-hand side of the
list.
For information about the content of each section, see
“Report sections” on page 81.
5Tap Add. The selected sections are added to the
report and the Date/Time Range screen is displayed.
Date/Time Range screen
101
BARVISION FOR PALM OS®
User’s Guide
Draft for Reseller Review Only
Not for Distribution to End Users
The Start Date and Start Time values default to
the End Date and End Time values you selected
the last time you ran the report. The End Date and End
Time values default to the current date and time.
6Do one of the following:
• To run a report for all of the data in the activity list
(regardless of when the data was collected), select
the Full journal Check Box ( ) and proceed to
step 8.
• To run a report for a specific data collection period,
which you want to define, proceed to step 7.
7Specify the date and time range of the data to be
included in the report by doing any of the following:
• To adjust the start date for the report, tap the Start
Date field. The Select Start Date screen will be
displayed. Select a starting year, month, and date
for the report by tapping the appropriate items.
Select Start Date screen
To quickly select the current year, month, and
date, tap To d ay .
• To adjust the start time for the report, tap the Start
Time field. The Select Start Time screen will be
displayed. Select a start time for the report by
tapping a digit, using the Selection Arrows () to
set the numeral, selecting either AM or PM, and
then tapping OK.
Select Start Time screen
• To adjust the end date for the report, tap the End
Date field. The Select End Date screen (similar to
the Select Start Date screen shown above) will be
displayed. Select an ending year, month, and date
for the report by tapping the appropriate items.
• To adjust the end time for the report, tap the End
Time field. The Select End Time screen (similar to
the Select Start Time screen shown above) will be
displayed. Select an end time for the report by
tapping a digit, using the Selection Arrows () to
set the numeral, selecting either AM or PM, and
then tapping OK.
8Optionally, select the Export Check Box () if
you would like to designate the resulting report data
for export to a text file.
9With the Date/Time Range screen now appropri-
ately configured, do one of the following:
• To print the report, tap Print. A Printing confir-
mation message will be displayed. After printing has
finished, tap <Back to return to the Date/Time
Range screen. Proceed to step 11.
If you experience any problems while attempting to
print a report, see “Printing problems” on page 119.
• To preview the report, tap View. Proceed to step
10.
10 A View Report screen, similar to the one below,
will be displayed. It provides an on-screen preview of
the Quick View report.
CHAPTER 7
102
Working with Reports
Draft for Reseller Review Only
Not for Distribution to End Users
View Report screen
Do any of the following:
•Tap PgUp or PgDn to navigate up or down
through the pages of the report.
•Tap Print to print the report. A Printing confir-
mation message will be displayed. After printing has
finished, tap <Back to return to the View Report
screen.
If you experience any problems while attempting to
print a report, see “Printing problems” on page 119.
After you have finished viewing the report, tap <Back
to return to the Date/Time Range screen.
11 Tap <Back on the Date/Time Range screen to
return to the Reports screen.
Deleting reports
You may want to delete unused or unwanted reports.
This can simplify the report running process by
limiting the number of selections that appear on the
report screens.
You can delete any existing report (excluding the built-
in Configuration and Quick View system
reports). Deleting a report does not affect any existing
data and will not remove any recorded events from the
activity list.
Note: Performing the following procedure typically
requires the manager security code. See “About security
codes” on page 26.
To delete a report:
1Choose Mgr > Reports to display the Reports
screen.
Reports screen, Sample Report selected
2In the report list, tap the report you want to delete.
The report should appear selected, as does Sample
Report in the figure above. If the report you want to
select is not displayed among the currently visible
items, drag the Scroll Arrows ( and ) at the right-
hand side of the list.
3Tap Delete ().
4A Confirmation screen similar to the one below will
be displayed. Tap Yes to delete the report and return to
the Reports screen.
103
BARVISION FOR PALM OS®
User’s Guide
Draft for Reseller Review Only
Not for Distribution to End Users
Report deletion Confirmation screen

CHAPTER 7
104
Working with Reports
Draft for Reseller Review Only
Not for Distribution to End Users

105
Draft for Reseller Review Only
Not for Distribution to End Users
Chapter 8: Using the BarVision System
his chapter provides instruction for completing
those routine procedures you or your staff will
perform on a continuing basis. It contains tips
to help ensure that simple day-to-day activities, such as
pouring and changing empty bottles, are performed
both efficiently and in compliance with the require-
ments of the system. It contains the following sections:
• “Pouring” on page 105
• “Changing bottles” on page 105
• “Cleaning pour spouts” on page 106
Pouring
To ensure the efficiency of each pour, as well as the
accuracy of the pour sizes BarVision reports, a few
basic pouring strategies should be observed. The goal
of these strategies is to help eliminate any pour spout
gurgling and ensure a constant, unrestricted flow of
liquid. To accomplish this, you should tilt the bottle at
the same rate as the liquid travels down the neck
toward the spout, and then take care to fully invert the
bottle.
To help provide bartenders with feedback on their
pouring style, BarVision flags inefficient pours. All
pours that occur at a bottle tilt angle of less than 135
degrees are identified on the activity list by the word
Tilt followed by a question mark (Tilt?). These
pours are also itemized on any report that includes the
Exceptions, Irregular Empty Containers, Journal
Detail, or Pour Detail report sections.
Adhering to the following pouring procedure will help
ensure an efficient pour and maximize a bartender’s
productivity.
To pour a serving:
1Grab the bottle by the neck.
2Tip the bottle at the same rate as the liquid travels
down the neck toward the pour spout.
3Invert the bottle as quickly as possible to at least a
135 degree angle.
4After the proper amount of liquid has been
dispensed, return the bottle to an upright position.
Changing bottles
BarVision wireless pour spouts can be easily attached or
removed. When a bottle runs empty, the bartender
needs simply remove the pour spout from the empty
bottle and attach it to a full one. The pour spout will
automatically sense the removal and reattachment and
send signals communicating those events to the rest of
the system. There are no buttons to press or procedures
to perform.
While changing bottles does not require any unusual or
extraordinary actions on the user’s part, the following
precautions should be observed:
• Do not tilt an empty bottle to ninety degrees while
attempting to remove the pour spout. Doing so will
cause an unintended pour to be registered.
• Avoid removing more than one pour spout at a
time. This will help ensure that pour spouts are not
inadvertently placed on incorrect bottles.
• After the pour spout has been removed from a
bottle, refrain from pressing the transmitter tag’s
recessed resume button. The resume button should
only be pressed when you want to remove the pour
spout from a bottle that is not yet empty (for
example, for cleaning) and then reattach it to that
same bottle. For more information about the
function of the resume buttons see “Pour spout” on
page 2.
• Be sure to attach the pour spout to a replacement
bottle of the same brand and size.
• Securely attach the pour spout to the new bottle,
both to protect against leakage and to ensure that
the transmitter tag’s buttons become fully pressed
in.
T

CHAPTER 8
106
Using the BarVision System
Draft for Reseller Review Only
Not for Distribution to End Users
Cleaning pour spouts
To maintain sanitary conditions and to ensure
consistent pour spout pour rates, it will occasionally be
necessary to clean the pour spouts. Cleaning all the
pour spouts from every liquor bottle in your bar on a
routine scheduled basis could be a very time-
consuming process. Generally, such an undertaking
should not be necessary. However, BarVision wireless
pour spouts can accommodate whatever regimen or
schedule your establishment currently adheres to,
whether you clean a pour spout each time a bottle runs
empty, or clean each pour spout on a weekly basis.
Careful warm-water rinsing should remove any residue
that has built up in the nozzle and help minimize any
pour rate degradation.

107
Draft for Reseller Review Only
Not for Distribution to End Users
Chapter 9: Working with Data
o effectively manage your establishment, you
need access to timely, accurate data. BarVision
supplies that data. This chapter provides you
with tips for using, safeguarding, and maintaining your
BarVision data. It contains the following sections:
• “About BarVision data” on page 107
• “Exporting data” on page 107
• “Backing up data” on page 110
• “Restoring data” on page 111
• “Maintaining the journal” on page 113
• “Erasing the journal” on page 115
About BarVision data
As BarVision monitors the events that occur to the
open bottles in your establishment, it generates and
stores detailed data about the specifics of those events.
These data records are then saved in the system’s
journal, and a summary of each event record is
displayed on the Activity screen.
BarVision’s built-in reports enable you to organize,
view, and print the collected data. But you might want
to interact with the data more directly. For example,
you might want to export BarVision’s raw journal data
so that you can analyze it, use it to generate charts and
graphs, or evaluate it to track trends. You might want
to back up the system data for archival and system
recovery purposes. Or you might want to delete all of
the collected data to simplify your ability to track
liquor usage during a special event or at a seldom-used
remote bartending location. BarVision allows you to do
all of these things, and the following sections of this
chapter explain how.
Exporting data
You can export BarVision journal and report data from
your Palm® handheld to a laptop or desktop computer.
You might want to do this in order to print, e-mail,
archive, or analyze the data. To export BarVision data,
you must have the BarVision Conduit for Palm
HotSync installed on the target PC (refer to “Installing
the BarVision Conduit for Palm HotSync” on
page 13). With the conduit installed, you can export
BarVision data simply by synchronizing your Palm®
handheld to your personal computer. (For information
about synchronizing, refer to the documentation that
accompanied your handheld.)
Each time you synchronize your handheld to a
computer equipped with the BarVision Conduit for
Palm HotSync, a new journal data file is created. This
export occurs automatically and requires no action on
your part, other than to initiate the synchronization.
Report data, by contrast, is only exported if a report
has been run since the last time you performed a
synchronization, and only if the report that was run
had its Export setting (see “Export” on page 81)
enabled at the time. These two types of data (journal
and report) are saved in different file formats and to
different locations on the target computer’s hard drive,
as explained below.
Journal data
BarVision journal data is exported to a comma
separated value (.csv) file. This export occurs automati-
cally each time you synchronize your Palm® handheld
(with BarVision for Palm OS® software installed) to a
personal computer (with BarVision Conduit for Palm
HotSync software installed). Each exported file
contains all of the journal data collected since the last
time you synchronized your handheld. The data file’s
name identifies its creation date and the handheld
terminal from which it was exported. Exported journal
data files are stored on the target PC in the default
location: C:\Documents and
Settings\User Name\My
T
CHAPTER 9
108
Working with Data
Draft for Reseller Review Only
Not for Distribution to End Users
Documents\BarVision\Journal. The comma
delimited files can then be viewed and manipulated
using any spreadsheet, database, or report design
program (such as Microsoft® Excel®, Lotus® 1-2-3, or
Crystal Reports®).
Exported journal data files contain information in
columnar format. Each row provides information for a
single journal event record. The table below identifies
the data provided for each event record.
Table 1: Data provided in exported .csv journal data
files Report data
BarVision report data is exported in ASCII text file
(.txt) format. When you run a report that has been
configured for export (see “Export” on page 81), the
system stores the generated report information. The
next time you synchronize your handheld (with
BarVision for Palm OS® software installed) to a
personal computer (with BarVision Conduit for Palm
HotSync software installed), a text file version of the
report is created on the target PC. Each exported
report file’s name identifies the date and time the
report was run and the handheld terminal on which it
was run. Exported reports are saved to the default
location: C:\Documents and
Settings\User Name\My
Documents\BarVision\Reports. After those
text files have been created, they can be printed, e-
mailed, or archived for permanent storage and record
keeping.
Current handheld hardware limitations restrict
the amount of stored BarVision report data to
three megabytes. If you reach this limit and do not export
the report data from the handheld, any report you run
afterward will overwrite the oldest saved report infor-
mation. To avoid this potential for loss, be sure to regularly
synchronize your handheld.
Data Label Explanation
Date The date on which the event occurred.
Time The time at which the event occurred.
Location The location number assigned to the con-
tainer.
EventType The type of event that occurred.
ItemCount For events of EventType “Lost,” this column
identifies the number of lost events.
SerialID The serial identification number of the
wireless pour spout.
Product The product name assigned to the con-
tainer.
Category The price category assigned to the con-
tainer.
PourTime The duration, in seconds, for which the
bottle was tilted past 90 degrees during a
pour.
Tilt90_Time The duration, in seconds, for which the
bottle was tilted between 90 and 135
degrees during a pour.
Volume The volume of liquid dispensed during a
pour.
Cost The wholesale cost of the volume of liquid
dispensed.
ServingSize The serving size that the pour was allo-
cated to.
Over_Under Indicates if the pour was an over- or under-
sized pour.
ImproperTilt Identifies pours made at an improper bot-
tle tilt angle. A value of 1 indicates an
improper tilt angle.
ContainerSize The volume of liquid the container holds at
capacity.
YieldVolume The total volume of liquid dispensed from
the container.
Data Label Explanation
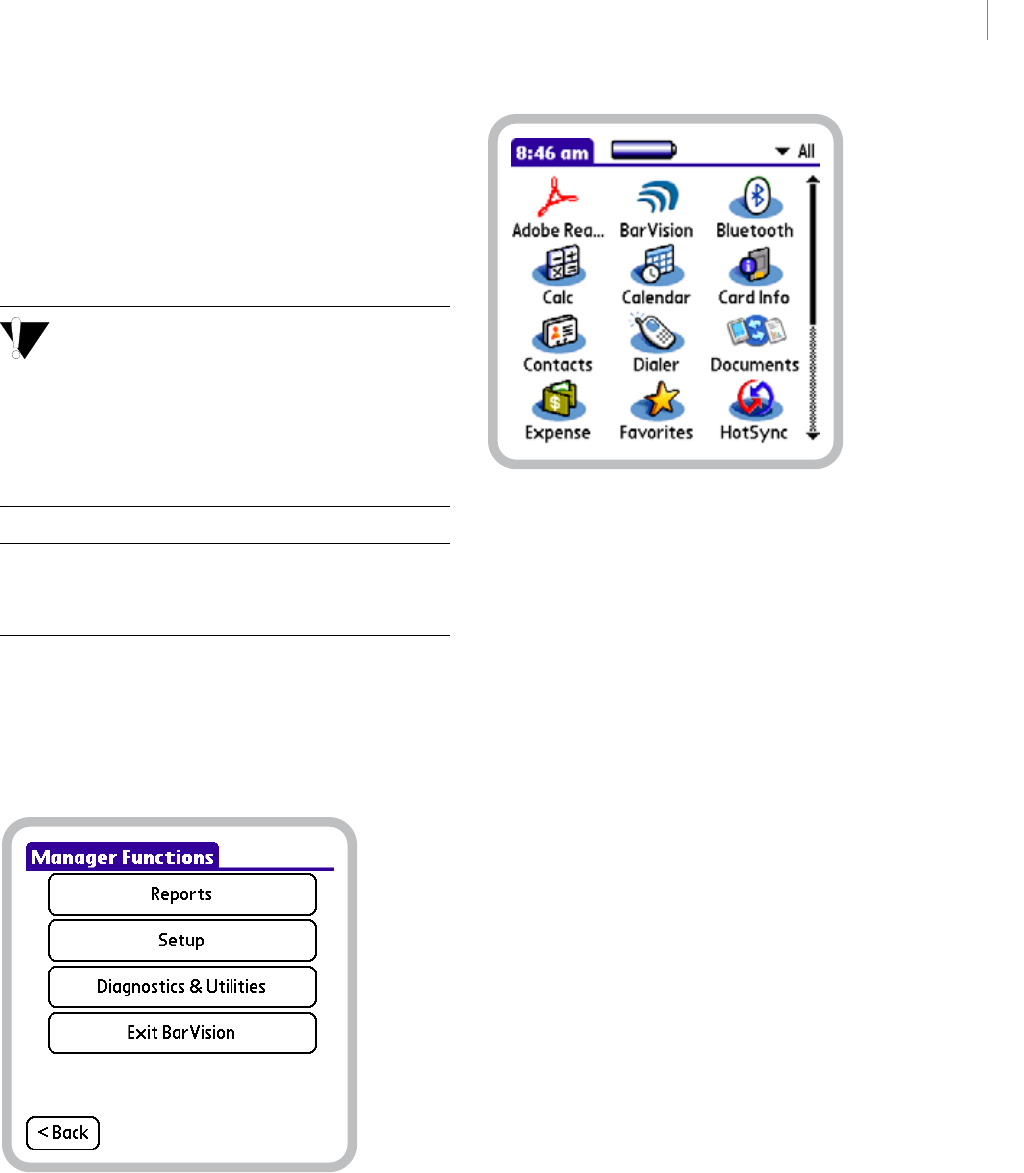
109
BARVISION FOR PALM OS®
User’s Guide
Draft for Reseller Review Only
Not for Distribution to End Users
Export procedure
To export BarVision data from your handheld to a
personal computer, the BarVision Conduit for Palm
HotSync software must be installed on the target PC.
For information, see “Installing the BarVision Conduit
for Palm HotSync” on page 13.
To synchronize a handheld to a personal computer,
HotSync® Manager must be active. HotSync®
Manager is installed when you install the PalmSource™
Desktop software. If you did not install PalmSource™
Desktop, you do not have HotSync® Manager on your
computer. Refer to the documentation that accompanied
your handheld.
Note: Performing the following procedure typically
requires the manager security code. See “About security
codes” on page 26.
To export data from your Palm® handheld to a per-
sonal computer:
1Choose Mgr to display the Manager Functions
screen.
Manager Functions screen
2Tap Exit BarVision to quit the BarVision for Palm
OS® program and display the Applications View.
Applications View
3Synchronize your Palm® handheld and personal
computer. Depending upon your hardware configu-
ration and network setup, this can be done in any one
of four ways:
• Wirelessly using Bluetooth® technology on your
handheld
• Using the USB sync cable by attaching it to your
handheld and your computer
• Using your handheld’s infrared port
• Connecting to your wireless (Wi-Fi) network
Refer to the User Guide that accompanied your Palm®
handheld for details.
4After the synchronization process is complete,
navigate on your personal computer’s file system to the
location: C:\Documents and
Settings\User Name\My
Documents\BarVision. This folder should
contain subfolders named Journal and Reports.
The Journal folder contains the exported journal
data file in .csv format. The Reports folder contains
any exported report data files in .txt format.
5After you have finished exporting data, be sure to
restart the BarVision for Palm OS® software and
connect the handheld to the BarVision data receiver.

CHAPTER 9
110
Working with Data
Draft for Reseller Review Only
Not for Distribution to End Users
Backing up data
Regularly backing up the BarVision for Palm OS® data
provides you with a clear recovery path in the event of
a disaster (for example, if the Palm® handheld should
be lost and replaced, erased, or if a hard reset is
performed). When you create a backup, each of the
system’s databases is copied to the SD memory card
located in the handheld’s expansion card slot. Should
the need arise, those databases can then be restored to
the handheld (see “Restoring data” on page 111). This
will return the system to the state it was in at the time
the backup was created. All of the categories, serving
sizes, containers, and reports you have created, as well
as all of the events recorded in the activity list, will be
restored.
You can create a system backup in three different ways:
by running a properly configured report (see “Back up
during maintenance” on page 84), by selecting the
Back up to SD card before doing maintenance option
when performing journal maintenance (see
“Maintaining the journal” on page 113), or by
choosing the Back up to SD card utility function.
Regardless of which method initiates the back up, the
BarVision for Palm OS® databases are copied to the SD
memory card location
Palm\BarVision\Backup. Each time you
initiate a back up, the existing database files stored on
the memory card at that location are overwritten.
To minimize the possibility of data loss, Nuvo Technol-
ogies recommends using two SD memory cards on a
daily rotating basis, or, alternatively, copying the
backed up databases from the SD memory card to your
personal computer’s hard drive. These safeguards will
help protect your data should a memory card
malfunction or become lost or misplaced.
Note: The following procedure describes the process of
manually backing up the system’s databases. For infor-
mation on creating a backup while running a report, see
“Back up during maintenance” on page 84. For infor-
mation on backing up during journal maintenance, see
“Maintaining the journal” on page 113.
Note: Performing the following procedure typically
requires the manager security code. See “About security
codes” on page 26.
To back up the BarVision for Palm OS® databases:
1Verify that the SD memory card you want to back
up to is located in the handheld’s expansion slot. If it is
not, insert it.
2Choose Mgr > Diagnostics & Utilities to display
the Diagnostics & Utilities screen.
Diagnostics & Utilities screen, Back up to SD card selected
3In the utilities list, tap Back up to SD card to
highlight it, and then tap Select.
4One of the following two things will occur:
• If the SD memory card in the handheld’s expansion
slot does not already contain a backup of
BarVision’s databases, the Maintenance status
screen will be displayed. Proceed to step 5.
• If the SD memory card in the handheld’s expansion
slot already contains a backup of BarVision’s
databases, a Confirmation screen similar to the one
below will be displayed.
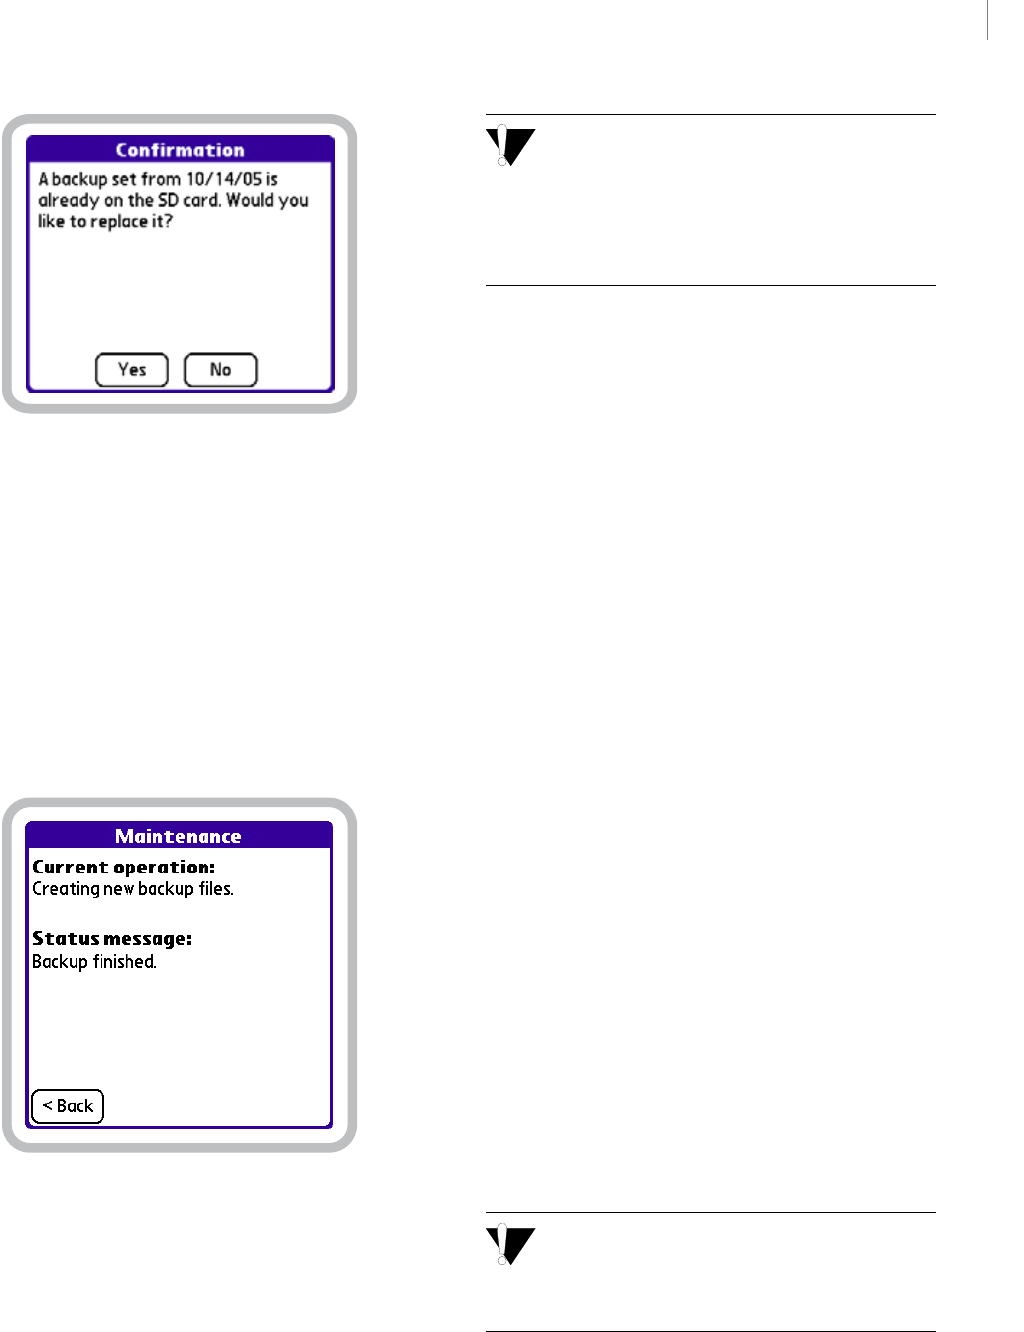
111
BARVISION FOR PALM OS®
User’s Guide
Draft for Reseller Review Only
Not for Distribution to End Users
Back up to SD card Confirmation screen
Do one of the following:
—Tap No to cancel the backup operation. Remove
the SD memory card, insert a different one, and
then return to step 3.
—Tap Yes to replace the existing backup. Proceed
to step 5.
5The Maintenance status screen will be displayed.
This screen indicates the progress as each of the
system’s databases is copied to the SD memory card.
Maintenance status screen
If the system is unable to create a backup (for
instance, if the SD card is unformatted, write-
protected, or has not been fully inserted), that information
will display in the status message area of the Maintenance
screen. Be sure to review the status message to verify that a
system backup was successfully created.
After all operations are complete and you have finished
viewing the screen, tap <Back to return to the
Diagnostics & Utilities screen.
6Optionally, remove the SD memory card from the
handheld’s expansion slot and copy its contents to your
personal computer’s hard drive.
Restoring data
In the event of a disaster to your handheld computer
(for example, if it should be lost and replaced, erased,
or if a hard reset is performed), you can restore the
most recent backup to minimize the possibility of data
loss. When you create a backup (see “Backing up data”
on page 110), each of the system’s databases is copied
to the SD memory card in the handheld’s expansion
slot. Should the need arise, those databases can then be
restored to the handheld (see “Backing up data” on
page 110).
When you restore the system’s databases from a
backup, the system is returned to the state it was in at
the time the backup was created. All of the categories,
serving sizes, containers, and reports you have created,
as well as all of the events recorded in the activity list,
are restored. After the restoration is complete,
additional event records may be downloaded from the
data receiver. Any event stored in the data receiver’s
memory that was received after the date and time the
backup was created, and that pertains to a container
defined in the restored database, is downloaded.
If more than 6,144 events have occurred,
systemwide, since the system backup was created,
the data receiver’s storage limit will have been exceeded
and information will have been lost.
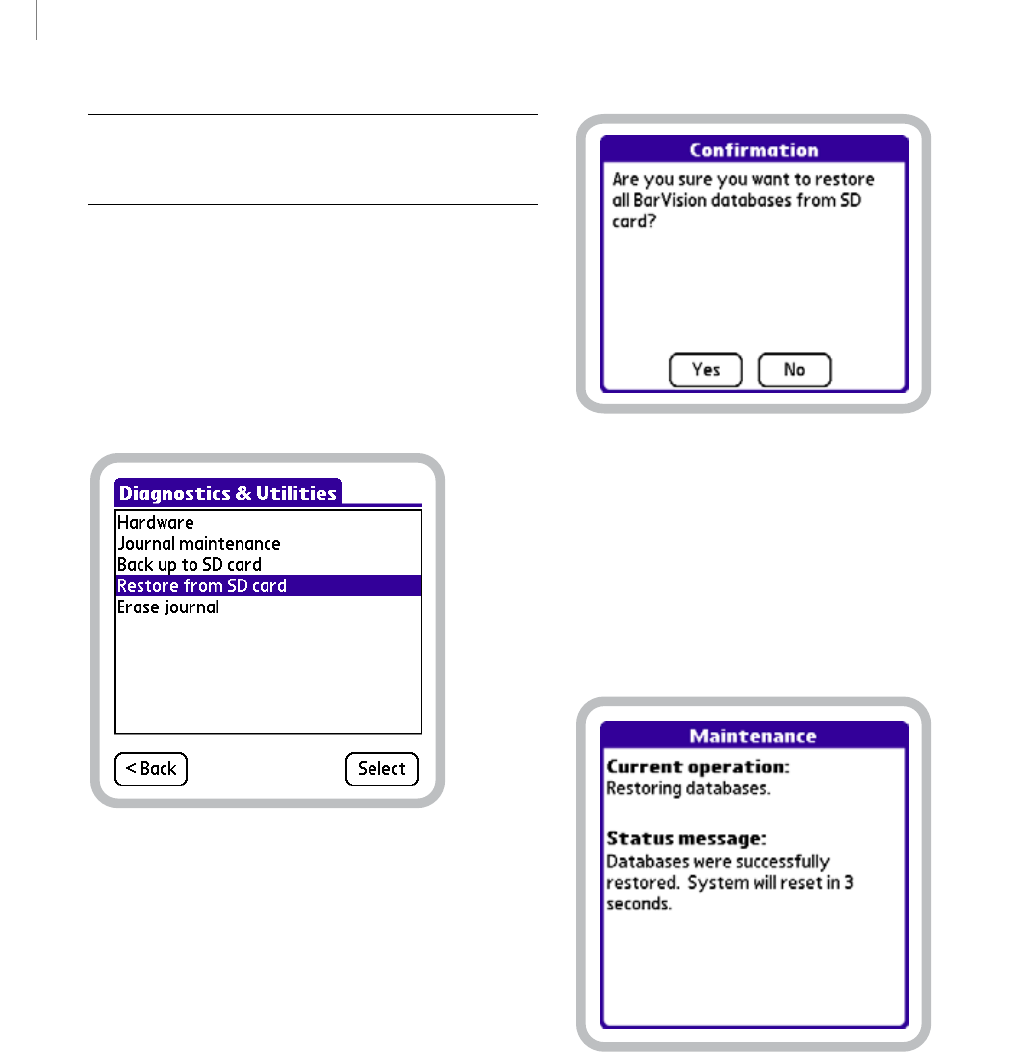
CHAPTER 9
112
Working with Data
Draft for Reseller Review Only
Not for Distribution to End Users
Note: Performing the following procedure typically
requires the manager security code. See “About security
codes” on page 26.
To restore the BarVision for Palm OS® databases:
1Verify that the SD memory card containing the
system backup you want to restore is located in the
handheld’s expansion slot. If it is not, insert it.
2Choose Mgr > Diagnostics & Utilities to display
the Diagnostics & Utilities screen.
Diagnostics & Utilities screen, Restore from SD card selected
3In the utilities list, tap Restore from SD card to
highlight it, and then tap Select.
4The following Confirmation screen will be
displayed.
Confirmation screen
Tap Yes to copy the databases located on the SD
memory card to the Palm® handheld.
5The Maintenance status screen will be displayed.
This screen indicates the progress as each of the
system’s databases is restored from the SD memory
card.
Maintenance status screen
6After the databases have been restored, the
handheld will reset. The BarVision for Palm OS®
software will restart, and the Activity screen will be
displayed.
7If the handheld is not already connected to the
BarVision data receiver, connect it. Any events stored
in the data receiver’s memory that were received after
113
BARVISION FOR PALM OS®
User’s Guide
Draft for Reseller Review Only
Not for Distribution to End Users
the date and time the backup was created, and that
pertain to a container defined in the restored databases,
will be downloaded and appear in the activity list.
Maintaining the journal
You may want to perform maintenance on the journal’s
list of events on a periodic basis. When you perform
journal maintenance, you define the age of the obsolete
events you want removed from the journal. An obsolete
event is one that pertains to an empty bottle no longer
in use (that is, a bottle whose pour spout has been
removed). Performing journal maintenance will not
eliminate any events for bottles currently in use, no
matter the age of the event.
By maintaining the journal, you control the amount of
historical data available to end users on the Activity
screen. This can help you and your bartending staff
locate a particular event, should the need arise, by
reducing the number of existing event records.
You can initiate journal maintenance in two different
ways: by running a properly configured report (see
“Perform maintenance” on page 81), or by manually
selecting the Journal maintenance utility function.
Because reports are generally run at regular intervals,
the system can use the generation of a report as a
trigger for performing data maintenance. During
report-initiated maintenance, the system deletes
obsolete events older than the Minimum days in
journal value (see “Minimum days in journal” on
page 84). When you conduct maintenance manually,
you define which obsolete events are to be deleted by
selecting a date and time. All obsolete events older than
the date and time you select are then removed from the
journal.
Note: The following procedure describes the process of
manually performing journal maintenance. For infor-
mation on enabling report-initiated maintenance, refer to
“Perform maintenance” on page 81.
Note: Performing the following procedure typically
requires the manager security code. See “About security
codes” on page 26.
To manually perform journal maintenance:
1Choose Mgr > Diagnostics & Utilities to display
the Diagnostics & Utilities screen.
Diagnostics & Utilities screen, Journal maintenance selected
2In the utilities list, tap Journal maintenance to
highlight it, and then tap Select to display the Mainte-
nance screen.
Maintenance screen
CHAPTER 9
114
Working with Data
Draft for Reseller Review Only
Not for Distribution to End Users
3The Maintenance screen’s Date field will default to
the date that corresponds with the value set for the
Minimum days in journal report option. For example,
if the Minimum days in journal report option is set to
14, the Maintenance screen’s date field will be set to
the date fourteen days prior to the current date. The
Time field value will default to the current time.
Do one of the following:
• To remove all obsolete events generated before the
default Date and Time values, proceed to step 5.
• To specify alternative Date and Time values before
which obsolete events will be removed, proceed to
step 4.
4Specify the date and time before which obsolete
events will be removed by doing any of the following:
• To adjust the remove events date, tap the Date
field. The Select Day screen will be displayed. Select
a year, month, and date by tapping the appropriate
items.
Select Day screen
To quickly select the current year, month, and
date, tap To d ay .
• To adjust the remove events time, tap the Time
field. The Select Time screen will be displayed.
Select a time by tapping a digit, using the Selection
Arrows ( ) to set the numeral, selecting either
AM or PM, and then tapping OK.
Select Time screen
5Optionally, to back up the system’s databases before
journal maintenance is performed (see “Backing up
data” on page 110), tap Back up to SD card before
doing maintenance. The Check Box will appear
selected ( ) when the option is enabled.
• If you chose to back up the databases, verify that an
SD memory card is located in the handheld’s
expansion slot. If there is not, insert one.
6Tap Purge.
7The Maintenance status screen will be displayed.
This screen indicates the number of obsolete events
removed from the journal.
Maintenance status screen
115
BARVISION FOR PALM OS®
User’s Guide
Draft for Reseller Review Only
Not for Distribution to End Users
After you have finished viewing the screen, tap <Back
to return to the Diagnostics & Utilities screen.
Erasing the journal
You may want to erase the journal to remove all of the
event records from the list. For example, you might
want to erase the journal in preparation for tracking
usage at a specific social event (such as a catered party
or reception). When you erase the journal, all event
records are deleted, regardless of their age. Even those
event records that pertain to a bottle currently in use
are deleted. This has the effect of resetting each
container’s Remaining % to 100. Because of this, the
yield values provided for any partially empty bottles
after the journal has been erased should be ignored.
Erasing the journal will reset the Remaining %
value for all containers to 100.
Note: Performing the following procedure typically
requires the manager security code. See “About security
codes” on page 26.
To erase the journal:
1Choose Mgr > Diagnostics & Utilities to display
the Diagnostics & Utilities screen.
Diagnostics & Utilities screen, Erase journal selected
2In the utilities list, tap Erase journal to highlight it,
and then tap Select to display the erase journal Confir-
mation screen.
Erase journal Confirmation screen
3Tap Yes to erase the journal.
4The Maintenance status screen will be displayed.
This screen identifies the current system operation and
notifies you when the journal has been successfully
erased.
Maintenance status screen
After you have finished viewing the screen, tap <Back
to return to the Diagnostics & Utilities screen.

CHAPTER 9
116
Working with Data
Draft for Reseller Review Only
Not for Distribution to End Users

117
Draft for Reseller Review Only
Not for Distribution to End Users
Chapter 10: Common Questions
hould you encounter a problem while using the
BarVision system, please review this appendix
before requesting assistance. This portion of the
guide provides troubleshooting tips, techniques, and
information designed to help you eliminate or rule out
the most common sources of difficulty. It contains the
following sections:
• “Palm® handheld problems” on page 117
• “Data receiver problems” on page 117
• “Pour spout problems” on page 118
• “Printing problems” on page 119
• “Security code problems” on page 120
• “Data loss problems” on page 120
• “Disaster recovery” on page 121
• “Customer support” on page 122
Palm® handheld problems
The green “charging” indicator light does not come
on when the handheld is connected to the data
receiver via serial cable.
Try each of these in turn:
• Attach your handheld firmly to the serial cable.
• Connect the power adapter securely to the data
receiver.
• Check that the power adapter is plugged into a
working electrical outlet.
The handheld does not turn on when you press the
power button.
Try each of these in turn:
• Perform a soft reset:
1Use the tip of your stylus to gently press the
reset button inside the hole on the back panel of
your handheld.
• Charge your handheld for two full hours.
1Attach your handheld to its AC charger.
2Make sure the green indicator light is on.
The handheld keeps turning itself off.
When the handheld is not properly supplied with
power, it will automatically turn itself off after a period
of inactivity (depending on preference settings, this
period can be from thirty seconds to three minutes).
Try each of these in turn:
• Attach your handheld firmly to the cable.
• Connect the power adapter securely to the data
receiver.
• Check that the power adapter is plugged into a
working electrical outlet.
For all other Palm® handheld issues:
• Refer to the User Guide which accompanied your
hardware.
Data receiver problems
The BarVision activity list indicates that the data
receiver has been disconnected.
Try each of these in turn:
• Verify that the data receiver’s power switch is in the
“on” position.
• Attach your handheld firmly to the serial cable.
• Connect the serial cable securely to the back of the
data receiver.
• Connect the power adapter securely to the data
receiver.
• Replace the data receiver batteries:
1Remove the data receiver cover.
2Remove the six currently installed AA batteries.
S

CHAPTER 10
118
Common Questions
Draft for Reseller Review Only
Not for Distribution to End Users
3Install six new AA batteries, taking care to
properly orient them.
4Replace the data receiver cover.
Pour spout problems
Pouring from a container does not generate an event
record in the activity list.
Try each of these in turn:
• Confirm communications between the Palm®
handheld and the data receiver:
1Temporarily detach the Palm® handheld from
the serial cable, and then firmly attach it to the
serial cable again.
2Verify that a Receiver connected event
record exists in the activity list. If you cannot locate
one, refer to “Data receiver problems” on page 117.
• Confirm the pour spout is properly attached to the
neck of the bottle:
1Attach the pour spout tightly to the bottle neck.
2Verify the transmitter tag’s bottle detect button
(located on the underside of the tag) is fully pressed
in.
• Verify that the pour spout attached to the container
is the one that was associated with it during the
container addition process:
1Choose Mgr > Setup > Containers to display
the Containers screen.
2Put the data receiver in active listening mode by
tapping Listen ( ) in the upper right-hand
corner of the screen.
3Tilt the bottle until an item becomes selected in
the container scroll list.
4If the container selected is not the one antici-
pated, pour spouts have been inserted into incorrect
bottles. Proceed to the next step.
If no container is selected, the pour spout may not
be communicating. Skip to the step entitled,
“Confirm that the pour spout has not expired:” on
page 118.
5Physically locate the container whose entry was
selected in the container scroll list during the
previous step.
6Swap the pour spouts between the two
containers.
7Repeat this procedure with the original
container to verify that it is now equipped with the
appropriate pour spout.
• Confirm that the pour spout has not expired:
1Choose Mgr > Setup > Containers to display
the Containers screen.
2Begin entering the name of the container in the
Lookup field until the appropriate item becomes
selected in the scroll list.
3Tap Spout to display the page 1 of the pour
spout Hardware Detail screen.
4View the pour spout’s expiration information to
verify it has not expired. If the spout has expired,
replace it with a new one. See “Assigning a new
pour spout to (or removing the current pour spout
assignment from) a container” on page 57.
• You may need to add an active antenna to increase
the wireless coverage area of your BarVision system.
Contact the dealer who sold you your system for
details.
Pour spout not recognized when attached to a bottle
during the container addition procedure.
• Confirm that the pour spout’s transmitter tag
battery still retains a charge:
1Fully press in the transmitter tag’s bottle detect
button (located on the underside of the tag).
2Verify that the red and green LEDs (located on
top of the transmitter tag at the edge farthest away
from the metal nozzle) illuminate. If they do not,
the transmitter tag’s battery has likely lost its
charge. Replace the tag with a new one.

119
BARVISION FOR PALM OS®
User’s Guide
Draft for Reseller Review Only
Not for Distribution to End Users
Printing problems
Cannot print to a network printer.
Try each of these in turn:
• Verify your handheld’s Wi-Fi or VPN connections.
Refer to the User Guide which accompanied your
hardware.
• Verify the printer option settings:
1Choose Mgr > Setup > Options to display the
Options screen.
2In the option list, tap Printer and then tap
Select to display the Printer Options screen.
3Confirm the Connection option is set to
Network (LPR).
4Confirm the Print Server Name/address value
matches your printer’s host name or IP address.
(Refer to the documentation that accompanied
your printer for instructions on how to locate the
value of this setting.)
5Verify the Printer/queue value matches the
value of your printer’s queue. (Refer to the
documentation that accompanied your printer for
instructions on how to locate the value of this
setting.)
6If you still experience problems, consult your
network administrator.
Cannot print to a printer equipped with an infrared
port.
Try each of these in turn:
•Verify the Connection printer option setting:
1Choose Mgr > Setup > Options to display the
Options screen.
2In the option list, tap Printer and then tap
Select to display the Printer Options screen.
3Confirm the Connection option is set to IrDA.
• Be sure the infrared port of your handheld is
aligned directly opposite to, and within a few
inches of, the infrared port of your printer.
Printed report appears on only the left-hand side of
the page.
•Verify the Printer type printer option setting:
1Choose Mgr > Setup > Options to display the
Options screen.
2In the option list, tap Printer and then tap
Select to display the Printer Options screen.
3Confirm the Printer type option is set to
Letter.
Page numbers on printed reports appear in improper
locations.
•Verify the Lines per page printer option setting:
1Choose Mgr > Setup > Options to display the
Options screen.
2In the option list, tap Printer and then tap
Select to display the Printer Options screen.
3For printing on 8½-by-11-inch paper, the Lines
per page value should typically be set to 60.
However, you may need to adjust this value to
accommodate either a specific printer or page sizes
other than U.S. Letter.
Line breaks occur in improper locations when print-
ing receipts.
•Verify the Printer type printer option setting:
1Choose Mgr > Setup > Options to display the
Options screen.
2In the option list, tap Printer and then tap
Select to display the Printer Options screen.
3Confirm the Printer type option is set to
Receipt.

CHAPTER 10
120
Common Questions
Draft for Reseller Review Only
Not for Distribution to End Users
Security code problems
The Manager security code has been forgotten.
The following procedure may result in data loss. If
more than 6,144 events have occurred,
systemwide, since the most recent system backup was
created, the data receiver’s storage limit will have been
exceeded and information will have been lost.
• Reset the handheld, delete the BarVision for Palm
OS® software, and then reinstall it to set the security
code to the system default:
1Use the tip of your stylus to gently press the
reset button inside the hole on the back panel of
your handheld.
2After the system has reset, verify or set the
location, date, and time, and then tap Done.
3Press or tap Home on your Palm® handheld to
display the Applications View.
4Tap the date in the upper left-hand corner of
the handheld’s screen to display the App menu.
5From the App menu, select Delete.
6Tap BarVision to select the software for
deletion.
7Tap Delete.
8Tap Yes.
9Tap Done.
10 Restore available system data by performing the
procedure described under “Disaster recovery” on
page 121.
Data loss problems
Event records have been removed from the activity
list.
A number of different circumstances and operations
have the potential to result in event records being
removed.
• Running a report that has the Perform mainte-
nance setting enabled will remove all obsolete
container event records older than the Minimum
days in journal report option value.
— To modify the amount of data retained during
report-initiated data table maintenance, edit the
Minimum days in journal report option value.
See “Editing journal options” on page 91.
— To disable report-initiated data table mainte-
nance, clear the Perform maintenance setting
for all applicable reports. See “Editing report
settings” on page 87.
•Running the Erase journal utility from the
Diagnostics & Utilities screen will clear all existing
event records from the journal.
— Accessing this function typically requires the
entry of the manager security code. If you
suspect that the security code has been compro-
mised, change it. If the security code has been
disabled, enable it. See “About security codes”
on page 26.
•Running the Journal maintenance utility from the
Diagnostics & Utilities screen will remove all
obsolete container pour (see “Container pour” on
page 32) and container empty (see “Container
empty” on page 31) events received before the date
and time selected on the Maintenance screen.
— Accessing this function typically requires the
entry of the manager security code. If you
suspect that the security code has been compro-
mised, change it. If the security code has been
disabled, enable it. See “About security codes”
on page 26.

121
BARVISION FOR PALM OS®
User’s Guide
Draft for Reseller Review Only
Not for Distribution to End Users
• Running the Restore from SD card utility from the
Diagnostics & Utilities screen could result in lost
event records. When this utility is run, it returns
the activity list to the state it was in at the time the
backup was created. Then, additional event records
may be downloaded from the data receiver. Any
event stored in the data receiver’s memory that was
received after the date and time the backup was
created, and that pertains to a container defined in
the restored database, is downloaded.
If more than 6,144 events have occurred,
systemwide, since the system backup was created,
the data receiver’s storage limit will have been exceeded
and information will have been lost.
— Accessing this function typically requires the
entry of the manager security code. If you
suspect that the security code has been compro-
mised, change it. If the security code has been
disabled, enable it. See “About security codes”
on page 26.
— Be sure to create frequent, up-to-date system
backups. You can create backups manually via
the Back up to SD card utility (see “Backing up
data” on page 110). Or you can configure the
system to generate a backup when you run a
report. To do so, you must enable the Back up
during maintenance report option as well as a
specific report’s Perform maintenance setting.
See “Editing journal options” on page 91 and
“Editing report settings” on page 87.
• The BarVision for Palm OS® data table that stores
events can hold a maximum of thirty thousand
records. When the system approaches this limit, it
must create enough data table space to allow the
system to function properly. To do so, it will delete
the oldest one thousand event records. If possible,
the system will delete only those records that
pertain to bottles no longer in use. However, if this
is not possible, some of the oldest event records for
currently active bottles will be deleted.
— Be sure to create frequent, up-to-date system
backups. You can create backups manually via
the Back up to SD card utility (see “Backing up
data” on page 110). Or you can configure the
system to generate a backup when you run a
report. To do so, you must enable the Back up
during maintenance report option as well as a
specific report’s Perform maintenance setting.
See “Editing journal options” on page 91 and
“Editing report settings” on page 87.
Reports designated for export cannot be located
after synchronizing the handheld and PC.
• When you run a report that has the Export setting
enabled, the system designates the report for export
to a data file. The next time you synchronize your
handheld and personal computer, the system creates
a text file version of the report on the computer
connected to the handheld. BarVision for Palm OS®
can store up to three megabytes (MB) of report
information for export. After this limit has been
reached, the oldest exported report information will
be overwritten by the most recently generated
exported report. (Use of the export function
requires installation of the BarVision Conduit for
Palm HotSync.)
— Be sure to regularly synchronize your handheld
to your PC. (For information about synchro-
nizing your Palm® handheld computer, refer to
the documentation that accompanied your
hardware.)
Disaster recovery
Palm® handheld lost and replaced, erased, or a hard
reset performed.
• Install the BarVision for Palm OS® software and
restore the most current BarVision data backup:
1Install the BarVision software. Refer to the
BarVision Hardware Installation Guide.

CHAPTER 10
122
Common Questions
Draft for Reseller Review Only
Not for Distribution to End Users
2Insert the SD memory card containing the most
recent system backup into the handheld’s expansion
slot.
3Choose Mgr > Diagnostics & Utilities to
display the Diagnostics & Utilities screen.
4In the utilities list, select Restore from SD card
and then tap Select.
5A database restoration Confirmation screen will
be displayed. Tap Yes to restore the most recent
backup from the SD memory card.
6After the restoration is complete, the system will
reset and BarVision for Palm OS® will be restarted.
7Attach the Palm® handheld to the serial cable
that connects it to the data receiver (if it is not
already). So long as the data receiver has not lost
power, its memory will contain the 6,144 events
most recently received. Any event stored in the data
receiver’s memory that was received after the date
and time the backup was created, and that pertains
to a container defined in the restored database, will
be downloaded.
If more than 6,144 events have occurred,
systemwide, since the system backup was created,
the data receiver’s storage limit will have been exceeded
and information will have been lost.
8If any items were added or edited (including
reports, containers, categories, and serving sizes)
since the last system backup was generated, those
additions and edits will have to be manually
recreated.
Problems with third-party
products
If you require assistance with the operation of your
Palm® handheld, printer, personal computer, or any
third-party software:
• Refer to the documentation that accompanied your
product or contact the manufacturer directly. Nuvo
Technologies, Inc. does not provide technical assis-
tance for third-party hardware or software.
Customer support
If you require assistance using the BarVision system
that cannot be found in these pages:
• Contact the dealer who sold you your BarVision
system and who is familiar with the details of your
particular installation and configuration.
123
Draft for Reseller Review Only
Not for Distribution to End Users
Appendix A: Product Regulatory
Information
FCC statement
This device complies with part 15 of the FCC Rules. Operation is subject to the following two conditions: (1) This
device may not cause harmful interference, and (2) this device must accept any interference received, including
interference that may cause undesired operation.
NOTE: This equipment has been tested and found to comply with the limits of Part 15 of the FCC Rules. These
limits are designed to provide reasonable protection against harmful interference in a residential installation. This
equipment generates, uses and can radiate radio frequency energy and, if not installed and used in accordance with
the instructions, may cause harmful interference to radio communications. However, there is no guarantee that
interference will not occur in a particular installation. If this equipment does cause harmful interference to radio or
television reception, which can be determined by turning the equipment off and on, the user is encouraged to try
to correct the interference by one or more of the following measures:
• Reorient or relocate the receiving antenna.
• Increase the separation between the equipment and receiver.
• Connect the equipment into an outlet on a circuit different from that to which the receiver is connected.
• Consult the dealer or an experienced radio/TV technician for help.
Changes or modifications not expressly approved by the party responsible for compliance could void the user’s
authority to operate the equipment.
Responsible Party:
Nuvo Technologies, Inc.
6060 East Thomas Road
Scottsdale, Arizona 85251, USA
phone: +1 480.222.6000
Canadian ICES-003 statement
This Class B digital apparatus complies with Canadian ICES-003.
CE compliance statement
indicates compliance with European requirements for safety, health, environment, and customer protection.
Assessment of compliance with the requirements relating to electromagnetic compatibility and safety were based on
the standards referenced in the following Declarations of Conformity:
Tes t e d t o C o m p l y
With FCC Standards

APPENDIX A
124
Product Regulatory Information
Draft for Reseller Review Only
Not for Distribution to End Users
Declarations of conformity
Nuvo Technologies, Inc. Declares the Product: Pour Spout
Model Name: BarVision Pour Spout
Manufacturer’s Name: Nuvo Technologies, Inc.
Manufacturer’s Address: 6060 East Thomas Road, Scottsdale, Arizona 85251, USA
Conforms with the following specifications:
• EN 50082-1, EN 61000-4-2: Electrostatic Discharge (ESD)
• EN 50082-1, EN 61000-4-3: Radiated Electromagnetic Field (EMF)
• EN 55022-1998 with Amendment A1: 2000 (CISPR-22)
Nuvo Technologies, Inc. Declares the Product: Active Antenna
Model Name: BarVision Active Antenna
Manufacturer’s Name: Nuvo Technologies, Inc.
Manufacturer’s Address: 6060 East Thomas Road, Scottsdale, Arizona 85251, USA
Conforms with the following specifications:
• EN 50082-1, EN 61000-4-2: Electrostatic Discharge (ESD)
• EN 50082-1, EN 61000-4-3: Radiated Electromagnetic Field (EMF)
• EN 55022-1998 with Amendment A1: 2000 (CISPR-22)
Nuvo Technologies, Inc. Declares the Product: Data Receiver
Model Name: BarVision Data Receiver
Manufacturer’s Name: Nuvo Technologies, Inc.
Manufacturer’s Address: 6060 East Thomas Road, Scottsdale, Arizona 85251, USA
Conforms with the following specifications:
• EN 50082-1, EN 60000-3-2: Current Harmonics
• EN 50082-1, EN 60000-3-3: Voltage Fluctuations and Flicker
• EN 50082-1, EN 61000-4-2: Electrostatic Discharge (ESD)
• EN 50082-1, EN 61000-4-3: Radiated Electromagnetic Field (EMF)
• EN 50082-1, EN 61000-4-4: Electrical Fast Transient/Burst (EFT)
• EN 50082-1, EN 61000-4-5: Surge Immunity (Mains)

125
BARVISION FOR PALM OS®
User’s Guide
Draft for Reseller Review Only
Not for Distribution to End Users
• EN 50082-1, EN 61000-4-11: Voltage Dips and Interruptions
• EN 55022-1998 with Amendment A1: 2000 (CISPR-22)
Battery warning
Do not mutilate, puncture, or dispose of batteries in fire. The batteries can burst or explode, releasing hazardous
chemicals. Discard used batteries according to the manufacturer’s instructions and in accordance with your local
regulations.

APPENDIX A
126
Product Regulatory Information
Draft for Reseller Review Only
Not for Distribution to End Users

127
Draft for Reseller Review Only
Not for Distribution to End Users
Appendix B: Legal Notices
BarVision License Agreement
IMPORTANT NOTICE!
PLEASE READ THIS BEFORE USING THE PRODUCT
PLEASE READ THIS ENTIRE BARVISION LICENSE AGREEMENT (“AGREEMENT”) CAREFULLY
BEFORE USING OR INSTALLING THE BARVISION PRODUCT (INCLUDING EQUIPMENT AND/OR
SOFTWARE). BY USING OR INSTALLING THE PRODUCT AND/OR BY TAPPING/CLICKING THE
“AGREE” BUTTON WHEN ACCESSING A PRODUCT ELECTRONICALLY, YOU ARE AGREEING TO
BE BOUND BY THE TERMS OF THIS AGREEMENT. IF YOU DO NOT AGREE TO THE TERMS OF
THIS AGREEMENT, DO NOT USE OR INSTALL THE PRODUCT OR ANY PART OF THE PRODUCT,
AND YOU MAY RETURN THE UNUSED PRODUCT WITHIN THIRTY (30) DAYS OF PURCHASE
AND YOUR MONEY WILL BE REFUNDED.
This is a legal agreement between you and Nuvo Technologies, Inc. and its affiliates (“Nuvo”). By continuing with
the installation and/or use of the Product (defined below), you understand and agree to be bound by the terms of
this Agreement. If you do not agree to the terms of this Agreement, do not install or use the Product.
Definitions. For purposes of this Agreement, the “Software” includes all BarVision software (for PDAs, Windows®
and other platforms, devices, etc.), firmware, and documentation, whether on disk, in read only memory, on any
other media or hardware, or in any other form, licensed from Nuvo or an authorized BarVision dealer or
distributor. The “Equipment” includes all BarVision hardware and equipment, other than Software, including,
without limitation, BarVision radio and/or data transmitting and/or receiving hardware and equipment and any
other equipment incorporating BarVision technology licensed from Nuvo or an authorized BarVision dealer or
distributor. The “Product” includes the Software and the Equipment. “Third-Party Products” includes products
manufactured by third parties.
General. You are hereby granted a nonexclusive, limited and revocable right and license to use the Product at a
single location (“Site”). You may change the Site only upon written notice to and approval by Nuvo or an autho-
rized BarVision dealer or distributor. The Product may be used only in the country of original purchase. The
Product is licensed, not sold, to you by Nuvo for use only under the terms of this Agreement. The Product contains
Nuvo’s proprietary technology protected by copyright, patent and other intellectual property laws and treaties.
Nuvo owns and retains all right, title, interest, copyright and other intellectual property rights in and to the
Product. The Product is designed to be used with certain Third-Party Products designated by Nuvo. You own any
Third-Party Products that you might have purchased, such as personal computers or PDAs. Any Equipment that
you subsequently acquire or any software or firmware updates and upgrades that replace and/or supplement the
original Software or Equipment are subject to the terms of this Agreement, unless such new Equipment, update or
upgrade contains a separate agreement or license. Nuvo reserves all rights not expressly granted to you in this
Agreement.
Permitted Uses. The Software and the Equipment are licensed as a unitary product. You agree that you will not use
the Software or the Equipment with any other software or equipment, except for Third-Party Products designated
by Nuvo. Without limiting the generality of the foregoing, you agree that you will use only the Equipment to
transmit, receive and/or process radio transmissions from other Equipment. You agree that you will use the
Software only with the Equipment and the Equipment only with the Software. You agree that you will use the

APPENDIX B
128
Legal Notices
Draft for Reseller Review Only
Not for Distribution to End Users
Equipment only to the extent (amount of usage and/or time period) that you have paid Nuvo or an authorized
BarVision dealer or distributor for its use. You can install and use the Software on more than one PDA or PC, as
applicable, provided each PDA or PC is located and used at the Site. You may not make the Software available over
a network. You may make only one copy of the Software in machine-readable form for backup purposes; provided
that the backup copy includes all copyright and other proprietary notices contained on the original.
Restrictions. You acknowledge and agree that the Product contains copyrighted, patented or patent pending
material, trade secrets and other proprietary and confidential information and material which is the property of
Nuvo. You agree to take all reasonable steps to protect Nuvo’s proprietary interest in the Product and to prevent
unauthorized use of the Product. You agree that you will not, directly or indirectly, or permit anyone else to, copy
(except as expressly permitted in this Agreement), reproduce, reprogram (except for installing any Software updates
or upgrades provided by Nuvo or an authorized BarVision dealer or distributor, as long as the installation conforms
with all instructions and the applicable license agreement for such update or upgrade), disassemble, take apart,
dismantle, decompile, duplicate, translate, reverse assemble, reverse translate, reverse engineer, modify, create deriv-
ative works, or in any manner decode all or any part of the Product for any purpose including, without limitation,
to derive any source code therefrom or to ascertain the construction or operation of the Product. You shall not, or
permit anyone else to, (1) modify, alter or deface all or any part of the Product or (2) remove, deface, alter or
modify any descriptive or identifying markings, labels or notices on the Product. You shall not network, rent, lease,
loan, license, re-license, sublicense, sell, resell or distribute the Product, nor permit anyone else to do so. You shall
not transfer the Product without Nuvo’s prior written consent. You shall not electronically transmit the Software
from one computer to another or over a network, nor permit anyone else to do so (except and only to the extent
expressly permitted in this Agreement).
Termination. This Agreement is effective until terminated. You may terminate this Agreement at any time by deliv-
ering the Product (including, without limitation, the Equipment, the Software and all copies, full or partial, of the
Software) to Nuvo or the authorized BarVision dealer or distributor from which it was obtained. This Agreement
will terminate immediately and automatically without notice if you breach or fail to comply with any term of this
Agreement. Upon termination of this Agreement, you must immediately cease all use of the Product and deliver
the Product (including, without limitation, Equipment, Software, and all copies, full or partial, of the Software) to
Nuvo or the authorized BarVision dealer or distributor from which it was obtained. If this Agreement is termi-
nated, you agree that Nuvo or an authorized BarVision dealer or distributor can access your premises, physically or
electronically, to retrieve and/or disable the Product or its operation, including, if necessary, installing equipment to
disable the Product. In the event the Agreement is terminated, all restrictions related to the Product shall remain in
force.
Export Law Assurances. You agree that neither the Product nor any technical data received from Nuvo will be
shipped, transferred, exported or re-exported into any country except as authorized and as permitted by the laws
and regulations of the United States and the laws and regulations of any jurisdiction in which you obtained the
Product. You agree that you will not export the Product out of the country of original delivery.
Governmental End Users. The Software is “commercial computer software” and “restricted computer software”
within the meaning of FAR Part 12 and FAR § 52.227-19, and the Government’s rights therein are set forth in the
regulation. To the extent that any portion of the Product is deemed not to constitute commercial computer
software, all such material was developed exclusively at private expense, and the government receives “limited
rights” in such material.

129
BARVISION FOR PALM OS®
User’s Guide
Draft for Reseller Review Only
Not for Distribution to End Users
No Warranties on Third-Party Products. Nuvo does not provide, and fully disclaims, any warranties on Third-Party
Products. Third-Party Products may be warranted by their respective manufacturers. Nuvo shall have no responsi-
bility or liability for Third-Party Products.
DISCLAIMER OF WARRANTIES. YOU EXPRESSLY ACKNOWLEDGE AND AGREE THAT USE OF
THE PRODUCT IS AT YOUR SOLE RISK AND THAT THE ENTIRE RISK AS TO SATISFACTORY
QUALITY, PERFORMANCE, ACCURACY AND EFFORT IS WITH YOU. THE EQUIPMENT IS
WARRANTED ONLY TO THE EXTENT OF AND IN ACCORDANCE WITH THE CONDITIONS SET
FORTH IN AN APPLICABLE WRITTEN WARRANTY STATEMENT, IF ANY, WHICH MAY BE
PUBLISHED BY NUVO WITH RESPECT TO PARTICULAR EQUIPMENT. EXCEPT FOR ANY SUCH
SEPARATE WRITTEN WARRANTY STATEMENTS THAT MAY BE APPLICABLE, TO THE MAXIMUM
EXTENT PERMITTED BY APPLICABLE LAW, THE PRODUCT IS PROVIDED “AS IS”, WITH ALL
FAULTS AND WITHOUT WARRANTY OF ANY KIND, AND NUVO AND ITS EMPLOYEES,
OFFICERS, SHAREHOLDERS, AND AGENTS HEREBY DISCLAIM ALL WARRANTIES AND CONDI-
TIONS WITH RESPECT TO THE PRODUCT, EITHER EXPRESS, IMPLIED OR STATUTORY,
INCLUDING, BUT NOT LIMITED TO, THE IMPLIED WARRANTIES AND/OR CONDITIONS OF
MERCHANTABILITY, OF SATISFACTORY QUALITY, OF FITNESS FOR A PARTICULAR PURPOSE,
OF ACCURACY, OF QUIET ENJOYMENT, QUIET POSSESSION, CORRESPONDENCE TO
DESCRIPTION, CONFORMITY TO SAMPLES AND NON-INFRINGEMENT OF THIRD PARTY
RIGHTS. NUVO DOES NOT WARRANT AGAINST INTERFERENCE (RADIO OR OTHERWISE)
WITH YOUR ENJOYMENT OF THE PRODUCT, AGAINST LACK OF NEGLIGENCE, AGAINST LACK
OF VIRUSES, THAT THE FUNCTIONS CONTAINED IN THE PRODUCT WILL MEET YOUR
REQUIREMENTS, THAT THE OPERATION OF THE PRODUCT WILL BE UNINTERRUPTED OR
ERROR-FREE, OR THAT DEFECTS IN THE PRODUCT WILL BE CORRECTED. FURTHERMORE,
NUVO DOES NOT WARRANT OR MAKE ANY REPRESENTATIONS REGARDING THE USE OR THE
RESULTS OF THE USE OF THE PRODUCT IN TERMS OF THEIR CORRECTNESS, ACCURACY,
RELIABILITY, OR OTHERWISE. NO ORAL OR WRITTEN INFORMATION OR ADVICE GIVEN BY
NUVO (OR A NUVO EMPLOYEE, AGENT, DEALER OR DISTRIBUTOR) SHALL CREATE A
WARRANTY OR IN ANY WAY INCREASE THE SCOPE OF ANY WARRANTY. SHOULD THE
PRODUCTS BE DEFECTIVE, YOU (AND NOT NUVO OR ITS EMPLOYEES OR AGENTS) ASSUME
THE ENTIRE COST OF ALL NECESSARY SERVICING, REPAIR OR CORRECTION. THIS
DISCLAIMER OF WARRANTY CONSTITUTES AN ESSENTIAL PART OF THIS AGREEMENT. TO
THE EXTENT PERMISSIBLE, ANY IMPLIED WARRANTIES, IF APPLICABLE, ARE LIMITED TO
THIRTY (30) DAYS.
EXCLUSION OF INCIDENTAL, CONSEQUENTIAL AND CERTAIN OTHER DAMAGES. TO THE
MAXIMUM EXTENT PERMITTED BY APPLICABLE LAW, IN NO EVENT SHALL NUVO (OR ITS
EMPLOYEES, OFFICERS, SHAREHOLDERS OR AGENTS) BE LIABLE FOR ANY SPECIAL,
INCIDENTAL, INDIRECT, PUNITIVE, OR CONSEQUENTIAL DAMAGES WHATSOEVER
(INCLUDING, BUT NOT LIMITED TO, DAMAGES FOR LOSS OF PROFITS OR DATA OR CONFI-
DENTIAL OR OTHER INFORMATION, FOR LOSS OF BUSINESS OR GOODWILL, FOR BUSINESS
INTERRUPTION, FOR PERSONAL INJURY, FOR LOSS OF PRIVACY, FOR FAILURE TO MEET ANY
DUTY INCLUDING OF GOOD FAITH OR OF REASONABLE CARE, FOR NEGLIGENCE, AND FOR
ANY OTHER PECUNIARY OR OTHER LOSS WHATSOEVER) ARISING OUT OF OR IN ANY WAY
RELATED TO THE USE OF OR INABILITY TO USE THE PRODUCT, THE PROVISION OF OR
FAILURE TO PROVIDE SUPPORT OR OTHER SERVICES OR INFORMATION, OR OTHERWISE
ARISING OUT OF THE USE OF THE PRODUCT, OR OTHERWISE UNDER OR RELATING TO THIS

APPENDIX B
130
Legal Notices
Draft for Reseller Review Only
Not for Distribution to End Users
AGREEMENT, EVEN IN THE EVENT OF THE FAULT, TORT (INCLUDING NEGLIGENCE), MISREP-
RESENTATION, STRICT OR PRODUCT LIABILITY, BREACH OF CONTRACT OR BREACH OF
WARRANTY OF NUVO OR ANY DEALER OR DISTRIBUTOR, AND EVEN IF NUVO (OR A NUVO
EMPLOYEE, AGENT, DEALER OR DISTRIBUTOR) HAS BEEN ADVISED OF THE POSSIBILITY OF
SUCH DAMAGES. UNDER NO CIRCUMSTANCE SHALL NUVO (OR ITS EMPLOYEES, OFFICERS,
SHAREHOLDERS OR AGENTS) BE LIABLE FOR ANY CLAIMS BY ANY THIRD PARTY.
LIMITATION OF LIABILITY AND REMEDIES. WITH THE SOLE EXCEPTION OF THE TERMS OF
ANY APPLICABLE LIMITED WARRANTIES FOR EQUIPMENT, IF ANY, NOTWITHSTANDING ANY
DAMAGES THAT YOU MIGHT INCUR FOR ANY REASON WHATSOEVER (INCLUDING,
WITHOUT LIMITATION, ALL DAMAGES REFERENCED ABOVE AND ALL DIRECT OR GENERAL
DAMAGES (IN CONTRACT OR TORT OR ANYTHING ELSE)), THE ENTIRE CUMULATIVE
LIABILITY OF NUVO (AND ITS EMPLOYEES, OFFICERS, SHAREHOLDERS AND AGENTS)
RELATING TO THIS AGREEMENT AND NUVO’S PRODUCTS, AND YOUR EXCLUSIVE REMEDY
FOR ALL OF THE FOREGOING, SHALL BE LIMITED TO THE LESSER OF (A) THE ACTUAL
DAMAGES YOU INCUR IN REASONABLE RELIANCE ON THE PRODUCTS, (B) THE MAXIMUM
AMOUNT ACTUALLY PAID BY YOU FOR THE PRODUCTS, OR (C) $1,000. THE FOREGOING
LIMITATIONS, EXCLUSIONS AND DISCLAIMERS SHALL APPLY TO THE MAXIMUM EXTENT
PERMITTED BY APPLICABLE LAW, EVEN IF ANY REMEDY FAILS ITS ESSENTIAL PURPOSE. You
acknowledge that Nuvo has set its prices and entered into this Agreement in reliance on the disclaimers of liability,
the disclaimers of warranty and the limitations of liability set forth in this Agreement, and that the same form an
essential basis of the bargain between the parties.
Controlling Law and Severability. This Agreement shall be governed by and construed in accordance with the laws
of the United States and the State of Arizona, as applied to agreements entered into and to be performed entirely
within Arizona between Arizona residents, and excluding the application of conflicts of law rules. Exclusive juris-
diction and venue for all matters relating to this Agreement shall be in a court located in the State of Arizona, USA,
and you consent to such jurisdiction and venue. Notwithstanding the foregoing, if you are located outside of the
United States and have no property in or relationship with the United States, you agree that any legal action arising
out of or relating to this Agreement shall be submitted to arbitration in Phoenix, Arizona, USA or such other
location mutually agreed to by the parties under the rules of the International Chamber of Commerce. Any
proceeding shall be conducted in English. This Agreement shall not be governed by the United Nations
Convention on Contracts for the International Sale of Goods, the application of which is expressly excluded. If for
any reason a court of competent jurisdiction finds any provision of this Agreement, or portion thereof, to be
unenforceable, that provision of the Agreement shall be enforced to the maximum extent permissible so as to effect
the intent of the parties, and the remainder of this Agreement shall continue in full force and effect.
Miscellaneous. This Agreement constitutes the entire agreement between the parties with respect to the use of the
Products, and it supersedes all prior or contemporaneous understandings or agreements, written or oral, regarding
such subject matter (including purchase orders). No amendment to or modification of this Agreement will be
binding unless in writing and signed by an authorized officer of Nuvo. There are no third party beneficiaries to this
Agreement. No waiver shall be effective unless in writing, and any waiver by Nuvo of any violation of this
Agreement by you shall not constitute, or contribute to, a waiver by Nuvo of any other or future violation of the
same provision, or any other provision, of this Agreement. This Agreement may not be assigned or transferred
without Nuvo’s prior written consent. Subject to the foregoing, this Agreement shall be binding upon you and your

131
BARVISION FOR PALM OS®
User’s Guide
Draft for Reseller Review Only
Not for Distribution to End Users
representatives, successors and permitted assigns. Any translation of this Agreement is done for local requirements
and in the event of a dispute or inconsistency between the English and any non-English versions, the English
version of this Agreement shall govern.
Notice. Nuvo, Nuvo Technologies, the Nuvo Technologies logo, BarVision, the BarVision logo, and all Nuvo
product names, product numbers and slogans are trademarks of Nuvo Technologies, Inc. BarVision is protected by
multiple patents pending. All rights reserved.
Copyright © 2003-2005 by Nuvo Technologies, Inc. All rights reserved.
Nuvo Technologies, Inc.
Nuvo Corporate Center
6060 East Thomas Road
Scottsdale, Arizona 85251, USA
phone: +1 480.222.6000
fax: +1 480.222.6001
www.nuvoinc.com
www.barvision.com

APPENDIX B
132
Legal Notices
Draft for Reseller Review Only
Not for Distribution to End Users
BarVision Limited Warranty (Active Antenna/Data
Receiver)
(UNITED STATES AND CANADA ONLY)
IMPORTANT NOTICE: THIS WARRANTY APPLIES ONLY TO THE ORIGINAL PURCHASER FOR
END USE WHO COMPLETES AND FILES A WARRANTY REGISTRATION FORM WITHIN THIRTY
(30) DAYS OF PURCHASE OR INSTALLATION, WHICHEVER IS EARLIER.
Who is covered:
—This limited warranty (“warranty”) is given only to the original end-user licensee (referred to in this warranty as
“Original Purchaser”) of a BarVision Active Antenna and/or BarVision Data Receiver (collectively referred to in
this warranty as “Product”) sold by Nuvo Technologies, Inc. (“Nuvo”) or an authorized BarVision dealer.
—If you purchased the Product from someone other than an authorized BarVision dealer or Nuvo in the United
States or Canada, or if the Product was used before your purchase, you are not the Original Purchaser and the
Product that you purchased is not covered under this warranty.
What is the length of the warranty period:
—The warranty period is one year from the date of original purchase or installation, whichever is earlier. The
Product is not covered under this warranty if you have not agreed to the terms of the applicable BarVision license
agreement.
What is covered:
—Except as otherwise provided herein, Nuvo warrants that the Product will be free from defects in materials and
workmanship when used normally and under normal circumstances.
—This warranty applies only to this Product. It does not apply to any other product or service.
What is NOT covered:
—This warranty does NOT cover:
(1) Physical damage to this Product;
(2) Damage caused by improper installation, improper or abnormal use, improper or abnormal storage, fire, power
change, misuse, abuse, mishandling, misapplication, tampering, neglect or accident;
(3) Damage which occurs in shipment or damage that is attributable to acts of nature;
(4) Damage caused by another device or software used with this Product; and
(5) Problems arising from other than defects in materials or workmanship.
—This limited warranty is VOID:
(1) If the Product has been altered or modified in any way (including but not limited to attempted repair without
authorization from Nuvo);

133
BARVISION FOR PALM OS®
User’s Guide
Draft for Reseller Review Only
Not for Distribution to End Users
(2) If the Product’s original label or trademark, patent, serial number or other markings or identifications have been
defaced, altered, modified or removed;
(3) If the Product is used contrary to the instructions in the user’s manual or the applicable BarVision license
agreement;
(4) If the Product is used with equipment or software not supplied by Nuvo or an authorized dealer; or
(5) If the Product is exported out of the country of original purchase.
What to do if you think your Product is eligible for warranty service:
—Report your issue to Nuvo at +1 480.222.6000 within the applicable warranty period. Have the serial number of
the Product ready. You may be asked to provide a copy of your original proof of purchase and/or other information.
—After contacting Nuvo, you may be required to deliver or send the Product, properly packaged, freight prepaid,
to Nuvo within seven days. You may be required to complete a claim form. You are responsible for the cost of
shipping (including duties), packing and insurance (if you desire insurance). You are also responsible for loss or
damage to this Product in shipping.
What Nuvo will do:
—If the problem concerning your Product is covered by this warranty and you first reported the problem to Nuvo
within the applicable warranty period, Nuvo will repair or replace the Product at no charge to you for parts and
labor. The decision as to whether to repair or replace the Product is made by Nuvo in its sole discretion. Nuvo
reserves the right to supply a refurbished or remanufactured replacement Product and to use refurbished parts. The
repaired or replacement Product will be returned to you freight prepaid or made available for you to pick up at
Nuvo. Product/parts that are replaced by Nuvo shall be kept by Nuvo. If Nuvo elects to replace the Product, the
replacement Product you receive (even if refurbished or remanufactured) will be covered by the balance of the
limited warranty period remaining on the original Product.
—If the Product is not covered by this warranty, you will be charged for shipping the Product back to you.
—The foregoing are your sole (i.e., only) and exclusive remedies under this warranty.
Limitations:
—This limited warranty becomes effective only after (1) payment in full for all products sold by Nuvo or an autho-
rized BarVision dealer, (2) consent to the terms of the applicable BarVision license agreement and (3) only if a
warranty registration form is properly completed and sent to Nuvo within thirty days of purchase or installation,
whichever is earlier.
—This limited warranty may not be sold, transferred or assigned without Nuvo’s prior written approval.
—Nuvo shall not be liable for any loss or damage from delay or failure to perform resulting directly or indirectly
from fire, flood, strike, accident, civil commotion, labor difficulties, equipment failure, late deliveries by suppliers,
riot, war, regulations, priorities, government intervention, acts of nature, embargoes, shortage of labor, transpor-
tation, facilities, fuel, energy, materials or supplies, or any circumstances (whether or not similar to the foregoing)
that are beyond the control of Nuvo.
—Nuvo is not responsible for damage to or loss of any equipment, media, programs or data related to the use of
this Product.

APPENDIX B
134
Legal Notices
Draft for Reseller Review Only
Not for Distribution to End Users
—THIS WARRANTY IS IN LIEU OF ALL OTHER WARRANTIES. TO THE FULLEST EXTENT
ALLOWED BY APPLICABLE LAW, NUVO EXPRESSLY DISCLAIMS ALL OTHER WARRANTIES AND/
OR CONDITIONS, EXPRESS OR IMPLIED, WHETHER ARISING BY STATUTE, BY LAW, BY COURSE
OF DEALING OR USAGE OF TRADE, INCLUDING, WITHOUT LIMITATION, ANY WARRANTY OF
MERCHANTABILITY OR FITNESS FOR A PARTICULAR PURPOSE. THERE ARE NO WARRANTIES
THAT EXTEND BEYOND THIS LIMITED WARRANTY.
—NUVO SHALL HAVE NO LIABILITY FOR ANY SPECIAL, INCIDENTAL, INDIRECT, PUNITIVE OR
CONSEQUENTIAL DAMAGES WHATSOEVER, OF ANY KIND (INCLUDING LOSS OF BUSINESS OR
PROFITS OR DATA) OR ARISING UNDER ANY LEGAL THEORY (INCLUDING NEGLIGENCE OR
BREACH OF CONTRACT OR WARRANTY) EVEN IF NUVO (OR A NUVO EMPLOYEE, AGENT,
DEALER OR DISTRIBUTOR) HAS BEEN ADVISED OF THE POSSIBILITY OF SUCH DAMAGES.
NUVO NEITHER ASSUMES NOR AUTHORIZES ANY DEALER, DISTRIBUTOR OR OTHER PERSON
TO ASSUME FOR IT ANY OBLIGATION OR LIABILITY OTHER THAN SUCH AS IS EXPRESSLY SET
FORTH HEREIN.
—NUVO’S LIABILITY IS LIMITED AS SET FORTH IN THIS WARRANTY AND THE REMEDY
PROVIDED HEREIN SHALL BE THE SOLE AND EXCLUSIVE REMEDY. THE ENTIRE CUMULATIVE
LIABILITY OF NUVO RELATING TO THIS WARRANTY SHALL BE LIMITED TO THE LESSER OF
(A) THE REMEDY SET FORTH IN THIS WARRANTY, OR (B) THE MAXIMUM AMOUNT ACTUALLY
PAID FOR THE PRODUCT.
—This limited warranty is the only warranty that Nuvo is giving for this Product. It is the final expression and the
exclusive and only statement of Nuvo’s obligations to you for this Product. It replaces all other agreements and
understandings about warranty obligations for this Product that you may have with Nuvo or its representatives.
—This limited warranty may not be changed in any way unless you and Nuvo sign the same piece of paper in
which we (1) refer to the Product by serial number and to your bill of sale date, (2) describe the change to this
warranty, and (3) agree to make that change.
—This limited warranty shall be governed and construed by the laws of the State of Arizona, U.S.A., in all respects,
without regard to conflicts of law rules.
Contact information:
To determine an applicable warranty period or to report a problem, please contact Nuvo as follows:
Nuvo Technologies, Inc.
Nuvo Corporate Center
6060 East Thomas Road
Scottsdale, Arizona 85251, USA
Attn.: Warranty Services
phone: +1 480.222.6000
fax: +1 480.222.6001
www.nuvoinc.com
www.barvision.com

135
BARVISION FOR PALM OS®
User’s Guide
Draft for Reseller Review Only
Not for Distribution to End Users
BarVision Limited Warranty (Tag)
(UNITED STATES AND CANADA ONLY)
IMPORTANT NOTICE: THIS WARRANTY APPLIES ONLY TO THE ORIGINAL PURCHASER FOR
END USE WHO COMPLETES AND FILES A WARRANTY REGISTRATION FORM WITHIN THIRTY
(30) DAYS OF PURCHASE OR INSTALLATION, WHICHEVER IS EARLIER.
Who is covered:
—This limited warranty (“warranty”) is given only to the original end-user licensee (referred to in this warranty as
“Original Purchaser”) of a BarVision Tag (“Tag”) licensed by Nuvo Technologies, Inc. (“Nuvo”) or an authorized
BarVision dealer.
—If you purchased a Tag from someone other than an authorized BarVision dealer or Nuvo in the United States or
Canada, or if the Tag was used before your purchase, you are not the Original Purchaser and the Tag that you
purchased is not covered under this warranty.
What is the length of the warranty period:
—The warranty period starts from the date of purchase or installation, whichever is earlier, and ends based on the
warranty period applicable to the particular Tag. To determine the applicable warranty period for a particular Tag,
please contact Nuvo or an authorized BarVision dealer. The Tag is not covered under this warranty if you have not
agreed to the terms of the applicable BarVision license agreement.
What is covered:
—Except as otherwise provided herein, Nuvo warrants that the Tag will be free from defects in materials and
workmanship for the number of pour events specified for the particular Tag, during the applicable warranty period,
when the Tag is used normally and under normal circumstances. For liquor bottle Tags, a pour event occurs when a
Tag is placed on a bottle (or the bottle attach button is pressed) and the Tag is tilted more than 90 degrees, whether
or not any liquid is dispensed from the bottle. To determine the number of pour events specified for a particular
Tag, please contact Nuvo or an authorized BarVision dealer.
—This warranty also covers physical damage to the Tag, whether caused intentionally or accidentally, unless such
damage prevents Nuvo from determining how many pour events occurred in connection with the particular Tag.
—This warranty applies only to this Tag. It does not apply to any other product or service. It also does not apply to
damage caused by another device or software used with this Tag.
When is the warranty VOID:
—This limited warranty is VOID:
(1) If there is damage to the Tag (that occurs for any reason whatsoever) that prevents Nuvo from determining how
many pour events occurred in connection with the Tag;
(2) If the Tag’s original label or trademark, patent, serial number or other markings or identifications have been
defaced, altered, modified or removed;
(3) If the Tag is used contrary to the instructions in the user’s manual or the applicable BarVision license
agreement;

APPENDIX B
136
Legal Notices
Draft for Reseller Review Only
Not for Distribution to End Users
(4) If the Tag is used with equipment or software not supplied by Nuvo or an authorized dealer; or
(5) If the Tag is exported out of the country of original purchase.
What to do if you think your Tag is eligible for a warranty claim:
—Report your issue to Nuvo at +1 480.222.6000 within the applicable warranty period. Have the serial number of
the Product ready. You may be asked to provide a copy of your original proof of purchase and/or other information.
—After contacting Nuvo, you may be required to deliver or send the Tag, properly packaged, freight prepaid, to
Nuvo within seven days. You may be required to complete a claim form. You are responsible for the cost of
shipping (including duties), packing and insurance (if you desire insurance). You are also responsible for loss of the
Tag in s hipp i ng.
What Nuvo will do:
—If the problem concerning the Tag is covered by this warranty and you first reported the problem to Nuvo
within the applicable warranty period, Nuvo will credit you with a discount on the purchase price of a replacement
Tag with a similar or greater number of specified pour events. Nuvo reserves the right, in its sole discretion, to
supply a refurbished, repaired or remanufactured replacement Tag. If the percentage of warranted life of the Tag
that is used is greater than the percentage of specified pours that are used, then the discount will be pro-rated based
on the unexpired warranty period of the Tag (“Time-Based Discount”). Alternatively, if the percentage of specified
pours of the Tag that are used is greater than the percentage of warranted life that is used, then the discount will be
pro-rated based on the number of unused specified pour events for the Tag (“Pour-Based Discount”). Only one
discount shall apply. The Time-Based Discount shall be calculated as follows: (a) the weekly cost, based on Nuvo’s
then-current retail list price for the replacement Tag, multiplied by (b) the number of unused warranted weeks for
the Tag (from the date the problem is reported, as long as the Tag is returned to Nuvo within seven days). The
Pour-Based Discount shall be calculated as follows: (a) the price per pour event, based on the number of specified
pour events for the replacement product and Nuvo’s then-current published retail list price for the replacement Tag,
multiplied by (b) the number of unused specified pour events for the Tag.
—You will be required to pay the difference between the discount and the then-current retail list price of the
replacement product, FOB Nuvo’s facility, plus shipping (including duties), handling and insurance, and any appli-
cable taxes, before the replacement Tag is sent to you. Any Tag that is replaced by Nuvo shall be kept by Nuvo. If a
Tag is replaced by Nuvo under the terms of this warranty, the replacement Tag (even if refurbished, repaired or
remanufactured) shall be covered by the terms of whatever warranty may be applicable to the replacement Tag and
not by the terms of this warranty.
—If the Tag is not covered by this warranty, you will be charged for shipping the Tag back to you.
—The foregoing are your sole (i.e., only) and exclusive remedies under this warranty.
Limitations:
—This limited warranty becomes effective only after (1) payment in full for all products sold by Nuvo or an autho-
rized BarVision dealer, (2) consent to the terms of the applicable BarVision license agreement and (3) only if a
warranty registration form is properly completed and sent to Nuvo within thirty days of purchase or installation,
whichever is earlier.
—This limited warranty may not be sold, transferred or assigned without Nuvo’s prior written approval.

137
BARVISION FOR PALM OS®
User’s Guide
Draft for Reseller Review Only
Not for Distribution to End Users
—Nuvo shall not be liable for any loss or damage from delay or failure to perform resulting directly or indirectly
from fire, flood, strike, accident, civil commotion, labor difficulties, equipment failure, late deliveries by suppliers,
riot, war, regulations, priorities, government intervention, acts of nature, embargoes, shortage of labor, transpor-
tation, facilities, fuel, energy, materials or supplies, or any circumstances (whether or not similar to the foregoing)
that are beyond the control of Nuvo.
—Nuvo is not responsible for damage to or loss of any equipment, media, programs or data related to the use of
this Tag.
—THIS WARRANTY IS IN LIEU OF ALL OTHER WARRANTIES. TO THE FULLEST EXTENT
ALLOWED BY APPLICABLE LAW, NUVO EXPRESSLY DISCLAIMS ALL OTHER WARRANTIES AND/
OR CONDITIONS, EXPRESS OR IMPLIED, WHETHER ARISING BY STATUTE, BY LAW, BY COURSE
OF DEALING OR USAGE OF TRADE, INCLUDING, WITHOUT LIMITATION, ANY WARRANTY OF
MERCHANTABILITY OR FITNESS FOR A PARTICULAR PURPOSE. THERE ARE NO WARRANTIES
THAT EXTEND BEYOND THIS LIMITED WARRANTY.
—NUVO SHALL HAVE NO LIABILITY FOR ANY SPECIAL, INCIDENTAL, INDIRECT, PUNITIVE OR
CONSEQUENTIAL DAMAGES WHATSOEVER, OF ANY KIND (INCLUDING LOSS OF BUSINESS OR
PROFITS OR DATA) OR ARISING UNDER ANY LEGAL THEORY (INCLUDING NEGLIGENCE OR
BREACH OF CONTRACT OR WARRANTY) EVEN IF NUVO (OR A NUVO EMPLOYEE, AGENT,
DEALER OR DISTRIBUTOR) HAS BEEN ADVISED OF THE POSSIBILITY OF SUCH DAMAGES.
NUVO NEITHER ASSUMES NOR AUTHORIZES ANY DEALER, DISTRIBUTOR OR OTHER PERSON
TO ASSUME FOR IT ANY OBLIGATION OR LIABILITY OTHER THAN SUCH AS IS EXPRESSLY SET
FORTH HEREIN.
—NUVO’S LIABILITY IS LIMITED AS SET FORTH IN THIS WARRANTY AND THE REMEDY
PROVIDED HEREIN SHALL BE THE SOLE AND EXCLUSIVE REMEDY. THE ENTIRE CUMULATIVE
LIABILITY OF NUVO RELATING TO THIS WARRANTY SHALL BE LIMITED TO THE LESSER OF
(A) THE REMEDY SET FORTH IN THIS WARRANTY, OR (B) THE MAXIMUM AMOUNT ACTUALLY
PAID FOR THE TAG.
—This limited warranty is the only warranty that Nuvo is giving for this Tag. It is the final expression and the
exclusive and only statement of Nuvo’s obligations to you for this Tag. It replaces all other agreements and under-
standings about warranty obligations for this Tag that you may have with Nuvo or its representatives.
—This limited warranty may not be changed in any way unless you and Nuvo sign the same piece of paper in
which we (1) refer to the Tag by serial number and to your bill of sale date, (2) describe the change to this warranty,
and (3) agree to make that change.
—This limited warranty shall be governed and construed by the laws of the State of Arizona, U.S.A., in all respects,
without regard to conflicts of law rules.
Contact information:
To determine the applicable warranty period or the number of pour events specified for a particular Tag, or to
report a problem, please contact Nuvo as follows:

APPENDIX B
138
Legal Notices
Draft for Reseller Review Only
Not for Distribution to End Users
Nuvo Technologies, Inc.
Nuvo Corporate Center
6060 East Thomas Road
Scottsdale, Arizona 85251, USA
Attn.: Warranty Services
phone: +1 480.222.6000
fax: +1 480.222.6001
www.nuvoinc.com
www.barvision.com

139
Draft for Reseller Review Only
Not for Distribution to End Users
Glossary
Active antenna
A BarVision system component that receives
wireless data signals generated by the pour spouts
and then relays those signals to the data receiver.
Active antennas are used to increase BarVision’s
wireless coverage area. Typically, one active antenna
is installed at each bartending station (or well) and
one at the back bar, with at least two antennas per
bar area.
Active listening mode
A BarVision for Palm OS® software function that
simplifies the process of selecting a container in the
container list. You enable active listening mode by
tapping the Listen ( ) icon in the upper right-
hand corner of the Containers screen. After this
mode has been enabled, momentarily tilting a
bottle equipped with a wireless pour spout (but
without pouring from it) selects that container in
the list. This can simplify the process of editing a
container or checking a container’s status. You can
disable active listening mode by tapping the icon
again or exiting the Containers screen.
Actual pour rate
The actual dispense rate for a specific individual
pour spout. The actual pour rate of each specific
pour spout will vary due to manufacturing toler-
ances, liquor viscosity and temperature, bottle
shape, and so forth. This value is used to calculate
actual serving sizes and can be manually set. These
values help account for the variability factors
affecting that specific pour spout on that specific
container poured at that specific location.
Actual serving size
The amount of liquor a bartender actually
dispensed during a pour. BarVision calculates this
value by factoring in a Pour delay (based on the
current volume of the container), and then multi-
plying the amount of time for which the bottle was
tipped by the container’s Actual pour rate value.
This amount is used to derive such values as the
volume of liquor remaining in the container and
the container’s current weight.
Bar area
A distinct section of an establishment’s property or
building specifically set aside for preparing and
serving alcoholic beverages. A single room may
contain more than one bar area—one at each end
of the room, for example—and a single bar area
usually comprises one or more bartending stations
(or wells) and a back bar.
Category
Used to classify liquor for pricing purposes. The
BarVision system uses categories to identify and
organize liquor price classifications. Examples of
commonly used categories include Well, Call,
Premium, and Top Shelf.
Container
Any liquor or beverage bottle that has been defined
via the BarVision software and associated with a
BarVision wireless pour spout. Each container is
continually monitored by the BarVision system,
ensuring that every pour gets tracked and that
running inventory totals are constantly maintained.
Data receiver
A BarVision system component that collects data
from active antennas and downloads it to the
connected Palm® handheld. The data receiver can
store up to 6,144 events before it must download
the gathered information to a handheld or else data
will be lost. Typically, one data receiver is installed
at each bar area.
Double-tap
To press the stylus tip down on, and then lift it up
from, the screen of a Palm® handheld two times in
rapid succession. Performing this action selects a
word or number so that it can be edited.

GLOSSARY
140
Draft for Reseller Review Only
Not for Distribution to End Users
Drag
To press the stylus to the Palm® handheld’s screen
and then move across, up, or down the screen to
select a field’s value or scroll a scrollable list.
Exception
Used to identify events or data that are either of an
irregular nature or outside established parameters.
For example, any pour of a volume larger than the
Max allowed pour size is classified by the system as
an exception. Likewise, any bottle whose yield is
less than the Underyield value is flagged as an
exception. Exceptions are identified and detailed on
appropriately configured system reports.
Expected pour rate
The average dispense rate for a pour spout type.
BarVision uses this value, in conjunction with the
measured bottle tilt time, to calculate the expected
serving sizes displayed on the Activity screen. An
average dispense rate is used (rather than an exactly-
measured actual pour rate for a specific individual
pour spout), because pour spouts can have more
than a 20% variability in their dispense rates.
Because the ultimate purpose of this value is to help
bartenders achieve consistent pour counts (after it
has been used to calculate an expected serving size),
entering spout-specific values would frustrate that
goal. It would result in providing the bartender
with feedback that indicated inconsistent pour
counts—even in cases when the bottle tilt times
were exactly the same. To avoid this, an average
dispense rate is used.
Expected serving size
The amount of liquor a bartender expected to pour
based solely on the duration for which the liquor
bottle was tilted. BarVision calculates this value by
multiplying the tilt time by the Expected pour rate
(the average pour rate for the pour spout type). No
other variability factors enter into the equation.
After the value is calculated, the expected serving
size is then displayed on the Activity screen. Based
on the serving size displayed, bartenders can get
feedback about the accuracy of their pour counts
and can regulate them accordingly. Because all the
other variables that can affect the serving size (such
as pour spout variability, liquor viscosity and
temperature, and bottle shape) are outside the
bartender’s control, helping them regulate their
pour counts is the only way to help them reliably
free-pour the most uniform amounts (by time) on
average.
Jitter
Designates any inadvertent bottle tilt that cannot be
classified as a pour. For a BarVision wireless pour
spout to register a pour and generate a pour event
transmission, a container must be tilted past ninety
degrees for a duration longer than the amount of
time represented by the Jitter level container
option. If a bottle is tilted past ninety degrees but
does not remain tilted for the defined amount of
time, the system assumes that the tilt was
unintended and that no liquid was actually
dispensed. As a result, the action is not registered as
a pour and no pour event record appears on the
Activity screen.
Journal
Term used to designate BarVision’s running list of
events that appears on the Activity screen. Events
recorded and displayed in the system’s activity list
include such occurrences as: connecting or discon-
necting the data receiver, moving a container
equipped with a wireless pour spout into or out of
transmission range, manually adjusting a container’s
contents level, pouring from a container, and
attaching or removing a pour spout from the
mouth of a bottle. Each of these events is recorded
in BarVision’s journal and displayed on the Activity
screen.
Line of sight
An unobstructed path between transmitter and
receiver. BarVision wireless pour spouts and active
antennas generally require a clear line of sight to
communicate with each other.

141
BARVISION FOR PALM OS®
User’s Guide
Draft for Reseller Review Only
Not for Distribution to End Users
Location
A container value used to uniquely identify the
place where a container is stored. This setting can
enable a single data receiver to track an entire bar
area. Because a bar area may include several
bartending stations (or wells) and a back bar, you
should define each of those places as a separate
Location so that the inventory at each is indepen-
dently tracked.
LPD/LPR
Line Printer Daemon/Line Printer Remote. A
printing protocol that uses TCP/IP (communi-
cation protocols) to establish connections between
the printers and computers on a network. This
technology is the most common cross-platform
printing protocol. The LPD software is usually
stored in the printer or print server and the LPR
software installed in the client device. The LPR
client sends a print request to the IP address of the
LPD printer/server, which in turn queues the file
and prints it when the printer becomes available.
Management report
Term used to designate any report not explicitly
configured for public access and therefore not
available on the Public Reports screen. Specifically,
a management report is one whose Public report
setting has not been selected. Management reports
typically require a security code to access.
Palm® Handheld
A handheld personal computer designed to run the
Palm OS®. These handhelds usually combine
personal organizer, Web browsing, e-mail, and
networking features. A properly configured Palm®
handheld running the BarVision for Palm OS®
software is an integral component of the BarVision
system. Palm® handhelds typically use a special
stylus for input. BarVision data files located on
your Palm® handheld can be transferred to a
desktop or laptop computer using a Palm® USB
sync cable.
POS
Point of Sale. Point of Sale systems used in the bar
and restaurant industry generally employ a touch-
screen interface, record food and beverage sales in
detail, and provide basic reporting and data
exporting capabilities.
Pour count
To achieve a measure of consistency in their serving
sizes, bartenders often time their pours. This is
typically done by using a rhythmic pour count. For
example, some bartenders use a four-count ounce.
That is, they count to four at a rate that corre-
sponds to the time it takes to dispense one ounce of
liquor through an average pour spout. Due to
several factors (such as pour spout variability, liquor
viscosity and temperature, and bottle shape), the
actual amount of liquor dispensed may be less than
or greater than one ounce. But these variables are
beyond a bartender’s control. As a result, the best
way for bartenders to produce the most accurate
timed pours on average is for them to stringently
regulate the accuracy and consistency of their pour
counts.
Public report
Term used to designate any report explicitly
configured for public access and therefore available
on the Public Reports screen. Specifically, a public
report is one whose Public report setting has been
selected. Public reports do not require a security
code to access.
Radio frequency (RF)
Used to identify a class of electromagnetic signals
intended to be radiated as waves. RF signals are
used to transmit AM and FM radio station broad-
casts, VHF and UHF television broadcasts, and
cellular phone calls. RF signals are also used to
transmit data between components of the
BarVision system.
Receiver
See Data receiver.

GLOSSARY
142
Draft for Reseller Review Only
Not for Distribution to End Users
SD memory card
An SD (secure digital) memory card is a highly
secure stamp-sized flash memory card. SD memory
cards provide portable data storage and feature fast
transfer rates. SD memory cards use non-volatile
solid-state memory so that data is not lost when
power is turned off. Palm® handhelds are generally
equipped with an SD memory card expansion slot.
Serving size
The volume of one of an establishment’s desired
portion sizes. A serving size value represents the
amount of liquor intended to be served in a
precisely poured drink. Different types of alcoholic
beverages require different amounts of liquor. As a
result, a serving size must be configured for each of
the desired quantities.
Terminal ID
A BarVision for Palm OS® software field used to
uniquely identify a Palm® handheld in a multiple
data receiver BarVision implementation. In such an
installation, it is important that a one-to-one associ-
ation between a handheld and a data receiver be
maintained. Only the Palm® handheld used to
configure a container can be used to download the
information collected for that container from a data
receiver. For that reason, attaching a Palm®
handheld to the incorrect data receiver’s serial cable
could potentially lead to data loss.
Transmitter Tag
One of the three components that, together with a
plastic cork and metal nozzle, compose a BarVision
wireless, free-pour spout. The transmitter tag is the
component in the assembly that houses the wireless
hardware. It generates wireless signals and broad-
casts them to the active antennas. To prevent the
possibility of data loss, each transmitter tag stores
and periodically retransmits its sixteen most
recently recorded events. Typically, every open
liquor bottle in a bar should be equipped with a
BarVision wireless, free-pour spout.
Triple-tap
To press the stylus tip down on, and then lift it up
from, the screen of a Palm® handheld three times in
rapid succession. Performing this action selects a
line of text so that it can be edited.
Yield
The total accumulated amount of liquid dispensed
from a container expressed as a percentage of the
container’s capacity. For example, if BarVision
calculates that the pours from a 33.81 ounce bottle
total 37.19 ounces, the yield is 110%. For the same
bottle, if the pours total 30.42 ounces, the yield is
90%. A yield significantly greater than or less than
100% might indicate that the container has been
tampered with or that the pour spout’s dispense rate
deviates significantly from the average pour rate (in
which case the container’s Actual pour rate value
would need to be adjusted).

143
BARVISION FOR PALM OS®
User’s Guide
Draft for Reseller Review Only
Not for Distribution to End Users
Index
Symbols
.csv file format 107
.txt file format 108
A
active antenna
function explained 3–4
activity list
maximum number of stored events
29
Activity screen
explained 23–25
software procedures and xii
Actual pour rate
container detail, editing 61–63
container detail, explained 46
actual pour rate
explained 8, 71
Add icon
explained 27
Add time marker every
security option, editing 30–31
adding
categories 38
containers 51–54
reports 84–86
sections to a report 88–89
serving sizes 73–74
serving sizes, not allowed 73
Age
container status, explained 51
pour spout hardware detail, explained
50
arranging. See reordering
B
Back button
explained 27
Back up during maintenance
journal option, editing 91–92
journal option, explained 84
backing up data 110–111
methods for, explained 110
BarVision
customer support for xii
exiting 35
navigating the software 25–28
starting 22–23
system overview 1
using, overview 8–9
BarVision Conduit for Palm HotSync
explained 13, 80
exporting journal data using 107
exporting report data using 107
installation 13–14
BarVision for Palm OS®
configuring, after installation 14–16
configuring, for peripheral devices
16–20
function explained 6–7
installation 11–13
BarVision software
installation 11–14
battery
disposal warning 125
Battery level icon
explained 23
battery, handheld
charging 21
bottle graphic
container status, explained 51
bottle shape
assigning new, to containers 60–61
buttons
Back, explained 27
Detail, explained 23
Mgr, explained 23
Page selector, explained 28
Reports, explained 24
Save, explained 28
Status, explained 24
C
cable
charging handheld battery using 21
Canadian ICES-003 statement 123
categories
adding 38
assigning new, to containers 59–60
deleting 40–41
deleting, effect on containers of 40
deleting, not allowed 40
editing 39–40
explained 37–38
maximum number of 37, 38
minimum number of 37, 40
names, maximum number of
characters in 37, 39
nonalcoholic beverages and 38
predefined, list of 37, 38
prices and 37
reconciling to POS or register using
37
renaming 39
renaming, effect on containers of 39
reordering 40
Category
container detail, editing 59–60
container detail, explained 44
CE compliance statement 123
changing. See editing
components
active antenna, function explained 3–
4
BarVision for Palm OS®, function
explained 6–7
data receiver, function explained 4–5
handheld computer, function
explained 6
overview 1–7
pour spout, function explained 2–3
required, list of 1
Configuration report
explained 98
running, viewing, and printing 98–
99
configuring. See editing
Connected icon
explained 23
container details
Actual pour rate 46
Category 44
Container size 45
Cost 45
editing 61–63
Empty weight 45
Expected pour rate 46
explained 43–46
Location 45
Product 44
Remaining % 45

INDEX
144
Draft for Reseller Review Only
Not for Distribution to End Users
Shape 44
Spout 44
Unit weight 46
vol. 45
wt. 45
container empty
event, explained 31–32
container found
event, explained 33
container missing
event, explained 32–33
container open
event, explained 31
container options
Default container size 47
Default pour rate 47
Default shape 47
editing 63–64
explained 46–49
Improper pour pour rate 49
Improper pour time limit 49
Jitter level 48
Overyield 48
Pour delay 48
Report missing after 48
Underyield 48
container pour
event, explained 32
Container size
container detail, editing 61–63
container detail, explained 45
container status information
Age 51
bottle graphic 51
explained 50–51
Percent 50
Pours 51
Recent 51
signal strength 51
Volume 50
Weight 50
container variance
event, explained 33
containers
adding 51–54
assigning a new bottle shape to 60–
61
assigning a new category to 59–60
assigning a new pour spout to 57–59
assigning a product name to 55–57
effect on, of category deletion 40
effect on, of category renaming 39
deleting 64–65
details. See container details
editing 54–64
explained 43
options. See container options
removing current pour spout
assignment from 57–59
status information, viewing 67–69
status information, viewing from
Activity screen 68–69
status information, viewing from
Containers screen 67–68
viewing pour spout hardware details
65–66
controls, software
functions explained 27–28
conventions
user’s guide xii
Cost
container detail, editing 61–63
container detail, explained 45
creating. See adding
csv file format 107
customer support 122
for BarVision xii
for Palm® handhelds xiii
D
data
backing up 110–111
erasing 115
exporting 107–109
maintainence of 113–115
restoring 111–113
data loss
troubleshooting 120
data maintenance
backing up during 84
enabling 81
explained 83
Minimum days in journal option and
84
prompting user to perform 84
data receiver
data storage limit of 21, 29
function explained 4–5
troubleshooting 117
data storage limits
of data receiver 21, 29
of transmitter tags 29
date and time marker
interval, editing 30–31
date/time range
for report data, disabling access to 80
for report data, explained 80
declarations of conformity 124
Default container size
container option, editing 63–64
container option, explained 47
Default pour rate
container option, editing 63–64
container option, explained 47
Default shape
container option, editing 63–64
container option, explained 47
Delete icon
explained 27
deleting
categories 40–41
categories, effect on containers of 40
categories, not allowed 40
containers 64–65
reports 102–103
reports, not allowed 102
sections from a report 90–91
serving sizes 76–77
all serving sizes, detriment of 76
serving sizes, effect on event records of
76
unused serving sizes, benefit of 76
Detail button
explained 23
Detail icon
explained 27
Disable date/time range
report setting, editing 87–88
report setting, explained 80
disaster recovery
procedure, explained 121
Disconnected icon
explained 23
E
editing
Add time marker every 30–31
categories 39–40
container options 63–64
containers 54–64
journal options 91–92
Max allowed pour size 75–76
report settings 87–88
reports 86–92
reports, not allowed 86
serving sizes 74–75

145
BARVISION FOR PALM OS®
User’s Guide
Draft for Reseller Review Only
Not for Distribution to End Users
serving sizes, effect on event records of
74
Empty Containers
report section, explained 81
Empty Containers Count
report section, explained 82
Empty weight
container detail, editing 61–63
container detail, explained 45
erasing journal 115
Event #
pour spout hardware detail, explained
50
event records
obsolete, defined 113
events
container empty, explained 31–32
container found, explained 33
container missing, explained 32–33
container open, explained 31
container pour, explained 32
container variance, explained 33
events lost, explained 34–35
list of actions recorded as 24–25
maximum number of 83
receiver connected, explained 29
receiver disconnected, explained 29
effect on, of serving size deletion 76
effect on, of serving size editing 74
spout reattached, explained 34
spout removed, explained 33–34
time marker, explained 29–30
viewing details for 28–29
events lost
event, explained 34–35
Exceptions
report section, explained 82
exceptions
Max allowed pour size and 73, 75
exiting
BarVision 35
Expected pour rate
container detail, editing 61–63
container detail, explained 46
expected pour rate
explained 8, 72
Expires
pour spout hardware detail, explained
50
Expiring Hardware
report section, explained 82
Export
report setting, editing 87–88
report setting, explained 81
exported journal data
default location for 107
file format of 107
exported report data
default location for 108
file format of 108
limit of 108
exporting journal data 107–109
BarVision Conduit for Palm HotSync
and 13, 107
exporting report data 107–109
BarVision Conduit for Palm HotSync
and 107
exporting reports
BarVision Conduit for Palm HotSync
and 13, 80
F
FCC statement 123
file format
of exported journal data 107
of exported report data 108
Firmware
pour spout hardware detail, explained
50
H
handheld computer
function explained 6
handheld computer. See Palm® handheld
Hardware
report section, explained 82
hardware
active antenna, function explained 3–
4
data receiver, function explained 4–5
handheld computer, function
explained 6
introduction to 1–7
pour spout, function explained 2–3
required, list of 1
I
icons
Add, explained 27
Battery level, explained 23
Connected, explained 23
Delete, explained 27
Detail, explained 27
Disconnected, explained 23
Move down, explained 27
Move up, explained 27
Scroll arrows, explained 27
Improper pour pour rate
container option, explained 49
Improper pour time limit
container option, explained 49
inserting. See adding
installation
BarVision Conduit for Palm HotSync
13–14
BarVision for Palm OS® 11–13
BarVision software 11–14
introduction
to system components 1–7
to the BarVision system 1
Irregular Empty Containers
report section, explained 82
J
Jitter level
container option, editing 63–64
container option, explained 48
journal
erasing 115
maintenance of 113–115
options. See journal options
journal data
default location of exported 107
exporting 107–109
exporting, BarVision Conduit for
Palm HotSync and 13
file format of exported 107
Journal Detail
report section, explained 82
journal events
obsolete, defined 113
journal options
Back up during maintenance 84
editing 91–92
explained 83–84
Minimum days in journal 84
Prompt for maintenance 84
L
Last heard
pour spout hardware detail, explained
50
launching
BarVision 22–23

INDEX
146
Draft for Reseller Review Only
Not for Distribution to End Users
LEDs
pour spout, functions explained 3
legal notices 127–138
license agreement 127–131
Location
container detail, editing 61–63
container detail, explained 45
pour spout hardware detail, explained
50
M
maintenance. See data maintenance
management reports
explained 79, 95
running, viewing, and printing 95–
98
manager security code
default value 26
disabling 27
editing 26–27
entering 26
explained 26–27
permissible values 26
procedures and xii
screens accessible without entering 26
Max allowed pour size
default value 73
deleting serving sizes by editing 75
exceptions and 73, 75
security option, editing 75–76
security option, explained 73
measure
unit of, unspecified 7
metric units
recommendations for using 7
Mgr button
explained 23
Minimum days in journal
default value 84
journal option, editing 91–92
journal option, explained 84
permissible values 84
Missing Hardware
report section, explained 82
Model
pour spout hardware detail, explained
49
modifying. See editing
Move down icon
explained 27
Move up icon
explained 27
moving. See reordering
N
navigating
the BarVision software 25–28
nonalcoholic beverages
categories and 38
numbers
tips for entering 22
O
obsolete event records
defined 113
Open Containers
report section, explained 82
ordering. See reordering
overview
of BarVision system 1
of system components 1–7
overviiew
of using BarVision 8–9
Overyield
container option, editing 63–64
container option, explained 48
P
Page selector buttons
explained 28
Palm® handheld
battery, charging 21
entering text and numbers 22
serial cable, tips for using 21
stylus, tips for using 21–22
tips for using 21–22
troubleshooting 117
Palm® handhelds
customer support for xiii
pass code. See security code
password. See security code
PDA. See Palm® handheld
Percent
container status, explained 50
Perform maintenance
report setting, editing 87–88
report setting, explained 81
peripheral devices
configuring BarVision for use with
16–20
Pour delay
container option, editing 63–64
container option, explained 48
Pour Detail
report section, explained 82
pour rate
actual, explained 8, 71
expected, explained 8, 72
pour rate, actual
container detail, editing 61–63
container detail, explained 46
pour rate, expected
container detail, editing 61–63
container detail, explained 46
pour rates
explained 7–8
pour spout
assigning new, to a container 57–59
button, functions explained 3
function explained 2–3
hardware details, viewing 65–66
LEDs, functions explained 3
removing currently assigned, from a
container 57–59
pour spout hardware details
Age 50
Event # 50
Expires 50
explained 49–50
Firmware 50
Last heard 50
Location 50
Model 49
Product 50
RF signal level 50
Serial ID 49
pour spouts
troubleshooting 118
pour volumes
explanation of expected 71–72
serving sizes and 71
Pours
container status, explained 51
Pours by Category
report section, explained 83
Pours by Location
report section, explained 83
Pours by Product
report section, explained 83
prices
categories and 37
printers
configuring BarVision for use with
16–20

147
BARVISION FOR PALM OS®
User’s Guide
Draft for Reseller Review Only
Not for Distribution to End Users
printing
Configuration report 98–99
management reports 95–98
public reports 92–95
Quick View report 99–102
troubleshooting 119
procedures
manager security code and xii
software, Activity screen and xii
software, default starting point for xii
Product
container detail, editing 55–57
container detail, explained 44
name, assigning to a container 55–57
pour spout hardware detail, explained
50
Prompt for maintenance
journal option, editing 91–92
journal option, explained 84
Public
report setting, editing 87–88
report setting, explained 80
public reports
explained 79, 92
running, viewing, and printing 92–
95
Q
Quick View report
explained 99
running, viewing, and printing 99–
102
R
receiver connected
event, explained 29
receiver disconnected
event, explained 29
Recent
container status, explained 51
registering BarVision xi
warranty activation and xi
regulatory information 123–125
Canadian ICES-003 statement 123
CE compliance statement 123
declarations of conformity 124
FCC statement 123
Remaining %
container detail, editing 61–63
container detail, explained 45
removing. See deleting
renaming
categories 39
categories, effect on containers of 39
reports 86–87
reports, not allowed 86
reordering
categories 40
sections in a report 89–90
report data
default location of exported 108
exporting 107–109
file format of exported 108
limit of exported 108
Report missing after
container option, editing 63–64
container option, explained 48
report sections
adding, to a report 88–89
deleting, from a report 90–91
Empty Containers 81
Empty Containers Count 82
Exceptions 82
Expiring Hardware 82
explained 79, 81–83
Hardware 82
Irregular Empty Containers 82
Journal Detail 82
Missing Hardware 82
Open Containers 82
Pour Detail 82
Pours by Category 83
Pours by Location 83
Pours by Product 83
reordering, in a report 89–90
Serving Sizes 83
Serving Sizes by Category 83
Serving Sizes by Location 83
report settings
Disable date/time range 80
editing 87–88
explained 80–81
Export 81
Perform maintenance 81
Public 80
reports
adding 84–86
adding sections to 88–89
Configuration, explained 98
data included in, specifying 80
date/time range for data in, explained
80
deleting 102–103
deleting sections from 90–91
deleting, not allowed 102
editing 86–92
editing, not allowed 86
explained 79
exporting, BarVision Conduit for
Palm HotSync and 13, 80
management, explained 79, 95
maximum number of 79, 84
predefined, list of 84
printing Configuration 98–99
printing management 95–98
printing public 92–95
printing Quick View 99–102
public, explained 79, 92
Quick View, explained 99
renaming 86–87
renaming, not allowed 86
reordering sections in 89–90
running Configuration 98–99
running management 95–98
running public 92–95
running Quick View 99–102
sections. See report sections
settings. See report settings
viewing Configuration 98–99
viewing management 95–98
viewing public 92–95
viewing Quick View 99–102
Reports button
explained 24
resources
finding additional xii
restoring data 111–113
RF signal level
pour spout hardware detail, explained
50
running
Configuration report 98–99
management reports 95–98
public reports 92–95
Quick View report 99–102
S
Save button
explained 28
screens
accessible without manager security
code 26
hierarchy of 25
navigating 25–28
Scroll arrow icons
explained 27

INDEX
148
Draft for Reseller Review Only
Not for Distribution to End Users
SD memory card
backing up data to 110
sections. See report sections
security code, manager
default value 26
disabling 27
editing 26–27
entering 26
explained 26–27
permissible values 26
procedures and xii
security codes
screens accessible without entering 26
troubleshooting 120
serial cable
data connection for handheld 21
data receiver communications link 21
potential for data loss 21
power source for handheld 21
tips for using 21
Serial ID
pour spout hardware detail, explained
49
service. See customer support
Serving Sizes
report section, explained 83
serving sizes
adding 73–74
adding, not allowed 73
benefits of using 72
deleting 76–77
deleting all, detriment of 76
deleting unused, benefit of 76
deleting, effect on event records of 76
editing 74–75
editing, effect on event records of 74
expected pour volume and 71–72
explained 71–72
Max allowed pour size and 73, 74
maximum number of 71, 73
midpoints and pour allocation to 71
permissible values 73, 74
pour volumes and 71
predefined, list of 71, 73
ranges for 71
Serving Sizes by Category
report section, explained 83
Serving Sizes by Location
report section, explained 83
settings. See report settings
Shape
container detail, editing 60–61
container detail, explained 44
signal strength
container status, explained 51
software
BarVision for Palm OS®, function
explained 6–7
configuring, after installation 14–16
configuring, for peripheral devices
16–20
controls, explained 27–28
installation 11–14
installation, Barvision Conduit for
Palm HotSync 13–14
installation, Barvision for Palm OS®
11–13
navigating 25–28
screen hierarchy 25
special characters
entry of, not allowed 22
Spout
container detail, editing 57–59
container detail, explained 44
spout
hardware details. See pour spout
hardware details
spout reattached
event, explained 34
spout removed
event, explained 33–34
starting
BarVision 22–23
Status button
explained 24
status. See container status information
storage limits
of data receiver 21, 29
of transmitter tags 29
stylus
dragging, explained 22
tapping, double-tapping, and triple-
tapping, explained 22
tips for using 21–22
support. See customer support
T
technical support. See customer support
Terminal ID
editing 20
explained 20
text
entering special characters, not
allowed 22
tips for entering 22
third-party products
troubleshooting 122
time marker
event, explained 29–30
interval, editing 30–31
transmitter tags
data storage limit of 29
troubleshooting
data loss 120
data receiver 117
disaster recovery 121
Palm® handheld 117
pour spouts 118
printing 119
security codes 120
third-party products 122
txt file format 108
U
Underyield
container option, editing 63–64
container option, explained 48
unit of measure
for default values 7
unspecified, explanation of 7
Unit weight
container detail, editing 61–63
container detail, explained 46
user’s guide
conventions xii
tips for experienced users xi
tips for new users xi
using
BarVision, overview of 8–9
V
viewing
Configuration report 98–99
container status information 67–69
container status information, from
Activity screen 68–69
container status information, from
Containers screen 67–68
event detail information 28–29
management reports 95–98
public reports 92–95
Quick View report 99–102
vol.
container detail, editing 61–63
container detail, explained 45
Volume

149
BARVISION FOR PALM OS®
User’s Guide
Draft for Reseller Review Only
Not for Distribution to End Users
container status, explained 50
W
warranty
activating by registering BarVision xi
active antenna 132–134
data receiver 132–134
tag 135–138
Weight
container status, explained 50
wt.
container detail, editing 61–63
container detail, explained 45

INDEX
150
Draft for Reseller Review Only
Not for Distribution to End Users

Nuvo Corporate Center
6060 East Thomas Road
Scottsdale, Arizona 85251, USA
phone: +1 480.222.6000
fax: +1 480.222.6001
www.nuvoinc.com
www.barvision.com
P/N 469
Rev. 1.0-101905
U.S. Customary
TM