SHUOYING DIGITAL SCIENCE and TECHNOLOGY DV0200 Action camera User Manual DV0200SA
SHUOYING DIGITAL SCIENCE&TECHNOLOGY;(CHINA)Co.,Ltd Action camera DV0200SA
User Manual
1
SHUOYING DIGITAL SCIENCE&TECHNOLOGY(CHINA)Co.,Ltd
DV0200 Action camera
User Manual

2
I
In
nt
tr
ro
od
du
uc
ct
ti
io
on
n
Thank you for choosing this camera. The product adopts high-performance chip which can achieve HD video,
motion graphics with strong continuity, support AVI video format, and take clear photograph. The product, with
unique portable design, can be applied to various fields, and provide you convenient, safe and colorful life.
Please carefully read this manual before using. Keep the manual in a safe place for future reference.
The compilation of the user manual refers to the latest information. The manual quotes captured screen displays
and graphics, with the aim to introduce the digital camera through detailed and direct methods. Due to the
differences of technical R&D and production batch, those captured screen displays and graphics indicated in the
manual may be different from that of actual digital camera. The actual functions of camera shall prevail.
P
Pr
re
ec
ca
au
ut
ti
io
on
ns
s
Please carefully read the Precautions of manual before using, to ensure the correct and safe use of camera,
optimal performance of camera and long lifespan.
Do not place the camera under direct sunlight, or let the camera lens face the sunlight, otherwise, the
image sensor will be damaged.
When using the camera at the beach or waterfront, avoid water or sand to enter into the camera. The water,
sand and dust may have saline component which will damage the camera.
Do not expose the camera to dust or chemicals. Keep the camera in a cool and dry place with good
ventilation. Do not put the camera in high-temperature, damp or dusty place, to avoid the failure of
camera.
Periodically use the camera during the long-term storage of camera. Check whether the camera can work
normally before using.
Use a soft, clean and dry cloth to wipe any dirt or stain on the camera or lens gently. If there is any sand

3
or dust on the camera or lens, blow the sand or dust off the camera or lens. Do not use cloth to wipe,
otherwise, the surface of camera or lens may be scratched.
In case of cleaning the surface of camera lens, first blow the dust off the surface, use a cloth or paper
available to optical equipment to wipe the lens gently. Use the professional camera cleanser to clean the
lens. Do not use any organic solvent.
Do not touch the lens surface by fingers.
In case of using the memory card of the digital camera for the first time, please back up the data first, and
format the memory card of camera.
The external TF card is made of precise electronic parts. The following cases may cause the loss or
damage of data:
1. Improper use of memory card.
2. The memory card is bent, loose, or subject to impact.
3. The memory card is placed high-temperature or damp environment or under direct sunlight.
4. The memory card is exposed to electrostatic field or electromagnetic field.
5. Remove the memory card or interfere the power of camera when the digital camera or computer is
accessing the memory cart (i.e. reading, writing or formatting etc.).
6. Touch the metallic contact surface of memory card by finger or metallic materials.
7. The lifespan of memory card is expired (please purchase new memory card timely).
P
Pr
ro
od
du
uc
ct
t
P
Pr
ro
of
fi
il
le
e
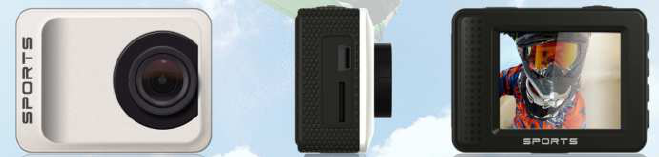
Compact size and convenient installation.

4
The product adopts high-performance chip which can achieve HD video, motion graphics with
strong continuity. The video recording is available even under low illumination. Support AVI
video format.
Support HD (1280x720),VGA (640x480) and QVGA (320 x 240) for recording.
Sizes of 5M, 1M, VGA available for photographing.
Support high-speed USB2.0.
Support maximum 32G TF card.
S
Sy
ys
st
te
em
m
R
Re
eq
qu
ui
ir
re
em
me
en
nt
ts
s
System requirements
Operating system
Microsoft Windows2000, XP, Vista, Windows 7
CPU Intel Pentium III 800MHz or above or CPU with equivalent performance
Memory 512MB or above
Sound card and
graphics card Support Direct X8 or later
CD driver 4X speed or higher
Hard disk More than 500MB free space
Others 1 standard USB1.1 or USB2.0 port
5
A
Ap
pp
pe
ea
ar
ra
an
nc
ce
e
a
an
nd
d
K
Ke
ey
ys
s
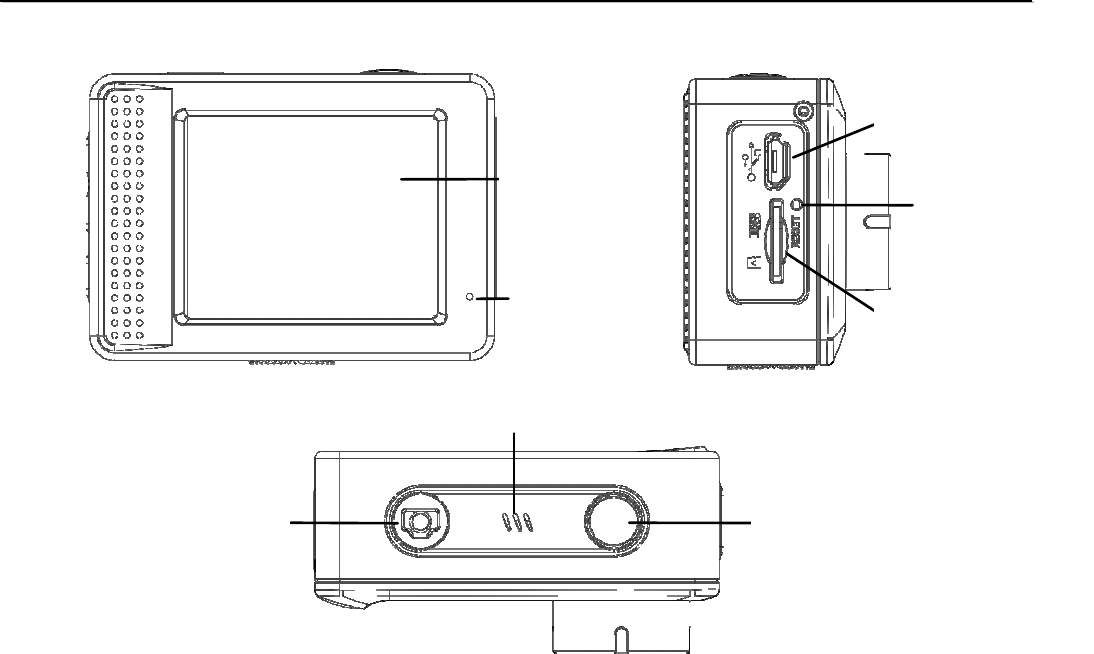
LCD screen
Indicator
Micro USB
Micro SD
Shutter/Confirm key
Power/Mode key
Reset
Microphone
6
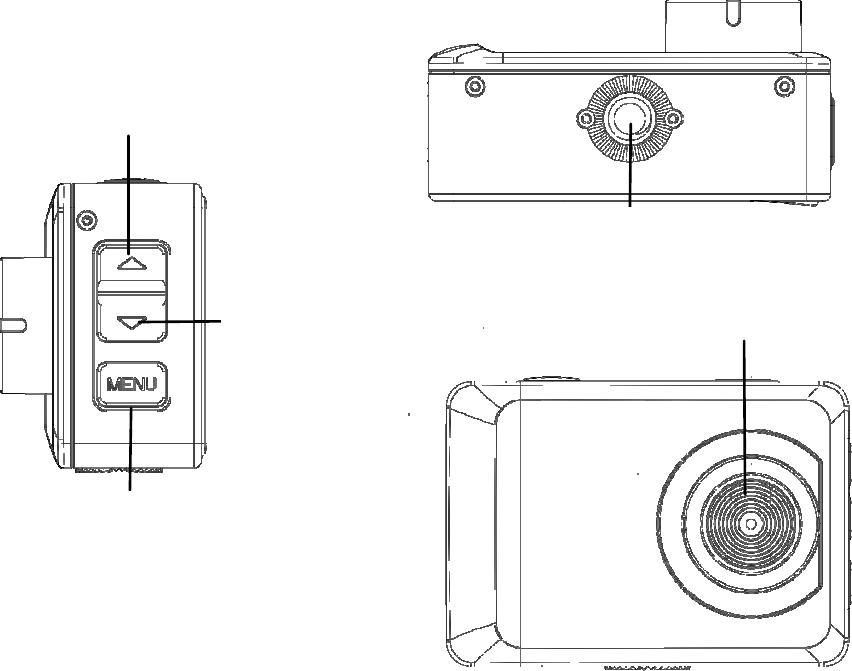
Up key
Down key
Menu key
Tapped hole for tripod
Lens

7
S
St
ta
ar
rt
t
t
to
o
u
us
se
e
1. Charge the built-in lithium battery
Connect the camera to computer for charging under shutdown status. The charging indicator will be on when
charging, and will be off when the battery is fully charged. Generally, the battery can be fully charged after 2-4
hours.
Charging indicator
Connect the computer to USB port
8
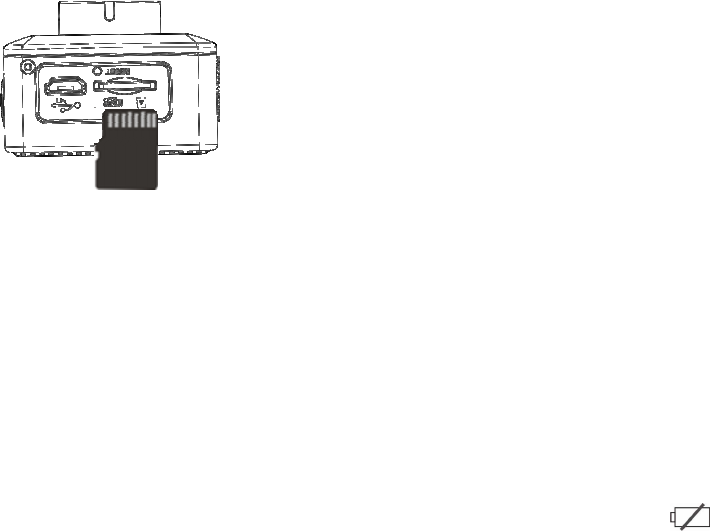
2. How to use the memory card
2.1 Properly insert the TF card into the card holder as per the instructions indicated near the card holder.
2.2 To remove the TF card, press the end of memory card gently, the card will be ejected.
Note:The camera is not equipped with built-in memory. Please insert memory card before using.
3. Startup and shutdown
3.1 Startup: press the POWER key for 3 seconds, the camera will show startup screen and enters into POWER
ON state.
3.2 Shutdown: press the POWER key when the camera is under idle mode to shut down.
3.3 Auto shutdown: the camera will be shut down automatically when the camera is under idle mode for a certain
time to save power. The default time for auto shutdown is 3 minutes.
3.4 Shutdown under low power: when the battery is under low power, the LCD will indicate “ ”. Please
charge the battery timely. When the icon turns red and flashes, the camera will be shut down automatically.
9
4. Function modes switching
The camera has 3 modes: photo mode, video mode, and playback mode. Press the power key to switch the
modes after starting up.
Photo mode: for taking photos.
Video mode: for recording videos.
Playback mode: for playing back the current photo or video.
5. Indicator light
5.1 BUSY indicator: When the camera is working (e.g. recording, photographing, auto screen off etc.), the
indicator will be ON.
5.2 Charging indicator: In shutdown state, the lightened indicator means the user is charging the camera.
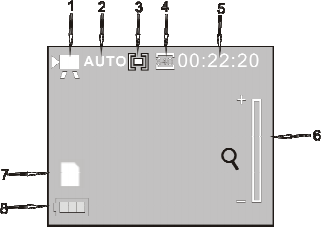
6. Video mode
Press the Power key to switch to video mode, press the Shutter key under the preview state to start recording,and
press the Shutter key again to stop recording. If the memory card is full or the battery is under low power during
recording, the camera will automatically stop recording:
1. Video mode 5. Available recording time
2. White Balance mode 6. Icon of digital zoom
3. Metering mode 7. SD card inserted
4. VGA size 8. Battery state
10
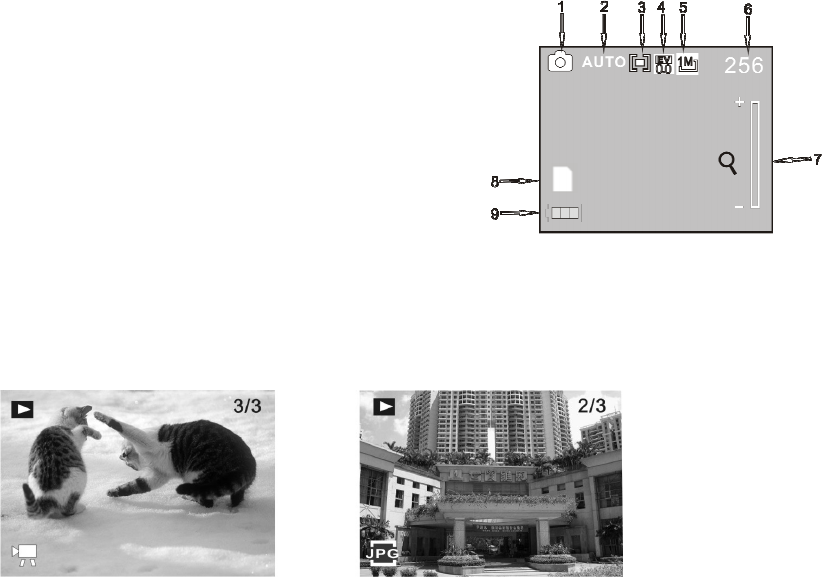
7. Photo mode
Press the Power key to switch to photo mode. Press the Shutter key under preview state can take one photo.
1. Photo mode 6. Available shooting count
2. White Balance mode 7. Icon of digital zoom
3. Metering mode 8. SD card inserted
4. Exposure mode 9. Battery state
5. Photo resolution
8. Playback mode
8.1 Press the Power key to switch to playback mode. Press the Up key or Down key under preview state to play
the previous or next photo or video.
Playback video Playback photo
11
8.2 Press the Shutter key to play the video, and press the Shutter key again to stop play.
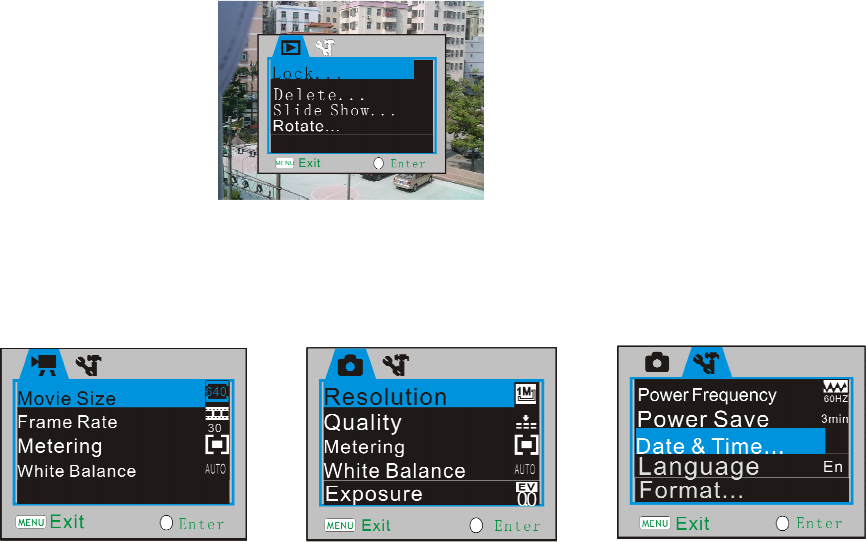
8.3 File operation: In playback mode, press MENU key to enter into the menu to lock, delete, slide show or
rotate recorded files. Press the Up key or Down key to select the relevant menu item, then press Shutter key to
confirm, or press MENU key to exit. As the following picture shows:
9. Menu mode
9.1 Press the MENU key when the camera is under idle state to enter into the menu of relevant mode. As the
following picture shows:
Menu of video mode Menu of photo mode Menu of setup mode

12
9.2 After entering the menu mode, short press the shutter key to switch between the shooting mode and setup
mode.Press Up key or Down key to select the menu items.Press Shutter key to confirm the selection.Press
MENU key to cancel the selection or exit from the menu.
A
Ap
pp
pl
li
ic
ca
at
ti
io
on
n
o
on
n
P
PC
C
The camera has Plug and Play function. Use a USB cable to connect the camera to PC under Power On state to
switch to removable hard disk mode. The icon of removable hard disk will be indicated in the window of “My
Computer”. The shot photo/video files will be saved in the folder of removable disk I:\DCIM\100MEDIA (I
refers to the removable disk of camera).
Note: No driver needs to be installed if operating the removable hard disk in windows 2000 or later version.
I
In
ns
st
ta
al
ll
la
at
ti
io
on
n
o
of
f
D
Dr
ri
iv
ve
er
rs
s
a
an
nd
d
S
So
of
ft
tw
wa
ar
re
e
The disc includes the driver of camera and attached software MAGIX Video easy SE / MAGIX Photo
Manager 9 (available for processing photos and videos).
Installation interface:Insert the disc into CD/DVD-ROM drive, the system will automatically run the
installation program, and the screen will show the following installation guide.(The running of auto installation
program may need several seconds which depend on the performance of computer. If the screen does not show
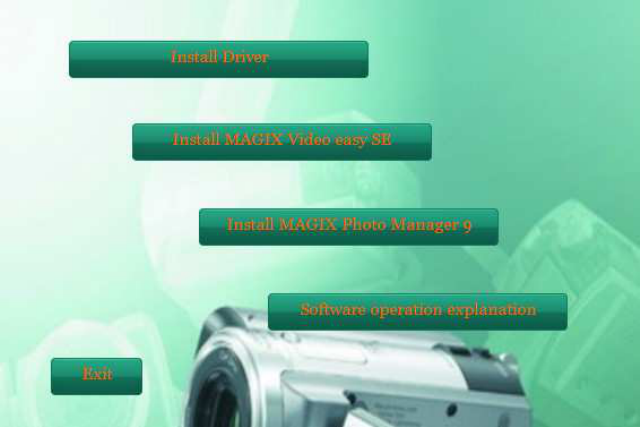
13
the installation window, please run “Windows Resource Manager”, and select and run “SoftwareInstaller.exe”
under CD/DVD-ROM drive)
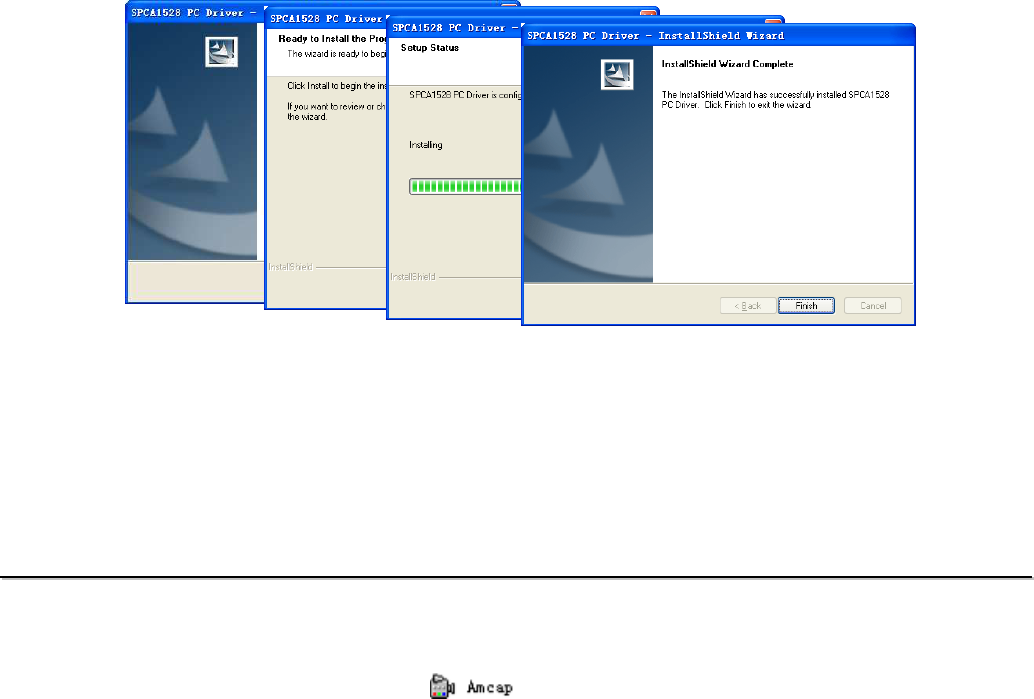
Driver installation: Click “Install Driver” in the installation guide window, and finish the installation step by
step as per the instructions. Restart the computer after finishing the driver installation.
14
Application software MAGIX Video easy SE / MAGIX Photo Manager 9: Please click the button on the
guide window, and finish the installation step by step as per the instructions.Please click the “Software operation
explanation” button on the guide window to check the operating method.
U
Us
se
e
a
as
s
C
Co
om
mp
pu
ut
te
er
r
C
Ca
am
me
er
ra
a
After connecting the camera to computer, press the shutter key to enter Camera mode.
Before using the camera function, please check whether the computer has been installed with camera driver.
After installing the driver, find a shortcut icon in the menu of “SPCA1528PC Driver” which is newly
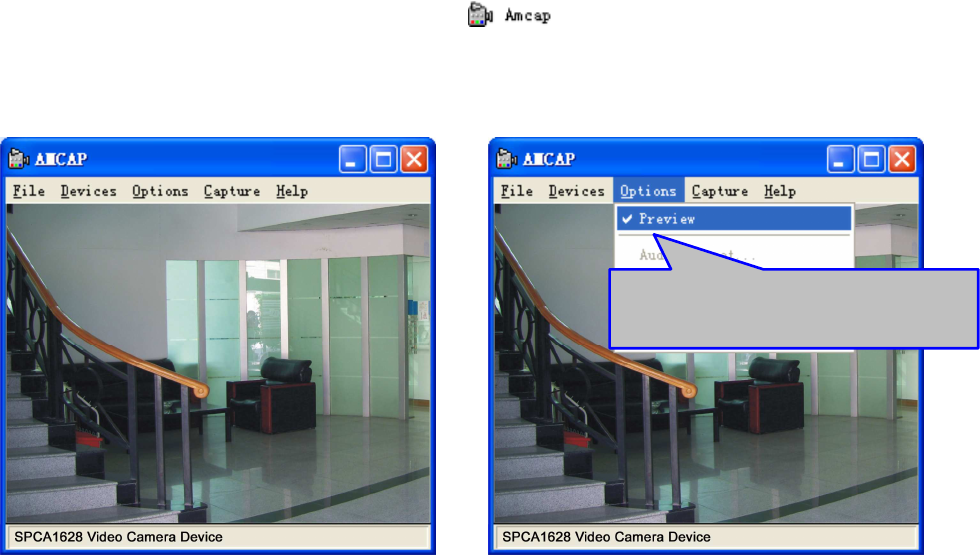
15
added in “Start→All Programs”. Click the shortcut icon to open the AMCAP window which will
show the video shot by the camera. When the AMCAP software is not activated, the camera function can also be
used for transmitting video via network.
Ensure the Preview item in
Option menu is selected.

16
T
Te
ec
ch
hn
ni
ic
ca
al
l
P
Pa
ar
ra
am
me
et
te
er
rs
s
Image sensor 0.3 Mega Pixels CMOS Sensor
Function mode Video, photo, playback
Lens F1.05, f=4.1mm
Digital zoom 4X
Shutter Electronic shutter
LCD display 2.0 inch LCD
Photo resolution 5M(2592×1944),1M (1280×1024), VGA (640 x480)
Video resolution HD(1280x720, 15 frame/sec), VGA(640x480,30 frame/sec),
QVGA(320 x 240, 30 frame/sec)
White balance Auto/Daylight/Cloudy/Fluorescent/Tungsten
Exposure -2.0 ~ +2.0
Video AVI
File format Picture JPEG
Storage medium TF card (maximum 32GB)
USB port High-speed USB 2.0 port
Power source Built-in 3.7V rechargeable lithium battery
Dimension(L×W×H) 65×46×24mm
Warning: Changes or modifications to this unit not expressly approved by the party responsible for compliance
17
could void the user’s authority to operate the equipment.
NOTE: This equipment has been tested and found to comply with the limits for a Class B digital device,
pursuant to Part 15 of the FCC Rules. These limits are designed to provide reasonable protection against
harmful interference in a residential installation. This equipment generates, uses and can radiate radio
frequency energy and, if not installed and used in accordance with the instructions, may cause harmful
interference to radio communications.
However, there is no guarantee that interference will not occur in a particular installation. If this equipment
does cause harmful interference to radio or television reception, which can be determined by turning the
equipment off and on, the user is encouraged to try to correct the interference by one or more of the following
measures:
Reorient or relocate the receiving antenna.
Increase the separation between the equipment and receiver.
Connect the equipment into an outlet on a circuit different from that to which the receiver is connected.
18
Consult the dealer or an experienced radio/TV technician for help.
Shielded cables must be used with this unit to ensure compliance with the Class B FCC limits.
This device complies with Part 15 of the FCC Rules. Operation is subject to the following two conditions : (1)
this device may not cause harmful interference, and (2) this device must accept any interference received
including interference that may cause undesired operation.
Only the USB cable supplied (with molded ferrite core) must be used with this product,Shielded cables must be
used with this unit to ensure compliance with the ClassB FCC limits.