SHUOYING DIGITAL SCIENCE and TECHNOLOGY DV036 Wearable Camera User Manual
SHUOYING DIGITAL SCIENCE&TECHNOLOGY;(CHINA)Co.,Ltd Wearable Camera Users Manual
15_DV036 UserMan.pdf
P
Pr
re
ef
fa
ac
ce
e:
:
Thank you for choosing this camera. This product features exquisite in industrial design,
easy for carrying and realizes a shooting with large-angle.
Please carefully read through this product manual for its best performance and longer
lifespan. We wish this product will satisfy your demand and provide a long-term service for
you.
A
Ab
bo
ou
ut
t
t
th
he
e
p
pr
ro
od
du
uc
ct
t
This product enjoys a compact design and is easy for installation.
This product applies the high performance chip and thus high definition video can be
achieved, features strong in continuity of motion picture, and video recording can be
performed even with low light.
Camera shooting supports HD (1280x720@15FPS) recording;
Support high-speed USB2.0;
Maximally support 32G Min SD card.
System requirement
System Requirements
Operating System Microsoft system: Microsoft Window 2000, XP, Vista, 7, 8
Apple system: Mac OS X ver: 10.0.0 or above version
CPU Intel Pentium of more than 1GB Hz or other CPU with
equivalent performance
Internal Memory Larger than 1GB
Sound Card and Display Card The sound card and video card shall support DirectX8 or
higher version.
CD Driver Speed of 4 times or faster
Hard Disk Free space of more than 2GB
Others USB1.1 or USB2.0 port
Model Name: DV036
A
Ap
pp
pe
ea
ar
ra
an
nc
ce
e
a
an
nd
d
b
bu
ut
tt
to
on
ns
s
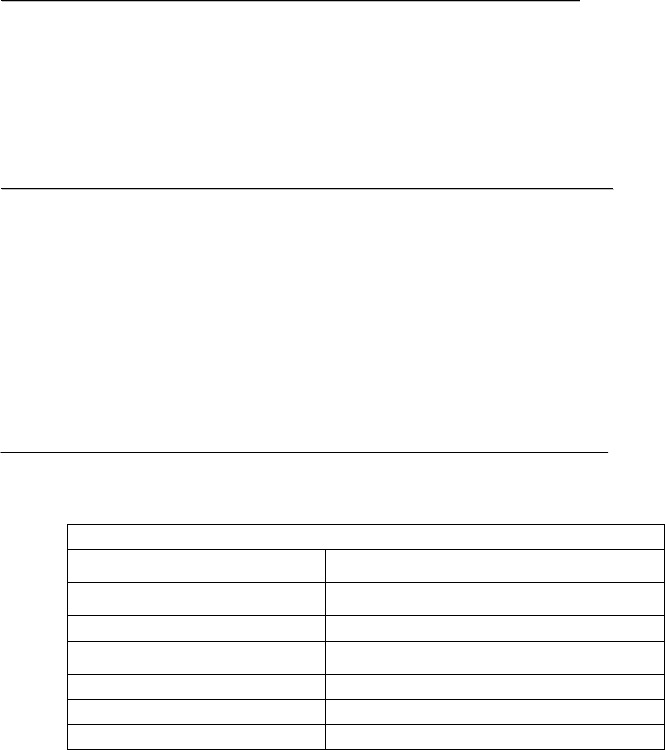
1 Lens 2 Mic 3 LCD 4 USB port /TF card slot 5 charging indicator (blue/red)
6 Power on 7 MODE Indicator (red) 8 Mode Switch 9Shooting indicator (red) 10
Shutter button 11 SIZE switch indicator (red) 12 SIZE switch
LCD display icon:
: camera mode; : video mode; : timelaps mode; : TF card icon
(displayed if there is a card inserted); : battery power icon; : image
resolution (HI means high resolution; HILO means moderate resolution; LO means low
resolution;) : timer/counter
1
2
3
45
6
7
8
9
10
11
12

S
St
ta
ar
rt
t
o
op
pe
er
ra
at
ti
io
on
n
1. Charger the built-in lithium battery
Generally, it will OK to just connect the camera with a computer for charging the battery. At
this time, the charger indicator (blue) will light, and it will light off when being charged full.
It will generally take 2-4 hours to charge full. For faster charging full, you are
recommended to charge it in power-off.
2. Use storage card
2.1 Following instructions by the storage card slot, push in TF card into the slot till entirely
pushed in.
2.2 If to take TF card out, please gently press the end of the storage card inwards, and the
card will pop up.
Note: There is no built-in storage card available in the camera. It is a must to insert a
storage card in for using.
3. Power On/Of
3.1 Power-on: Press and hold POWER key for roughly 2 second, the screen will be
switched on and display a word “ON”, and the camera is powered on.
3.2 Power-off: when the camera is idle, press POWER key to power it off.
Automatic shutdown: When automatic time reached during the camera idle, it will
automatically shut down to save power. The default automatic shutdown time of the
system is 3 minutes.
3.3 Lower power shutdown: in case of a very low battery, LCD display will display an icon
“”, and then the camera will be automatically shut down.
4. Mode Switch
Three modes are available, including Video mode, Photo mode and timelaps mode. You
can switch the mode by pressing the MODE key.
Video mode: For video recording;
Photo mode: For photo taking;
Timelaps mode: For taking time-lapse video
5 Video operation
When the camera is on, press MODE key to switch to video mode, as the following
picture shows, and press shutter button to start recording video; the LCD timer will start
counting the time automatically. Press the shutter button again to stop. If the memory is full
or in case of low battery, the recording will also stop automatically.
In this mode, press SET to switch between HI and LO:
HI indicates 1280x720@15FPS;
LO indicates 640x480@30FPS;
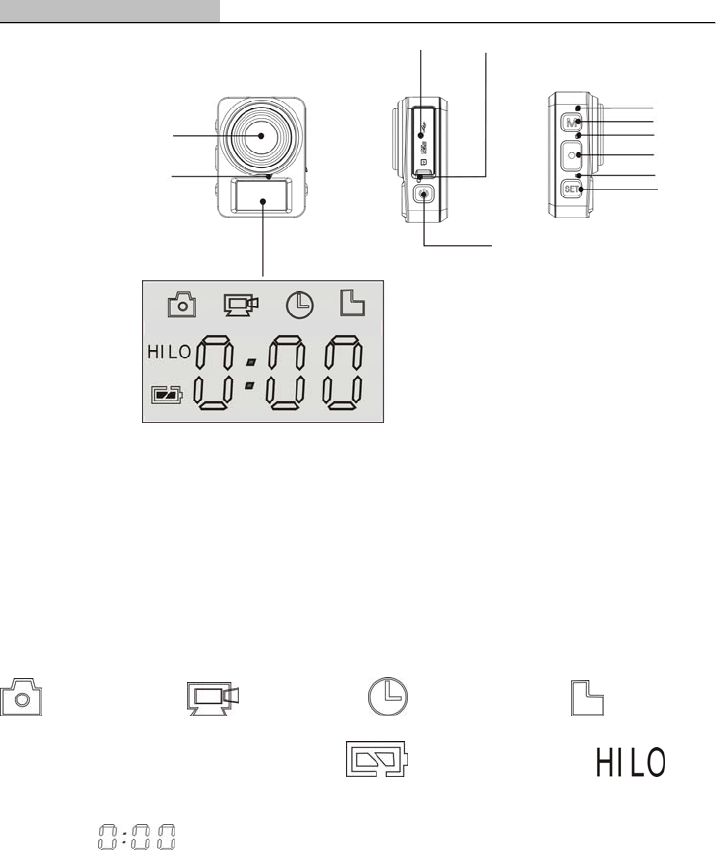
6 Photo operation
When the camera is on, press MODE key to switch to photo mode, and then press
shutter button to take a photo. LCD counter will starting counting automatically.
In this mode, press SET to switch between HI and LO:
HI indicates 2592x1944 (5M);
HILO indicates 2048x1536 (3.1M);
LO indicates 1280x1024 (1.3M);
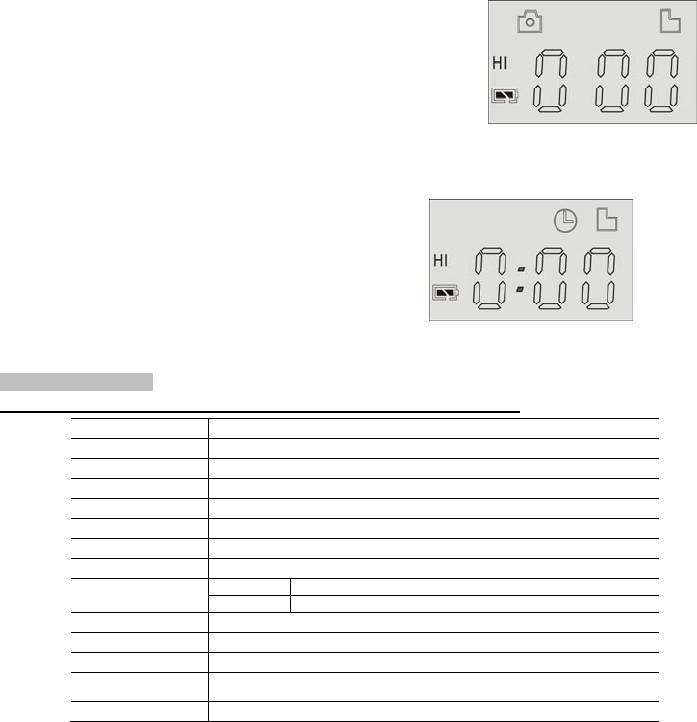
7 timelaps video operation
When the camera is on, press MODE key to switch to timelaps mode, and press shutter
button to start taking time-lapse video.
In this mode, press SET to switch between HI and LO:
HI indicates 1280x720@6FPS;
LO indicates 640x480@6FPS;
The above recorded files can be viewed on PC by connecting the camera to PC.
T
Te
ec
ch
hn
ni
ic
ca
al
l
p
pa
ar
ra
am
me
et
te
er
rs
s
Image sensor 0.3m pixels (CMOS)
Function mode Video recording, photo taking, automatic video recording
Lens F3.0 f=2.12mm
LCD Black-and-white screen
Photo resolution Default 1.3M
Video resolution Default:HD: 1280x720 (15fps)
White balance Auto
Exposure Auto
File format Video AVI
Photo JPEG
Storage TF card (up to 32GB)
USB port High speed USB 2.0/3.0 port
Power Supply Built-in 250mah battery
Language Figure + icon
Dimensions 50x38x18.5mm

Label Statement:
This device complies with part 15 of the FCC Rules. Operation is subject to the following two conditions: (1) This device may not
cause harmful interference, and (2) this device must accept any interference received, including interference that may cause
undesired operation.
FCC Statement
This equipment has been tested and found to comply with the limits for a Class B digital device, pursuant to part 15 of the FCC
rules. These limits are designed to provide reasonable protection against harmful interference in a residential installation. This
equipment generates, uses, and can radiate radio frequency energy and, if not installed and used in accordance with the
instructions,
may cause harmful interference to radio communications. However, there is no guarantee that interference will not occur in a
particular installation.
If this equipment does cause harmful interference to radio or television reception, which can be
determined by turning the equipment off and on, the user is encouraged to try to correct the
interference by one or more of the following measures:
• Reorient or relocate the receiving antenna.
• Increase the separation between the equipment and receiver.
• Connect the equipment into an outlet on a circuit different from that to which the receiver
is connected.
• Consult the dealer or an experienced radio/TV technician for help.
To assure continued compliance, any changes or modifications not expressly approved by the
party responsible for compliance could void the user’s authority to operate this equipment.