SHUOYING DIGITAL SCIENCE and TECHNOLOGY PDV1800 Panoramic View Camera User Manual
SHUOYING DIGITAL SCIENCE&TECHNOLOGY;(CHINA)Co.,Ltd Panoramic View Camera
User manual
1
Panoramic View Camera
PDV1800
2
User’s Manual
D
De
es
sc
cr
ri
ip
pt
ti
io
on
n
o
of
f
a
ap
pp
pe
ea
ar
ra
an
nc
ce
e
a
an
nd
d
k
ke
ey
ys
s
3
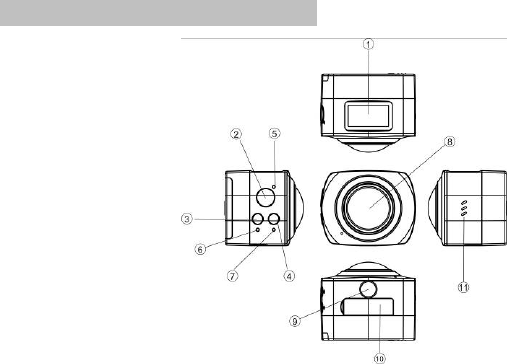
1. LCD display screen 2.Shutter key
3.Power/Mode 4.Wifi key
5.Busy indicator (red) 6. Charging indicator (blue)
7. WIFI indicator (red) 8. Lens
9. Gear adjusting triangle nut 10. Interface lid (USB, HDMI)
11.Speaker
Use your WIFI camera
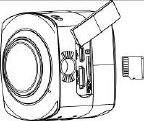
1. First insert a micro SD or micro SDHC card, as shown in the right figure:
A high-speed card of Class 6 or above is recommended, and a Class 10 card is needed for video
recording in professional mode.
Be sure to turn off the video camera before a card is inserted or taken out.

4
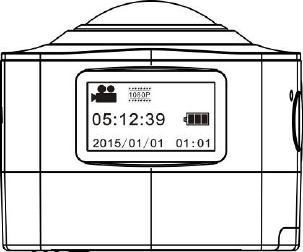
2. Power on/off
Power on: Press and hold Power key for about 2 seconds and release it, accompanied by a sound
of the buzzer, the LCD screen will be started (video recording mode is started by default), and the
working indicator in red/Busy indicator will be normally on.
Power saving mode: The device will enter power saving mode when it is in an idle state for one minute
(default setting of the system) without any operation, LCD display will be turned off automatically. And it
can be activated by pressing any key after it is turned off.
Power off: Press and hold Power key for about 3 seconds and release it, accompanied by a sound
of the buzzer, the LCD screen will be shut down.
The device will be turned off automatically when it is in power saving mode for 3 minutes (default
setting of the system) without any operation, “Goodbye” will be displayed on the LCD screen when it is
turned off.
5
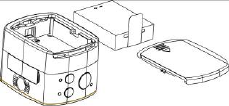
3. Charging the camera
An external chargeable lithium battery is used in this device, and its installation is as shown in the figure
below:
Open the cover of the battery:
Mount the battery as per the correct marks
for positive and negative poles;
Then put on the cover of the battery;
In power-off state, connect the device to the USB interface of the computer with a USB cable for
charging. The charging indicator will be in blue in charging. It takes at least 4 hours to complete
charging due to current limit of the USB interface of the computer. After charging is completed, charging
indicator will be off.
6
4. Switch of functional modes
This video camera has three modes: video recording mode, driving mode and photographing mode.
After power is on, modes can be switched by pressing Power/Mode key, or through APP.
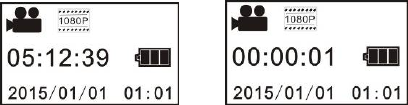
Video recording mode: As illustrated below, press Shutter key to start video recording, accompanied
with a sound from the buzzer. In video recording, Busy indicator will be flashing in red all the time,
and LCD timer will start timing. To stop video recording, press this key again.
7
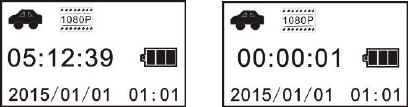
Driving mode: In driving mode, video will be recorded in a cycled way, with a passage of video being
recorded for three minutes by default. When the card is full, the file recorded earliest will be deleted
automatically so that video recording can continue. As illustrated below, press Shutter key to start
video recording, accompanied with a sound from the buzzer. In video recording, Busy indicator will be
flashing in red all the time, and LCD timer will start timing. To stop video recording, press this key again.
8
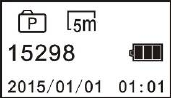
Photographing mode: After switching to photographing mode, press Photograph key to take a photo,
accompanied with a sound from the buzzer, and Busy indicator will be flashing in red all the time in
photographing. After photographing, the timer will count in a decreasing way.

9
5. Menu operation:
After power is on, hold WIFI key for 2 seconds to activate the menu:
Menu in photographing mode Menu in setting mode
Press Power key to switch between menu in photographing mode and that in setting mode;
Press WIFI key and move the cursor to select on the menu
Press Shutter key to confirm;
Hold WIFI key to cancel setting or exit from the menu;
10
6. Application of watch-type remote controller:
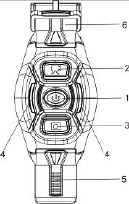
1. Definition of keys on the watch-type remote controller:
Keys of the remote controller are illustrated as below:
1. Power key
2. Video recording key
3. Photographing key
4. Key indicator (red)
5. Watch band
6. Watch buckle
2. Use of watch-type remote controller:
Use the watch-type remote controller to for operations of power on, video recording, photographing,
and power off within a range of 30m without operating on the camera, and just press one key to realize
corresponding functions.
Remarks: Press any key, the two indicators on two sides will be on in red simultaneously.

11
3. Turn on or off the camera with the watch-type remote controller
Power on: Hold key till indicator is off and release, the camera will be turned on and the
buzzer will sound.
Power off: Press and release it, the camera will be turned off and the buzzer will sound.
4. Replacement of battery of watch-type remote controller
When electrical quantity in the remote controller is low and the battery needs to be replaced, open
the battery door with a coin carefully, and avoid its appearance being damaged.
12
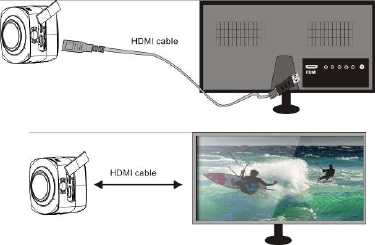
II. Connecting the device to an HDTV
Connect the video camera to a HDTV with a HD cable as illustrated below. After power is on, display
signals in the video camera will be output to the HDTV automatically, and HD videos and photos can be
browsed in the HD TV.
Note: Stop video recording or playing before connecting or pulling off the HDMI cable.
13
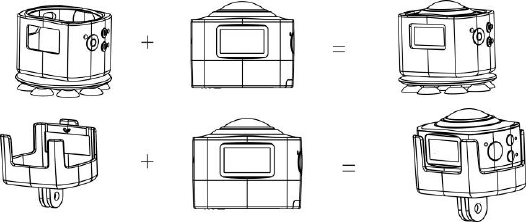
III. Illustrated use of accessories:
1. Silicaon suction
2.

14
5. Selfie stick

15
Applications (Android and Apple systems supported)
I. How to acquire APP installation program?
1. For android system, search for SYMAX360 in Play store and acquire the installation
program, and install it as per the prompt, or scan the QR code on the color box for
installation.
2. For Apple system, search for SYMAX360 in Apple store and acquire the installation
program, and install it as per the prompt, or scan the QR code on the color box for
installation.
II. Application of APP programs
1. Install SYMAX360 application program on the mobile phone or the tablet (available
from the supplier or the internet), and an icon will be displayed on the screen.

16
2. Insert the card into the video camera and turn it on, press Wi-Fi key to activate Wi-Fi,
and a prompting word of Wi-Fi signals will be displayed on the screen;
3. Turn on Wi-Fi on the mobile phone or the tablet, search for P1800-xxxxxx, the name of
wireless AP signal, input the wifi password : 1234567890, then connect it till the system
shows that connection is successful;
4. Click the icon of application program on the mobile phone of the tablet, and you
can see the preview screen transmitted by the video camera on the mobile phone or the
tablet directly, and then you can perform relevant operations.
Note:
1. Before taking photos or downloading pictures on mobile phone or tablet terminal,
insert a TF card into the video camera;
2. After connecting the mobile phone or computer terminal to the video camera
normally, Wi-Fi indicator will be normally on.
3. This equipment should be installed and operated with minimum distance 15mm between
your body.
17
A
Ap
pp
pl
li
ic
ca
at
ti
io
on
ns
s
o
on
n
t
th
he
e
p
pe
er
rs
so
on
na
al
l
c
co
om
mp
pu
ut
te
er
r:
:
This video camera is for plug and play, in power-on state, connect the device to the
computer with the USB cable, it will be switched to movable hard drive mode
automatically.
The icon of movable drive will appear on the window of “My Computer”. The photos
you take will be saved in I:\jpg folder in the movable drive (I is the movable drive of
this device), video files you take will be saved in I:\video and car-borne files you take
will be saved in I:\CAR folder.
Note: If the function of movable hard drive is used in Windows 2000 or windows system
of higher version, drivers cannot be installed.

18
T
Te
ec
ch
hn
ni
ic
ca
al
l
p
pa
ar
ra
am
me
et
te
er
rs
s
Image sensor 8.0 million pixels (CMOS)
Functional mode Video recording and photographing
Lens F2.0 f=1.1mm
Video resolution 1920*1440P (30fps)、 1440*1080P (30fps)
Photo resolution 3840*2160、3072*1728、2560*1440
File format Video H.264(MOV)
Picture JPG
Storage medium TF card (max. 32GB supported)
USB interface High-speed USB 2.0 interface
Power source External lithium battery 1000mAh
19
FCC Notice:
This device complies with Part 15 of the FCC Rules. Operation is subject to the following two
conditions: (1) This device may not cause harmful interference. (2) This device must accept any
interference received, including interference that may cause undesired operation.
NOTE: This equipment has been tested and found to comply with the limits for a Class B digital device,
pursuant to Part 15 of the FCC Rules. These limits are designed to provide reasonable protection
against harmful interference in a residential installation. This equipment generates uses and can
radiate radio frequency energy and, if not installed and used in accordance with the instructions, may
cause harmful interference to radio communications. However, there is no guarantee that interference
will not occur in a particular installation. If this equipment does cause harmful interference to radio or
television reception, which can be determined by turning the equipment off and on, the user is
encouraged to try to correct the interference by one or more of the following measures:
---Reorient or relocate the receiving antenna.
---Increase the separation between the equipment and receiver.
---Connect the equipment into an outlet on a circuit different from that to which the receiver is
connected.
---Consult the dealer or an experienced radio/TV technician for help.
20
WARNING: Changes or modifications not expressly approved by the party responsible for compliance
could void the user's authority to operate the equipment.
RF Exposure
The device has been evaluated to meet general RF exposure requirement. The device can be used in portable
condition without restriction.
21
IC Notice:
This device complies with Canada Industry licence-exempt RSS standard(s). Operation is subject to
the following two conditions:
(1) this device may not cause interference; and
(2) this device must accept any interference. Including interference that may cause undesired operation
of the device.
22
Avis d’Industrie Canada
Le présent appareil est conforme aux CNR d'industrie Canada applicables aux appareils radio exem
pts de licence L'exploitation est autorisée aux deux conditions suivantes:
1) I'appareil ne doit pas produire de brouillage; et
2) I'utillsateur de I'appareil doit accepterbrouillage radioélectrique subi meme si le brouillage est
susceptible d'encompromettre le fonctionnement. mauvais fonctionnement de I'appareil.
Cet appareil numériquie de la classe B est conforme à la norme NMB-003 du Canada.
23
CAUTION
RISK OF EXPLOSION IF BATTERY IS REPLACED BY AN INCORRECT TYPE.
DISPOSE OF USED BATTERIES ACCORDING TO THE INSTRUCTIONS