SHUOYING DIGITAL SCIENCE and TECHNOLOGY WDVV9 Wifi Action Camera User Manual
SHUOYING DIGITAL SCIENCE&TECHNOLOGY;(CHINA)Co.,Ltd Wifi Action Camera Users Manual
15_WDVV9S UserMan.pdf
User’s Manual
WDVV9S
Foreword
Thank you for purchasing our WIFI DV. Before use, please carefully read this User’s Manual for best performance and
longer service life of this product, and properly keep this manual for future reference.
This manual covers the latest information while it was prepared. The displays and pictures used in this manual are for
better understanding of the operation of the product. Due to technical reasons and different production batches, the DV
you receive may be different from how it is described herein.
System requirement
Before using and operating your DV, please know the minimum system requirement to operate it and we strongly
recommend you to use a better PC to operate the product for best performance of the DV. The minimum system
requirement to operate the product is as below:
System Requirements
Operating System Microsoft system:Microsoft Window 2000,XP, Vista, 7,8
Apple system:Mac OS X ver: 10.0.0 or above version
CPU Intel Pentium of more than 1GB Hz or other CPU with equivalent
performance
Internal Memory Larger than 1GB
Sound Card and Display Card The sound card and video card shall support DirectX8 or higher
version.
CD Driver Speed of 4 times or faster
Hard Disk Free space of more than 2GB
Others USB1.1 or USB2.0 port
Features and functions
WIFI,photo shooting, video recording (1080P FHD, 30fps),car recorder, Playback
5m effective pixels
1.77’’ LCD
Powered by external 1100mah battery
micro USB port + TF card slot + mini HDMI port
120°wide angle 4G lens
IR wireless remote
A
Ap
pp
pe
ea
ar
ra
an
nc
ce
e
a
an
nd
d
b
bu
ut
tt
to
on
ns
s
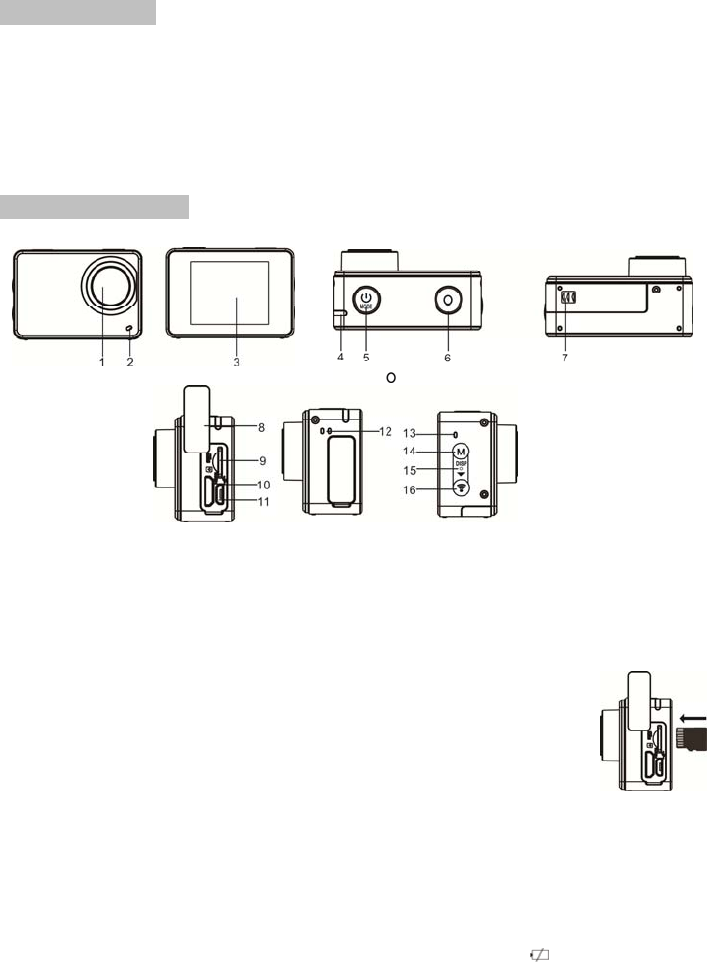
I. Using your Wifi DV for the first time
1.Insert a micro SD or a micro SDHC card first, see right picture
High speed card of Class 6 or above is recommended. When using professional video mode, Class 10 is required.
Turn off your DV before inserting/removing card.
2. Power on/off
2.1 Power on: press and hold power button for about 2 seconds then the screen turns on and the camera goes into power on state.
2.2 Power off: when the camera is in idle state, press the power button for about 2 seconds for power off.
Auto power-off: when the camera's idling time reaches power saving mode (1 minute in default), the camera screen will be
automatically turned off for energy saving. When in power saving mode, the work indicating lamp will be on normally. In case no
operation is made for 3 minutes after in power saving mode, it will be turned off automatically powered off.
2.3 Shutdown due to Low Power:When its power is extremely low, LCD will display the icon “ ”, the camera will automatically
shut down,and please charge the battery timely .
1.Lens 2. charging indicator /busy lamp(blue/red) 3. 1.77”LCD
4.busy lamp(red) 5. Power on/off (mode switch) 6. OK/shutter
7. battery cabin 8. Dust Cover 9. TF card slot (inserting TF card)
10. HDMI port 11. Micro-USB port (connecting PC) 12. horn hole
13. Mic 14. DISP/MENU button 15. Wifi indicator (red)
16.WIFI/
Selection
button
3. Charging battery
The DV uses external li-battery. While power-off, connect the DV to the PC by a USB cable to charge the battery; while charging, the
charging indicator will remain on. It takes about 3 to 4 hours to fully charge the battery, and the indicator will go off when charging
completes.
Remark: blue lamp while charging, red lamp while working and in wifi mode;
4. Function mode switch
The camera has 4 modes, after power on, press Mode button to switch to mode selection, or use APP to switch mode.
Video mode( ):For video recording;
Driving mode( ):For car recording;
Photo mode( ):For photo taking;
Playback mode( ):Playing back the saved videos or photos;
Ⅱ.Mode Preview
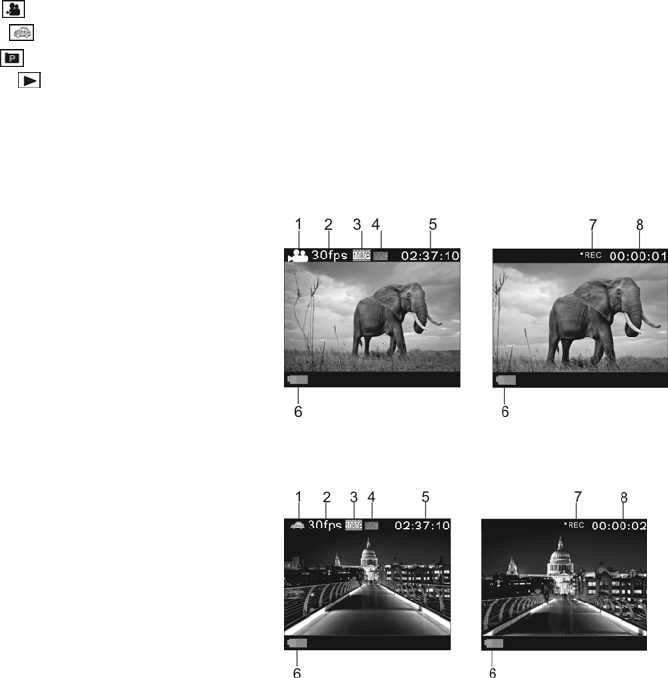
1. Video Mode Operation
After power on, DV is recoding mode automatically. When in preview state, press the shutter to start recoding. Press shutter again to
stop recording. If the memory card gets full or battery gets low, it will stop recording automatically.
1 Mode icon, indicate recording mode
2 Recording frame rate
3 Indicate video size, FHD 1080P(30FPS)
/ HD 720P(60FPS) / HD 720P(30FPS) available
4 Indicate video quality
5 Recording time, indicate minutes left for recording.
6 Battery icon, indicate current battery volume.
7 REC icon, flash when recording.
8 Recording length. Video mode Recording mode
2. Driving Mode Operation
After power on, shortly press power button for one time to enter driving mode.
1 Mode icon, indicate car recording mode.
2 Recording frame rate
3 Indicate video size, FHD 1080P(30FPS)
/ HD 720P(60FPS) / HD 720P(30FPS) available
4 Indicate video quality
5 Recording time, indicate minutes left for recording.
6 Battery icon, indicate current battery volume.
7 REC icon, flash when recording.
8 Recording length Driving mode Recording mode
Tips:1. Car recording mode saves one video segment every three minutes. When the memory card gets full, the earliest video segment
will be deleted, thus it records in loop.
2 .After power on, select car recording mode, then turn off normally and turn on again, connect it with car charger, it will
automatically enter car recording mode and start recording.
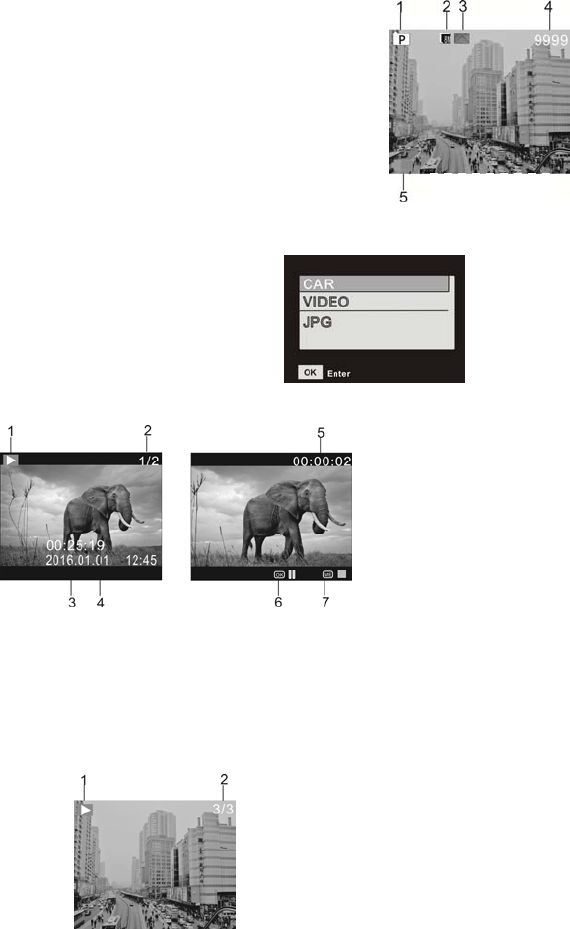
3. Photo Mode Operation
After power on, shortly press power button for two times to enter photo mode. When in preview state, press shutter to take a photo:
1 Mode icon, indicate photo mode.
2 Photo size, click the icon to choose 3M/5M/8M/10M/12M.
3 Indicate photo quality
4 Counter, indicate photos left at the moment.
5 Battery volume icon.
4. Playback mode:
After power on, enter Preview state, then continuously short press the power button to switch to playback mode. When in playback mode,
firstly choose mode file for playing back as shown in the image below:
Choose CAR indicates playing back car recording file mode;
Choose VIDEO indicates playing back normal recording file mode;
Choose JPG indicates photo file mode;
Play Image Introduction:
Recording file imgae:
1 Playback mode icon;
2 Indicate current file sequence number/total files number;
3 Indicate dater of the recording day;
4 Indicate recording time parameter;
5 Play timer ;
6 Operation button reminder to pause play;
7 Operation button reminder to stop play;
When playing video, click OK to pause play; click MENU to stop play.
Photo image:
1 Playback mode icon;
2 Indicate current file sequence number/total files number;
Tip: when in playback, press WIFI to choose other files, and it realizes cycle pick..
1/5
Photo Mode

Ⅲ.Menu Operation:
There are different menus in every work mode, see the following menu images:
Video,Driving mode menu Photo mode menu Setting mode menu Playback mode menu
Operation: press MENU, LCD displays the mode menu, and then short press power button so that the cursor is
able to be moved left and right to choose menu. Press WIFI to move the cursor down (recyclable) to choose menu, at this
moment, the menu is in highlight display, press OK to confirm, and press MENU to return or exit the menu mode.
Ⅳ. Watch remote control:
1. Buttons on watch remote control:
Buttons on the remote control are shown in the picture below
1. Power button
2. Photo button
3. Video button
4. Button indicator (red)
5. Strap
6. Buckle
2. Using the remote control:
The watch remote control allows you to power on/off the DV and to take photo or video at 30M away without operating on DV
directly; just press a button to achieve the said functions.
Remark: press any button the two indicator lamps at both sides will light in red at the same time.
3. Power on/off the DV by remote control
Power on: press and hold the button until the indicator goes off, the DV will turn on and the buzzer will beep once.
Power off: press and hold the button, the DV will turn off and the buzzer will beep once.
4. Changing battery of the remote control:
You need to change the battery of the remote control when the battery level is low. Open the battery cover carefully with a coin and
avoid scratching the surface.
To change the battery, put a coin in the slot at the center of the battery cover and unscrew the cover according to the direction marked
on it, replace the old battery with the new one (pay attention to the +/-), then cover and screw the cover.
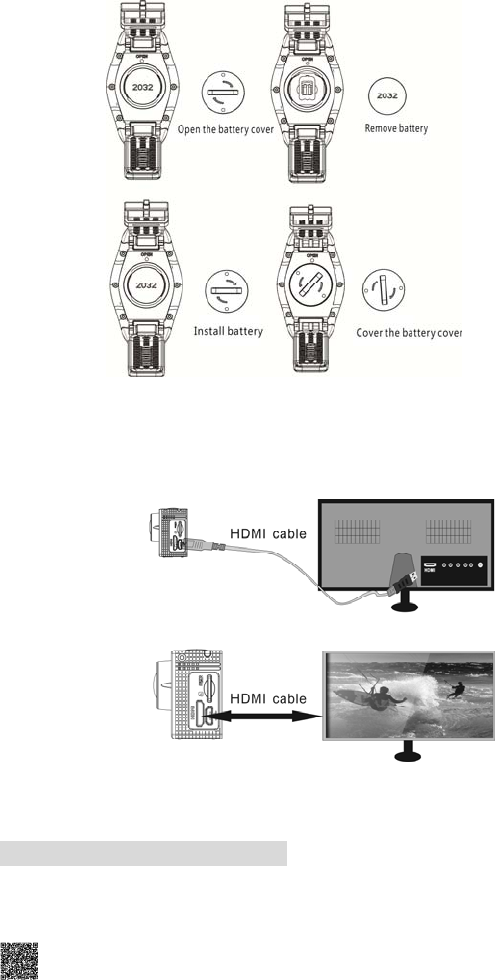
Ⅴ.Connect device to HDTV:
Connect the video camera to an HDTV with a HD cable as shown in the following figure, display signals in the camera will be output into
the HDTV automatically, and you can browse HD videos and photos that are recorded or taken in the HDTV.
APP (support Android and iOS)
I. Installing the APP
1. For Android, search for “SYMAGIX2” at Play Store and install the APP according to the prompt; or scan the QR code
on the package to install.
Signal transmission
Dia
g
ram of connection
2. For iOS, search for “SYMAGIX2” at APP Store and install the APP according to the prompt; or scan the QR code
on the package to install.
II. Android APP
1. Install SYMAGIX2 APP (obtained from your vendor or internet) on your Android smart phone or tablet, the icon
will display on the screen;
2. Insert card and power on the DV, press the Wi-Fi button to enable Wi-Fi, the Wi-Fi indicator will flash, and then
remain on after successful connection;
3. Enable Wi-Fi on your phone or tablet, search for wireless AP name WDVV9 and connect, the system will display
when connection successes;
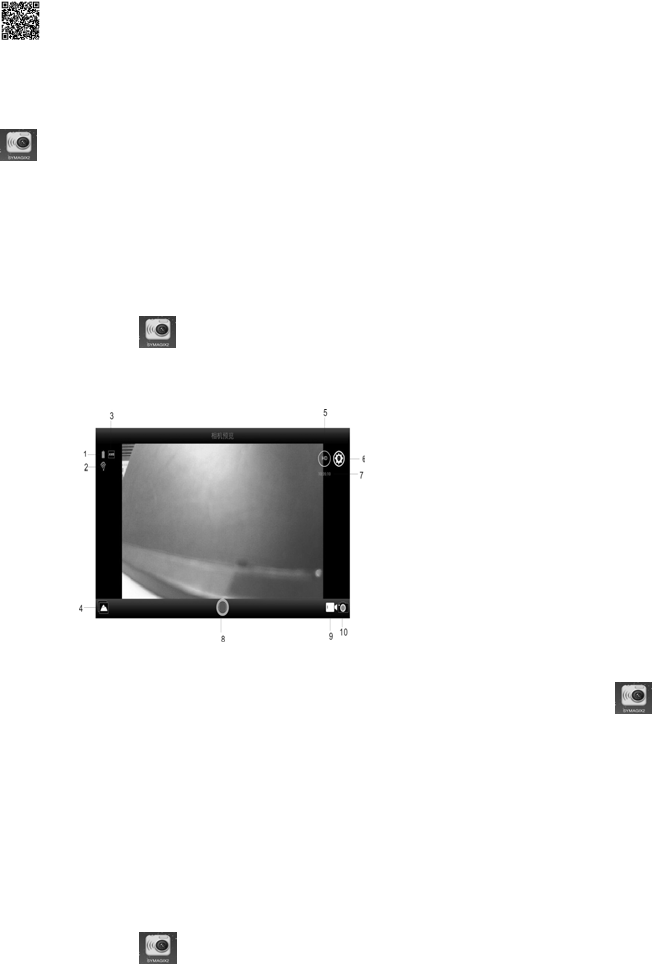
4. Click the APP icon on your phone or tablet, you can see the preview picture (see picture below) of the DV on
your phone or tablet, then you can operate the DV.
1. Battery level of the DV
2. WIFI signal icon
3. White balance
4. Enter playback mode
5. Video resolution
6. Setting (enter setting menu))
7. Rest recording time
8. Video button
9. Video mode
10. Photo mode
III. iOS APP
1. Install SYMAGIX2 APP (obtained from your vendor or internet) on your iPhone or iPad, the icon will display
on the screen;
2. Insert card and power on the DV, press the Wi-Fi button to enable Wi-Fi, the Wi-Fi indicator will flash, and then
remain on after successful connection;
3. Enable Wi-Fi on your iPhone or iPad, search for wireless AP name WDVV9 and connect, the system will display
when connection successes;
Remark: for first use, please enter password: 1234567890.
4. Click the APP icon on your iPhone or iPad, you can see the preview picture (see picture below) of the DV on
your phone or tablet, then you can operate the DV.
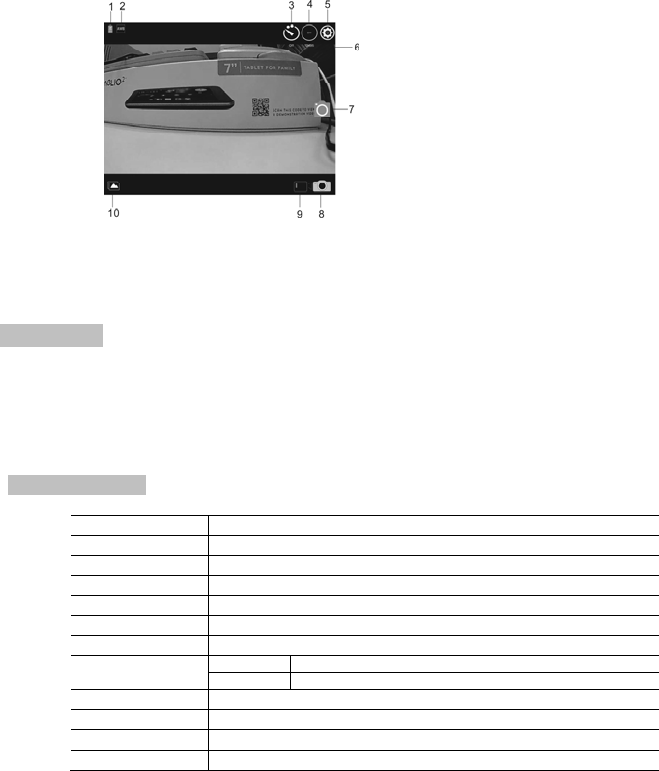
1. Battery level of the DV
2. White balance
3. Time-lapse selfie
4. Photo size
5. Setting (enter setting menu)
6. Counter, indicating photo numbers left.
7. Photo button
8. Photo mode
9. Video mode
10. Playback mode
Note: 1 You need to insert a TF card into the DV to take or download picture via your phone or tablet;
2.After successful connection between your phone/tablet and the DV, the Wi-Fi indicator will remain on.
A
Ap
pp
pl
li
ic
ca
at
ti
io
on
n
o
on
n
P
PC
C
The DV supports plug-and-play function. After power on, the mobile hard disk mode is activated automatically when the DV is
connected to PC via USB cable.
The icon of the mobile hard disk will display in “My computer”. The photos taken will be saved in I:\jpg folder (I is the volume label
of your mobile hard disk which varies); the car files will be saved in I:\CAR folder.
Note: driver is not required to use mobile hard disk function on Windows 2000 or above.
T
Te
ec
ch
hn
ni
ic
ca
al
l
p
pa
ar
ra
am
me
et
te
er
rs
s
Image sensor 5m pixels (CMOS)
Function mode Video recording、photo taking、Driving mode、Playback mode,
Lens F=2.4 f=3.1mm
LCD 1.77 ’’LCD
Photo resolution 12M、10M、8M、5M 、3M
Video resolution 1920x1080(FHD/30fps)、1280x720(HD/60fps)、 1280x720(HD/30fps)
White balance Auto/Daylight/Cloudy/Tungsten/Fluorescent
Video H.264(MOV)
File format Photo JPG
Storage TF card (up to 32GB)
USB port High speed USB 2.0/3.0 port
Power Supply Powered by external 1100mah battery
Dimensions 59*41*23.5mm
Label Statement:
This device complies with part 15 of the FCC Rules. Operation is subject to the following two conditions: (1) This device may not cause
harmful interference, and (2) this device must accept any interference received, including interference that may cause undesired operation.
FCC Statement
This equipment has been tested and found to comply with the limits for a Class B digital device, pursuant to part 15 of the FCC rules. These
limits are designed to provide reasonable protection against harmful interference in a residential installation. This equipment generates, uses,
and can radiate radio frequency energy and, if not installed and used in accordance with the instructions,
may cause harmful interference to radio communications. However, there is no guarantee that interference will not occur in a particular
installation.

If this equipment does cause harmful interference to radio or television reception, which can be
determined by turning the equipment off and on, the user is encouraged to try to correct the
interference by one or more of the following measures:
• Reorient or relocate the receiving antenna.
• Increase the separation between the equipment and receiver.
• Connect the equipment into an outlet on a circuit different from that to which the receiver
is connected.
• Consult the dealer or an experienced radio/TV technician for help.
To assure continued compliance, any changes or modifications not expressly approved by the
party responsible for compliance could void the user’s authority to operate this equipment.