SHUOYING DC100 Digital Camera User Manual
SHUOYING INDUSTRIAL (SHENZHEN) CO., LTD. Digital Camera
SHUOYING >
User Manual
1
Foreword
Thank you for purchasing this digital video camera. Before use of this video camera, please read this
user’s manual carefully and place it in a safe place for future reference.
The contents covered in this user’s manual are based on the latest information obtained when this
manual was prepared. The screen display pictures, and illustrations, etc., used in this manual are to
describe the operations of the video camera in a more detailed and direct viewing manner, but they may
be slightly different from the digital video camera you actually use due to the differences in technical
developments and production batch.
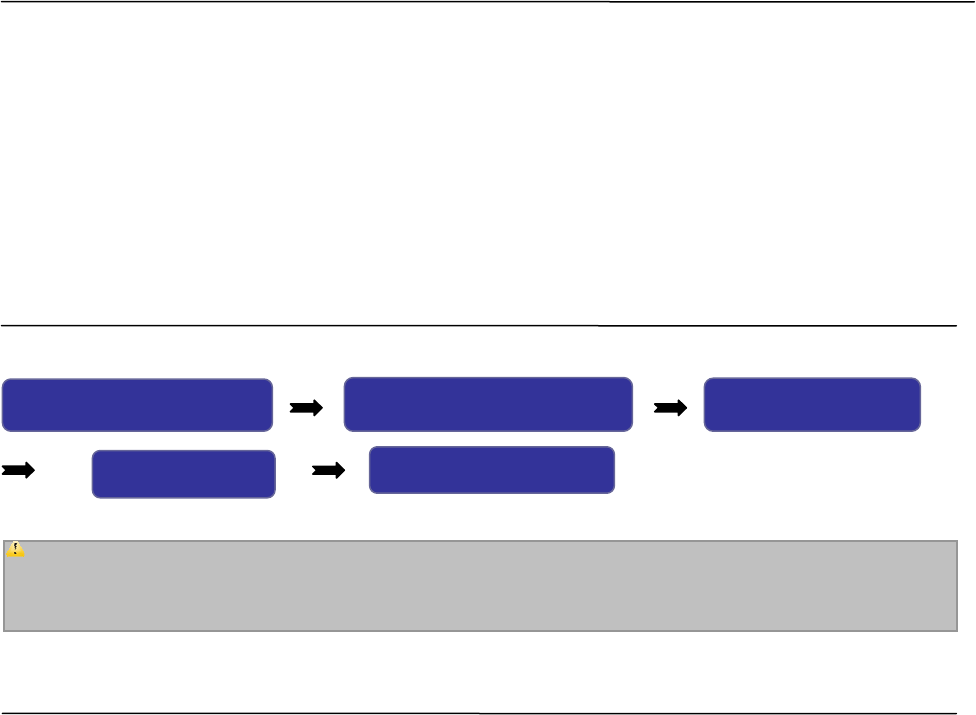
Note
Please use this video camera according to the following sequence.
Notice for Use
This video camera can use TF cards (multimedia memory cards).
Instructions for use of memory card
● If a newly purchased memory card is used for the first time, or a memory card contains data or other
recorded video camera images, which the video camera cannot recognize, please be sure to format
the memory card first.
● Before inserting or removing a memory card, please turn off the power of the video camera first.
● After a memory card is used many times, its performance will be degraded. If the memory card’s
performance is degraded, a new memory card should be purchased.
Attention: If a newly purchased memory card or a memory card having been used in another digital
camera/video camera is to be used in this video camera, please format it using this video camera first.
Before formatting, please back up the important data onto other media first, e.g., soft disk, hard disk,
CD, etc.
Inspect power supply of
video camera
Insert and format memory
card
Record video/ take
p
hoto
Install driver Connect computer

2
● Memory cards are precision electronic devices. Do not bend any memory card, and avoid dropping it
or subjecting it to stress.
● Do not place any memory card into a strong electric field or magnetic field environment, e.g., near a
speaker or TV receiver.
● Do not use or place any memory card in too hot or too cold an environment.
● Please keep any memory card clean and avoid it contacting any liquid. If the memory card contacts
liquid, wipe it dry with a piece of soft cloth.
● When a memory card is not in use, put it into a card case.
● Note that a memory card will become hot after being used for a long time. This is fully normal.
● Do not use a memory card that has been used in another digital video camera or digital camera. If
you want to use it in this digital video camera, format it using this video camera first.
● Do not use a memory card that is formatted in another digital video camera or memory card reader.
● If one of the following occurs for a memory card, the recorded data may be destroyed:
- Use the memory card improperly.
- Turn off the power or remove the memory card during recording, deleting (formatting), or reading.
● It is recommended that important data be backed up onto other media, such as a soft disk, hard disk,
CD, etc.
Maintenance and care of video camera
When the video camera is not in use, store it in a dry and dark place with the batteries removed.
● Use a proper protective case to avoid scratching the lens and screen.
● To clean the lens surface, blow off the sand and dust on the surface first, and then use a piece of
cloth or paper towel suitable for cleaning optical devices to lightly wipe the lens. If necessary, employ
lens cleanser. Do not use organic solvent to clean the video camera.
● Do not touch the lens surface by your fingers.
System Requirements
When operating or using this digital video camera, please refer to the minimum system requirements for
a computer that uses the video camera. However, we strongly recommend that you use a better
computer device to operate the video camera so as to offer the best efficiency. The minimum system
requirements are as follows:
System requirements
Operating system Microsoft Windows 2000,XP,VISTA,Windows7
CPU Intel PIII667 or above, or equivalent
Internal memory 128 MB or more
Sound card, display card Sound card, display card, supporting DirectX8, or higher version
CD drive 4× or more
Hard disk 1 GB or more free space
Other One standard USB 1.1 or USB 2.0 interface
3
Functions and Features
This video camera has many features and functions:
z Digital video camera
z Digital camera (130 million pixels)
z Mobile disk
z Pickup head
z 4× digital zoom
Accessories
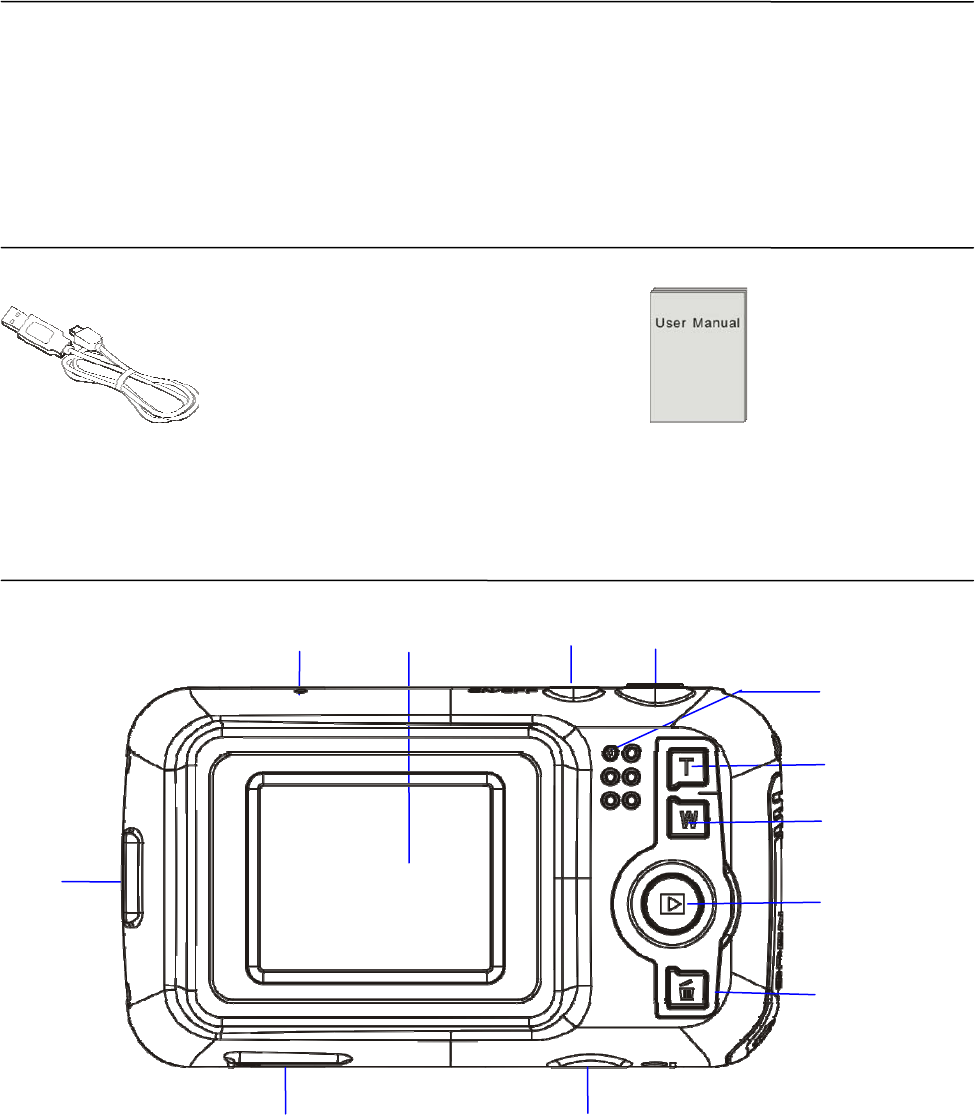
When unpacking the video camera, you will see the following main accessories.
USB connecting cable User’s manual
Brief Introduction to Outside
Screen
Microphone Shutter key Power key
USB interface
Operation indicator
lamp
T key
W key
Mode key
Delete key
TF card slot Tripod installation hole
4
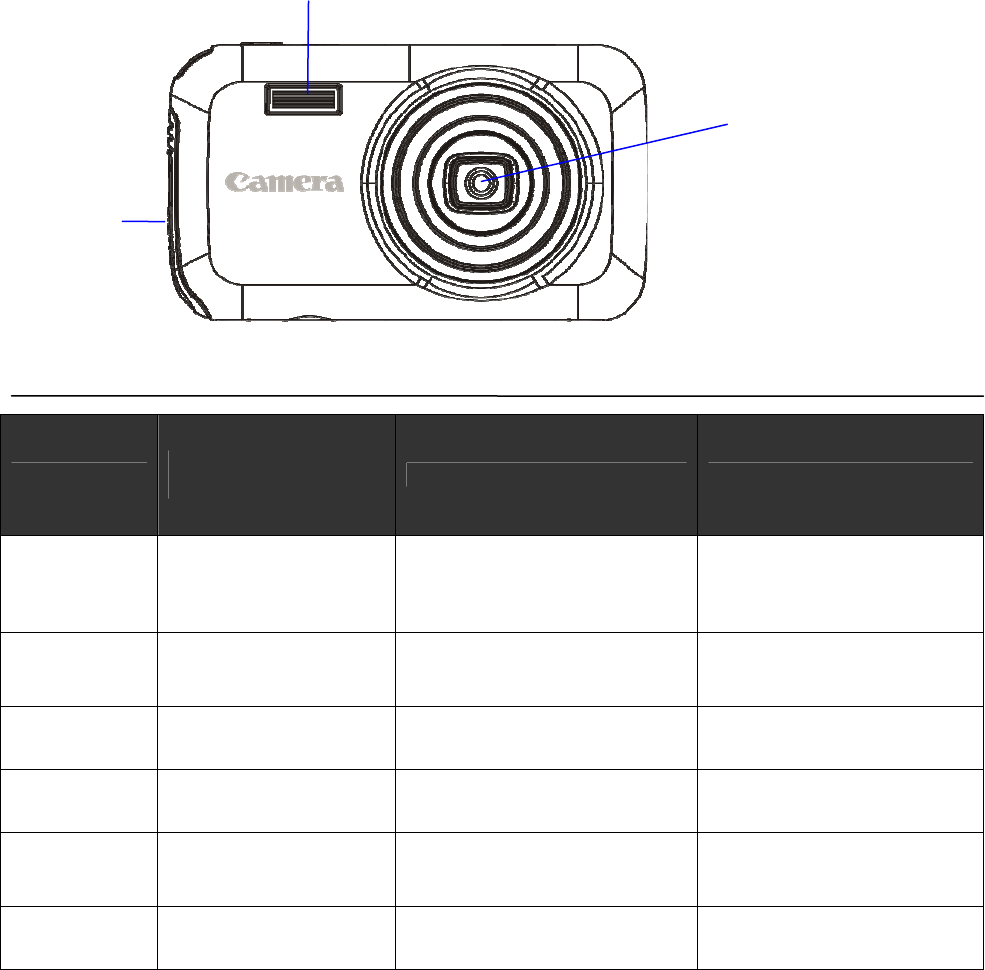
Key Functions and Indicator Lamps of Video Camera
Key Photographing
/Video-recording mode Playback mode Menu setup mode
Power key
Long press to start
up/shut down
Short press to enter
menu
Long press to start up/shut
down
Short press to enter menu
Long press to start up/shut
down
Short press to close menu
Shutter key
Take a photo
Start/pause video
recording
Start/stop playing Switch over to setup menu;
confirm menu
T key Digital zoom in Select file rightwards Switch over to the previous
menu
W key Digital zoom out Select file leftwards Return to the next menu
Mode key
Switch over between
video-recording mode
and playback mode
Enter photographing mode N/A
Delete key Turn on/ Turn off fill
light
Delete a photo or video
rapidly N/A
Fill light
Battery compartment
cover
Lens

5
Start Use
Install batteries
This video camera uses 3 AAA alkaline batteries. For replacement of batteries, turn off the power of the
video camera first.
Open the battery compartment cover, install batteries according to the prompt marks for positive and
negative polarities on the sides of the battery compartment, and then close the battery compartment
cover.
Install TF memory card
Insert a TF memory card into the memory card slot with the metal pins facing inwards according to the
prompt marks on the sides of the card slot.
To remove the memory card, press the TF memory card down and then remove it.
────────────────────────────────────────────────────────────────
Attention: z Before replacing the memory card, please turn off the power of the video camera.
z For card insertion, insert the card in the correct direction. Do not apply excessive force
onto the card when inserting the card, to avoid damaging the card or the parts of the video
camera. If you cannot insert the card, please check whether the card is inserted in correct
the direction.
z If a memory card is used the first time or a memory card has been used in another video
camera, please format the memory card first.
────────────────────────────────────────────────────────────────
Startup
Press the power key for 3 seconds and then release it; the camera is started up.
Mode switchover
After startup, the camera will enter the photographing mode; you can press the mode key to switch over
to the video recording mode and the playback mode; in the playback mode, you can press the mode key
to switch over back to the photographing mode.
Video recording
In the video recording mode, you can press the shutter key once to start video recording, and press it
again to stop video recording.
Photographing
In the photographing mode, you can press the shutter key to take a photo.
Playback
In the playback mode, you can view photos and can also play the video camera recorded videos.
View a photo: Use the T key or W key to select a photo or video.
Play a movie: Use the T key or W key to select a movie you want to play, and press the shutter key once
to start playing; you can press the shutter key again to stop the playing.
Shutdown
In the power-on state, press the power key for 3 seconds, the video camera will be shut down.
If the video camera is in a free state and is not operated for a time period exceeding the set automatic
shutdown time (1 min/ 3 min/ 5 min), it will be automatically shut down to save power.
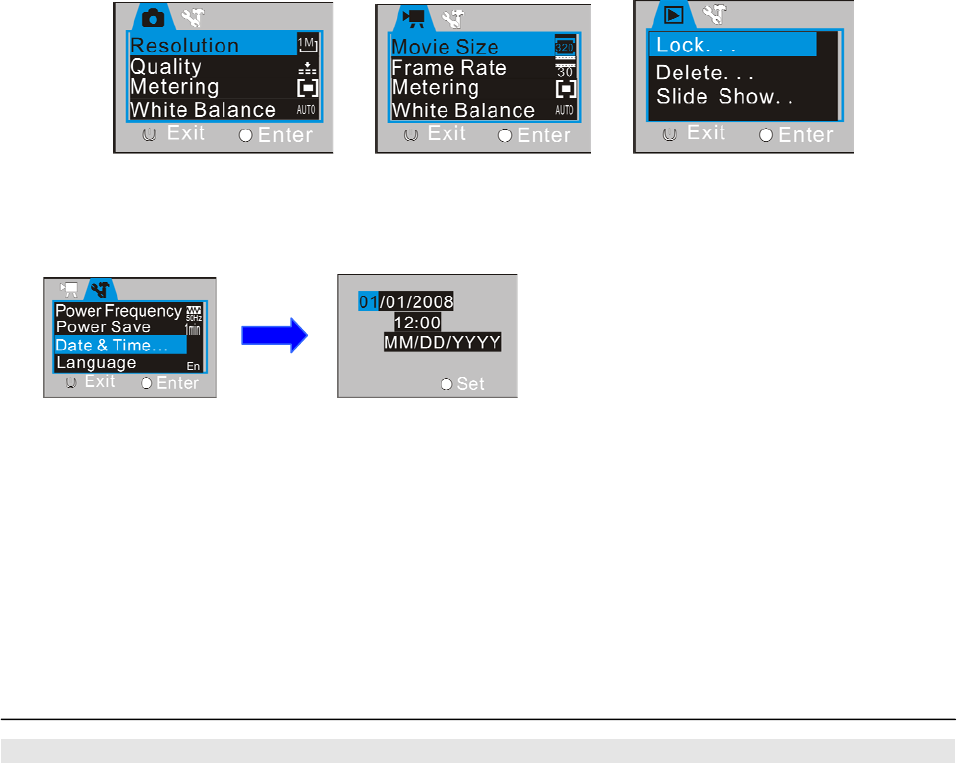
Menu setup
In the photographing, video recording or playback mode, press the power key to open the menu (after
opening the menu, you can press the shutter key to switch over from the photographing menu or video
recording menu to the setup menu), and then press the W key or T key to select a submenu and press
the shutter key to enter the submenu. In menu selection, the selected menu option will be highlighted.
6
▲ Photographing menu ▲ Setup menu ▲ Playback menu
Date and time setup
Press the power key to open the menu, and then press the shutter key to enter the setup menu. Press
the W key to select the “Date & Time” menu option, and then press the shutter key to enter the setup
window.
In the setup window, press the mode key to select the option to be adjusted (date, time), and the
selected option will be displayed in blue background. Afterwards, press the T/W key to adjust the value;
after the adjustment is over, press the shutter key to confirm or press the power key to cancel the setting
and to return. Finally, press the power key to exit the setup mode.
Computer connection
Before connecting a computer, please use the installation CD to install the video camera driver first.
Start up the video camera, and then use the USB cable in the accessories to connect the video camera
to a usable USB port of a computer; select the USB mode as MSDC (mobile disk) or PC CAM (pickup
head mode), and then connect the USB port to the video camera, the video camera will accordingly
enter the mobile disk or pickup head mode.
Advanced Operations
Photographing mode
After startup, use the mode key to select the video recording mode.
Press the shutter key to start video recording; press the shutter key again to stop video recording.
Press the T key or W key to conduct digital zoom.
Use of LED fill light: In the photographing or video recording mode, you can press the delete key to turn
on or off the fill light. (In the playback mode, the fill light is unusable.)
────────────────────────────────────────────────────────────────
7
Attentions: z Hold the video camera stably when photographing; it is preferable to place it onto a support,
e.g., tripod, etc., so as to obtain clear photos.
z After the shutter key is pressed to take a photo, the BUSY lamp will light up; at this
moment, do not move the video camera. The video camera can be moved only after the
BUSY lamp goes out, so as to avoid taking blurry photos.
z Do not press the photographing key during video recording, as the key does not function at
this time.
────────────────────────────────────────────────────────────────
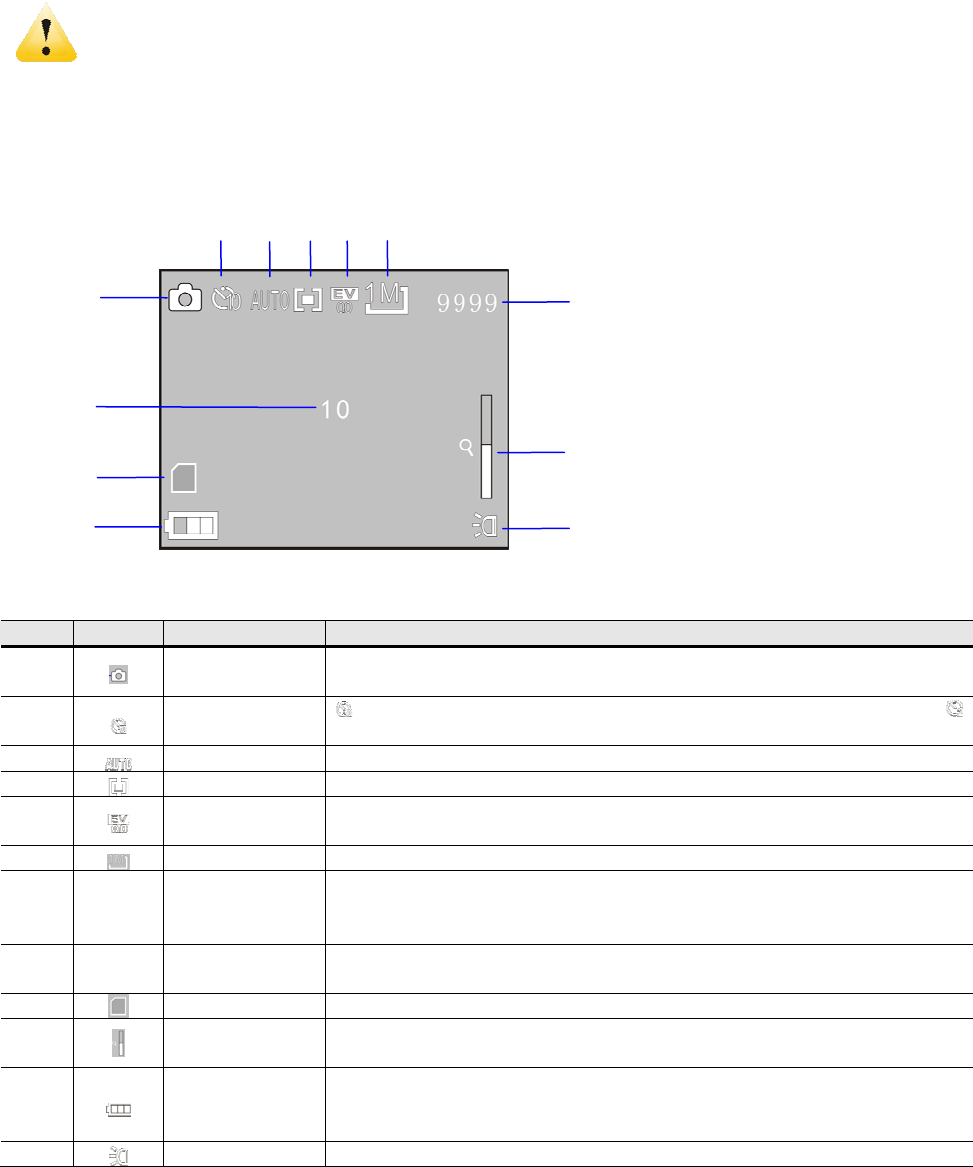
◆ The screen displayed information in the photographing mode
Icon Icon name Description
1 Photographing
icon Indicates that the photographing mode has been selected
2 Self-timer icon Indicates switchover to 10-second self-timer mode, and
Indicates switchover to 2-second self-timer mode
3 White balance Indicates the current white balance setting
4 Metering mode Indicates the current metering mode
5 Exposure
compensation Indicates the currently set exposure compensation value
6 Photo size Indicates the current photo resolution
7 9999
Number of
photographabl
e photos
Indicates the number of remaining photographable photos
8 10 Countdown
photographing
Indicates that the video camera is currently in 10-second
countdown photographing
9 Card Indicates that a memory card has been inserted
10 Zoom
indication Indicates the current digital zoom ratio
11 Battery
Indicates the current battery state; when the icon is in red, it
indicates low battery and the video camera will be automatically
shut down
12 Fill light Indicates that the fill light has been turned on
1
2 3 4 5 6
7
10
12
11
9
8

8
◆ Menu setup
Press the menu key to open the main menu for video recording, press the W/T key to select a menu
option and then press the shutter key to enter the sub-menu. In the sub-menu, press the shutter key to
confirm and to return to the main menu (or directly press the power key to return to the main menu), and
press the W/T key to conduct selection. After returning to the main menu, you can press the power key to
exit the menu.
In menu selection, the selected menu option will be highlighted.
Options in photographing menu:
Main menu Sub-menu Description
2592x1944 5 million-pixel resolution
2048x1536 3 million-pixel resolution
1280x960 1.3 million-pixel resolution
Image size
640x480 0.3 million-pixel resolution
Excellent The best image quality
Good Better image quality
Image quality
Normal General image quality
Center-weighted
metering
Multi-spot metering
Metering mode
Spot metering
Automatic Automatic white balance is suitable for most cases
Daylight Suitable for daylight environment
Cloudy Suitable for cloudy environment
Fluorescent lamp Suitable for fluorescent lamp light source
environment
White balance
Tungsten lamp Suitable for tungsten lamp light source
environment
Exposure /
Using the mode key to adjust the exposure
compensation
Off Using general single-frame shooting mode
2s Using 2-second-delay self-timer mode
10s Using 10-second-delay self-timer mode
Photographing mode
Continuous shooting Continuous shooting
Normal Normal effect
Black and white Black and white effect
Aging Old style photo effect
Negative Negative effect
Red Reddish effect
Green Greenish effect
Special effects
Blue Bluish effect
9
Attention: When you enter the exposure sub-menu to adjust the exposure compensation, and use the
mode key to adjust the exposure compensation value, the brightness of picture on the screen will
change accordingly. After the setting is completed, press the shutter key to confirm and to return to the
main menu, or press the power key to cancel the setting.
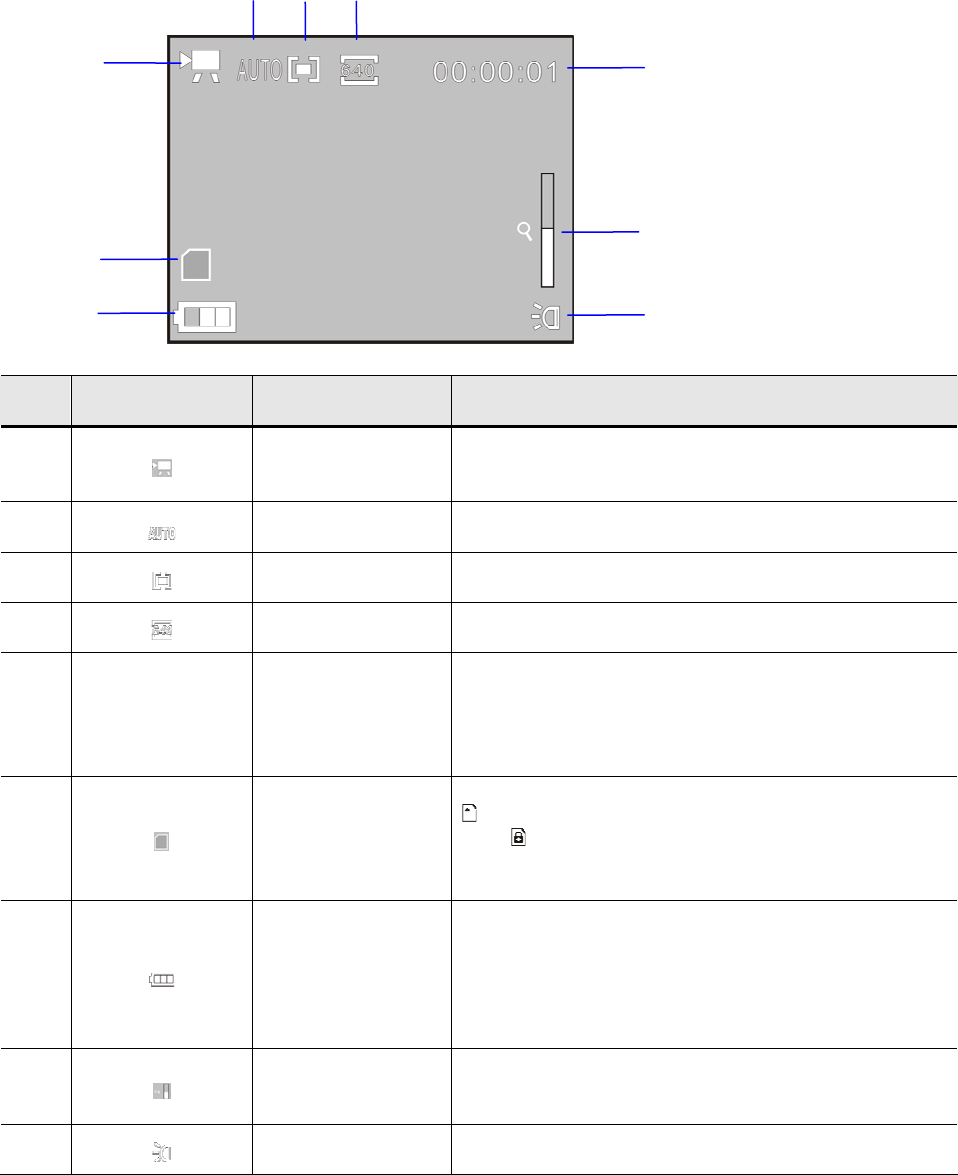
◆ The screen displayed information in the video recording mode
Icon Icon name Description
1 Video recording
icon
Indicates that the video recording mode has been
selected
2 White balance Indicates the current white balance setting
3 Metering mode Indicates the current metering mode
4 Video format Indicates the current video resolution
5 00:00:1 Recording time
Indicates the remaining recordable time in free state
and the used recording time in recording state
6 Card
Indicates that a memory card has been inserted,
and Indicates that the employed SD card is
write-protected
7 Battery
Indicates the current battery state; when the icon is
in red, it indicates low battery and the video camera
will be automatically shut down
8 Zoom indication Indicates the current digital zoom ratio
9 Fill light Indicates that the fill light has been turned on
1
2 3 4
5
8
9
7
6

10
◆ Menu setup
Press the menu key to open the main menu for video recording, press the W/T key to select a menu
option and then press the shutter key to enter the sub-menu. In the sub-menu, press the shutter key to
confirm and to return to the main menu (or directly press the power key to return to the main menu), and
press the W/T key to conduct selection. After returning to the main menu, you can press the power key to
exit the menu.
In menu selection, the selected menu option will be highlighted.
Options in video recording menu:
Main menu Sub-menu Description
640X480 High resolution format
Video format 320X240 Low resolution format
30 fps High
Frame rate 15 fps Low
Excellent The best image quality
Good Better image quality
Image quality
Normal General image quality
Center-weighted
metering /
Multi-spot metering /
Metering mode
Spot metering /
Automatic Automatic white balance is suitable for most
cases
Daylight Suitable for daylight environment
Cloudy Suitable for cloudy environment
Fluorescent lamp Suitable for fluorescent lamp light source
environment
White balance
Tungsten lamp Suitable for tungsten lamp light source
environment

11
Setup menu
Whether in video recording mode or in photographing or playback mode, press the menu to open the
main menu, and then press the shutter key to enter the main menu of setup menu. Afterwards, press the
W/T key to select a menu option and then press the shutter key to enter the sub-menu. In the sub-menu,
press the W key or T key to select an option, and then press the shutter key to confirm (press the power
key to directly return to the main menu for setup). After returning to the main menu, you can press the
menu key to exit the menu.
In menu selection, the selected menu option will be highlighted.
Main menu Sub-menu Description
50 Hz Setting the power frequency to 50 Hz
Power frequency 60 Hz Setting the power frequency to 60 Hz
1 min Automatic shutdown after 1 minute in free state
3 min Automatic shutdown after 3 minutes in free state
Automatic shutdown
5 min Automatic shutdown after 5 minutes in free state
Date & time / Setting date & time and date format
English Setting the menu language to English
French Setting the menu language to French
Spanish Setting the menu language to Spanish
German Setting the menu language to German
Italian Setting the menu language to Italian
Language
Portuguese Setting the menu language to Portuguese
Mobile hard disk Used as a mobile hard disk
USB mode Pickup head Used as a pickup head
Format Y/N Formatting the memory card
Reset to factory default Y/N Resetting to factory default
For date & time setting, use the mode key to switch over the option to be set, and press the W key or the
T key to adjust the value. Press the shutter key to confirm, or press the power key to cancel the setting
and to return to the main menu.
Playback mode
In the video recording mode, press the mode key to enter the playback mode.
In the playback mode, press the T key to select a file forwards or press the W key to select a file
backwards.
After the video recording mode is selected, press the shutter key to start playing; at this moment, there is
a playing timer displayed on the upper right corner of the screen. During playing, you can press the
shutter key to stop the playing.
12
◆ The screen displayed information in the video playback mode
Icon Icon name Description
1 Playback mode icon Indicates that the playback mode has been
selected
2 12/34 File number
Indicates the position of the current file and the
total number of files (a playing timer is displayed
in the video playing mode)
3 File protection Indicates that the current file is being protected
4
video file icon,
photo file icon Indicates that the currently selected file is a photo
◆ Menu setup
Press the menu key to open the main menu for video recording, press the W/T key to select a menu
option, and then press the shutter key to enter the sub-menu. In the sub-menu, press the shutter key to
confirm and to return to the main menu (or directly press the power key to return to the main menu), and
press the W/T key to conduct selection. After returning to the main menu, you can press the power key to
exit the menu.
In menu selection, the selected menu option will be highlighted.
Options in playback menu:
Main menu Sub-menu Description
Lock/ unlock this file Lock/ unlock the current file
Lock all Lock all files
File locking
Unlock all Unlock all files
Delete this file Delete the current file
File deleting
Delete all Delete all files
Start Start to play a slide show
Interval 1 sec – 10 sec
Slide show playing
Cycle Y/N
1 2
3
4

13
Connect computer to download photos /videos
After the video camera is connected to a computer and enters the mobile disk mode, there will be a
newly added mobile disk in the “My Computer” window, you can store the taken photos or recorded
videos under the directory “DCIM\100MEDIA” in the mobile disk, and you can enter the directory to copy
files to the hard disk of your computer.
────────────────────────────────────────────────────────────────
Attention: During file download, do not disconnect the USB connection; insertion or removal of the
memory card shall not be conducted under USB connection condition to avoid data loss.
────────────────────────────────────────────────────────────────

14
For the use method, click the “User’s manual” key in the installation guide window.
Specifications
Image sensor 1.30 million-pixel CMOS image sensor
Photo resolution 2592×1944, 2048×1536, 1280×960, 640x480
Memory External TF card (512 MB to 32 GB)
File format JPEG, AVI
Video resolution
VGA 640×480 ,QVGA 320×240
Self-timer delay 2 sec / 10 sec
Digital zoom 4×
White balance Automatic/ Daylight/ Cloudy/ Fluorescent lamp/ Tungsten lamp
Exposure
compensation control -2.0 – +2.0
USB interface USB2.0
Screen 1.77” TFT LCD
Power supply 3 AAA alkaline batteries
Menu language English/ French/ Spanish/ German/ Portuguese/ Italian/
Focal length f = 6.5 mm
Aperture F 3.1
Automatic shutdown 1 min/ 3 min/ 5 min
Operating system
requirement Windows 2000 / XP / Vista / Windows7
Dimensions 101*56*23 mm

15
Attention: The product specifications are defined according to the latest information that can be obtained
when the user’s manual is prepared, and they are subject to change without notice; the actual video
camera shall govern.
FAQ
Low battery; please replace the batteries (or recharge the lithium
battery.)
The battery packaging is not removed.
The video camera cannot
be started after the
batteries are installed Any battery is installed reversely; please confirm that the batteries are
installed correctly.
No memory card is inserted; photographing or video recording can be
conducted only after a memory card is inserted.
No photographing and
video recording can be
conducted after the shutter
key is pressed The internal memory of the TF card is full.
The taken photos are
vague
Hand shaking in photographing. Please hold the video camera stably by
both hands, or stabilize the camera body using other objects such as
tripod, etc.; do not shake the video camera in photographing.
The taken photos or
recorded videos are
lackluster
Insufficient light in the photographing environment. Please photograph
at places with sufficient light, or use lamps to increase the brightness.
Low battery, please replace the batteries (or recharge the lithium
battery.)
The video camera is
automatically shut down To save electric energy, if no operation is conducted for more than 1 min
(3 min or 5 min, depending on the setting), the video camera will be
automatically shut down according to the setting.
FCC Warning:
z This device complies with Part 15 of the FCC Rules. Operation is subject to the
following two conditions:
z (1) this device may not cause harmful interference, and
z (2) this device must accept any interference received, including interference that
may cause undesired operation.
z Changes or modifications not expressly approved by the party responsible for
compliance could void the user's authority to operate the equipment.
z NOTE: This equipment has been tested and found to comply with the limits for a
Class B digital device, pursuant to Part 15 of the FCC Rules. These limits are
designed to provide reasonable protection against harmful interference in a
residential installation. This equipment generates, uses and can radiate radio
frequency energy and, if not installed and used in accordance with the
instructions, may cause harmful interference to radio communications. However,
there is no guarantee that interference will not occur in a particular installation. If
this equipment does cause harmful interference to radio or television reception,
which can be determined by turning the equipment off and on, the user is
encouraged to try to correct the interference by one or more of the following
measures:
z -- Reorient or relocate the receiving antenna.
z -- Increase the separation between the equipment and receiver.
z -- Connect the equipment into an outlet on a circuit different from that to which
the receiver is connected.
-- Consult the dealer or an experienced radio/TV technician for help.