SHUOYING DV152 digital video camera User Manual DV152
SHUOYING INDUSTRIAL (SHENZHEN) CO., LTD. digital video camera DV152
SHUOYING >
User Manual
1
DV152英文说明书
英文说明书英文说明书
英文说明书
I
In
n
t
th
he
e
p
pa
ac
ck
ka
ag
ge
e
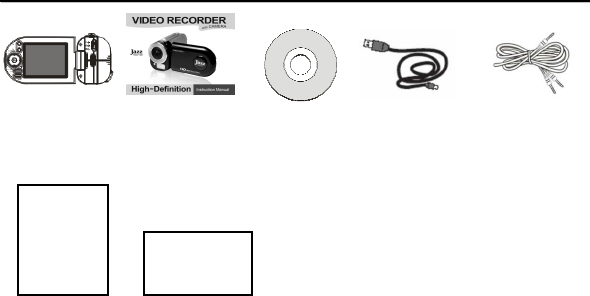
Video Recorder User Manual CD USB cable TV cable
W
Wa
ar
rr
ra
an
nt
ty
y
C
Ca
ar
rd
d
Q
Qu
ui
ic
ck
k
G
Gu
ui
id
de
e
Warranty
Card
Quick Guide
2
I
In
n
t
th
he
e
p
pa
ac
ck
ka
ag
ge
e…
….
.…
……
……
……
……
……
……
……
……
……
……
……
……
……
….
.…
……
……
……
……
……
……
……
……
……
……
……
……
……
……
……
….
..
.2
2
F
FC
CC
C
s
st
ta
at
te
em
me
en
nt
t…
……
……
……
……
……
……
……
……
……
……
……
……
……
……
……
……
……
……
……
……
……
……
……
……
……
……
……
……
……
……
……
…4
4
I
In
nt
tr
ro
od
du
uc
ct
to
or
ry
y
i
in
nf
fo
or
rm
ma
at
ti
io
on
n.
.…
……
……
……
……
……
……
……
……
……
……
……
……
……
……
……
……
……
……
……
……
……
……
……
……
……
……
….
..
.
5
5
B
Ba
as
si
ic
c
i
in
nf
fo
or
rm
ma
at
ti
io
on
n…
……
……
……
……
……
……
……
……
……
……
……
……
……
……
……
……
……
……
……
……
……
……
……
……
……
……
….
..
.
5
5
K
Kn
no
ow
w
y
yo
ou
ur
r
r
re
ec
co
or
rd
de
er
r…
….
..
..
..
..
..
..
..
.…
……
……
……
……
……
……
……
……
……
……
……
……
……
……
……
……
……
……
……
……
……
……
….
..
.6
6
B
Ba
as
si
ic
c
O
Op
pe
er
ra
at
ti
io
on
n
R
Re
ea
ad
dy
y
t
to
o
g
go
o…
……
……
……
……
……
……
……
……
……
….
..
.…
……
……
……
……
……
……
……
……
……
……
……
……
……
….
..
..
..
..
.9
9
I
In
ns
st
ta
al
ll
li
in
ng
g
B
Ba
at
tt
te
er
ri
ie
es
s…
……
……
……
……
……
……
……
……
……
……
……
……
……
……
……
……
……
……
……
….
..
.…
….
.…
……
……
……
……
……
…9
9
U
Us
si
in
ng
g
t
th
he
e
S
SD
D
C
Ca
ar
rd
d…
……
……
……
……
……
……
……
……
……
……
……
……
……
……
……
……
……
……
……
….
.…
……
……
……
……
……
…9
9
S
Se
el
le
ec
ct
t
t
th
he
e
F
Fo
oc
cu
us
si
in
ng
g
R
Ra
an
ng
ge
e
…
……
……
……
……
….
.…
……
……
……
……
……
……
……
….
..
.…
……
……
……
….
.…
……
……
……
…1
10
0
P
Po
ow
we
er
r
O
ON
N
&
&
O
OF
FF
F
y
yo
ou
ur
r
recorder…
……
……
……
……
……
……
……
……
……
……
……
……
……
……
……
……
……
……
……
…1
11
1
S
Se
el
le
ec
ct
t
t
th
he
e
m
mo
od
de
e…
……
……
……
……
……
….
..
.…
……
……
……
……
……
……
……
….
.…
……
……
……
……
……
……
……
……
……
…1
12
2
A
Ad
dv
va
an
nc
ce
ed
d
O
Op
pe
er
ra
at
ti
io
on
ns
s:
:-
-
S
Se
et
tt
ti
in
ng
g
D
Da
at
te
e
/
/
T
Ti
im
me
e
…
……
……
……
….
.…
……
……
……
……
……
……
……
……
……
……
……
……
……
….
..
.1
13
3
L
LE
ED
D
L
Li
ig
gh
ht
t
/
/
I
In
nd
di
ic
ca
at
to
or
rs
s…
……
……
……
……
……
……
……
……
……
……
……
……
……
……
……
……
……
……
……
……
….
..
..
..
..
..
.1
13
3
V
Vi
id
de
eo
o
M
MO
OD
DE
E…
……
……
……
……
……
……
……
……
……
……
……
……
……
……
……
……
……
……
……
……
……
……
……
……
……
……
……
….
..
.1
15
5
C
Ca
am
me
er
ra
a
M
MO
OD
DE
E
…
……
……
……
……
……
……
……
……
……
……
……
……
……
……
……
……
….
..
.…
……
……
……
……
……
……
……
……
……
….
..
.1
18
8
V
Vo
oi
ic
ce
e
R
Re
ec
co
or
rd
di
in
ng
g
M
MO
OD
DE
E…
……
……
……
……
……
……
……
……
……
……
……
……
……
……
……
……
……
……
……
……
……
……
……
….
..
.2
22
2
P
Pl
la
ay
yb
ba
ac
ck
k
M
MO
OD
DE
E…
……
……
……
……
……
……
……
……
……
……
……
……
……
……
……
……
……
……
……
……
……
….
.…
……
…2
23
3
S
Se
et
tu
up
p
/
/
I
In
nt
te
er
rn
na
al
l
s
se
et
tt
ti
in
ng
g
m
mo
od
de
e…
……
……
……
……
……
……
……
……
……
……
……
……
……
……
……
……
……
……
….
.…
……
……
…2
29
9
C
Co
on
nn
ne
ec
ct
ti
in
ng
g
recorder
t
to
o
t
th
he
e
c
co
om
mp
pu
ut
te
er
r………………………………………………………..31
D
Dr
ri
iv
ve
er
r
i
in
ns
st
ta
al
ll
la
at
ti
io
on
n…
……
……
……
……
……
……
……
……
……
……
……
……
……
……
……
……
……
……
……
……
……
……
….
..
.…
……
……
……
…3
31
1
D
Do
ow
wn
nl
lo
oa
ad
di
in
ng
g
v
vi
id
de
eo
o,
,
p
pi
ic
ct
tu
ur
re
es
s
t
to
o
y
yo
ou
ur
r
c
co
om
mp
pu
ut
te
er
r…
……
……
……
……
……
……
……
……
……
……
……
……
……
……
…3
33
3
I
In
ns
st
ta
al
ll
li
in
ng
g
s
so
of
ft
tw
wa
ar
re
e…
……
……
……
……
….
.…
……
….
.…
……
……
……
……
……
……
……
……
……
……
……
……
……
……
……
….
.3
34
4
C
Co
on
nn
ne
ec
ct
ti
in
ng
g
recorder
t
to
o
T
TV
V…
……
……
……
……
……
……
……
……
……
……
……
……
……
……
……
……
……
……
……
……
……
…3
39
9
S
Sa
af
fe
et
ty
y
P
Pr
re
ec
ca
au
ut
ti
io
on
ns
s…
……
……
……
……
……
……
……
……
……
……
……
……
……
……
……
……
……
……
……
……
……
……
……
……
……
……
……
….
.4
40
0
S
Sy
ys
st
te
em
m
r
re
eq
qu
ui
ir
re
em
me
en
nt
ts
s…
……
……
……
……
……
……
……
……
……
……
……
……
……
……
……
……
……
……
……
……
……
……
……
……
……
……
……
….
.4
41
1
T
Te
ec
ch
hn
ni
ic
ca
al
l
s
sp
pe
ec
ci
if
fi
ic
ca
at
ti
io
on
ns
s…
……
……
……
……
……
……
……
……
……
……
……
……
……
……
……
……
……
……
……
……
……
……
……
……
….
.4
42
2
3
FCC statement
This device complies with part 15 of FCC rules. Operation is subject to the following
two conditions: (1) this device may not cause harmful interference, and (2) this
device must accept any interference received, including interference that may
cause undesired operation.
Caution: Changes or modifications to this unit not expressly approved by the party
responsible for compliance could void the user’s authority to operate the equipment.
Note: This equipment has been tested and found to comply with the limits for a
Class B digital device, pursuant to Part 15 of the FCC Rules. These limits are
designed to provide reasonable protection against harmful interference in a
residential installation. This equipment generates, uses, and can radiate
radio frequency energy and, if not installed and used in accordance with the
instructions, may cause harmful interference to radio communications.
However, there is no guarantee that interference will not occur in a particular
installation. If this equipment does cause harmful interference to radio or
television reception, which can be determined by turning the equipment off
and on, the user is encouraged to try to correct the interference by one or
more of the following measures:
- Reorient or relocate the receiving antenna.

4
- Increase the separation between the equipment and receiver.
- Connect the equipment into an outlet on a circuit different from that to which
the receiver is connected.
- Consult the dealer or an experienced radio TV technician for help.
Pertinent testing documentation is available for verification.
Shielded USB cables must be used with this unit to ensure compliance with the
Class B FCC limits.
Note: The contents of this Manual refer to the latest technical information available
when the Manual was compiled. The screen display, illustrations and information shown
in the manual are for detailed understanding of the recorder functions. Some information
& illustrations may slightly differ from your recorder as a result of continuous development
and improvement in production.
I
In
nt
tr
ro
od
du
uc
ct
ti
io
on
n
i
in
nf
fo
or
rm
ma
at
ti
io
on
n
Thank you for purchasing this video recorder. Please read following operating
instructions carefully in order to know and use digital video recorder correctly and enjoy
best performance and results.
Keep this Manual handy and refer to the text anytime you need to do so.
See safety precautions listed near end of manual

5
K
Kn
no
ow
w
y
yo
ou
ur
r
v
vi
id
de
eo
o
r
re
ec
co
or
rd
de
er
r
1 Lens 2 Self timer LED light 3 LED support light 4 Zoom in button 5 Zoom
out button 6 Direction buttons (Up/Down/Left/Right) 7 OK button 8 Display
button 9 MENU button 10 LCD screen 11 Mode indicator 12 Mode switch
13.
Hand strap anchor post 14. Hand strap attachment post
6
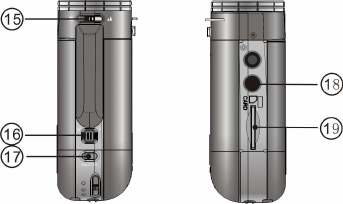
TOP VIEW BOTTOM VIEW
15. Macro / Normal lens switch 16. Zoom button 17. Shutter button 18. Tripod
Socket 19. SD Memory card slot
7
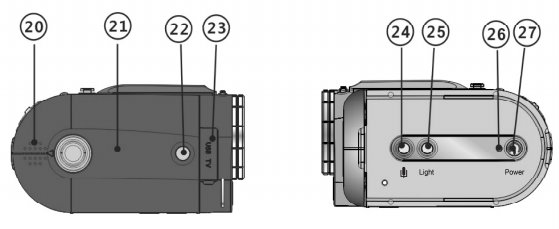
RIGHT SIDE VIEW LEFT SIDE VIEW (with LCD SCREEN opened)
20. Built in speaker 21. Battery cover 22. Battery cover LOCK Button
23. TV/USB port 24. Voice recording button 25. Support LED light button
26. Power Indicator 27. Power ON / OFF button

8
B
Ba
as
si
ic
c
O
Op
pe
er
ra
at
ti
io
on
n
-
-
R
Re
ea
ad
dy
y
t
to
o
g
go
o
1. Installing Batteries
1. Press in the Battery cover LOCK button and slide back / open the cover.
2. Insert four (4) fresh AAA alkaline batteries; note terminals polarity and align batteries
correctly.
3. Close the Battery cover; the LOCK will click securing the cover.
Note: Batteries are not supplied and need to be purchased separately
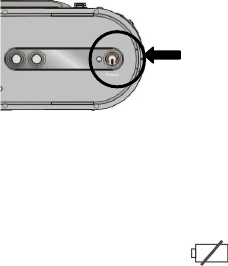
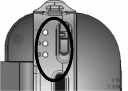
2. Using the SD Card - Insert / remove the SD Card
1. Insert SD Memory Card into the card slot located on the bottom of the recorder and
press it down until the Card is latched.
2. Lightly press the Card downwards to release and then eject the card when you wish to
remove or replace the Card.
Note: SD card is not supplied and needs to purchased separately
9
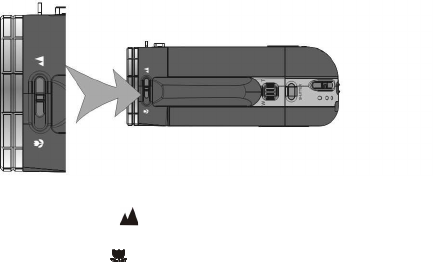
3. Select the Focusing range
Slide the Macro / Normal lens switch to select required position;
TOP VIEW
1. Normal: Set to Normal for typical video or picture taking when the subject is
located at 5 feet or more from the recorder.
2. Macro: Set to Macro only for shooting very close-up objects located just
6 ~ 10 inches from recorder.
10
4. Power ON and OFF your recorder
1. Open the LCD screen
2. Press and then hold the Power button down for two to three seconds to turn the
power ON. The Power indicator will light, the recorder becomes active and the LCD
will display the scene.
3. Press the Power button again for two to three seconds (when recorder is active) to turn
the power OFF.
Auto Power OFF: Your recorder has Auto Power OFF feature.
If recorder is unused for 1 minute, the power will turn OFF automatically to save
batteries. The Auto Power OFF time may be set to 1, 3 or 5 minutes (review Setup
Menu mode for details).
3. Low Power / Battery level indicator: The low power icon will appear on the
LCD Screen when the batteries are exhausted and recorder will be automatically
11
turned OFF. Replace exhausted batteries
5. Select the MODE
Slide the Mode switch up or down to select desired MODE
Video Mode: select this mode to record Videos
Camera Mode: select this mode to take Still Pictures
Playback Mode: select this mode to playback video, voice recordings or review still
pictures.
6. Basic operations
Video Recording: In video mode press shutter button to start Video Recording. Press
again to stop.
Still Pictures (Camera): In camera mode press shutter button once to take a Still Picture.
Voice recording: Press voice (audio) recording button to start Voice Recording. Press
again to stop.
Zooming: Tilt the zoom switch to T (tele) position to zoom in on the scene or action and
tilt to W (wide) position to zoom out

12
Playback: In playback mode press OK button to playback recorded video clips or voice
records. Press OK again to stop playback. Press LEFT or RIGHT button to browse still
pictures.
Menu selection: Press menu button to see and adjust many different setting options.
Use Up/Down/ Left/ Right buttons to scroll and select. Press OK to confirm selection and
menu button to exit.
A
Ad
dv
va
an
nc
ce
ed
d
O
Op
pe
er
ra
at
ti
io
on
ns
s
7. Setting Date / Time
1. Press MENU button, then select Setup to enter setting date / time adjustment mode
2. Use the Directional Button (Up/ Down/ Left/ Right) to select current date / time and
adjust digits as needed.
3. Press OK Button to confirm setting, then press Menu button to exit.
8. LED Light / Indicators
13
LED support light
- Use this LED support light when taking images in dark or low light scenes.
Note that as this light has limited range, please use additional auxiliary light to brighten
the scene instead to get proper exposure.
Press the LED support light button to activate this lamp. Press again to turn OFF.
Self timer LED indicator
- This lamp indicates that the recorder is active in Self-timer Mode.
Refer to section in manual for Self-timer setting details.
Display Button operation
Pressing the Display Button will create following changes:
- Press once to remove all information icons and numbers from the LCD screen; this
will help you to improve framing and selecting the recorded scene.
- Press it a second time and the screen becomes blank but camera is still active as
indicated by the Power indicator lamp. The blank screen will help you to save
battery power during recording of long video.
- Press again to return to LCD displaying typical screen with all icons
14
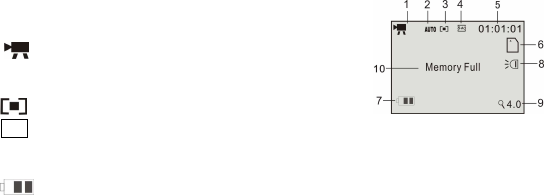
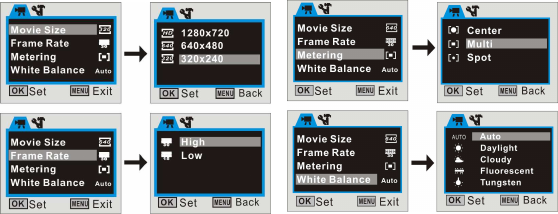
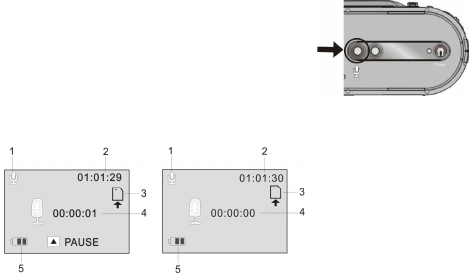
9. Video MODE
Preview / scene mode: The following icons / information are displayed on the LCD
screen in Video MODE.
1 Video Mode icon
2 Auto White Balance icon
Available: Auto/Daylight/Cloudy/Fluorescent/Tungsten
3 Metering / exposure (multi)
4 640 Video resolution indicator 1080x720, 640x480 or 320x240.
5 00:00:00 Video recording counter; hours, min, sec.
6 SD Card icon: the icon appears when the SD card is inserted
7 the battery power indicator
8 LED Supporting light icon: the lamp is ON
9 Zoom range: numbers indicate current setting of the zoom (max. 4X available)
10 Memory Full: message indicates that the SD card memory is full and no more
recording is possible.
15
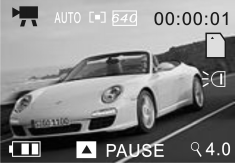
Recording Video clips
Turn the recorder ON and select the Video MODE
Point the lens towards the subject, observing the scene appearing on the LCD screen.
1 Press the Shutter button to start recording video
2 The video recording counter will start counting the elapsed recording time
3 Press the Up button to pause recording and press again to continue
4 Press the Shutter button again if you wish to stop recording
5 You can zoom IN or zoom OUT of the scene while recording a Video clip;
use Zoom IN / OUT buttons or Zoom IN / OUT switch to adjust the zoom.
16
Video mode / Menu
When the recorder is in Preview / scene Mode press the Menu button to enter
available settings as below:
Use the Up / Down buttons to browse and select available Menu options then press the
Right button to review available settings.
Press Up / Down button to select desired setting then press OK button to confirm your
selection.
Press the Menu button to exit the Video Menu mode and return to Preview / scene
17
Mode.
Note: When ‘HD’ video resolution is selected, ‘Frame Rate’ option is disabled.
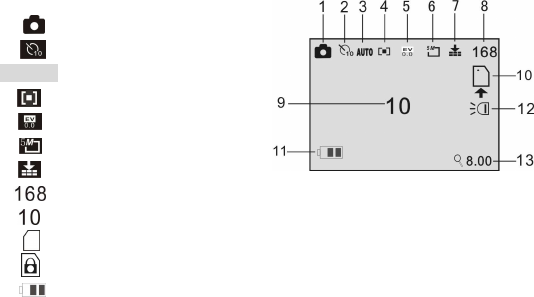
10 Camera MODE
Preview / scene Mode: The following icons and information are displayed on the LCD
screen in Camera MODE.
1 Camera / still picture icon
2 Self-timer mode symbol
3 Auto White balance (Auto)
4 Metering / exposure mode
5 Exposure value
6 Picture resolution value
7 Image quality icon
8
Image counter shows number of available pictures remaining
9 Self timer / delay time in seconds
10 SD card icon; the card is inserted
The SD card is locked – no storage is possible. Unlock the card to use it
11 Battery / power level status
18
12 LED Supporting light ON icon
13 4.0 Zoom value indicator.
Taking Still pictures
Turn the recorder ON and move the Mode Selector to the Camera Mode
Aim at the scene or subject visible on the LCD screen
Keep recorder steady then press the Shutter Button to take a picture.
Note: The LCD will display “Card Locked!” message if the inserted SD memory
card is set in LOCK (locked) position and recorder will NOT take a picture.
Remove, unlock and re-insert the SD card to take and store pictures.
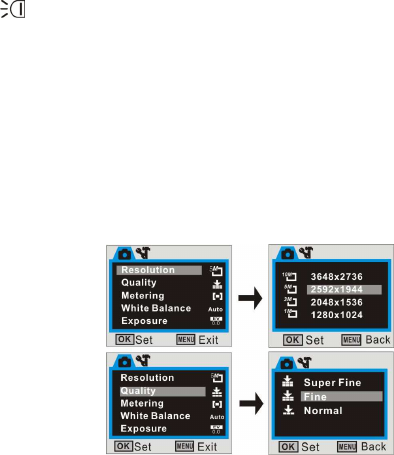
Camera Mode / Menu:
When the recorder is in Preview / scene Mode press the Menu button to enter
available settings as below:
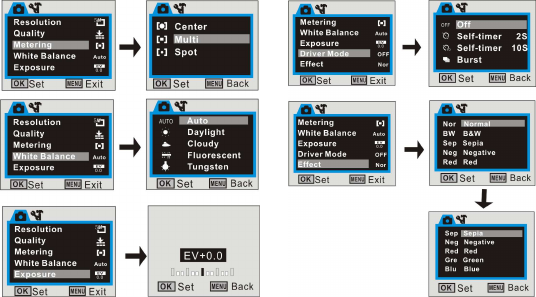
19
Use the Up / Down buttons to browse and select available Menu options, then press the
Right button to review available options.
20
Press Up / Down button to select desired setting, then press OK button to confirm.
Press the Menu button to exit the Camera Menu mode.
Driver Mode
The Driver Mode will allow you to adjust / set the Self- timer, or take three consecutive
pictures in the Burst Mode.
- Self timer
Browse and select the Driver Mode then press the Right button to access the available
Self Timer options then select 2 or 10 seconds delay time.
Press OK to confirm, then press MENU to exit setting.
Press the Shutter button and recorder will “beep” while counting down the delay time,
then the picture will be automatically taken.
Note: You can also quickly access the Self Timer / Setting mode when the recorder is set
in Camera Mode. Simply press the Right Button to access the Self-timer setting.
- Burst / Consecutive photos:
Activate the recorder, then press the MENU button.
Select the Driver Mode and Set the Burst option.
Press OK to confirm, then MENU to exit setting.
Press the Shutter button and the recorder will automatically take three consecutive
21
pictures.
11 Voice Recording MODE:
Set Recorder to Video or Camera recording mode.
1 Press the
Voice Recording button to enter
the Voice recording options
2 Press the Shutter button to start recording
3 Press Up button to pause recording, press
again to continue recording
4 Press the Shutter button to stop recording
Recording Stop
1. Voice Recording Mode icon
2. Counter showing available recording time remaining
3. SD Memory card icon
4. Actual recording elapsed time

22
5. Battery / power level status
12 Playback MODE
Power the recorder ON and slide the MODE selector all way down to enter the
Playback mode.
Use Right / Left buttons to review / select stored records; Video, Still Pictures or
recorded Voice. Press OK button to play selected video or recorded voice file.
You can “zoom” the displayed photo images by pressing the zoom IN / OUT buttons
or sliding Zoom IN / OUT switch.
When the image is zoomed IN, press OK button and you can “pan” the displayed
image by pressing directional buttons. To exit from Pan and Zoom status, press OK
button again. You can view other photos, video or voice files by pressing Left/ Right
buttons
Thumbnail mode
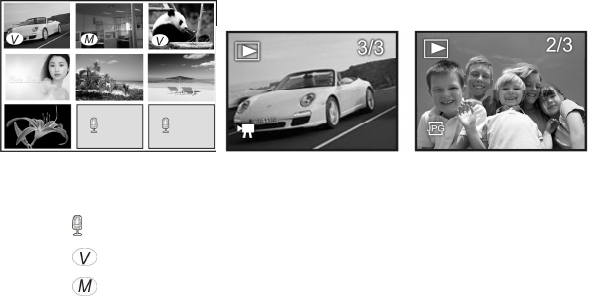
23
Press Zoom Out button to enter the Thumbnail / Playback mode.
Note:
: This icon indicates recorded voice file
: This icon indicates video media file.
: This icon indicates photo with “voice added memo” file.
You can use the direction key to select desired image file, and press OK key or Zoom IN
key to exit this Thumbnail mode and return to full screen display mode.
Playing the Video or Voice file
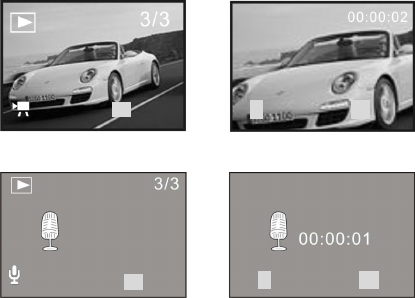
24
Select the Video or Voice file then press OK button to start playing selected record.
You may press Up button to pause or press OK again to stop playing.
Stop mode Playing mode
Playback / Menu
In Playback mode, press MENU button to enter available settings as below:
◄►SELECT OK PLAY ▲
׀׀
OK ■
◄►SELECT OK PLAY ▲
׀׀
OK ■
25
Use Up / Down buttons to select desired function, use Right button to obtain access to
available setting. Use Up / Down buttons to select option, then press OK to confirm.
Note: The locked files
can not be deleted.
Unlock the file first,
then delete
26
Resize
functi
on
You can “resize” the
image only to the
smaller size than original
Press Shutte
r
button to
stop the recording;
27
Note: Options highlighted in gray color are not available for selection.
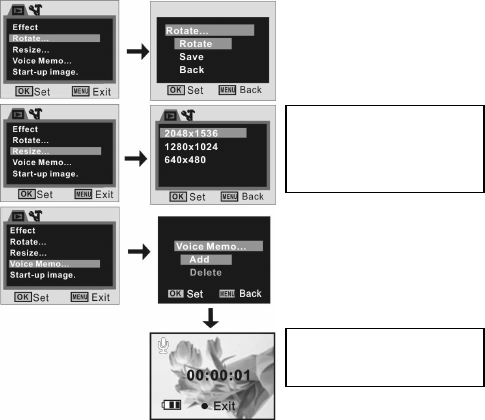
Adding Voice Memo to Images
You may add a Voice Memo / comment to selected image.
30 seconds is the maximum Voice Memo recording time.
Playing image with the Voice Memo file
1 Use direction buttons and select the image with
the Voice Memo
2 Press OK to start playing the selected jpg with
voice memo
3 Press Up key to pause / resume playing, press OK to stop
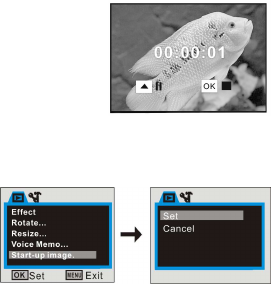
Start up image
You can set your favorite picture as your own
“Welcome” screen.
1. Scroll down Playback setting and activate
Start-up Image option on selected photo.
2. Press the Right button and select Set, then press OK to confirm.
28
3. Press the MENU button entering the Internal settings
4. Use the UP/ Down buttons to select Start-up Image option.
5. Press the Right button and select My Image. Then press OK to confirm.
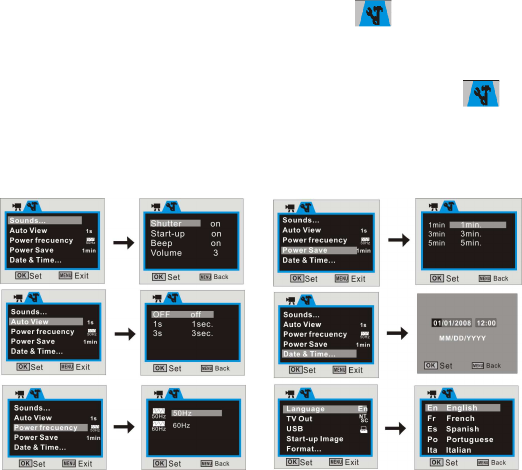
13 Setup / Internal setting mode:
1. Turn the recorder ON then press the MENU and Right button to enter
internal
settings
2. Use the Up/ Down buttons to select desired setting and press the Right button to
access available options; see available setting options below.
3. Press OK key to confirm and press MENU key back or exit.
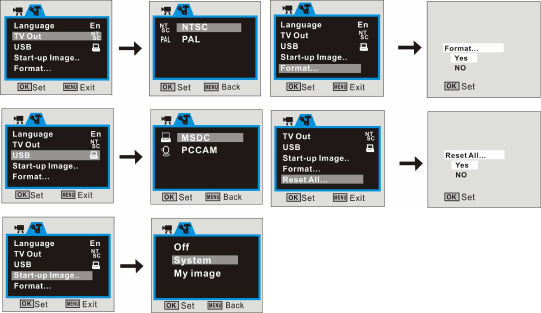
29
Note:

30
Format:
Formatting the SD card (when the card is inserted) will erase all data.
Make sure to back up & save important files / records before formatting SD card.
C
Co
on
nn
ne
ec
ct
ti
in
ng
g
R
Re
ec
co
or
rd
de
er
r
t
to
o
t
th
he
e
C
Co
om
mp
pu
ut
te
er
r
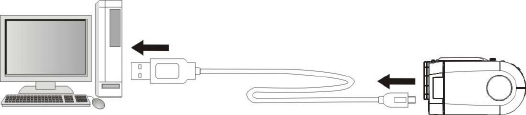
Please install the Driver (bundled on supplied CD) first, before connecting
recorder to the computer.
Note: Installation of the Driver is required ONLY if you wish to use your recorder as
a PC cam to see or transfer live images, scenes through the Internet.
1. Driver Installation
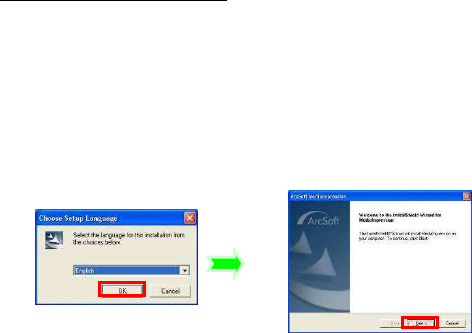
1. Please insert supplied CD into computer’s CD ROM drive.
2. The system will start CD Installer interface; see the screen shown below:
Install Driver
Install MediaImpression
Browse CD
Exit
31
Note: If your computer did not start CD Installer as Auto run, please open My
Computer, go to CD ROM, and select “autorun.exe” program located in the CD
root directory.
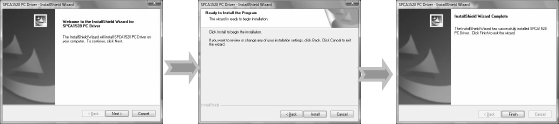
• Driver installation
Click “Install Driver” button, follow provided steps and complete installation.
• Restart computer when installation has been completed.
Note: The Driver (bundled on CD) is suitable for Windows XP, Vista, 7
Use supplied USB cable and connect video recorder to computer USB port.
32
Note: The recorder has two USB modes; MSDC (default, when power ON)
and PCCAM (when selected from Internal Setting Menu)
- The default MSDC (Mass Storage / Removable Disc) is used for playback
and downloading video, pictures into the computer.
- The PCCAM (PC camera / webcam) can be used for transferring live
images, scenes into the computer.
3. Download video, picture files to the computer:
- Power ON recorder and connect to the computer using USB cable.
- Select and open “My Computer” on the computer screen.
- Scroll down and open the “Removable Disc” which represents your recorder in
Mass Storage mode.
- Open selected “Removable Disc” then select DCIM / 100MEDIA folder.
- Open 100MEDIA folder to see all captured images / video files.
33
- You can click to play / review selected records and / or store valuable records
inside computer’s memory.
- Copy or drag files into the folder where you wish to save your records.
MediaImpression Installation
You may install MediaImpression software into your computer from installation CD.
This program will allow you to import / store all, or selected records from your camera
(when connected) to your computer.
Also MediaImpression will give you easy access to YouTube and other popular websites.
Software installation
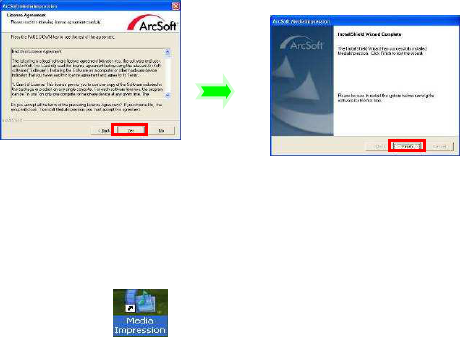
Click “Install MediaImpression” button and complete the installation according to the
following steps
34
Please restart the computer when prompted to complete the installation, computer will
install MediaImpression shortcut / icon on the Desktop.
Using MediaImpression
The MediaImpression program will also provide “one button” access to the YouTube
website: - post your video and share with millions of Internet users!
Double click the icon on the desktop or follow “Start →
Programs” to open MediaImpression
After starting MediaImpression, click “Import” to import the media.
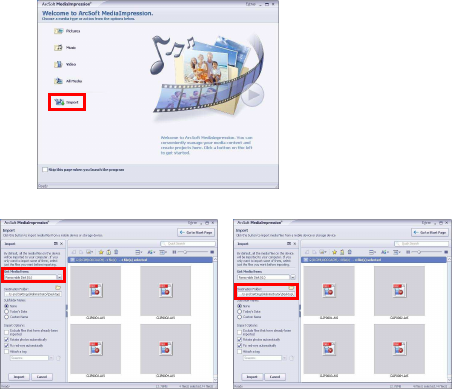
35
Choose the video camera storage and choose the output location.
Choose required file and click “Import” - selected file will be stored in the indicated output
36
location.
Click “Go to Start Page” to return the main screen; click the “Video” or “All Media” to get
the “YouTube” access.

37
Choose file and click “Upload to YouTube”
Enter your username and password to login to YouTube, execute upload / post selected
Video.
Note that when software installation is complete, please reboot the computer for the first
time operation.
5. PC Camera function
- Power ON the
recorder
and set it at the PC Cam Mode (refer to the Manual if required).
- Connect
recorder
with your PC and open MediaImpression program.
- Click and follow onscreen prompts
Live images, scene will appear.
- Click button to exit or close the PC Cam if session completed.
38
Note: If no images or scene is visible; please check whether the Driver for the recorder is installed properly and
check whether the selected Video
recorder
is indicated.
Refer to MediaImpression “Help” if further information required.
C
Co
on
nn
ne
ec
ct
ti
in
ng
g
recorder
t
to
o
T
TV
V
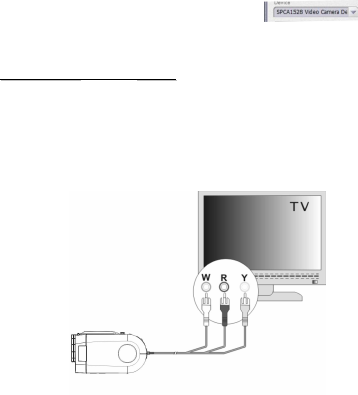
You may connect recorder to your TV and watch recorded video clips or view photos on the TV screen.
Turn on the power of the recorder.
Use supplied AV cable and connect TV output port on your recorder to Video input (yellow connector) and Audio
input (red / white connector) on your TV. Set your TV to Video/ External mode.
Slide the MODE selector of the
recorder
all the way down to enter the Playback mode.

39
Use Right / Left buttons of the recorder to review / select stored Video and Photos. Press OK button to play
selected video on your TV.
S
Sa
af
fe
et
ty
y
p
pr
re
ec
ca
au
ut
ti
io
on
ns
s
Your video recorder is a complex electronic digital device and you need to be aware of
and follow basic precautions: .
Do not try to open the housing of the video recorder or attempt to modify this video
recorder in any way. Maintenance and repairs should be carried out only by an
authorized service agent.
Keep the recorder away from dust, sand, water and other liquids or harmful
chemical substances.
The recorder is not waterproof. Protect from humidity. Do not use recorder if your
hands are wet.
Keep your recorder away from extreme heat and do not point recorder directly into
strong sunlight.
Use only AAA type alkaline batteries. If batteries become exhausted
,
remove all old
and install new batteries. Dispose of old batteries according to local disposal
regulations.
Check your recorder and the condition of batteries after long storage period or
before recording important events.
Remove batteries if you do not intend using recorder for an extended time
Do not touch the lens surface with finger, use soft cloth if necessary or blow away
any dust contamination. Do not use any solvent to clean lens or plastic housing.

40
Format the SD memory card before using with the recorder; save important records
first before formatting the card, as the formatting will erase all data.
Using the SD memory card:
1. Keep the card away from extreme heat or dust, do not bend or tamper with the
card.
2. Do not force the card when inserting into the recorder; if you feel resistance
check card alignment and reinsert card carefully.
3. Note that the card has a tiny LOCK slide / switch; set the slide to non-LOCK
position when you wish to save recordings or images on the card.
S
Sy
ys
st
te
em
m
r
re
eq
qu
ui
ir
re
em
me
en
nt
ts
s
Computer System Requirements
Operating System
Windows XP, Vista, 7
C P U Pentium III 1GHz or above
Memory 512 MB or above
Sound Card,
Display Card
The sound card and the display card should support
DirectX8 or higher version.
CD Driver 4 x speed or above
Hard Disk 1 GB or more available hard disk space
Interface USB 2.0

41
K
Ke
ey
y
f
fe
ea
at
tu
ur
re
es
s
Digital video recorder – HD video resolution and other resolution options
Still picture capability up to 10 Mega pixel image resolution
Mass Storage / PC webcam mode
4 X digital zoom
TV output
2.4inch color LCD display
SD Memory card slot, up to 8GB SD/ SDHC card capacity
Macro / Normal lens settings
T
Te
ec
ch
hn
ni
ic
ca
al
l
S
Sp
pe
ec
ci
if
fi
ic
ca
at
ti
io
on
ns
s
Video record
resolution
HD: 1280 x 720
VGA: 640x480
QVGA: 320×240
Still Picture
resolution 10MP- 3648x2736, 5MP- 2592×1944,
3MP- 2048x1536, 1.3MP- 1280x1024, VGA - 640×480
Lens Focus
distance 5ft(140cm)~infinity (Normal setting); 6~10inches/15~25cm
(Macro setting);
Digital zoom 4×
LCD display
screen 2.4〞TFT LCD
Function modes
Video recording, Still photo taking, Voice recording, Playback,

42
Mass storage, Web Cam
White balance Auto/manual: Daylight, cloudy, Tungsten and Fluorescent
Exposure Automatic/manual (-2.0EV~+2.0EV, 0.3EV/step)
Self-timer 2/10 seconds delay
Video AVI
Photo JPEG
File format
Voice WAV
External
Memory SD Card slot - accepts up to 8 GB card (card not supplied)
USB interface USB 2.0 interface
Power supply Battery: 4×AAA alkaline 1.5V (not supplied)
Dimensions
(L×W×H) 4.5 × 1.65 × 2.45 inches
Weight 5.3oz (excluding batteries)