SHUOYING DVH198 Digital Video Camera User Manual DVH198SB
SHUOYING INDUSTRIAL (SHENZHEN) CO., LTD. Digital Video Camera DVH198SB
SHUOYING >
Manual
1
Foreword
Thank you for choosing our digital video. Please read this
manual carefully before using, and keep it in a safe place for
future reference.
The content involved in this manual is the latest information
during compilation. The screen display and figures adopted by
this manual are used to introduce the operation of the digital
video in a more detailed and intuitive way, which may vary from
the one in actual use due to the difference of technical
development and production batches.
Introduction
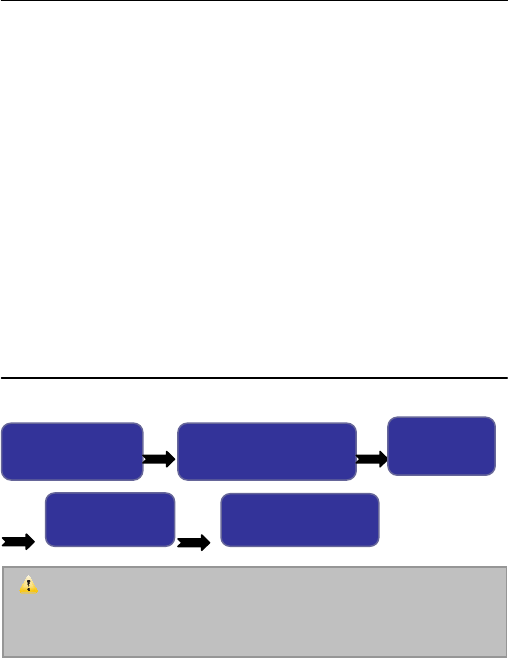
Please use the digital video pursuant to the following sequence:
Note: Any new memory card or the one used in other digital videos/cameras before should
be formatted by the digital video if such card will be used in the digital video. Please backup the
important data on other media, such as soft disks, hard disks or optical disks, etc.
Check the digital video
power
Insert and format the memory
card
Record video/
Shoot
Install the drivers
Connect computers

2
Operation Instructions
There is write-protection switch on SD card. It can
prevent deleting or formatting saved data.
Push write-protection switch to the bottom. Saved data in
SD card will be protected. Push the switch to the top, the
data will be unprotected.
Operations on Storage Card
● If use any new memory card, or the one with data
unable to be recognized by the digital video or
photos shot by other digital videos, please format the
memory card before using.
• Turn off the digital video power before inserting or
removing the memory card.
• Using the memory card for many times may
reduce its performance. If so, please replace it
with new ones.
• The memory card is a precise electronic device.
Metal Pin of Storage Card
Write-Protect Switch
3
Please do not bend the card, and prevent it from
falling down or being pressed heavily.
• Please do not expose the memory card in strong
electronic/ magnetic fields, such as speakers or
near TV receivers.
• Please don’t use or keep the memory card in
extra hot/cold circumstances.
• Please keep the memory card clean and avoid
touching it with any liquid. If so, dry it with soft
cloth.
• Keep the memory card in the card holder when
not using.
• Please note that it is normal for the memory card
to become warm after using for a long time.
• Do not use any memory card that used in other
digital videos/cameras before. Please format any
memory card to be used in the digital video.
• Do not use any memory card formatted by other
digital video or memory card reader.
• Under any of the following conditions, data stored
on the memory card may be damaged:
- Use of the memory card inappropriately.
4
- Turn the power off or remove the memory card
while recording, deleting (formatting) or reading.
• Recommend to backup important data in other
media, such as soft disks, hard disks and optical
disks.
Maintenance for Digital Video
Keep the digital video at dry place and remove its
battery when not using.
• Wear the wrist strap to avoid sliding it off while
using.
• Use proper protective film to avoid scratching the
lens or display screen.
• To clean the lens, firstly, move dust on it, and
then use proper cloth or tissue fit for cleaning
optical devices to wipe the lens softly. If
necessary, use lens detergents. Do not use
organic solvent to clean the digital video.
• Do not touch the surface of lens by fingers.

5
System Requirements
When operating the digital video, please refer to the
computer system with minimum requirements. We
strongly recommend you to use better computer
system for best performance of the digital video. The
minimum system requirements are as follows:
System Requirements
Operating Microsoft Windows 7 2000,XP,VISTA
Operating
system
Above Intel PIII667 or other CPU with
equivalent performance
RAM Above 128 MB
Audio card
Video card
Support DirectX8 or higher versions
CD-ROM Above 4 times speed
Hard disk More than 1 GB free space
Others One standard USB 1.1 or USB 2.0
port
Functions & Features
The digital video has various features and functions:
Digital Video
Digital camera (5 million pixels)
6
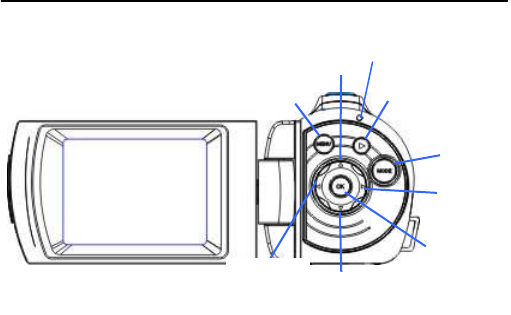
MENU Up Playbac
mode
right
OK
down
Left
Busy lamp
Mass Storage (Removable disk)
PC Digital video (Camera)
4 times digital zoom
Appearance Introduction
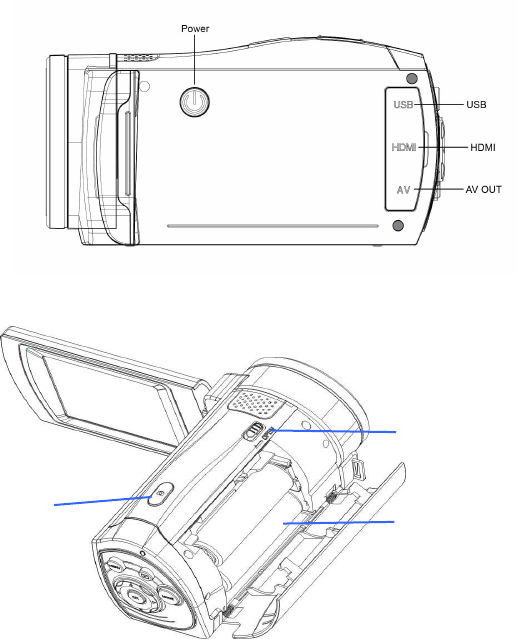
7
Battery cover switch
Shooting
Battery
8
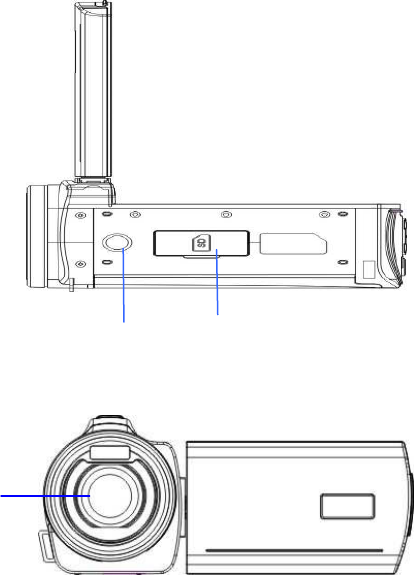
Lens
Tripod SD card slot

9
Digital Video’s Key Functions and Indicators
Press/
Indicator
Functions
Power key Turn the digital video on/off
Shooting key
1.Shooting
2.Recording/Stop
MENU key Open/exit the menu. Stop playing
(while playing video)
MODE key
Switch among picture, video and
preview mode (press this key to
switch to PCCAM after connecting to
PC)
Playback key
Enter/exit playing mode.
Up key
Select menu. Zoom in and move the
picture (when the picture is zoomed
in)
Down key
Select menu. Zoom out and move
the picture (when the picture is
zoomed in). In preview mode, press
this key to enter grid screen.
Left key Move the picture (when the picture is
zoomed in). Turn on/off flash. While

10
playing video, press and hold to
reverse fast.
Right key
In picture mode, adjust the shooting
mode (self portrait \2S \10S
\continuous). Move the picture
(when the picture is zoomed in).
While playing video, press and hold
to forward fast.
OK key
Press this button to enter menu and
start setting. Confirm and return to
upper menu. Pause/play video.
Busy lamp The indicator is constantly lit when
the camera is turned on.
Start Using
Insert Battery
This digital video uses 2 AA batteries. Before replacing
batteries, please turn it off.
Open the battery cover, and then insert batteries
according to the prompt of the positive/negative poles
in the battery compartment. Replace the battery cover.

11
Insert SD/MMC Memory Card
Insert a SD/MMC memory card in the memory card
slot with the metal pins towards inside in light of the
prompts next to the card slot.
To remove the memory card, press the SD/MMC
memory card downwards, and then remove it.
───────────────────────────────────
Note: Turn the power off before replacing the
memory card.
Insert cards in correct direction. Do not insert
cards with large force to avoid damaging cards
or any part of the digital video. If failed, check
whether the direction is correct.
Format any new memory card or the one used in
other digital videos before using it in your digital
video
───────────────────────────────────
Open Screen
Open the LCD to let it face towards yourself.
Turn Digital Video on
12
Press Power key to turn the digital video on.
Switch mode
In picture/video mode, press the Play key to switch to
playback mode; in playback mode, press the Play key to
exit.
Video recording
In video recording mode, press the shutter key to start
video recording, and press the shutter key again to stop
recording.
Taking picture
In picture mode, press the shutter key to take a picture.
Playback
Press the Play key to enter the playback mode, browse
the pictures and play the recorded video.
Browse picture: press the LEFT/RIGHT key to select a
picture and press the Zoom key to zoom in the picture.
When the picture is amplified, press the
UP/DOWN/LEFT/RIGHT key to move the picture.
Play video: press the LEFT/RIGHT key to select a video,
press and hold the LEFT/RIGHT key to forward/reverse
fast, and release the key to play normally. Press OK to
start playing, and press MENU to stop playing; while
快进
<<
<< <<
<<
>
>>
>
>>
>> >>
>>
慢进
---
------
---
|
音量
---
------
---
|
--
----
--
13
playing, press OK to pause, and press it again to resume
playing.
HDMI output
To output video and sound from the video recorder to
HDTV, insert the common terminal of the HDMI cable
to the HDMI interface of the video recorder, and insert
the input port of the HDMI cable into the HD input
interface of the HDTV. Before inserting/pulling out the
HDMI cable, stop the video recording/playing first.
TV Out
To output video and sound of digital video to TV, please
insert common terminal of TV cord into the TV port of the
digital video. Yellow terminal should be connected to
input port of video equipment. Red/White port should be
connected with sound input port of the video equipment.
Note: Before inserting/pulling out the TV cable, stop the
video recording/playing first.
Power-off
When digital video is on, press Power button once to turn
it off.
If digital video is idle, and the idle time without operation
is beyond automatic power-off time (1 minute/ 3
14
minutes/5 minutes), it will turn off automatically for power
saving.
Menu settings
In picture/video or playback mode, press the MENU key
to open the menu, and then press the UP/DOWN key to
select a menu, and press OK to enter the submenu.
When selecting menu, the selected menu will be
highlighted.
▲Video recording Menu ▲Shooting menu
Date & Time Setting
Press the MENU key to open the menu, and then press
the LEFT/RIGHT key to enter the setting. Press the
DOWN key to select “Date & Time” option and press OK
to enter the setting window.
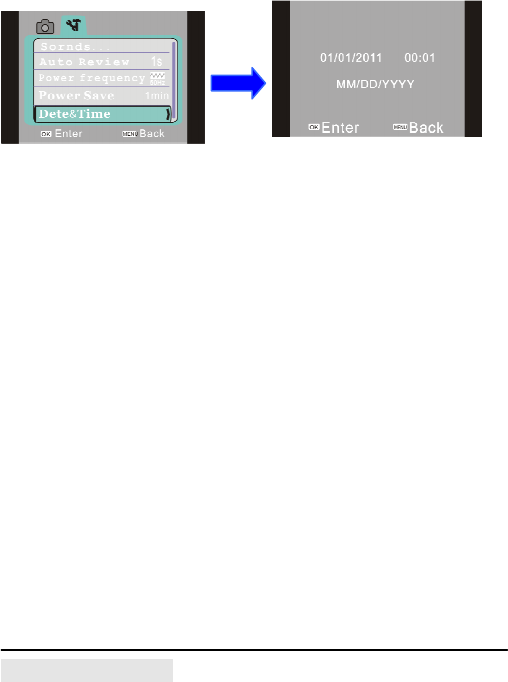
15
In setting window, press the LEFT/RIGHT key to select
an item (date, time), and the selected item will be
highlighted in Blue. Then, press the UP/DOWN key to
adjust, then press OK to confirm, or press the MENU key
to cancel and return. Finally, press the MENU key to exit
the setting mode.
Computer-connecting
Before connecting to computer, please install driver for
digital video with installation disk. First turn digital video
on, and connect digital video to available USB port of
computer with accessory USB cord. In USB mode, it can
be used as removable disk, or camera. Digital video
automatically enter into removable disk mode, and press
MODE button to enter camera mode.
Advanced Operations
Picture/video mode
16
After turned on, the device enters picture/video mode
automatically.
Press the shutter key to take a picture directly.
Press the shutter key to start video recording, and press
it again to stop recording.
Press the UP/DOWN key to zoom.
Press the LEFT key to turn on/off the LED flash (flash
isn’t used in playback mode).
Press the RIGHT key to select self portrait 2S/10S or
continuous mode.
◆
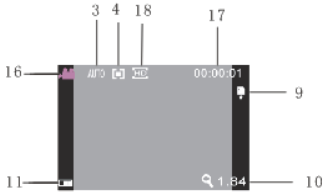
Display of Picture/Video Mode on Screen
▲Screen display message in shooting mode
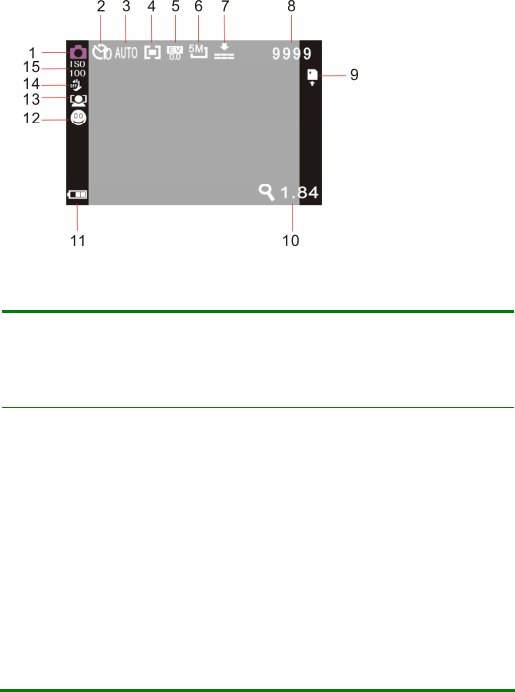
17
▲Screen display message in video recording mode
NO
.
Icon Name
Description
1
Shooting
mode
It indicates that it is able to take
photos by pressing Shutter key
in the shooting mode.
2
Self-shooting
count down
It instructs the countdown for
self-timer.
3
White
balance
It indicates the current settings
for white balance.
4
Metering
mode
It indicates current metering
mode.

18
5
Exposure
It indicates current exposure
value.
6
Image size
It indicates current resolution of
photos
7
Image quality
It indicates current selected
picture quality.
8
Residual
photos
It indicates the remaining
numbers of photos available to
be taken.
9
SD Card
The icon indicates to insert
the memory card
, indicates that
inserted SD is locked for write-protection.
10
Zoom
indication
It indicates the current times for
digital zoom.
11
Battery level
It indicates current power
status. In red color, it means
the power is depleted, and the
digital video will turn off
automatically.
12
Smile
Capture
Activate smile detection.
13
Face detect
Activate face detection.
14
Anti-shake
Activate anti-shake.

19
15
ISO 100
Indicate that the value of ISO is
100.
16
Video
recording
mode
It indicates the digital video is in
the video recording mode, in
which press Video Recording
key to record.
17
REC time
The free time indicates the
remaining available recording
time; the recording time
indicates the recorded time.
18
Video format
It indicates current video
resolution.
◆
Menu setting
Press the MENU to open the video/picture menu, press
the UP/DOWN key to select a menu, and then press OK
to enter the submenu. In the submenu, press MENU or
OK to return to the main menu, press the UP/DOWN key
to select and press OK to confirm. In the main menu,
press the MENU key to exit.
When select menu, the selected menu will be highlighted
in green.

20
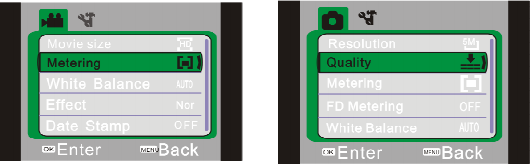
Video menu option:
Main
Menu Sub Menu Description
1920x1080 Full HD
1280x720
High resolution
scheme
Move size
640x480
Medium resolution
scheme
Center
It subjects to the
central area when
metering.
Multi
It subjects to multi
spots when
metering
Metering
Spot
It subjects to one
spot when metering
Auto It is fit for many
conditions.
Day light
It is fit for day light
circumstance.
White
balance
Cloudy
It is fit for cloudy

21
circumstance.
Fluorescent
It is fit for
fluorescent lamp
circumstance.
Tungsten
It is fit for tungsten
lamp circumstance.
Normal Normal effect
B&W
Black & White
effect
Sepia
Return to the
ancients effect
Negative
Negative film effect
Red
Partial red effect
Green
Partial green effect
Effect
Blue
Partial blue effect
Off
Disable the
function of printing
date/time on files.
Date
stamp
Date
When
shooting/video
recording, the date
will be print on the

22
lower right corner
of files.
Date & Time
When
shooting/video
recording, the date
and time will be
print on the lower
right corner of files
Picture menu option:
Main Menu Sub Menu Description
2592 x 1944
5 million pixels
resolution
2048 x 1536
3 million pixels
resolution
Resolution
1280 x 1024 1.30
million pixels
resolution
Super Fine Excellent picture
quality
Fine
Good picture
quality
Quality
Normal
Normal picture

23
quality
Center
It subjects to the
central area when
metering
Multi
It subjects to multi
spots when
metering
Metering
Spot
It subjects to one
spot when metering
On
Enable the auto
face metering,
which optimizes
faces automatically.
FD metering
Off
Disable the auto
face metering.
Auto It is fit for many
conditions.
Daylight
It is fit for day light
circumstance.
Cloudy
It is fit for cloudy
circumstance
White
balance
Fluorescent
It is fit for

24
fluorescent lamp
circumstance
Tungsten
It is fit for tungsten
lamp circumstance.
Exposure /
Use Left/Right key
to adjust the
compensation for
exposure.
Off
Use the normal
single photo
shooting mode
Self-timer 2s
Use the 2s delayed
self-timer mode.
Self-timer
10s
Use the 10s
delayed self-timer
mode.
Driver mode
Burst
Continuous
shooting
Normal Normal effect
B& W
Black & White
effect
Effect
Sepia
Return to the

25
ancients effect
Negative
Negative film effect
Red
Partial red effect
Green
Partial green effect
Blue
Partial blue effect
Off
Disable the
function of printing
date/time on files
Date
When
shooting/video
recording, the date
will be print on the
lower right corner
of files.
Date stamp
Date & Time
When
shooting/video
recording, the date
and time will be
print on the lower
right corner of files.
Face detect
On It will be shown on
the screen.

26
Off
Disable the
function of face
detection
On
The digital video
will shoot
automatically if
detecting smile of
humans.
Smile
capture
Off
Disable the
function of smile
capture.
On
Activate anti-shake
during
picture-shooting.
Anti-shake
Off
Disable the
function of anti
hand shake.
ISO100
Set ISO value as
100
ISO200
Set ISO value as
200
ISO
ISO400
Set ISO value as
400
Setting menu

27
In video, picture or playback mode, you can press the
MENU key to open the menu, and press the
LEFT/RIGHT key to enter the setting menu. Then, press
the UP/DOWN key to select a menu, and press OK to
enter the submenu. In the submenu, press MENU or OK
to return to the main menu, press the UP/DOWN key to
select and press OK to confirm. In the main menu, press
the MENU key to exit.
▲ Setting menu
When selecting menu, selected menu will be displayed in
highlight.
Main
Menu Sub Menu
Description
Shutter On/off Sound
Start-up No/1/2/3

28
Beep On/off
Volume 0/1/2/3
Off No playback after
shooting
1sec. Playback 1s after
shooting
Auto
review
3sec. Playback 3s after
shooting
50Hz Set light source
frequency as 50HZ Power
frequency
60Hz Set light source
frequency as 60HZ
1 min.
Auto power off after
being in idle status for 1
min.
3 min.
Auto power off after
being in idle status for 3
min.
5 min.
Auto power off after
being in idle status for 5
min.
Power
save
OFF Disable the function of

29
auto power off.
Date &
Time /
Set date & time,
together with the date
format
English
Set the menu language
as English
French Set the menu language
as French
Language
Spanish
Set menu language as
Spanish.
NTSC Set television system as
NTSC
TV out
PAL Set television system as
PAL
Format Yes/No Format the memory
card.
Reset Yes/No Restore the factory
settings
To set time and date, use Left button to switch item to be
adjusted and press Up/Down button to change value.
Press OK button for confirmation and press MODE

30
button to cancel setting or return to main menu.
Picture/Video Mode
After power-on, digital video automatically enter video
mode.
Press shutter to start picture-shooting, video-recording,
or stop video-recording.
Press the UP/DOWN key to zoom.
To delay self portrait, press the RIGHT key to switch to
2s/10s self portrait.
Self portrait mode: press the shutter key to start counting
down, and take a picture after 2sec or 10sec delay.
Continuous Shooting Mode: Select continuous shooting
mode. By pressing shutter once, three continuous
pictures will be captured.
Use LED Flashlight: Press Right button to open or shut
flashlight. (In replay mode, flashlight is not available.)
───────────────────────────────────
Note: Stabilize digital video while shooting. Better
use tripod or supporters to acquire clear pictures.
When recording video of high resolution and full
HD, it is necessary to use Class 4 4GB storage card.
───────────────────────────────────

31
◆
Menu setting
Press the MENU key to open the picture/video menu,
press the UP/DOWN key to select a menu, and press OK
to enter the submenu. In the submenu, press OK to
confirm and return to the main menu, press the
UP/DOWN key to select and press OK to confirm. In the
main menu, press the MENU key to exit.
The selected menu will be highlighted in green.
Shooting menu option:
Note: When adjusting exposure compensation in
exposure submenu, press the LEFT/RIGHT key to adjust
the exposure, the screen brightness changes accordingly.
After setting, press OK to confirm and return to the main
menu, or press the MENU key to cancel setting.
Setting menu
The menu operation is same as picture/video mode.
Playback mode
Press the Play key to enter the playback mode.
If a video is selected, press OK to start playing, and the
upper right of the screen shows the playing timer (the
lower left of the video file has a video icon, which
distinguishes from the picture). While playing, press OK
32
to pause, press it again to resume playing, press and
hold the LEFT/RIGHT key to reverse/forward fast, and
release the key to play normally. Press the MENU key to
stop playing.
If a picture is selected, press the UP key to zoom in the
picture, press the LEFT/RIGHT key to confirm and then
press the direction keys to move the picture.
◆
Playback menu setting
Press the MENU key to open the playback menu, press
the UP/DOWN key to select a menu, and press OK to
enter the submenu. In the submenu, press OK to confirm
and return to the main menu, press the UP/DOWN key to
select and press OK to confirm. In the main menu, press
the MENU key to exit.
The selected menu will be highlighted.
▲ Playback menu
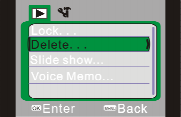
Options of Picture Menu:

33
Main Menu
Sub-menu Instructions
Lock/unloc
k one
Lock/unlock the present
file
Lock all
Lock all files
Lock
Unlock all
Unlock all files
One Delete the present file Delete
All
Delete all files
Start Start playing slide
Interval
1 second-10 seconds
Slide show
Repeat
Yes/No
Add Add sound label to picture
Voice
memo Delete
Delete sound label added
to picture
Note: 1. The lantern slide playing and sound memo are
only valid for pictures.
2. Each picture can be attached with 30 seconds
sound memo. In playback mode, the picture attached
with sound menu has an icon. Press OK to start
playing the sound memo, press the UP key to pause or
press the MENU key to stop. Press and hold the
LEFT/RIGHT key to reverse/forward fast, and release the

34
key to play normally.
Downloading Picture/Video via Connecting to Computer
When digital video is connected to computer and enter
removable disk mode, a new removable disk will be
added to the window of “My Computer”. Recorded picture
or video is stored in” DCIM\100MEDIA” of the removable
disk. You can copy files in this path to your hard drive.
───────────────────────────────────
Note: 1. In the course of download, do not
disconnect USB cord. When USB connection is applied,
do not insert or plug off storage card to avoid data loss.
───────────────────────────────────
Application of Camera
When digital camera is connected to computer, press
MODE button to enter camera mode. Before using
camera, make sure the driver of camera is installed on
computer. When driver is installed, “SPCA1628 PC
Driver” item will be added to “Start-All Programs”. There
is a shortcut icon in it. After digital camera is
35
connected with computer and enters into camera mode,
press the shortcut icon to open AMCAP window.
In AMCAP window, captured image via camera will be
displayed. If AMCAP is not run, the camera can transmit
image through network.
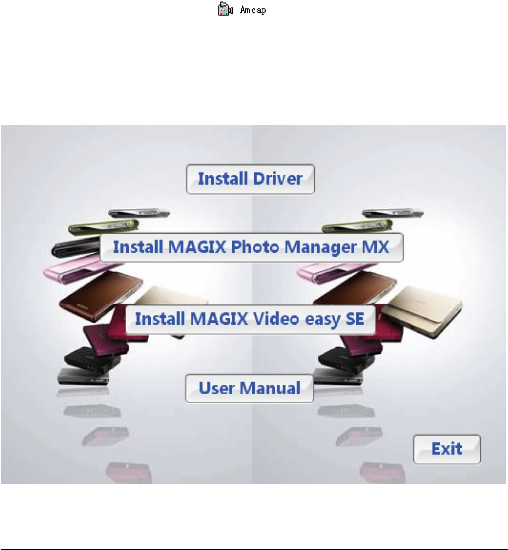
Install driver and software
The provided CD contains video recorder driver and the software MAGIX Video
easy SE / MAGIX Photo Manager 10 (used for picture and video processing).
Installation interface
Insert the provided CD into the CD-ROM, the installer will be run automatically,
and the installation wizard as below will appear.
36
(Depending on the PC configuration, it takes several seconds to run the installer
automatically. If the installer window doesn’t appear, please open the “Windows
Explorer”, and run the “SoftwareInstaller.exe”.)
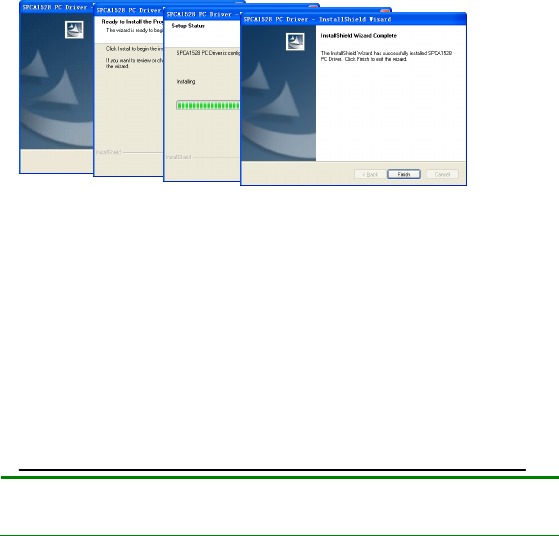
Install driver
In the installation wizard window, click the “Install Driver” button, and follow the
prompt to finish the installation step by step.
Please restart the PC after installing the driver.
Select MAGIX Video easy SE / MAGIX Photo Manager 10, click the
button on the wizard window and follow the prompt to install step by
step.
For usage, please click the “Software operation explanation” button on
the installation wizard window.
Specifications
Image
Sensor
Image Sensor130 Megapixel CMOS

37
Resolution of
Picture
5M (2592 x 1944), 3M (2048 x 1536), 1.3M
(1280 x 1024)
Storage External SD Card (128M to 32GB)
File Format JPEG, AVI, WAV
Video
Resolution
FHD 1920x1080,HD 1280X720,VGA 640×480
640×480
Self-shooting
Delay
2 seconds / 10 seconds
Digital Zoom 4 times
White
Balance
Auto/Daylight/Cloudy/Fluorescent /Tungsten
Exposure
Compensation
-2.0 ~ +2.0
USB Port
USB2.0
TV Output NTSC / PAL
Screen 2.4” TFT LCD
Power 2 *AA alkaline batteries
Language of
Menu
English/French/Spanish
Focal Length
f=7.5mm
Aperture F3.0
Auto 1minute / 3minutes/5minutes
Requirement Windows7/ 2000 / XP / Vista

38
Size 114 mm × 52 mm ×60 mm
Note: Specifications of product design are subject to the
latest information written in this instruction manual. Any
change of the product will not be noticed further. It is
subject to real product.
Common Problem-Shooting
1. Battery is low, please replace with
new batteries.
2. Battery package is not removed.
Failure in
power-on
after installing
battery 3. Wrong installation, please make
sure that battery installation is correct.
1. The memory is full; please move
the files to another memory device.
Can’t take
picture or
record video
by pressing
the shutter
key
2. The write protection of SD card in
the video recorder is enabled. Please
take out the SD card and toggle the
write-protection switch to release the
protection.

39
The picture is
blurry
1. Hand shakes when taking picture.
Please hold the video recorder with
both hands, or use a tripod to stabilize
the device; do not make the device
shake when taking picture.
The picture or
video is dark
1. The environment lighting is
insufficient. Please take picture or
record video at a place with sufficient
lighting, or use flash light to increase
the brightness.
1. The battery voltage is too low;
please replace the battery.
The video
recorder
turns off
automatically
2. To save energy, the video recorder
will turn off automatically if there is no
operation in one minute (3min or
5min, depending on the setting).
Can’t delete
files in the
video
recorder
1. The write-protection of SD card in
the video recorder is enabled. Please
take out the SD card and toggle the
write-protection switch to release the
protection. The file protection function
is enabled in the camera menu.

40
Please turn off this function in the
menu.
Warning: Changes or modifications to this unit not expressly approved by the party
responsible for compliance could void the user’s authority to operate the equipment.
NOTE: This equipment has been tested and found to comply with the limits for a Class B
digital device, pursuant to Part 15 of the FCC Rules. These limits are designed to provide
reasonable protection against harmful interference in a residential installation. This
equipment generates, uses and can radiate radio frequency energy and, if not installed and
used in accordance with the instructions, may cause harmful interference to radio
communications.
However, there is no guarantee that interference will not occur in a particular installation. If
this equipment does cause harmful interference to radio or television reception, which can be
determined by turning the equipment off and on, the user is encouraged to try to correct the
interference by one or more of the following measures:
Reorient or relocate the receiving antenna.
Increase the separation between the equipment and receiver.
Connect the equipment into an outlet on a circuit different from that to
which the receiver is connected.
Consult the dealer or an experienced radio/TV technician for help.
Shielded cables must be used with this unit to ensure compliance with the Class B
FCC limits.
41
Only the USB cable supplied (with molded ferrite core) must
be used with this product