SHUOYING PA7807X Mobile Internet Device User Manual Updated
SHUOYING INDUSTRIAL (SHENZHEN) CO., LTD. Mobile Internet Device Updated
SHUOYING >
Users Manual
1
1. Appearance and buttons: ..................................................................................................... 5
2. First use ....................................................................................................................................... 6
2.1 Battery management and charge ............................................................................................................. 7
2.2 Connection with PC ....................................................................................................................................... 9
3. Equipment operation interface ........................................................................................ 10
3.1 Unlock Interface ............................................................................................................................................ 10
3.2 Main interface describe ............................................................................................................................. 11
3.3 Shortcut Mode .............................................................................................................................................. 11
3.4 Usage of Small Tools on Desktop ........................................................................................................... 13
4. Browse Webpage ................................................................................................................... 14
5. Introduction to Typical Application ................................................................................ 14
5.1 E-mails .............................................................................................................................................................. 14
5.2 Browse Files .................................................................................................................................................... 16
5.3 Music ................................................................................................................................................................ 17
5.4 Calendar .......................................................................................................................................................... 18
5.5 Calculator ........................................................................................................................................................ 20
5.6 Sound Recorder ............................................................................................................................................ 20
5.7 Clock ................................................................................................................................................................. 21
5.8 Search ............................................................................................................................................................... 23
5.9. Camera ............................................................................................................................................................ 23
6. Downloads ............................................................................................................................... 24
7. Prompts and Tips ................................................................................................................... 24
2
7.1 Convenient Operation Modes ................................................................................................................. 24
7.2 Convenient Settings .................................................................................................................................... 25
7.2.1 Wireless Network Connection: ......................................................................................................... 25
7.2.2 Tips for Battery Usage ......................................................................................................................... 25
8. Customized Settings ............................................................................................................ 26
8.1 Wireless and Network ................................................................................................................................ 26
8.2 Sound ............................................................................................................................................................... 26
8.3 Display .............................................................................................................................................................. 28
8.4 SD Card and Storage ................................................................................................................................... 29
8.5 Language and Input .................................................................................................................................... 29
8.6 Date and Time ............................................................................................................................................... 30
8.7 About Tablet ................................................................................................................................................... 32
9. Lock Handheld Tablet .......................................................................................................... 33
10. Trouble Shooting ................................................................................................................. 33
10.1 Close Application Program .................................................................................................................... 33
10.2 Forced Shutdown ....................................................................................................................................... 35
10.3 Restore Default Settings .......................................................................................................................... 35
11. Problem solution ................................................................................................................. 36
12. Basic Specifications ............................................................................................................ 36
13. Do’s for disposal of product ........................................................................................ 37
14. Don’t of disposal of equipment .................................................................................. 37
15. Information on the consequences of improper handling, accidental breakage
3
damage and improper recycling of the end of life product. ...................................... 38
For all respected users:
Important Declaration
1. Before using the tablet PC, please read all information provided by us
first so that you can use this product correctly. Please make sure that you
have read this manual carefully before using this product.
2. The information covered in this manual is all based on the latest
information when compiling the manual, and products are subject to
change without notice for further improvement. We are not committed to
any mistakes or incidences caused by the manual. For additional product
information, visit the company’s website: www.namco.co.uk
3. When using this product, please make backup for the data by yourself
and this company will just be responsible for the product's hardware itself,
and will not undertake any responsibility for any loss or damage of
personal data and information due to wrong operations of hardware.
Precautions
This manual includes important information on safety precautions and
proper usage of this product. To prevent any accident, please make sure
that you have read this manual carefully before using this product.
• Do not keep this product in a place with a high temperature, humidity
4
or too much dust. Especially do not place this product in a car with all
windows closed in summer, and keep out direct sunlight.
• Avoid dropping or shocking this product heavily and avoid shaking
the TFT display violently, otherwise, the TFT display may be damaged
or cannot play correctly.
• Please choose a suitable volume. Avoid excessively high volume when
using a headset. If you feel any ear noise, please decrease the volume
or stop using.
• Do not break the connection suddenly when this product is
conducting formatting, uploading or downloading operations,
otherwise there may be program errors.
• This company will not undertake any responsibility for any memory
loss due to product damage, repairing or other reasons.
• Do not dissemble this product by yourself and do not clean the
surface of this product with alcohol, thinner or benzene.
• Do not use this product in a place where the using of electronic
device is prohibited, such as on a plane.
• Do not use this product while driving a car or walking on the street,
otherwise traffic accident may occur.
※ This Company reserves the right to make any improvement on this
product.
No further notice will be provided on any variation on the specification and
design of this product!
★ (This product has no water-proof function)
5
【Remark】
All pictures in this manual are just for your reference.
6
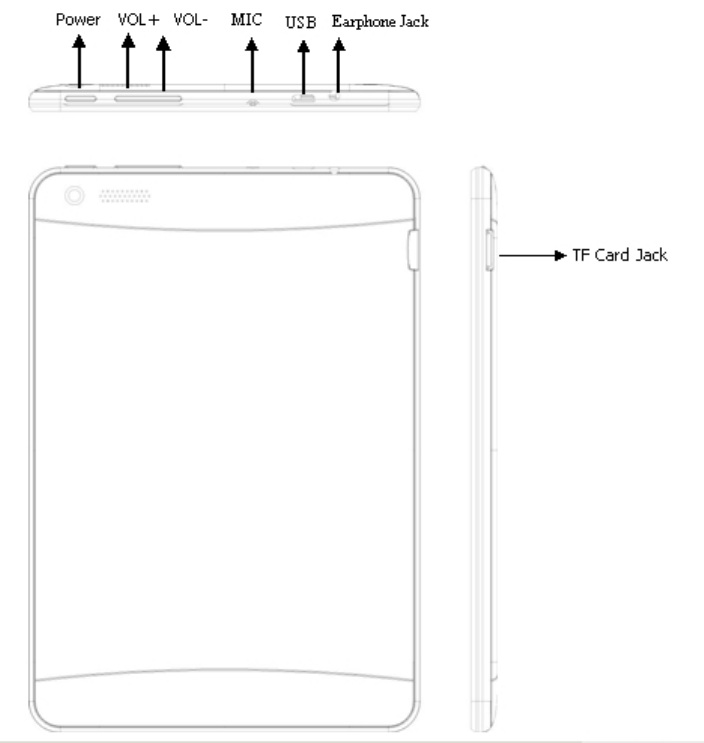
1. Appearance and buttons:
7
2. First use
2.1 Battery management and charge
Before first use, please make sure the device's battery is fully charged
Just need to connect the adaptor or USB interface, then you can
charge
The first two times charging please charge for 6 hours, after that you
just need 4 hours to charge.
【Remark】:
This tablet using Built-in type polymer battery, Charger must be
standard adaptor, this device does not include DC charging. USB
interface can charge, Choose USB interface to charge.
During the charging, the battery icon will scroll.
When finished charging, battery icon will become green and stop
scrolling
In order to prolong the service life of the machine, suggest using out
the battery power before recharging it.
【Remark】:
1. If you don’t use this tablet for a long time, to avoid power
consumption damage, please charge/use the battery once a month.
2. After low battery shut down, connect DC adaptor. Device will
remind of low battery charging. You need to wait some time until the
battery has enough power to enter into main menu.
3. Device charging should be in standby status for reach normal
8
charging time. Device screen power consumption may cause longer
charging time.
9
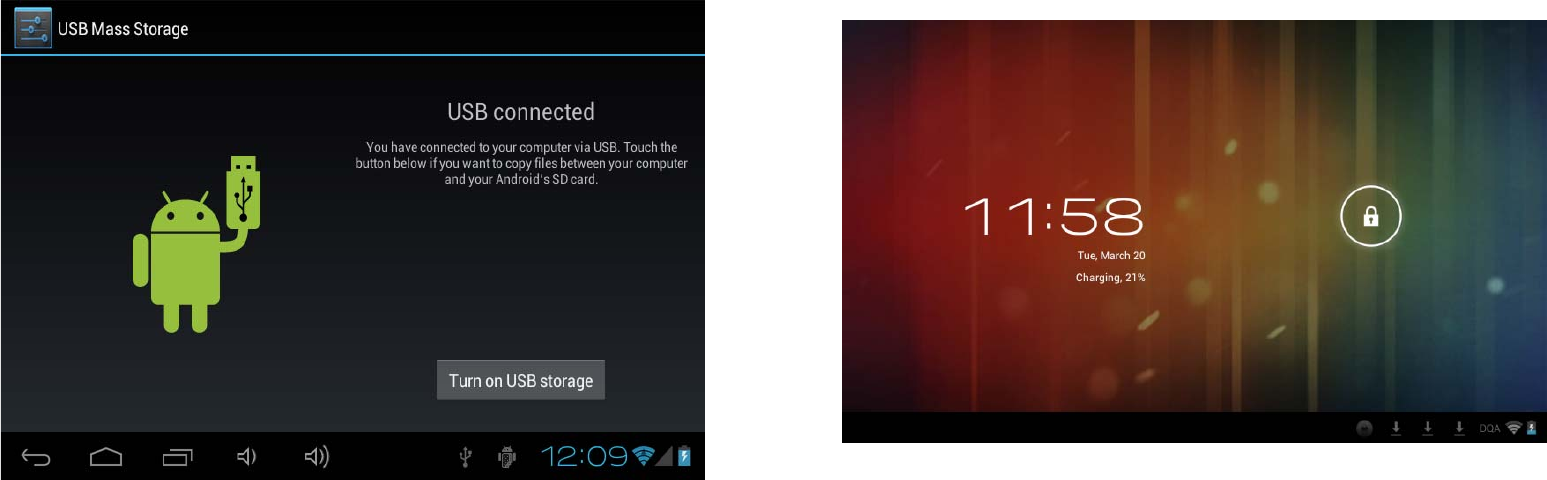
2.2 Connection with PC
Use USB cable to connect device to PC, device will pop up the USB
connection window, click Turn on USB storage to connect to PC.
Into the USB mass storage mode, you can copy and delete the file on
the device and the file on the memory card.
10
3. Equipment operation interface
3.1 Unlock Interface
After starting up, the Locking interface will be shown first, just as the
following:
Operations can only be conducted after unlocking.
Unlocking method: touch the Lock icon by using finger, and drag it
next to a lock at the right, then release finger. The system will be
unlocked, and enter the main interface. If dragged to the left, the
system will enter the Camera mode.
11
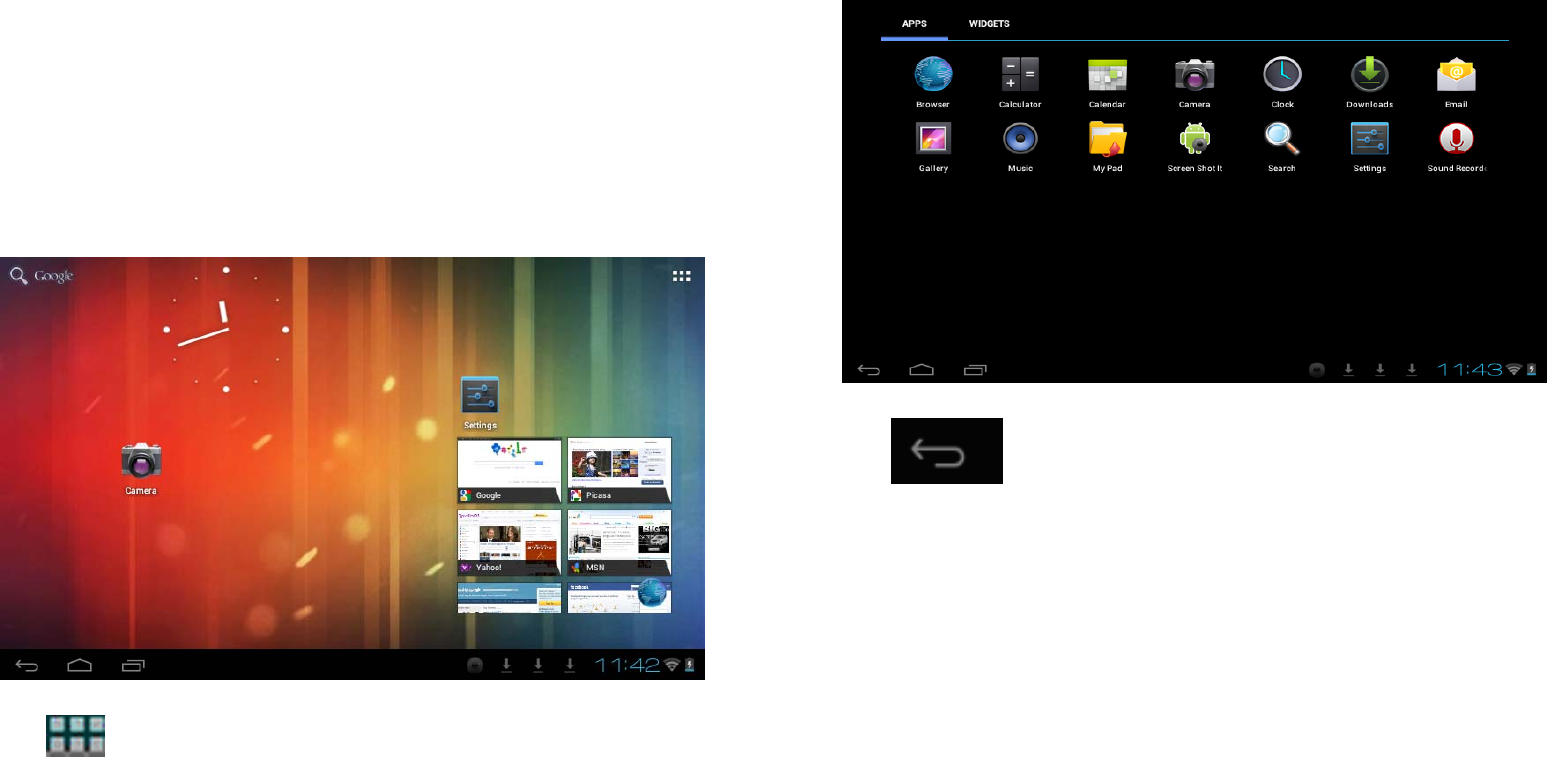
3.2 Main interface describe
The main interface of the handheld tablet includes two modes: the
small tools on the desktop mode and the icons of application
programs mode, both of which can be switched between via the
button at the top right corner.
The mode of small tools on the desktop is shown as follows:
Tap button on the shortcut bar to enter the interface of icon
modes for application programs, which is shown as follows:
12
Tap button to enter the desktop interface.
13
3.3 Shortcut Mode
Under the interface of the mode of small tools on the desktop, after
pressing Menu key, the Shortcut menu will popup at the bottom of
the screen, shown as follows:
3.4 Usage of Small Tools on Desktop
Users can add, delete or install the small tools on the desktop, as well
as add or delete icons of application programs or adjust the positions
of icons; the icons can be dragged within the working zone, or
between the working zone and the shortcut bar. Users can also add or
delete the icons.
Under the interface of the mode of small tools on the desktop, press
and hold the icons of small tools, a check will popup on the interface,
14
and a sign of trash bin will popup in the center of the shortcut bar. At
that time, it is able to drag the icon anywhere on the desktop, or drag
it directly to the trash bin to delete it.
4. Browse Webpage
Users can connect to the Internet via the browser:
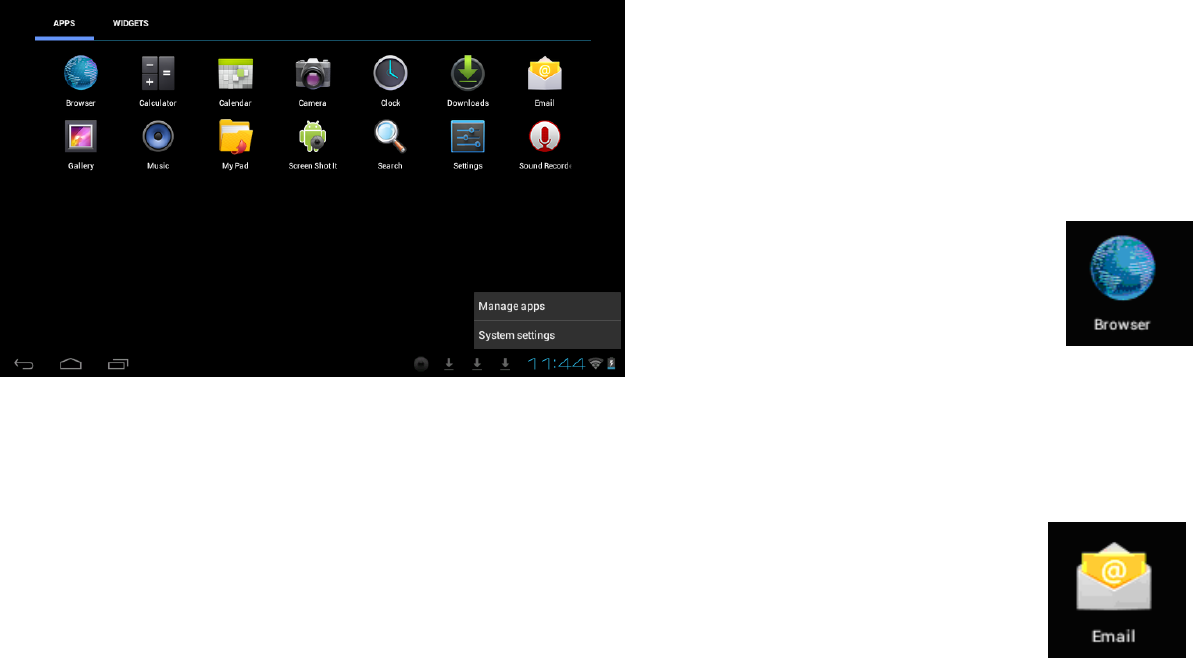
Tap the browser icon on the desktop to open the
network browser, and then the interface below will popup:
5. Introduction to Typical Application
5.1 E-mails
Tap the E-mail icon to enter E-mails. Do the following:
15
1. Set E-mail accounts
2. Setup new E-mails.
3. Receive/send E-mails
4. Download or open attachments.
Note: The Shortcut menu will popup by pressing Menu key.
16
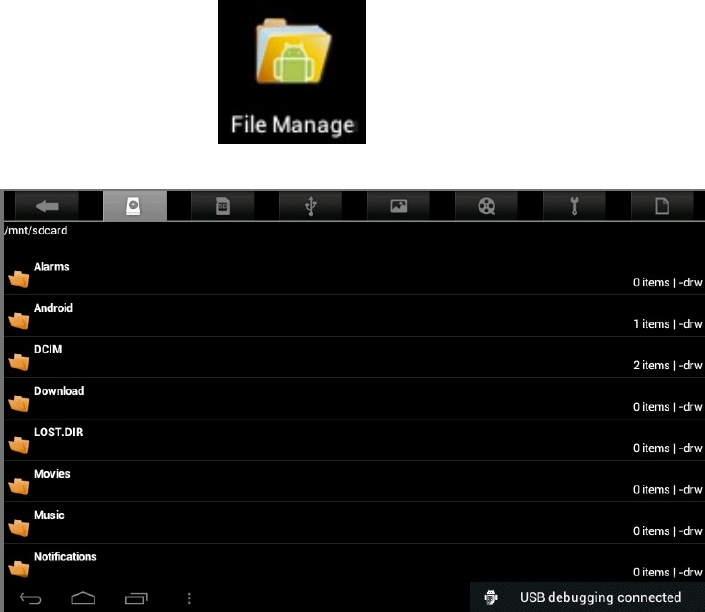
5.2 Browse Files
Tap the My Pad icon to enter the interface of
Browsing files
After entering the interface of Browsing file, you can copy, cut, paste,
add new, rename, or delete the LOCAL, SD1 or U disk.
Install Files
To install files in the file browser, tap the installation file with extension
name as APK, an installation window will popup. Select “Install” to
install the software on the tablet.
17
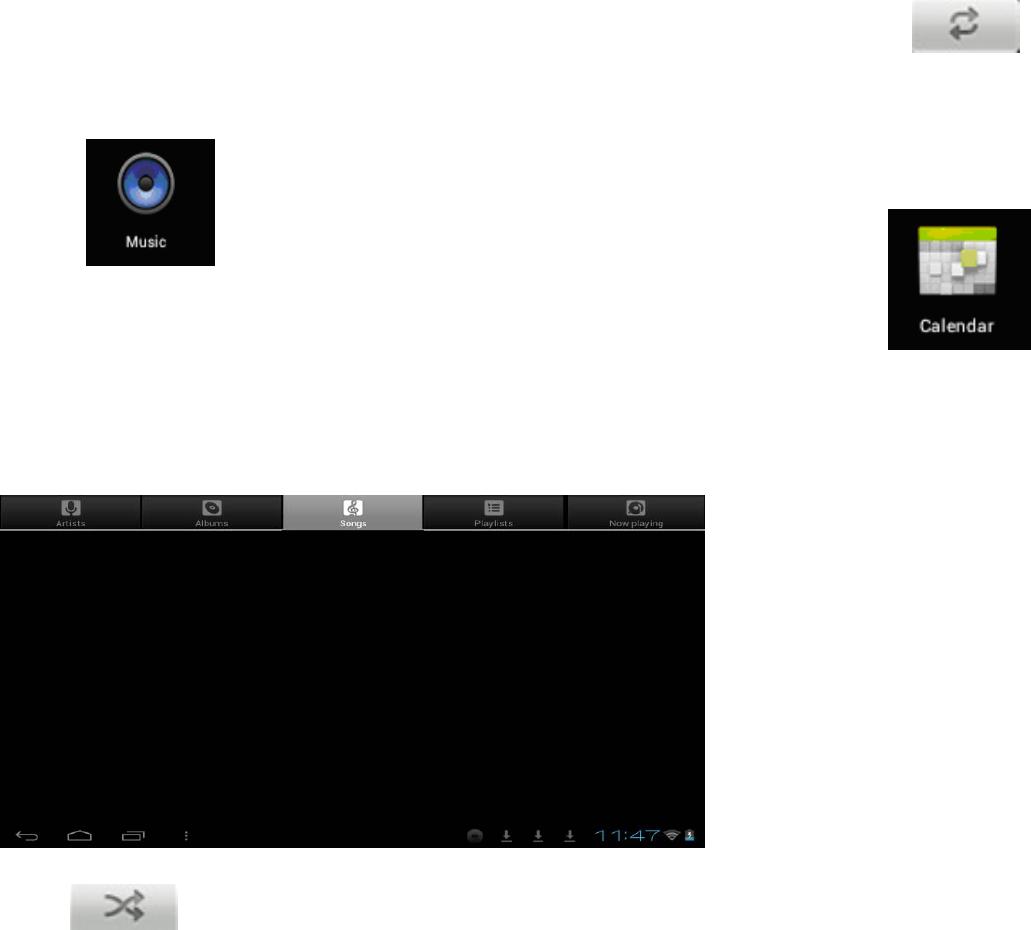
5.3 Music
Tap th e icon to enter the interface of Music.
Tap the menu to popup the following shortcut menus, including
Media gallery, Music,
My favorite and my list.
Tap Music to enter the playing interface
1. Tap icon to enter the mode of random playing.
18
2. Tap icon to switch between the mode of loop for all and
the mode of single song playing.
5.4 Calendar
Tap icon to check date and time, as well as add
memorandums. Please set the calendar before using.
Do the following:
1.Firstly, connect the network. Then, open the Calendar to add
Exchange account, E-mail address, and password into the popup
dialog box. Then tap Next step.
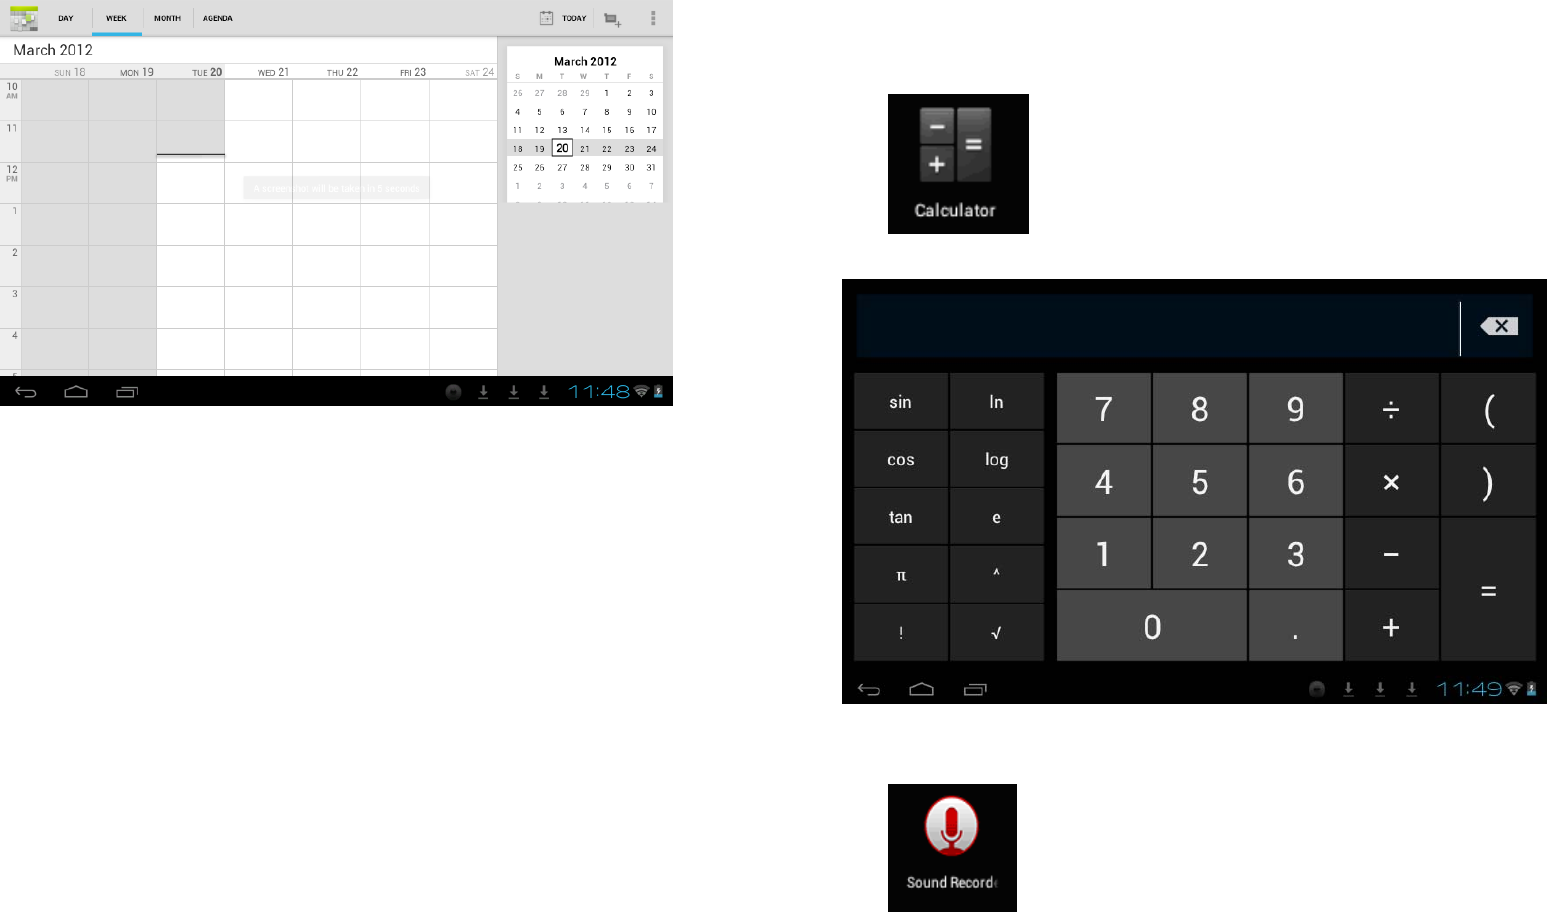
19
2. After setting the server, take the next step according to the tips.
Note: in the step of server setting, it may fail to be connect one time. If
so, try several times until it is successful.
3. After completion of setting, the system will exit from this interface
automatically. Return to the main interface, and then enter Calendar
interface to set date, time and memos. (Note: the E-mail set for the
first time cannot be deleted; the second time the setting can be
deleted. You can add new E-mail address. To delete E-mail addresses,
restore the factory-setting.
4. Tap Menu key to popup the following menus, including options of
1day, 7 days, 31 days, itinerary, today, more, etc. for the corresponding
operations.
20
5.5 Calculator
Tap icon to conduct calculation, shown as follows:
5.6 Sound Recorder
Tap icon to enter the interface of Sound record.
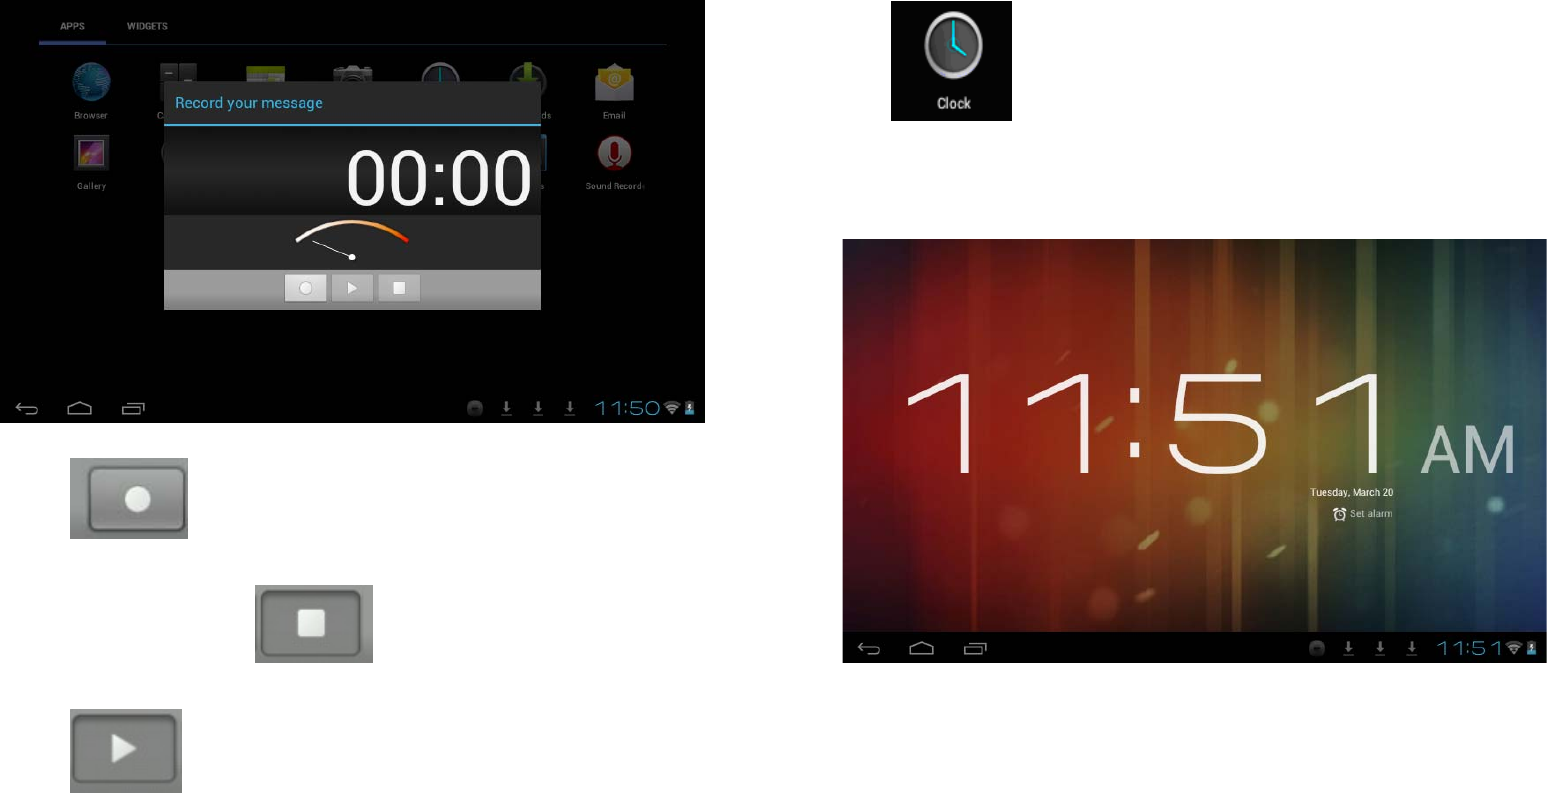
21
1. Tap icon to start recording.
2. During recording, tap icon to stop, one dialog box will
popup, indicating “Use this recording or give up”.
3. Tap icon to listen to the current recording.
5.7 Clock
22
Tap icon to enter the interface of Table clock, providing
functions of alarm clock, checking images, playing music and exiting,
shown as follows:
23
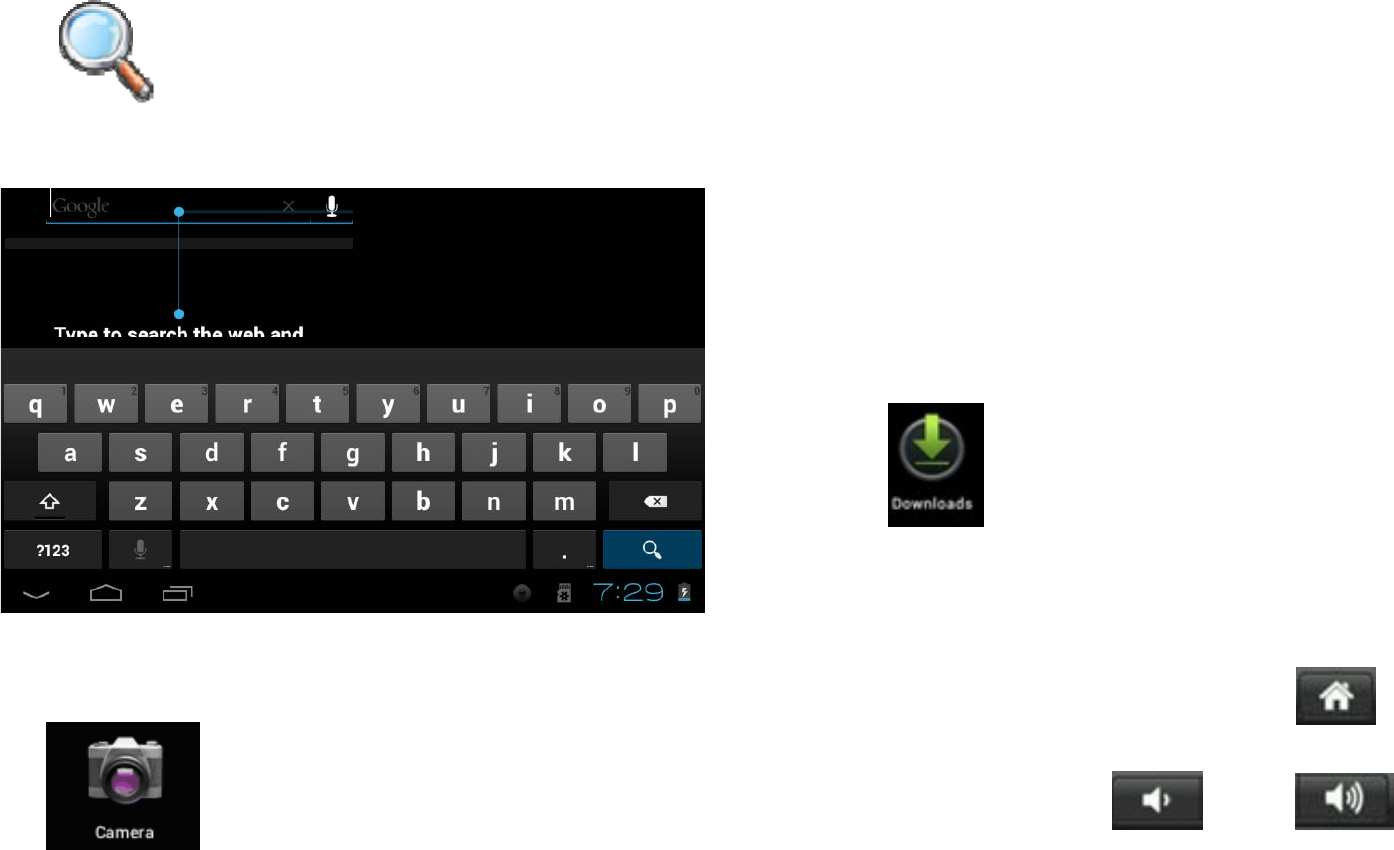
5.8 Search
Tap icon to enter the interface of Google search to
conduct search by voice or text, as shown below:
5.9 Camera
Tap icon to enter the interface of camera
24
Do the following:
1.Tap the icon at the bottom right corner to take photos. It is able to
save photos under the root directory—DCIM/CAMERA on the
memory card.
2.Slide up the block on the icon on the right to switch from the
shooting mode to the recording video mode.
3.Tap the icon at the top right corner to check the previous photo, and
conduct the following operations for photos: play slides, delete, share,
cut, rotate to the left/right or set as wall paper or icons of contacts.
Tap Complete button to return to the interface of camera.
6. Downloads
Tap icon to check the content just being downloaded.
7. Prompts and Tips
7.1 Convenient Operation Modes
Return to the Home interface, and then tap icon.
To adjust the volume, tap icon or icon.
25
7.2 Convenient Settings
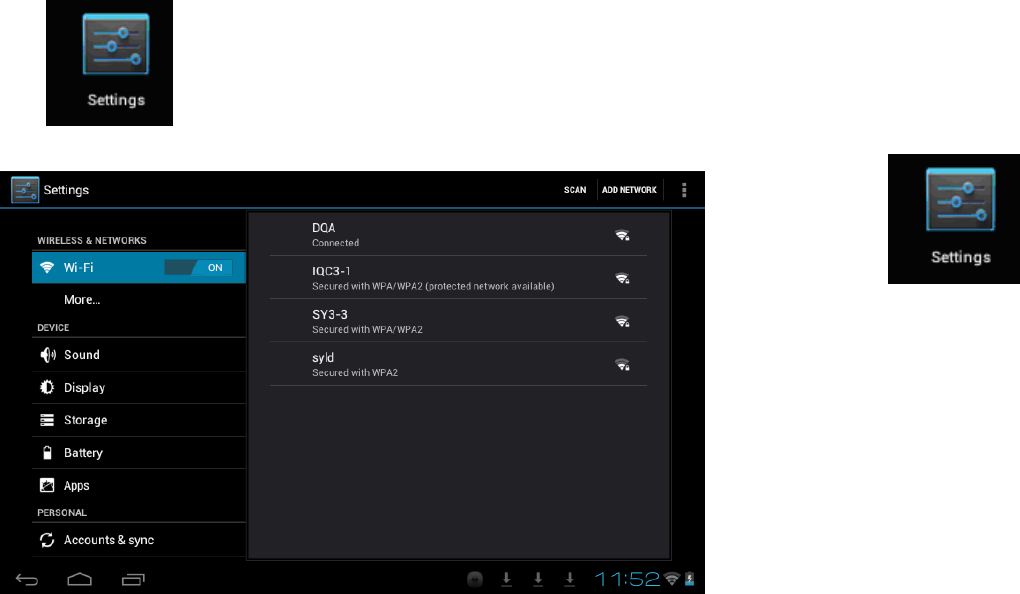
7.2.1 Wireless Network Connection:
Tap icon to enter the interface of wireless network
connection, shown as follows:
Input user name and password, and then tap “connect” to enter
wireless network.
7.2.2 Tips for Battery Usage
For the wide screen used by the tablet, a lot of power will be
consumed. To prolong the service time of the battery, reduce the
operating frequency of the following functions.
1. Watching movies, enjoying music or taking photos.
26
2. Brightness of display: press Menu key-Settings-Sound and Display
(display setting)-Brightness (reduce brightness)
3. Network search: press Menu key-Settings-Wireless
network-Connect wireless network-WIFI settings-Network notice
8. Customized Settings
Tap icon of desktop setting on the Shortcut menu to
conduct customized setting.
8.1 Wireless and Network
1. To open WIFI, press Menu key-System settings-Wireless and
Network, and then select the click box behind WIFI.
2. To set and manage the wireless AP, press Menu key-System
settings-Wireless and Network-WIFI settings.
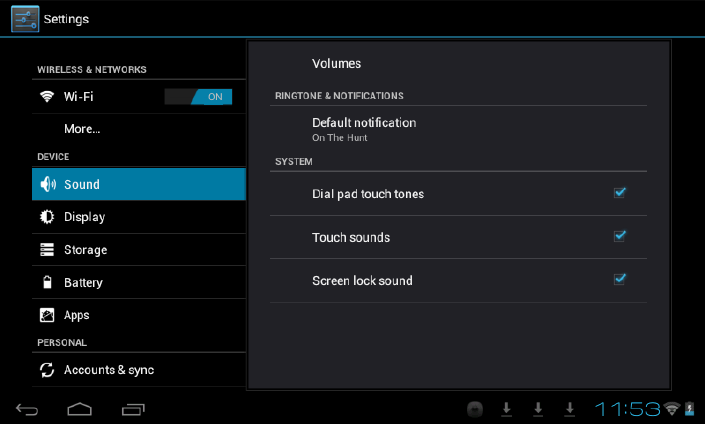
8.2 Sound
Set rings, notice and brightness of the screen
27
Mute mode
If set, all sound will be muted except the media and alarm clock, press
Menu key-System setting-Sound (sound setting)-mute mode.
Media Volume
To set the volume of music and video, press Menu key-System
setting-Sound (sound setting)-Media volume.
Notice Ring
To set the notice ring, press Menu key-System setting-Sound (sound
setting) - Notice ring.
Select Touch Sound
To set the screen selection with sound, press Menu key-System
28
setting-Sound (sound setting)- Feedback of touch.
To use the soft keyboard or conduct the UI interactive vibration, press
Menu key-System setting-Sound (sound setting)- Feedback of touch.
8.3 Display
Auto-rotation of Screen
Enter Menu-Settings-Display (display setting)-Auto-rotation of screen,
and then set the tablet to change the direction of display
automatically while rotating. If you select the check box behind
Direction, the screen will rotate with the movement of the tablet.
Brightness
To adjust the brightness of screen, press Menu key-System
setting-Display (display setting)-Brightness.
Screen adaption
In order to adjust the size of some games display screen, press Menu
key-System setting-Display (display setting)-Screen adaption.
29
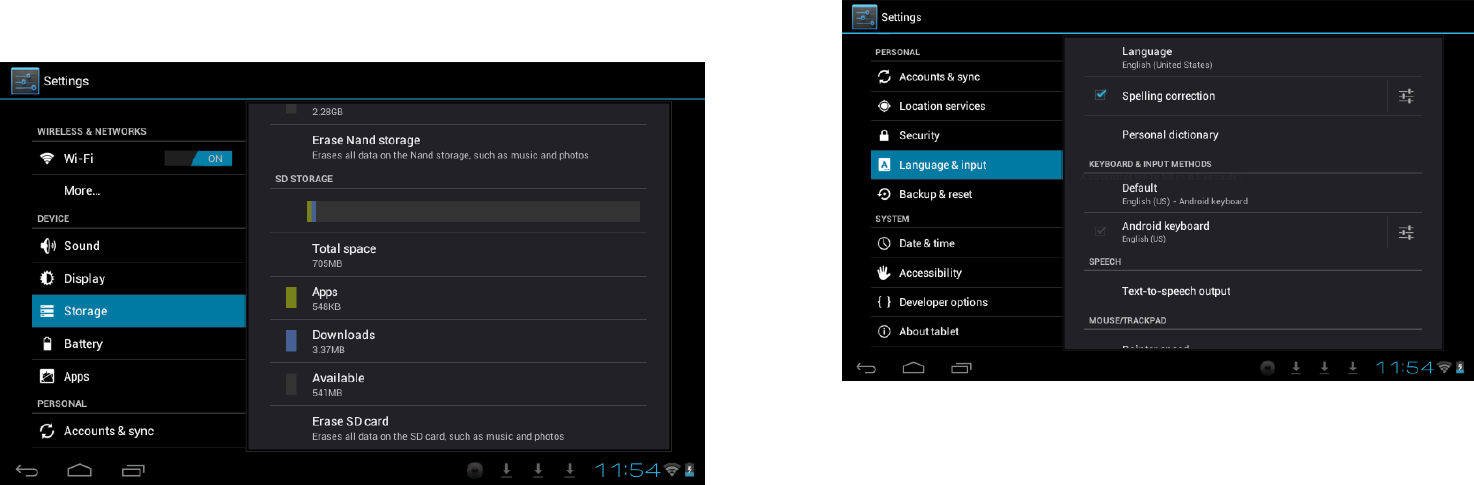
8.4 SD Card and Storage
Check the available storage space.
8.5 Language and Input
Set the options of language zone (language and zone), text input and
auto correct.
30
Select Language Zone
To select the language and zone, press Menu key-System
settings-Language and Keyboard-Select language zone
Android Keyboard
To set Android keyboard, press Menu key-System settings-Language
and Keyboard-Android keyboard
User Dictionary
To add/delete words from the user dictionary, press Menu key-System
settings-Language
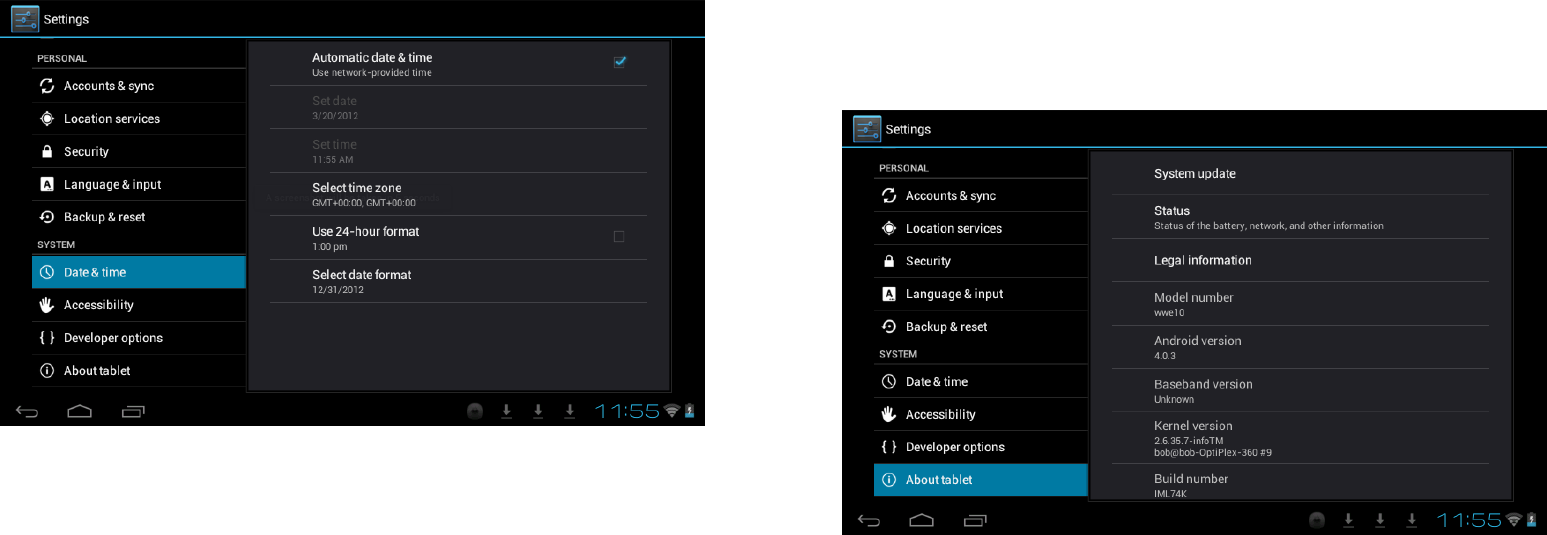
8.6 Date and Time
To set date, time, time zone, timing and format, press Menu
key-System settings-Date and time
31
32
8.7 About Tablet
Check the legal information, status and software version.
Status
To check the status and power of battery, time of starting up, WIFI
address, press Menu key-System settings-About tablet-Status.
Legal Information
To check the legal information, press Menu key-System
settings-About tablet-legal information
Model
To check the model, press Menu key-System settings-About
tablet-Model
33
9. Lock Handheld Tablet
Unlock screen/tablet:
When the system is in the status of sleep, press and release the Power
key to enter the interface of screen-lock; slide up the Unlock icon to
conduct unlocking, and then enter the interface before system sleep.
10. Trouble Shooting
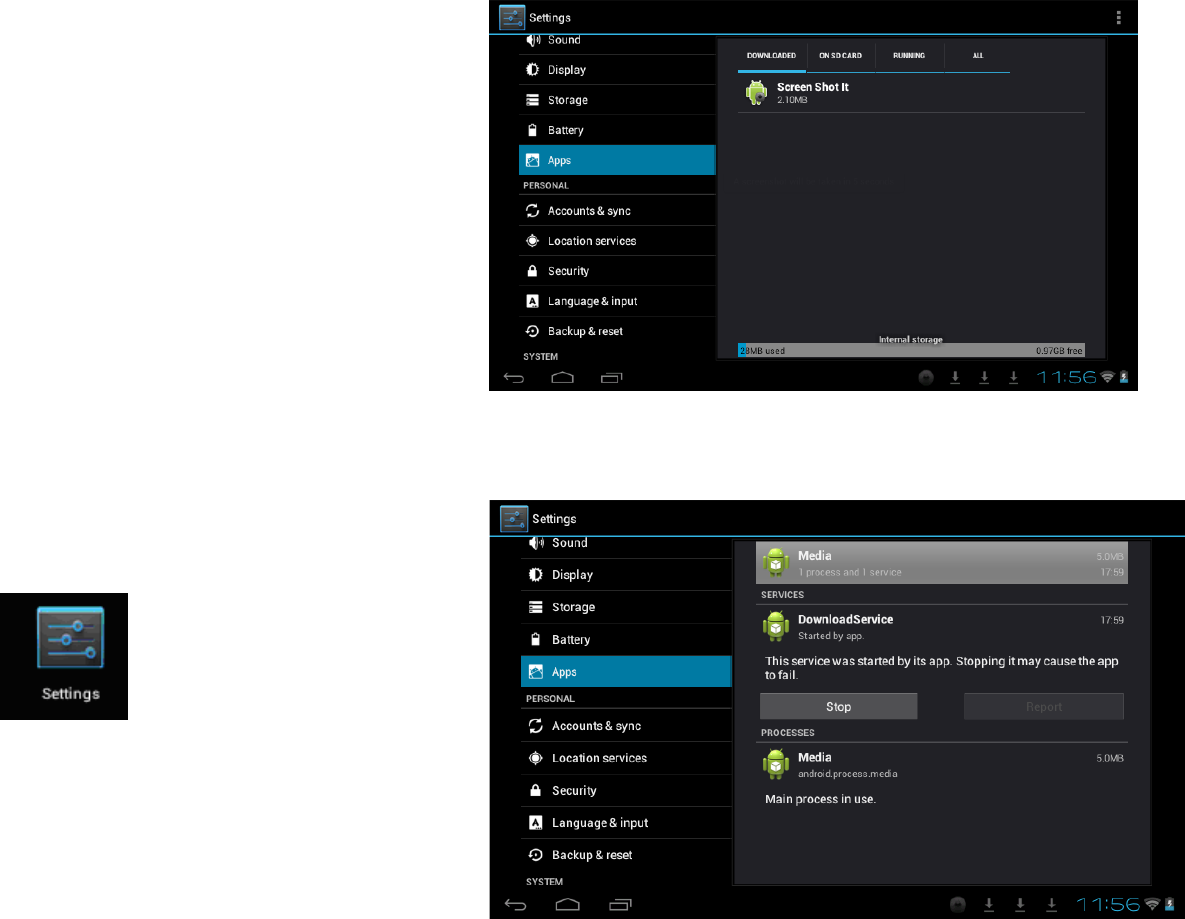
10.1 Close Application Program
Any running program will occupy certain memory, and affect the
operating speed of the tablet. So, close unneeded programs in time to
release occupied memory, in order to maintain normal operating
speed.
To close application program, tap icon on the shortcut
bar on the desktop to enter the interface of system setting. Select
Application program-Running service, shown as follows:
34
Tap the application program to be closed, a window will popup to
confirm whether to stop service, shown as follows:
Tap Stop button to close the application program, the running

35
window of which will disappear.
10.2 Forced Shutdown
Press and hold the Power key for 7s to turn off the tablet by force.
10.3 Restore Default Settings
To restore the factory-settings and erase all data, press Menu
key-System settings-Private right-Restore factory-settings.
Warning: After resetting the tablet, the system will delete the Google
account, data and settings of the system and application programs, as
well as downloaded application programs. Please use this function
with extreme caution.
36
11. Problem solution
Device won’t turn on
1. Check the battery power
2. Connect adaptor first, then check again
3. After charging if the tablet still won’t turn on, please contact the
supplier
After startup the screen or the opening picture should appear. If not:
1. Power is too low, please charge
Headset can't hear the voice
1. Please check the volume level
2. Check whether the music file is damaged. Try playing other music, if
the file has been damaged it may lead to serious noises or skips
Cannot copy file or play music and so on.
1. Please check between computer and device is correct connection
2. Check if the memory storage space is already full
3. Check whether the USB cable is good or not
4. Check if the USB connection is disconnected
12. Basic Specifications
Hardware configuration
CPU processor speed: A23 dual core, 1.3GHZ
Memory: 4GB Nand flash
RAM: DDR3 512MB
TF card: 128MB-32GB

37
Display screen: 7.85” (Capacitive multi-touch) TFT capacitive touch
Resolution: 1024*768
Battery and capacity: rechargeable Built-in type polymer battery,
3200Mah
Record: built-in microphone
Operation System: Android 4.2
13. Do’s for disposal of product
• Always drop your used electronic products, batteries, and packaging
materials after the end of their life in nearest collection point or
collection center.
• Separate the packaging material according to responsible waste disposal
options and sorting for recycling.
• The battery can easily be removed from the product for recycling.
14. Don’t of disposal of equipment
a) Never dump E-waste in garbage bins or municipal solid waste
stream.
b) Do not dispose of your product as unsorted municipal waste.
c) Do not throw used batteries into household waste.
d) Do not dispose damaged or leaking Lithium Ion (Li-Ion) battery with
normal household waste.
38
15. Information on the consequences of improper
handling, accidental breakage damage and improper
recycling of the end of life product.
a) If batteries are not properly disposed of, it can cause harm to human
health or the environment.
b) Placing of batteries or devices on or in heating devices, such as
microwave ovens, stoves, or radiators and improper disposal of
batteries may lead to explosion.
If the battery terminals are in contact with metal objects, it may cause a fire.
39
FCC Warning:
This device complies with part 15 of the FCC Rules. Operation is subject to the
following two conditions: (1) This device may not cause harmful interference, and
(2) this device must accept any interference received, including interference that
may cause undesired operation. Any Changes or modifications not expressly
approved by the party responsible for compliance could void the user’s authority
to operate the equipment.
Note: This equipment has been tested and found to comply with the limits for a
Class B digital device, pursuant to part 15 of the FCC Rules. These limits are
designed to provide reasonable protection against harmful interference in a
residential installation. This equipment generates uses and can radiate radio
frequency energy and, if not installed and used in accordance with the instructions,
may cause harmful interference to radio communications. However, there is no
guarantee that interference will not occur in a particular installation. If this
equipment does cause harmful interference to radio or television reception, which
can be determined by turning the equipment off and on, the user is encouraged to
try to correct the interference by one or more of the following measures:
--Reorient or relocate the receiving antenna.
--Increase the separation between the equipment and receiver.
40
--Connect the equipment into an outlet on a circuit different from that to which the
receiver is connected.
--Consult the dealer or an experienced radio/TV technician for help.
FCC Radiation Exposure Statement:
This equipment complies with FCC radiation exposure limits set forth
for an uncontrolled environment.
This transmitter must not be co-located or operating in conjunction with any other
antenna or transmitter.