SHUOYING PI0920X MID User Manual PI0920 ENGLISH MANUAL final
SHUOYING INDUSTRIAL (SHENZHEN) CO., LTD. MID PI0920 ENGLISH MANUAL final
SHUOYING >
User manual

1
PI0920 MID User’s Manual
Tablet of Contents
1.Appearance...........................................................................4
2. Power Switch........................................................................5
4. Using SD Card......................................................................5
5. Getting Started......................................................................6
6. Desktop.................................................................................7
7. Lock Screen..........................................................................8
8. Pre-installed applications......................................................9
9. Desktop Menu....................................................................10
10.ManagingApplications....................................................10
11. Clock..............................................................................123
13. Browser..........................................................................145
14. Calendar............................................................................14
15. Camera............................................................................155
16. Calculator.......................................................................167
17. Sound Recorder..............................................................178
18. Email..............................................................................178
19. File Manager...................................................................212
20. Music..............................................................................223

2
21. HD Video Player............................................................245
22. Settings...........................................................................256
23. HDMI Connection..........................................................301
24. FAQ................................................................................356
25. Battery management.........................................................38
26. Important safety instruction..............................................38
3
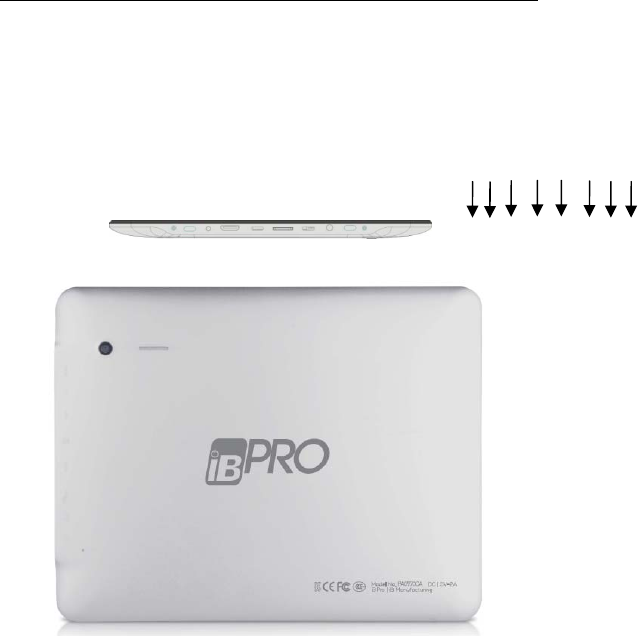
1. Appearance
USB port
TF Card
HDMI port
DC port
USB Port
Earphone
Back
Power switch

4
2. Power Switch
Switch on: press and hold the power switch for 3 seconds and wait for startup.
Switch off: press and hold the power switch for 3 seconds → click Power off → click
OK.
Lock/unlock screen: briefly press the power switch to lock/unlock the screen.
Force shut down: if the device has no response, press and hold the power switch for 7
seconds to switch off device by force.
Warning: forced shut down may cause unexpected system errors!
3. Touch Screen
The touch screen is easy and convenient to use.
You can use the touch screen in the following methods:
Single click: briefly touch the screen with the finger and then move away.
Click and hold: click the screen with the finger and hold for about 2 seconds.
Drag: click a certain icon in the screen and hold, then move the finger, the icon will
move accordingly.
☆ To avoid damage the screen, never put anything directly on screen.
4. Using SD Card
☆ The device supports up to 32GB storage card.
Insert the card into the card slot, and push it in with your finger until a “click” is heard.
Now the card is ready for use.

5
Removing SD Card
Close all programs or files on the card first. Click Settings → Storage → Remove SD
card → OK. Then press the card with your finger, and simply remove it when card is
ejected.
☆ Do not insert and remove the card repeatedly in a short time, this may cause damage
to the card.
☆ We suggest using a reputable storage card brand to ensure compatibility.
5. Getting Started
Charging the device
☆ It is not recommended to charge the device via USB cable.
☆ You may operate the device while charging it, but this may prolong the charging
time.
Connect one end of the AC adaptor to main supply and the other end to the power jack
on the device to charge it (it may take about 5 hours to fully charge the device).
The battery icon will roll during charging, when battery is full (it will stop
rolling), please disconnect the AC adaptor.
Starting the device
Press and hold the power switch for 3 seconds and wait for system startup.
Wi-Fi setting
We suggest you configure your Wi-Fi network before using, as many functions require
for it to w
o
1. Clic
k
2. Swi
t
The devic
e
need to en
t
3. Click t
h
4. Click R
e
☆ The
W
click Add
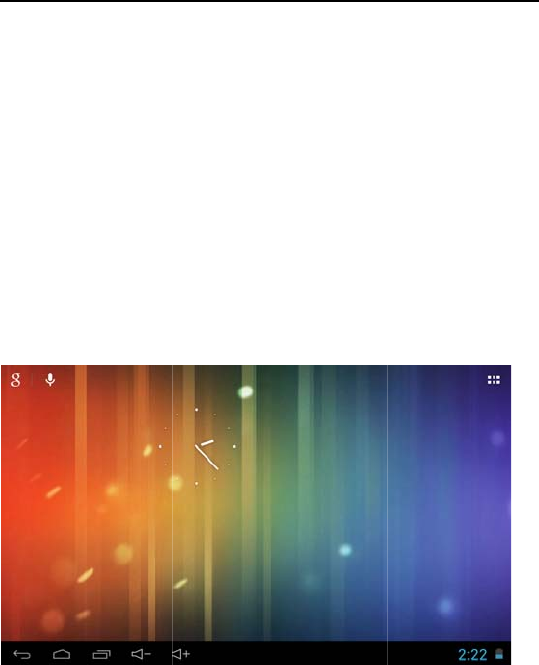
6. Deskto
p
○
○
2
o
rk normally.
k
Settings → W
i
t
ch the Wi-Fi on.
e
will search and l
i
t
er a password to
c
h
e desired Wi-Fi n
e
turn to return to
d
W
i-Fi set as hidden
Wi-Fi Network a
n
p
○
1
6
i
reless and Netw
o
i
st all available
W
c
onnect to a Wi-F
i
etwork → Enter
d
esktop.
will not be search
e
n
d enter necessary
o
rk
W
i-Fi networks. If
a
i
network.
the password (if a
n
e
d automatically.
I
information to ad
d
a
n icon is displaye
n
y) → Click Co
n
I
n this case you n
e
d
your Wi-Fi.
d, you
n
nect.
e
ed to

7
○
3 ○
4 ○
5 ○
6 ○
7 ○
8
○
9
○
1 Search
○
2 Click to view all applications
○
3 Return
○
4 Return to desktop directly
○
5 Task
○
6Volume –
○
7Volume +
○
8 Current time
○
9 Battery status
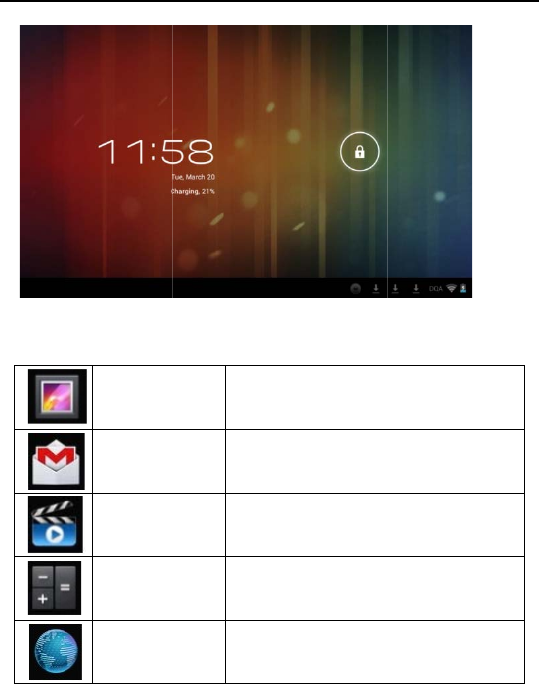
7. Lock Screen
You can set auto lock screen or lock screen manually by pressing the power switch.
The lock screen interface is as follows. Slide to the right to unlock the screen.
8. Pre-ins
t
t
alled Applicatio
n
Photo al
b
Gma
i
HD video
p
Calcul
a
Brow
s
8
n
s
b
um
i
l Sen
p
layer
a
tor
M
s
er
View pic
t
d and receive em
a
addre
s
Play and man
a
M
ake four arithm
e
Connect to
I
t
ures.
a
ils via your email
s
s
a
ge videos.
e
tic operations.
I
nternet
Sound re
c
Calen
d
Settin
g
Cloc
k
Sear
c
File ma
n
Download
e
Came
r
Musi
1 Mobile
M
9
c
order
R
d
ar A c
g
s
k
Vie
c
h
n
ager Vie
w
Install
e
d files
r
a
c
M
arket 300,0
0
R
ecord and play r
e
alendar where yo
u
Make personali
z
w current time an
d
Google sea
r
w
and manage file
s
Android applicati
in SD c
a
Records of dow
n
Take ph
o
Play and manag
e
0
0+ Available Ap
p
e
corded sound.
u
can set agendas.
z
ed settings.
d
set alarm clock.
r
ch tools
s
and applications
.
ons and backup fi
l
a
rd.
n
loaded files.
o
tos.
e
music files.
p
lications and Ga
m
.
l
es
m
es
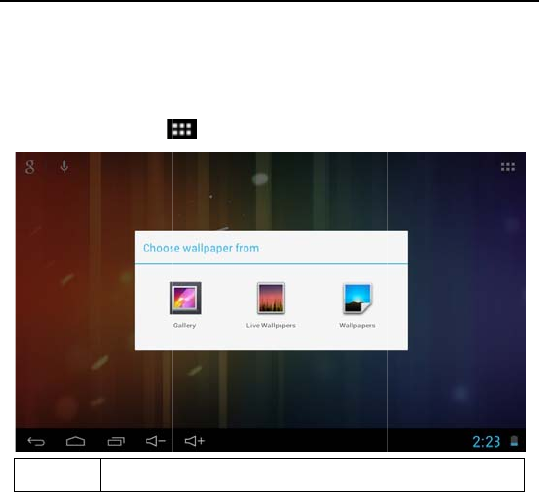
9. Deskto
p
On the de
s
Wallp
a
10.Mana
Installing
☆
You
Sim
p
p
Menu
s
ktop, click icon
a
pe
r
Select wa
l
ging
A
pplicatio
n
can find many in
t
p
ly open the brow
10
to display m
e
l
lpaper from phot
o
n
s
t
eresting and free
ser and search fo
r
e
nu functions.
o
album.
Android applicati
“Android Applic
ons through the i
n
ations”.
n
ternet.
The purch
a
simply ins
1. Copy
card
o
2. Click
3. Click
4. Selec
t
Now the a
p
displays a
l
5. Click
inter
fa
Downloa
d
You can d
App
a
sed or download
e
talled through the
the .apk file you
w
o
r connect the US
B
the Fil
e
or
t
an .apk file →
I
p
plication is insta
l
l
l applications.
Open to run the
a
fa
ce.
d
ing applications
irectly download
A
or you may
d
11
e
d Androi
d
applic
a
File Manage
r
.
w
ant to install on
t
B
disk to the devi
c
e
Manager icon.
to find folder
s
I
nstall.
l
led and applicati
o
a
pplication, or clic
k
from internet
A
ndroid applicati
o
d
ownload applicat
i
a
tions
c
t
he SD card or U
S
c
e.
s
containing .apk
f
o
n icon will displa
y
k
Complete to ret
o
ns from the prein
s
i
ons directly from
c
an be quickly an
d
S
B disk → insert
t
f
iles.
y
in the interface
w
urn to File Brows
s
talled 1 Mobile
M
your web browse
r
d
t
he
w
hich
er
M
arket
r
.
12
1. Click Browser icon to connect to internet.
2. Enter the URL and click the link of the application you want to install.
3. After the application is downloaded, press and hold the downloaded file (in
Downloaded Files interface) → Click to open → Install.
Uninstalling the application
You can conveniently uninstall the Android applications.
1. Click → Settings → Applications → Manage Applications.
2. Click the application you want to uninstall → Uninstall.
3. Click OK to uninstall the application.
11. Clock
Click Clock icon to view the current date and time.
Alarm clock
The device supports more than one clock at the same time.
☆ When the icon appears in the status bar on the top of the screen, it means at
least one alarm clock is activated.
13
Add alarm clock
1. Click Clock icon .
2. Double click Set alarm clock → + Add alarm clock.
3. Set your desired alarm clock.
4. Click Activate alarm clock.
5. Click Complete.
Stop the alarm clock
When the set time is reached, a window will pop up showing the name of the alarm
clock.
If you want the clock to alarm again 10 minutes later, you can click Pause and repeat.
Click Cancel to stop the alarm clock.
Activate the alarm clock
If alarm clock is repeated, then you want to stop the alarm temperately but not delete it.
1. In the alarm clock interface, select the alarm clock you want to activate.
2. Click Reactivate.
Edit the alarm clock
1. Click Clock icon → Click
2. Click the alarm clock you want to edit → Edit the alarm clock.
Delete the alarm clock
14
1. Click Clock icon → Click
2. Click the alarm clock you want to delete.
3. Click to delete the alarm clock.
Click to return to desktop.
13. Browser
The user can connect to the internet through the browser.
Click the Browser icon on the desktop to open the browser.
14. Calendar
Click the Calendar icon .
If this is the first time you use this function, you need to open an Exchange account first.
Enter your email address and password, click Next and complete the account
configuration by following the instructions. Now you can use the Calendar.
New activity
1. In calendar interface, click the date you want to add an activity.
15
2. Select time of the activity → enter the details of the activity in the field.
3. Click Complete.
4. Click icon to select your desired calendar interface.
☆ The date with agenda is displayed in grey.
15. Camera
Click Camera icon.
Menu function
1. Press the Menu button to bring up menu list, which includes: Switch to video/Switch
to camera and My album/My video.
2. In camera interface, click My album to enter the album to view the taken photos.
3. In video recording interface, click My video to enter the video list.
Take a photo
1. In camera interface, click to take a photo.
2. The photo will be saved automatically.
3. Click the thumbnail to enter My album to view full size photos.
4. Click Return to return to camera.

16
5. Click to exit camera and return to the desktop.
Record a video
1. Click to switch to video to enable video recording.
2. Click to start recording, click to stop recording.
3. The recorded video will be saved automatically.
4. Click the thumbnail to play the video.
5. Click Return to return to camera.
6. Click to switch back to camera interface.
7. Click to exit camera and return to the desktop.
16. Calculator
1. Click the Calculator icon .
2. Click the numbers and operators to make operations.
3. Click Clear to clear the entry one by one, or click and hold Clear to clear all entries.
17
17. Sound Recorder
1. Click the Sound Recorder icon .
2. Click the icon to start recording.
3. When recording completes, click the icon to stop recording.
4. Click the Play icon to play the recorded sound.
18. Email
☆ Supports POP3 and SMTP accounts.
New email account
You enter one or more email accounts that you want to use on the device.
1. Click the Email icon .
2. In the Your account interface, click Next.
3. Click Email address option → Enter your email address.
4. In the Password option → Enter the password of your email.
5. Click complete.
6. Manual setting (optional): the server will select email provider (such as gmail.com)
18
according to the email address you have entered automatically. However, if you need
to change the server setting, you can click Manual setting and make necessary
changes.
7. Click Next.
8. Optional: enter account name.
9. Enter the signature → Click Complete.
☆ When setup is complete, if you cannot connect to a free email account, please
confirm whether or not your email provider’s server supports (POP) and/or
(SMTP) protocols.
Inbox
1. Click the Email icon .
2. If only one email account is setup, such account will be opened directly. If more than
one is set, all email accounts will be listed.
3. Click the email account that you want to open → Click Inbox.
Open an email
1. In Inbox interface, click an email to open it.
2. If there is attachment, click Open to activate the corresponding application to open it,
or click Save to save it to SD card.
3. To reply, click Reply or Reply all.
a. Enter the message you want to reply.
b. Click Send to send the email. If you save it as draft, the message will be saved
19
but not sent; if you don’t save it or sent it, it will be discarded.
4. Click Cancel to cancel an email immediately.
Compose an email
1. In Inbox interface, click → Compose your email.
2. Click Send to option, then enter the address of the Receiver.
3. Or, if you want cc or bcc to others, click the icon → Add cc and bcc, then
enter the email address of the receiver.
4. In the title bar of the email, enter the subject of your email.
5. Click Compose email option to enter your message.
6. If necessary, click → Add attachment to add attachment.
7. When composition completes, click → Send.
Edit email account
1. Click the Email icon .
20
2. In Inbox interface, click → Account setting.
3. Make your email account setting according to your needs.
4. Click to return to Inbox interface.
Delete an email account
☆ If you have more than one account, and you have deleted the default account, then
the next account in the list will become default.
1. Click the Email icon .
2. In Inbox interface, click → Account.
3. Click and hold the account you want to delete.
4. In the pop up Account option window, click Delete account.
5. Click Ok to confirm to delete.
Set default email account
You should always have one default email account. If you have more than one account,
you can select any one as default.
1. Click the Email icon .
21
2. In Inbox interface, click →Account setting.
3. Click and select default account
If the default account is deleted, the next account in the list will become default.
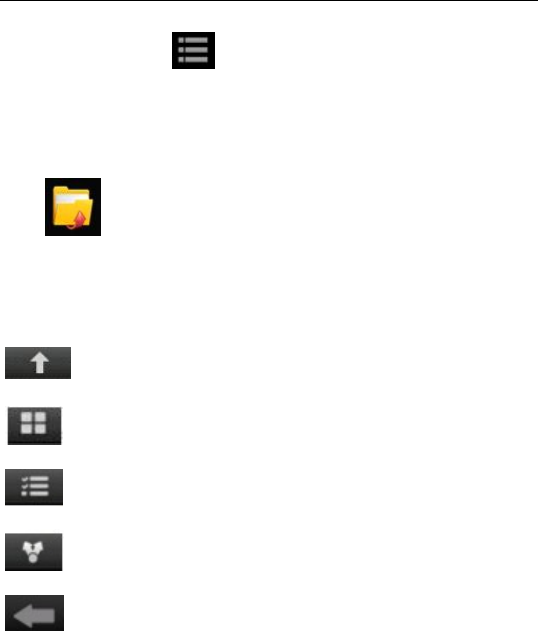
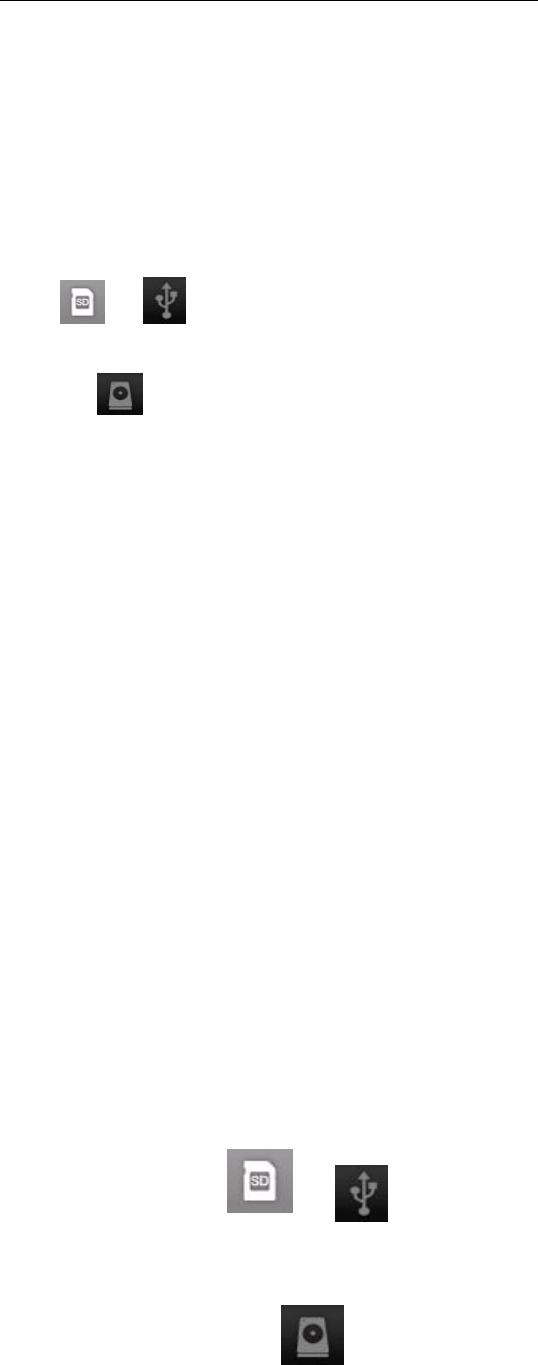
19. File Manager
Click File Browser icon to view the files in all storage mediums (internal
storage of the device, SD card, USB disk), and you can quickly and easily install
Android applications into the device.
Functions of the icons in the screen are as follows:
Previous folder
View
Multi select
Send email
Previous folder
Copy files between PC and device
22
You can use the File Browser to copy files between PC and the external/internal storage
mediums. To copy files to the device, you can first copy them to SD card or USB disk.
☆ The folder name of the internal storage medium is “Local”, the name of the storage
card is “sdcard”, and the name of the USB disk is “udisk”.
☆ The following example is that you copy file into the device from SD card or USB
disk. You can use the same way to copy the file from the device to the SD card or USB
disk. Then connect your storage medium to your PC and copy the files into the desired
folder.
1. Click or to display the files in the storage medium.
2. Click and hold the file or folder you want to copy → click Copy.
3. Click icon to return to internal storage medium → click the folder you
want to copy to → click Paste.
Delete a file
Select the file or folder you want to delete → click Delete → click OK to delete.
20. Music
☆ Supports MP1, MP2, MP3, WMA, OGG, APE, FLAC, WAV, AC3, AAC, AMR,
DTS, RA, M4A formats.
Play music
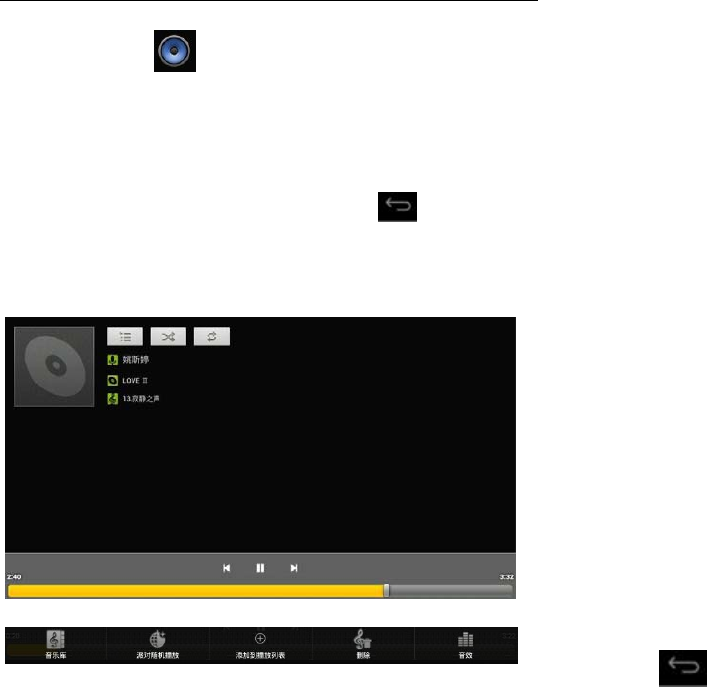
23
1. Click My music icon .
2. Select the track you want to play from All/Album/Artist/Album/Track/Play list/Now
playing.
3. Click the track to play.
4. To return to previous interface while playing a track, click to return to
desktop.
Click the track in the list to enter Music Player. The interface is as follows:
In this interface, you can use the operations such as Search, Play/Pause, Next

24
track/Previous track, Repeat all and Random play.
Operate the track and play list
New play list
1. Click setting, and click Add to play list
2. Enter the name of the play list.
3. Click OK.
Rename or delete the play list
Click and hold the play lists → click Rename or Delete.
New track
1. Click and hold the track you want to add to play list, → click “Add to play list”.
Delete track
Click and hold the track you want to delete → click Delete.
21. HD Video Player
☆ Supports RM, RMVB, MKV (H.264), MPEG (AVI), MOV, FLV, MPG, VOB,
MPE, DAT formats. Support 2160P, 3840×2160.
☆ Supported picture format: JPG, JPEG, BMP and PNG.
25
1. Click the HD Video Player icon .
2. Select the video or picture you want to play from All/Content/My favorite/Personal
list.
3. Click on the screen to adjust the video including volume, pause/play, brightness, etc
4. Click the picture to preview or play in slide.
5. Click to return to list.
22. Settings
Wireless and
network
Wi-Fi Enable Wi-Fi.
Wi-Fi Setting
Mobile network Set roaming, network, APN option.
Mute mode Mute except media and alarm clock.
Volume Adjust volume of media, alarm clock
and notification. Click and move the
26
Sound
slider , then
click OK.
Notification
ringtone
Select desired notification ringtone.
Operation tone Tone played when selecting on screen.
Screen lock
promote tone
Tone played when
locking/unlocking screen.
Display
Brightness Click and move slider
to adjust brightness of the screen and
click OK to confirm.
Auto rotate screen When it is selected, the screen will
switch between Portrait and Landscape
according to the direction of the device.
G-sensor
coordinate system
Use the different coordinate system
mode, which is necessary under certain
conditions.
Animation Whether or not to display in animation
in the operation.
Screen timeout Adjust the time before screen lock.
Use wireless
network
Use wireless network to view location
in applications (such as Google map) .
27
Location and
security
Set screen lock Use picture, PIN or password to lock
screen.
Visible password The entered password is visible.
Select device
manager
Add or delete device manager.
Use security
credential
Allow application to access to security
credentials and other credentials.
Install from TF
card
Install encrypted certificate from SD
card.
Set password Set or change credential password.
Clear storage Clear all credentials and rest the
password.
Applications
Unknown source Allow installing applications supplied
by electronic market.
Manage
application
Manage and delete installed
applications.
Service in process View and control the services in
process.
Storage status View the space occupation of the
application.
Development Set application development options.
Background data Set whether or not the applications will
28
Account and
synchronization
synchronize, send and receive data from
time to time.
Auto
synchronization
Auto data synchronization of the
application.
Privacy
Back up my data Back up the application data, Wi-Fi
password and other settings to Google
server.
Auto recovery When an application is reinstalled, the
system will recover the backup setting
or other data.
Restore factory
setting
Click to clear all data on the device.
Click Reset the device will be reset or
click to cancel and return to
previous screen.
Warning: the following data will be
deleted from the device:
~ Google account.
~ Data and settings of the system and
applications.
~ All downloaded applications.
The following data will not be deleted:

29
~ System software and preinstalled
applications.
~ Files in SD card, such as music and
photos.
Storage
Total capacity
free space
Display when a TF card or USB disk is
inserted.
Remove SD
card/USB disk
When a TF card or USB disk is
inserted, click Remove SD card/USB
disk to remove them.
Format SD
card/USB disk
Format (clear) TF card/USB disk.
Language and
input/output
Select language Select language according to your
location.
Personal
dictionary
Add words to the user dictionary.
Android keypad Screen keypad setting.
Listening example Play short voice examples.
Preferred engine Set the voice combination engine for
switching between text and voice.
Voice speed Play speed after the texts are converted
into voice.
30
Pico TTS Pico TTS setting.
Date and time
Auto Use the network value, i.e. to
synchronize with the network time.
Set date Set date.
Set time Set time.
Select time zone Select time zone.
Use 24-hour time
system
Select 24-hour time system or 12-hour
time system.
Select date format Select date format.
About the
device
View status, battery status, legal
information, model, Android version,
kernel version and version number.
23. HDMI Connection
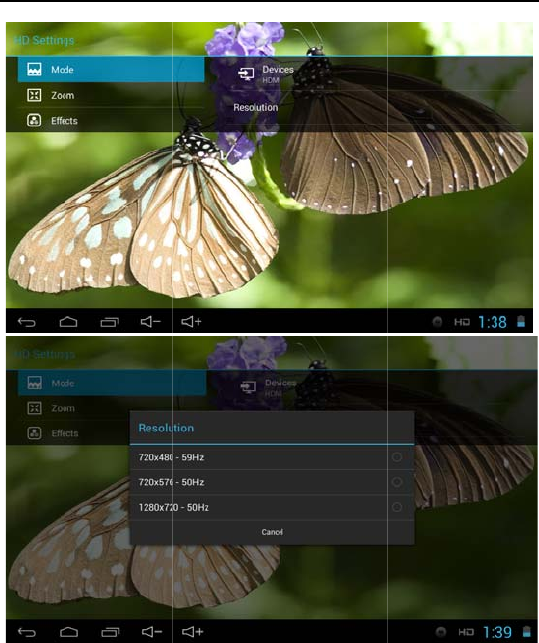
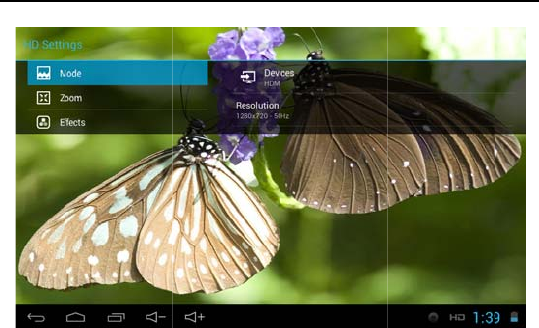
1. Connect HDMI cable to tablet, tap the“HD” icon to enter the“HD settings” as below:
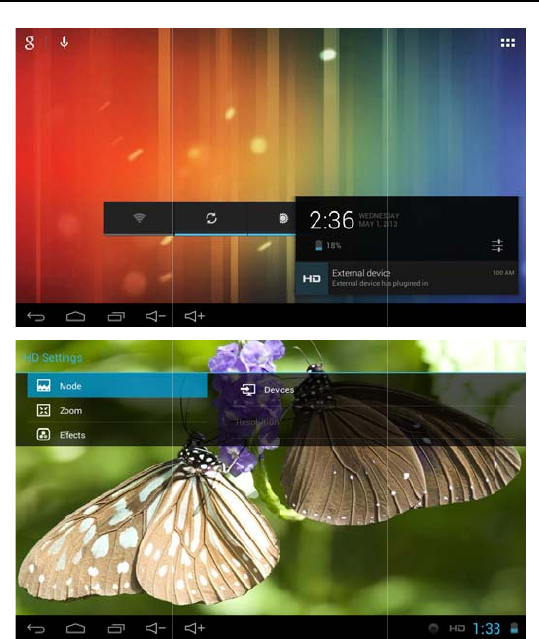
2. Tap the “Devices” icon a
n
31
n
d select “HDMI”.
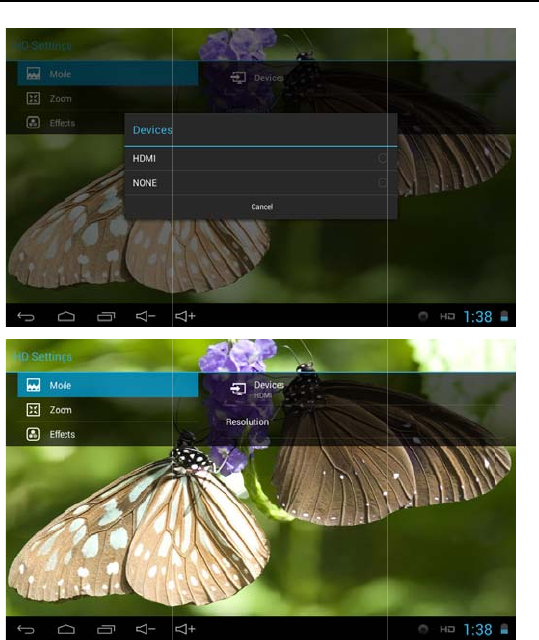
3. Tap “re
s
s
olution” and sele
c
32
c
t “1280x720-50
H
H
z”.
33
34

35
FAQ
Android
Q: What is the Android version?
A: 4.1.1
Basic function of the device
Q: Do I need to charge the device before use?
A: You need to charge the battery for at least 4 hours, however, you can operate the
device while charging. When charging, always use an AC adaptor.
Email
Q: May I use my own email address to send and receive emails?
A: The device support POP3and SMTP accounts. The device may not support some free
email accounts. Please consult the email provider for details.
Storage card
Q: What storage card does the device support?
A: Micro SD card.
Music
Q: What audio formats does the device support?
A: MP2, MP3, WAV, AAC, WMA
Q: How can I add music into the device?
A: You can copy the audio files from PC to SD card or USB disk, then copy them onto
the device through File Browser.

36
Picture
Q: What picture formats does the device support?
A: JPG, JPEG, BMP and PNG.
Q: How can I add pictures into the device?
A: You can copy the picture files from PC to SD card or USB disk, and then copy them
into the device through File Browser.
Video
Q: What video formats does the device support?
A: MPEG1/2/4, MJPG, H263, H264. H264 supports 720×480 other formats support
1280×720.
Q: Are videos in YouTube playable by the device”
A: Yes. You can click YouTube icon to play videos or download Youtube from the app
market.
Q: How can I add videos into the device?
A: You can copy the video files from PC to SD card or USB disk, then copy them into
the device through File Browser.
Wi-Fi
Q: Do I need an eternal Wi-Fi device to connect to internet?
A: No. The device has built in Wi-Fi function.

37
Battery management
The battery is not fully charged when leaving the factory, so we suggest you charge the
battery for at least 4 hours before using.
The useful life of the battery is usually counted by charging times. However, you can try
the following to prolong its useful life:
● Use the device at least once every week.
● Regularly charge the battery fully.
● Never keep the battery empty for a long time.
● Keep the device and the battery away from heat.
Charging the battery
Connect one end of the AC adaptor to the main supply and the other end to the power
jack on the device (it takes about 5 hours to fully charge).
When the battery is full, the battery icon will display
It takes about 5 hours to fully charge an empty battery. You can operate the device while
charging.
Important safety instruction
Please follow the below safety instructions while using the device to avoid risk of fire,
electric shock or injury:
● Keep the product away from rain and humidity.
● Keep the product away from direct sunlight and heat.

38
● Protect the power core. When connecting the power core, do not trample on it or
place anything on it. Use care to protect the connectors of the power core.
● Please only use the approved AC adaptor for charging. Using other adaptors may
cause damage.
● Never dissemble or try to repair the device.
Clean the device
Clean the screen tenderly. To clean the fingerprints or dust on the screen, we suggest
you use the soft cloth used on camera lens. Do not use any rough cloths.
●This device complies with Part 15 of the FCC Rules. Operation is subject to the
following two conditions: (1) this device may not cause harmful interference, and (2)
this device must accept any interference received, including interference that may cause
undesired operation. changes or modifications not expressly approved by the party
responsible for compliance could void the user's authority to operate the equipment.
NOTE: This equipment has been tested and found to comply with the limits for a Class
B digital device, pursuant to Part 15 of the FCC Rules. These limits are designed to
provide reasonable protection against harmful interference in a residential installation.
This equipment generates, uses and can radiate radio frequency energy and, if not
installed and used in accordance with the instructions, may cause harmful interference to
radio communications. However, there is no guarantee that interference will not occur in
a particular installation. If this equipment does cause harmful interference to radio or
television reception, which can be determined by turning the equipment off and on, the

39
user is encouraged to try to correct the interference by one or more of the following
measures:
-- Reorient or relocate the receiving antenna.
-- Increase the separation between the equipment and receiver.
-- Connect the equipment into an outlet on a circuit different
from that to which the receiver is connected.
-- Consult the dealer or an experienced radio/TV technician for help.
FCC RF warning statement: The device has been evaluated to meet general RF
exposure requirement. The device can be used in portable exposure condition without
restriction.