User Manual
1
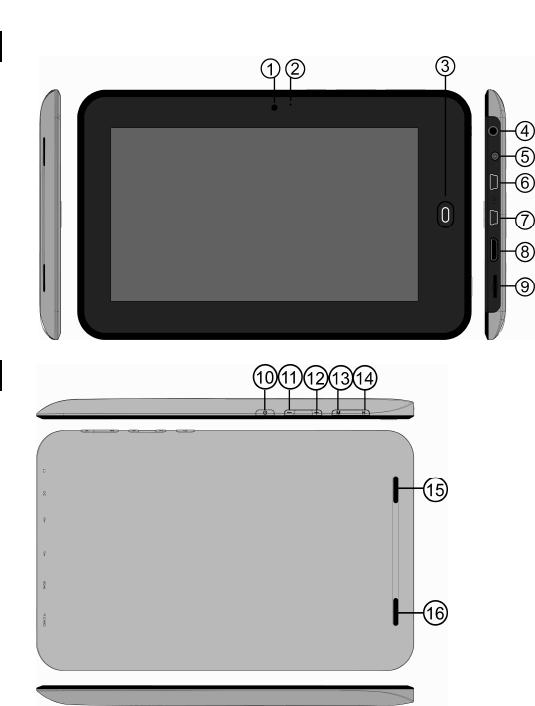
1. Description of appearance
Product structural diagram:

2
Getting started
Statement: our company ceaselessly devotes itself to the improvement product
quality and software versions are updated continuously. If there are differences
between the outgoing product and functions described in this instruction, please
kind prevail. Thank you!
2.1 Battery charging
The tablet palmtop computer is equipped with a built-in battery. System will
suggest to charge when the battery is low.
Power adapter
Connect one end of the power adapter to a socket and the other end to the power
jack of the device to charge the device. (Strongly recommended to use allocative
power adapter from the company to avoid damage to the machine)
Charging methods
1. Plug the power adapters, the charging indicator of the battery will turn red to
1.Camera
2.MIC
3.Return Key
4.Earphone
5.DC in
6.USB port
7.USB Port
8.HDMI port (Disable)
9.TF card slot
10.POWER key
11.VOL- key
12.VOL+ key
13.MENU key
14.Home key
15.Speaker
16.Speaker

3
show that charging is in process. When the battery is full, the charging indicator
goes out.
2. Users can still use tablet palmtop computer during charging.
2.2 Use of memory card
Insert memory card:
Insert the memory card into the card slot and press it into the card slot until hear the
sound of "Click". A prompt will appear on the top left corner of the screen: The
memory card is preparing.
Browse the documents in the memory card:
Run "My Pad" program. Display all files under the root directory and select
"Memory Card 1" to open it to browse the content in the card.
Pull out memory card:
Close all the files opened from the card: click menu, select settings → internal
memory of memory card device → memory card 1 → uninstall memory card. The
system will prompt that “memory card has been safely removed": Gently press the
card and it will popup a part. Then take it out: “memory card has been safely
removed" will be prompted on the top left corner of the screen.
Note:
1. The card should be inserted into correct position, otherwise it will be damaged;
2. Please do not forcibly pull out the card before the appearance of the prompt that
"remove the memory card", lest that the car will be damaged;
3. Memory cards of main brands is suggested to be used to avoid the
incompatibility of the card

4
2.3 Hot swapping between memory card and external USB flash disk
Please do not carry out hot swapping when using or browsing files in memory card
and external USB flash disk. Directly pull out memory card or external USB flash
disk when browsing or using files in them in My Video, My Music, My Album and
other softwares may damage the card and USB flash disk and they may
automatically exit process for self-protection. Please refer to "2.2 Use of memory
card” on insert and extract of memory card. Please close all files being used in the
external USB flash disk before pulling it out.
2.4 Storage space
The device has three storage spaces: internal storage of the device, USB flash disk
and memory card. Internal storage of the device is not displayed; the displayed
folder name of memory card is: "SD Card 1"; the displayed folder name of external
USB flash disk is “USB Flash Disk 1”. System storage area can only be used for
storing system files. The total internal storage space of the device is 4 GB. The
storage space of USB flash disk and memory card is determined by their specific
capacity.
Please refer to 9.7 storage card and device storage for related specific information
on storage.
2.5 ON OFF
1. Starting up: when the battery has sufficient electricity, long press the power key
for 2 seconds to start up. Screen lock will be entered after starting up. Slide unlock
icon upward to enter main interface; (slide it downward to turn off sound and slide
it downward again to turn on sound)

5
2. Shutdown: Press the power key (4 seconds) and the system will popup
shutdown confirmation interface. Slide the following shutdown icon upward to shut
down, while slide the above shutdown cancel icon downward to return to the
shutdown interface.
3. Hibernation: press the power key (1 second) and the system will enter
hibernation state. The screen of LCD will turn black while hibernation. Press the
power key can wake up the system under hibernation state and it will enter screen
lock after being waked up. If low battery is happened under hibernation state, the
device will shutdown after automatic staring up to save electricity.
2.6 Interface rotation
The system interface can automatically rotate screen according to the direction of
the device. The system interface will be displayed by vertical screen when hold
endwise, while by horizontal screen when hold widthwise. The rotation time of the
screen is within 2 seconds. Refresh the screen to make it return to normal state after
switch.
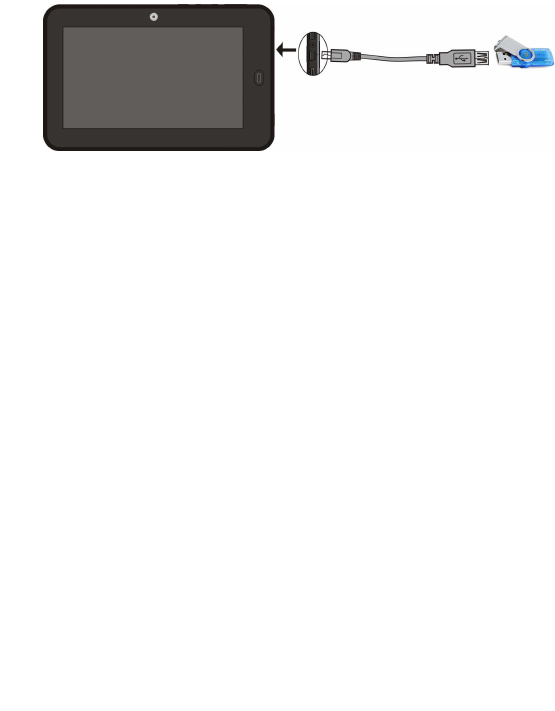
2.7 External USB flash disk
Insert USB flash disk to USB port by USB transfer line USB, as the following
figure. USB flash disk can be used after connected to the device. Files can be
copied between the device and memory card.
6
2.8 Network connection
Wireless network:
1. Select "settings" icon under the shortcut bar of the desktop
2. Select "wireless network" in the Settings menu
3. Select check box behind WI-FI to open WI-FI
4. Select "WI-FI setting" option to set WI-FI network
5. All AP the device can search will be listed. Click the AP to be connected in the
options
6. If the AP was successfully connected before, the information will be stored.
Select "connection" in the window popping up to start connection, while select
"forget" to eliminate AP information
7. If the AP is not encrypted, select "connection" in the window popping up to start
connection.
8. If the AP is encrypted, input password in the window popping up and click
"connection" to start connection
9. After success of network connection, WIFI icon will appear on the status bar on
the top of the desktop
7
3. Input operations
3.1 Keyboard
When you use procedures or files needing to input text and digitals, the touch
keyboard will automatically appear on the screen.
Note: the device supports external USB keyboard, but when using an external USB
keyboard, some keys may not be normally used
3.2 Touch screen
Touch screen can induct moving track of fingers, which can carry out the following
operation:
Note: please do not place objects on the surface of the touch screen, which may
scratch or crush it
Click: Select an icon and click it to select the icon or option needed
Long press: Select an icon and long press it to select the icon and it can be dragged
to the quick bar at the bottom of the desktop to display
Drag: Drag icons on the desktop to move them among different pages in the module
interface. Application icon also can be dragged to quick bar.
Touch pen can be used to replace figures during the process of using the touch
screen
3.3 Mouse
The device supports external USB mouse. Insert USB mouse to carry out functions
of click, selection, dragging, sliding and popping up menus by right click.
Field
FieldField
Field
Code
CodeCode
Code
Changed
ChangedChanged
Changed
8
4. Desktop
4.1 Status bar
The status bar is on the top of the screen. It has one software button on the left and
five on the right. They are desktop button, refresh button, screenshots button,
volume increase or decrease button, menu button, back button. The status bar also
shows signal strength of WI-FI, battery status, time and other system information.
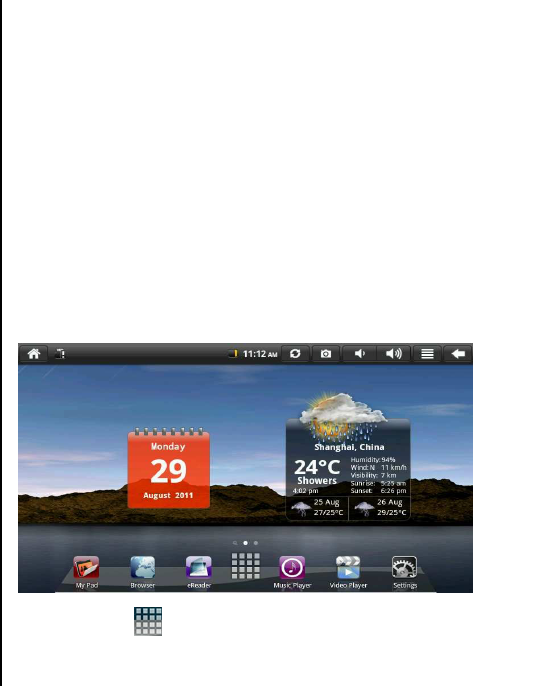
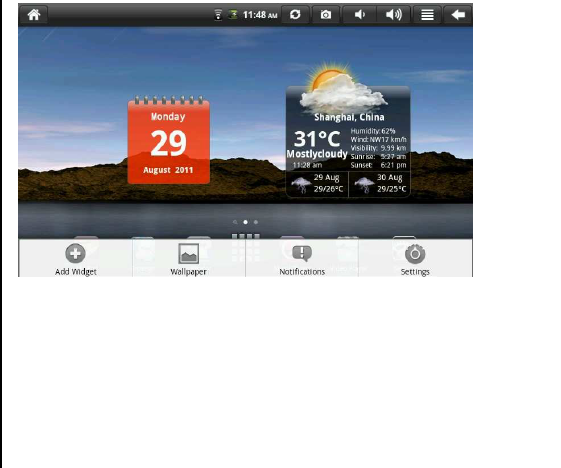
4.2 Main interface
The tablet palmtop computer main interface procedure page includes two modes:
desktop small tool mode and application icon mode. The two modes can be
switched by the central shortcut button. The interface of the desktop small tool
mode is showed as the following figure:
Click the button on the quick bar to enter application icon mode interface.
Application icon mode interface is showed as the following figure:

9
Click button to enter desktop small tool mode interface
4.3 Shortcut
In desktop small tool mode interface, press menu button or click menu chart
on the top of the status bar. Shortcut menu will popping up on the bottom
of the screen. Menu items includes: add widget, wallpaper, search, notifications,
desktop settings and system settings. It is showed as the following figure:
10
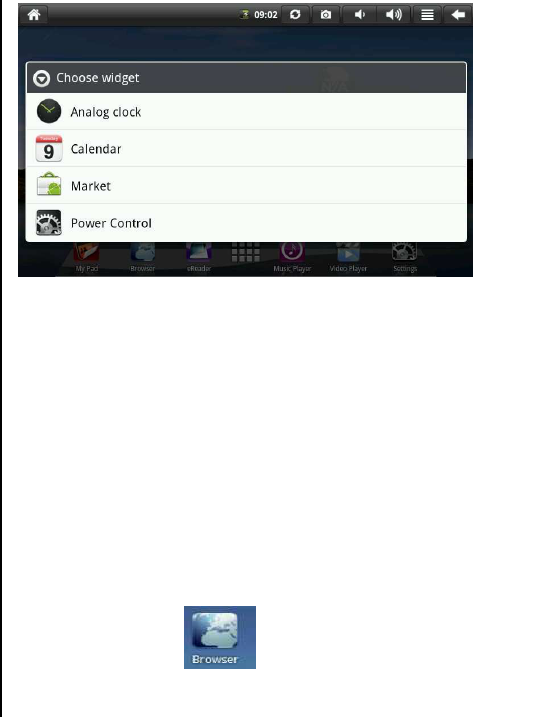
4.4 Shortcut with small tools
Widget
If you want to add a widget to the main screen, in desktop small tool mode interface,
please press menu - add - widget, and choose a widget to add to the main screen.
Click the shortcut icon on the main screen to carry out corresponding shortcut
operation.
11
4.5 Use of desktop small tools
Users can add, delete, install desktop small tools, add, delete application icons,
more and adjust the positions of icons, drag icons within the working area or
between the working area and the quick bar, add or delete icons etc.
In desktop small tool mode interface, long press the small tool icon. Small check
will pop up on the interface and litter bin signage will pop up in the centre of the
quick bar. The icon can be dragged to any position of the desktop at the moment
and also can be dragged to the litter bin to be deleted.
5. Web surfing
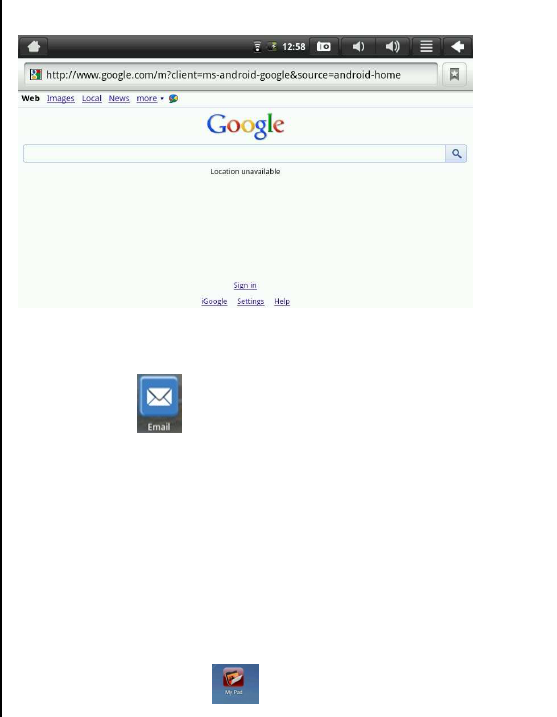
Users can access to Internet by the connection of the browser.
Click the browser icon on the desktop to open web browser. The
following interface pops up when opening webpage:
12
6. Typical applications introduction
6.1 Email
Click email icon to enter Email. The following operation can be carried
out:
1. Set email account
2. Set up new email
3. Receive and send mails
4. Download or open attachments
Tip: Shortcut menu will pop up by pressing menu button
6.2 File browsing
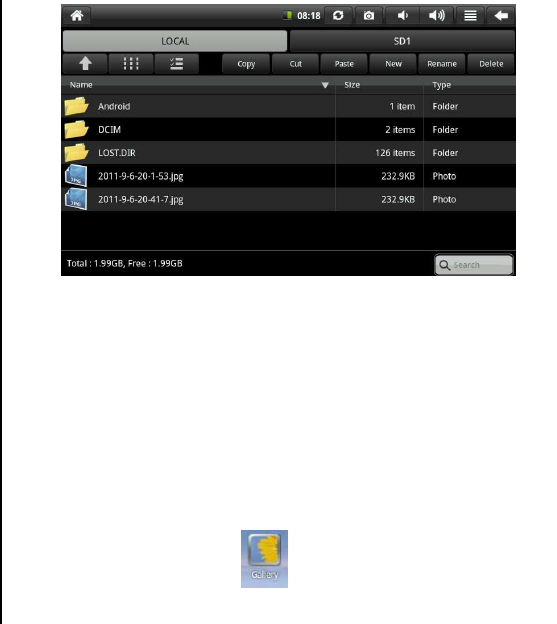
Click the file browsing icon to enter file browsing interface
13
Click to enter browsing interface to carry out copy, cut, paste, new, rename, delete
and other operations on LOCAL, SD1 and USB flash disk.
Files installation:
To install software in the file browser, you only need to click the installation file,
the extension name of which is .apk. The installation prompts will popup. Select
installation to install the software to the device.
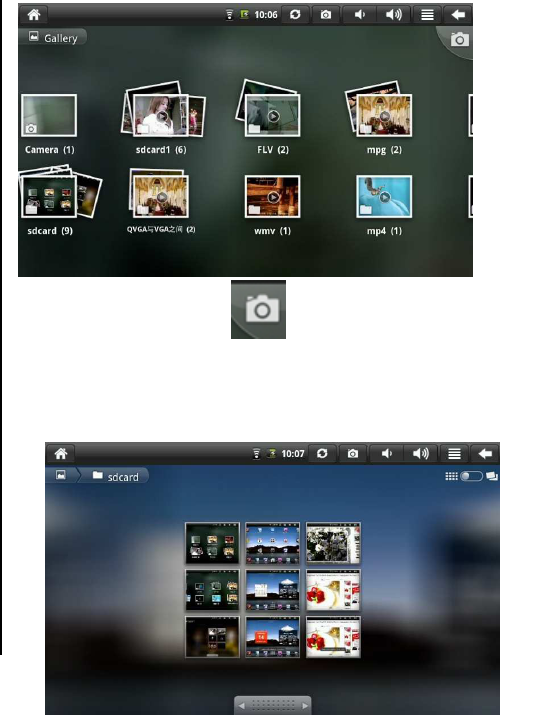
6.3 Multimedia library
Click the multimedia library icon to enter multimedia library interface, the
interface is showed as following:
14
1. After entering gallery, click in the top right corner of the screen to
enter photo and video mode.
2. Click the menu button to pop up shortcut menu, which includes options of
slideshow, multichoice and Settings

15
3. Click slideshow to enter slideshow mode
4. Click Settings to enter setting interface.
5. Click thumbnails of pictures in gallery interface to enter full screen mode. Click
the screen and magnified icon and miniature icon will pop up for magnified and
miniature operation. Press the menu button and shortcut menu will pop up for the
following operation, such as sharing pictures, deleting pictures, building pictures,
setting pictures as wallpapers or contact icon and more options. Click more to read
detailed information of pictures, display pictures on maps, carry out slideshow and
other operations.
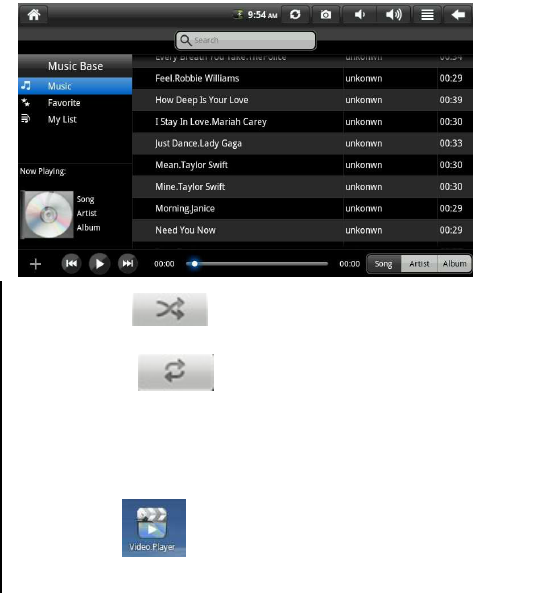
6.4 Music
Click the icon to enter music
Click the menu to pop up the following shortcut menu. Media Base can be selected:
Music, My Favorite, My List.
Click a song to enter play interface.
16
1. Click the icon to enter shuffle mode
2. Click the icon to switch between all repeat mode and single play
mode
6.5 Video display:
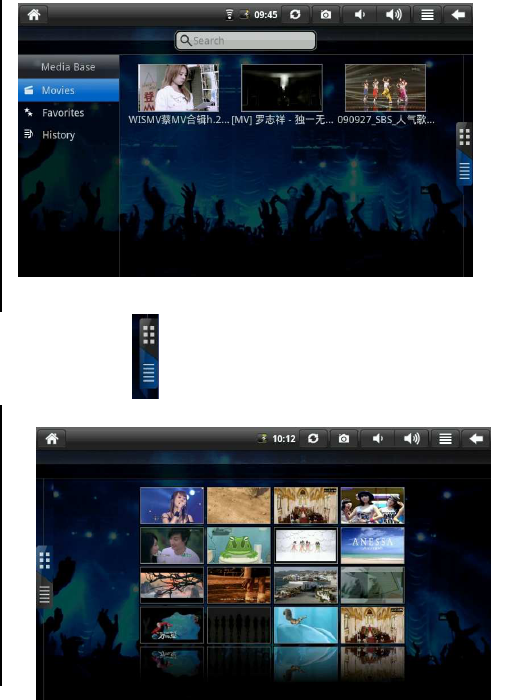
Click the icon to enter video interface. Media Base can be selected:
Movies, Favourites, History. The interface is showed as following:
17
1. Click a video to play.
2. Click the icon to check the list. The interface is showed as following:
18
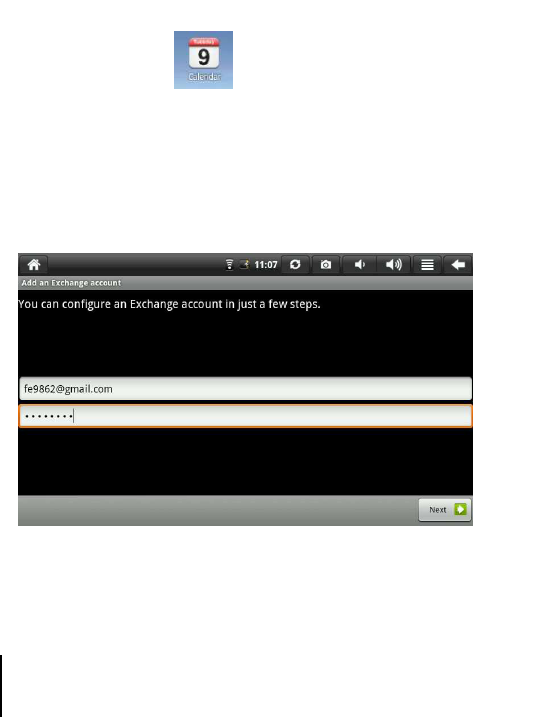
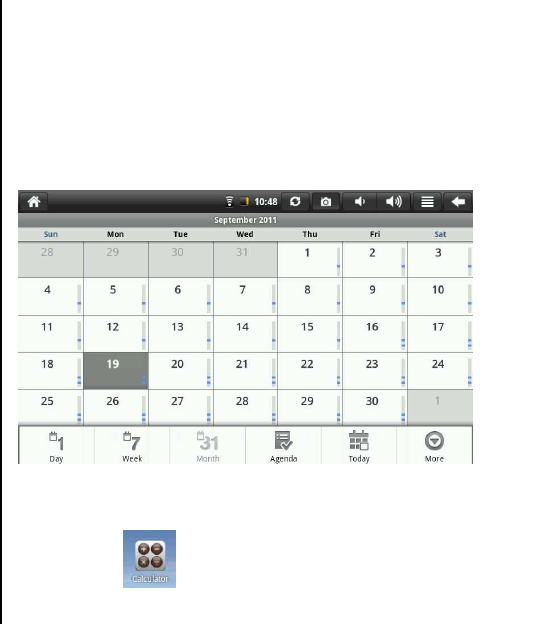
6.6 Calendar
Click the calendar icon to check date and time, add memorandum and do
other operation. The calendar can be used only after being set. The specific
operation is as following:
1. First of all, connect the device to network, and then open the calendar. A dialog
box read add an Exchange account will pop up. Input email address and password,
then click Next.
2. Continue Next according to the prompt after setting server. Note: The step of
entering service setting may not be connected by one time and several times of try
may be needed to connect it.
3. The interface will automatically exit and return to the main interface after setting.
Click to enter calendar to carry out date, memorandum and other operations. (Note:
the email address set for the first time can not be deleted, while the email
19
address set for the second time can be deleted the second set can be deleted. Email
address only can be added. Remove the email address just by restoring the factory
default)
4. Click the menu button to pop up the following shortcut menu, corresponding
operation can be carried out to choose 1 day, 7 weeks, 31 months, agenda, today,
more and so on. The interface is shown as following:
6.7 Calculator
Click the icon to carry out calculation. It is showed as the following
figure:
20
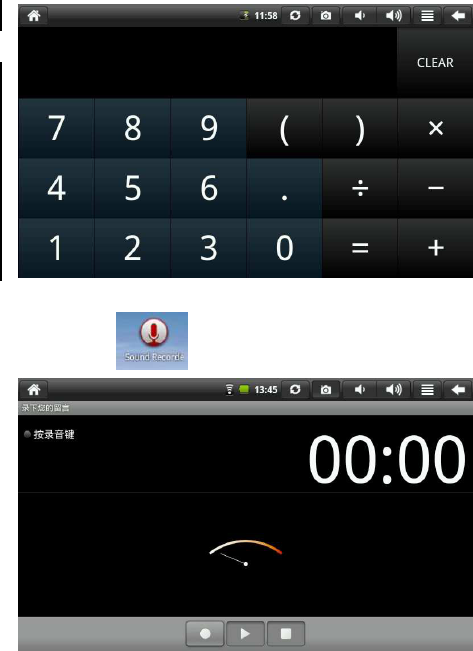
6.8 Recorder
Click the icon to enter audio interface
21
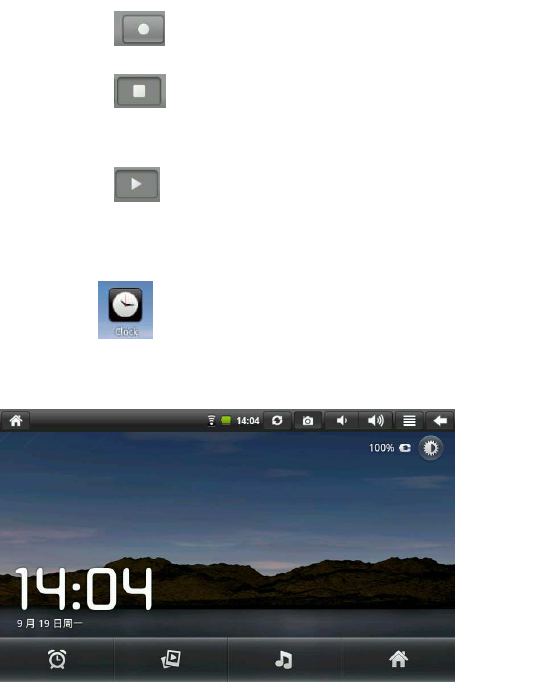
1. Click the icon to carry out record.
2. Click the icon to stop record in the process of recording. A prompt read
that use the recording or give up will pop up.
3. Click the icon to listen to the recording recorded just now.
6.9 Clock
Click the icon to enter desk clock interface, which has alarm clock, photo
browsing, music play, exit and other functions. Corresponding functions can be
operated. It is showed as the following figure:
22
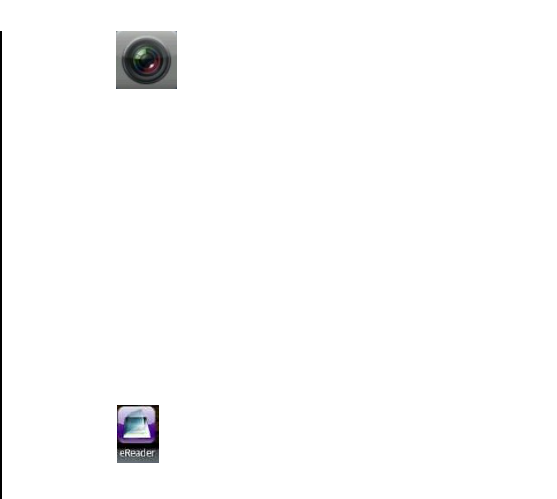
7. Camera
Click the icon to enter photo mode interface of the camera.
The operation is showed as following:
1. Click the icon on the bottom right corner to take photos. Photos can be stored in
DCIM/CAMERA under the root directory of memory card
2. Remove the slider on the right icon upward to switch to photo mode to
photography mode
3. Click the icon on the top right corner to check the last photo being taken.
Slideshow, delete, share, clip, rotating photos to left and right side, setting as
wallpaper or contact icon can be operated on the photo. Click the finish bottom to
return camera interface
7.1 eReader
Click the icon to read the books being added. It is showed as the following
figure:
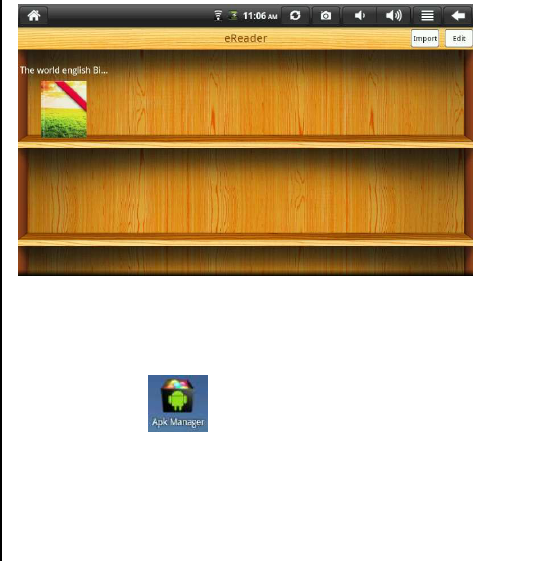
23
Click "import" on the top right corner to add books to the memory card. Books can
also be deleted by "editing".
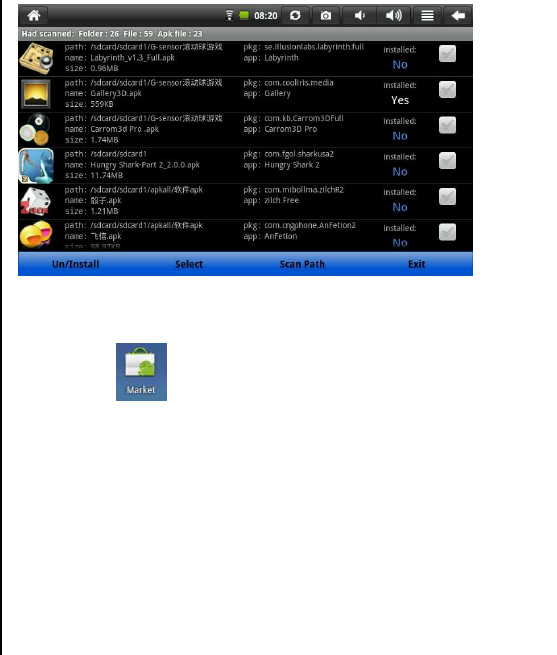
7.2 APK manager
Pre-installed software in the APK manager can not be display. The APK manager
can display installed or uninstalled APK in the memory card. Un/install, select,
scan path, exit and other functions can be operated. The interface is showed as
following:
24
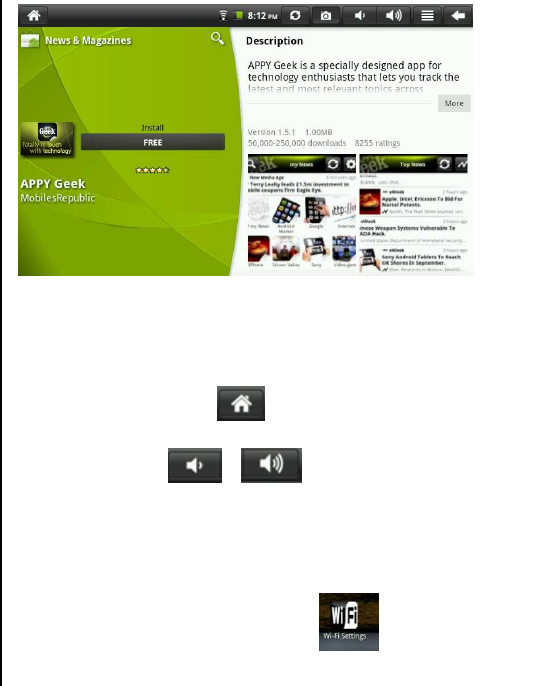
7.3 Electronic market
Click the icon
1. Electronic market should be set before being use. First, open the network and
open electronic market to pop up dialog box dialogue box read that add Google
account. Input email address and password, and click login.
2. The interface will automatically exit after setting and return to the main interface.
Click market to enter it.
3. If you want to download applications, click electronic market icon on the main
interface to select the application needed. Click install. The interface is showed as
following:
25
8. Tips and skills
8.1 Some convenient operating way
Return to home screen – click
Adjust volume – click /
8.2 Convenient settings
8.2.1 Wireless Internet connection:
Click the wireless Internet connection icon to enter wireless Internet
connection interface. The interface is showed as following:
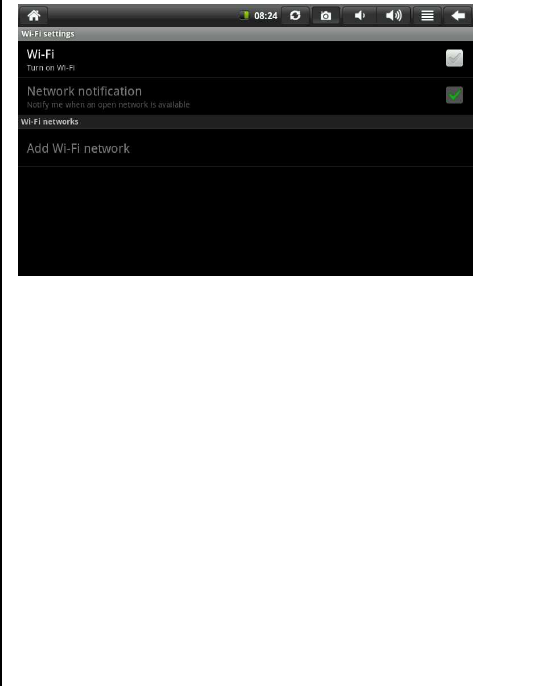
26
After inputting user name and password, click “connect” to connect to wireless
network
8.3 Use battery prompts
The wide screen of the device will cost a lot of power. If you want to extend service
time of the battery, you can reduce the operating frequency of the following
functions
1. Watch movies, listen to music or take photos
2. Display brightness: please press menu button - settings - sound and display
(display settings) - brightness (turn down brightness)
3. Network search: please press menu button – settings - wireless network - connect
to wireless - WIFI settings - network notification
27
9. Personalized settings
Click desktop settings on the shortcut menu to carry out personalized
settings
9.1 Wireless and network
1. To open WIFI, please press menu button - system settings - wireless and network
- selected check box behind WIFI
2. To set and manage wireless access point, please press menu button - system
settings - wireless and network - WIFI settings
Please refer to 8.2.1 Wireless Internet connection in convenient settings for specific
information
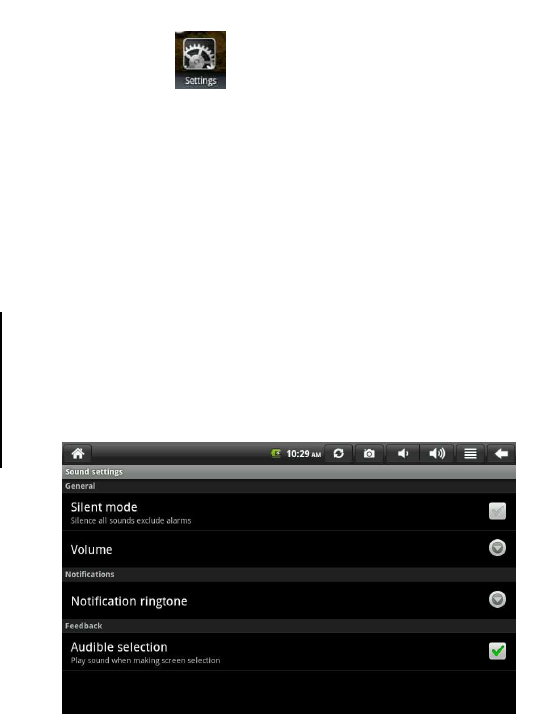
9.3 Sound
Set ringtone, notification and screen brightness

28
Silent mode
To set all sounds mute expect the media and alarm clock, press menu button -
system settings - sound (sound settings) - silent mode.
Volume
To set volume of music and video, press menu button - system settings - sound
(sound settings) - volume.
Notification ringtone
To set defaulted notification ringtone, press menu button - system settings - sound
(sound settings) - notification ringtone
Audible selection
To make sounds while screen selection, press menu button - system settings - sound
(sound settings) - tactile feedback
To carry out some UI interacted vibrations on soft keys, press menu button - system
settings - sound (sound settings) - tactile feedback
9.4 Display
Automatic screen rotation
Press menu button – settings - display (display settings) - automatic screen rotation
to set automatical change of display direction. If the check box behind the direction
is checked, rotary interface of the device will automatically follow to rotate.
Animation
To display all or part of the animations on windows, press menu button - system
settings - display (display settings) – animation.
29
Brightness
To adjust the screen brightness, press menu button - system settings - display
(display settings) – brightness.
Screen standby
To adjust the delay before the automatic locking of the screen, press menu button -
system settings - display (display settings) - screen standby.
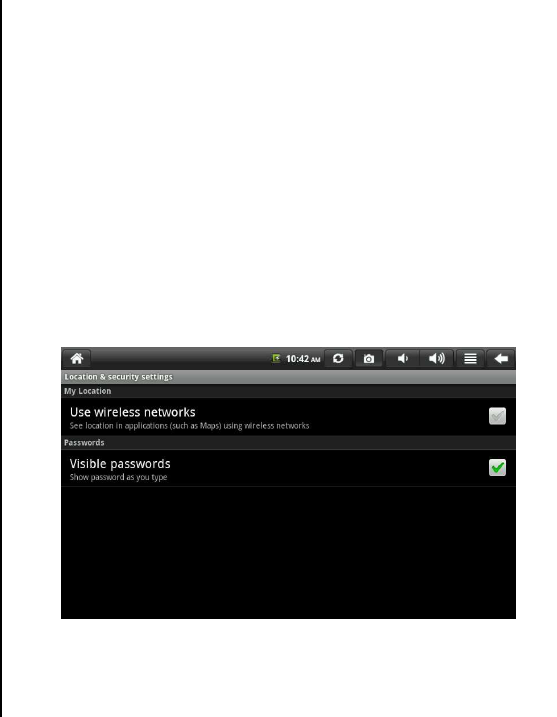
9.5 Location & security
Use wireless network
To use wireless network to check location in applications, please press menu button
- system settings - location & security - use wireless network
Passwords
To show password as you type, please press menu button - system settings -

30
location & security - visible passwords
9.6. Application
Unknown source
Allow installation of applications from non-electronic markets after selected.
Manage applications
To manage and remove installed applications, press the menu button - system
settings - applications - manage applications.
Running services
To view and control the services currently running, press the menu button - system
settings - applications - running services.
Development
To set development options of applications, press the menu button - system settings
- applications - development.
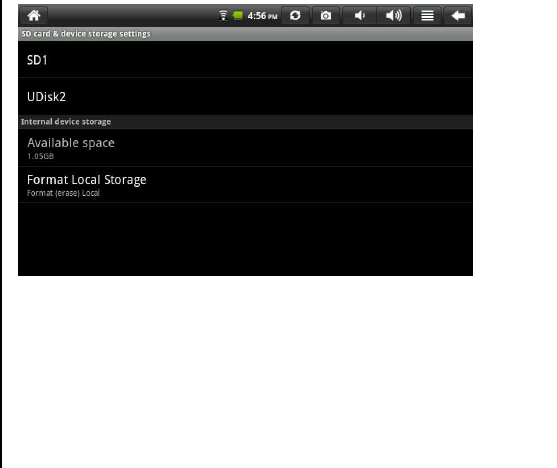
9.7 SD card & device storage
Check the available storage space
31
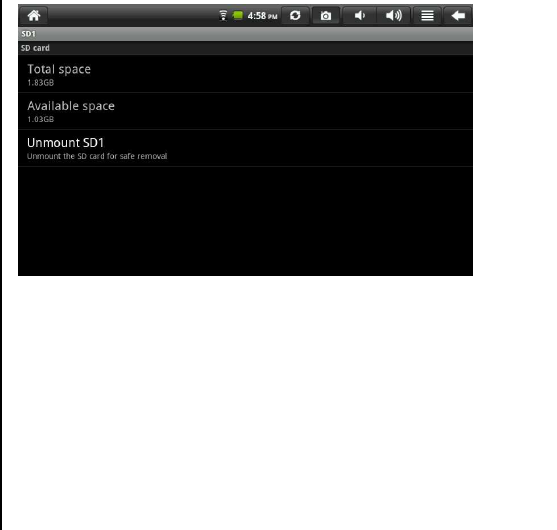
Storage devices (SD card and USB flash disk)
To check and operate the storage devices, such as unloading and so on, please enter
menu - system settings -SD card and internal device storage. Select corresponding
storage device under storage device directory, such as SD1. Total space and
available space can be checked after entering storage device interface. Unmount
operation also can be carried out. The interface showed as the following figure:
32
Device storage
To check device storage, please enter menu - system settings - SD card & device
storage. It can be checked under device storage directory.
Format local storage
If to format (clear) local storage, please press menu button - system settings - SD
card & device storage - format local storage
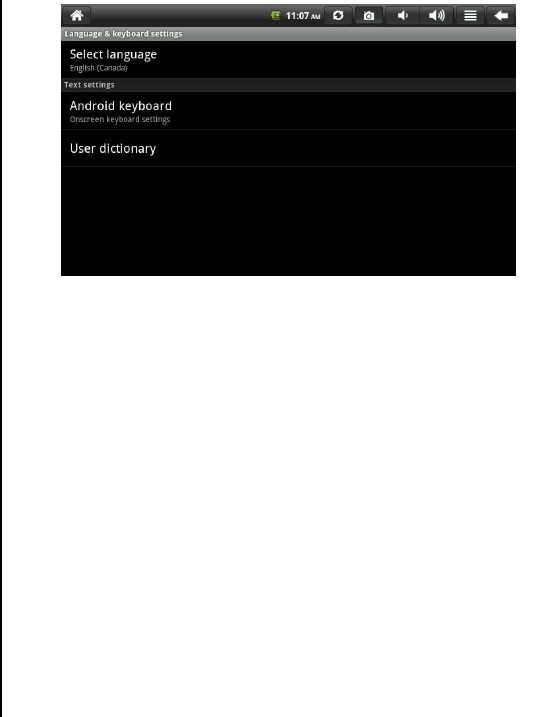
9.8 Language & keyboard
Set language (language and area), text input and automatic correction options.
33
Select language
To select language and area, please press menu button- system setting - language &
keyboard – select language
Android keyboard
To carry out Android keyboard settings, please press menu button - system settings
- language & keyboard - Android keyboard
User dictionary
To add words to user dictionary and delete words from user dictionary, please press
menu button - system settings - language & keyboard – user dictionary
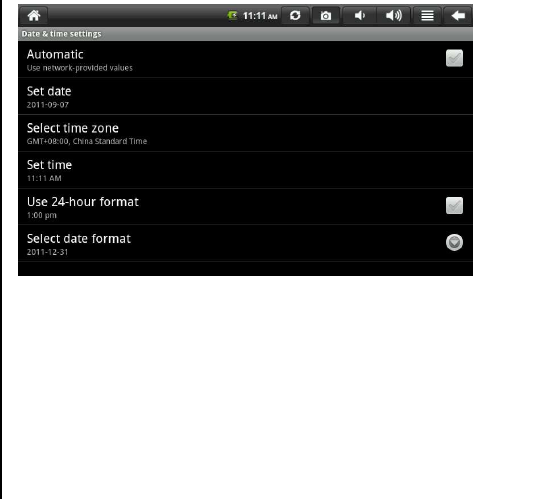
9.9 Date & Time
To set date, time, time zone, 24-hour format and date format, please press menu
button - system settings - date & time.
34
9.10 Screen calibration
To calibrate the touch screen, press the menu button - system setting - touch screen
calibration. Follow the prompts to do touch screen calibration. Appropriate prompt
will appear for returning to the setting list after the calibration is completed.
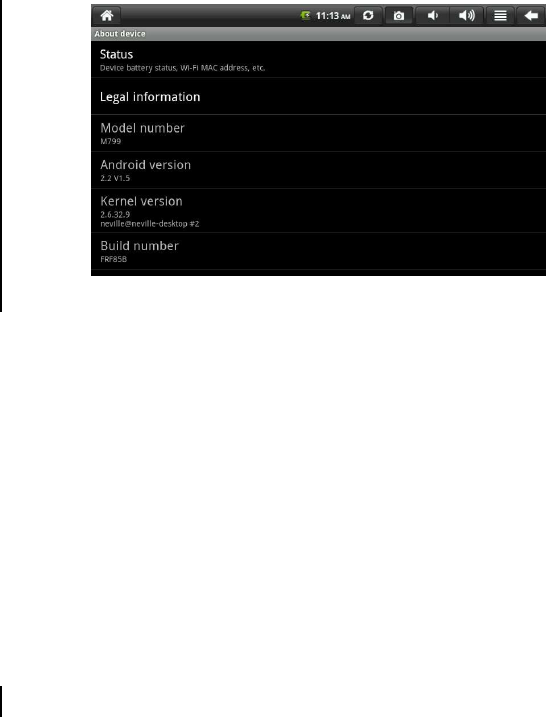
9.11 About device
To check legal information, device status and software versions
35
Status
To check battery status, battery power, boot time and WIFI MAC address, please
press menu button - system settings – about device - status
Legal information
To check related legal information, please press menu button - system settings -
about device - legal information
Model number
To check model number, please press menu button - system settings - about device
- model number
Kernel version
To check kernel version, please press menu button - system settings - about device -
kernel version

36
Build number
To check build number, please press menu button - system settings - about device -
build number
10. Lock of tablet palmtop computer
Unlock screen/device:
Short press power key to enter screen lock when the system enters dormant state.
Slick unlock icon upward to unlock and enter the interface before hibernation.
11. Troubleshooting
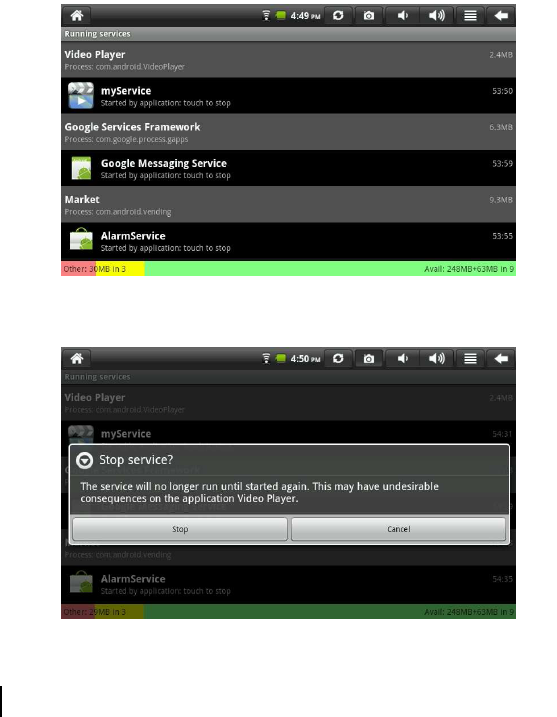
11.1 Close application
All applications having been opened will occupy memory in the device. Too much
applications having been opened will influence the running speed of the device.
Therefore, unused applications should be close in time to reduce memory usage and
keep the normal running speed of the device.
To close applications, please click the icon on the quick bar on desktop to
enter system settings interface of system setup. Select applications - running
services. The interface is showed as the following picture:
37
Click the application needed to be closed and the window read that stop service will
pop up. The interface is showed as follow:
Click stop to close the application and the application will disappear in the
windows being used.
12.2 Forced shutdown

38
Long press the power key of the device for 7 seconds, forced shutdown will be
operated on the device.
12.3 Restore defaults
To restore the device to original factory settings and clear all information, press the
menu button - system settings - privacy right - restore factory settings.
Warning: After selecting to reset the device, Google account, data and settings of
system and application and downloaded applications will be deleted. Please
cautiously use this function.
There is one ferrite core attached with the adapter.
Warning: Changes or modifications to this unit not expressly approved by the party
responsible for compliance could void the user’s authority to operate the equipment.
NOTE: This equipment has been tested and found to comply with the limits for a
Class B digital device, pursuant to Part 15 of the FCC Rules. These limits are
designed to provide reasonable protection against harmful interference in a residential
installation. This equipment generates, uses and can radiate radio frequency energy
and, if not installed and used in accordance with the instructions, may cause harmful
interference to radio communications.
However, there is no guarantee that interference will not occur in a particular
installation. If this equipment does cause harmful interference to radio or television
reception, which can be determined by turning the equipment off and on, the user is
encouraged to try to correct the interference by one or more of the following measures:
Reorient or relocate the receiving antenna.
Increase the separation between the equipment and

39
receiver.
Connect the equipment into an outlet on a circuit different from that to
which the receiver is connected.
Consult the dealer or an experienced radio/TV technician for help.
NOTE: FCC Radiation Exposure Statement: This equipment complies with FCC radiation exposure
limits set forth for an uncontrolled environment. This transmitter must not be co-located or operating in
conjunction with any other antenna or transmitter.