SHUOYING UMPC9901 Portable Netbook User Manual shouying
Shuo Ying (ShenZhen) Industrial Company Limited Portable Netbook shouying
SHUOYING >
user manual
1
Table of Contents
1. Overview ........................................................................................................................................................................................ 2
2. Structure.......................................................................................................................................................................................... 2
3. Operation Instructions .................................................................................................................................................................... 4
3.1 Turn-on ........................................................................................................................................................................... 4
3.2 Turn-off........................................................................................................................................................................... 4
3.3 Reset ............................................................................................................................................................................... 4
3.4 Charge............................................................................................................................................................................. 5
3.5 Network Setup................................................................................................................................................................ 5
3.6 Website Browse .............................................................................................................................................................. 5
3.7 Instant Communication .................................................................................................................................................. 5
3.8 One Button Internet Access............................................................................................................................................ 5
3.9 Office Software............................................................................................................................................................... 6
3.10 Media Playback ............................................................................................................................................................ 6
3.11 File Management.......................................................................................................................................................... 7
4. Cautions.......................................................................................................................................................................................... 8
Appendix: Internet Access Instructions............................................................................................................................................ 10
2
1. Overview
The Internet Access Laptop is a mini multifunctional laptop equipped with low power consumption ARM926-EJS based on
AK7802 CPU and pre-installed the Microsoft Windows CE 5.0 operating system. As for its functions, please refer to the
following:
1) Wireless Internet Access
2) Wire Internet Access
Media Playback
Mobile Office
Games and Entertainment
The mini laptop is also characterized by features like low power consumption (the battery operation time is way longer than that
of normal laptop batteries), small size and light weight and so on, suitable for internet access, entertainment, basic computer
operation learning as well as computer-aid learning for children etc.
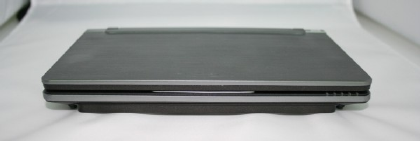
2. Structure
2.1 Outer Structure
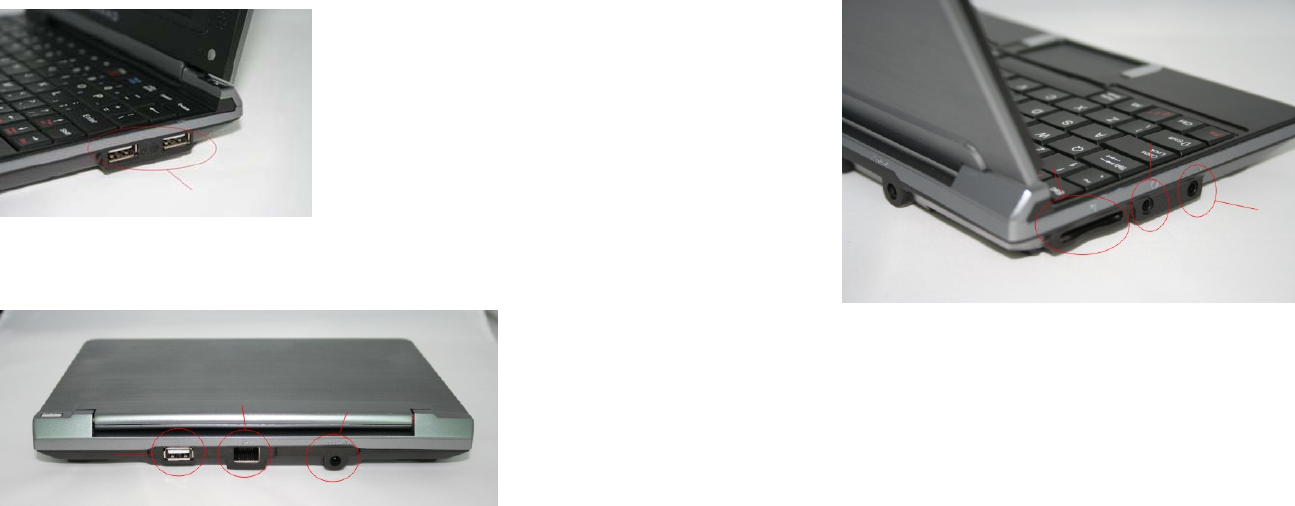
2.2.1 Keyboard and Mouse Ports
3
Notes: The both ports are only available for keyboard and mouse but not for memory stick.
2.2.2 Memory Stick Port, Internet Access and External Power Sockets
2.2.3 SD Card, Headset and Microphone Sockets
Keyboard and Mouse Ports
Memory Stick Port
Internet Access Sockets External Power Sockets
4
3. Operation Instructions
3.1 Turn-on
Press and hold the Power button till relevant text message appears on the LCD screen and the Turn-on indicator lights up
simultaneously, indicating that the laptop is on, and then release the power button.
3.2 Turn-off
There are alternatives offered to turn off the laptop:
Alternative I: Hardware off: Press and hold the Power button till the Turnoff image shown below appears and then release the
Power button.
Alternative II: Software off: Click Startup, select Power Off and in the following dialogue box, select Yes to turn off and No to
quit.
3.3 Reset
When the operating system runs into a deadlock, poke the Reset Hole next to the Battery Chamber Cover at the bottom of the
laptop with a pointed object to shut down the system.
SD Card Socket
Headset Sockets
Microphone Sockets
5
3.4 Charge
Plug in the external power adapter and the Charge Indicator turns on. When charge is over, the indicator turns off automatically.
3.5 Network Setup
Refer to the “Internet Access Instructions” and set up the network to make sure the laptop is able to access to the internet
normally.
3.6 Website Browse
The precondition for internet website browse is to ensure that the laptop connects to the internet normally via either wire and
wireless internet access devices or ADSL according to the Internet Access Instructions.
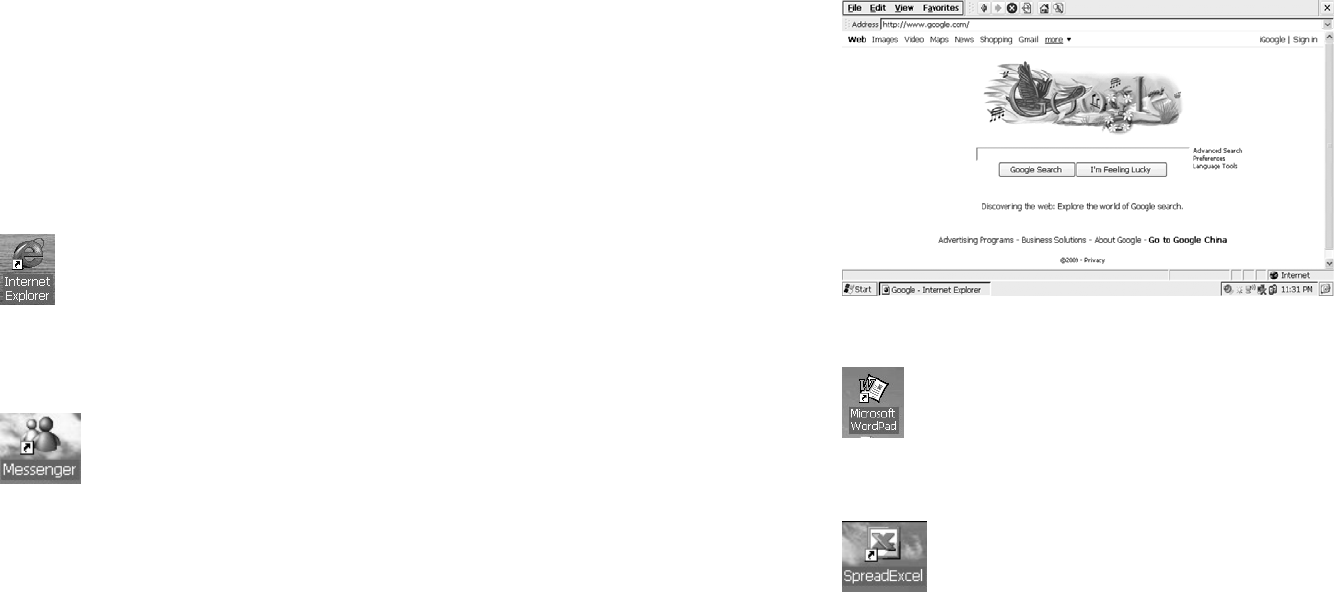
Internet Explorer
Double click the Internet Explorer icon on the Desktop to start surfing the internet.
3.7 Instant Communication
3.7.1 MSN
MSN Instant Communication
Double click the Messenger icon on the Desktop to launch the program, click “Click here to log in” and select “Net Messaging
Service” and then press OK. Enter username and password and click OK to log into the MSN interface.
3.8 One Button Internet Access
To enable the said function, you have to set up a shortcut key in compliance with the Section 4.3 “Shortcut Keys Setup”.
3.8.1 Internet Surfing
Press F6 directly to surf the internet.
6
3.9 Office Software
3.9.1 Word
Word Program
Double click the Microsoft Word icon on the Desktop to start editing text.
3.9.2 Excel
Excel Program
Double click the Excel icon on the Desktop to start processing spreadsheet.
3.10 Media Playback
3.10.1 Windows Media Player
Due to its built-in hardware video decoder, the Window Media Player is able to play back video files with large bit-rate faster
7
than the Player.
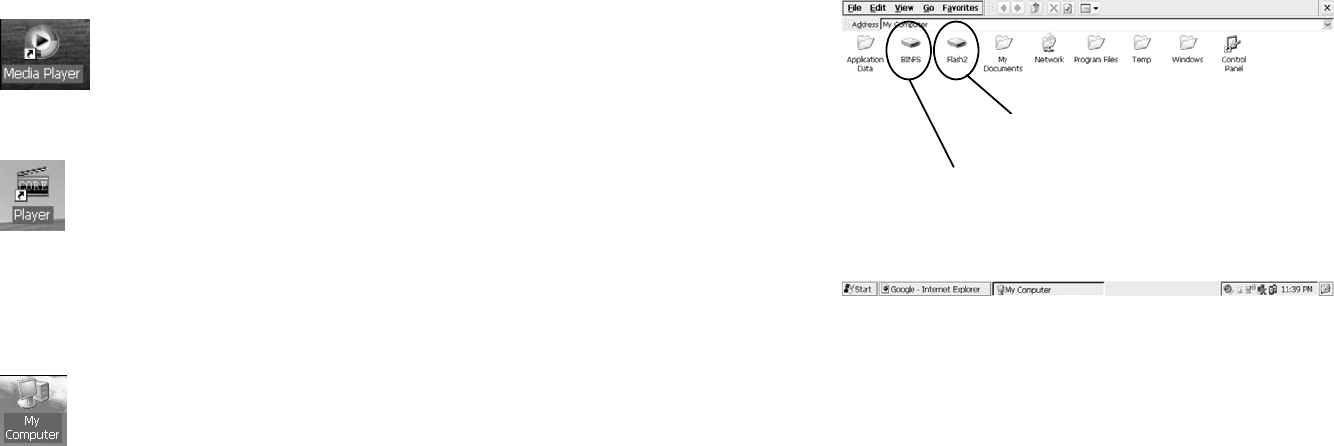
Hardware Decoding Windows Media Player
Double click its icon on the Desktop and select a target video file to start playback.
3.10.2 Player
Software Decoding Media Player
Double click the Player icon on the Desktop. It supports more file formats than the Window Media Player does as it adopts
software decoding, directly resulting in relatively slow playback speed.
Notes: The laptop supports video formats like MPEG2, AVI, 3GP and MP4 etc. and might not be compatible with other
video formats.
3. 11 File Management
Open My Computer
Double click the My Computer icon on the Desktop to display file directory.
3.11.1 Built-in Flash
8
SD Card
Insert the SD card and its partition symbol appears in the Resource Manager. Double click its partition symbol to browse the files
on the SD card.
Memory Stick
Notes: Only the USB port at the back of the laptop can accept memory sticks and those on the side mouse and keyboard.
Plug in the memory stick via the USB port at the back and its partition symbol appears in the Resource Manager.
Double click My Computer and the following interface pops up. In order to prevent data loss, never store any data on the
Desktop but only to the Flash 2, SD card and memory stick.
4. Cautions
Trouble-shooting
The purpose of this section is to guide you through problems you run into during laptop operation.
4.1 Unable to turn on
If using the battery to power the laptop, check its electricity in the first place and charge it with the power adapter delivered
together the laptop in the situation of low electricity.
If using the external power supply, check the main power socket, power cable and other switches that could affect power supply
Built-in Flash for storing user’s documentation
System Flash for storing the Windows CE
system files and unavailable for users
9
to the laptop.
4.2 Shortened Battery Operation Time
Check the battery if it is fully charged. Usually, it takes 2.5hours to charge the battery fully in the turn-off condition and longer in
the turn-on condition.
Due to its chemical properties, the battery gradually shortens the operation time following repeated charges and discharges,
which is quite normal.
4.3LCD Blackening
Check if the laptop is in hibernation or set up to shut down the LCD screen in a certain period of time in the operating system. If
so, adjust the brightness of the backlight to solve this problem.
If finding abnormalities occurred to the operating system or applications, you have to reboot.
4.4 Peripheral devices unable to operate
Connect peripheral devices to the laptop via corresponding ports: Memory Stick to Back USB Port; Keyboard and Mouse to Side
USB Port; Headset and Microphone to Related Sockets (for details, refer to the Section 2 “UMPC Structure”)
Never use inferior quality memory stick, SD card, mouse and keyboard as well as other peripheral devices.
4.5 Unable to play back audio and video files
Check if the audio and video files are corrupted.
Check if the target file format is compatible: Supported file formats include MP3, WMA, MPEG2, MP4, AVI and 3GP etc. and as
of other formats, conversion is required.
4.6 Unable to store data
Never store data on the Desktop to prevent possible data loss.
Check if the hard disc is fully occupied. If it is, please delete useless data directly or transfer them to a memory stick or SD card
etc. for storage.
4.7 Unable to install or run applications
The laptop only supports applications based on the Windows CE5.0.
You can also search out some Windows CE5.0 compatible green software from the internet and copy them to the laptop directly.
4.8 Unable to play back audio and video files from memory stick and SD card
Check if the memory stick and SD card are of high quality and connected well to the laptop.
Check if the target file format is supported by the laptop. Supported file formats include MP3, WMA, MPEG2, MP4, AVI and
3GP etc. and as of other formats, conversion is required.
10
Another reason is that the data transfer speed is too low due to memory stick and SD card in terrible quality. Under this
circumstance, it is strongly suggested to copy those files to the laptop first and then start playback.
4.9 Unable to surf the internet
Confirm the internet access approach first.
If accessing the internet via Modem ADSL, check if the modern is working normally and connected to the laptop correctly.
If accessing the internet via router, check if the router is working normally, connected to the laptop correctly and its DHCP
service is enabled.
If accessing the internet via wireless WIFI router, check if the router is working normally, connected to the laptop correctly and
the network password is set up appropriately (it is strongly suggested not to encrypt the wireless router).
4.10 Unable to play back audio and video files on line, and also unable to play online games.
Together with games based on the X86 Windows, the online audio and video files are not supported by the system. When playing
back audio and video files, launch the 3rd party player (not the built-in Window Media Player) Core Player and then select target
files for playback.
Appendix: Internet Access Instructions
1. Wire Internet Access.................................................................................................................................................................. 10
1.1 Dynamic IP....................................................................................................................................................................11
1.2 Static IP......................................................................................................................................................................... 14
2. Wireless Internet Access............................................................................................................................................................ 16
1. Wire Internet Access
You can access to the internet via the following 2 methods on the precondition that the LAN through which you can access to the
internet, is available.
11
1.1 Dynamic IP
If the existing LAN router adopts the approach of Dynamic IP, follow the following steps to set up the laptop:
Turn on the laptop and plug in the network cable.
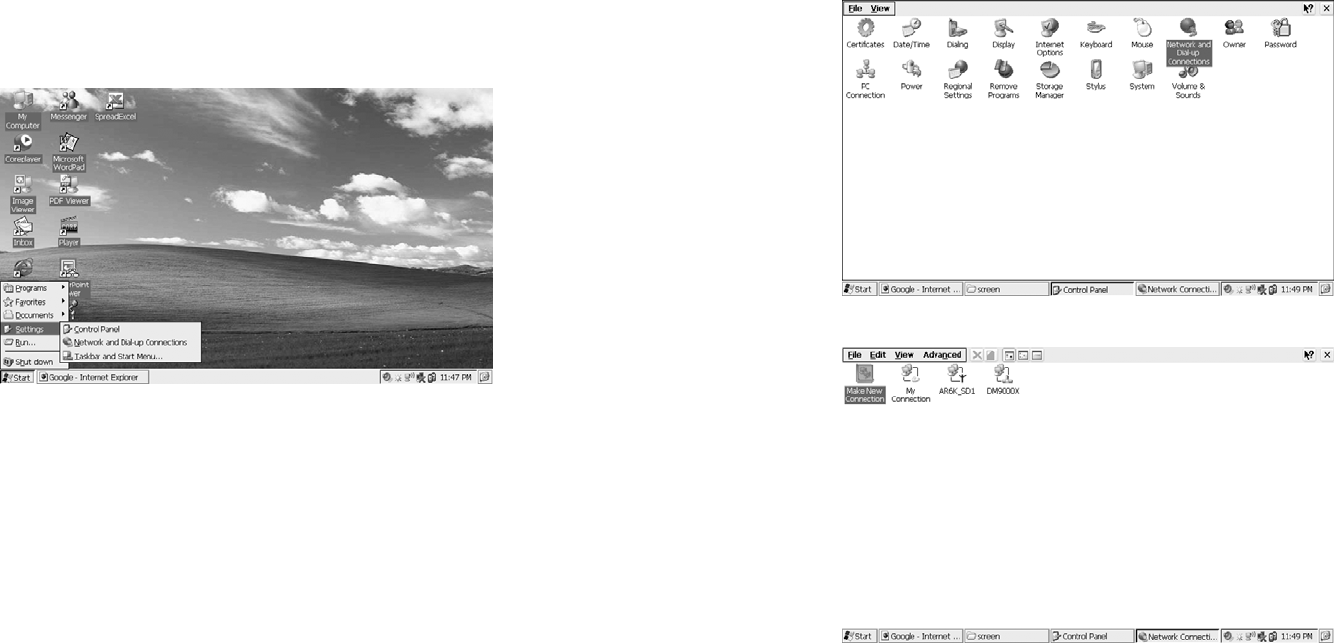
Log into the Control Panel.
12
Double click “Network & Dialup Connection”.
Double click “DM9000X”.
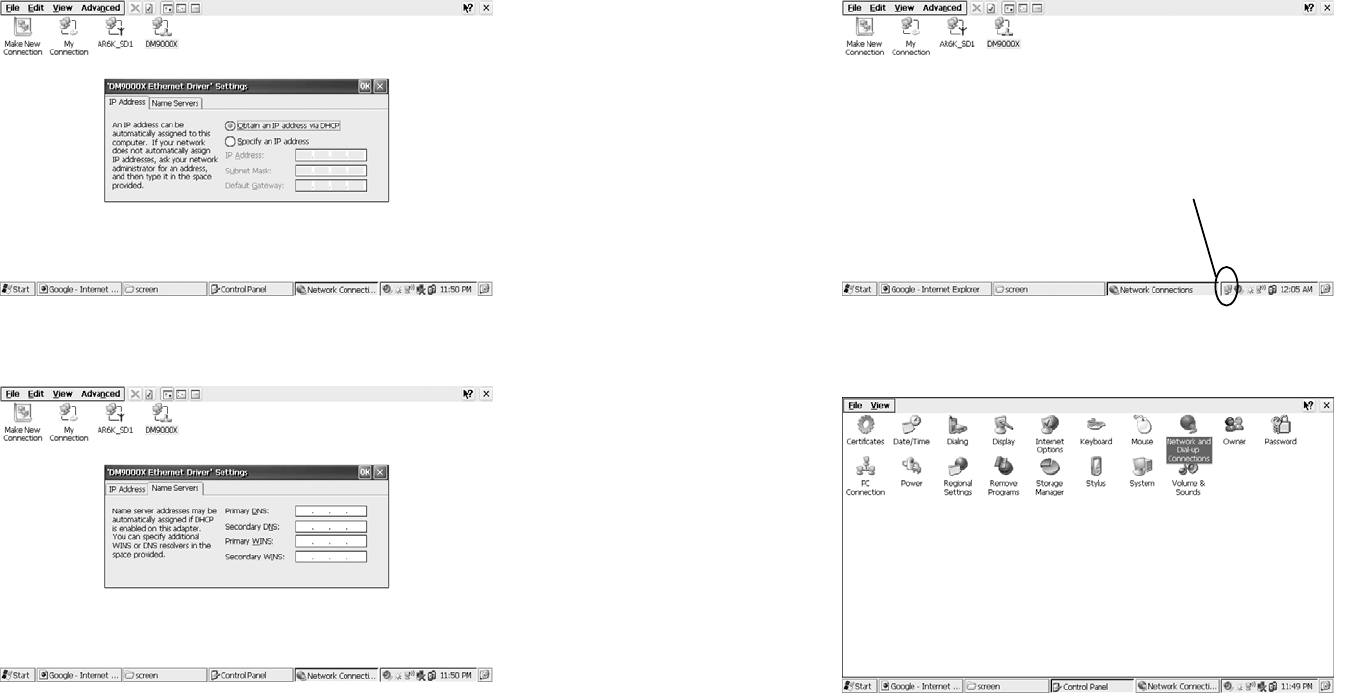
13
Select “IP Address” and “Obtain IP address through DHCP” as shown above. Select “Nameserver” and empty all the fields as
shown below.
Click OK and the system will link to the network in 15s when plugging in the network cable.
14
1.2 Static IP
If the existing LAN router adopts the approach of Static IP, follow the steps as in 1.1 to enter the Control Panel
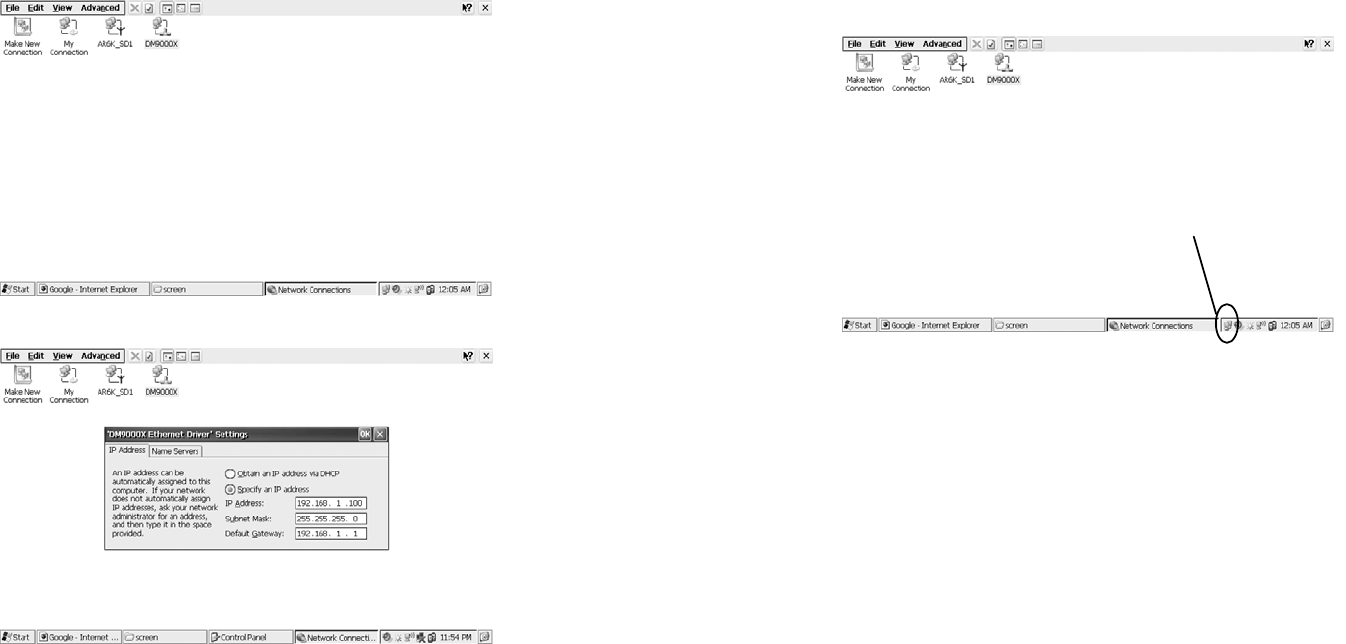
If access succeeds, the following icon appears.
Otherwise, a cross is attached to the icon.
15
Click “Network & Dialup Connection”.
Select “DM9000X” to log into the network setup interface.
Select “IP Address” and “Appoint a IP address”.
16
Enter the IP address, NetMask code and default Gate as shown above. For details, please refer to the router configuration and
contact the Network Supervisor if necessary. When setup is done, plug in the network cable and the system will link to the
internet automatically.
2. Wireless Internet Access
To access the internet through this way, the precondition is that the internet wireless LAN is available.
Turn on the laptop and the Desktop appears.
If access succeeds, the following icon appears.
Otherwise, a cross is attached to the icon.
17
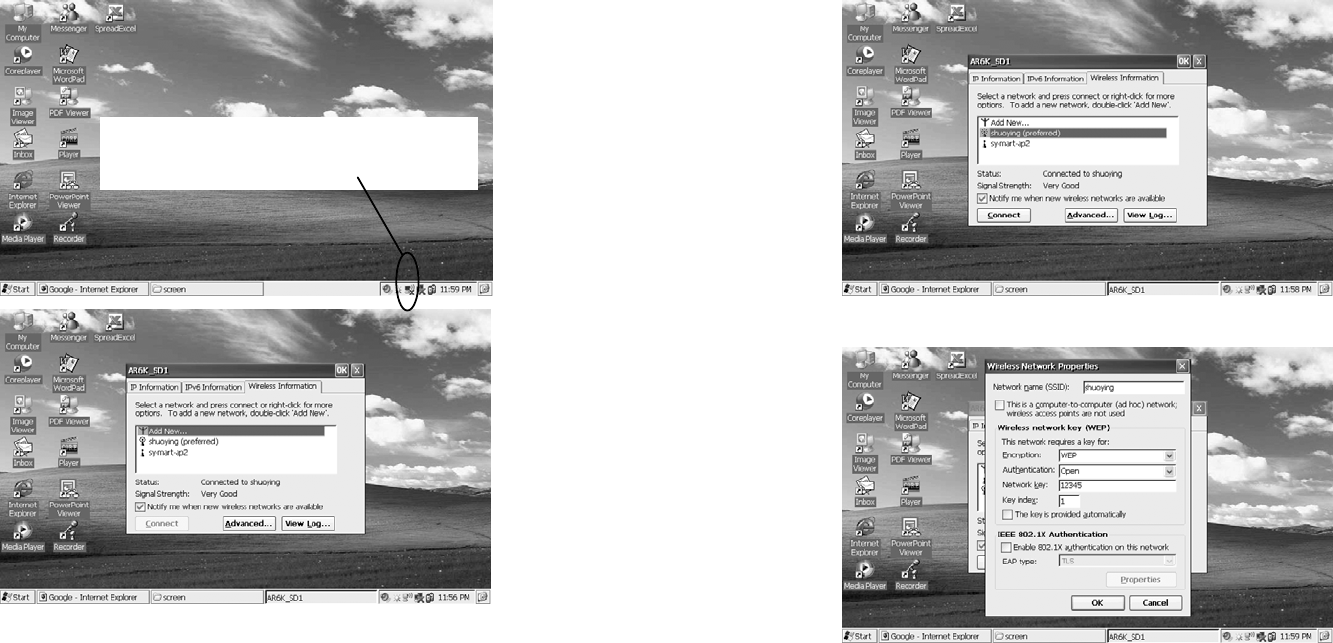
Select “Wireless Information”.
Double click the Wireless Network icon in the Taskbar to
log into the network setup interface.
18
Select the target wireless network and click “Connect”.
If password is enabled, enter the password and click OK.
Notes: The settings concerning Encryption, ID Verification and Network Password must be identical with that of the wireless
router. Otherwise, you can not link to the internet. When access succeeds, the following icon appears.

19
Shortcut Keys Function List
No. Shortcut
Keys Function Remarks
1 F6
Internet (One
Button Internet
Access)
Press F6 to open the Internet Explorer.
2 F8 Volume + Increase volume
3 F9 Volume - Decrease volume
4 F11 BackLight + Brighten the backlight
5 F12 BackLight - Dim the backlight
6 PrtScr/SysRq
Screen Snap (print
out the screen)
Print out the screen and keep screen snaps under the
directory\Flash2\Screen as BMPs.
FCC WARNING STATEMENT
FCC NOTE:
THE MANUFACTURER IS NOT RESPONSIBLE FOR ANY RADIO OR TV INTERFERENCE CAUSED BY
UNAUTHORIZED MODIFICATIONS TO THIS EQUIPMENT. SUCH MODIFICATIONS COULD VOID THE USER’S
AUTHORITY TO OPERATE THE EQUIPMENT.
Access Success Indicating Icon
You can surf the internet accordingly.
20
This device complies with Part 15 of the FCC Rules. Operation is subject to the following two conditions:
1. This device may not cause harmful interference, and
2. This device must accept any interference received, including interference that may cause undesired operation.
Note: This equipment has been tested and found to comply with the limits for a Class B digital device, pursuant to part 15 of the
FCC Rules. These limits are designed to provide reasonable protection against harmful interference in a residential installation.
This equipment generates, uses and can radiate radio frequency energy and, if not installed and used in accordance with the
instructions, may cause harmful interference to radio communications. However, there is no guarantee that interference will not
occur in a particular installation. If this equipment does cause harmful interference to radio or television reception, which can be
determined by turning the equipment off and on, the user is encouraged to try to correct the interference by one or more of the
following measures:
—Reorient or relocate the receiving antenna.
—Increase the separation between the equipment and receiver.
—Connect the equipment into an outlet on a circuit different from that to which the receiver is connected.
—Consult the dealer or an experienced radio/TV technician for help.
5)ZDUQLQJVWDWHPHQW
7KHGHYLFHKDVEHHQHYDOXDWHGWRPHHWJHQHUDO5)H[SRVXUHUHTXLUHPHQW
7KHGHYLFHFDQEHXVHGLQSRUWDEOHH[SRVXUHFRQGLWLRQZLWKRXWUHVWULFWLRQ