SIGFOX SMBST SMBS-T Mini base station User Manual USERS MANUAL
SIGFOX SA SMBS-T Mini base station USERS MANUAL
SIGFOX >
USERS MANUAL

Mini base station installation
guide
Ref.: MAN/DPL/000
Rev.: 0.2
Date:03/05/2016
NOTICE: The contents of this document are proprietary of SIGFOX and shall not be disclosed, disseminated,
copied, or used except for purposes expressly authorized in writing by SIGFOX.
© Copyright SIGFOX. All rights reserved Page 1 of 16
SIGFOX Mini base station
Installation Guide
DISTRIBUTOR
APPROVED:
AUTHOR SIGN-OFF SIGNATURE #1 SIGN-OFF SIGNATURE #2
SIGN-OFF SIGNATURE #3 SIGN-OFF SIGNATURE #4 SIGN-OFF SIGNATURE #5

Mini base station installation
guide
Ref.: MAN/DPL/000
Rev.: 0.2
Date:03/05/2016
© Copyright SIGFOX. All rights reserved Page 2 of 16
Table of contents
1 Installation site recommendations ............................................................................................ 4
2 Specifications............................................................................................................................. 5
3 Warning statements ................................................................................................................... 6
4 Bill of material........................................................................................................................... 7
5 Cable Ethernet POE .................................................................................................................. 9
6 Electrical connection ................................................................................................................ 9
7 DEL Status .............................................................................................................................. 10
8 Antenna ................................................................................................................................... 10
9 Antenna installation (outdoor configurations) ...................................................................... 10
10 Mast mounting ........................................................................................................................ 12
11 Waterproofness ........................................................................................................................ 13
12 Earthing the base station ........................................................................................................ 14
13 Connectivity ............................................................................................................................. 15
14 Base station « switching on » procedure ................................................................................ 15
15 Sigfox Backend Commissioning ............................................................................................. 16

Mini base station installation
guide
Ref.: MAN/DPL/000
Rev.: 0.2
Date:03/05/2016
© Copyright SIGFOX. All rights reserved Page 3 of 16
Changes description
Version Description Author Date
0.0 Draft C.Cazeaux 13/01/2016
0.1 §3 Warning statements added C.Cazeaux 30/03/2016
0.2 Addition of Antenna requirements S. Barreiro 03/05/2016

Mini base station installation
guide
Ref.: MAN/DPL/000
Rev.: 0.2
Date:03/05/2016
© Copyright SIGFOX. All rights reserved Page 4 of 16
1 INSTALLATION SITE RECOMMENDATIONS
SIGFOX SMBS-T series are multiband, low profile, small factor base stations intended for extension of the
SIGFOX base station family. These series are dedicated for quiet radio environments with limited performance
for capacity and blocking resistance. This gives a complementary solution for the SIGFOX network based on
macro cell SBS-T base stations. These series are intended for outdoor and indoor installation with aluminum
chassis, suitable for antenna mast mounting, shelter cabinet mounting, rack mounting or desktop installation.
Regarding capacity performances, the SMBS-T is able to receive about 100 000 SIGFOX messages per day.
The installation site, and in particular the antenna elevation, shall be chosen so that the number of
SIGFOX devices covered by the SMBS-T antenna is compliant with this capacity.
The choice of the installation site is of the highest importance for proper operation of the station. Hereafter are
the minimum distances from other radio transmitters in order to ensure proper operation. If the most severe
constraints cannot be met, it is still possible to install a filter cavity in front of the mini station to avoid noise
injection in the operating band. This will lead to a loss of sensitivity from 1 to 2 dB, depending on the filter.
If a cellular, or broadcast antenna is installed too closed to the SMBS-T antenna after the installation of the
SMBS-T, the consequence will be a significant increase of the noise floor and a significant decrease of the
number of messages received by the base station. A first corrective action should be to set the internal LNA of
the SMBS-T in bypass mode. The consequence is a loss of sensitivity of 10dB (more in band edges). If there
are still too many lost messages, the installation of a cavity filter will be necessary.
The following recommendations are available whatever the operating band of the mini station: from 865 to
870MHz and from 902 to 928MHz.
Whatever the type of installation (indoor or outdoor), the mini base station must be installed so that its RF
connector must not receive more than -20dBm signals from 0 to 821MHz and from 925MHz to 2.5GHz.
In terms of distance from potential aggressors it means:
For indoor installation: The mini base station must be installed at a minimum distance of 10 meters from
any fixed radio device (such as WiFi access points for example).
For outdoor installation without cavity filter:
Co-hosting with cellular or broadcast antennas is forbidden.
Regarding site location versus other emitter sites, the minimum distances to respect in a horizontal plane line
of sight are:
Distance from a broadcaster of 100KW (FM or
digital TV DBV-T)
4000m
Distance from the front of a distant cellular
antenna of 2KW (typically in wide area)
500m
Distance from the front of a distant cellular
antenna of 150W (typically in urban area)
150 m
Outdoor installation with a cavity filter from those allowed by SIGFOX (Elythe or Matech):
Co-hosting with cellular antennas is allowed provided that the SIGFOX antenna is located in the vertical axis
of the cellular antenna at a minimum distance of 2 meters.
Regarding site location versus other emitter sites, the minimum distances to respect in an horizontal plane
line of sight are:
Distance from a broadcaster of 100KW (FM or
digital TV DBV-T)
500m
Distance from the front of a distant cellular
antenna of 2KW (typically in wide area)
50m
Distance from the front of a distant cellular
antenna of 150W (typically in urban area)
30 m

Mini base station installation
guide
Ref.: MAN/DPL/000
Rev.: 0.2
Date:03/05/2016
© Copyright SIGFOX. All rights reserved Page 5 of 16
2 SPECIFICATIONS
RADIO INTERFACE CHARACTERISTICS
Standard SIGFOX UNB bidirectional protocol
Operating bands SRD 868 (865 – 870 MHz) or ISM 902 (902 – 928 MHz) (software configurable)
Monitored spectrum 192kHz
Radio Mode Access Point
Receiver Sensitivity -142dBm @ 100bps; -134dBm @600bps
Transmit Power Up to 1 Watt, configurable remotely according to country regulations
Antenna Connector Type N Female
INTERFACES
Ethernet 1x10/100BaseT (RJ45) – POE+ type
USB 2xUSB2.0 ports (for cellular connectivity backhaul and monitoring. Type A jack
Maintenance port USB Type B jack (only for maintenance)
POWER SUPPLY
Power Consumption 17W typical, 25W max peak (in transmit mode)
Power supply POE+ (Power Over Ethernet +) compliant IEEE 802.3at
MECHANICAL & ENVIRONMENTAL
Product dimensions 160x180x58 mm indoor version. 240x180x58 mm with connectivity cover
Product weight Ca 2kg (4 lbs)
Operating temperature -40 to +70°C
Storage temperature -45°C to +85°C
Protection IP65 with connectivity cover
Casing material Aluminum
COMPLIANCE
Compliance CE (EMC EN 301 489, radio EN 300 220, safety EN60950-1)
FCC Part 15C equipment class

Mini base station installation
guide
Ref.: MAN/DPL/000
Rev.: 0.2
Date:03/05/2016
© Copyright SIGFOX. All rights reserved Page 6 of 16
3 WARNING STATEMENTS
FCC warning statement
This device complies with Part 15 of the FCC Rules and with Industry Canada licence-exempt RSS standard(s).
Operation is subject to the following two conditions:
(1) this device may not cause harmful interference, and
(2) this device must accept any interference received, including interference that may cause
undesired operation.
Changes or modifications made to this equipment not expressly approved by (manufacturer name)
may void the FCC authorization to operate this equipment.
This equipment complies with FCC radiation exposure limits set forth for an uncontrolled
environment. End users must follow the specific operating instructions for satisfying RF exposure
compliance. This transmitter must not be co-located or operating in conjunction with any other
antenna or transmitter.
This equipment should be installed and operated with minimum distance of 20 cm between the
radiator and your body.
This equipment must be professionally installed. The installer is responsible for ensuring that the
proper antenna is employed so that the limits in part 15 are not exceeded.
Only the antennas approved by SIGFOX must be used. The antennas may not be modified. The
antenna must not be co-located or operating in conjunction with any other antenna or transmitter. No
additional antenna must be used.
NOTE: This equipment has been tested and found to comply with the limits for a Class B digital device,
pursuant to Part 15 of the FCC Rules. These limits are designed to provide reasonable protection against
harmful interference in a residential installation. This equipment generates, uses and can radiate radio
frequency energy and, if not installed and used in accordance with the instructions, may cause harmful
interference to radio communications. However, there is no guarantee that interference will not occur in a
particular installation. If this equipment does cause harmful interference to radio or television reception, which
can be determined by turning the equipment off and on, the user is encouraged to try to correct the interference
by one or more of the following measures:
Reorient or relocate the receiving antenna.
Increase the separation between the equipment and receiver.
Connect the equipment into an outlet on a circuit different from that to which the receiver is connected.
Consult the dealer or an experienced radio/TV technician for help.
IC warning statement
"Under Industry Canada regulations, this radio transmitter may only operate using an antenna of a
type and maximum (or lesser) gain approved for the transmitter by Industry Canada.
To reduce potential radio interference to other users, the antenna type and its gain should be so
chosen that the equivalent isotropically radiated power (e.i.r.p.) is not more than that necessary
for successful communication.
This device complies with Industry Canada licence-exempt RSS standard(s). Operation is subject to
the following two conditions:
(1) this device may not cause interference, and
(2) this device must accept any interference, including interference that may cause undesired
operation of the device."
This equipment should be installed and operated with minimum distance of 20 cm between the radiator and
your body.
Mini base station installation
guide
Ref.: MAN/DPL/000
Rev.: 0.2
Date:03/05/2016
© Copyright SIGFOX. All rights reserved Page 7 of 16
Conformément à la règlementation d'Industrie Canada, le présent émetteur radio peut fonctionner avec une
antenne d'un type et d'un gain maximal (ou inferieur) approuvé pour l'émetteur par Industrie Canada.
Dans le but de réduire les risques de brouillage radioélectrique a l'intention des autres utilisateurs, il faut
choisir le type d'antenne et son gain de sorte que la puissance isotrope rayonnée équivalente (p.i.r.e.) ne
dépasse pas l'intensité nécessaire à l'établissement d'une communication satisfaisante.
Le présent appareil est conforme aux CNR d'Industrie Canada applicables aux appareils radio exempts de
licence. L'exploitation est autorisée aux deux conditions suivantes :
(1) l'appareil ne doit pas produire de brouillage, et
(2) l'utilisateur de l'appareil doit accepter tout brouillage radioélectrique subi, même si le brouillage
est susceptible d'en compromettre le fonctionnement
Cet équipement est conforme aux limites d'exposition aux rayonnements IC établies pour un environnement
non contrôlé. Cet équipement doit être installé et utilisé avec un minimum de 20 cm de distance entre la source
de rayonnement et votre corps.
4 BILL OF MATERIAL
Outdoor installation types
The SMBS-T base station can be installed:
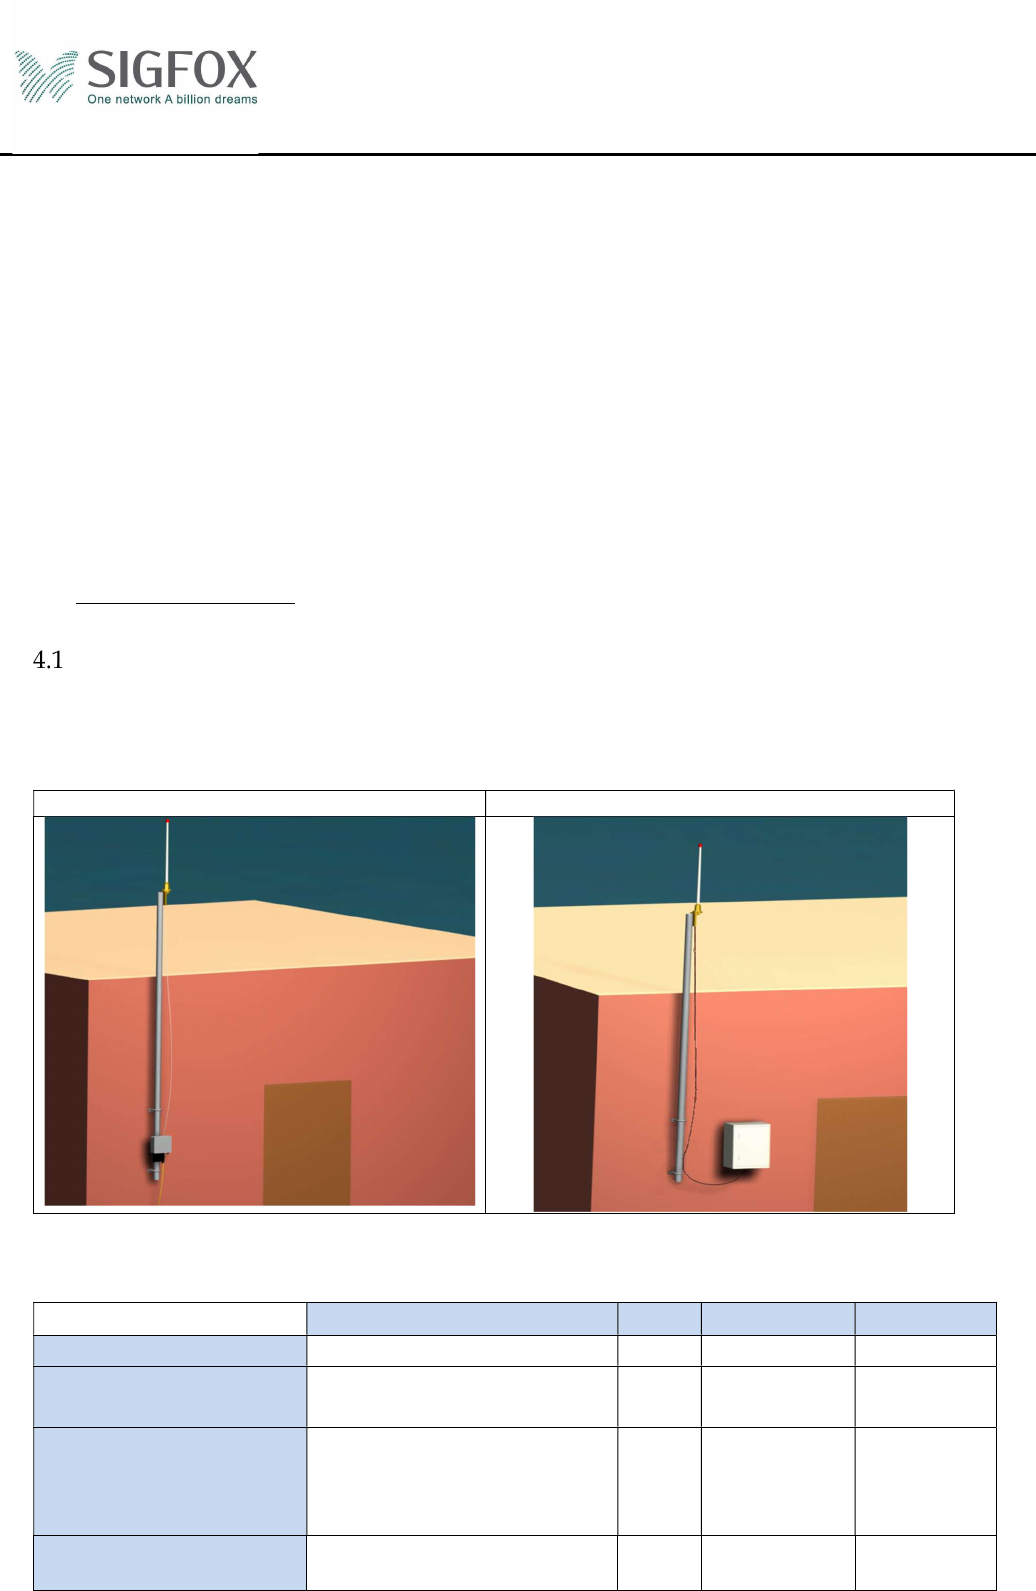
mounted on the mast: mast mounting plate needed
Inside a cabinet together with the ADSL or SAT modem: DIN rail plate needed
Mast mounting Case mounting
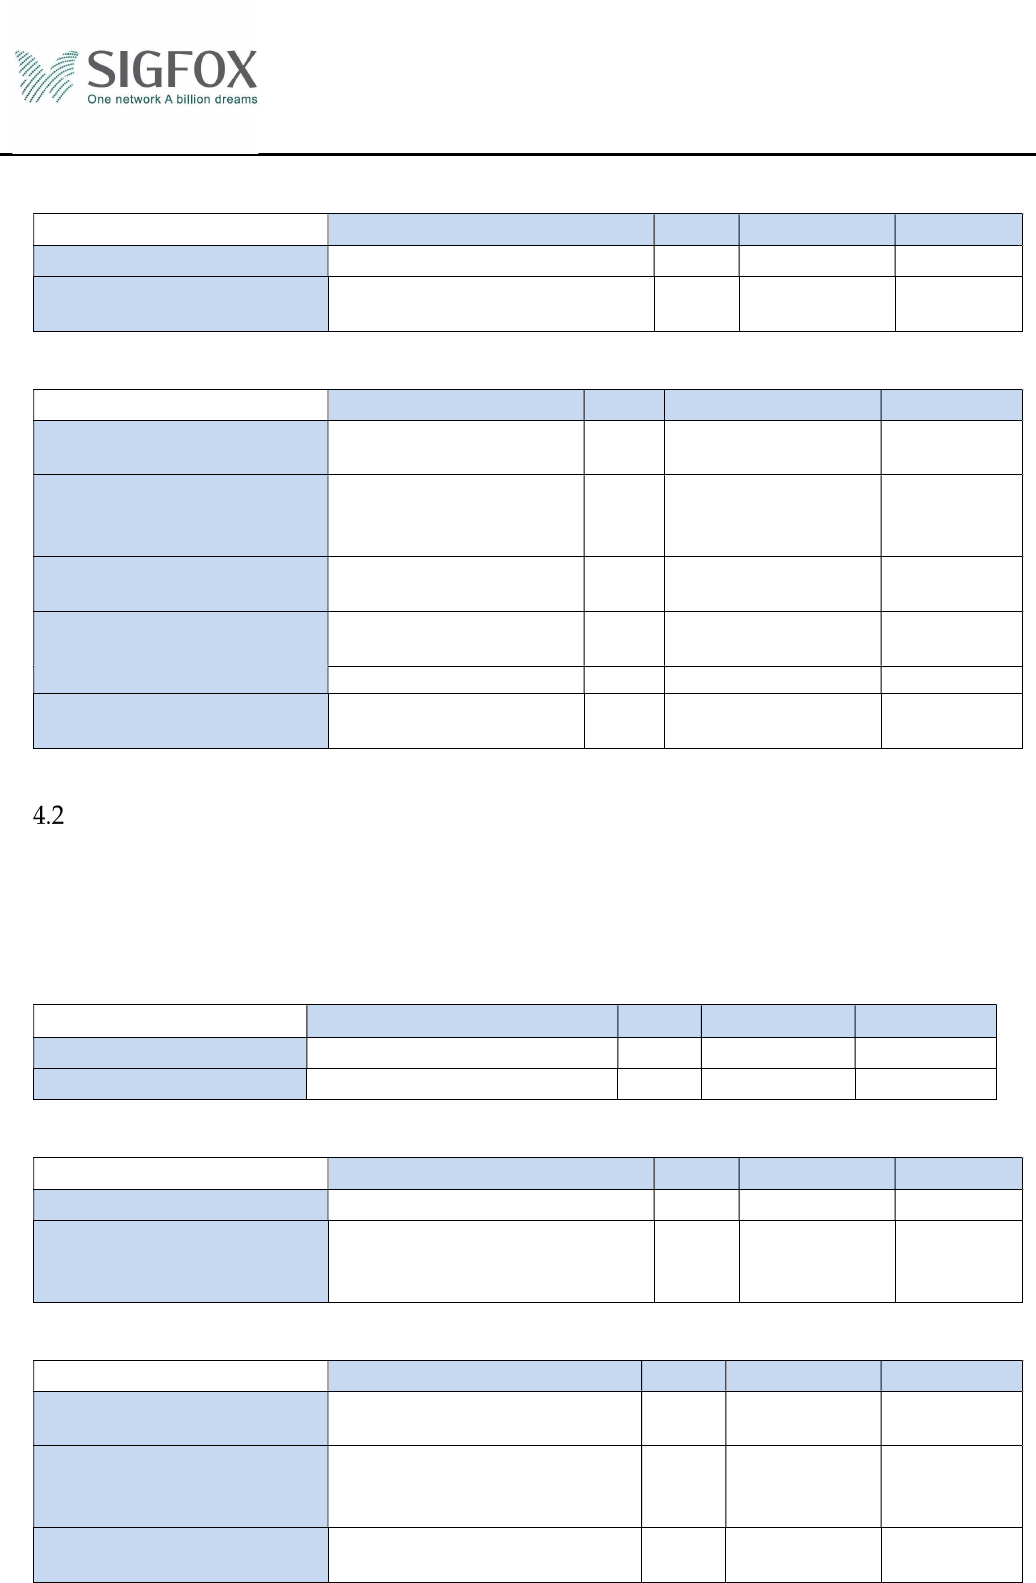
Antenna and feeder
Component
Description
Index
Supplier
Quantity
Antenna
Omnidirectional antenna
1 SIGFOX 1
Antenna mounting support
Steel bracket between existing
support and antenna. - DISTRIBUTOR 1
coaxial cable LMR400 or ½” coaxial cable 3 DISTRIBUTOR
10m max
Depends on
site
configuration
Connector
Nmale feeder
connector - DISTRIBUTOR 2
Mini base station installation
guide
Ref.: MAN/DPL/000
Rev.: 0.2
Date:03/05/2016
© Copyright SIGFOX. All rights reserved Page 8 of 16
Base station
Component
Description
Index Supplier Quantity
SMBS-T
Mini Station
- SIGFOX 1
Mounting accessories
Mast mounting plate or
Din rail plate SIGFOX 1
Internet connection
Component
Description
Index Supplier Quantity
Modem
ADSL
modem or
SAT
modem + power cable - DISTRIBUTOR 1
Ethernet cable POE
Ethernet
c
able
category 6
or 6a 5 DISTRIBUTOR
Depends on
site
configuration
Connector
RJ45 connector for
Ethernet cable DISTRIBUTOR 2
USB 3G key
3G key
. Must be agreed
by SIGFOX. - SIGFOX/DISTRIBUTOR
1
Activated M2M SIM card
-
DISTRIBUTOR
1
POE injector
POE Injector + power
cable supply 4 SIGFOX 1
Indoor installation types
The SMBS-T base station can be installed:
on a horizontal surface such as a table or a shelf: no mounted accessory needed
wall mounted on a DIN rail or inside a cabinet: DIN rail plated needed
Racked in a bay: 2U front panel needed
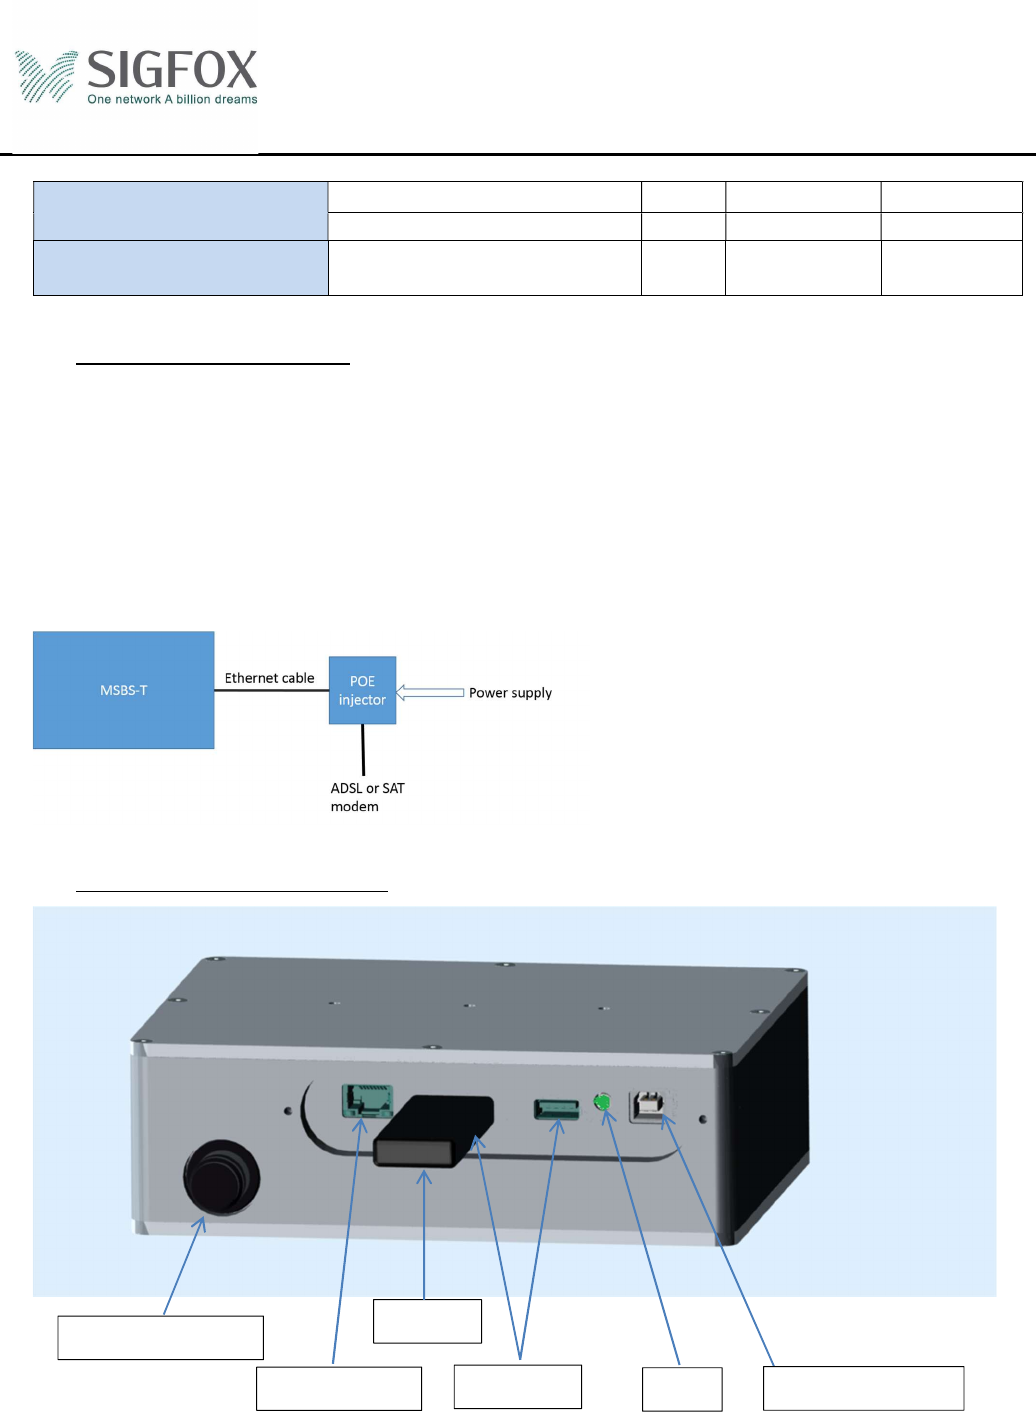
Antenna
Component
Description
Index
Supplier
Quantity
Antenna
Omnidirectional antenna
1 SIGFOX 1
Connector
Adapt
er
N male to SMA fem
- DISTRIBUTOR 2
Base station
Component
Description
Index Supplier Quantity
SMBS-T
Mini Station
- SIGFOX 1
Accessories
None or
din rail plate or
2U front panel
SIGFOX 1
Internet connection
Component
Description
Index Supplier Quantity
Modem
ADSL
modem or
SAT
modem +
power cable - DISTRIBUTOR 1
Ethernet cable POE
Ethernet
c
able
category 6 or 6a
5 DISTRIBUTOR
Depends on
site
configuration
Connector
RJ45 connector for Ethernet
cable DISTRIBUTOR 2
Mini base station installation
guide
Ref.: MAN/DPL/000
Rev.: 0.2
Date:03/05/2016
© Copyright SIGFOX. All rights reserved Page 9 of 16
USB 3G key (if 3G coverage
3G key
- SIGFOX 1
Activated M2M SIM card
-
DISTRIBUTOR
1
POE injector
POE Injector + power cable
supply 4 SIGFOX 1
5 CABLE ETHERNET POE
The Ethernet cable must be a category 6 or 6a. The maximum length of the cable depends on its gauge.
Gauge > AWG25: 100m maximum
Gauge = AWG26: 50m maximum
The shielding of the Ethernet cable should be SFTP or SSTP.
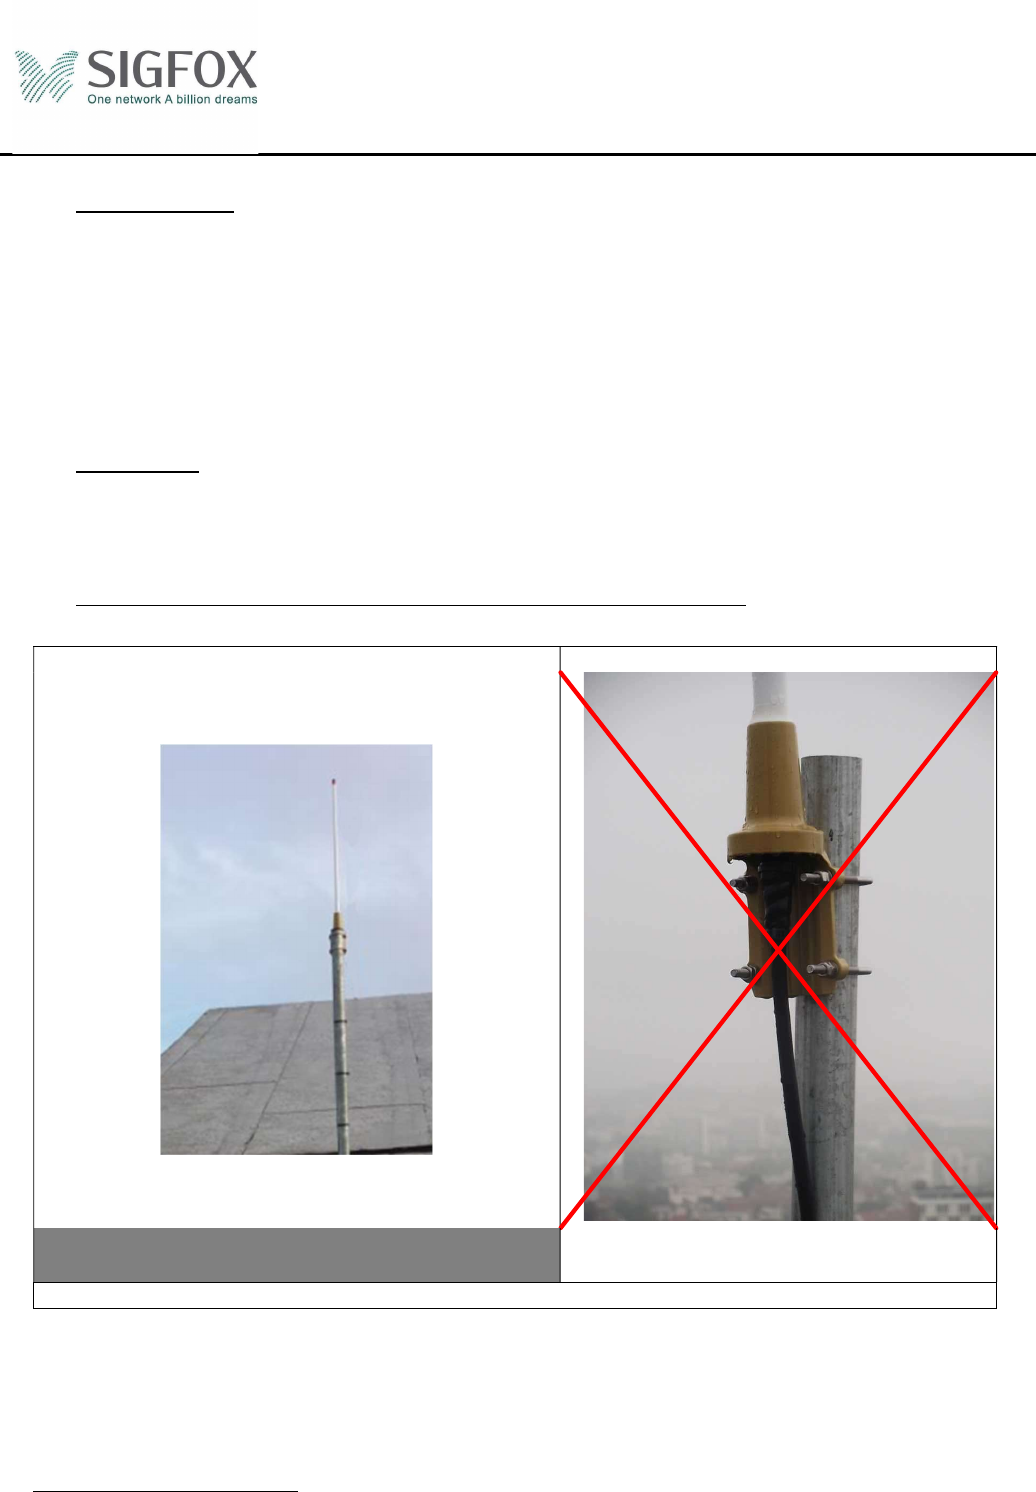
The Ethernet cable is connected to the mini base station from one side and to a POE injector at the other side.
The modem (SAT or ADSL) is connected to the POE injector. The POE injector is connected to the power
supply.
6 ELECTRICAL CONNECTION
N Fem Connector
RJ45 POE port USB ports DEL
3G Key
Maintenance port
Mini base station installation
guide
Ref.: MAN/DPL/000
Rev.: 0.2
Date:03/05/2016
© Copyright SIGFOX. All rights reserved Page 10 of 16
7 DEL STATUS
Green flash => Boot sequence.
Orange flash => Connection to the SIGFOX CRA for backbone access
Orange light => Backbone configuration KO.
Red Flash => Check POE tension
Red light => Connection to the radio card
Green light + orange flash according to Ethernet traffic => Operational
8 ANTENNA
This Base station was certified with an Omnidirectional Antenna with a Gain of 5dBi. Only an
omnidirectional antenna with a gain of 5dBi or less can be used.
9 ANTENNA INSTALLATION (OUTDOOR CONFIGURATIONS)
Correct installation Incorrect installation
The antenna must be fixed at the end of the
tube
The mounting support diameter must be in the range of 40 to 50mm and be hot deep galvanized
inside as well as outside
The antenna must be fixed by nuts and jam nuts
Installation recommendation:
Ensure the waterproofness (must be 100%) of the connector with a self-vulcanizing scotch-
seal (rubber mastic tape) , then with and finally with 2 zip tie-wraps
The tightening of RF connectors must be made manually.
Mini base station installation
guide
Ref.: MAN/DPL/000
Rev.: 0.2
Date:03/05/2016
© Copyright SIGFOX. All rights reserved Page 11 of 16
Coaxial cable measurement
This measure aims at checking the cable characteristics at 868MHz ETSI or 902MHz FCC and the quality of
the installation.
Type of measurements :
VSWR
Loss
Length
The main cable measures must not exceed the following:
VSWR : < 1.2 or >21dB Return loss @ 868MHz or 902MHz
Loss : < 2dB max @ 868MHz or 902MHz
Maximum cable length depending on cable type:
LMR 400 → max 14m
1/2" LDF4-50 → max 24m
The main cable measurement must be performed once it installed in the cable tray.
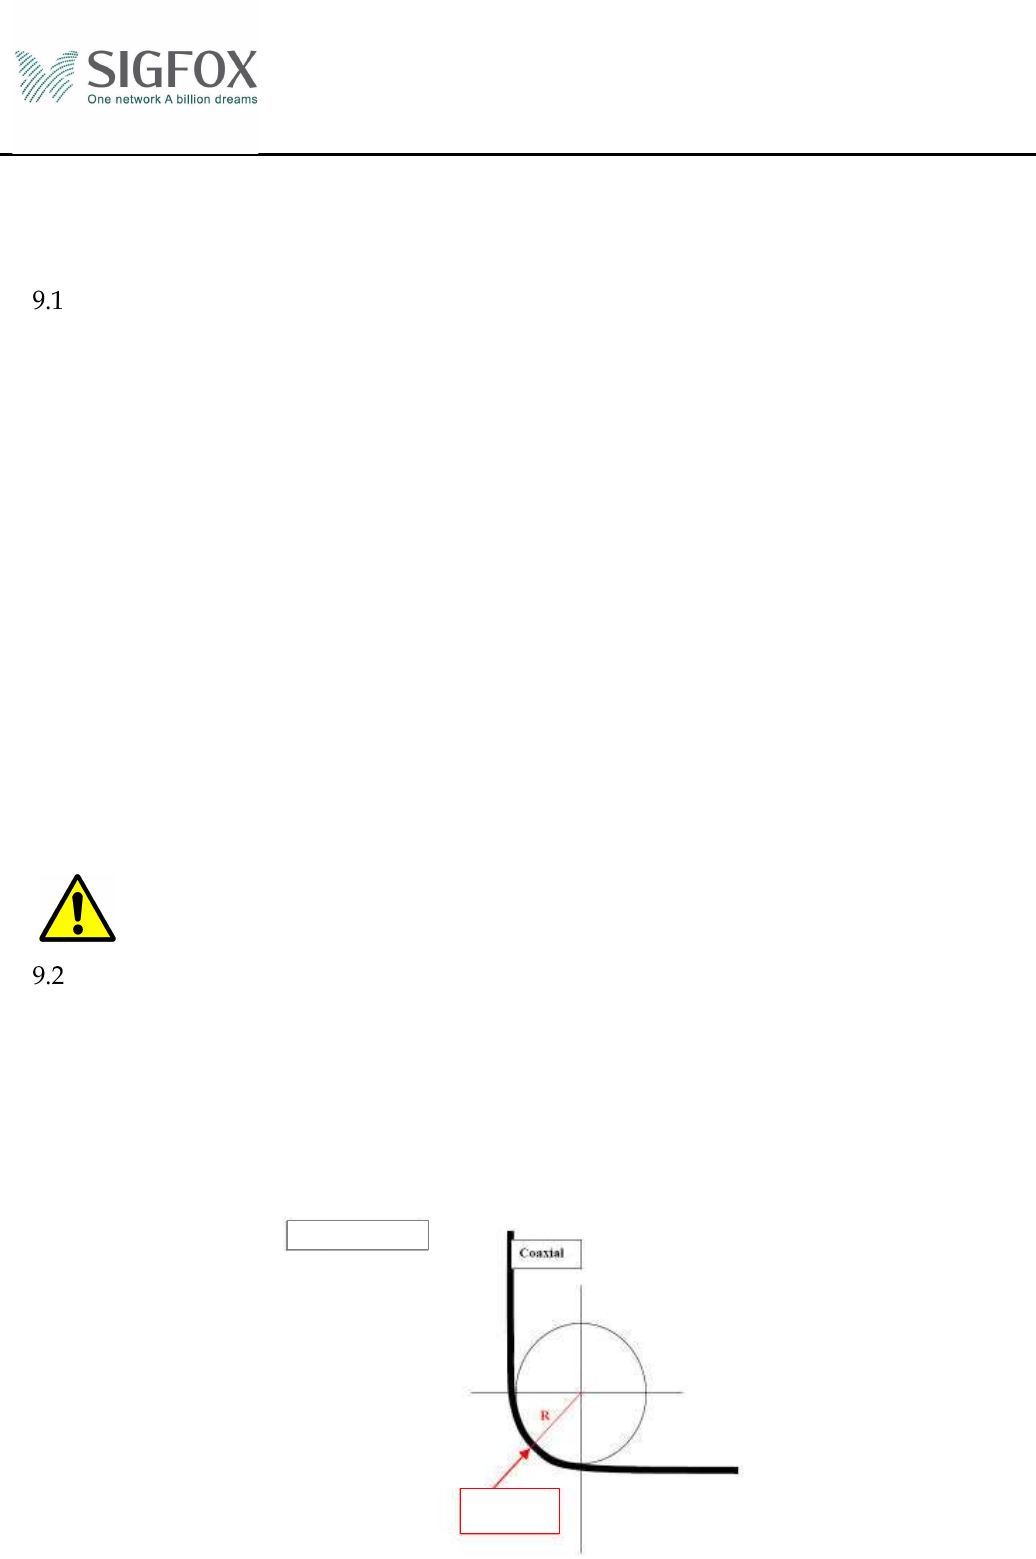
Coaxial bending radius
Static mode:
LMR 400 → Radius mini 4cm
1/2" LDF4-50 → Radius mini 15cm
Bending radius
Radius mini
Mini base station installation
guide
Ref.: MAN/DPL/000
Rev.: 0.2
Date:03/05/2016
© Copyright SIGFOX. All rights reserved Page 12 of 16
Key risks
The list below gives the main hotspots during the antenna installation.
Connector installation procedure must be strictly followed in order to avoid specific problems VSWR
on cables and to maximize the efficiency and lifetime of connections.
Specific attention must also be paid to ensure waterproofness and labeling.
Labeling
Coaxial cable must be clearly marked closed to the base station with a label : SIGFOX – 868 (or 902)
Tables, electrical circuit breakers must be clearly marked with a label : SIGFOX
When connections are made and waterproofness has been made and checked, final labeling can be
implemented. All labels must be easily legible.
No hidden label in the cable tray.
10 MAST MOUNTING
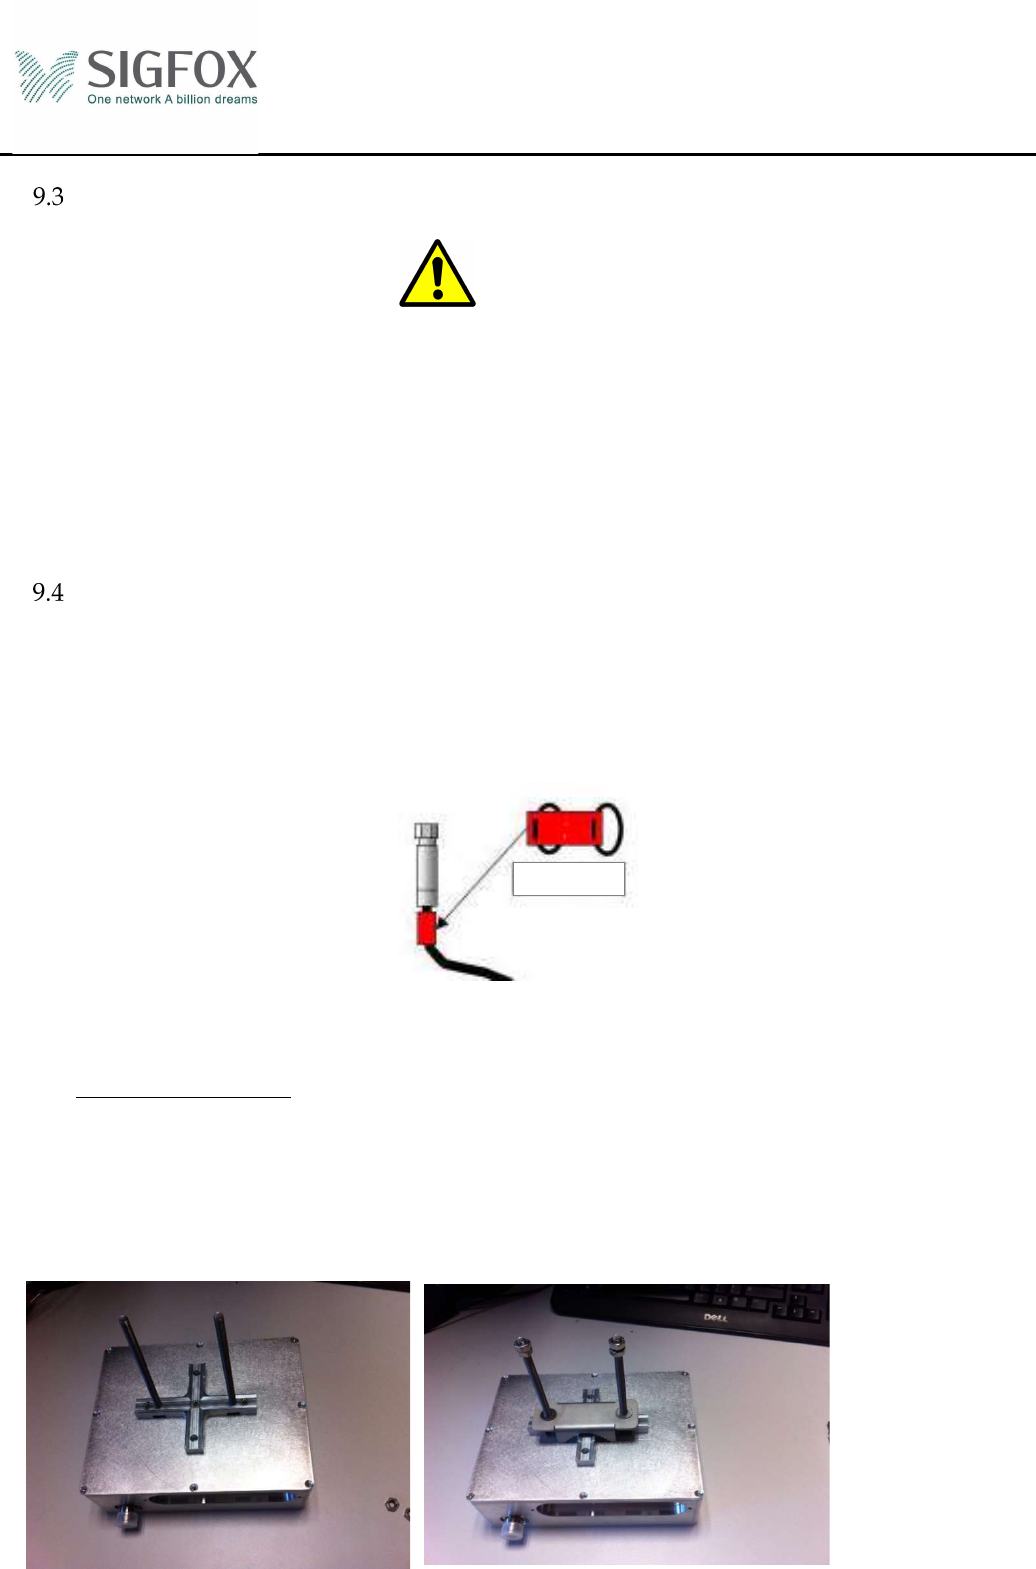
In order to mount the mini base station on a mast (outdoor installation), you need to screw the mast mounting
plate on bottom of the station. Take care to insert the assembly rods of the bracket before screwing the plate.
Once the plate is screwed, you can insert the bracket on the rods, put the washers first and then the nuts to
maintain the bracket.
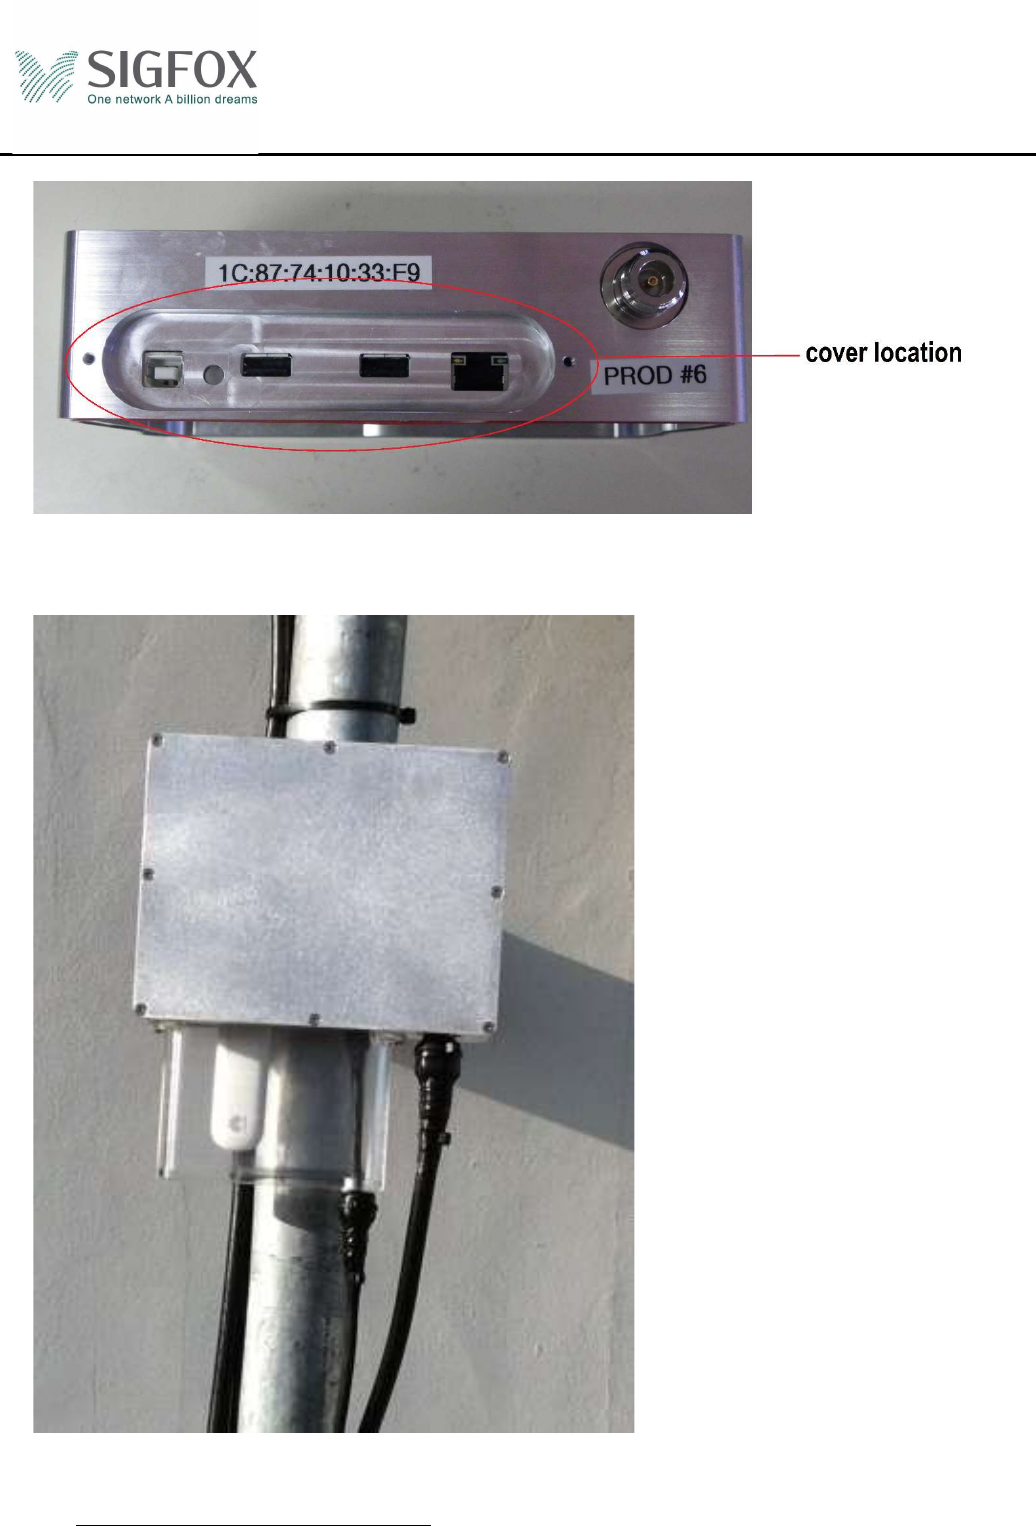
Pay attention to screw the plate so that, once mounted on the mast, the RF connector and the connectivity cover
are located on the underside of the station.
Label
Mini base station installation
guide
Ref.: MAN/DPL/000
Rev.: 0.2
Date:03/05/2016
© Copyright SIGFOX. All rights reserved Page 13 of 16
Top
Down
11 WATERPROOFNESS
Coaxial cable, connectors, and overall cables, performance and lifetime strongly depend on waterproofness
level. The main purpose of ensuring waterproofness is to avoid the direct contact with water and thus prevent
oxidation of the connectors and also protect against steam, salt and dust,
The N connectors must be waterproofed self-vulcanizing scotch-seal (rubber mastic tape), then with
and finally with 2 zip tie-wraps (at the top and at the bottom connector).
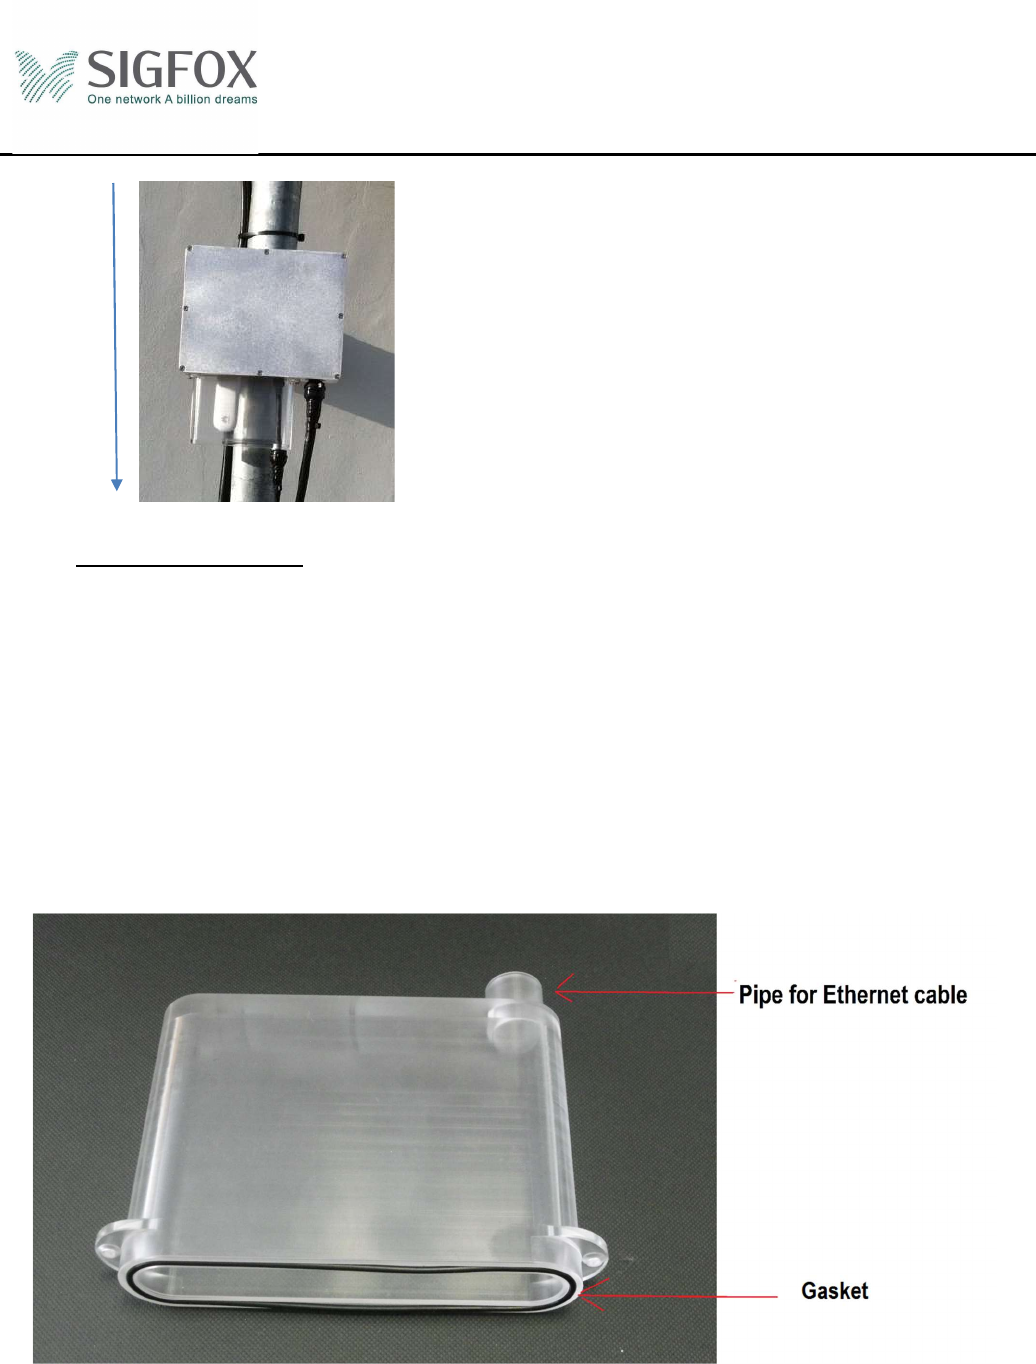
The connectivity cover insures the waterproofness of the mini base station itself. The gasket must be correctly
positioned in the groove of the cover. Once the 3G Key is connected to the mini station and the Ethernet cable
is passed through the pipe of the cover and connected to the mini station, the cover must be screwed on the
front panel of the station.
Mini base station installation
guide
Ref.: MAN/DPL/000
Rev.: 0.2
Date:03/05/2016
© Copyright SIGFOX. All rights reserved Page 14 of 16
Then, the pipe for the Ethernet cable must be waterproofed with self-vulcanizing scotch-seal (rubber mastic
tape).
12 EARTHING THE BASE STATION
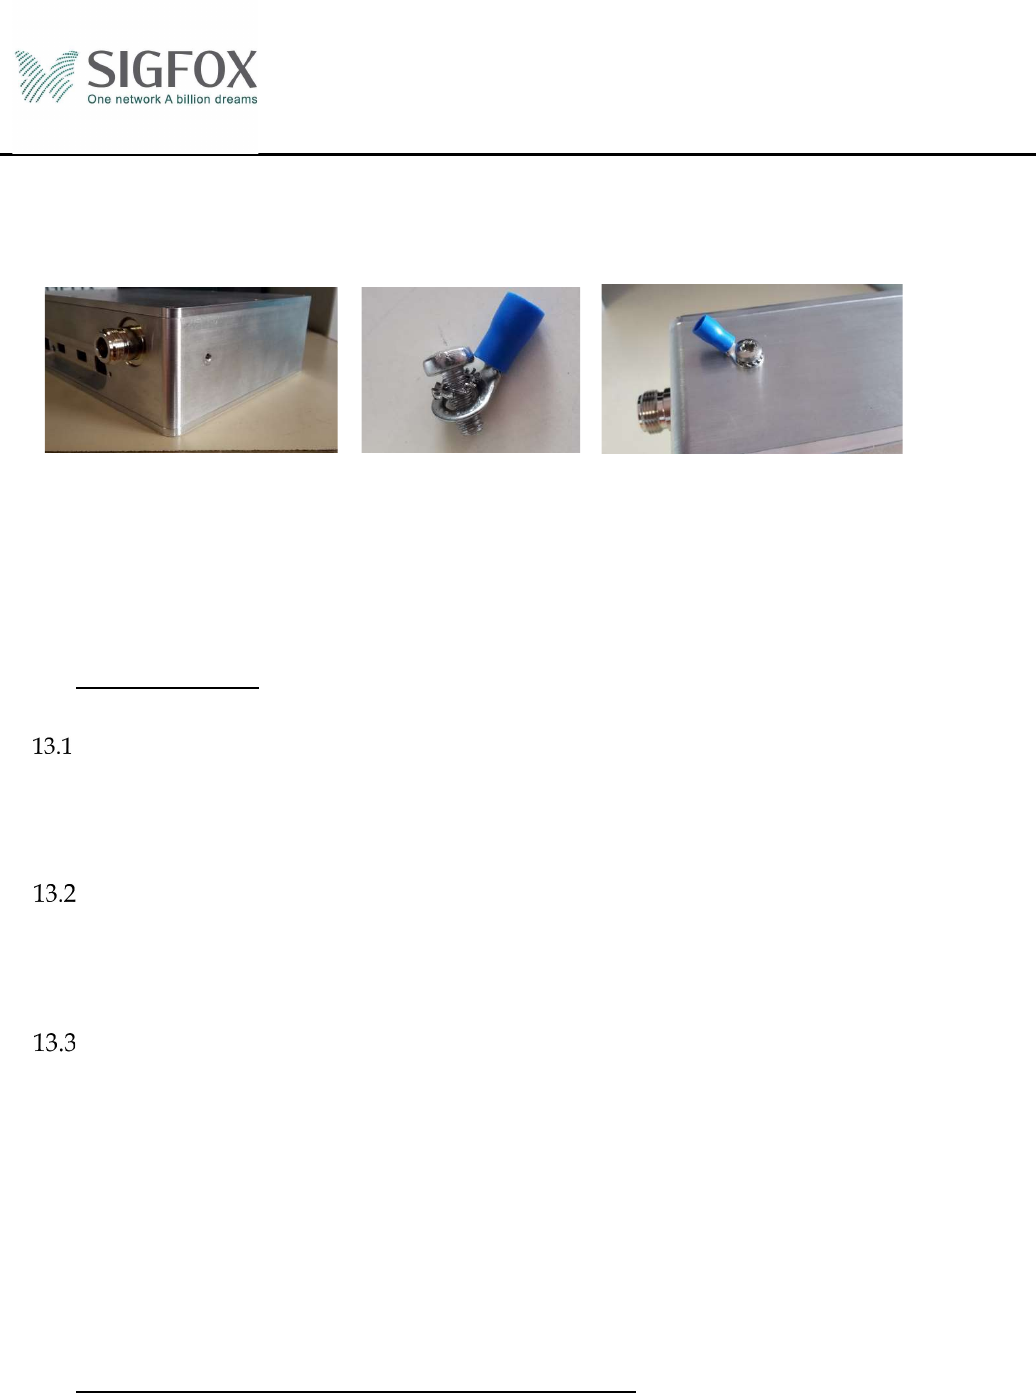
In order to protect the station, it must be earthed with a G/Y 6mm2 wire (or AWG9).
Mini base station installation
guide
Ref.: MAN/DPL/000
Rev.: 0.2
Date:03/05/2016
© Copyright SIGFOX. All rights reserved Page 15 of 16
First you need to insert a grower washer or a lock washer and a grounding lug into a hexagon socket screw
M4x10. And then you must screw it into the hole provided for this purpose on the side of the station. The
correct tightening torque is of 2.2 N.m. If needed, you can bend the lug to ease the insertion of the wire.
13 CONNECTIVITY
Via ADSL (primary)
Please refer to your provider manual
The base station only accepts the dynamic host configuration protocol (DHCP) on the ETH interface
Via Satellite connexion (primary)
Please refer to your provider manual
The base station only accepts the dynamic host configuration protocol (DHCP) on the ETH interface
Via the 3G network (secondary)
The 3G key is connected directly to the front panel of the base station
The indicator (DEL) on the 3G key will blink for a few minutes and then should stop. At this point color must
be blue or green. The blinking green or blue means: research network.
Blue → fixed connection to 3G networks (depends on the material)
Green → fixed connection to 2G networks (depends on the material)
14 BASE STATION « SWITCHING ON » PROCEDURE
How to switch the base station on:
Switching occurs when the POE+ cable is powered and connected to the base station. Do it at the end of the
installation.
Mini base station installation
guide
Ref.: MAN/DPL/000
Rev.: 0.2
Date:03/05/2016
© Copyright SIGFOX. All rights reserved Page 16 of 16
ADSL connectivity checks :
DSL and internet lights must be green (depends on the material)
RF Tests
An RF transmitter (key App) has been shipped with the Equipment.
Press the transmitter button to switch it on, until the light becomes green. When it does get green stop
moving and wait until the signal is received on the backend. Press again to switch the transmitter off.
15 SIGFOX BACKEND COMMISSIONING
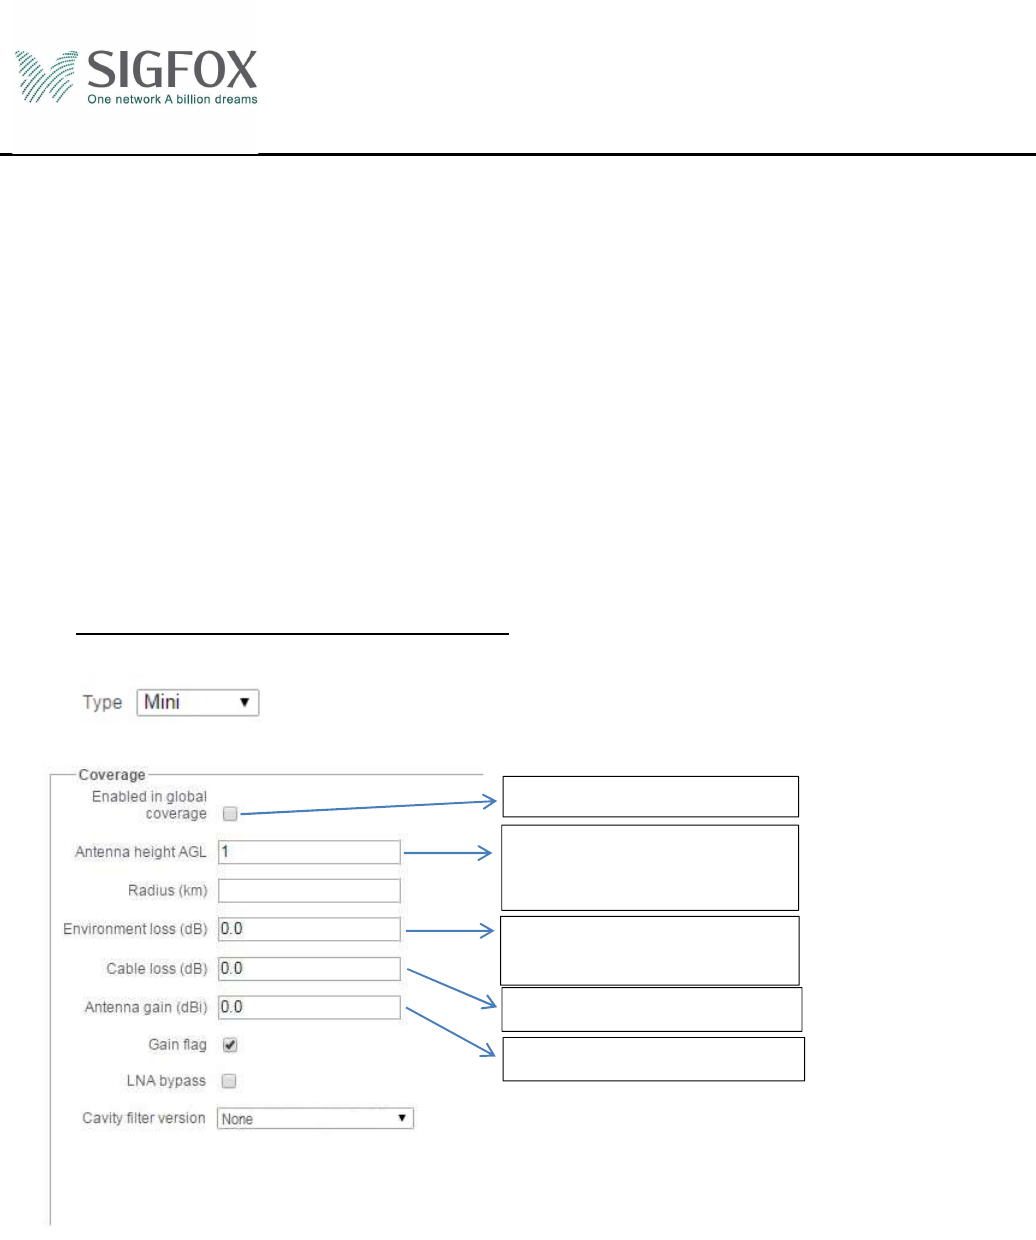
The Type of the SMBS-T must be set to Mini:
Any identified radio obstacle (building, wall …) in SIGFOX antenna vicinity shall also be set accordingly to
reflect field situation.
More detailed information are available in SIGFOX training documentation.
To tick if outdoor installation
Antenna height vs ground
level in meter (outdoor
installation)
Cable loss measured/deducted
Depends on antenna model
Env loss based on assumption
and BS spectrum analysis