SILICON POWER COMPUTER and COMMUNICATION WHD USB3.0 Wifi Hard Drive User Manual
SILICON POWER COMPUTER & COMMUNICATION INC. USB3.0 Wifi Hard Drive
User Manual
USB 3.0 WiFi Hard Drive
Sky Share H10 User Manual

2
1. Introduction.......................................................................................................... 3
2. Spec and System Requirements............................................................................ 5
3. Sky Share H10 Overview ....................................................................................... 6
4. Sky Share Web UI Overview ................................................................................. 8
5. Sky Share app Overview ..................................................................................... 11
6. Sky Share Wi-Fi Security ..................................................................................... 13
7. Setting up Sky Share Device................................................................................ 13
8. Regarding File format ......................................................................................... 16
9. How to play and view your media files............................................................... 17
10. Downloading Content to Your WiFi Device or Computer.................................. 23
11. Uploading Content to Sky Share from Your WiFi Device or Computer ............. 24
12. Sky Share Setup Page........................................................................................ 25
13. How to delete the files stored in Sky Share ...................................................... 31
14. How to safely remove Sky Share from your computer ..................................... 31
15. Troubleshooting................................................................................................ 32
3
1. Introduction
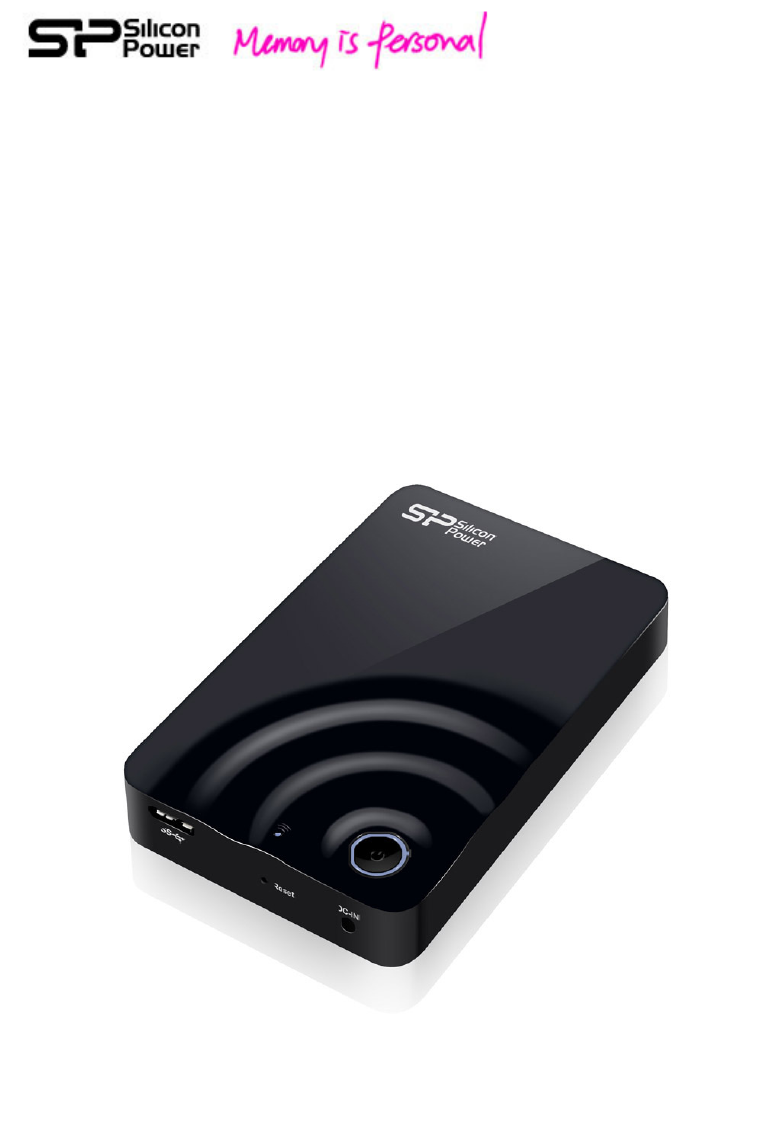
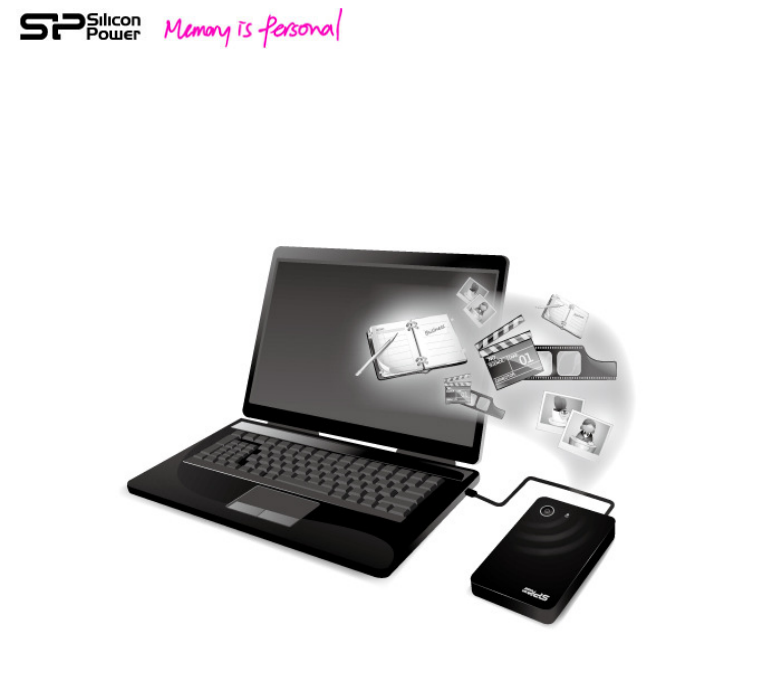
Sky Share H10, a portable Wi-Fi hard drive available in 500GB above, breaks the
storage limits for all Smart handheld devices such as iPhone, iPad, Android phone,
Android tablets, windows mobile phone…etc. and can also support Notebook, PC,
and Mac.
More than a traditional portable hard drive’s functions, H10 is capable of having up
to 8 users to share and stream media contents simultaneously and wirelessly.
Its USB 3.0 interface provides up to 5Gbs high speed access in portable hard drive
mode. Build-in 2T2R antenna and re-chargeable Lithium battery to provide the
wireless transfer speed up to 300Mbs and up to 5 hours streaming per single charge.
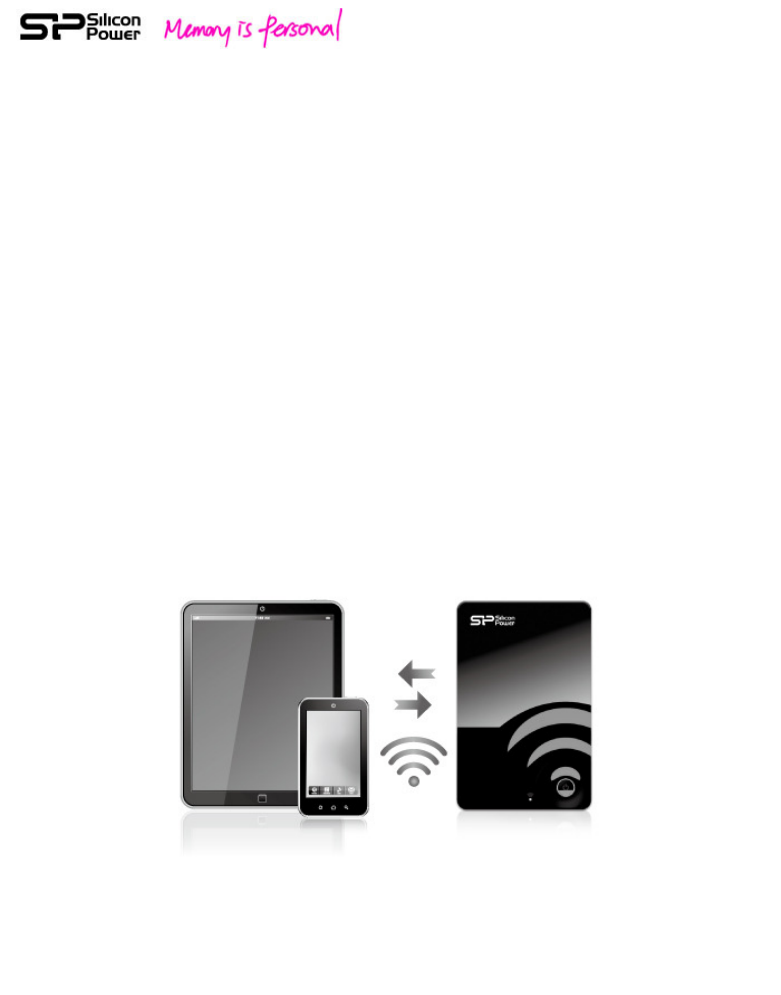
Sky Share H10 also provides iPhone App, iPad App, Andorid App, and Web UI (Web
browser User Interface) to support various WiFi devices mentioned above.
The compact size design makes Sky Share H10 easy to carry, and it is also designed
for wireless and cableless operation, providing bigger capacity to support your
Smartphone and tablet as a wireless portable media library.
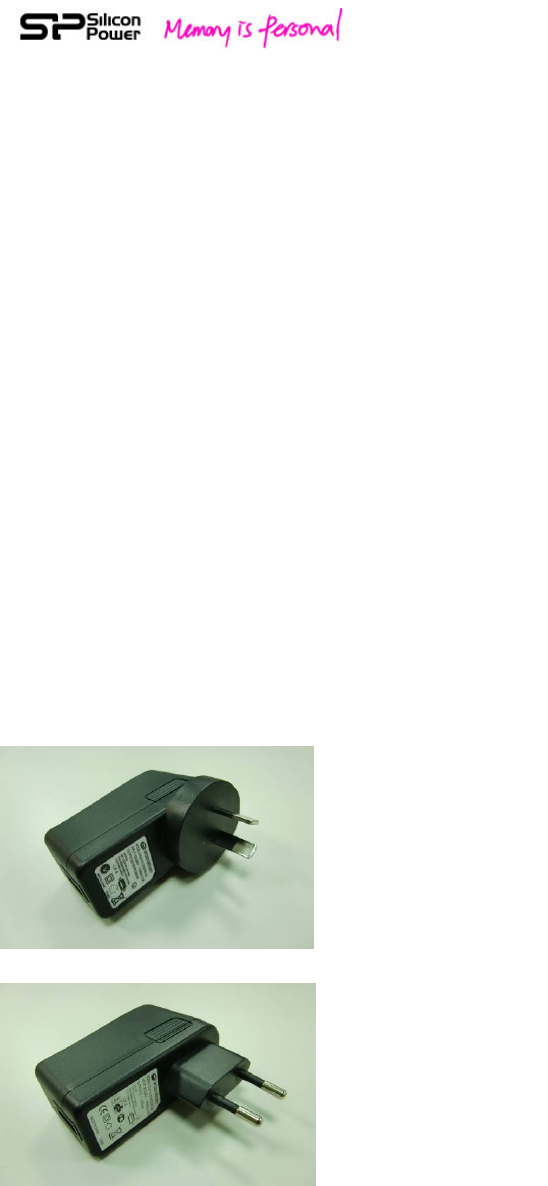
The package is including-
USB Wall adapter x 1 pcs
(The adapter type is subject to the country.)
(Australia/ New Zealand)
(EU, Iran, Russia...etc)
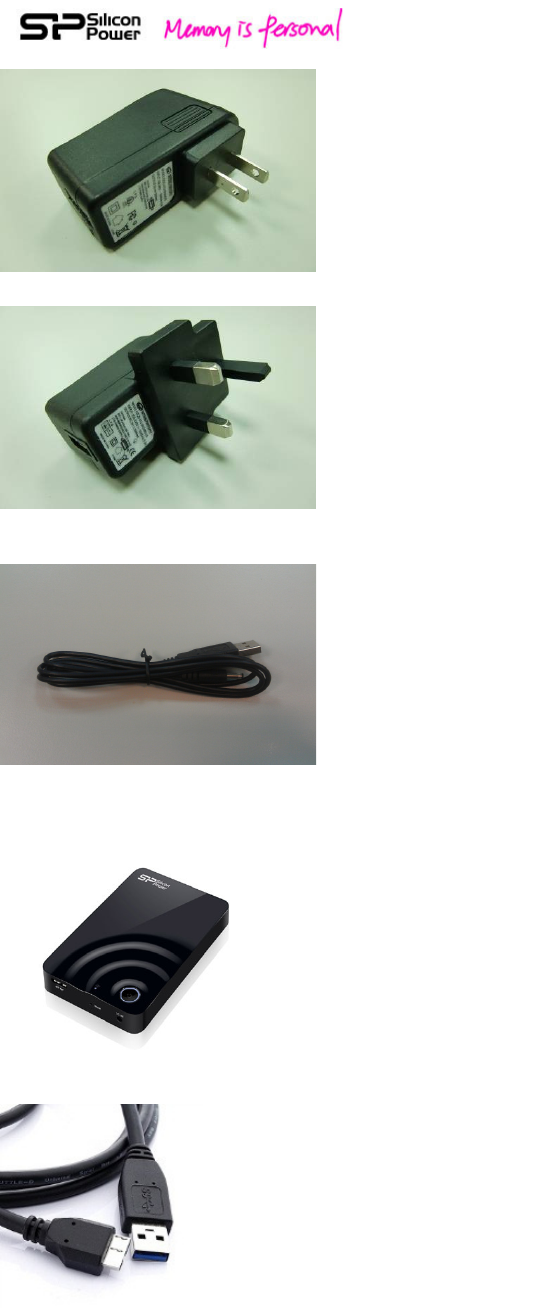
4
(Japan, Taiwan, USA...etc)
(UK...etc)
USB to DC Jack x 1pcs
Sky Share x 1 pcs
USB 3.0 cable x 1pcs
Quick Guide including warranty card x 1pcs

5
2. Spec and System Requirements
Capacity: 500GB, 1TB
Dimension: 133 x 86 x 23.5 mm
Weight: 255g +/- 5%
WiFi Interface: IEEE 802.11b/g/n Standard
Build-in 2T2R Antenna, up to 300 Mbs
Build-in USB 3.0 (Compatible with USB 2.0),
up to 5Gb/s Transfer rate (USB 3.0 Mode)
WiFi connection: up to 8 users
Connection range: up to 100 Feets
Power Supply: DC 5V/2A (Power supplied through AC-to-DC adapter)
Battery: Build-in Lithium Battery for up to 5 hours multimedia streaming and sharing
(Single device)
Operating Temperature: 5℃ ~ 45℃
Storage Temperature: -10℃ ~ 70℃
Wireless security: WPA+WPA2
Operation system: Support Win 7, Win XP, Win Vista, Mac OS X (10.5.X+),
iPhone 3GS (iOS 4.2+), iPhone 4, iPhone 4S, iPad, ipad2, the new ipad, Anroid 2.3
above smart phones and Tablets
Browsers: Support Safari 5 or later version, Webkit (Android), Internet Explorer 8 or
later version, Firefox, and Google Chrome
File system: FAT32/NTFS
Supporting file types:
You can store any file in Sky Share H10, but need your WiFi device to support the file
format and resolution you want to play or view.
Sky Share iPhone/iPad App: you can play or view the following file types.-
Video: .m4v, mp4, .mov
Photo: JPG, BMP, PNG, GIF
Music: MP3
Document: DOC, XLS, PPT, PDF
For rest of file types, you can find them in Home directory and play them if supported
by your device application. (for example, .m4a played by Quick Time Player and .wma
played by Windows Media Player)
Sky Share Web UI:
Play any file supported by your device applications and recommended browsers
6
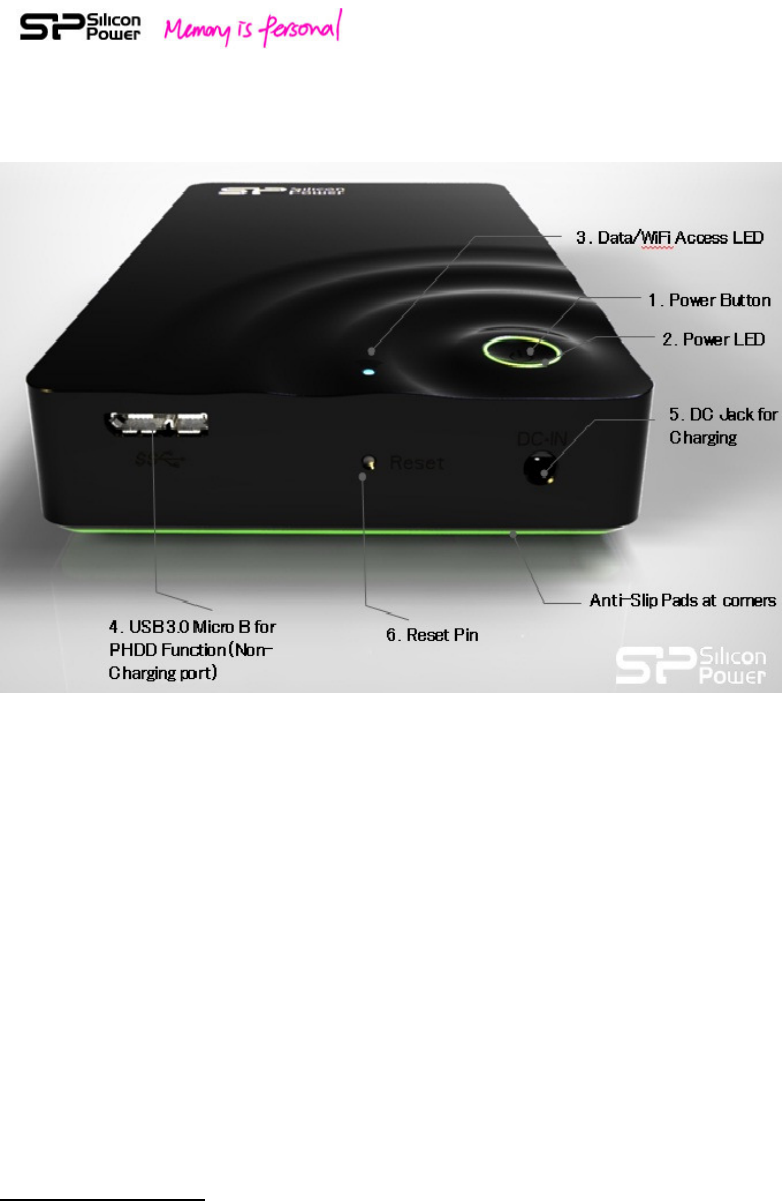
3. Sky Share H10 Overview
Fig. 1 Sky Share H10 Overview
Power button (1): Once pressing the power button, Sky Share H10 is turn on and will
go into WiFi Mode in a minute.
Power button LED (2):
Solid Green: Full battery
Blinking Orange: Half full
Solid Red: Low battery, charging is required
Solid Orange: Charging
Note: It takes about 1.5 hours for the battery without activation and about 4 hours
for the battery with activation to charge from low to full status by the wall adapter.
Data/WiFi Access LED (3):
The LED indicates the data access in both of PHDD (portable hard drive) mode and
WiFi mode.
WiFi mode (Power on)
Blinking Purple: During setup
Solid Blue: Ready for access
Blinking Blue: WiFi accessing
Solid Red: System error

7
PHDD mode (Connected to the computer by USB cable)
Fast Blinking Blue: During setup
Solid Blue: Ready for access
Blinking Blue: Data Access
LED off: Hard drive Safety removal
USB 3.0 Micro B (4): Connects Sky Share H10 to your computer and then Sky Share
will behave like a portable hard drive (PHDD).
Note: No power charge in this connection. All charging is required to go through DC
Jack (5) of Sky Share H10.
DC Jack (5): Connects Sky Share via the USB to DC Jack power cable and its wall
charger for charging. You can charge first and then stream the content as a portable
media library wirelessly. In addition, you can stream the content while charging.
Reset Pin (6): a). Press the pin lightly and release it immediately. The system will be
rebooted. b). Press and hold the pin for about 3 seconds and then release the pin.
The system will be reset to factory default setting. During this reset process, all data
stored in Sky Share H10 will be still remaining.
8
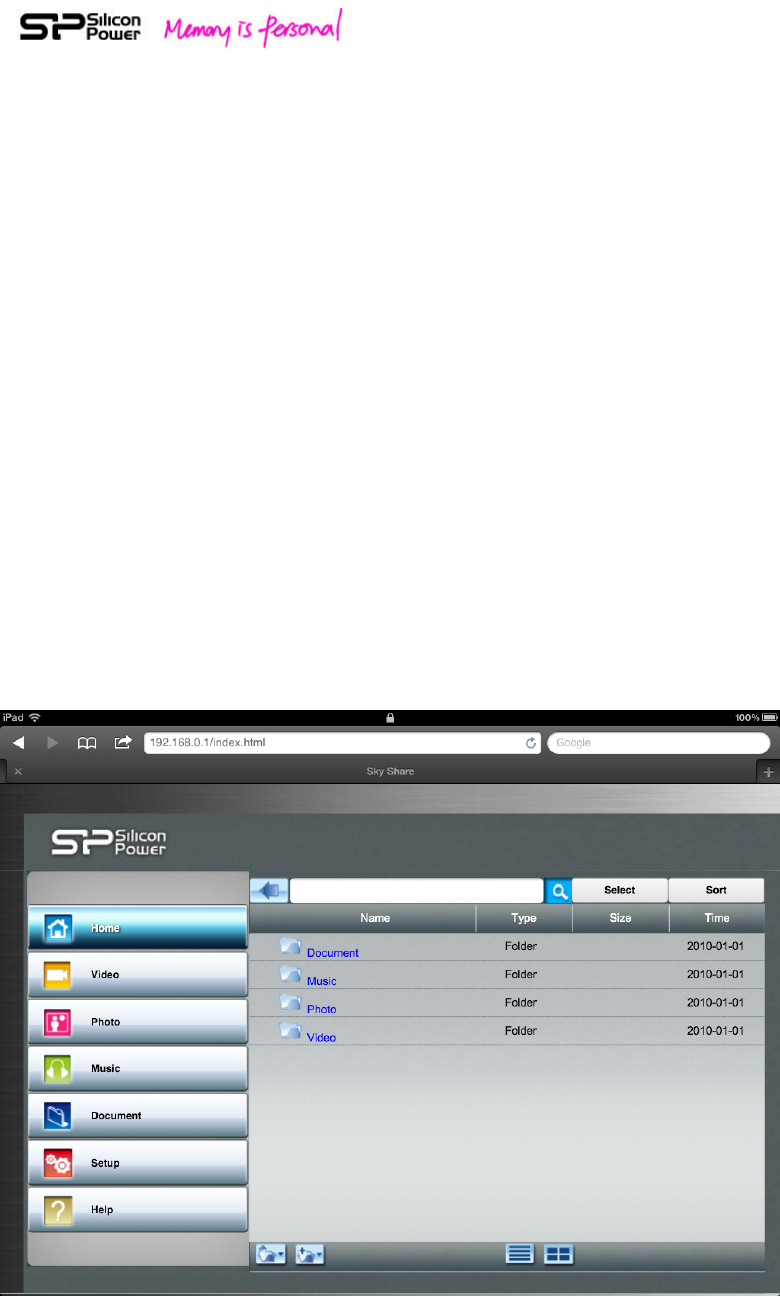
4. Sky Share Web UI Overview
Sky Share Web UI provides a solution for a user to play and view his files stored in Sky
Share by his WiFi device’s web browser.
After connecting to Sky Share, opening web browser, and typing www.skyshare.com
or 192.168.49.73 in the URL (Uniform resource locator) column, Sky Share Web UI
will be displayed. (Referring to the Fig. 2 below)
Fig. 2 Sky Share Web UI Overview - 1
Home: Home page of Sky Share Web UI
You can see all files in home directory.
Default Media Folders: Video, Photo, Music, Document
Sky Share avoids sorting the whole hard drive during each power-on. This can save a
user’s time during each device power-on when he stores a large number of files in
Sky Share. Instead, a user is necessary to store video, photo, music, and document
files in the default video, photo, music, and document folder respectively. These four
default folders are located under the folder of Sky Share.
Sky Share\
The default folders on the left side of the screen will display the supported video,
photo, music, and document files only. If you happen to mix your file types and
cannot find them in these four default folders, you can go to “Home” for a complete
9
file structure view to find your file.
Search: Input keyword in the search column. Sky Share will display all files
associated with the keyword.
Sort: The files can be sorted by the file type, file size, alphabet of file name, or
creation date.
Select/Cancel: Click “select” button to select media files for play, upload, or
download. Once clicking cancel, all selection will be deselected.
Folder View: Display the files in a file list and folder structure
Thumbnail view: Display the files in thumbnail size
Setup: You can setup Sky Share device from “Setup” page. The detail functions will
be described later. (Referring to Chapter 12 –Sky Share Setup page)
Help: Help page provides some tips for frequently asked questions.
Upload icon:
::
: Click to upload files from your computer to Sky Share
Create Folder icon: Click to create the new folder other than the default
folders.
Fig. 3 Sky Share Web UI Overview - 2

10
Download icon: You can click to download the selected files from Sky
Share to your computer.
Play icon: After you select one or multiple files, you can click play icon to
play the media files selected by you.
11
5. Sky Share app Overview
Sky Share iPhone and iPad app are available on Apple store for free download.
For the download and setup, please refer to the chapter 7, Sky Share device setup.
Fig 4. Sky Share App Overview
Home: Home page of Sky Share App
You can view all files stored in Sky Share H10 in home directory.
Default Media Folders: Video, Photo, Music, Document
Sky Share avoids sorting the whole hard drive during each power-on. This can save a
user’s time during each device power-on when he stores a large number of files in
Sky Share. Instead, a user is necessary to store video, photo, music, and document
files in the default video, photo, music, and document folder respectively. These four
default folders are located under the folder of Sky Share.
Sky Share\
Video, Photo, Music, and Document folder on the left side of the screen will display
the supported video, photo, music, and document files only. If you mix your file
types and cannot find them in these four folders, you can go to “Home” for a
complete file structure view to find your file.
Search: Same as Web UI function

12
Sort: Same as Web UI function
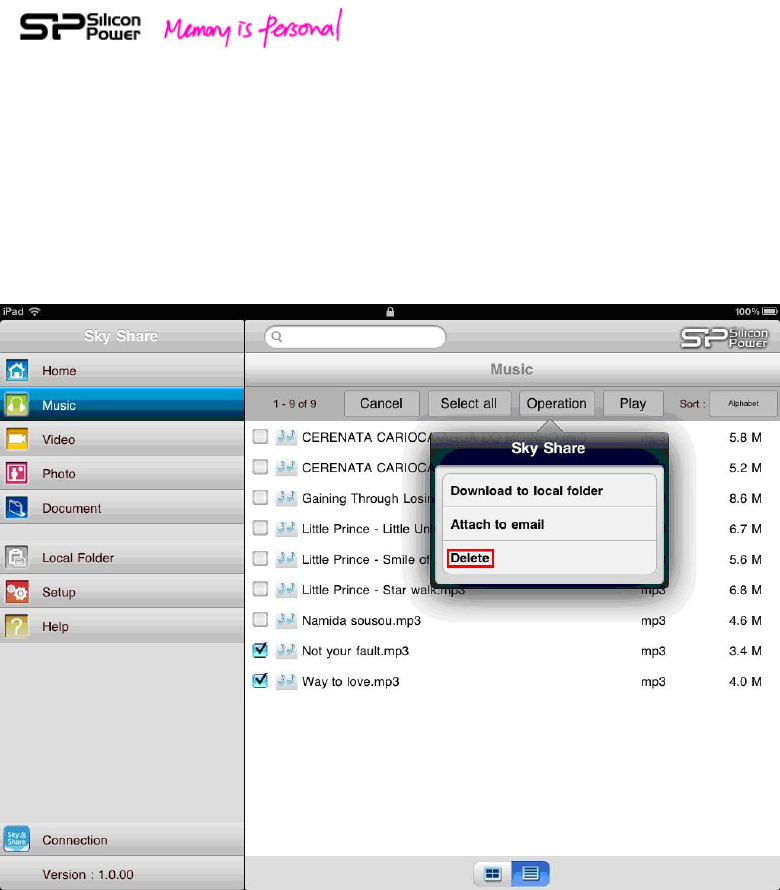
Tool/Cancel: Tap “Tool” button to select media files for play, upload to Sky Share,
or download to iPhone/iPad local folder. Tap “Cancel” button to cancel the selection
function.
Select all: Tap “Select all” and then all files will be selected.
Deselect all: Tap “Deselect all”, all selections will be cleared.
Operation: After selecting the files, you can tap “operation” to have a further
operation.
1). For the files stored in Sky Share, you can tap “operation” to select:
“download to local folder”: allow you to download your selected files to local folder
from Sky Share.
“Attach to email”: allow you to attach one file to email.
“Delete”: allow you to delete the selected files.
In case of photo, you can have one more function below:
“download to photo album”: allow you to download your selected files to the photo
album of iPhone or iPad.
2). For the files stored in local folder, you can tap “operation” to select:
“Upload to Sky Share”: allow you to upload your selected files to Sky Share.
“Attach to email”: allow you to attach one file to email
“Delete”: allow you to delete the selected files.
In case of photo, you can have one more function below:
“Upload from photo album”: tap local folder and then tap “upload from photo
album”. Camera roll of iPhone or iPad will pop up. Once you tap the photo, the
photo will be uploaded to Sky Share automatically.
Folder View: View the files presented in a file list and folder structure from your
computer.
Thumbnail view: View the files presented in thumbnail size.
Setup: Same as Web UI function
Help: Help page provides some tips for frequently asked questions.
Play: After you select one or multiple files, you can tap “play” icon to play the media
files selected by you.
13
6. Sky Share Wi-Fi Security
Sky Share H10 is a wireless broadcasting device within its range (up to 30
Meters/100 Feet).
Note: The signal range is related to the environment where you use Sky Share, too.
When you are using Sky Share, be aware that your files are visible to any device
connecting to your Sky Share. You can set a password to restrict access to Sky Share.
(Referring to chapter 12, Sky Share setup page), but you may limit your files stored in
Sky Share based on your own confidential consideration.
7. Setting up Sky Share Device
This setting up procedure is provided in User Quick Guide, too.
If you have already completed the installation process, you may skip this chapter.
Step 1:
Fig. 5 Connect Sky Share to your computer by USB 3.0 cable
Plug USB 3.0 cable (Compatible with USB 2.0 device) to your computer to have a
faster data transfer in Portable Hard drive mode (PHDD Mode).
14
Step 2:
Fig. 6 Copy files to Sky Share from your computer in PHDD mode
In PHDD mode, you can find video/photo/music/document sub-folders under Sky
Share directory. Copy your video, photo, music, document files into the default video,
photo, music, document folders respectively.
Note: You can copy any file to the Sky Share, but the device you use to connect Sky
Share will only play or view the file formats it supports.
There are some software applications to convert video files into different formats.
You may want to convert the files into the formats compatible with your device
before copying them to Sky Share.
Step 3:
Remove USB cable, and switch on the power button of Sky Share.
Once you power on Sky Share, automatically, the system will go into WiFi mode.
After pressing the power button, the data/WiFi access LED will blink in purple for
about 1 min. Once the status is ready for use, this LED will turn blue.
15
During the product shipment, the build-in battery of Sky Share is partially charged to
enable Sky Share access.
When the power button turns red, please charge your Sky Share by the included USB
to DC cable and USB Wall adapter.
In order to use the battery efficiently, it’s recommended to activate the battery. For
battery activation, you will need to charge the battery from low to full for 3 to 5
cycles. After battery activation, you can have a longer battery hour, but will need to
take longer hours (up to 4 hours) to charge the battery from low to full status.
Step 4:
Fig. 7 Connect your WiFi device to Sky Share
For iPhone/iPad
1. Install Sky Share app (You can search for “Sky Share” on the app store and have a
free download. Keyword: Sky Share)
2. On the iPhone/iPad, Select Settings > Wi-Fi and then select Sky Share from the
wireless network list.
3. Tap the Sky Share app to open the application from iPhone/iPad home screen.

16
For Android Smartphone/Tablet:
1. Install the Sky Share app (You can search “Sky Share” on the Android Market and
have a free install)
2. On the Android Smartphone/Tablet, Select settings and then enable WiFi
3. Select and connect Sky Share from the wireless network list
4. Tap the Sky Share app to open the application from Android smartphone/tablet
home screen
For Other Tablets, Smartphones and Computers
1. Enable WiFi
2. Select and connect Sky Share from your device’s wireless network list.
3. Launch your device’s Web browser and type 192.168.49.73 or
www.skyshare.com on URL column. The Web UI (user interface) will pop up for your
use.
Safari of iPhone/iPad and Web kit of Android smartphone/tablet are also supported if
Sky Share app is not installed.
8. Regarding File format
Sky Share is including a hard drive inside with FAT32 format, a Windows standard.
FAT32 file system can only support the file size up to 4GB. If you want to play the file
bigger than 4GB, you can format Sky Share into NTFS file system, remove USB cable,
power-on Sky Share, and then the default folders will be automatically created. Both
of NTFS and FAT32 are supported by Sky Share. But, Mac OS will only be able to read
NTFS files. In order to write NTFS files in Mac OS, a 3rd party NTFS driver will be
required.
Warning: Do not allow Time Machine® to use Sky Share for backup. Time Machine
will attempt to reformat the hard drive inside Sky Share.

17
9. How to play and view your media files
Sky Share Web UI is available for any wireless-enabled tablet, computer, or
smartphone with recommended web browsers. You can play and view your media
files by Sky Share Web UI.
In addition, Sky Share app for iPhone and iPad is available for free download now.
You can download Sky Share app and then play and view your media files by Sky
Share app. Chapter 7 has described how to link to Sky Share Web UI and how to
download and launch Sky Share app.
This chapter further provides instructions for playing videos, music and viewing
photos and documents by using the Sky Share app and the Web UI.
Playing Videos
1. Connect to Sky Share
2. Open the Sky Share app or a Web UI.
3. Select the Video tab on the left side of the screen
4. Tap the video you want to watch and then the play will start.
Browser only: Some browsers download the entire video before the video can be
played. The download time is subject to the actual file size.
If a video you copied to the Sky Share device cannot be played, it may be related to
the file format not supported by your media player.
To pause a video:
For the app: Tap the screen and then tap the pause icon.
For a browser: Tap the pause button in your media player.
To stop playback of a video:
For the app: Tap the screen and then select the Done button in the upper left
corner.
For a browser: Close the media player.
Playing Music
1. Connect to Sky Share
2. Open the Sky Share app or a Web UI.
3. Select the Music tab on the left side of the screen
4. Tap the Music you want to listen to and then the play will start.
If a music file you copied to the Sky Share device cannot be played, it may be related
to the file format not supported by your media player.
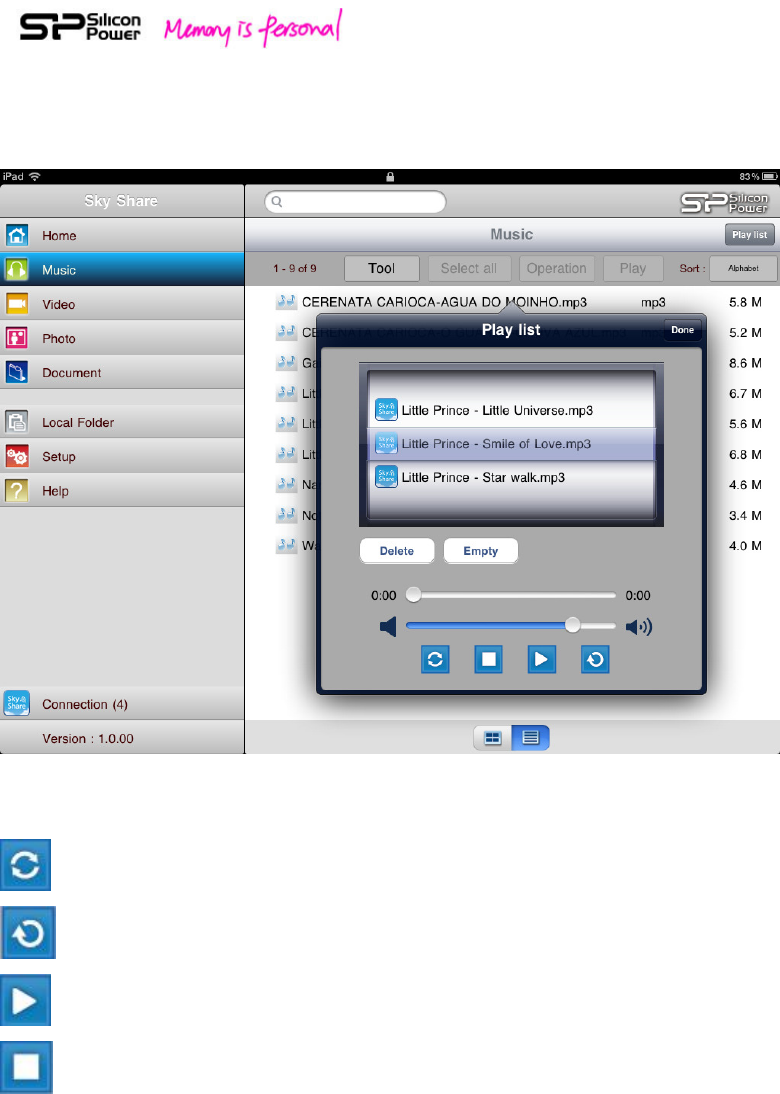
For the app, after you select the music files, these files will be listed in the play list.
(Referring to the figure 8). You can tap to repeat the single music file or repeat all
selected music files in turn and then tap play, pause, or stop to play, pause, or stop
18
the music files. If you would like to remove the music files from the play list, you can
tap “delete” or “Empty” to remove one music file or all music files from the play list
respectively.
Fig. 8: Music play list
: Tap to repeat single music file play
: Tap to repeat all selected music files play in turn
: Tap to play the music / Tap again to pause the music play
: Tap to stop the play
To pause music:
For the app: Tap the screen and then tap the pause icon.
For a browser: Tap the pause button in your media player.
To stop playback of music:
For the app: Tap the screen and then tap the stop button of the playlist.
For a browser: Close the media player.
19
Viewing Photos
1. Connect to Sky Share
2. Open the Sky Share app or a Web UI.
3. Select the Photo tab on the left side of the screen
4. Tap the Photo you want to watch and then the photo will be displayed.
If a photo file you copied to the Sky Share device cannot be displayed, it may be
related to the file format not supported by your media player.
5. You can also tap “Select” button on the top of the screen.
Once the “select” button is tapped, the check box will be displayed. You can select
one or multiple photo files you want to play and then tap the “Play” button to have
photo slide show.
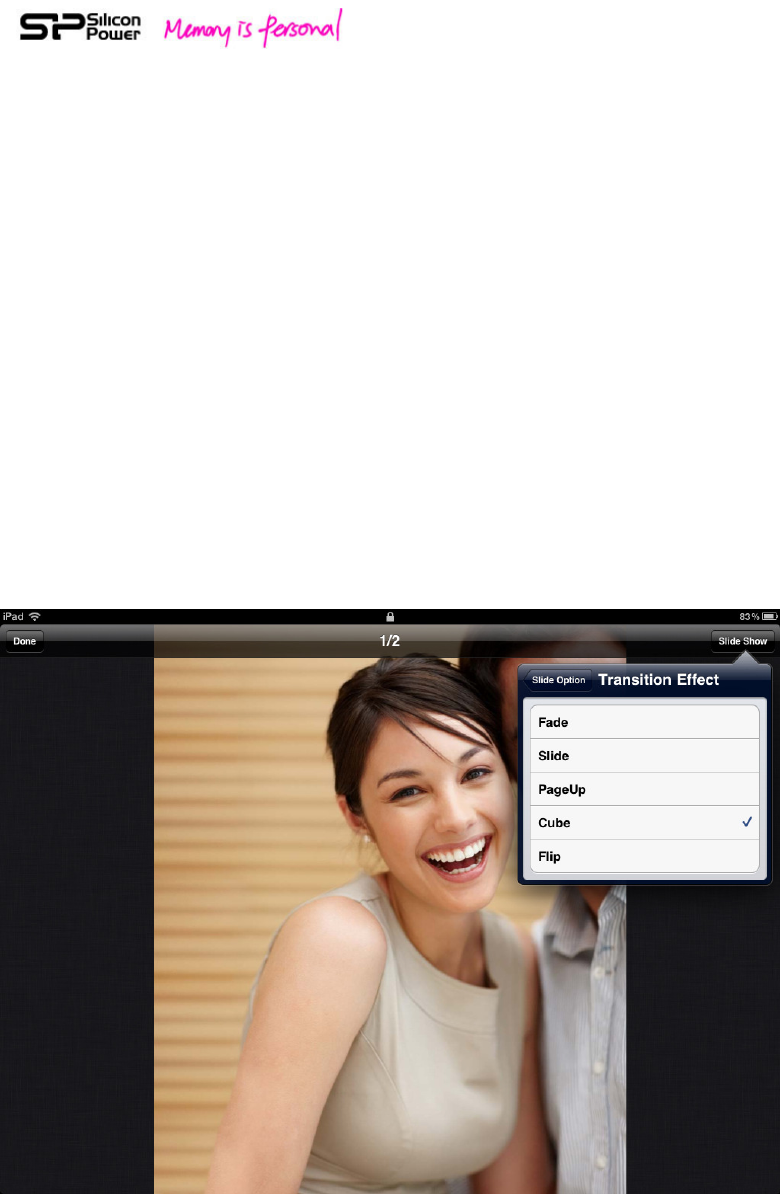
For the app only, during the photo slide show, you can tap the screen and then tap
the slide show displayed in upper right corner to further select the different
transition effect of photo slide show and decide the interval time to have a faster or
slower photo slide show. (Referring to figure 9)
Fig. 9 Transition Effect of Photo Slide Show
20
To stop playback of a photo slide show:
For the app: Tap the screen and then tap the Done button in the upper left corner.
For a browser: Close the current picture or tap the back arrow
Viewing Documents
1. Connect to Sky Share
2. Open the Sky Share app or a Web UI.
3. Select the Document tab on the left side of the screen
4. Tap the Document you want to read and then the document will be open.
If a document file you copied to the Sky Share device cannot be open, it may be
related to the file format not supported by the device you use to connect to Sky
Share. Please check your device’s specification for its supported document types.
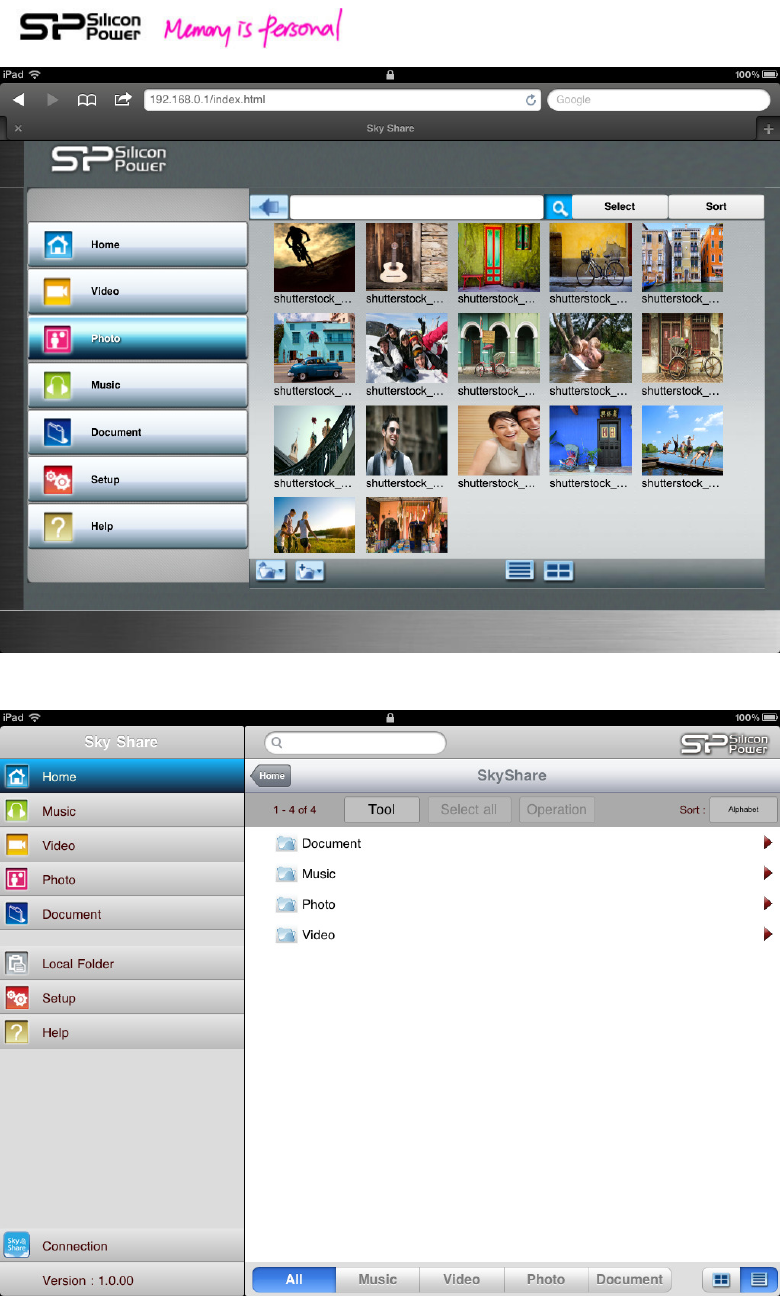
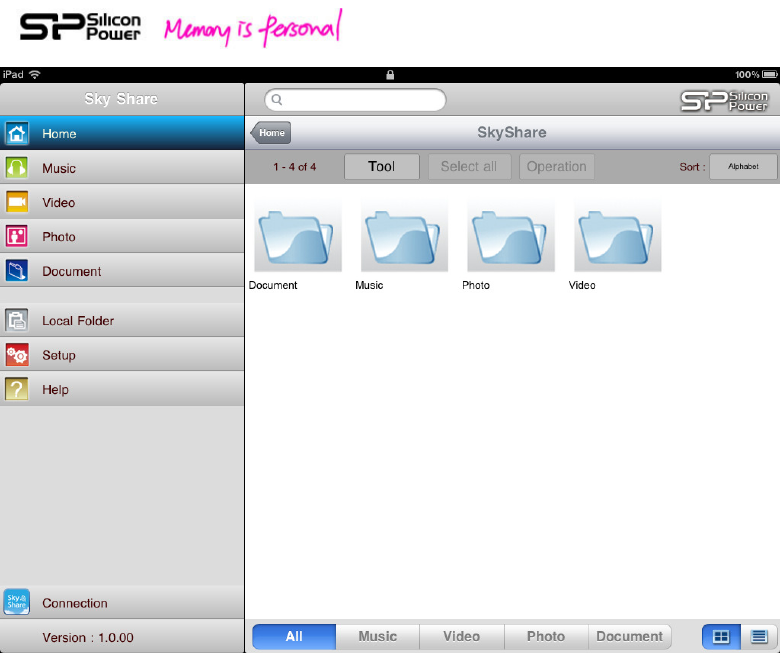
Viewing Content
Sky Share provides both of “Folder view” and “Thumbnail” view in App and Web UI
for Photos.
Folder View: Show your files in a file list and folder structure.
Thumbnail View: Show your files and folders in thumbnail pictures
You can switch “Folder view” or “Thumbnail view” by tapping its button. Please refer
to the screen below:
Fig.10 Folder view of Web UI
21
Fig.11 Thumbnail view of Web UI
Fig.12 Folder view of App
22
Fig.13 Thumbnail view of App
The App further provides the file categorization function in folder view and
thumbnail view of Home. You can select “All”, “Music”, “Video”, “Photo”, or
“Document” listed on the bottom of the browsing area to filter the file types
displayed in current directory. (Referring to Fig. 13)
Note: This function is to filter the files only stored in the current directory you have
selected.
Sort:
Sky Share provides file sorting function for a user to find its file easily.
When there are many files listed in the browsing area, you can tap “Sort” and then
further select file type, file size, Alphabet, or date for file sorting.
File type: When you select it, the system will sort the files based on the file type.
File size: When you select it, the system will sort the files based on file size from the
biggest file size to the smallest file size.
Alphabet: When you select it, the system will sort the files based on the name of the
files from A to Z.
Date: When you select it, the system will sort the files based on its creation date
from latest date to the oldest date.

23
Search file
If you store a huge number of files in Sky Share and want to find the specific file for
viewing or playing, you can input the keyword in the search column and then tap
search.
The system will find all files related to your input keyword and list them in the
browsing area.
10. Downloading Content to Your WiFi
Device or Computer
In addition to streaming your content from the Sky Share device, you can download
files from Sky Share to your media device or computer.
For a Browser, you can download your files from Sky Share to your WiFi device or
computer. After you select the files you want to download, please tap the download
icon.
Note: For some WiFi devices, this download function of Web UI may be inactive. (For
example, iPhone and iPad.)
For the App, you can download the files you selected from Sky Share to the “Local
folder” of your iPhone or iPad. After you select the files you want to download,
please tap “operation” and then select “download to local folder”.

24
11. Uploading Content to Sky Share from
Your WiFi Device or Computer
In addition to streaming your content from the Sky Share device, you can upload files
from your media device or computer to Sky Share.
For a Browser, you can upload your files from your WiFi device or computer to Sky
Share. Once you tap the upload icon, a window will pop up for you to select the
source files and then the files will be saved into the current folder of Sky Share.
Note: For some WiFi devices, this Upload function of Web UI may be inactive. (For
example, iPhone and iPad.)
For the App, you can upload the photos from your Photo album of iPhone and iPad
to Sky Share. Please tap “local folder” and then select “Upload to Sky Share”. The
camera roll of iPhone or iPad will pop up. Once you select the photo, it will be
automatically uploaded to Sky Share.
Note: it’s limited to one photo upload each time.
In addition, you can upload the files stored in local folder of your iPhone/iPad to Sky
Share. After you tap “tool” and then select the files you want to upload, please tap
“operation” and then select “upload to Sky Share”. For this function, multiple files
can be selected.
Create Folder
In addition to the default folders, you may want to create your own folders to store
files. You can do by the following ways:
a.) Create the folder by PHDD mode (portable Hard drive)
It’s the same operation as traditional portable hard drive.
b.) Create the folder via Web UI
Once you tap “Create Folder” icon, a window will pop up for you to input the folder
name. Enter the name and then tap “OK” button, this new folder will be created in
the current folder.
Note: Sky Share supports only one layer of subfolder. Please limit the folder
creation under this rule.
Note: This function is not supported by iPhone and iPad app.
25
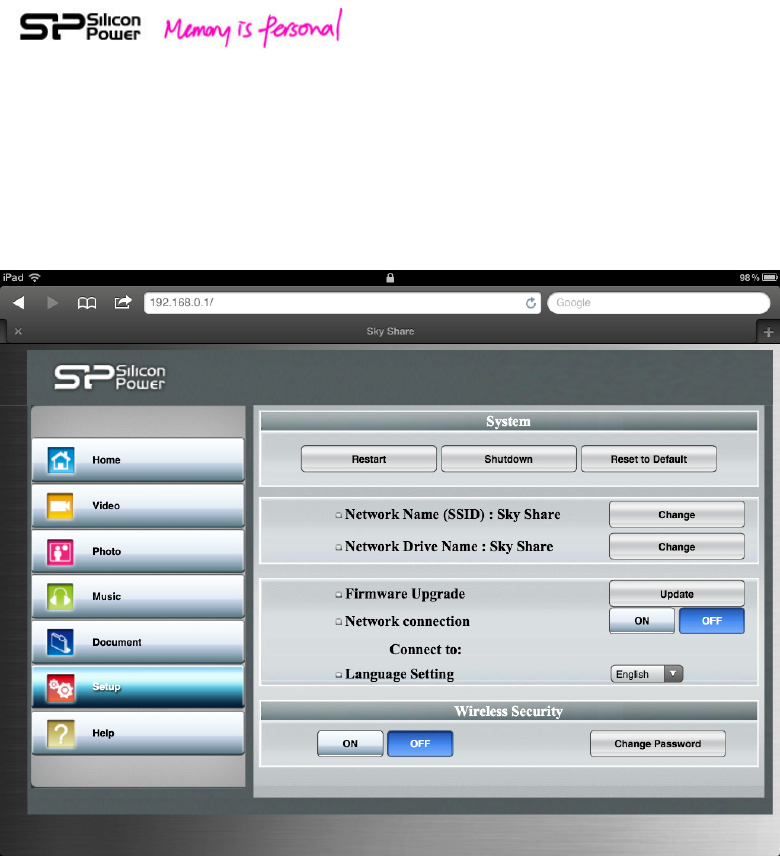
12. Sky Share Setup Page
Sky Share is designed with default setting in production. You may want to adjust its
setting in use. For example, setting your password, change the name of Sky Share,
upgrade its firmware and more. The setting adjustment can be done through the
setup page of Sky Share Web UI or App.
Fig.14 Setup page of Web UI

26
Fig.15 Setup page of App
Restart
If you encounter a minor problem with Sky Share, you can select to restart Sky Share.
When you tap Restart, Sky Share will take a while to restart the system. Once the
system is ready (Referring to chapter 3, Sky Share H10 Overview - LED indication),
please re-connect to Sky Share and open Sky Share Web UI or App for a further
operation. During the restart process, the setting of Sky Share and all files stored in
Sky Share will remain.
You can have the same function if you press the hardware reset pin lightly and
release it immediately.
Please make sure no one is watching a video, viewing photos, listening to music, or
working with any other file stored in Sky Share before you enable restart.
Shutdown
To turn off Sky Share, you can press the power button or tap the Shutdown from
setup page of Sky Share Web UI or App. Please make sure no one is watching a video,
viewing photos, listening to music, or working with any other file stored in Sky Share
before you shutdown Sky Share.

27
Reset Default
If you want to recover Sky Share setting to its factory default setting, you can tap
Reset Default from the setup page of Sky Share Web UI or App. You can have the
same function if you press the hardware reset pin for about 3 seconds and then
release it.
When you tap Reset Default, Sky Share will take a while to reset the system. Once
the system is ready (Referring to chapter 3, Sky Share H10 Overview - LED indication),
please re-connect to Sky Share and open Sky Share Web UI or App for a further
operation.
For this function, all files stored in Sky Share will remain, but the setting of Sky Share
will return back to the original factory default setting. You may want to use it if you
forget the password or encounter some problem you cannot solve by restart. Please
make sure no one is watching a video, viewing photos, listening to music, or working
with any other file stored in Sky Share before you enable Reset Default.
Change Network Name (SSID)
The Sky Share H10 is named “Sky Share” by default. This is the network name shown
in the available network list during your wireless connection. It’s also known as the
SSID (Service Set Identifier). You can change it to your preferred name based on the
following procedure.
1. Switch to the setup page of Sky Share Web UI or App and then click “Change”
button of Network Name.
2. Type a new name and then tap OK
3. Sky Share will take a while to change the Network name in its system. Please wait
for a while.
4. Please reconnect to your Sky Share device after the name has been changed.
Change Network Drive Name
Network Drive (Samba Share) function is available for Windows PC/NB environment.
The default setting of Network drive name is Sky Share. If a user has his preferred
name, he can change it.
Please switch to the Setup page of Sky Share Web UI or App.
Click “Change” button of Network Drive Name.
Type the new name in pop-up window and then click “OK”.
Sky Share will take a while to change the name in its system. Please wait for a while.
Please reconnect to your Sky Share device after the name has been changed.

28
Firmware Upgrade
If the new firmware is ready to enhance the product functions, it will be available on
our website. http://www.silicon-power.com/support/su_dlc.php
Once you download the firmware, please store it in the root directory of Sky Share
H10 in PHDD mode. After that, please remove USB 3.0 cable and follow the following
steps to update the Sky Share H10 firmware.
1. Please make sure no other user is using Sky Share H10.
2. Please plug adapter to have a stable power.
3. Press power button to turn on Sky Share H10.
4. After the system is ready, please connect to Sky Share H10.
5. Switch to setup page of Sky Share H10 Web UI or App
6. Tap “Update” button of firmware Upgrade
7. The system will re-confirm if you do want to execute firmware upgrade. Please
tap OK.
8. Sky Share H10 will take a while to upgrade the firmware. Please wait for a while.
Once the firmware upgrade is completed, the LED of WiFi/Data access will
change to solid blue from blinking blue
Note: It’s important to plug adapter to have a stable power for firmware upgrade. In
case of sudden power off, the firmware may be damaged.
Network Connection
The Sky Share device is a wireless network on its own. When your WiFi device is
connected to Sky Share, WiFi connection is dedicated for Sky Share wireless. If you
want to use your WiFi device to surf on the Internet or check e-mail while
connecting Sky Share, you can switch on “Network Connection” function from the
setup menu to re-connect to your usual network.
1. Network Connection ON
Switch to the “setup page” of Web UI or App.
Press “ON” of Network Connection. Your WiFi enabled device will start to search the
available network list nearby. Tap the network you want to connect. In case of
“Password” required, please enter the correct password and then press “confirm”
button. A message will pop up to show that the selected network is connecting.
Please wait for a while. Once it’s ready, you will need to reconnect Sky Share again.
Please switch to “Setup page” for confirmation. (referring to figure 16)
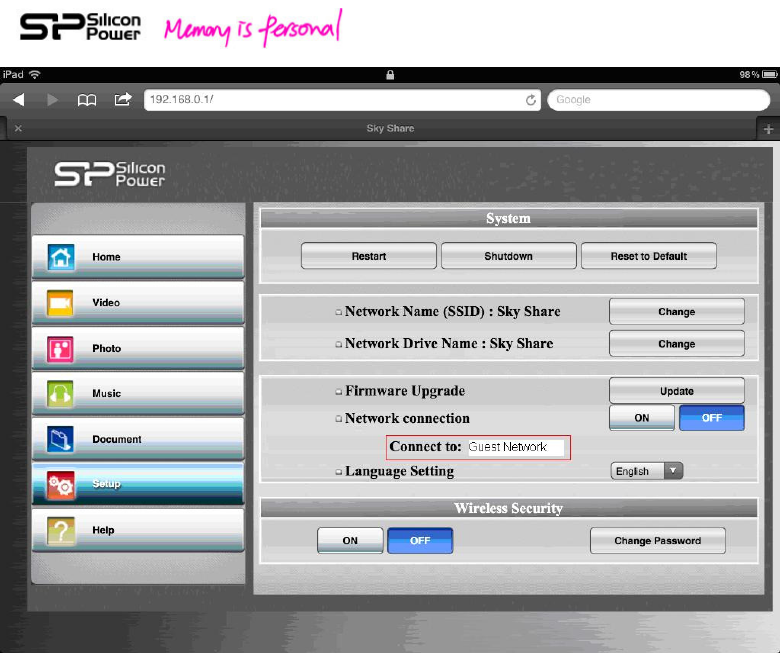
29
Fig. 16 Network connection confirmation
2. Network Connection Off
If you would like to turn off Network connection, please go to “setup page” of Web
UI or App and then press “OFF” of Network connection.
Sky Share will disable this function and restart again. After the restart is ready,
please reconnect to Sky Share.
Wireless Security
Sky Share provides you with password function to protect your network access. The
default setting is password off. If you want to restrict access to your Sky Share device,
you may want to set a password. Especially, when you are in an environment you
don’t want any unauthorized user to access your Sky Share.
1. Please switch to Setup page of Sky Share Web UI or App.
2. Tap ON of Wireless Security. A window will pop-up for a user to input wireless
password.
3. Once input is done, please tap OK. Sky Share will take a while to setup the
password. Please wait for a while.
4. Once it’s ready, please reconnect to Sky Share with your password.

30
To turn off the password
Please switch to the setup page of Sky Share Web UI or App.
Tap OFF of Wireless Security.
The system will re-confirm if you do want to disable the password.
Once you tap “Yes”, Sky Share will take a while to switch off Password. Please wait
for a while.
Once it’s ready, please reconnect to Sky Share.
To change the password
Please switch to the setup page of Sky Share Web UI or App.
Tap “Change” of Wireless Security.
A window will pop-up for a user to input wireless password.
Once you click “OK”, Sky Share will take a while to change the password. Please wait
for a while.
Once it’s ready, please reconnect to Sky Share with your new password.
The password must be at least eight characters long and no more than 32 characters.
Only numbers and alphabet are valid for password choice.
Sky Share User Access Management
The Sky Share is designed for up to 8 different devices connection at once
(Recommend 3 different devices for HD Video streaming), if a 9th device is trying to
connect, it will be blocked. To allow a blocked device access to Sky Share, one user
must disconnect from its wireless network.
Either switch off its WiFi function or select any other wireless network other than
Sky Share.
31
13. How to delete the files stored in Sky Share
You can delete files in PHDD mode. Once you plug USB 3.0 cable to your computer,
the Sky Share just behalves as a normal PHDD. You can read, write, and erase files in
Sky Share as a PHDD.
In addition, Sky Share app also provides “delete file” function. Referring to the figure
17 below:
Fig.17 Deleting files (App)
14. How to safely remove Sky Share from
your computer
It’s highly recommended to have safety removal for Sky Share in order to avoid data
missing or file damage.
1. Make sure that no files in Sky Share are still in use or transfer.
2. Safely eject the Sky Share from your computer:
• For Mac OS, drag the Sky Share drive icon from the desktop to the trash.
• For Windows, click the Safely Remove Hardware icon.
3. Wait for the data access LED off and then remove Sky Share from your computer.

32
15. Troubleshooting
Can I change default IP address (192.168.49.73)?
No, the default static IP address cannot be changed.
I cannot use the Internet after I connect to Sky Share. What
happened?
The Sky Share device is a wireless network on its own. When your WiFi device is
connected to Sky Share, WiFi connection is dedicated for Sky Share wireless. If you
want to use your WiFi device to surf on the Internet or check e-mail while connecting
Sky Share, you can switch on “Network Connection” function from the setup menu
to re-connect to your usual network.
I cannot play part of my songs, videos, and files.
Please make sure the device you use to connect Sky Share can support your file
formats.
You can copy any file to the Sky Share, but the device you use to connect Sky Share
will only play or view the file formats it supports.
There are some software applications to convert video files into different formats.
You may want to convert the files into the formats compatible with your device
before copying them to Sky Share.
I reformatted Sky Share for my Mac by mistake.
If you reformatted Sky Share by mistake, please return Sky Share back to FAT32
format. After power on under FAT32 format, the system will re-build the default
folders and initial status.
I cannot play the file bigger than 4GB.
The default format of Sky Share H10 is FAT32. FAT32 file system can only support the
file size up to 4GB. If you want to play the file bigger than 4GB, you can format Sky
Share into NTFS file system, remove USB cable, power-on Sky Share, and then the
default folders will be automatically created. Both of NTFS and FAT32 are supported
by Sky Share. But, Mac OS will only be able to read NTFS files. In order to write NTFS
files in Mac OS, a 3rd party NTFS driver will be required.

33
Federal Communication Commission Interference Statement
This device complies with Part 15 of the FCC Rules. Operation is subject to the
following two conditions: (1) This device may not cause harmful interference,
and (2) this device must accept any interference received, including
interference that may cause undesired operation.
This equipment has been tested and found to comply with the limits for a
Class B digital device, pursuant to Part 15 of the FCC Rules. These limits are
designed to provide reasonable protection against harmful interference in a
residential installation. This equipment generates, uses and can radiate radio
frequency energy and, if not installed and used in accordance with the
instructions, may cause harmful interference to radio communications.
However, there is no guarantee that interference will not occur in a particular
installation. If this equipment does cause harmful interference to radio or
television reception, which can be determined by turning the equipment off
and on, the user is encouraged to try to correct the interference by one of the
following measures:
- Reorient or relocate the receiving antenna.
- Increase the separation between the equipment and receiver.
- Connect the equipment into an outlet on a circuit different from that
to which the receiver is connected.
- Consult the dealer or an experienced radio/TV technician for help.
FCC Caution: Any changes or modifications not expressly approved by the
party responsible for compliance could void the user's authority to operate
this equipment.
This transmitter must not be co-located or operating in conjunction with any
other antenna or transmitter.

34
Radiation Exposure Statement:
The product comply with the FCC portable RF exposure limit set forth for an
uncontrolled environment and are safe for intended operation as described in
this manual. The further RF exposure reduction can be achieved if the
product can be kept as far as possible from the user body or set the device to
lower output power if such function is available.
For Body worn operation, this device has been tested and meets FCC RF
exposure guidelines when used with an accessory that contains no metal and
that positions the device a minimum of 0.5 cm from the body. Use of other
accessories may not ensure compliance with FCC RF exposure guidelines.
警語:
經型式認證合格之低功率射頻電機,非經許可,公司、商號或使用者均不
得擅自變更頻率、加大功率或變更原設計之特性及功能。
低功率射頻電機之使用不得影響飛航安全及干擾合法通信;經發現有干擾
現象時,應立即停用,並改善至無干擾時方得繼續使用。前項合法通信,
指依電信法規定作業之無線電通信。低功率射頻電機須忍受合法通信或工
業、科學及醫療用電波輻射性電機設備之干擾。
Safety Guidelines
Please read the safety guidelines below carefully before using the Sky Share Product.
Incorrect use of your device may cause undesired operation, reduced battery
performance, or damage of your device.
1. Do not drop the product. Dropping may cause product damage.
2. Extreme shock and vibration may cause damage to the product such as
data corruption etc……
3. Do not attempt to open or disassemble this product.
4. Store and operate between 5~45℃
5. Recharge the battery every 3 months when not in use.
6. Do not place this product near a heat source or flame or in a high

35
temperature environment.
7. Do not allow this product to have contact with liquid(s).
8. When scrapping this product, the battery needs to be disposed of properly.