SIRIUS Sxdv3 D&P Vehicle Kit Quick Start Guide E 140731C User Manual
Sxdv3 D&P Vehicle Kit Quick Start Guide E 140731C SXDV3 D&P Vehicle Kit Quick Start Guide E 140731c
2016-03-11
User Manual: SIRIUS Sxdv3 D&P Vehicle Kit Quick Start Guide E 140731C
Open the PDF directly: View PDF ![]() .
.
Page Count: 2
2 3
65 7
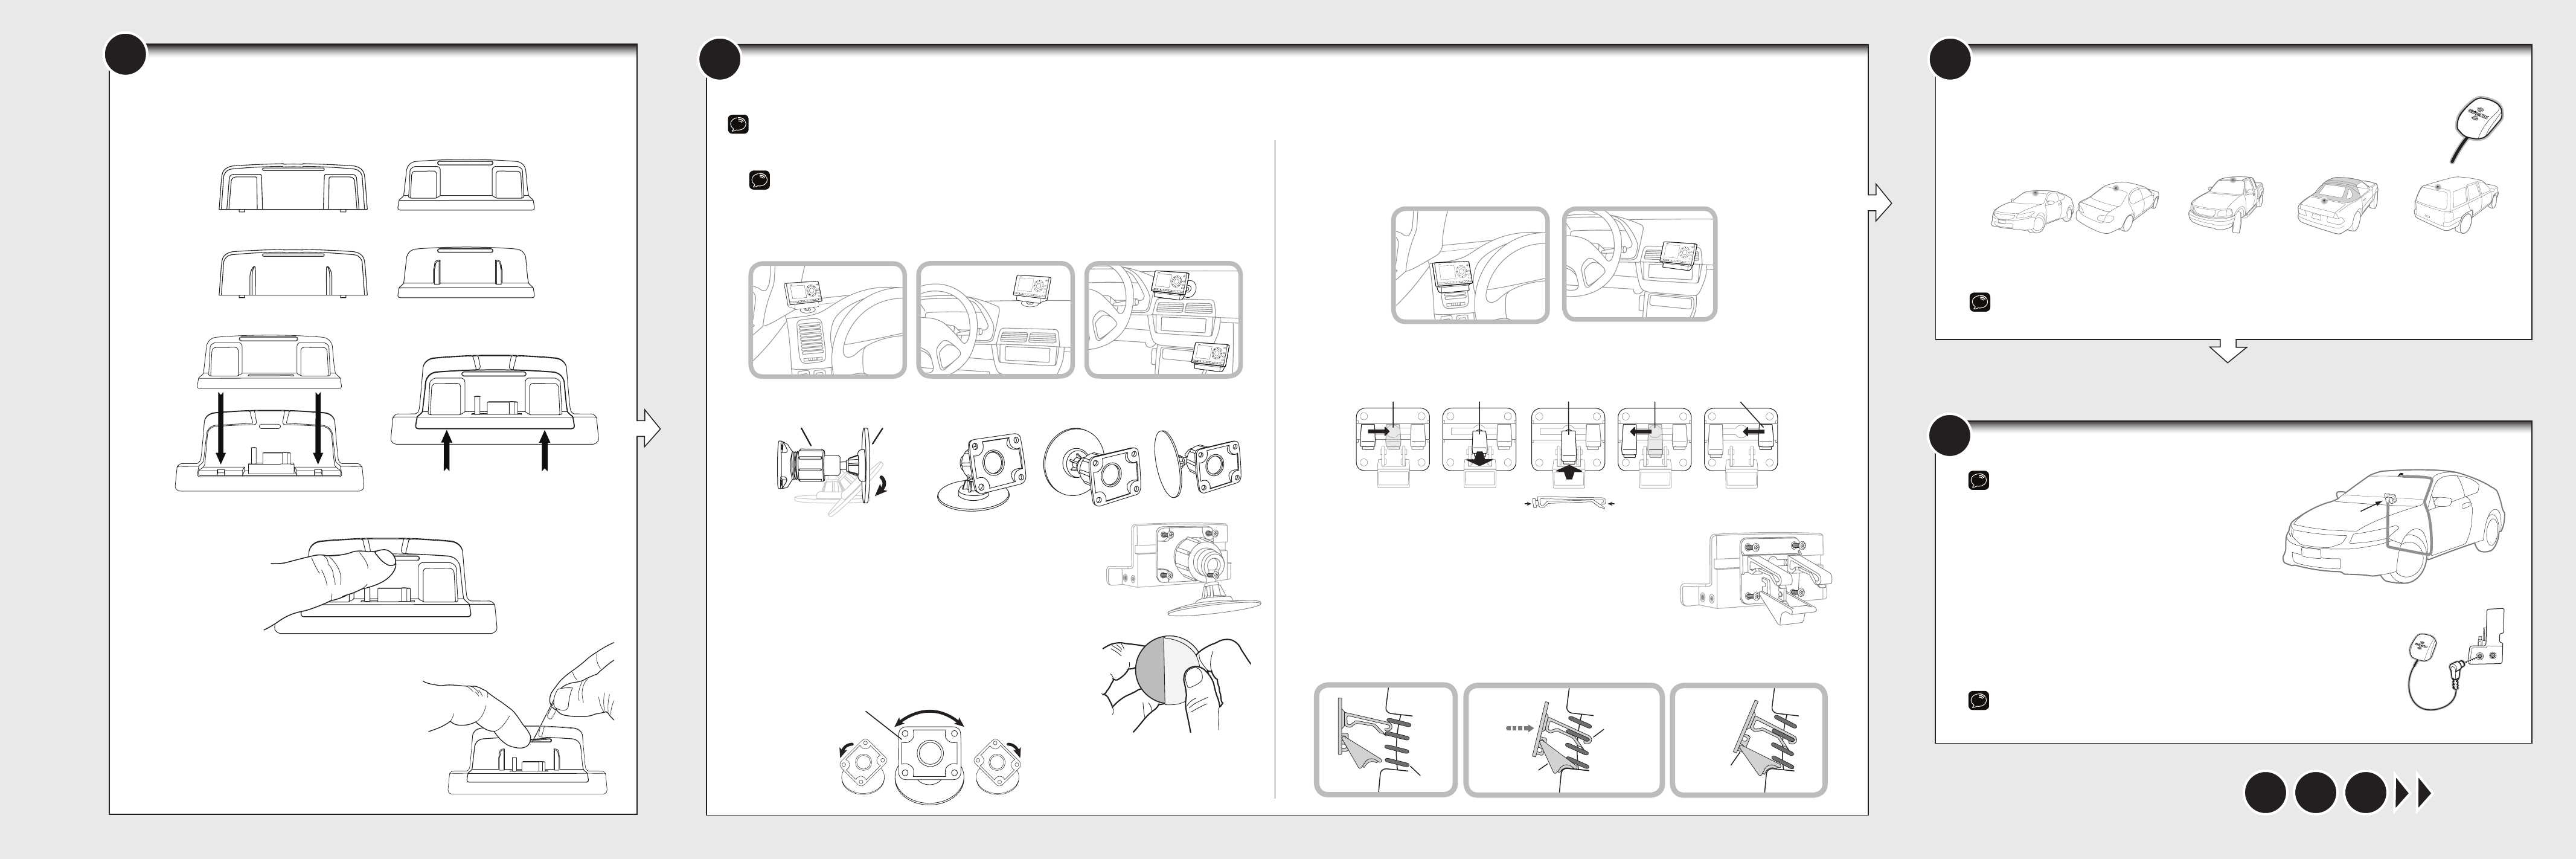
Find a Location for the Vehicle Dock and Mount it
Select either the Dash Mount or the Vent Mount method for mounting the Vehicle Dock. You will need a phillips screwdriver to complete the installation.
NOTE: Your Radio may be a different model than the Radio shown here.
TIP! You can take advantage of the wire guide channel across the back of the Vehicle Dock to organize the wires which connect to the dock.
You’ll need to insert the Radio Dock Adapter that is compatible with your Radio into the Vehicle Dock.
A. Locate the Radio Dock Adapter that is compatible with your Radio.
If you have an XM or SiriusXM Radio: If your Radio is branded as XM* or SiriusXM*, select the
Radio Dock Adapter marked XM & SIRIUSXM on the back of the adapter.
If you have a Sirius Radio: If your Radio is branded as Sirius*, select the Radio Dock Adapter
that is marked SIRIUS on the back of the adapter.
B. Orient and place the Radio Dock Adapter that you selected into the Vehicle Dock. Be sure the
adapter is centered, and is seated all the way down into the dock.
C. Once the adapter is seated correctly in the Vehicle Dock, gently press the top of the adapter
against the dock with your finger until it clicks into place. The Radio Dock Adapter is now
installed.
Should it become necessary to remove the Radio Dock
Adapter from the Vehicle Dock, use your fingernail to
gently press down on the top of the adapter, and then use
a long thin object such as a paper clip, a screw driver, or
something similar to pry the adapter away until it releases
from the dock. Then lift the adapter up and out of the
dock.
A. Mount the Magnetic Mount Antenna outside your vehicle, on a clean and dry horizontal surface
that will always face the sky.
B. Choose the location for the antenna according to your type of vehicle. Center it between the
left and right sides, and away from other antennas.
TIP: Use the Alcohol Prep Pad to clean the surface.
Sedans and Coupes
(above front windshield or rear window)
Pickups
(above front windshield)
SUVs
(rear of roof)
Convertibles
(leading edge of trunk)
Mount the Magnetic Mount Antenna
Start Here
4Route the Antenna Cable
NOTE: These instructions are for a sedan or coupe where the
antenna is mounted above the front windshield. The SiriusXM
Dock and Play Vehicle Kit User Guide SXDV3 has detailed antenna
cable routing instructions for all types of vehicles.
Go to
www.siriusxm.com/guides for the User Guide.
A. Tuck the antenna cable under the windshield rubber
molding and run it to the nearest corner.
B. Route the cable out of the molding and into the rubber
weather stripping around the door opening.
C. Lift the weather stripping. Tuck and run the cable inside it
to the bottom of the door opening. Replace the weather stripping.
D. Pull the cable out and route it to your Radio.
E. Plug the Magnetic Mount Antenna connector into the silver ANT connector on the
side the Vehicle Dock.
TIP: Include enough slack in your routing to accommodate open doors or the hood lid. Coil any
excess cable in a hidden location and keep it away from any vehicle pedals or controls.
Radio
Location
Dash Mount Method:
IMPORTANT: The air temperature needs to be at least 60°F to install the Dash Mount. If needed, turn on the
heater in your vehicle.
A. Select a flat surface for the Dash Mount with ample room for the Vehicle Dock and Radio. Avoid
mounting on leather surfaces. Choose a location that doesn’t interfere with the driver’s vision or
access to driving controls, one that won’t interfere with the deployment of airbags or other safety
equipment, and makes your Radio easily accessible for operation. (Airbag locations are typically
marked with “SRS” logos.)
B. Orient the adhesive foot so that your Radio is easily accessible. Loosen the knob and adjust the
adhesive foot to position 1, 2, or 3, and then tighten it.
C. Attach the Dash Mount to the PowerConnect Vehicle Dock using
the 4 provided screws. If you plan to use the wire guide channel
across the back of the Vehicle Dock to organize the wires, do not
fully tighten the screws. If not, tighten the screws.
D. Clean the mounting surface in the vehicle with the alcohol
preparation pad and let it dry thoroughly.
E. Once the surface is dry, remove the adhesive liner. Press and hold
the Dash Mount in place for 30 seconds. Allow the adhesive to
cure for at least 2-4 hours.
F. You can tilt the dock mounting plate in your preferred direction.
(Note that for clarity the illustration does not show the Vehicle
Dock attached to the Dash Mount.)
jump
FM
menu
234567890
direct
1
1
2
3
234567890
direct
jump
FM
menu
1
234567890
direct
jump
FM
menu
1
234567890
direct
jump
FM
menu
1
1
234567890
direct
jump
FM
menu
1
jump
FM
menu
234567890
direct
1
Vent Mount Method:
A. Select a vent with ample room for the Vehicle Dock and Radio, one that won’t interfere with the deployment
of airbags or other safety equipment, and makes your Radio easily accessible for operation. (Airbag locations
are typically marked with “SRS” logos.)
B. Some vents have recessed louvers. If yours are recessed, remove the regular vent clamps and install the
extended vent clamps.
C. Attach the Vent Mount to the PowerConnect Vehicle Dock using the 4
provided screws. If you plan to use the wire guide channel across the
back of the Vehicle Dock to organize the wires, do not fully tighten
the screws. If not, tighten the screws.
D. Install the Vent Mount onto the vehicle vent. (Note that for clarity the
illustrations below do not show the Vehicle Dock attached to the Vent
Mount.)
i. Insert the vent mount into the vent opening.
ii. Push until hooked on the rear of the vent louver. Rest the foot
against the bottom of the vent.
iii. If necessary, adjust the tilt of the Vent Mount by repositioning the foot to a different tilt adjustment
hole.
PUSH
III III
Dash
Dash
Dash
Vent
Louver
Vent Vent
HOOKED
TILT
ADJUSTMENT
HOLES
FOOT
Knob Adhesive Foot
Option 1 Option 2 Option 3
Dock Mounting Plate
Round End Orientation
Ve
nt Mount Rear View
Slide Left Clamp
to
Hole in Center Pull Clamp Out
Towards Yo u
Insert Round End
of the Extended
Clamp in the
Center Hole
Slide Clamp to Left
to Complete
Installation Repeat to Replace
Right Clamp
Insert the Radio Dock Adapter Into the Dock
1
SIRIUS
Front View
Correct
Orientation
Back
View
XM & SIRIUSXM
Front View
Correct
Orientation
Back
View
AUDIO
ANT
*If you are unsure whether your Radio is an XM, SiriusXM,
or Sirius Radio, check the label on the back of the Radio. If
the label on your Radio says XM Radio ID or Radio ID, and
has an 8-digit alphanumeric number, it is an XM or SiriusXM
Radio. If the label on your Radio says Sirius ID, SID, or ESN,
and has a 12-digit numeric number, it is a Sirius Radio.
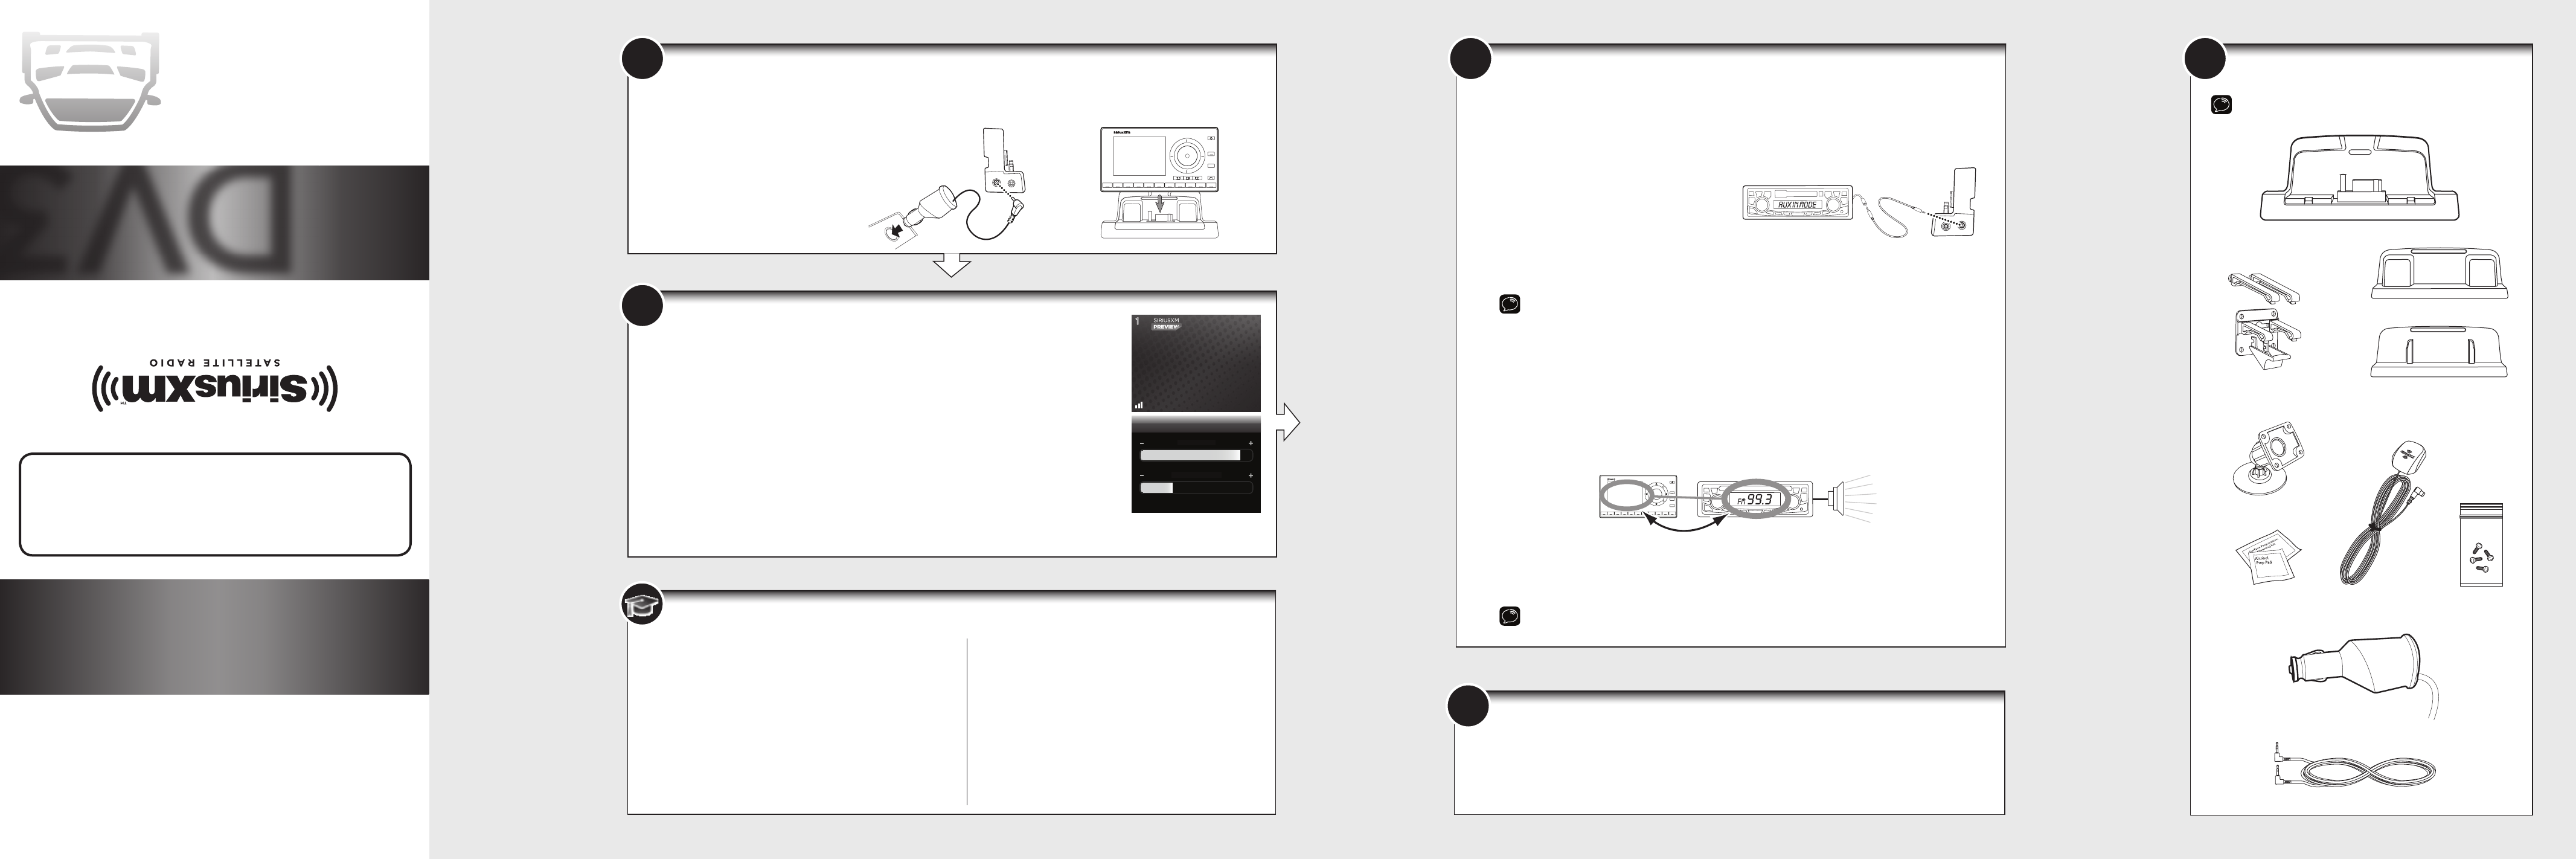
7 ? What’s in the Box?
5
6
© 2012 Sirius XM Radio Inc.
XDNX1VKQSG 120530a
Sirius XM Radio Inc.
1221 Avenue of the Americas
New York, NY 10020
1.866.635.2349
siriusxm.com
© 2014 Sirius XM Radio Inc.
SXDV3QSG 140731c
D
V3
QUICK START GUIDE
Dock & Play Vehicle Kit
A. Verify the signal reception by looking at the antenna signal strength bars on the screen.
If the Radio is showing at least two vertical bars of antenna signal strength, continue
with step 7. If not, be sure that you have mounted the antenna on the outside of the
vehicle, as shown in step 3, and that the vehicle is parked outdoors with a clear view of
the sky. Move the vehicle away from any obstructed area, for example, if you are parked
in a garage, or parked near a large structure.
B. Refer to your Radio’s User Guide (go to www.siriusxm.com/guides) for instructions on
accessing the Signal Indicator, Signal, or Antenna Aiming screen of your Radio, to see
a visual indication of signal strength.
Verify Signal Reception
Self installation instructions and tips are provided for your convenience. It is your
responsibility to determine if you have the knowledge, skills and physical ability
required to properly perform an installation. SiriusXM shall have no liability for
damage or injury resulting from the installation or use of any SiriusXM or third
party products. It is your responsibility to ensure that all products are installed
in adherence with local laws and regulations and in such a manner as to allow
a vehicle to be operated safely and without distraction. SiriusXM product
warranties do not cover the installation, removal or reinstallation of any product.
Decide on one of the following in-box audio connection options. You can also refer to the SiriusXM Dock &
Play Vehicle Kit User Guide SXDV3 for additional audio connection options, such as a cassette adapter or
the FM Direct Adapter (FMDA) (both sold separately). Go to www.siriusxm.com/guides for the User Guide.
Option 1: Best: Use the provided Aux In Cable, if your vehicle’s stereo system has an auxiliary input jack.
A. Plug one end of the cable into the green AUDIO
connector on the side of the PowerConnect
Vehicle Dock and the other end into the auxiliary
input jack on the vehicle’s stereo system.
B. Turn on your vehicle’s stereo system and set
it to play from the auxiliary input source.
C. You should hear the SiriusXM audio through
your vehicle’s stereo system.
D. If you are using the wire guide channel across the back of the Vehicle Dock to organize the wires,
place the wires in the guide and then tighten the 4 screws to securely attach the mount.
TIP! Refer to your vehicle’s owner’s manual to find the location of the auxiliary input jack, or consult the
vehicle dealer.
Option 2: Good: Use the PowerConnect feature in your Radio. PowerConnect plays the audio through
your vehicle’s FM radio.
A. Use the SiriusXM FM Channel Finder at www.siriusxm.com/fmchannel. Go to the website and enter
your zip code. The Channel Finder will suggest a list of available FM channels in your area. For
convenience, write down or print out the list.
B. Pick the first FM channel on your list. Tune your vehicle’s FM radio to this FM channel. You should
only hear static or silence. If not, try the next FM channel on your list.
C. Set your satellite Radio to transmit on the same FM channel that you have selected on your vehicle’s
FM radio. You may need to turn On the FM Transmitter in your Radio first. Go to www.siriusxm.
com/guides for your Radio’s User Guide (with Vehicle Kit) for instructions. You should now hear the
SiriusXM audio.
D. If you are not satisfied with the audio quality, move to the next FM channel on your list and repeat
the process. Continue until you have found an FM channel with which you are satisfied.
E. If you are using the wire guide channel across the back of the Vehicle Dock to organize the wires,
place the wires in the guide and then tighten the 4 screws to securely attach the mount.
TIP! You may find an FM channel with static or silence on your vehicle’s FM radio that does not work with your
satellite Radio. It is possible that some type of inaudible interference is present that prevents reception of the
SiriusXM broadcast. Your only options are to use another FM channel or a different audio connection method.
Connect the Audio
CAUTION: Do not attempt to install, activate, or adjust any of the
setting options described in this Quick Start Guide unless your
vehicle is parked in a safe location.
Power
Connect™ Vehicle Dock
Magnetic Mount
Antenna
Antenna & Dash Mount
Alcohol Preparation Pads
Power
Connect Power Adapter
Aux In Cable
A. Insert the PowerConnect Power Adapter into your vehicle’s 12 volt power adapter or cigarette lighter socket. Plug the other
end into the red PWR connector on the side of the PowerConnect Vehicle Dock.
B. Place your Radio into the dock and
press the Power button.
Connect the PowerConnect Power Adapter
Dash Mount
Screws (4)
Vent Mount and
Extended Vent Clamps
Important Legal Information
!
©2014 Sirius XM Radio Inc. “Sirius”, “XM” and all related marks and logos are trademarks of Sirius XM Radio Inc. Visit www.siriusxm.com/channellineup for updates. All
programming/channel lineup/XM service subject to change or preemption. All other marks and logos are the property of their respective owners. All rights reserved.
Our satellite service is available only to those at least 18 and older in the 48 contiguous USA and DC. Our Sirius satellite service is also available in PR (with coverage limitations). Our
Internet Radio service is available throughout our satellite service area and in AK and HI. Certain channels are not available on our Internet Radio service or on mobile devices.
WARNING: This product contains chemicals known to the State of California to cause cancer and birth defects or other reproductive harm.
Specifications
System
Power Requirements: 9-16 V DC, 500 mA (max)
Operating Temperature: -4°F to +140°F (-20°C to +60°C)
Audio Output: 1.0 Vrms (max)
Power
Connect Dock
Dimensions: 4.1 in (W) x 1.8 in (H) x 1.1 in (D)
105 mm (W) x 46 mm (H) x 28 mm (D)
Weight
(without adapter)
: 1.4 oz (40 g)
Weight
(with adapter)
:
1.5 oz (43 g)
Audio Connector: 1/8 in (3.5 mm) female
Antenna Connector: SMB male
Power
Connect Power Adapter
Dimensions: 3.7 in (W) x 1.7 in (H) x 1.3 in (D)
94 mm (W) x 43 mm (H) x 34 mm (D)
Weight: 2.4 oz (69 g)
Input / Output: 9-16 V DC / 5 V DC, 1.5 A
Cable Length: Approximately 4.6 ft. (1.4 m)
Vehicle Antenna
Type: SiriusXM Magnetic Mount
Connector: SMB female, right angle
Cable Length: Approximately 23 ft (7.0 m)
Aux In Cable
Connectors: 1/8 in (3.5 mm) stereo male to
1/8 in (3.5 mm) stereo male
Cable Length: Approximately 4 ft (1.2 m)
234567890
b / #
alerts
twx
FM
menu
t-mix
t-scn
1
PLUS
234567890direct
jump
FM
menu
1
99.3
MATCH FM CHANNELS
PWR FM
AUDIO
ANT
XM & SiriusXM Radio Dock Adapter
Sirius Radio Dock Adapter
*The screens shown above are
representative and may differ
from the screens displayed on
your Radio.
Signal Indicator
S
ATELLIT
E
TERRESTRIA
L
Press menu to exit
866-635-2349
siriusxm.com
1
b
A
