SIRIUS Xvsap1V1 Userguide V2 User Manual Guide
Xvsap1V1 Userguide V2 XVSAP1V1_UserGuide_v2 XVSAP1V1_UserGuide_v2 cms images sxm-java-dev
2016-03-10
User Manual: SIRIUS Xvsap1V1 Userguide V2
Open the PDF directly: View PDF ![]() .
.
Page Count: 98

3
Table of Contents
Introduction....................5
Features ............................6
Compatibility ........................7
Safety and Care Information . . . . . . . . . . .8
What’s in the Box? . . . . . . . . . . . . . . . . . . 10
XM SkyDock Features and Controls . . . . 11
XM SkyDock Features and Connections 12
Installing the XM SkyDock App . . . 13
Installing the XM SkyDock Application . 14
Vehicle Installation . . . . . . . . . . . . . 15
Setting Up the
Power
Connect FM
Transmitter...................... 28
Activation ....................31
Using Your XM SkyDock . . . . . . . . .37
Navigating the XM SkyDock Screens . . 38
Home Screen Information . . . . . . . . . . . 39
Favorites Panel .....................41
Replay Screen ..................... 42
Channel List Screen . . . . . . . . . . . . . . . . 43
Category List Screen . . . . . . . . . . . . . . . 44
Direct Tuning ...................... 45
Setting your Favorite Channels . . . . . . 46
Traffic & Weather or Jump Button . . . . 49
Song Tagging . . . . . . . . . . . . . . . . . . . . . . . 51
Sports Alerts...................... 54
Displaying the Sports and Stock Ticker 55
Pause, Rewind, and Replay . . . . . . . . . . 56
Setting Up Your XM SkyDock. . . . 59
Settings Menu ..................... 60
My Account ........................61
FM Settings ....................... 62
Alert Options...................... 66
Ticker Options..................... 66
Sports.............................67
Stocks............................ 69
Traffic & Weather. . . . . . . . . . . . . . . . . . . . 71
Preview Cards ......................72
Parental Controls . . . . . . . . . . . . . . . . . . .73
Sound Levels .......................76
Disable Auto-Lock. . . . . . . . . . . . . . . . . . .77
Application Tour . . . . . . . . . . . . . . . . . . . .78
Appendix .....................81
Miscellaneous Alerts. . . . . . . . . . . . . . . . 82
Updating the XM SkyDock Firmware . . 84
Restore Defaults . . . . . . . . . . . . . . . . . . . 85
How to Find Available FM Channels
in Your Area ..................... 87
Troubleshooting.................... 89
Owner’s Record.................... 93
Specifications ..................... 94
Patent Information . . . . . . . . . . . . . . . . . 95
Environmental Information . . . . . . . . . . 95
Copyrights and Trademarks. . . . . . . . . . 97

4

5
Introduction
6
Introduction
Features
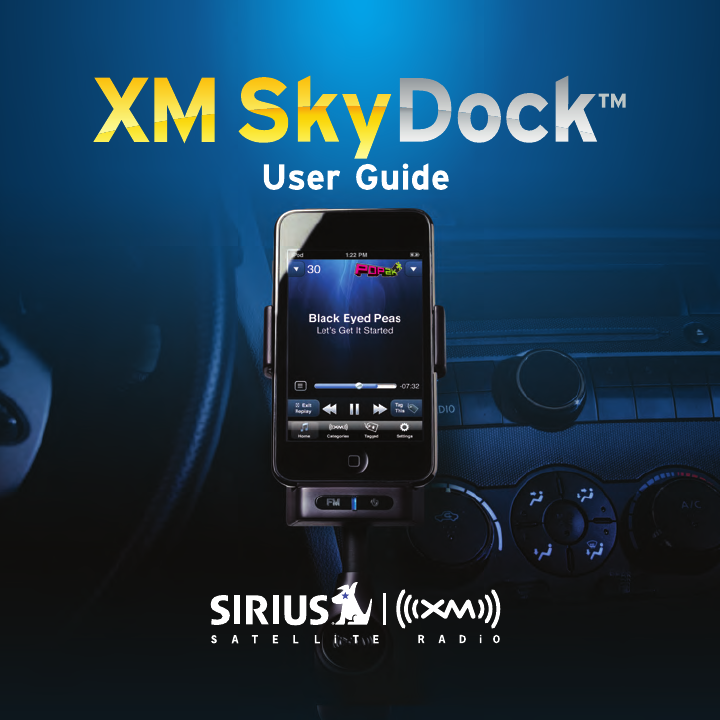
Thank you for purchasing the XM SkyDock!
The XM SkyDock™ has these exciting features to enhance your listening experience:
• Built-in XM tuner, so you can enjoy live Satellite Radio anywhere you drive
controlled by your iPod touch® or iPhone®.
• Uses the Free XM SkyDock App available for download from the App Store.
• Song Tagging allows you to discover new music and easily purchase from iTunes®
to expand your personal music library.
• Pause, rewind, and replay up to 30 minutes of live satellite radio.
• Revolutionary SIRIUS|XM
Power
Connect™ FM Transmitter works through your
existing car radio.
• Integrated design allows for easy installation and moving from vehicle to vehicle
• Works in portrait or landscape mode.
• Flexible stalk optimizes placement in your vehicle.
• Charges iPod touch or iPhone while you listen.
• Set alerts to notify you when your favorite song, artist or sports team is playing
on other channels.
• Stock and Sports Ticker allows you to track your favorite stocks and teams.
To get the most from your new XM SkyDock, please read this entire User Guide.
NOTE: XM SkyDock works on the XM Network and requires an active XM subscription.
NOTE: All references to iPhone in this manual also apply to the iPod touch, unless
otherwise noted.
7
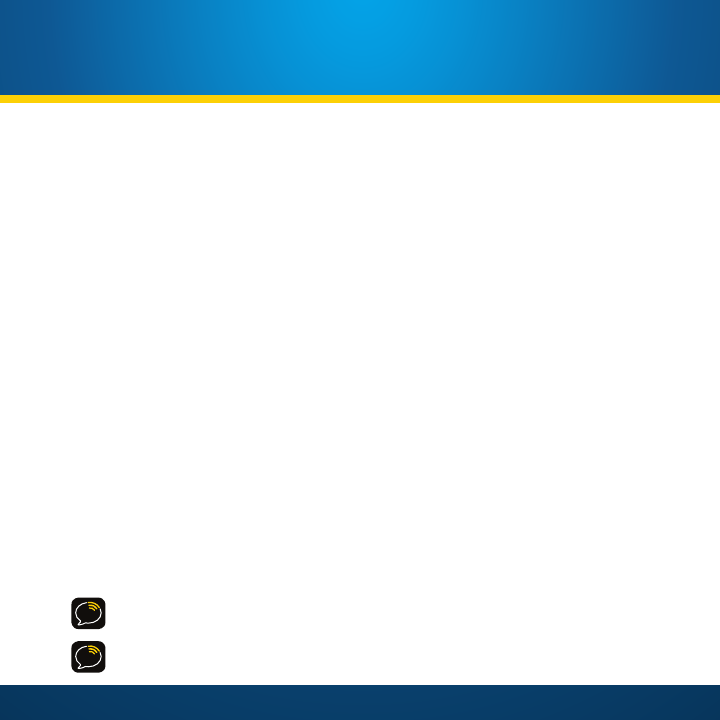
Compatibility
Your XM SkyDock will work with the following iPhone and iPod touch models
running
iPhone OS 3.0 or later:

8
Safety and Care Information
IMPORTANT: Always read and understand all the instructions to avoid injury to
yourself and/or damage to your radio. SIRIUS|XM claims no responsibility for damage
from data loss due to breakdown, repair, or other causes.
• Do not expose to extreme temperatures (above 140°F or below -4°F, or above
60°C or below -20°C).
• Do not expose to moisture. Do not use device near or in water.
• Do not let any foreign matter spill into device.
• Do not store in dusty areas.
• Do not expose to chemicals such as benzene and thinners. Do not use liquid or
aerosol cleaners. Clean with a soft damp cloth only.
• Do not expose to direct sunlight or other heat sources for a prolonged period.
• Do not try to disassemble and/or repair the device yourself.
• Do not drop the device or subject it to severe impact.
• Do not place heavy objects on the device.
• Do not subject the device to excessive pressure.
Introduction

9
Warning!
• Opening the case may result in electric shock.
• The un-insulated parts inside the XM SkyDock may cause electric shock or fire.
For your safety, please do not open the XM SkyDock. Do not let metallic objects,
such as necklaces or coins, come into contact with the XM SkyDock plug.
• To avoid electric shock, use the XM SkyDock only with a power outlet that
matches the shape of its plug.
• Make sure that you insert the XM SkyDock all the way into the power socket.
• Do not plug several devices into the same power outlet.
• Use the XM SkyDock away from water sources to avoid fire or electric shock.
• Do not touch the device with wet hands.
When using this product it is always important to keep your eyes on the road and hands
on the wheel. Not doing so could result in personal injury, death, and/or damage to your
device, accessories, and/or to your vehicle or other property.
Your XM SkyDock should be placed in your vehicle where it will not interfere with the
function of safety features, e.g., deployment of airbags. Failure to correctly place this
device may result in injury to you or others if the unit becomes detached during an
accident and/or obstructs the deployment of an airbag.
WARNING: This product contains chemicals known to the State of California to cause
cancer and birth defects or other reproductive harm.
10
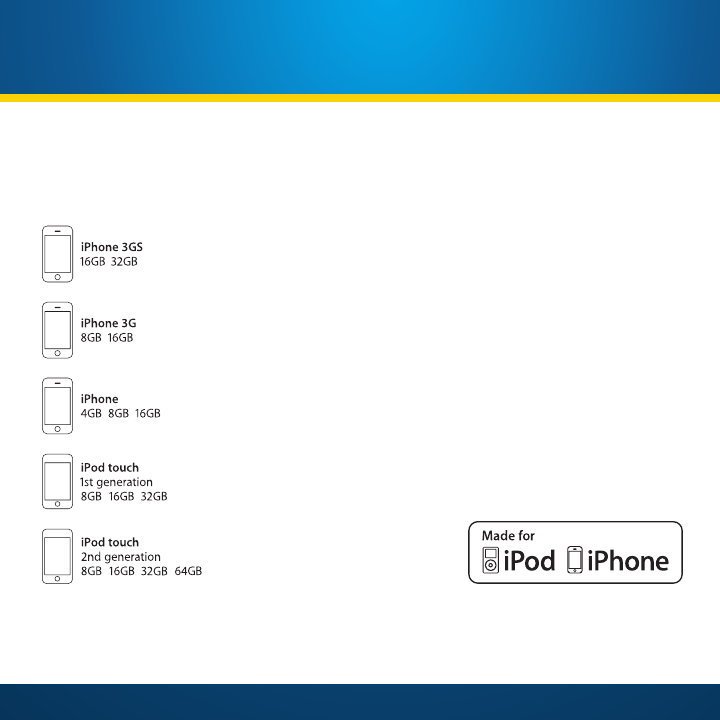
What’s in the Box?
XM SkyDock Satellite Radio
Tuner with
Power
Connect Magnetic Mount
Antenna
Spacer 3Spacer 2
(shipped attached
to XM SkyDock)
Spacer 1
Aux In Cable
Also Included: This User Guide, a Quick Start Guide, and an XM Channel Guide.
Introduction
Cable
Routing Adapter
Alcohol
Preparation
Pad
Alcohol
Prep Pad
11
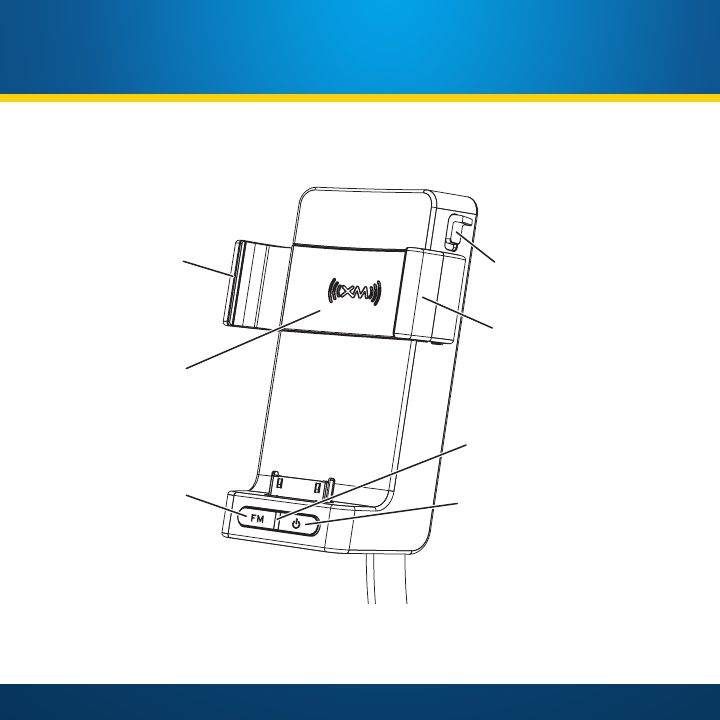
XM SkyDock Features and Controls
Side Grip
Power Button
Power Indicator
Side Grip
Replaceable
Spacer
FM Button
Side Grip
Release Lever

12
XM SkyDock Features and Connections
Antenna Connector
Flexible Stalk
FM Out ConnectorAudio Connector
Introduction

13
Installing the XM SkyDock App
14
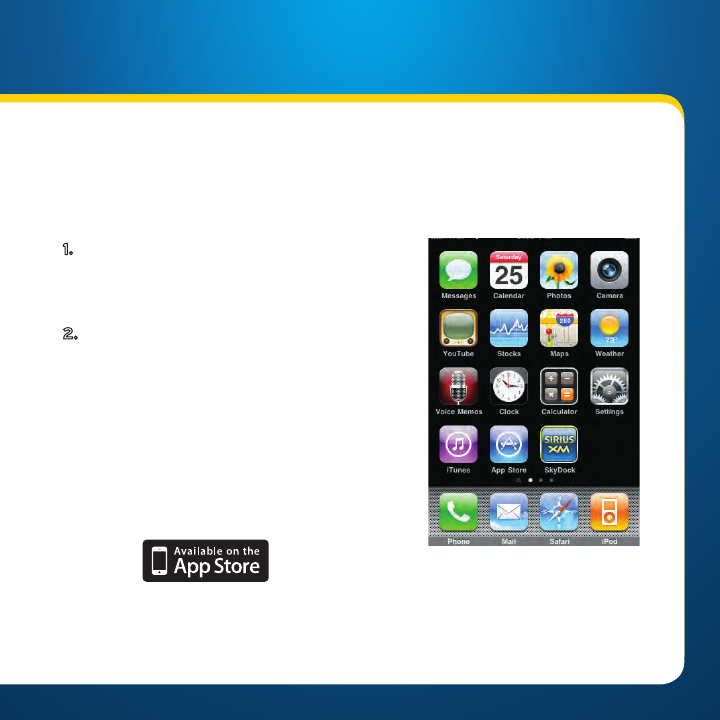
Installing the XM SkyDock Application
To operate the XM SkyDock you will need to install the application from the App
Store. There are two ways to locate and install the XM SkyDock App:
1. You can use your iPhone to install the
XM SkyDock App directly from the App
Store (as long as you are in an area with
Wifi or 3G coverage).
2. From your computer, you can install the
XM SkyDock App directly from the App
Store in iTunes. You will then need to
synchronize your iPhone with iTunes to
complete the installation.
Once the XM SkyDock App has been
successfully installed, the Home Screen will
display the SkyDock icon on the Home screen.
Tap the icon to launch the XM SkyDock App.
iPhone Home Screen with
XM SkyDock App Icon
Installing the XM SkyDock App

15
Vehicle Installation
16
Vehicle Installation
Installing the XM SkyDock in Your Vehicle
WARNING! DO NOT attempt to install the XM SkyDock while driving.
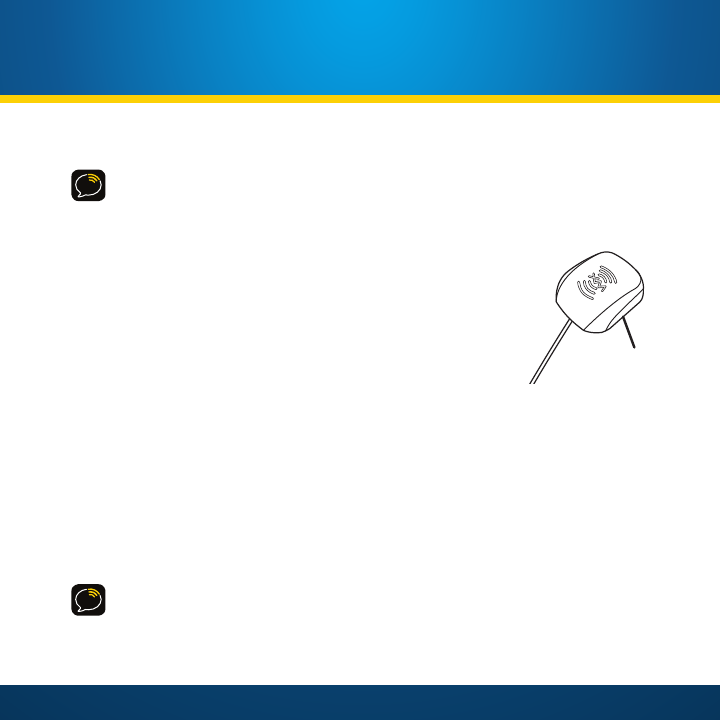
Mounting the Magnetic Mount Antenna
The XM SkyDock incorporates an XM Satellite Radio Tuner.
A special magnetic vehicle mount antenna is included
that, when properly installed, will allow you to receive
the signal. Proper placement is very important. Consult
a professional installer if you are uncomfortable with
installing the antenna yourself.
Mount the Magnetic Mount Antenna on the outside
of your vehicle, on a horizontal surface that will always face the sky. The antenna
contains a strong magnet that will stick to any metal part of your vehicle.
For most vehicles the best location is on the roof above the front windshield, as close to
centered between the left and right sides as the cable length will allow. For convertible
vehicles that do not have room above the windshield, place the antenna on the hood
of the vehicle near the back corner. Consult a professional installer if your vehicle roof
or hood is non-metallic (i.e. fiberglass) or you have difficulty finding a location for your
antenna.
IMPORTANT: The XM SkyDock uses a unique antenna. Do not substitute an antenna
from any other XM radio for the XM SkyDock antenna. Replacement XM SkyDock
antennas are available from shop.xmradio.com.
Magnet
17
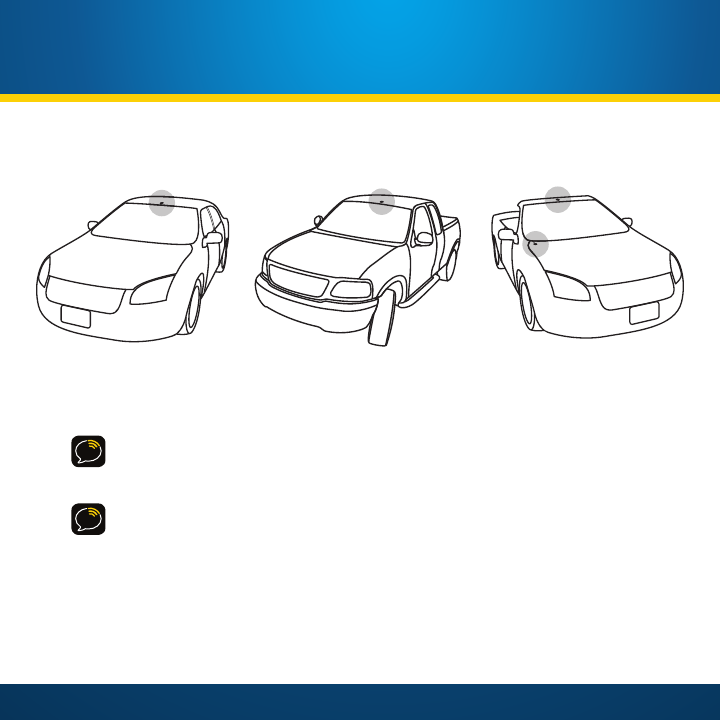
Recommended Antenna Locations
Sedans and Coupes Pickups and SUVs Convertibles*
* If the antenna can not be
placed above the windshield
place on vehicle hood.
TIP: When mounting the Magnetic Mount Antenna, be sure that the area is clean and
dry. Avoid locating the antenna near other antennas (i.e. GPS, Cellular, or AM/FM) as
well as roof rack or other items that can obstruct the view to the satellites.
IMPORTANT! Consult a professional installer if your vehicle roof or hood is non-
metallic (i.e., fiberglass), or you have difficulty finding a location for your antenna. (See
xmradio.com/accessories or visit your favorite retailer.)
18
Vehicle Installation
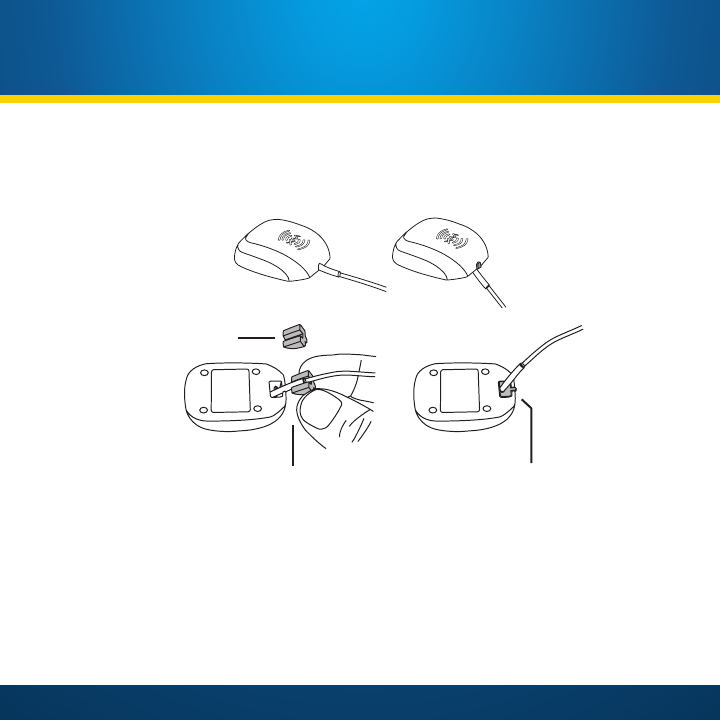
If you are installing the antenna at the roof edge, or hood edge, install the Cable
Routing Adapter to direct the antenna cable downward.
Place the antenna
wire into the groove
of the Cable Routing
Adapter
Slide the Cable Routing
Adapter down the antenna
wire and press it into the
antenna until it is flush with
the bottom of the antenna
Without Cable
Routing Adapter
Installed
With Cable
Routing Adapter
Installed
Cable Routing
Adapter orientation
Press the antenna wire under the rubber molding around the front windshield to the
nearest corner. Then route the cable out of the windshield molding and into the rubber
weather stripping around the door opening. Lift the weather stripping from the opening
and tuck the cable inside it, then replace the weather stripping. Run the cable inside of
the weather stripping to the bottom of the door opening.

19
Recommended: Hide the antenna wire inside
the cabin. Pull the cable out of the weather
stripping at the bottom of the door opening and
route it under the carpet toward the cigarette
lighter power adapter socket. Coil any excess
cable in a hidden location, such as under the
carpet, keeping it away from any vehicle pedals
or controls. Secure the excess cable with wire
ties.
TIP: Always be careful to include enough
slack in your routing to accommodate open
doors or trunk lids. Use electrical tape to
secure the cable in areas so that hinges do
not pinch the cable with the door.
Plug the Magnetic Mount Antenna
connector into the XM SkyDock’s
Antenna connector. The antenna plug
and cable will fit into the recess on the
top of the XM SkyDock base.
Place Antenna
Closer to A-Pillar
if Cable Doesn’t Reach
Center of Roof
Cigarette Lighter
or Power Adapter
Location
Antenna
Connector
Antenna
Plug
Connecting the Magnetic Mount Antenna
20
Inserting the Spacers
Your XM SkyDock comes with three numbered rubber spacers that assure a proper fit
with different iPhone and iPod touch models, with and without aftermarket cases that
surround and protect the iPhone or iPod touch.
IMPORTANT: The XM SkyDock will accommodate many,
but not all types of after-market cases. Compatible
cases must be no thicker than 2mm in any dimension
and must have a large enough open area around the
connector at the bottom of the iPhone or iPod touch to
allow it to seat properly in the XM SkyDock.
Spacer 1: For iPhone with compatible case
Spacer 2: For iPhone without case; for iPod touch with
compatible case
Spacer 3: For iPod touch without case
Install the appropriate Spacer by inserting it all the
way into the recess in the XM SkyDock.
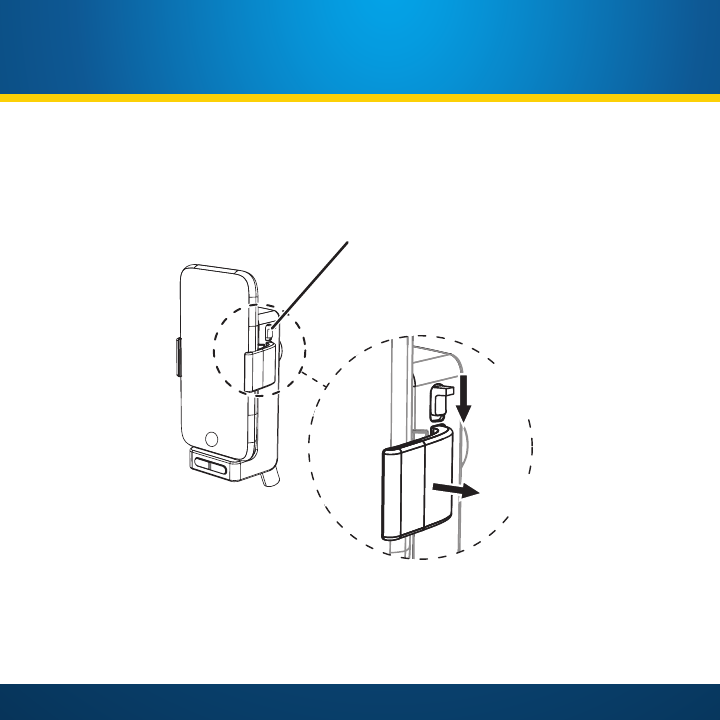
Removing the Spacers
1. Use one finger to apply sliding pressure on
the Spacer towards one of the Side Grip
arms.
2. Using another finger, pry up under the edge
of the Spacer to release it.
Recess
Spacer
1. Press Spacer &
Slide Towards
Side Grip
2. Pry Spacer Up
and Remove
Vehicle Installation
21
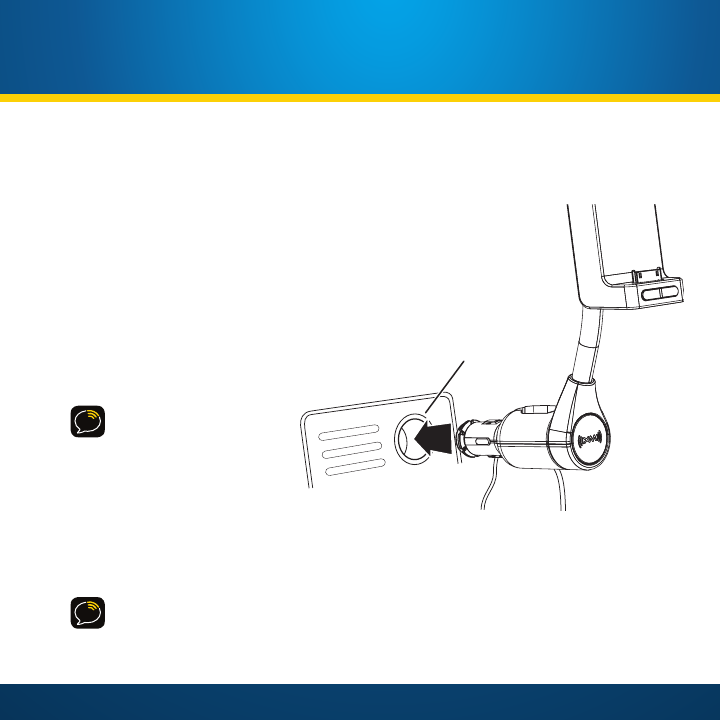
Finding a Location for the XM SkyDock
The XM SkyDock mounts into your vehicle’s
cigarette lighter or power adapter
socket. If your vehicle has more
than one, be sure to choose the
one that doesn’t interfere with the
driver’s vision, access to driving
controls, doesn’t interfere with the
deployment of airbags or other
safety equipment, and makes
the iPhone easily accessible for
operation.
NOTE: After plugging the
XM SkyDock into the
cigarette lighter socket,
align the cables so they do
not interfere with the safe
operation of the vehicle.
If the XM SkyDock has power from the vehicle’s cigarette lighter socket, it will not turn
ON until the iPhone is inserted into the XM SkyDock. If the iPhone is removed, the XM
SkyDock will turn OFF.
NOTE: If you want to turn OFF your XM SkyDock while the iPhone is inserted, press and
hold the Power button on the front of the XM SkyDock for 3 seconds. Repeat to turn
back ON.
Cigarette Lighter
or Power Adapter
Socket
22
Vehicle Installation
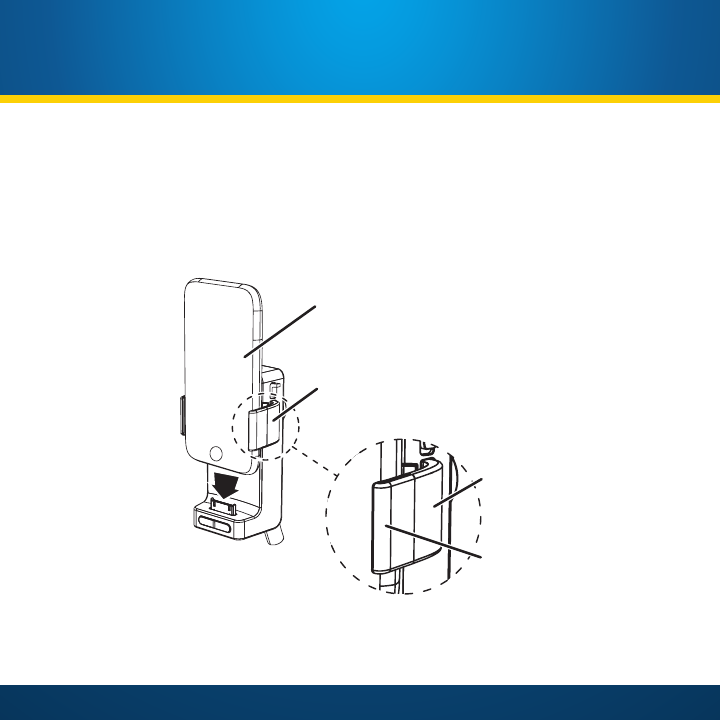
Inserting your iPhone or iPod touch
To insert the iPhone in the XM SkyDock: Insert the bottom of the iPhone straight down
onto the connector, making sure that the connection is solid. Gently squeeze the side
grips against the iPhone to secure it. Squeeze towards the rear of both side grips, as
shown in the diagram below.
1.
2.
1.
TO INSERT
iPHONE
TO REMOVE
iPHONE
2.
Squeeze grips here
DO NOT squeeze here
Slide Release Lever DOWN
Grips will spread apart
Press iPhone down onto connector
Squeeze grips to close
Slide Release Lever down
Lift iPhone off of connector
and out of the XM SkyDock
23
To remove the iPhone: Slide the Side Grip Release Lever DOWN to spread the grips
apart. Then lift the iPhone off the connector and pull it straight up and out of the XM
SkyDock.
1.
2.
1.
TO INSERT
iPHONE
TO REMOVE
iPHONE
2.
Squeeze grips here
DO NOT squeeze here
Slide Release Lever DOWN
Grips will spread apart
Press iPhone down onto connector
Squeeze grips to close
Slide Release Lever down
Lift iPhone off of connector
and out of the XM SkyDock
24
Vehicle Installation
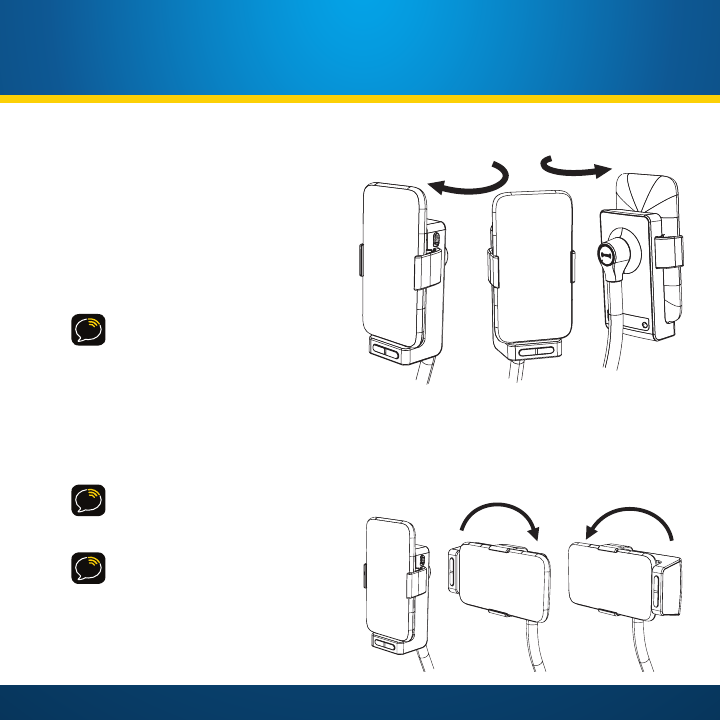
Adjusting the Flexible Stalk
The XM SkyDock’s flexible stalk gives you
lots of freedom to position the iPhone
so it is convenient for you to use. You
can twist the stalk up to 90° in either
direction (see illustration), and bend it to
be clear of controls or other items.
CAUTION! DO NOT over-rotate
the stalk. Doing so could cause
damage.
Rotating the XM SkyDock
You can rotate the XM SkyDock up to 100° in either direction so that the iPhone
is landscape-oriented instead of portrait oriented. The XM SkyDock App will
automatically orient the screen image to match the XM SkyDock’s orientation.
CAUTION! DO NOT over-rotate
past the stopping point. Doing so
could damage the XM SkyDock.
NOTE: Ensure that the XM
SkyDock and iPhone will not block
airbags as they deploy, or block
any controls needed for operating
the vehicle.
25
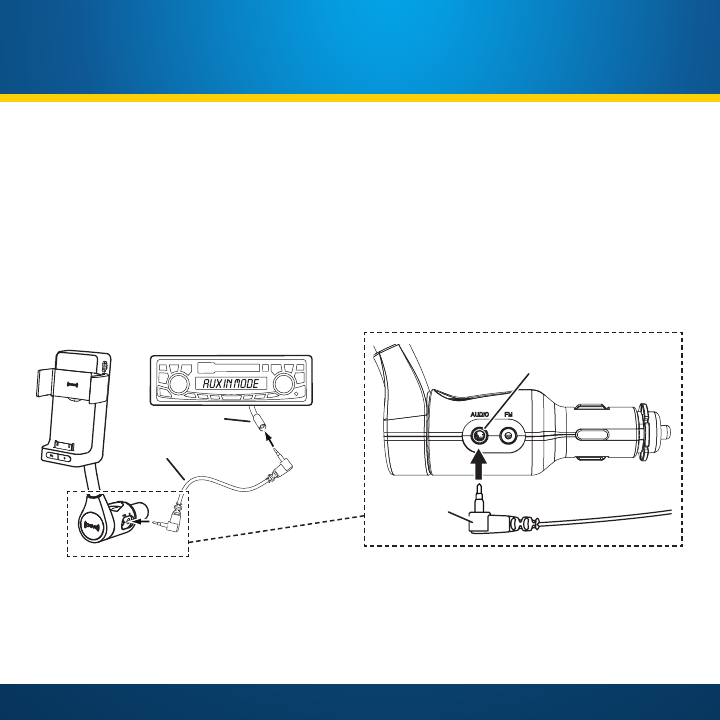
Connect the XM SkyDock to Your Audio System
If your vehicle’s audio system has an auxiliary audio input (or Aux In) it is the best
quality audio connection you can use to connect your XM SkyDock to. Simply connect
the included Aux In Cable between XM SkyDock’s
Audio
connector directly to your
vehicle’s auxiliary audio input.
Connecting the Aux In Cable
Aux In
Cable
Aux In
Audio
Connector
Aux In Cable
Connector
26
Vehicle Installation
If your vehicle’s audio system does not have an audio input, your XM SkyDock
incorporates a special FM transmitter called
Power
Connect that will ‘broadcast’ its
audio to your vehicle’s FM radio through your vehicle’s power system. Refer to “Setting
Up the PowerConnect FM Transmitter” on page 28 for details.
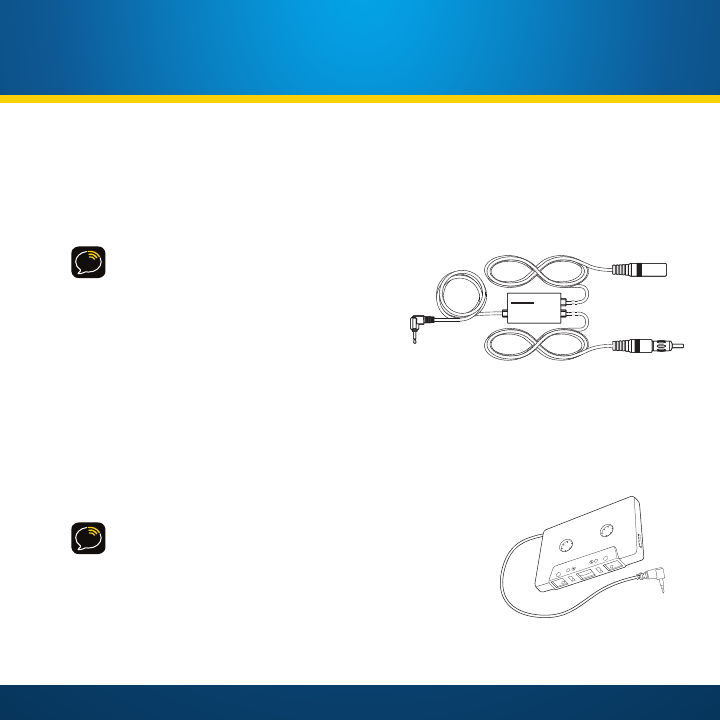
NOTE: An FM Direct Adapter (sold
separately) will provide superior FM
performance between your XM SkyDock and
your vehicle radio. You will still listen to
your XM SkyDock through your vehicle
radio’s FM tuner, but the FM Direct Adapter
connects the XM SkyDock’s FM Out
connector directly to your vehicle’s FM
radio, eliminating the outside static and
interference you can sometimes experience
when using the PowerConnect FM
transmitter.
FM Direct Adapters are available at your local XM retailer or at shop.xmradio.com.
Professional installation of the FM Direct Adapter is strongly recommended. See your
local SIRIUS|XM retailer.
NOTE: If your vehicle’s audio system does not have an
Aux Input but has a cassette player, you can purchase a
cassette adapter from your local electronics retailer or
from XM at shop.xmradio.com. Plug the adapter’s
connector into the XM SkyDock’s Audio connector and
insert the adapter into your vehicle’s cassette player.
Cassette Adapter
(Sold Separately)
TO
RADIO
MODEL#FMDA25 Made in China
TO VEHICLE FM
ANTENNA
TO VEHICLE FM
RADIO
FM DIRECT ADAPTER
FM Direct Adapter
(Sold Separately)
27
Test Your Audio Connection
Before you can activate your subscription, you will need to make sure your XM SkyDock
audio is connected and functioning properly with your vehicles’ radio.
1. Make sure your iPhone is inserted into
your SkyDock.
2. Launch the XM SkyDock App.
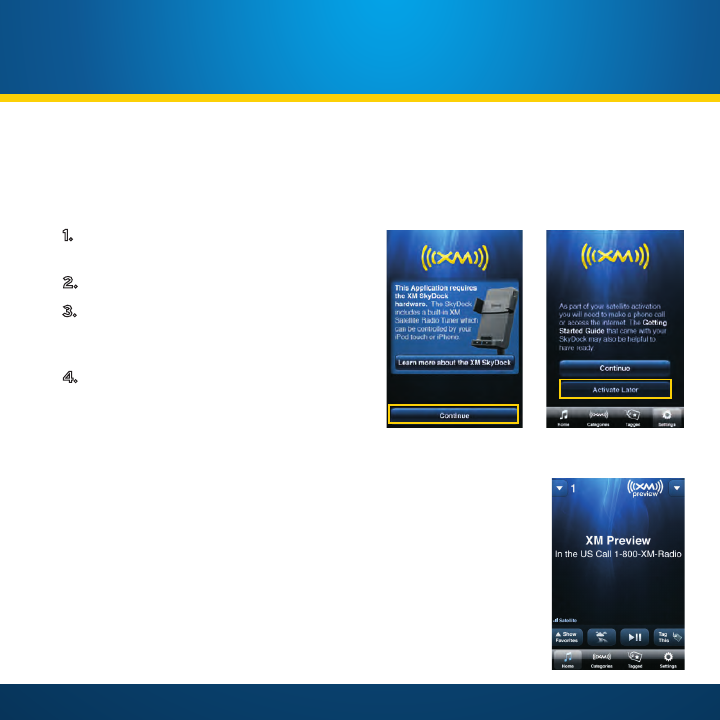
3. If this is the first time that you’ve
launched the XM SkyDock App, you will
see the Welcome screen. Tap Continue.
4. On the Activate XM screen, tap
Activate Later which will take you to
the XM Preview channel.
Using the AUDIO Connection on Your XM SkyDock
If you are using your Aux In Cable connected to the
Audio
connection on the XM SkyDock and your vehicle’s radio, you should
now hear the audio from the XM Preview channel. You can now
activate your XM SkyDock. (Skip to “Activation” on page 32).
Using the Built-in
Power
Connect FM Transmitter
You will need to setup your XM SkyDock FM Transmitter before you can
hear the XM Preview channel. Set up instructions are on the next page.
Tap
Continue
Tap
Activate Later

28
Vehicle Installation
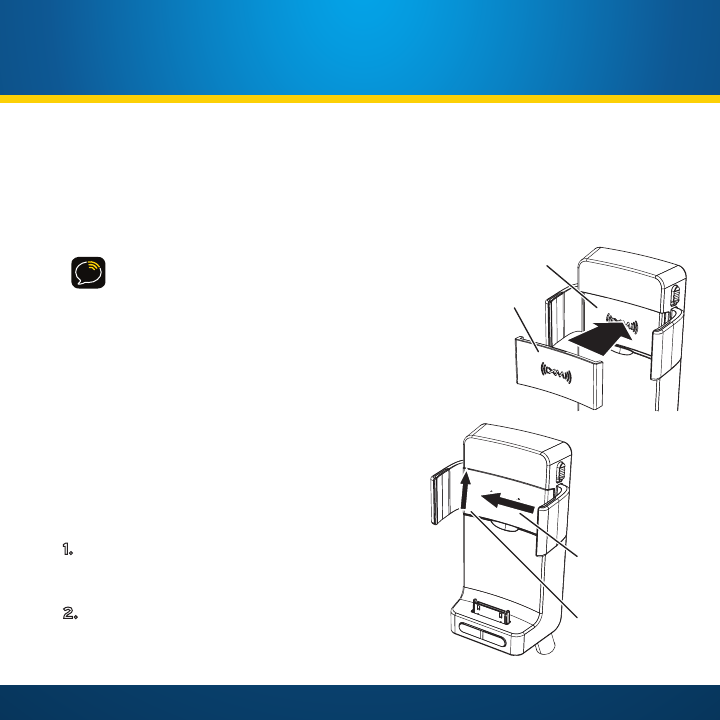
Setting Up the
Power
Connect FM Transmitter
Your XM SkyDock includes the SIRIUS|XM
Power
Connect FM transmitter that will
‘broadcast’ its audio to your vehicle’s FM radio if you have not used the included audio
cable to connect the XM SkyDock to your vehicle’s audio system.
1. On the Home Screen, tap the Settings
button. The Settings screen will appear.
2. Tap the FM Settings listing. The FM Settings
screen will appear. Tap the On/Off button to
turn the FM transmitter OFF.
3. Tune through your vehicle radio’s FM
channels to find an FM channel (between
88.1 MHz and 107.9 MHz) that is not
broadcasting in your area. (If you use an
FM channel that is being used by a local
broadcaster, it will interfere with your XM
SkyDock’s performance.). Review the Find
Available FM Channels in Your Area section
on page 87 if you need more information.
4. Once you have located an FM channel that
is not broadcasting in your area, save it as a
preset on your vehicle radio. This will become
your XM SkyDock preset.
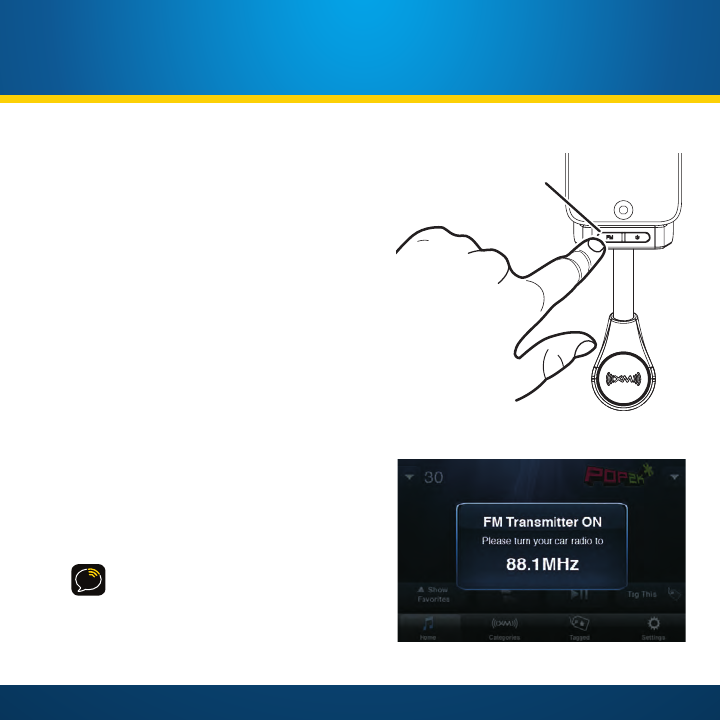
5. Tap the On/Off button on the XM SkyDock’s FM Settings screen again to turn the
FM transmitter ON. The first preset (factory set to 88.1 MHz) will be highlighted.
This may not be the best frequency for your area.
FM Settings Screen
Settings Screen
29
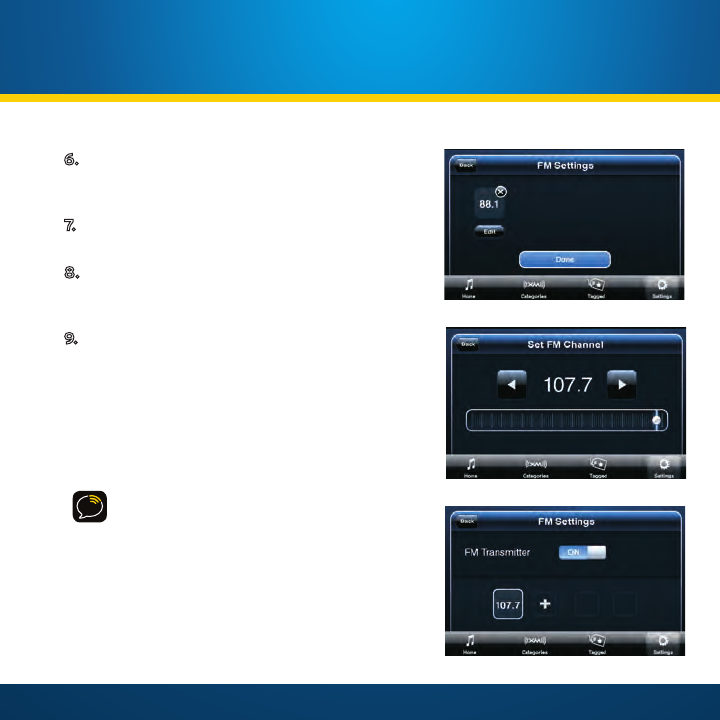
6. Press-and-hold the 88.1 preset button for
2 seconds. The FM Settings screen will
change to the Edit Mode.
7. Tap the Edit button beneath the 88.1
preset. The Set FM Channel screen appears.
8. Tap the arrow buttons to select the FM
frequency that matches the channel that you
preset on your vehicle radio to in Step 3.
9. Tap the Back button to return to the FM
Settings screen with the new FM preset
frequency stored. To exit, tap the Home
button.
To listen to your XM SkyDock, turn your vehicle’s
FM radio ON and press the SkyDock preset you set
in Step 4.
NOTE: For complete details about setting the
FM transmitter, refer to “FM Settings” on page
62.
New FM Preset Stored
Set FM Channel Screen
FM Settings Screen Edit Mode

30

31
Activation

32
Launching the XM SkyDock App for the First Time
1. Be sure that your XM SkyDock is correctly connected and installed, that the
Magnet Mount Antenna is oriented to receive the XM signal, and that your
iPhone is properly inserted in the XM SkyDock.
NOTE: The XM SkyDock automatically turns ON whenever the iPhone is inserted, and
automatically turns OFF whenever the iPhone is removed.
2. Launch the XM SkyDock App.
The iPhone will display the
Welcome screen.
3. Tap Continue. The iPhone will
display the Continue/Activate
Later screen.
NOTE: Selecting Learn more
about the XM SkyDock will
launch the Safari browser and
take you to the XM SkyDock
information page. (WiFi or 3G
coverage required.)
4. Tap Continue. The iPhone will
begin the activation process.
5. Have your credit card handy and proceed to “Activating Your XM Subscription”
on page 33.
Welcome Screen Continue/Activate
Later Screen
Activation
33
Activating Your XM Subscription
NOTE: The activation procedure screens are only displayed in portrait orientation.
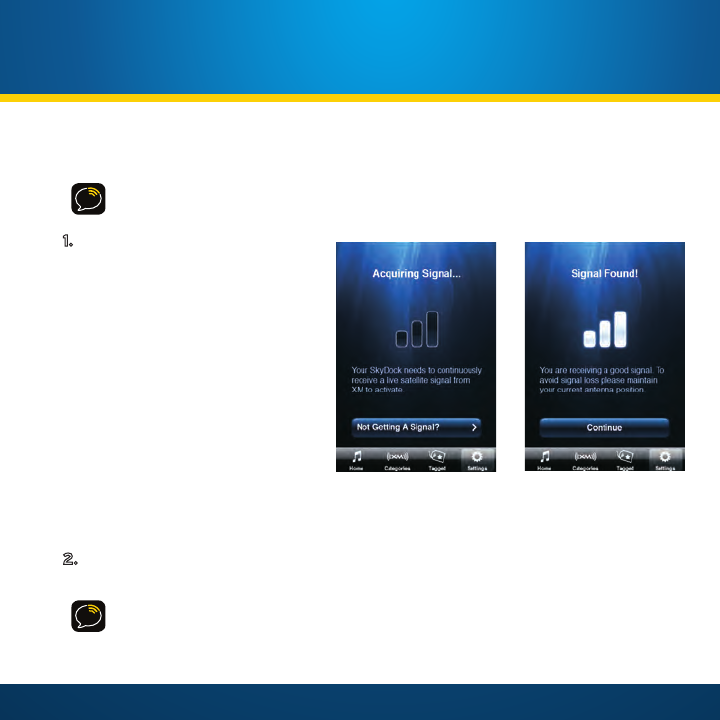
1. If you’re activating directly
after launching the XM
SkyDock App for the first
time, your iPhone should
be displaying either the
Acquiring Signal screen or
the Signal Found screen.
If the Acquiring Signal
screen remains displayed,
make sure that the Magnetic
Mount Antenna is properly
connected to the XM SkyDock,
and that it is properly
mounted and has a clear view
of the sky. (See page 16.)
2. Once the Signal Found screen is displayed, tap Continue. The To Complete
Activation screen will be displayed.
NOTE: The XM SkyDock App will remain active on your iPhone until you press the
iPhone’s Home button.
Acquiring Signal Screen Signal Found
Screen
34
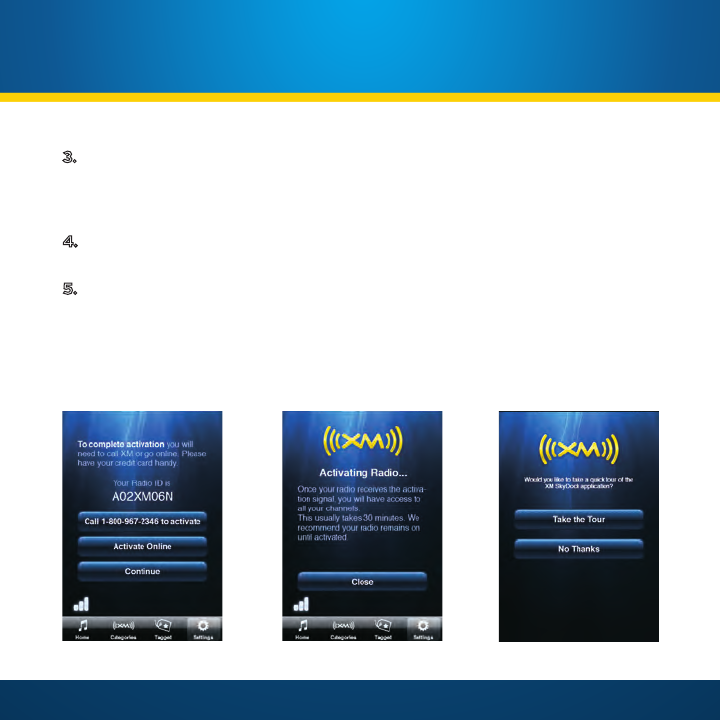
3. Call 1-800-XM-RADIO (1-800-967-2346) or go to xmradio.com from your
computer and click on the
Activate Radio
link at the top right of the page to set up
your subscription. (When you’re typing-in your Radio ID, note that XM Radio IDs do
not use the letters I, O, S, or F.)
4. During the activation process the iPhone will display the Activating Radio
screen.
5. Once the activation process is completed, tap the Close button. The iPhone will
display a screen asking if you would like to take a tour that will show you all of
the key operational features of the XM SkyDock application.
– To take the tour, tap Take the Tour. See “Application Tour” on page 78 for
details about the application tour.
– To skip the tour, tap No Thanks.
To Complete
Activation Screen
Activating Radio Screen Take The Tour Screen
Activation
35
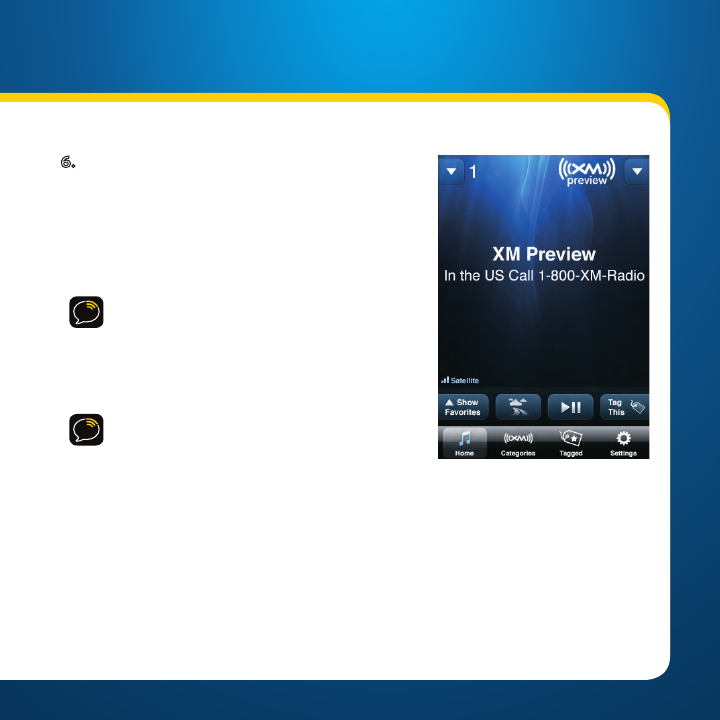
6. If you tap the No Thanks button (or when
you’re finished with the Application Tour),
the iPhone will automatically display
the Home screen (tuned to XM Preview
channel #1). You can now tune to any XM
channel and enjoy XM Satellite Radio on
your iPhone.
NOTE: When your service is activated your
XM SkyDock will receive all channels in
your subscription package. This usually
takes 10 to 15 minutes, but may take up to
an hour. Your XM SkyDock must remain on
until activated.
TIP: Your XM SkyDock Radio ID can also be
found on the My Account screen (in
Settings), Channel 0, on the Radio ID
sticker on the back of the XM SkyDock, and
the bottom of your XM SkyDock packaging. Home
Screen
(on XM Preview Channel)

36

37
Using Your XM SkyDock
38
Using Your XM SkyDock
Navigating the XM SkyDock Screens
You will be using the following basic actions to navigate all of the XM
SkyDock App screens:
Tap: A touch of your fingertip on a button or
item to select it.
Press-and-Hold: On some buttons, holding
your fingertip on the button for two seconds
or longer will enter a different screen mode.
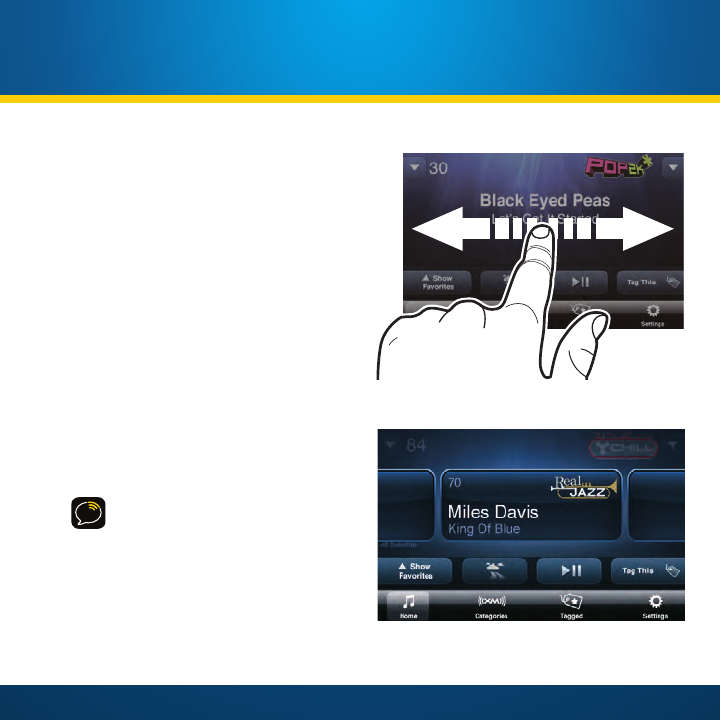
Swipe up and down: Sliding your finger up or
down on the screen will scroll through a list
or column.
Swipe side-to-side: Sliding your finger across
the screen will change to different screens.
NOTE: The screens shown in this manual
may differ slightly from the actual screens
displayed by the XM SkyDock App.
NOTE: This User Guide uses the
landscape view screens. Unless otherwise
noted, the screens can also be displayed
in portrait view.
Swiping Up/Down to
Scroll-Through a List
Swiping Sideways to
Change Preview Cards
39
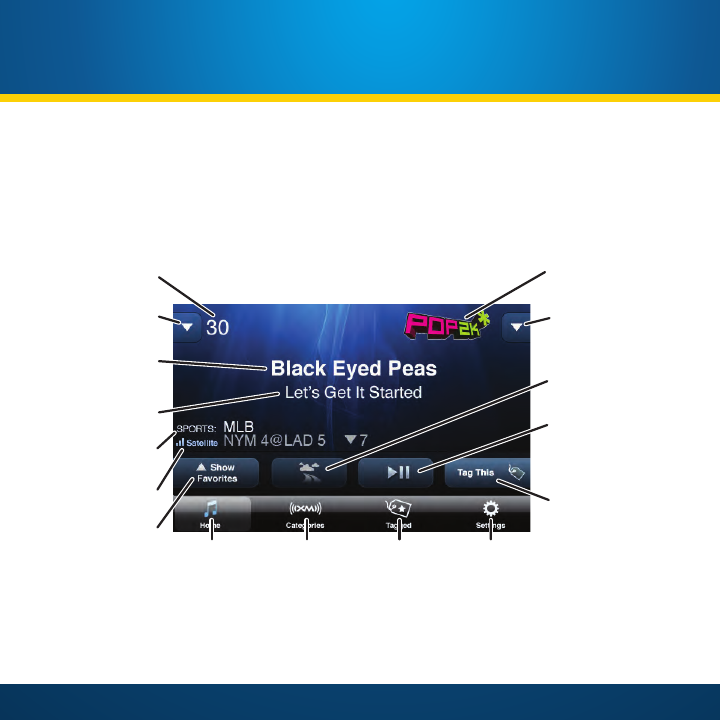
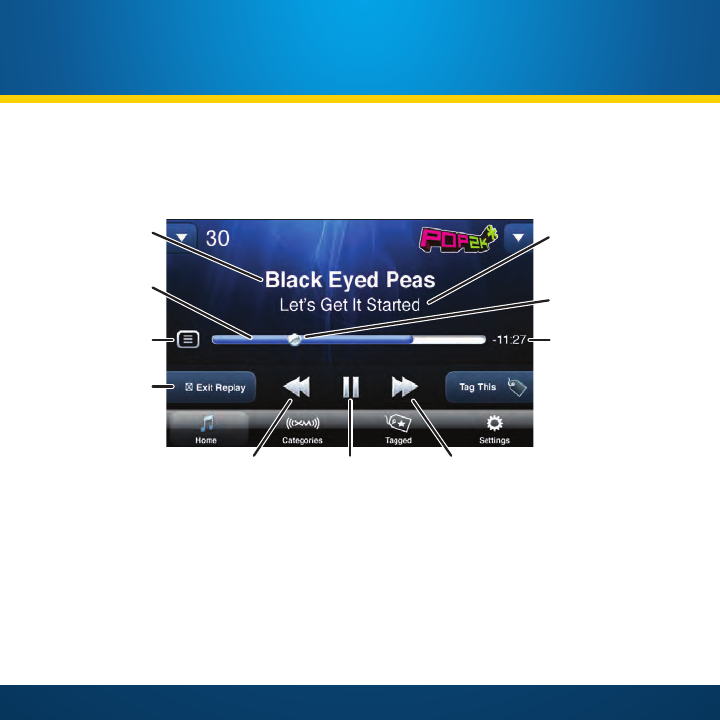
Home Screen Information
When using the XM SkyDock App the screen will display items such as the currently-
tuned channel, the song or show being played, the artist’s name, and other information.
This screen is referred to as the Home Screen in this manual. Refer to page 40 for more
detail about each item on the Home Screen.
Whenever you launch the XM SkyDock App, the channel that was previously selected
will automatically begin playing, and the currently-playing artist name and song or
program title will be displayed.
Current
Channel Number
Direct Tuning
Button
Current
Channel Icon
Current Category
Channel List
Button
Tag This Button
Currently-
Playing Artist
Currently-
Playing Song
or Program
Signal
Strength
Tagged
Button
Traffic/Weather or
Jump Button
Replay Button
Show Favorites
Button Categories
Button
Sports and/or
Stock Ticker
Home
Button
Settings
Button

40
Current Channel Number: Shows the number of the currently-playing XM channel.
Sports and/or Stock Ticker: Displays game scores and information or stock prices. For
details see page 55.
Direct Tuning Button: Tap to enter channel numbers for Direct Tuning. For details see
page 45.
Current Channel Icon: Shows the currently-playing XM channel.
Current Category Channel List Button: Tap to display the Channel List screen for the
current category. Also lets you change channels or categories. For details see page 43.
Traffic/Weather or Jump Button:
• When a traffic/weather channel has been selected, tap to tune to your pre-
selected traffic and weather channel. Tap again to return to your original
channel. Press and hold to set or change your traffic/weather channel.
• When a traffic/weather channel has not been selected, tap to jump to the
previously tuned channel. For details about configuring this button see page 49.
Replay Button: Tap to enter Replay where you can pause, rewind, and replay XM
content. For details see page 42 and page 56.
Tag This!
Button: Tap to tag the current song and add it to your tagged song list. For
details on Song Tagging see page 51.
Show Favorites
Button: Tap to display the preset buttons for up to 12 of your Favorite
channels. For details about Favorites see page 41 and page 46.
Home
Button: Returns to the Home Screen.
Categories
Button: Tap to display the Category List screen. See page 44 for details.
Tagged
Button: Tap to display your tagged song list. You can then set options for your
tagged songs to notify you if the song or artist is playing on other channels. You even have
Using Your XM SkyDock
41
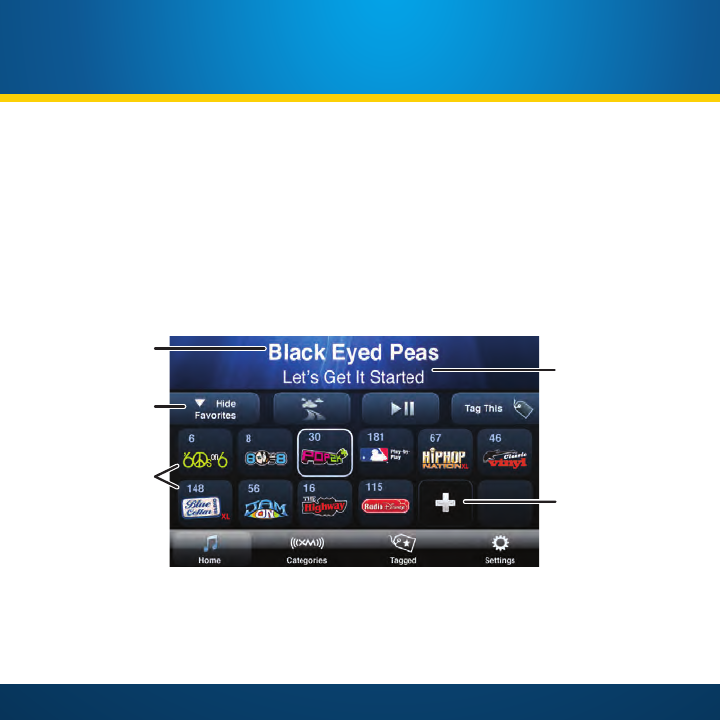
Favorites Panel
When the Show Favorites button is tapped on the Home Screen, the favorites panel
opens and displays a list of your favorite channels. For details about Favorites see page
46.
Hide Favorites Button: Closes the favorites panel.
Add Favorite Channel Button (+): Adds the currently tuned channel to favorites.
Favorite Channels: Tapping a favorite channel button tunes to the channel.
Currently-
Playing Song
or Program
Currently-
Playing Artist
Favorite
Channels
Add Favorite
Channel Button
Hide Favorites
Button
the ability to search iTunes for tagged songs and purchase them. For details see page 52.
Settings
Button: Tap to open the Settings menu. For details see page 60.
42
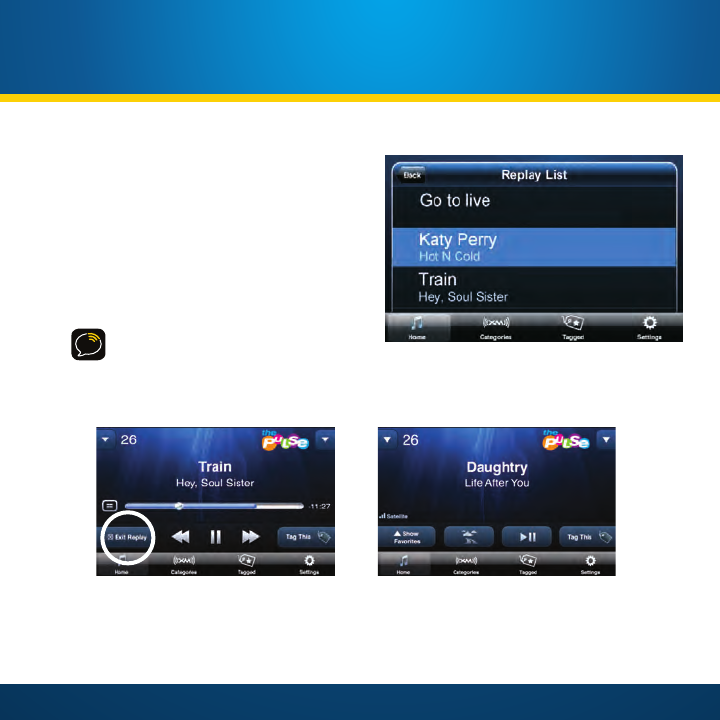
Replay Screen
When the Play/Pause button is tapped on the Home Screen, live radio is paused and
the Replay screen is displayed. For more details on using Replay, see page 56.
Replay Time Line: Shows how much content is stored for Replay.
Replay List Button: Tap to displays a list of all Replay content from which you can select
content to replay.
Exit Replay Button: Tapping exits Replay and returns to the Home Screen.
Listening Position in Replay: Shows your current listening position in the replay content.
Time Behind Live XM: Shows how many minutes and seconds behind the live XM
broadcast you are listening.
Rewind, Play/Pause, Fast Forward Buttons: Tap to navigate through the replay content.
Currently-
Playing Song
or Program
Currently-
Playing Artist
Time Behind
Live Radio
Current Position
in Replay
Replay Time
Line
Replay List
Button
Exit Replay
Button
Play/Pause
Button
Rewind
Button
Fast-Forward
Button

43
Channel List Screen
Tapping the Current Category Channel List button on the Home Screen (shown on
page 39) displays the channel list screen for the current category.
To Select a Channel: Tap the channel you want to listen to.
To See More Channels: Swipe your finger up or down on the channel list to scroll
through the list of available channels.
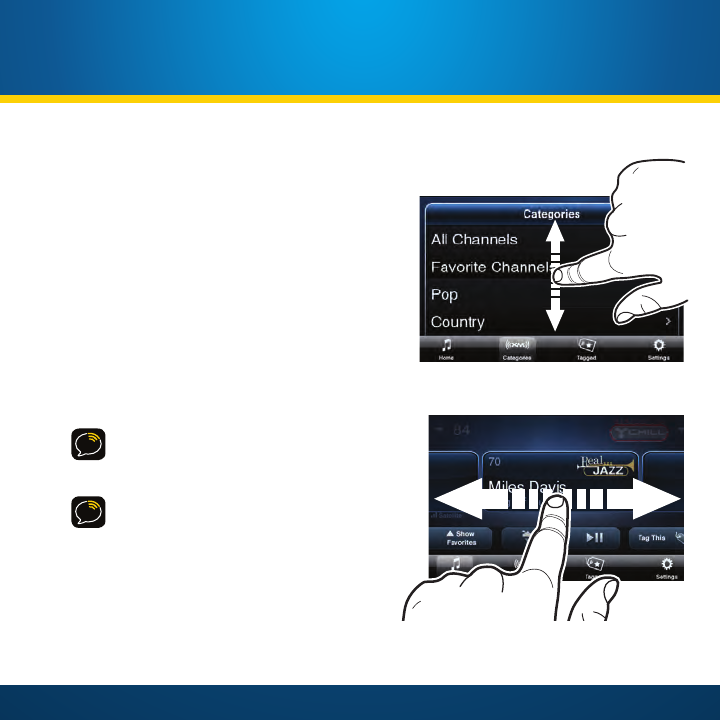
To Change to a New Category: Swipe your finger left or right across the title bar on the
channel list. The screen will change to a channel list in the next or previous category.
You can also tap the left and right arrows to change to the next or previous category.
Tap on the category title or you can tap the XM Categories button to access main
category list. (See page 44)
Channel
Number Channel
Icon
Categories
Button
Category
Name
Left
Arrow
Right
Arrow
Song or
Program
Artist
44
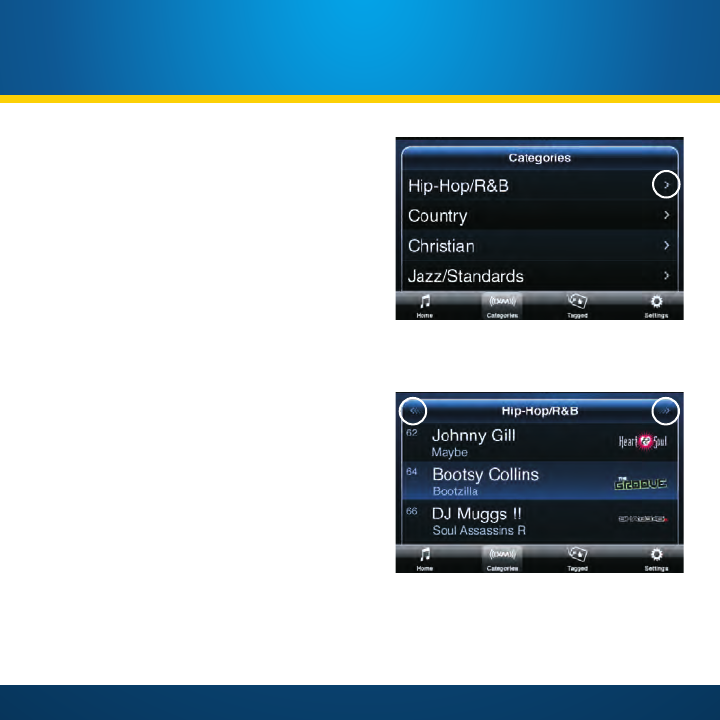
Category List Screen
Tapping the Categories button on the
Home Screen (see page 40) will display the
Categories screen, containing a list of all
categories.
To scroll through the list of categories:
Swipe your finger up or down on the
screen.
To see a category’s channel list: Tap the
category’s arrow button. The screen will
display a channel list in the new category.
Tap a channel to listen to it.
To scroll-through the list of channels:
Swipe your finger up or down on the
channel list. Tap the channel you want to
listen to.
To change to a different category: Swipe
your finger across the channel list or
tap the left or right arrows. The next
category’s channel list will appear.
Categories
Screen, with
Arrow Button Highlighted
Category Channel List Screen, with
Left and Right Arrows Highlighted
Using Your XM SkyDock

45
Using Your XM SkyDock
Direct Tuning
A channel can be tuned by entering the channel number:
1. On the Home Screen, tap the Direct Tuning arrow button (A, below). The Direct
Tuning keypad is displayed (B, below).
2. Tap the keypad to enter each number for the channel (C, below). Only numbers
for valid channels are displayed as you enter the channel number.
3. When you finish entering the number you can tap the OK button or wait for
SkyDock to automatically tune to the channel (D, below).
Enter New Channel Number
C
Keypad is Displayed
B
New Channel is Tuned
D
Tap Direct Tuning Arrow
A
46
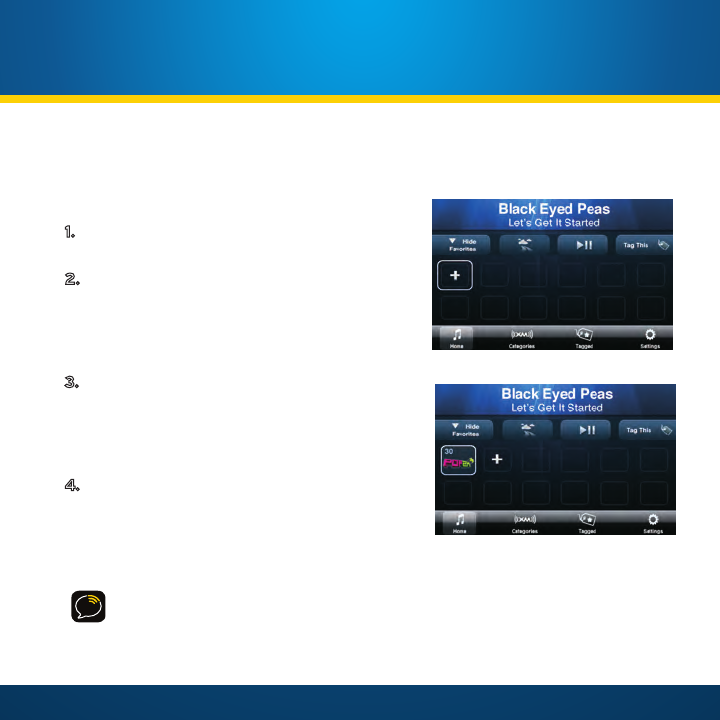
Setting your Favorite Channels
You can save up to 12 of your favorite channels to Favorites buttons so you can quickly access
them.
1. Tune to a channel you’d like to save as a
Favorite.
2. Tap the Show Favorites button on the
Home Screen (see page 40). The Favorites
panel will appear. (When the Favorites
panel appears for the very first time there
will be no Favorites saved.)
3. Tap the “+” to add the current
channel to the list. The channel name and
number will appear in the button and the
next empty button will be indicated by the
“+”.
4. You can repeat Steps 1 – 2 to save up to 12
Favorite channels.
The Favorites panel will stay open until you tap
the Hide Favorites button.
NOTE: While the panel is open you can tune to a new category or channel by tapping
the XM Categories button (see page 44) or swiping on the artist/song title.
Favorites Panel
(current channel saved)
Favorites Panel (none saved)
Using Your XM SkyDock
47
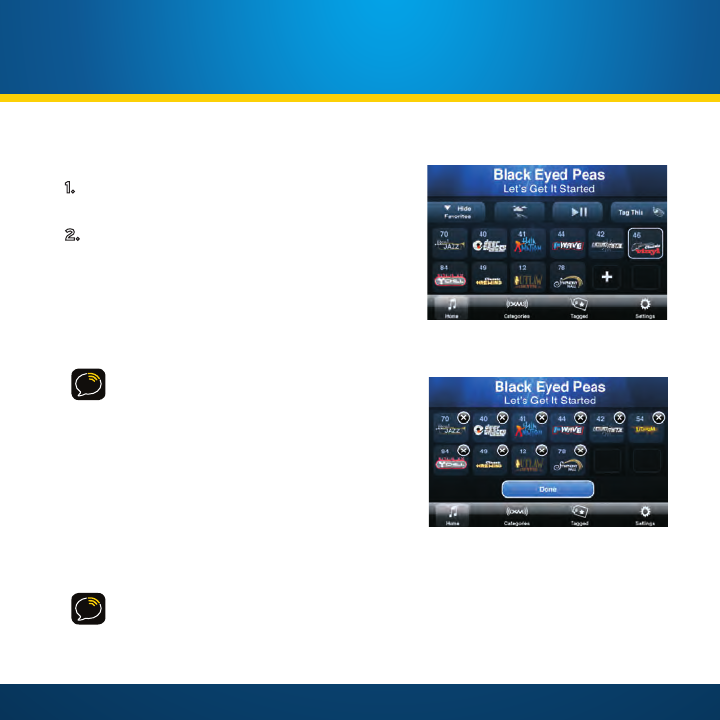
To Listen to a Favorite:
1. Tap the Show Favorites button on the
Home Screen to display the Favorites panel.
2. Tap the Favorite button where you assigned
the desired channel. The selected Favorite
will be highlighted.
To Edit Your Favorites: Press-and-hold on any
one of the stored favorite buttons to enter the
favorites edit mode:
WARNING! DO NOT edit your favorite
channels while driving.
• You can change the Favorites order by
dragging them from one location to
another in the list.
• You can delete a Favorite by tapping its
“X”. A pop-up will appear, asking you to
confirm the deletion. You can now save a
new channel in the empty Favorite.
Tap the Done button to return to the Favorites panel.
TIP: You cannot directly replace a favorite — you must delete it and create a new one.
To hide the Favorites panel, tap the Hide Favorites button. The Home Screen will
return.
Tap a Favorite Button
to Listen
Favorites Panel Edit Mode
48
Browsing Channels or Favorites*
You can preview what is playing on other
channels while continuing to listen to
your current channel.
Swiping your finger across the Home
Screen will display a Preview Card
showing the next channel up or down.
Continue to swipe left or right to scroll-
through all the XM channels.
Tapping a Preview Card will then tune to
that channel. If you take no action within
10 seconds or tap the screen outside of
a Preview Card it will disappear and the
Home Screen will return without changing
the channel.
TIP: You cannot directly replace a
favorite — you must delete it and
create a new one.
* The Settings menu allows you to set
the Preview Cards to show either All
Channels (factory default) or your
Favorite channels. For details see page 72. Preview Card with Favorite Channel
Swipe Finger Left or Right
Using Your XM SkyDock
49
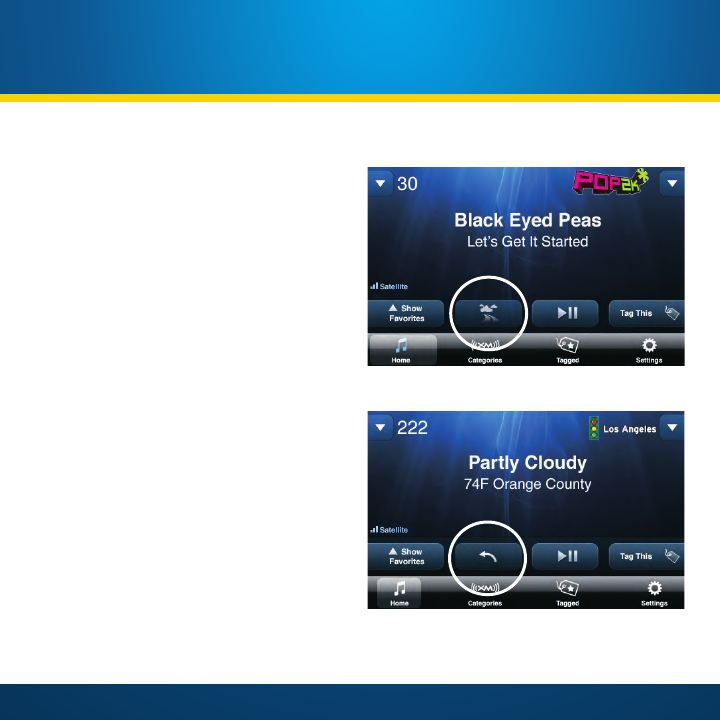
Traffic & Weather or Jump Button
Depending on how this button is
configured, tapping it either tunes to
a channel broadcasting traffic and
weather conditions, or it jumps to the
previous channel that was being played.
When you have selected a traffic and
weather channel (see page 50), the button
icon shows a weather graphic. Tap
the button to listen to the traffic and
weather channel. While tuned to the
traffic and weather channel, the button
changes to the jump icon. Tapping the
button returns to your originally-tuned
channel.
When not configured for traffic and
weather, the button shows the jump
icon. Tapping the Jump button returns
you to the previous channel that was
being played.
Traffic & Weather Button
Traffic & Weather Channel,
Showing Back Arrow Icon

50
Pressing and holding the Traffic &
Weather /Jump button will display
the Traffic & Weather screen. From
this screen you can select your traffic
& weather channel, or select None to
configure the button for Jump.
To select a traffic and weather channel,
swipe up and down to scroll through the
list to find the city you want, then tap it
to select it. Your selection is indicated
by a check mark.
TIP: Local traffic and weather are provided for the 20 most congested cities. If your
desired city is not listed, use the Emergency Alert 24/7 channel for national
information.
NOTE: You can also access the Traffic & Weather screen from the Setup menu. See
page 71 for details.
NOTE: When None is selected, the Traffic & Weather / Jump button will jump back to
the last channel tuned.
Traffic & Weather Screen
Using Your XM SkyDock
51
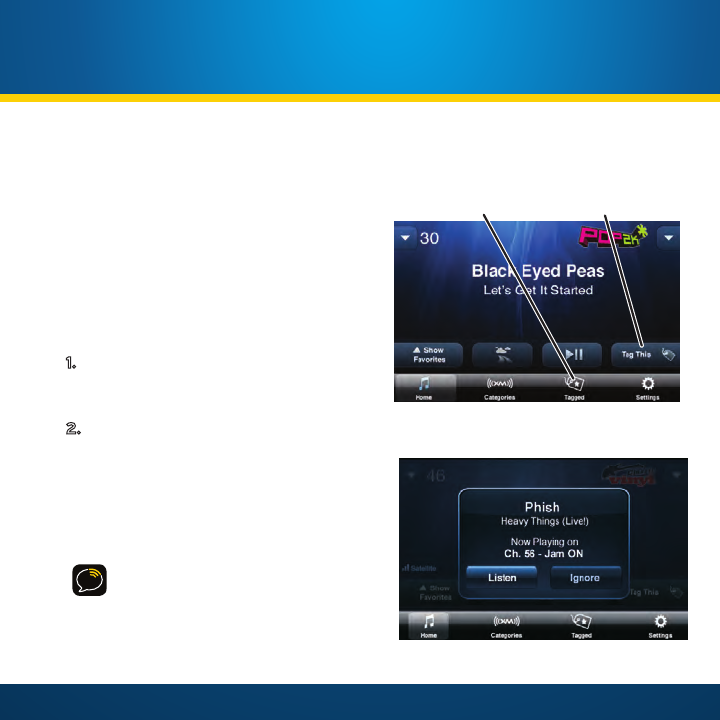
Song Tagging
You tag any artist/song combination by
simply pressing the Tag This! button. Once
a song is tagged, you can set your XM
SkyDock to alert you when either the artist
or song is playing on any channel at any
time. You can even choose to purchase the
song from iTunes. Your XM SkyDock can
track up to 50 of your favorite songs or
artists.
1. When you hear an song or artist you
want to tag, tap the Tag This! button.
A Song Tagged pop-up will appear.
2. To set options for your tagged songs,
tap the Tagged button. The Tagged
Songs list will appear (see page 52).
Tap on the artist/song combination
you would like to set options for. The
Song Options screen will appear (see
page 52).
WARNING! DO NOT manage or edit
your tagged song list while driving.
Tag This!
Button
Tagged
Button
Song Tagging
Buttons
Song Tagged
Pop-Up
52
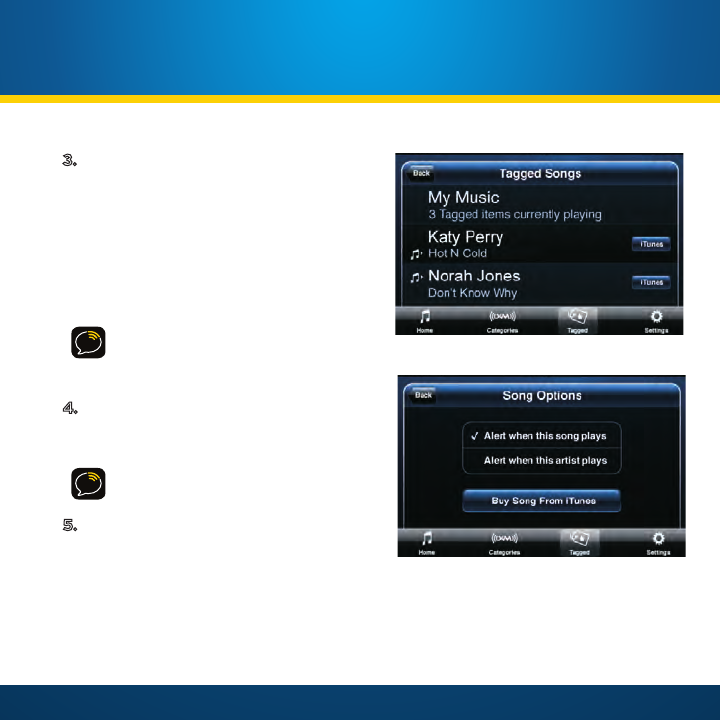
3. Tagged song/artist options are:
•Alert when this song plays
•Alert when this artist plays
• Buy the song from iTunes (tapping
this exits the XM SkyDock App and
launches the iTunes App on your
iPhone). Requires a WiFi or 3G
connection.
NOTE: iTunes will search for the best
match to your selected song. It is
possible that you will get multiple
matches or no matches at all.
4. Tap either alert to select it. (A
selected alert is indicated by a check-
mark.)
NOTE: You can only select to alert
either the artist or song, not both.
5. Tap the My Music listing to display a
virtual category that contains all of
your tagged songs that are currently
playing on any channels. The number
on the listing indicates how many tagged artists or songs are currently playing.
Musical note icons will appear next to any songs or artists for which you have set
alerts.
Tagged Song
List
Using Your XM SkyDock
Songs Options
Screen
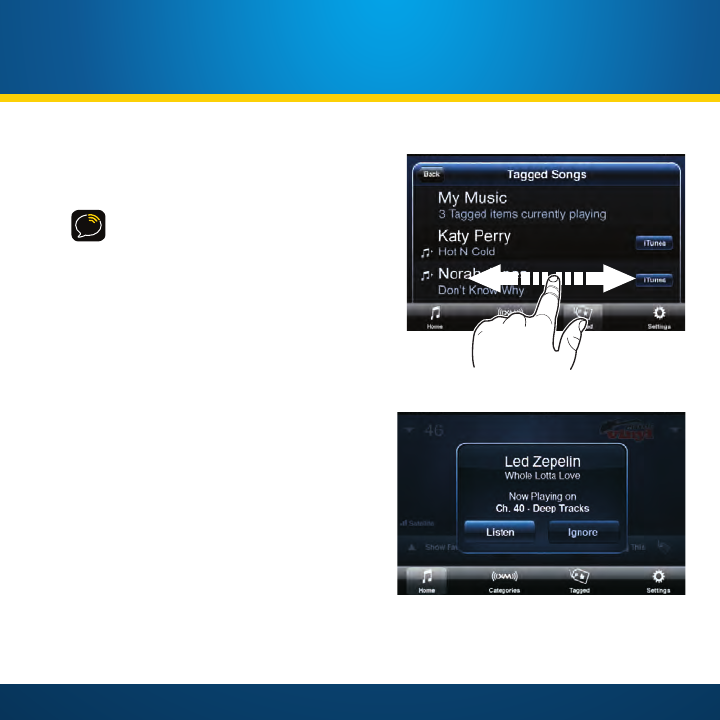
53
To buy a tagged song from iTunes touch the
iTunes button next to the song’s entry.
WARNING! DO NOT try and purchase
songs while driving.
To delete a song from the list, swipe your
finger across the song listing (left-to-right or
right-to-left). The iTunes button will change
to a Delete button. Tap the Delete button to
delete the song.
Getting a Song or Artist Alert
When a tagged song or artist plays on any
channel you’ll see a Tagged Song/Artist Alert
pop-up. To switch to that channel, tap Listen. To
dismiss the pop-up and remain on the current
channel, tap Ignore.
Tagged Song
Delete
Button
Tagged Song/Artist Alert Pop-Up
54
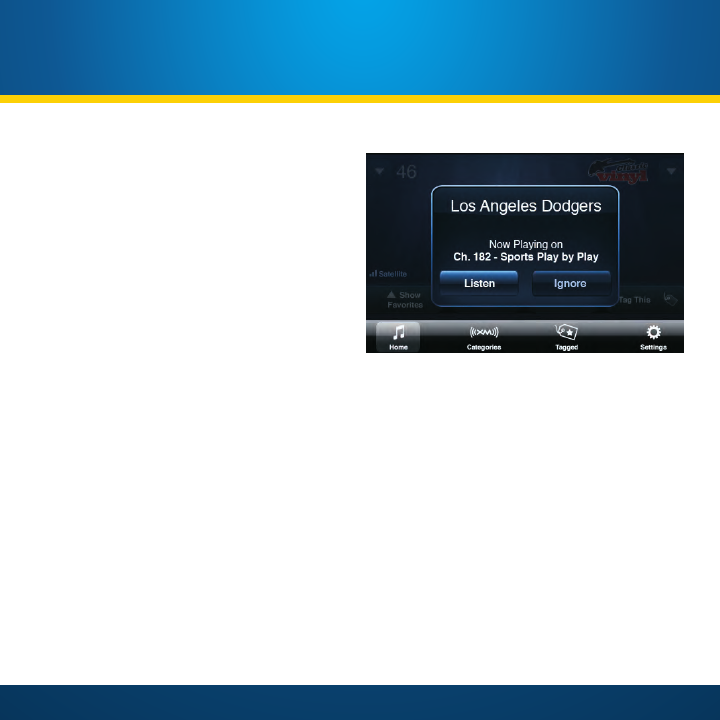
Sports Alerts
You can set your XM SkyDock to alert
you when your favorite sports teams
are playing.
The Sports listing of the Settings menu
(page 67) lets you set alerts for your
favorite sports teams and leagues.
When an event involving one of your
selected teams is playing on any
channel, you’ll see a pop-up. To switch
to that channel, tap Listen. To dismiss
the pop-up and remain on the current
channel, tap Ignore.
For complete information about setting Sports Alerts, see “Sports” on page 67.
If you tune to a channel that is showing a play-by-play event that is either scheduled
in the future, in progress or has ended, you can press the Tag This button to add both
teams to your Sport Alerts and you will be notified when either team starts a game.
You can edit your sporting team list in the The Sports listing of the Settings menu
(page 67).
Sports Alert Pop-Up
Using Your XM SkyDock
55
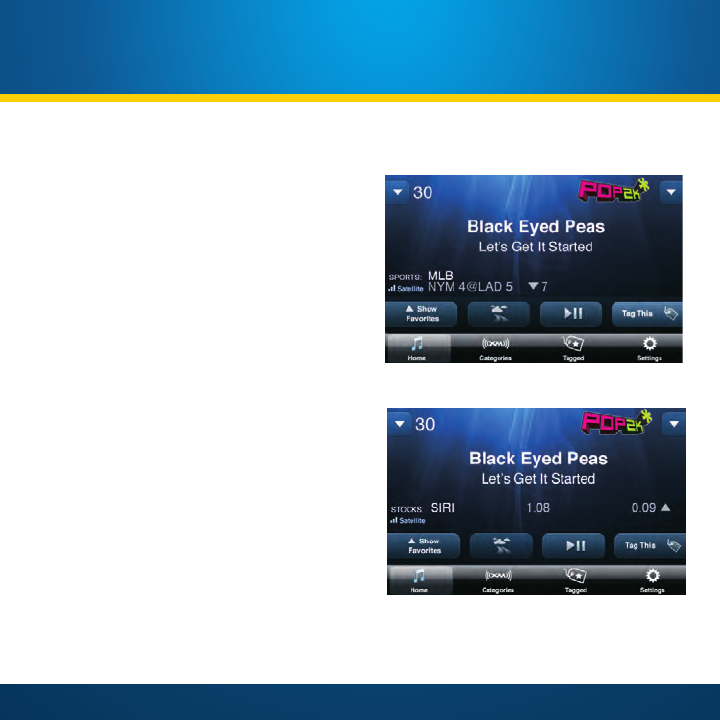
Displaying the Sports and Stock Ticker
Your XM SkyDock can display a ticker that
shows you the scores of your
favorite sports teams and the prices and
movement of your designated stocks.
After activating the tickers in the Ticker
Options listing of the Settings menu (see
page 66), the ticker will
appear on the Home Screen.
Each sports game or stock will show for 5
seconds, followed by the next
sports score or stock. If you have set the
ticker to show both scores and stocks, all
stocks will be displayed in a group followed
by all scores.
Sports Ticker
Stock Ticker
56
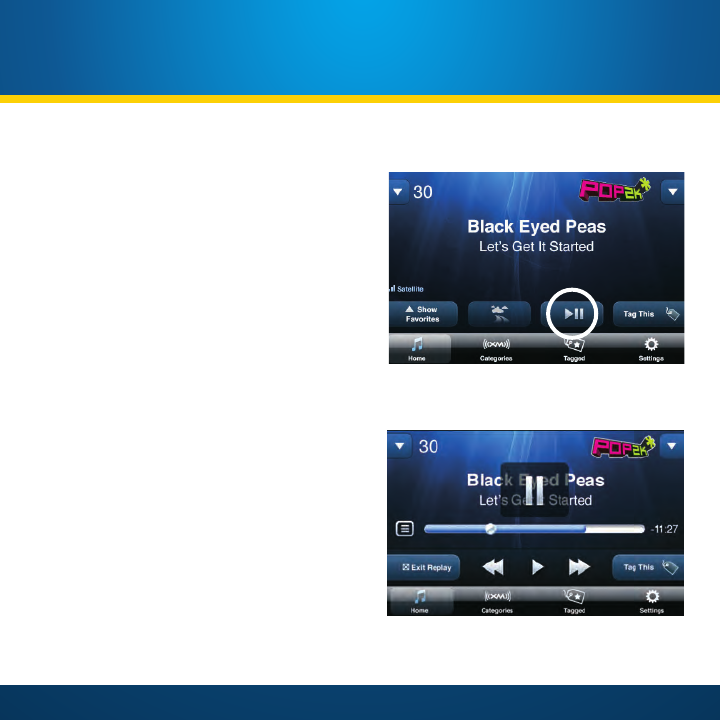
Pause, Rewind, and Replay
You don’t need to miss any XM programming if
you’re temporarily interrupted while listening
to a channel. Just press the Replay button
to pause the channel and enter Replay. When
you’re ready to listen again, press Play. A
paused channel will save up to the last 30
minutes of the programming for replay.
Replay is exited and cleared if you tune to a
different channel, answer a call on the iPhone,
exit the SkyDock app, remove the iPhone from
the SkyDock, or turn the SkyDock off.
• Replay Button: Press to pause live
radio and enter Replay. A time-line
will be displayed on the screen which
shows your position in the replay
content, as well as how many minutes
and seconds you are listening behind
live XM.
• Rewind and Fast-Forward Buttons:
Pressing and holding moves through
the replay content until the button is
released. Tapping jumps to the previous
or next content change, for example, to
the beginning of the current song or to
the next song.
Replay, Paused
Replay Button
Using Your XM SkyDock
57
You can view a list of all the replay content by
pressing the Replay List button. Swipe your
finger up or down to scroll through the list,
and tap an item in the list to listen to it. Tap
Back to exit the replay list, or tap Go to live
at the beginning of the list.
To exit Replay, tap the Exit Replay button.
NOTE: If you receive and answer an
incoming phone call while in Replay, you
will exit Replay and return to live radio
when the phone call ends.
Replay Content List
Exit Replay Button Live Radio

58

59
Setting Up Your XM SkyDock

60
Setting Up Your XM SkyDock
Settings Menu
WARNING! DO NOT make setting
adjustments while driving.
Your XM SkyDock App provides many options
so you can set it up to operate just the way
you like. To change the settings, tap the
Settings button. The Settings Menu will be
displayed. The Settings options are:
• My Account
• FM Settings
• Sports
• Stocks
• Ticker Options
• Alert Options
• Parental Controls
• Preview Cards
• Traffic & Weather
• Sounds
• Disable Auto-Lock
• Application Tour
Swipe up or down on the screen to scroll through the list and tap the item you want to
display.
Settings
Menu
Settings
Button
61
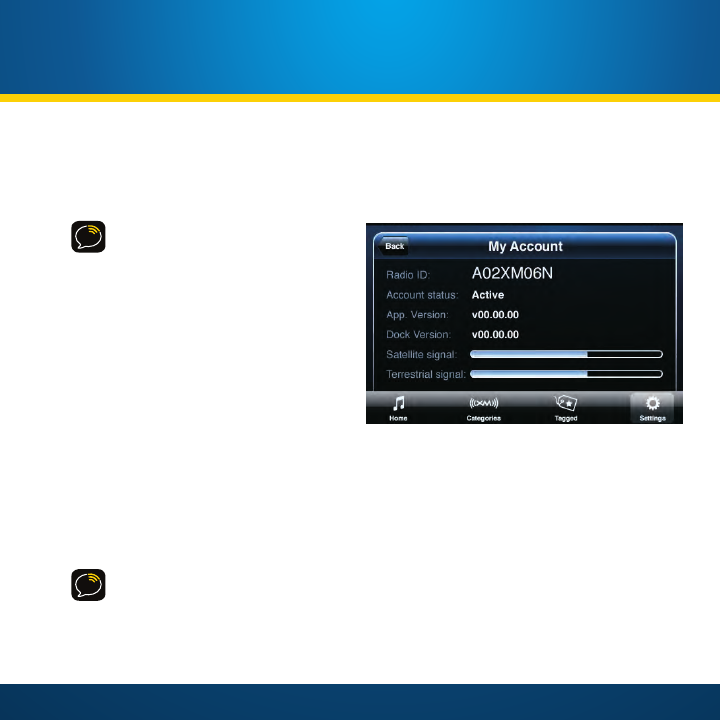
My Account
The My Account screen provides information about your XM account:
Radio ID: The unique ID number assigned to your XM SkyDock.
NOTE: XM Radio IDs do not use
the letters I, O, S, or F.
Account Status: The status of your
XM Radio account.
App. Version: The version of the XM
SkyDock application software
currently installed on your iPhone.
Dock Version: The version of the
SkyDock firmware currently installed
on your XM SkyDock.
Satellite Signal: The current strength
of the signal reaching your XM
SkyDock from the XM satellites.
Terrestrial Signal: The current strength of the signal reaching your XM SkyDock
from XM’s terrestrial repeaters. The signal strength indicators can help you orient
your XM SkyDock antenna for best reception.
NOTE: If you ever need to contact XM customer service to activate your radio, alter
your subscription package, or for technical assistance, the My Account screen will have
the key information required to get started.
My Account
Screen
62
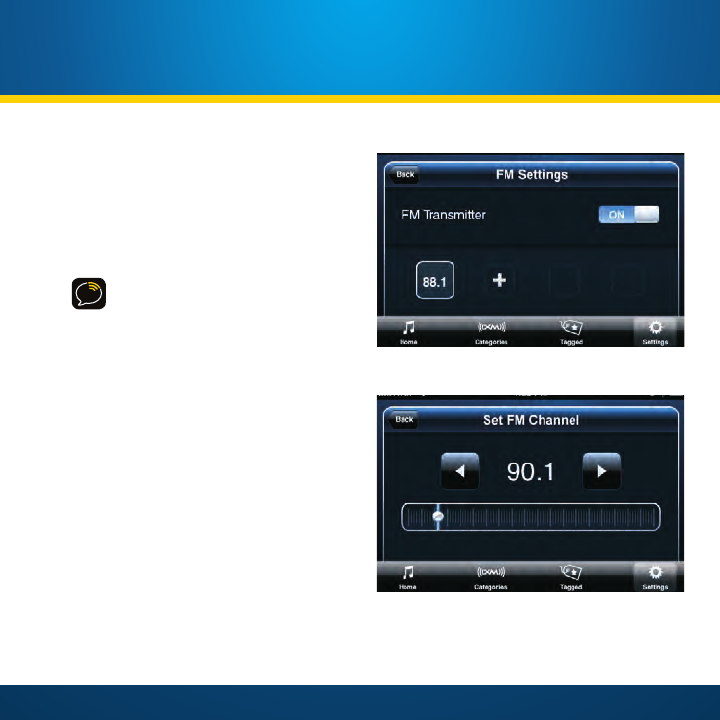
FM Settings
The FM Settings screen lets you turn
the XM SkyDock’s
Power
Connect
FM transmitter ON and OFF, and set
the preset FM channels that the FM
transmitter ‘broadcasts’ on.
WARNING! DO NOT edit your FM
Presets while driving.
To Turn the FM transmitter ON and
OFF: Tap the ON/OFF button. The active
preset will be highlighted.
To Change Active Presets: Tap the
desired preset button.
To Set a New FM Channel Preset:
Tap the next available empty preset
(indicated by a “+”). The Set FM Channel
screen appears. Drag the channel tuning
bar with your finger or tap the arrow
buttons to tune to the new frequency.
(This is performed live, so you will hear
audio feedback that can help you find a
frequency with clean performance.)
When the desired frequency is shown on the screen tap the Back button.
FM Settings
Screen
Set FM Channel
Screen
Setting Up Your XM SkyDock
63
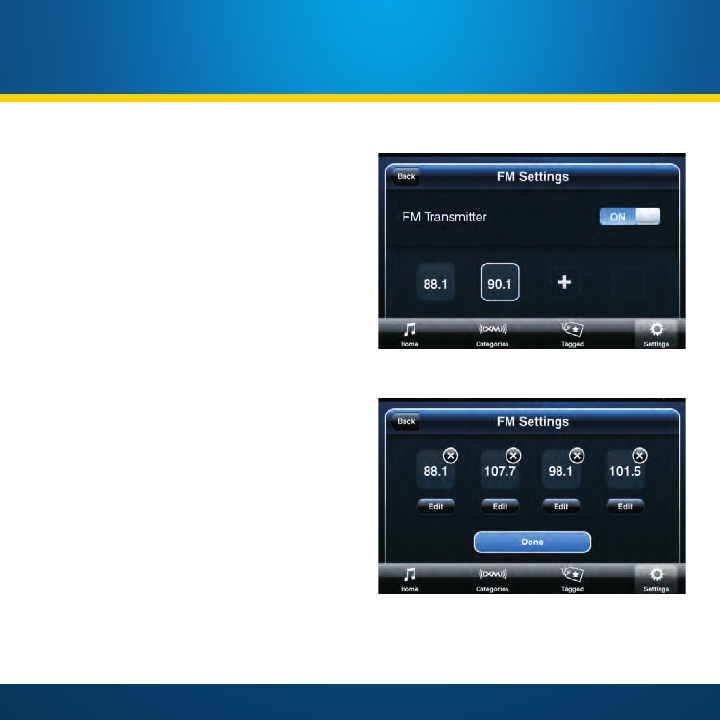
The FM Settings screen will return with
the new preset selected.
You can set up to four different FM
presets. If you regularly travel between
cities with different active FM channels
this makes it easy to switch to the best
FM channel for each city.
To Edit FM Presets: Press-and-hold
any one of the FM preset buttons for 3
seconds. The screen will enter the FM
Settings edit mode:
• You can edit a preset by tapping its
Edit button. The Set FM Preset
screen will appear and you can
change its frequency (see page 62).
• You can delete a preset by tapping
its “X”. A pop-up will appear, asking
you to confirm the deletion. If
desired you can then set the preset
to a different frequency.
Tap the Done button to return to the FM
Settings screen.
FM Settings
Screen with New Preset
FM Settings
Screen Edit Mode
64
To Use XM SkyDock’s
Power
Connect FM
Transmitter: To switch between your FM
Presets, press the XM SkyDock’s FM button.
Each press of the button will switch to the
next FM Preset.
• An alert will be displayed showing
the active FM Preset frequency and
reminding you to tune your vehicle’s
radio to that frequency.
The first press of the FM button will show
the last-used FM Preset.
Pressing-and-holding the XM SkyDock’s FM
button for 3 seconds when the FM
transmitter is ON will turn the FM
transmitter OFF. Pressing-and-holding
the button for 3 seconds when the FM
transmitter is OFF will turn it ON. The light in
the button will turn on and off to indicate the
FM transmitter’s ON/OFF status.
WARNING! If using the optional FM
Direct Adapter (FMDA), turn the XM
SkyDock’s FM transmitter OFF
whenever you want to listen to your
vehicle’s AM/FM radio.
FM Transmitter ON
Alert
FM
Button
XM SkyDock
FM
Button
Setting Up Your XM SkyDock
65
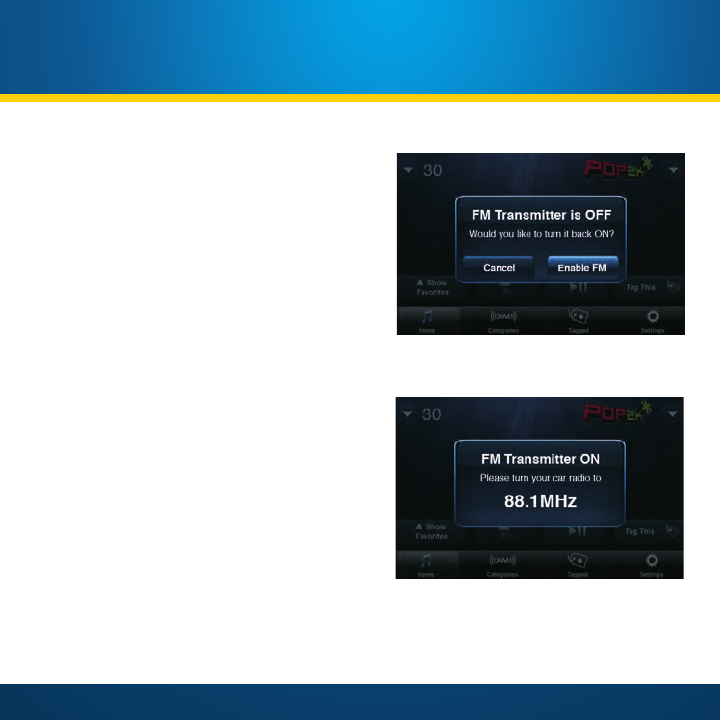
If the FM transmitter is turned OFF when
you press and release the FM button you
an alert will be displayed asking if you want
to turn it ON. Press Enable FM if you would
like to turn back ON the FM Transmitter.
If you Enable the FM Transmitter, the FM
Transmitter is ON alert will be displayed.
Tune your vehicle’s FM radio to the channel
displayed.
FM Transmitter is OFF Alert
FM Transmitter ON
Alert
66
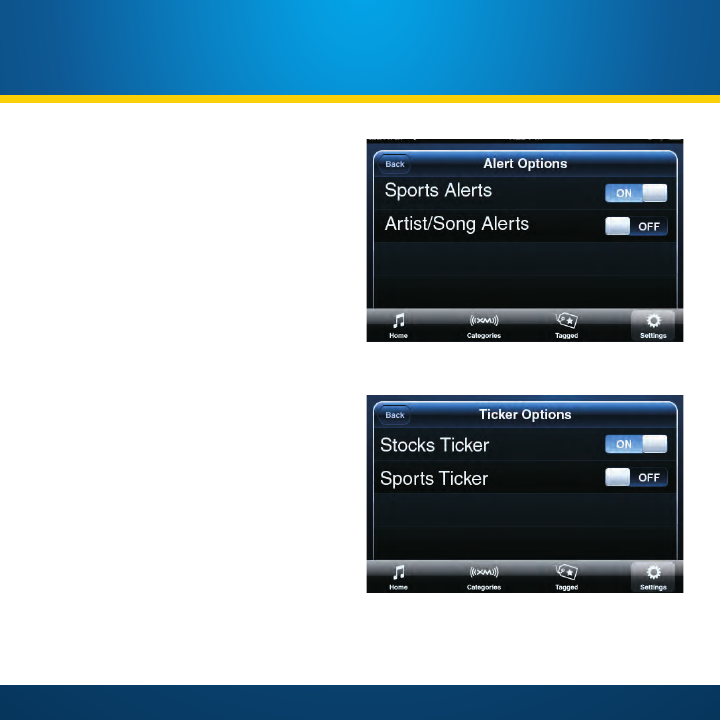
Alert Options
The Alert Options screen lets you
activate or de-activate Sports Alerts
and Song Alerts.
Tap the ON/OFF buttons to turn the
alerts ON and OFF. (The default
setting is ON.)
Ticker Options
The Ticker Options screen lets you turn
the stock and sports tickers ON and OFF.
Tap the ON/OFF buttons to turn the
tickers ON and OFF. (The default setting
is OFF.)
Ticker Options
Screen
Alert Options
Screen
Setting Up Your XM SkyDock
67
Sports
Tapping the Sports listing displays
the Selections screen, which lets you
manage your favorite sports teams and
the XM SkyDock’s sports alerts and
sports ticker.
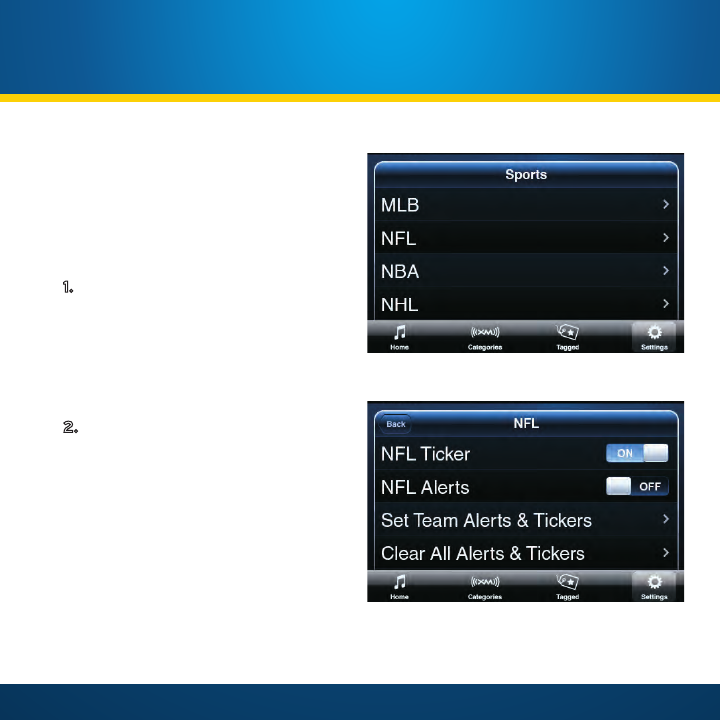
1. From the Sports screen, tap the
league you want to manage. The
league screen will appear.
Available sports leagues are:
MLB, NFL, NBA, NHL, NCAA
Football, and NCAA Men’s
Basketball.
2. Each league screen lets you
manage the following options for
that league:
[League] TIcker: Tap ON/OFF to
activate/de-activate the sports
ticker for the entire league.
[League] Alerts: Tap ON/OFF to
activate/de-activate game alerts
for the entire league.
Sports
Screen
League Screen (NFL shown)
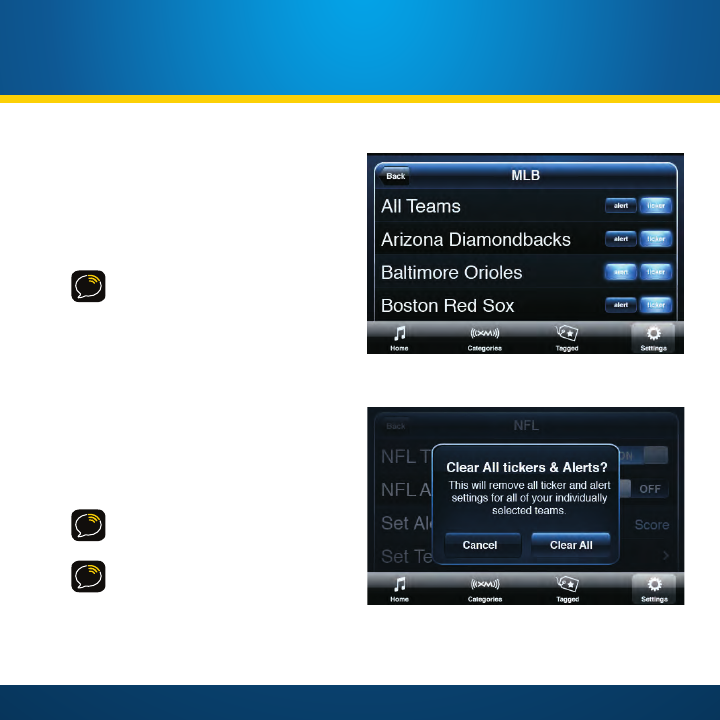
68
Set Team Alerts & Tickers: You
can also enable alerts and tickers
for each individual team in the
league, and/or for all teams at
once.
NOTE: Disabling the alert or
ticker for All Teams will not
disable any alerts or tickers that
have been set for individual
teams.
Clear Team Alerts & Tickers: Tap
to clear all individual team alerts
and tickers settings. A pop-
up will be displayed asking for
confirmation before clearing the
settings.
WARNING! DO NOT add or edit
your sports alerts while driving.
NOTE: To receive Sports Alerts
for NFL games you will need to
be subscribed to The Best of
SIRIUS Package.
Clear All Tickers & Alerts
Pop-Up
Team Alerts and Tickers (MLB shown)
Setting Up Your XM SkyDock
69
Setting Up Your XM SkyDock
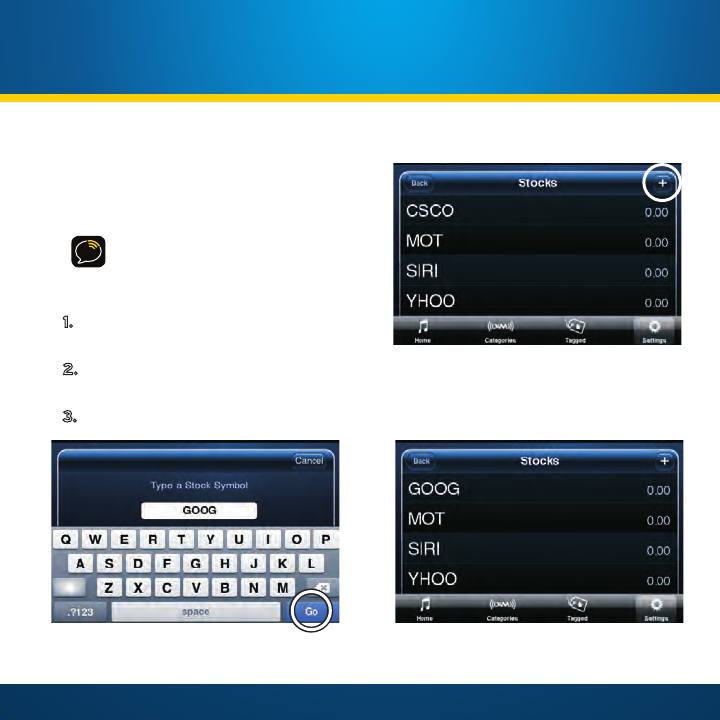
Stocks
The Stocks screen lets you track the price
and daily movement for up to 64 of your
favorite stock symbols.
WARNING! DO NOT add or edit
stocks while driving.
To add a stock ID to the list:
1. Tap the + button. The Add a Stock
screen will appear.
2. Use the keypad to type the stock’s
symbol, then tap the
Go
button.
3. The new stock symbol will appear on the Stocks screen.
Stocks
Screen, with Added Stock
Stocks
Screen, Showing + Button
Add a Stock
Screen,
Showing
Go
Button
70
NOTE: After your XM subscription
is initially activated it will take
approximately 4 ~ 5 minutes while
listening to XM to download the
complete stock database from the
XM Satellite system. During this
time, you will not be able to add
any stocks to the list.
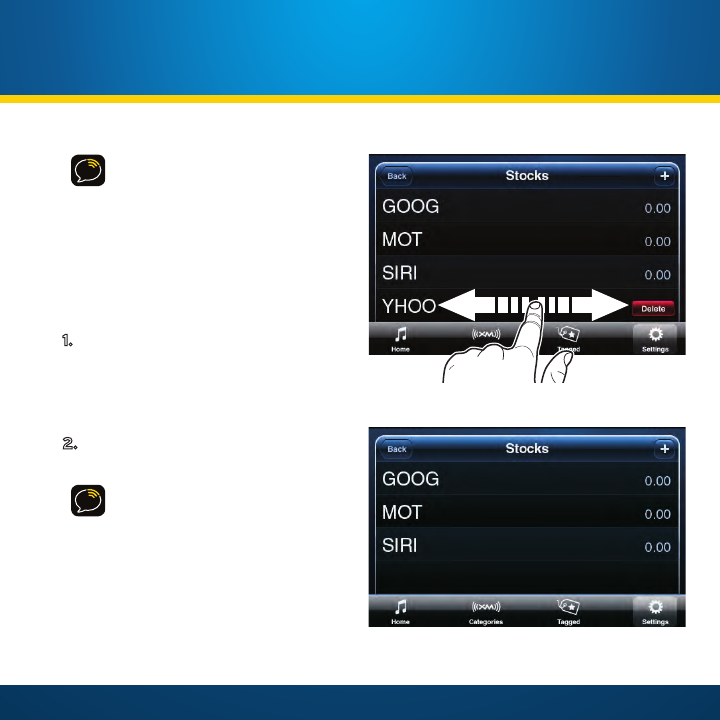
To delete a stock symbol from the list:
1. Swipe your finger across the
stock’s listing from left-to-right
or right-to-left. A Delete button
will appear in place of the stock’s
value listing.
2. Tap the Delete button to delete
the stock from the list.
NOTE: Information about most
stocks and indices listed on the
NYSE, AMEX, or NASDAQ is
available. Market information is
delayed approximately 25
minutes. Stock data is provided by
ComStock, Inc.
Stock Listing
Delete
Button
Stocks
Screen, with Stock Deleted
Setting Up Your XM SkyDock
71
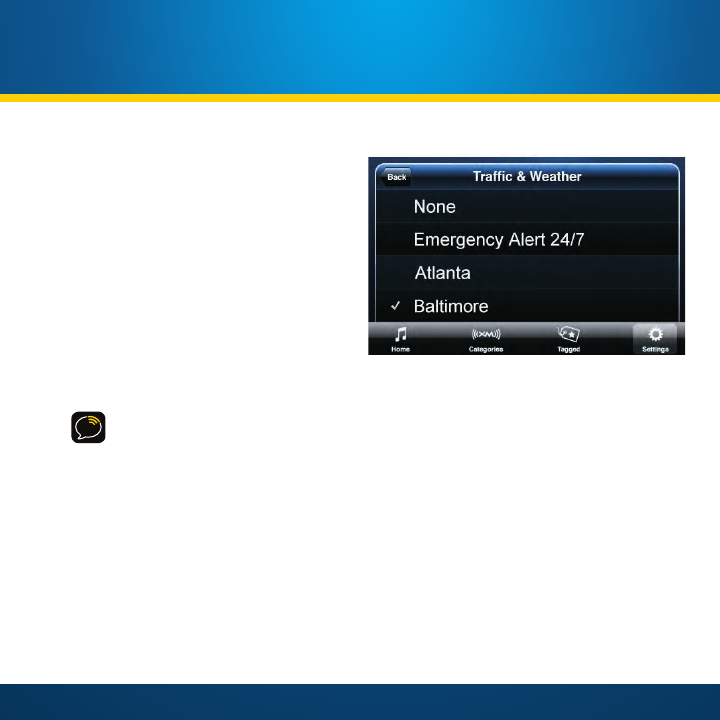
Traffic & Weather
The Traffic & Weather / Jump button
can be configured to tune to a traffic
and weather channel when tapped,
or it can be configured to jump to the
previous channel that was being played.
To configure for Traffic & Weather:
Swipe up and down to scroll through
the list to find the city for the traffic
and weather you want and then tap the
city to select it. The selected city is
indicated by a check mark.
TIP: Local traffic and weather are only provided for the 20 most congested cities. If
your desired city is not listed, use the Emergency Alert 24/7 channel for national
information.
To Configure for Jump: Tap None at the beginning of the list. A check mark will be
displayed to indicate it is selected.
Traffic & Weather
Screen (Shown Configured
For Traffic and Weather)
72
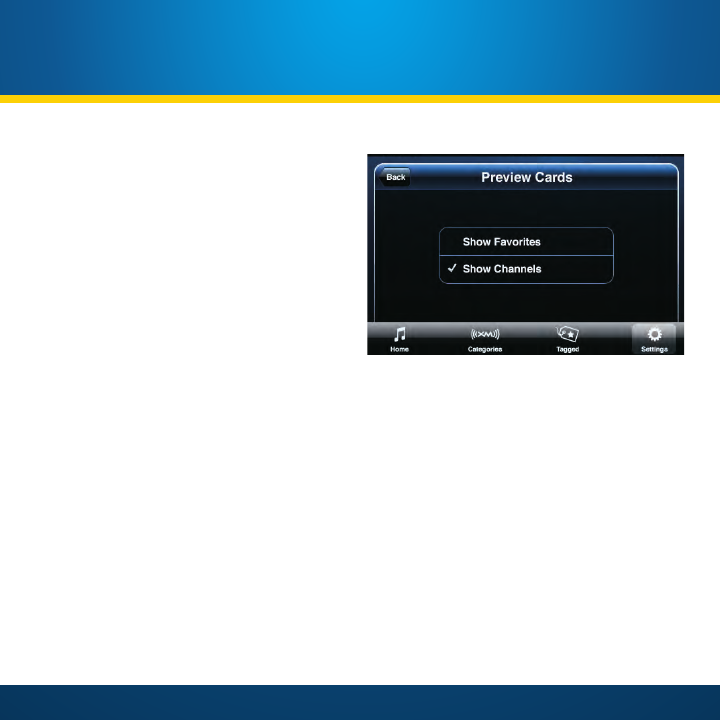
Preview Cards
The Preview Cards screen lets you set
the Preview Cards to show either the
next higher or lower channel, or your
next higher or lower Favorite
Channel. (Tap one or the other to
select it.) Your selection is indicated
by an arrow. The default is set to Show
Channels.
See page 48 for more details about
Preview Cards.
Preview Cards
Screen
Setting Up Your XM SkyDock
73
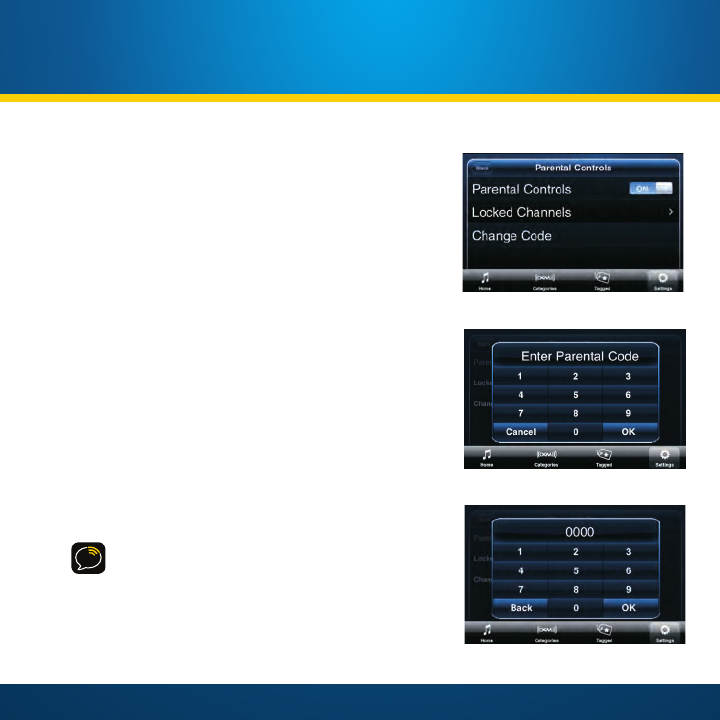
Parental Controls
The Parental Controls screen lets you lock channels
you do not want others (such as children) to access
without your permission.
Attempting to tune to a locked channel by tapping
its Favorite Preset, using Direct Tuning, choosing a
channel from the Category list or Preview Cards will
display an Enter Parental Code keypad screen.
The locked channel can only be tuned-to if the
correct 4-digit code is entered.
Parental Controls: Tap the ON/OFF button to
turn parental controls ON or OFF. When activating
parental controls for the first time the Enter Parental
Code screen will appear. Use the 10-key pad to create
your personal 4-digit code. (The numbers you enter
will appear at the top of the screen as you enter
them.) When you’re satisfied with your code, tap the
OK button.
IMPORTANT! Be sure to remember your 4-digit
code number! If your forget it, you can reset the
code in the “Restore Defaults” menu in the
iPhone global Settings menu. (See page 85 for
more information.)
Parental Controls
Screen
Enter Parental Code
Screen
Code Numbers Entered
74
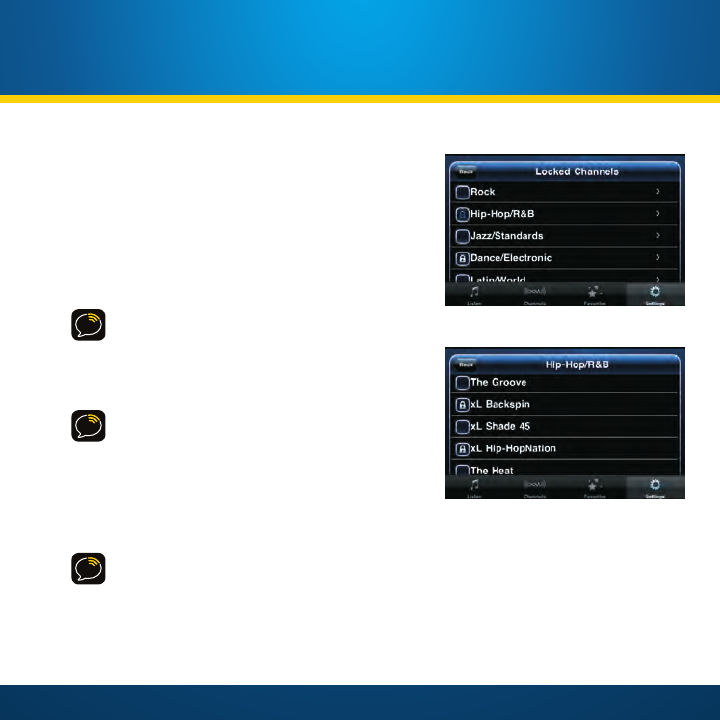
Locked Channels: Tapping Locked Channels
displays a list of all categories. Each category will
have an empty box to its left.
• To lock an entire category: Tap the empty
box next to its name. A lock icon will
appear in the box, indicating that all
channels in the category have been blocked.
NOTE: A virtual “Explicit Channels” category
appears at the top of the category list. This
makes it easy to lock all channels containing
explicit content without having to find and
lock each one individually.
NOTE: If a category contains any individually-
locked channels, a grayed-out lock icon will
appear in the box next to its name on the
category list (see below).
• To lock individual channels:
1. Tap the category name. A list of all
channels in the category will appear.
NOTE: Channels containing explicit content will have an xL preceding their name.
2. Tap the empty box next to the channel name you want to lock. A lock icon will
appear in box, indicating that the channel has been locked.
• To unlock a channel or category: Tap on the box next to the channel or category
name that contains the lock icon. The lock icon will disappear, and the channel
Locked Channels
Screen
Category Channel List Screen
Setting Up Your XM SkyDock
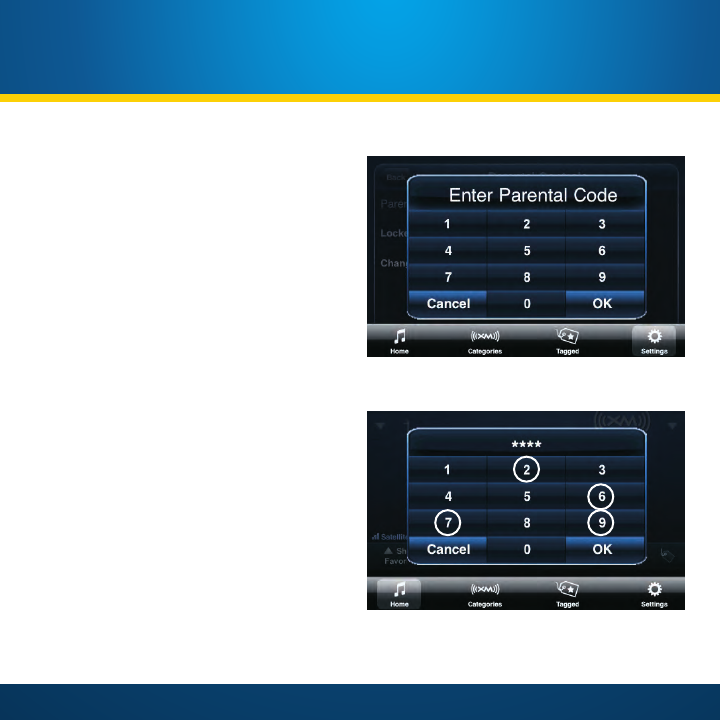
75
can be tuned without entering
the 4-digit code number.
• To listen to a locked channel:
Tap on the channel listing that
appears when attempting to
tune to a locked channel. The
Enter Parental Code keypad
will appear. Entering the correct
4-digit code will tune to the
channel.
Change Code: Tapping Change Code on
the Parental Controls screen (shown
on page 73) displays the Enter Parental
Code keypad. Entering your current
4-digit code will then take you through
the procedure to set a new 4-digit code
number.
Enter Parental Code
Screen
Entering Code Numbers
76
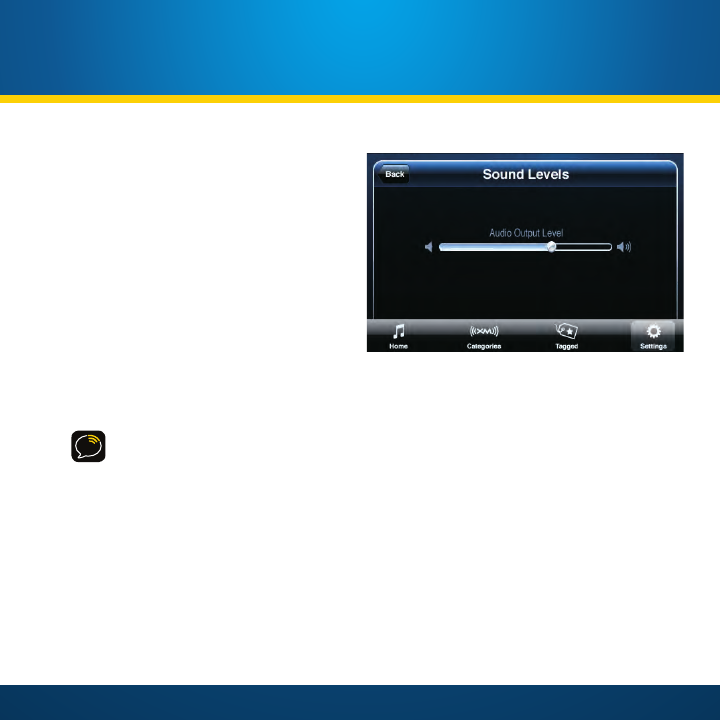
Sound Levels
Audio Output Level: Controls the
output level of the XM SkyDock’s Audio
output connection.
To adjust the sound level, touch and
drag the slider marker left or right
to increase or decrease the audio
output level. Moving the slider marker
towards the right increases the volume;
moving the slider marker towards
the left decreases the volume. The
will be a slight delay between making
adjustments and the actual level increasing or decreasing.
NOTE: If you’re using an optional Cassette Adapter connected to the XM SkyDock’s
Audio connector (see page 25 and page 26), for best performance set the Audio Output
Level slider to the minimum setting (all the way to the left).
Sound Levels
Screen
Setting Up Your XM SkyDock
77
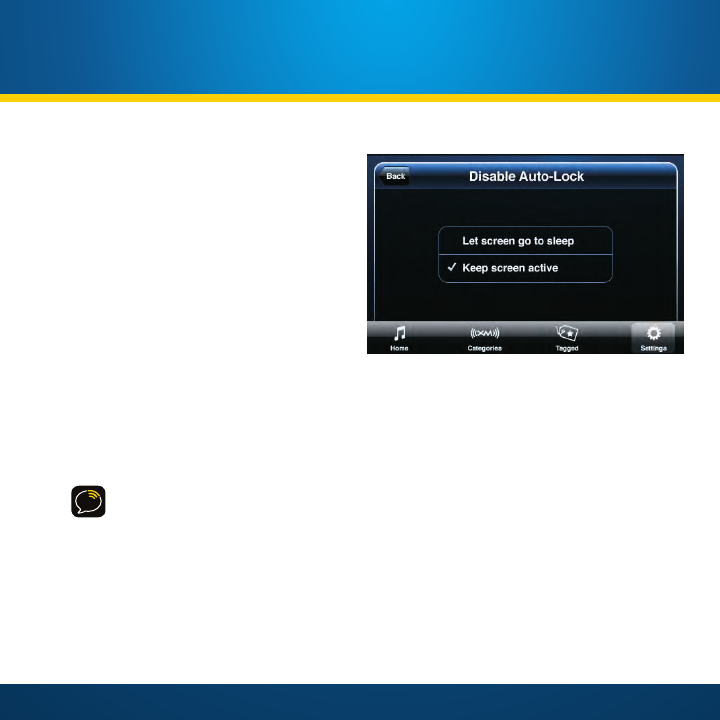
Disable Auto-Lock
Let screen go to sleep: The iPhone
screen will be allowed to go to sleep
after the XM SkyDock App is not
interacted with for a period of time
(determined by your iPhone Auto-Lock
settings). XM radio sound will continue
to play even though the iPhone screen
is asleep.
To wake up the screen, press the iPhone
Home button and slide the screen lock
to the unlocked position. You can now
interact with the XM SkyDock App.
Keep screen active: The iPhone screen will stay awake until you press the iPhone
Sleep/Wake button. This is the XM SkyDock App default setting.
NOTE: If your iPhone or iPod touch global auto-lock and passcode lock settings are set
to on, it is possible that the screen will lock if you receive an alert from a calendar
event or SMS, and do not close the alert.
Disable Auto-Lock
Screen
78
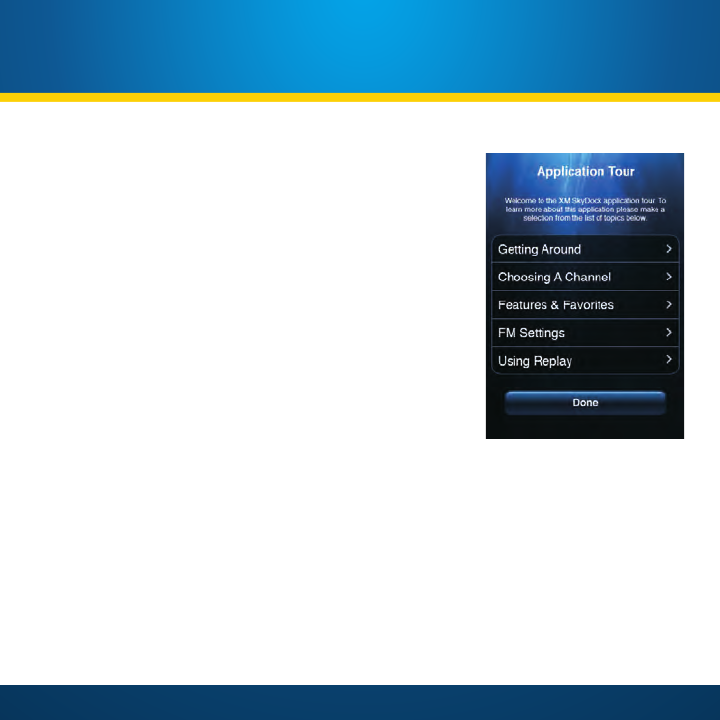
Application Tour
The Application Tour lets you take a guided tour of the
XM SkyDock App main features to help you get started
using the system right away.
Tapping the Application Tour listing displays the tour’s
table of contents. (Note that the Application Tour
screens only appear in portrait orientation.)
Tapping one of the items on the table of contents list
enters a guided tour that shows and explains that
item’s various features and functions:
Getting Around: Explains the XM SkyDock App Home
Screen Menu items (Home, Categories, Tagged and
Settings buttons).
Choosing a Channel: Explains how to select channels,
and the various channel and category screens.
Features & Favorites: Explains the Tag This, Traffic & Weather and Favorites buttons.
FM Settings: Explains how to set-up and operate XM SkyDock’s built-in FM transmitter.
Using Replay: Explains how to pause, rewind, and replay satellite radio.
Tapping the table of contents screen’s Done button exits the tour and returns to the
Settings menu (see page 49).
Application Tour
Table
of Contents Screen
Setting Up Your XM SkyDock
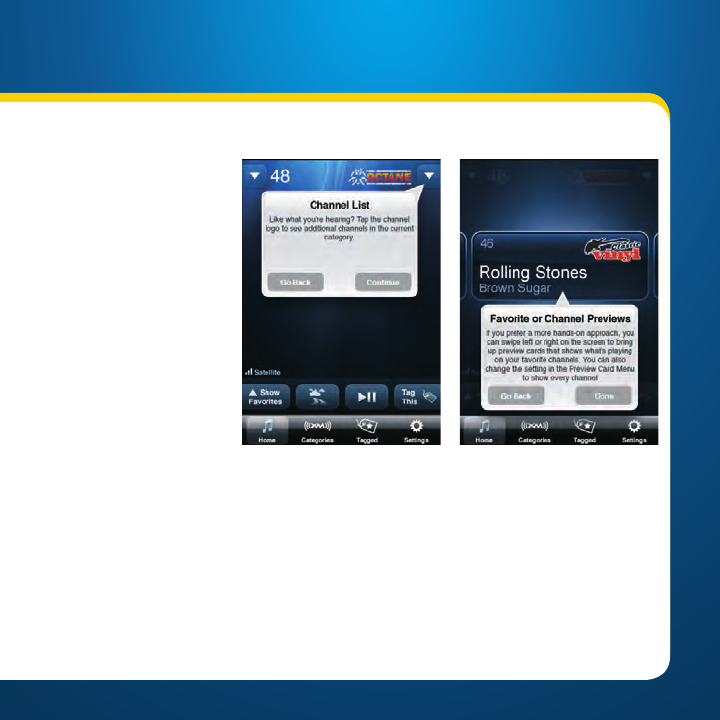
79
While the tour is active
the XM SkyDock will
be in “slideshow”
mode. None of the XM
SkyDock App buttons
will function except
for the Go Back and
Continue buttons that
appear on the various
tour pop-ups.
Tapping any tour pop-
up’s Go Back button will
return to the previous
screen on the tour.
Tapping a Continue
button will continue to
the next screen on the
tour.
The Continue button on the last pop-up in each tour will be replaced by a Done
button. Tapping that Done button will return to the Application Tour Table Of
Contents screen.
Tapping the Done button on the Table Of Contents screen will exit the tour and
return to the Settings menu.
Application Tour Screen
Showing
Go Back
and
Continue
Buttons
Application Tour Screen
Showing
Go Back
and
Done
Buttons

80

81
Appendix
82
Appendix
Miscellaneous Alerts
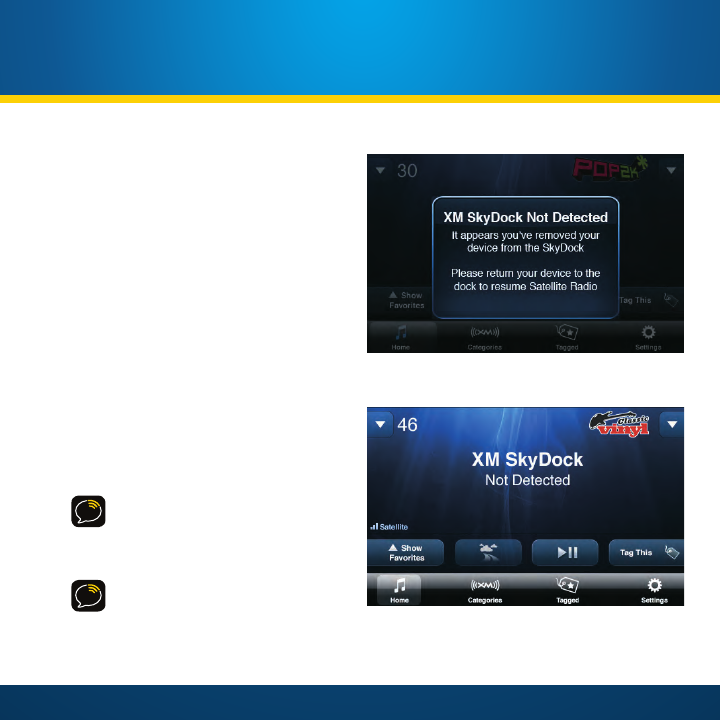
XM SkyDock Not Detected
If you remove the iPhone from the
SkyDock while you’re listening to the
XM SkyDock App it will display the XM
SkyDock Not Detected pop-up. The
Home Screen will then return, but will
display “XM SkyDock Not Detected”
in place of artist and song title
information.
To continue listening: Return the
iPhone to the SkyDock.
To discontinue listening: Press the
iPhone Home button.
NOTE: The XM SkyDock will
power-down and discontinue
audio playback if the iPhone is
removed from the SkyDock.
NOTE: You can manage your
tagged songs and adjust your
settings while the iPhone is
removed from the SkyDock.
XM SkyDock Not Detected
Pop-Up
Home Screen with
XM SkyDock
Not Detected
Message

83
Acquiring Signal
If you are not receiving good signal you will see the
Acquiring Signal... message on the Home screen.
Make sure the antenna is properly mounted outside
of the vehicle.
Move the antenna or the vehicle away from any
obstructions.
Check Antenna
If your Magnetic Mount Antenna is disconnected or
damaged, you will see the Check Antenna message on
the Home Screen.
Make sure the antenna is firmly and securely plugged
into the XM SkyDock antenna connector. Make sure
the antenna cable is not tightly bent, crimped or
broken - if so you will need to replace the antenna.
See page 16 for details on proper antenna installation.
Loading
Your XM SkyDock is acquiring audio or program
information. This Message usually goes away in a few
seconds.
Acquiring Signal Screen
Check Antenna Screen
Loading Screen
84
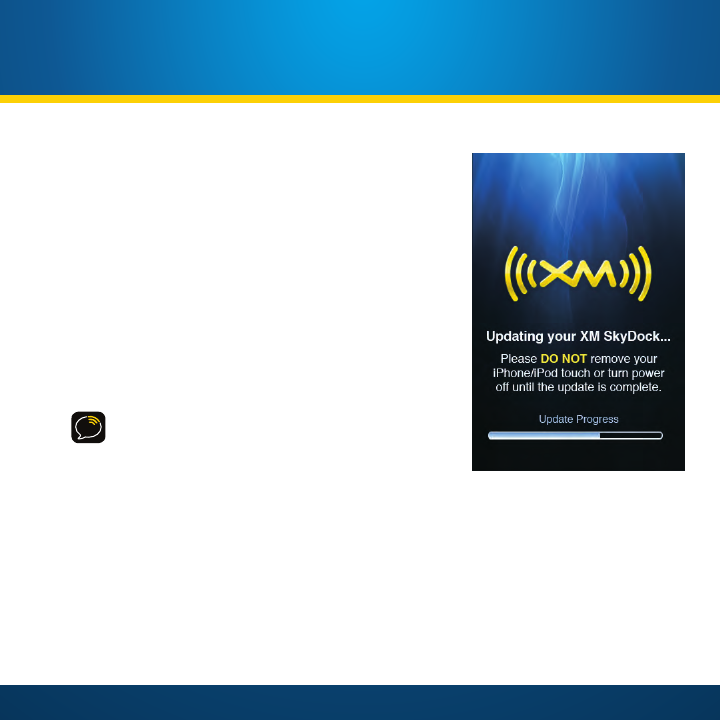
Updating the XM SkyDock Firmware
The XM SkyDock application monitors the firmware
version of the SkyDock hardware. If an update
is required, the firmware will be automatically
updated. During the update process, an Updating
Your XM SkyDock… message and an update
progress bar will be displayed.
When the update is completed, the XM SkyDock will
automatically power down, then back on and you
will see the “XM SkyDock Disconnected message
briefly then the the XM SkyDock application will
continue to start up and operate as normal.
IMPORTANT: Do not remove your iPhone from
the XM SkyDock or disconnect the power
during the updating process.
Updating your
XM SkyDock
Screen
Appendix

85
Restore Defaults
If you wish you can return your XM SkyDock application to its factory-set defaults.
To restore the factory-set defaults:
1. In the iPhone Home
screen, tap the
Settings (global
settings) icon. Scroll-
down the list of
options until you
find the XM SkyDock
listing and tap it to
enter.
2. Tap the Restore
Defaults ON/OFF
button to set the
option to ON.
3. Press the iPhone
Home button to
exit the Settings
application.
4. Re-launch the XM
SkyDock application.
iPhone
Settings
Menu XM
SkyDock
Restore Defaults
Listing
iPhone Home Screen
showing
Settings
icon
86
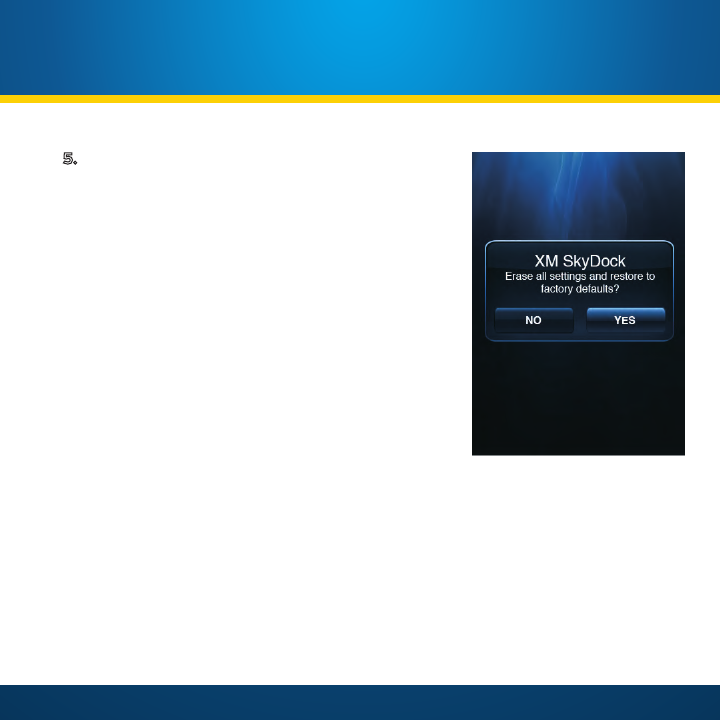
5. You will see an XM SkyDock message asking if
you would like to restore your factory defaults.
Tap Yes to restore, tap No to cancel.
Tapping Yes makes the following changes in the XM
SkyDock application:
• All Favorite channels will be cleared
• The selected traffic & weather channel will be
replaced with Emergency Alert 24/7
• All tagged songs and artists will be cleared
• FM Transmitter will be set 88.1 MHz and turned
ON (all other presets will be removed)
• All Alert Options will be set to ON
• All saved sport teams will be cleared
• All stock symbols will be cleared
• All Ticker Options will be set to OFF
• All sports and artist/song alerts will be set to
OFF
• All Parental Controls set to OFF and code will be cleared
• Preview Cards will be set to Show Favorites
• The Audio Output level will be set to 1V RMS (Approximately 3/4 of MAX)
• Disable Auto-Lock will be set to Keep Screen Active
Restore Defaults
Confirmation
Screen
Appendix

87
How to Find Available FM Channels in Your Area
Before attempting any of the procedures below, you should park your vehicle in a safe
location. Do not attempt to set up your FM channels or any XM SkyDock App function
while driving.
Power
Connect allows you to listen to XM audio through your vehicle’s FM radio. You will
first need to find an available FM channel, which is a channel that is not being used by
an FM radio station in your area. When you tune your FM radio to an available channel,
you should only hear static or silence – not talk or music.
Once you have found an available channel, you need to tune the XM SkyDock’s built-in
transmitter to the same channel to receive XM sound through your vehicle’s radio.
We recommend one of the following two methods to find an available FM channel:
1. Use the SIRIUS|XM FM Channel Finder
Use the SIRIUS|XM FM Channel Finder at www.xmradio.com/fmchannel. Go to the
website and enter your zip code. The Channel Finder will suggest a list of available
FM channels in your area. For convenience, write down or print out the list.
Tune your XM SkyDock to a favorite XM channel (or to channel 1, if it’s not yet
activated) and turn on your vehicle’s FM radio. Pick the first FM channel on your
Channel Finder list and tune the FM radio to that channel. If you do not hear a
local FM station broadcast, then tune the XM SkyDock FM transmitter to the
same channel. (Follow the instructions in “FM Settings” on page 62.) You should
hear the XM channel through your vehicle’s radio. If you are satisfied with the
sound quality, you’re done! If this FM channel doesn’t work well for you, work
down the list until you find an FM channel that allows you to hear XM clearly.
88
2. Manually tune through your local FM channels
Tune your XM SkyDock to a favorite XM channel (or to channel 1, if it’s not yet
activated) and turn on your vehicle’s FM radio. Start at 88.1 and use the ‘Manual’
tune function on your vehicle’s FM radio to tune through each FM channel one-
by-one (88.1 followed by 88.3 etc.) to locate channels that aren’t being used by a
local FM radio station. Write down each FM channel that has only static or silence
on it, until you reach 107.9.
Once you have created your list of available FM channels, you will need to find
the one that provides the best match for XM SkyDock. Tune your FM radio to the
first FM channel on your list, then tune the XM SkyDock’s FM transmitter to the
same channel. (Follow the instructions in “FM Settings” on page 62.) You should
hear the XM channel through your vehicle’s radio. If you are satisfied with the
sound quality, you’re done! If this FM channel doesn’t work well for you, work
down the list until you find an FM channel that allows you to hear XM clearly.
Helpful Hints:
You may find a channel with no audio or noise that does not work with your XM SkyDock.
It is possible that some type of inaudible interference is present that prevents reception
of the XM SkyDock broadcast. Your only option is to use another channel or installation
method.
If you regularly drive from one location to another, such as your daily commute, you may
need to use different FM channels along your route for best performance. If this is the
case, we recommend saving the best FM channels as presets on your FM radio and your
XM SkyDock. Then you simply select and match the best channel for the area you are in.
Appendix

89
Troubleshooting
If you see this on the Screen: Try This
Acquiring Signal •Make sure that the vehicle is outdoors with a clear
view of the sky.
•Make sure the Magnetic Mount Antenna is mounted
outside of the vehicle.
•Move your Magnetic Mount Antenna away from any
obstructed area. For example, if you are parked in an
underground garage, you should receive a signal after
leaving the garage.
Check Antenna •Make sure that the antenna cable is firmly and
securely plugged into the ANTENNA connection on
the XM SkyDock.
•Quit the XM SkyDock App and relaunch. The message
may reset.
•If the message persists, most likely the antenna cable
has been damaged. Replace the Magnetic Mount
Antenna.
Loading Your XM SkyDock is acquiring audio or program
information. This message usually goes away in a few
seconds.
Channel Off Air The channel you’ve selected is not currently
broadcasting. Tune to another channel.
90
Troubleshooting (continued)
If you see this on the screen Try This
XM SkyDock Not Detected •Re-insert your iPod touch or iPhone back into the XM
SkyDock.
•The SkyDock does not have power. Check your
cigarette lighter socket connection.
•The SkyDock is turned OFF. Press the XM SkyDock
Power button to turn on.
If this happens Try This
You do not receive all the XM
channels you subscribed to
•Review and follow the activation instructions in
“Activation” on page 32.
•Go to www.xmradio.com/refresh and enter your
Radio ID and follow the instructions to refresh your
activation signal.
•Call 1-800-967-2346 for more assistance.
No audio when using Aux In Cable •Make sure the Aux In Cable is connected fully into
your XM SkyDock Audio connection and to your
vehicle’s auxiliary input. (Refer to page 26.)
•Make sure your vehicle’s stereo is set to auxiliary
mode. (See your vehicle owners manual for details.)
•Check the XM SkyDock Audio Output Level. (Refer to
“Sound Levels” on page 76.)
Appendix
91
If this happens Try This
No audio when using
Power
Connect •Make sure the FM Transmitter is ON. (Refer to “FM
Settings” on page 62.)
•Make sure your vehicle radio is tuned to the same
channel as the FM Transmitter. (Refer to “FM
Settings” on page 62.)
•Review “How to Find Available FM Channels in Your
Area” on page 87.
Audio is too low (soft) •Adjust the Audio Output Level. (Refer to “Sound
Levels” on page 76)
XM Traffic and Weather channels
sound different from other channels
•These channels use a different audio technology than
other XM channels so they often sound different.
No song title or artist name
displayed
•This information may not be available, or updates may
be in process.
Stock and/or Sport Tickers are not
displayed
•Make sure the Ticker Options are turned ON in the
Settings menu. (Refer to “Ticker Options” on page 66.)
One or all of the favorite channels
switch to Channel 1 - XM Preview
•The channel is no longer available. Delete the channel
and add a new one. (Refer to “Setting your Favorite
Channels” on page 46.)
iPod touch or iPhone has a dead
battery and SkyDock does not turn
ON.
•Press the Power button on the XM SkyDock. This will
turn on the XM SkyDock and start to charge the iPod
touch or iPhone.
92
Troubleshooting (continued)
If this happens Try This
Swiping the Artist Song/Artist does
not bring up the Preview Cards
•Preview Cards set to Show Favorites, and Favorite list
is empty. (Refer to “Setting your Favorite Channels”
on page 46 to add favorite channels.)
•Change Preview Cards to Show Channels to see all
channels. (Refer to “Preview Cards” on page 72.)
FM button on the SkyDock is not
backlit.
•The
Power
Connect FM Transmitter is turned OFF. If
you want to turn it back ON, press the FM button and
choose Enable FM. You can also turn it on through the
FM Settings menu.
Forgot Parental Lock Code •You can Restore Defaults to clear the Parental Lock.
(Refer to “Restore Defaults” on page 85.)
CAUTION: Restoring the defaults will clear all your
stored Favorites, clear your Tagged Songs, Stocks
and Sports Alert, and Ticker information. (Refer to
page 86 for a list of the settings which are changed by
restoring the defaults.)
The iPod touch or iPhone display
goes dim or turns OFF
•Disable Auto-Lock is set to allow the screen go
to sleep. If you would like to keep the screen from
turning OFF, change the setting to Keep Screen
Active. (Refer to “Disable Auto-Lock” on page 77.)
•if you have your iPod touch or iPhone Auto-Lock and
Passcode Lock settings turned ON, it is possible that
if you receive an SMS or Calendar alert/reminder, and
do not close the alert, the global settings can cause
the screen to dim, turn off, and eventually lock.
Appendix
93
Owner’s Record
The model number is located below and the XM Radio ID is located on the My Account
page of the Settings menu. Record the XM Radio ID in the space provided below.
Refer to these numbers whenever you call your dealer regarding this product.
Model Number: XM SkyDock (XVSAP1V1)
Radio ID:_______________________________
NOTE: XM Radio IDs do not use the letters I, O, S, or F.

94
Specifications
Dimensions:
Dock Portion (arms closed): 2.6 in (W) X 4 in (H) X 2.2 in (D)
66.3mm (W) X 102.8mm (H) X 55.5mm (D)
Flexible Shaft: 0.43 in (Dia.) X 3.1 in (L)
10.9mm (Dia.) X 80mm (L)
Power Interface/Mount: 1.3 in (W) X 4.4 in (L)
33mm (W) X 111.5 mm (L)
Dock Rotation: 200° Max (100° in either direction)
Weight: 5.5 oz (156 g)
Power Requirements: 11 ~ 16V DC
Current Consumption: 800mA (max)
Operating Temperature: -4°F to 140°F (-20°C to 60°C )
Audio Output Type:
1/8 in (3.5 mm)
stereo mini connector
Line Output Level: Variable — 75mV ~ 1.8V (RMS)
FM Output:
FM Modulator (Built-in):
Power
Connect Type
FM Direct Output (Option): 2.5 mm (for use with optional FMDA25)
Aux In Cable Type:
1/8 in (3.5 mm) Stereo Audio (right-angle male/male)
Aux In Cable Length: 4 ft (1.2 m)
Antenna Type: Magnetic Mount with right-angle SMB connector
Antenna Cable Length: 11.5 ft (3.5 m)
NOTE: due to continuous product improvement, all features and specifications are
subject to change without notice.
Appendix

95
Patent Information
It is prohibited to, and you agree that you will not, copy, decompile, disassemble,
reverse engineer, hack, manipulate, or otherwise access and/or make available any
technology incorporated in receivers compatible with the XM Satellite Radio system.
Furthermore, the AMBE® voice compression software included in this product is
protected by intellectual property rights including patent rights, copyrights, and trade
secrets of Digital Voice Systems, Inc. The software is licensed solely for use within this
product. The music, talk, news, entertainment, data, and other content on the Services
are protected by copyright and other intellectual property laws and all ownership rights
remain with the respective content and data service providers. You are prohibited from
any export of the content and/or data (or derivative thereof ) except in compliance with
applicable export laws, rules and regulations. The user of this or any other software
contained in a SIRIUS|XM Radio is explicitly prohibited from attempting to copy,
decompile, reverse engineer, hack, manipulate or disassemble the object code, or in any
other way convert the object code into human-readable form.
Environmental Information
Follow local guidelines for waste disposal when discarding packaging and electronic
appliances.
Your Satellite Radio tuner is packaged with cardboard, polyethylene, etc., and does not
contain any unnecessary materials.

96
FCC Statement
The user is cautioned that changes or modifications not expressly approved by SIRIUS|XM Radio,
Inc. can void the user’s authority to operate this device.
This device has been designed to operate with the antenna provided in the original packaging. Use
of antenna other than the antenna provided will result in improper operation.
This device complies with Part 15 of the FCC rules:
1. This device may not cause harmful interference.
2. This device must accept any interference received, including interference that may cause
undesired operation.
This equipment has been tested and found to comply with the limits for a Class B digital device,
pursuant to Part 15 of the FCC Rules. These limits are designed to provide reasonable protection
against harmful interference in a residential installation.
This equipment generates, uses, and can radiate radio frequency energy and, if not installed and
used in accordance with the installation instructions, may cause harmful interference to radio
communications. However, there is no guarantee that interference will not occur in a particular
installation. If this equipment does cause harmful interference to radio or television reception,
which can be determined by turning the equipment off and on, the user is encouraged to try to
correct the interference by one or more of the following measures:
•Reorientorrelocatethereceivingantennaoftheaffectedreceiver.
•IncreasetheseparationbetweentheSIRIUS|XMequipmentandtheaffectedreceiver.
•ConnecttheSIRIUS|XMequipmentintoanoutletonacircuitdifferentfromthattowhichthe
affected receiver is connected.
•Consultthedealeroranexperiencedradio/TVtechnicianforhelp.
WARNING! The FCC and FAA have not certified this Satellite Radio Receiver for use in any aircraft
(neither portable nor permanent installation). Therefore, SIRIUS|XM Radio cannot support this type
of application or installation.
Appendix

97
Copyrights and Trademarks
Hardware and subscription sold separately. Activation fee, other fees, and taxes required.
Installation required with some equipment. Except as specifically provided, SIRIUS and
XM Radios and Accessories are compatible only with their respective subscription service.
Subscriptions governed by, as applicable, the SIRIUS Terms & Conditions available at sirius.
com, or the XM Customer Agreement available at xmradio. com. Prices and programming are
subject to change. SIRIUS U.S. Service available only in the 48 contiguous United States, D.C.
and Puerto Rico. XM U.S. Service available only in the 48 contiguous United States and D.C.
Service available in Canada; see www. siriuscanada.ca or www.xmradio.ca.
© 2010 SIRIUS XM Radio Inc. SIRIUS, XM and all related marks and logos are trademarks of
SIRIUS XM Radio Inc. and its subsidiaries. All other trademarks, service marks and logos are
the property of their respective owners. All rights reserved.
“Made for iPod” and “Made for iPhone” mean that an electronic accessory has been designed
to connect specifically to iPod or iPhone respectively, and has been certified by the developer
to meet Apple performance standards. Apple is not responsible for the operation of this device
or its compliance with safety and regulatory standards. iPhone, iPod, iPod touch and iTunes
are trademarks of Apple Inc., registered in the U.S. and other countries. iTunes is for legal or
rightholder-authorized copying only. Don’t steal music.
WARNING: This product contains chemicals known to the State of California to cause cancer
and birth defects or other reproductive harm.
SIRIUS XM Radio
1221 Avenue of the Americas
New York, NY 10020
1.800.967-2346
©2010 SIRIUS XM Radio, Inc.
XM SkyDock User Guide (XMSkyDockUG051710a)
xmradio.com
