SITECSystem SITECMHP100 Portable MPEG4 Player User Manual Portable Mpeg4 Player
SITECSystem Co., Ltd. Portable MPEG4 Player Portable Mpeg4 Player
UserManual.wiki
>
SITECSystem
>
SITECMHP100 User Manual
Users Manual
Navigation menu
Upload a User Manual
Namespaces
Wiki Guide
HTML
PDF
Info
Views
User Manual
Discussion / Help
Navigation
![2.5” HDD MULTIMEDIA JUKIBOX PORTABLE MPEG4 PLAYER Pre-Cautions We strongly recommend to read the below “Pre-Cautions.. * We strongly recommend you to back up the data to another safe media. We are responsible for the hardware of the Mpeg4 Player only but don’t have the responsibility for data damage or loss in a HDD. * In a car, we recommend you to use the supplied cigarette lighter jack (option) and we are not responsible for the damage or loss of data in a HDD by using another cigarette lighter jack. * It’s better unplug the power adaptor when you don’t use for a long time. * Grip the side of the Mpeg4 Player. The top & bottom cover may have heat due to aluminum case. * This Mpeg4 Player does not supports the DivX, XviD codec of video files that has GMC, Qpel option. * This Mpeg4 Player supports only “Pass-Through for DTS Audio codec. * Don’t power off while a file is playing. * If the length of USB cable is too long, it may not be connected smoothly (Recommend : up to 3 meters) * We strongly recommend you to use the supplied USB cable that supports more enough power to the Mpeg4 Player (Customized USB Cable). * If you have USB 1.1 Host Adapter, the Mpeg4 Player is working at USB1.1 speed. * On less than 6GB HDD, data damage or loss may be caused. We recommend you to use more than 6GB HDD. * [Very Important] : If unformatted HDD is insert into the Mpeg4 Player, a PC can not detect the Mpeg4 Player. Make sure that the HDD is formatted. For “How to format a HDD, contact HDD manufacturer or the seller. * Be careful of dropping or impact or shock. If a HDD is damaged by dropping, impacting, shocking, then contact manufacturer or the seller. * We recommend you to use the all supplied cables or accessories that are customized for the best performance of the Mpeg4 Player. Using other cables or accessories may not support the best performance. * [Very Important] : Be away from water, heavy moisture. If the Mpeg4 Player has a liquid, unplug the Mpeg4 Player from a PC right away. If you use the Mpeg4 Player under this condition, the HDD may be fired or you may have electric shock. * Don’t touch the Mpeg4 Player by wet hands. It may cause electric shock. * Be away from heat, a direct ray of light. * Be away from devices that transmit strong magnetic signal. It may cause data damage or loss on HDD. * Don’t disassemble as the user’s own accord. It may cause the Mpeg4 Player damaged or loose the data. 4](https://usermanual.wiki/SITECSystem/SITECMHP100/User-Guide-504224-Page-2.png)
![2.5” HDD MULTIMEDIA JUKIBOX PORTABLE MPEG4 PLAYER Package AV3 Cable (Yellow / Red / Green) AV 2 Cable (Yellow/S-Video) AV 1 Cable (Yellow / Red / White) DC Adaptor Mpeg4 Player Quick Guide USB Cable Remote Control AAA Battery Installation CDThis is basic accessories and shall be changed without prior notice (AV 1,2,3 Cable Length : 1M) Explanation of the exterior Appearance FRONT VIEW BACK VIEW 1) Power LED 3) IR LED 4) IR Receiver 5) USB Port8) Composite / Stereo L-R / Component (Pb) 6) DC Input2) HDD LED 7) S-Video / Coaxial / Component (Y, Pr) 1) Power LED : LED for power supply. It’s lighting when power is supplied. 2) HDD LED : It’s lighting when data is transmitting. 3) IR LED: It’s blinking when the remote control receives a signal. 4) IR Receiver : The receipt area of the remote control. 5) USB Port : Connect USB Cable to a PC in order to [copy] & [paste] data. 6) DC Input : Connect DC Power Adaptor. 7) SV/5.1 : Output for S-Video, Coaxial, Component (Y, Pr) signal. 8) A/V : Output for Composite, Stereo L-R, Component (Pb) signal. 6](https://usermanual.wiki/SITECSystem/SITECMHP100/User-Guide-504224-Page-4.png)
![2.5” HDD MULTIMEDIA JUKIBOX PORTABLE MPEG4 PLAYER Chapter 2. How to Assemble & Insert HDD This is how to assemble or disassemble HDD to/from the Mpeg4 Player. ※ [Note] : The HDD that is inserted to the Mpeg4 Player should be “Master”. 7](https://usermanual.wiki/SITECSystem/SITECMHP100/User-Guide-504224-Page-5.png)
![2.5” HDD MULTIMEDIA JUKIBOX PORTABLE MPEG4 PLAYER Chapter 3. How to Connect a PC & the Mpeg4 Player Connect a PC & the Mpeg4 Player with supplied USB Cable. [Note] : Installation Driver should be installed on a PC first for Windows 98/SE users. Refer to the below instructions. 1. Instructions for Windows Users When a PC and the Mpeg4 Player is connected, a new Volume will be appeared on [My Computer]. You can save any data on this volume. See the instructions below for a various Window versions. After detecting the Mpeg4Player, a new volume willbe appeared. (1) Windows 98/SE Users [Note] : Installation Driver for Windows 98/SE should be installed first in order a PC can detect the Mpeg4 Player. The Installation Drive (Win98_Mpeg4 Player.exe) is at a supplied CD and you can find the driver at the “Win98Driver” folder. Win98Driver file name is “Win98_Mpeg4 Player.exe”. After installing the driver and when you connect the Mpeg4 Player to a PC then the PC can detect the Mpeg4 Player as a new volume. When you install [Win98_Mpeg4 Player.exe], theinstallation wizard will be appeared. Press [Next]button and complete the installation. [Note] : Check the Driver Installation You can check whether the driver is installed correctly or not at [Appendix. Check the Driver Installation for the Mpeg4 Player at Windows]. [Note] : Check whether a HDD is formatted or not If a HDD is not formatted, a PC can not detect the HDD. Refer to the manufacturer’s information of the HDD or contact the seller where you purchased. 8](https://usermanual.wiki/SITECSystem/SITECMHP100/User-Guide-504224-Page-6.png)
![2.5” HDD MULTIMEDIA JUKIBOX PORTABLE MPEG4 PLAYER [Note] : Refer to how to remove the Mpeg4 Player safely from a PC Remove the Mpeg4 Player with using the right icon at Windows 98/SE. If you don’t follow this procedure, data and the Mpeg4 Player may have damage. (2) Windows ME/2000/XP Users [Note] : No need to installation any Installation Driver. Connect the Mpeg4 Player and a PC by using supplied USB Cable then the PC detect the Mpeg4 Player as a [USB Mass Storage Device] at [My Computer]. [Note] : Check the Driver Installation You can check whether the driver is installed correctly or not at [Appendix. Check the Driver Installation for Mpeg4 Player at Windows]. [Note] : Check whether a HDD is formatted or not If a HDD is not formatted, a PC can not detect the HDD. Refer to the manufacturer’s information of the HDD or contact the seller where you purchased. [Note] : When USBntmap.sys file is asked at Windows ME When you are asked <USBntmap.sys> file, find at [Windows ME CD] -> [Win9X] folder -> [base2.cab]. [Note] : Refer to how to remove the Mpeg4 Player safely from a PC Remove the Mpeg4 Player with using the right iconat Windows ME/2000/XP. If you don’t follow thisprocedure, data and the Mpeg4 Player may havedamage. 9](https://usermanual.wiki/SITECSystem/SITECMHP100/User-Guide-504224-Page-7.png)
![2.5” HDD MULTIMEDIA JUKIBOX PORTABLE MPEG4 PLAYER 2. MAC Users No need to install the installation driver at MAC OS 9.x version and the Mpeg4 Player will be detected automatically. If the Mpeg4 Player is detected correctly, an icon is appeared at a monitor. When remove the Mpeg4 Player safely, drag the icon to a trash and unplug the Mpeg4 Player. 3. Linux Users It can be available at Linux 2.4 higher. [Automatic Mount] After booting, do log-in. Connect the Mpeg4 Player -> Power On the Mpeg4 Player -> Check the detection with [fdisk] -> make Mount Pointer (ex. mediatest) at Folder Mount(/mnt) -> Edit [/etc/fstab] -> add the following; /dev/sda /mnt/mediatest vfat noauto, user 0 0 (in case of FAT32 HDD) /dev/sda /mnt/mediatest ntfs noauto, user 0 0 (in case of NTFS HDD) Do Log-in again. [Note] above example “sda” is assumed that the Mpeg4 Player will be detected as “sda” on your system. If not, you have to write the drive name which is detected as “USB Mass Storage”, not “sda” [Manual Mount] Connect the Mpeg4 Player -> Power On Mpeg4 Player -> Check the detection with [fdisk] -> make Mount Pointer (ex. mediatest) at Folder Mount(/mnt) -> Edit [/etc/fstab] -> add the following; mount –t vfat /dev/sda /mnt/mediatest (in case of FAT32 HDD) mount –t ntfs /dev/sda /mnt/mediatest (in case of FAT32 HDD) [Note] above example “sda” is assumed that the Mpeg4 Player will be detected as “sda” on your system. If not, you have to write the drive name which is detected as “USB Mass Storage”, not “sda” [How to stop using] Do [unmount] at Device Control. 10](https://usermanual.wiki/SITECSystem/SITECMHP100/User-Guide-504224-Page-8.png)
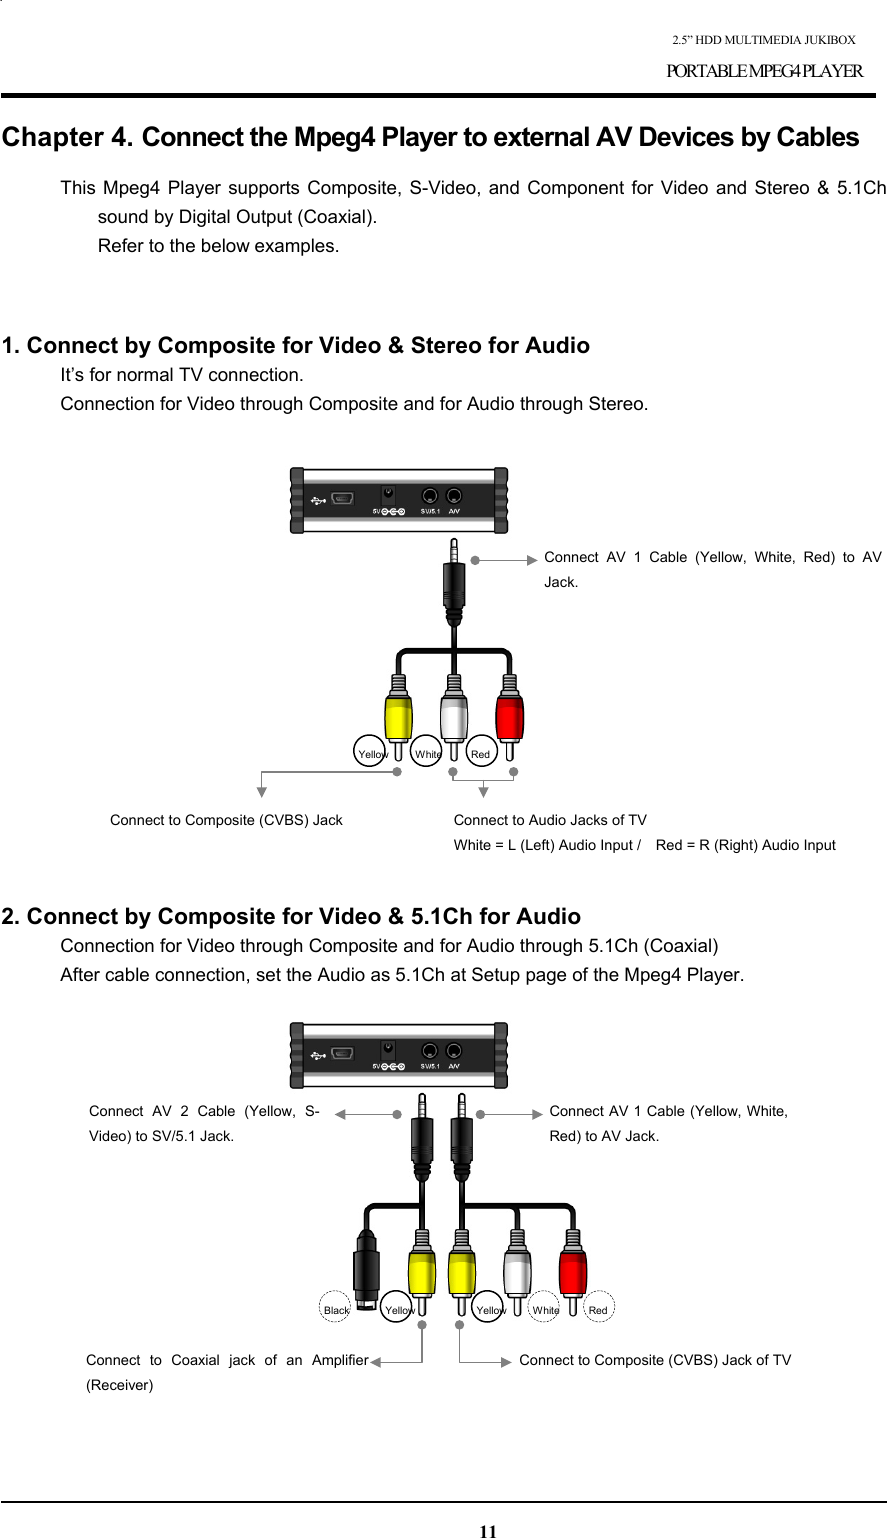
![2.5” HDD MULTIMEDIA JUKIBOX PORTABLE MPEG4 PLAYER 3. Connect by S-Video for Video & Stereo for Audio Connection for Video through S-Video and for Audio through Stereo Black Yellow Red WhiteYellowConnect to Audio Jacks of TV White = L (Left) Audio Input / Red = R (Right)Audio Input Connect S-Video (blackcolor) to S-Video Jack ofTV Connect AV 2 Cable (Yellow, S-Video) to SV/5.1 Jack Connect AV 1 Cable (Yellow, White,Red) to A/V Jack 4. Connect by S-Video for Video & 5.1Ch for Audio Connection for Video through S-Video and for Audio through 5.1Ch (Coaxial) After cable connection, set the Audio as 5.1Ch at Setup page of the Mpeg4 Player. 검정 노랑Connect AV 2 Cable (Yellow, S-Video) to SV/5.1 Jack Connect to Coaxial jack of an Amplifier (Receiver) Connect S-Video (black color) to S-Video Jack of TV 5. Connect by Component for Video & Stereo for Audio Connection for Video through Component and for Audio through Stereo [Note] : In case, the main page is not appeared In case, the main page is not appeared after connecting the proper cables, press [F1] button until 12](https://usermanual.wiki/SITECSystem/SITECMHP100/User-Guide-504224-Page-10.png)
![2.5” HDD MULTIMEDIA JUKIBOX PORTABLE MPEG4 PLAYER you see the main page (Mpeg4 Player LOGO PAGE) and then press [Setup] button in order to match [Video] setup with TV. GreenRed Yellow Red WhiteYellowConnect to Audio Jacks of TV White = L (Left) Audio Input / Red = R (Right) Audio InputConnect COMPONENT (Pb) Jack of TV Connect to COMPONENT (Y) Jack of TVConnect COMPONENT (Pr) Jack of TV Connect AV 3 Cable (Yellow, Red,Green) to SV/5.1 Jack Connect AV 1 Cable (Yellow, White,Red) to A/V Jack of 6. Connect by Component for Video & 5.1Ch for Audio Connection for Video through Component and for Audio through 5.1Ch (Coaxial) After cable connection, set the Audio as 5.1Ch at Setup page of the Mpeg4 Player. [Note] : In case, the main page is not appeared In case, the main page is not appeared after connecting the proper cables, press [F1] button until you see the main page (Mpeg4 Player LOGO PAGE) and then press [Setup] button in order to match [Video] setup with TV. Connect AV 3 Cable (Yellow, Red,Green) to SV/5.1 Jack Connect AV 1 Cable (Yellow, White,Red) to A/V Jack of Connect to Coaxial jack ofan Amplifier (Receiver) Connect COMPONENT (Pr) Jack of TV Connect COMPONENT (Pb) Jack of TV GreenRed Yellow Red WhiteYellowConnect to COMPONENT (Y) Jack of TV 13](https://usermanual.wiki/SITECSystem/SITECMHP100/User-Guide-504224-Page-11.png)
![2.5” HDD MULTIMEDIA JUKIBOX PORTABLE MPEG4 PLAYER Chapter 5. Basic Setup of the Mpeg4 Player 1. Video Setup The default Video Setup is Composite Connection for general TV. If a general cable (Yellow) is connected, no need to change. If you want to connect by other cables, select a proper TV system (NTSC / PAL) for a TV to receive a correct video signal. For Video Setup, press [Setup] button on a remote controller. [Note] : In case, the main page is not appeared In case, the main page is not appeared after connecting the proper cables, press [F1] button until you see the main page (Mpeg4 Player LOGO PAGE) and then press [Setup] button in order to match [Video] setup with TV and also refer to TV manual. (1) Setup of TV System (NTSC / PAL) 1) Select [Setup] -> [Video Setup] -> Press [Enter] or [ ] button. 2) Select [TV Output] by using [ or ] button. 3) Select a menu by using [ ] and [ ] key and press [Enter] for setup. 4) Now, the new configuration is applying. Be sure to press [Enter] button to save the new setup. 5) Set other configurations by using arrow buttons or go to other setup pages by pressing [Setup] button. (2) Setup of HD Component (Progressive) In order to use Components connection, the TV MUST support [Progressive]. 1) Select [Setup] button on a remote controller. 2) Select [Video Setup] -> Press [Enter] or [ ] button. 3) Select [HD Component] output by using [ ] keys. 4) By using [ ] and [ or ] button, select a proper one (480p, 720p, 1080i, off) and then press [Enter] button. [Note] * NTSC, PAL : Standard of TV Output. Selecta proper one for using in your country. * C(Composite) : If a general cable (Yellow) isconnected, no need to change. * S-Video : In case, connect by S-Video cable(Black) and the color is white-black, need tochange the configuration. * Y,PB,PR : In case of Component VideoOutput 14](https://usermanual.wiki/SITECSystem/SITECMHP100/User-Guide-504224-Page-12.png)
![2.5” HDD MULTIMEDIA JUKIBOX PORTABLE MPEG4 PLAYER 5) Now, the new configuration is applying. 6) Be sure to press [Enter] button to change the new setup. Finally, press [Setup]button for saving configurations. [Note] If you see an abnormal screen, the TV does not support [Progressive]. In this case, press [Video] button on a remote controller until you have a normal screen. Some TVs may not support [720P]. 2. Audio Setup 1) Select [Setup] button on a remote controller. 2) Select [Audio Setup] by using [ or ] button. 3) Select a proper one (Stereo or Digital 5.1Ch) by using [ ] button and press [Enter] button. 4) Set other configurations by using arrow buttons or go to other setup pages by pressing [Setup] button. [Note] * Analogue : Select when you connect Audio Cables (Red, White) to TV directly. * Digital : Select when you want to listen through 5.1Ch / DTS Dolby by connecting receiver (or amplifier) with AV2 or AV3 Cable . 3. Other Setup 1) Select [Setup] button on a remote controller. 2) Select [Other Setup] by using [ or ] button. 3) Select a proper menu and press [Enter] button. 4) Set other configurations by using arrow buttons or go to other setup pages by pressing [Setup] 15](https://usermanual.wiki/SITECSystem/SITECMHP100/User-Guide-504224-Page-13.png)
![2.5” HDD MULTIMEDIA JUKIBOX PORTABLE MPEG4 PLAYER button. [Note] * Setup of TV Type (Screen Ratio Configuration) : Select one (4:3 Letter Box, 4:3 Pan Scan, 16:9). * JPEG File Preview : If enable “JPEG File Preview ON”, a small picture will be shown at the left side of a screen. * Firmware Version : You can check the current firmware version of the Mpeg4 Player 16](https://usermanual.wiki/SITECSystem/SITECMHP100/User-Guide-504224-Page-14.png)
![2.5” HDD MULTIMEDIA JUKIBOX PORTABLE MPEG4 PLAYER Chapter 6. Play Video, Audio and Photo 1. Play Video Files Select [Video] -> Press [Enter] button then you will see video files you saved into the Mpeg4 Player. Select a file you would prefer and press [Enter] or [Play] button then the file will be played. [Menu Description] * Display : Current all video files will be played in order. * Return : You can move to other menu like Audio, Photo, Play list without returning to the main page while you are in [Video] menu. [Note] Various functions of the buttons on the remote control You can use the following buttons when you are playing a video file. * [Audio] button : You can select Audio 01, Audio 02 if the audio format is multi-audio. * [Caption] button : Supports the following three functions. 1) Screen Location & Size : Control Screen Location & Size. 2) Select Caption : The files that have caption will be displayed. Select a preferable caption. 3) Select Caption Language : Select a preferable language that is multi-language file. * Control Lightness of caption : Number 4 (make it dark), Number 6(make it bright) * [Scr. Size] button: Supports the following three functions. 1) Upper & Lower Enlargement : By using keys, the screen can be enlarged or reduced. 2) Enlarge overall : Enlarge the overall screen 3) Make a screen by using / / / keys manually. * [Time Search] button : Move to a selected time of a file. * [Brt. Cont] button. : Control luminosity / color depth / brightness of a screen. * [File Info.] button : Check the information of the file played now. * Screen Reset function: If a frame of a video file is broken, green color runs on a overall screen. Press number [o “Zero”] for screen reset. 17](https://usermanual.wiki/SITECSystem/SITECMHP100/User-Guide-504224-Page-15.png)
![2.5” HDD MULTIMEDIA JUKIBOX PORTABLE MPEG4 PLAYER 2. Play Audio Files Select [Audio] -> Press [Enter] button then you will see audio files you saved into the Mpeg4 Player. Select a file you would prefer and press [Enter] or [Play] button then the file will be played. [Menu Description] * Display : Current all video files will be played in order. * Return : You can move to other menu like Video, Photo, Play list without returning to the main page while you are in [Video] menu. 3. Play Photos Select [Photo] -> Press [Enter] button then you will see photo files you saved into the Mpeg4 Player. Select a file you would prefer and press [Enter] or [Play] button then the file will be played. [Menu Description] * Display : Current all video files will be played in order. * Return : You can move to other menu like Video, Audio, Play list without returning to the main page while you are in [Video] menu. [Note] : Photo Preview You can do setup [Photo Preview] at [Other Setup]. If it is enabled, a small picture will be shown at the left side of a screen. [Note] : Available Buttons when display photos * Volume + : Enlarge photos (Zoom In) * Volume - : Reduce photos (Zoom Out) * F2 Button : Rotate photos (Rotation) * / / / buttons : Move photos to up, down, left and right (Panning) 18](https://usermanual.wiki/SITECSystem/SITECMHP100/User-Guide-504224-Page-16.png)
![2.5” HDD MULTIMEDIA JUKIBOX PORTABLE MPEG4 PLAYER [Note] : Slide Show by using [Display] Select [Display] -> press [Enter] then the current all photos will be displayed in order. 4. Make Play-List You can build [Play-List] in order you prefer. Select [Play-List] –> Press [Enter] then the files will be shown. Select files you would prefer to play and press [Enter] button then the files you selected has [v] mark. After making [Play-List] and if press [See Play-List] then the files will be shown you selected. [Menu Description] * Display : Play-List added files shows. * Return : Move to [Video], [Audio], [Photo] without returning to the main page. * Play all : Play all files in order. * Random Play : Play the files randomly. * Remove All : All the added files in the current Play-List will be deleted. [Note] : Change the order of [Play-List] Select [Display] -> Select a file -> scroll the files and select a file you would switch. Then the order of each file will be switched. 19](https://usermanual.wiki/SITECSystem/SITECMHP100/User-Guide-504224-Page-17.png)
![2.5” HDD MULTIMEDIA JUKIBOX PORTABLE MPEG4 PLAYER Chapter 7. Appendix Appendix. Check the Driver Installation for the Mpeg4 Player at Windows 1. At Windows 98/SE Check at [Start > Settings > Control Pannel> System > Device Manager > Hard diskcontrollers > Hi-Speed USB-IDE BridgeController] 2. At Windows ME Check at [Start > Settings > Control Pannel> (view all Control Pannel options) >System > Device Manager > UniversialSerial Bus controllers > USB Mass StorageDevice] 3. At Windows 2000/XP Check at [Start > Settings >Control pannel > (switch toclassic View on Windows XP)> system > Hardware >Device manager > UniversalSerial Bus controllers > USBMass Storage Device ] 21](https://usermanual.wiki/SITECSystem/SITECMHP100/User-Guide-504224-Page-19.png)
![2.5” HDD MULTIMEDIA JUKIBOX PORTABLE MPEG4 PLAYER Appendix. Non High-Speed USB Hub Message The message will be displayed On windows XP when you plug the Mpeg4 Player into USB 1.1 spec. Host adapter. Appendix. Check when new local disk drive not be created. 1) Check HDD’s jumper is master. 2) Check to match the pin socket of the Mpeg4 Player with the pins of HDD. 3) Check the driver installation on your windows system. If the driver displays “! or ?”, delete the driver and re-install it. 4) Connect the supplied power adapter. If you connected the Mpeg4 Player to side USB port or no power USB hub, use the supplied power adapter or connect the Mpeg4 Player to rear USB Port of PC and power USB hub. 4) In Case of using a USB Hub, you had better use the USB hub with external power. 5) USB connect cable’s length is recommended upto max 3M. Appendix. How to upgrade a new firmware If you want to get a new firmware, contact to the seller. Save the upgrade file into Mpeg4 Player -> Connect the Mpeg4 Player to TV or a monitor -> Select [Video] -> Select the upgrade file -> press [Enter] button then the upgrade is applying automatically. After doing upgrade, turn off and on the Mpeg4 Player. In order to check the firmware version, press [Setup] -> see [Other Setup] then you can see the current firmware version. 22](https://usermanual.wiki/SITECSystem/SITECMHP100/User-Guide-504224-Page-20.png)