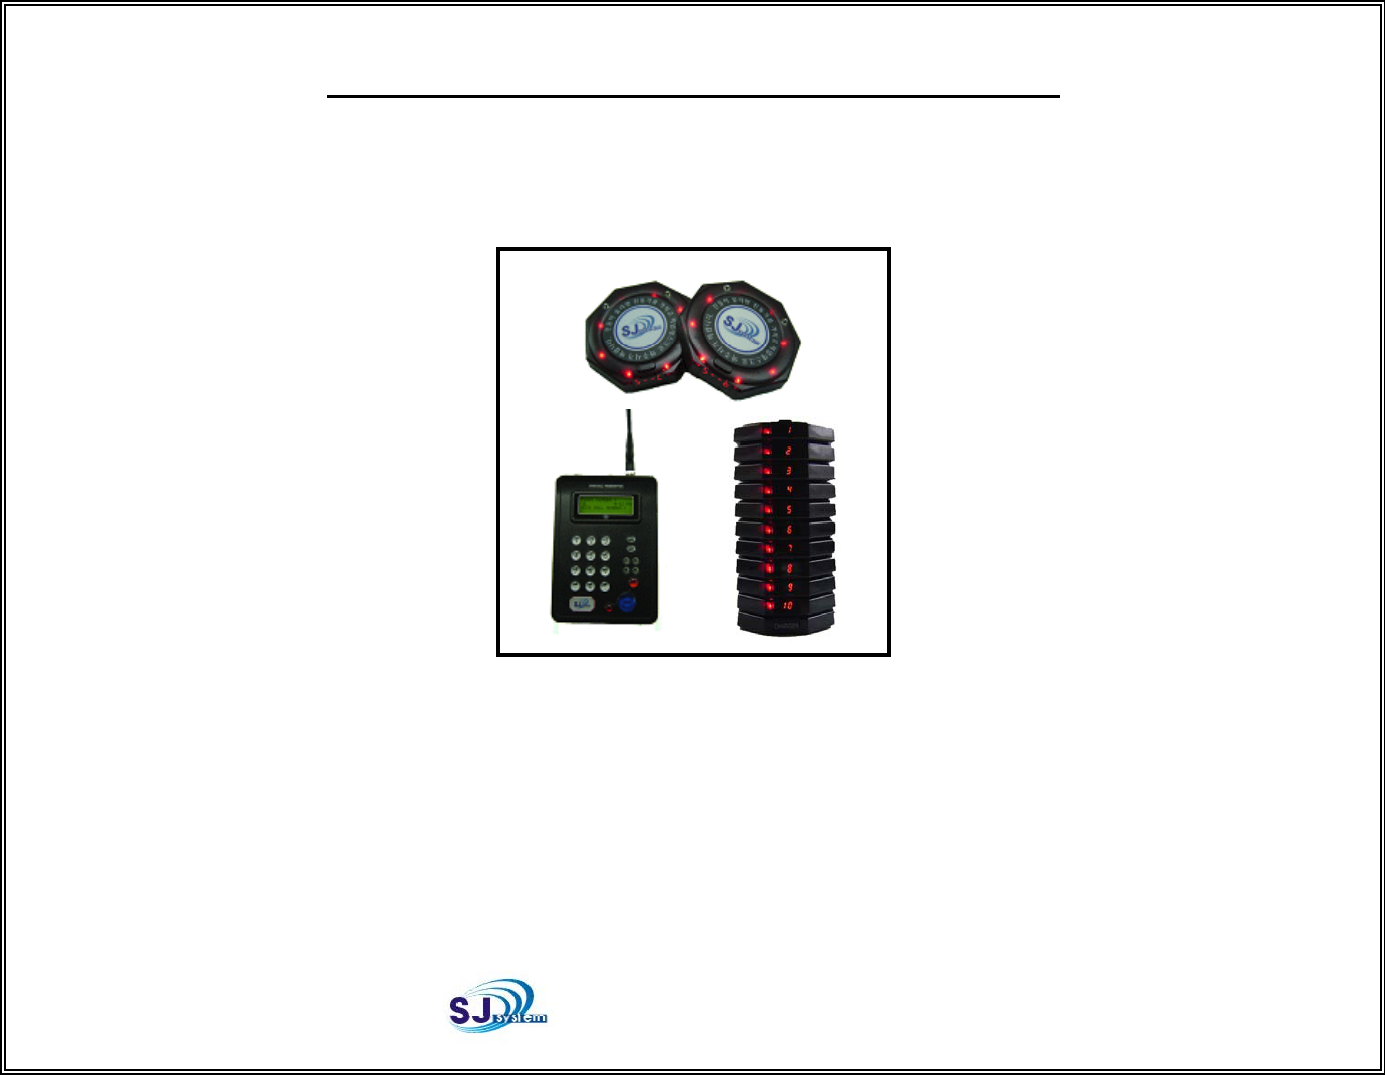
SJ system SC-100T Pager Transmitter User Manual STAR CALL SYSTEM USER MANUAL
SJ system Pager Transmitter STAR CALL SYSTEM USER MANUAL
Users Manual
STAR CALL USER MANUAL
STAR
CALL
USER
MANUAL
(MODEL : SC-100T & SC-100R)
SJ SYSTEM
SJ
SYSTEM

CONTENTS.
1. PREFACE
2. The initial display turning the transmitter on/off
3. How to call a receiver and send a message.
1) How to call the individual number of pagers.
2
)
How to call the number of an auto call
p
a
g
er number.
)pg
3) How to send a numeric message.
4) How to send an alpha message.
5) How to send a PRE-SET message(F1,F2,F3,F4)
6) Error mode ( In the event of a high sound)
4. MENU MODE
4.
MENU
MODE
1) menu options
2) How to setup the menu
* CURRENT TIME
* PAGER OFF TIME
*
RANGE TESTING
RANGE
TESTING
* OUT OF RANGE
* AUTO CALL MESSAGE : The message in initial screen.
-
Themodethatinputadefaultmessageandthesection
'
s number in the food court.
The
mode
that
input
a
default
message
and
the
section s
number
in
the
food
court.

5. The user manual for a receiver.
6. How to input the starcall program.
1) How to input and change the number of a starcall's receiver.
- The mode that change and input the number of a starcall's receiver in the food court.
2) How to input & modificate BASE ID & GROUP ID & PAGER NUMBER ID & OUT OF RANGE ID &
BPS ID
The user manual for a Transmitter
1. PREFACE
■ The starcall transmitter is the paging system capable of addressing up to 9,999 pagers with Alpha message
or Numeric message.
It consists of a fully featured encoder with 128 letters by 64 character on the LCD display.
2. Turning the TX on/off
■ Plug the Pager Transmitter A/C Adaptor into the Pager Transmitter and then into a standard 110/220 outlet.
■ The initial LCD screen is as below.
PAGER NUMBER.:
>■ 12:00 AM
STAR CALL TRANCEIVER
ROM VERSION :1 00
AUTO CALL NUMBER :
>
ROM
VERSION
.
:1
.
00
AUTO
CALL
NUMBER
.
:
(ROM VERSION SCREEN) (The initial screen)
3. How to call the receiver & send the message.
1) How to call the individual pager number.
■
Setting an initial screen : In menu options
(5 AUTO CALL MESSAGE : In the case of off)
■
Setting
an
initial
screen
:
In
menu
options
(5
.
AUTO
CALL
MESSAGE
:
In
the
case
of
off)
☞ In the initial screen, Input corresponding pager number and then press SEND. Sebsequently no message is sent.
■ Setting an initial screen : In menu options (5.AUTO CALL MESSAGE : In the case of on, send the number of a food court)
☞ In the initial screen, Input corresponding pager number and then press SEND.
Sebsequently the message that is saved for the auto call message is sent.
2) How to call Auto call pager number.
■
In initial screen input the calling pager number and then press SAVE (Possible to save up to 50ea in order )
■
In
initial
screen
,
input
the
calling
pager
number
and
then
press
SAVE
.
(Possible
to
save
up
to
50ea
in
order
.
)
■ Call the pager number inputting on auto call pager number screen in order by using "SEND".
■ After calling the pager, return an initial screen.
☞ To return an initial screen on the screen, input CANCEL.
3) How to send the numeric message (The pager type is set to the numeric mode in menu 6 Pager Type set-up)
3)
How
to
send
the
numeric
message
.
(The
pager
type
is
set
to
the
numeric
mode
in
menu
6
.
Pager
Type
set-up)
■ Input corresponding pager number in initial screen and then press ENTER.
■ "Enter Message:" is displayed and you can input the message. Then press ENTER. (Maximum available up to 16 characters)
■ Transmit message and return to initial screen. (Sending Message Please Wait)
☞ To return to an initial screen on the process, input CANCEL.
4) How to send the alpha message.(The pager type is set to the alpha mode in menu 6.Pager Type set-up)
■ Input corresponding pager number in initial screen and then press ENTER.
■ "Enter Message:" is displayed and you can input the message. Then press ENTER.(Maximum available up to 128 characters)
■ Transmit message and return to initial screen. (Sending Message Please Wait)
☞ To return to an initial screen on the process, input CANCEL.
5) How to send the preset message.
■ Input corresponding pager number in initial screen.
■ When "Enter Pre-Set Message(F1-F4):" is displayed, input number among F1-F4 and then press ENTER
■
Transmit message and return to initial screen (Sending Message Please Wait)
■
Transmit
message
and
return
to
initial
screen
.
(Sending
Message
Please
Wait)
☞ To return to an initial screen on the process, input CANCEL.
6) Error mode
■ In initial screen, input the number except 0-9999 and then enter nothing with beep.
4. MENU MODE
1) Menu options.
1. CURRENT TIME
☞ The mode that input current time.
2
PAGER OFF TIME
2
.
PAGER
OFF
TIME
☞ Set Pager off Time is utilized not to use the receiver for a long time or to makes use of closing the business hours.
It says that a receiver isolates the receipt of a message. also, a receiver can isolate the receipt at fixed hours.
Since then, you only have to keep the receiver in storage space.
3
RANGE TESTING
3
.
RANGE
TESTING
☞ The Range testing means to separate a receiver from the charger and measure the distance to receive a signal.
If the receiver is dividen from the charger, the receiver's LEDs flash on and repeat to light up and off at 10 second intervals for the
half-hour. It says that the receiver takes a signal. You go out into a department or around the workplace with this receiver.
Then you can measure the range to send a signal. In case of a big department or a broad space,
The above
-
mentioned Range Testing is executed to test the range
The
above mentioned
Range
Testing
is
executed
to
test
the
range
.
4. OUT OF RANGE
☞ The out of range mode means the function to sound an alarm when the guest gets out of his range from the receiver.
and if the transmitter stands apart from the receiver beyond 200m, the melody becomes a beep. It is the signal coming back within
the range Also it carries out the function to prevent a theft However this testmustnotbedoneonthewaytobeused
the
range
.
Also
it
carries
out
the
function
to
prevent
a
theft
.
However
,
this
test
must
not
be
done
on
the
way
to
be
used
.
So to speak, it means to test that except the business time and whether it is operating or not in collecting all receivers.
For the practical test, when out of the given range, you only confirm whether the melody rings or not.
Also, you eliminate the adaptor connected to a transmitter to confirm the out of range on the spot and after 50 seconds, the melody
will ring. So to speak, If the receiver can't take a signal, the melody will ring. To stop the melody, connect the adaptor to a transmitter
and power up. If you don't usually use this function, turn off it.
5. AUTO CALL MESSAGE (The transmission message In initial screen )
☞ When using the receiver in food court, input the section number.(00~99)
2) How to set the menu.
■
To enter menu setup mode press MENU in initial screen
■
To
enter
menu
setup
mode
,
press
MENU
in
initial
screen
■ "PASSWORD?" Is displayed.
■ Input password and then Menu Options is displayed.
☞ Input USER PASSWORD : #321*
■ Can move Menu No.1-5 using *(←) and #(→) Key.
☞
To return an initial screen on the process input CANCEL
☞
To
return
an
initial
screen
on
the
process
,
input
CANCEL
1. CURRENT TIME
◈ In Menu Options, Go to 1.CURRENT TIME using *(←) and #(→) Key and press ENTER.
◈ "Current Time" is displayed and default time is 12:00 AM.
◈ Set hour(01-12) and then press #(→).
◈ Set minute(0-59) and then press #(→).
◈ Set AM/PM using #(→) Key.
◈ Press ENTER, and then return to Menu Mode screen.
☞ If hour(1-12) or minute(00-59) is set by other number, nothing is inputted with HI BEEP.
2. PAGER OFF TIME
◈ Go to 2.PAGER SLEEP TIME using *(←) and #(→) Key and then press ENTER.
◈ Select ON/OFF using #(→) Key and then press ENTER
◈ "PAGER SLEEP TIME" is displayed and default Sleep Time is 12:00 AM.
◈
Input hour(01 12) and then press #(→)
◈
Input
hour(01
-
12)
and
then
press
#(→)
.
◈ Input minute(00-59) and then press #(→).
◈ Select AM/PM using #(→) Key.
◈ Press ENTER and The screen moves to Menu Mode screen.
☞ If hour(1-12) or minute(00-59) is set by other number, nothing is inputted with HI BEEP.
3
RANGE TESTING
3
.
RANGE
TESTING
◈ Go to 3.RANGE TESTING using *(←) and #(→) Key and then press ENTER
◈ "RANGE TESTING SEDING MESSAGE?" is displayed
◈ The range test begins. (the message is called once per 15 seconds)
◈ If you press CANCEL, range test is finished and the screen moves to Menu Mode screen.
4. OUT OF RANGE
◈ Go to 4.OUT OF RANGE using *(←) and #(→) Key and then press ENTER.
◈ "OUT OF RANGE:" is displayed and you can select ON/OFF using #(→) Key.
◈ Make it "ON" and then press ENTER.
◈
"
SENDING MESSAGE
"
is displayed and transmit Message twice
◈
SENDING
MESSAGE
is
displayed
and
transmit
Message
twice
◈ With saving, move to Menu Mode.
5. AUTO CALL MESSAGE - When using the receiver in food court, input the section number.(00~99) -
◈ Go to 5.AUTO CALL MESSAGE using *(←) and #(→) Key and then press ENTER.
◈ "AUTO CALL MESSAGE:" is displayed and you can select ON/OFF using #(→) Key.
◈ Input the initial message and press ENTER. input the section number.(00~99)
◈ Store the initial message and move to Menu Options.

5 The user manual for a starcall receiver
The user manual for a Receiver.
5
.
The
user
manual
for
a
starcall
receiver
.
1) The matters relevant to handling the receiver.
◈ When giving a starcall receiver to the guests, separate a receiver from a charger and then "LED" blinks once.
At this time, you notice a guest to bring the receiver to the desk and be seat in case of LED and Vibration.
2) The customer call
◈ As the table or the food are ready, press the receiver number provided for the guests and press "SEND".
For example, "11+SEND" and then the receiver #11 operates.
3) OUT OF RANGE
◈ The out of range mode means the function to sound an alarm when the guest gets out of his range from the receiver.
and if the transmitter stands apart from the receiver beyond 200m the melody becomes a beep It is the signal coming back within
and
if
the
transmitter
stands
apart
from
the
receiver
beyond
200m
,
the
melody
becomes
a
beep
.
It
is
the
signal
coming
back
within
the range. and as the customer comes in the range, the melody will stop.
◈ In initial stage, The Out of range is OFF
☞ OUT OF RANGE: To turn on or off, after take a receiver off the charger or eliminate the adaptor, you press on the transmitter as
follows and then can confirm the operation.
☞ OUT OF RANGE : ON
★ In the initial screen of a transmitter, press "Group ID → ENTER → #*008 → SEND" and while "LED" blinks about one second,
"O-On" appears and disappears on the front FND.
☞ OUT OF RANGE :OFF
★ In the initial screen of a transmitter, press "Group ID → ENTER → #*009 → SEND" and while "LED" blinks about one second,
"O-OFF" appears and disappears on the front FND.
4) The motion setting of a starcall receiver.
◈ There are 7 different species of the alert type and the supervisor only can change them. After take a receiver off the charger or
eliminate the adaptor, you press on the transmitter as follows and then can change the operation variously.
Merely, while being open or giving the receiver to a guest, it must not be used. The customer can mistake calling himself.
☞
VIBE MODE
☞
VIBE
MODE
★ In the initial screen of a transmitter, press "Group ID → ENTER → #*001 → SEND" and while "LED" blinks about one second,
"S--v" appears and disappears on the front FND.
☞ LED MODE
★ In the initial screen of a transmitter, press "Group ID → ENTER → #*002 → SEND" and while "LED" blinks about one second,
"S--L" appears and disappears on the front FND.
☞ BEEP MODE
★ In the initial screen of a transmitter, press "Group ID → ENTER → #*003 → SEND" and while "LED" blinks about one second,
"S--b" appears and disappears on the front FND.
☞ VIBE & LED & BEEP MODE
★ In the initial screen of a transmitter, press "Group ID → ENTER → #*004 → SEND" and while "LED" blinks abput one second,
"
SvLb
"
appears and disappears on the front FND
SvLb
appears
and
disappears
on
the
front
FND
.
☞ VIBE & LED MODE
★ In the initial screen of a transmitter, press "Group ID → ENTER → #*005 → SEND" and while "LED" blinks about one second,
"S-vL" appears and disappears on the front FND.
☞ VIBE & BEEP MODE
★ In the initial screen of a transmitter, press "Group ID → ENTER → #*006 → SEND" and while "LED" blinks about one second,
"
S
-
vb
"
appears and disappears on the front FND
Svb
appears
and
disappears
on
the
front
FND
.
☞ LED & BEEP MODE
★ In the initial screen of a transmitter, press "Group ID → ENTER → #*007 → SEND" and while "LED" blinks abput one second,
"S-Lb" appears and disappears on the front FND.
5) The setting of a starcall receiver's motion time.
◈
Can select the motion time and the supervisor only can change them After take a receiver off the charger or eliminate the adaptor
◈
Can
select
the
motion
time
and
the
supervisor
only
can
change
them
.
After
take
a
receiver
off
the
charger
or
eliminate
the
adaptor
,
you press on the transmitter as follows and then can change the motion time variously.
Merely while being open or giving the receiver to a guest, it must not be used. the customer can mistake calling himself.
☞ The setting mode to operate for 5 seconds.
★ In the initial screen of a transmitter, press "Group ID → ENTER → #*010 → SEND" and while "LED" blinks about one second,
"
A5
"
appears and disappears on the front FND
A
--
5
appears
and
disappears
on
the
front
FND
.
☞ The setting mode to operate for 10 seconds.
★ In the initial screen of a transmitter, press "Group ID → ENTER → #*011 → SEND" and while "LED" blinks about one second,
"A--10" appears and disappears on the front FND.
☞ The setting mode to operate for 15 seconds.
★
In the initial screen of a transmitter press
"
Group ID → ENTER → #*012 → SEND
"
and while
"
LED
"
blinks about one second
★
In
the
initial
screen
of
a
transmitter
,
press
Group
ID
→
ENTER
→
#*012
→
SEND
and
while
LED
blinks
about
one
second
,
"A--15" appears and disappears on the front FND.
☞ The setting mode to operate for 30 seconds.
★ In the initial screen of a transmitter, press "Group ID → ENTER → #*013 → SEND" and while "LED" blinks about one second,
"A--30" appears and disappears on the front FND.

☞ The setting mode to operate for 60 seconds.
★ In the initial screen of a transmitter, press "Group ID → ENTER → #*014 → SEND" and while "LED" blinks about one second,
"
A
--
60
"
appears and disappears on the front FND
A60
appears
and
disappears
on
the
front
FND
.
☞ The setting mode to operate for 120 seconds.
★ In the initial screen of a transmitter, press "Group ID → ENTER → #*015 → SEND" and while "LED" blinks about one second,
"A--120" appears and disappears on the front FND.
6) The function mode that indicates the number of a food court. (Pager system for the court.)
◈
Using the transmitter in food court indicate the number of food court on the front of a transmitter
(
Section number
"
C00~C99
"
)
◈
Using
the
transmitter
in
food
court
,
indicate
the
number
of
food
court
on
the
front
of
a
transmitter
.
(
Section
number
C00~C99
)
(When calling #10 of food court, "C10" is indicated on the front of a receiver.)
7) The power of a receiver : OFF MODE
◈ In the initial screen of a transmitter, press "Group ID → ENTER → #*016 → SEND" and can sleep the receiver at once.
Namely, the receiver can't take a signal.
6 How to input on the program
6
.
How
to
input
on
the
program
1) The inputting & modificating the number of a receiver. (Inputting the number of a receiver in food court)
◈ Set the pager on the electric charger.
◈ To enter the inputting mode on the program, press "MENU" in initial screen.
◈ "PASSWORD?" Is displayed.
◈ Input password **777** and then "PROGRAMMER PAGER" is displayed.
PROGRAMMER PAGER.:
1.ON
2.ON(+1)
(The initial screen inputting on the program)
CAN:ESC & SEL:ENT(#)

◈ you can select 2.ON(+1) using #(→) Key and press "ENTER".
☞ "1.ON" : The number of a receiver is fixed and is inputted.
☞ "2.ON(+1)" : The number of a receiver is increased one by one(+1) automatically.
◈ The screen inputting on program is displayed. (Possible to input 0~9999)
1.0 0 0 1
PROGRAMMER PAGER.:
◈
Press
"
ENTER
"
and then
"
0001
"
inputted on the screen is deleted
(The screen inputting on program)
CAN:ESC & SEL:ENT(#)
◈
Press
ENTER
and
then
0001
inputted
on
the
screen
is
deleted
.
PROGRAMMER PAGER.:
1.0 0 0 0
◈ Input the number of a receiver that is registrated newly.(Ex : In case of #50, input "50".))
(The screen inputting on program)
CAN:ESC & SEL:ENT(#)
CAN:ESC & SEL:ENT(#)
PROGRAMMER PAGER.:
1.0 0 5 0
◈ Press "SEND" and then the number inputting newly is sent.
(The screen inputting on program)
(The screen sending on program)
SETTING WAIT..
◈ The new number of a receiver is inputted on transmitter and after "LED" blinks about one seond, the input of a new number is finished.
☞ To return to initial screen on the process, input "CANCEL".
2) How to input & modificate BASE ID & GROUP ID & PAGER NUMBER ID & OUT OF RANGE ID & BPS ID
◈ To enter the input mode, press "MENU" in initial screen.
◈ "PASSWORD?" Is displayed.
◈ Input password **999** and then "PROGRAMMER PAGER" is displayed.
PROGRAMMER PAGER.:
1.ON
2.ON(+1)
CAN:ESC & SEL:ENT(#)
(The initial screen inputting ID on the program)
◈ you can select 2.ON(+1) using #(→) Key and press "ENTER".
☞ "1.ON" : The number ID of a receiver is fixed and inputted.
☞ "2.ON(+1)" : The number ID of a receiver is increased one by one(+1) automatically.
(The
initial
screen
inputting
ID
on
the
program)
◈ The screen inputting on program is displayed.
1.____, ____, ____, ____
PROGRAMMER PAGER.:
◈ You can select among ①~⑤ using *(←) and #(→) Key.
(The screen inputting ID on the program)
_.
CAN:ESC & SEL:ENT(#)
① BASE ID : Possible to input among 000-200 (ex : In case of #1, input "001")
② GROUP ID : Possible to input among 0000-9999 (In case of #9998, input "9998")
③ PAGER NUMBER ID : Possible to input among 0000-9999 (In case of #1, input "0001")
④ OUT OF RANGE ID : Possible to input among 0000-9999 (In case of # 1, input "0001")
⑤ BPS : 0(512BPS) & 1(1200BPS)
◈ Press "ENTER". The ID inputted on screen is deleted and then "_ _ _ _" inputting the new ID

◈ Input the new number ID registrating to receiver.(Ex : In case of #1, input "0001".)
◈
As below connect to RS-232 and PROGRAM JIG
◈
As
below
,
connect
to
RS-232
and
PROGRAM
JIG
.
◈ As below, insert PROGRAM JIG to the receiver.
◈ Press "SEND" and input the new number ID
◈ The new number of a receiver is inputted on transmitter and after "LED" blinks about one seond, the input of a new number is finished.
☞ To return to initial screen on the process, input "CANCEL".

Matters that require attention
◈
A separation distance of at least 8 inches (20cm) must be maintained between the Rx and the Tx
◈
A
separation
distance
of
at
least
8
inches
(20cm)
must
be
maintained
between
the
Rx
and
the
Tx
.
◈ To operate this product smoothly for all day, the recycle time of at least 5 hours is needed.
(Including the charger.)
◈ If putting a product on a charger in full discharge, do the initial motion or "LED" begins to flash on.
If a transmitter will not display anything you confirm the following items
If
a
transmitter
will
not
display
anything
,
you
confirm
the
following
items
.
◈ Make sure there is power to the outlet
◈ Check all connections.
◈ If you try all this and the transmitter still want power up your power supply may be bad. If display is still blank, call us
* Remember that the capability of your system will be affected by: Foil backed wallboard, Metal mesh,
wire reinforced glass, metal sheeting, large mirrors, suspended ceilings, lift shafts etc. These can all
reflect and thereby reduce the signaling capability of the transmitter. A little forethought prior to
installation, coupled with a few tests, can normally avoid most of these problems.
* Read through the manual. Answers to most questions can be found there.
A t bl h ti ti f th i t i di i th bl
A
t
rou
bl
e s
h
oo
ti
ng sec
ti
on
f
ur
th
er ass
i
s
t
s you
i
n
di
agnos
i
ng
th
e pro
bl
em.
The warranty.
◈
Alteration or modification to an
y
p
art of this e
q
ui
p
ment
,
without the
p
rior written consent of the manufacturer
,
◈
yp q p , p ,
will invalidate all manufacturer approvals and warranty.

◈ ST warrants this product against any defects that are due to faulty material or workmanship for a one-year period after the
original date of consumer purchase. This warranty does not include damage to the product resulting from accident, misuse or
improper electrical connection.
I need to send some transmitter in for repair - What do I do?
Within warranty period / Covered by our Product-Care Program:
Ship malfunctioning components to the following address:
◈
Room 305 362-15 Daeya-dong Siheung-si
◈
Room
305
,
362-15
,
Daeya-dong
,
Siheung-si
,
Gyeonggi-do,Korea 429-010
TEL : (031)311- 1953 / FAX : (031)311-1956
1) Pack the components securely
2) Enclose a note with a brief description of the problem
3) Include a business card
4) Ship the equipment in a traceable manner for your protection. (ie UPS ).
5) Insure the shipment for replacement value.
◈ There are no charges for repaired equipment within the warranty period, or if covered by Product-Care, other than your
shipping costs We will pay shipping one way back to you
shipping
costs
.
We
will
pay
shipping
one
way
back
to
you
.
(Shipping by the courier service is available at an additional charge on request)
Out of warranty items will be repaired and sent back C.O.D.
Federal Communication Commission Interference Statement
This equipment has been tested and found to comply with the limits for a Class B digital device,
pursuant to Part 15 of the FCC Rules. These limits are designed to provide reasonable
protection against harmful interference in a residential installation. This equipment generates,
uses and can radiate radio frequency energy and, if not installed and used in accordance with
the instructions, may cause harmful interference to radio communications. However, there is no
guarantee that interference will not occur in a particular installation. If this equipment does
cause harmful interference to radio or television reception, which can be determined by turning
the equipment off and on, the user is encouraged to try to correct the interference by one of the
following measures:
• Reorient or relocate the receiving antenna.
• Increase the separation between the equipment and receiver.
• Connect the equipment into an outlet on a circuit different from that to which the receiver is
con-nected.
• Consult the dealer or an experienced radio/TV technician for help.
FCC Caution: To assure continued compliance, (example - use only shielded interface cables
when connecting to computer or peripheral devices). Any changes or modifications not
expressly approved by the party responsible for compliance could void the user’s authority to
operate this equipment.This device complies with Part 15 of the FCC Rules. Operation is
subject to the following two conditions: (1) This device may not cause harmful interference, and
(2) this device must accept any interference received, including interference that may cause
undesired operation
IMPORTANT NOTE:
FCC RF Radiation Exposure Statement:
This equipment complies with FCC RF radiation exposure limits set forth for an uncontrolled
environment. This equipment should be installed and operated with a minimum distance of 20
centimeters between the radiator and your body.This transmitter must not be co-located or
operating in conjunction with any other antenna or transmitter.
Caution : Other antenna must not use except offering antenna
Helical antenna , Gain: 0dBi