SK Teletech SK-6000 Single-Mode Cellular Phone (CDMA) User Manual RF Exposure Warning Spacing No belt clip
SK Teletech Company Limited Single-Mode Cellular Phone (CDMA) RF Exposure Warning Spacing No belt clip
Users Manual
1
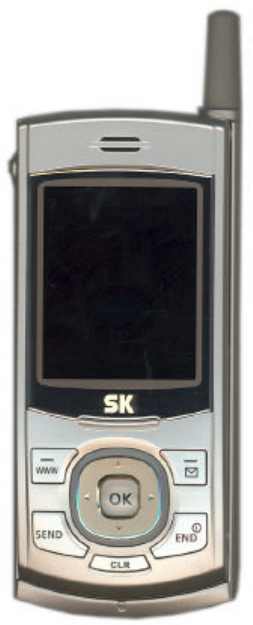
SK-6000
User Manual

2
Advanced features of SK-6000
New style! Slide-up!
Slide-up !
The phone implements a new style different
from the existing flip and folder styles in a
way to push up the top slide with one hand.
You can enjoy a fancy attractiveness of slide-
up style far from the common flip and folder
types.
40 chord melody More vivid melody!
The phone provides diverse and more vivid
music in various fields with 40-chord melody.
CDMA2000 1x superhigh
speed data communication
SK-6000 is a mobile phone faster than a
modem.
The phone implements the CDMA 2000 1x
superhigh speed communication function of
153.6Kbps with MSM6000 equipped, enabling
you to navigate the wireless Internet in super
high speed or to swiftly download the
multimedia data.
Wireless internet You can enjoy a hundredfold realistic wireless
Internet at anytime and anywhere by
downloading various multimedia contents to
SK-6000.
Other features Still smart and various functions!
auto answering/recorder, 99 memory
location numbers, stopwatch, electronic
pocketbook (Calendar/scheduler, alarm,
morning call, and calculator), various
animations, my melody, etiquette, music
bell, etc.
3
SK-6000 User’s Manual Table of Contents
The contents of this user’s manual are subject to change without prior notice for
enhancement of product performance.
Advanced features of SK-6000....................................................................2
Precautions for using the mobile phone.......................................................6
Safety information......................................................................................7
Package Contents............................................................ 8
Part Names and Functions ............................Error! Bookmark not defined.
Display Indicators ........................................Error! Bookmark not defined.
Muti-function keys........................................Error! Bookmark not defined.
Basic key usage ...........................................Error! Bookmark not defined.
Using the battery .........................................Error! Bookmark not defined.
Basic Operation ....................Error! Bookmark not defined.
Switching the phone on/off...........................Error! Bookmark not defined.
Making a call................................................Error! Bookmark not defined.
Redialing calls ..............................................Error! Bookmark not defined.
Speed dial....................................................Error! Bookmark not defined.
Answering calls ............................................Error! Bookmark not defined.
Functions available during a call....................Error! Bookmark not defined.
Search call history (list)................................Error! Bookmark not defined.
Etiquette mode............................................Error! Bookmark not defined.
My Information ............................................Error! Bookmark not defined.
Timers .........................................................Error! Bookmark not defined.
PIM Phone Book....................Error! Bookmark not defined.
Add phonebook ............................................Error! Bookmark not defined.
SPEED Search..............................................Error! Bookmark not defined.
Search by name...........................................Error! Bookmark not defined.
Search by number........................................Error! Bookmark not defined.
Edit group....................................................Error! Bookmark not defined.
Edit Speed dial .............................................Error! Bookmark not defined.
Electronic dialing using Pause .......................Error! Bookmark not defined.
Message Function..................Error! Bookmark not defined.
Text Message...............................................Error! Bookmark not defined.
Voice Message.............................................Error! Bookmark not defined.
Create New Message....................................Error! Bookmark not defined.
Outbox ........................................................Error! Bookmark not defined.
Delete All Messages ......................................Error! Bookmark not defined.
4
SMS Alert.....................................................Error! Bookmark not defined.
WWW..................................Error! Bookmark not defined.
Connect WWW .............................................Error! Bookmark not defined.
Games World ...............................................Error! Bookmark not defined.
Multimedia...................................................Error! Bookmark not defined.
Ringtones ....................................................Error! Bookmark not defined.
Animations ...................................................Error! Bookmark not defined.
Voice Portal..................................................Error! Bookmark not defined.
What’s New..................................................Error! Bookmark not defined.
SMS Info......................................................Error! Bookmark not defined.
Sound .................................Error! Bookmark not defined.
Select Ringer/Vibrate....................................Error! Bookmark not defined.
Set Group Ring ............................................Error! Bookmark not defined.
Setting Mambo Tone ....................................Error! Bookmark not defined.
Setting Effect Tone.......................................Error! Bookmark not defined.
Manage My Ringer........................................Error! Bookmark not defined.
Set Volume..................................................Error! Bookmark not defined.
Display................................ Error! Bookmark not defined.
Set Logo......................................................Error! Bookmark not defined.
Set Picture...................................................Error! Bookmark not defined.
Manage My Picture.......................................Error! Bookmark not defined.
Set Backlight................................................Error! Bookmark not defined.
Info. Manager/Entertainment ..Error! Bookmark not defined.
Calendar ......................................................Error! Bookmark not defined.
Scheduler ....................................................Error! Bookmark not defined.
Setting wakeup call (Morning call).................Error! Bookmark not defined.
Alarm ..........................................................Error! Bookmark not defined.
Answer Machine ...........................................Error! Bookmark not defined.
My memo.....................................................Error! Bookmark not defined.
Calculator ....................................................Error! Bookmark not defined.
Stopwatch....................................................Error! Bookmark not defined.
World Time..................................................Error! Bookmark not defined.
Game............................ Error! Bookmark not defined.
Game Manual...............................................Error! Bookmark not defined.
Set Environment................... Error! Bookmark not defined.
Auto Function...............................................Error! Bookmark not defined.
Set Options ..................................................Error! Bookmark not defined.
Security.......................................................Error! Bookmark not defined.
5
Set Data Communication ..............................Error! Bookmark not defined.
Select System ..............................................Error! Bookmark not defined.
Check S/W Version.......................................Error! Bookmark not defined.
WWW Font Config ........................................Error! Bookmark not defined.
Convenient Features.............. Error! Bookmark not defined.
Auto answering ............................................Error! Bookmark not defined.
Voice Recorder.............................................Error! Bookmark not defined.
Earphone Mic (accessory) .............................Error! Bookmark not defined.
Appendix .............................Error! Bookmark not defined.
Menu Construction .......................................Error! Bookmark not defined.
Options........................................................Error! Bookmark not defined.
Q&A for Phone .............................................Error! Bookmark not defined.
Prevent Illegal Handling of ESN.....................Error! Bookmark not defined.
Specifications and Features...........................Error! Bookmark not defined.
Mobile Phone Data........................................Error! Bookmark not defined.
6
Precautions for using the mobile phone
Read these precautions carefully to use this unit with full performance.
F
ully charge the battery before you use the unit for the first time or
when the mzxobile phone has been left unused for a long time.
The unit may not be repaired when flooded. Avoid hot and damp area.
Note that the unit disassembled or remodeled by other than qualified
service personnel cannot be covered by warranty.
Avoid severe impact and keep the unit in a safe place.
Since the unit in your hippocket may be out of order due to excessive
forces, make sure not to cause damages to your unit.
Do not grip or touch the antenna during the call to keep the clean
voice quality.
Clean the unit with soft clothes or towel and do not use chemical
cleaners including thinner or solvent.
Since this unit is sensitive to electric wave, any antenna or a
ccessories
not approved by SK T
eletech may deteriorate the performance. Also
keep the unit away from steel desk, computer or microwave oven
,
which may cause electromagnetic interference.
If abnormal substances such as san
ds, tobacco ashes, etc. are entered
into a gap between slides, they may occur a malfunction.
At this time, please contact a near A/S center.
7
* Keep the ringer volume low not to disturb others.
* If you use or keep the cellular phone in extremely cold or hot areas, the unit
performance may be deteriorated and lifespan shortened.
Safety information
1. Using a cellular phone during driving may not only increase the risk of traffic accident
but also affect the electronic devices in a car. Give full attention to driving. If you must
use a phone, please use hands free for your safe driving.
2. Since hospitals or health care facilities may be using equipment that could be
sensitive to external RF energy, turn your phone off in those facilities.
3. Since using a phone while in the air may affect the electronic flight devices, please
turn it off in the airplane.
4. Turn your phone off in any places where posted notices so require.
8
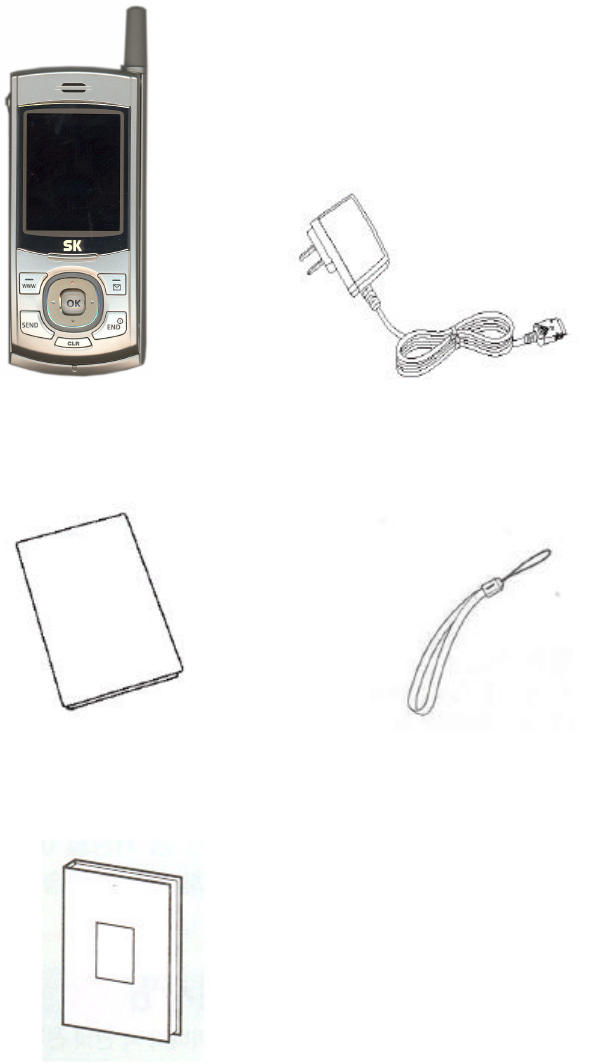
Package Contents
Handset Desktop/portable Charger
Soft Pack Battery Hand Strap
User Manual
(Including Product Warranty)

1
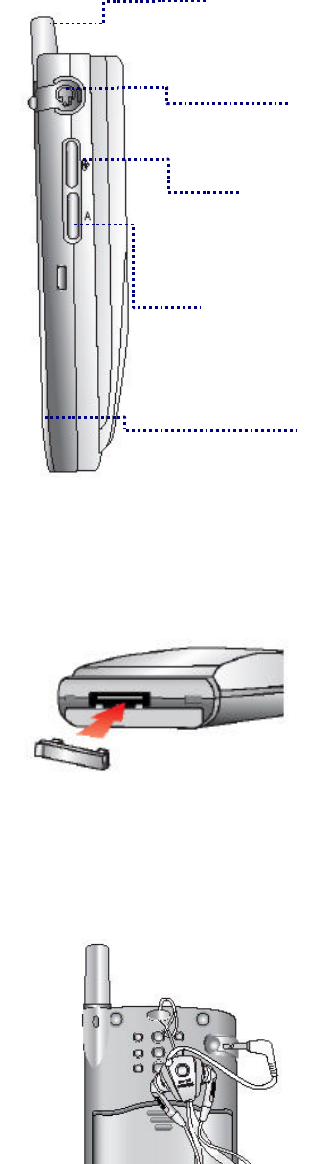
Part Names and Functions
Part Name
LCD screen:
Displaying the mobile
phone status.
Send key:
Press the key to make
a call or to redial the
last number called.
Etiquette mode Key:
Press and hold the key during the
standby mode to activate vibration
and silent keypad, during a call to
activate silent keypad and whisper
mode .
Earpiece(Receiver)
Multi-function Key:
Select various functions
with five multi-function
keys.
WWW / Function Key :
Press the key when using
WWW.
Select the lower left item on
LCD screens excluding the
Logo
End Key:
Switches the phone
on/off, ends a call,
and backs out to
main menu.
Mic(Sender)
Message / Function Key
Press the key when using
Voice/character messages.
Select the lower right item on
LCD screens excluding the
Logo.
Slide:
Open the slide to answer
the call, and close it to end
the call.
Delete/Cancel Key:
Press the key to delete
the letter entered or to
cancel a function.
Lock Key:
Press it long in standby
mode and the phone is
locked(unlock the phone
with password).
Numeric keys
2
Part Function
Antenna:
Fixed antenna
Earphone Mic Jack :-
Connect an earphone mic for
use.
Battery
(Refer to page 14)
Insert cellular phone hand strap :
Pass the cellular phone hand strap through the
hole near the antenna from the bottom and insert it
to the ring at the other end.
Record/Play Key:
Press and hold the key
to start/finish playing the
record.
Auto-Answer
Press and hold down Auto-Answer
for activation and deactivation.
In-car Connector:
Connecting hands free/car kit adapter and data manager
cable. (Refer to page 14)
* Always put rubber plug in this part to prevent contact
from metal which causes power off.
* When the power is off, remove the battery and insert it
again and switch the power on.
3
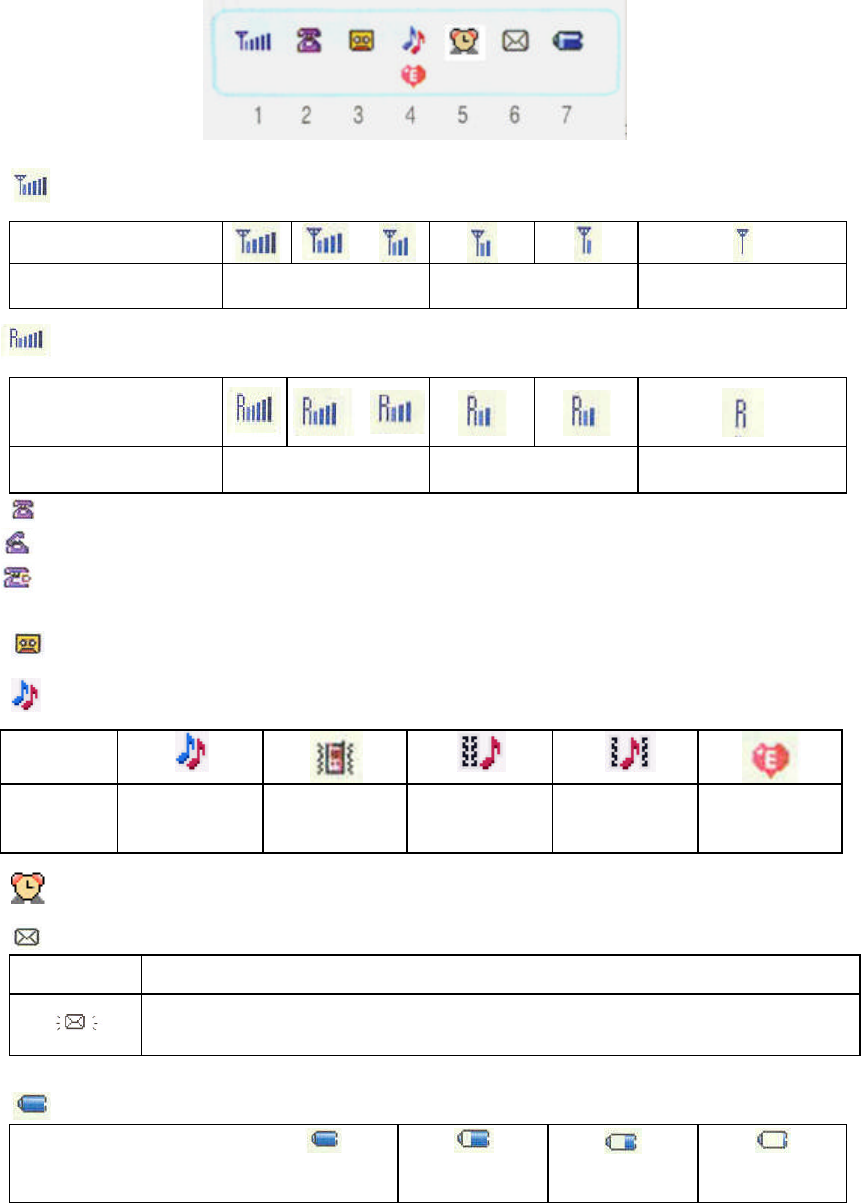
Display Indicators
1. Signal strength of the service area
Indicators
Signal strength level Good Poor Out of service area
Indicators in the service area of other provider
Indicators
Signal strength level Good Poor Out of service area
2. Appears in standby mode.
Appears when you make a call or during a call.
Appears when there is no exchange of data duaring a data service.
3. Appears when auto answering is set
4. Appears when ringer is set
Indicators
Meaning Ringer Vibration Ringer after
vibration Simultaneou
s ringer and
vibration
Etiquette
mode
5. Appears when alarm is set
6. Text or voice message received.
Indicator Description
This icon will flick when new voice/text message arrives and disappear
after checking the message.
7. The remained battery power
Indicators
Available battery power High Medium Low Needs
charging

4
Muti-function keys
Select menu
Select outgoing call history
Select incoming call history
Select phonebook
<On active screen>
Move to the left.
Move to the upward.
Move to the downward.
Move to the Right.
Select [OK] Item.
5
Basic key usage
Adding an entry
E.g.) Hi~!
1. Press (SMS)[SMS], and press (2)[Out-Box] and (1)[New Message].
2. Press (OK)[Input] to enter letters.
3. Press (4) twice to enter [H] then press (SMS) key to move to [eng].
- You can change the entry mode in the order of Hebrew, English Upper, English Lower,
symbol, and number whenever you press (SMS).
4. Press (4) three times to enter [i] then press (SMS) key to move to [Symbol].
5. Press (Down), (1)[~], (Up) and (3)[!].
- Press (Up/Down) to select various symbols.
How to view items
1. Press (Right)[Book], and press (4)[New Entry].
- indicates there exist other items. You can press (OK) to view listed items or
press (Left/Right) key to check an item.
When you press (ok)
- When you press (ok) where the cursor is, related item appears.
When you press (Left/Right)
- When you press (Left/Right) key instead of (OK), contents move one by one.
How to select items
1. Press (Left)[Menu], and press (1)[Sound].
- Use (Up/Down) to go to a desired item and then press (OK)[Select]. Or you can just
press the number shown before the item.
2. Press (Left)[Menu], and press (5)[Setup] and (2)[Option]
- When you press (OK)[Select] and go to (Up/Down), the cursor will follow. When you
press (OK)[Confirm] on a desired item, it will be selected and the screen will
automatically show the next item.
3. Press (Left)[Menu], and press (5)[Setup] and (1)[Auto Function].
- When you use (Up/Down) to go to a desired item and press (OK), then the checkbox
for the item will be checked.
4. Press (SMS), and (2)[Out-Box] and (4)[Phrase] and (WWW)[Menu] and (1)[Delete].
- Use (Left/Right) and select "Yes" to delete an item or otherwise "No", and then press

6
(OK).
How to use related menu
1. You can open a related menu if (
(
(M
M
Me
e
en
n
nu
u
u
icon is displayed below the screen.
2. When you press (WWW)[Menu], available functions are displayed on the screen.
- Activated menus will vary depending on a selected item.
Ex.: 1. When you select a related menu for call history:
- Press (Up)[Running], and press (WWW)[Menu].
2. When you select a related menu for edit Message:
- Press (SMS)[SMS], and press (2)[Out-Box] and (1)[New Message].
Using the battery
Cautions
# Always use the authorized, dedicated charger and batteries.
- Unauthorized product may damage or explode the battery.
# Keep the charger and battery clean.
- Dust or dirt on the metal part of the connector terminal may obstruct battery charging.
# Do not disassemble the battery and charger, and keep them away from fire.
- Battery may explode.
# Do not drop the battery or give a severe shock.
Write Message
New Name
Existing Name
PhoneBook
Delete All
Calling Time
Save as Phrase
Retrieve
SPEED Search
Search By Name
Call ID List
Calling List
Save Message
Delete All No.
7
- This may cause battery fault or short battery life.
# Keep the battery in room temperature (5 - 35C).
- If you place the battery in too cold or too hot places, battery capacity and life may be
reduced. Remove the battery from the phone when unused for a long time.
# Replace the old battery with a new one when battery capacity has reduced by
half.
- As a consuming item, repeated charging/discharging may reduce the battery capacity.
# Dispose the used batteries separately.
- Recyclable metal is used for the battery.
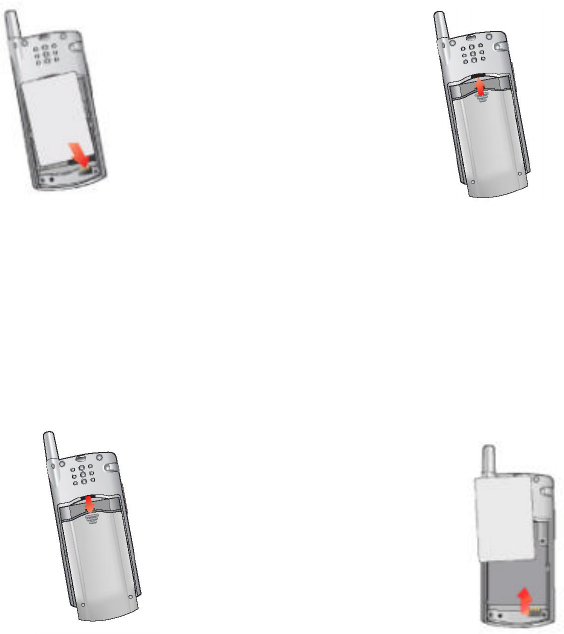
Inserting the battery
Removing the battery
* Switch off the phone before you remove the battery.
Battery life
By mode
Place the bottom of the battery
on the latch in arrow direction
Place the battery cover on the
latch in arrow direction.
Push the battery cover to arrow
direction.
Remove the battery in arrow
direction.
8
Type of battery Mode Slim Battery Pack
Call About 140 minutes
Standby About 102-118 hours*
* Maximum value measured in the SK Teletech's laboratory (in slot mode 2).
- When you are on the move by car or on foot, your mobile phone sends/receives signals
with the base stations adjacent to maintain the optimum call status. In this case, more
power consumes, and the battery life may be reduced.
- Using a motion picture (animation) of “Set picture” in Logo may consume more power
than not using it. Therefore, battery life can be reduced by 20-30% than those
described in this manual.
Low battery alarm
appears with alarm when battery requires charging. The phone would be switched
off with a message “The phone is switched off due to low power” if you fail to charge the
battery.
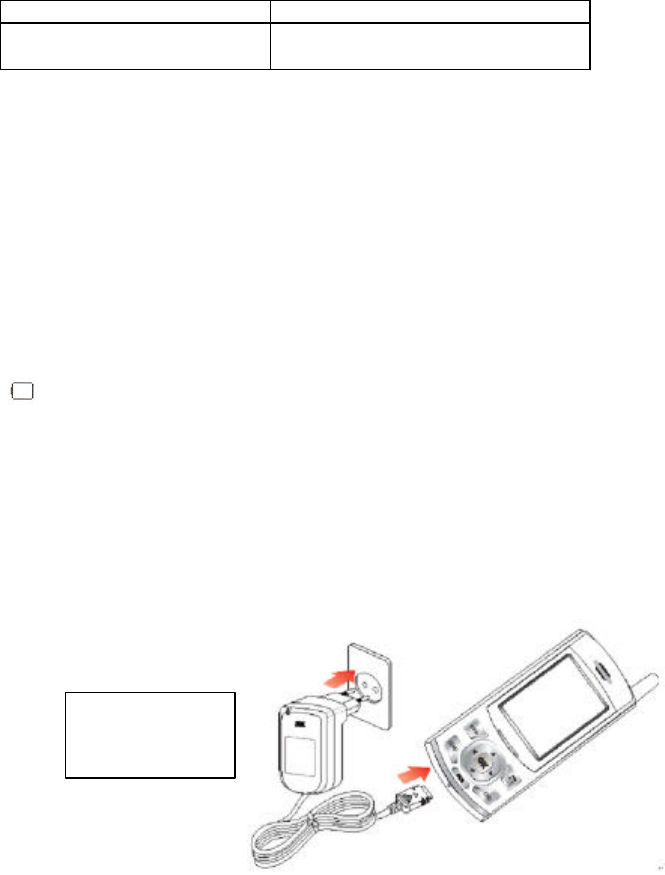
Charging the battery
Connect the power plug of battery charger to the outlet (110V or 220V)
* To use 110V, purchase an additional adapter.
- To charge the battery with handset or to charge the battery only
(The charging front lamp turns red when the charging starts)
- The lamp turns green color when charging is completed.
- Push the battery into the charger fitting in correctly to the guide hop.
* When you fast-charge the standard battery fully discharged, its temperature may be
increased a little. However, this does not affect the battery performance.
* Lamp blinks when you insert the battery to the charger incorrectly. Pull out the
battery and insert it to the charger again.
* Dust or dirt on the connecting terminal of the battery charger may cause malfunction.
* Keep the battery charger out of reach of the children or animals.
Battery
charging lamp

9
Minimum battery charging time
Type of battery Slim Battery Pack
Minimum battery charging
time About 180 minutes
* Fully charge the battery. Battery is not charged when you purchase the product.
* Charging in too cold or too hot place may take longer charging time.
* When you charge the battery with the handset on, the battery may not be fully
charged even though the charging completion lamp (green color) is on.
1
PIM Phone Book
In addition to the default groups, Family, Work, Friend, Relative, School and Unclassified,
you can add (41) groups including <Unclassified> using <new> in <Memory Group>.
If the name you entered already exists in the Phonebook, a message, "Save it here?"
appears. Press (OK) to overwrite the existing name or press [No] to go back to the Edit
window.
For input method, refer to how to activate/select the menu.
Add phonebook
You can enter and save new information.
Add a phone number to the new name
Add a phone number to a new name using (4)[New Entry] function of (Right)[Book].
1. Press (Right)[Book] and (4)[New Entry] menu.
- For input method, refer to how to activate/select the menu.
2. Press (SMS)[Save]
* In addition to the default groups, Family, Friend, School, Work, Relative and
Unclassified, you can add (41) groups including <Unclassified> using <new> in
<Memory Group>.
* If the name you entered already exists in the Phonebook, a message, "Save it here?"
appears. Press (OK)[YES] to overwrite the existing name or press [No] to go back to
the Edit window.
<E-mail address add/edit>
1. Search the required name using the Search function of (Right)[Book] and then press
(SMS)[Edit].
2. Press (WWW)[Menu] and (2)[Add e-mail] and then enter the E-mail address.
- Press (OK)[Select], and press (CLR) key to amend the existing address and enter new
e-mail address.
- Enter numeric key (0) to enter [@].
3. Press (OK)[Select] and (SMS)[Save].
* Up to 32 English letters including ‘@’ and ‘.’ are available for text entry of user ID and
mail server.
2
<Anniversary>
Anniversary is displayed only in English.
1. Select a name to amend using the Search function of (Right)[Book] and press
(SMS)[Edit].
2. Press (WWW)[Menu].
- The anniversary can be added even through ‘Add data’.
3. Press (4)[Add Special].
- Move to the content of anniversary using (Left/Right) keys.
4. Press (Down) and enter the date. (E.g.: 02. 14. 2004)
5. Press (SMS)[Save].
- Anniversary is classified into Birthday, Marriage, and Meeting as default. You may enter a
specific anniversary pressing ‘Anniv.Type’.
- To delete the anniversary, press (SMS)[Menu] and then press (6)[Delete Special] while
placing the cursor on the date of anniversary.
<Phonebook memo>
You can enter memo by adding item in the same method of anniversary on the Edit
Phonebook window of Search Phonebook.
* You can save up to 64 English letters in phonebook memo.
Adding an entry in Logo
You can save / edit the phone number at the entry window.
<Add a number to the new name>
Add a phone number entered in the Logo to the new name.
1. Enter a phone number.
- Press (SMS)[Find] then you can search the phone number and Phonebook the same as
by phone number.
2. Press (OK)[Save].
- The phone number storing window is displayed.
3. Press (1)[New name ].
- For input method, refer to how to activate/select the menu.
* Up to 2400 (Maximum 1200 people) phone numbers can be added.
3
<Add a number to the existing name>
Add a phone number entered in the Logo to the existing name.
1. Enter phone number.
2. Press (OK)[Save].
- The phone number storing window is displayed.
3. Press (2)[Existing name].
- Move to the names in the group using (Up/Down) keys.
- Press (WWW)[Menu] to delete the grop name o r check the phonebook information.
4. Press (OK)[Select].
- Names in the group is displayed.
- Move to the name to search using (UP/DOWN) keys.
5. Press (OK)[Select].
- Press (UP ) to find out Home using (Left/Right) on the screen that includes the phone
number.
6. Press (SMS)[Save].
Edit Phonebook
You can enter or edit a phone number using search function.
1. Search the name required using search function in (Right)[Book].
2. Press (SMS)[Edit].
- Phonebook edit window for the searched name is displayed on the screen.
- Press (Up/Down) to move to the item to enter/edit. Refer to how to activate and select
the menu (Refer to page 13).
- Press (OK)[Select].
- To delete the contents, press (CLR).
- Press [Add data] to add more information.
3. Press (SMS)[Save].
* You can also add the information in Add Item by pressing (SMS)[Menu] key.
Delete names
Delete the name from the Phonebook using search function.
1. Press (Right)[Book] and (OK)[Select].
- Press (Up/Down) to search the required name.
2. Press (WWW)[Menu].
- You can choose (1)[Enter Message] or (2)[Set TURBO Dial].
4
3. Press (3)[Delete Name].
- Press (OK)[Yes] to delete the name.
SPEED Search
You can search the names in the Phonebook in by group.
1. Press (Right)[Book] and then press (1)[SPEED Search].
- Press (Up/Down)to search the name.
- You can make a call by entering a figure (1,2,3,4,5) on the above screen.
2. Press (OK)[Select].
- Press (Up/Down) to move to the number required.
- To make a message, designate a speed dial and remove the phone number on the
above screen, press [Menu].
3. Press (Send).
- To modify the number, press (SMS)[Edit] at the above step 2.
- Phonebook main window configuration.
- Phonebook main window is configured with the following items.
- You can enter or edit anniversary, memo and e-mail address as well as phone numbers
with (SMS)[Edit] key.
Search by name
You can search the phone number by entering the name.
1. Press (Right)[Book] and select (2)[Search By Name].
- Text edit mode window is displayed.
2. Enter the full or partial name to search. In case of doing search by part of the name ,
enter the name spelling in order.
3. Press (OK)[Done].
- Press (OK)[Select] on the name required to move to the phone number field using
(Up/Down) keys.
- You can make a call by pressing figure(1, 2, 3, 4, 5) on the above screen.
- Press (WWW)[Menu] to make a message, designate a speed dial and delete phone
number.
4. Press (Send).
- To search the name in the secret group, you should release the secret group. (Refer to
5
page 29~30)
Search by number
Enter phone number (whole or part) to search the phone number and Phonebook.
1. Press (Right)[Book] and select (3)[Search By No.].
2. Enter a part or whole phone number to search using numeric keys. In case of doing
search by part of the phone number, enter the number in order.
3. Press (OK)[Confirm].
- The name that includes the number (i.e. 23) is displayed. Press (Up/Down) keys to
move to the required name.
4. Press (OK)[Select].
- Press (Up/Down) keys to move to the required phone number field.
- Press (WWW)[Menu] to make a message, designate a speed dial and delete phone
number.
5. Press (Send).
* To search the name in the secret group, you should release the secret group. (Refer to
page 29~30)
Edit group
You can add, amend or delete groups, or designate melody of each group.
Add new group
You can add new group for phone number.
1. Press (Right)[Book] and select (6)[Memory Group].
2. Select (SMS)[New] and enter the new group name.
3. Press (OK)[Done].
- Move to the required answer using (Left/Right) keys and press (OK)[Select].
- To release secret group, amend the Secret into ‘No’ from [Memory Group] and save.
* If the number of existing groups reaches the number allowed (41), you cannot add
new group any more.
* If the same group name already exists, there appears a message "The same group
exists."
* You should enter a password to retrieve the phone number of the secret group. If you
6
make a call using Phonebook or numeric key, the number appears in Call history
without name. You cannot retrieve the number with Search by name or Search by
number.
* When a caller subscribes the Calling Line Identification Presentation service and is
saved as the secret group, the number appears in Call history without name.
Change group
You can change the existing group name to the other.
1. Press (Right)[Book], and select (6)[Memory Group].
- Press (Up/Down) keys to move to the group to change.
2. Press (OK)[Select].
- Amend the group information to change.
- To make the group secret, change the Secret from ‘No ’ to ‘Yes’ using (Left/Right) keys.
3. Press (SMS)[Save].
Delete group
You can delete the existing group or group name.
1. Press (Right)[Book], and select (6)[Memory Group].
- Press (Up/Down) keys to move to the group to delete.
2. Press (WWW)[Menu].
3. Press (1)[Delete Group].
- Select (Left/Right) keys to delete or cancel and press (OK)[Select].
* ‘Del. Group name’ only deletes the name of the group. Phone numbers (names and
phone numbers) of the group remain in <Unclassified> and in the <All Name List>.
* You should enter a password to delete the secret group name.
* To change the order of groups on the screen, press “Edit Order” or “Sort Group” from
the (WWW)[Menu].
Edit Speed dial
You can edit frequently used phone numbers with speed dial.
Add new speed dial
You can add frequently used phone number as speed dial.
1. Press (Right)[Book] and select (5)[Edit TURBODial].
7
- Press (Up/Down) keys to move to the address to add new speed dial.
2. Press (OK)[Select].
- Press (Up/Down) keys to move to the group that includes the name to designate.
3. Press (OK)[Select].
- Press (Up/Down) keys to move to the name to designate.
4. Press (OK)[Select].
- Press (Up/Down) keys to move to the phone number to designate, and press
(OK)[Select].
* The function is not available without any phone number saved in phonebook.
You cannot make a call with speed dial without password when Phonebook is locked.
Change the existing speed dial
You can change the existing speed dial.
1. Press (Right)[Book] and select (5)[Edit TURBODial].
- Press (Up/Down) keys to move to the address to designate.
2. Press (WWW)[Edit].
- Press (Up/Down) keys to move to the group that includes the name to change.
3. Press (OK)[Select].
- Press (Up/Down) keys to move to the name to change.
4. Press (OK)[Select].
- Press (Up/Down) keys to move to the phone number to designate, and press
(OK)[Select].
* If there are lots of phone numbers designated as speed dial and you want to find out
the required number quickly, press numeric keys 1, 2, 3, 4, and 5 in turns. Then, the
Speed dial screen moves to No.10, 20, 30, 40 and 50 in turns. Press the numeric key 0
to go back to No.1.
Delete the existing speed dial
You can delete the speed dial.
1. Press (Right)[Book] and select (5)[Edit TURBODial].
- Press (Up/Down) keys to move to the address to delete.
2. Press (OK)[Select].
3. Press (SMS)[Delete].
- Select (Left/Right) keys to delete or cancel and press (OK)[Select].
8
* Even when the memory location number is deleted, the phone number in the
Phonebook is not deleted.
However, when the phone number is deleted from the Phonebook, the related speed
dial is also deleted.
Electronic dialing using Pause
You can use this function when you have to enter digits by the voice announcement for
Automatic Response System (ARS).
i.e.) Telebanking, pager, etc.
1. Press phone number and then press and hold (7) and phone number to be electronically
dialed.
- ‘P’ appears on LCD screen when pressing and holding (7).
- To enter Pause again (several times), enter the number and then press and hold digit
key (7) for over one second.
2. Press (Send).
- You can save the number in the phonebook by pressing (Save).
- When the call is connected, press (SMS)[Next] for the ARS announcement prompting
you to enter number.
* Pause is available only when 3 or more digits are entered.
* The numbers “1 2 3” after Pause is dialed electronically.
* You can enter Pause several times. You can transmit the entered numbers in sequence
by pressing (SMS)[Next] continuously by ARS announcement.
* If you press “T” (Digit key (8)) instead of "P", entered numbers are transmitted at the
interval of 5 seconds.
* Up to 32 digits including “P” (or “T”) are available to enter for Pause.

9
Message Function
Text Message
You can check the received text message and the call back number.
1. Press (SMS), and select (1)[In-Box] and (1)[Text Msg] in turn .
- Press (Up/Down) to move to the message you want.
* ( ) indicates the message is already read and ( ) indicates the message is a new
one.
* Press (SMS)[Delete] to delete the selected message.
* Press (OK)[Reply] to check the message and immediately reply to it, or (SMS)
[Forward] to deliver the received
Delete all text messages
1. Press (WWW)[Menu] on the above screen.
2. To delete all received messages, select (1)[Delete All].
3. Shift to the item to delete using (Right/Left) keys and press (OK)[Select].
Save text messages
1. Press (WWW)[Menu] on the above screen.
2. To save a selected message to “Received Phrase”, select (2)[Save].
* If you select (1)[Text Msg] when there is no incoming text message, a message “No
Text Message” will be displayed and returns to Inbox screen.
* Up to 62 text messages can be received and for more than 62, the new one is saved
by deleting the oldest one.
* SMS Alert depends on whether you set alarm for incoming message or not.
Voice Message
You can check the voice message of the caller via VMS.
1. Press (SMS), and select (1)[In-Box] and (2)[Voice Msg] in turn.
- Press (SMS)[Delete] to delete the selected messages.
10
Delete All Voice Messages
- Press (WWW)[Menu], and press (1)[Delete All]
- Use (Left/Right) and select "Yes" to delete an item or otherwise "No", and then press
(OK).
* Press (Send) on the above screen to automatically connect to the call back number.
2. Press (OK)[Conn].
- You can check the voice mail at Voice mail center.
- Press (SMS)[Send] to call back to the caller, if the caller has left his/her phone number.
* If you select (2)[Voice Message] when there is no incoming voice message, a message
“No Voice Message” will be displayed and returns to Inbox screen.
* You can save up to 20 text messages, and for more than 20, the new message is
received by deleting the oldest one.
Create New Message
You can create a new message.
1. Press (SMS), (2)[Out-Box] and (1)[New Message] in turn.
- Press (OK)[Input] to enter message and press (OK)[Done].
2. Enter the phone number for return call, and the phone number to send message to.
3. Press (SMS)[Send].
* Broadcast
- You can send the message up to 20 users simultaneously.
- If you want to send the message to the users in one group simultaneously, press
(WWW)[Menu], (3)[SPEED Search] in the screen of No. 2 and [Add] add the group.
But, only mobile phone number is entered in the group. If mobile phone number is
over 2, the first number will be saved in the phonebook.
- If the broadcast transmission trial fails, try one more. If it fails again, the result is
automatically stored at ‘Outgoing Message’.
- If the call history has a desired phone number, you can search it to input it.
* In (WWW)[Menu], (1)[Save as Phrase] and (7)[Save Message] will be activated in
Message Contents Screen.
* To erase all phone numbers entered in Phonebook, press (8)[Delete All No.] of
(WWW)[Menu].
11
Save as Phrase
You can save the frequently used sentences in the [Phrase].
You can save or open the message in the message input screen.
1. Press (SMS), and select (2)[Out-Box] and (1)[New Message] in turn.
- In Message Input Screen
2. Press (WWW)[Menu].
3. Press (1)[Save as Phrase].
- If you select [Save as Phrase] for a phrase, it is stored to [Out-Box].
Search Phonebook
You can easily enter the phone number using Search if the phone number of the
receive is saved in the phonebook
1. Press (SMS), and select (2)[Out-Box], (1)[New Message] and (WWW)[Menu] in turn.
- Press (WWW)[Menu] with the cursor positioned on the phone number of the other
party.
2. Press (3)[Speed Search] and (OK)[Select].
- Press (Up/down) to select the phone number of the other party, and press (OK)[Select].
- Refer to pages 28~29, for Search Phonebook.
3. (OK)[Select]
- Select the number to insert, and press (OK)[Select].
Search by Incoming call history
1. Press (SMS), and select (2)[Out-Box], (1)[New Message], (WWW)[Menu] and (5)[Call
ID List]/(6)[Running] in turn.
- Press (WWW)[Menu] with the cursor positioned on the phone number of the other
party.
- Press (Up/Down) to select the related item and press (OK)[Select].
- Search by outgoing call history is the same.
Save Message
You can save the composed message in [Outgoing Message] box.
1. Press (SMS), and select (2)[Out-Box], (1)[New Message], (WWW)[Menu] and (7)[Save
Message] in turn.
12
- If you save the message without any text entered, it is saved as [No Contents] in
[Outgoing Message] Box
Delete All Phone Numbers
You can delete all phone numbers in the message input screen.
1. Press (SMS), and select (2)[Out-Box], (1)[New Message], (WWW)[Menu] and (8)
[Delete All No.] in turn.
- All the phone numbers you entered in the number of the other party in the phonebook
will be deleted.
* The Menu is activated depending on the position of cursor.
Outbox
You can save the messages you saved before sending or if you failed to send.
Message that cannot be sent during broadcasting will be separately saved.
Edit old message
1. Press (SMS) and (2)[Out-Box] and (2)[Outgoing Message]
- Press (Up/Down) to move to the message you want to edit.
2. Press (OK)[Select] and edit the contents.
- Press (OK)[Input].
- Edit the contents using the numeric key and Enter key, and press (OK).
Delete Old Messages
1. Press (SMS) and (2)[Out-Box] and (2)[Outgoing Message]
- Shift to the message to delete using [Up/Down] keys.
1. Press (SMS)[Delete].
- Press (OK) to delete the message.
* Press (WWW)[Menu] and [Delete All] to delete all messages in Outgoing Message.
Sent Message
You can automatically save up to 62 messages you have successfully sent.
1. Press (SMS), and select (2)[Out-Box] and (3)[Sent Message] in turn.
- Press (Up/Down) to move to the message you want.
2. Press (OK)[Select].
13
- If you want to edit and send the sent messages again, edit the message pressing
(OK)[Write] and enter your phone number and the phone number of the other party.
Then, press (SMS)[Send].
Phrase
You can save the frequently used sentence in the Sentences and open the message
later.
1. Press (SMS), and select (2)[Out-Box], and (4)[Phrase] in turn.
- Shift to the desired item using (Up/Down) keys.
- Press (SMS)[New] to make/save new message.
2. Press (OK)[Select].
- Press (OK)[Write] to edit and send the message.
- Refer to page 34, for New Message.
* Press (WWW)[Menu] on No.1 screen to delete the saved sentences. Press (1)[Delete]
to delete the selected sentence only, and (2)[Delete All] to delete all the sentences
saved. Press (Left/Right) to select whether to delete the message, and press (OK)
[Select].
Delete All Messages
You can delete all messages.
1. Press (SMS) and (3)[Delete All Msg].
- The password is set as 0000 by default
2. Enter password.
- Press (Up/Down) to move to the message to delete.
3. Press (OK)[Select].
(Ex. When deleting all saved sentences)
- Press (Left/Right) to select whether to delete and press (OK)[Select].
SMS Alert
You can select bell or lamp that indicates the message is received.
1. Press (SMS) and (4)[Set Msg Alert], and set the alert.
- Press (OK)[Select] to select the message you want using (Up/Down).
2. Press (OK)[Select] and (Up/Down).
14
- You can set the alert bell to No Alert, Alert once and Every 2 minutes.
3. Press (OK)[Select] twice and (Up/Down)
- Type of Alert Tone: Total six types
4. Press (OK)[Select] and (Left/Right)
- Size of Alerts
- Adjust the size of alert pressing (Left/Right)
- You can set it also in Volume of Sound Option (Refer to page 43).
5. Press (OK)[Select]
- Alert In Call
- Select whether to alert when you receive a message during call.
- Press (OK)[Setup/Release] to set or release the alarm during call.
6. Press (SMS)[Save].
* SMS alert
No Alert: The LCD blinks when a message is received.
Alert once: The LCD blinks twice and bell goes off for several seconds when a
message is received.
Every 2 minutes: The LCD blinks and bell goes off twice when message is received,
and at every two
minutes when there is a new message received.
* When you set the alarm for messages received to Alert Once or Every 2 Minutes and set
the incoming bell to Ring/Not Vibrated at the same time, the alarm will not ring.
15
WWW
Connect WWW
You can use this menu while searching information in WWW.
1. Press (WWW), and select (1)[Internet Portal] in turn.
* Press and hold (WWW) at any screen while searching website to move to the WWW
initial screen.
* Initial screen and service are subject to change due to development of better service
and technology by business operator.
* For releasing the connection to www, press (END).
Games World
You can download the various Game contents from the WWW to enjoy fully the service
of [WWW] at anytime in anywhere.
1. Press (WWW), and select (2)[Game World] and (1)[Activate] in turn.
- Execute the downloaded SKVM.
2. Press (WWW), and select (2)[Game World] and (2)[Download] in turn.
- Download SK_VM contents in connecting to the relevant site.
Multimedia
You can save the multimedia contents you downloaded form WWW.
1. Press (WWW), and select (3)[Multimedia] and (1)[Activate] in turn.
- Execute the downloaded Wavelet.
2. Press (WWW), and select (3)[Multimedia] and (2)[Download] in turn.
- Download Wavelet contents in connecting to the relevant site.
Ringtones
You can execute the designated bell sound if you receive a call from the designated
caller by download the Ringstones from WWW.
1. Press (WWW), and select (4)[Ringtones] and (1)[Activate] in turn.
- View the downloaded Ringtone (melody).
16
2. Press (WWW), and select (4)[Ringtones] and (2)[Download] in turn.
- Download Ringtone contents in connecting to the relevant site.
* The contents of WWW service are subject to change due to development of better
service and technology by business operator.
Animations
You can execute the designated animation if you receive a call from the designated
caller by download the Animation from WWW.
1. Press (WWW), and select (5)[Animations] and (1)[Activate] in turn .
- Execute the downloaded Animation
2. Press (WWW), and select (5)[Animations] and (2)[Download] in turn.
- Download Animations in connecting to the relevant site.
Voice Portal
You can connect to the voice guide service portal provided by PCL.
1. Press (WWW), and select (6)[Voice Portal] in turn.
* The contents of WWW service are subject to change due to development of better
service and technology by business operator.
What’s New
Provide the relevant services by connecting to site provided by PCL.
1. Press (WWW), and select (7)[What’s New] in turn.
SMS Info
You can select the relevant Sub Menu to request the desired information.
1. Press (WWW), and select (8)[SMS Info.]
- 6 Main Menus. Select the relevant Sub Menu to request the desired information.
17
Sound
Select Ringer/Vibrate
You can set various types of ringer or vibration whatever you want.
1. Press (left)[Menu] and press (1)[Sound].
2. Press (1)[Ring/Vibrator], and set the type of bell.
- Press (OK)[Select], and press (Up/Down) keys or (Left/Right) keys to select the ringer
type.
- Press (Left/Right) to adjust the volume and then, press (OK)[Select].
- You can set various types of ringer or vibration even in the Volume.
- Press (OK)[Select], and then press [Scroll] to select Ringer/Vib..
- In Etiquette mode, the phone operates in vibration mode although you selected bell
mode.
- Press (OK)[Select], and then press [Scroll] to select Ring Duration.
- If you set bell ringer duration, the bell goes off for the time period and then only the
LCD lamp blinks.
- The phone operates in vibration mode when you set Etiquette mode or vibration mode.
3. Press (SMS)[Save].
* Type of bell
: The type of bell is divided into Default, Theme Bell, Anniv. Song, Classic, Effect
Sound, My Bell.
Set Group Ring
You can designate a specific melody for the call from a specific group.
1. Press (Left)[Menu], and select (1)[Sound] and (2)[Set Group Ring] in turn .
2. Press (OK)[Select]
3. Press (Up/Down) keys and (Left/Right) keys.
- Select the group using (Up/Down) keys and press (OK)[Select]. Select it in the same
way.
4. Press (SMS)[Save].
* If you select [Not Set], it will ring the existing melody selected in Set Ring Type.
18
Setting Mambo Tone
You can set the sound upon slide open/close.
1. Press (Left)[Menu], and select (1)[Sound] and (3)[Slide Effect] in turn.
2. Press (OK)[Select]
3. Press (Up/Down) keys.
- Select the group using (Up/Down) keys and press (OK)[Select].
4. Press (SMS)[Save].
* What is Mambo tone?
: You can set up various tones when opening and closing slide-up.
Setting Effect Tone
You can set various effect tone and alarm tone.
1. Press (Left)[Menu], and select (1)[Sound] and (4)[Sound Effect] in turn.
2. Press (OK)[Select]
3. Press (Up/Down) keys.
Select the group using (Up/Down) keys and press (OK)[Select]. Select it in the same
way.
4. Press (SMS)[Save].
* Key Tone: An effect tone that rings whenever a key is pressed.
* Menu Tone: An effect tone that rings whenever a menu is changed.
* Connection Tone: An effect tone that rings whenever a message box is displayed.
* Minute Alert: A tone that rings whenever a call is connected.
Manage My Ringer
You can designate the designated ring as your ring and manage the ring including
change of designated ring, file information and delete
1. Press (Left)[Menu] and (1)[Sound Option] and (5)[My Bell]
- (1)[Download Melody] and (2)[User Melody] are showed.
19
Set Volume
You can adjust various kinds of volume, or set/release alert.
1. Press (Left) [Menu], and select (1)[Sound] and (6)[Volume] in turn.
- Press (Left/Right) to adjust the volume.
- Press (Up/Down) to move to the next item.
2. Press (SMS)[Save].
* Type of volumes
Earpiece: Volume of the voice from the receiver during call.
Sliding: Volume of sound made when the slide is open/closed
Effect Sound: Volume of various alarm tones
Ringer: Volume of Ring when a call is received.
Alarm: Volume of alarm when you designate the alarm.
Message: Volume of alarm that goes off when a message is received.
Game: Volume of the game when game contents are executed.
20
Display
Set Logo
1. Press (Left)[Menu], and select (2)[Display] and (1)[Decoration] in turn.
- Press (WWW)[Preview] to check the picture to be displayed in advance.
2. Set Picture
- Press (OK)[Select], and then press (Up/Down) to select the item.
3. Select Clock/Calendar
- Press (OK)[Select], and then select the clock/calendar.
- If you select No Clock/Calendar, date and time are not displayed in the Logo.
4. Name of Phone
- Refer to Text Entry.
- Press (OK)[Select] to set/release the entry.
5. Help Line
- Select the Help Line display status on the Logo.
6. Press (SMS)[Save].
* You can download various animation screens from data manager (refer to page 65) or
WWW beside the logo screen by default, and save them in ‘Picture Setting’.
* Select ‘No Picture’ not to set the picture.
* If you set the moving animation to be displayed when the slide is open, the battery
standby time is shortened.
* Type of clock/calendar
* If you select (1)[None], a clock is not displayed on the Logo.
* If you display (4)[Clk Big], (5/6)[Clk Analog] of Set Clock and ‘Calendar’ on the Logo,
you cannot set the picture.
* If the Logo is designated to (4)[Clk Big], (5/6)[Clk Analog] (7/8)[Cal.] and you
download a picture from WWW in normal screen status, the Logo is automatically set
to ‘Small Clock’.
Set Picture
You can set/release the animation to be displayed when you receive a call, turn on and
off power and start WWW.
1. Press (Left)[Menu], and select (2)[Display] and (2)[Set Picture] in turn.
2. Press (OK)[Select].
3. Press (Up/Down) keys and (Up/Down) keys.
21
- Press (OK)[Select] on the picture you want to move to the next item. After this, you
can choose the items in the same way.
4. Press (SMS)[Save].
* Picture Contents include ‘Basic Picture ’, ‘My Picture’, and ‘No Picture’.
* There is no ‘No Picture ’ content to be displayed when starting WWW.
* If you select the standby screen as a moving picture, battery capacity gets reduced.
Manage My Picture
You can manage the designated picture including Rename File, user file information and
delete picture.
1. Press (Left)[Menu], and select (2) [Display] and (3)[Picture Setting] in turn.
- (1)[Download Image] and (2)[User Image] are showed.
Set Backlight
1. Press (Left)[Menu], and select (2)[Display] and (4)[Set Backlight] in turn.
2. Press (OK)[Select].
- If set to (4)[Set Time], the calling time/queue time may be reduced.
- (e.g.-(4). in case of [Set Time])
:Enter the time of auto backlight using (Up/Down) keys, (Left/Right) keys, ‘AM/PM’
and numeric key.
3. Press (SMS)[Save].
* 10-second-long Auto-backlight: Set the backlight lighted for ten seconds in case the
slide gets open, a call comes in, or a key is pressed.
* 30-second-long Auto-backlight: Set the backlight lighted for 30 seconds in case the
slide gets open, a call comes in, or a key is pressed.
* 60- second-long Auto-backlight: Set the backlight lighted for 60 seconds in case the
slide gets open, a call comes in, or a key is pressed.
* Set Time: The lamp is on for 10 seconds when you press the keys during a specified
period. It is off during an unspecified period.
* Always Off: The backlight is not set.
22
Info. Manager/Entertainment
Calendar
This displays calendar from Jan, 1996 to Dec, 2015 in both solar and lunar system.
1. Press (Left)[Menu], and select (3)[Info. Manager].
2. Press (1)[Scheduler].
- The current month is displayed on the screen.
Retrieve calendar
1. Press (Left)[Menu], and select (3)[Info. Manager] and (1)[Scheduler].
2. Press (SMS)[Special].
3. Press (4)[Search Calendar].
- Enter the year and month to retrieve.
4. Press (OK)[Done].
Scheduler
You can conveniently manage the schedule by storing anniversary, special appointment,
and schedule.
Add new schedule
1. Press (left)[Menu], and select (3)[Info. Manager] and (1)[Scheduler].
2. (OK)[Confirm], and [New] in order.
3. Press (1)[Add Schedule].
- Add Anniversary : Press (2)[Add Special].
4. Put contents and press (SMS)[Save] to save them.
* You can save up to ten schedules per day.
Check schedule
1. Press (Left)[Menu] and select (3)[Info. Manager], (1)[Scheduler]
2. Move to a date to be checked and press (OK)[Confirm].
- (Move to the month containing the specific schedule by pressing (Left/Right) keys.
Move to the required date using (Up/Down) keys.)
- The schedule for a related date is listed.
* When you enter contents to the Phonebook with the birthday, it will be automatically
23
stored to Anniversary.
* The anniversaries added using Add Anniversary can be deleted showing you Deletion
mark while a holiday and the birthday added during the input to the Phonebook do not
indicate the Deletion mark.
* To delete a birthday, delete one from the Phonebook, which also makes it deleted from
the Anniversary.
Setting schedule alarm
<Setting schedule alarm>
1. Press (Left)[Menu], (3)[Info. Manager], and (1)[Scheduler] in order.
2. Press (WWW)[Sched.] and (3)[Alert Type].
3. Put contents and press (SMS)[Save] to save them.
<Setting Anniversary alarm>
1. Press (Left)[Menu], (3)[Info. Manager], and (3)[scheduler] in order.
2. Press (SMS)[Special] and (3)[Special Alarm].
3. Put contents and press (SMS)[Save] to save them.
- When you press (OK)[Setup] at Set Alarm, you can set subitems.
* You can set Set/Clear All Schedule Alarms at Add Schedule.
* By default, it is set to 'No Alert'.
Setting wakeup call (Morning call)
If activated, this function rings alarms until it is cleared by a key input on a scheduled
time basis (Snooze function).
1. Press (Left)[Menu], (3)[Info. Manager], and (2)[Morning Call].
2. Press (OK)[Setup] to set overall wakeup call and then set items.
- For input method, refer to how to activate/select the menu (Refer to pages 13).
3. Press (SMS)[Save] to save it.
* If the Snooze function is activated and the wakeup call alarm rings, a key input will
stop current alarms only while [End] key input will clear the Snooze function.
Alarm
You can set alarm at any time.
24
Set new alarm
1. Press (Left)[Menu], and select (3)[Info. Manager] and (3)[To Do].
2. Press (SMS)[New].
- Press (Up/Down) to move to the required alarm period.
3. Press (OK)[Select] and enter the time for alarm.
- For input method, refer to how to activate/select the menu (Refer to pages 13).
- Enter alarm memo and press (OK)[Done].
4. Press (SMS)[Save].
- You can save up to 16 English letters for alarm memo.
* Alarm period is divided into Specific Time, Every Day, Every Week, Every Month.
* Specific time alarm goes off once at the designated time lapse.
* In case of an alarm only once ringing, it is automatically deleted after once ringing.
* Press (WWW)[Menu] on the alarm list to release the alarm, or change the alarm using
the edit function.
* Up to ten designations are available for alarm.
* If the phone is off at the designated time, alarm goes off at switching it on.
* If the phone is busy at the designated time, alarm goes off after the call is
disconnected.
Set alarm ringer
You can set the type and volume of alarm ringer.
1. Press (Left)[Menu], and select (3)[Info. Manager] and (3)[To Do]. Then, press (WWW)
[Menu].
2. Press (2)[Set Alert].
- Press (OK)[Select] and then select the type of alarm ringer or adjust the picture using
(Up/Down) or (Left/Right) keys.
3. Press (SMS)[Save].
Answer Machine
You can record the message of the caller, by simply recording and selecting the
announcement with one touch.
Setting auto answering function
1. Press (Left)[Menu] and (3)[Info. Manager] and then press (4)[Ans. Machine].
2. Press (1)[Set Alert] and ‘Ring Duration’.
25
- Press (OK)[Select] to select the ringer duration time.: The phone rings/vibrates for the
time designated when a call is coming and auto answering mode is activated.
3. Select ‘Announce Voice’
- Press (OK)[Select] to select the announcement.
- You can record announcement by yourself or can select one of five recorded
announcements.
- Announcement is set as ‘General’ by default.
4. Press (SMS)[Save].
Record/Play Announcement
You can record and check the auto answering announcement.
1. Press (Left)[Menu] and (3)[Info. Manager], (4)[Ans. Machine]. and (2)[Record/Play] in
turn.
- If it already recorded, press (SMS)[Play] to check the recorded user’s voice.
- For recording, press (OK)[Record] and save it by pressing (SMS)[Save].
- Maximum recording time is 30 seconds.
* Press (SMS)[Play] to play the recorded contents.
My memo
You can make / save up to 10 memos anytime and anywhere using my memo.
New memo
1. Press (Left)[Menu], and select (3)[Info. Manager] and (5)[My Memo].
2. Press (SMS)[New] and enter required memo.
- For input method, refer to ‘Adding an entry’ (Refer to page 13).
3. Press (OK)[Done].
Check/Edit memo
1. Press (Left)[Menu], and select (3)[Info. Manager] and (5)[My Memo].
- Move to the memo to edit using (Up/Down) keys.
- To delete memo, press (WWW)[Delete] on the above screen, and press (OK).
2. Press (OK)[Confirm].
3. Press (SMS)[Edit].
- If the entry mode is activated, delete contents with (CLR) key, and enter memo.
* You can make/save up to 10 memos, and up to 64 English letters for each memo.

26
* If ten memos are full, the message “Cannot save any more” is displayed.
Calculator
This processes addition, subtraction, multiplication and division.
1. Press (Left)[Menu] and select (3)[Info. Manager] and (6)[Calculator].
- Use the numeric and calculation code keys to calculate.
2. EX) in case of 9 x 7, enter figure (9), select (Up)[X], enter figure (7), and then press
(OK)[=].
- You may use calculation codes many times. The result should not exceed 12 digits. If it
exceeds 12 digits, [Error] message appears and the screen returns to the initial
calculator screen.
* Application keys for calculation are as follows.
[+] to add,
[X] to multiply,
[] to divide,
[-] to subtract,
[.] to enter decimal point, and
(AC) clears the screen.(ALL CLEAR).
[=] to get the answer and
(CLR) press it to delete a letter, and press and hold it to delete all.
* (SMS)[Ref] shows the calculation contents before initialization. For restart of
calculation, press (SMS) [Ref].
* (WWW)[Menu] is as follows.
Save : Save the result of calculation.
Total : Add the current result to the memorized value.
Load : Call the last memorized value to the LCD.
Delete : Delete the memorized values. But the calculation contents are not
deleted.
Initialize : Delete all calculations.
Stopwatch
You can use stopwatch with your phone.
1. Select (Left)[Menu], (3)[Info. Manager], and (7)[Stop Watch].

27
2. Press (OK)[Start].
- The stopwatch begins to operate.
- Screen in measuring
3. Press (SMS)[Stop].
- Press (SMS)[Reset] to go back to the initial mode.
* Press (OK)[Save] to record the interim result during operating the stopwatch, and
check the records using (WWW)[View] in the still screen.
* Press (SMS)[Stop] to suspend and press (OK)[Continue] to measure again.
* Stopwatch is cancelled when a call is incoming.
* You can save up to 20 stopwatch records.
World Time
You can know the present time of various countries in the world.
1. Press (Left)[Menu], and select (3)[Info. Manager] and (8)[World Time].
- Press (Up/Down) keys to move to the required city in alphabetic order.
- If (Left/Right) is pressed, the cursor moves to the near of city that is indicated by the
world map.
* A user sets DST (Daylight Saving Time) period for each different city. After it is set,
the time displayed will reflect the summer time.
* 41 city names recorded on the World time are as follows.
World time of 41 major cities
1 Amsterdam 15 Hanover 29 Rio de Janeiro
2 Athens 16 Helsinki 30 Rome
3 Baghdad 17 Honolulu 31 Samoa
4 Bangkok 18 Lisbon 32 San Francisco
5 Beijing 19 London 33 Seattle
6 Beirut 20 Los Angeles 34 Seoul/Tokyo
7 Berlin 21 Madrid 35 Singapore
8 Boston 22 Manila/HGKONG 36 Sidney/MEL
9 Cairo 23 Mexico City 37 Taipei
10 Chicago 24 Montreal 38 Tehran
11 Dallas 25 Moscow 39 Vienna
12 Denver 26 New York 40 Washington DC
13 Detroit 27 Paris 41 Wellington
14 George Town 28 Phoenix

28
Game
You can enjoy various games in your mobile phone screen.
Game Manual
1. Slime Hunter
1. Press (Left)[Menu] and select (4)[Game]
2. Press (1)[Slime Hunter].
- Single Game : One-to-one game with phone
- Option : Set up the sound/vibration and backlight.
- How to Play : Show the usage of keys.
- Ranking : Best score is displayed.
* Selection of character
- Select the character by pressing (left/right).
- Usable items show by character.
* How to play
When game starts, the screen shows partner and user.
The lower part is controlled by the user. The upper part
shows the partner's game.
Move the cursor by using (up,down,left,right). Place the
cursor to the slime to be removed and remove it by
pressing (OK). Over three slimes of the same color in the
same direction disappear with adjacent slimes of the
same color. The energy of partner and user shows in
blue and red respectively. The more the chain reaction
increases, the more the user's energy increases. The
gamer of two wins with first 100% energy. When the
29
user does not remove the slimes while timer counts down, the some part of its energy
decreases. And the timer starts recount. The small gage in the bottom of character icon
increases by the chain reaction. When the gage shows 100, item displayed on the gage is
automatically adopted. Also you drop the bomb on the partner's slime. This bomb explodes
after a certain time. Before explosion, remove the relevant slime to drop the bomb.
30
Set Environment
Auto Function
You can set/release various auto functions.
1. Press (Left)[Menu], (5)[Setup] and (1)[Auto Function] in turn.
- Press (Up/Down) keys to move to the item you want.
- Select (OK)[Set/Release].
- If you select auto local code, it automatically enters auto local code.
2. Press (SMS)[Save].
* Auto Redialing: When there is heavy traffic, you can activate/deactivate auto redial to
the number you called.
* HandsFree: With connection to HandsFree, you can set/release auto-received after the
ringer sounds twice.
* Earphone: You can set/release the function to automatically receive after bell rings for
10 seconds when you connect to the earphone.
* Local area code: You can set the frequently used local area code so that you don’t
have to press it whenever you make a call.
* Enter local area code: Enter the local area code you want using numeric keys when
you select auto local area code.
* Auto-receive by HandsFree, Auto-receive by Earphone and area code are preset as
deactivated.
Set Options
1. Press (Left)[Menu], and select (5)[Setup], (2)[Option] and (OK)[Select] in turn.
- Press [Scroll] and (OK)[Confirm].
2. Set the method of receiving call.
- How To Answer: you can set how to receive a call to ‘Slide Open’, ‘Open & Press’ and
‘Open & Send’ when an incoming bell rings in closed status of slide.
- Press [Scroll] and (OK)[Confirm].
3. Set Dial Font Size.
- You can select font size out of Large/Default one when placing a call.
4. Press (SMS)[Save].
* Receiving calls in closed status
* Slide Open: you can open the slide to receive a call when the call is incoming.
31
* Open & Press: you can open and press the key to receive a call when the call is
incoming.
* Open & Send: you can press the key to receive a call in closed status of slide when the
call is incoming.
Security
You can activate the lock function of your phone, change the password, or initialize the
Phonebook or the system.
<Lock>
You can set/release the lock function not to use the specific function of phone or not
to make a call without entering password.
1. Press (Left)[Menu], and select (5)[Setup] and (3)[Security] in turn, and enter password.
- The password is set as 0000 by default.
2. Press (1)[Lock]
3. Press (OK)[Set]
4. Press (SMS)[Save]
* Auto lock: you can set/release the function not to use the phone without entering
password when the phone is switched on.
* Out key lock: you can set/release the function not to use the external keys without
entering password.
* Call List : You can set/release the function not to check or make a call to the recently
sent or received number without entering password.
* Message: You can set/release the function not to use the SMS function without
entering the password.
* Phone Book: In Phonebook lock mode, you should enter password to use the
Phonebook. You cannot make a call with hot key if this lock is set.
* Menu: You can activate/deactivate Menu lock in which you should enter password to
use Menu.
* Record/play: You can activate / deactivate Rec/ play lock in which you should enter
password to record or to play.
When this lock is set, pressing [Record] will prompt you to ask the password.
* Memo:You can activate / deactivate Memo lock in which you should enter password to
use memo function.
* My Information: You can activate/deactivate this lock in which you should enter
password to check my information.
32
<Change Password>
You can change the old password to new one.
1. Press (Left)[Menu], and select (5)[Setup] and (3)[Security] in turn, and enter password.
- The password is set as 0000 by default.
- And press (2)[Set Password] .
2. Enter new password.
- Enter new password to change.
3. Confirm new password.
- Enter new password again to confirm.
<Initialize Book>
Initialize phonebook to the default status.
1. Press (Left)[Menu], and select (5)[Setup] and (3)[Security] in turn, and enter password.
- The password is set as 0000 by default.
2. And press (4)[Init. Book]
- Press (Left/Right) to select whether to initialize, and press (OK)[Sele ct].
- All phone numbers will be deleted during initialization.
<Initialize System>
Initialize all functions of system to the default functions.
1. Press (Left)[Menu], and select (5)[Setup] and (3)[Security] in turn, and enter password.
- The password is set as 0000 by default.
2. And press (4)[Init. System] in turn.
- Press (Left/Right) keys to select whether to initialize, and press (OK)[Select].
Set Data Communication
You can set environment for data service including Internet / PC communicatio n / FAX.
1. Press (Left)[Menu], and Press (5)[Setup], (5)[Data Comm.] and (OK)[Select] in turn,
and select receiving mode.
- Press [Scroll] to confirm.
- Incoming mode: Set the receiving mode of the phone when you connect the PC with
the mobile phone through a data manager cable.
2. Press (Up/Down) to select the item, and press (OK)[Confirm].
- PC Baud Rate: Set the interface rate between PC and mobile phone.
33
3. Press (SMS)[Save].
<Set Incoming mode>
For Modem and FAX, you should select Modem Mode or FAX Mode. However, you do not
need to set receiving mode for Modem or FAX origination.
<PC Baud Rate>
The maximum speed in desktop/notebook is 115,200bps and you should insert I/D card
or PCMCIA Card in the desktop/notebook that supports high speed communication in
order to set the communication speed with PC as 230, 400 bps.
The recommended speed for using fax data service is 19,2000 bps.
Select System
This function is to select one number if the user uses mobile phone with more than 2
service operators.
1. Press (Left)[Menu], (5)[Setup], and (6)[Select System] in turn, and enter password.
- Password is 0000 by default.
* If the phone is set again to the selected system, it will be turned off and on again.
* Password is 0000 by default. Do not change it as much as possible. If you still need to
change it, contact the service center first.
Check S/W Version
1. Press (Left)[Menu], (5)[Setup], and (7)[S/W Version] in turn.
- The version number of the software will be displayed when you purchase the phone.
WWW Font Config
1. Press (Left)[Menu], and select (5)[Setup], (8)[WWW Font Config] and (OK)[Select] in
turn, and select either Default or Small Font.
- Press [Scroll] and (OK)[Select].

34
Convenient Features
Auto answering
You can record the message of the caller according to the announcement previously set
when you cannot answer the call.
Set auto answering
1. With slide opened in standby status, press and hold down <A> key on the left. For
releasing it, press and hold down <A> key.
2. When a call arrives, the selected bell/vibration functions and it returns to auto-answer
mode.
- When a call arrives, you convert immediately to auto-answer by pressing and hold
down <A> key.
- When auto-answer is set, guide voice is converted from General In Class User Meeting
in order by pressing <A> key shortly.
Auto answering operation
1. On incoming call, the bell rings for the designated number of times, and auto answering
voice announcement is transmitted.
- You can select one of the two announcements, announcer’s voice (GeneralIn Class
User Meeting) and user’s voice.
2. At the end of the announcement, the caller can record his/her message for 30 seconds.
3. When message recording is completed, Missed call status is displayed.
- Open and close the slide to display the auto answering mode.
Check Message
1. Open the slide, and press key on the left.
2. Press (OK)[Play] to check the recorded message.
* Refer to how to use Play Function of Recording for more details.
Release Auto answering

35
1. Press and hold <A> key in the auto answering mode.
- Auto answering is released and the phone returns to standby mode
* You can answer the call during the recording by pressing (SEND) key and can finish
the call by pressing (END) key. The message recorded before you answer is
automatically saved.
* You can switch the phone to auto answering mode by pressing and holding <A>
key when a call is incoming at normal standby mode.
Voice Recorder
You can record/play/delete contents of the call or other contents in standby mode or
during the call.
Record
1. Open the slide, and press key on the left.
2. Press (SMS)[Record] to start recording.
- Pressing (OK)[Save] makes the recordings saved. Pressing and holding key can
also execute the recording.
- When key is pressed during the recording, recording stops and the recordings are
saved.
* You can record the contents of the call during the call by pressing and holding
(SMS)[Record] button. Play / Delete is disabled during the call.
* When the call is disconnected during recording the contents of the call, the recording
automatically stops and the recorded contents are saved.
* W hen a call is received during the recording, the recording automatically stops and the
recorded contents are saved. At this time, the alert type changes into vibration.
* When you press [Record] again after using the maximum recording time (4 minutes),
the screen displays the message, “No space for recording!”, and then gets back to the
recording information screen.
* You can record up to 20 messages. (When 20 messages are recorded, you can record
no more messages regardless of remained recording time.)

36
Play
1. Open the slide and press key on the left.
- Press (WWW)[Menu] to delete a message, delete all messages, or continuously play
the recorded messages.
2. Press (OK)[Play].
- Press (Up/Down) to select the recorded message you want, and press (OK)[Play] to
play it.
- After the play is finished, the LCD returns to the recorded message screen.
* Press [Scroll] on the Record/Play Screen to select and play the recordings.
* When you receive a call during playing, the Play mode ends. Press any key to receive a
call. At this time, alert type is changed into vibration mode.
Delete
1. Open the slide and press key on the left.
- Shift to the recording to delete using (Up/Down) key.
2. (WWW)[Menu]
3. (1)[Delete]
- Press (Left/Right) to select Yes or No depending on whether to delete or not, and press
(OK)[Select].
* Press (2)[Delete All] to delete all the saved recording lists.
* During playing the recordings, you can also move to the item to delete and press
(WWW)[Delete].
Earphone Mic (accessory)
Earphone Mic is an optional item, which is not included to the basic supply. You should
purchase it separately.
* E/M-200 and E/M-300 alike are available for SK-6000. If you use E/M-100, the button
on the mic will not operate.
1. Insert earphone Mic to the Earphone Mic jack from the top of the mobile phone.
2. Put the earphone into your ear. Mic is then automatically placed to your mouth.
3. You can hear and talk with earphone Mic instead of mobile phone speaker and Mic.
4. Press and hold the Mic switch. The switch is operated [Call] function when a call is
received, as (SEND) function to make a call at the standby mode, as (End) function
37
during the call.
* While the earphone Mic is connected to the mobile phone, the call is not disconnected
even when you close the slide during a call.
* Press and hold the button on the mike at standby mode to make a call to the last
called number.
* Press and hold the button on the mike to end the call.

38
Appendix
Menu Construction
You will easily access various functions with Multi-key; Select menu by Multi-key, then
simply press a corresponding number key.
Setup Step1 Step2 Step3 Step 4
1. Ring/Vibrator Ringer Type
Ring Volume
Ringer/Vib.
Ring Duration
2. Set Group Ring
3. Slide Effect Slide Open
Slide Close
4. Sound Effect Key Tone
Menu Tone
Connection
Tone
Minute Alert
5. My bell 1. Download
Melody
2. User Melody
1. Sound Option
6. Volume Earpiece
Sliding
Effect Sound
Ringer
Alarm
Message
Game
1. Decoration
Picture
Clock/Calendar
Phone Name
Help line
2. Set picture Incoming Call
Power On
Power Off
WWW Start
3. Picture Setting
1. Download
Image
2. User Image
1.Left Key
menu
2. Display
4. Set Backlight 1.10sec
2.30sec
3.60sec
4.Set Time
5.Always Off

39
3. Info. Manager 1. Scheduler
2. Morning Call
3. To do
4. Ans. Machine
5. My Memo
6. Calculator
7. Stop Watch
8. World Time
4.Game 1.Slime Hunter
1. Auto Function Auto Redialing
HandsFree
Earphone
Local Area
Code
2. Option Language
How To Answer
Dial Font Size
1. Lock Auto Lock
Out Key Lock
Call List
Message
Phone Book
Menu
Record/Paly
Memo
My Information
2. Set
Password
3. Init. Book
3. Security
4. Init. System
1. Last Call
2. Lifetime Call
4. Call Timers
3. Total Call
SndVoice
RcvVoice
WWW Conn.Time
SndData
RcvData
Incoming Mode Voice
Modem
Fax
5. Data Comm.
PC Baud Rate 19,200 bps
115,200 bps
230,400 bps
6. Select System NAM 1
NAM 2
7. S/W Version
5. Setup
8.WWW Font
Config Font Size Default
Small Font
1. Speed search
2. Search By Name
3. Search By No.
4. New Entry
5. TURBO Dial
6. Memory Group
Right Key
Menu
#. My Information
WWW Key 1. Internet Portal

40
2. Games World
3. Multimedia
4. Ringtones
5. Animations
6. Voice Portal
7. What’s New
8. SMS lnfo
Upper/Lo
wer key in
standby
mode
Call history(List)
1. In-Box 1. Text Msg
2. Voice Msg
3. Saved Msg
2. Out-Box
1. New Message
2. Outgoing
Message
3. Sent Message
4. Phrase
3. Delete All Msg 1. Text Msg
2. Voice Msg
3. Saved Msg
4. Outgoing Msg
5. Sent Message
6. Phrase
7. All Messages
SMS key
4. Set Msg Alert Alert Type
Alert Tone
Volume
Alert In Call
1. Receive Msg
2. Mute
3. Call ID List
WWW Key
menu
During a
call (Hot
menu) 4. Calling List
1. Speed Search
2. Search By Name
3. Search By No.
4. New Entry
SMS key
menu
During a
call
(phonebo
ok) #. My Information
Upper/low
er key
during a
call
Volume
Record
key Record
Auto
answer (Press and hold) toggle between auto answering/normal answering

41
Options
Following items are required for supplementary service and not included in SK-6000
basic component.
Use the product provided by SK Teletech only.
Data manager kit (IMCBL-600)
This kit provides connection between PC and phone, enabling you to easily utilize the
phone function.
# Connect data manager
* Note that this data manager cable should be used with the battery attached to the
phone.
# Data manager function
* PIM Phonebook edit * Selecting ringer melody * Selecting animation
*SMS function *Setting environment
Earphone Mic (E/M-300)
For SK-6000, please use E/M-200,E/M-300
If you use E/M-100, the button on Mic does not operate.
Q&A for Phone
Q A
Q. When making a call, only “tu-tu-tu”
sound is heard and calling is not
complete.
A. It is due to the facts that either all
calling channels are engaged or
transmission to the base station is not
successful.
Pressing (End) and (Send)
consecutively will allow a user to redial
the last called number automatically.
Q: I saved more than 2 phone numbers
on the phonebook of SK-
6000 and
transmitted it to the other SK
model(which does not support saving
of over 2 numbers), but not all the
phone numbers in one list are
transmitted.
A. Different SK model(which does not
support
saving of over 2 numbers) has
different structure of phonebook
memory from that of SK-6000, so that
it allows the user to save only 1
number.
Q. I am a user with no data manager
cable. Also modem are not installed on
my PC. Is there any way I can use the
data manager?
A. Connecting through IP address using
ADSL modem or LAN card installed on
a computer allows a user to use the Air
data manager function.
* For more information, refer to Air
data manager

42
Prevent Illegal Handling of ESN
It is illegal to remove or change the Electronic Serial Number (ESN) of the phone
manufactured by SK Teletech, or to copy the other number. Anyone who commits the
illegal action is the subject for imprisonment for less than 3 years or for the penalty of
less than ten million won in accordance with the relative laws and regulations (Article 4
of the Radio Waves Act, Article 57 of the Electronic Communication Business Law and
Article 347 of the Criminal Law. This illegal attempt may damage the software of the
phone, resulting in broken phone. Users are required to be careful not to suffer
damages caused by these illegal acts. When any illegal act is found, service by
warranty, whether it is free of charge or charged, shall not be provided.
Precautions
- Do not lend your phone to others.
- Contact the nearest after-sales service center designated by SK Teletech.
- When the phone is lost or stolen, contact the report to the carrier immediately.
Specifications and Features
Range of frequency used TX: 824.70 - 848.31 MHz
RX: 869.70 - 893.31 MHz
Accuracy of the frequency Within 300 Hz of assigned frequency
Size With slim battery: 95.6 x 45 x 20.55 mm
Weight With slim battery: 97.3g
TX output 0.327 W 50%
Phone -20 ~ +50
Operation
temperature Charger 0 ~ + 40
Relative humidity 5% ~ 95%
Mobile Phone Data
Model name SK-6000
Date of purchase
Business name
Purchased from Telephone No.
Serial No.

43
Phone No.
Password

For more information about RF exposure, please visit the FCC website at www.fcc.gov
FCC RF EXPOSURE INFORMATION
In August 1996 the Federal Communications Commission (FCC) of the United States
with its action in Report and Order FCC 96-326 adopted an updated safety standard for
human exposure to radio frequency electromagnetic energy emitted by FCC regulated
transmitters. Those guidelines are consistent with the safety standard previously set by
both U.S. and international standards bodies. The design of this phone complies with
the FCC guidelines and these international standards.
Use only the supplied or an approved antenna. Unauthorized antennas, modifications,
or attachments could impair call quality, damage the phone, or result in violation of FCC
regulations.
Do not use the phone with a damaged antenna. If a damaged antenna comes into
contact with the skin, a minor burn may result. Please contact your local dealer for
replacement antenna.
Body-worn Operation
This device was tested for typical body-worn operations with the back of the phone kept
1.5 cm. from the body. To maintain compliance with FCC RF exposure requirements,
use only belt-clips, holsters or similar accessories that maintain a 1.5 cm. separation
distance between the user’s body and the back of the phone, including the antenna,
whether extended or retracted. The use of belt-clips, holsters and similar accessories
should not contain metallic components in its assembly. The use of accessories that
do not satisfy these requirements may not comply with FCC RF exposure requirements,
and should be avoided.
WARNING! Read this information before using your phone