SKY DRAGON Audio video Technology SR213C Wireless Soundbar Home Theatre Sound System User Manual
Shenzhen SKY DRAGON Audio-video Technology Co.LTD Wireless Soundbar Home Theatre Sound System Users Manual
User Manaul
WirelessSoundbarHomeTheatreSound
System
UserManual
contents
Safetyinstructions.............................................................................................................................2
Electrical conducts:...................................................................................................................2
Technical conducts:...................................................................................................................2
Operation conducts:..................................................................................................................2
Environmental conducts:...........................................................................................................2
FCC Warning............................................................................................................................2
Qverview...........................................................................................................................................3
Product:.....................................................................................................................................3
Remote:.....................................................................................................................................3
Operation..........................................................................................................................................4
Install the Remote Control:.......................................................................................................4
Get Started:...............................................................................................................................4
Bluetooth Pairing:.....................................................................................................................4
Optical Source:..........................................................................................................................4
AUX Source:.............................................................................................................................5
Line in Source:..........................................................................................................................5
Indicator light:...........................................................................................................................5
Troubleshooting...............................................................................................................................5
Specifications....................................................................................................................................6
Safety instructions
Electrical conducts:
Toreducetheriskofelectricshock,donotremovecover.Nouserserviceablepartsinside.Referservicingtoqualifiedservicepersonnel.
Beforeyouconnecttheappliance,ensurethevoltageratingonthetypeplatecorrespondstoyourmainsvoltage(typeplateislocateonthe
backsideoftheunit).
Technical conducts:
Repairstoelectricalappliancesshouldonlybeperformedbyqualifiedpersonnel.Improperrepairsmayplacetheuserand/orequipmentat
seriousrisk.
Donotoperatethisappliancewithadamagedplugorcord,afteramalfunctionorafterbeingdroppedordamagedinanyway.
Ifthesupplycordisdamaged,itmustbereplacedbythemanufacturer,itsserviceagentorsimilarlyqualifiedpeopleinordertoavoida
hazard.
Donotpushobjectsintoanyopeningsasdamagetotheequipmentand/orelectricshockmayoccur.
Ifabnormalnoise,smell,smokeoranyotherfailureisdiscoveredduringoperation,turnofftheproductandunplugthepowerplug.Then
contacttheservicecenterforrepair.
Donotremovetheappliancefromthemainspowersupplybypullingthecord;pulltheplug.
Operation conducts:
Thisequipmentisnotintendedforusebypeople(includingchildren)withreducedphysical,sensoryormentalcapabilitiesorlackof
experienceorknowledge.Theyshouldbegivenappropriatesupervisionandinstructionstousetheequipmentbyapersonresponsiblefortheir
safety.
Thisproductisnotatoy.Neverleavetheequipmentnearchildren.
Thisequipmentisintendedforhouseholduseonlyandshouldnotbeusedforindustrialorcommercialpurposes.
Donotusethisequipmentforanythingotherthanitsintendeduse.
Donotimmersetheproductinwateroranyotherliquid.
Alwaysunplugtheapplianceafteruseandbeforeanycleaningorusermaintenance.
Environmental conducts:
Ensuretheequipmentisnottooclosetoheatemittingappliancesorplacedindirectsunlight.
Donotusethisapplianceoutdoors.
FCC Warning
WARNING:Toassurecontinuedoperation,followtheattachedinstallationinstructionsanduseonlyshieldcableswhenconnectiontoother
devices.Changesormodificationsnotexpresslyapprovedbythepartyresponsibleforcompliancecouldvoidtheuser’sauthoritytooperatethe
equipment.
NOTE:ThisequipmenthasbeentestedandfoundtocomplywiththelimitsforaClassBdigitaldevice,pursuanttoPart15oftheFCCRules.
Theselimitsaredesignedtoprovidereasonableprotectionagainstharmfulinterferenceinaresidentialinstallation.Thisequipmentgenerates,
uses,andcanradiateradiofrequencyenergyand,ifnotinstalledandusedinaccordancewiththeinstructions,maycauseharmfulinterferenceto
radiocommunications.However,thereisnoguaranteethatinterferencewillnotoccurinaparticularinstallation.Ifthisequipmentdoescause
harmfulinterferencetoradioortelevisionreception,whichcanbedeterminedbyturningtheequipmentoffandon,theuserisencouragedtotry
tocorrecttheinterferencebyoneormoreofthefollowingmeasures:
Reorientorrelocatethereceivingantenna.
Increasetheseparationbetweentheequipmentandreceiver.
Connecttheequipmentintoanoutletonacircuitdifferentfromthattowhichthereceiverisconnected.
Consultthedealeroranexperiencedradio/TVtechnicianforhelp.
ThisdevicecomplieswithPart15oftheFCCRules.Operationissubjecttothefollowingtwoconditions:
(1)Thisdevicemaynotcauseharmfulinterference,and(2)thisdevicemustacceptanyinterferencereceived,includinginterferencethatmay
causeundesiredoperation.
1
2
3
4
5
6
7
8
9
10
11
12
13
14
15
16
17
18
19
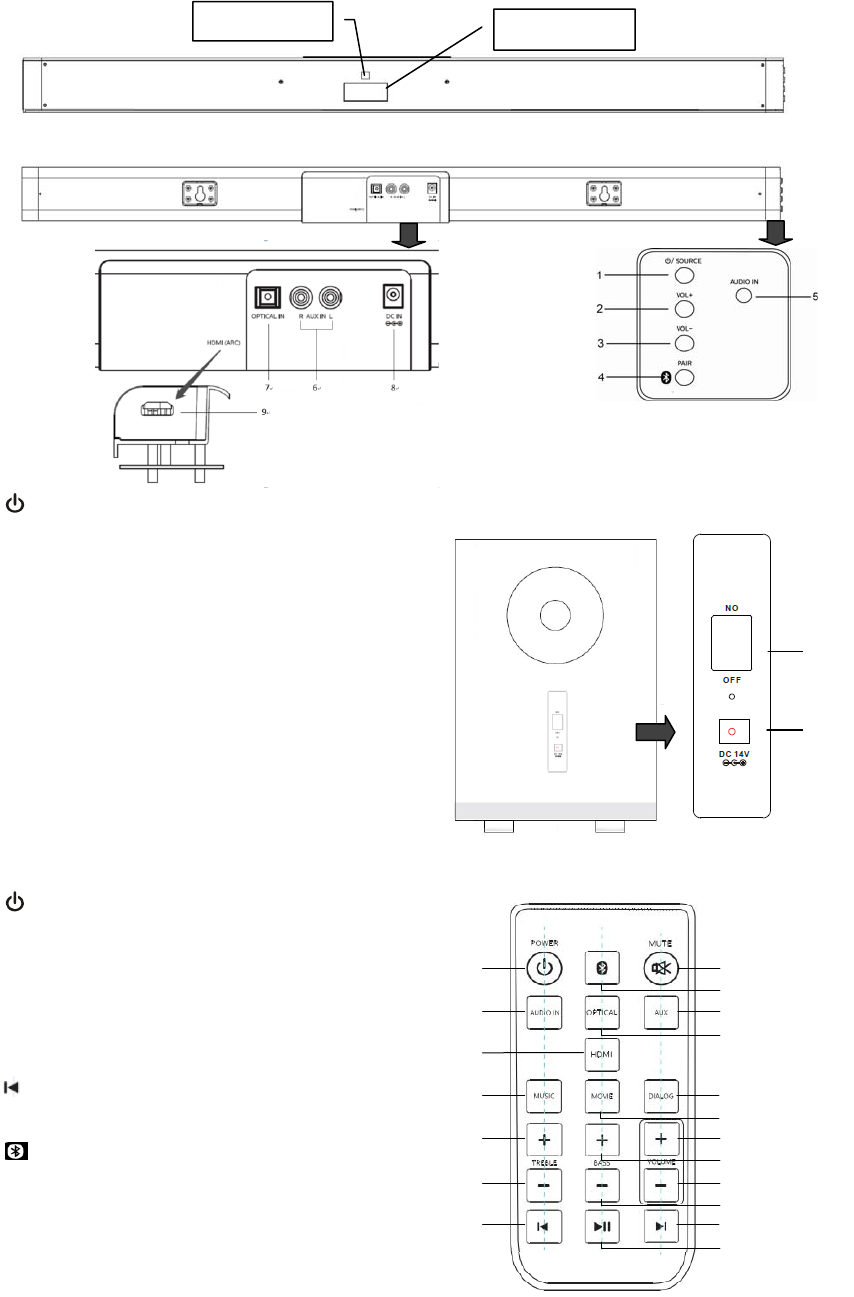
Qverview
Product:
FRONT
BACK
1:/SORUCE:Shortpressboot,shortpressconversionfunction,longpressshutdown;
2:VOL+:Shortorlongvolumeup;
3:VOL-:Shortorlongvolumedown;
4:PAIR :ShortorlongpressBluetoothpair;
5:AUDIOIN;
6:AUXIN(L/R);
7:OPTICALIN;
8:SoundbarDCIN;
9:HDMIIN;
10:SubwooferPowerbutton;
11:SubwooferDCIN.
Remote:
1: :Shortpushbootandshutdown;
2:AUDIOIN:ShortpushAUDIOINmode;
3:HDMI:ShortpushHDMImode;
4:MUSIC:Shortpushthroughsoundeffect
5:TREBLE+:Short‐clicktreblesoundeffectratingincreased
6:TREBLE–:Shortdescendingbythesoundeffectgradeofahighvoice
7::ShortpressjumplastsonginBluetoothmode;
8:MUTE:Shortpressmuteandopensound
9::ShortpushBluetoothmode;longpress
Bluetoothpair;
10:AUXIN:ShortpushAUXINmode;
11:OPTICALIN:ShortpushOPTICALINmode;
12:DIALOG:Shortclickspeechsoundeffect;
13:MOVIE:Shortpresscinemasoundeffect;
10
11
LEDdisplayscreen
IRRemoteSensor

14:VOL+:Shortorlongpressvolumeup;
15:BASS+:Shortpressbassratingincreases
16:VOL-:Shortorlongvolumedown;
17:BASS–:Shortpressbassratingdecrease;
18::ShortpressjumpnestsonginBluetoothmode;
19::ShortpresstoplayandpausemusicinBluetoothmode;
Operation
Install the Remote Control:
TheRemoteControlhasapre‐installedlithiumCR2025battery.RemovetheprotectivetabtoactivatetheRemoteControlbattery.
Note:TheRemoteControlworkswithinarangeof6meter.
Get Started:
1. Makesureyouhavemadeallthenecessarycableconnectionsbeforeyouconnectthesoundbartoawalloutlet,thesoundbarwillenterto
standbymode,theindicatorwilllightup.
2. Makesurethesubwooferisconnectedtothepower,andturnthebuttonto“ON”.
3. ShortpresstheMainPowerSwitchonthebackofthesoundbartoturnonthesoundbar.Theindicatorofthelastusedmodewilllightup.
4. PresstheSourcebuttononthesoundbarorRemoteControltochooseanaudiosource.Thecoloroftheindicatorlightwillchangeasyou
switchmode.
Note:Thesoundbarwillre‐entertheStandbyModeagainifthereisnooperationfor15minutes.
Bluetooth Pairing:
1. PresstheBluetoothbuttonontheremotecontroltoentertheBluetoothmode.Youcanalsoshortpressthesourcebuttononthesound
bartochoosetheBluetoothsource.
2. TheLEDdisplayscreenwillshow“BT”.
3. TurnontheBluetoothfunctiononyourdeviceandthedevicewillstarttosearchfortheSoundbar.
4. Select“XS‐SPEAKER”fromthelistoffounddevices.
5. Ifasked,enterthepassword“0000”andpressOK.
6. Whensuccessfullypairedwithyourdevice,theindicatorlightwillbelitsteadily.
Note:TheBluetoothplaybackiscontrolledbyyourdeviceandthebuttonsontheremotecontrolandthesoundbar.
Note:TheoperationrangefortheBluetoothconnectionis6meters.
Note:Ifamobilephoneonwhichyouareplayingmusicreceivesacall,themusicwillbeinterrupted.Thesoundhoweverisnotplayedback
viathesoundbar.Afteryouhaveendedthecall,thedevicesareconnectedtoeachotheragainandplaybackcontinues.
7. PressandholdthePlay/PausebuttonontheRemoteControlfor3secondstodisconnecttheBluetoothpairing.
HDMI Source:
1. EnsurethatthesoundbarisconnectedtotheTVorotheraudiodeviceviaHDMIcables.
2. PresstheHDMIbuttonontheremotecontroltoenterthedesiredmode.Youcanalsoshortpressthesourcebuttononthesoundbarto
choosetheHDMIsource.
3. TheLEDdisplayscreenwillshow“HDMI”.
Note:ThedevicecansynchronizethevolumewiththeTV,andalsowiththeswitch.
Note:ThedevicecansynchronizepoweronwiththeTV,whilethesoundbarisconnectedtotheTVotheraudiodeviceviaHDMIcables,
andalsocansynchronizepoweroffwiththeTVinHDMImode.
Optical Source:
1. EnsurethatthesoundbarisconnectedtotheTVorotheraudiodeviceviaopticalcables.

2. PresstheOPTICALbuttonontheremotecontroltoenterthedesiredmode.Youcanalsoshortpressthesourcebuttononthesoundbarto
choosetheOPTICALsource.
3. TheLEDdisplayscreenwillshow“OPT”.
Note:Theplaybackiscontrolledbyyourdeviceandbythebuttonsontheremotecontrolandthesoundbar.
AUX Source:
1. EnsurethatthesoundbarisconnectedtotheTVorotheraudiodeviceviaanAUXcable.
2. PresstheAUXbuttonontheRemotecontroltoenterthemode.Youcanalsoshortpressthesourcebuttononthesoundbartochoosethe
AUXsource.
3. TheLEDdisplayscreenwillshow“AUX”.
Note:Theplaybackiscontrolledbyyourdeviceandbythebuttonsontheremotecontrolandthesoundbar.
Line in Source:
1. EnsurethatthesoundbarisconnectedtotheTVorotheraudiodeviceviaanaudiocable.
2. PresstheLINEINbuttonontheremotecontroltoenterthemode.Youcanalsoshortpressthesourcebuttononthesoundbartochoose
theLINEINsource.
3. TheLEDdisplayscreenwillshow“A‐IN”.
Note:Theplaybackiscontrolledbyyourdeviceandbythebuttonsontheremotecontrolandthesoundbar.
Indicator light:
LightcolorStatus
RedLineinfunction
GreenOpticalfunction
WhiteAUXfunction
BlueBluetoothfunction
Trouble shooting
TroublesSolutions
PairingconnectionviaBluetoothcannot
becompleted
Othermobiledevicehasconnectedbeforeuseandthemobiledevicehasnotleftaswellasits
Bluetoothisnotoff.Whenitconnects,Bluetoothofthisdevicewillautomaticallyfindthe
Bluetoothdeviceandconnect.First,turnoffBluetoothdevicecanbefoundandnormallypairedto
connect.
VolumeofplaybackviaBluetoothissmall1. Afterconnectionswithmobiledevices,VolumeofBluetoothdeviceisnotupbutatthe
defaultoutputlevel.Turnonthemobiledeviceoutput.
2. OutputvolumeofBluetoothdeviceislowitself.
ConnectiondistanceviaBluetoothisnot
short
ObstructionexistsbetweenmobiledevicesandBluetoothdevice.Removeobstructions.
ConnectionviaBluetoothisright,
sometimesstaccato
1. ObstructionexistsbetweenmobiledevicesandBluetoothdevice.Remoteobstructions.
2. ToofarawayfromBluetoothdevicetoconnectedmobiledevices.Beyondtheconnection
range.
3. ShortenthedistancebetweentheBluetoothdeviceandmobiledevices.
SilentplayafterconnectionviaBluetoothAfterconnectionswithmobiledevices,Bluetoothdeviceandmobileaudioisoff.Turnonthe
mobile’soutputvolume.
Pairtothewirelesssubwooferwithsound
bar
Turnonthesoundbar,thenpressandholdboththebuttonofVolume+andVolume‐,thenturnon
thesubwoofer,theredLEDwillflashfor4times,thenrestartthedevice,andfinishthepair.

Specifications
ProductnameSR213C
Outputpower15W*2+30W
Speakerdriver14V/2A*2
Speakerfrequency50Hz‐15KHz
Bluetoothfrequency2402~2480GHz
Bluetoothversion5.0
BluetoothrangeUpto10m
IncludedinthepackagingSoundbar*1
Subwoofer*1
Remote*1
ACadapter*2
RCAcable*1
Usermanual*1
Wallanchors*2
Screws*2