SKYPINE ELECTRONICS CES8116CL Car Entertainment System User Manual 10 AVC Operation
SKYPINE ELECTRONICS (SHEN ZHEN) CO., LTD. Car Entertainment System 10 AVC Operation
User Manual

VX400 / VZ400
Owner’s Manual & Installation Manual
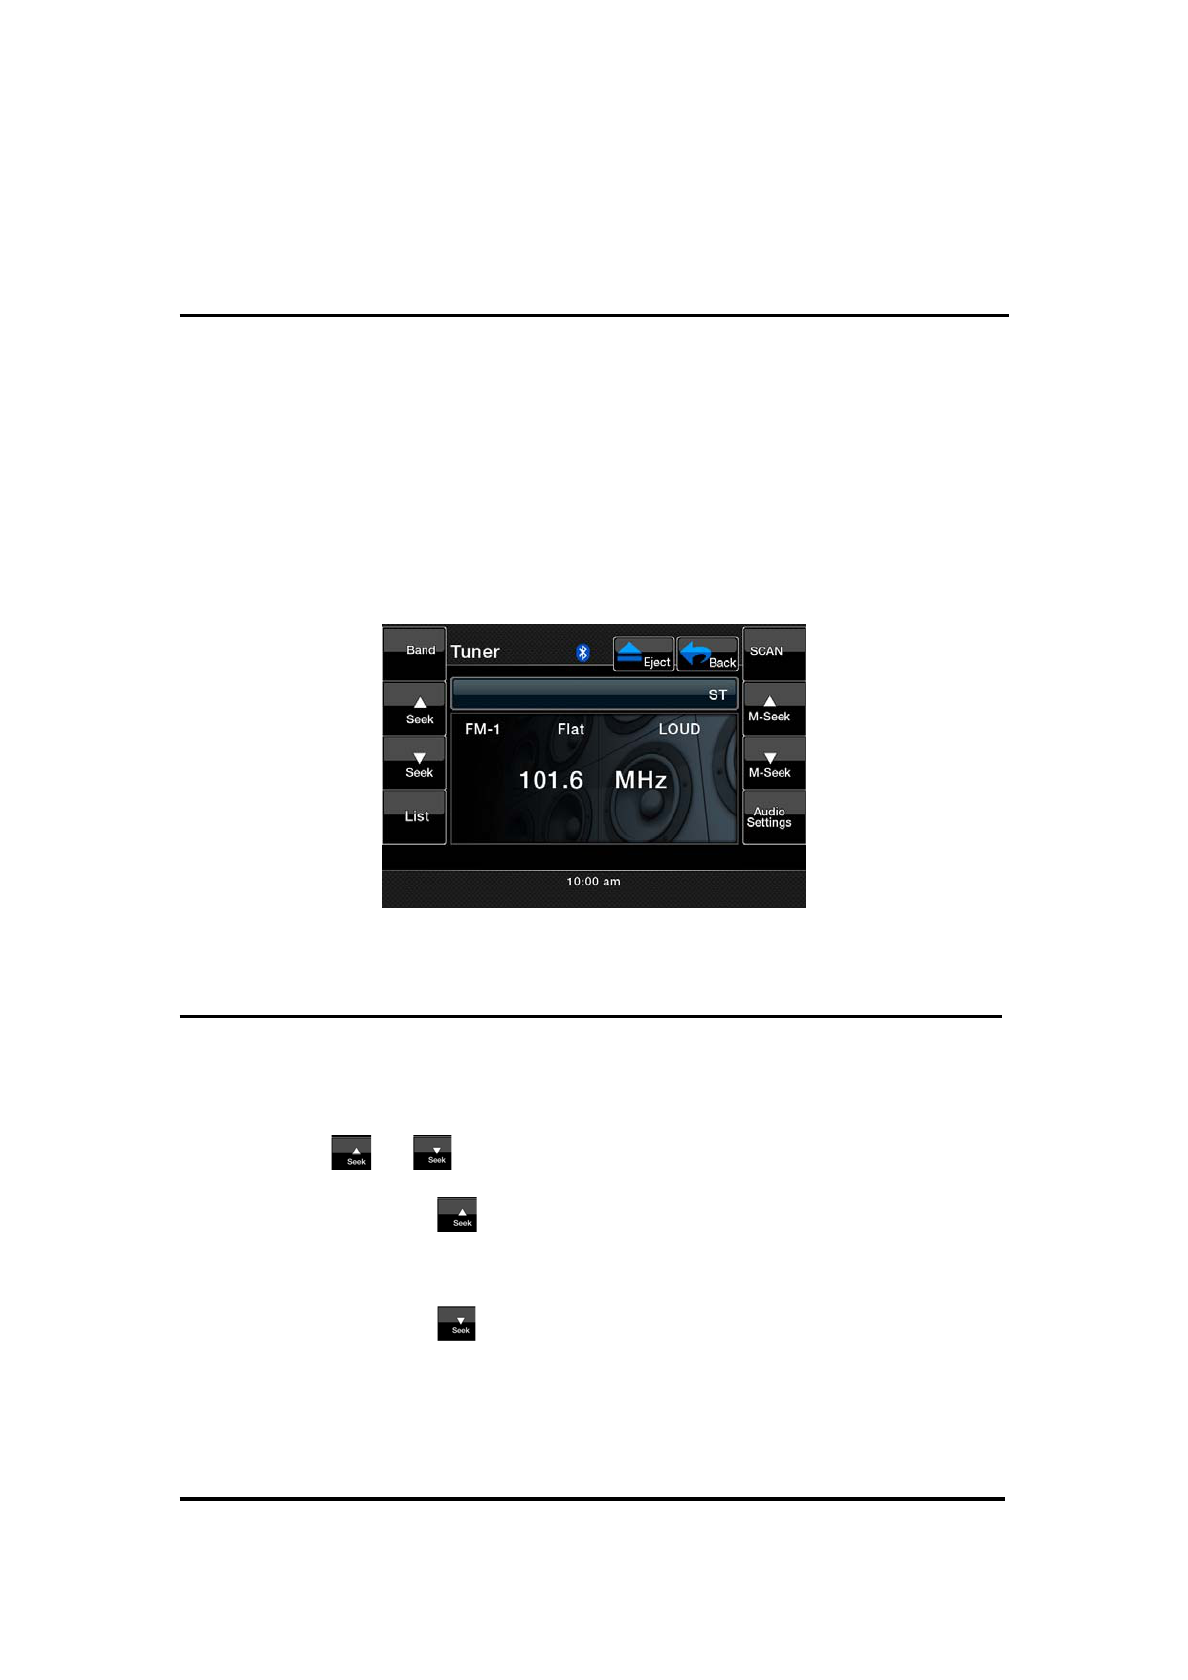
Radio Operations
Listening to the Radio
1. Touch the [Tuner] button on the Source display. The Tuner mode screen is
displayed.
2. Press the [Band] key on remote control or touch the [Band] button to
select the radio Band. Each time the button is pressed, the radio reception
Band changes in the following order:
FM1 ė FM2 ė FM3 ė AM ė FM1…
Seek tuning
1. Press the [Band] key on remote control or touch the [Band] button to
select the desired Band (FM or AM).
2. Touch the or button to automatically seek a station.
ĆWhen touching the button, the station is sought in the direction of
higher frequencies.
ĆWhen touching the button, the station is sought in the direction of
lower frequencies.
Manual tuning
1. Press the [Band] key on remote control or touch the [Band] button to select
the desired Band (FM or AM).
2. Touch the or button to manually select a station.
ĆWhen touching the button, the frequency is tuned in the direction of
higher frequencies.
ĆWhen touching the button, the frequency is tuned in the direction of
higher frequencies.
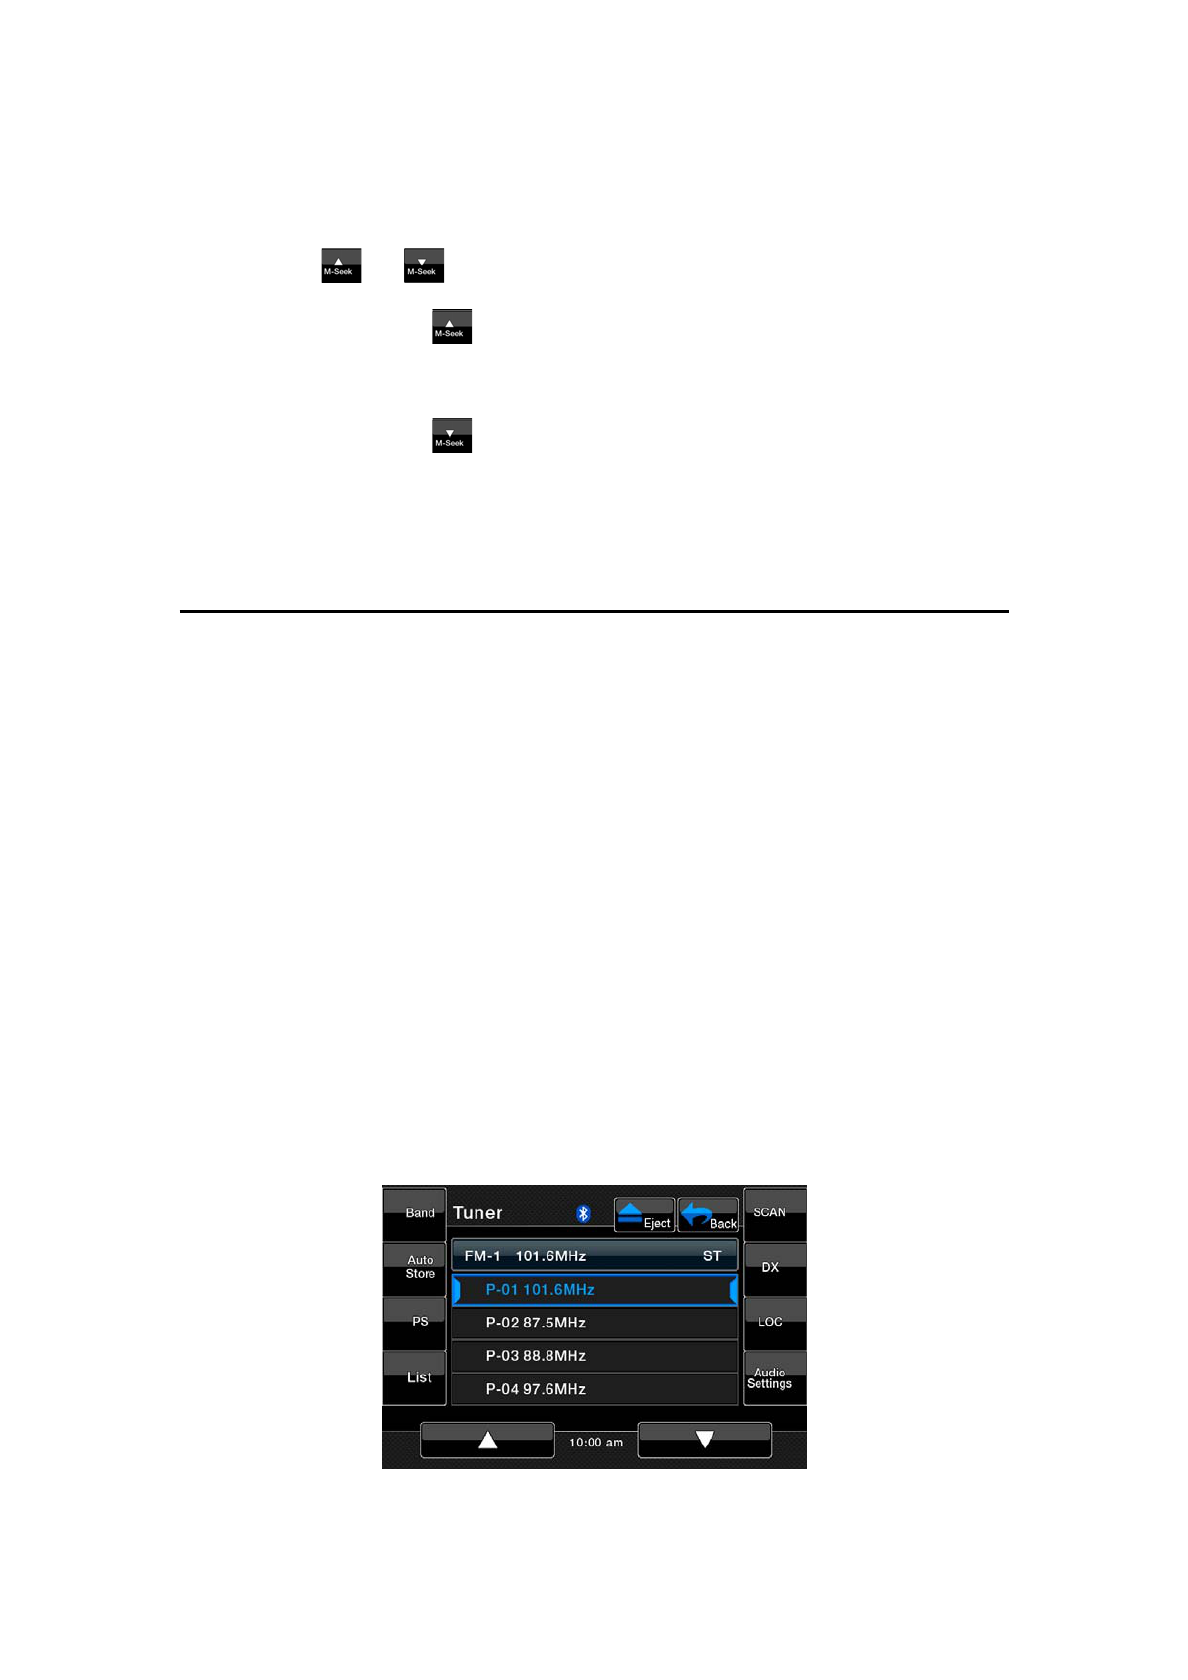
Recalling a preset station
There are total of 48 preset positions (12-FM1, 12-FM2, 12-FM3, 12-AM) to
store individual radio stations in memory.
There are 2 ways available to recall the preset station.
Using the remote controller
1. Press the [Band] button on remote control to select the desired Band (FM
or AM).
2. Press the preset number desired on the 0~9 numeric keypad.
Using the Preset List screen
1. Touch the [List] button.
2. Touch the corresponding Preset button to recall the stored station.

You can select the desired Band by touching the [Band] button. Scroll through
pages using scroll bar buttons to the right of the presets.
Touching and holding the desired Preset button for more than 2 seconds will
store the current station to the preset memory.
3. Touch the [List] button to return to the previous screen.
Manual memory
1. Touch the [Band] button to select the desired Band (FM or AM).
2. Select the desired station with the seek tuning, manual tuning, or preset
tuning.
3. Touch the [List] button.
4. Touch and hold one of the Preset button for more than 2 seconds to store
the current station into the preset memory.
5. Scroll through the 3 pages of presets in each Band by pressing the scroll
bar buttons to the right of the presets.
Auto store
The Auto Store is a function for storing up to 12 stations that are automatically
tuned in sequentially. If 12 receivable stations cannot be received, a previously
stored station remains unoverwritten at the memory position.
1. Touch the [Band] button to select the desired Band (FM or AM).
2. Touch the [Auto Store] button momentarily to start the Auto Store function.
Preset scan
The Preset Scan receives the stations stored in the preset memory in order.
This function is useful when searching for the desired station in memory.
1. Touch the [Band] button to select the desired Band (FM or AM).
2. Touch the [PS] button to start the Preset Scan.
3. When the desired station is tuned in, touch the [PS] button again to

continue receiving that station.
Channel scan
The Channel Scan receives the stations sequentially and scans continuously.
This function is useful when searching for the desired station in an unfamiliar
area.
1. Touch the [Band] button to select the desired Band (FM or AM).
2. Touch the [SCAN] button to start the Channel Scan. The unit starts
scanning each station for 10 second sequentially.
3. When the desired station is tuned in, touch the [SCAN] button again to
continue receiving that station.
DX/LOC setting
The DX/LOC setting changes the Tuner sensitivity in order to separate closely
spaced stations. This feature is useful in areas that have many radio stations in
close proximity.
1. Touch the [LOC] button to switch to LOCAL Tuner sensitivity.
2. Touch the [DX] button to switch to DX Tuner sensitivity.
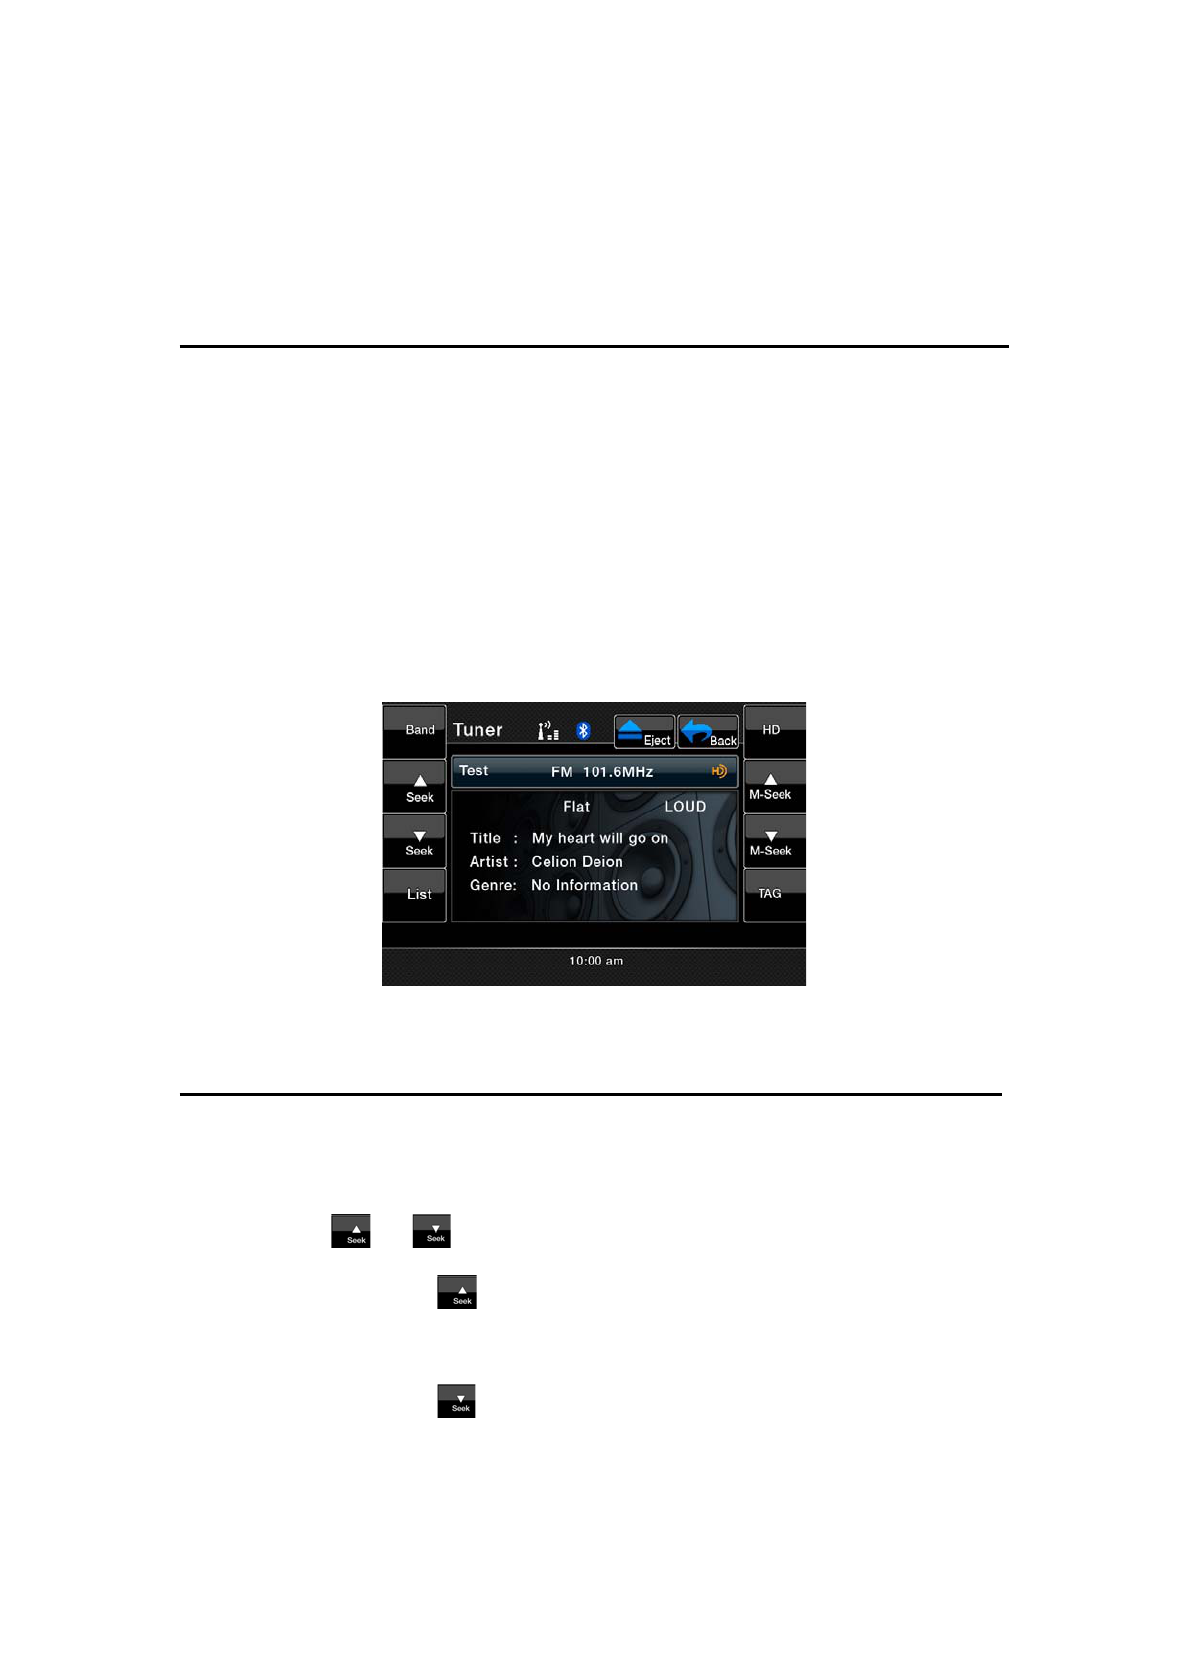
HD Radio Operations
Listening to the Radio
Note: Connect THD400 HD Radio black box to activate HD Radio function.
1. Touch the [Tuner] button on the Source display. The Tuner mode screen is
displayed.
2. Press the [Band] key on remote control or touch the [Band] button to
select the radio Band. Each time the button is pressed, the radio reception
Band changes in the following order:
FM ė AM ė FM…
Seek tuning
1. Press the [Band] key on remote control or touch the [Band] button to
select the desired Band (FM or AM).
2. Touch the or button to automatically seek a station.
Ć When touching the button, the station is sought in the direction of
higher frequencies.
Ć When touching the button, the station is sought in the direction of
lower frequencies.

Manual tuning
1. Press the [Band] key on remote control or touch the [Band] button to select
the desired Band (FM or AM).
2. Touch the or button to manually select a station.
ĆWhen touching the button, the frequency is tuned in the direction of
higher frequencies.
ĆWhen touching the button, the frequency is tuned in the direction of
higher frequencies.
Recalling a preset station
There are total of 48 preset positions (16-FM, 16-AM) to store individual radio
stations in memory.
There are 2 ways available to recall the preset station.
Using the remote controller
1. Press the [Band] key on remote control to select the desired Band (FM or
AM).
2. Press the preset number desired on the 0~9 numeric keypad.
Using the Preset List screen
1. Touch the [List] button.
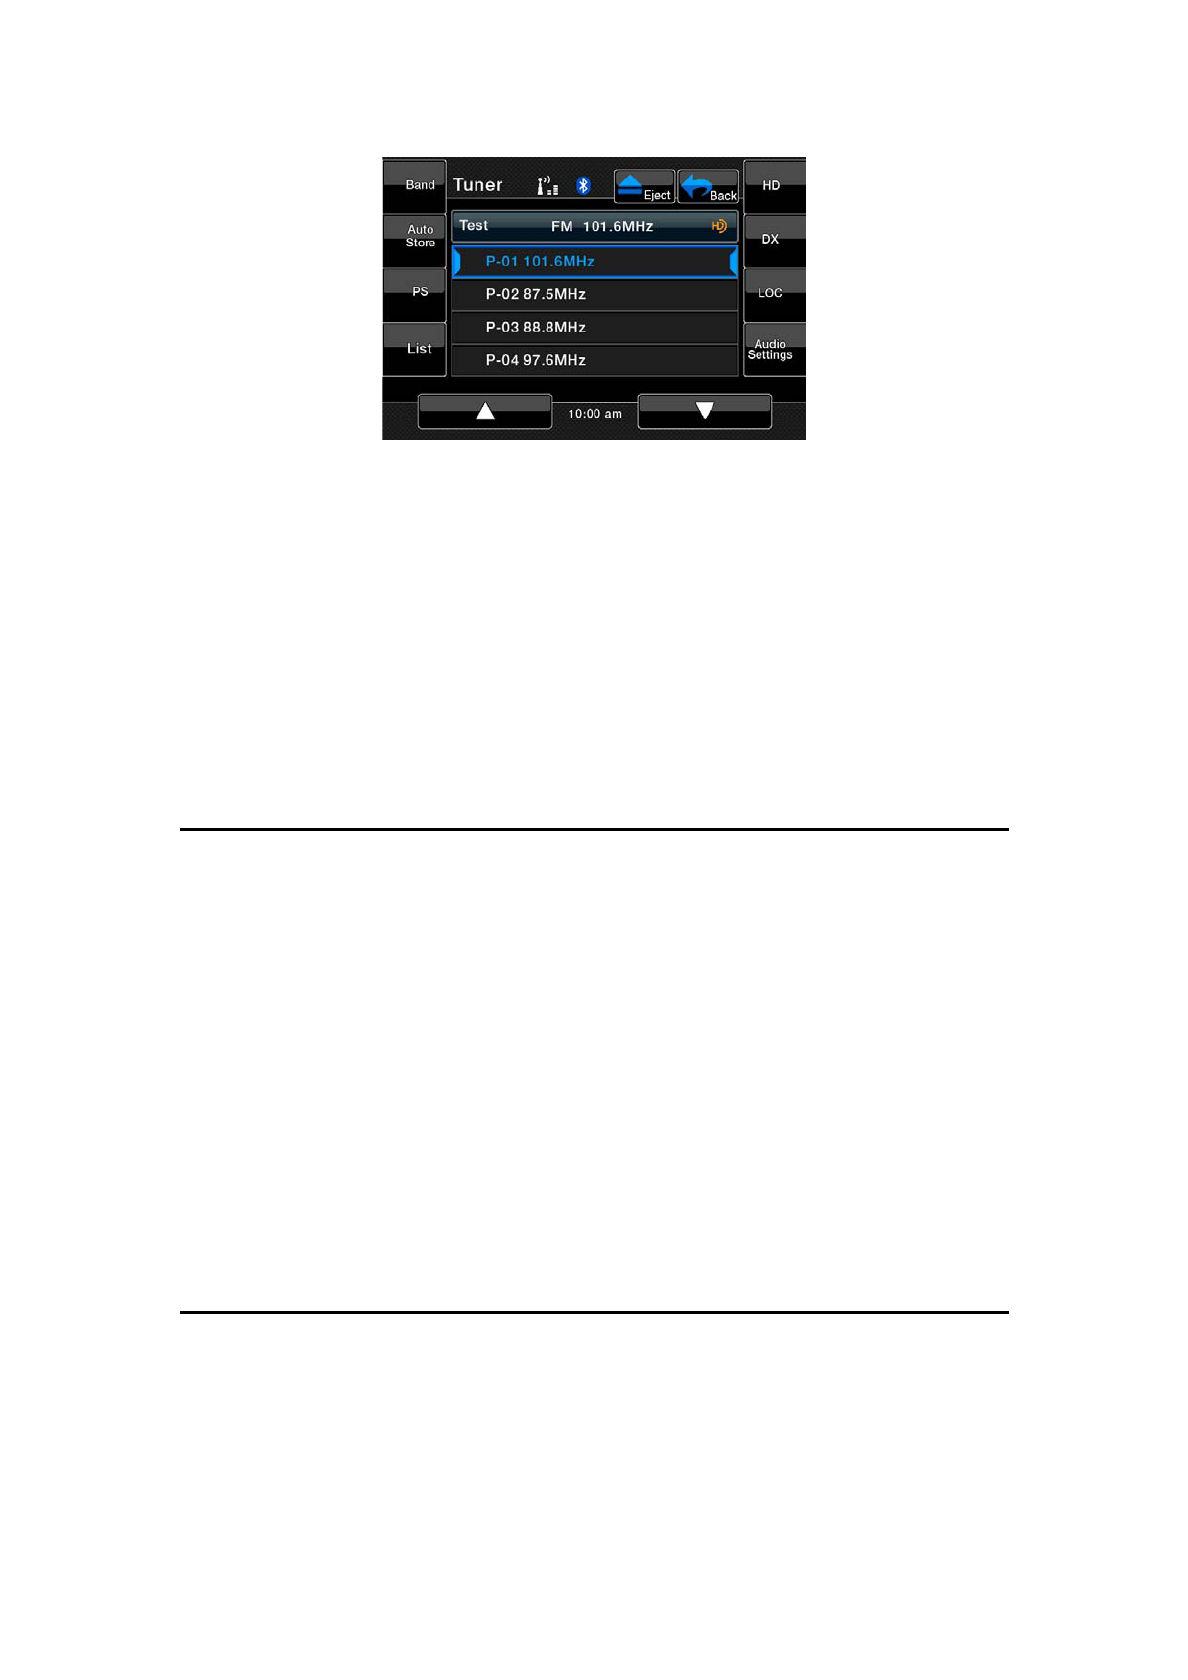
2. Touch the corresponding Preset button to recall the stored station.
You can select the desired Band by touching the [Band] button. Scroll through
pages using scroll bar buttons to the right of the presets.
Touching and holding the desired Preset button for more than 2 seconds will
store the current station to the preset memory.
3. Touch the [List] button to return to the previous screen.
Manual memory
1. Touch the [Band] button to select the desired Band (FM or AM).
2. Select the desired station with the seek tuning, manual tuning, or preset
tuning.
3. Touch the [List] button.
4. Touch and hold one of the Preset button for more than 2 seconds to store
the current station into the preset memory.
5. Scroll through the 3 pages of presets in each Band by pressing the scroll
bar buttons to the right of the presets.
Auto store
The Auto Store is a function for storing up to 16 stations that are automatically
tuned in sequentially. If 16 receivable stations cannot be received, a previously
stored station remains unoverwritten at the memory position.
1. Touch the [Band] button to select the desired Band (FM or AM).
2. Touch the [Auto Store] button momentarily to start the Auto Store function.
Preset scan
The Preset Scan receives the stations stored in the preset memory in order.
This function is useful when searching for the desired station in memory.
1. Touch the [Band] button to select the desired Band (FM or AM).
2. Touch the [PS] button to start the Preset Scan.
3. When the desired station is tuned in, touch the [PS] button again to
continue receiving that station.
DX/LOC setting
The DX/LOC setting changes the Tuner sensitivity in order to separate closely
spaced stations. This feature is useful in areas that have many radio stations in
close proximity.
1. Touch the [LOC] button to switch to LOCAL Tuner sensitivity.
2. Touch the [DX] button to switch to DX Tuner sensitivity.
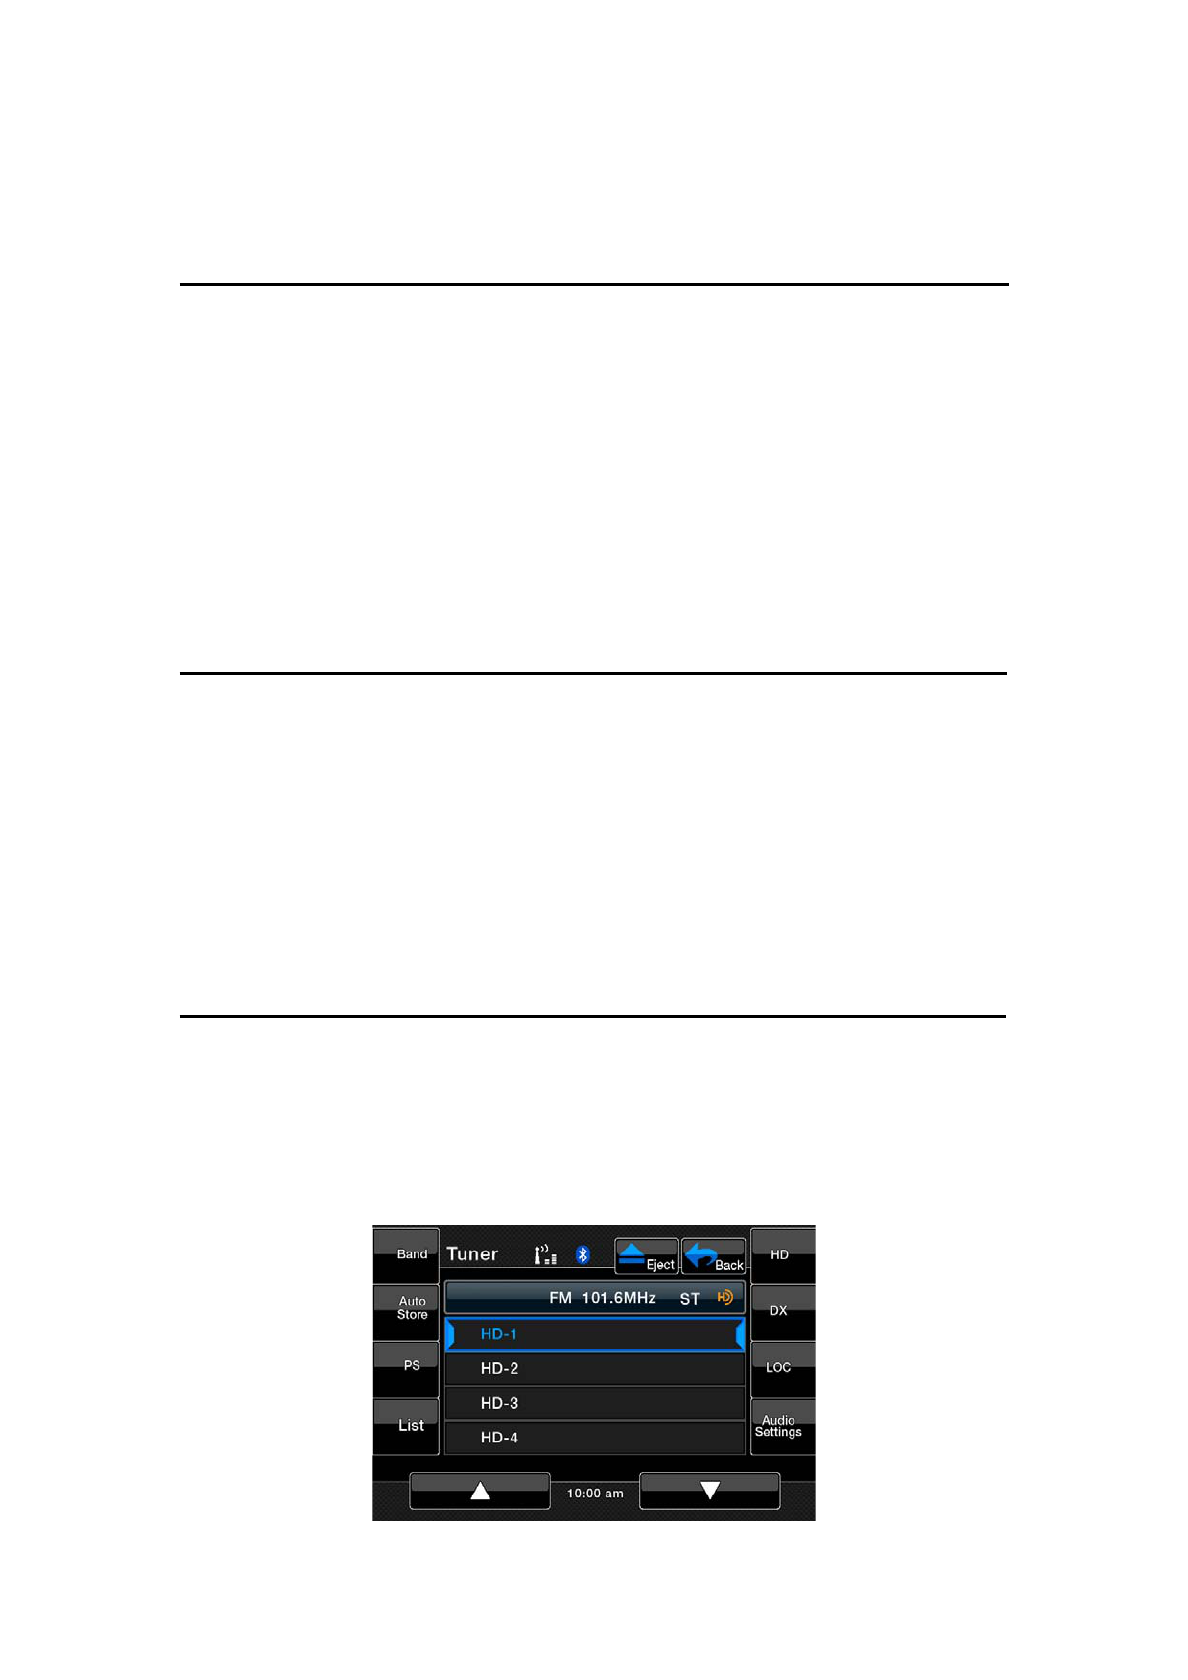
HD Radio subchannel preview
When the subchannel is available, the [HD] button will become activated.
Press it will change the preset list to subchannel list. Press each of the
subchannel to tune to it.
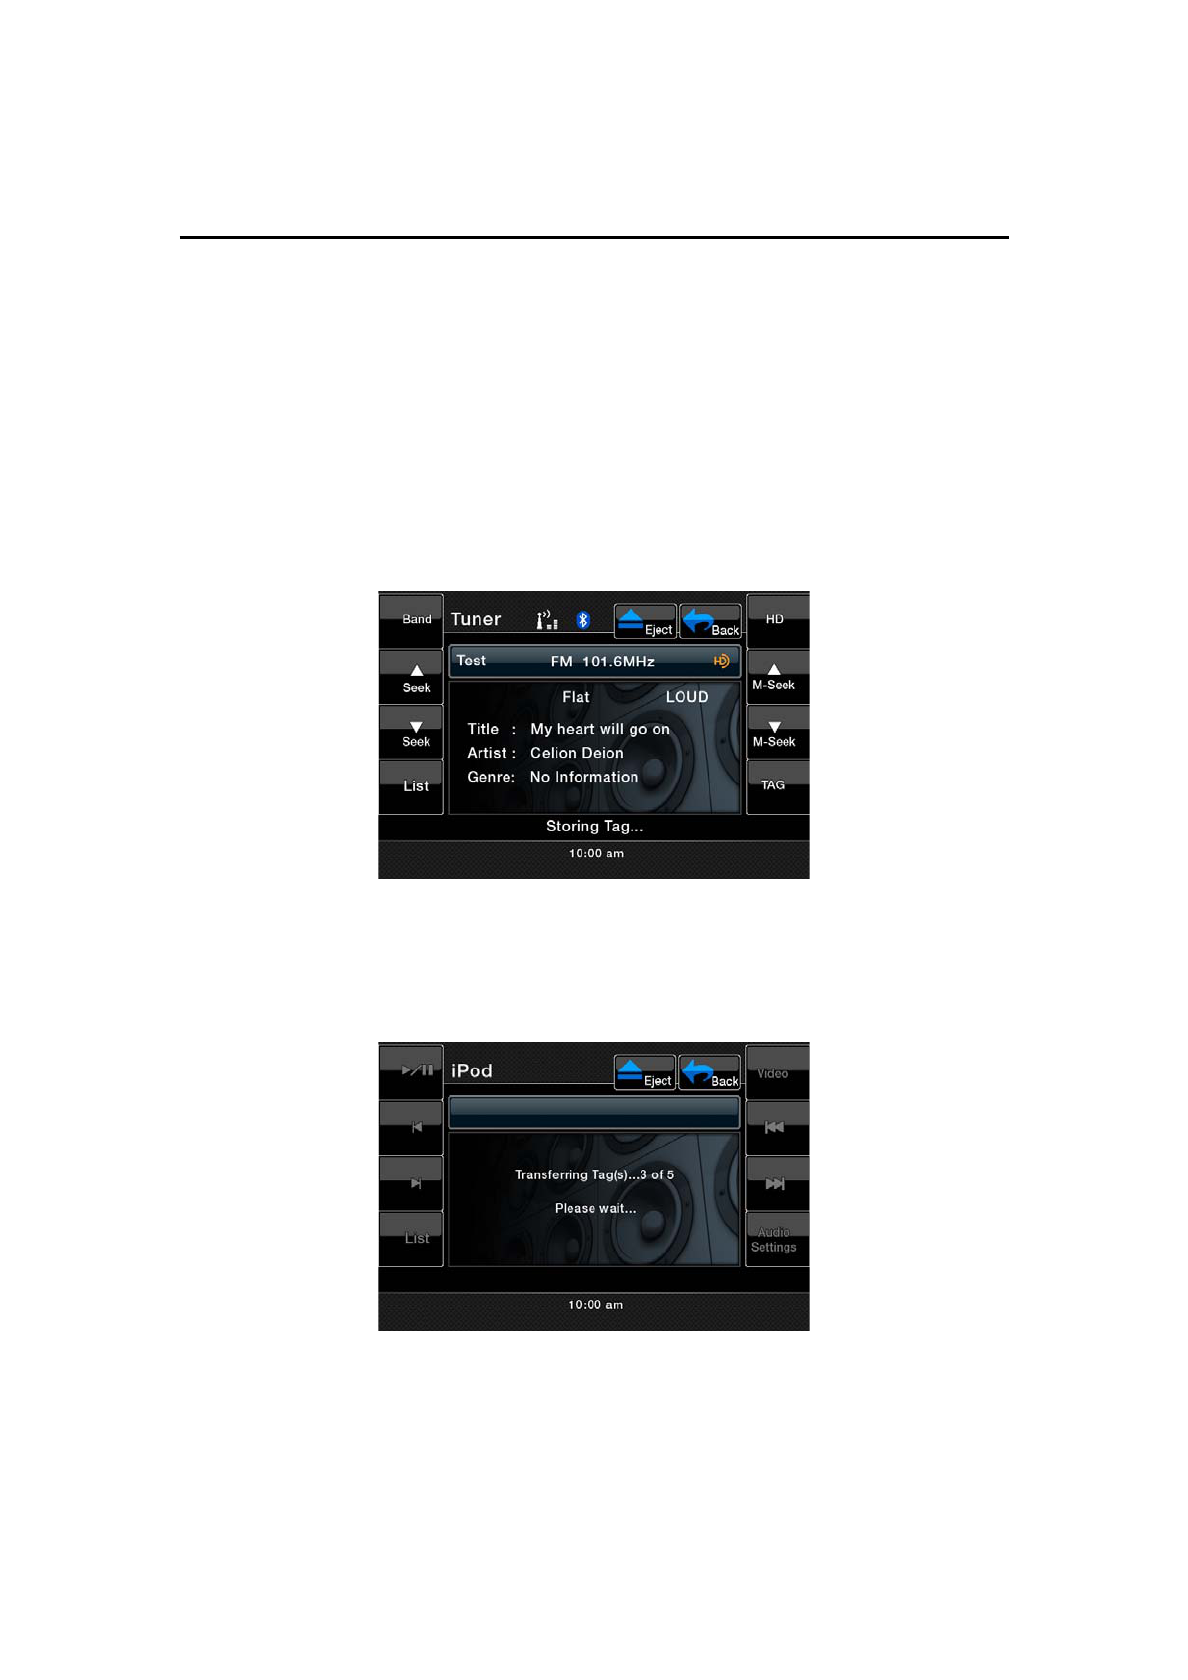
iTunes Tagging Function
A new feature is available to mark songs on HD Radio broadcasts for review
and purchase at a later time from the listener’s personal computer. This feature
is available through HD Radio receivers that build in the new “iTunes Tagging”
feature.
Now iTunes Tagging system is only available for Apple iPod and iPhone.
1. Touch [TAG] button to store the current music information tag to the system.
The capacity is 64 tags totally.
3. When iPod or iPhone is connect to the unit, there will be an iPod logo on
the screen and the radio will transfer the tags information to iPod
automatically.
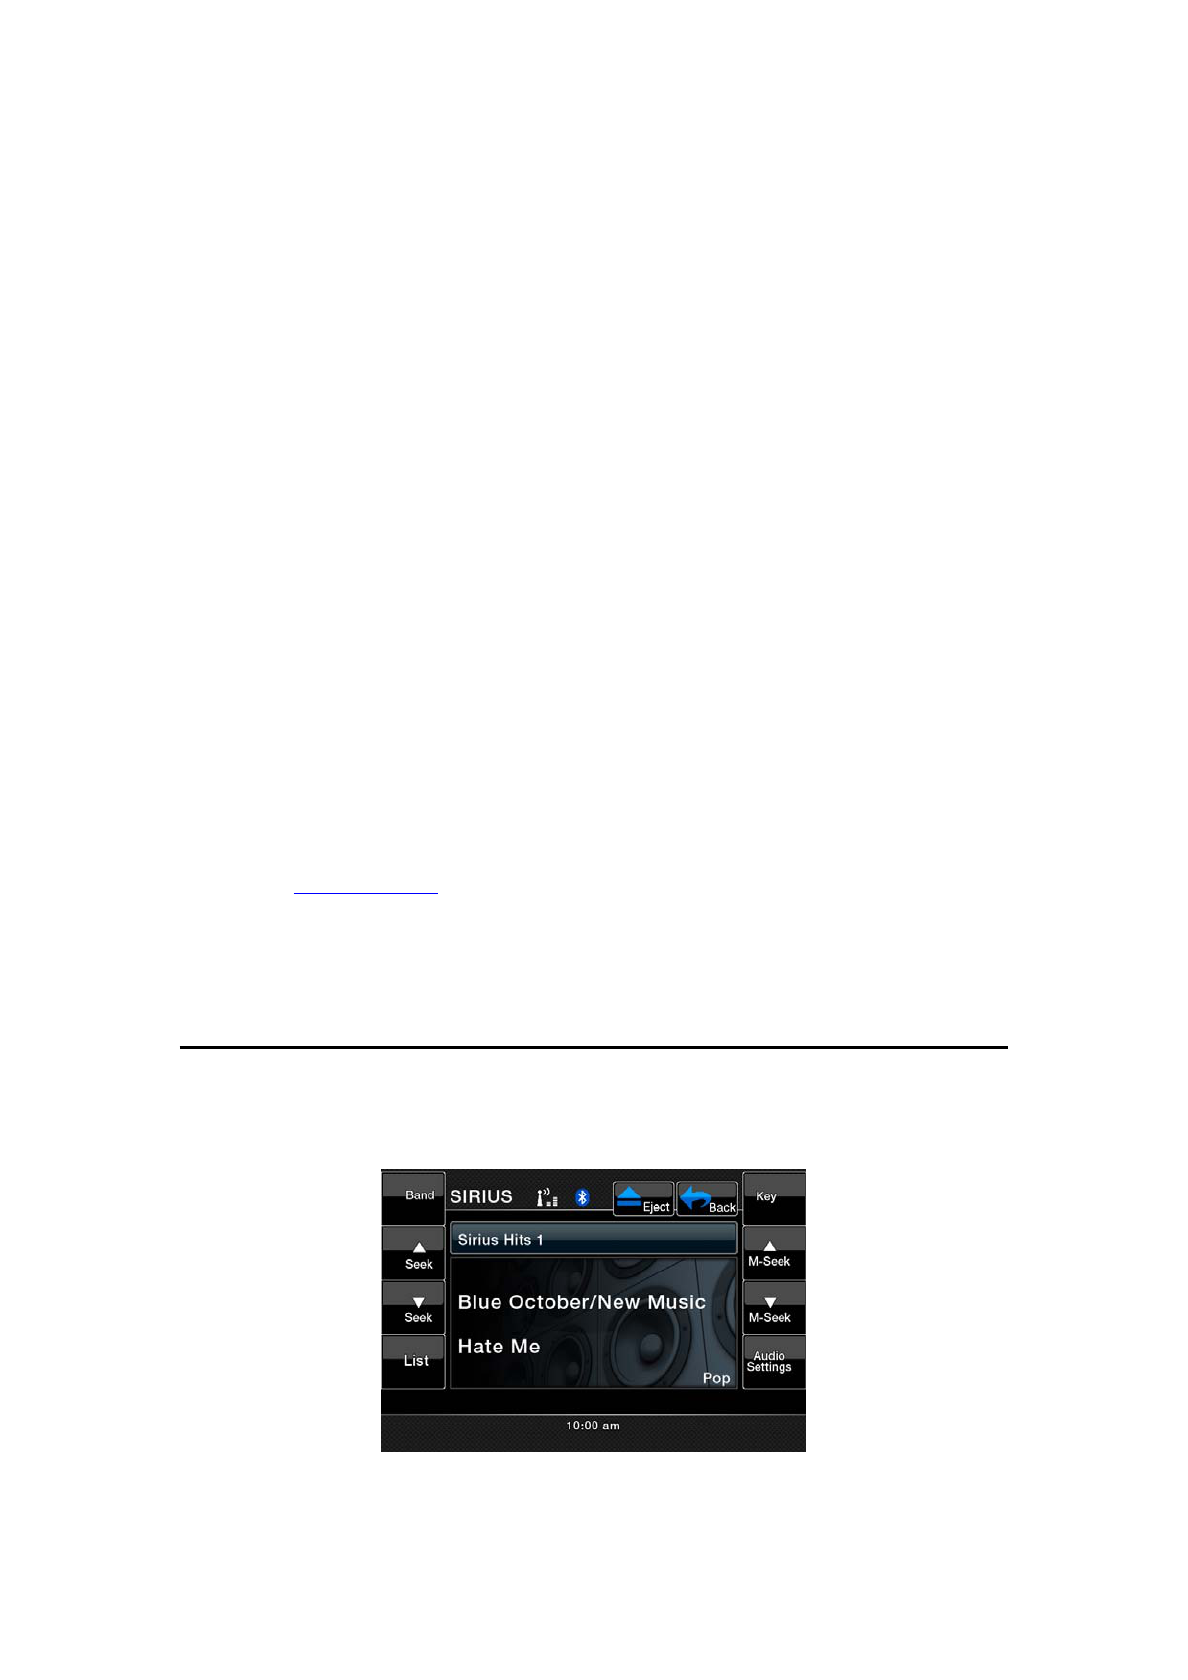
Sirius Satellite Radio Operations
This function is available when a Sirius Satellite Radio Receiver is connected
through the dedicated connection. This unit requires the following receiver:
ĆSIRIUS Satellite Radio Receiver: SC-C1
Note:
SIRIUS satellite radio is a subscription service. Please contact Sirius Radio to begin or
alter you subscription:
Ć
Internet: www.sirius.com
Telephone: 888-539-SIRIUS(747487)
Selecting a Satellite Radio mode
1. Press the [SIRIUS] button on Source display. The system changes to the
Sirius Satellite Radio mode. The Sirius mode screen is displayed.

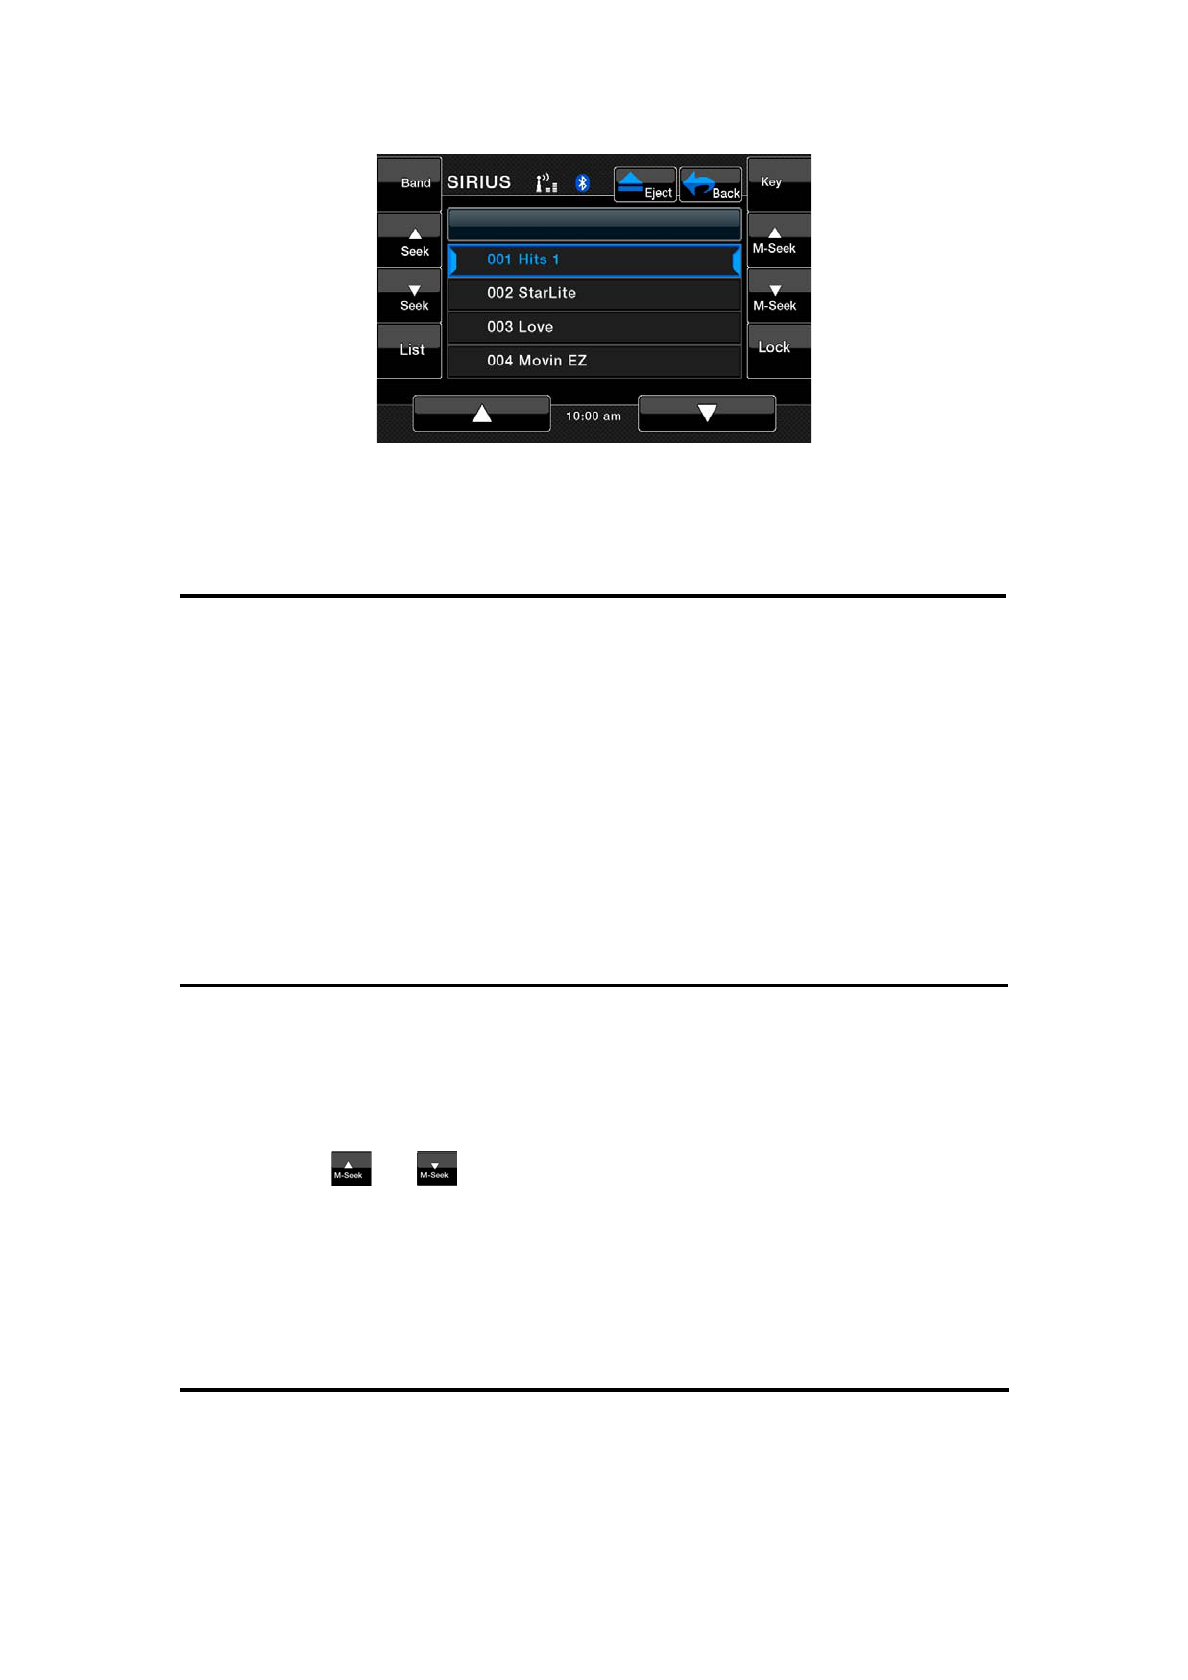
Selecting you presets
1. Press the [Band] key on remote control or touch the [Band] button to enter
the preset memory menu. You can save up to 20 presets for your favorite
channels for quick access.
Information Displayed During Reception
The following information is displayed when the Satellite radio cannot be
received normally.
ĆWhen the receiver is turned on the first time or after a reset: “UPDATING”
followed by a percentage of completion.
ĆWhen a channel is being tuned in (no signal is yet received): “ACQUIRING
SIGNAL”
ĆA channel not covered by your contract: “CALL 888-539-SIRIUS”
Call (888)539-747487 to activate your radio.
ĆWhen a channel is out of air time: “OFF AIR”
ĆWhen the antenna is disconnected or has been damaged: “ANTENNA
ERROR”
Confirming Your Radio ID
1. Touch the [KEY] button on the SIRIUS Menu display the keypad. Enter [0]
and press [OK].
Your SIRIUS ID (12-digit number) will be displayed.
2. To return to the Sirius Radio, enter a new channel to resume.
Displaying channel labels
1. Touch the [List] button and the next four channels are displayed for your
ease of viewing.
2. Touch the [List] button again to return to the main display screen.
Selecting a station with the channel number
1. Touch the direct access button on the Sirius screen to enter direct channel
selection.
2. Enter the channel number of your desired station by touching the [0] to [9]
buttons.
3. Touch the [OK] button.
The radio channel you entered will be tuned.
Selecting a station with in the tuning mode
Only channels that can be received are selected. Channels that are locked and
channels not covered by the contract will be skipped. The receiver seeks the
next available channel below or above the current channel.
1. Touch the or button.
The receiver seeks the next available channel below or above the current
channel.
Saving a preset station
A total of 20 satellite radio stations can be stored in the receiver’s memory. You
can access the presets by pressing the BAND button. This allows you to stores
your favorite satellite radio stations the memory for later recall.

1. Enter the channel number of your desired station by touching the [0]
presets.
2. Touch and hold for more than 2 seconds the corresponding preset button to
save the selected channel.
ĆThere are 5 pages of preset memory space available for your use. You can
scroll the right of the screen.
3. Touch the [Band] button to return to the previous screen.
Auto preset store
1. Touch the [Band] button and hold it for 3 seconds and the selected channel
will be stored in the next available empty preset location.
Recalling a preset station
A total of 20 satellite radio stations can be recalled from the receiver’s memory.
You can access the presets by pressing the [Band] button. This allows the
memory for later recall.
1. Touch the [Band] button to enter the preset list to select or save your
presets.
2. Touch the corresponding Preset button (1 to 4) to recall the desired preset
station.
ĆThere are 5 pages of preset memory space available for your use. You can
scroll the right of the screen.
3. Touch the [Band] button to return to the previous screen.
Deleting a preset
1. Touch the [Band] button and enter the preset menu.
2. Select the preset you would like to delete by touching it in the preset menu.
3. Touch and hold the [Del] button for more than 3 second.

Receiving stations selected by category
Satellite Radio allows you to select broadcast channel category (contents).
1. Touch the or button.
Scroll the category and select a channel
1-1. Touch the scroll bar buttons on the bottom to scroll through the available
pages.
1-2. Touch the or button to scroll through the available
categories.
1-3. Select your desired channel by touching it momentarily on the screen.
1-4. Touch the desired category item button to select the category.
2. Touch the [List] button to exit category tuning mode.
Note:
When the category selection mode is entered, the category of the last received channel is
displayed first.

DVD Video Player Operations
Changing DVD System settings
Note:
If the Setup operation is preformed in the middle of DVD video play, the disc will restart
from beginning.
Selecting the DVD setup menu
1. Press the [MENU] key, and touch the [Settings] button. The main
STEEING screen is displayed.
2. Touch the [Video] button to display the Display settings menu.
3. Touch the [Regional] button to display the Language settings menu.
4. Touch the [Rating] button to display the Parental Controls settings menu.
5. Perform setting for the desired setting items. See the following sections for
detail.
6. Touch the [Back] button to exit settings menu display.
Screen Saver Feature
1. Press the [MENU] key, and touch the [Settings] button. The main Setting
screen is displayed.

2. Touch the [Monitor Adjust] button.
3. Touch the [Screen saver] button to display the screen saver selection
menu.
4. Touch the [Off] or [On] button to turn off or on the screen saver feature.
Note:
If the screen saver is not for entertainment purpose. The feature is intended to prevent
screen damage if the unit is paused or stopped for an extended period of time.
Setting up the screen size
1. Touch the [Aspect Ratio] button on the display in to change the screen
size 4:3 or 16:9.
Ć The factory default setting is “ 16:9 ”.
Ć When watching a wide type through a conventional type of the rear view
monitor (4:3), the leftmost and rightmost areas of the screen are cut off.
This function allows displaying the important part of image fully on the screen.
In some cases, image is displayed while being panned (scrolled).
2. When watching a wide type through a wide type of the rear view monitor
(16:9), the leftmost and rightmost areas of the screen are not cut off.
Setting up the audio language
1. Touch the [Regional] button in the Settings menu. The Language menu is

displayed.
2. Touch the [Audio] button to select a desired language and set it by
touching the available languages.
Ć The factory default setting is “English”.
Setting up the subtitle language
3. Touch the [Regional] button in the Settings menu. The Language menu is
displayed.
4. Touch the [Subtitle] button to select a desired language and set it by
touching the available languages.
Ć The factory default setting is “English”.
Setting up the password for parental level control
Ć The factory default setting is “0000”.
1. In Source press [Settings] button. Press [Rating] button on the display.
Touch the Set Password **** and a numerical key pad will appear. Input a
new password. The password is set.
Note:
When a disc with view restrictions is inserted, you will be prompted to input a password.
The disc will not be viewable until the correct password is entered.
Set rating for parental level control
1. Select [Rating] screen while in Settings mode. Press [Parental control]
button. Press the desired rating for level control. Use this table to set the
parental level.
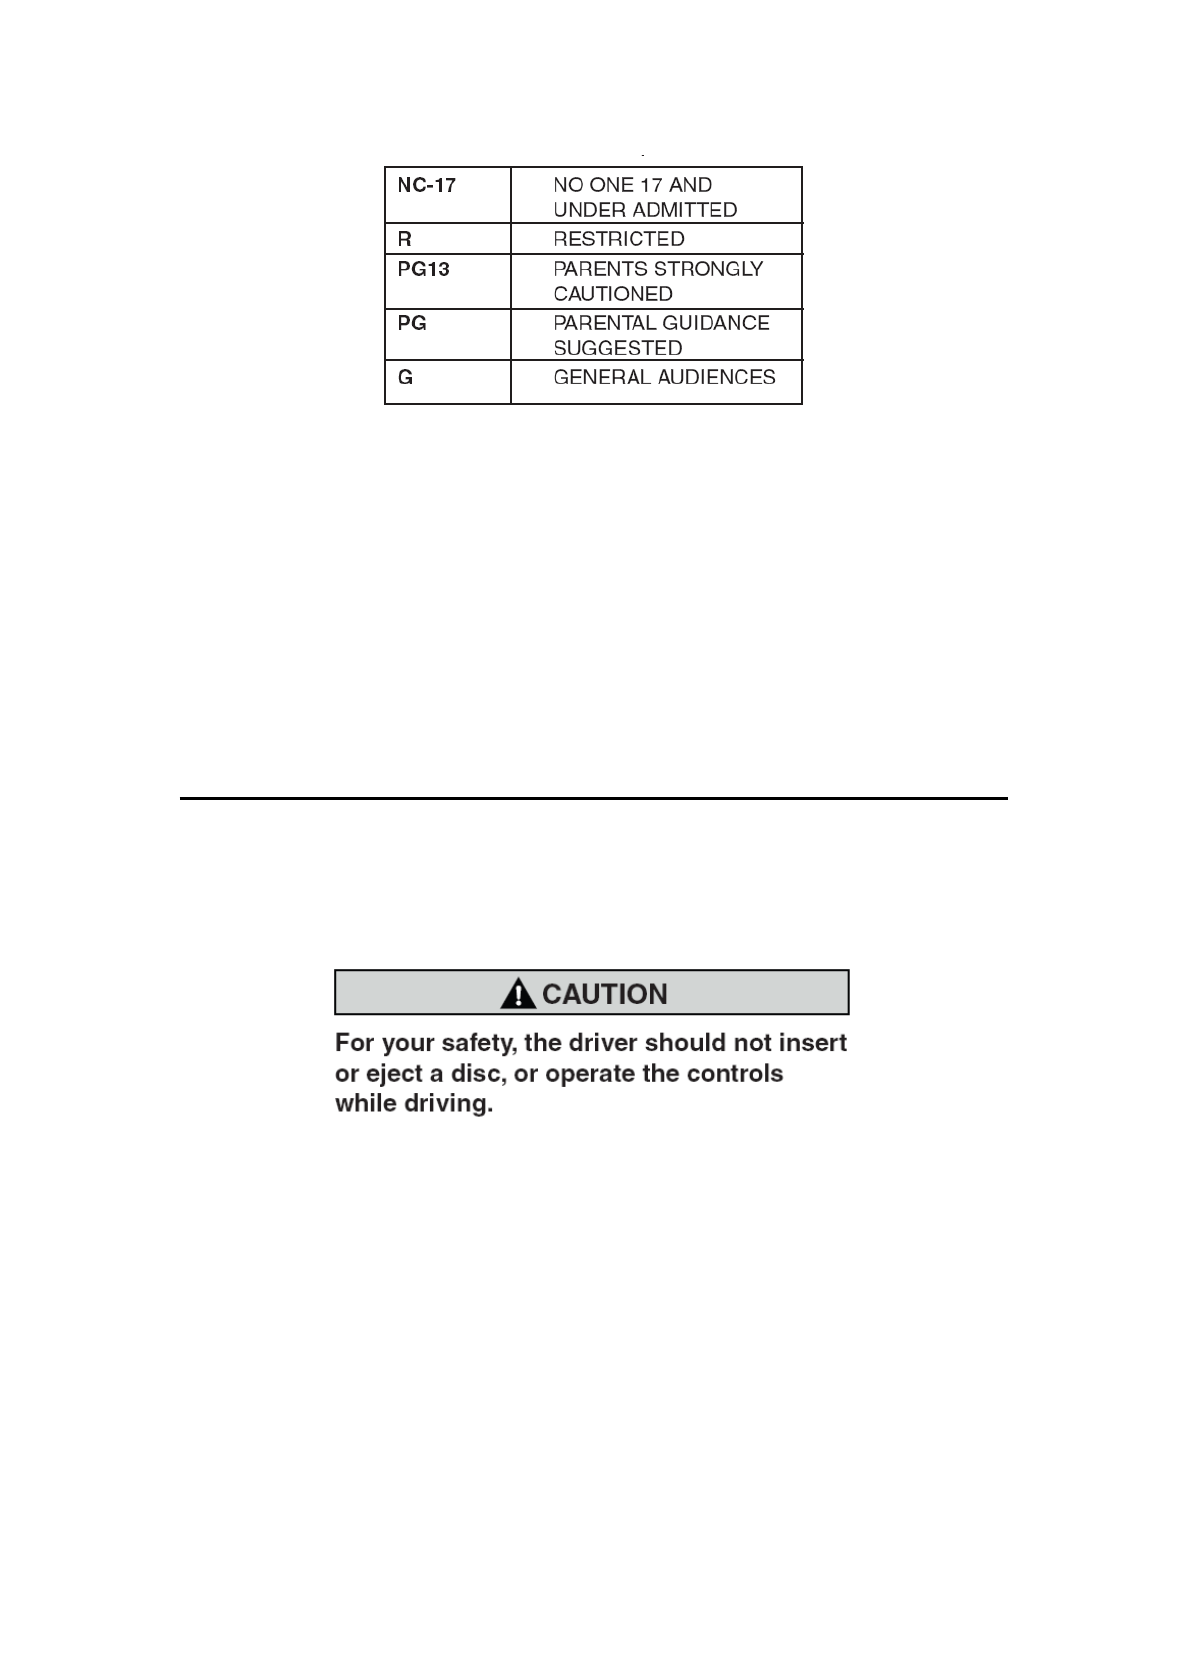
Ć The contents that the parental level restricts vary with the country code.
Note:
The rating can be selected only under the password unlocked status, and the limits can be
set only under the password locked status.
Loading a disc
1. To load a disc:
Press the [OPEN] key to flip down the front panel. (VZ400 only)
Insert the disc into the center of the insertion slot the label side facing up.
Note:
ĆNever insert foreign objects into the disc insertion slot.
ĆIf the disc is not inserted easily, there maybe another disc in the mechanism or the unit
may require service.
Ć8cm (single play) discs cannot be used.
2. Disc starts playing automatically.
Ejecting a disc
1. To eject a disc press [Eject] button on the screen. The play mode than
switches to the Tuner mode.
Ć If the disc is left in the ejected position for 15 seconds, the disc is
automatically reloaded. In this case, the play mode will remain set to the
Tuner mode.
Note:
If you force a disc into before auto reloading, it will damage a disc.
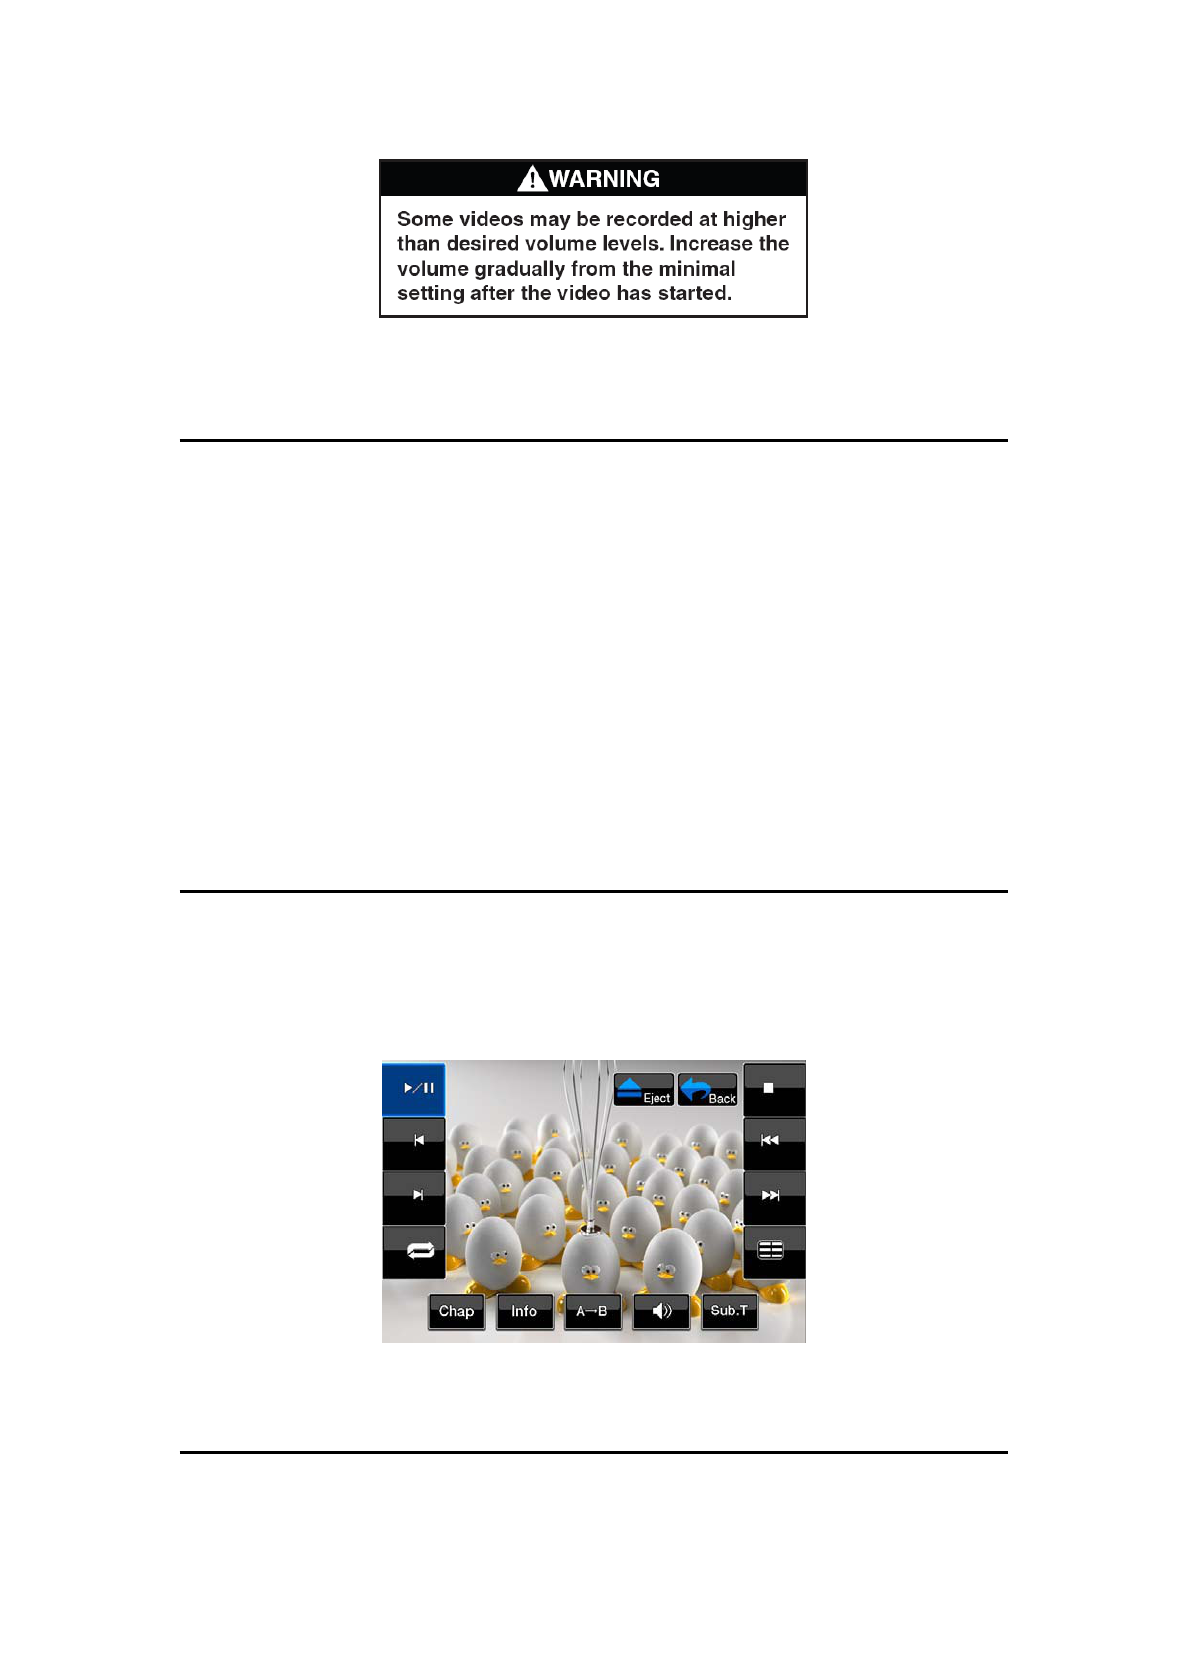
Showing DVD Player mode screen
After disc is loaded, the play mode is automatically engaged. Touch the screen
of the playing disc to display DVD Video menu. The display will return to the
playback screen, if you do not touch the screen for 5 seconds.
Operate the DVD Player menu
You can select the button items displayed in the DVD menu by directly
touching it. If the button items are hard to select correctly, you can also operate
them by using the remote control directional buttons.
Stop Playback
1. Touch the [ ] key. Playback is stopped.
2. To resume playback, press the [ ] button. Playback resumes from the
scene where playback is stopped.
Play/Pause Playback
1. Touch the [ / ] key to pause during playback.
2. Touch the [ / ] key again to resume playback.
Skip(Search) a Chapter
1. Press the [ ] or [ ] button during playback.
Chapters are skipped down or up from current locations, as many times as
the button is pressed, and playback starts.
Fast Forward Fast Backward
1. Press the [ ] or [ ] button to start your fast backward or fast forward
during playback. The playback speed starts at 2x, then will increase to 4x, 8x,
and 16x with each additional press.
Ć No audio is reproduced during fast forward and fast backward operation.
Ć The fast forward and fast backward speed may differ depending on the disc.
Search with a Chapter/Title Number
You can locate the beginning of a scene using the chapter numbers or title
numbers recorded on the DVD Video disc.
1. Showing the DVD PLAYER mode screen, touch the [Chap] key. The Key
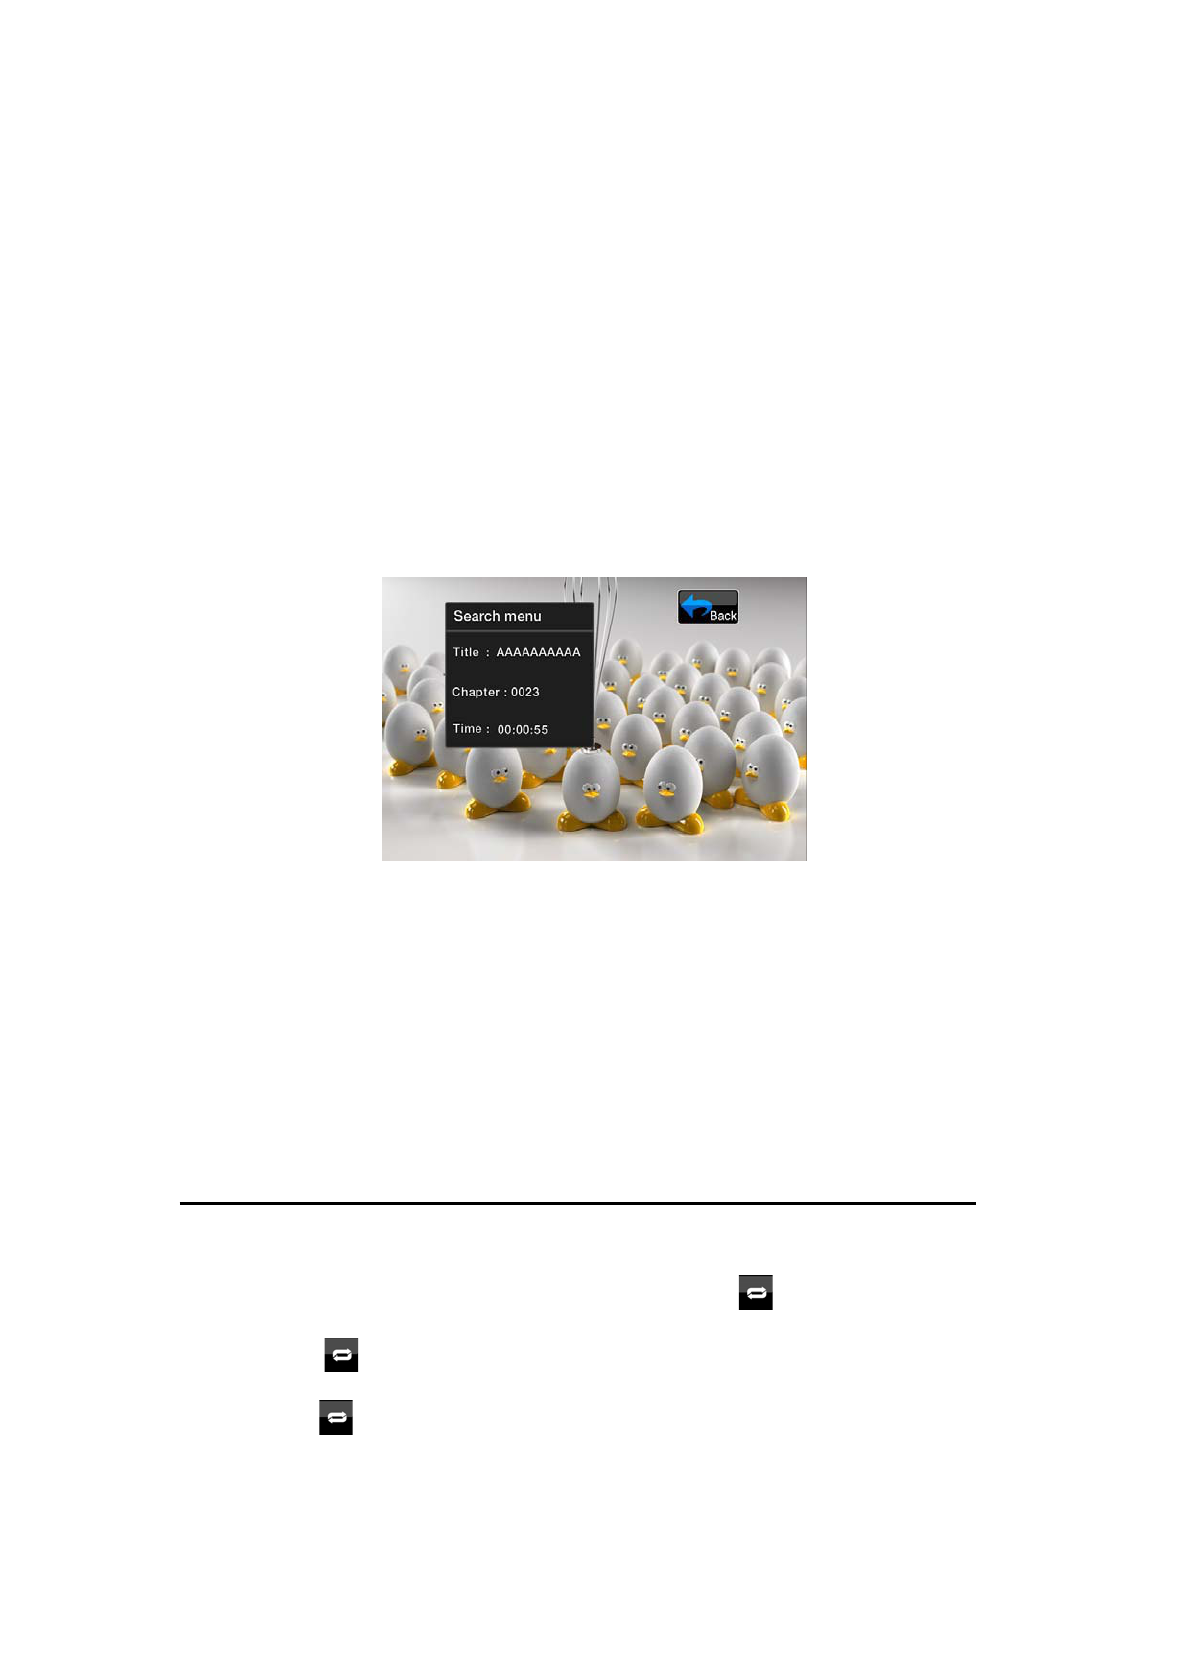
Pad screen appears with the chapter number input mode. Touching the
[Title] key turns the Key Pad to the title number input mode. Touching the
[Time] key turns the Key Pad to the time number input mode.
噝Title: A large segment to divide the data area of the disc.
噝Chapter: A small segment to divide the data area of the disc.
噝Time: A specific time on the disc.
2. Input the number of the title/chapter/time that
you want to play back with the [0] to [9] key.
3. Touch the [OK] key.
Playback starts from the scene of the input title number, time or chapter
number.
Ć If the input title/chapter/time number does not exist or searching with a
title/chapter number is not allowed, the screen image will not change.
4. Touch the [Back] key.
Repeat Playback
This operation plays back chapters recorded on the DVD-Video repeatedly.
1. Showing the DVD Player mode screen, touch the Repeat key.
2. Touch the key once for Chapter Repeat, again for Title Repeat.
3. Press the button again to turn off the repeat playback.

Repeat A-B
Select the desired passage to play back.
Touch [A-B] repeat A to B button.
Selected passage starts play again.
Touch this button again to stop replay.
Using the Title Menu
On DVD discs containing two or more titles, you can select from the title menu
for playback.
1. Showing the DVD PLAYER mode screen, touch the key during
playback. The title menu screen appears.
Ć Depending on the disc, the title menu cannot be called.
2. Select the button items displayed in the title menu screen by the same way
of the DVD menu operation.
Ć Depending on the disc, items cannot be selected with the ten-key buttons.
Switching Audio Language
On discs in which two or more audios or audio languages have been recorded,
you can switch among the audio languages during playback.
1. Touch the audio key during playback.
• Each time you touch the key, you can switch among audio languages.
• It may take time to switch among audios.
Ć Depending on the disc, up to 8 audios may be recorded. For details, see the
mark of the disc: ( Indicates that 8 audios have been recorded).
Ć When the power is turned on and when the disc is changed to a new one,
the language set as the factory default is selected. If that language has not
been recorded, the language specified on the disc.
Ć Depending on the disc, switching may be completely impossible or

impossible on some scenes.
2. The DVD PLAYER mode screen will hide in 5 seconds after your selection is
made.
Switching Subtitles
On DVD discs in which two or more subtitle languages have been recorded,
you can switch among the subtitle languages during playback.
1. Touch the [Sub.T] key during playback. Each time you touch the key, you
can switch among subtitles.
• It may take time to switch among subtitles.
Ć Depending on the disc, up to 32 kinds of subtitles may be recorded. For
details, see the mark of the disc: ( Indicates that 8 kinds of 8 subtitles
have been recorded).
Ć Depending on the disc, switching may be completely impossible or
impossible on some scenes.
2. The DVD Player mode screen will hide in 5 seconds after your selection is
made.
3. To turn off subtitles, repeat touching [Sub.T] key until subtitles are turned
off.
Switching angles
angles, you can switch among the angles during playback.
1. Touch the [Angle] button on the remote control during playback. Each time
you touch the key, you can switch among angles.
Ć It may take time to switch among angles.
Ć Depending on the disc, up to 9 angles may be recorded. For details, see the
mark of the disc: ( Indicates multi-angle).
Ć Depending on the disc, angles may switch smoothly or switch with a
momentary still image.
Ć Depending on the disc, switching may be completely impossible or
impossible on some scenes.
Ć Depending on the disc, scenes recorded in two or more angles may be
played back.
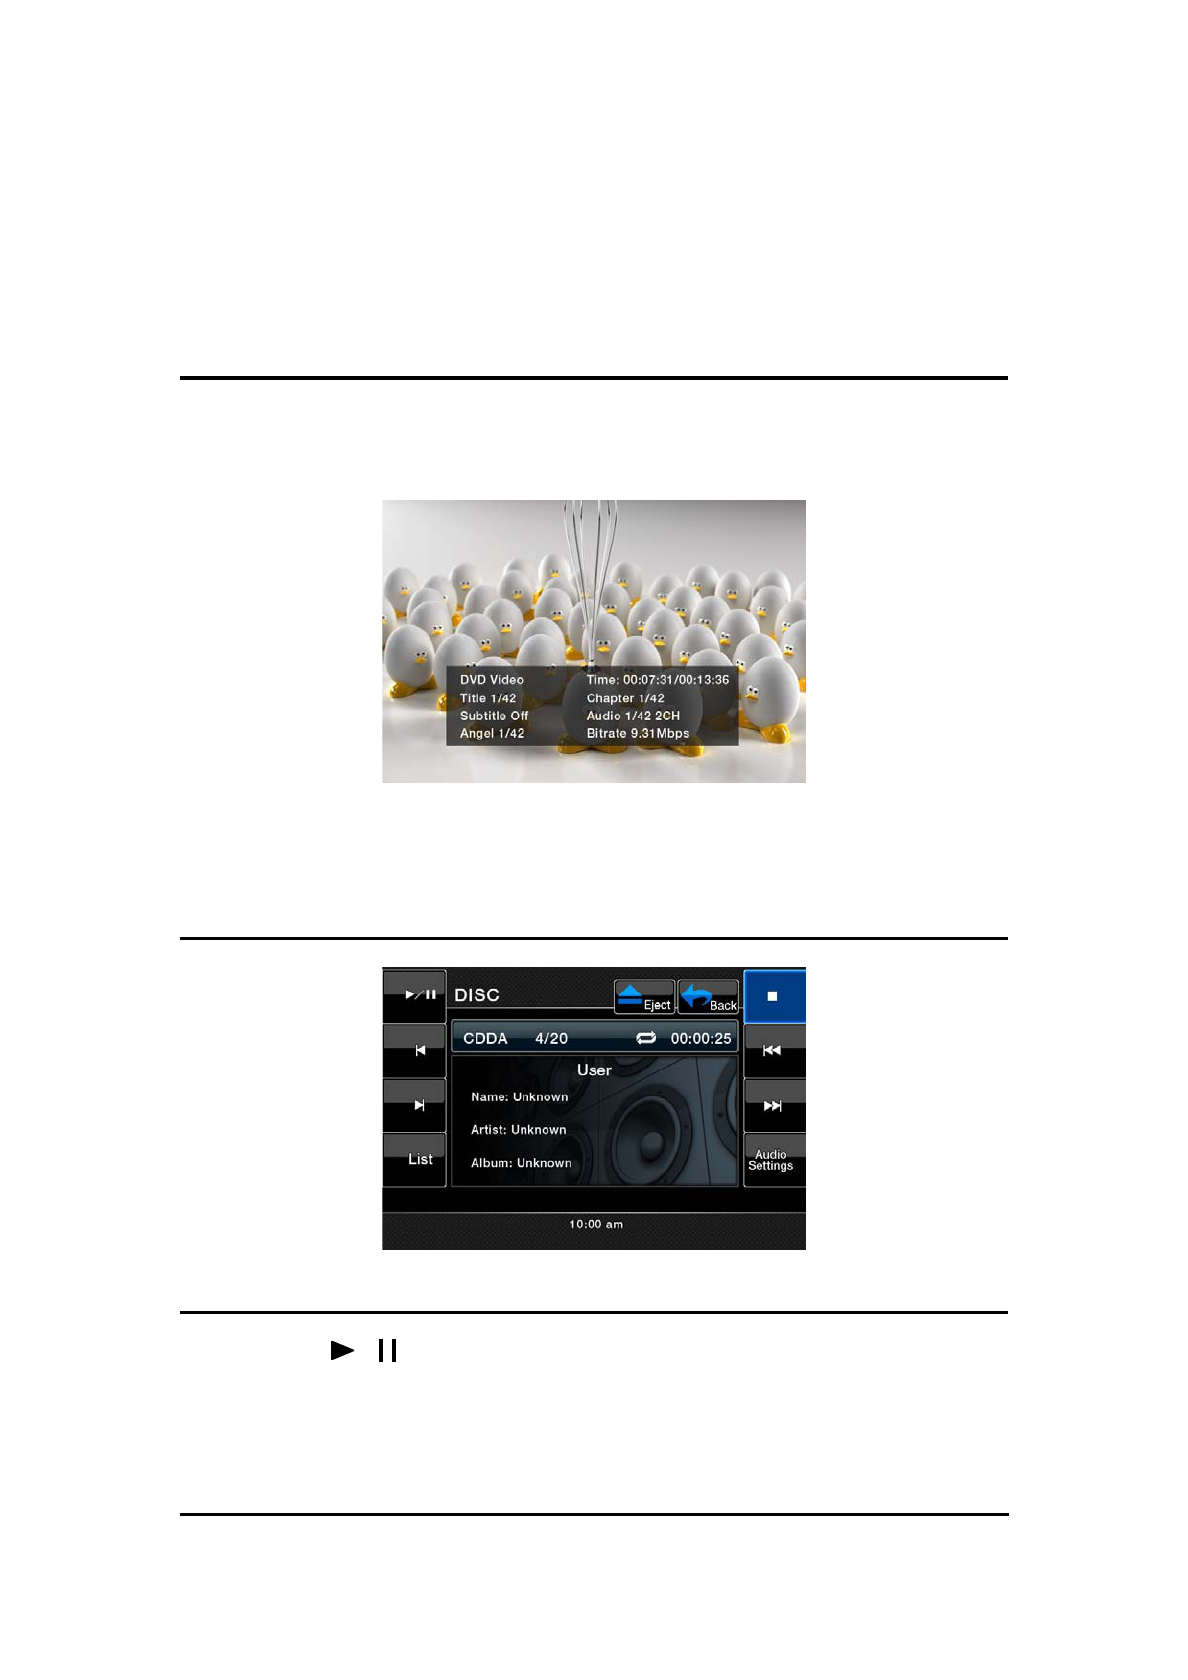
Displaying the playback status
Touch the [Info] key on the DVD Player mode screen, or remote control.
Playback status is displayed on the screen.
Listening to a CD
Pausing Playback
1. Touch the [ / ] button to pause playback.
2. To resume playback, touch the same button again.
Skipping a Track (searching)
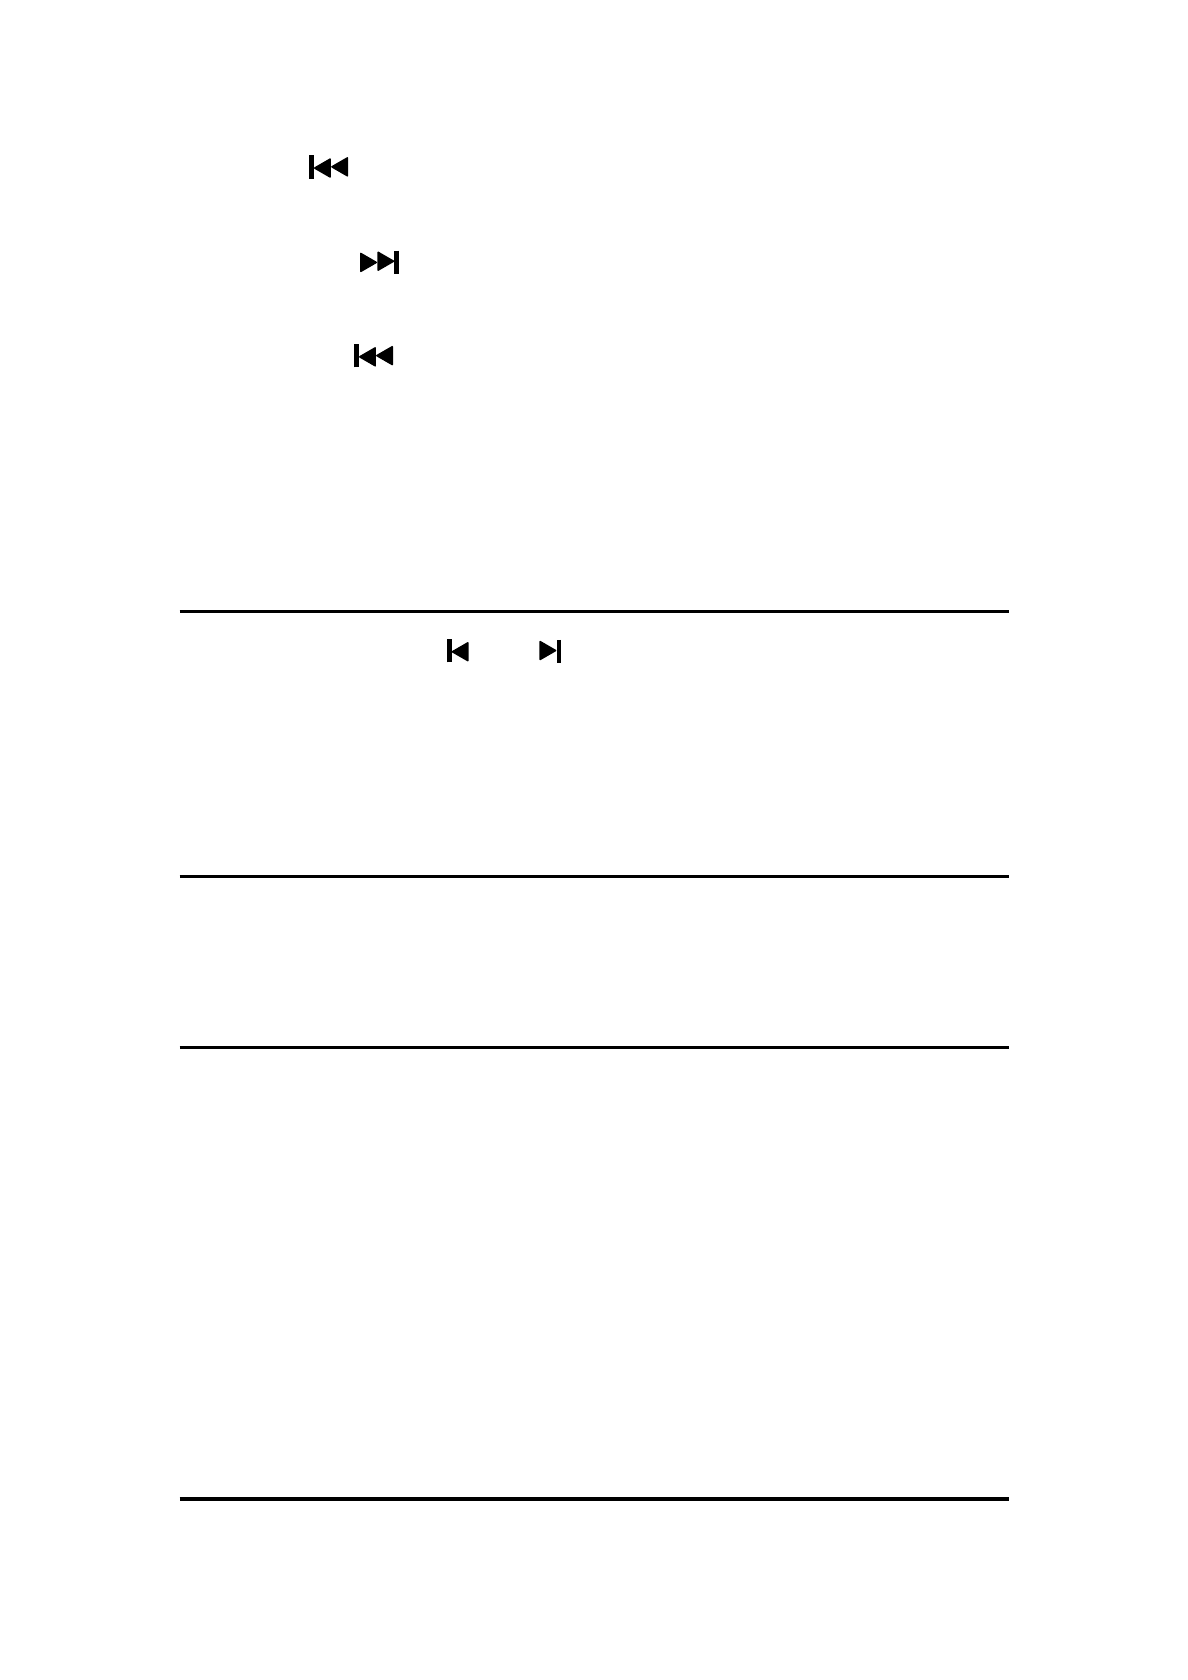
Touch the [ ] button during playback. Tracks are skipped, as many as the
times the button is pressed, and playback starts.
• Pressing the [ ] button starts playback from the beginning of the next
track.
• Pressing the [ ] button starts playback from the beginning of the current
track.
When this button is pressed again within about 2 seconds, playback starts
from the beginning of the previous track.
Fast Forward and Fast Backward
1. Press and hold the [ ] or [ ] button during playback. Press again to
advance to higher speed reversing or forwarding such as 2h, 4h, 8h and
16h. Press once more to resume normal speed playback.
Scanning the Tracks
1. Touch the [Scan] button during playback. Each song will play 10 seconds.
Searching with the Track Number
This operation allows searching using the track numbers recorded on the CDs.
1. Touch the [Key] button on a display. The numerical keypad willappear on
the screen.
2. Input the track number that you want to play back with [0] to [9] key.
Playback starts from the track of the input track number.
• If the input track number does not exist or searching with a track number is
not allowed, the screen image will not change.
Selecting a track on the Track List Screen
This function allows you to select tracks from a displayed list.
1. Touch the track title on the display list. The selected track will start playing.
2. When the desired track is not displayed, touch the [ ] or [ ] key to scroll
the track list.
3. Touch the desired track title key. The corresponding track is started
playback.
Other various play functions
Touch the touch key of the function you want to play.
Repeat :Press once to start a single track repeat. Press again to activate
a repeat all. To turn repeat off, press same button again.
• Repeat symbols are displayed in the info window in the upper right area of
the screen.
Shuffle : Touch this button to shuffle the tracks during playback. Touch
this button again to turn off the feature.
• A shuffle symbol is displayed in the info window in the upper right area of the
screen.
Stop Playing [ ]: Stop play all the tracks.
Set up [Audio Settings]: Touch this button to enter Audio menu.
Listening to MP3/WMA
This unit is an ID3 Tag compatible model.
This unit supports the ID3 TAGs of the Version 2.4, 2.3, 1.1 and 1.0.
In displaying, this unit gives priority to the Version 2.3 and 2.4 TAGs.
After USB device inserted into USB slot of front panel, or disc is loaded, the
play mode is automaticlly engaged.

What is MP3/WMA?
MP3 is an audio compression method and classified into audio layer 3 of
MPEG standards.
WMA is an audio compression method developed by Microsoft Corporation.
These audio compression methods have penetrated into PC users and
become a standard format.
These features compress the original audio data to about 10 percent of its
initial size with a high sound quality. This means that about 10 music CDs can
be recorded on a CD-R disc or CD-RW disc to allow a long listening time
without having to change CDs.
Note:
• Some CDs recorded on CD-R/RW mode may not be usable.
Displaying MP3/WMA TAG titles
Tag information such as title, artist and album title can be displayed
for MP3/WMA file containing Tag information.
Precautions when creating an MP3 disc
噝
File extensions
1. Always add a file extension “.MP3” or “.mp3” to an MP3 file, and “.WMA” or
“.wma” to a WMA file by using single byte letters. If you add a file extension
other than specified or forget to add these file extension, the file cannot be
played. In addition, if you use upper case and lower case letters (capital and
small letters) mixedly for file extensions, normal play may not be possible.
2. Files other than MP3/WMA data cannot be played.
Playing files with a format not supported will be skipped, and the scan, random
and repeat playback mode may be canceled.

噝
File and Disc Not Supported
Files and discs with following extensions are not supported: *.AAC, *.DLF,
*.M3U, *.PLS, MP3 PRO files, files with DRM, open session discs.
噝
Logical format (File system)
1. When writing an MP3/WMA file on a disc, please select “ISO9660 level 1 or
level 2 (without including expansion format)” as the writing software
format. Normal playback may not be possible if the disc is recorded on
another format.
2. The folder name and file name can be displayed as the title during
MP3/WMA play but the title must be within 31 single byte alphabetical letters
and numerals for the folder name and file name (including an extension).
Entering more letters or numerals than specified may cause an incorrect
display.
• Entering File and Folder Names
Names using the code list characters are the only file names and folder names
that can be entered and displayed. Using any other character will cause the file
and folder names to be displayed incorrectly.
噝
Electronic Shock Protection
10 seconds for CD-DA (CDA)
45 seconds for MP3 recorded at 44.1 kHz, 128kbps
90 seconds for WMA recorded at 44.1 kHz, 128kbps
噝
Folder structure
1. A disc with a folder having more than 8 hierarchical levels will conflict with
the ISO9660 and playback will be impossible.
噝
Number of files or folders
1. The maximum allowable number of folders is 255 (including root directory);
the maximum allowable number of files is 512 (max. 255 per folder). This
represents the maximum number of tracks that can be played back.
2. Tracks are played in the order that they were recorded onto a disc. (Tracks
might not always be played in the order displayed on the PC).
• Some noise may occur depending on the type of encoder software used
while recording.
• In case of a track recorded at VBR (variable bit rate), the display for the play
time of the track may be slightly different from the actual play time. Also, the
recommended value of VBR ranges from 32 kbps to 320 kbps.
• After disc selection, the play mode is automatically engaged.
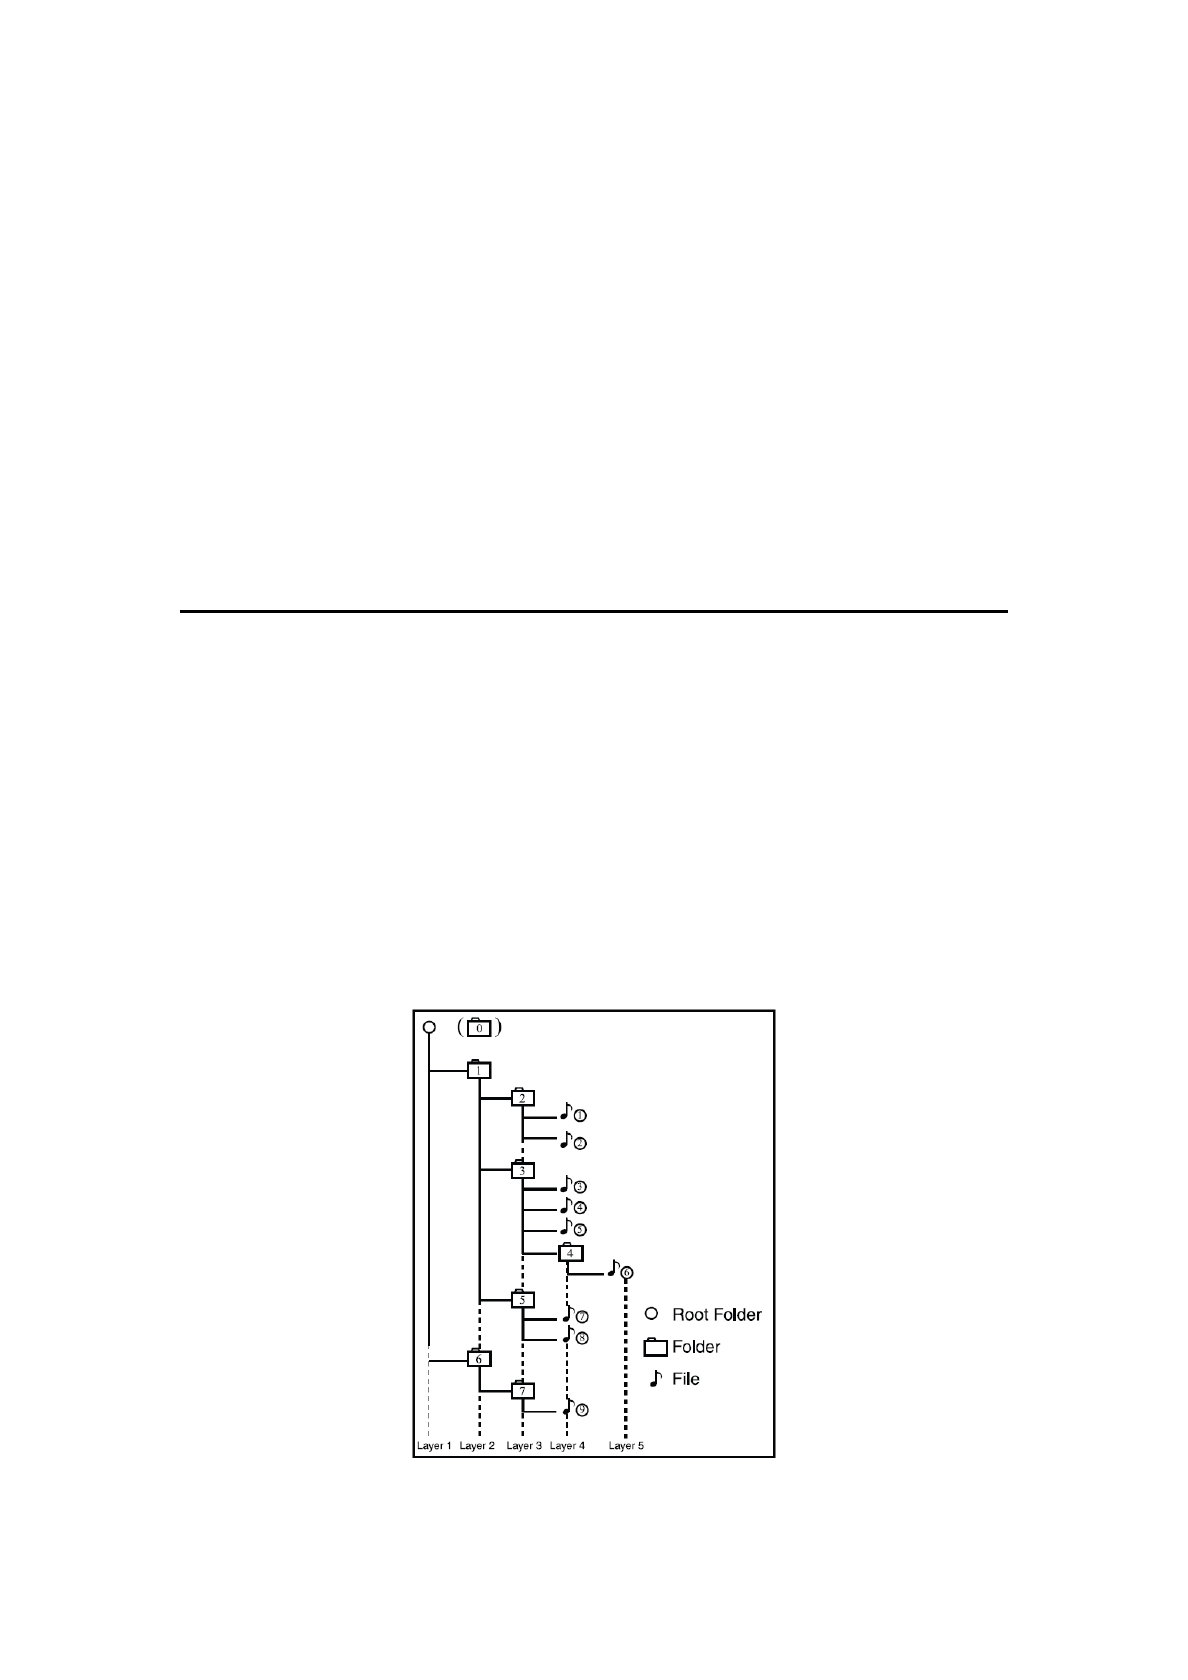
Playing MP3 folders
When selected for play, files and folders (Folder Search, File Search or Folder
Select) are accessed in the order in which they were written to the media. As a
result, the order in which they are expected to be played may not match the
order in which they are actually played.
You may be able to set the order in which MP3/WMA files are to be played by
assigning file names beginning with play sequence numbers such as “01” to
“99”. For example, a medium with the following folder/ file hierarchy is subject
to Folder Search, File Search or Folder Select. See the diagram below.
The player will only recognize three folder levels and does not display folders
containing other folders. In the example above, the unit will display folders 3, 4,
6, and 8, but not 2 and 7 since they do not contain others.
AUX IN / AV IN Operations
External peripheral devices, including a game console, camcorder, navigation
unit, iPod/ iPhone, etc. can be connected to the AUX IN or AV IN connector on
the back of this unit using the A/V media cables.
NOTE:
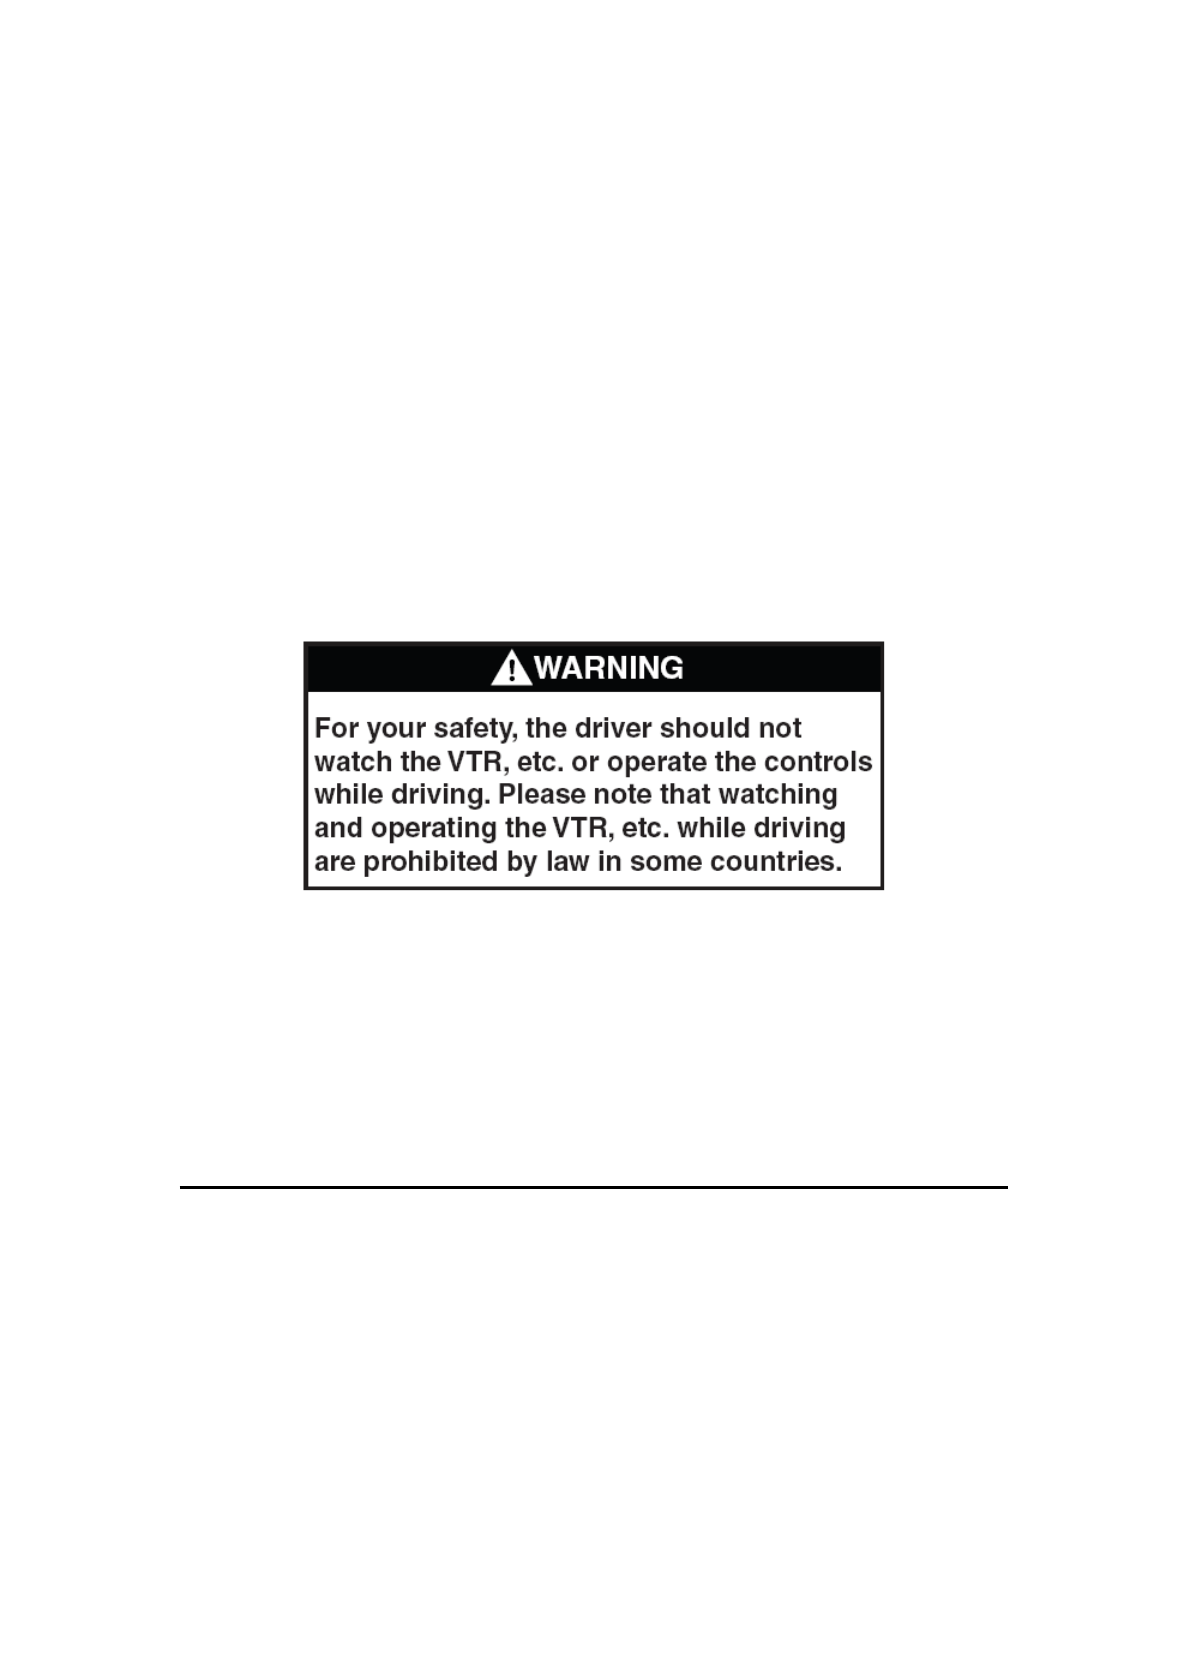
For your safety, the unit has a safety function, which turns off the picture when car is
moving, so only the audio can be heard. The picture can be only watched, when the car is
stopped and parking brake is applied.
Switching to AUX IN / AV IN mode
Press [AUX IN] or [AV IN] button on Source display to select desired mode
(when unit is reading).
The LCD will display the external video.
The screen will dispaly “No Video” menu, if there is no video signal.
You cannot directly control external devices connected to the AUX IN or AV IN
input.

Camera Operations
Switching to Camera mode
Press [Camera] button on Source display to select desired mode (when unit is
reading).
The LCD will display the external video.
The screen will dispaly “No Video” menu, if there is no video signal. Press
[Back] back button to return to the Source display.

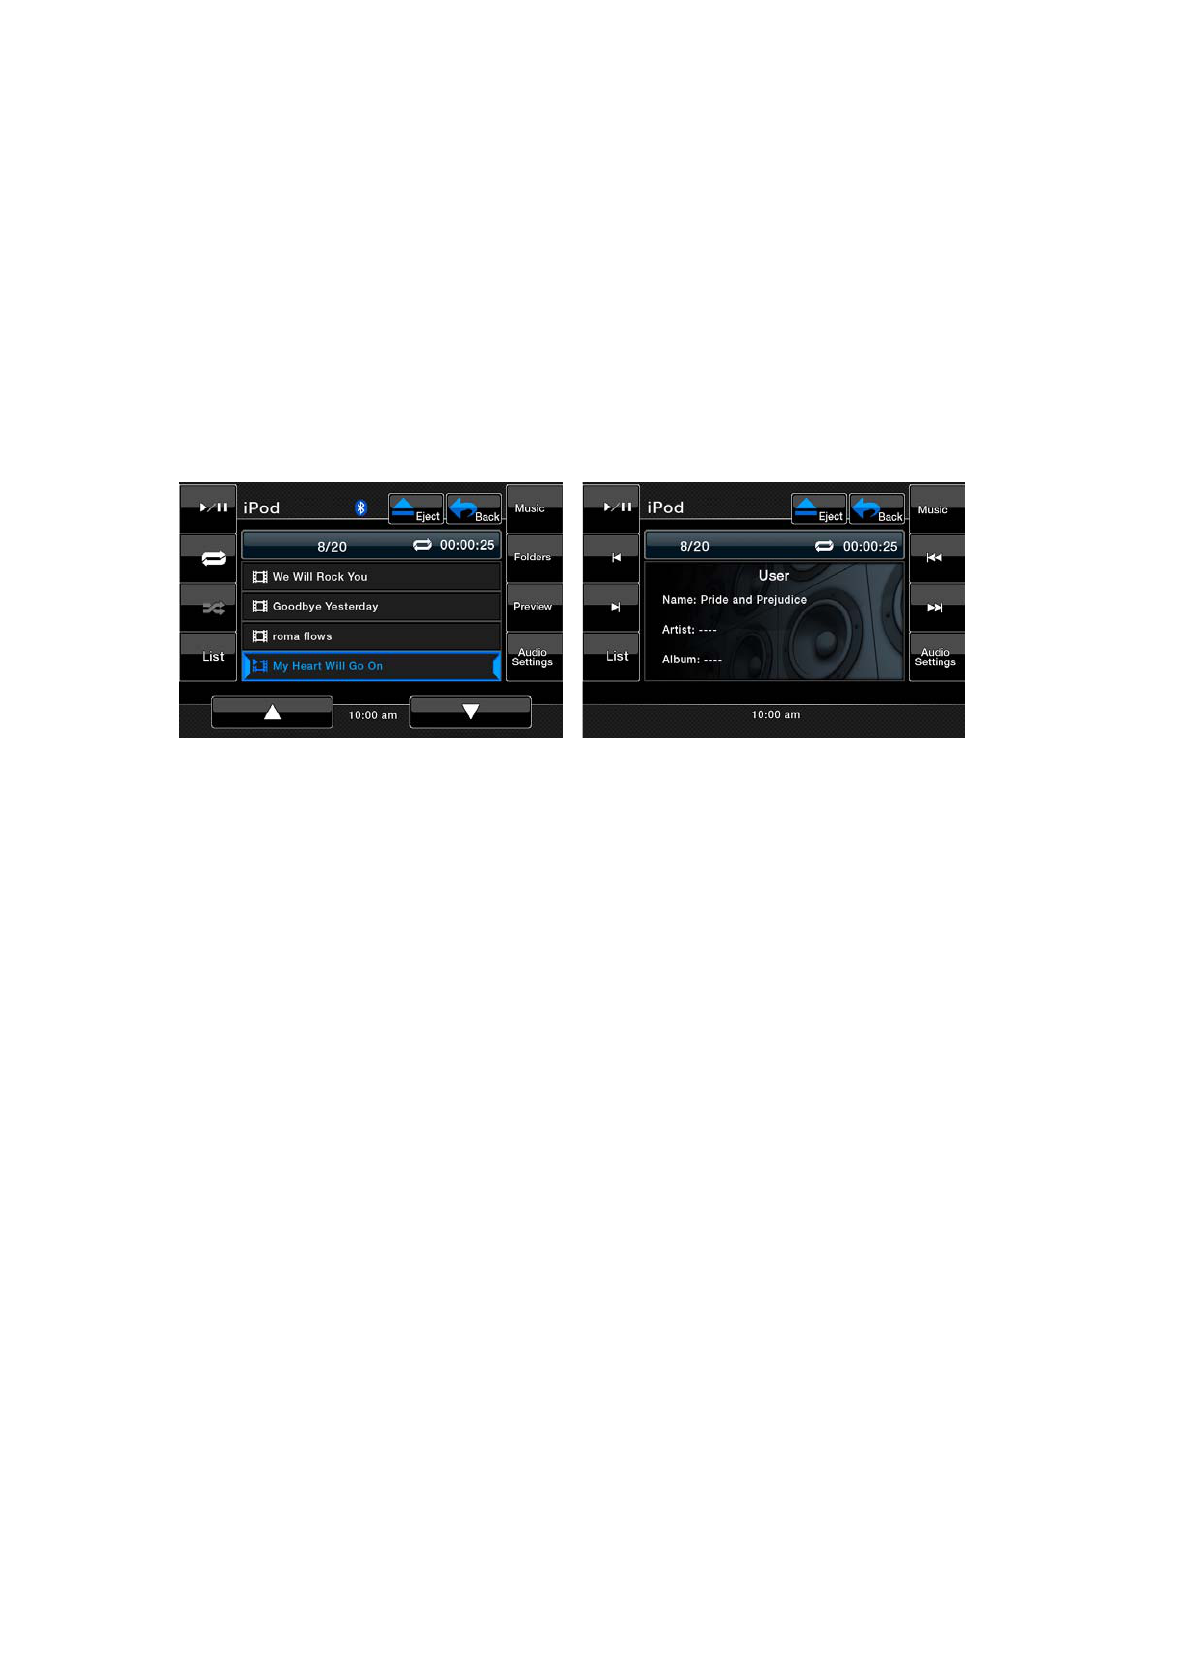
iPod/iPhone Operations
iPod/iPhones can be connected by using the connector cable supplied with the
iPod/iPhone, but in this case, you can enjoy its audio sound only. To enjoy
video movies stored in the iPod/iPhone with video displaying them on this unit,
it is required to use the special connector cable (CCA-723) separately sold.
Note:
噝
This system will not operate or may operate improperly with unsupported versions.
噝
For detailed information on the playable iPod/iPhone models, see our home page:
www.clarion.com
Notes on using Apple iPod/iPhone
• Do not connect an iPod/iPhone to this unit with a headphone connected to
the iPod/iPhone.
• After the iPod/iPhone has been connected to this unit, the iPodÿs buttons
are disabled for operation in the Music mode.
In the Video mode, do not operate the iPodÿs
buttons.
• When in the iPod mode, a special iPod/iPhone control screen is displayed
different from the main screens for other modes.
• When in the iPod mode, the screen image input from the AUX terminal is
output to the rear monitor.
• When no data is present, the title display will remain blank.
• The iPod/iPhone is used with the equalizer function turned OFF.
• Set the iPod/iPhoneÿs language setting to English before connecting your
iPod/iPhone. Some characters of the other languages may not be displayed
correctly in this system.
噝
Precautions on battery consumption:
If the iPod/iPhone is connected to this unit when the iPod/iPhone’s internal
battery has run down, this function may not operate correctly. You must
connect the iPod/iPhone after charging the battery if it has run down.
Selecting the iPod mode
1. Connect your iPod/iPhone to the USB connector. The system will
automatically detect the connected device and change to the iPod mode.
The iPod icon is displayed on the Source display screen.
The playback starts after a while, from where the iPod/iPhone has been
paused.
• When a iPod/iPhone is already connected
Touch the [USB] key on the Source display screen. The system changes to
the (USB) iPod mode, and starts playback from the previous position.
Controlling the iPod/iPhone
Operation keys
• iPod audio mode screen
[Video] button
• Switches to the screen of which the video output from the iPod/iPhone is
displayed.
Note:
• Note that not all iPod/iPhone devices are compatible to output video to this unit.
shuffle button
• Use to switch the shuffle mode on or off. When enabled, this function
performs playback of tracks in random order, regardless of the order in
which they are recorded.
[ / ] Play/Pause key
• Use to control playback and pause.
1. Touch the key during playback. Playback pauses.
2 . To resume playback touck the key again.
[Audio Setting] button
• Use to enter Audio Menu to set.
[Key] button
• Use to input number to select the track.
Repeat button
• Use to repeat the selected track. Skipping a track (searching)
Skipping a track (searching)
1. Press the [ ] or [ ] button during playback. Tracks are skipped, as
many times as the button is pressed, and playback starts.
• Pressing the [ ] button starts playback from the beginning of the next
track.
• Pressing the [ ] button starts playback from the beginning of the current
track.
When this button is pressed again within about 2 seconds, playback starts
from the beginning of the previous track.
Fast forward and fast backward playback
Press and hold the [ ] or [ ] buttons on the menu display for fast forward
or fast reverse.
The first press will advance the music at 2h speed. Following presses will
increase the speed to 4h, 8h, and 16h.
Release the button to resume normal playback.
Selecting a list item from a list screen
1. Touch the display list icon in the iPod selection screen.
2. Touch a desired list item on the screen to display the corresponding list of
tracks.
• Use the [ ] and [ ] keys to scroll the list.
3. Touch the desired track name on the list to play back.
• Use the [ ] and [ ] keys to scroll the list.
Viewing video data in the iPod/iPhone (only for the
iPod/iPhone with video features)
When you connect an iPod/iPhone with video features by using the optional
connector cable for iPod/iPhone with video, you can enjoy the video data and
slide show data stored in the iPod/iPhone showing them on the display of this
unit (and the rear monitor if connected).
Note:
• Do not connect the iPod/iPhone to this unit when a Video Playlists item is selected on
the iPod/iPhone.
1. Touch the [Video] button on the iPod audio menu screen. The iPod play
video screen is displayed.
2. Select the type of video, you would like to be played, by touching it on the
right side of the menu. The video playback will start.
Note:
Video playback is not available on all iPod/iPhone devices. Please contact your Clarion
dealer for details. An optional connection cable or accessory may be required for this
feature.
3. To stop the video play, touch the screen. iPod play video menu will be
displayed.
4. Touch the [Music] button to return to the iPod menu.
Note:
噝Ā
AUDIO ONLY
ā
is displayed when the automobile is moving.
噝
Image data may not be played back accordin to the status of the iPod/iPhone.
噝
The volume setting of video data is relatively lower than audio data. Be sure to lower the
volume setting before switching to the other mode.
噝
Do not select the categories with no track registered from the iPod menu screen.
The iPod/iPhone may be frozen. If the iPod/iPhone is frozen, reset the iPod/iPhone by
following the procedure described in the instruction manual of the iPod/iPhone.

噝
Audio may be played back slightly out of synchronization with video images.
USB Operations
This system can play audio files (MP3/WMA/AAC) stored in an USB memory
which is recognized as
“USB Mass Storage Class device”. You can use your USB memory as an
audio device by simply
copying desired audio files into it.
Note:
噝
This system will not operate or may operate improperly with some USB memory.
噝
Files protected with any DRM can not be played.
Notes on using USB memories
噝
General notes
• When no data is present, the message “NO FILE” will be displayed.
• The USB memory is used with the equalizer function turned OFF.
噝
Notes on the MP3/WMA/AAC files
• This system can play the MP3/WMA/AAC files stored in the USB memory.
• This system cannot play DivX files stored in the USB memory.
• For AAC files, this system supports only the MPEG4 Audio files encoded
by the iTunes.
• Set the Sampling Frequency to:
For MP3 files:
• MPEG1 Layer3: 32, 44.1, or 48 kHz
• MPEG2 Layer3: 16, 22.05, or 24 kHz
• MPEG2.5 Layer3: 8, 11.025, or 12 kHz

For WMA files: 32, 44.1, or 48 kHz
For AAC files: 44.1 or 48 kHz
• Set the Bit Rate to:
For MP3 files:
• MPEG1 Layer3: 32 to 320 kbps (VBR)
• MPEG2 Layer3: 16 to 160 kbps (VBR)
• MPEG2.5 Layer3: 16 to 160 kbps (VBR)
For WMA files: 32,48, 64, 80, 96, 128, 160, or 192 kbps
For AAC files: 16 to 320 kbps (VBR)
• Add the following file extension using single byte characters:
For MP3 files: “.MP3” or “.mp3”
For WMA files: “.WMA” or “.wma”
For AAC files: “.M4A” or “.m4a”
噝
Notes on the folder structure
• The folder hierarchy must be within 8 hierarchical levels. Otherwise,
playback will be impossible.
• The maximum allowable number of folders is 512 (including root directory
and folders with no MP3/WMA/AAC file).
• The maximum allowable number of files in a folder is 255.
• You can store the MP3 files, WMA files, and AAC files together in a folder.
噝
Notes on the Tag titles
The limitations on the Tag titles are same as those in the MP3/WMA/AAC
modes.
噝
Folder representation in the folder list
The limitations on the folder representation are same as those in the
MP3/WMA/AAC modes.
Selecting the USB Memory mode
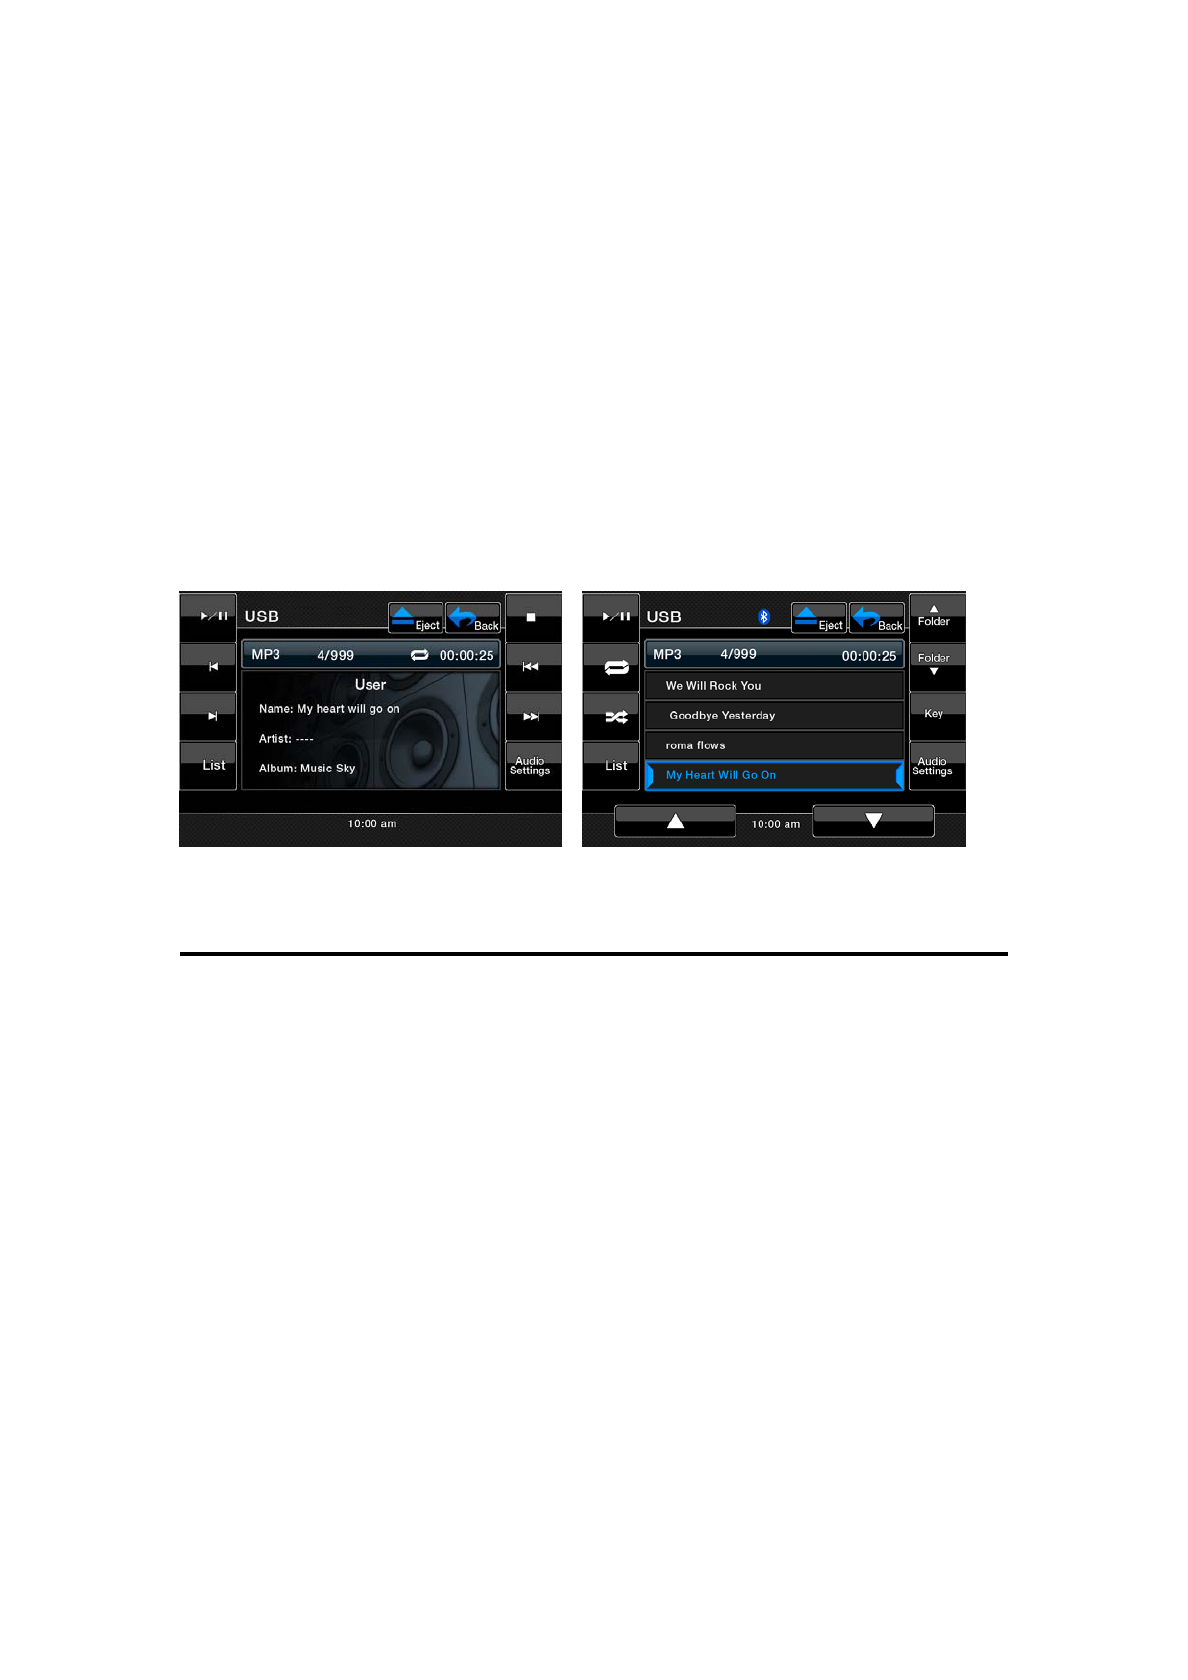
Connect your USB memory to the USB connector. The system will
automatically detect the connected device, and change to the USB mode (USB
Memory mode), and start playback after a while. If you reconnect
the same device that you disconnected last, the system will play back where it
left off.
噝
When an USB memory is already connected
Touch the [USB] key to select the USB in Source mode.
The system changes to the USB mode, and starts playback from the previous
position.
Playing back files in the USB memory
The operations in the USB Memory mode are same as those in the
MP3/WMA/AAC modes.
See “Listening to a CD” for details.
Note:
When performing the fast forward or fast backward function, the playback speed will
become 10-time faster. For the VBR files, it may differ depending on the file.

Bluetooth Operations
The Bluetooth Indicator
There is a Bluetooth indicator at the top of the screen.
When the Bluetooth function is" OFF", the indicator is grey.
When the Bluetooth function is" ON", and no phone is connected to the unit,
the indicator will blink.
If a phone has been connected to the unit, the indicator is on solid.
Accessing Bluetooth Mode
Access the Main Menu first and touch the button on the screen to access the
Bluetooth mode.
Touch the button at the top of the screen to access the Bluetooth mode
directly.
Pairing, Connecting with Mobile Phone
Access the Bluetooth [Settings] and press the [Pair mode] option on the
screen, the "Wait pairing…" displays on the screen. Now you can pair a
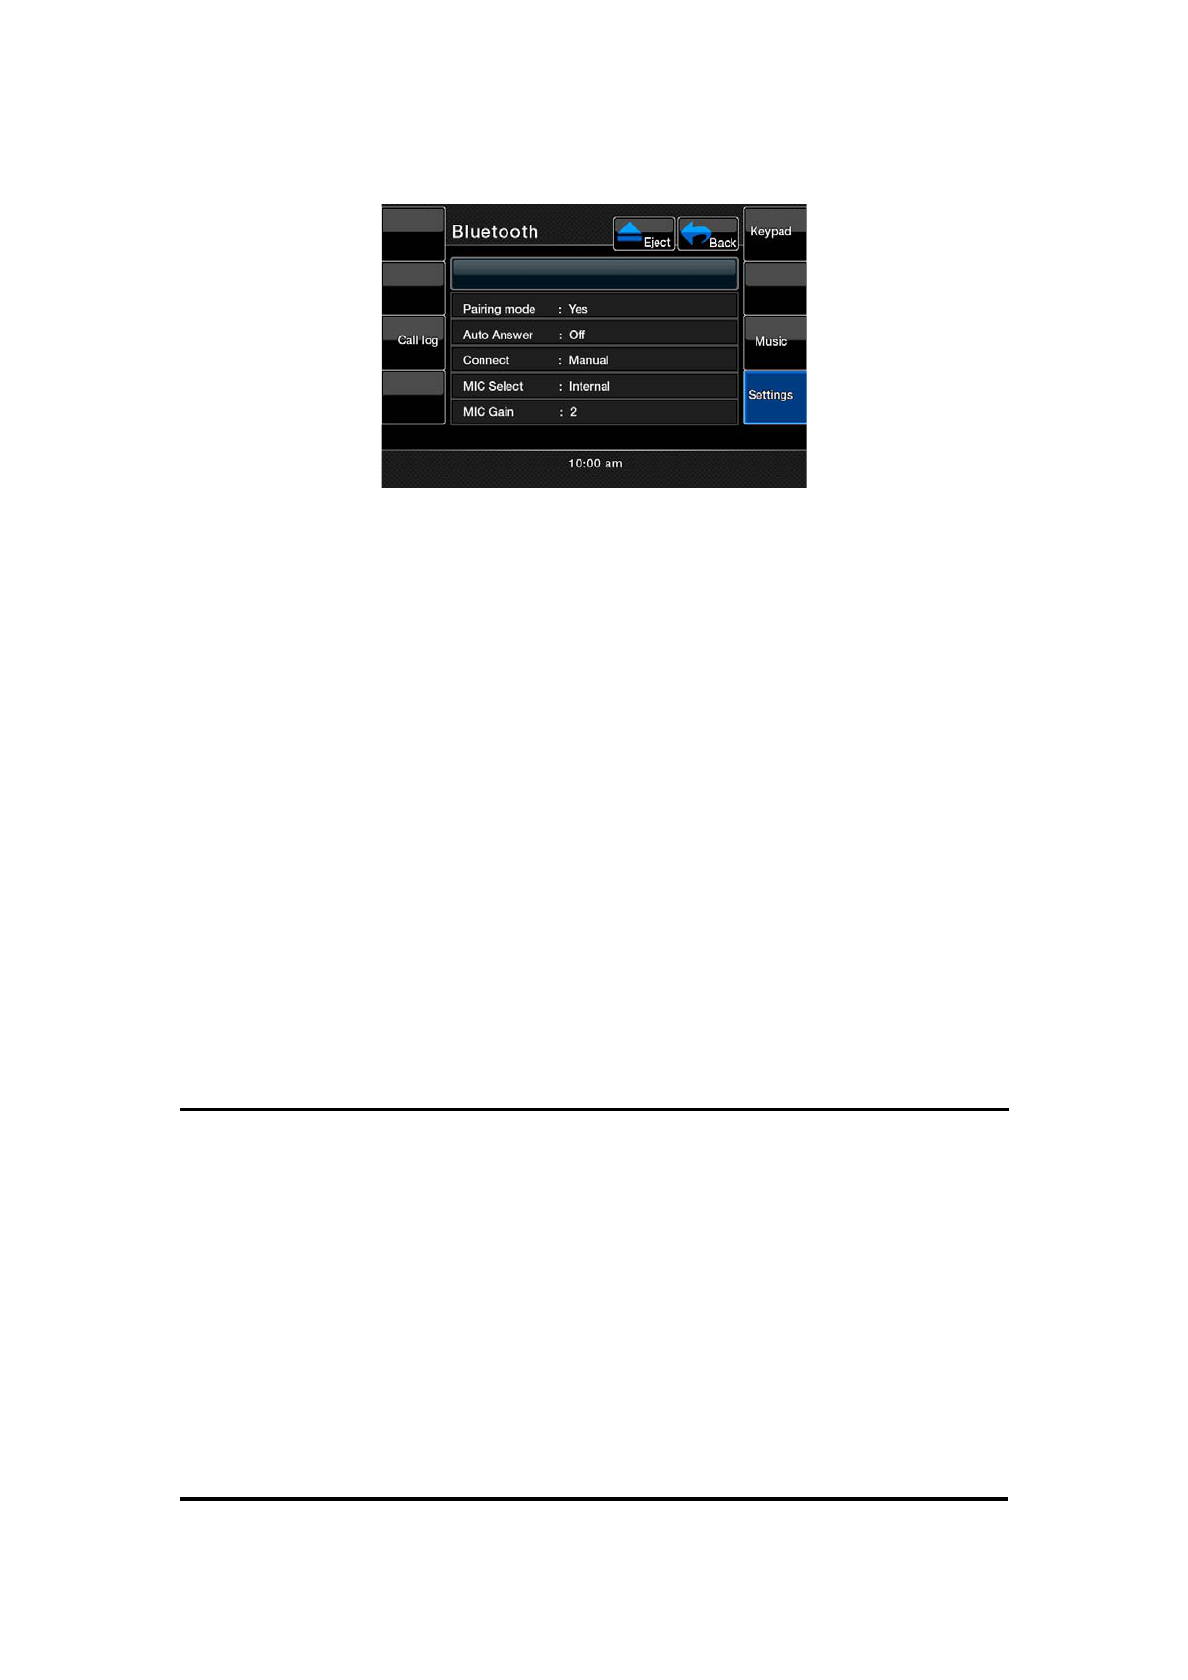
phone with the unit.
This unit can pair with 4 mobile phones in all, but just one can be active at a
time. The default phone will be retained only if all other paired phones are
deleted. Default phone: The phone that was first paired with the unit.
When maximum pairing has been completed, that is, four mobile phones have
been connected with the unit, and you want to pair a new one, then the system
will retain the default phone and last used phone used.The phone least
used(except the default phone)will be deleted and the new paired phone will
become the last used phone.Last used phone: The phone connected with the
unit was used last.If you want pair you phone with unit ,the password 1234 is
used to complete the pairing.When asked,enter this password in the phone
which you are pairing with this unit.
Auto Connect
If the unit has been set to auto connect, it will attempt to connect to the last
used phone first.
If auto connect is not activated, the unit will return to the previous operating
mode.
When the phone connects to the unit successfully, all of the cell one's
Bluetooth enabled otions will be active.
Answering An Incoming Call
You can answer an incoming call even if the playing source is other than the
telephone is selected.
You can answer an incoming automatically or manually. Refer to Bluetooth
setup and the controls and indicators title for exact instructions.
When a call come in, the following interface will be displayed on the screen.
End A Call
Touch the [End] icon to end a call.
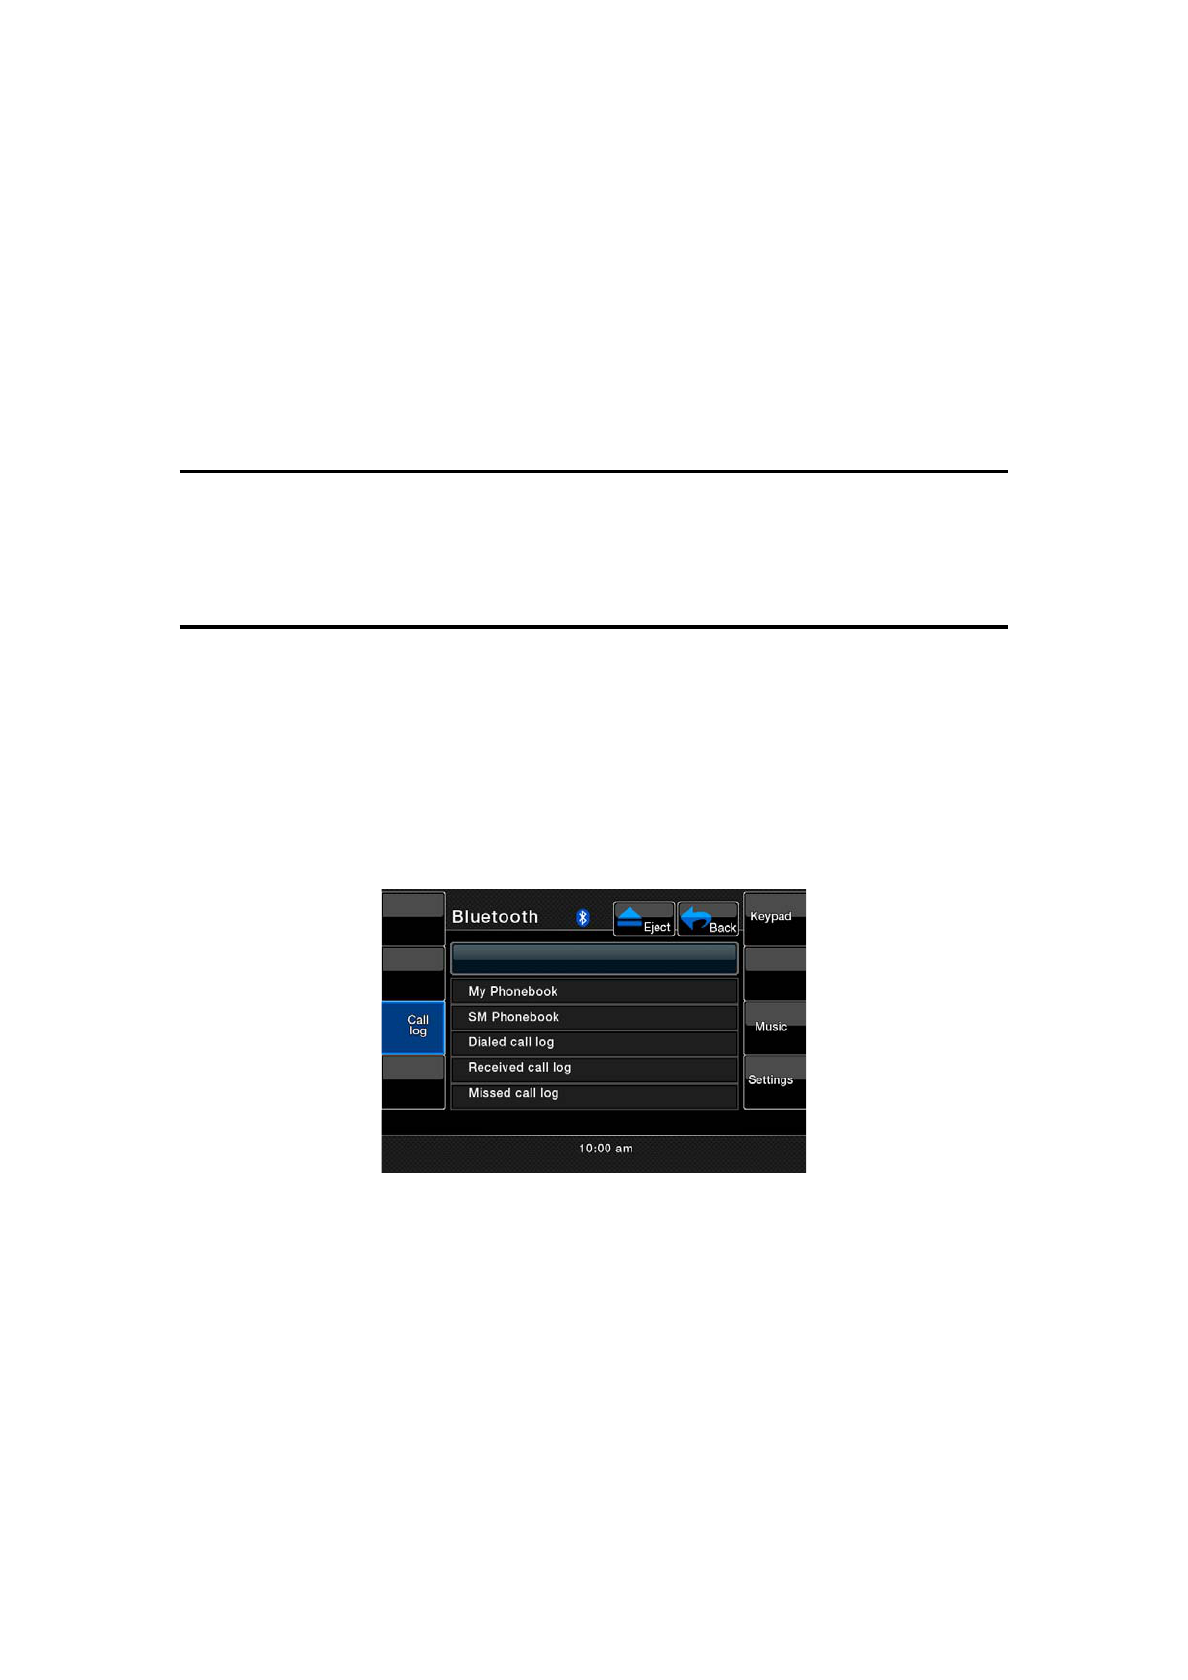
Phonebook
Press the [Phone Function] button to access the phone book.
You can see [My phone book], [SIM book], [Dialed Call], [Received Call]
and [Missed Call].
If the number has been stored in the phone book, it can be accesse by the
number to initiate the phone call.
Touch [SIM book], [Dialed Call], [Received Call] or [Missed Call], the
phonebook list will displayed on the screen.
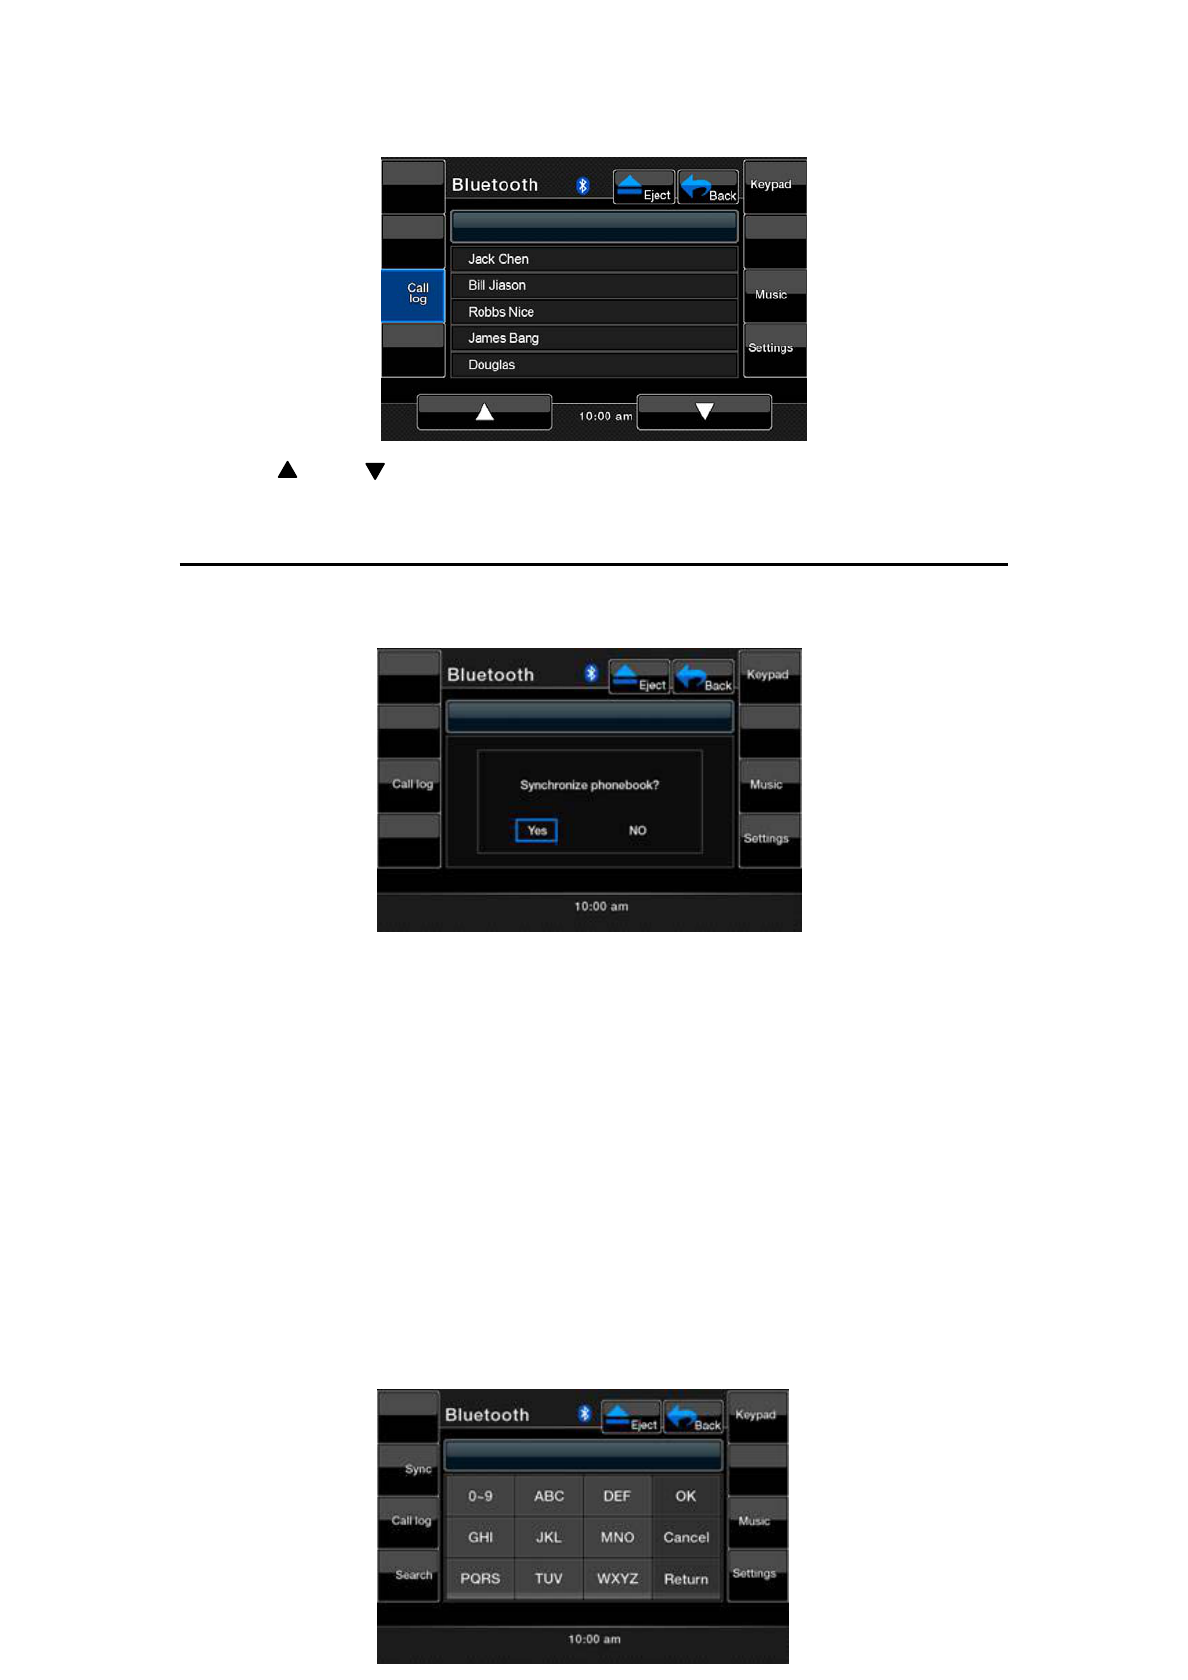
Use the [ ] and [ ] keys to scroll the list.
Synchronize Phonebook
Touch [My Phonebook] button. A message box will displayed on the screen.
Touch [Yes] button to synchronize the phonebook stored in your mobile phone.
The unit can store 500 contacts.
After synchronize the phonebook, the names of all contacts will show in the list.
Clicking one contact’s name, it will send a call.
Touch [Search] button user can search the phonebook by the first character of
the contact’s name. If entering one character, then touching [OK], the list will
display all the contact’s name, whose first character is just the selected
character.
Touch [Return] button to close search keyboard.
Note:
The function will not work if your phone is not support phonebook.
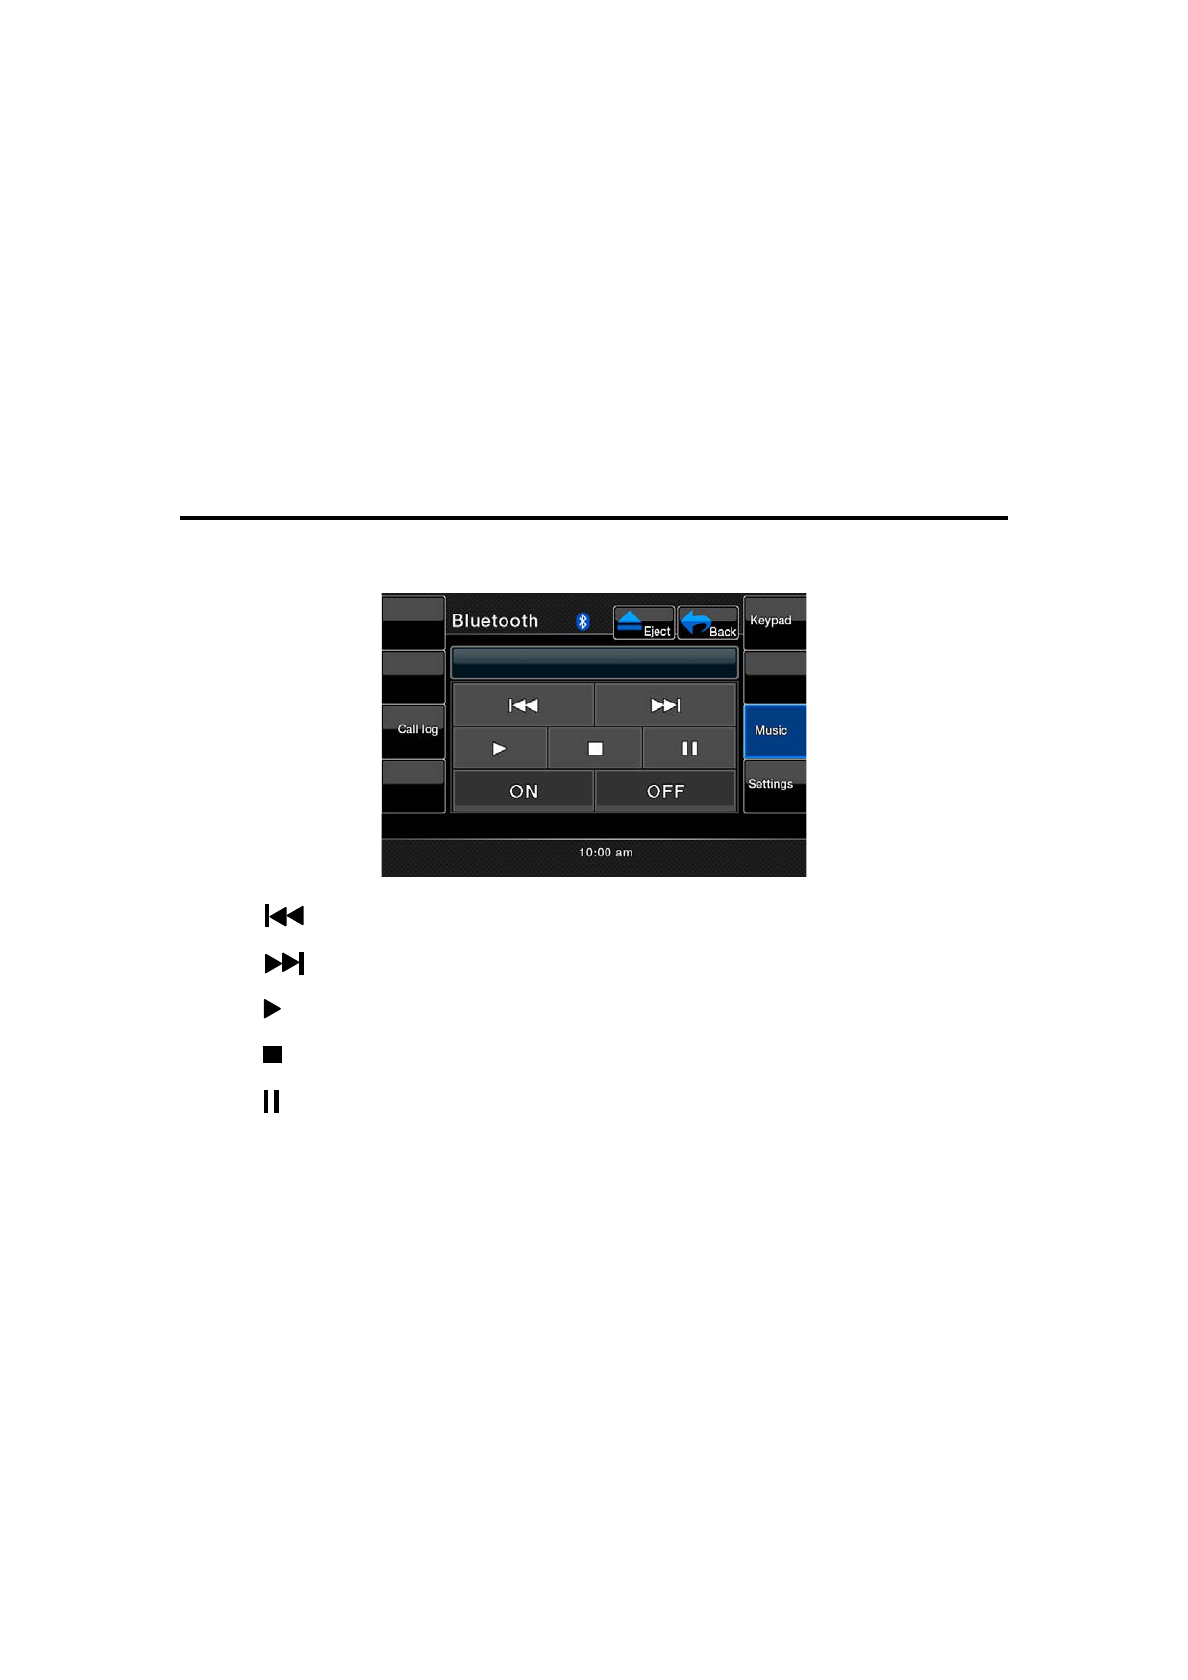
Music Operation
When touching the Music Icon, the Music Interface appears.
Touch [ ] button to previous song.
Touch [ ] button to next song.
Touch [ ] button to start play music.
Touch [ ] button to stop play music.
Touch [ ] button to pause music.
Touch [ON] button connect A2DP.
Touch [OFF] button disconnect A2DP.
Note:
The function will not work if your phone is not support A2DP.

This device complies with Part 15 of the FCC Rules. Operation is
subject to the following two conditions: (1) this device may not
cause harmful interference, and (2) this device must accept any
interference received, including interference that may cause
undesired operation.
Warning: Changes or modifications to this unit not expressly approved by
the party responsible for compliance could void the user's authority
to operate the equipment.
NOTE: This equipment has been tested and found to comply with
the limits for a Class B digital device, pursuant to Part 15 of the FCC
Rules. These limits are designed to provide reasonable protection
against harmful interference in a residential installation. This
equipment generates, uses and can radiate radio frequency energy
and, if not installed and used in accordance with the instructions,
may cause harmful interference to radio communications.
However, there is no guarantee that interference will not occur in a
particular installation. If this equipment does cause harmful
interference to radio or television reception, which can be
determined by turning the equipment off and on, the user is
encouraged to try to correct the interference by one or more of the
following measures:
- Reorient or relocate the receiving antenna.
- Increase the separation between the equipment and receiver.
- Connect the equipment into an outlet on a circuit different
from that to which the receiver is connected.
- Consult the dealer or an experienced radio/ TV technician for
help.