SKYPINE ELECTRONICS CNE8415BSMHLR Smart High Line User Manual part 1
SKYPINE ELECTRONICS (SHEN ZHEN) CO., LTD. Smart High Line part 1
Contents
- 1. User manual part 1
- 2. User manual part 2
User manual part 1


Index ............................................ 2
smart high line radio ....................... 5
4515848382 É45158483825ËÍ
Contents 1
A
Address entry menu ......................... 28
Adjusting the balance ..................... 16
Adjusting the volume
Click ...................................... 18
Confirmation tone ..................... 18
Navigation messages .............. 15, 17
Switch-on volume ....................... 18
Traffic announcements ............ 15, 17
Alternative route
Calculating .............................. 32
Viewing information .................. 32
Automatic full screen (video) ........... 88
Auto zoom (navigation) .................... 48
AUX jack ....................................... 73
B
Bluetooth®
Conditions (telephone) ............... 54
Editing device names ................. 64
LED display .............................. 56
Searching for and registering a
mobile phone ............................ 55
C
Call
Ending .................................... 59
Transferring from the hands-
free system to the mobile phone .... 59
CD/DVD
Ejecting (DVD single drive) ......... 72
Inserting (DVD single drive) ........ 72
Character entry
Navigation ............................... 12
Phone book ............................... 13
Connecting an audio device .............. 74
Connecting a USB device .................. 74
Connecting Bluetooth® audio devi-
ces .............................................. 75
D
Destination (navigation)
Entering a destination by
address ................................... 28
Entering a destination using
the map ................................... 35
Entering a special destination .... 35
Entering using geo-coordinates ... 33
Selecting from favourites ........... 34
Selecting from previous towns ..... 34
Viewing on the map .................... 31
Destination input .......................... 27
Destination memory
see Favourites
DNC
see Dynamic Noise Covering
Dynamic Noise Covering .................. 82
E
Easy mode (navigation) .................... 26
Electromagnetic compatibility .......... 5
Emergency call 999 or 112 ................. 54
Example: entering an address ........... 28
Expert mode (navigation) ................. 26
F
Factory settings ............................ 23
Favourites .................................... 45
Creating a new favourite ............. 46
Deleting a destination ............... 46
Renaming a destination .............. 46
Saving a destination .................. 45
Front panel
Moving up/down .......................... 8
Full screen mode (video mode) .......... 84
Function restrictions
Using the telephone ................... 54
G
Guarantee ...................................... 5
H
Home address
Entering and saving ................... 31
2Index
I
Interference ................................... 5
iPod®
Connecting ............................... 73
J
Junction
Entering .................................. 30
M
Main menu ...................................... 8
Navigation ............................... 25
Map (navigation)
Adjusting the scale .................... 47
Display ................................... 47
Moving .................................... 47
Map view ...................................... 48
Master device (mobile phone)
Determining ............................. 57
Menu
All special destinations ............. 35
Audio settings .......................... 81
Bluetooth® settings .................... 63
Detailed information ................. 30
Editing a route ......................... 43
Entering a new destination
(navigation) ............................. 28
Entering a street ....................... 29
Programme settings (navigation) .. 49
Screen settings ......................... 19
Searching for a special desti-
nation ..................................... 36
Settings (radio) ........................ 68
Settings (video) ........................ 86
System settings ......................... 21
Time entry ............................... 20
Volume settings ......................... 17
Mobile phone
Connecting (Bluetooth® inter-
face) ....................................... 55
De-authorising ......................... 57
Registering (authorising) ........... 55
Music main menu ............................ 75
Music mode
Activating ............................... 75
Switching off ............................ 76
N
Navigation
Deactivating ............................ 25
Navigation announcements
Switching off ........................... 40
Switching on ............................ 40
Navigation menu
Showing ................................... 85
Navigation mode
Switching on ............................ 24
O
Operating safety ............................. 5
P
Phone book
Downloading (from mobile
phone) ..................................... 64
Mobile phone ............................ 60
smart high line radio ................. 61
Picture viewer
Calling up ............................... 90
Displaying pictures ................... 91
Rotating pictures ...................... 91
Plotting the GPS track (Expert mode) .. 44
Previous towns (navigation) ............. 45
Product information ....................... 23
Proper use ..................................... 5
Q
Quick menu (navigation, Expert
mode)
Calling up ............................... 44
Editing ................................... 45
R
Radio display ................................ 65
Radio text ..................................... 71
Index 3
Route
Alternative routes ..................... 32
Calculating .............................. 31
Route guidance
Map view ................................. 38
Route information (Expert mode) ....... 41
Trip info ................................. 42
Route options
Checking/changing .................... 31
Setting .................................... 27
S
Screen
Dimming .................................. 19
SD/MMC memory card
Inserting ................................. 73
Removing ................................. 73
Security code
Changing ................................. 22
Selecting a keyboard ...................... 22
Selecting a station (radio)
Using the waveband scan ............. 66
Selecting stations
Entering the frequency manually ... 67
Using station memory ................. 66
Selecting traffic jam avoidance
(Expert mode) ................................ 41
Selecting video files ...................... 86
Setting the standby time .................. 22
Setting the volume
Telephone calls ......................... 17
Setting treble and bass .................... 16
Setting X-bass ............................... 16
smart high line radio
Switching on/off ....................... 14
smart high line radio operating
system ........................................... 6
Sound
Switching on/off ....................... 15
Sound settings ............................... 16
Special destination
Category .................................. 37
Entry ...................................... 35
Symbols on the map .................... 50
Speed Limit Assist ......................... 50
Station
Setting the sensitivity ............... 71
Station memory .............................. 66
Stations
Setting .................................... 66
Station search ............................... 66
Storing stations
Manually .................................. 68
Storing stations (radio)
Automatically ........................... 68
Switching radio mode on/off ............ 65
T
Telephone
Incoming call ........................... 58
Rejecting/ending a call .............. 58
Transferring a hands-free call
to the mobile phone ................... 59
Telephone menu ............................. 63
Touch screen
Calibrating ............................. 23
Overview ................................... 9
Traffic Announcement (TA)
Interrupting ............................. 70
Switching on/off ....................... 70
Travelstore
Storing stations automatically ..... 68
U
USB port ....................................... 73
V
Video DVD
Playing conditions .................... 83
Selecting a scene/chapter ........... 85
Video main menu ............................ 84
Video mode
Deactivating ............................ 85
Switching on ............................ 83
Voice control system
Switching off ........................... 52
Switching on ............................. 51
Voice dial (telephone) .................... 59
4Index

Introduction
Guarantee
The smart sales organisation1 provides a
guarantee for the period of 24 months with-
out kilometre limit for this accessory or
replacement part.
Operating safety
GRisk of accident
Your attention must always be focused on
the traffic conditions. Only operate the
radio when the traffic situation permits.
Operating the radio could distract you from
the traffic conditions and cause you to lose
control of your vehicle. This could result
in an accident.
Bear in mind that, at a speed of only 50 km/
h, your vehicle covers a distance of nearly
14 m per second.
GRisk of accident
Always set the volume so that you remain
able to hear the sounds of your environment
(e.g. car horns, ambulances, police sirens
etc.). You could otherwise cause an acci-
dent.
Correct use
Always observe the following when using
the audio equipment:
Rthe safety notes in this manual
RNational road traffic regulations
GRisk of accident
If work on electronic equipment or systems
(e.g. the radio) and its software is carried
out incorrectly, this equipment could stop
functioning. The electronic systems are
linked together by interfaces. Work on
electronic systems may also cause systems
that have not been modified to malfunction.
These malfunctions could affect the oper-
ating safety of your vehicle and therefore
also have a considerable effect on your
safety.
Therefore, only have work on and changes to
electronic components carried out at a
qualified specialist workshop which has
the necessary specialist knowledge and
tools to carry out the work required.
Daimler recommends that you visit a
smart Centre for this purpose.
This radio receiver is suitable for opera-
tion by all persons in accordance with
valid EU directives.
The device conforms to currently applica-
ble European or harmonised national
standards.
Therefore, adherence to the relevant spec-
ifications for electromagnetic compati-
bility is guaranteed for this device.
As a result, interference caused by your
equipment to other electrical/electronic
equipment, as well as interference to your
equipment caused by other electrical/
electronic equipment, is largely preven-
ted.
The equipment is approved by the vehicle
manufacturer in accordance with European
Automotive EMC Directive 95/54/EC. There-
fore, operation according to its intended
purpose is approved for your vehicle. The
equipment does not require certification
It complies with device-specific EMC
requirements according to the following
European standards:
REN 55013
REN 55020
! Portable electronic devices in the car
can severely impair the radio reception.
1The guarantor is the respective sales organisation in the country in which the accessory or replacement
part was bought (see list in the service booklet).
>> smart high line radio. 5
Z
At a glance
Operating system
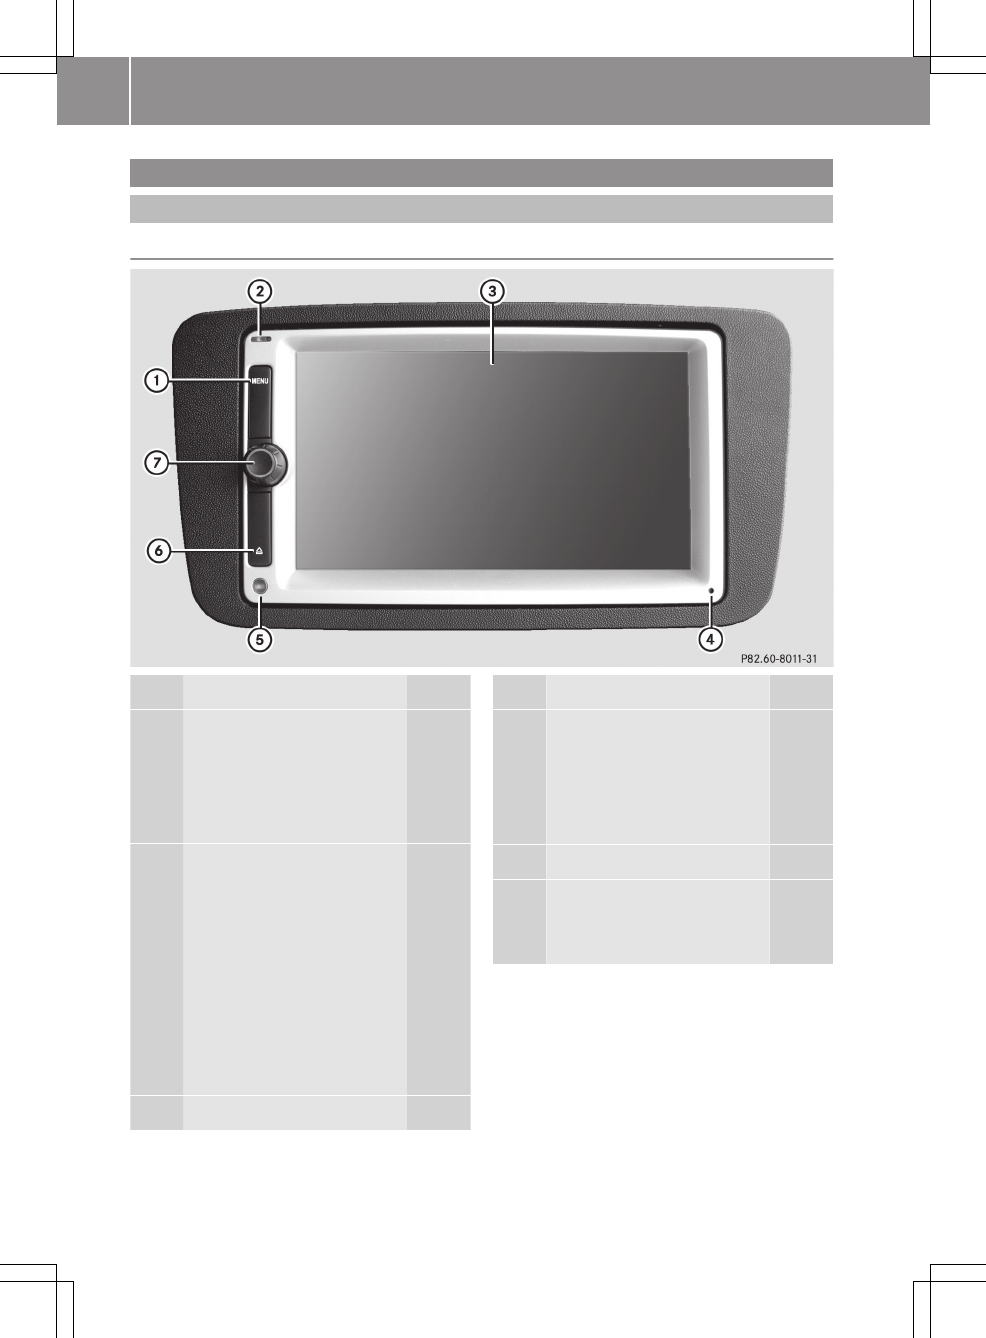
Overview
Function Page
:t button
Press briefly: calls up the
main menu 8
Press and hold: calls up
the "Audio settings" menu 8
;LED 56
Blue display: Bluetooth®
device (mobile phone,
audio equipment) is con-
nected
Flashing blue display:
Bluetooth® connection is
being established
No display: no Bluetooth®
device is connected
=Touch screen 9
Function Page
?Microphone
Telephone operation 59
Voice commands in navi-
gation 51
Dynamic Noise Covering 82
ABrightness sensor 19
Bþ button
Moves the front panel up/
down 8
6>> smart high line radio.

Function Page
CBriefly press the control
knob
• switches on the smart
high line radio 14
• mutes the audio/video
source or the navigation
announcement 15
Press and hold the control
knob
• switches the smart high
line radio off 14
Turn the control knob
• adjusts the volume 15
iThere is a reset button to the right of
LED ;. If the smart high line radio is
not working correctly, it can be reset and
restarted. To do this, press the reset
button using a pen, for example.
>> smart high line radio. 7
Z
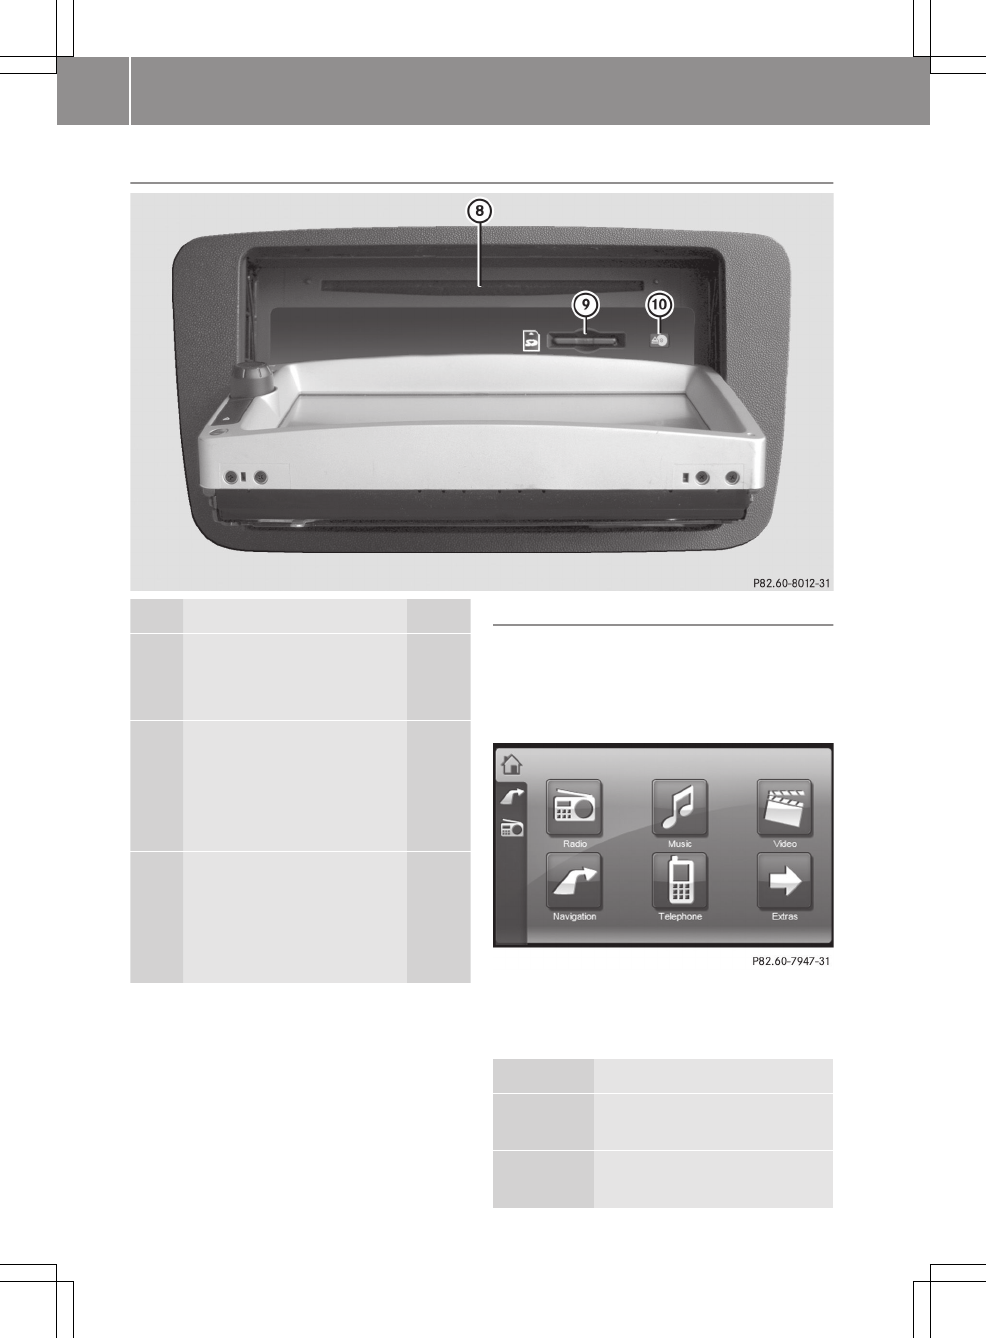
Moves the front panel up/down
Function Page
DDisc slot
• Inserts CDs/DVDs 72
• Ejects the CD/DVD 72
ESD/MMC memory card slot
• Loads an SD/MMC memory
card 73
• Ejects an SD/MMC mem-
ory card 73
FEject button 72
Display lights up orange:
CD/DVD is inserted
No display no CD/DVD
inserted
XTo move the front panel down: press but-
ton B.
XTo move the front panel up: press button
B again.
iThe front panel is moved up automati-
cally after approximately one minute.
t button
You can call up the main menu or the "Audio
settings" menu using this button.
XTo call up the main menu: press the
t button briefly.
Main menu
Select the following functions from the
main menu:
Selection Step
Radio Switches on radio mode
(Y page 65)
Music Calls up the music main
menu (Y page 75)
8>> smart high line radio.
Selection Step
Video Calls up the video main
menu (Y page 84)
Naviga‐
tion
Switches on navigation
mode (Y page 24)
Tele‐
phone
Calls up the telephone menu
(Y page 63)
Extras Calls up the picture viewer
(Y page 90)
or
Selecting general settings:
RAudio settings
(Y page 81)
RVolume settings
(Y page 17)
RScreen settings
(Y page 19)
RClock settings
(Y page 20)
RSystem settings
(Y page 21)
XTo call up the "Audio settings" menu:
press and hold the t button.
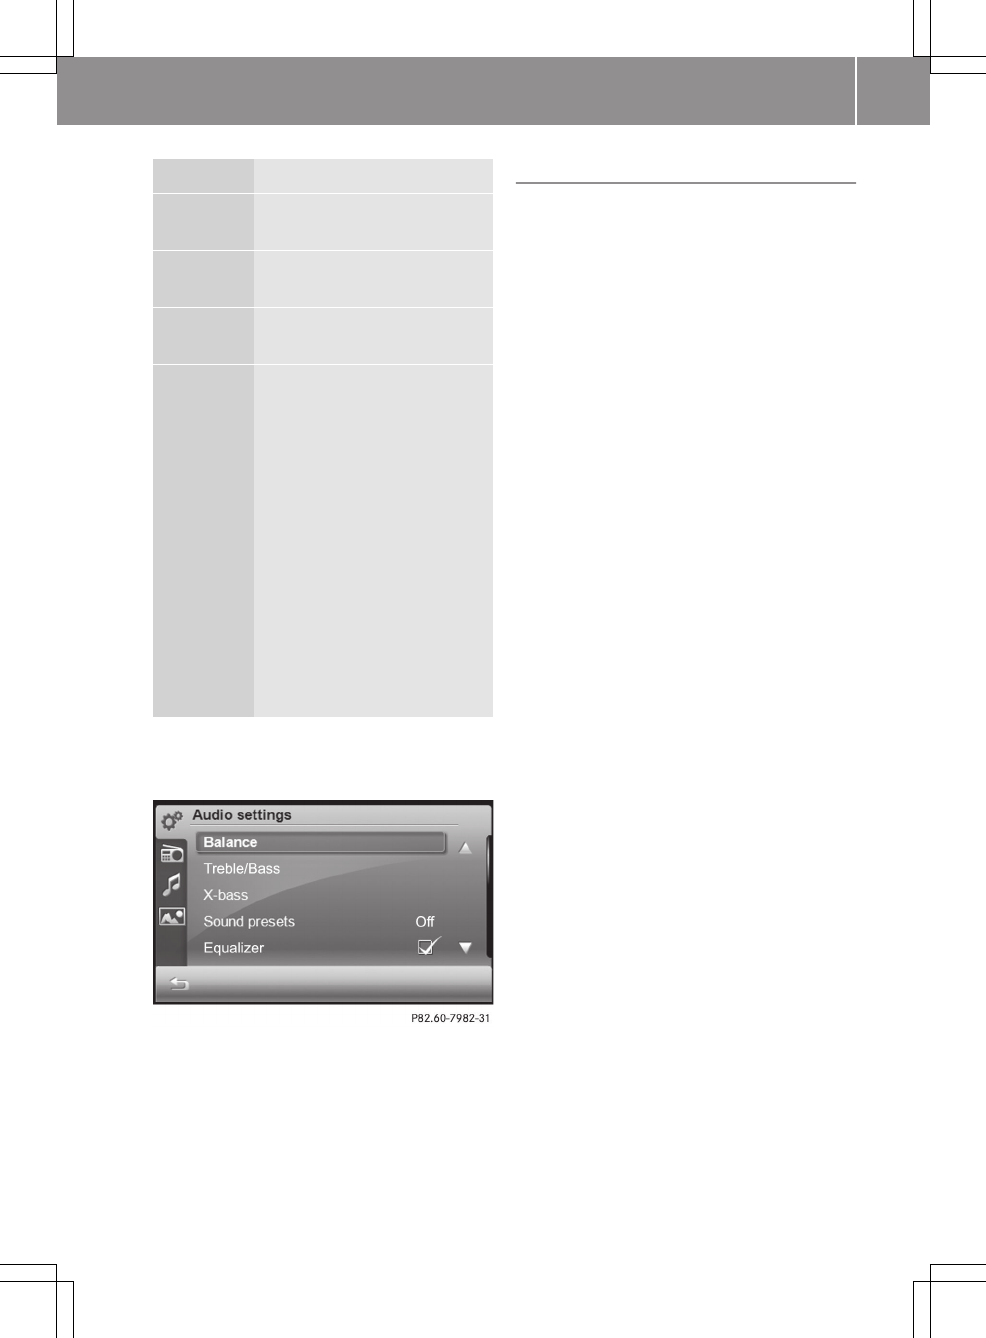
"Audio settings" menu
The setting options for Balance, Bass/
Treble and X-bass can be found in the
"Sound settings" section (Y page 16).
Further setting options are described in
the "Audio settings" section (Y page 81).
Touch screen
General notes
Wearing polarised sunglasses can limit the
display's legibility.
Cleaning instructions
The display must be switched off and cooled
down before you start cleaning. Clean the
display screen, when necessary, with a
commercially available microfibre cloth
and cleaning agent for TFT/LCD displays.
Then, dry the surface with a dry microfibre
cloth.
Do not use any alcohol-based thinners, pet-
rol or abrasive cleaning agents. These
could damage the display surface. Do not
apply pressure to the display surface when
cleaning it as this could cause irreversi-
ble damage.
>> smart high line radio. 9
Z
Overview
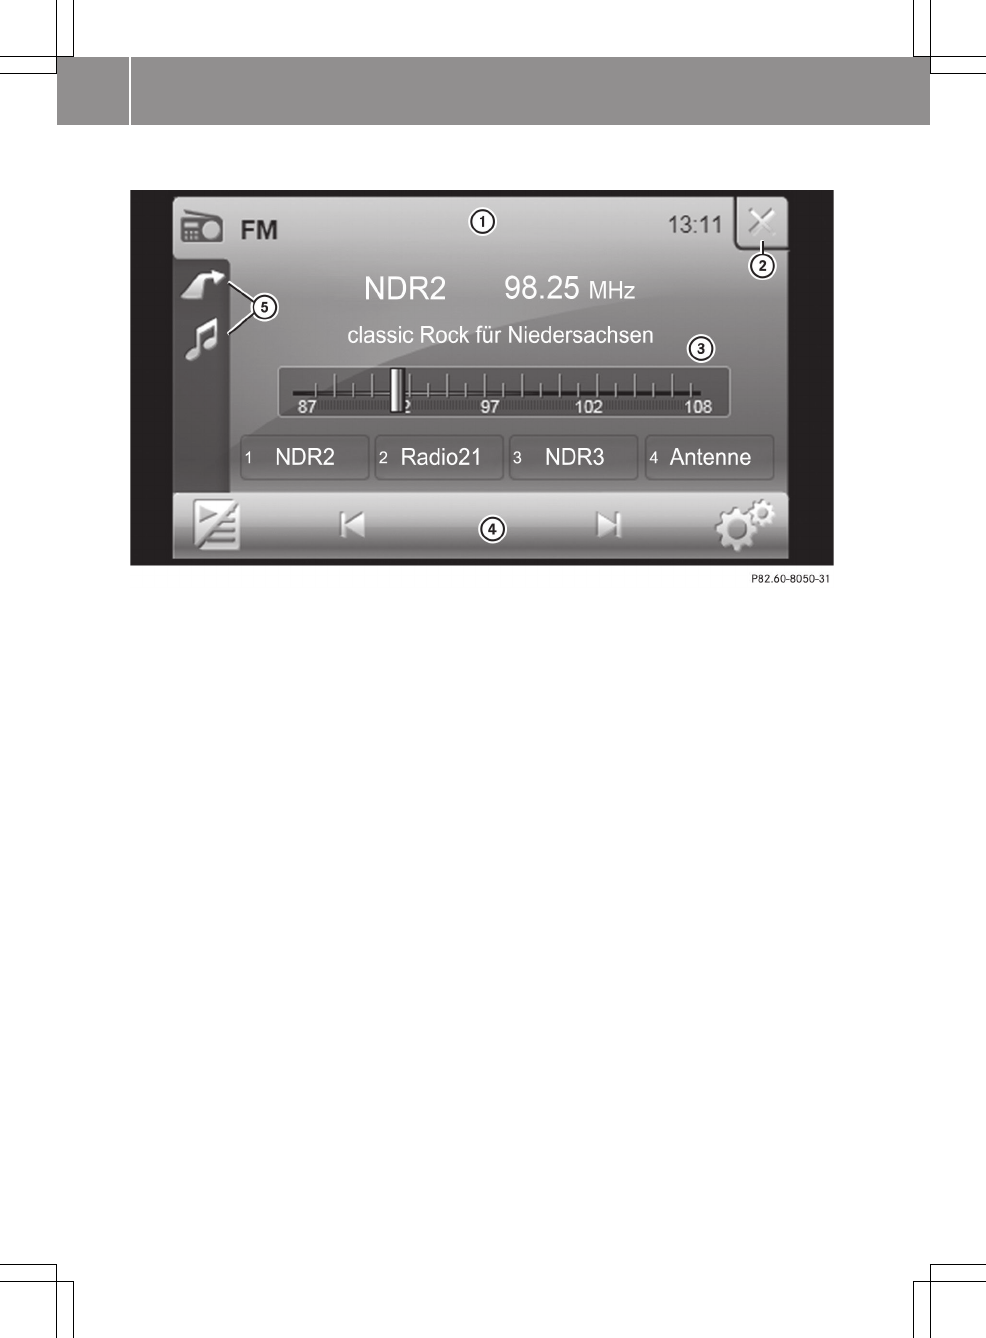
Radio display (example)
:Status bar
;Switches radio mode off
=Display/selection area
?Radio menu bar
AThe icon bar shows the activated functions for fast switching
The status bar : shows the time and the current settings for radio operation.
You can switch the radio off using closing box ;.
Display/selection area = shows:
Rthe station name and the station frequency (line 1)
Rthe radio text as scrolling text (line 2)
Rthe waveband (line 3)
Rthe assignment of the first four memory positions (line 4)
iThe radio text is switched off in the standard setting. Switching radio text on/off
(Y page 71).
Radio menu bar ? allows you to operate the different radio functions.
Icon bar A shows which other functions are currently activated, in the example these
are navigation and music mode. Pressing one of the symbols switches to the relevant mode.
Important menu functions
The following illustration shows the
important symbols that are shown in sev-
eral menus and can be selected by pressing.
10 >> smart high line radio.
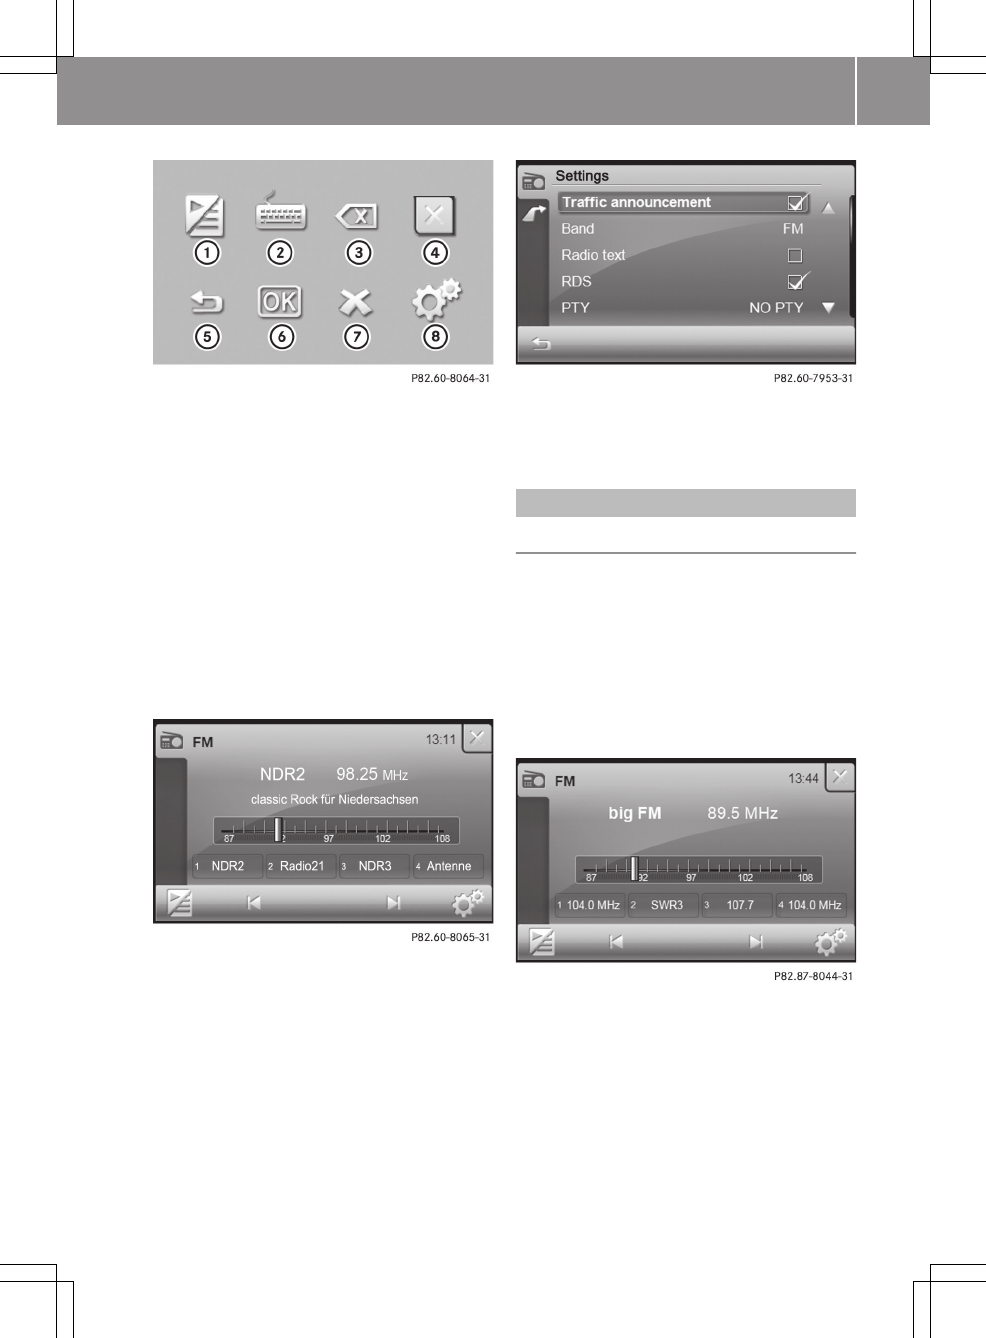
:Switches between a preset/list and the
playback display
;Calls up the search menu
=Deletes a character or an entry
?Switches off the current operating mode
ACalls up the next higher menu level
BConfirms an entry
CCancels a function
DCalls up the "Settings" menu
Selecting a function
You would like to call up the radio settings,
for example, in the radio display.
XPress d.
The "Radio settings" menu appears.
You hear a clicking sound. You can set the
volume of the click (Y page 18).
XPress & to call up the radio display
again.
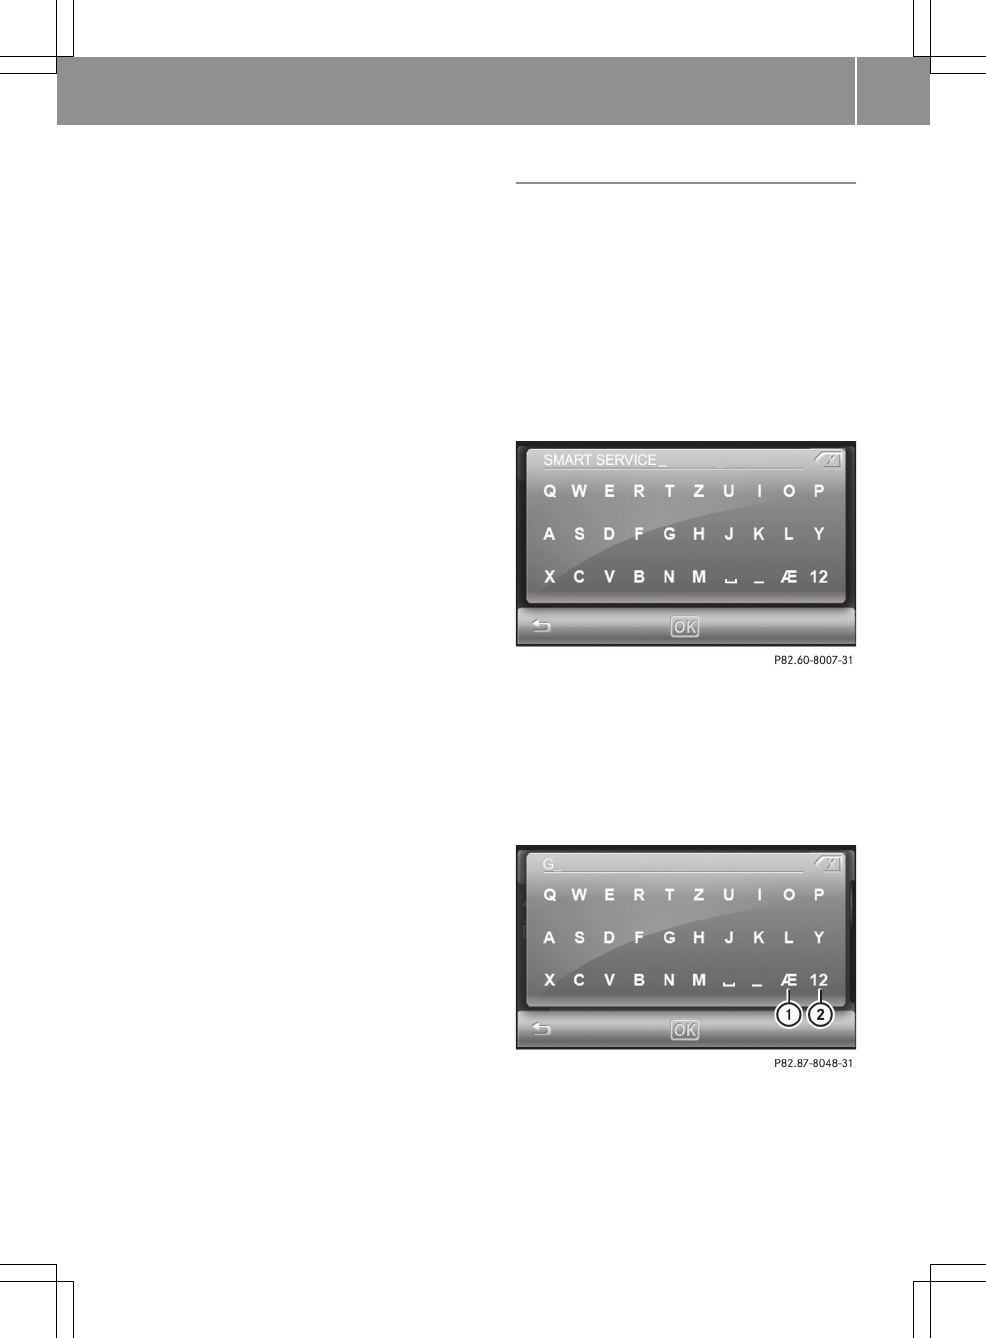
Operation
Example of operation
Initial situation
You would like to store your preferred
radio station in the station preset memory.
Switching on radio mode
XPress Radio in the main menu (Y page 8).
The radio display appears. You will hear
the current station selected.
Selecting a station
XPress û or ü in the radio menu.
The needle jumps left or right in the
waveband and stops at the next station
with adequate reception.
XRepeat the operation step until the
desired station is selected.
>> smart high line radio. 11
Z
Further setting options can be found in the
"Selecting a station" section (Y page 66).
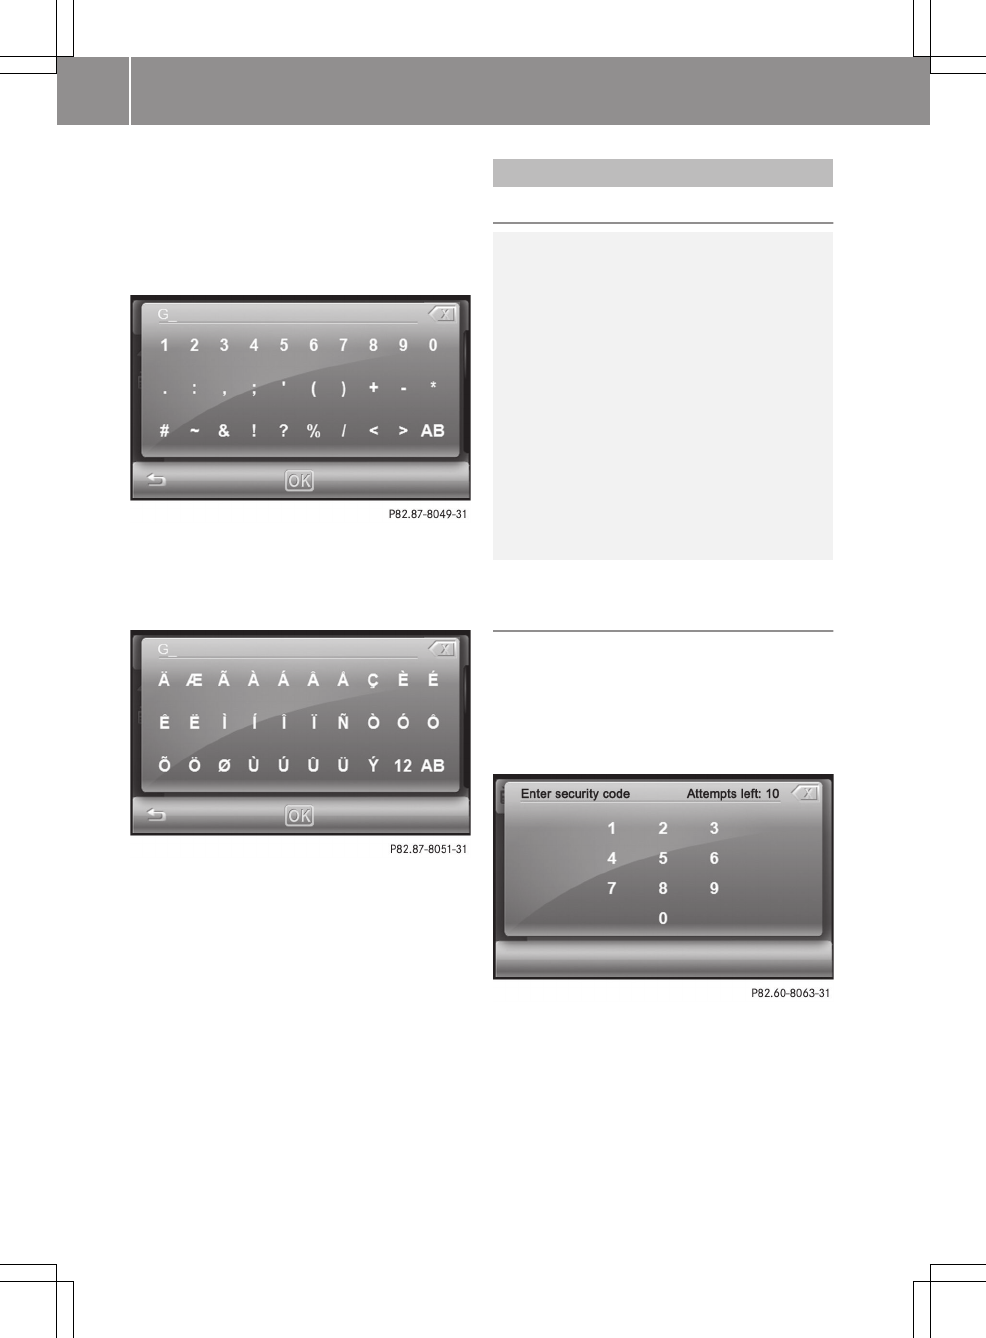
Storing stations
In the example, the station "big FM" is
selected and you would like to store this as
preset position 1 in the station presets.
You can save your four favourite stations to
the first four preset positions in this way.
XPress and hold preset position 1 until you
hear a confirmation tone.
:The current station is stored as preset
position 1
Further setting options can be found in the
"Storing a station" section (Y page 68).
Entering characters in navigation
Entering characters
The following sections explain character
entry for the example of entering the street
name Unter den Linden.
XCall up the "Entering a street name" menu
(Y page 29).
All letters are available in the menu.
XEnter U, N, T.
The letters are entered in the entry
line :.
:Letters entered by the user UNT
;Deletes a character or an entry
=Calls up all entries that match the cur-
rent user entry
?Characters not currently available
AThe first three entries that best match
the current user entry
BCharacters currently available
First three entries A, that best match the
current user entry, are displayed. If the
entry you were searching for is shown, you
can select it.
All of the characters that have been entered
so far are shown in white, letters UNT: in
the example.
The characters that can be entered next are
shown in white on the keyboard B. The
characters available depend on the entry
made by the user so far and the data con-
12 >> smart high line radio.
tained on the digital map. Characters that
are not available are black ?.
The More hits= option can be used to
switch to the list.
Further entry options
XTo delete a character: press symbol ;.
XTo delete an entry: press symbol ;
repeatedly until the entire entry has
been deleted.
XTo select a number/special character:
press 123&#?.
XSelect a number or special character.
XPress ABC to return to entering letters.
XTo select an umlaut: press ÄÖÜÆØ.
XSelect an umlaut.
XPress ABC to return to entering letters.
XTo select a keyboard: call up the "System
settings" menu (Y page 21) and select a
keyboard (Y page 22).
You can select the following keyboard set-
tings:
RAlphabetical
RGerman (German "QWERTZ" computer key-
board)
REnglish (UK)
RFrench
RCyrillic
XTo exit character entry: press &.
Calling up the list of streets
XPress More hits
The list of streets appears and shows the
section of the list that best matches the
user entry so far.
XPress 9 or : to scroll in the list.
XSelect the desired street.
The street is accepted.
Information about entering a destination
can be found in the "Destination entry"
section (Y page 27).
Character entry in the phone book
Creating a new entry in the smart high line
radio phone book
The example shows how to store a contact
from the phone book in the mobile phone
(Y page 60) to the smart high line radio
phone book.
XSelect a contact from the phone book in
the mobile phone and press the save sym-
bol.
An input menu appears.
XEnter a name. Proceed as described in the
"Entering characters in navigation"
section (Y page 12).
XPress OK and confirm the name.
The Saved message appears.
Further entry options
:Calls up umlauts
;Calls up numbers and special charac-
ters
XTo delete a character: press symbol 1.
>> smart high line radio. 13
Z
XTo delete an entry: press symbol 1
repeatedly until the entire entry has
been deleted.
XTo select a number/special character:
press ;.
XSelect a number or special character.
XPress AB to return to entering letters.
XTo select an umlaut: press :.
XSelect an umlaut.
XPress AB to return to entering letters.
XTo select a keyboard: call up the "System
settings" menu (Y page 21) and select a
keyboard (Y page 22).
XTo exit character entry: press &.
Finishing and saving an entry
XPress OK.
Basic functions
Safety note
GRisk of accident
Before driving off, you should be familiar
with the operation of the functions which
you consider the most important. Never try
out new functions while the vehicle is in
motion. This will distract you from the
traffic conditions and may result in an
accident.
Operate the radio only in such a manner as
to allow you to retain full control of your
vehicle in all traffic conditions.
Bear in mind that, at a speed of 50 km/h,
your vehicle is already covering a distance
of 14 m per second.
Switching the smart high line radio on/
off
Switching on
XPress control knob W briefly.
After the initial screen, either the last
menu activated or a menu to enter the
security code appears.
XEnter the four-digit security code and
press OK.
The smart high line radio is switched on
and shows the last menu activated.
iThe security code is set to "0000" at the
factory. It is recommended that you
change the security code (Y page 22).
14 >> smart high line radio.

iYou have ten attempts to enter the cor-
rect security code. If you enter an incor-
rect security code, an error message
stating the number of attempts remain-
ing is shown for two seconds.
iIf the smart high line radio was last
switched off by switching the engine off,
it is then switched on again when the
engine is next started.
Deactivating
XBy switching to standby mode: press and
hold control knob W.
The smart high line radio always
switches to standby mode after the Good
Bye message.
Standby mode is terminated after a defined
time period (standby time). The device is
then switched off. You can set the standby
time (Y page 22).
In standby mode, the device is ready for use
quickly after being switched on again.
iIf the smart high line radio is operated
while the engine is switched off, the
device also goes into standby mode after
30 minutes. A message to this effect will
be shown first.
XWithout switching to standby mode: press
control knob W for approximately ten
seconds.
Mute
Audio and video source
XPress control knob W briefly.
The audio or video source is muted. When
the sound is switched off, you will see
the , icon in the status bar.
iYou will still hear traffic announce-
ments and navigation announcements,
even if the sound is muted.
The , symbol cannot be seen on very
bright areas of the screen in video mode
and in the picture viewer.
Audio sources are muted automatically if
you activate voice control system for the
navigation (Y page 51).
Switching Traffic Programme and naviga-
tion announcements on/off
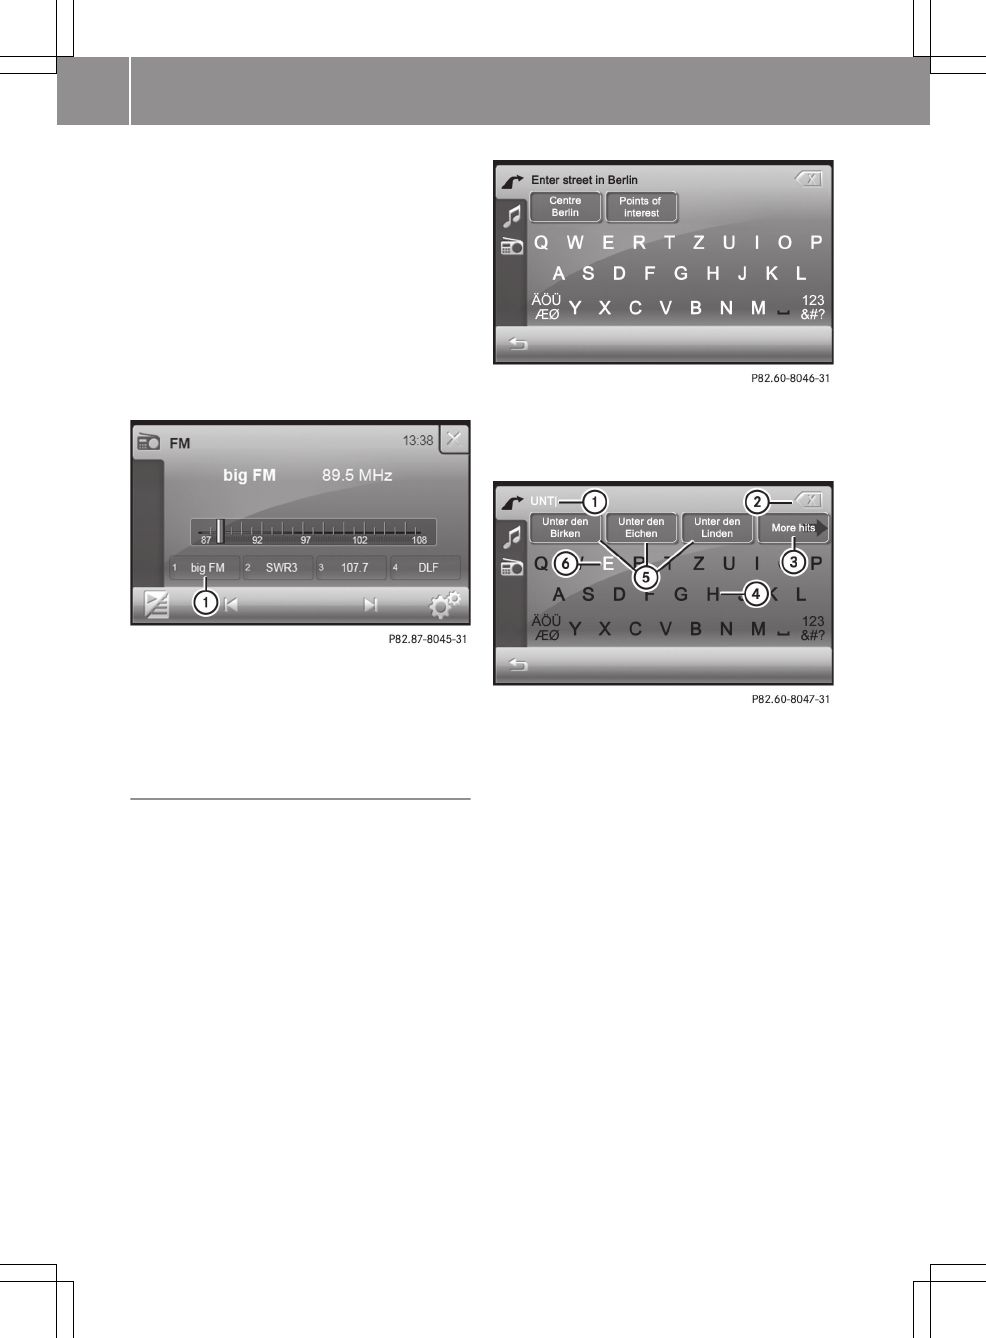
XTo switch the Traffic Programme on/off:
call up the "Settings" menu in radio mode
and press Traffic announcement
(Y page 70).
Depending on the previous status, the
function is switched on O or off ª.
XTo switch off navigation announce-
ments: press control knob W briefly dur-
ing a navigation announcement.
or
XSwitch off voice output via the "Set-
tings" menu (Y page 40).
XTo switch on navigation messages: press
on the arrow indicating the driving
direction on the map during route guid-
ance.
or
XSwitch on voice output via the "Settings"
menu (Y page 40).
Adjusts the volume
Adjusting the volume for the audio or video
source
XTurn cVd the control knob.
Adjusting the volume for the traffic
announcements and navigation announce-
ments
Option 1
XTurn cVd the control knob during a traf-
fic announcement or a navigation
announcements.
Option 2
XAdjust the volume for the traffic
announcements (Y page 15) or the audio
fadeout in the "Volume settings" menu
>> smart high line radio. 15
Z
during a traffic announcement
(Y page 15).
Adjusting the volume for phone calls
Option 1
XTurn cVd the control knob during a
phone call.
iThe volume is set to the default value
again for the next phone call.
Option 2
XSet in the "Volume settings" menu
(Y page 17).
Further volume settings
Further settings can be made in the "Vol-
ume settings" menu:
RSwitch-on volume (Y page 18)
RVolume of the confirmation tone
(Y page 18)
RClick volume (Y page 18)
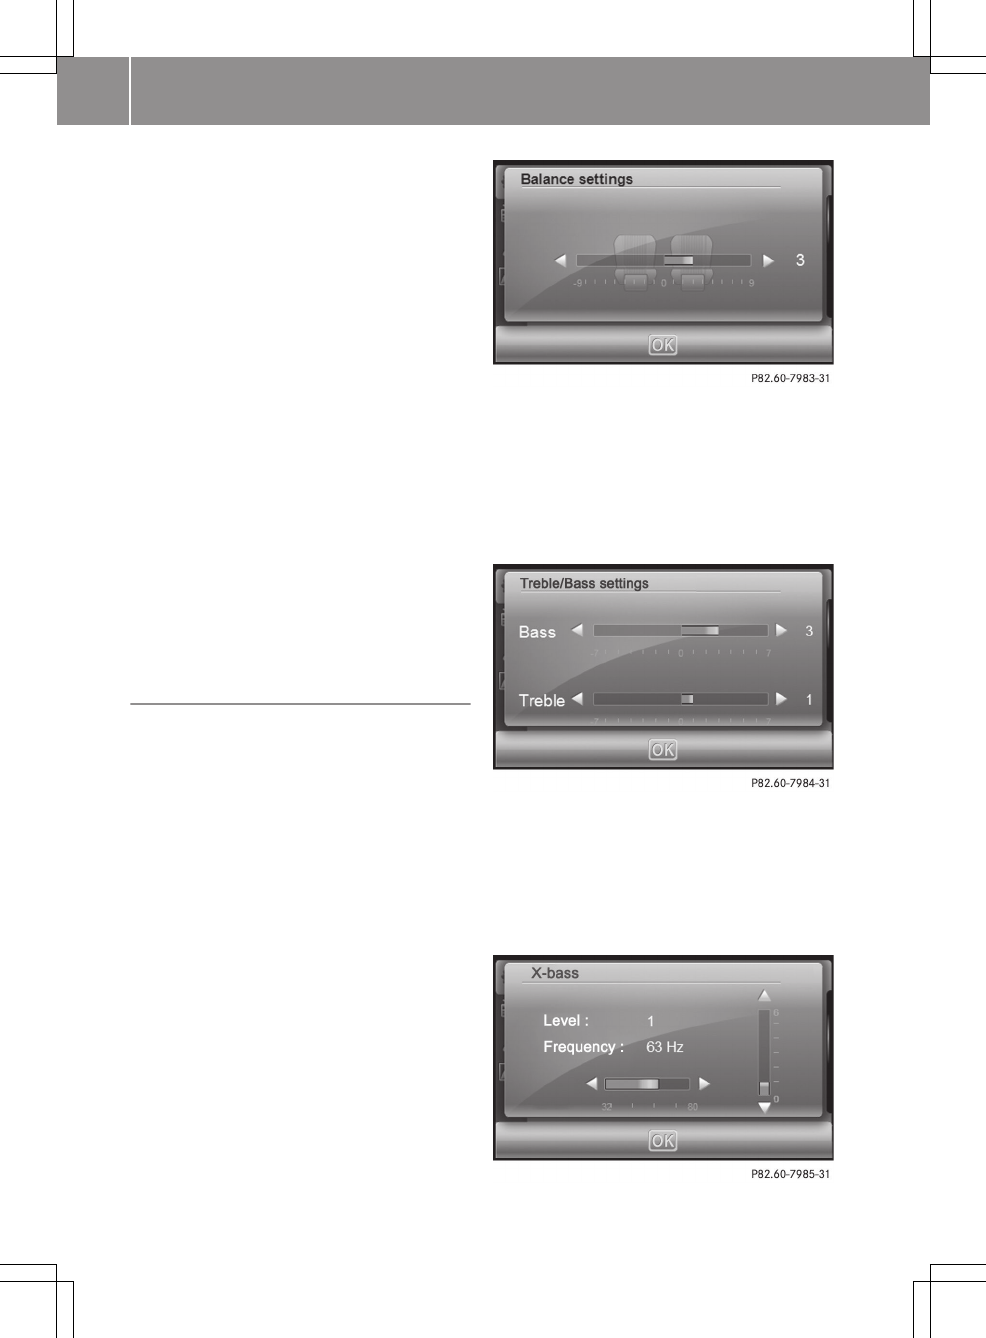
Adjusting the sound settings
Introduction
You can adjust the balance, treble and bass,
as well as the X-bass in the "Audio set-
tings" menu.
With the Balance function, you can control
whether the sound is louder on the driver’s
or front-passenger side.
X-bass can be used to increase the bass by
up to six levels for a selected frequency
(32 Hz, 40 Hz, 50 Hz, 63 Hz, 80 Hz).
Adjusting the balance
XCall up the "Audio settings" menu
(Y page 81).
XPress Balance.
XPress = or Ì to set the sound focus
point.
Setting treble and bass
XCall up the "Audio settings" menu
(Y page 81).
XPress Bass/Treble.
XPress = or Ì respectively to set
bass and treble.
Setting X-bass
XCall up the "Audio settings" menu.
XPress X-bass.
16 >> smart high line radio.
XPress = or Ì to set the frequency.
XPress 9 or : to increase the X-
bass by level.
XPress OK.
The settings are stored and you exit the
menu.
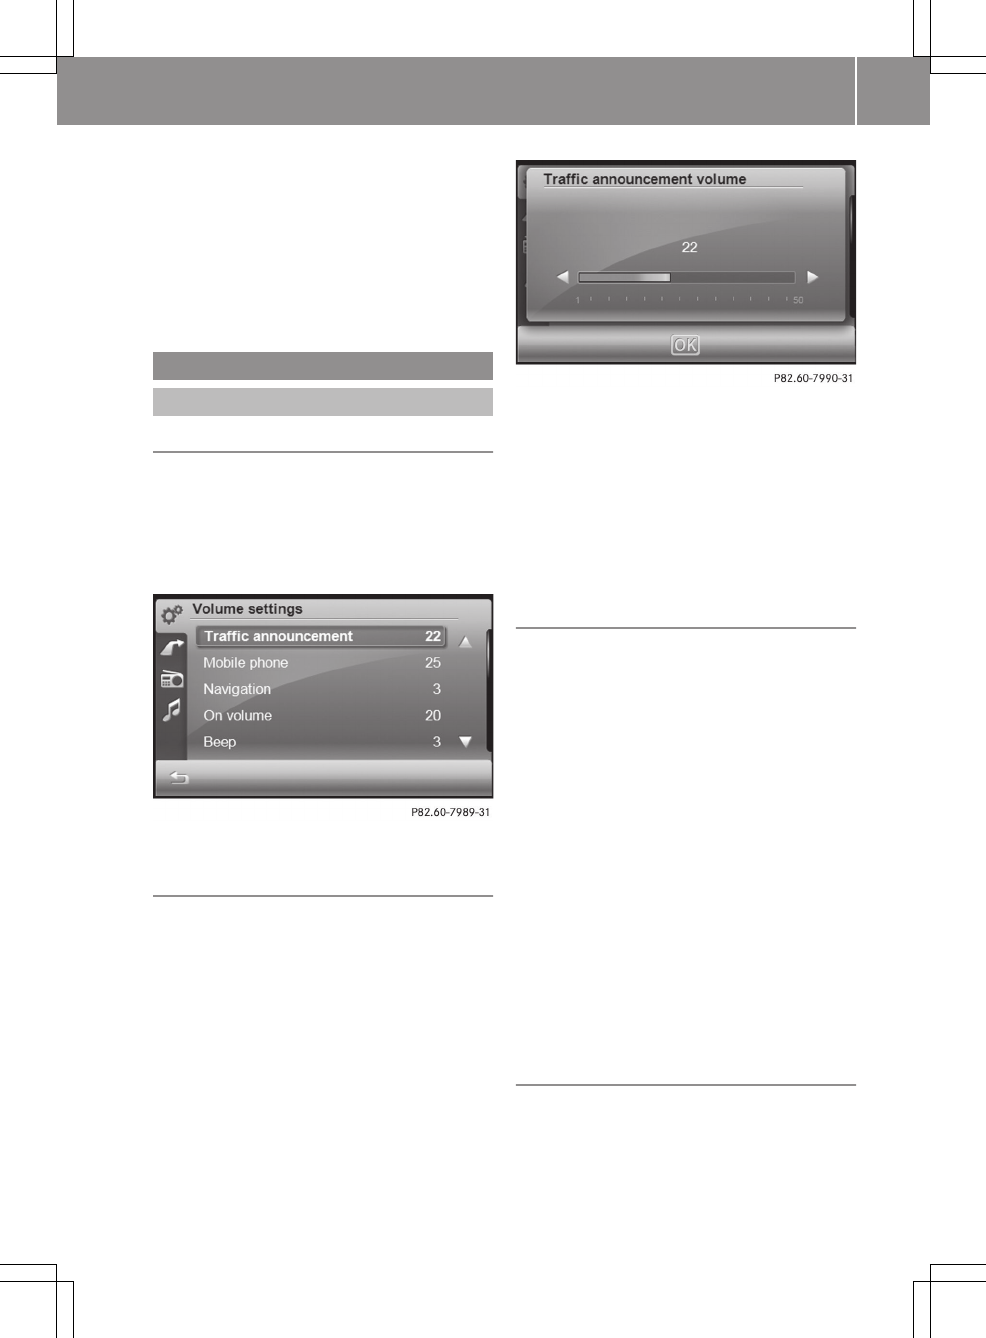
General settings
Volume settings
Calling up the "Volume settings" menu
XPress Extras in the main menu
(Y page 8).
XPress Options in the "Extras" menu.
The "General settings" menu appears.
XPress Volume settings.
Adjusting the volume for traffic
announcements
You can increase or decrease the volume for
subsequent traffic announcements.
XCalling up the "Volume settings" menu
The entry on the right beside Traffic
announcement shows the current setting.
XPress Traffic announcement in the
menu.
A settings menu appears.
XPress = or Ì to adjust the volume.
You can select values between 0 (switched
off) and 50 (loud).
or
XTurn cVd the control knob.
XTo confirm the setting: press OK.
The "Volume settings" menu appears.
Adjusting the volume for phone calls
You can adjust the volume for hands-free
mode.
XCall up the "Volume settings" menu
(Y page 17)
The entry on the right beside Mobile
phone shows the current setting.
XPress Mobile phone in the menu.
A settings menu appears.
XPress = or Ì to adjust the volume.
You can select values between 0 (switched
off) and 50 (loud).
or
XTurn cVd the control knob.
XTo confirm the setting: press OK.
The "Volume settings" menu appears.
Audio fadeout during a navigation
announcement
The volume of an audio source can be low-
ered during a navigation announcement.
>> smart high line radio. 17
Z
XCall up the "Volume settings" menu
(Y page 17)
The entry on the right beside Naviga‐
tion shows the current setting.
XPress Navigation in the menu.
A settings menu appears.
XPress = or Ì to adjust the volume
fadeout. You can select values between 0
(no fadeout), 1 to 5 (light to strong fade-
out) and 6 (full fadeout).
or
XTurn cVd the control knob.
XTo confirm the setting: press OK.
The "Volume settings" menu appears.
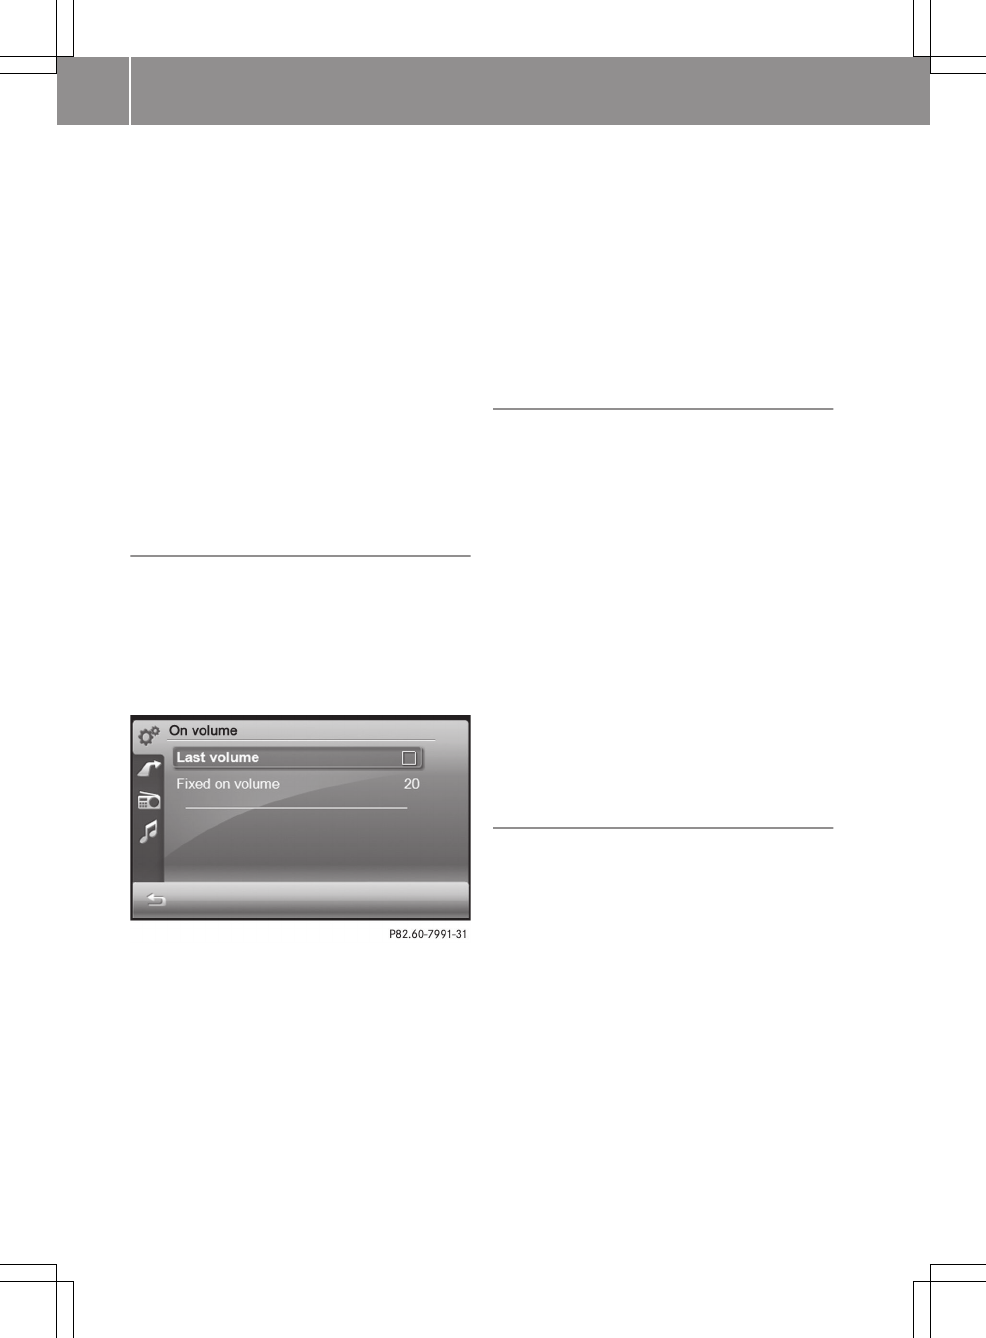
Adjusting the switch-on volume
XCall up the "Volume settings" menu
(Y page 17)
The entry on the right beside On vol‐
ume shows the current setting.
XPress On volume in the menu.
A menu appears.
XPress Last volume.
Depending on the previous status, the
function is switched on O or off ª.
When the function is switched on, the
switch-on volume is the volume at which
the smart high line radio was last
switched off. The Last entry is on the
right beside On volume in the menu.
or
XPress Fixed on volume.
A settings menu appears.
XPress = or Ì to adjust the volume.
You can select values between 0 (switched
off) and 50 (loud).
or
XTurn cVd the control knob.
XTo confirm the setting: press OK.
The "Volume settings" menu appears.
Adjusting the volume of the confirmation
tone (beep)
Some functions, such as storing a radio
station, are acknowledged with a confir-
mation tone. You can adjust the volume of
the confirmation tone.
XCall up the "Volume settings" menu
(Y page 17)
The entry on the right beside Beep shows
the current setting.
XPress Beep in the menu.
A settings menu appears.
XPress = or Ì to adjust the volume.
You can set values between 0 (switched
off) and 3 (loud).
XTo confirm the setting: press OK.
The "Volume settings" menu appears.
Adjusting the click volume
Entries that you make by pressing briefly
on the screen are accompanied by a tone
(click). You can adjust the volume of this
click.
XCall up the "Volume settings" menu
(Y page 17)
The entry on the right beside Click shows
the current setting.
XPress : until the Click entry
appears.
XPress Click.
A settings menu appears.
18 >> smart high line radio.
XPress = or Ì to adjust the volume.
You can set values between 0 (switched
off) and 6 (loud).
XTo confirm the setting: press OK.
The "Volume settings" menu appears.
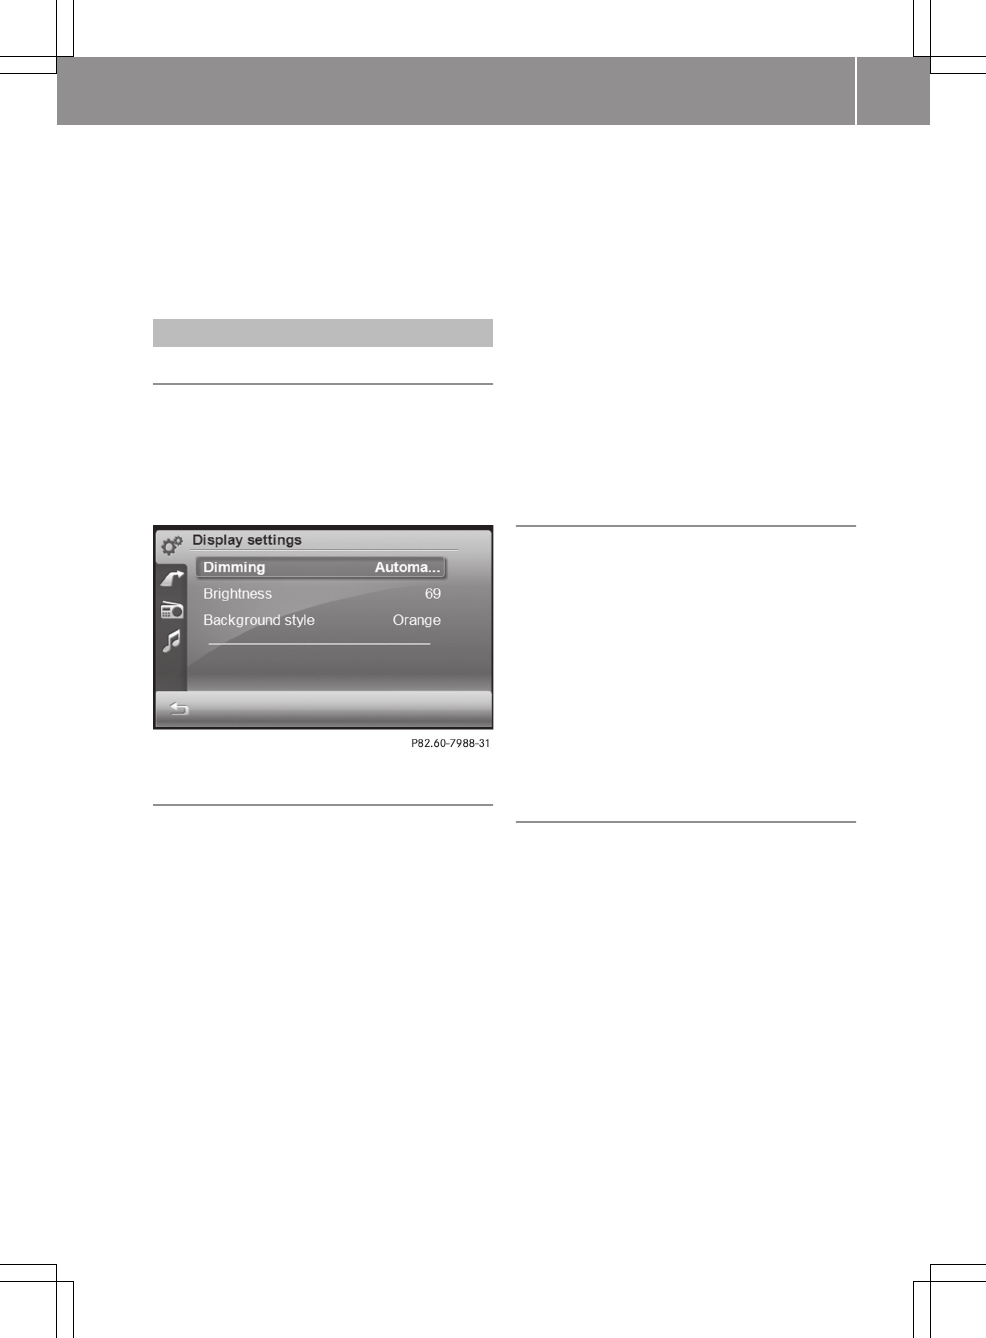
Screen settings
Calling up the "Screen settings" menu
XPress Extras in the main menu
(Y page 8).
XPress Options in the "Extras" menu.
The "General settings" menu appears.
XPress Display settings.
Dimming the screen
The brightness set in the brightness sensor
(Y page 6), (position A) of the smart high
line radio affects the setting options for
this function.
When you dim the screen, adjust the display
lighting accordingly. You can choose
between automatic or manual setting.
XCalling up the "Screen settings" menu
(Y page 19)
The entry on the right beside Dimming
shows the current setting.
XSelect Dimming.
A menu appears.
XAutomatic setting: press Automatic
first and then press &.
The setting is accepted and the "Screen
settings" menu appears.
XManual setting: press Manual.
A settings menu appears.
XPress = or Ì to select a value
between 0 (very dark) and 16 (bright) for
the dimmer.
XPress OK.
The setting is accepted.
XPress &.
The "Screen settings" menu appears.
Setting the brightness
XCalling up the "Screen settings" menu
(Y page 19)
XPress Brightness. The entry on the right
beside Brightness shows the current
setting.
A settings menu appears.
XPress = or Ì to select a value for
the brightness.
XPress OK.
The setting is accepted.
Selecting a colour scheme
XCalling up the "Screen settings" menu
(Y page 19)
XPress Background style. The entry on
the right beside Background style
shows the current setting.
A menu appears.
XSelect the desired colour scheme.
XPress OK to confirm the selection.
The display appears in the selected col-
our scheme.
>> smart high line radio. 19
Z
Clock settings
Introduction
The smart high line radio sets the time
automatically if it has sufficient GPS
reception.
You can also set the time manually (e.g. if
there is no GPS reception or the reception
is insufficient). However, the time that you
enter will be overwritten when there is GPS
reception. The time zone and summer time
settings are not changed.
Calling up the "Time entry" menu
XPress Extras in the main menu
(Y page 8).
XPress Options in the menu.
The "General settings" menu appears.
XPress Clock settings.
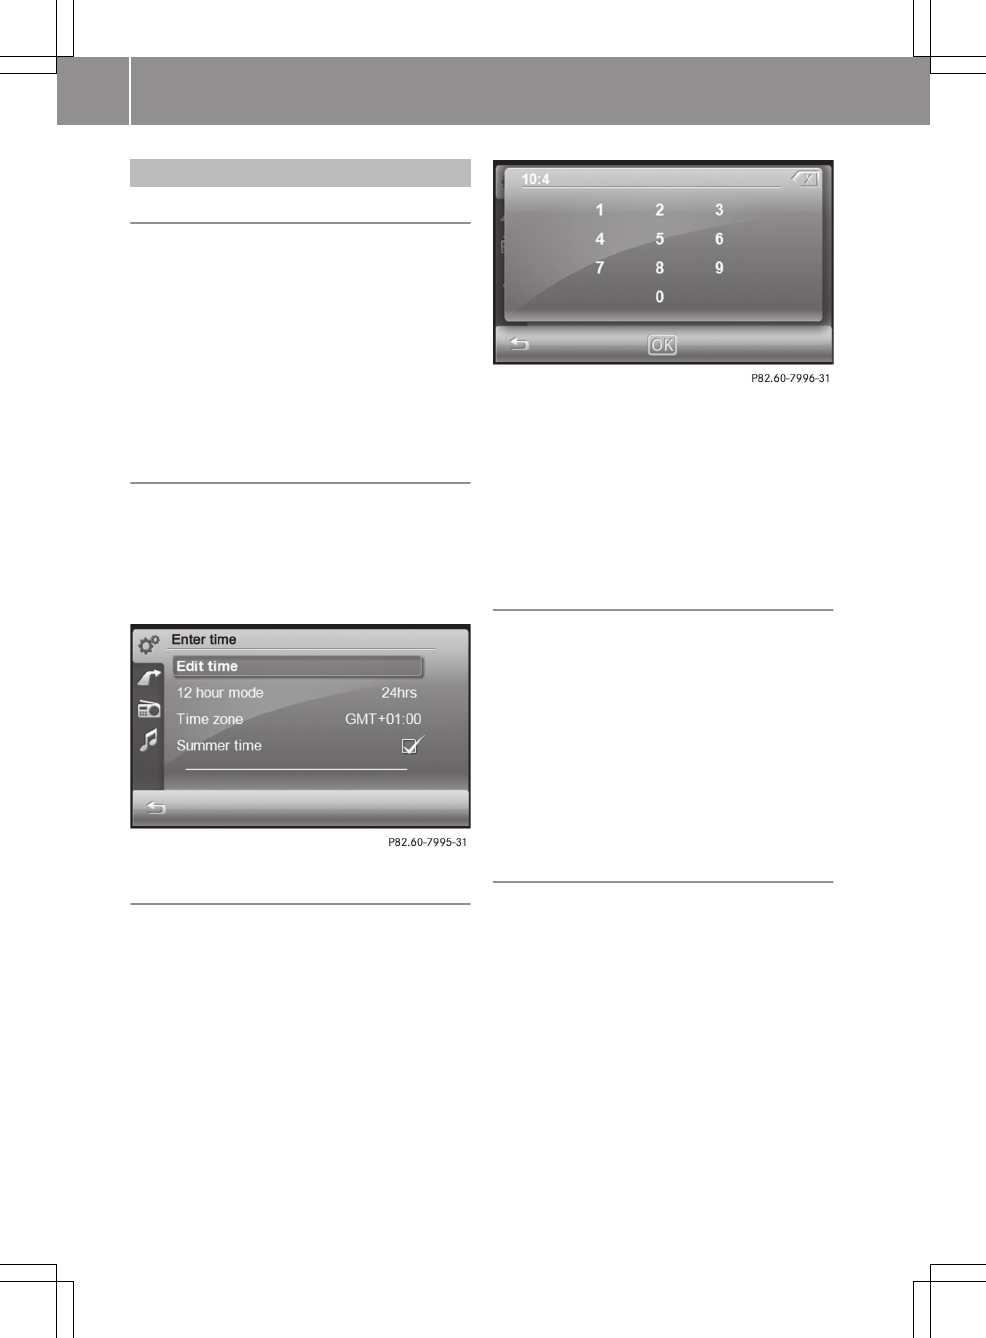
Setting the time
The time is shown in the status bar in the
radio display.
XCall up the "Time entry" menu
(Y page 20).
XPress Edit time.
XPress the available numbers (shown in
white) one after another.
The colon between the hours and minutes
is entered automatically.
XPress OK.
The setting is accepted and the "Time
entry" menu appears.
Setting the time format
You can set 24-hour or 12-hour (AM/PM) for-
mat.
XCall up the "Time entry" menu
(Y page 20).
The entry on the right beside 12 hour
mode shows the current setting.
XPress 12 hour mode.
The entry on the right beside 12 hour
mode changes.
Setting the time zone
XCall up the "Time entry" menu
(Y page 20).
The entry on the right beside Time
zone shows the current setting.
XPress Time zone.
A list appears for the selection of the
time zone. The currently selected time
zone is identified by the O symbol.
20 >> smart high line radio.
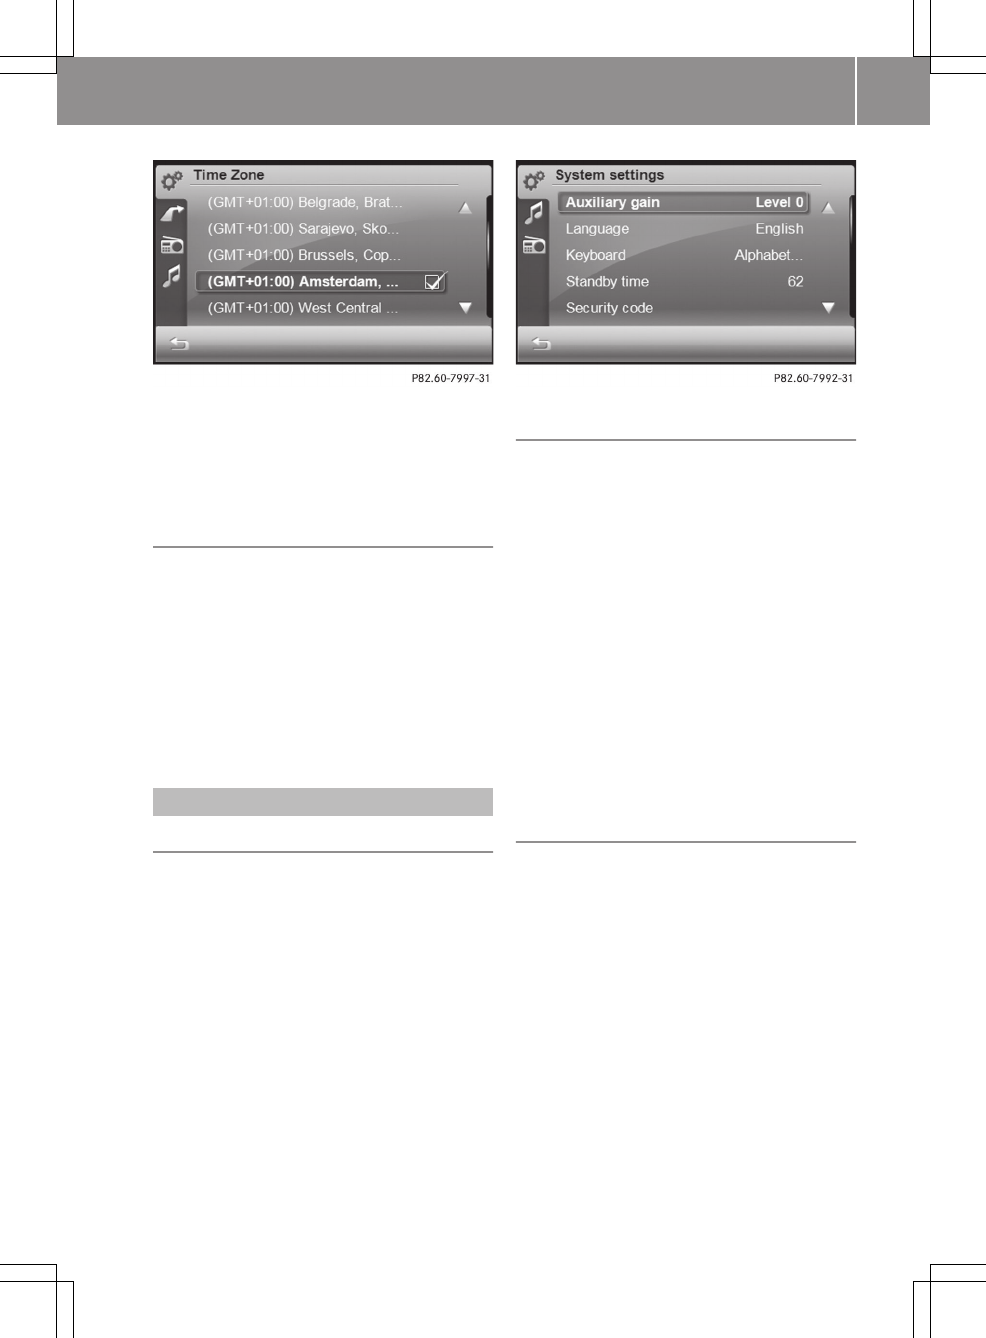
XPress 9 or : to scroll in the list.
XSelect the desired time zone.
The O symbol indicates the currently
set time zone.
Setting summer time
If no summer time conversion takes place
in the time zone selected, this menu item
is not available.
XCall up the "Time entry" menu
(Y page 20).
XPress Summer time.
Depending on the previous status, sum-
mer time is switched on O or off ª.
System settings
Calling up the "System settings" menu
XPress Extras in the main menu
(Y page 8).
XPress Options in the "Extras" menu.
The "General settings" menu appears.
XPress System settings.
Increasing the volume for audio AUX
In some cases, the volume of the external
audio device may be quieter or louder, or
the usual maximum possible volume may be
lower. On some devices, it is possible to
adjust the volume separately. In this case,
start at a medium volume and increase it
gradually. This enables you to determine
whether the system is able to play the music
at high volume without distorting it.
XCall up the "System settings" menu
(Y page 21).
XPress Auxiliary gain in the menu.
The level (level, value) on the right
beside the entry changes. You can select
level 0 (no volume increase), 1 or 2.
Setting the language
You can use this function to determine the
language for the menu displays and the nav-
igation announcements. The selected lan-
guage affects the characters available for
entry. When you set the system language, the
language for the voice control system
changes at the same time (Y page 51). If
the voice control system does not support
this language, voice commands are not pos-
sible.
>> smart high line radio. 21
Z

XCall up the "System settings" menu
(Y page 21).
The entry on the right beside Language
shows the current setting.
XPress Language.
The list of languages appears. The cur-
rently selected language is identified
by the O symbol.
XPress 9 or : to scroll in the list.
XSelect the desired language.
The smart high line radio loads the lan-
guage and switches back to the "System
settings" menu.
Selecting a keyboard
The keyboard selection affects the selec-
tion options in the input menus (keyboard
layout, special character entry).
You can select the following keyboard set-
tings:
RAlphabetical
RGerman (German "QWERTZ" computer key-
board)
REnglish (UK)
RFrench
RCyrillic
XCall up the "System settings" menu
(Y page 21).
The entry on the right beside Keyboard
shows the current setting.
XPress Keyboard.
A list appears.
XSelect the desired keyboard.
The smart high line radio loads the key-
board and switches back to the "System
settings" menu.
Setting the standby time
The smart high line radio uses less power
in standby mode (energy-saving operating
mode).
The smart high line radio switches to
standby mode after it has been switched
off. In this mode, the device is ready for
use quickly after being switched on again.
Standby mode is terminated after a defined
time period (standby time). The device is
then switched off. You can set the standby
time individually.
iThe standby time is preset to 18 h. Set-
ting a low standby time is recommended,
for example, when the battery charge is
low.
If the smart high line radio is operated
while the engine is switched off, the
device also goes into standby mode after
30 minutes. You will see a warning mes-
sage to this effect.
XCall up the "System settings" menu
(Y page 21).
The entry on the right beside Standby
time shows the current setting.
XPress Standby time in the menu.
A settings menu appears.
XPress = or Ì to adjust the standby
time. You can select values between 1 and
24 h.
XPress OK.
The smart high line radio accepts the
value and switches back to the "System
settings" menu.
Changing the security code
Entering a four-digit security code serves
to protect against theft. The security code
must be entered after disconnecting the
battery, for example.
The security code is set to "0000" at the
factory. It is recommended that you change
the security code.
XCall up the "System settings" menu
(Y page 21).
XPress Security code.
An input menu appears for the entry of the
current security code.
XTo enter the current (old) code: press the
numbers one after another.
22 >> smart high line radio.
XPress OK to confirm the entry.
An input menu appears for the entry of the
new security code.
XTo enter the new code: press the numbers
one after another.
XPress OK to confirm the entry.
The Please confirm again entry prompt
appears.
XTo confirm the new code: enter the new
code again and press OK.
The New code saved message appears.
The new security code is requested when
the smart high line radio is switched on
again.
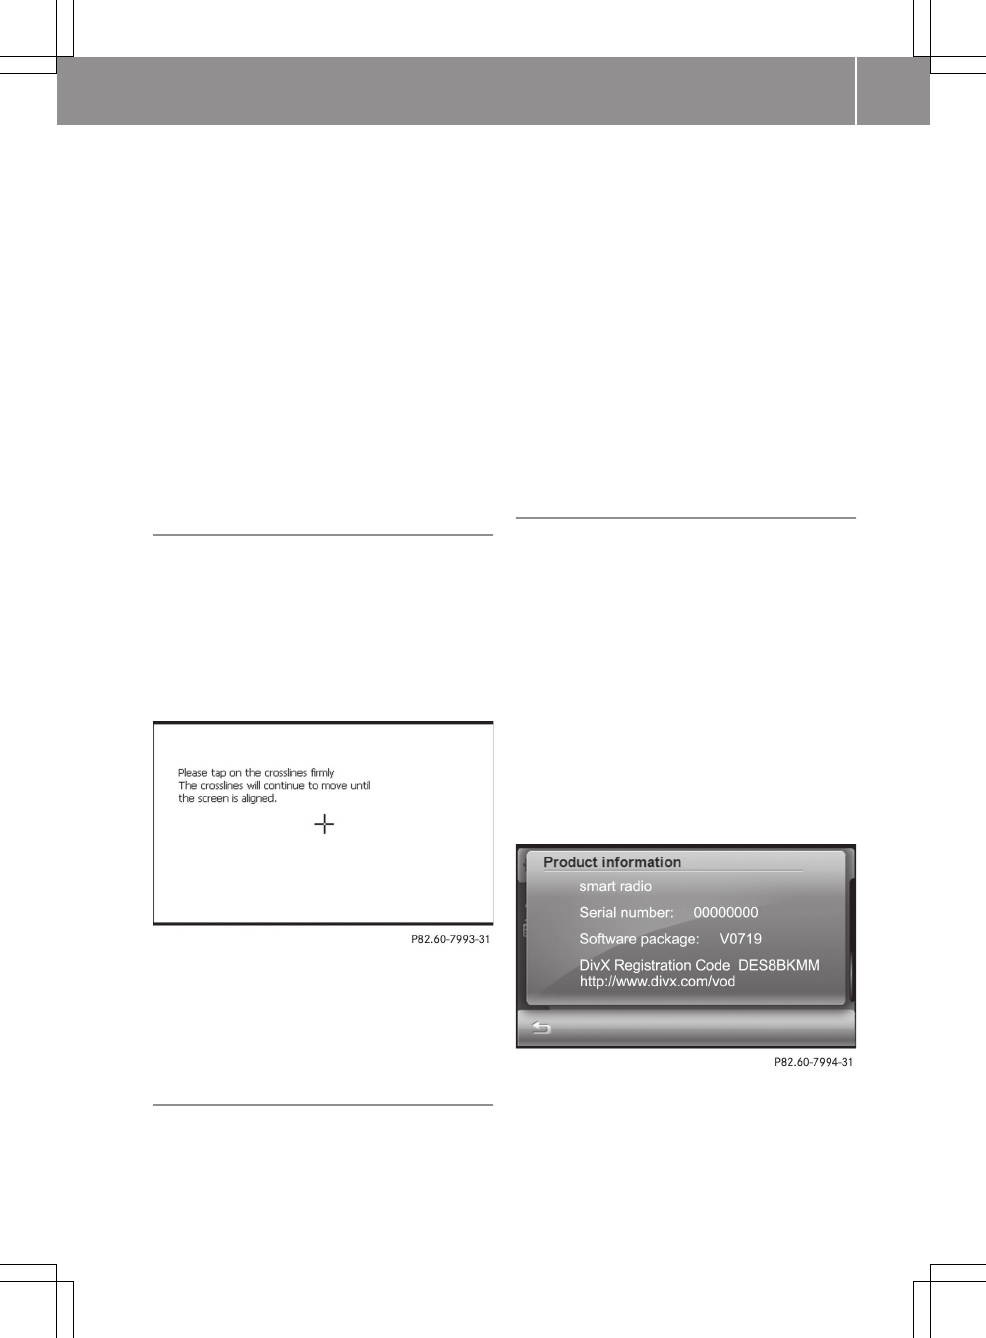
Calibrating the touch screen
The touch screen is calibrated before
delivery. Recalibrate it if it no longer
responds precisely to your entries.
XCall up the "System settings" menu
(Y page 21).
XPress Touch calibration.
An entry prompt is shown.
XPress the cross.
The cross moves across the screen.
XRepeat this action until the "System set-
tings" menu appears.
Loading the factory settings
You can reset the smart high line radio to
the factory settings (as-delivered state).
Amongst other things, this will delete all
personal data (e.g. station presets, entries
in the destination memory and in the list
of previous destinations in the navigation
system, phone book entries). Resetting is
recommended before handing over or sell-
ing the vehicle, for example.
XCall up the "System settings" menu
(Y page 21).
XPress Factory settings.
The Please confirm to load the fac‐
tory settings entry prompt appears.
XPress OK.
To cancel the factory settings reset:
press &.
Displaying product information
Product information includes:
Rthe serial number
Rthe software package number
Rthe DivX registration code with the
internet address (enables downloading
of films in DivX format)
iThe serial number can be used to iden-
tify the smart high line radio unambig-
uously.
XCall up the "System settings" menu
(Y page 21).
XPress Product information.
>> smart high line radio. 23
Z

Navigation system
Introduction
Safety notes
GRisk of accident
For safety reasons, only enter a new desti-
nation when the vehicle is stationary. You
may otherwise be distracted from the traf-
fic conditions, cause an accident and
injure yourself and others.
The device calculates the route to the des-
tination without taking account of the fol-
lowing, for example:
RTraffic lights
Rstop and give way signs
RParking or stopping restrictions
RRoad narrowing
ROther road and traffic rules and regula-
tions
The device may give incorrect navigation
commands if the surroundings do not cor-
respond to the data on the digital map. For
example, a route may have been diverted or
the direction of a one-way street may have
changed.
For this reason, you must always observe
road and traffic rules and regulations dur-
ing your journey. Road and traffic rules and
regulations always have priority over the
system's driving recommendations.
General notes
Operational readiness of the navigation
system
The navigation system must determine the
position of the vehicle before first use or
whenever operational status is restored.
Therefore, you may have to drive for a while
before the position of the vehicle can be
determined precisely.
GPS reception
Correct functioning of the navigation sys-
tem depends, amongst other things, on GPS
reception. In certain situations, GPS
reception may be impaired, there may be
interference or there may be no reception
at all, e.g. in tunnels or multi-storey car
parks.
Available/unavailable functions
Functions that are currently available are
highlighted, functions that are currently
unavailable are greyed out.
Switching navigation mode on/off
Switching on navigation mode
XTo switch on navigation mode: press the
t button.
The main menu appears.
XPress Navigation.
You will see the navigation start screen.
The Please follow traffic regula‐
tions! Do not operate any function
while driving! note then appears
XPress OK and confirm the note.
Option 1: the Would you like to start
in Easy or Expert mode? prompt appears
when the navigation is switched on for the
first time.
Easy mode makes the basic functions for
settings, destination entry and route
guidance possible.
24 >> smart high line radio.
Expert mode makes addition functions pos-
sible, such as:
Rspecial destination entry
Ralternative routes
Rdisplaying the maximum permissible
speed on the map and a warning tone if
this is exceeded
Rsettings for traffic jam avoidance
Rroute plotting (GPS track)
XPress Easy or Expert.
The "Navigation" main menu is shown in
the Easy or Expert mode. You can switch
between the Easy and Expert mode
(Y page 26).
Option 2: the navigation system shows the
display that was left before switching off.
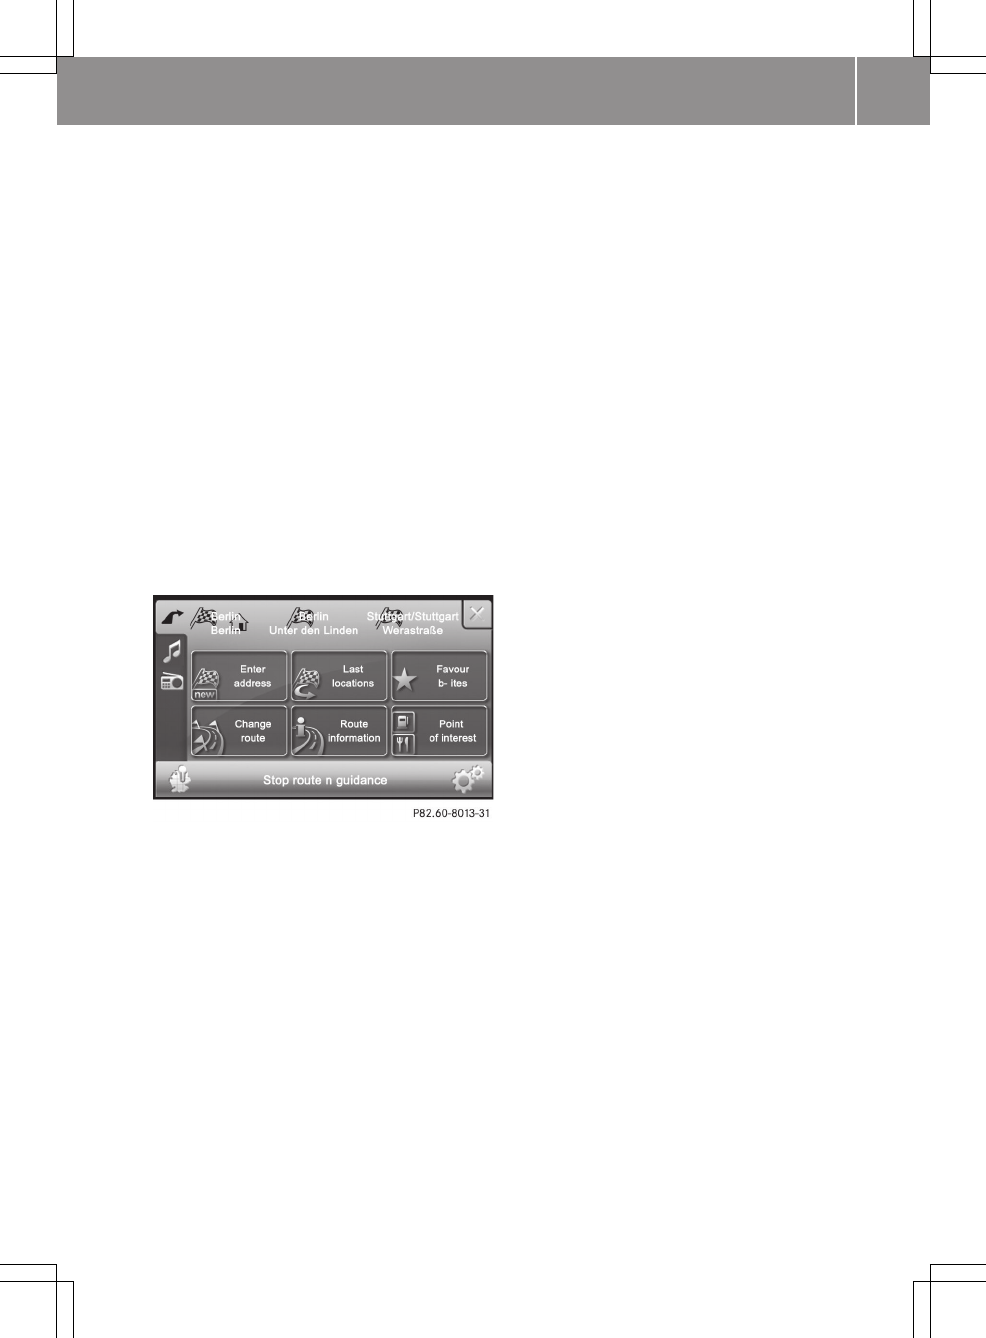
"Navigation" main menu
Example: Expert mode
Deactivating navigation mode
XPress 1 at the top right of the naviga-
tion menu.
>> smart high line radio. 25
Z

Basic settings
Easy and Expert modes
Introduction
You can select Easy or Expert mode when switching navigation on (Y page 24) or switch
between the two modes in the "Settings" menu.
Easy/Expert mode overview
Function Easy mode Expert mode
"Navigation"
main menu
REntering an address
RPrevious towns
RFavourites (destination
memory)
REntering an address
RPrevious towns
RFavourites (destination memory)
RChanging the route
RRoute information
RSpecial destinations
"Settings" menu RRoute options
RDisplay
RProgramme settings
RVoice output
RRoute options (additionally: route
type, alternative routes, traffic
jam avoidance)
RDisplay (additionally: junction
zoom, map colours)
RProgram settings (additionally:
displaying the speed limit on the
map, route recording)
RVoice output
RSpecial destinations on the map
Route calculation RStandard route RStandard route and alternative
routes
Route guidance RRoute guidance func-
tions
RRoute guidance functions
RQuick menu: allows fast access to
six individually selectable func-
tions
RPlotting the GPS track
Setting Easy/Expert mode
XOption 1: select the mode when the Would
you like to start in Easy or
Expert mode?prompt is shown when
switching the navigation on for the first
time.
XOption 2: press the d symbol at the
bottom right of the "Navigation" main
menu (Y page 25).
The "Settings" menu appears.
26 >> smart high line radio.
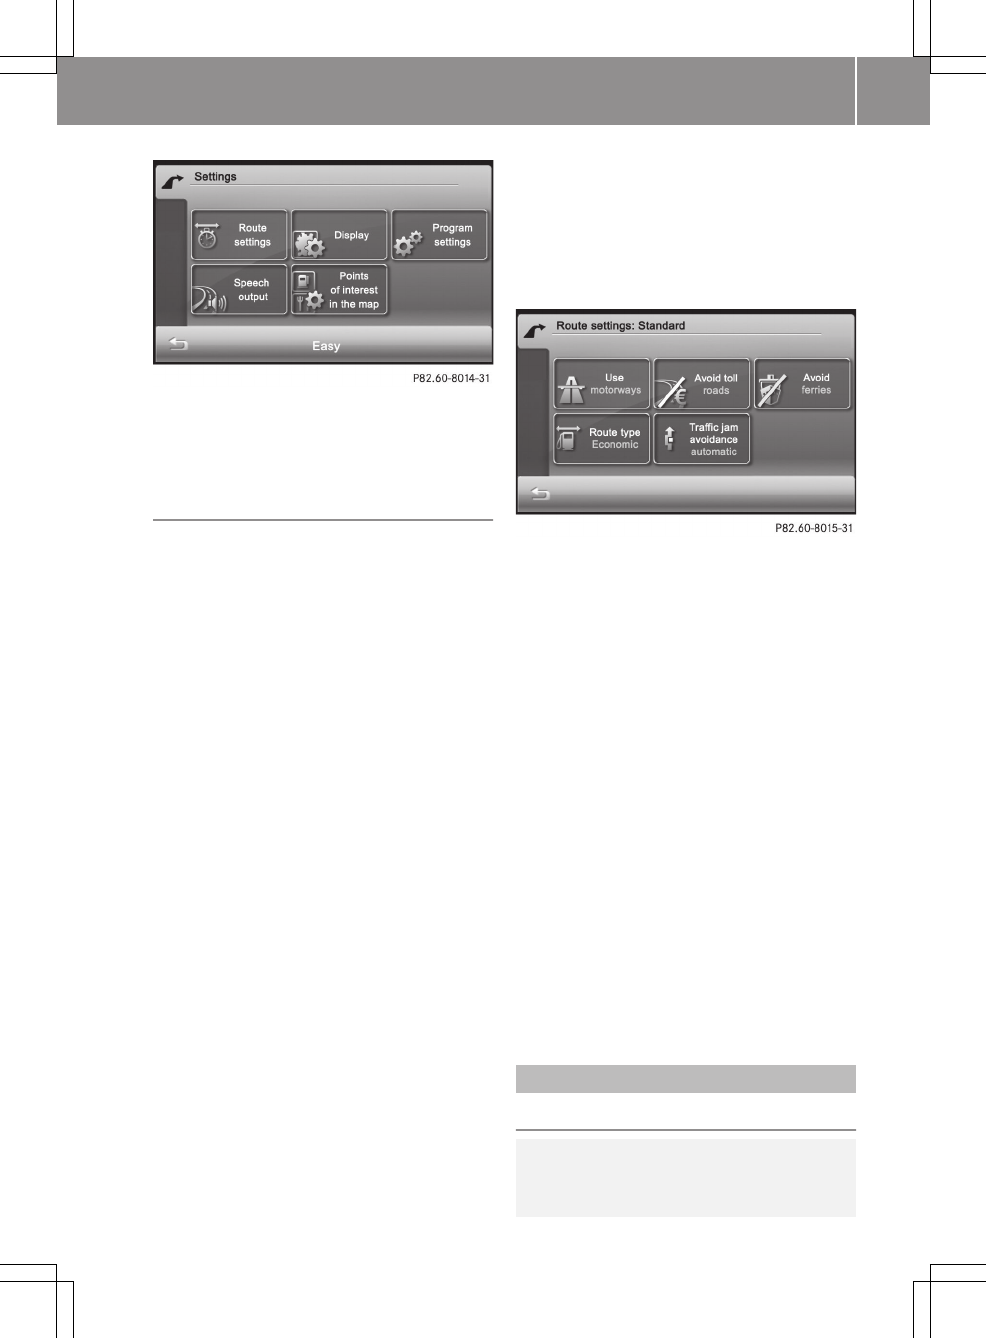
"Settings" menu (example: Expert mode)
XDepending on the current mode, press
Easy or Expert.
Setting the route options and route type
Note
The route options and route type (Expert
mode) determine the route calculation.
To set route options
XPress Route options in the "Settings"
menu.
Depending on the mode selected, the
available route options are shown.
Easy mode: you can use/avoid motorways,
toll roads and ferries (standard route).
Expert mode: in addition to the standard
route, there are two alternative routes
available for route calculation. You can
use/avoid motorways, toll roads and fer-
ries, as well as set the route type and
select traffic jam avoidance.
XEasy mode: press one of the route
options.
Depending on the previous setting, use
or avoid the route options.
XPress & to return to the "Settings"
menu.
or
XExpert mode: press Standard, Alterna‐
tive 1 or Alternative 2.
The route options appear.
XPress one of the route options.
Depending on the previous setting, use
or avoid the route options.
"Route options" menu (example: Expert mode)
Setting the route type (Expert mode)
XPress Route type.
XPress short, fast or economic.
XPress & twice to return to the "Set-
tings" menu.
You can set the following route types:
RShort route: the device calculates a
route with the shortest possible (mini-
mised) distance.
RFast route: the device calculates a
route with the shortest possible (mini-
mised) driving time.
REconomic route: the economical route
is an optimised mix of the short and fast
routes.
iTraffic jam avoidance is described in
the section with the same name
(Y page 41).
Destination entry
Introduction to destination entry
GRisk of accident
For safety reasons, only enter a new desti-
nation when the vehicle is stationary. You
>> smart high line radio. 27
Z
could otherwise be distracted from the
traffic conditions, cause an accident and
injure yourself and others.
The following destination entry options
are available:
Rentering a destination by address
Rentering a destination as geo-coordi-
nates
Rentering a destination from the previous
towns
Rentering a destination from the favour-
ites (destination memory)
Rentering a destination using the map
Rentering a special destination
Rcompiling a route with multiple desti-
nations
Entering a destination by address
Introduction
When entering an address as the destina-
tion, you have the following options:
Rentering the country, town/postcode and
house number
Rentering the country, town/postcode and
street
Rentering the country, town/postcode,
street and junction
Rentering the country, town/postcode and
centre
Rentering the country, town/postcode and
special destinations
Rentering the country, town/postcode
Country and town/postcode are sufficient
to start navigating. You can enter either a
town or a postcode. By entering further
address data such as the street and house
number, you can specify the destination
more precisely.
iNote that you can only enter a street,
house number, junction etc. once you
have entered a country and a town or post-
code.
iYou can only enter those towns, streets,
postcodes etc. that are stored in the dig-
ital map. This means that for some coun-
tries, you cannot enter postcodes, for
example.
Example: entering an address
The following is a step-by-step example of
how to enter an address in expert mode. The
destination address is as follows:
Germany
Berlin
Unter den Linden/Friedrichstraße corner
You can of course enter any country, town,
street and house number desired and enter,
for example, your home address (My
address).
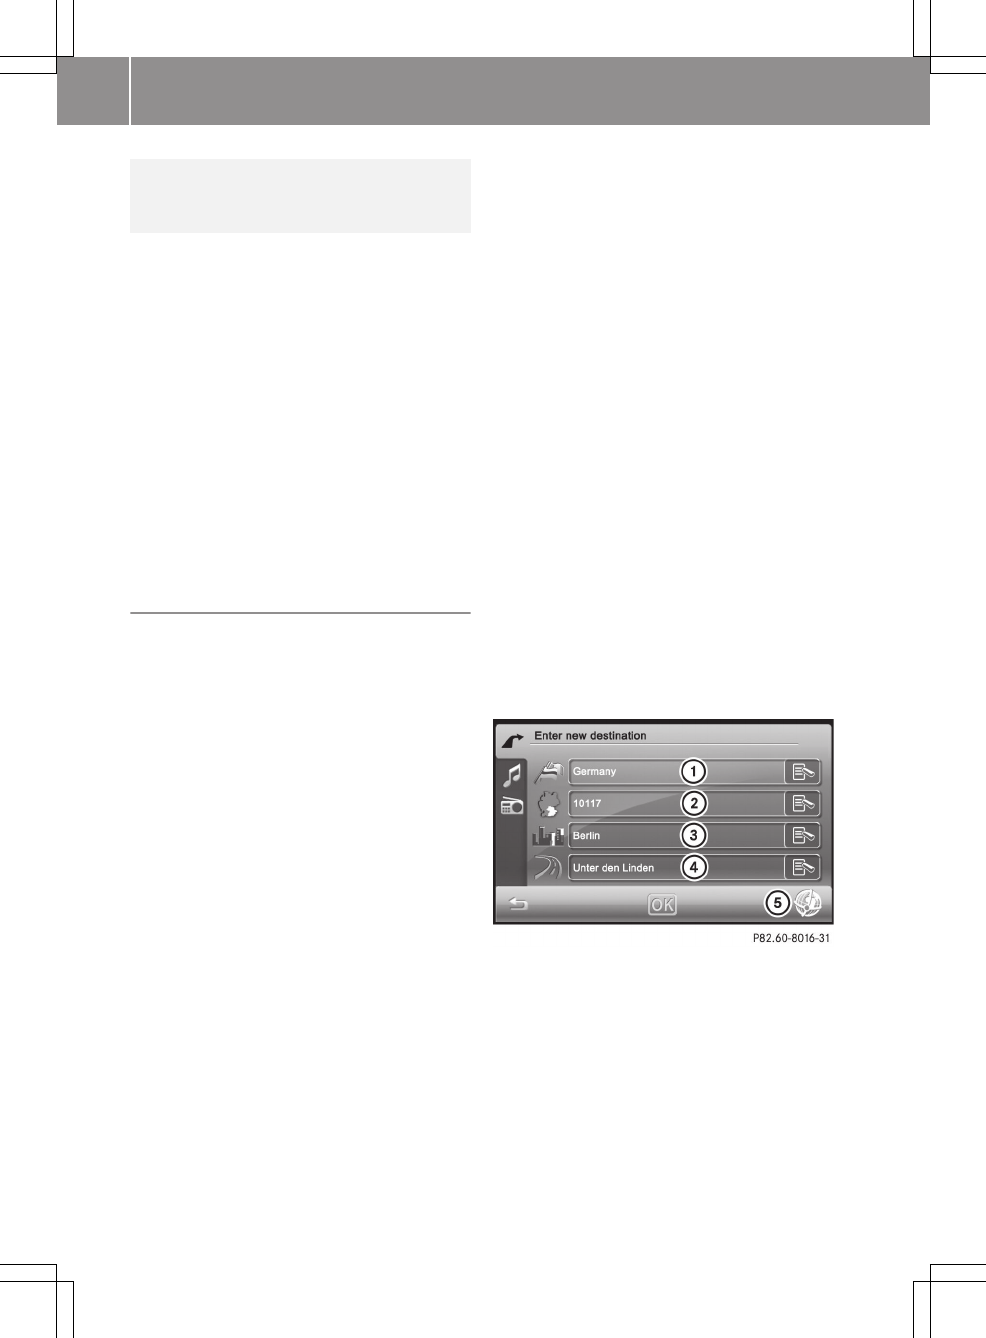
Calling up the address entry menu
XCall up the "Navigation" main menu
(Y page 25).
XPress Enter address.
The "Entering a new destination" menu
appears.
"Entering a new destination" menu
:Selecting the country
;Entering a postcode
=Enter town
?Entering a street name
AEntering geo-coordinates (Expert
mode)
28 >> smart high line radio.
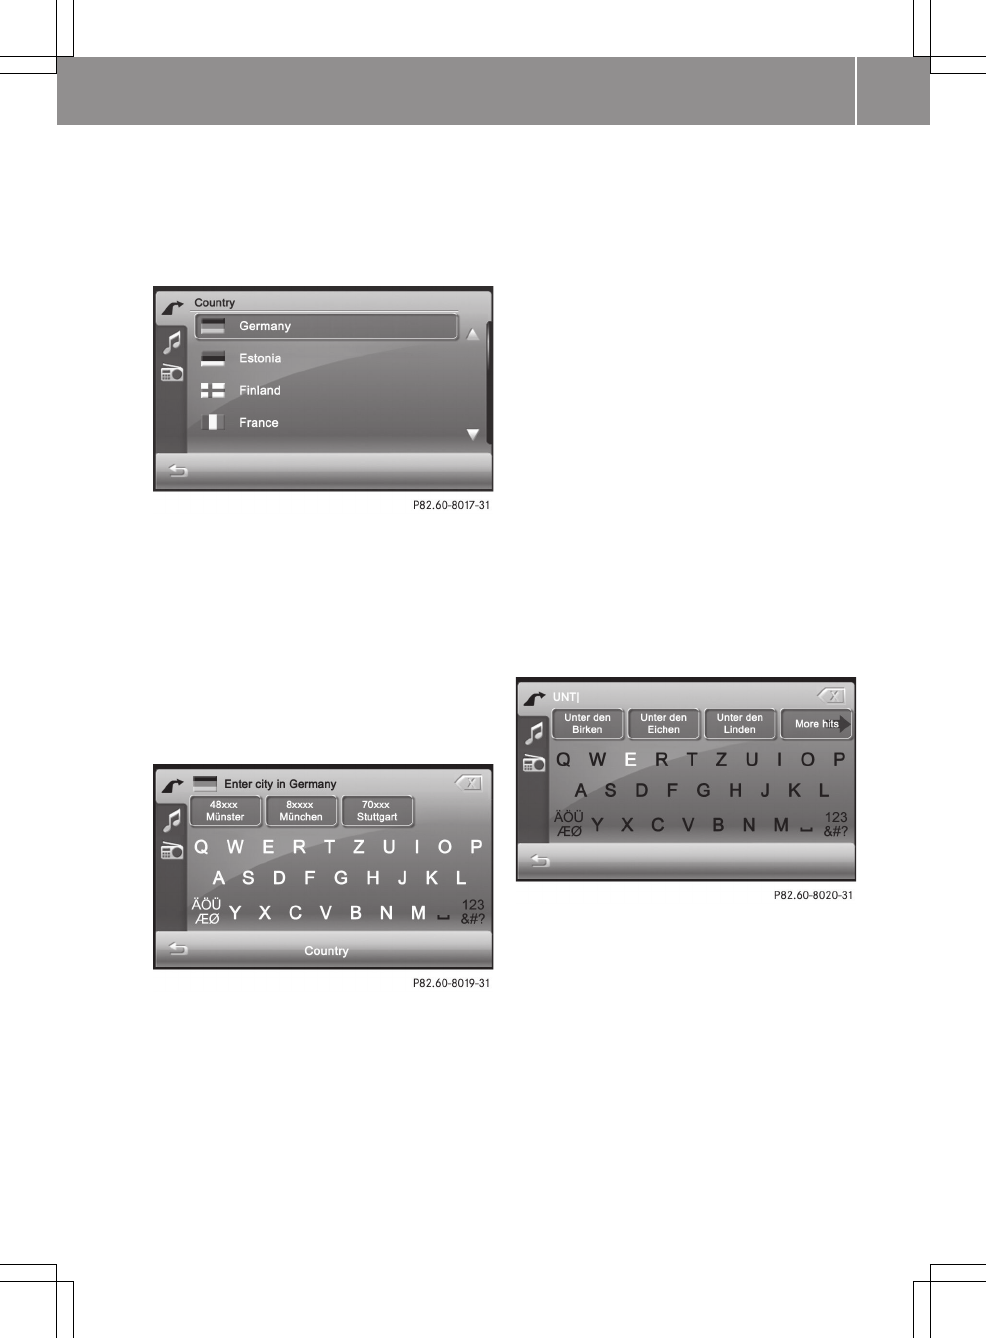
Selecting the country
XPress the country entry in the "Entering
a new destination" menu (Y page 28),
e.g.Germany.
You see the country list.
XPress 9 or : to scroll in the list.
XPress the desired country.
The country is selected and is now
entered in the "Entering a new destina-
tion" menu.
Enter town
XPress the town entry in the "Entering a
new destination" menu (Y page 28).
The input menu for the town appears.
Option 1
XEnter B. There is a description of how to
enter characters in the "Entering char-
acters in navigation" section
(Y page 12).
As soon as the letter has been entered,
the three largest towns found can be
selected.
iYou can set the keyboard (Y page 22).
XPress 1xxxx Berlin.
You can now enter the street.
Option 2
XEnter B.
As soon as the letter has been entered,
More hits can be selected.
XPress More hits
A list shows the first three largest towns
that match the entry and then shows all
other entries in alphabetical order. The
towns are shown on the left-hand side of
the map.
XPress Hide map to only show the list.
XPress Display on map to show the map
and the list.
XPress 9 or : to scroll in the list.
XPress 1xxxx Berlin.
You can now enter the street.
Entering a street name
iThe menu also appears if you press the
street entry in the "Entering a new des-
tination" menu (Y page 28).
Option 1:
XEnter UNT. There is a description of how
to enter characters in the "Entering
>> smart high line radio. 29
Z
characters in navigation" section
(Y page 12).
After entering UNT, the desired street is
shown in the first three entries.
XPress Unter den Linden.
You can now enter a house number or a
junction.
Option 2
XEnter UNT.
XPress More hits and select Unter den
Linden from the list.
You can now enter a house number or a
junction.
Further entry options immediately after
calling up the menu:
Selection Function
Berlin Centre Sets the destination to
the town centre and
calls up the "Detailed
information" menu
(Y page 30).
Points of
interest
XEnter a special des-
tination
(Y page 35).
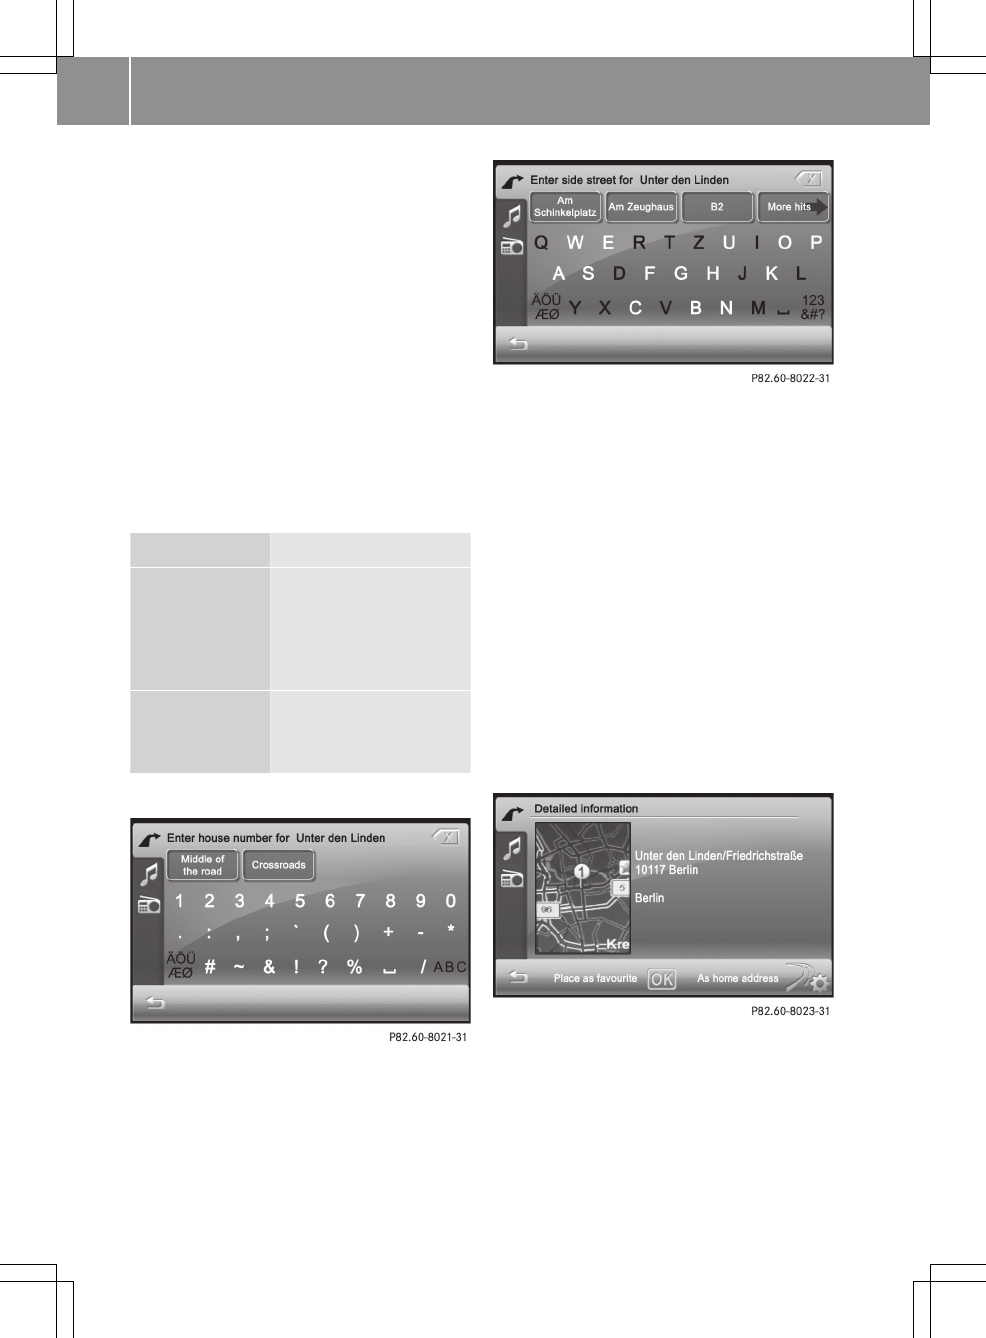
Enter a junction name
XPress Crossroads in the "Entering a
house number" menu.
The input menu for the junction appears.
The first three side streets that can be
selected are shown in alphabetical
order.
Option 1:
XEnter F. Instructions for entering char-
acters using street input as an example
can be found in the "Entering characters
in navigation mode" section (Y page 12).
XPress Friedrichstraße.
The address is now complete and the
"Detailed information" menu appears.
Option 2
XEnter F.
XPress More hits and select Friedrich‐
straße from the list.
The address is now complete and the
"Detailed information" menu appears.
"Detailed information" menu
The menu shows the address entered and the
destination on the map :.
30 >> smart high line radio.
Before calculating the route to the desti-
nation entered, you can:
Rstore the address as your home address
(Y page 31)
Rstore the address as a favourite
(Y page 45)
Rview the destination on the map
(Y page 31)
Rcheck/change the route options for the
address (Y page 31)
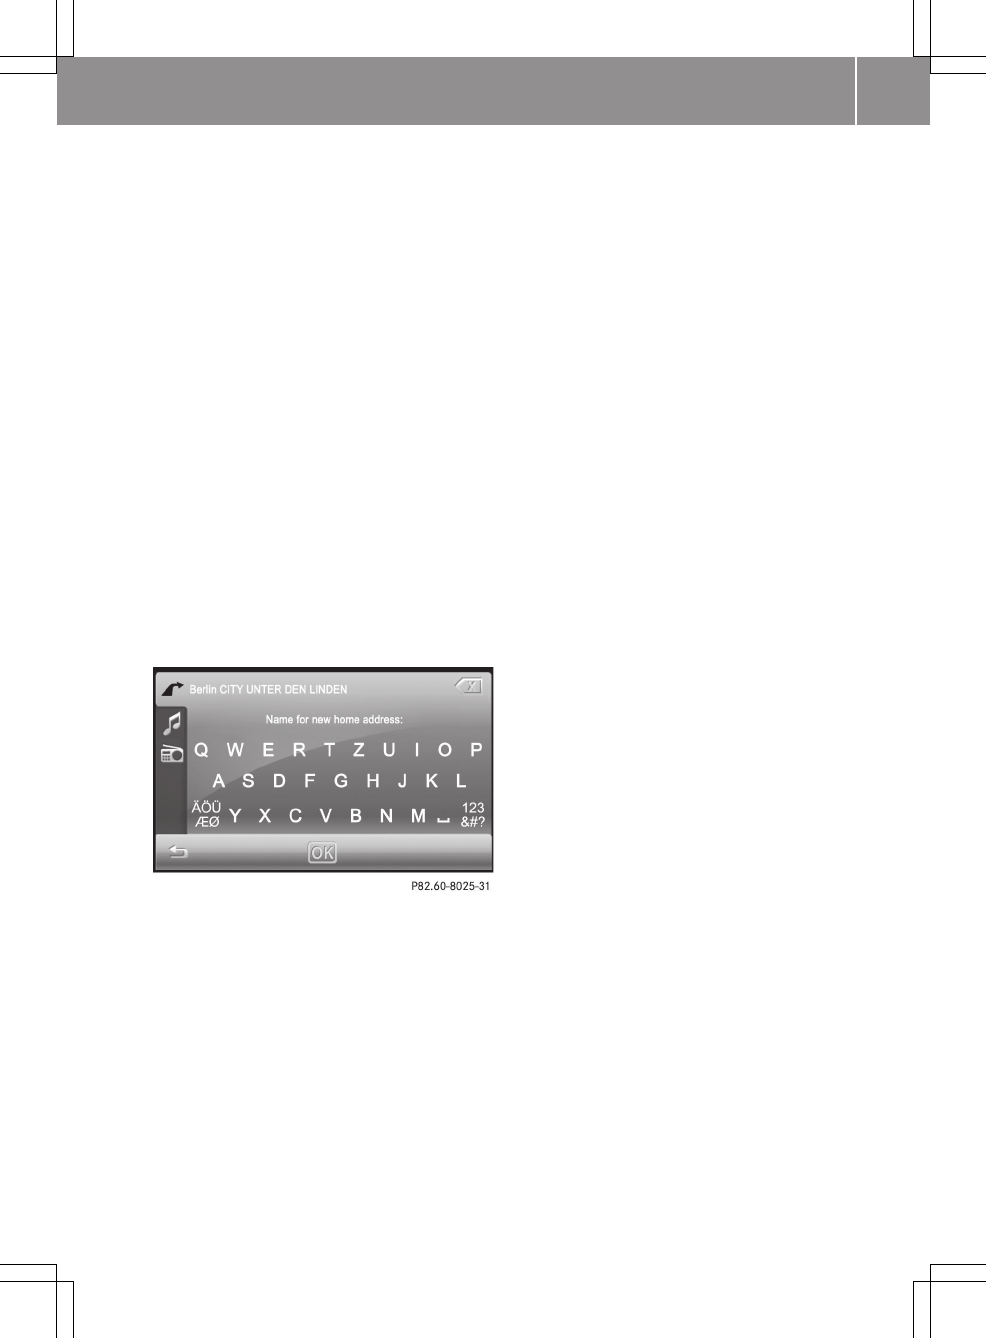
Entering and storing your home address
You can either enter your home address for
the first time (option 1) or edit a previ-
ously stored home address (option 2).
XOption 1: enter the address, e.g. a town,
street and junction.
XAfter entering the address, press As
home address in the "Detailed informa-
tion" menu.
An input menu appears.
iYou can set the keyboard (Y page 22).
XEnter a name for the home address.
Instructions for entering characters
using street input as an example can be
found in the "Entering characters in nav-
igation mode" section (Y page 12).
XPress OK.
The destination is stored as the home
address in the favourites under the name
entered (Y page 46).
XOption 2: proceed as described under
"Option 1".
The A favourite with this name
already exists. Do you want to
replace this file? message appears.
XPress OK if you want to overwrite the home
address.
XIf you do not want to overwrite the home
address: press &.
Viewing the destination on the map
XPress on the map.
XTo return to the "Detailed information
menu": press &.
Calculating the route
Checking/changing route options
The "Detailed information" menu appears
after the address has been entered. Before
starting the route calculation, you can
check and change the route options.
XPress the symbol at the bottom right of
the "Detailed information" menu
(Y page 30).
The "Route options" menu appears
(Y page 27) and shows the current set-
tings.
XChanging the route options.
XPress & to return to the "Detailed
information" menu.
Calculating the route
XPress OK in the "Detailed information"
menu (Y page 30).
The route to the destination is calcula-
ted using the selected route options.
After the route has been calculated, you
will hear Route calculation comple‐
ted.
The map shows:
Rthe destination address (at the top)
Rthe route as a blue line
Rthe selected route option (e.g. stand-
ard) with the distance and expected
journey duration to the destination
>> smart high line radio. 31
Z
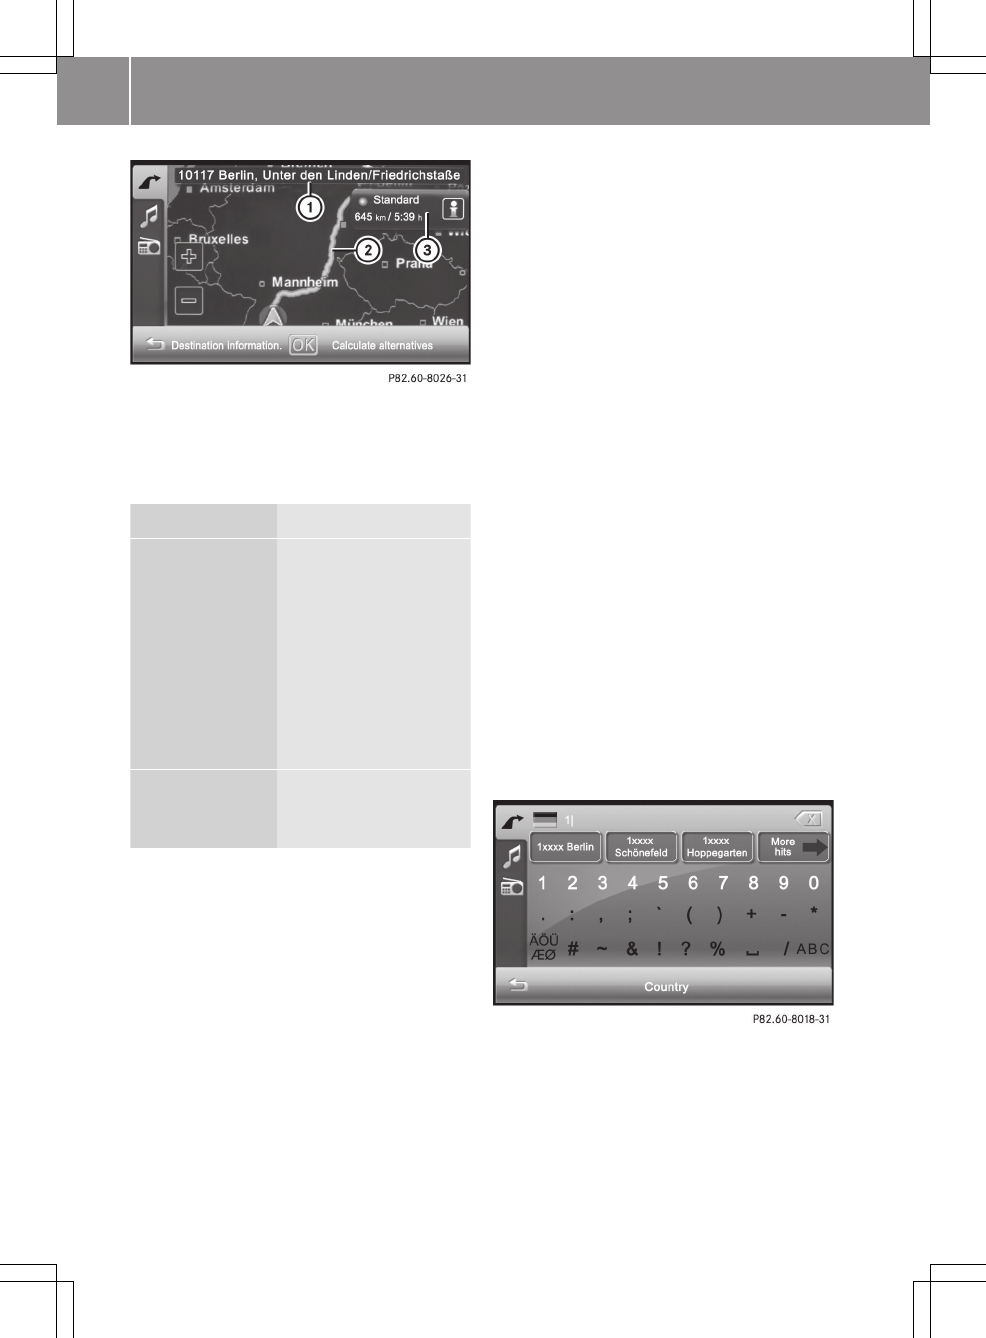
Map after route calculation (Expert mode)
:Address entered
;Route calculated (light blue)
=Selected route option
Selection Function
Destination
information
Calls up the "Detailed
information" menu.
XStore the town as a
favourite or as the
home address
(Y page 30).
XCheck/change the
route options
(Y page 31).
Calculate
alternatives
(Expert mode)
Calculates two addi-
tional alternative
routes.
Calculating alternative routes
The smart high line radio calculates two
alternative routes in Expert mode (e.g.
short, fast).
XPress Calculate alternatives.
The alternative routes are calculated.
After the alternative routes have been
calculated, you will hear Route calcu‐
lation completed.
The map shows the following routes on the
right:
Rstandard (light blue)
Ralternative 1 (green)
Ralternative 2 (light brown)
each with the distance and expected
journey time to the destination.
XTo view information about the route/
alternative route =: press ã.
You see the following information:
Rlength (distance)
Rjourney time (expected)
Rarrival time (expected)
Rmotorways (length of the route used)
Rtoll roads (length of the route used)
Rferries (length of the route used)
XPress & to close the display.
iThe ã symbol is shown in red if a route
option (e.g. Avoid ferries) that has
been selected for the route does not make
sense. Set the route options (Y page 27).
XTo hide the alternative routes: press
Hide alternatives.
XTo start route guidance: press OK.
Entering a postcode
XPress the entry with the postcode in the
"Entering a new destination" menu
(Y page 28).
The input menu for the postcode appears.
Option 1
XEnter a postcode, e.g. 10117. Instruc-
tions for entering characters can be
32 >> smart high line radio.
found in the "Entering characters in nav-
igation mode" section (Y page 12).
As soon as the first number has been
entered, the first three towns found can
be selected.
XPress 10117 Berlin.
You can now enter the street.
Option 2
XEnter the first number, e.g. 1.
As soon as the number has been entered,
More hits can be selected.
XPress More hits
A list shows the three largest towns that
match the entry and then shows all other
entries in alphabetical order. The towns
are shown on the left-hand side of the
map.
XPress Hide map to only show the list.
XPress Display on map to show the map
and the list.
XPress 9 or : to scroll in the list.
XPress 1xxxx Berlin.
You can now enter the street.
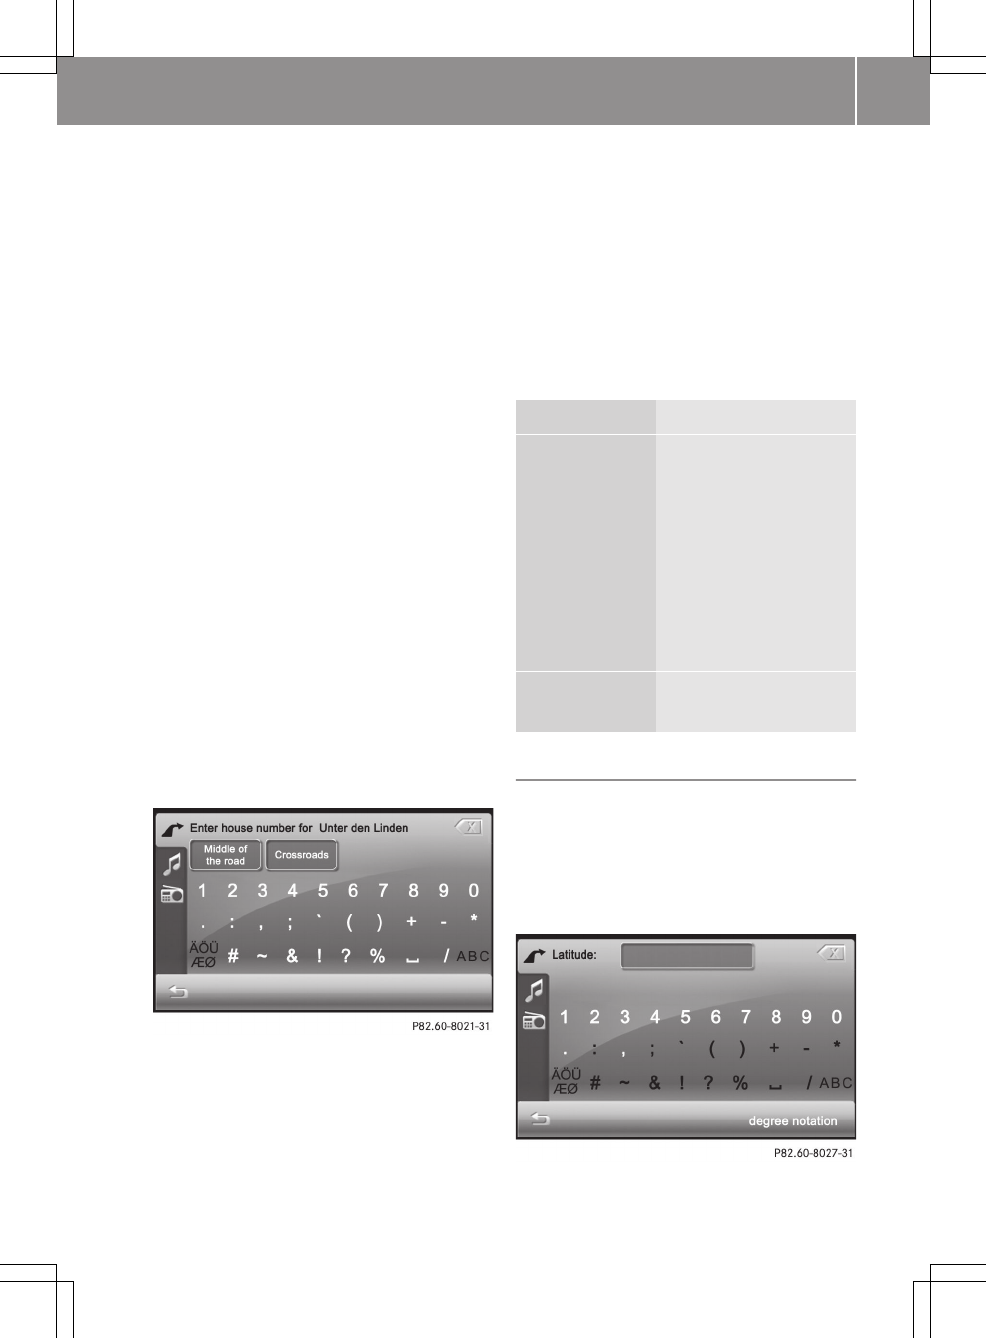
Enter house number
A house number can be entered after the
street has been entered.
XEnter a house number, e.g. 40. Instruc-
tions for entering characters can be
found in the "Entering characters in nav-
igation mode" section (Y page 12).
As soon as the first number has been
entered, the first three entries found can
be selected.
XPress 40.
The "Detailed information" menu
appears (Y page 30).
Further entry options immediately after
calling up the menu:
Selection Function
Middle of
the road
Sets the destination to
the middle of the road
and calls up the
"Detailed informa-
tion" menu (Y page 30).
Calls up a list from
which you can select an
entry. The "Detailed
information" menu
then appears.
Crossroads XEnter a junction
(Y page 30).
Entering geo-coordinates (expert mode)
XPress the globe at the bottom right of the
"Entering a new destination" menu
(Y page 28).
The "Enter coordinates" menu appears.
You can enter the geo-coordinates as
degrees or decimal notation.
XEnter the geo-coordinates. There is a
description of how to enter characters in
>> smart high line radio. 33
Z
the "Entering characters in navigation"
section (Y page 12). An example entry is
shown in the table.
XTo switch to decimal notation: press
decimal notation.
XTo switch to degree notation: press
degree notation.
Notation Example input
(Berlin)
Degree notation
RLatitude N 52° 33' 40", 00
(N latitude)
RLongitude E 13° 17' 22", 00
(E longitude)
Decimal notation
RLatitude 52.561111
RLongitude 13.289444
XTo confirm the entry: press OK.
The "Detailed information" menu
appears (Y page 30).
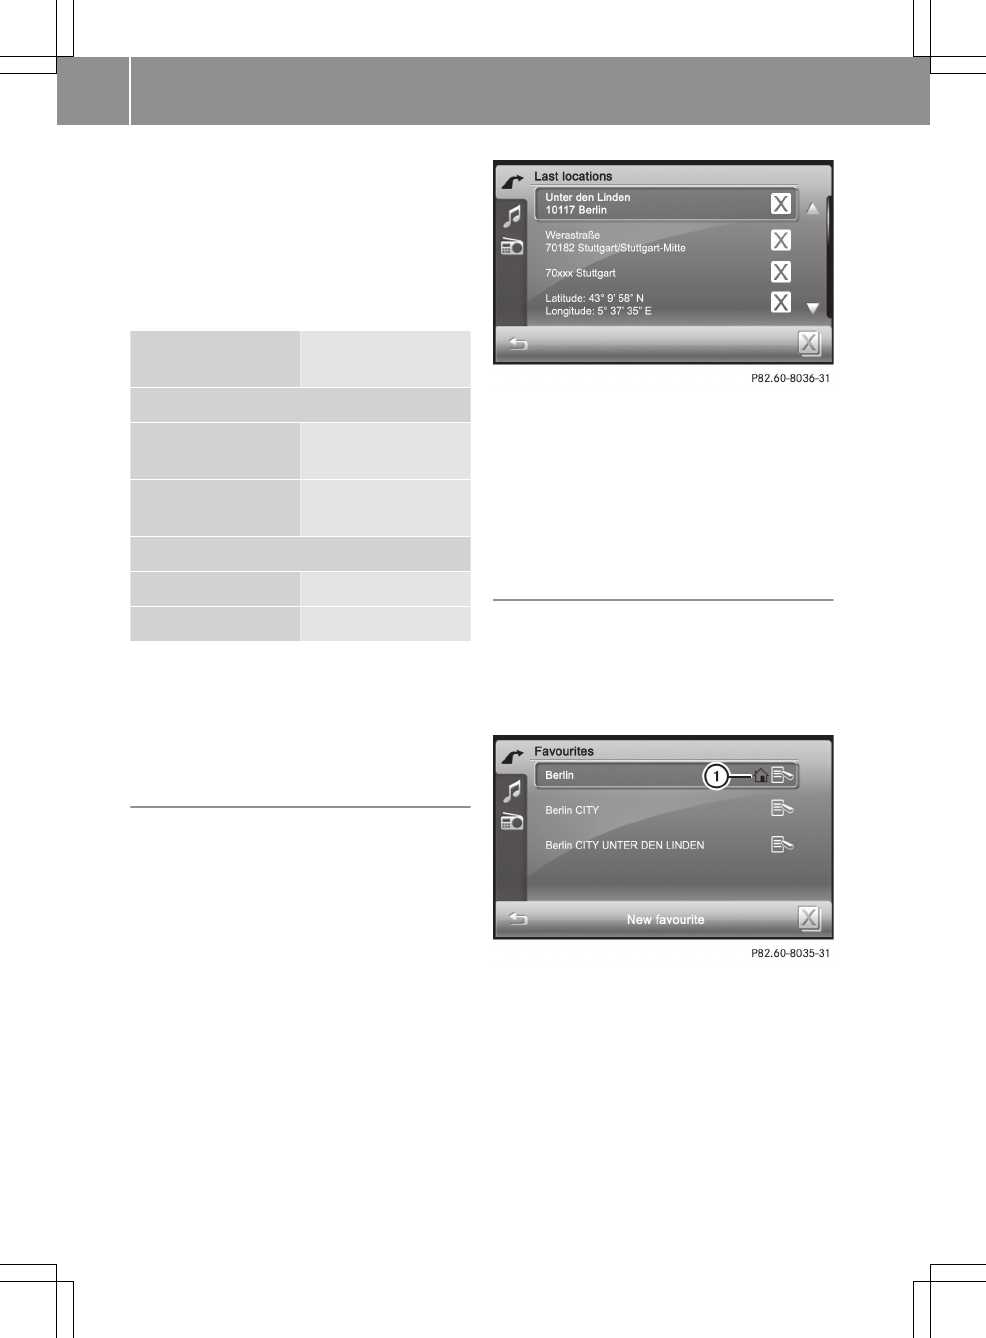
Selecting a destination from "Previous
towns"
The smart high line radio automatically
stores the last destinations entered.
XPress Last locations in the "Naviga-
tion" main menu (Y page 25).
The "Last locations" destination memory
appears.
iExpert mode: the first three entries
from the "Last locations" memory are
shown at the top of the "navigation" main
menu. These can be selected for fast des-
tination entry.
XPress 9 or : to scroll in the list.
XPress a destination address.
The "Detailed information" menu
appears (Y page 30).
iYou will find further information in the
"Last locations" section (Y page 45).
Selecting a destination from favourites
XPress Favourites in the "Navigation"
main menu (Y page 25).
The "Favourites" destination memory
appears. Your home address : is also
stored here.
:Home address symbol
XPress 9 or : to scroll in the list.
XPress a destination address.
The "Detailed information" menu
appears (Y page 30).
Further information, e.g. about storing,
can be found in the "Favourites (destina-
tion memory)" section (Y page 45).
34 >> smart high line radio.
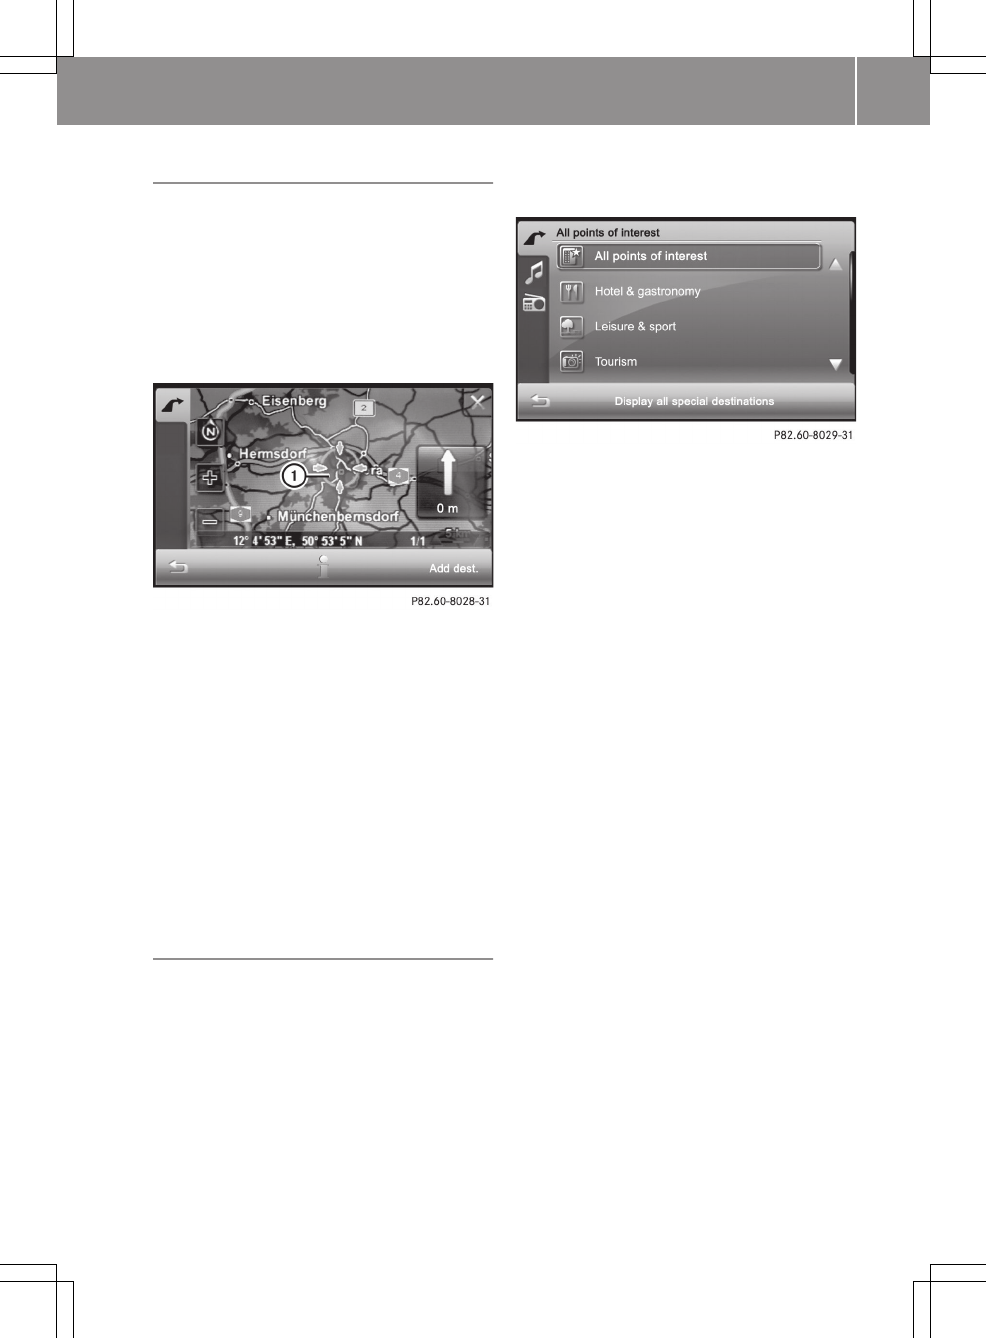
Entering the destination on the map
XPress the map when it is displayed.
A light blue circle appears on the map.
If there are destinations available for
this town, these are shown as an address
or as geo-coordinates. If further desti-
nation information is available, the
specification"1/3" and the symbols
9, : are shown after the entry.
:A circle marks the destination on the
map
XTo call up further destination informa-
tion (if available): press 9 or :.
XTo display an address: press ã.
XTo move the destination on the map: press
on the crosshair and move it on the map.
XTo select a destination: press Add
dest..
The "Detailed information" menu
appears (Y page 30).
Entering a special destination (Expert
mode)
Initiating special destination entry
XSetting Expert mode (Y page 26).
XPress Points of interest in the "Nav-
igation" main menu (option 1),
(Y page 25) or in the "Entering a street"
menu (option 2).
The "All special destinations" menu
appears. You can display all special des-
tinations or search for special destina-
tions within a category, e.g. Leisure
and sport.
>> smart high line radio. 35
Z

Option 1: calling up from the "Navigation" main menu
XPress All points of interest or select a category first (Y page 37).
A menu appears.
Searching for a special destination in the "Sport arena" category
Selection Action
At a specific location XEnter a town or press Display all special desti‐
nations.
Depending on the selection, an input menu or a list
appears.
XEnter a special destination and press Display
selection.
XSelect a special destination from the list.
The "Detailed information" menu appears
(Y page 30).
Nearby XEnter a destination or press Display all special
destinations.
Depending on the selection, an input menu or a list
appears.
XEnter a special destination and press Display
selection.
XSelect a special destination from the list.
The "Detailed information" menu appears
(Y page 30).
Along the Route (available
when the route has been cal-
culated)
XProceed as described under Nearby.
At destination (available
when the route has been cal-
culated)
XProceed as described under Nearby.
36 >> smart high line radio.

Option 2: calling up from the "Enter a
street" menu
XPress All special destinations or
select a category first (Y page 37).
The "Entering a special destination in
<Town>" menu appears.
XOption 1: enter a special destination and
press Display selection.
XOption 2: press All special destina‐
tions.
The special destinations are displayed
and shown on the left of the map.
XSelecting a special destination.
The "Detailed information" menu
appears (Y page 30). You can call up a
special destination if a telephone num-
ber is stored and the mobile phone has
been connected (Y page 55).
iThe phone number displayed may be out-
dated due to the database.
XPress Call now.
This initiates dialling.
Selecting a category
Example: you would like to go to an Indian
restaurant.
XPress Hotel & gastronomy in the "All
special destinations" menu (Y page 35).
The "Hotel & gastronomy" menu shows the
available categories.
XPress Restaurant/Nightlife.
The "Restaurant/bar" menu shows the
available categories.
XPress 9 or : until Indian is
selected.
XPress Indian.
Either the "Searching for a special des-
tination" menu (option 1), (Y page 36) or
the "Entering a special destination in
<Town>" menu (option 2) appears.
XProceed as described under option 1 or 2.
Route guidance
General notes
The smart high line radio guides you to
your destination by means of navigation
commands in the form of audible naviga-
tion announcements and route guidance
displays.
If you do not follow the navigation
announcements or if you leave the calcula-
ted route, the device automatically calcu-
lates a new route to the destination.
If the digital map contains the corre-
sponding information, the following
applies:
RWhen selecting a route, the smart high
line radio tries to avoid roads that only
have limited access, e.g. roads closed to
through traffic and non-residents.
Rroads that have time restrictions (e.g.
closed on Sundays and public holidays)
are avoided for route guidance.
If the digital map provides no information
or incomplete information during route
guidance, the current vehicle position is
shown using geo-coordinates.
This occurs in the following situations,
e.g.:
Rthe vehicle is outside of the area covered
by the digital map section (off-map
location).
Rthe vehicle is travelling through an area
that is only partially shown on the map.
Rthe vehicle is within the area covered by
the digital map section but not on a dig-
ital road (off-road location).
Starting route guidance
XCalculate a route or alternative route
(Y page 31) and then press OK.
Route guidance starts.
>> smart high line radio. 37
Z
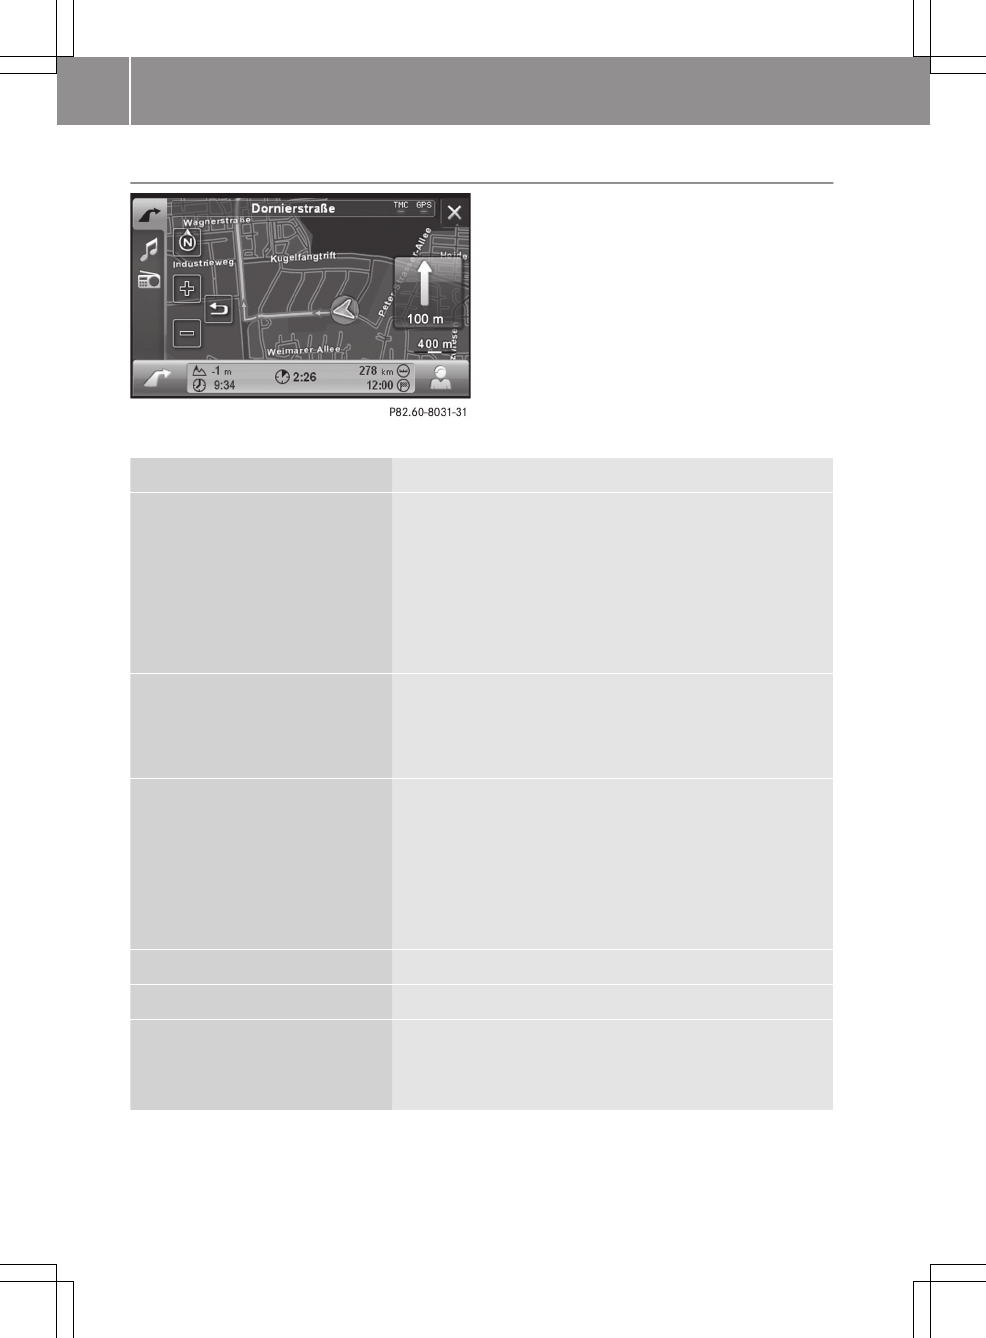
Displaying the map during route guidance
Map during route guidance (example)
Function Explanation
Route guidance display with
arrow indicating the direction
of travel (example shows an
arrow pointing straight ahead
and a distance of 100 m)
The upcoming change of direction is shown with an
arrow indicating the direction of travel and the dis-
tance.
The route guidance display can also be seen in other
operating modes, e.g. radio mode.
XTo repeat the current navigation announcement:
press on the route guidance display.
Auto zoom As you approach a change in direction, the area of the
junction is zoomed in on the map.
In Expert mode, you can set how much the map section
is zoomed in (Y page 48).
Lane recommendations Lane recommendations may be shown for multi-lane
roads. The relevant data must be available on the dig-
ital map. Recommended lanes are shown with a green
arrow, lanes that are not recommended are shown with
a red cross.
Lane recommendations apply to the next change of
direction.
Current map scale Appears under the route guidance display.
Map view Enables different map orientations (Y page 48).
Setting the map scale XZoom in on the map section using W or zoom out
using X.
XPress % to return to the original auto zoom view.
38 >> smart high line radio.
Function Explanation
Speed Limit Assist (Expert
mode)
The maximum permissible speed is shown when the
corresponding map data is available and the Speed
limit function is not deactivated (Y page 50).
A warning tone sounds if the maximum permissible
speed is exceeded and one of the Warning at x km/
h settings is activated.
iThe maximum permissible speed display may dif-
fer from the actual traffic situation, e.g. as a result
of incorrect map data.
TMC and GPS display Blue display: reception
Red display: no reception
Destination information The current height above average sea level is shown
at the bottom edge of the screen.
For the next destination (intermediate stop, final
destination), you will also see:
Rthe estimated driving time to the destination
Rthe distance to the destination
Rthe expected arrival time at the destination
XPress on the field with the destination information
to display the "Trip info" display with additional
information (Y page 42).
Displaying special destina-
tion symbols
Special destinations are Restaurant/Nightlife or
Petrol station, for example. The corresponding
symbols can be displayed on the map (Y page 50).
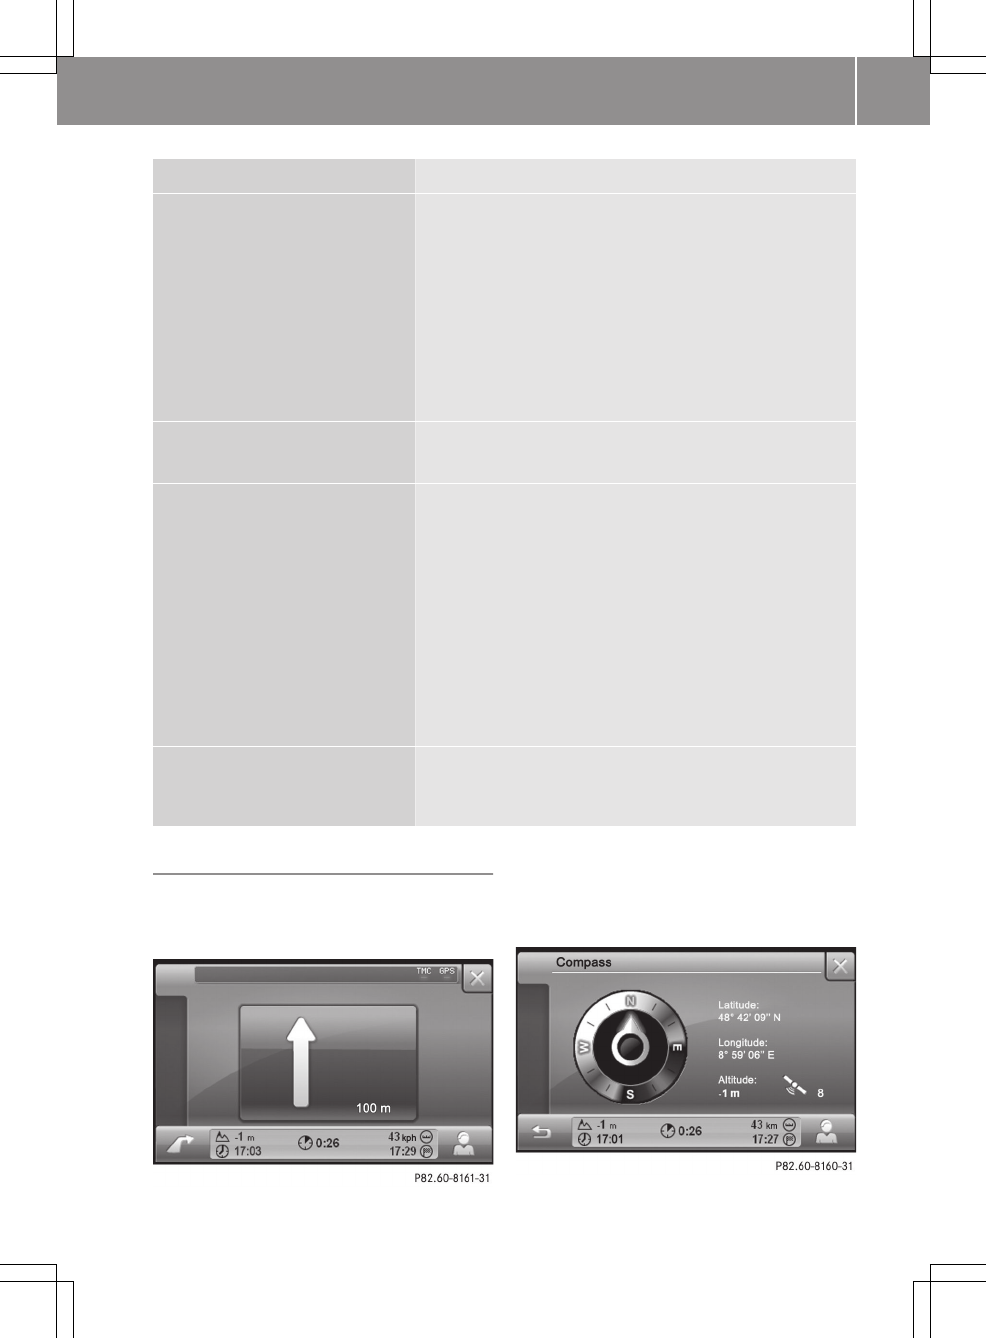
Selecting a route guidance display
You can choose between the Map only, Turn
Icons or Compass display, see the "Dis-
play" section (Y page 47).
"Turn Icons" display (example)
If Turn Icons has been selected, the arrow
indicating the direction of travel is shown
with the distance display until the next
change of direction.
Compass display (example)
>> smart high line radio. 39
Z

You see the following information:
Rcurrent direction of travel
Rlatitude coordinates
Rlongitude coordinates
Rcurrent height above mean sea level
Rnumber of satellites currently being
used
The bar underneath shows the following
information:
Rcurrent height above mean sea level
Rcurrent time (if route guidance is not
active) or remaining journey time to
next destination (intermediate stop,
final destination)
Rremaining distance to next destination
(intermediate stop, final destination)
Rexpected arrival time at next destina-
tion (intermediate stop, final destina-
tion)
XTo close the compass display: press &.
Stopping route guidance
XPress Stop route guidance in the "Nav-
igation" main menu (Y page 25).
Route guidance is interrupted.
Destination reached
When you reach your destination, a cheq-
uered flag is displayed on the right-hand
side of the display and route guidance is
ended automatically.
Navigation announcements
Switching navigation announcements on/
off
Option 1
XTo switch off: press control knob W
briefly during a navigation announce-
ment.
XTo switch on: press the arrow indicating
the direction of travel on the map
(Y page 38).
The current navigation announcement is
repeated.
iNavigation announcements are muted in
the event of a traffic announcement, an
incoming call or during a phone call.
Option 2
XPress the arrow at the bottom left of the
map (Y page 38).
The "Navigation" main menu appears.
XPress d.
The "Settings" menu appears.
XPress Speech output.
The "Speech output" menu appears.
XPress Speech output again.
Depending on the previous setting, the
functions are deactivated or activated.
Announcing street names
XPress the arrow at the bottom left of the
map (Y page 38).
The "Navigation" main menu appears.
XPress d.
The "Settings" menu appears.
XPress Speech output.
The "Speech output" menu appears.
XPress Street names.
Depending on the previous setting, the
function is deactivated or activated.
40 >> smart high line radio.
Adjusting the volume for navigation
announcements
XTurn cVd the control knob during a traf-
fic announcement.
or
XSet the volume of traffic announcements
compared to the volume of the active
audio source (Y page 15).
The volume of the active audio source is
lowered to the selected value for the
duration of the navigation announce-
ment.
Selecting traffic jam avoidance (Expert
mode)
XPress the arrow at the bottom left of the
map (Y page 38).
The "Navigation" main menu appears.
XPress Route options.
The "Route options" menu appears. The
by pass option shows the current set-
ting.
XPress by pass.
A menu appears.
XPress none, manual or automatic.
Selection Explanation
none Traffic jams are not taken
into account for route guid-
ance.
manual The selected traffic jam
section and additional
information are shown on
the map. However, no new
route is calculated.
automatic The smart high line radio
calculates a detour if TMC
traffic announcements are
received.
iIn Easy mode, the stand-
ard setting is automatic.
Route information (Expert mode)
Calling up the "Route information" menu
XPress the arrow at the bottom left of the
map (Y page 38).
The "Navigation" main menu appears.
XPress Route information.
The "Route information" menu appears.
Calling up a route list
XPress Directions in the "Route infor-
mation" menu.
The route list shows the street sections
to be driven on.
XPress 9 or : to scroll in the list.
XTo close the route list: press &.
Checking the traffic conditions
XPress Traffic information in the
"Route information" menu.
The list shows the current TMC traffic
announcements. Traffic announcements
with a red symbol affect the current
route, traffic announcements with a grey
symbol apply to other sections of road.
>> smart high line radio. 41
Z
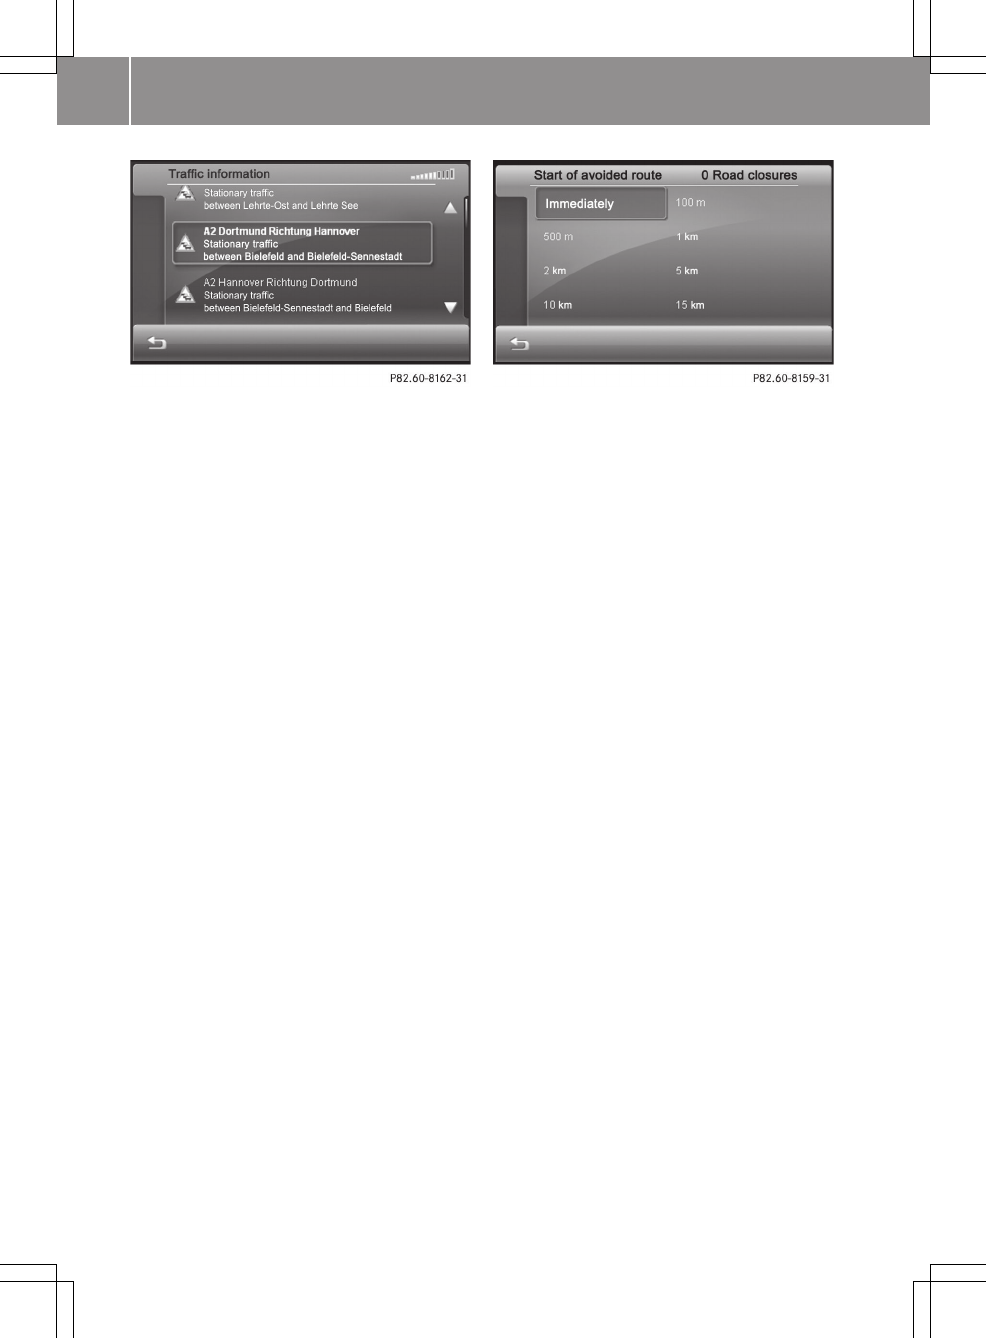
iThe list can be displayed by clicking
on the TMC symbol on the top right-hand
side of the display (Y page 38). The dis-
play does not depend on the RDS TMC
radio station currently playing.
XTo close the list: press &.
Setting the map to a route position
XPress Go to... in the "Route options"
menu (Y page 41).
A menu appears.
XPress Current position, Destination
area, Overview or Starting point.
The map shows the route section with the
selected route position or a complete
overview of the route.
Blocking a section of the route
It is possible to block more than one route
section. The number of active blocks can be
seen in the "Length of block" and "Start of
block" lists at the top right.
XPress Avoid route in the "Route infor-
mation" menu (Y page 41).
The "Length of block" list appears.
XPress a selection option, e.g. 5 km, to
select the extension of the block.
The "Start of block" list appears.
XPress Immediately or another selection
option to determine when the block
should start.
The route section is blocked. The route
is recalculated.
XTo delete blocks: Press 1 at the bottom
right in the "Length of block" list.
Starting route simulation
XPress Simulation mode in the "Route
information" menu (Y page 41).
The route is shown from the start (or pre-
vious position) to the destination.
Displaying trip info
XPress Trip info in the "Route informa-
tion" menu (Y page 41).
You see the following information:
RMaximum speed
RAverage speed
Rdistance covered
Rdriving time
Rtotal remaining driving time
Rtotal remaining journey distance
The bar underneath shows the following
information:
Rcurrent height above sea level
Rcurrent time (if route guidance is not
active) or remaining journey time to
next destination (intermediate stop,
final destination)
42 >> smart high line radio.
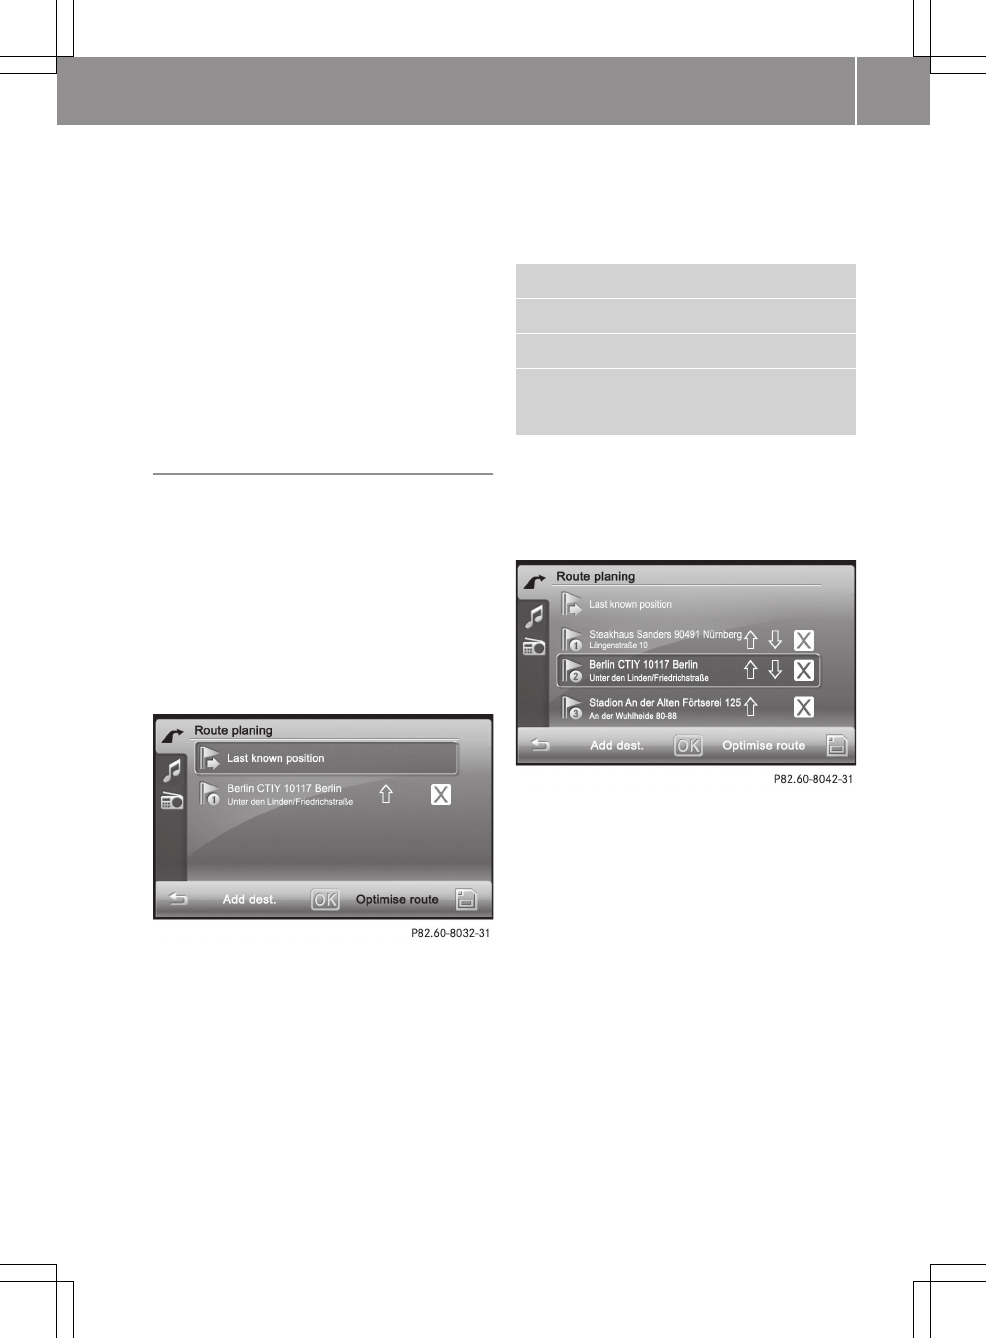
Rremaining distance to next destina-
tion (intermediate stop, final desti-
nation)
Rexpected arrival time at next destina-
tion (intermediate stop, final desti-
nation)
XTo close trip info: press &.
iThe information can also be shown by
pressing the field with the destination
information at the bottom of the map
(Y page 38).
Editing a route
Introduction
You can add additional destinations to the
route, optimise route guidance or change
the order of the destinations.
XPress the arrow at the bottom left of the
map (Y page 38).
The "Navigation" main menu appears.
XPress Edit route.
The "Edit route" menu appears.
The following functions can be selected:
Radding a destination
Roptimising a route (available with four
or more destination entries)
Rchanging the order of the destinations
within the route
Rloading/saving a route
adding a destination
XPress Alternative route.
The "New destination" menu appears.
XSelect destination entry.
Entering an address (Y page 28)
Previous towns (Y page 34)
Current position (if available)
Special destinations (Y page 35)
XSelect option 1.
XPress OK in the "Detailed information"
menu (Y page 30).
The destination is entered in the "Edit-
ing the route" menu.
XTo calculate a new route: press OK.
Optimising a route
This function is available when there are
four or more entries (including the start-
ing point and the destination).
XPress optimise route in the "Editing a
route" menu.
The order of the destinations is checked
and the route is optimised according to
the distance. The route's starting point
and destination are not changed.
Changing the order of the destinations
within the route
XPress the up or down arrow in the "Edit-
ing a route" menu.
The destination is moved up or down.
>> smart high line radio. 43
Z
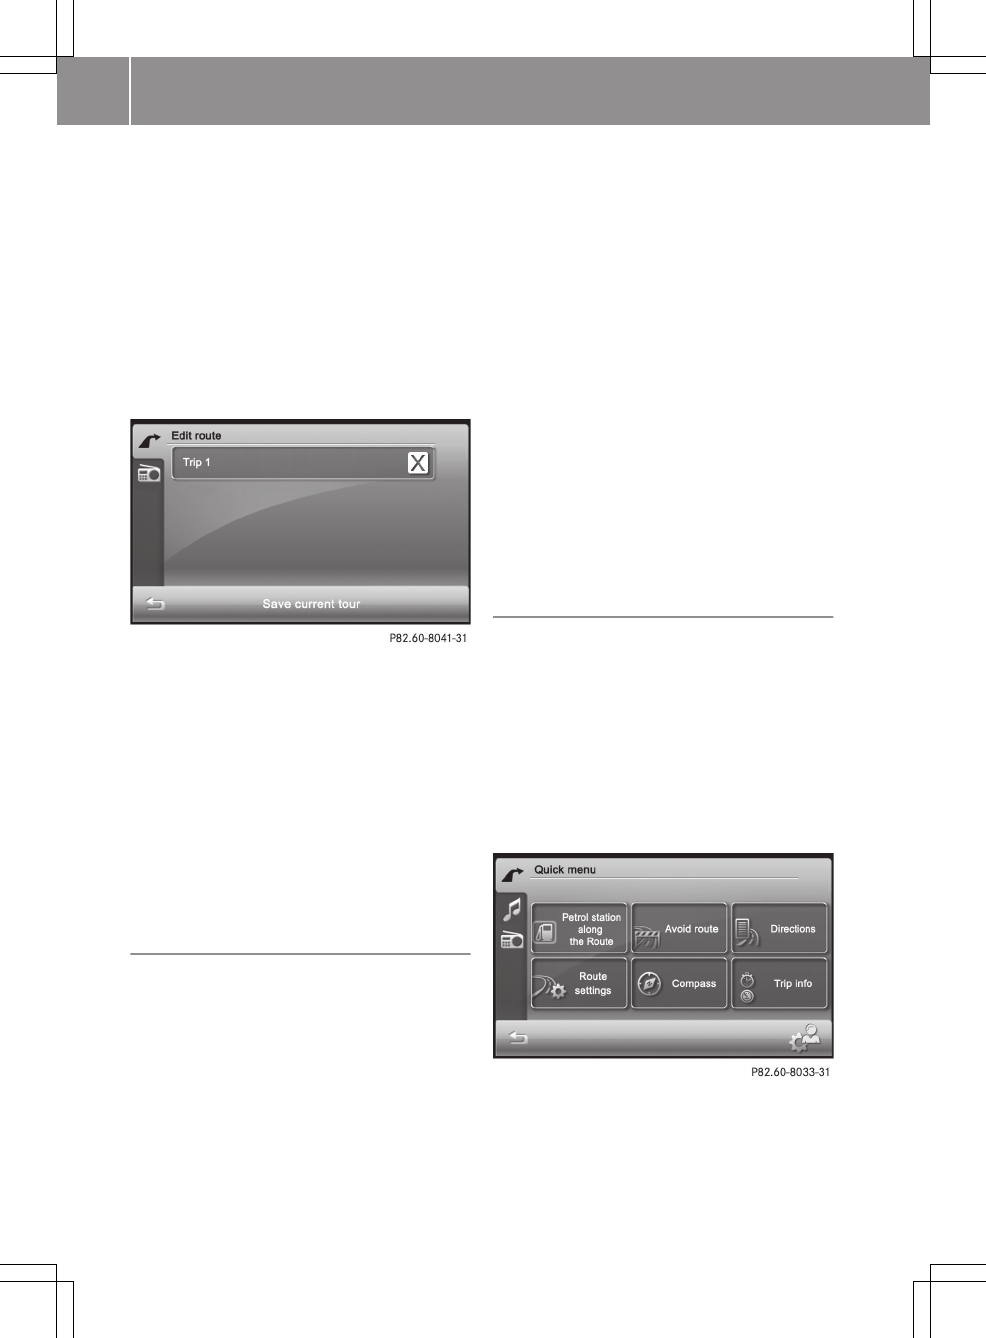
Deleting a destination from the route
XPress 1 after an entry in the "Editing
a route" menu.
The destination is deleted from the
route.
Loading/saving a route
XPress on the memory card symbol in the
"Editing a route" menu (Y page 43).
The "Loading and saving a route" menu
appears.
XSaving a route: Press Save current
tour.
An input menu appears.
XEnter a name for the route and then press
OK.
The route is stored.
XTo load a route: press an entry.
The route is loaded.
XTo delete a route: press 1 after an
entry.
Plotting the GPS track (Expert mode)
If this function is activated and an SD/MMC
memory card has been inserted
(Y page 73), the route taken is plotted.
The route is saved as a GPX file in the "GPS
tracks" folder on the SD/MMC memory card.
You can view the route later, in Google
Earth for example.
Feature specific to simultaneous playback
of SD/MMC memory cards or USB devices:
RPlayback may be interrupted occasion-
ally.
RAfter switching the smart high line
radio off and on again, the first music
track on the data medium is played.
XPress the d symbol in the main menu
(Y page 25).
The "Settings" menu appears.
XPress Programme settings.
The "Programme settings" menu appears.
XPress Plot GPS track.
Depending on the previous setting, the
function is activated or deactivated.
Plotting the GPS track is started after
you have activated the setting.
Quick menu (Expert mode)
Calling up the Quick menu
The Quick menu enables fast access to six
frequently used functions during route
guidance. You can personalise these six
functions.
XPress the symbol at the bottom right of
the map.
The Quick menu appears and shows the
functions that are currently available.
44 >> smart high line radio.
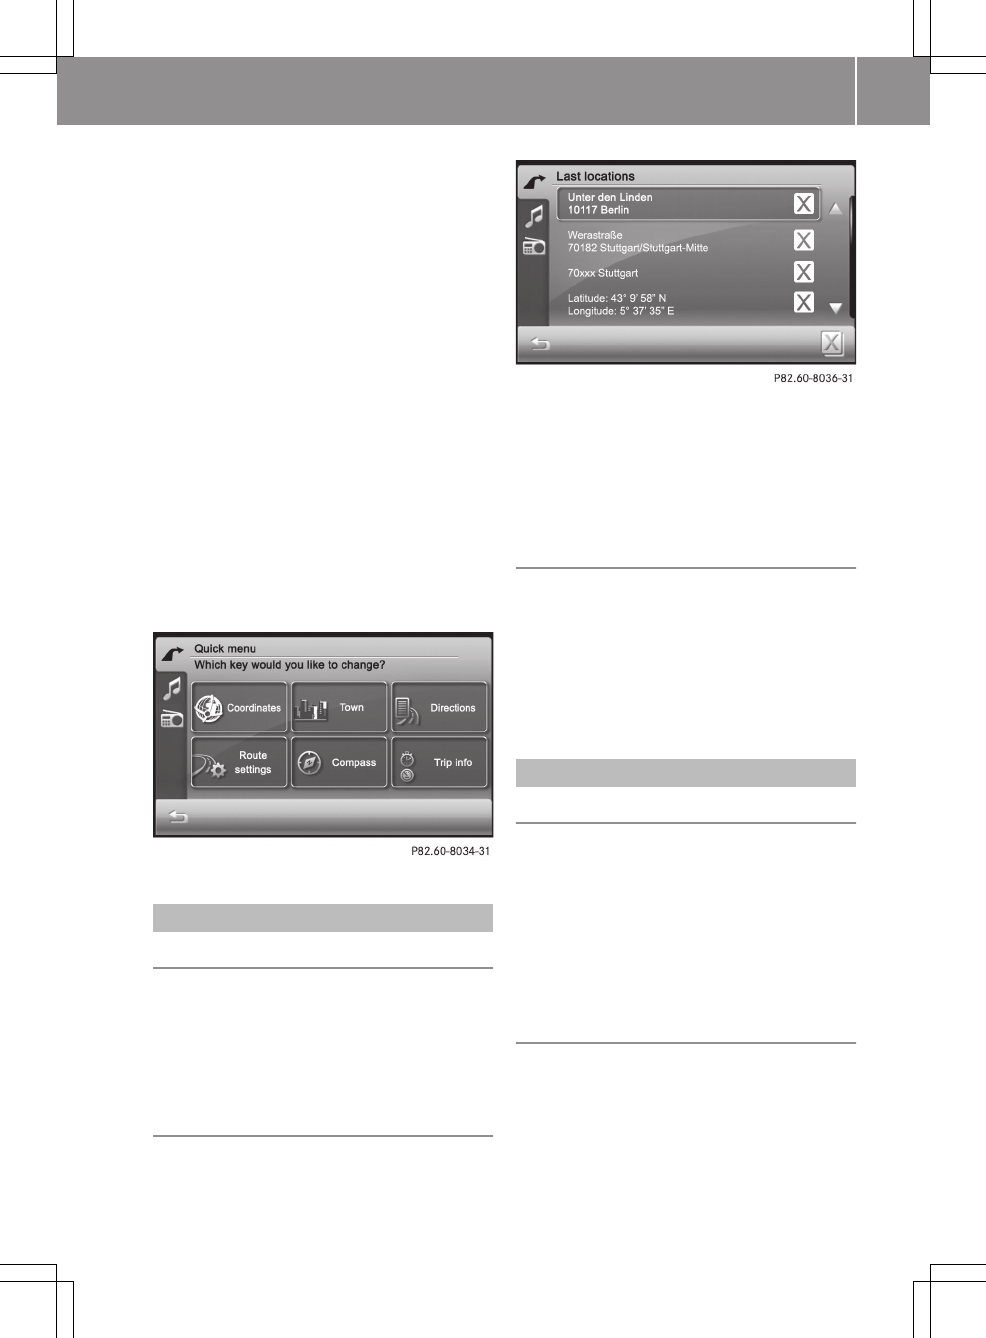
Editing the Quick menu
XPress the symbol at the bottom right of
the menu.
The "Quick menu" menu appears with the
Which key would you like to
change? prompt.
XPress a key.
The "Changing a key" menu appears.
XPress on one of the following functions:
RSelect destination
RPoints of interest
RRoute information
RSettings
ROther views
Depending on the selection, the availa-
ble keys are shown.
XSelect a key.
The Quick menu appears and shows the
new key assignment.
Previous towns
Introduction
The smart high line radio automatically
stores the previous towns for which route
calculation was started. If the list is full,
the device deletes the oldest destination.
You can also delete destinations yourself.
Deleting all destinations
XPress Last locations in the "Naviga-
tion" main menu (Y page 25).
The "Previous towns" list appears.
XPress 1 on the bottom right.
A query appears.
XPress OK.
All destinations are deleted from the
"Previous towns" list.
Deleting a destination
XPress 1 after an entry in the "Previous
towns" list.
A query appears.
XPress OK.
The destination is deleted from the
"Previous towns" list.
Favourites (destination memory)
Storing your home address
XEnter your home address as a destination,
e.g. as a town, street and house number
(Y page 28).
XBefore route calculation is started,
press as home address in the "Detailed
information" menu and store the address
(Y page 30).
Saving a destination to your favourites
Option 1: after destination entry
XEnter the destination, e.g. as a town,
street and house number.
XBefore route calculation is started,
press Place as favourite in the
"Detailed information" menu.
>> smart high line radio. 45
Z
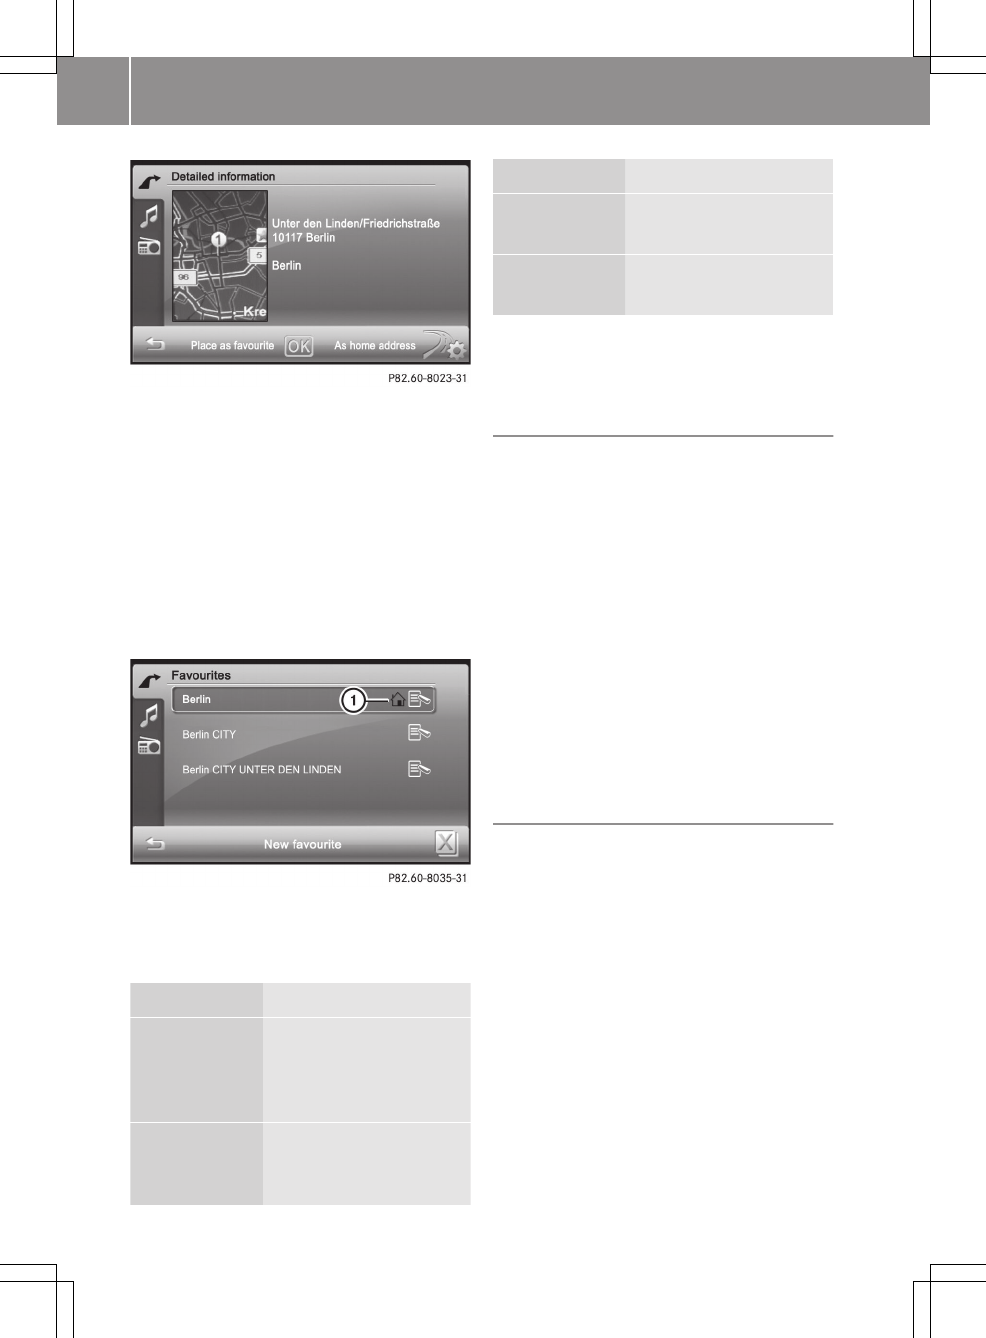
XEnter a name for the new favourite. Pro-
ceed as described under "Character
entry" in the "At a glance" section
(Y page 13).
XPress OK to save the destination to the
favourites.
Option 2: create a new favourite
XPress Favourites in the "Navigation"
main menu (Y page 25).
The "Favourites" list appears.
:Home address symbol
XPress New favourite.
XSelect an option from the menu.
Selection Step
Enter an
address
XEnter the destination
address, e.g. as a
town, street and house
number (Y page 28).
Last loca‐
tions
XSelect a destination
from "Last locations"
(Y page 34).
Selection Step
Current
position
XSelect the current
position.
Points of
interest
XEnter a special desti-
nation (Y page 35).
XContinue as described under "Option 1:
after destination entry".
Renaming a destination in favourites
XPress on a destination or the edit symbol
to the right while the "Favourites" list
is shown.
The "Detailed information" menu
appears.
XPress Rename favourite or Rename
home address.
XEnter a new name for the favourite. Pro-
ceed as described under "Character
entry" in the "At a glance" section
(Y page 13).
XPress OK and save the destination to the
favourites with a new name.
Deleting a destination from the favour-
ites
Deleting all destinations
XPress 1 in the "Favourites" list.
The Are you sure you want to delete
all favourites? message appears.
XPress OK.
All destinations, including a home
address, are deleted from the favourites.
Deleting a destination
XPress the edit symbol on the right-hand
side of the destination entry in the
"Favourites" list.
XPress 1 on the bottom right of input
menu.
The destination is deleted from the
favourites.
46 >> smart high line radio.
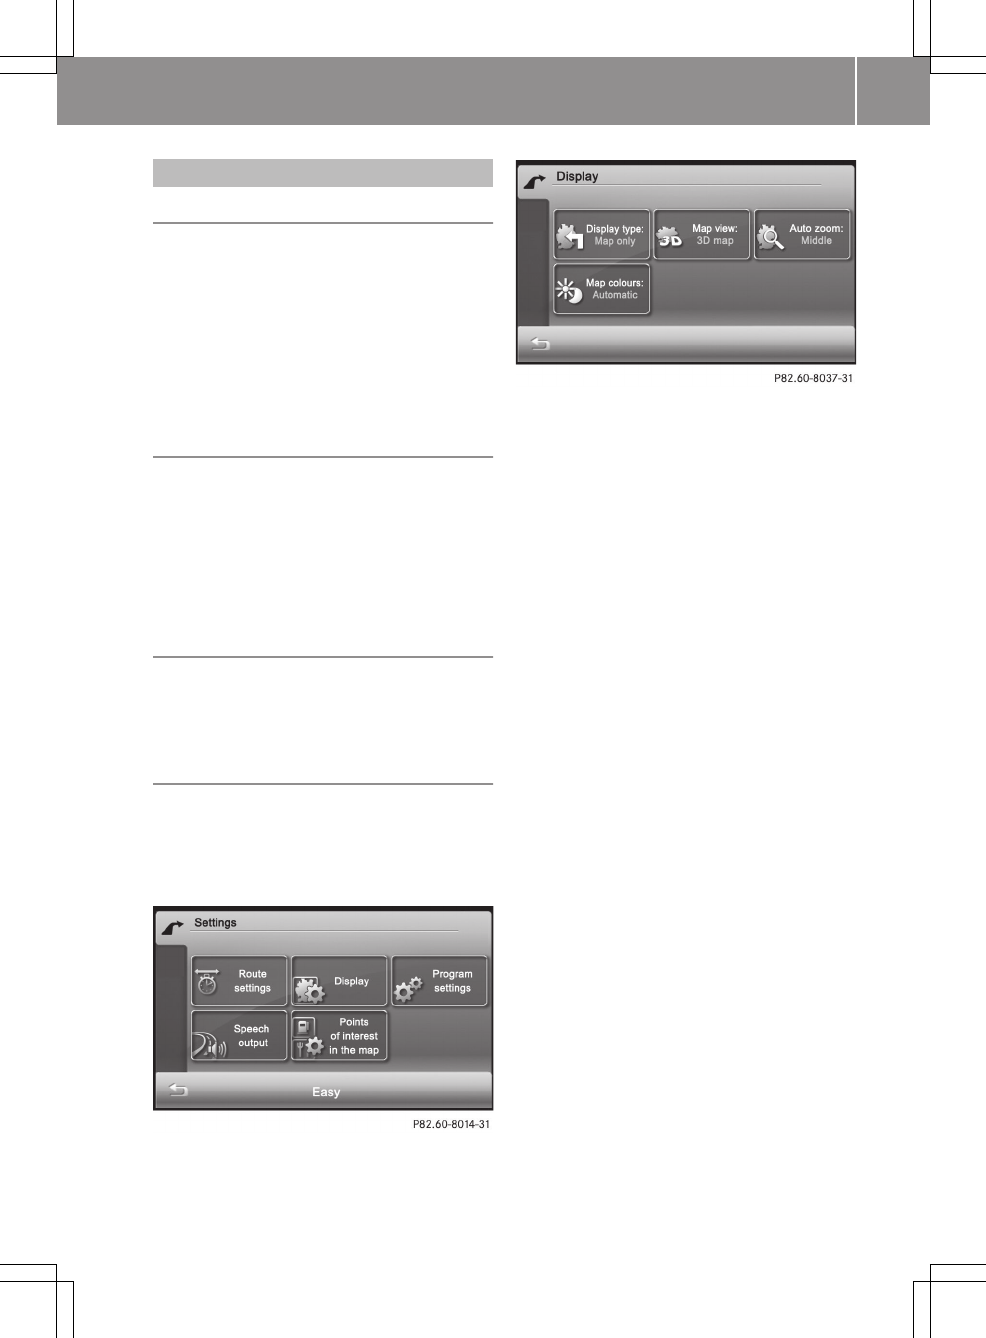
Map operation and settings
Note
Company logos displayed on the map are
trademarks of the respective companies
and used solely for the purpose of indicat-
ing the location of these companies. The
use of such logos on the map does not indi-
cate approval of, support of or advertising
by these companies for the navigation sys-
tem itself.
Setting the map scale
XWhen the map is displayed (Y page 38),
press W or X.
The section of the map is then zoomed in
or zoomed out.
XPress % to return to the original auto
zoom view.
Moving the map
XPress on the map (Y page 38) and move the
map using your finger.
The map moves in the relevant direction.
Display
Calling up the "Display" menu
XPress the d symbol in the "Naviga-
tion" main menu (Y page 25).
The "Settings" menu appears.
XPress Display.
The "Display" menu appears.
>> smart high line radio. 47
Z

Explanation of functions
Function Explanation Step
Display type Enables different dis-
plays during route
guidance
XPress Display type.
XSelect Map only, Turn Icons or
Compass.
Map view Enables different map
orientations
XPress Map view.
XSelect Align map northwards,
Map in driving direction, Map
display dynamic or 3D map.
North up: the map is displayed so that
north is at the top, the point of the
north arrow always points up.
Map in driving direction: the map is
displayed so that the heading is
always up. The north arrow turns. The
point of the current vehicle position
always points up.
Dynamic map: when a smaller map
scale is used (e.g. when driving on the
motorway), the map is displayed so
that north is always up in order to
make orientation easier.
3D map: the map is shown from the
bird's-eye view.
Auto zoom (Expert
mode)
Selects how much a map
section will be zoomed
in before a change in
direction.
XPress Auto zoom.
XSelect nearby, Middle or far.
Map colours (Expert
mode)
Sets the display to day
or night display or
switches automati-
cally.
XPress Map colours.
XPress Automatic, Day design or
Night design in the list.
Automatic: the display design
changes depending on the brightness
determined by the light sensor.
Day design: the display is always set
to day design.
Night design: the display is always
set to night design.
48 >> smart high line radio.
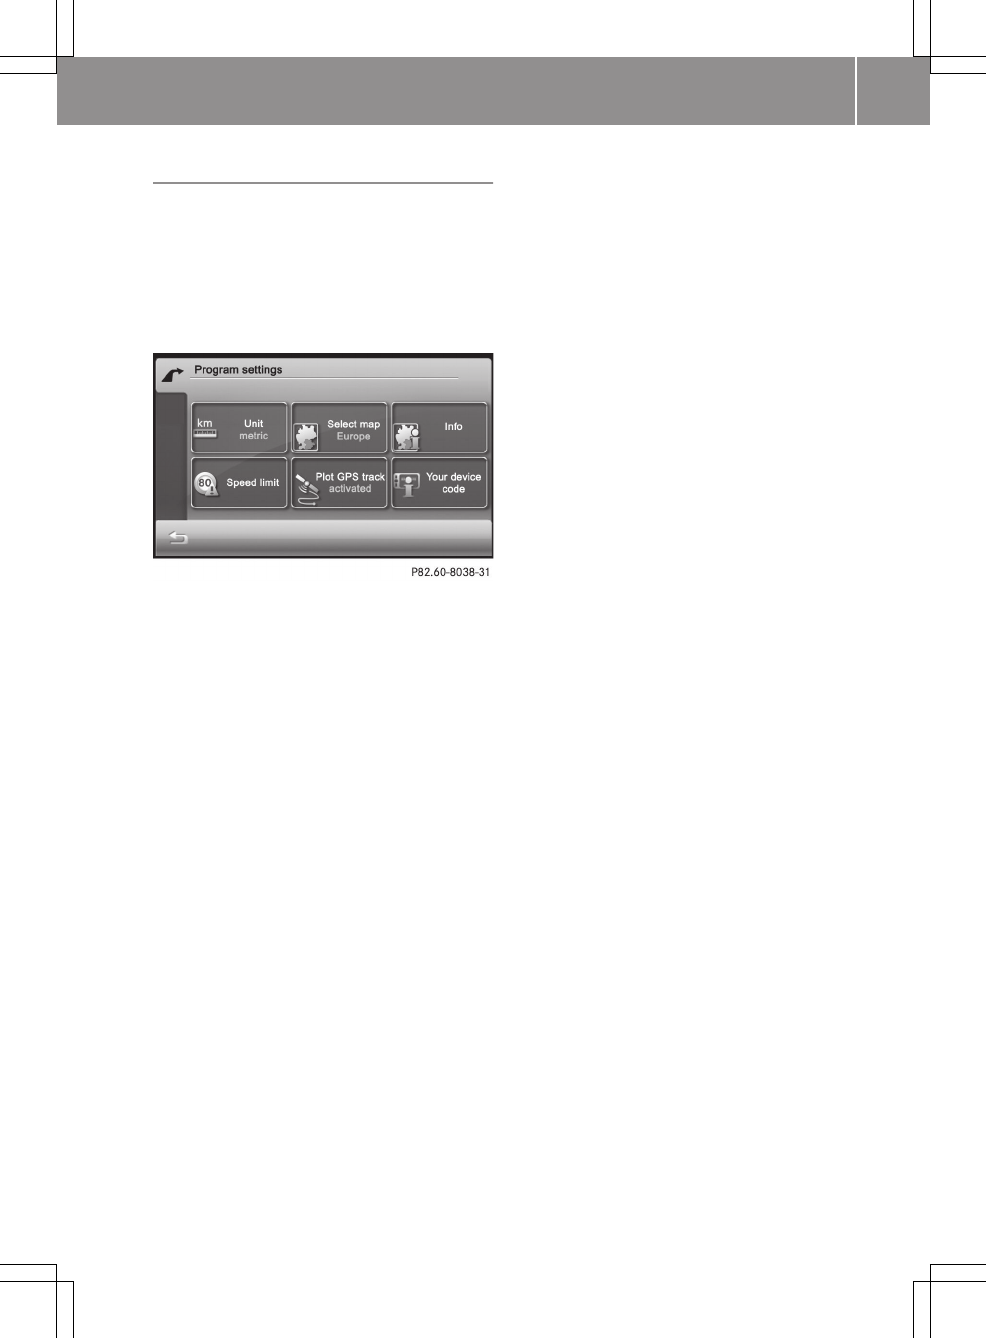

Explanation of functions
Function Explanation Step
Units Select km-display (met-
ric) or mi-display (impe-
rial) for the map
mi = miles
XPress Units.
The setting switches between met-
ric and imperial.
Info Shows the respective map
data version for all coun-
tries contained in the map
XPress Info.
XPress 9 or : to scroll in the
list.
Speed limit
(Expert mode)
The maximum permissible
speed is shown when the
corresponding map data
is available and the
Speed limit function is
not deactivated.
A warning tone sounds if
the maximum permissible
speed is exceeded and one
of the Warning at x km/
h settings is activated.
iThe maximum permis-
sible speed display may
differ from the actual
traffic situation, e.g.
as a result of incorrect
map data.
XPress Speed limit.
XPress Warning at x km/h (several
settings possible), Show with‐
out warning or Do not show in
the list.
Your device code The device code is
required for map updates.
XPress Your device code.
The device code is shown.
iThe Plot GPS track function (Expert mode) is described in the "Route guidance"
section (Y page 44).
Special destination on the map (Expert
mode)
Displaying special destination symbols on
the map
Special destinations are, for example,
Restaurant/Nightlife, Shopping
centre, Cinema or Petrol station. The
corresponding symbols can be displayed on
the map.
iThe symbols are not shown on all map
scales.
XPress the d symbol in the "Naviga-
tion" main menu (Y page 25).
The "Settings" menu appears.
XPress Points of interest in the
map.
The "Special destinations on the map"
menu appears. It shows the available cat-
egories.
50 >> smart high line radio.
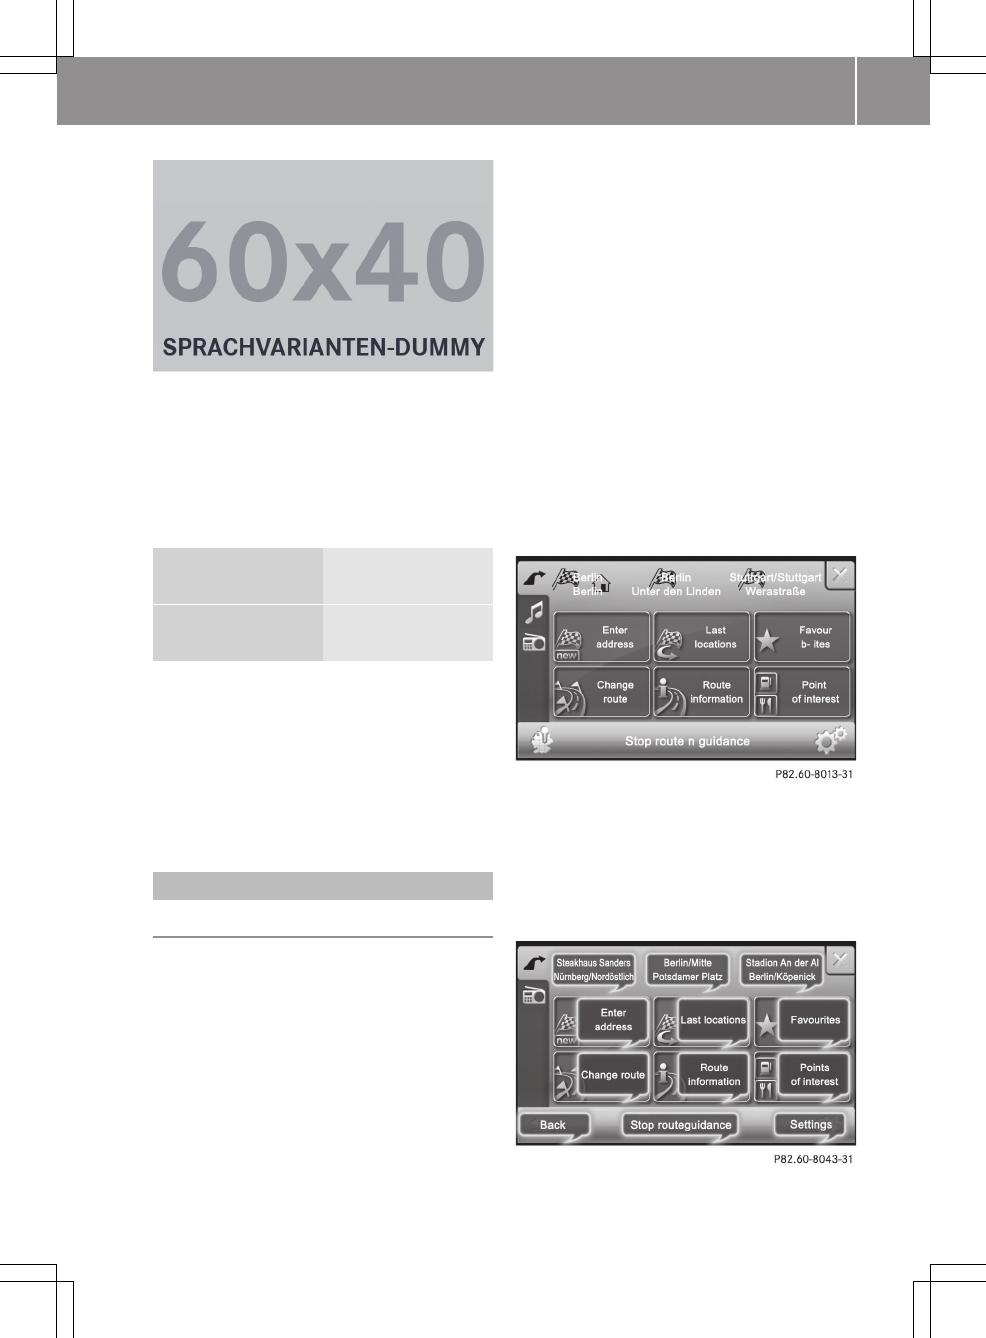
XTo scroll in the list, press 9
or :.
XSwitching category display on/off: press
on a symbol.
Depending on the previous setting, the
display is switched on or off.
Blue tick all sub-entries are
shown
White tick Some of the sub-
entries are shown
XTo call up a sub-category: press the cat-
egory names.
Depending on the category, sub-catego-
ries are shown for selection.
iChanges within a category may also have
an impact on other categories.
Voice control system
At a glance
Overview
You can operate navigation using the voice
control system. Available commands are
shown in the individual displays and are
announced in some menus.
Say the commands without pausing between
individual words.
The voice control system confirms impor-
tant commands and gives instructions when
entries are unsuccessful.
If you give the command unclearly or give
a non-existent or incorrect command, the
device responds with "Please repeat your
comment".
The following languages are available:
RGerman
REnglish
RFrench
RItalian
RDutch
RPortuguese
RSpanish
Switching the voice control system on
XSwitch navigation mode on (Y page 24)
and call up the "Navigation" main menu.
XPress the display for longer than 2 sec-
onds.
The voice control system is switched on.
The available commands are shown as
light blue speech bubbles. An active
audio source is muted.
>> smart high line radio. 51
Z

You can start the voice control system in
this way from any navigation display.
The commands depend on the relevant Nav-
igation menu. All the functions available
for manual input are also available with
the voice control system.
Switching the voice control system off
XSay "Cancel".
The voice control system is switched off.
or
XPress a menu option.
The voice control system is switched off
and the selected function is carried out.
iThe voice control system is switched off
automatically at the end of an input
sequence (e.g. when starting route guid-
ance).
Adjusts the volume
XStart the dialogue.
XSay a command, e.g. "Main menu".
XSet the volume by turning cVd the con-
trol knob.
The volume increases or decreases dur-
ing the voice output.
Controls
Please bear the following in mind
GRisk of accident
The navigation system cannot take the pre-
vailing traffic situation into account or
recognise any dangers or obstacles. You
must therefore be constantly aware of the
prevailing road and traffic conditions so
that you can recognise any dangers and
react to them.
The route guidance only provides recom-
mendations. You must always comply with
the national road traffic regulations and
adapt your driving style to the prevailing
conditions. You could otherwise become
involved in an accident in which you or
others could be injured.
General commands
Voice commands are marked by ? in this
manual. The following voice controls are
always available.
R? Back
The previous menu is shown.
R? Cancel
The voice control system is switched off.
R? Help
The voice control system starts the help
function. You can use the "Help" command
to have all of the basic commands read
out.
R? Main menu
The "Navigation" main menu is dis-
played.
Announcement of the available commands
In some menus, e.g. the "Navigation" main
menu (Y page 25), the voice control system
informs you of the available commands.
Voice control system voice outputs have the
^ symbol in this manual.
Example announcement in the "Naviga-
tion" main menu (Expert mode)
^Here, you can say: enter address,
previous towns, favourites, change
route, route information, special
destinations, route guidance, stop
route guidance, settings, map or
previous destination.
Dialogue example
Displays have the _ symbol in this man-
ual.
Entering the address and calculating the
route
?Entering an address
_The "Entering a new destination"
menu appears.
^Please make a selection.
?Enter town
_The "Enter town" menu appears.
52 >> smart high line radio.

^Say the name of the town.
?Berlin
_The system shows a numbered list of
town names in the display.
^Please select an entry number from
the list.
?Say the number.
^Name the street.
?Unter den Linden.
_The system shows a numbered list of
street names in the display.
^Please select an entry number from
the list.
?Say the number.
^Name the house number.
?Say a house number.
_The system shows a numbered list of
house numbers in the display.
^Please select an entry number from
the list.
?Say the number.
_The address is now complete and the
"Detailed information" menu
appears.
^Would you like a route to be calcu-
lated for this destination?
?Yes.
^Route calculation complete.
?Start route guidance.
Telephone
General notes
Introduction
Telephony via the Bluetooth® interface is
available in conjunction with a Blue-
tooth®-capable phone. With a suitable
mobile phone, you can use the hands-free
system via the Bluetooth® interface and
download contacts from the mobile phone,
e.g. via PBAP (Phone Book Access Profile).
For more information on suitable mobile
phones and on connecting the Bluetooth
mobile phone to the smart high line radio,
contact your smart Centre.
Safety notes
GRisk of accident
You must observe the legal requirements
for the country in which you are currently
driving when operating mobile communi-
cations equipment in the vehicle.
If it is permitted to operate communica-
tions equipment while the vehicle is in
motion, you may only operate such equip-
ment when road and traffic conditions per-
mit. You may otherwise be distracted from
the traffic conditions, cause an accident
and injure yourself and others.
Two-way radios or fax machines without
low-reflection exterior aerials may inter-
fere with the vehicle electronics and
thereby compromise the operational safety
of the vehicle and your safety. Therefore,
only use these if they are properly connec-
ted to a separate, low-reflection exterior
aerial.
GRisk of injury
Excessive electromagnetic radiation may
constitute a health hazard to yourself and
others. Use of an exterior aerial gives con-
sideration to the current scientific dis-
cussion surrounding the possible health
risk posed by electromagnetic fields.
General notes
Call disconnection while the vehicle is in
motion
A call may be disconnected if:
Rthe mobile phone battery is not suffi-
ciently charged
Rthere is insufficient GSM network cov-
erage in certain areas.
>> smart high line radio. 53
Z