SKYPINE ELECTRONICS CNE8415BSMHLR Smart High Line User Manual part 2
SKYPINE ELECTRONICS (SHEN ZHEN) CO., LTD. Smart High Line part 2
Contents
- 1. User manual part 1
- 2. User manual part 2
User manual part 2

Ryou move from one GSM transmit-
ter / receiver area (GSM cell) into
another and no channels are free.
Ryou use a SIM card which is not compat-
ible with the available network.
Ryou are using a mobile phone with "Twin-
card" and the mobile phone with the sec-
ond SIM card is already logged into the
network.
Function restrictions
You will not be able to use the telephone,
will no longer be able to use the telephone,
or you may have to wait before using it, in
the following situations:
Rif the mobile phone is not switched on
Rwhen the "Bluetooth®" function is
switched off in the mobile phone
Rif the mobile phone is not logged into a
mobile phone network
The telephone automatically tries to log
on to a network. If no network is availa-
ble, you will not be able to make a "999"
or "112" emergency call.
RIf you switch off the smart high line
radio during a call in hands-free mode,
the call is transferred to the mobile
phone.
"999" or "112" emergency call
Making emergency calls without entering a
PIN is only possible using the mobile
phone.
The following conditions must be fulfilled
in order to make a 112 emergency call:
Rthe mobile phone must be switched on.
Ra network must be available.
Ra valid and operational SIM card must be
inserted in the mobile phone.
Rthe PIN must have been entered.
If you cannot make an emergency call, you
must arrange rescue measures yourself.
The 999 emergency call number is a public
service. Any misuse is punishable by law.
Bluetooth® interface telephony
Conditions
To use Bluetooth® interface telephony in
conjunction with the smart high line radio,
you need a Bluetooth®-capable mobile
phone.
Not all mobile phones available on the
market are equally suitable. For more
information on suitable mobile phones and
on connecting the Bluetooth mobile phone
to the smart high line radio, contact your
smart Centre.
The battery of the mobile phone should
always be kept sufficiently charged in
order to prevent malfunctions.
In preparation for telephoning via the
Bluetooth® interface, you should check the
following items on your mobile phone (see
the mobile phone operating instructions):
XHands-Free Profile
The mobile phone must support Hands-
Free Profile 1.0 or above.
iSome displays depend on the supported
version of the Hands-free Profile.
XBluetooth® visibility
On certain mobile phones, the device
itself must be made "visible" for other
devices, as well as activating the Blue-
tooth® function (see the mobile phone
operating instructions).
XBluetooth® device name
Every Bluetooth® device has its own Blue-
tooth® device name. This device name is
freely definable, but can be identical
for all devices from the same manufac-
turer. It is therefore recommended that
you change this name so that you can eas-
ily recognise your mobile phone (see the
mobile phone operating instructions).
54 >> smart high line radio.
Registering and connecting the mobile
phone
General information
You will need to register your mobile phone
before using it with the smart high line
radio for the first time. The mobile phone
is then entered in the smart high line
radio's Bluetooth® phone list.
This process includes:
Rthe search by the Bluetooth® mobile
phone
Rsubsequent registration.
If you want to reconnect a phone that has
already been registered, it is connected
automatically.
The Bluetooth® device name for the smart
high line radio is smart Radio.
You can register a maximum of five Blue-
tooth® devices (mobile phones and Blue-
tooth® audio devices).
iIf the smart Radio Bluetooth® device
name is already in the Bluetooth® device
list, it may not be possible to connect a
mobile phone.
Searching for and registering a mobile
phone
XPress Mobile phone in the main menu
(Y page 8).
The Telephone menu appears
XPress Options in the telephone menu.
The "Bluetooth settings" menu appears.
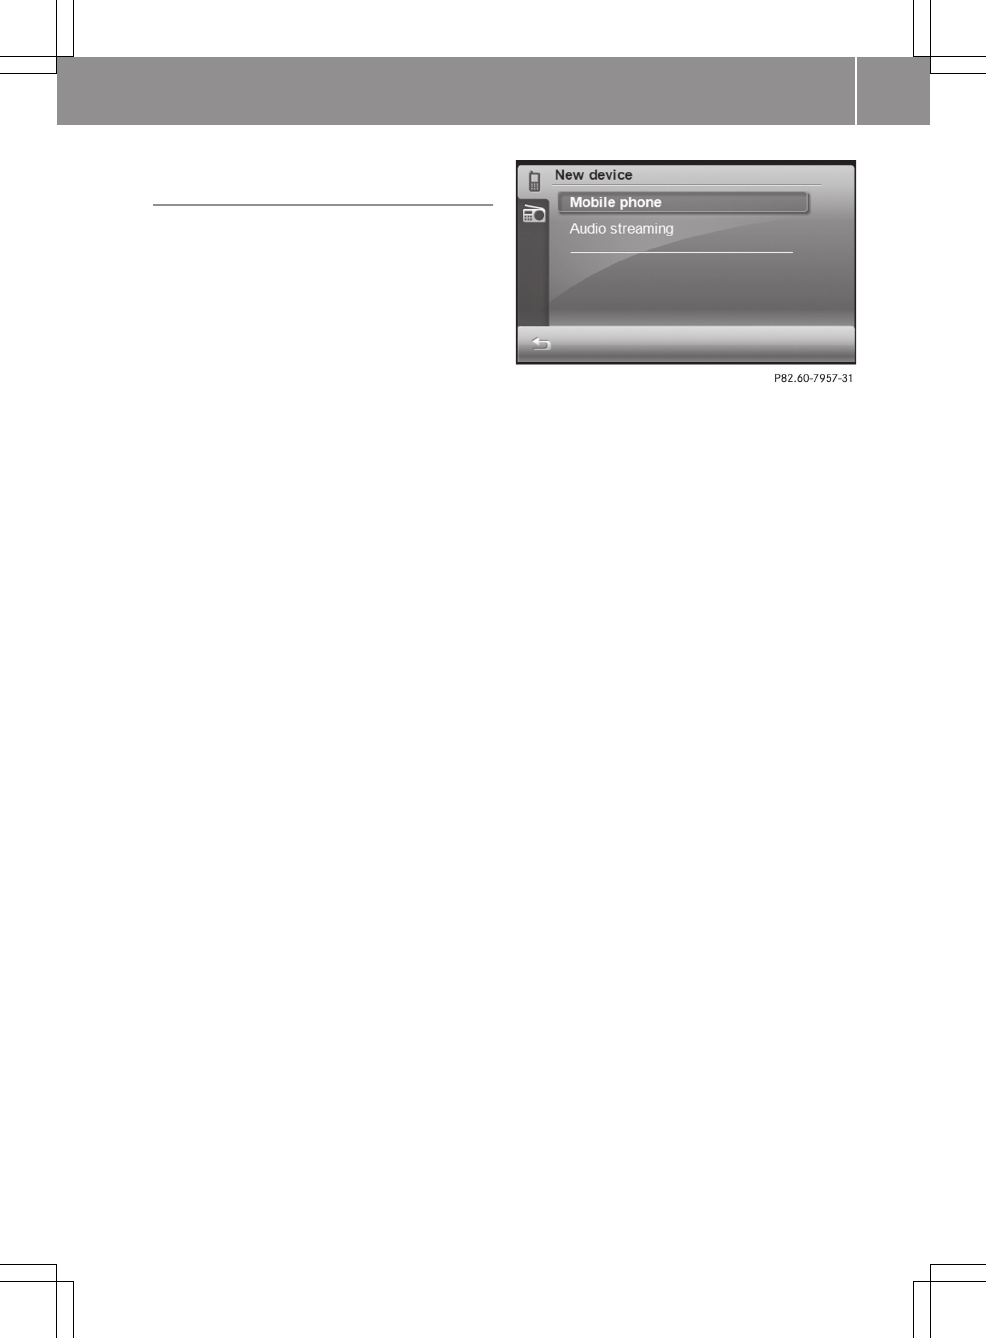
XPress New device in the menu.
"New device" menu (for Bluetooth® connection)
XPress Mobile phone.
The Please start searching from
mobile device !PIN xxxx message
appears.
XTo start a search: start the Bluetooth®
search on the mobile phone (see mobile
phone operating instructions).
Example input: select the "New device"
entry in the mobile phone's Bluetooth®
device list.
The mobile phone starts the search for
Bluetooth® devices within range. If the
smart radio is found, the Bluetooth®
device name smart Radio appears in the
mobile phone's Bluetooth® device list.
XSelect the smart high line radio on the
mobile phone.
XTo register a mobile phone: enter the PIN
that is shown in the smart high line radio
display into the mobile phone and con-
nect the mobile phone.
The following messages are shown one
after another in the smart high line
radio display when registering:
RCalling...
RPhone connected <Device name>
The LED lights up blue.
RCall history downloading...
RDownloading phonebook...
The Bluetooth® device name for the
mobile phone is entered in the smart
high line radio's telephone device list.
>> smart high line radio. 55
Z
The mobile phone is registered on the
smart high line radio.
iIf you connect a mobile phone with the
Bluetooth® audio function, the Stream‐
ing connected message also appears.
LED display for Bluetooth® connection
The LED shows whether a Bluetooth® device
is connected or not (Y page 6).
LED display Explanation
Blue Bluetooth® device
(mobile phone, audio
equipment) is connected
Flashes blue Bluetooth® connection is
being established
No display
(dark)
No Bluetooth® device is
connected
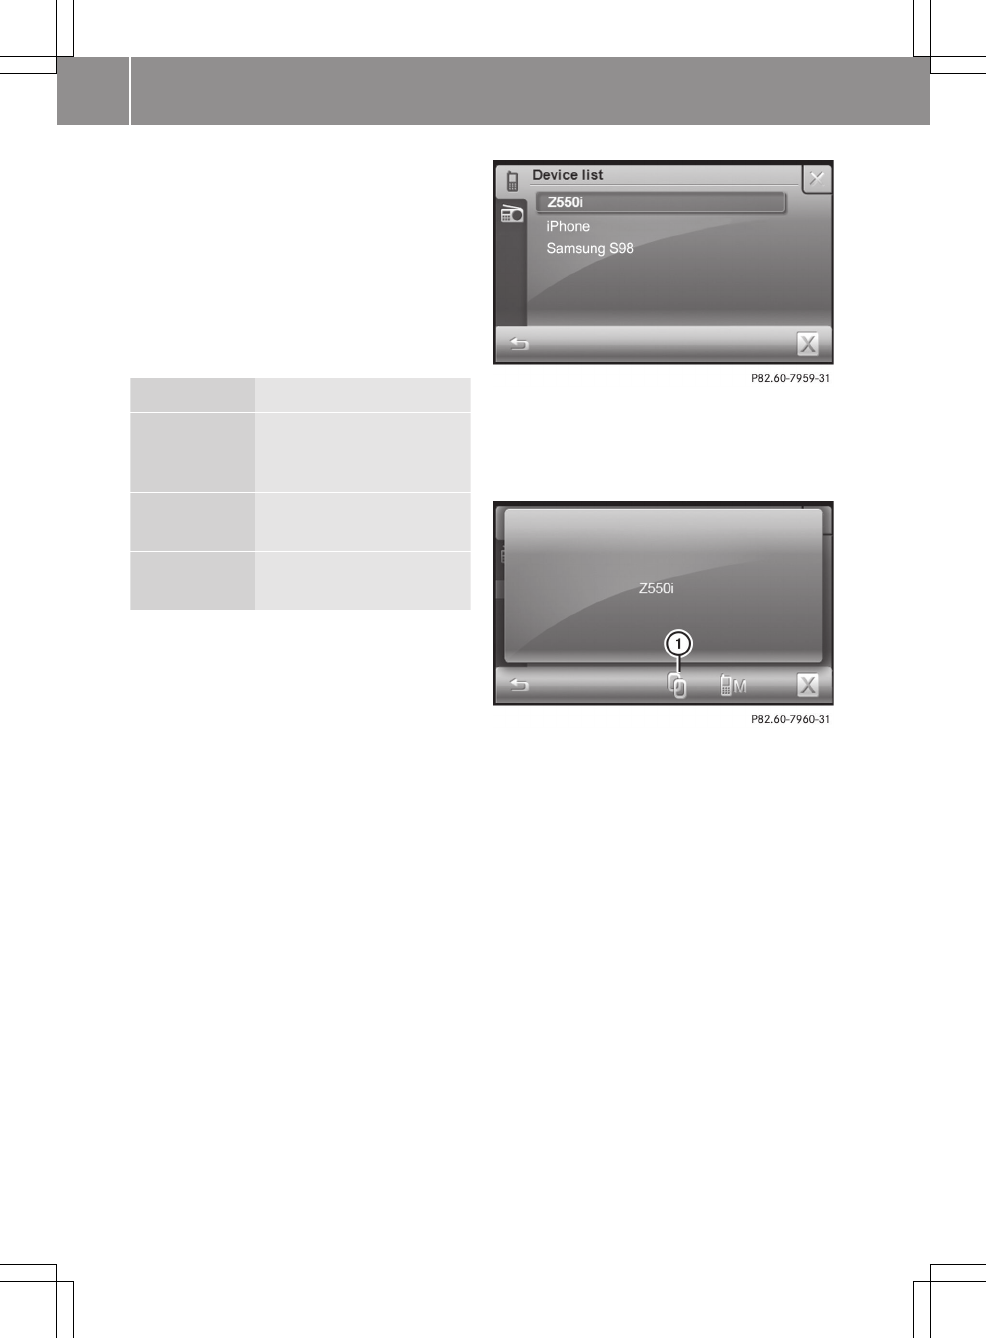
Selecting a mobile phone from the tele-
phone device list
If you have registered multiple mobile
phones, you can select a mobile phone from
the Bluetooth® telephone list and connect
it to the smart high line radio.
iYou can only switch to another regis-
tered mobile phone if no phone call is
active.
XPress Mobile phone in the main menu
(Y page 8).
The Telephone menu appears
XPress Options in the telephone menu.
The "Bluetooth settings" menu appears.
XPress Device list in the menu.
XSelect an entry.
Depending on the connection status, one
of the following displays is shown (exam-
ple 1 and 2).
Mobile phone not connected (example 1)
:Connecting a mobile phone
In this display, the mobile phone can be:
Rconnected to the smart high line radio
Rdetermined as a master device
(Y page 57)
Rde-registered (Y page 57)
XTo connect: press symbol :.
The Calling... message appears.
When the mobile phone is connected, the
Phone connected <Device name> mes-
sage appears.
56 >> smart high line radio.
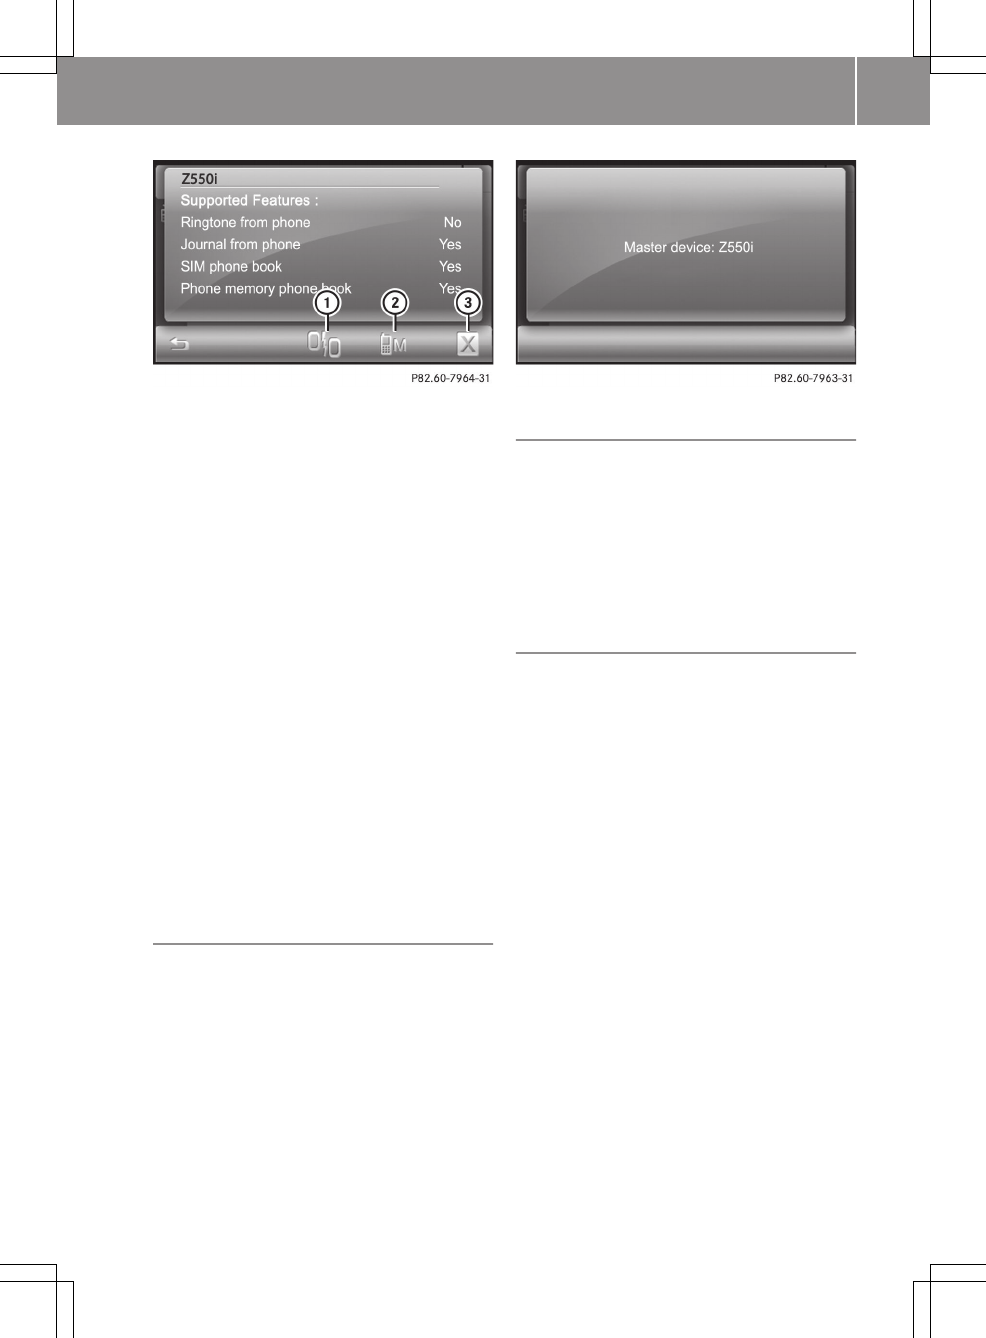
The mobile phone is connected and supported
Bluetooth® features are displayed (example 2)
:Disconnects the mobile phone
;Determines a master device
=De-registering a mobile phone
iThe supported Bluetooth® features are
displayed after a Bluetooth® audio
device is connected.
In this display, the mobile phone can be:
Rdetermined as a master device
(Y page 57)
Rde-registered (Y page 57)
Rdisconnected from the smart high line
radio
XTo disconnect a mobile phone: press sym-
bol :.
The mobile phone is no longer connected
to the smart high line radio but is still
entered in the telephone device list and
can be connected again later.
Determines a master device
You can determine a mobile phone as a mas-
ter device, but not a Bluetooth® audio
device. A master device is given priority
when reconnecting automatically.
XPress symbol ; in example 2.
The selected mobile phone is entered in
the telephone device list as a master
device.
Automatic reconnection
The smart high line radio searches for a
master device automatically when it is
switched off. If no master device is deter-
mined, the telephone device list is
searched for a mobile phone and the Blue-
tooth ® device list is searched for an audio
device.
De-registering a mobile phone
You can either de-register an individual
mobile phone or delete all mobile phones
from the telephone device list. Blue-
tooth® audio devices can be deleted from
the corresponding display in the same way.
XTo de-register a mobile phone: press
= in example 2.
The Please confirm to delete message
appears.
XPress OK.
The Deleted message appears.
The mobile phone display shows a mes-
sage that connection with the smart radio
was terminated.
XTo de-register all mobile phones: press
1 in the telephone device list.
Please confirm to delete all.
XPress OK.
The Deleted message appears.
>> smart high line radio. 57
Z
Telephone operation
Incoming call
Rejecting or accepting a call
When a call is being received, the Incom‐
ing call... message is shown. Either the
phone number, the name or Unknown is
shown in the display (phone number is not
sent).
XTo reject: press1.
XTo accept: press OK.
Once you have accepted the call, you can
use hands-free mode.
XSet the call volume by turning
cVd the control knob.
For more information, see the "Functions
during a call" section (Y page 59).
After the call is finished, the previous
display is shown again.
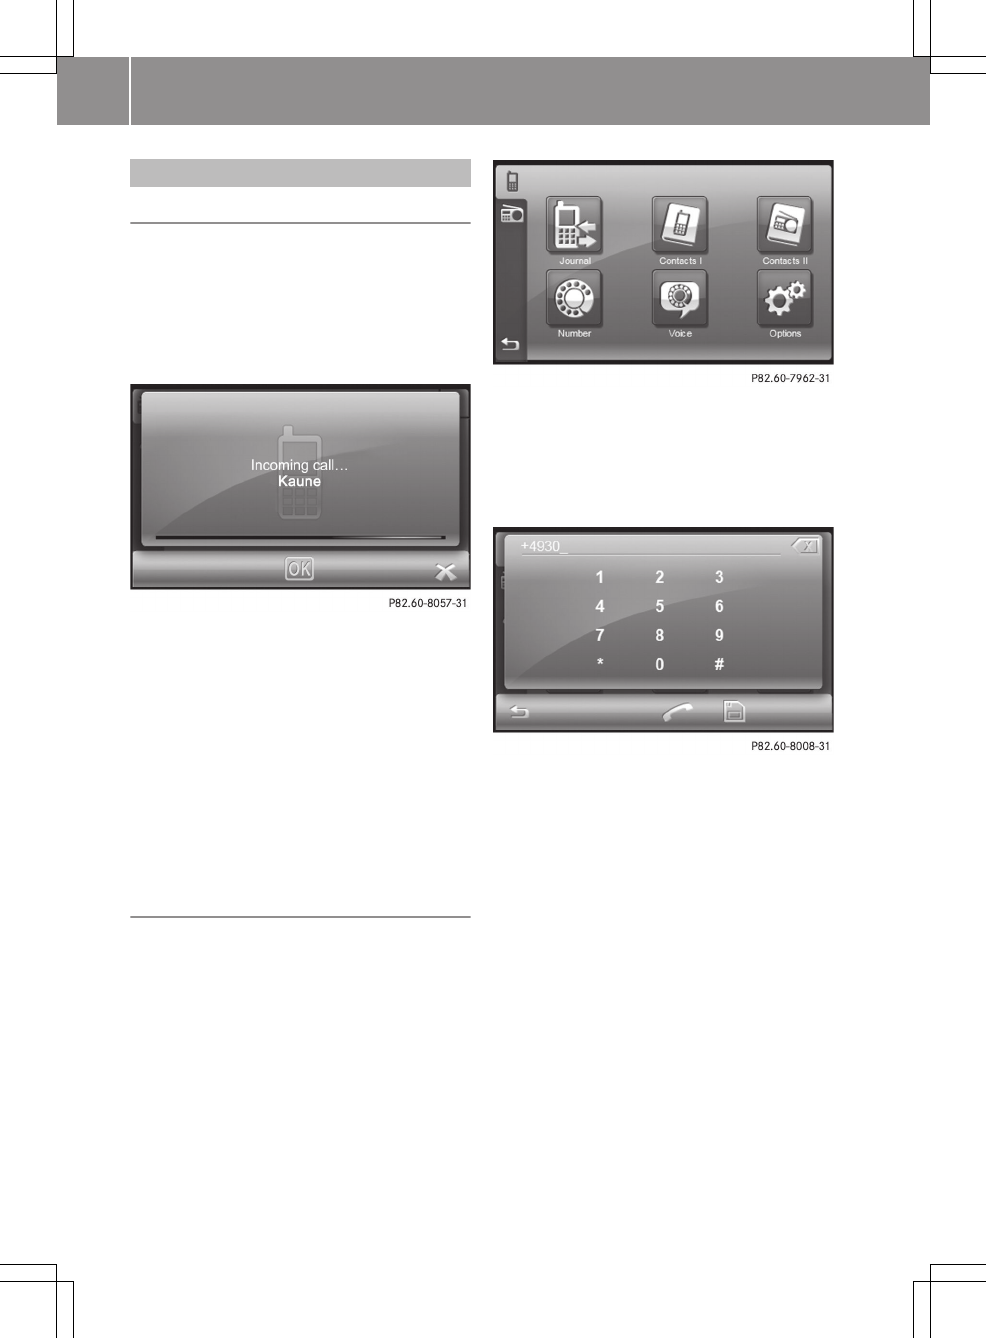
Making a call
XPress Telephone in the main menu
(Y page 8).
The Telephone menu appears
XPress Number.
An input menu appears.
XType in the phone number. Press and hold
0 to enter "+".
The phone number is shown at the top left.
XTo delete a number: press symbol 1.
XTo delete a phone number press and hold
symbol 1 until the call number has
been deleted.
XTo store a phone number in the radio:
press the memory card symbol.
XEnter a name and then press OK.
The contact is stored in "Radio phone
book" (Contacts II) (Y page 61).
XTo make a call: press ;.
The Calling....<Name> message
appears.
58 >> smart high line radio.
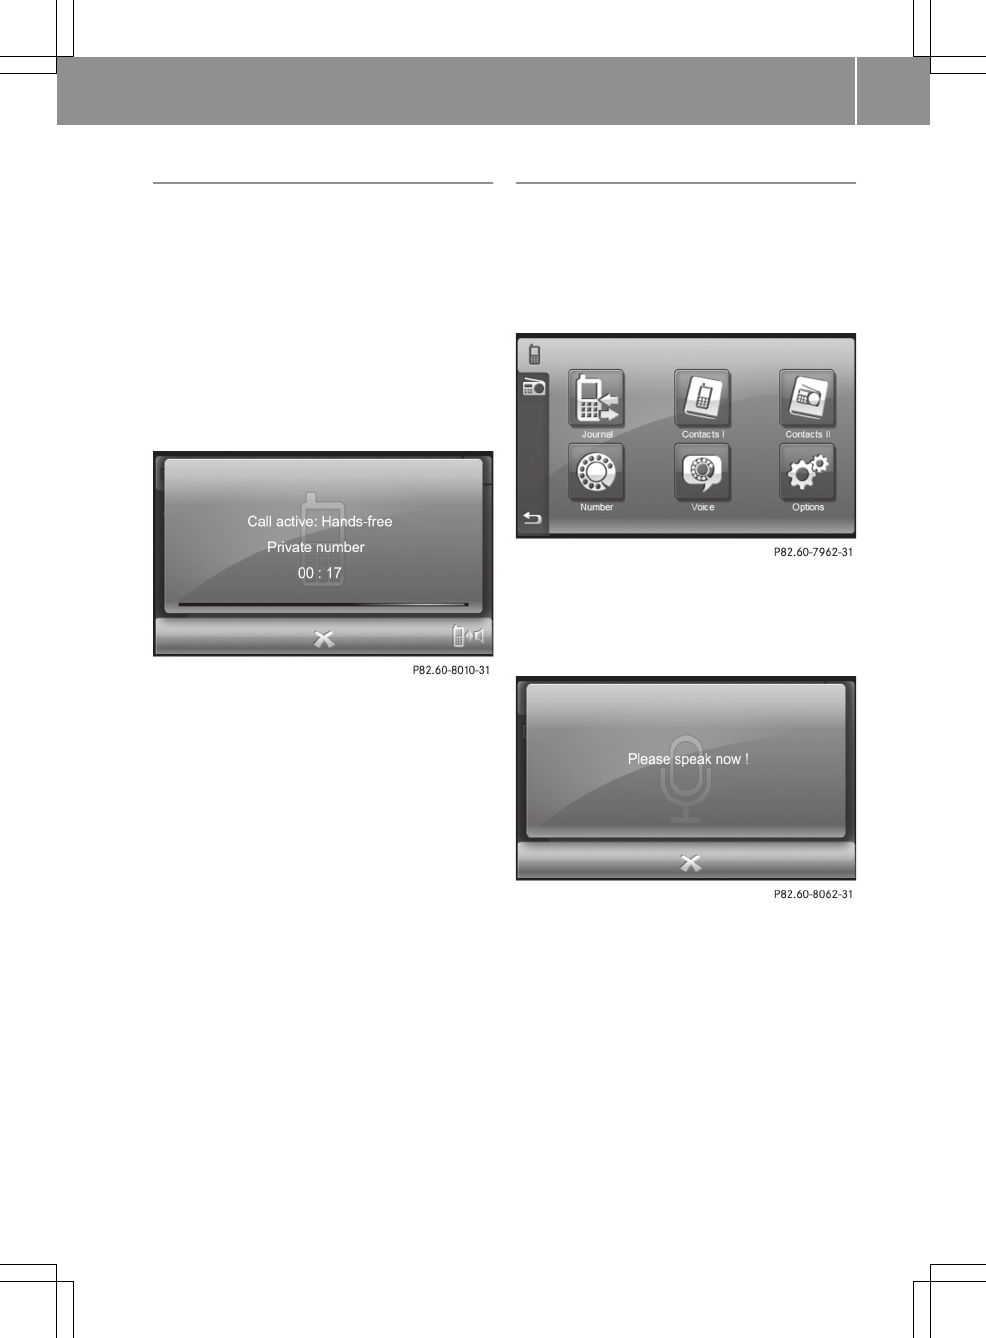
Functions available during a call
Transferring a hands-free call to the
mobile phone
The display shows either the phone number
or the name
The following information is shown in the
display during a call:
Rtype of connection (hands-free, mobile
phone)
Rname or phone number of the caller
Rcall duration
XPress the symbol on the bottom right.
You are now conducting the call using the
mobile phone. Call active: Mobile
phone is shown in the display.
XTo return to the call using the hands-
free system: press the symbol again.
Setting the call volume
Option 1
XTurn cVd the control knob.
Option 2
XCall up the "Volume settings" menu and
set the volume for telephone calls
(Y page 17).
To end a call
XPress 1.
The call is ended and the previous dis-
play appears.
Voice dial
If the connected mobile phone supports the
"Voice dial" function, you can select con-
tacts with a voice tag by saying the rele-
vant name. The mobile phone then takes
over the contact selection and making
calls.
XTo switch on voice dial: press Voice in
the telephone menu.
Voice dial is activated. The Please
speak now! prompt appears.
XTo make a call: Say the voice tag for the
contact.
If the voice tag exists and the mobile
phone recognises it, the call is made.
The Calling...<Name> message
appears.
If there is no voice tag or the system does
not recognise it, the Voice dial
failed! message appears.
XTo deactivate voice dial: press 1.
>> smart high line radio. 59
Z
Using the phone book
Introduction
The smart high line radio shows the mobile
phone's phone book (Contacts I) and the
smart high line radio's phone book (Con-
tacts II). The contacts in the phone book in
the mobile phone are automatically down-
loaded when the mobile phone is regis-
tered (Y page 55). They are updated after
every call and after the mobile phone is
connected again. You can also download the
contacts from the mobile phone yourself
(Y page 64).
Mobile phone contacts can be stored per-
manently in the smart high line radio's
phone book. These are then available inde-
pendent of the mobile phone connected.
Phone book in the mobile phone (Contacts
I)
Opening the phone book
Option 1: the phone book in the mobile
phone is shown as soon as downloading is
complete.
XOption 2: Press Contacts I in the tele-
phone menu.
Searching for a contact
XPress the keyboard symbol (under option
1 in the picture).
An input menu appears.
XEnter up to three letters of the entry to
be searched for. There is a description
of how to enter characters in the "Enter-
ing characters in the phone book" sec-
tion (Y page 13).
XPress OK in the phone book in the mobile
phone.
The phone book is opened at the corre-
sponding place.
Showing contact's phone number(s) and
making a call
XPress a contact in the mobile phone's
phone book.
The available phone numbers are dis-
played.
60 >> smart high line radio.
XPress a phone number and then
press ;.
The Calling...<Name> message
appears.
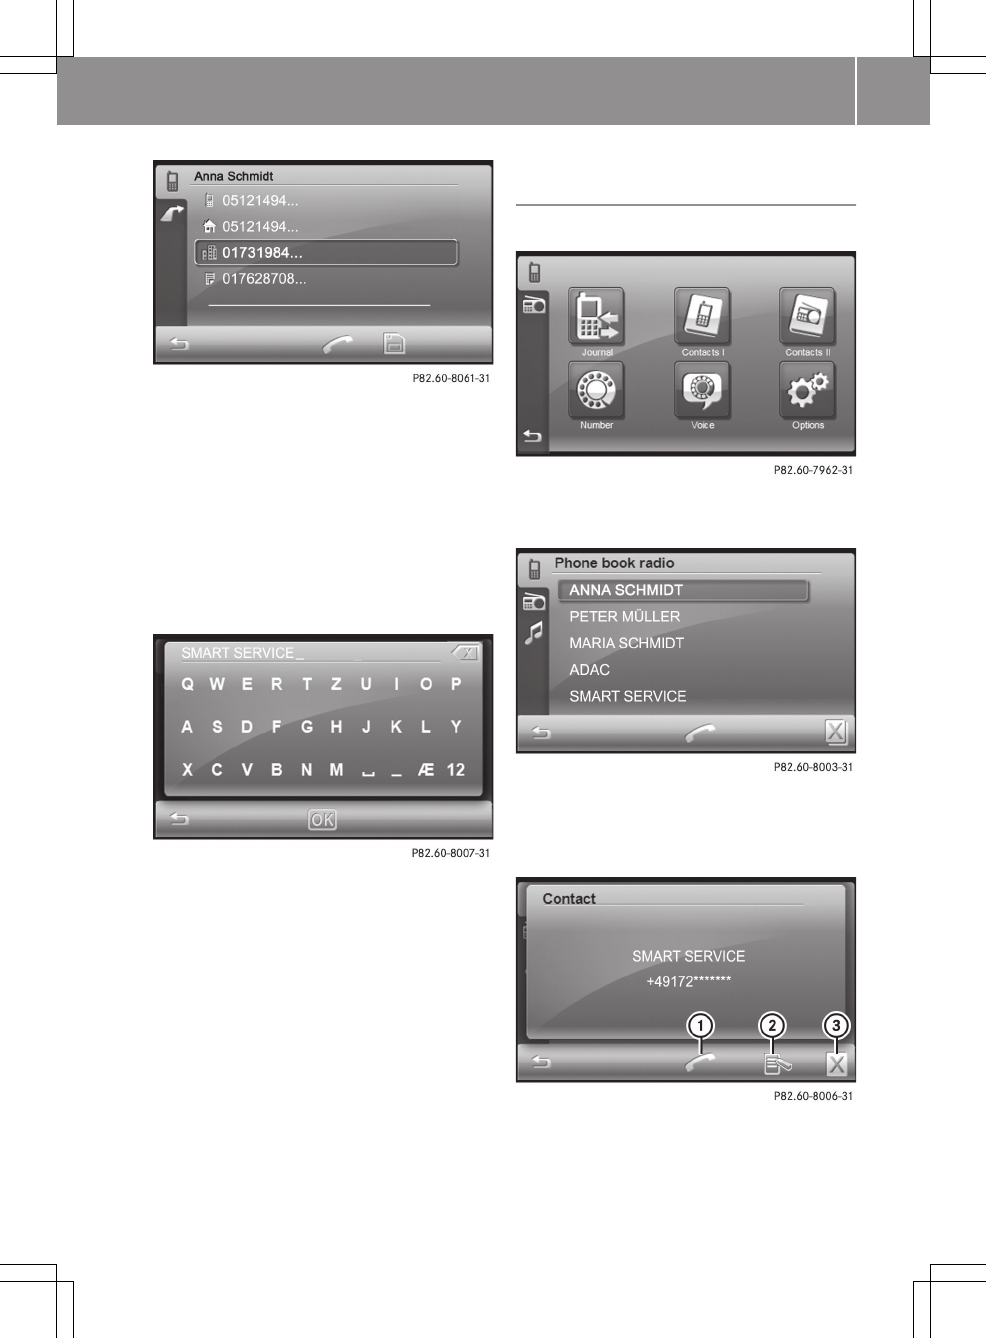
Storing a contact in the smart high line
radio's phone book (Contacts II)
XPress the memory card symbol when the
available phone numbers are displayed.
An input menu appears.
XChange the contact names if desired.
There is a description of how to enter
characters in the "Entering characters
in the phone book" section (Y page 13).
XPress OK.
The Saved message appears.
smart high line radio phone book (Con-
tacts II)
Opening the phone book
XPress Contacts II in the phone book.
The radio phone book appears.
Calling and editing a contact
XPress a contact in the phone book.
The contact is shown.
:Calls the contact
;Edits the contact
=Deletes the contact
>> smart high line radio. 61
Z
XTo call the contact: press :.
The Calling...<Name> message
appears.
XTo edit the contact: press ;.
The input menu for the name appears.
XChange the contact name. There is a
description of how to enter characters in
the "Entering characters in the phone
book" section (Y page 13).
XPress OK.
The input menu for the phone number
appears.
XChange the phone number.
XPress OK.
The Saved message appears.
XTo delete a contact: press =.
The Please confirm to delete. mes-
sage appears.
XPress OK.
The Deleted message appears.
Deleting all contacts
XPress 1 in the phone book.
XPress OK.
The Deleted message appears.
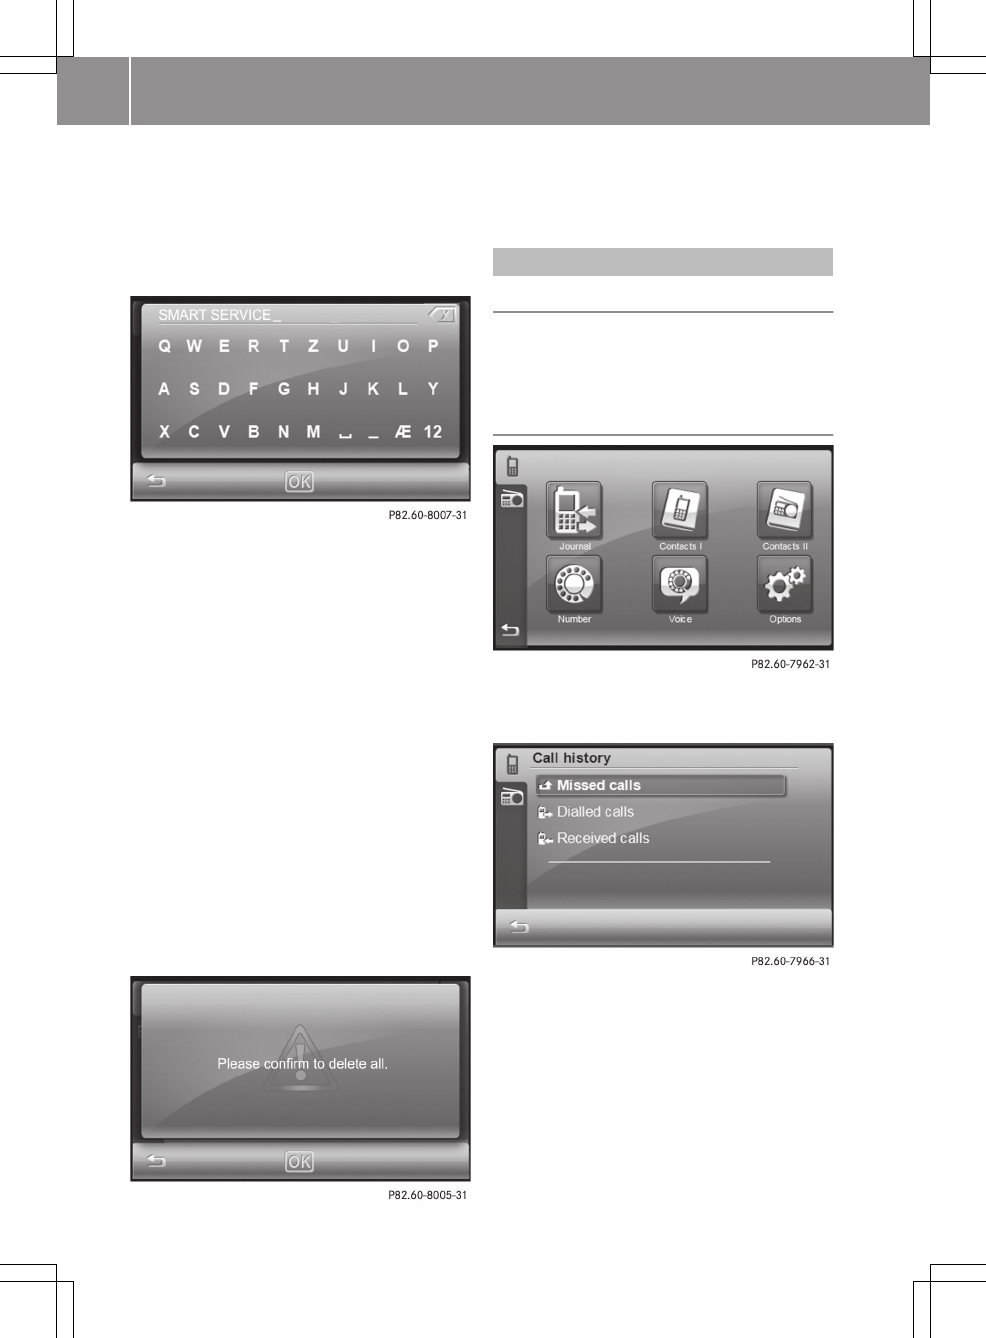
Using call lists
Introduction
The smart high line radio stores calls
received, dialled or missed while the tele-
phone is in operation in separate lists.
Opening call lists
XPress Journal in the telephone menu.
The call lists are displayed.
XSelect a call list, e.g. Missed calls.
The calls are displayed.
62 >> smart high line radio.
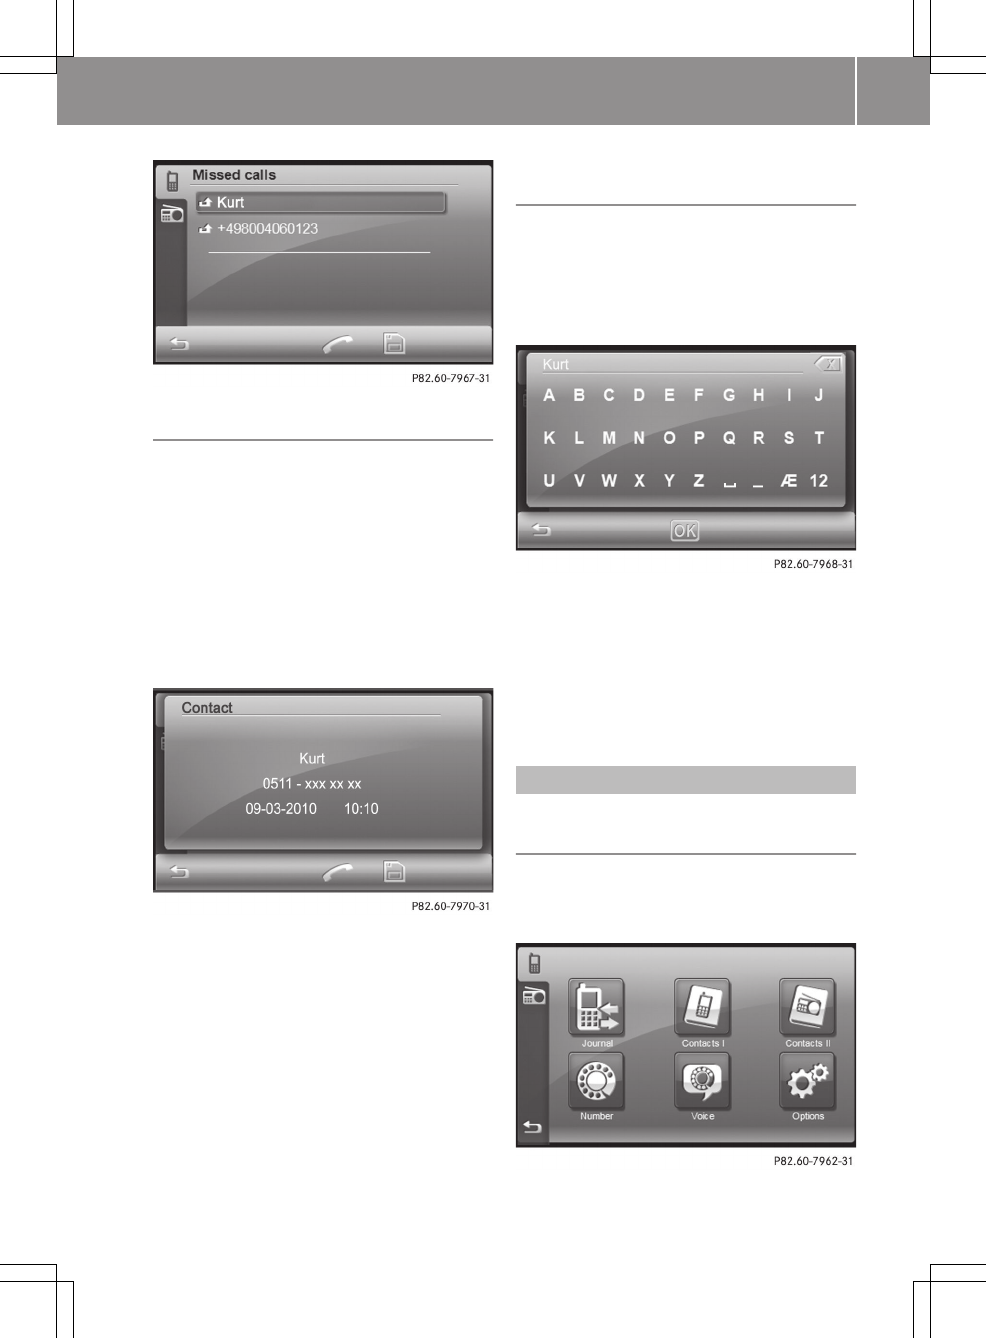
Calling a contact
Option 1
XPress ; briefly to select the high-
lighted entry.
The Calling...<Name> message
appears.
Option 2
XSelect an entry.
The contact details (name, phone number,
date, time) are shown.
Contact details (example)
XPress ;.
The Calling...<Name> message
appears.
Storing contacts in the phone book for
the smart high line radio
XSelect an entry in the call list and then
press the memory card symbol.
or
XPress the memory card symbol in the con-
tact details display.
XChange the name if desired. There is a
description of how to enter characters in
the "Entering characters in the phone
book" section (Y page 13).
XPress OK.
The Saved message appears.
Telephone settings
Calling up the "Bluetooth® settings"
menu
XPress Telephone in the main menu
(Y page 8).
The Telephone menu appears
Telephone menu
>> smart high line radio. 63
Z
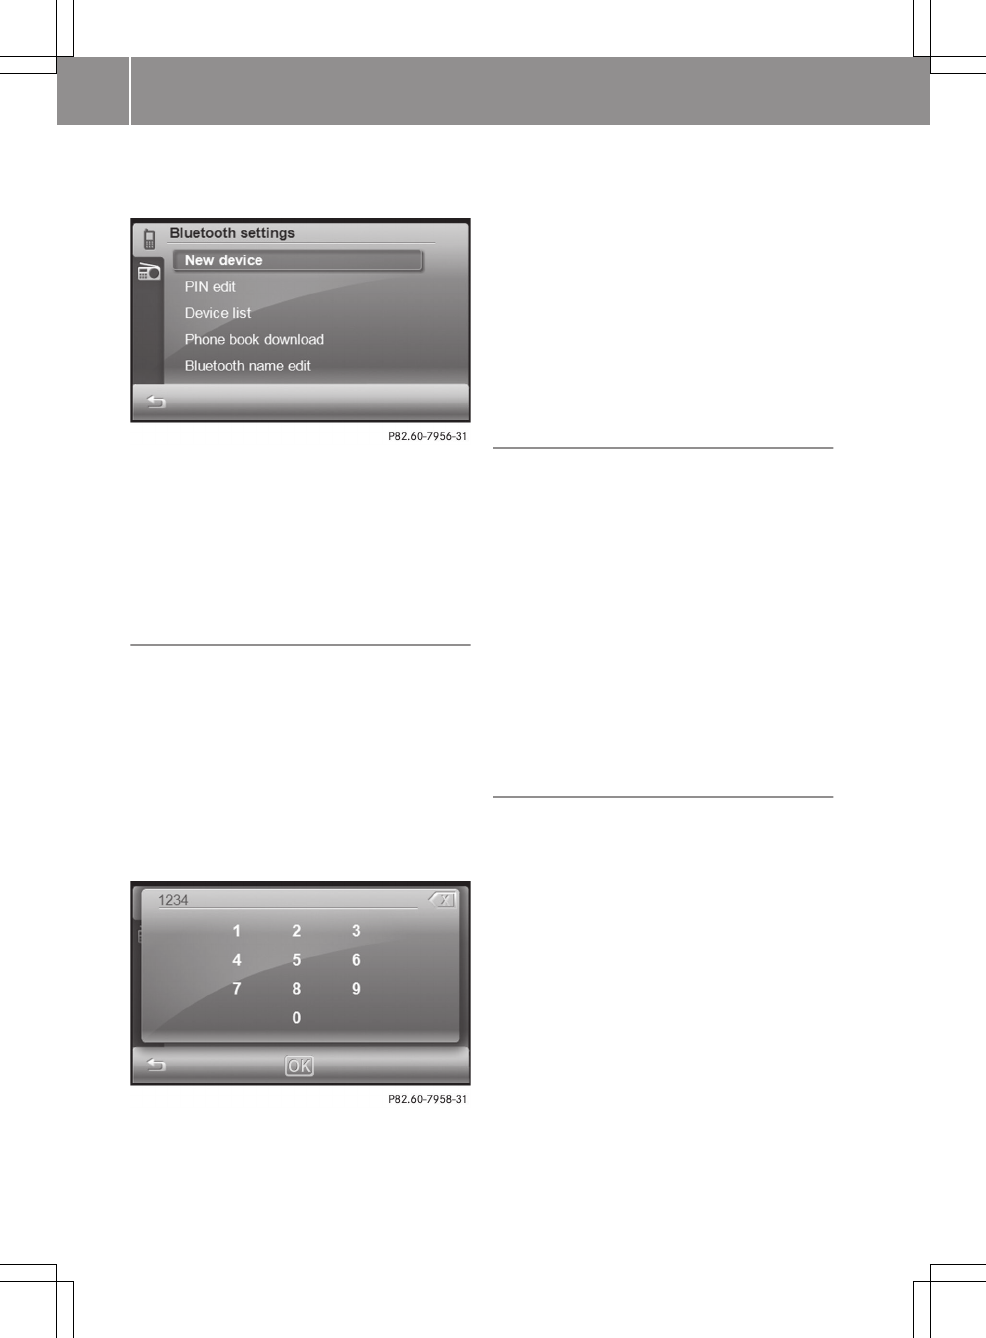
XPress Options in the telephone menu.
The "Bluetooth® settings" menu appears.
"Bluetooth® settings" menu
The New device and Device list functions
are described in the "Telephony via the
Bluetooth® interface" section under "Con-
necting a mobile phone" (Y page 55).
Editing the PIN for connection with
Bluetooth® devices
The PIN is required to connect the smart
high line radio with Bluetooth® mobile
phones and Bluetooth® audio equipment.
The default PIN is 1234.
You can change the PIN. The PIN is a four-
digit number sequence.
XPress PIN edit in the "Bluetooth® set-
tings" menu.
An input menu appears.
XSelect the numbers one by one by press-
ing briefly.
The numbers are entered at the top right.
XTo delete: briefly press1 to delete the
last number.
Press and hold 1 to delete the entry.
XPress OK to confirm the entry.
The input menu is closed and the "Blue-
tooth® settings" menu appears.
Dowloading the mobile phone's phone
book
The mobile phone is connected to the smart
high line radio (Y page 55).
iThe phone book is automatically down-
loaded to the smart high line radio after
connection.
XPress Phone book download in the
"Bluetooth® settings" menu.
The Downloading phonebook... mes-
sage appears. When the download is com-
plete, the Phone book downloaded mes-
sage and the number of entries downloa-
ded are shown.
Editing Bluetooth® device names
The Bluetooth® device name enables Blue-
tooth® connection to Bluetooth® mobile
phones and Bluetooth® audio devices. The
Bluetooth® device name for the smart high
line radio is smart Radio. You can edit
this device name.
XPress Bluetooth name in the "Blue-
tooth® settings" menu.
An input menu appears.
64 >> smart high line radio.
XEnter a name. There is a description of
how to enter characters in the "Entering
characters in the phone book" section
(Y page 13).
The name is shown at the top left.
XTo delete: briefly press1 to delete the
last letter.
Press and hold 1 to delete the entry.
XPress OK to confirm the entry.
The input menu is closed and the "Blue-
tooth® settings" menu appears.
Audio
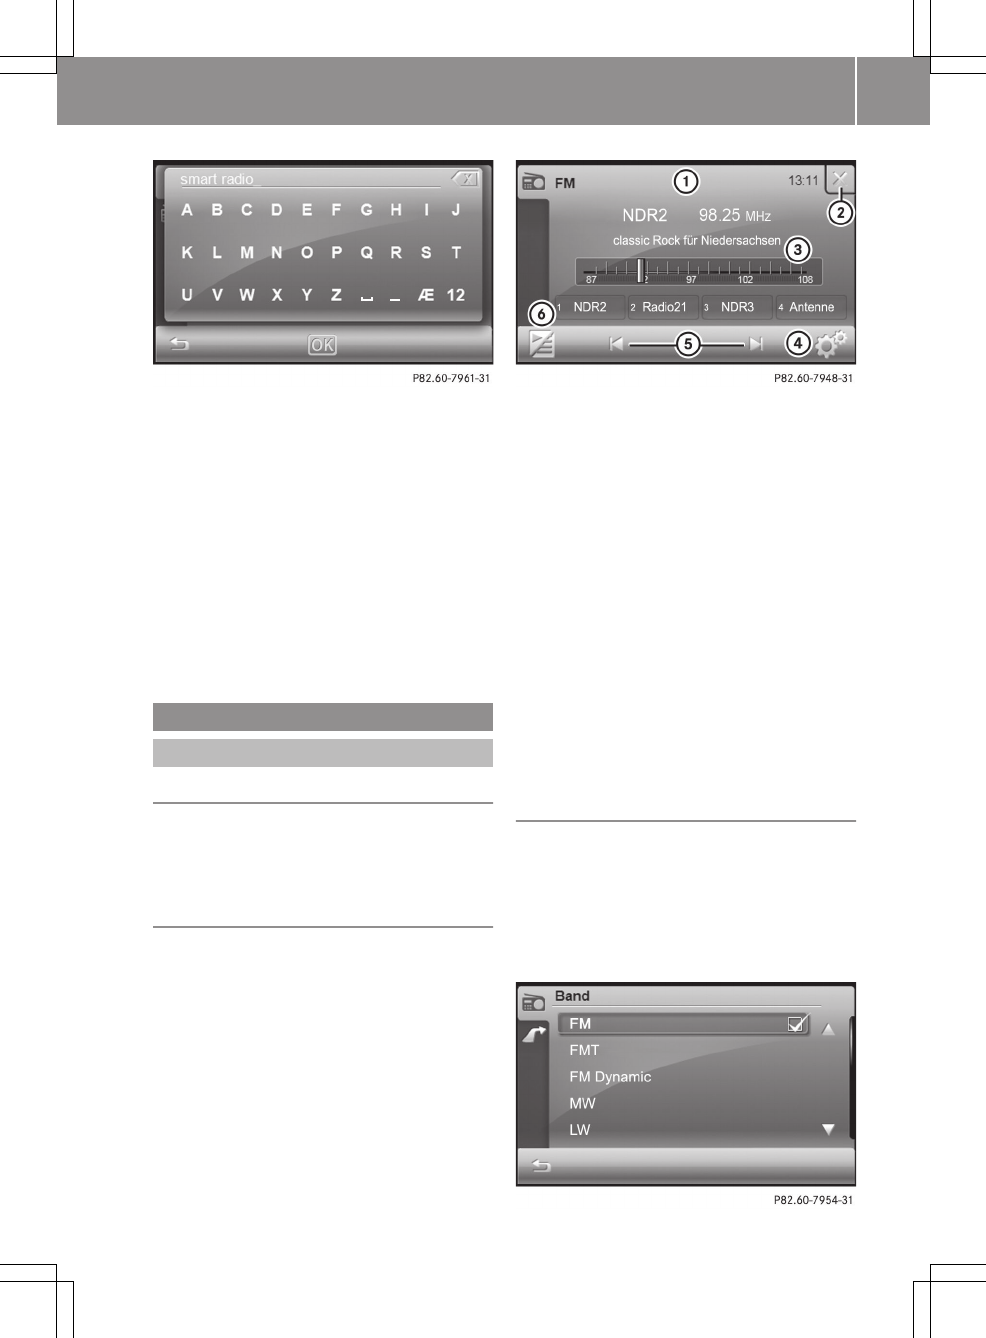
Radio mode
Introduction
iPortable electronic devices in the
vehicle may seriously impair radio
reception.
Switching radio mode on/off
Switching on radio mode
XPress Radio in the main menu (Y page 8).
The radio display appears. You will hear
the current station selected.
Radio display (example)
:The status bar shows the current wave-
band, clock and additional displays
;Switches radio mode off
=Display/selection area with station
name and station frequency (line 1),
radio text display (line 2), waveband
(line 3) and assignment of the first four
presets (line 4)
?Calling up the "Settings" menu
AStation search, forwards/backwards
BCalling up a station preset
Switches radio mode off
XPress ; in the radio display.
The last active main function is shown.
Switching waveband
XPress symbol ? in the radio display.
The "Settings" menu appears.
XPress Band in the menu. The entry on the
right beside Band shows the current set-
ting.
A list of available wavebands is shown.
>> smart high line radio. 65
Z
The frequencies that can be selected are
FM, FMT, FM dynamic, MW, LW and SW.
FMT: the waveband contains 32 stations
sorted by their reception quality, stored
automatically by the travel store function .
The station with the best reception quality
is stored as preset position 1. When you
next use this function, the current preset
stations are overwritten.
iIf you have activated traffic announce-
ments (TA) (Y page 70), only RDS sta-
tions are stored.
FM dynamic: while the vehicle is in motion,
the tuner scans regularly and stores the 32
stations with the best reception quality. It
is not possible to store a station manually.
Dynamic updating can cause a stored sta-
tion to change preset position in the list.
iThe smart high line radio shows the
station frequencies instead of the sta-
tion names in the MW, SW and LW wave-
bands.
XPress 9 or : to scroll in the list.
XPress the desired waveband.
Waveband Frequency
FM (VHF), FMT, FM
dynamic
87.5 – 108.0 Mhz
MW (medium wave) 531 – 1602 kHz
SW (short wave) 3900 – 9990 kHz
LW (long wave) 153 – 279 kHz
Selecting a station
Selecting a station using the station
search function
XPress û or ü in the radio display
(Y page 65).
The needle jumps left or right in the
waveband and stops at the next station
with adequate reception.
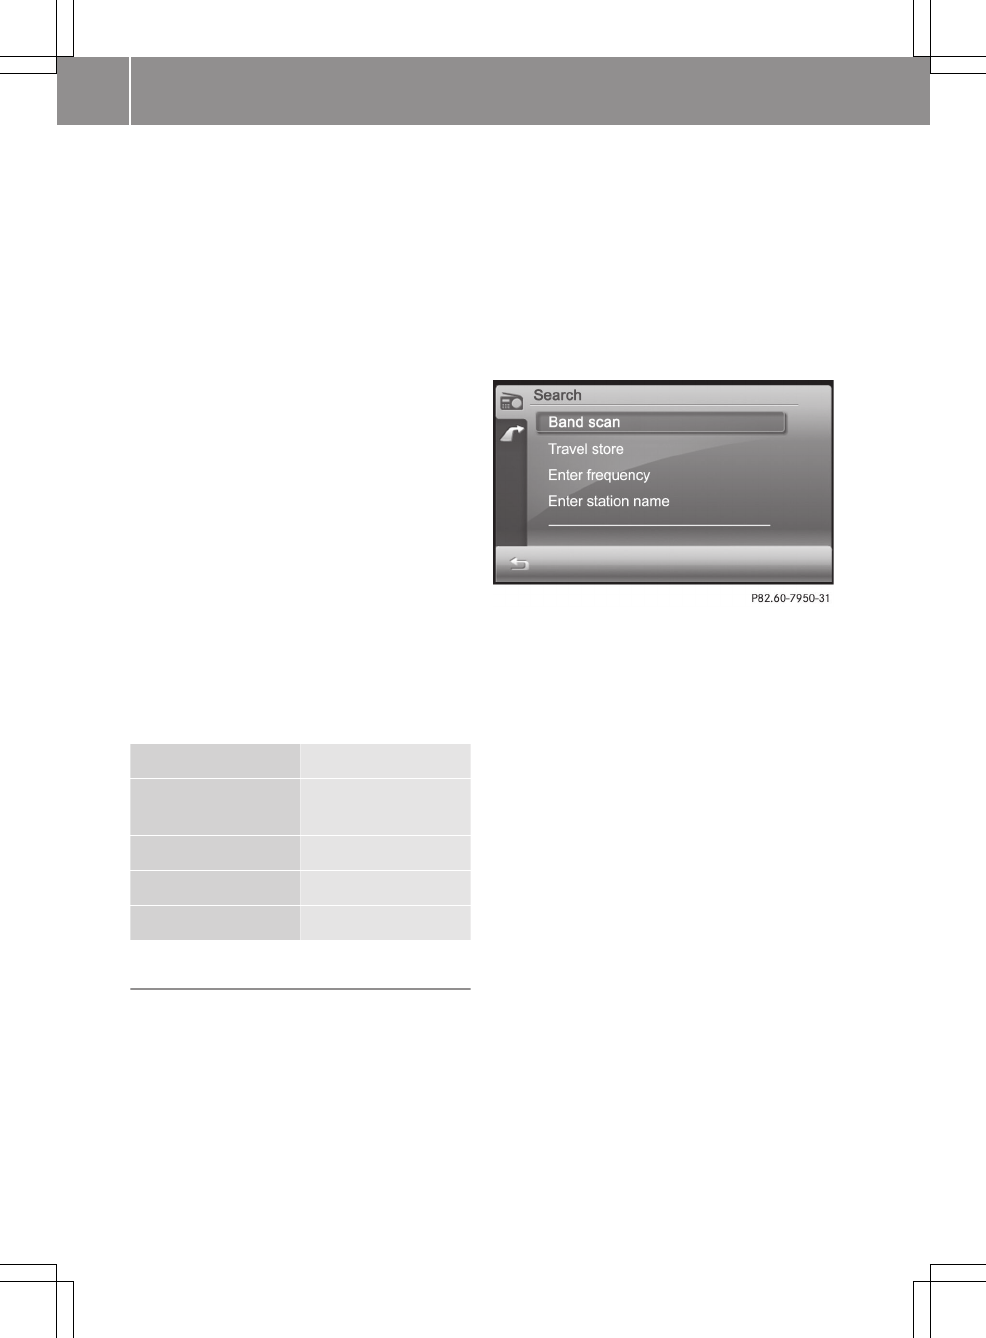
Selecting a station using the waveband
scan
XPress symbol B in the radio display
(Y page 65).
The station preset memory appears
(Y page 66).
XPress the magnifying glass symbol in the
station preset memory.
The "Station search" menu appears.
"Station search" menu
XPress Band scanning.
The Band scanning... message appears.
All available stations are played
briefly.
When the smart radio finds a station, the
display shows Playing 98.3 MHz, for
example.
XTo select the station being played: press
1.
The band scan is stopped.
Selecting stations via the station presets
Option 1
The station assignment of preset positions
1 to 4 appears in the radio display under
the waveband.
XPress one of preset positions 1 to 4.
The selected station is played.
Option 2
XPress symbol B in the radio display
(Y page 65).
The station preset memory appears.
66 >> smart high line radio.
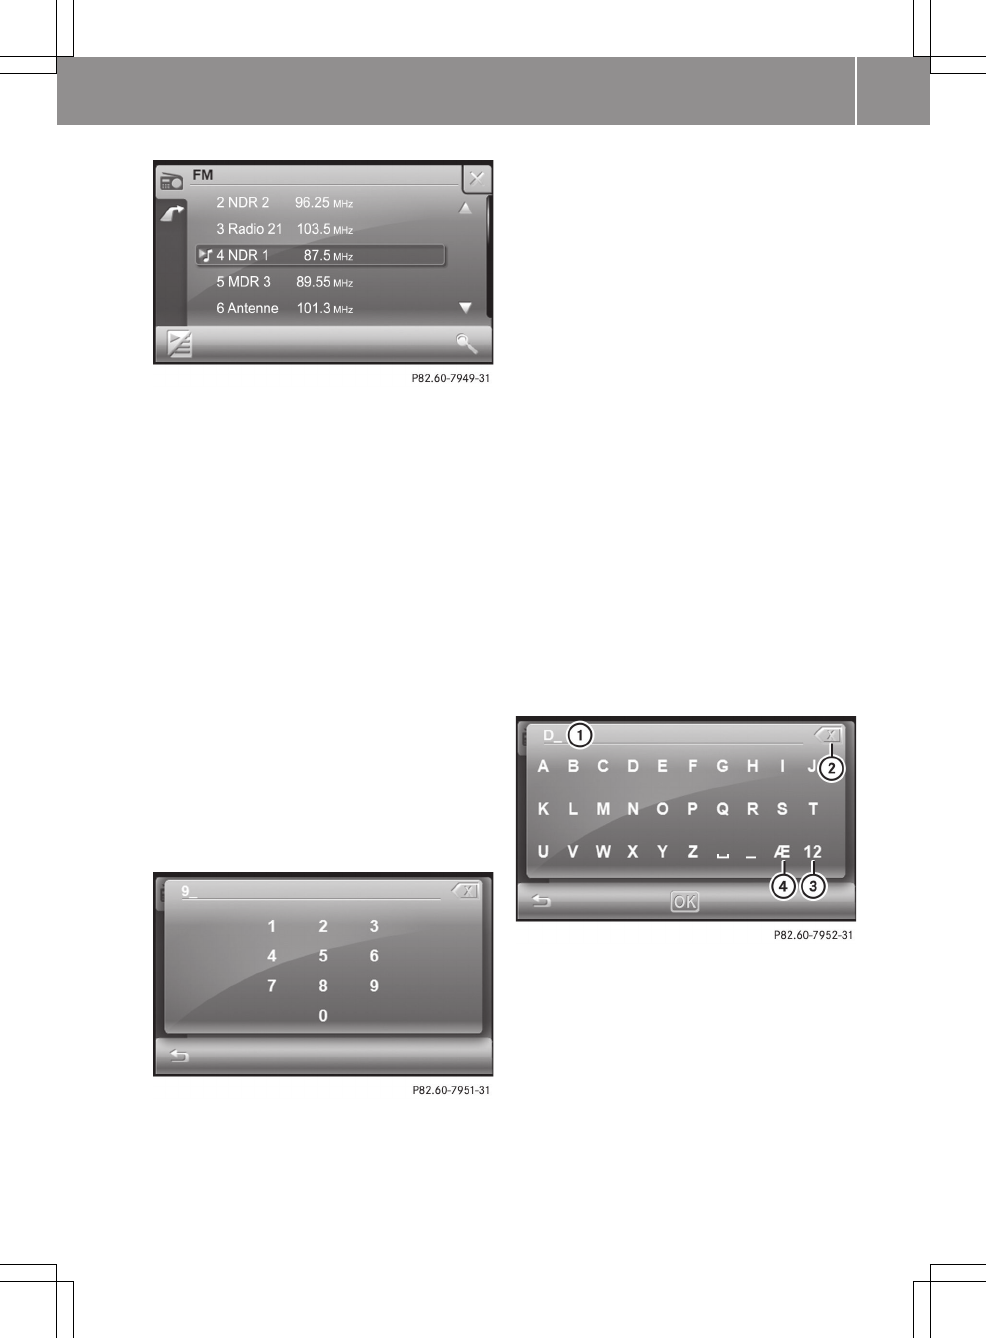
Station presets
An arrow and a note indicate under which
preset the currently selected station is
stored.
XPress 9 or : to scroll in the list.
XTap the desired station.
The selected station is played.
XPress Ì to call up the radio display.
Selecting stations by entering the fre-
quency manually
You can use this function for FM wavebands.
XPress symbol B in the radio display
(Y page 65).
The station preset memory appears.
XPress the magnifying glass symbol in the
station preset memory.
XPress Enter frequency.
An input menu appears.
XEnter the desired frequency by pressing
the numbers.
The frequency is shown at the top right,
the dot is entered automatically.
XPress OK and confirm the frequency
entered.
If the smart radio finds the respective
station, the display shows Playing
98.3 MHz, for example. The radio dis-
play then appears.
iYou can only enter currently permitted
numbers.
If you enter a frequency which is outside
the frequency range, the smart high line
radio tunes in to the next lower fre-
quency.
Selecting a station by entering the station
name
You can use this function for FM wavebands.
XPress symbol B in the radio display
(Y page 65).
The station preset memory appears.
XPress the magnifying glass symbol in the
station preset memory.
XPress Enter station name.
An input menu appears.
:Entry line
;Deletes an entry
=Enters numbers and special characters
?Enters umlauts
XEnter a station name. There is a descrip-
tion of how to enter characters in the
"Entering characters in the phone book"
section (Y page 13).
>> smart high line radio. 67
Z

XTo confirm the entry: press OK.
The Searching... display appears. You
then see a list of stations that can be
received.
XPress 9 or : to scroll in the list.
XTap the desired station.
XPress & to exit the list.
The selected station is played.
If no station is found for an entry, G not
found is shown, for example.
Storing stations
Storing channels manually
There are 32 preset positions available
each for the FM and FMT wavebands. You
cannot store stations manually in the FM
dynamic waveband. Up to 12 stations can be
stored in the MW, LW and SW wavebands.
XQuick save: in the radio display, press
and hold one of preset positions 1 to 4
until you hear a confirmation tone.
The currently set station is stored to the
preset position selected.
XIn the preset memory: press 9
or : to scroll in the list.
XPress and hold a preset position until
you hear a confirmation tone.
The currently set station is stored to the
preset position selected.
Storing stations automatically (travel
store)
This function automatically assigns sta-
tions that can be received to the preset
memory for the FMT waveband. The entire
waveband is searched, starting at the low-
est frequency. The 32 stations with the best
reception quality are stored to the preset
positions according to their reception
quality. The station with the best recep-
tion is stored at preset position 1.
XPress B in the radio display
(Y page 65).
The station preset memory appears.
XPress the magnifying glass symbol in the
station preset memory.
XPress Travel store in the "Station
search" menu.
XThe Travel store... message appears.
The smart high line radio searches for
stations that can be received. The avail-
able stations are automatically stored in
the preset positions.
XTo cancel a function: press 1.
Radio Data System (RDS)
General notes
The Radio Data System (RDS) provides
inaudible additional information in the
FM wavebands (FM, FMT, FM dynamic). The
system consists of a listening receiver and
a monitoring receiver.
The monitoring receiver constantly scans
the FM waveband and collects data from all
the stations which can be received. The
smart high line radio stores the data and
always keeps the preset memory up to date.
The listening receiver is therefore able to
switch instantaneously to an alternative
frequency with a better signal.
iRDS only functions for stations which
transmit RDS data.
Switching RDS on/off
XPress d in the radio display
(Y page 65).
The "Settings" menu appears.
68 >> smart high line radio.
XPress RDS in the menu.
Depending on the previous status, the
function is switched on O or off ª.
XPress & and return to the radio dis-
play.
Switching regional mode on/off
Some RDS programmes broadcast regional
programmes with local content. Switching
on regional mode prevents the station from
switching to an alternative frequency.
XPress d in the radio display
(Y page 65).
The "Settings" menu appears.
XPress Regional in the menu.
Depending on the previous status, the
function is switched on O or off ª.
XPress & and return to the radio dis-
play.
Program type category (PTY)
PTY is a service offered by several stations
in RDS. You can use it to select stations
with a certain programme type.
XPress d in the radio display
(Y page 65).
The "Settings" menu appears.
After PTY, the display either shows the
current programme type selected or NO
PTY.
XPress PTY in the menu.
The list of available programme types
appears.
XTo switch off PTY: press NO PTY.
The O symbol indicates that the func-
tion is switched off. The setting is
accepted and the list closes.
XTo select a programme type: press 9
or : to scroll in the list.
Press the desired programme type.
XPress & and close the list.
Available programme types:
RNews
RCurrent affairs
RInformation
RSport
REducation
RDrama
RCulture
RScience
RVaried
RPop Music
RRock Music
REasy Listening Music
RLight Classical Music
RSerious Classical Music
ROther Music
RWeather
RFinance
RChildren's programmes
RSocial affairs
RReligion
RPhone-in
RTravel
>> smart high line radio. 69
Z
RLeisure
RJazz Music
RCountry Music
RNational Music
ROldies Music
RFolk Music
RDocumentary
Traffic Programme
Note
Many FM stations transmit traffic
announcements (TA).
Switching traffic announcements on/off
XPress d in the radio display
(Y page 65).
The "Settings" menu appears.
XPress Traffic announcement.
Depending on the previous status, the
function is switched on O or off ª.
iIt is also possible to switch traffic
announcements off when a traffic
announcement is being received
(Y page 70).
XPress & and return to the radio dis-
play.
The car symbol at the top of the display
indicates that announcements are switched
on. If the selected station does not broad-
cast traffic announcements, this symbol is
crossed out in red.
After traffic announcements are switched
on, the smart high line radio selects an RDS
station.
The Traffic Programme is retrieved from:
Rthe currently selected FM station
Ran RDS station from the network of the
currently selected FM station
Rthe RDS station with the best reception
quality
When traffic announcements are switched
on, a traffic announcement will interrupt
the audio signal from the currently acti-
vated audio or video source.
iTelephone conversations and naviga-
tion announcements are not interrupted.
Incoming traffic announcements
An incoming traffic announcement is indi-
cated by a message.
XTo interrupt a traffic announcement:
press 1 in the message displayed.
The smart high line radio switches back
to the audio source that was playing
before the announcement. Subsequent
traffic announcements will interrupt the
audio source again.
XTo switch off traffic announcements:
press O in the message displayed.
No more traffic announcements are made.
70 >> smart high line radio.

Radio text
Notes
This function is available in FM radio
mode.
Radio text is additional information that
is shown in the radio display, e.g. infor-
mation about the current programme.
The radio text is switched off in the stand-
ard setting.
Switching radio text on/off
XPress d in the radio display
(Y page 65).
The "Settings" menu appears.
XPress Radio text in the menu.
Depending on the previous status, the
function is switched on O or off ª.
XPress & and return to the radio dis-
play.
If the station supports radio text and
information is available, this is shown
when the function is switched on. Longer
text information is shown as scrolling
text.
Reception settings
Switching stereo information on/off
XPress d in the radio display
(Y page 65).
The "Settings" menu appears.
XPress Stereo in the menu.
Depending on the previous status, the
function is switched on O or off ª.
XPress & and return to the radio dis-
play.
Noise suppression
This function suppresses interference
noises, e.g. as a result of poor reception,
by reducing the treble.
XPress d in the radio display
(Y page 65).
The "Settings" menu appears.
XPress Hicut in the menu.
A settings menu appears.
XPress = or Ì to select a value
between 0 (no lowering) and 7 (high low-
ering).
XPress OK and confirm the entry.
XPress & and return to the radio dis-
play.
Setting the sensitivity
By setting the sensitivity, you affect the
range of available channels when you use
the following functions:
RStation search (Y page 66)
RBand scan (Y page 66)
RTravel store
At high sensitivity, you only receive sta-
tions with high reception quality. At low
sensitivity, you also receive stations with
low reception quality.
XPress d in the radio display
(Y page 65).
The "Settings" menu appears.
XPress Sensitivity in the menu.
A settings menu appears.
XPress = or Ì to select a value
between 1 (low) and 6 (high).
XPress OK and confirm the entry.
XPress & and return to the radio dis-
play.
Music mode
Safety note
GRisk of accident
Only when the vehicle is stationary should
you:
Rload a disc
Reject a disc
>> smart high line radio. 71
Z
There is a risk of being distracted from the
road and traffic conditions if this is done
while the vehicle is in motion.
General notes
A maximum of 20,000 tracks or music files
are played.
If a data medium is divided into several
partitions, only the first partition found
is played.
Inserting and removing a CD/DVD
Notes
If the CD/DVD has a printed side, this must
face upwards when the CD/DVD is inserted.
If neither side is printed, the side to be
played should face downwards. CDs/DVDs
with copy protection may not be able to be
played by the system.
iIf a medium contains other files in
addition to music files, the loading time
before the first track starts to play may
be longer.
Inserting a CD/DVD
XPress the 8 button on the front panel.
The front panel is folded down and uncov-
ers the disc slot.
If the eject button, position
F(Y page 8), is lit up in orange, a CD/
DVD has already been inserted. If this is
the case, remove the CD/DVD first.
XInsert a CD/DVD into the disc slot.
The smart high line radio draws the CD/
DVD in.
The Disc reading... message appears.
If the CD/DVD is a permissible data
medium and was inserted correctly,
playback starts.
XPress the 8 button on the front panel.
The front panel raises and closes the
disc slot.
iThe front panel moves up automatically
after one minute.
Removing the CD/DVD
XPress the 8 button on the front panel.
The front panel is folded down and uncov-
ers the disc slot.
The eject button lights up orange if there
is a CD/DVD in the disc slot.
XPress the eject button, position
F(Y page 6).
XRemove the CD/DVD from the disc slot.
XPress the 8 button on the front panel.
The front panel raises and closes the
disc slot.
iThe front panel moves up automatically
after one minute.
Inserting and ejecting an SD/MMC mem-
ory card
General notes
The smart high line radio supports SDHC
memory cards, SD memory cards and MMC
memory cards.
RSDHC (SanDisk High Capacity)
RSD (SanDisk)
RMMC (Multimedia Card)
SD memory cards feature the following
logo:
This logo is a registered trademark of San-
Disk Corporation. The logo is shown on the
left beside the SD/MMC memory card slot
(visible when you fold the display down).
iDo not insert any SD-WLAN cards or par-
titioned SD cards, since these either
72 >> smart high line radio.

obstruct the opening/closing of the front
panel or do not fit in the slot.
iNot all SD/MMC memory cards are
designed for the temperatures which may
be reached in the vehicle.
Due to the wide range of SD/MMC memory
cards available on the market, playback
cannot be guaranteed for all brands of
SD/MMC memory card.
A maximum of 20,000 tracks or music files
are played. If the SD/MMC memory card is
divided into several partitions, only the
first partition found is played.
A partition must not be larger than 32 GB.
Inserting an SD/MMC memory card
XPress the 8 button on the front panel.
The front panel is folded down and uncov-
ers the slot for the SD/MMC memory card
(on the right beside the SD logo).
XInsert an SD/MMC memory card into the
slot. The side with the contacts must face
downwards and point towards the slot.
XPress the 8 button on the front panel.
The front panel moves up and closes the
SD/MMC memory card slot.
Removing the SD/MMC memory card
XPress the 8 button on the front panel.
The front panel is folded down and uncov-
ers the slot for the SD/MMC memory card
(on the right beside the SD logo).
XPress the SD/MMC memory card.
The SD/MMC memory card is ejected.
XRemove the SD/MMC memory card.
XPress the 8 button on the front panel
again.
The front panel moves up and closes the
SD/MMC memory card slot.
iPod® mode
Supported iPod® variants
iiPod® is a registered trademark of
Apple Inc., Cupertino, California, USA.
The following iPod® versions are suppor-
ted:
RiPod® classic 120 GB
RiPod® classic
RiPod® nano 4G
RiPod® nano 3G
RiPod® touch 3G
RiPod® touch 2G
RiPod® touch
RiPod® 5G
Connecting an iPod®
To connect an iPod® to the USB port in the
glove compartment, you will need a USB-
HID cable from the accessories range. You
can obtain further information from your
smart Centre.
iNever leave an iPod® in the vehicle as
extreme temperatures (e.g. if subjected
to direct sunlight or to extremely low
outside temperatures) may prevent it
from functioning correctly (see the sep-
arate operating instructions of the
respective device). smart does not take
responsibility for any damage to exter-
nal devices.
XConnect the iPod® to the corresponding
port.
iConnecting an iPod which has been
excessively discharged can result in an
extended initialisation period.
Operation via a USB/AUX port
USB/AUX port
The ports are in the glove compartment on
the left-hand side.
>> smart high line radio. 73
Z
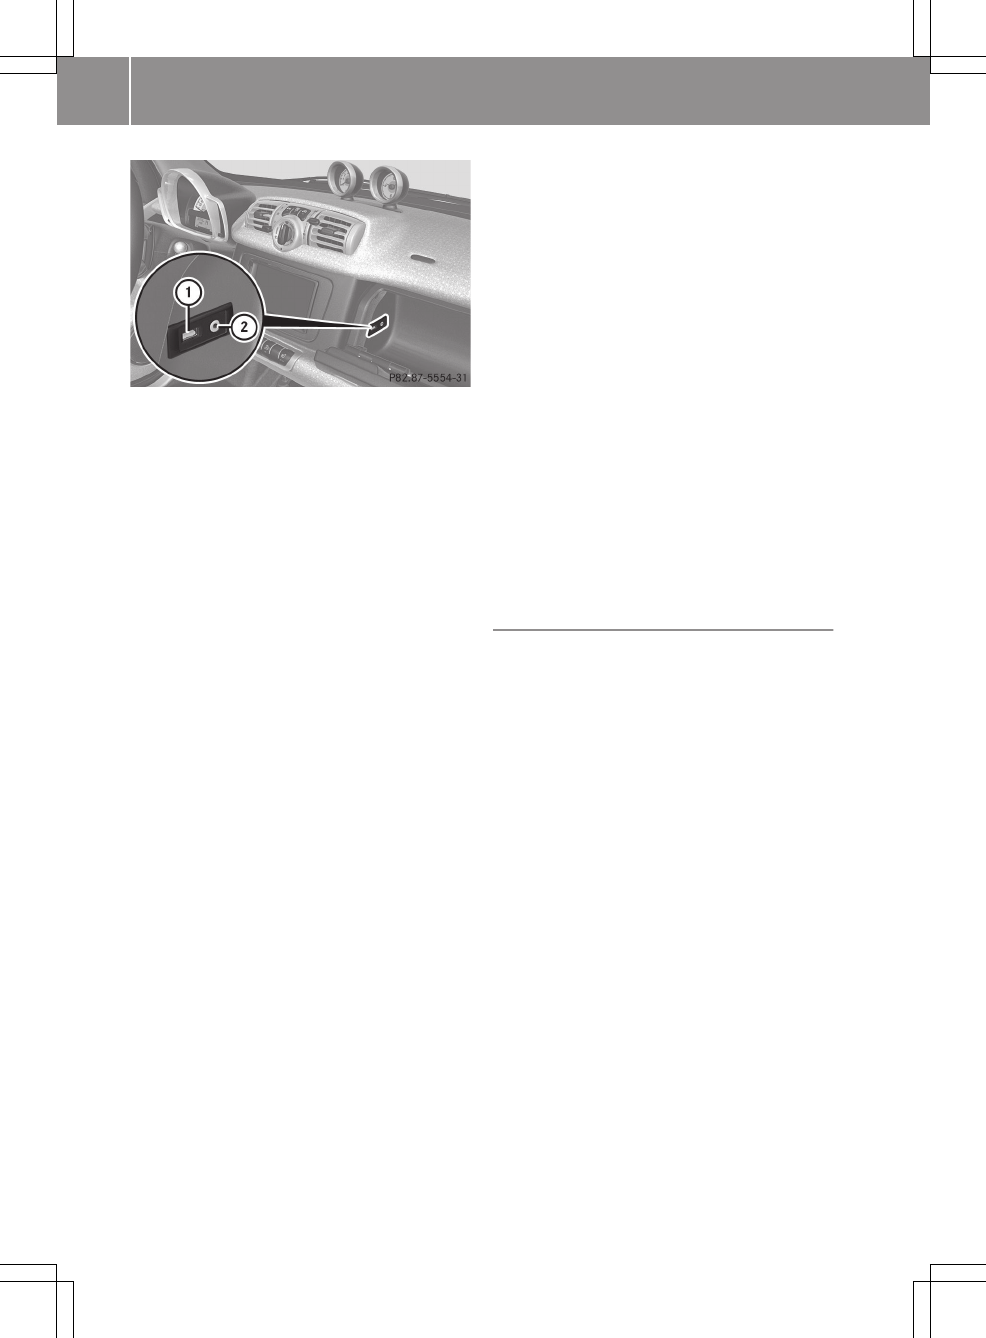
:USB port
;AUX port
You can connect an external audio source
(AUX) to the smart high line radio.
The USB port supports the following USB
devices:
RUSB sticks (flash memory)
RUSB hard drives requiring a permanent
current of a maximum of 500 mA (it may be
necessary to connect a separate power
supply)
iThe smart high line radio supports USB
storage media of "USB Device Sub-
class 6". Information concerning USB
Device Subclass 6 is available from the
equipment manufacturer.
A maximum of 20,000 tracks or music files
are played. If the USB storage medium is
divided into several partitions, only the
first partition found is played.
Size specifications for a partition:
RUSB sticks < 64 GB
RUSB hard drives < 1000 GB
Partitions of over 256 GB result in an
extended initialisation period. It
could therefore take a long time before
playback starts.
The storage space must be smaller than
256 GB for media files.
For more details and a comprehensive list
of supported devices, please contact a
smart Centre.
Connecting an audio device to AUX
XConnect the audio device using a 3.5 mm
stereo jack plug with AUX port ;.
XPlease see the respective operating
instructions for how to operate the
external audio source.
Connecting a USB device
iDo not leave external devices in the
vehicle as their correct function cannot
be guaranteed if they are subjected to
extreme temperatures (e.g. if subjected
to direct sunlight or very low outside
temperatures) (see the operating
instructions of the respective device).
smart does not take responsibility for
any damage to external devices.
XConnect the USB device to USB port :.
Bluetooth® audio mode
Conditions
Bluetooth® audio device
Bluetooth® audio mode requires a Blue-
tooth®-capable audio device.
Not all Bluetooth® audio devices available
on the market are equally suitable. You can
obtain more detailed information about
suitable Bluetooth® audio devices and
about connecting Bluetooth® audio devices
to the smart high line radio from your smart
Centre.
Before using Bluetooth® audio mode, you
should check your Bluetooth® audio device
for the following (see the Bluetooth® audio
device's operating instructions):
XBluetooth® audio profile
The Bluetooth® audio device must sup-
port the A2DP and AVRCP Bluetooth® audio
profiles.
iA2DP (Advanced Audio Distribution
Profile): Bluetooth® audio profile for
audio data transmission
74 >> smart high line radio.
AVRCP (Audio Video Remote Control Pro-
file): Bluetooth® audio profile for audio
data control
XBluetooth® visibility
On certain Bluetooth® audio devices, as
well as activating the Bluetooth® func-
tion, the device itself must also be made
"visible" for other devices (see the
Bluetooth® audio device's operating
instructions).
XBluetooth® device name
Every Bluetooth® device has its own Blue-
tooth® device name. This device name is
freely definable, but can be identical
for all devices from the same manufac-
turer. You should therefore change the
name of the device so that you can cor-
rectly identify your Bluetooth® audio
device (see the Bluetooth® audio devi-
ce's operating instructions).
XActivate Bluetooth® and Bluetooth® vis-
ibility on the Bluetooth® audio device.
General information
You will need to register your Bluetooth®
audio device before using it with the smart
high line radio for the first time.
This process includes:
Rthe search by the Bluetooth® audio device
as well as
Rsubsequent connection.
You can connect up five Bluetooth® devices.
iIf you register a mobile phone that sup-
ports Bluetooth® Audio and transmits the
A2DP and AVRCP Bluetooth® audio pro-
files, these profiles are connected auto-
matically. The mobile phone is then
entered in both the Bluetooth® tele-
phones list (Y page 55) and in the Blue-
tooth® Audio device list.
iThe functions supported depend on the
Bluetooth® audio device or the mobile
phone.
Connecting Bluetooth® audio devices
XProceed as described in the "Register-
ing and connecting a mobile phone" sec-
tion of the Telephone section
(Y page 55). Press Audio streaming
instead of Mobile phone in the "New
device" menu.
Activating music mode
Option 1: inserting or connecting a data
medium
XInsert a CD/DVD (Y page 72) or a SD/MMC
memory card (Y page 73).
or
XConnect a USB device (Y page 74), an
iPod® (Y page 73) or an audio device
(Y page 74).
or
XConnect a Bluetooth® audio device to the
smart high line radio (Y page 75).
XTo start playback: playback starts auto-
matically for CDs/DVDs. For all other
data mediums, press ; in the basic
display.
Option 2: select a data medium in the music
main menu
A CD/DVD or an SD/MMC memory card is
inserted or a data medium is connected to
the smart high line radio.
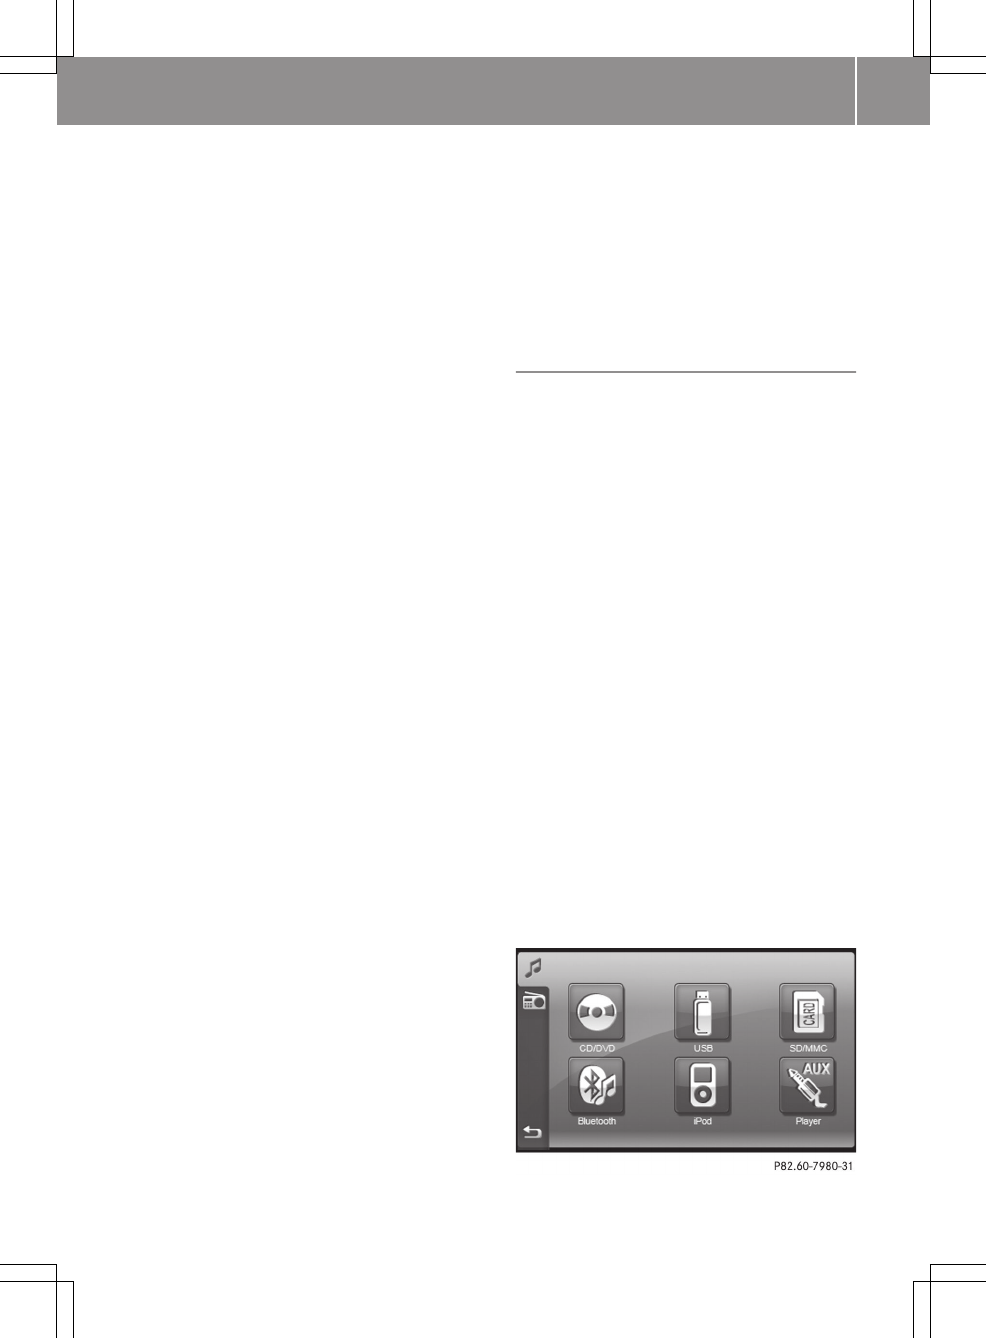
XPress Music in the main menu (Y page 8).
The music main menu appears.
Music main menu
>> smart high line radio. 75
Z

XPress on a data medium symbol.
The data medium is read. Playback then
starts.
CD/DVD mode (example)
:The status bar shows the current mode
and the current playback options
;Display with track, artist, album name
and genre (if supplied), with the play-
back bar underneath
=Menu bar
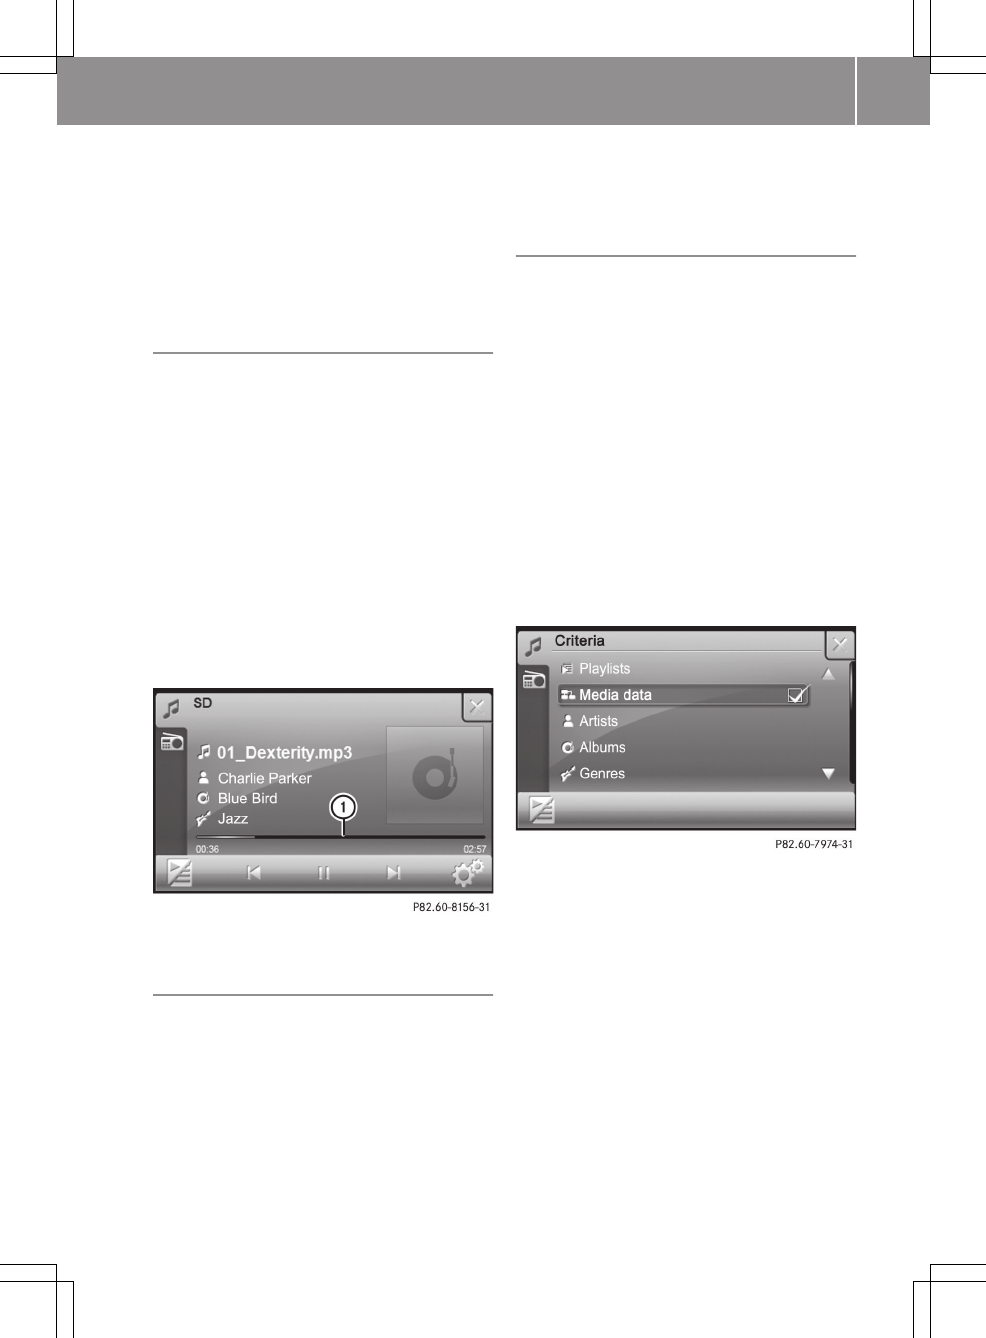
SD memory card mode (example)
iFor USB mode and SD/MMC memory card
mode, the cover is shown on the display
if the corresponding data is contained
in the ID3 tag.
Switching off music mode
XPress 1 in the relevant basic display.
The last active main function is shown.
Pause function
XPress Ë in the relevant basic display.
Playback is interrupted. Ì is shown
instead of Ë.
XTo continue playback: press Ì.
Playback continues from the point where
it was interrupted.
Selecting a track
By skipping
XPress û or ü in the relevant basic
display.
The skip forward function skips to the
next track.
Skipping backwards restarts the current
track (if it has been playing for more
than 8 seconds) or starts the previous
track (if the current track has only been
playing for a shorter time).
If you have activated the Mix playback
option, the tracks are played in a random
order. Depending on the data medium, all
the tracks on the medium, the tracks with
a certain playback criteria or the tracks
in a folder are played.
By track list
XPress the symbol at the bottom left in the
relevant basic display.
The track list appears.
76 >> smart high line radio.
XPress 9 or : to scroll in the track
list.
XSelect a title.
The track is played.
XTo return to the basic display: press the
symbol at the bottom left.
Fast forward/rewind
There are two options for this function. The
second option can be used when playing a
CD/DVD, an SD/MMC memory card or a USB
device.
Option 1
XPress and hold û or ü until the
desired position has been reached.
iOn an iPod®, fast rewind only functions
within the current track.
Option 2
XPress somewhere on playback bar : in
the following picture.
:Playback bar
Selecting a folder
This function is available in MP3 mode.
XPress the symbol at the bottom left in the
relevant basic display.
The track list appears.
XTo call up the next higher folder level:
press the folder symbol on the bottom
right.
XTo open a folder: press a folder symbol.
The folder content is shown.
Playback criteria
General information
You can select playback criteria for
iPods®, USB devices and SD/MMC memory
cards. Playback criteria include, for
example, playlists, artists or genres. After
selecting a criteria and a sub-entry, you
will then hear the corresponding tracks.
The folder structure can be displayed
using the Media data criteria.
Selecting playback criteria
XPress the symbol at the bottom left in the
relevant basic display.
The track list appears.
XPress magnifying glass symbol ;.
XPress one of the playback criteria.
If you press Artists, for example, a list
of available artists appears.
XSelect an artist.
A list of available tracks is shown.
XPress a track to start playback.
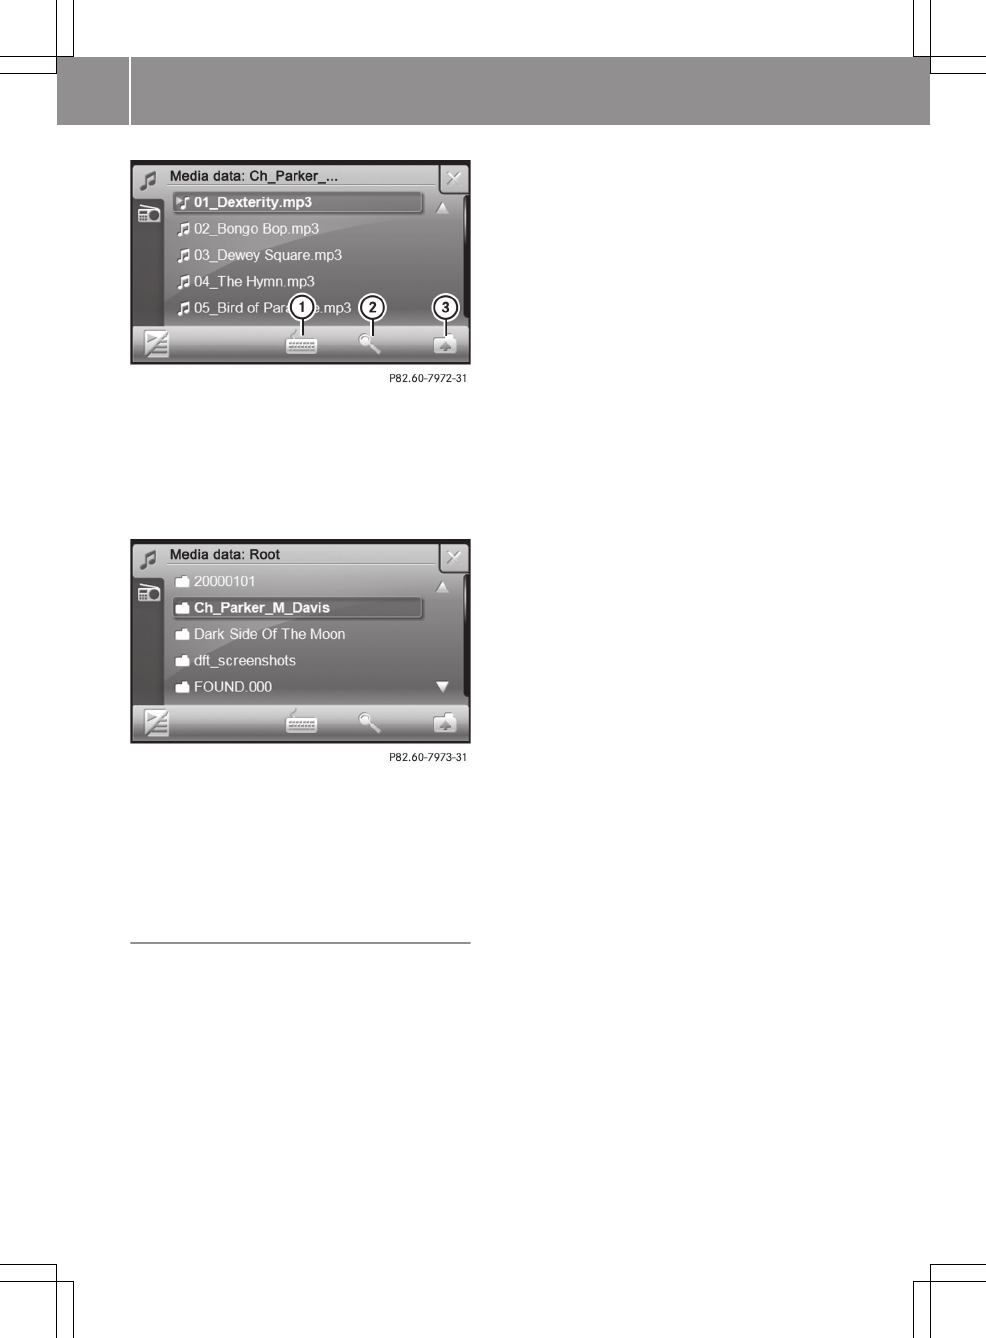
Displaying metadata
XPress Metadata in the "Criteria" dis-
play.
A folder structure or a track list
appears.
>> smart high line radio. 77
Z
:Alphabetical track search
;Search by playback criteria
=Selects the next highest folder level
XPress folder symbol =.
The folder structure appears.
Folder structure (highest level)
XWhen the highest folder level is shown,
press on the folder symbol at the bottom
right again.
The Criteria message appears again.
Track search
This function is available within the dis-
played list for USB mode and SD/MMC mem-
ory card mode.
XPress symbol : in the track list or after
selecting a playback criteria (e.g.
Artists).
An input menu appears.
XEnter characters. There is a description
of how to enter characters in the "Enter-
ing characters in the phone book" chap-
ter (Y page 13).
The search entry is entered in the upper
line.
XPress OK and confirm the entry.
A list shows the entries found.
XPress 9 or : to scroll in the track
list.
XSelect a title.
The track is played.
78 >> smart high line radio.
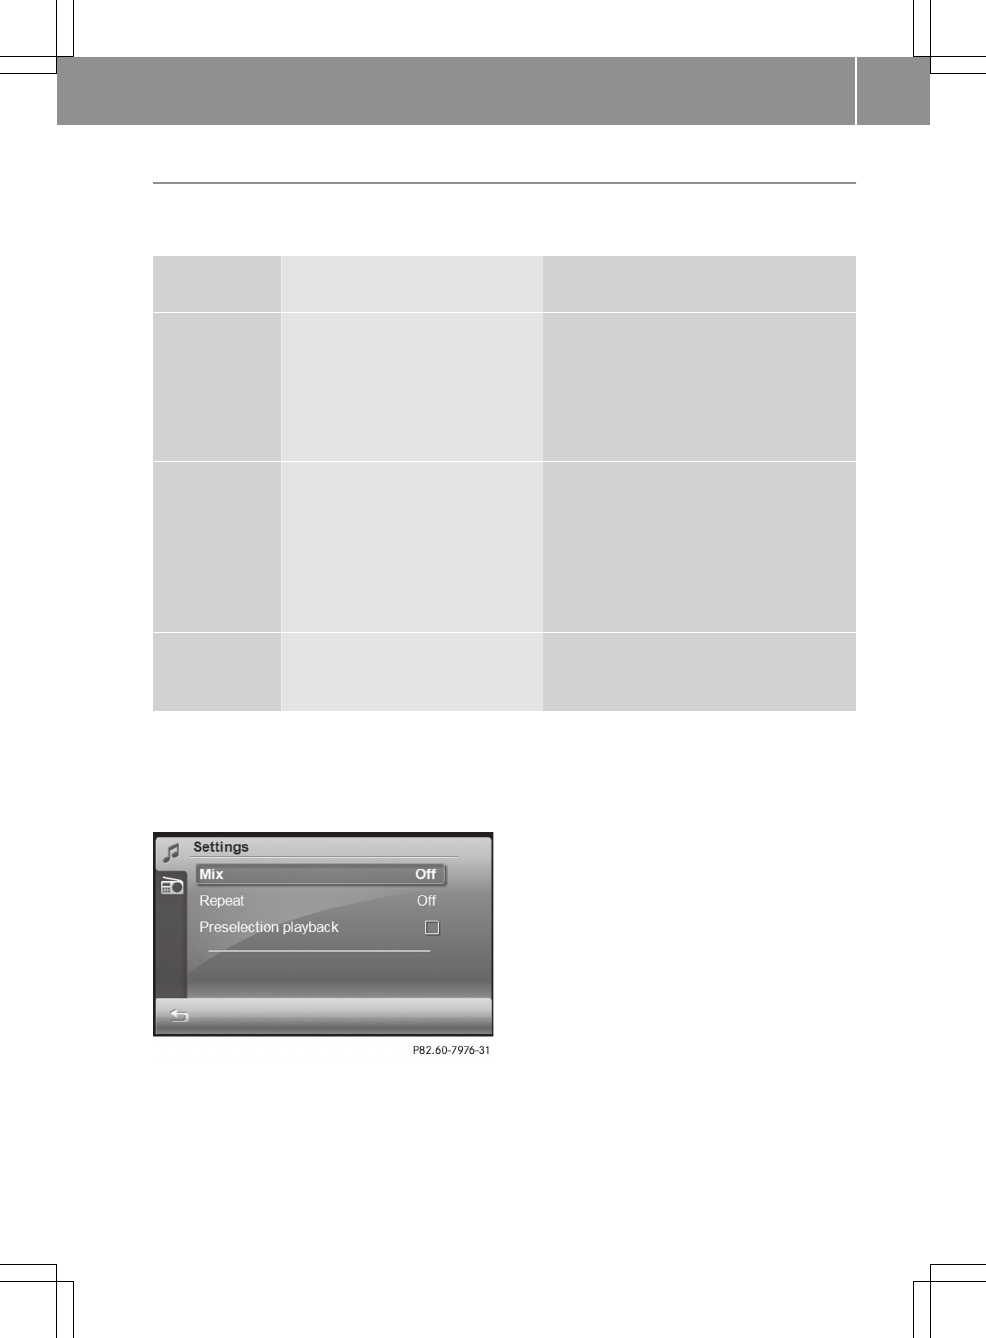
Playback options
Available playback options
iThis function is not available for Bluetooth® audio devices.
Playback
options
Discs Playback
Mix RAudio CD, audio DVD
RMP3 CD, MP3 DVD
RiPod®
RUSB device
RSD/MMC memory card
You hear the tracks in random order.
Depending on the data medium, the
tracks in the folder, the tracks that
match the current criteria or all the
tracks on the entire medium are
played.
Repeat RAudio CD, audio DVD
RMP3 CD, MP3 DVD
RiPod®
RUSB device
RSD/MMC memory card
The track that is currently being
played is repeated for as long as the
function is activated.
Depending on the data medium, the
current track, all the tracks that
match the current criteria or all the
tracks in the folder are repeated.
Preselec‐
tion play‐
back
RUSB device
RSD/MMC memory card
When this function is activated, the
next track to be played can be prese-
lected in the track list.
Selecting playback options
XPress the d symbol in the relevant
basic display.
The "Settings" menu appears.
Playback options for SD memory cards (example)
XPress a playback option.
If you have selected Mix, you switch
between the Off, Folder and Medium set-
tings.
If you have selected Repeat, you switch
between the Off, Track and Folder set-
tings.
If you have selected Preselection
playback, you either switch the function
on O or off ª, depending on the previ-
ous status.
XPreselection playback: when the function
is activated, press 9 or : in a
track list and set the selection marker to
the next track to be played.
The preselected track is played after the
current track has been played.
iIf you switch to the track list, the set-
tings for Mix and Repeat are reset to
Off.
>> smart high line radio. 79
Z

Notes on music mode
Data medium and supported audio formats
CD/DVD with music
files
aac, mp2, mp3,
wma
USB devices (sticks,
hard discs)
SD/MMC memory card
aac, m3u, mp3,
ogg, pls, wav,
wma, wpl
Bluetooth® audio
device with
Bluetooth® audio pro-
file A2DP
mp3, wma
Explanation of the most important audio
formats:
Raac - digital audio data compression
format, susceptible to sound quality
impairments
Rmp2 - digital audio data compression
format, susceptible to sound quality
impairments, standard for digital radio
Rmp3 - compression format (MPEG1 Audio
Layer 3), susceptible to sound quality
impairments, standard for transfer and
playback of music on digital audio play-
ers
Rm3u - file format for saving multimedia
playlists
Rogg - free-of-charge, loss-free
compressed format for digital audio
Rpls - file format for saving multimedia
playlists, contains additional track
information not contained in the "m3u"
format
Rwma - audio file compression technology
developed by Microsoft®
iThe MP3 audio encoding method is
under licence from Fraunhofer IIS
(Institut Integrierte Schaltungen –
Institute for Integrated Circuits) and
Thomson.
Permissible file systems
RISO9660/Joliet standard for CDs
RUDF for audio DVDs
RFAT16 for SD memory cards, FAT32 for
SDHC memory cards
RFAT32 for USB storage medium (USB
sticks, USB hard drives)
Permissible bit and sampling rates
MP3
smart high line radio supports MP3 files
with the following properties:
Rfixed and variable bit rates from
32 kbit/s to 320 kbit/s
Rsampling rates of 8 kHz to 48 kHz
WMA
smart high line radio supports WMA files
with the following properties:
Rfixed bit rates of 8 kbit/s up to
384 kbit/s
Rsampling rates of 8 kHz to 48 kHz
smart high line radio does not support WMA
files with the following properties:
RDRM (Digital Rights Management)
encrypted files
Rvariable bit rate
RWMA Pro
R5.1 (two-channel sound in the downmixing
process)
iThe downmixing process converts a
multichannel sound into a two-channel
sound.
iOnly use tracks with a bit rate of at
least 128 kbit/s and a sampling rate of at
least 44.1 kHz. Lower rates can cause a
noticeable deterioration in quality.
80 >> smart high line radio.

Notes for SD/MMC memory cards and USB
devices
Observe the following notes for fast access
to your music data or playback within a
category:
RLimit the number of folder entries to a
maximum of 255. This recommendation
also applies to the highest directory
(root).
RThe maximum directory depth must not be
more than ten levels.
RAvoid very large music files.
Notes on copyright
MP3 or WMA tracks that you create or play
back are generally subject to copyright
protection in accordance with the appli-
cable international and national regula-
tions.
In many countries, reproductions, even for
private use, are not permitted without the
prior consent of the copyright holder.
Make sure that you know about the applica-
ble copyright regulations and that you
comply with these.
If you own these rights yourself, e.g. for
your own compositions and recordings, or
if the copyright holder has granted you
permission, these restrictions do not
apply.
Notes on CDs/DVDs
Discs with copy protection are not compat-
ible with the audio CD standard. smart high
line radio may not be able to play them.
There may be playback problems when play-
ing copied discs. There is a wide range of
data carriers, disc-writing software and
writers available. This variety means that
there is no guarantee that the system will
be able to play discs that you have copied
yourself.
There may be playback problems if you play
CDs that you have copied yourself with a
storage capacity of more than 700 MB. CDs
of this type do not conform to the currently
applicable standards.
! Do not affix stickers or labels to the
discs. They could peel off and damage the
drive.
The drive is designed to hold discs which
comply with the EN60908 standard. There-
fore, you can only use discs with a max-
imum thickness of 1.3 mm.
If you insert thicker discs, e.g. those
that contain data on both sides (DVD on
one side and audio data on the other),
they cannot be ejected and can damage
the drive.
Do not use discs with a diameter of 8 cm,
even with an adapter. Only use round
discs with a diameter of 12 cm.
iThe device can play audio CDs with
high-resolution multichannel audio
format. Super audio CDs are played back
at CD quality.
Audio settings
Calling up the "Audio settings" menu
Option 1
XSelect Extras from the main menu
(Y page 8).
XSelect Options from the menu.
The "General settings" menu appears.
XSelect Audio settings.
Option 2
XPress the t button for longer than two
seconds.
>> smart high line radio. 81
Z
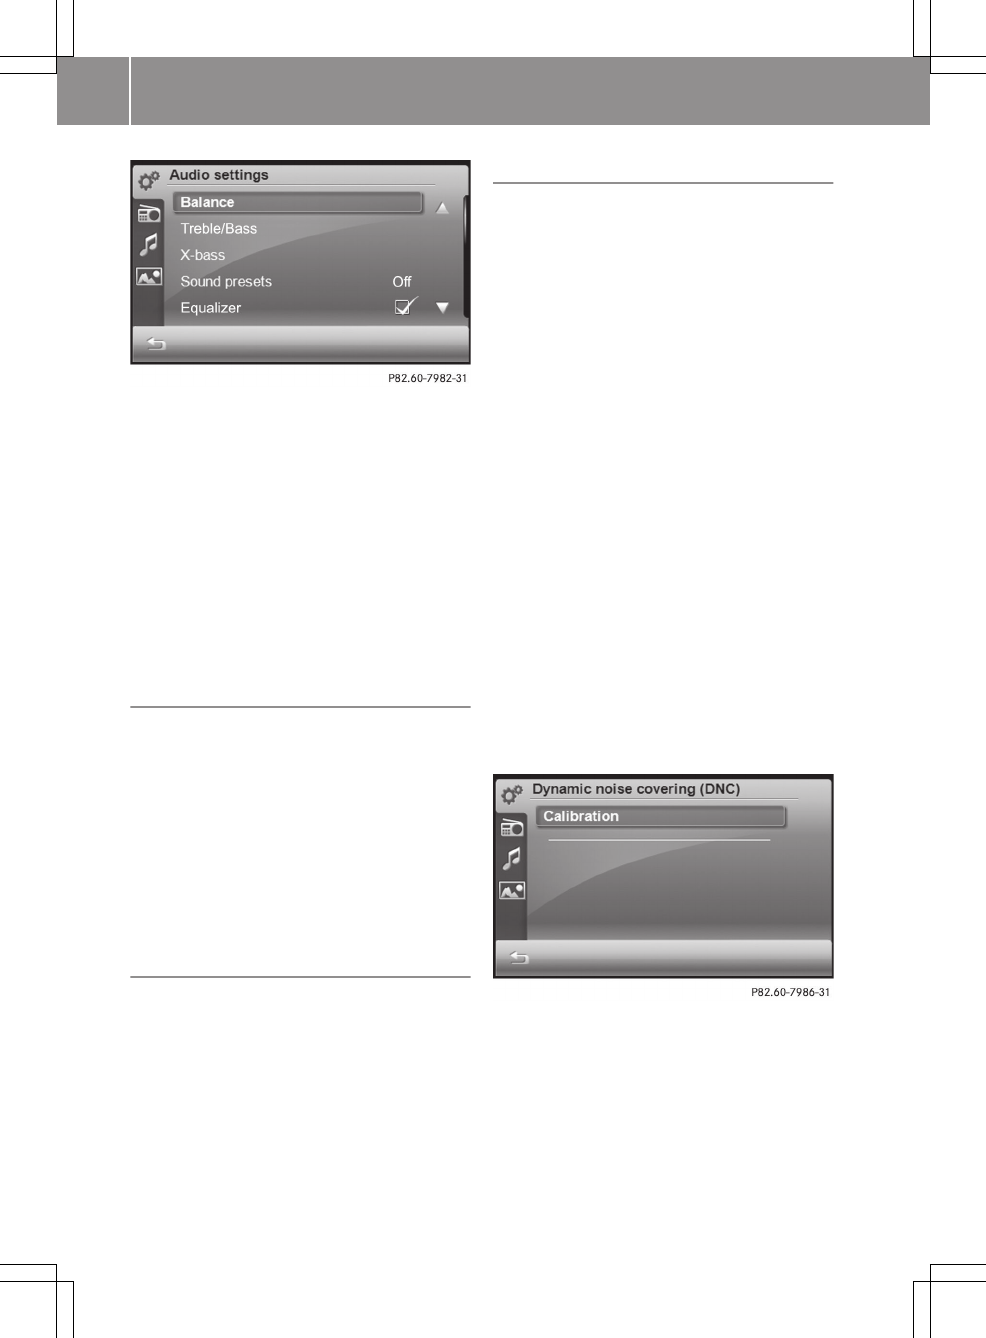
You can make the following audio settings:
RBalance
RBass/treble
RX-bass
RSound profile
REqualiser
RDynamic Noise Covering
iThe settings for balance, bass/treble
and X-bass can be found in the "At a
glance" section (Y page 16).
Selecting a sound profile
XCall up the "Audio settings" menu.
The entry on the right beside Sound
presets shows the current setting.
XSelect Sound presets.
A list appears. The O icon indicates the
current setting.
XSelect Off or Pop, Classical or Vocal.
The setting is accepted and the list
closes automatically.
Equaliser
XCall up the "Audio settings" menu.
The entry on the right beside Equal‐
izer shows the current setting.
XSelect Equalizer.
Switch the function on O or off ª.
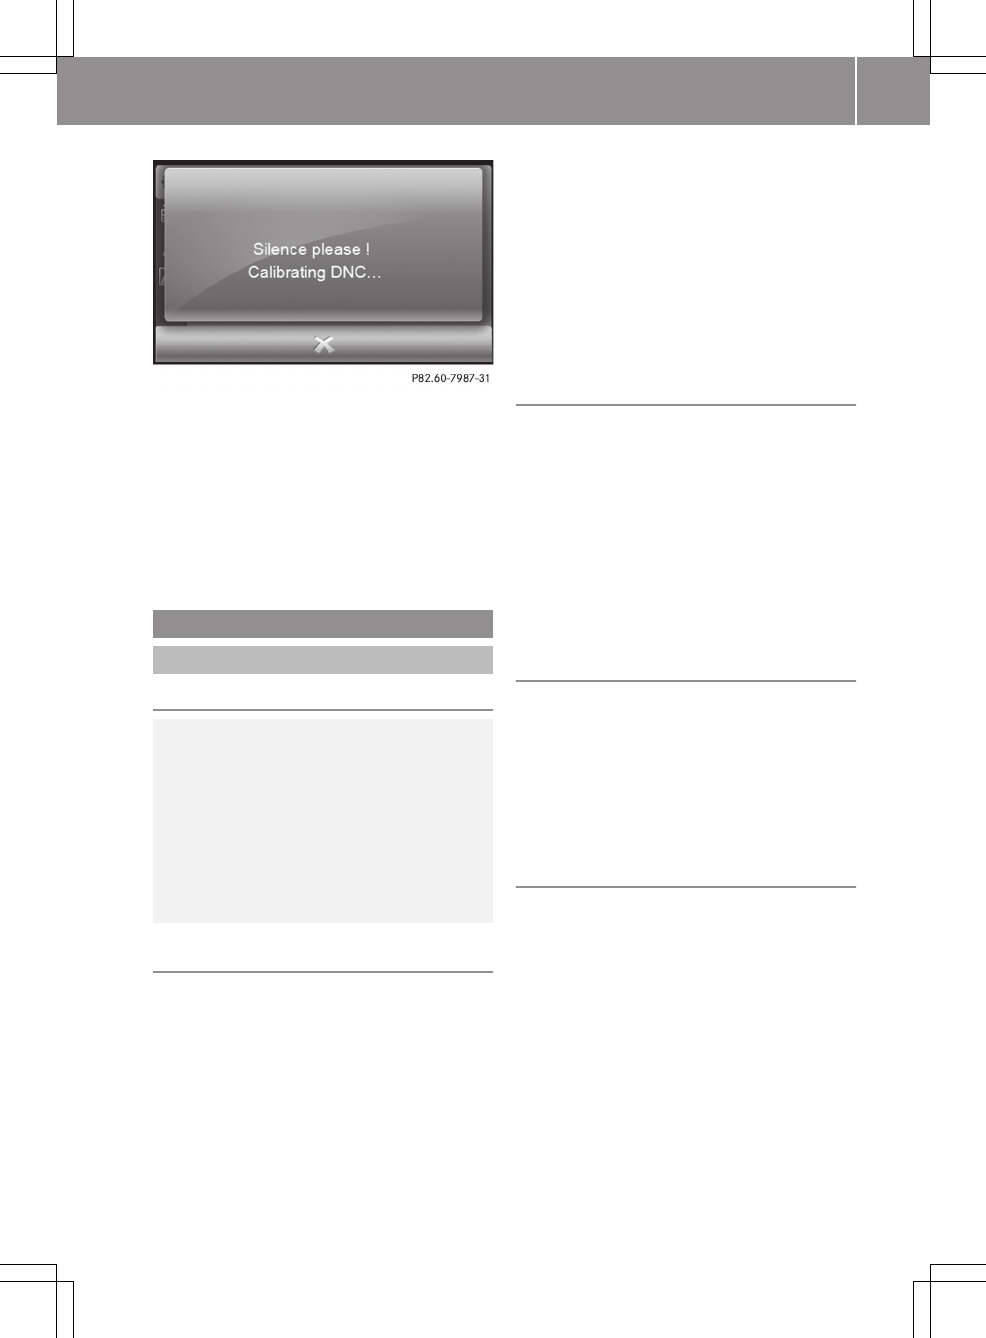
Dynamic Noise Covering
The equaliser cannot solve all of the acous-
tic problems in the vehicle. When driving,
listening pleasure is significantly affec-
ted by engine, wind and road noise. DNC
(Dynamic Noise Covering) relieves the
driver of the inconvenience of having to
make readjustments. The function ensures
outstanding sound quality, with the volume
and sound characteristics appearing to
remain constant, even during the journey.
The volume is adjusted depending on the
current background noise and the dynamics
are controlled so that even the quietest
sections can be heard clearly.
Before using DNC, calibrate your vehicle
values using the microphone integrated in
the smart high line radio. You can then
select six different volume increase levels
for DNC, 0 (none) to 5 (maximum).
Carry out the calibration process while the
vehicle engine is switched off and switch
on an audio source, e.g. the radio.
XCall up the "Audio settings" menu
(Y page 81).
XPress Dynamic noise covering (DNC).
XTo calibrate the microphone: press Cal‐
ibration.
The Silence please ! Calibrating
DNC message then appears.
The DNC calibration successful mes-
sage appears once the calibration proc-
ess is completed.
82 >> smart high line radio.
XTo select a volume increase: press
Level.
A settings menu appears.
XPress = or Ì to select a level from
0 (none) to 5 (maximum).
XPress O and confirm the selection.
The settings menu closes.
Video
Video mode
Safety note
GRisk of accident
Only when the vehicle is stationary should
you:
Rload a disc
Reject a disc
There is a risk of being distracted from the
road and traffic conditions if this is done
while the vehicle is in motion.
DVD playback conditions
There are video DVDs available on the mar-
ket which do not conform to the current
standards. Such DVDs may have picture,
sound or other playback problems.
The smart high line radio can play back
video DVDs produced according to the fol-
lowing standards:
Rregion code 2 (for Europe) or region code
0 (no region code)
RPAL or NTSC standard
You will generally find the relevant
details either on the DVD itself or on the
DVD case.
iThe smart high line radio is set to
region code 2 at the factory.
iIf you insert a video DVD with a differ-
ent region code, you will see a message
to this effect.
Function restrictions
If you would like to use the video function,
you first need to:
Xswitch off the navigation (Y page 25).
Xapply the parking brake (see the vehicle
Owner's Manual).
The video image is hidden during the jour-
ney. The For safety video watching is
not possible while driving or navi‐
gating ! message appears.
Data medium for video mode
The following data mediums can be used for
playback:
RVideo DVD/video CD
RVideo DVD/video CD with video files
RUSB device
RSD/MMC memory card
Switching video mode on
Option 1: inserting or connecting a data
medium
XInsert a video DVD/video CD (Y page 72).
or
XInsert an SD/MMC memory card
(Y page 73).
or
XConnect a USB device (Y page 74).
The data medium is read.
XTo start playback: playback starts auto-
matically for video DVDs/video CDs. For
>> smart high line radio. 83
Z
all other data mediums, press ; in the
basic display.
Option 2: select a data medium in the video
main menu
A data medium is inserted or connected to
the smart high line radio.
XPress Video in the main menu (Y page 8).
The video main menu appears.
Video main menu
XPress on a data medium symbol.
The data medium is read. The DVD menu
appears if CD/DVD was selected and a
video DVD is inserted.
Display with DVD menu (example)
Depending on the data medium selected, the
following are shown:
Rthe DVD menu (video DVD/video CD)
Rthe video image (video DVD/video CD
with video files, USB device, SD/MMC
memory card)
Starting playback
XThe DVD menu is displayed: press OK.
Playback starts.
If the Automatic full screen setting
is activated (Y page 88), playback is in
full screen mode.
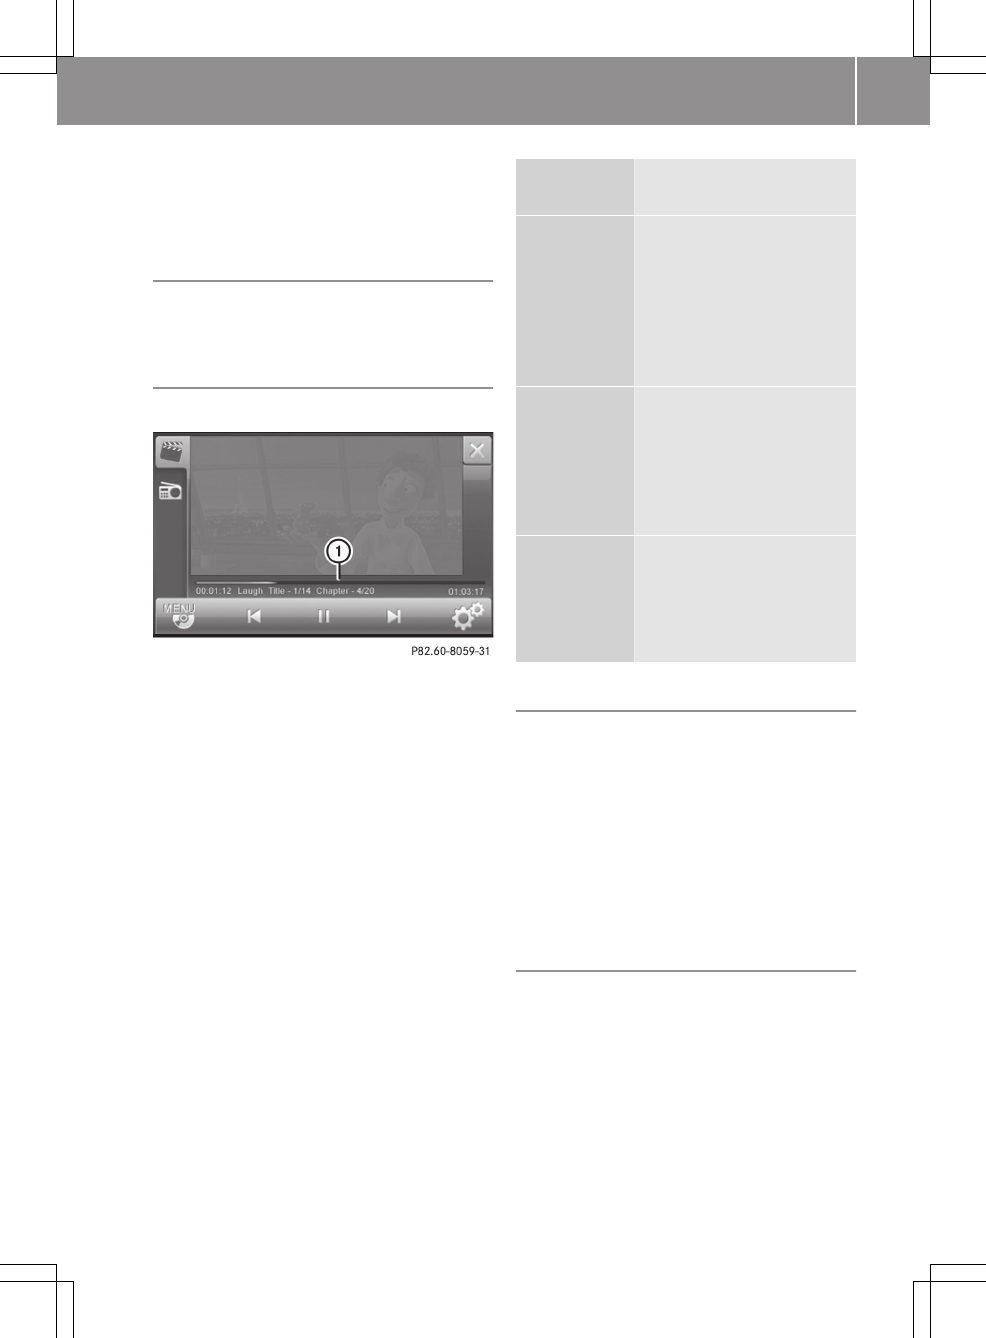
Explanation of the symbols in the navigation
menu (DVD video)
:Calling up the DVD menu
;Previous chapter
=Pause function
?Next chapter
AMakes settings
A list symbol is shown in : if a video DVD/
video CD with video files, a USB device or
a SD/MMC memory card is selected. After
confirming, you can select a video file
from the list (Y page 86).
Depending on the video source selected,
the skipping forwards/back and fast
forward/rewind functions may be available
using ; and ?.
XPress Ì in the navigation menu.
Playback starts.
Switching to full screen mode
XPress the video image when the naviga-
tion menu is displayed.
iSwitching to full screen mode takes
place after ten seconds, if the "Auto-
matic full screen" function is activated
(Y page 88).
84 >> smart high line radio.
Showing the navigation menu
XPress the video image in the full screen
mode.
Deactivating video mode
XPress 1 in the basic display.
The last active main function is shown.
Skip forwards/back
XShow the navigation menu (Y page 85).
:Playback bar
XPress somewhere on the playback bar.
Playback is continued from the selected
position.
Discs Display under the play-
back bar
Video DVD,
video CD
Line 1: elapsed playback
time (blue)
Line 2: elapsed playback
time, film track, current
track/total tracks, cur-
rent chapter/total tracks,
total playing time
Video DVD,
video CD
with video
files
Line 1: elapsed playback
time (blue)
Line 2: elapsed playback
time, video file name,
current track/total
tracks, total playing time
all other
data medi-
ums
Line 1: elapsed playback
time (blue)
Line 2: elapsed track
time, video file name,
track length
Pause function
XShow the navigation menu (Y page 85).
XPress Ë in the navigation menu.
Playback is interrupted. Ì is shown
instead of Ë.
XTo continue playback: press Ì.
Playback continues from the point where
it was interrupted. Ë is shown
instead of Ì.
Selecting a scene/chapter
This function can be used when playing a
video DVD/video CD.
If the film is divided into scenes or chap-
ters, you can select them directly while the
film is running, or skip forwards step-by-
step. Some DVDs/CDs do not permit this at
certain points (e.g. during the opening
credits).
>> smart high line radio. 85
Z

It may also be possible to select the scene/
chapter from within the menu stored on the
DVD.
XTo skip forwards or backwards: show the
navigation menu (Y page 85).
XBriefly press û or ü in the navi-
gation menu.
Selecting video files
This function cannot be selected when
playing a video DVD/video CD.
Option 1
XTo play the next/previous video file:
show the navigation menu (Y page 85).
XBriefly press û or ü in the navi-
gation menu.
If you have activated the Mix playback
option, the video files are played in a
random order. Depending on the data
medium, either all the video files on the
medium or all the files in a folder are
played.
Option 2
XShow the navigation menu (Y page 85).
XPress the list symbol at the bottom right
of the navigation menu.
A list appears.
List of video files (example)
XPress 9 or : to scroll in the list.
XPress a video file.
XPress Ì at the bottom left.
The video file is played.
iYou can move to the next higher folder
using the folder symbol at the bottom
right.
The list is exited automatically when
playback of the next video file starts.
Fast forward/rewind
XShow the navigation menu (Y page 85).
XPress and hold û or ü until the
desired place is reached.
iFast forward/rewind takes place within
the actual vide file for video DVDs/video
CDs.
Settings
Calling up the "Settings" menu
XShow the navigation menu (Y page 85).
XPress symbol d at the bottom right of
the navigation menu.
The "Settings" menu appears.
The selection options depend on the data
medium selected.
"Settings" menu (example: video DVD)
86 >> smart high line radio.

Overview
Discs Functions in the "Settings" menu
Video DVD, video CD RSelecting an audio track
RSelecting subtitles
RSearch (by track, chapter, playback time)
RRepeat A -> B
RRepeat (chapter, off)
RPlayback information
RSelecting full screen automatically
RSetting the viewing angle
Video DVD/video CD with
video files
RRandom (medium)
RRepeat (video file, medium, off)
RSelecting full screen automatically
USB device, SD/MMC memory
card
RRandom (medium)
RRepeat (video file, folder, off)
RSelecting full screen automatically
Selecting an audio track (video DVD/video
CD)
This function can be selected if the data
medium contains multiple audio tracks. If
the data medium only contains one audio
track, 1/1 is shown.
The selection options depend on the
respective data medium.
XSelect the available audio tracks in the
"Settings" menu (Y page 86) by pressing
Audio repeatedly.
Selecting subtitles (video DVD/video CD)
If the data medium supports subtitles,
these can be selected from a list. The
selection options depend on the data
medium selected.
If the data medium does not support subti-
tles, Subtitles not available is shown.
XPress Subtitles in the "Settings" menu
(Y page 86).
XPress 9 or : to scroll in the list.
XPress a subtitle.
Playback is continued with the selected
subtitles.
XTo exit a list: press &.
Search function (video DVD/video CD)
The search function can be used to continue
playback at a certain position. If the data
medium is divided into several tracks and
chapters, these can be selected directly.
Playback can also be continued from
another position by entering the playback
time.
XTo enter a track: press Search in the
"Settings" menu (Y page 86).
XPress Title in the menu.
XEnter the track number in the input menu.
XPress OK.
The corresponding track is played.
XTo enter a chapter: press Search in the
"Settings" menu.
XPress Chapter in the menu.
>> smart high line radio. 87
Z

XEnter the chapter number in the input
menu.
XPress OK.
The corresponding chapter is played.
XTo enter a playback time: press Search
in the "Settings" menu.
XPress Time in the menu.
XEnter the playback time in the input
menu, e.g. 01:05 for 1 hour and 5 minutes.
XPress OK.
Playback is continued from the corre-
sponding position.
Selecting mix
This function can be used for data mediums
with video files (video DVD/video CD), USB
devices and SD/MMC memory cards.
Option 1
XPress Mix in the "Settings" menu
(Y page 86).
Pressing repeatedly switches between
the settings in the order: Medium,
Folder and Off.
Option 2
XPress Mix.
Depending on the previous status, the
function is switched on O or off ª.
Repeat A->B (video DVD/video CD)
A film sequence can be repeated. To do this,
enter the times for the start (A) and end (B)
of the film sequence.
XPress Repeat A -> B in the "Settings"
menu (Y page 86).
XEnter the start of the film sequence (A)
in the input menu, e.g. 00:30 for
30 minutes.
XPress OK.
XEnter the end of the film sequence (B) in
the input menu, e.g. 00:38 for 38 minutes.
XPress OK.
The film sequence is repeated.
Selecting repeat
XPress Repeat in the "Settings" menu
(Y page 86).
Video DVD/video CD: you switch between
the On and Off settings.
For a video DVD/video CD; the setting
applies to a chapter.
For a data medium with video files (video
DVD/video CD), the setting either
applies to a video file or to the data
medium.
USB device, SD/MMC memory card:
depending on the previous status, the
function is either switched on O or off
ª.
For USB devices and SD/MMC memory
cards, the setting either applies to a
video file or the data medium.
Activating playback information (video
DVD/video CD)
XPress Playback information in the
"Settings" menu (Y page 86).
Depending on the previous status, the
function is switched on O or off ª.
Switching to full screen automatically
Full screen is selected automatically when
playback starts.
XPress Automatic full screen in the
"Settings" menu (Y page 86).
Depending on the previous status, the
function is switched on O or off ª.
Selecting the angle (video DVD/video CD)
This function can be selected if the data
medium contains multiple settings for the
angle. If the data medium only contains one
setting, 1/1 is shown.
XPress Angle in the "Settings" menu
(Y page 86).
88 >> smart high line radio.
Notes on video mode
Data mediums and video formats
Discs Video formats sup-
ported
Video DVD, CD
video, super CD
video with video
files
avi, divx, mpg, mpeg,
mp2, xvid
USB devices
(sticks, hard
discs)
SD/MMC memory
card
3gp, 3g2, asf, avi,
divx, m4v, mp4, mpeg,
mpg, wma, wmv, xvid,
H.264
iDue to differing video codecs (coding/
decoding process), not all video files
can be played in the "avi" or "mpeg" for-
mats.
Video
format
Explanation
3gp 3GPP multimedia file (audio/
video container format)
asf Advanced Systems Format file
(audio/video container for-
mat)
avi Audio Video Interleave (audio/
video container format)
divx DivX video file with MPEG-4
codec (DivX 6.0, 4.0) or DivX
video file with extension .avi
(DivX 3.0 and older)
dvx DivX video file
m4v
mp4
mpeg,
mpg
iTunes video format
MPEG-4 video container format
MPEG video format
wmv Windows Media Video, video
codec
Video
format
Explanation
xvid Video file with MPEG-4 codec
H.264 Standard for video compres-
sion
Notes about discs
There may be playback problems when play-
ing copied discs. There are a large variety
of discs, DVD authoring software, burning
software and burners available. This vari-
ety means that there is no guarantee that
the system will be able to play discs that
you have copied yourself.
! Do not affix stickers or labels to the
discs, They could peel off and damage the
device. Stickers can cause the disc to
bend, which can result in read errors and
disc recognition problems.
! The device is designed to hold discs
which comply with the EN 60908 standard.
You can therefore only use discs with a
maximum thickness of 1.3 mm.
If you insert thicker discs, e.g. those
that contain data on both sides (DVD on
one side and audio data on the other),
they cannot be ejected and can damage
the device.
Only use round discs with a diameter of
12 cm. Do not use discs with a diameter of
8 cm, even with an adapter.
Picture viewer
General notes
Using the smart high line radio, you can
view pictures in various file formats from
different storage mediums individually or
as a slide show.
>> smart high line radio. 89
Z
Discs Supported picture
formats
Video DVD, CD
video and super CD
video with video
files
jpeg, jpg
USB devices
(sticks, hard discs)
SD/MMC memory
card
jpeg, jpg, bmp, tif,
gif, png
Picture format Explanation
jpeg, jpg JPEG image file
bmp Bitmap image file
tif Tagged Image File
gif Graphical Inter-
change Format file
png Portable Network
Graphic
Function restrictions
If you would like to call up the picture
viewer, you first need to:
Xswitch off the navigation (Y page 25).
Xapply the parking brake (see the vehicle
Owner's Manual).
The function is not available while the
vehicle is in motion. The For safety pic‐
ture viewing is not possible while
driving or navigating. Photo viewer
will be automatically closed ! mes-
sage appears.
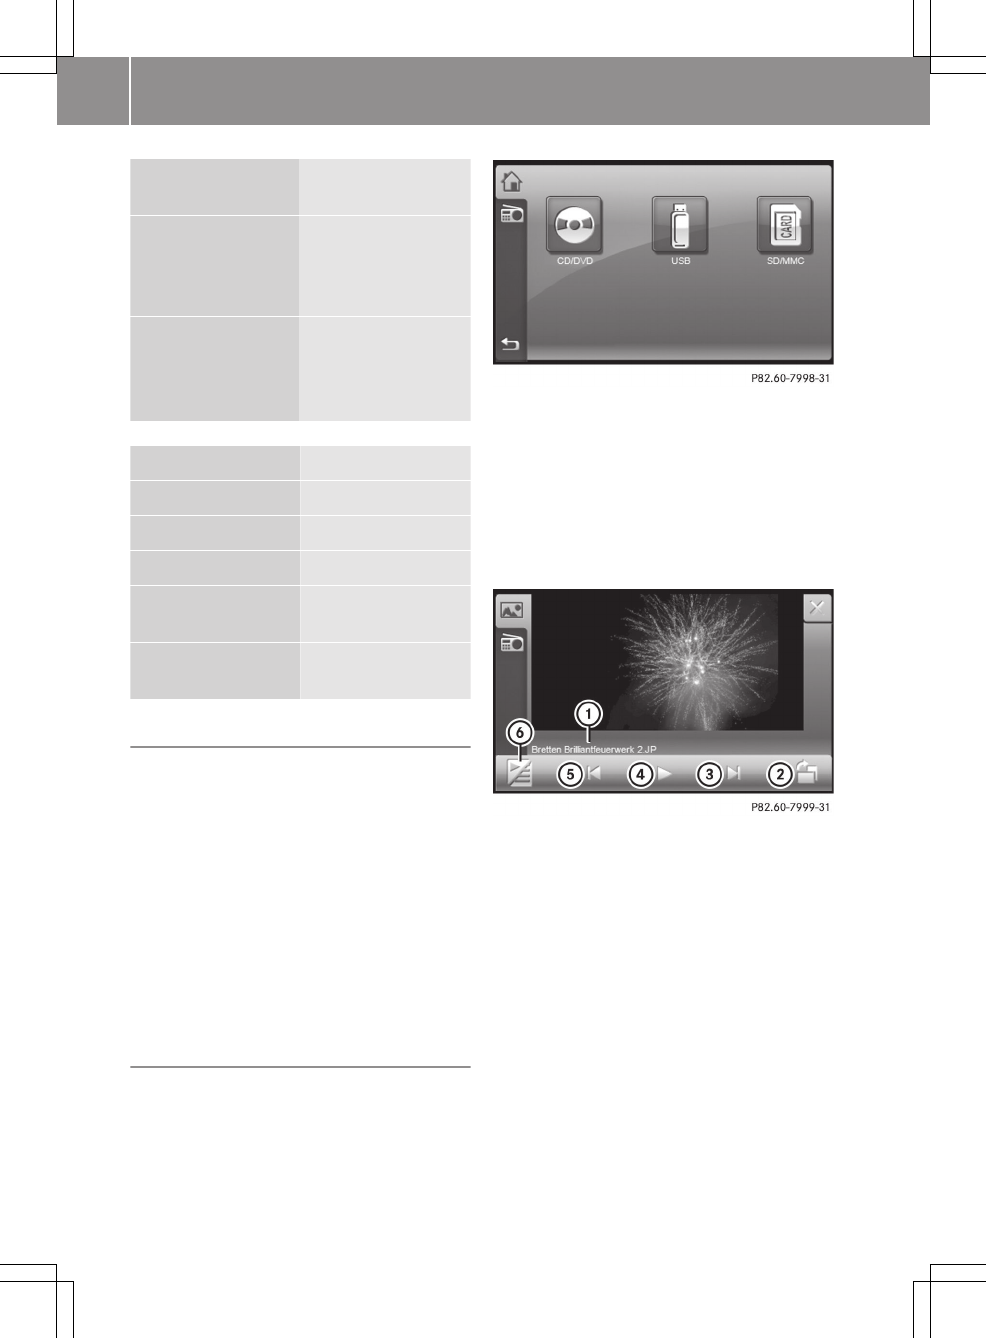
Calling up the picture viewer
XSelect Extras from the main menu
(Y page 8).
XPress Photo in the menu.
A menu appears for the selection of a
storage medium.
XSelect the desired storage medium.
If there are pictures in one of the speci-
fied file formats available on the stor-
age medium, the first picture found is
displayed. The search takes place alpha-
betically, starting in the upper direc-
tory and then in the folder names that
contain picture files.
Picture viewer
:Picture file name
;Rotates the picture clockwise
=Displays the next picture
?Starts a slide show
ADisplays the previous picture
BDisplays the content of the folder
XTo display full screen: press on the pic-
ture.
XTo show the menu: press on the picture
again.
90 >> smart high line radio.
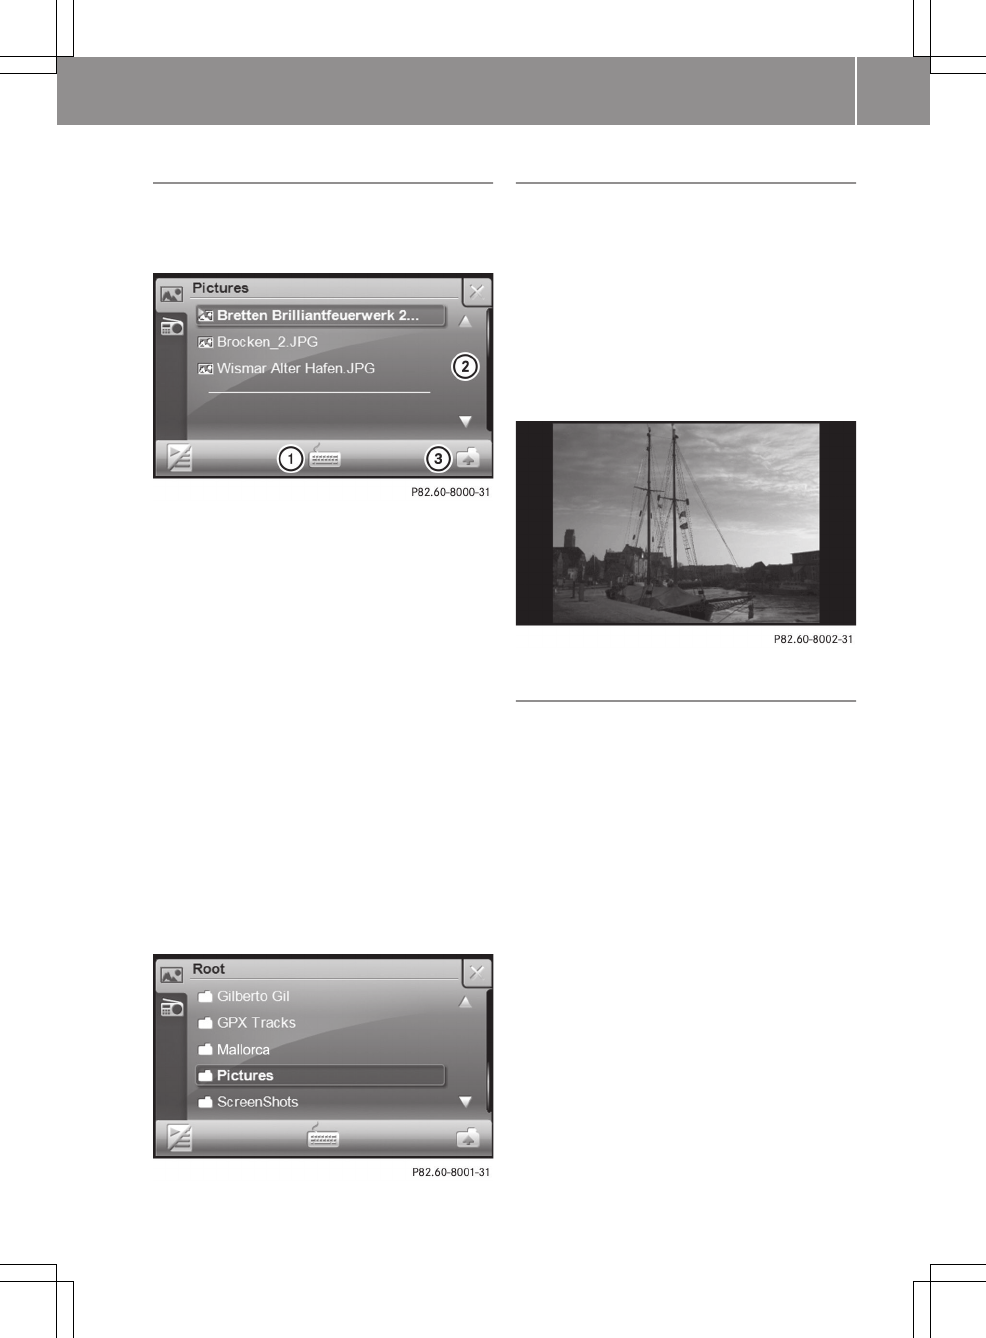
Picture lists
XPress B in the picture viewer
(Y page 90).
The list of pictures appears.
:Searches for a picture file
;Scrolls in the list
=Selects the next highest folder level
XTo select a picture file: press 9
or : to scroll in the list.
XSelect the desired picture file.
XTo search for a picture file: press :.
An input menu appears.
XEnter up to three characters from the
beginning of the file name. There is a
description of how to enter characters in
the "Entering characters in the phone
book" chapter (Y page 13).
XPress OK.
The search starts.
XTo select the next highest folder: press
folder symbol =.
Displaying pictures
You can view the pictures individually or
as a slide show.
XTo display the next or previous picture:
press û or ü in the picture viewer
(Y page 90).
XTo start a slide show: press Ì in the
picture viewer.
XTo close the slide show: press the dis-
play.
Rotating pictures
XDisplay the picture.
XPress on the symbol at the bottom right
of the picture viewer (Y page 90).
The picture is rotated clockwise. This
setting is not saved.
>> smart high line radio. 91
Z

92

This equipment should be installed and operated with a minimum distance of 20 centimeters between the radiator and
Publication details
Internet
Further information about smart vehicles
and about Daimler AG can be found on the
following websites:
www.smart.com
www.daimler.com
Editorial office
You are welcome to forward any queries or
suggestions you may have regarding this
manual to the technical documentation
team at the following address:
Daimler AG, HPC: R822,
D-70546 Stuttgart, Germany
Not to be reprinted, translated or other-
wise reproduced, in whole or in part, with-
out the written permission of Daimler AG.
As at 06.04.2010
This device complies with Part 15 of the FCC Rules. Operation is subject to the following two conditions:
(1) this device may not cause harmful interference, and (2) this device must accept any interference received,
including interference that may cause undesired operation.
Warning: Changes or modifications to this unit not expressly approved by the party responsible for compliance
could void the user’s authority to operate the equipment.
This equipment complies with FCC RF radiation exposure limits set forth for an uncontrolled environment.
your body.

É45158483825ËÍ
www.smart.com smart - A Daimler brand
4515848382
Order no. 6522 6814 02
Part no. 451 584 83 82
Edition ÄJ 2010/Ma
