SKYPINE ELECTRONICS MW4 Marine Audio Systems User Manual
SKYPINE ELECTRONICS (SHEN ZHEN) CO., LTD. Marine Audio Systems
Contents
- 1. User Manual 1
- 2. User Manual 2
- 3. User Manual
User Manual

Owner’s Manual
Mode d’ emploi et manuel
Manual de instrucciones
0:
MARINE BLACK BOX SOURCE UNIT WITH J1939
2 3
Owner’s Manual
English
&/$5,21352'8&75(*,675$7,21,1)250$7,21
For USA and Canada only
www.clarion.com
Dear Customer:
Congratulations on your purchase of a Clarion Marine Electronic Product. We are
Confident that you will enjoy your Clarion experience.
There are many benefits to registering your product. We invite you to visit our
website at www.clarion.com to register your Clarion product.
We have made product registration simple with our easy to use website.
The registration form is short and easy to complete. Once you are registered,
We can keep you informed of important product information.
Register at www.clarion.com - It is easy to keep your Clarion product up to date.
Contents
1. FEATURES.......................................................................................................................................3
2. PRECAUTIONS................................................................................................................................3
3. CAUTIONS ON HANDLING.............................................................................................................3
4. DISPLAY CONTROLLER BUTTONS ..............................................................................................4
About the Registered Marks, etc. ....................................................................................................4
Name of Buttons and their Functions ...............................................................................................5
5. OPERATIONS ..................................................................................................................................7
Radio (AM/FM/Weather Band) Operation ........................................................................................8
SiriusXM Satellite Radio Operation ..................................................................................................9
iPod Audio Operation ......................................................................................................................15
iPod Video Operation ......................................................................................................................24
USB 1 and USB 2 Operation ..........................................................................................................31
Pandora Operation .........................................................................................................................35
Settings ...........................................................................................................................................38
0: Information ....................................................................................................................38
System Reset............................................................................................................................39
Clock ........................................................................................................................................39
Date .........................................................................................................................................40
Bluetooth ..................................................................................................................................41
2-Zone Operation ...........................................................................................................................47
AUX 1 and AUX 2 Operation .............................................................................................................49
Camera Operation ..........................................................................................................................50
Bluetooth Audio Operation .............................................................................................................51
Phone Operation ............................................................................................................................56
Audio Settings (Button) ...................................................................................................................66
Display Settings (Button) ................................................................................................................70
Favorites (Button) ...........................................................................................................................73
Understanding the Graphical User Interface (GUI) ........................................................................74
6. TROUBLESHOOTING ...................................................................................................................77
7. SPECIFICATIONS ..........................................................................................................................80
8. INSTALLATION AND WIRE CONNECTIONS DIAGRAM .............................................................81
Owner’s Manual
English
1. FEATURES
2. PRECAUTIONS
* For your safet
y
, while boating, keep the volume to a level at which exte
r
nal sounds can be heard.
WARNING
1. This unit has precision pa
r
ts inside. Even in the event that trouble arises, never open the case,
disassemble the unit, or lubricate the pa
r
ts.
2. This equipment has been tested and found to comply with the limits for a Class B digital device,
pursuant to Pa
r
t 15 of the FCC Rules.
These limits are designed to provide reasonable protection against harmful interference in a
residential installation. This equipment generates, used, and can radiate radio frequency energy
and, if not installed and used in accordance with the instructions, may cause harmful interference to
radio communications. However, there is no guarantee that interference will not occur in a pa
r
ticular
installation. If this equipment does cause harmful interference to radio or television reception, which
can be determined by turning the equipment off and on, the user is encouraged to consult the
dealer or a experienced radio/TV technician for help.
3. CAUTIONS ON HANDLING
- Protect product from water. Do not submerge or expose the product directly to water, as this can cause
electrical sho
r
ts, fire or other damages.
- Protect from high temperature. Exposure to direct sunlight for an extended period of time can produce
ve
r
y high temperature in your vessel. Cool down the interior before use.
,1)250$7,21)2586(56
CHANGES OR MODIFICATIONS TO
THIS PRODUCT NOT APPROVED BY
THE MANUFACTURER WILL VOID THE
WARRANTY AND MAY VIOLATE FCC
REGULATIONS.
- SiriusXM-Ready™ (SiriusXM Connect Tuner and Subscription sold separately)
- Bluetooth (HFP, A2DP, Aptx, AVRCP 1.4, PBAP, SSP, SPP)
- Made for iPod® Made for iPhone®
USB iPod/iPhone Audio and Video Compatible (CCA750 Required for iPod Video)
- 2-Zone (Independent Zone Source Control)
- SVC (Source Volume Control), Independent Volume Control for each source
-
T
wo Audio/Video RCA Inputs
- Video
Output
- Dedicated Rear Camera RCA Input
- Global AM/FM
T
uner with RDS
- Weather Band Radio
- Water Resistant Chassis and Display Controller
- Dual 2.1A USB Po
r
ts
- OEM Steering Wheel Interface Ready
- Clarion Wired Remote Ready (MW1/MW2/MW4)
- 50W x 4 Built-In MOSFET Amplifier
0:
4 5
Owner’s Manual
English
4. DISPLAY CONTROLLER BUTTONS
$ERXWWKHUHJLVWHUHGPDUNVHWF
“Made for iPod” means that an electronic accesso
r
y has been designed to connect specifically to iPod and has been ce
r
tified by the
developer to meet Apple performance standards.
Apple is not responsible for the operation of this device or its compliance with safety and regulato
r
y standards.
iPod is a trademark of Apple Inc., registered in the U.S. and other countries.
Sirius, XM and all related marks and logos are registered trademarks of Sirius XM Radio Inc. All Rights reserved.
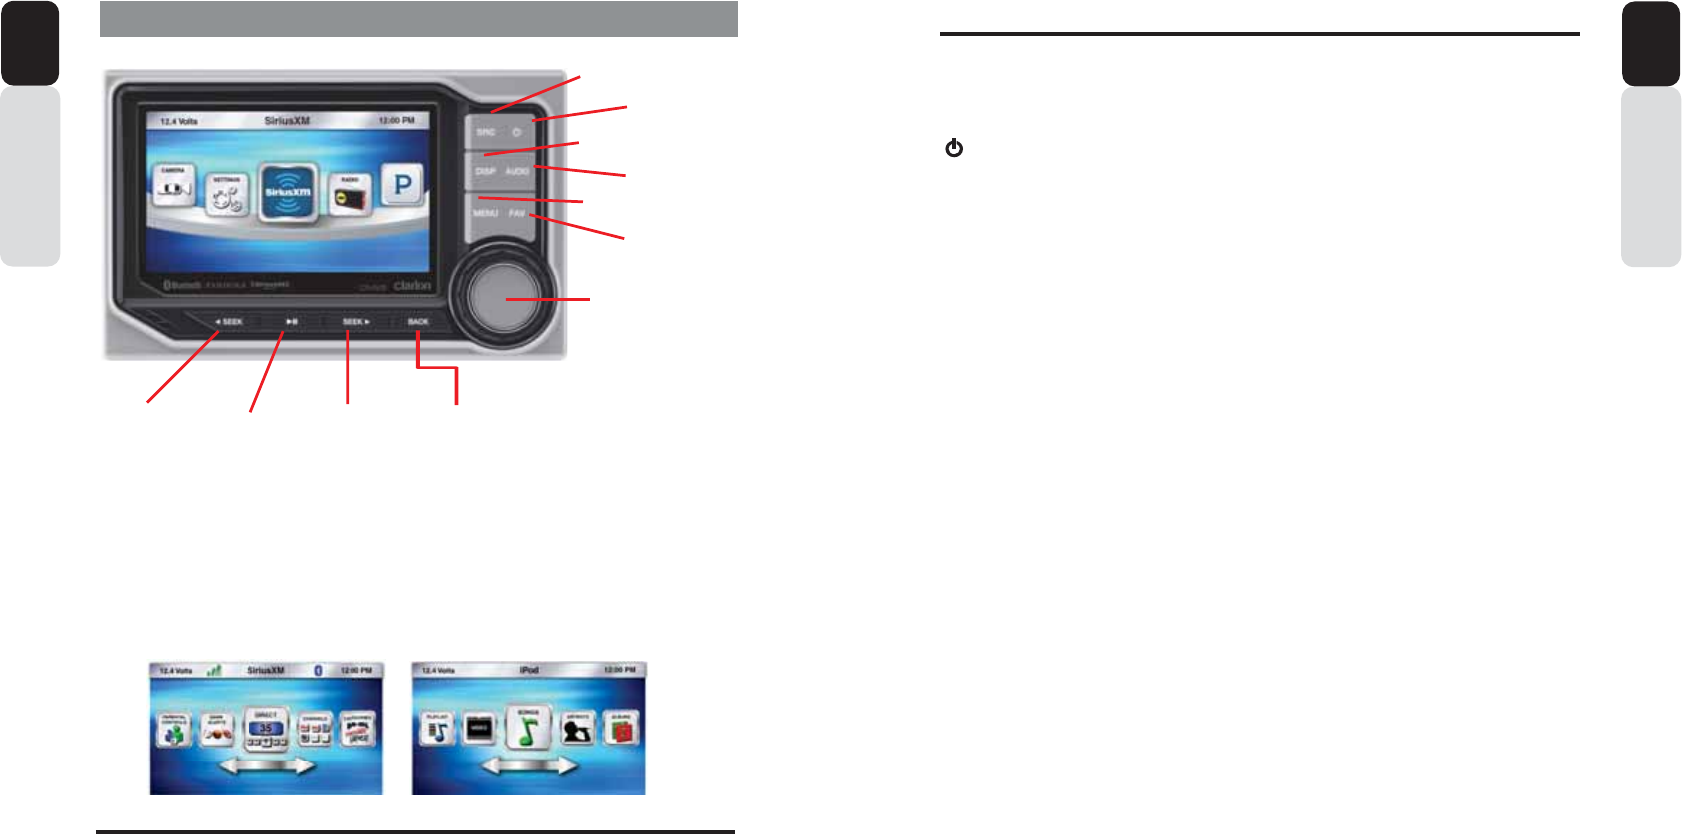
Volume Knob
Functions:
Rotate Volume Knob = Adjust Volume Level (Play Screens).
Press in on Volume Knob = Mute (Play Screens).
Rotate Volume Knob = Scroll Through Options (Menus).
Press in on Volume Knob = Select/Enter (Menu Options).
Options Arrow
This double sided arrow will only appear when additional options are available.
Owner’s Manual
English
1DPHRI%XWWRQVDQGWKHLU)XQFWLRQV
[ ] Power Button
- Press and release button to turn ON.
- Press and Hold for Three Seconds to turn OFF.
Volume Knob
- Rotate Volume Knob Clockwise to increase
Volume.
- Rotate Volume Knob Counter Clockwise to
Decrease volume.
Mute
- Press In and Release Volume Knob to Mute
and Rotate the Volume Knob to Un-Mute the
Audio.
[SRC] Source Button
- Press SRC button to display the Main Menu.
- Use Volume Knob to Scroll through Source
Options, then Press In and Release Volume
Knob to Select Source.
[MENU] Menu Button
- Press to access additional options.
- Radio (AM/FM/WB/LO/DX).
- SiriusXM (Search Functions, Direct, etc.).
- iPod (Audio, Video Menu options, Search,
Playlists, A
r
tists, Songs, Genre, etc.).
- USB (Folder, Song, Repeat, etc,).
- Bluetooth (HFP-ON/OFF, Pairing, etc.).
[AUDIO] Audio Button
- Press to access Audio adjustment settings.
Use Volume Knob to adjust by rotating
Clockwise or Counter-Clockwise, then Press
in and release Volume Knob to save Adjusted
setting.
-
T
reble/Mid/Bass
(12kHz/1k/50Hz).
Adjust Levels from “-10” to “+10”.
- EQ
Adjust Frequency for each of the 5-Bands.
- Balance/Fader
Adjust sound balance for Left and Right.
Adjust sound fader for Front and Rear.
- Subwoofer
Subwoofer Volume from “-10” to “+10).
Subwoofer Frequency (50/75/100/THROUGH).
Subwoofer Phase (Normal and Reverse).
1RWH
Be sure to read this chapter while referring to the diagram in chapter “4. DISPLAY CONTROLLER BUTTONS”
[AUDIO ] Audio Button
- 2-Zone
Adjust volume level for Zone 1, Zone 2 and Both
Zones.
- SVC (Source Volume Control)
Adjust volume level for each source independently
- Radio
- iPod
- Phone
- SiriusXM
- Bluetooth Audio
- USB
- AUX
[DISP] Display Button
- Press to access Display adjustment settings
- Clock
- ON = Large Clock will appear After 25 seconds
of no action
- Change Clock Font Color (White,
Yellow, Red
and Reverse)
- OFF = Large Clock will Not appear after 25
Seconds of no action
- Default = ON
- Status Bar
- Change Status Bar to appear at
T
op or Bottom
of Screen
- Default =
T
op
- Mode
Change Display preset color settings from:
- Day Mode = Brighter Colors
Night Mode = Darker Colors
Default = Day Mode
- Brightness
Adjust display brightness from “-10” to “+10”
[FAV] Favorites Button
- Press to access saved stations/channels
- Save up to 50 favorites
- SiriusXM
- Radio (AM/FM/Weather Band)
- Pandora
- Phone Contact
- Paired and Connected Phone
- Contacts have been synced
-
You can now save contact as a favorite
Example: Home, Work, etc.
Previous Song
Seek Back Play / Pause Back
Previous Screen
Next Song
Seek Forward
Favorites
Volume
Option Scroll
Enter Selection
Menu Options
Audio Settings
Display Options
Power
ON / OFF
Source
Main Menu
6 7
1RWH
Be sure to read this chapter while referring to the diagram in chapter 4 “DISPLAY CONTROLLER BUTTONS”
Owner’s Manual
English
[ SEEK] Seek Back Button
- Press and release button to go back to previous song.
- Press and Hold for Three Seconds to scan back through song, release and song will continue playing.
[SEEK ] Seek Forward Button
- Press and release button to advance to next song.
- Press and Hold for Three Seconds to scan through song, release and song will continue playing.
[ ] Play / Pause Button
- Press to PAUSE current song.
- When track is PAUSED, press again to continue playing current song (iPod, Bluetooth Audio, USB,
and Pandora).
[BACK] Back Button
- Press to go back to previous Menu or Settings Screen.
- Press to backwards in multiple Menu Screens.
- Press to return to current source play screen from Menu or Settings Screen.
Owner’s Manual
English
5. OPERATIONS
CAUTION
1RWH
- Start the engine before using this unit.
- Be careful about using this unit without the engine running. If used for long periods of time without the
engine running to charge the batteries, you may not be able to start the engine and this can reduce the
life and performance of the batteries. A Warning will appear when voltage is 10V or below.
When the unit is turned ON, and the volume has been increased to the maximum level
May cause damage to your hearing.
Please be aware and cautious of the volume level at all times.
%DVLF2SHUDWLRQV
7XUQLQJ21DQG2))WKH6\VWHP
6HOHFWLQJD6RXUFH
1. Rotate the Volume Knob Clockwise to increase the volume level.
2. Rotate the Volume Knob Counter-Clockwise to decrease the volume level.
$GMXVWLQJWKHYROXPH
1. Press the [SRC] button to display the Main Menu Screen.
* External add-on accessories will be required in order to use that source.
- SiriusXM requires a SiriusXM Connect Tuner and Subscription (sold separately).
- Pandora requires a iPod or iPhone to be connected to the 0:.
- CCA750 is required for iPod Video Playback.
- OEM Steering Wheel Interface Module is required for the steering wheel buttons to operate
the 0: audio features.
2. Use the Volume Knob to scroll through the source carousel.
3. Press in on the Volume Knob to select the source displayed in the middle of the source
Carousel.
* For your safet
y
, while boating, keep the volume to a level at which external sounds can be heard.
CAUTION
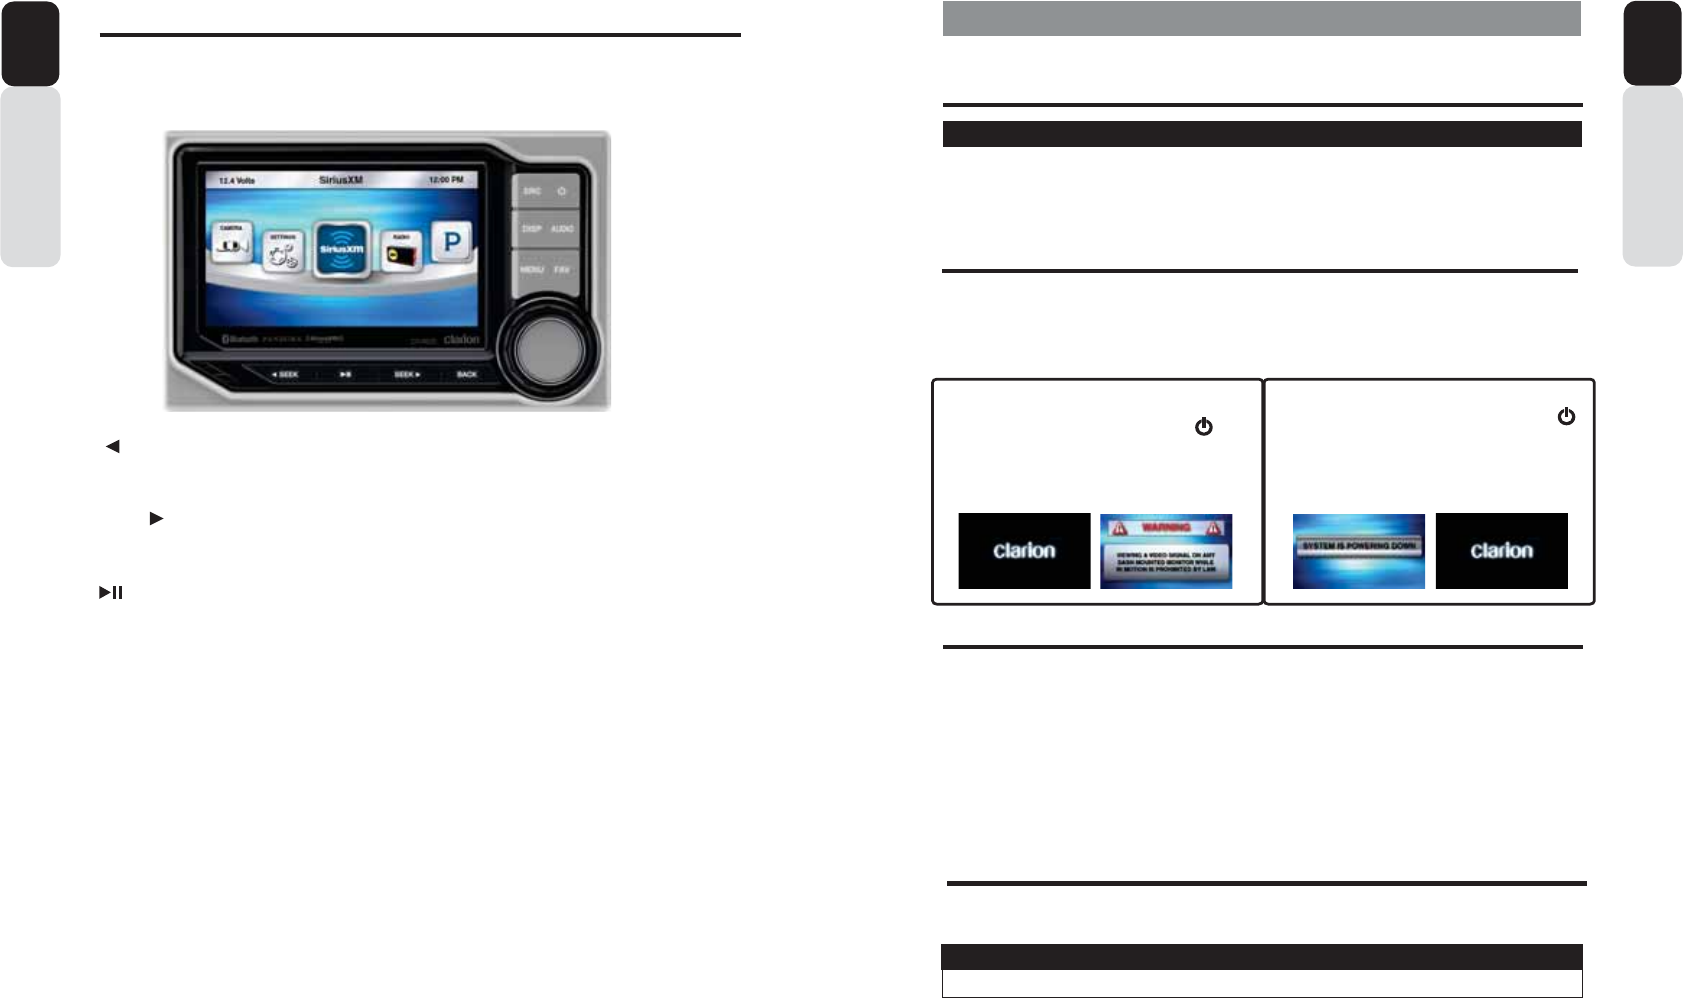
ON
1. Sta
r
t the engine.
2. Press and Release the Power Button. [ ]
3. The Blue LED trim around the Volume Knob
will light up and the 0: Display Controller.-
Clarion Splash Screen (10 Seconds).
- Viewing Video Disclaimer (5 Seconds).
OFF
1. Press and Hold the Power Button for 3 sec. [ ]
2. The Blue LED trim ring around the Volume Knob
will turn OFF.
- System in Powering Down Screen (5 Seconds).
- Clarion Splash Screen (10 Seconds).
1DPHRI%XWWRQVDQGWKHLU)XQFWLRQV

8 9
5DGLR$0)0:HDWKHU%DQG2SHUDWLRQ
Owner’s Manual
English
[ SEEK] Seek Back Button
- Press and release button to tune down in frequency step by step.
- Press and Hold for Three Seconds to scan back to the previous strongest station frequency.
[SEEK ] Seek Forward Button
- Press and release button to tune up in the frequency step by step.
- Press and Hold for Three Seconds to scan to the next strongest station frequency.
[MENU] Menu Button
- Press to select AM, FM, Weather Band, Local (LO) or Distance (DX).
- Use the volume knob to scroll through options.
- Press in on the volume knob to select option in the middle of the carousel.
- AM (Amplitude Modulation).
- FM (Frequency Modulation).
- Weather Band (NOAA - National Oceanic and Atmospheric Administration).
- Local (LO).
- Distance (DX).
- Press the Region Setting option to select the Region.
- Now a pop up window will appear providing 4 options.
- Other Countries
- USA
- Europe
- Australia
*Default=USA
- Use the volume knob to toggle between region options.
- Press in on the volume knob to select your choice.
- Press the BACK button to return to the previous Screen.
Note: Sirius XM will be available in source screen when the Tuner region is set to USA. Pandora will be
available when Region is set to USA/Australia. Else those options will be greyed out in Source list.
[BACK] Back Button
- Press to go back to previous Menu or Settings Screen.
- Press to backwards in multiple Menu Screens.
- Press to return to current source play screen from Menu or Settings Screen.
Owner’s Manual
English
6LULXV;06DWHOOLWH5DGLR2SHUDWLRQ
Only SiriusXM® brings you more of what you love to listen to, all in one place. Get over 140 channels,
including commercial-free music plus the best sports, news, talk, comedy and entertainment. Welcome
to the world of satellite radio. A SiriusXM Vehicle Tuner and Subscription are required. For more
information, visit www.siriusxm.com.
Activating your SiriusXM Subscription
After installing your SiriusXM Connect Vehicle Tuner and antenna, power on your Clarion 0: Marine
Source Unit and select SiriusXM mode. You should be able to hear the SiriusXM preview channel on
Channel 1. If you cannot hear the preview channels, please check the installation instructions to make
sure your SiriusXM Connect tuner is properly installed.
After you can hear the Preview channel, tune to Channel 0 to find the Radio ID of your tuner. In addition,
the Radio ID is located on the bottom of the SiriusXM Connect Vehicle Tuner and its’ packaging. You will
need this number to activate your subscription. Write the number down for reference.
Note: the SiriusXM Radio ID does not include the letters I, O, S or F.
In the USA, you can activate online or by calling SiriusXM Listener care:
ŖVisit www.siriusxm.com/activatenow
ŖCall SiriusXM Listener Care at 1-866-635-2349
For Canadian Subscriptions, please contact:
ŖVisit www.siriusxm.ca/activatexm
ŖCall XM customer Care at 1-877-438-9677
As part of the activation process, the SiriusXM satellites will send an activation message to your tuner.
When your radio detects that the tuner has received the activation message, your radio will display:
“<<Subscription Updated>>”. Once subscribed, you can tune to channels in your subscription plan. Note,
the activation process usually takes 10 to 15 minutes, but may take up to an hour. Your radio will need to
be powered on and receiving the SiriusXM signal to receive the activation message.
10 11
6LULXV;06DWHOOLWH5DGLR2SHUDWLRQ
Owner’s Manual
English
Owner’s Manual
English
6LULXV;06DWHOOLWH5DGLR2SHUDWLRQ
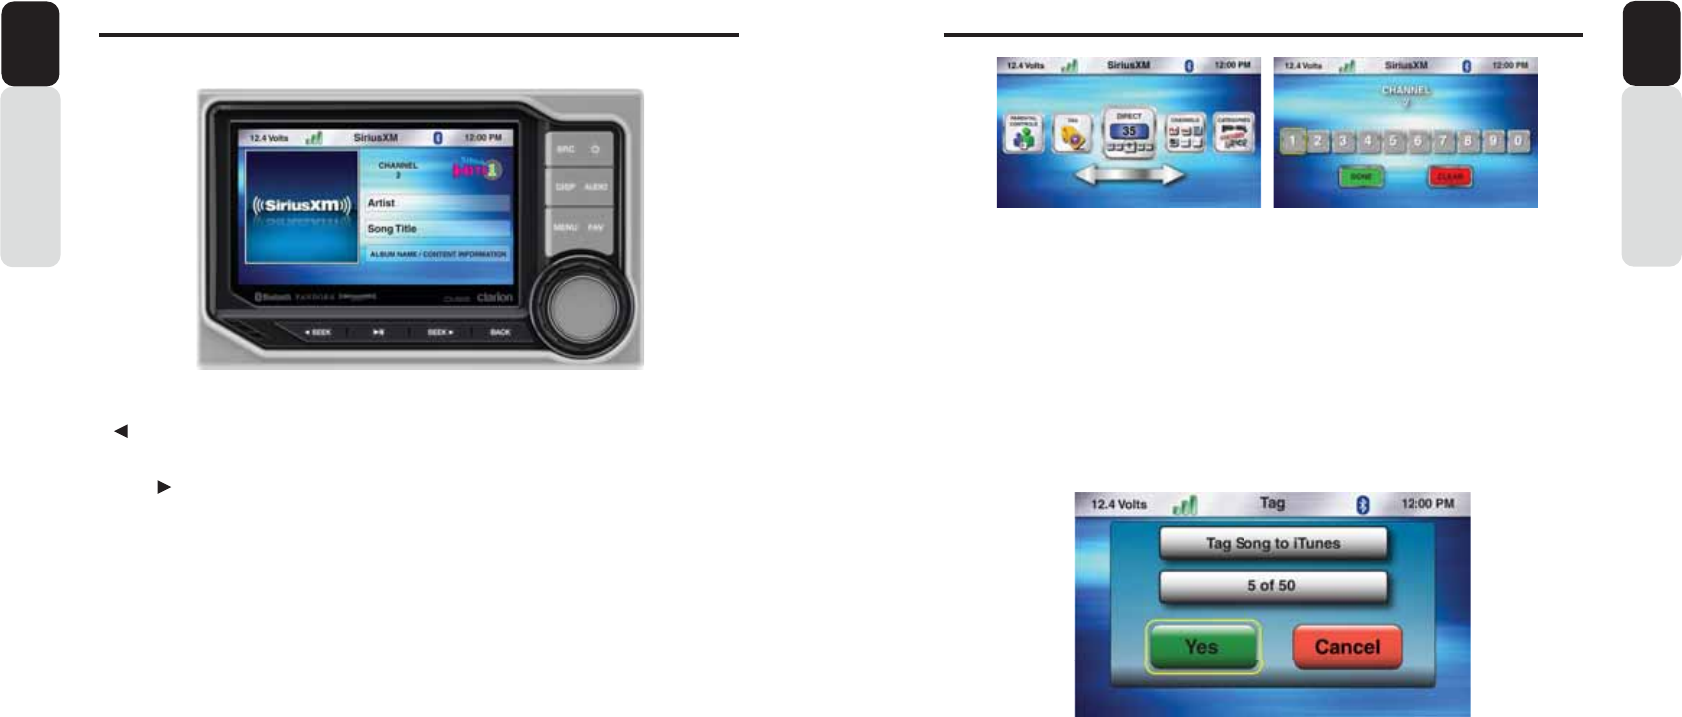
Direct Channel Tuning
1. From the SiriusXM Play Screen, Press the MENU Button.
2. Use the volume knob to scroll through options until the Direct Icon is in the middle of the carousel.
3. Press in on the volume knob to select Direct.
4. Now a pop-up window will appear with a numbers for you to enter to directly tune to a SiriusXM
Channel.
5. Use the volume knob to scroll through the numbers until the halo is around the number you want
t
o
select.
6. Press in on the volume knob to select that number.
7. If the channel you would like to tune to is a single digit number, then you can proceed to the bottom
of the pop-up window and select OK. If you would like to tune to a two or three digit channel, then
proceed by selecting the additional numbers needed.
8. Once all the channel numbers are displayed in the window, scroll down to the bottom of the pop-up
window and select OK.
9. Now you will return to the SiriusXM Play Screen and tuned to the channel entered.
[ SEEK] Seek Back Button
- Press and release button to tune to the previous channel.
[SEEK ] Seek Forward Button
- Press and release button to tune to the next channel.
[MENU] Menu Button
- Press to select Direct Channel, Parental Controls, Channel Search, Category Search and Tag.
- Use the volume knob to scroll through options.
- Press in on the volume knob to select option in the middle of the carousel.
- Direct (Tune directly to channel by entering channel number).
- Parental Controls (Lock Mature Content Channels, Manage Password).
- Channel Search (Search by Number or Letters).
- Category Search (Seach by Number or Letter).
- Tag (Tag song to iPod/iPhone to purchase from iTunes when device is connected to iTunes).
- Settings.
[BACK] Back Button
- Press to go back to previous Menu or Settings Screen
- Press to backwards in multiple Menu Screens
- Press to return to current source play screen from Menu or Settings Screen
iTunes® Song Tagging
1. From the SiriusXM Play Screen, Press the MENU Button.
2. Use the volume knob to scroll through options until the Tag Icon is in the middle of the carousel.
3. Press in on the volume knob to select Tag.
4. Now a pop-up window will appear asking you to confirm to Tag the current song to your iPod/iPhone.
5. You will also see how many songs you can Tag are left (50 total).
6. Select “YES” to Tag the song or “CANCEL” and the song will not be Tagged.
7. When Tag limit is reached, a pop-up showing “Memory Full, Connect iPod” will be displayed.
8. You will also see “Already Tagged” pop up on selecting YES option if the song is already tagged.
9. Once the song is Tagged, you will return to SiriusXM Play Screen.
* You will need to connect your iPod/iPhone to your home PC or MAC, launch iTunes to purchase the
Tagged Songs that have been saved to your iPod/iPhone.
** Tag icon will be greyed out when the song is not taggable or when the song has already been tagged.
*** Tag ID’s will remain on the 0: until the iPod/iPhone is connected. They will automatically be
deleted after they are transferred.
12 13
6LULXV;06DWHOOLWH5DGLR2SHUDWLRQ
Owner’s Manual
English
Owner’s Manual
English
6LULXV;06DWHOOLWH5DGLR2SHUDWLRQ
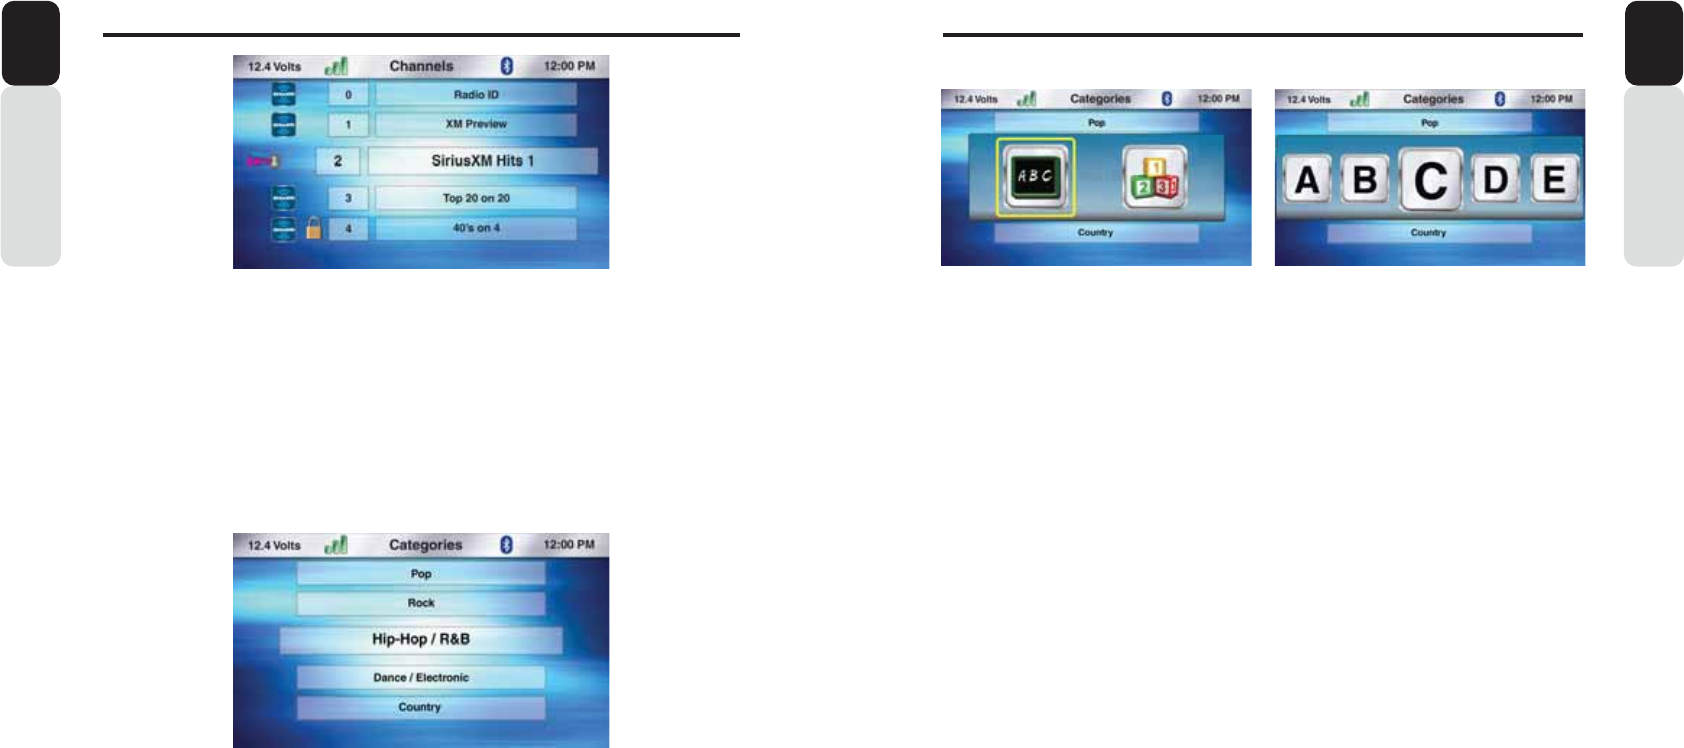
Channel List Tuning
1. From the SiriusXM Play Screen, Press the MENU Button.
2. Use the volume knob to scroll through options until the Channels Icon is in the middle of the
carousel.
3. Press in on the volume knob to select Channels.
4. The list of SiriusXM Channels will now appear.
5. You can use the volume knob to scroll up or down the list of SiriusXM Channels.
6. Once the Channel you would like to listen to is in the center middle of the screen,
7. Press in on the volume knob to tune to that Channel.
8. If you select a Channel with a “Lock”, then this Channel can not be selected until the correct
password is entered.
* See Parental Controls for instructions to Set a Password, Change Password or to Lock Channels.
9. 0: DC shall display SiriusXM Category list on Single press of BACK Button when it is displaying
selected category channel
Find a Channel by Category
1. From the SiriusXM Play Screen, Press the MENU Button.
2. Use the volume knob to scroll through options until the Categories Icon is in the middle of the carousel.
3. Press in on the volume knob to select Categories.
4. The list of SiriusXM Categories will now appear.
5. You can use the volume knob to scroll up or down the list of SiriusXM Categories.
6. Once the Category you would like is in the center middle of the screen,
7. Press in on the volume knob to select to that Category.
8. 0: DC shall display SiriusXM Menu Options on Single press of BACK Button when it is displaying
category list.
9. Once a Category is selected, list of channels from the selected Category will appear. Browse through
the list of channels and select a Channel. Then it starts playing the selected Channel.
10. Press the BACK Button to go back to SiriusX category list when it is displaying selected category
channel.
Channel and Category Sort by ABC or 123
1. From the SiriusXM Play Screen, Press the MENU Button.
2. Use the volume knob to scroll through options until the Channels/Categories Icon is in the middle of
the carousel.
3. Press in on the volume knob to select Channels/Categories.
4. The list of SiriusXM Channels/Categories will now appear.
5. Press the MENU Button.
6. Now a pop-up window will appear with two options to choose from: “ABC” or “123”.
- “ABC” is sorted alphabetically
- “123” is sorted by channel number.
7. Use the volume knob to toggle between the two options by moving the halo around the ABC icon.
8. Press in on the volume knob to select “ABC”.
9. Now a pop-up window will appear with Letters in icons.
10. Use the volume knob to scroll through the Letters until the Letter you want is in the middle of the
carousel.
11. Press in on the volume knob to select that Letter.
12. You will now see a list of Channels/Catego
r
y appear based on your letter or number selection.
Browse through the list of channels/catego
r
y and select a channel. Then it sta
r
ts playing the channel.
If there is no match found for the selected alphabet/number, then pop up saying the same will be
displayed.
13. Use the volume knob to scroll through the list of Channels.
14. When the Channel you would like to tune to is in the middle of the screen.
15. Press in on the volume knob to select that channel.
16. Now you will return to the SiriusXM Play Screen and tuned to the channel entered.
Note: In all search option (for all source option) , Searching is restricted to sta
r
ting Alphabet/Number only.

14 15
6LULXV;06DWHOOLWH5DGLR2SHUDWLRQ
Owner’s Manual
English
[ SEEK] Seek Back Button
- Press and release button to go back to previous song.
- Press and Hold for Three Seconds to scan back through song, release and song will continue playing.
[SEEK ] Seek Forward Button
- Press and release button to advance to next song.
- Press and Hold for Three Seconds to scan through song, release and song will continue playing.
[ ] Play / Pause Button
- Press to PAUSE current song.
- When track is PAUSED, press again to continue playing current song(iPod, Bluetooth Audio, USB, and
Pandora).
[BACK] Back Button
- Press to go back to previous Menu or Settings Screen.
- Press to backwards in multiple Menu Screens.
- Press to return to current source play screen from Menu or Settings Screen.
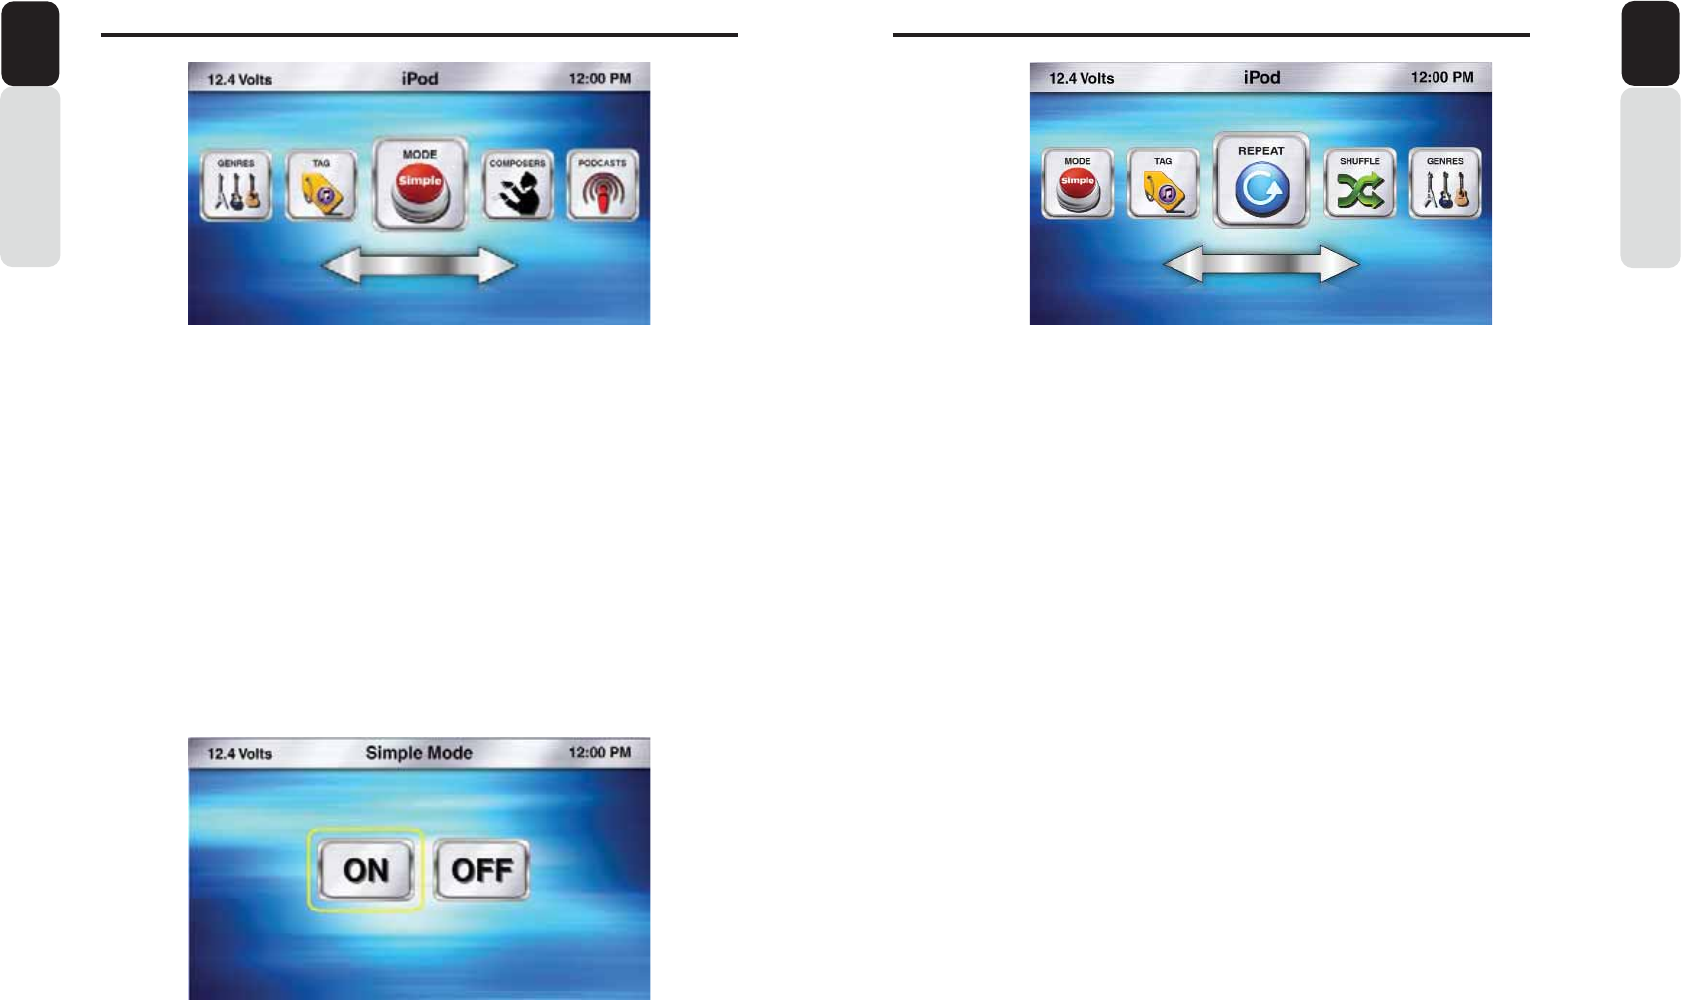
[MENU] Menu Button
Press to access additional options.
- Playlists (Search by “ABC” or “123”).
- Songs (Search by “ABC” or “123”).
- Artists (Search by “ABC” or “123”).
- Genre (Search by “ABC” or “123”).
- Composers (Search by “ABC” or “123”).
- Podcasts (Search by “ABC” or “123”).
- Simple Mode (ON or OFF) = Operation and Control directly from iPod/iPhone.
- Tag (Tag song to iPod/iPhone for purchase through iTunes).
- Repeat (Song, Playlist, All, Off).
- Shuffle (ON or OFF).
L3RG$XGLR2SHUDWLRQ
Owner’s Manual
English
Parental Controls
1. From the SiriusXM Play Screen, Press the MENU Button.
2. Use the volume knob to scroll through options until the Parental Controls Icon is in the middle of the
carousel.
3. Press in on the volume knob to select Parental Controls.
4. Now a pop-up window will appear with two options to choose from: “Lock Mature Content Channels”
or “Manage Password”.
- “Lock Mature Content Channels” locks the ability to tune to the “Mature Content” Channels.
- “Manage Password” Provides the ability to Set a Password or to Change the Password to lock the
Mature Content Channels.
- The default passcode set for the Parental lock is 1111. This can be changed with the help of
Manage Password.
Lock Mature Content Channels
1. Press in on the volume knob to select “Lock Mature Content Channels”.
2. A pop-up window will now appear asking you if you want to turn Lock the Mature Content Channels
feature “ON” or “OFF”.
3. Select “ON” by pressing in on the volume knob, to turn this feature “ON”.
4. Now you will be asked to enter in a 4-digit Lock Code to Lock the Mature Content Channels.
5. Using the volume knob, scroll through the numbers and Press in on the volume knob to select a
4-digit Lock Code.
* Write down the 4-digit Lock Code for future reference.
6. Now the SiriusXM Mature Content Channels are Lock and can not be listened to.
Unlock Mature Content Channels
1. Press in on the volume knob to select “Lock Mature Content Channels”.
2. A pop-up window will now appear asking you if you want to turn Lock the Mature Content Channels
feature “ON” or “OFF”.
3. Select “OFF” by pressing in on the volume knob, to turn this feature “OFF”.
4. Now you will be asked to enter in a 4-digit Lock Code to Unlock the Mature Content Channels.
5. Using the volume knob, scroll through the numbers and Press in on the volume knob to select your
4-digit Code.
Use the default passcode unless it is changed using Manage passcode.If the default passcode is
changed using Manage passcode, then enter the new chnaged passcode.
6. Now the SiriusXM Mature Content Channels are Unlocked and can be listened to.
Manage Password
This setting will allow you to change your existing password to Lock Mature Content Channels.
1. From the SiriusXM Play Screen, Press the MENU Button.
2. Use the volume knob to scroll through options until the Parental Controls Icon is in the middle of the
carousel.
3. Press in on the volume knob to select Parental Controls
4. Now a pop-up window will appear with two options to choose from: “Lock Mature Content Channels”
or “Manage Password”.
- “Lock Mature Content Channels” locks the ability to tune to the “Mature Content” Channels.
- “ Manage Password” Provides the ability to Set a Password or to Change the Password to lock the
Mature Content Channels.
5. Select “Manage Password”.
6. Enter in your Current Lock Code. For the first time, current lock code is same as default passcode.
7. Select Done when finished.
8. Enter in a New Lock Code.
9. Select Done when finished.
10. You will now see a confi
r
mation window appear displaying the new lock code.
* Please remember this code.
You will need it to listen to locked channels or to turn Off the Lock Mature
Content Features.

16 17
L3RG$XGLR2SHUDWLRQ
Owner’s Manual
English
Songs
1. From the iPod Play Screen, Press the MENU Button.
2. Use the volume knob to scroll through options until the Songs Icon is in the middle of the
carousel.
3. Press in on the volume knob to select Songs.
4. The list of your Songs will now appear.
5. Use the volume knob to scroll through your Songs.
6. Press in on the volume knob to select the Song that is in the middle of the screen.
7. You will now return to the iPod Play Screen and the song will start playing.
Songs Search by ABC or 123
1. From the iPod Play Screen, Press the MENU Button.
2. Use the volume knob to scroll through options until the Songs Icon is in the middle of the
carousel.
3. Press in on the volume knob to select Songs.
4. The list of your Songs will now appear.
5. Press the MENU Button.
6. Now a pop-up window will appear with two options to choose from: “ABC” or “123”.
- “ABC” is search by Letter.
- “123” is search by Number.
7. Use the volume knob to toggle between the two options by moving the halo around the ABC icon.
8. Press in on the volume knob to select “ABC” or “123”.
9. Now a pop-up window will appear with Letters/Numbers in icons.
10. Use the volume knob to scroll through the Letters/Numbers until the Letter/Number you want is in
the middle of the carousel.
11. Press in on the volume knob to select that Letter/Number.
12. You will now see a list of Songs.
13. Use the volume knob to scroll through the list of Songs.
14. When the Song you would like is in the middle of the screen.
15. Press in on the volume knob to select that Song.
16. Now you will return to the iPod Play Screen and the song will start playing
L3RG$XGLR2SHUDWLRQ
Owner’s Manual
English
Playlists
1. From the iPod Play Screen, Press the MENU Button.
2. Use the volume knob to scroll through options until the Playlists Icon is in the middle of the carousel.
3. Press in on the volume knob to select Playlists.
4. The list of your Playlists will now appear.
5. Use the volume knob to scroll through your Playlists.
6. Press in on the volume knob to select the Playlist that is in the middle of the screen.
7. You will now return to the iPod Play Screen and the first song in the Playlist will start playing.
Playlists Search by ABC or 123
1. From the iPod Play Screen, Press the MENU Button.
2. Use the volume knob to scroll through options until the Playlists Icon is in the middle of the carousel.
3. Press in on the volume knob to select Playlists.
4. The list of your Playlists will now appear.
5. Press the MENU Button.
6. Now a pop-up window will appear with two options to choose from: “ABC” or “123”.
- “ABC” is search by Letter.
- “123” is search by Number.
7. Use the volume knob to toggle between the two options by moving the halo around the ABC icon.
8. Press in on the volume knob to select “ABC” or “123”.
9. Now a pop-up window will appear with Letters/Numbers in icons.
10. Use the volume knob to scroll through the Letters/Numbers until the Letter/Number you want is in the
middle of the carousel.
11. Press in on the volume knob to select that Letter/Number.
12. You will now see a list of Playlists.
13. Use the volume knob to scroll through the list of Playlists.
14. When the Playlists you would like is in the middle of the screen.
15. Press in on the volume knob to select that Playlist.
16. Once selected, you will see the list of tracks corresponding to selected Playlist. Track Starts playing
when selected on a particular track. Browsing sequence should go as Playlist->Tracks. Search can
be done in each level.
17. Now you will return to the iPod Play Screen and the first song in the Playlist will start playing.

18 19
Owner’s Manual
English
L3RG$XGLR2SHUDWLRQ
Genre
1. From the iPod Play Screen, Press the MENU Button.
2. Use the volume knob to scroll through options until the Genre Icon is in the middle of the carousel.
3. Press in on the volume knob to select Genre.
4. The list of music Genre will now appear.
5. Use the volume knob to scroll through the music Genre.
6. Press in on the volume knob to select the Genre that is in the middle of the screen.
7. You will now return to the iPod Play Screen and the first song from the Genre will sta
r
t playing.
Genre Search by ABC or 123
1. From the iPod Play Screen, Press the MENU Button.
2. Use the volume knob to scroll through options until the Genre Icon is in the middle of the carousel.
3. Press in on the volume knob to select Genre.
4. The list of your music Genre will now appear.
5. Press the MENU Button.
6. Now a pop-up window will appear with two options to choose from: “ABC” or “123”.
- “ABC” is search by Letter.
- “123” is search by Number.
7. Use the volume knob to toggle between the two options by moving the halo around the ABC icon.
8. Press in on the volume knob to select “ABC” or “123”.
9. Now a pop-up window will appear with Letters/Numbers in icons.
10. Use the volume knob to scroll through the Letters/Numbers until the Letter/Number you want is in the
middle of the carousel.
11. Press in on the volume knob to select that Letter/Number.
12. You will now see a list of Genre.
13. Use the volume knob to scroll through the list of Genre.
14. When the Genre you would like is in the middle of the screen.
15. Press in on the volume knob to select that Genre.
16. Once selected,
You will see the list of A
r
tist corresponding to the selected Genre. Then, When an
a
r
tist is selected, corresponding Albums will be displayed.
T
racks will be shown when an album is
selected and track sta
r
ts playing when selected on a pa
r
ticular track. Browsing sequence should go
through the different levels like Genre->A
r
tist->Album->
T
racks.
T
racks are the last levels. Search can
be done in each level.
17. Now you will return to the iPod Play Screen and the first song from the Genre will sta
r
t playing.
L3RG$XGLR2SHUDWLRQ
Owner’s Manual
English
Artists
1. From the iPod Play Screen, Press the MENU Button.
2. Use the volume knob to scroll through options until the Artists Icon is in the middle of the carousel.
3. Press in on the volume knob to select Artists.
4. The list of Artists will now appear.
5. Use the volume knob to scroll through your Artists.
6. Press in on the volume knob to select the Artist that is in the middle of the screen.
7. You will now return to the iPod Play Screen and the first song from the Artist will start playing.
Artists Search by ABC or 123
1. From the iPod Play Screen, Press the MENU Button.
2. Use the volume knob to scroll through options until the Artists Icon is in the middle of the carousel.
3. Press in on the volume knob to select Artists.
4. The list of your Artists will now appear.
5. Press the MENU Button.
6. Now a pop-up window will appear with two options to choose from: “ABC” or “123”.
- “ABC” is search by Letter.
- “123” is search by Number.
7. Use the volume knob to toggle between the two options by moving the halo around the ABC icon.
8. Press in on the volume knob to select “ABC” or “123”.
9. Now a pop-up window will appear with Letters/Numbers in icons.
10. Use the volume knob to scroll through the Letters/Numbers until the Letter/Number you want is in the
middle of the carousel.
11. Press in on the volume knob to select that Letter/Number.
12. You will now see a list of Artists.
13. Use the volume knob to scroll through the list of Artists.
14. When the Artist you would like is in the middle of the screen.
15. Press in on the volume knob to select that Artist.
16. Once Selected, You will see the list of Album corresponding to selected Artist. Tracks will be shown
when an Album is selected and track starts playing when selected on a particular track. Browsing
sequence should go through the different levels like Artist->Album->Tracks. Search can be done in
each level.
17. Now you will return to the iPod Play Screen and the first song from the Artist will start playing.

20 21
Owner’s Manual
English
L3RG$XGLR2SHUDWLRQ L3RG$XGLR2SHUDWLRQ
Owner’s Manual
English
Composers
1. From the iPod Play Screen, Press the MENU Button.
2. Use the volume knob to scroll through options until the Composers Icon is in the middle of the
carousel.
3. Press in on the volume knob to select Composers.
4. The list of Composers will now appear.
5. Use the volume knob to scroll through your Composers.
6. Press in on the volume knob to select the Composer that is in the middle of the screen.
7. You will now return to the iPod Play Screen and the first song from the Composer will start playing.
Composers Search by ABC or 123
1. From the iPod Play Screen, Press the MENU Button.
2. Use the volume knob to scroll through options until the Composers Icon is in the middle of the
carousel.
3. Press in on the volume knob to select Composers.
4. The list of your Composers will now appear.
5. Press the MENU Button.
6. Now a pop-up window will appear with two options to choose from: “ABC” or “123”.
- “ABC” is search by Letter.
- “123” is search by Number.
7. Use the volume knob to toggle between the two options by moving the halo around the ABC icon.
8. Press in on the volume knob to select “ABC” or “123”.
9. Now a pop-up window will appear with Letters/Numbers in icons.
10. Use the volume knob to scroll through the Letters/Numbers until the Letter/Number you want is in the
middle of the carousel.
11. Press in on the volume knob to select that Letter/Number.
12. You will now see a list of Composers.
13. Use the volume knob to scroll through the list of Composers.
14. When the Composer you would like is in the middle of the screen.
15. Press in on the volume knob to select that Composer.
16. Once Selected, you will see the list of Album corresponding to selected composer. Tracks will be
shown when an Album is selected and track starts playing when selected on a particular track.
Browsing sequence should go through the different levels like Composer->Album->Tracks. Search can
be done in each level.
17. Now you will return to the iPod Play Screen and the first song from the Composer will start playing.
Podcasts
1. From the iPod Play Screen, Press the MENU Button
2. Use the volume knob to scroll through options until the Podcasts Icon is in the middle of the carousel
3. Press in on the volume knob to select Podcasts
4. The list of downloaded Podcasts will now appear
5. Use the volume knob to scroll through the Podcasts
6. Press in on the volume knob to select the Podcast that is in the middle of the screen
7. You will now return to the iPod Play Screen and the Podcast will start playing
Podcasts Search by ABC or 123
1. From the iPod Play Screen, Press the MENU Button
2. Use the volume knob to scroll through options until the Podcasts Icon is in the middle of the carousel
3. Press in on the volume knob to select Podcasts
4. The list of your downloaded Podcasts will now appear
5. Press the MENU Button
6. Now a pop-up window will appear with two options to choose from: “ABC” or “123”
- “ABC” is search by Letter
- “123” is search by Number
7. Use the volume knob to toggle between the two options by moving the halo around the ABC icon
8. Press in on the volume knob to select “ABC” or “123”
9. Now a pop-up window will appear with Letters/Numbers in icons
10. Use the volume knob to scroll through the Letters/Numbers until the Letter/Number you want
is in the middle of the carousel.
11. You will now see a list of Podcasts starting with Alphabet/Letter
12. When the Podcast you would like is in the middle of the screen
13. Press in on the volume knob to select that Podcast
14. Once selected, You will see the list of tracks corresponding to selected Episode. Tracks start playing
when selected on a particular track. Browsing sequence should go through the different levels like
Episode->Tracks. Search can be done in each level.
15. Now you will return to the iPod Play Screen and the Podcast will start playing
22 23
Owner’s Manual
English
L3RG$XGLR2SHUDWLRQ
Repeat
1. From the iPod Play Screen, Press the MENU Button.
2. Use the volume knob to scroll through options until the Repeat Icon is in the middle of the carousel.
3. Press in on the volume knob to select Repeat.
4. Now a pop-up window will appear with Repeat options:
- Song (Repeats current song).
- Playlist (Repeats songs in Playlist).
- All (Repeats All songs).
- Off (Turns OFF the Repeat Feature).
5. After your choice has been made, you will see the Repeat Icon appear on the iPod Play Screen.
Shuffle
1. From the iPod Play Screen, Press the MENU Button.
2. Use the volume knob to scroll through options until the Shuffle Icon is in the middle of the carousel.
3. Press in on the volume knob to select Shuffle.
4. Now a pop-up window will appear with Shuffle options:
- ON (Turns the Shuffle Feature ON).
- OFF (Turns the Shuffle Feature OFF).
5. After your choice has been made, you will see the Shuffle Icon appear on the iPod Play Screen.
Owner’s Manual
English
Simple Mode
When this feature is turned ON, you will now be able to control the iPod/iPhone features directly from the
iPod/iPhone.
Simple Mode ON
1. From the iPod Play Screen, Press the MENU Button.
2. Use the volume knob to scroll through options until the Simple Mode Icon is in the middle of the
carousel.
3. Press in on the volume knob to select Simple Mode.
4. You can now select the option to turn Simple Mode “ON”.
5. After you select “ON” you will now return to the iPod Play Screen.
* If you change your mind, and do not want to use the Simple Mode feature, press the Back Button to
return to the iPod Menu Options.
Simple Mode OFF
Follow these steps to turn Simple Mode OFF if Simple Mode has been ON.
1. From the iPod Play Screen, Press the MENU Button.
2. Use the volume knob to scroll through options until the Simple Mode Icon is in the middle of the
carousel.
3. Press in on the volume knob to select Simple Mode.
4. You can now select the option to turn Simple Mode “OFF”.
5. After you select “OFF” you will now return to the iPod Play Screen.
L3RG$XGLR2SHUDWLRQ
24 25
Owner’s Manual
English
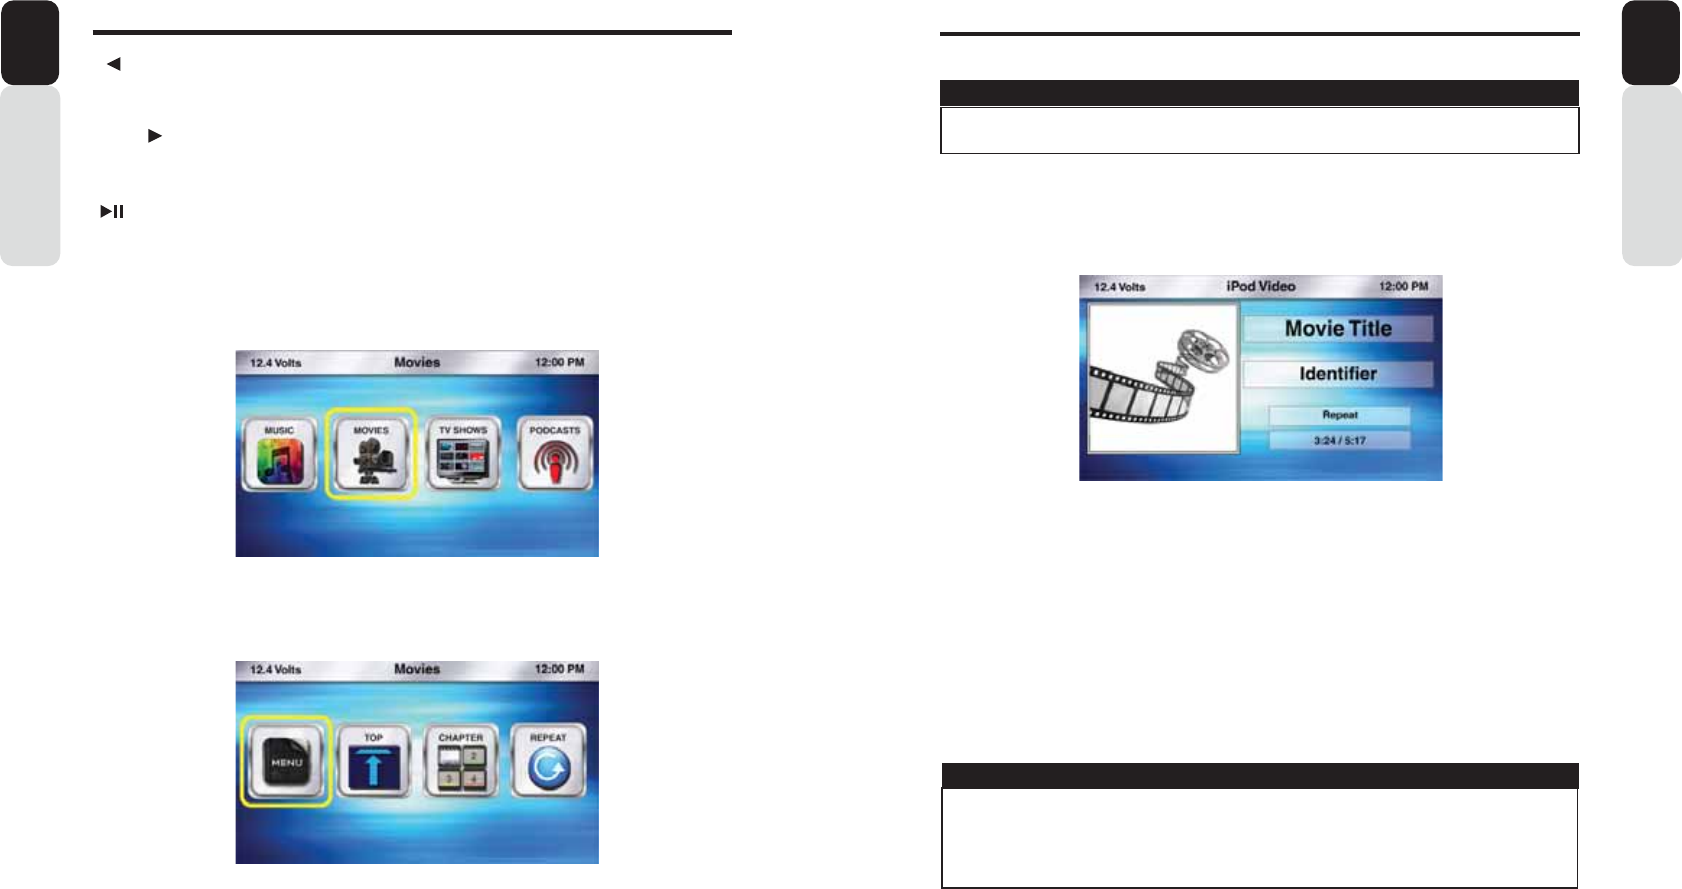
iPod Video
1. From the iPod Audio Play Screen, Press the MENU Button.
2. Use the volume knob to scroll through options until the Video Icon is in the middle of the
carousel.
3. Press in on the volume knob to select Video.
4. You will now switch to the iPod Video Play Screen.
Select Video
1. From the iPod Video Play Screen, Press the MENU Button.
2. You will now see the following options:
- Music (Returns you back to the iPod Audio Play Screen and Leaves iPod
Video).
- Movies (Search by “ABC” or “123”).
- TV Shows (Search by “ABC” or “123”).
- Podcasts (Search by “ABC” or “123”).
3. Use the volume knob to scroll through options
VIEWING A VIDEO SIGNAL ON ANY DASH MOUNTED MONITOR WHILE IN MOTION
IS PROHIBITED BY LAW.
WARNING
IF YOU SEE A “AUDIO ONLY” SCREEN WHILE TRYING TO WATCH A MOVIE, PLEASE CHECK
THE “VIDEO INTERLOCK” WIRE AND MAKE SURE IT IS CONNECTED.
VIDEO INTERLOCK
ON (GROUND), OFF (NO GROUND), ON (GROUND)
NOTE
L3RG9LGHR2SHUDWLRQ
Owner’s Manual
English
[ SEEK] Seek Back Button
- Press and release button to go back to previous chapter.
- Press and Hold for Three Seconds to scan back through chapter, release and video will continue playing.
[SEEK ] Seek Forward Button
- Press and release button to advance to next chapter.
- Press and Hold for Three Seconds to scan through chapter, release and video will continue playing.
[ ] Play / Pause Button
- Press to PAUSE the video.
- When track is PAUSED, press again to continue playing the video.
[BACK] Back Button
- Press to go back to previous Menu or Settings Screen.
- Press to backwards in multiple Menu Screens.
- Press to return to current source play screen from Menu or Settings Screen.
[MENU] Menu Button (While Video is Playing)
Press to access additional options.
- Menu (Subtitles ON and OFF).
- Top (Plays video from the beginning of the current chapter).
- Chapters (Search Chapters by “123”).
- Repeat (Chapter, All and OFF).
[MENU] Menu Button (From iPod Video Play Screen)
Press to access additional options.
- Movies (Search by “ABC” or “123”).
- TV Shows (Search by “ABC” or “123”).
- Podcasts (Search by “ABC” or “123”).
L3RG9LGHR2SHUDWLRQ

26 27
L3RG9LGHR2SHUDWLRQ
Owner’s Manual
English
TV Shows
1. Select TV Shows from the list of Menu Options from the iPod Video Play Screen.
2. You will now see the list of TV Shows that are on your iPod/iPhone.
3. Use the volume knob to scroll through the list of TV Shows.
4. When the TV Shows you want to watch is in the middle of the screen.
5. Press in on the volume knob to select that TV Show.
6. The TV Show will start playing.
TV Shows Search by ABC or 123
1. From the iPod Video Play Screen, Press the MENU Button.
2. Use the volume knob to scroll through options until the TV Shows Icon is in the middle of the carousel.
3. Press in on the volume knob to select TV Shows.
4. The list of your TV Shows will now appear.
5. Press the MENU Button.
6. Now a pop-up window will appear with two options to choose from: “ABC” or “123”.
- “ABC” is search by Letter.
- “123” is search by Number.
7. Use the volume knob to toggle between the two options by moving the halo around the ABC icon.
8. Press in on the volume knob to select “ABC” or “123”.
9. Now a pop-up window will appear with Letters/Numbers in icons.
10. Use the volume knob to scroll through the Letters/Numbers until the Letter/Number you want is in the
middle of the carousel.
11. Press in on the volume knob to select that Letter/Number.
12. Continue selecting Letters/Numbers until you have entered the Name of the TV Show.
13. Once the Name of the TV Show is complete, scroll to the bottom of the pop-up window and select OK.
14. You will now see a list of TV Shows.
15. Use the volume knob to scroll through the list of TV Shows.
16. When the TV Show you would like is in the middle of the screen.
17. Press in on the volume knob to select that TV Show.
18. Now you will return to the iPod Video Play Screen and the TV Show will start playing.
L3RG9LGHR2SHUDWLRQ
Owner’s ManualEnglish
Movies
1. Select Movies from the list of Menu Options from the iPod Video Play Screen.
2. You will now see the list of Movies that are on your iPod/iPhone.
3. Use the volume knob to scroll through the list of Movies.
4. When the movie you want to watch is in the middle of the screen.
5. Press in on the volume knob to select that movie.
6. The Movie will start playing.
Movies Search by ABC or 123
1. From the iPod Video Play Screen, Press the MENU Button.
2. Use the volume knob to scroll through options until the Movies Icon is in the middle of the carousel.
3. Press in on the volume knob to select Movies.
4. The list of your Movies will now appear.
5. Press the MENU Button.
6. Now a pop-up window will appear with two options to choose from: “ABC” or “123”.
- “ABC” is search by Letter.
- “123” is search by Number.
7. Use the volume knob to toggle between the two options by moving the halo around the ABC icon.
8. Press in on the volume knob to select “ABC” or “123”.
9. Now a pop-up window will appear with Letters/Numbers in icons.
10. Use the volume knob to scroll through the Letters/Numbers until the Letter/Number you want is in the
middle of the carousel.
11. Press in on the volume knob to select that Letter/Number.
12. Continue selecting Letters/Numbers until you have entered the Name of the Movie.
13. Once the Name of the Movie is complete, scroll to the bottom of the pop-up window and select OK.
14. You will now see a list of Movies.
15. Use the volume knob to scroll through the list of Movies.
16. When the Movie you would like is in the middle of the screen.
17. Press in on the volume knob to select that Movie.
18. Now you will return to the iPod Video Play Screen and the Movie will start playing.

28 29
L3RG9LGHR2SHUDWLRQ
Owner’s Manual
English
Menu
1. While the video is playing, Press the MENU Button.
2. Use the volume knob to scroll through options until the halo is around the Menu Icon.
3. Press in on the volume knob to select Menu.
4. Now a pop-up window will appear with Menu option:
- Subtitles (ON and OFF).
5. Press in on the volume knob to select the Menu Option.
** Note: Not All Video Files Will Contain These Features. **
Subtitles (ON and OFF)
1. If you select Subtitles you will see the subtitles on the screen while the video is playing.
2. Use the volume knob to select your Subtitle options.
3. You can press the Back Button to return back to the iPod Video Play Screen.
Top
This feature will take you to the beginning of the current chapter.
1. While the video is playing, Press the MENU Button.
2. Use the volume knob to scroll through options until the halo is around the Top Icon.
3. Press in on the volume knob to select Top.
4. You will be taken back to the iPod Video Play Screen and the video will begin playing from the start of
the current chapter.
L3RG9LGHR2SHUDWLRQ
Owner’s Manual
English
Podcasts
1. From the iPod Play Screen, Press the MENU Button
2. Use the volume knob to scroll through options until the Podcasts Icon is in the middle of the carousel
3. Press in on the volume knob to select Podcasts
4. The list of downloaded Podcasts will now appear
5. Use the volume knob to scroll through the Podcasts
6. Press in on the volume knob to select the Podcast that is in the middle of the screen
7. You will now return to the iPod Play Screen and the Podcast will start playing
Podcasts Search by ABC or 123
1. From the iPod Play Screen, Press the MENU Button
2. Use the volume knob to scroll through options until the Podcasts Icon is in the middle of the carousel
3. Press in on the volume knob to select Podcasts
4. The list of your downloaded Podcasts will now appear
5. Press the MENU Button
6. Now a pop-up window will appear with two options to choose from: “ABC” or “123”
- “ABC” is search by Letter
- “123” is search by Number
7. Use the volume knob to toggle between the two options by moving the halo around the ABC icon
8. Press in on the volume knob to select “ABC” or “123”
9. Now a pop-up window will appear with Letters/Numbers in icons
10. Use the volume knob to scroll through the Letters/Numbers until the Letter/Number you want is in the
middle of the carousel.
11. You will now see a list of Podcasts starting with Alphabet/Letter
12. When the Podcast you would like is in the middle of the screen
13. Press in on the volume knob to select that Podcast
14. Once selected, You will see the list of tracks corresponding to selected Episode. Tracks start playing
when selected on a particular track. Browsing sequence should go through the different levels like
Episode->Tracks. Search can be done in each level.
15. Now you will return to the iPod Play Screen and the Podcast will start playing
30 31
L3RG9LGHR2SHUDWLRQ
Owner’s Manual
English
[ SEEK] Seek Back Button
- Press and release button to go back to previous song
- Press and Hold for Three Seconds to scan back through song, release and song will continue playing
[SEEK ] Seek Forward Button
- Press and release button to advance to next song
- Press and Hold for Three Seconds to scan through song, release and song will continue playing
[ ] Play / Pause Button
- Press to PAUSE the song
- When track is PAUSED, press again to continue playing the song
[BACK] Back Button
- Press to go back to previous Menu or Settings Screen
- Press to backwards in multiple Menu Screens
- Press to return to current source play screen from Menu or Settings Screen
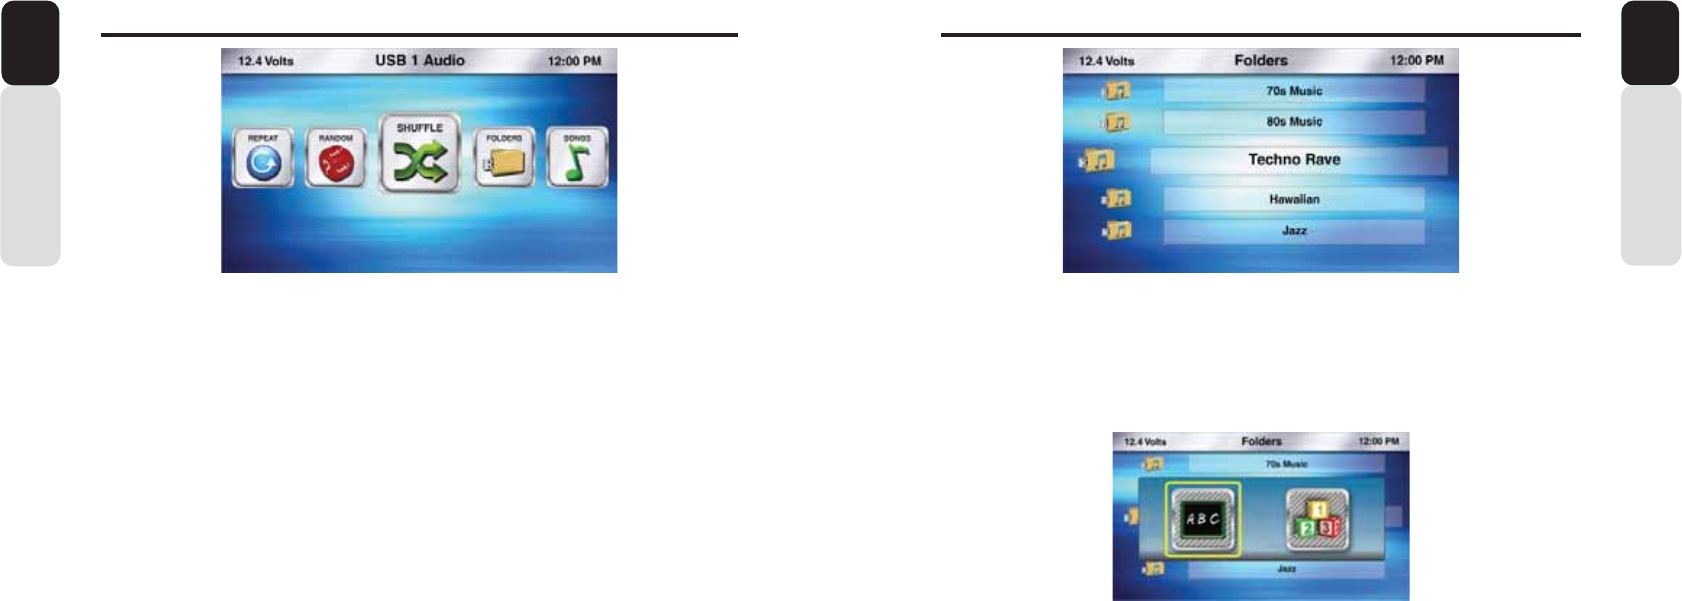
[MENU] Menu Button
Press to access additional options
- Repeat (Song, Folder, All or OFF)
- Random (ON or OFF)
- Shuffle (ON or OFF)
- Folders (Access Music Folders)
- Songs (Access Songs)
- SCAN option for Intro Music SCAN
86%DQG86%2SHUDWLRQ
Owner’s Manual
English
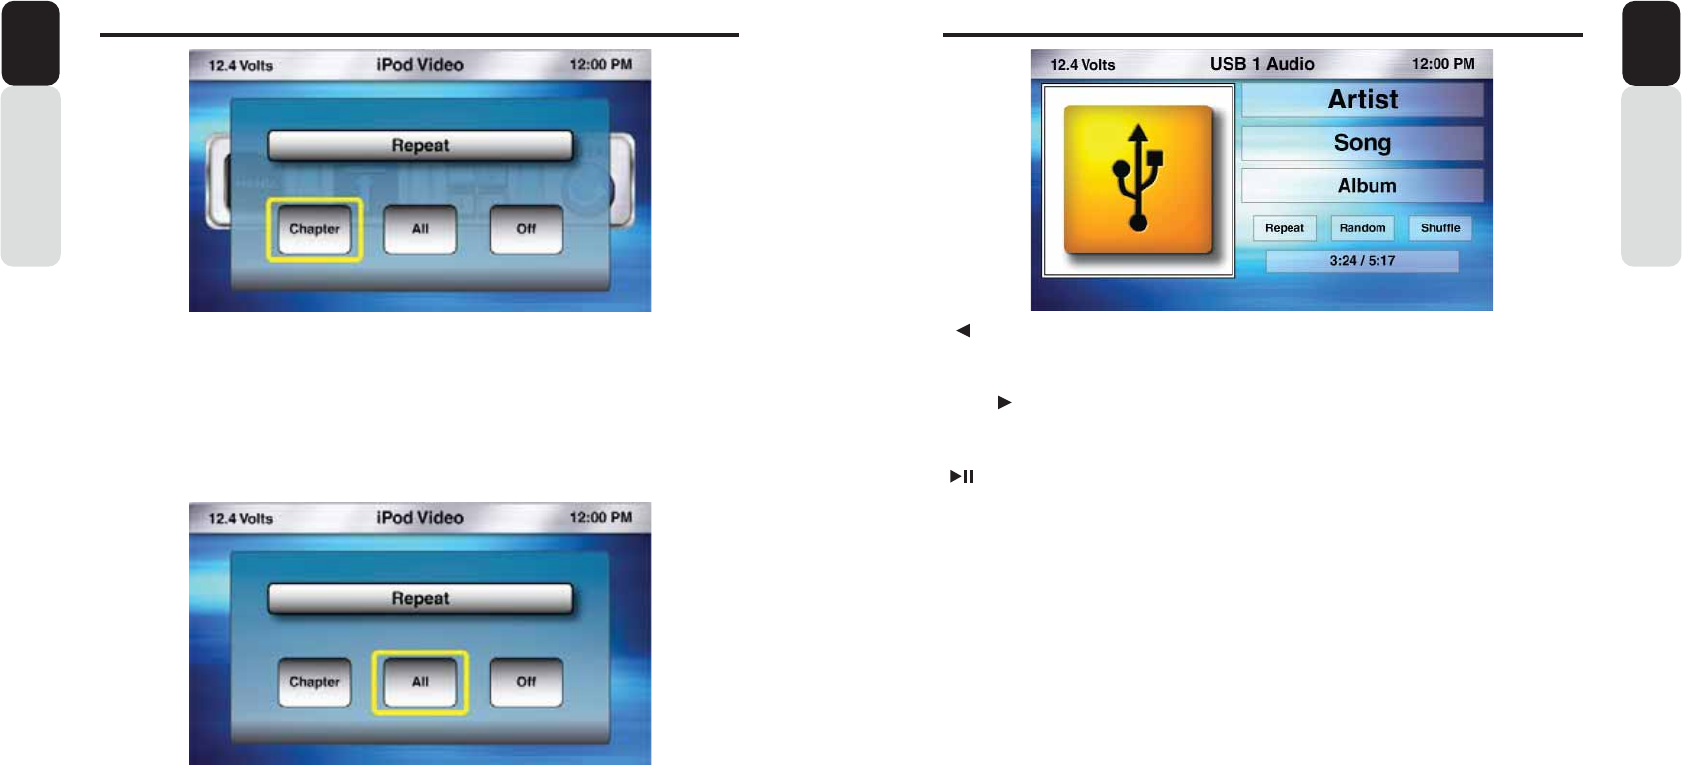
Repeat
1. While the video is playing, Press the MENU Button.
2. Use the volume knob to scroll through options until the halo is around the Repeat Icon.
3. Press in on the volume knob to select Repeat.
4. Now a pop-up window will appear with Repeat options:
- Chapter (Repeats current Chapter).
- All (Repeats All Chapters).
- Off (Turns OFF the Repeat Feature).
5. Press in on the volume knob to select your Repeat function.
* If you change your mind and do not want to use the Repeat function, press the Back Button and you
will return to the iPod Video Play Screen.
Chapter
1. While the video is playing, Press the MENU Button.
2. Use the volume knob to scroll through options until the halo is around the Chapters Icon.
3. Press in on the volume knob to select Chapters.
4. Now a pop-up window will appear with a number pad for you to enter in the chapter number..
5. Use the volume knob to scroll through the numbers.
6. Press in on the volume knob to select the chapter number(s).
7. When you have finished your chapter selection.
8. Scroll to the bottom of the pop-up screen and select “OK”.
9. You will now return to the iPod Video Play Screen and the video will start playing from the selected
Chapter.
32 33
86%DQG86%2SHUDWLRQ
Owner’s Manual
English
Folders
1. From the USB Play Screen, Press the MENU Button
2. Use the volume knob to scroll through options until the Folders Icon is in the middle of the carousel
3. Press in on the volume knob to select Folders
4. The list of your Folders will now appear
5. Use the volume knob to scroll through your Folders
6. Press in on the volume knob to select the Folder that is in the middle of the screen
7. It will display the list of songs present in that folder. Then press in on the volume knob to select the
song from the list. Now you will return to the play screen and songstarts playing.
Folders Search by ABC or 123
1. From the USB Play Screen, Press the MENU Button
2. Use the volume knob to scroll through options until the Folders Icon is in the middle of the carousel
3. Press in on the volume knob to select Folders
4. The list of your Folders will now appear
5. Press the MENU Button
6. Now a pop-up window will appear with two options to choose from: “ABC” or “123”
- “ABC” is search by Letter
- “123” is search by Number
7. Use the volume knob to toggle between the two options by moving the halo around the ABC icon
8. Press in on the volume knob to select “ABC” or “123”
9. Now a pop-up window will appear with Letters/Numbers in icons
10. Use the volume knob to scroll through the Letters/Numbers until the Letter/Number you want is in the
middle of the carousel.
11. Press in on the volume knob to select that Letter/Number
12. you will now see a list of folder starting with the selected Alphabet/Number.
13. If there is no match found for the selected alphabet/number, then pop up saying the same will be
displayed,
14. Use the volume knob to scroll through the list of Folder
15. When the Folder you would like is in the middle of the screen
16. Press in on the volume knob to select that Folder
17. It will display the list of songs present in that folder. Then press in on the volume knob to select the song
from the list. Now you will return to the play screen and songstarts playing
86%DQG86%2SHUDWLRQ
English Owner’s Manual
Shuffle
1. From the USB Play Screen, Press the MENU Button
2. Use the volume knob to scroll through options until the Shuffle Icon is in the middle of the carousel
3. Press in on the volume knob to select Shuffle
4. Now a pop-up window will appear with Shuffle options:
- ON (Turns the Shuffle Feature ON)
- OFF (Turns the Shuffle Feature OFF)
5. After your choice has been made, you will see the Shuffle Icon appear on the USB Play Screen
Repeat
1. From the USB Play Screen, Press the MENU Button
2. Use the volume knob to scroll through options until the Repeat Icon is in the middle of the carousel
3. Press in on the volume knob to select Repeat
4. Now a pop-up window will appear with Repeat options:
- Song (Repeats current Song)
- Folder (Repeats songs in Folder)
- All (Repeats All songs)
- Off (Turns OFF the Repeat Feature)
5. After your choice has been made, you will see the Repeat Icon appear on the USB Play Screen
Random
1. From the USB Play Screen, Press the MENU Button
2. Use the volume knob to scroll through options until the Random Icon is in the middle of the carousel
3. Press in on the volume knob to select Random
4. Now a pop-up window will appear with Random options:
- ON (Turns the Random Feature ON)
- OFF (Turns the Random Feature OFF)
5. After your choice has been made, you will see the Random Icon appear on the USB Play Screen
SCAN
1. From the USB Play Screen, Press the MENU Button
2. Use the volume knob to scroll through options until the SCAN Icon is in the middle of the carousel
3. Press in on the volume knob to select SCAN
4. In play screen, Scan indicator will appear, indicating that it is in Scan mode and the first 10 seconds of
each song in the folder will play
34 35
86%DQG86%2SHUDWLRQ
Owner’s Manual
English
[ SEEK] Seek Back Button
- No function
[SEEK ] Seek Forward Button
- Press and release button to advance to next song
-[ ] Play / Pause Button
- Press to PAUSE the song
- When track is PAUSED, press again to continue playing the song
[BACK] Back Button
- Press to go back to previous Menu or Settings Screen
- Press to go backwards in multiple Menu Screens
- Press to return to current source play screen from Menu or Settings Screen
3DQGRUD2SHUDWLRQ
Owner’s Manual
English
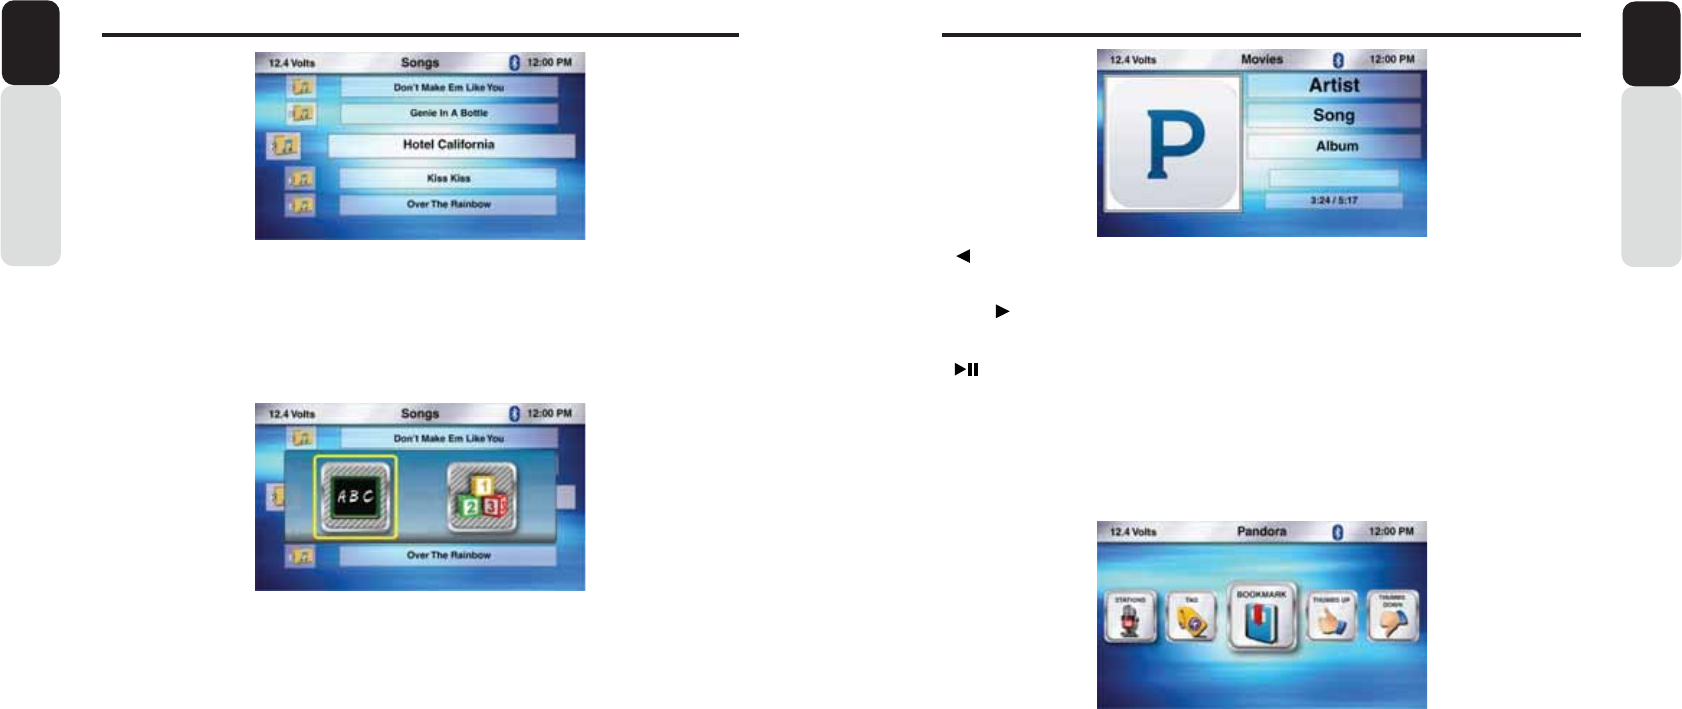
Songs
1. From the USB Play Screen, Press the MENU Button
2. Use the volume knob to scroll through options until the Songs Icon is in the middle of the carousel
3. Press in on the volume knob to select Songs
4. The list of your Songs will now appear
5. Use the volume knob to scroll through your Songs
6. Press in on the volume knob to select the Song that is in the middle of the screen
7. You will now return to the iPod Play Screen and the song will start playing
Songs Search by ABC or 123
1. From the USB Play Screen, Press the MENU Button
2. Use the volume knob to scroll through options until the Songs Icon is in the middle of the carousel
3. Press in on the volume knob to select Songs
4. The list of your Songs will now appear
5. Press the MENU Button
6. Now a pop-up window will appear with two options to choose from: “ABC” or “123”
- “ABC” is search by Letter
- “123” is search by Number
7. Use the volume knob to toggle between the two options by moving the halo around the ABC icon
8. Press in on the volume knob to select “ABC” or “123”
9. Now a pop-up window will appear with Letters/Numbers in icons
10. Use the volume knob to scroll through the Letters/Numbers until the Letter/Number you want is in the
middle of the carousel.
11. Press in on the volume knob to select that Letter/Number
12. You will now see a list of folder starting with the selected Alphabet/Number.
13. You will now see a list of Songs. If there is no match found for the selected alphabet/number, then pop
up saying the same will be displayed.
14. Use the volume knob to scroll through the list of Songs
15. When the Song you would like is in the middle of the screen
16. Press in on the volume knob to select that Song
17. Now you will return to the USB Play Screen and the song will start playing
Note: In all search option (for all source option), Searching is restricted to starting Alphabet/Number only
[MENU] Menu Button
Press to access additional options
- Stations (Music Stations from your Pandora Account)
- Bookmark (ON or OFF)
- Thumbs Up
- Thumbs Down
Note:
The following Pandora connection status may appear:
- Please login to Pandora on device - Unable to play due to music listening restrictions
- Device disconnected - Pandora server under maintainace
- Pandora not responding - Check the mobile app on device
- Skip limit reached - Skip not allowed
- Station does not exist - Select a station from station list
- Limited connectivity - Track rating failed
- Fetching stations information
36 37
3DQGRUD2SHUDWLRQ
Owner’s Manual
English
Bookmark
1. From the Pandora Play Screen, press the MENU Button
2. Use the volume knob to scroll through options until the Bookmark Icon is in the middle of the carousel
3. Press in on the volume knob to select Bookmark
4. Now a pop-up window will appear with Bookmark options:
- YES (Bookmarks the current song to your Pandora Account)
- CANCEL (Returns you back to the Pandora Play Screen)
5. If YES is selected, A pop up will appear with “Bookmark saved” screen for 2 seconds and then
displayagain the Pandora Play screen
6. If Bookmark failure occurs, Pop up window will appear with “Bookmark not saved” for 2 seconds
7. After your choice has been made, you will return to the Pandora Play Screen
Thumb Up
1. From the Pandora Play Screen, Press the MENU Button
2. Use the volume knob to scroll through options until the Thumb Up Icon is in the middle of the carousel
3. Press in on the volume knob to select Thumbs Up
4. After your choice has been made, you will return to the Pandora Play Screen
Thumb Down
1. From the Pandora Play Screen, Press the MENU Button
2. Use the volume knob to scroll through options until the Thumb Down Icon is in the middle of the
carousel
3. Press in on the volume knob to select Thumb Down
4. After your choice has been made, you will return to the Pandora Play Screen
General pop ups for Pandora:
1. Device disconnected
2. Pandora server under maintainance
3. Pandora not repsonding
4. Check the mobile app on the device
5. Skip limit reached
6. Limited connectivity etc
3DQGRUD2SHUDWLRQ
Owner’s ManualEnglish
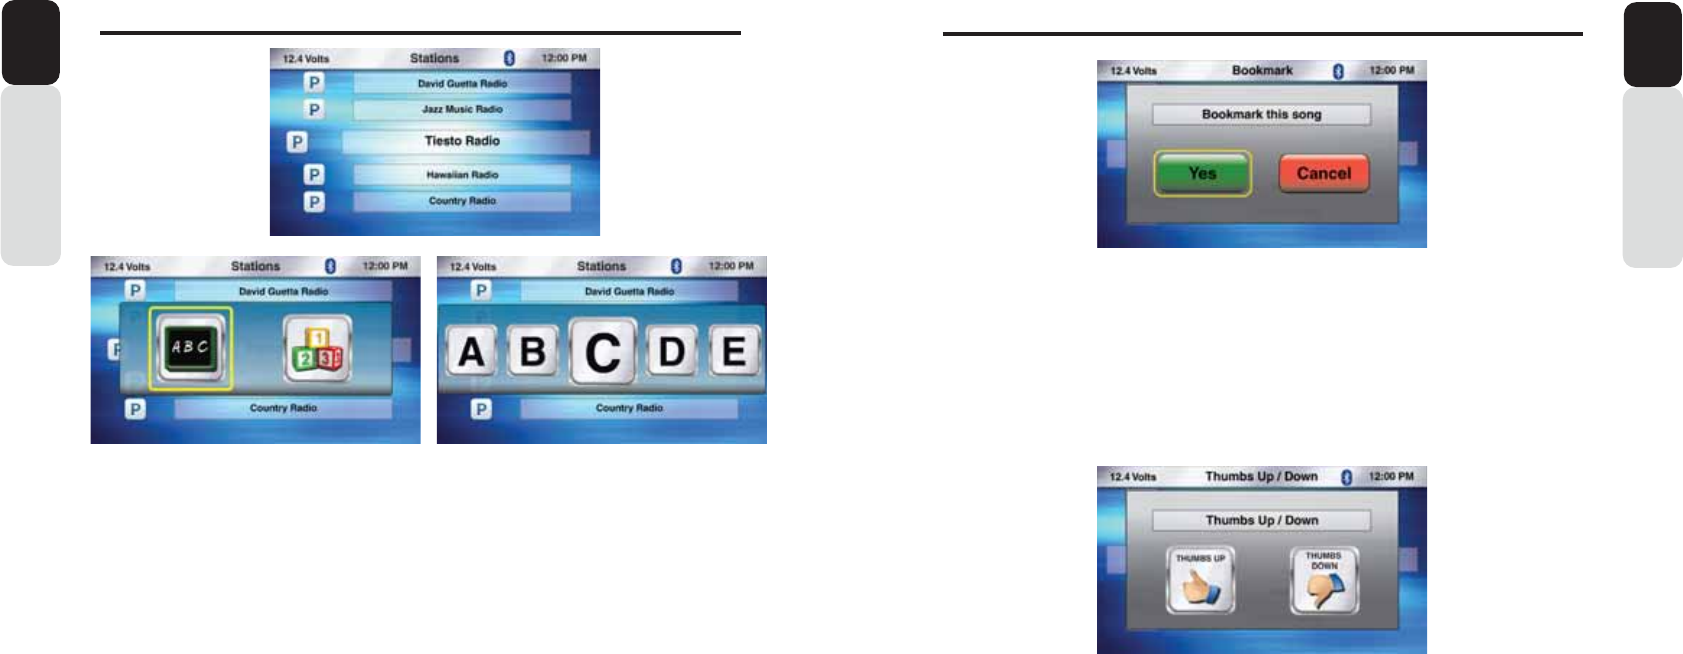
Stations
1. From the Pandora Play Screen, press the MENU Button
2. Use the volume knob to scroll through options until the Stations Icon is in the middle of the carousel
3. Press in on the volume knob to select Stations
4. The list of your Stations will now appear
5. Use the volume knob to scroll through your Stations
6. Press in on the volume knob to select the Station that is in the middle of the screen
7. You will now return to the Pandora Play Screen and the song will start playing
Stations Search by ABC or 123
1. From the Pandora Play Screen, press the MENU Button
2. Use the volume knob to scroll through options until the Stations Icon is in the middle of the carousel
3. Press in on the volume knob to select Stations
4. The list of your Stations will now appear
5. Press the MENU Button
6. Now a pop-up window will appear with two options to choose from: “ABC” or “123”
- “ABC” is search by Letter
- “123” is search by Number
7. Use the volume knob to toggle between the two options by moving the halo around the ABC icon
8. Press in on the volume knob to select “ABC” or “123”
9. Now a pop-up window will appear with Letters/Numbers in icons
10. Use the volume knob to scroll through the Letters/Numbers until the Letter/Number you want is in the
middle of the carousel.
11. Press in on the volume knob to select that Letter/Number
12. You will now see a list of Stations starting with the same alphabet/number.
If there is no match found for the selected alphabet/number, then pop up saying the same will be
displayed,
13. Use the volume knob to scroll through the list of Stations
14. When the Station you would like is in the middle of the screen
15. Press in on the volume knob to select that Station
16. Now you will return to the Pandora Play Screen and the Station will start playing
17. Station Art is display for each station, if available else generic station Art will be displayed.
Note: In all search option (for all source option), Searching is restricted to starting Alphabet/Number only

38 39
6HWWLQJV
Owner’s Manual
English
Clock
1. Press the Source Button (SRC)
2. Use the volume knob to scroll through the sources
3. When the Settings Icon is in the middle of the carousel, Press in on the volume knob to select
Settings
4. Once in Settings, rotate the volume knob to Clock
5. Press in on the volume knob to enter the Clock Settings
- Hour
- Minutes
- AM/PM
- 12 / 24 Hour Mode
** The halo will always default to Hour adjustment first, then minutes, AM/PM, and 12/24
6. With the halo around Hour, rotate the volume knob to adjust to the correct Hour
7. Press in on the volume knob to set the Hour
8. The halo will automatically shift to Minutes
9. With the halo around the Minutes, rotate the volume knob to adjust to the correct Minutes
10. Press in on the volume knob to set the Minutes
11. The halo will automatically shift to AM/PM
12. With the halo around the AM/PM, rotate the volume knob to change from AM to PM
13. Press in on the volume knob to set AM or PM
14. The halo will automatically shift to 12/24
15. With the halo around the 12/24, rotate the volume knob to change from 12 to 24 Hour Mode
16. Press in on the volume knob to set 12 or 24 Hour Mode
17. After the Clock has been set, you will return to the Settings Menu
System Reset
1. Press in Volume knob when System Reset option is focussed
2. Pop up window will appear with YES and CANCEL options
3. If selected YES by pressing on volume knob, then option to enter parental lock code will appear if
Parental Lock is set to ON. If code is not entered properly, then a confirmation screen saying “ Need
to proceed without resetting lock code ” will apeear
4. If Parental Lock is entered correctly (if applicable) or if LOCK is OFF, then a confirmation will appear
as below with the ACCEPT and CANCEL option
**THIS ACTION WILL RESET THE SYSTEM AND RESTORE BACK TO ALL FACTORY DEFAULT
SETTINGS**
** YOU WILL LOSE ANY SAVED FAVORITES AND SETTINGS**
5. If ACCEPT is selected, then System will reset by powering down and then it will automatically restart
6. if CANCEL is selected, then it will return back to the current source in use
6HWWLQJV
Owner’s Manual
English
Settings
1. Press the Source Button (SRC)
2. Use the volume knob to scroll through the sources
3. When the Settings Icon is in the middle of the carousel, Press in on the volume knob to select
Settings
4. Once in Settings, the following features will be accessible:
- 0: Information-
Clock
- Date
- Bluetooth
5. Press in on the volume knob to select the Settings Option you would like to enter
0: Information
1. Press the Source Button (SRC)
2. Use the volume knob to scroll through the sources
3. When the Settings Icon is in the middle of the carousel, Press in on the volume knob to select Settings
4. Once in Settings, use the volume knob to scroll to 0: Information
5. When the 0: Information Icon is in the middle of the screen, Press in on the volume knob to enter
the 0: Information Screen
6. After you have finished reviewing the 0: Information, Press the Back Button to return to the
previous Settings Screen
This section contains information for the
following 0: Features and Functions:
0: Information
- Hardware Information
- Operating System Information (OS)
- Software Version Information
- Bluetooth Software Version Information
- Application Firmware Information
- System Reset
40 41
6HWWLQJV
Owner’s Manual
English
Bluetooth
1. Press the Source Button (SRC)
2. Use the volume knob to scroll through the sources
3. When the Settings Icon is in the middle of the carousel, Press in on the volume knob to select Settings
4. Once in Settings, rotate the volume knob to Bluetooth
5. Press in on the volume knob to enter Bluetooth Settings
- Bluetooth Hands-Free ON or OFF (Turns the Bluetooth Hands-Free Feature ON or OFF)
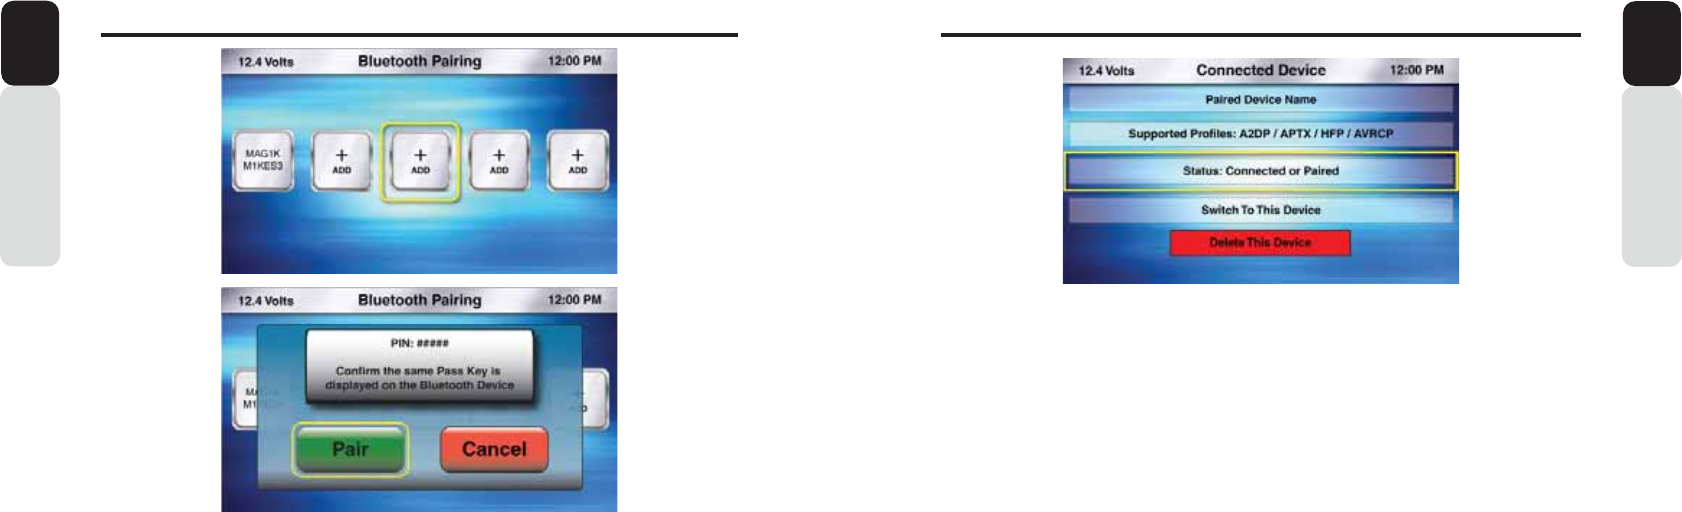
- Pairing (Pair, Connect, Transfer Bluetooth Connection, and Delete Paired Device)
- Microphone Gain (Adjust the Optional external Bluetooth Microphone sensitivity)
Bluetooth (Hands-Free ON or OFF)
1. Press the Source Button (SRC)
2. Use the volume knob to scroll through the sources
3. When the Settings Icon is in the middle of the carousel, Press in on the volume knob to select Settings
4. Once in Settings, rotate the volume knob to Bluetooth
5. Press in on the volume knob to enter Bluetooth Settings
6. With the halo around Bluetooth Hands-Free ON / OFF Icon
7. Press in on the volume knob to select Bluetooth Hands-Free ON / OFF
8. Now a pop-up window will appear providing Two options:
- ON = Turn ON the Bluetooth Hands-Free Profile (Allows for Hands-Free Calling)
- OFF = Turns OFF the Bluetooth Hands-Free Profile (Disables the ability for Hands-Free Calling)
* Default = OFF
9. Use the volume knob to toggle between ON and OFF
10. Press in on the volume knob to select your choice
11. After your choice has been made, you will be taken back to the Bluetooth Settings Menu
6HWWLQJV
Owner’s ManualEnglish
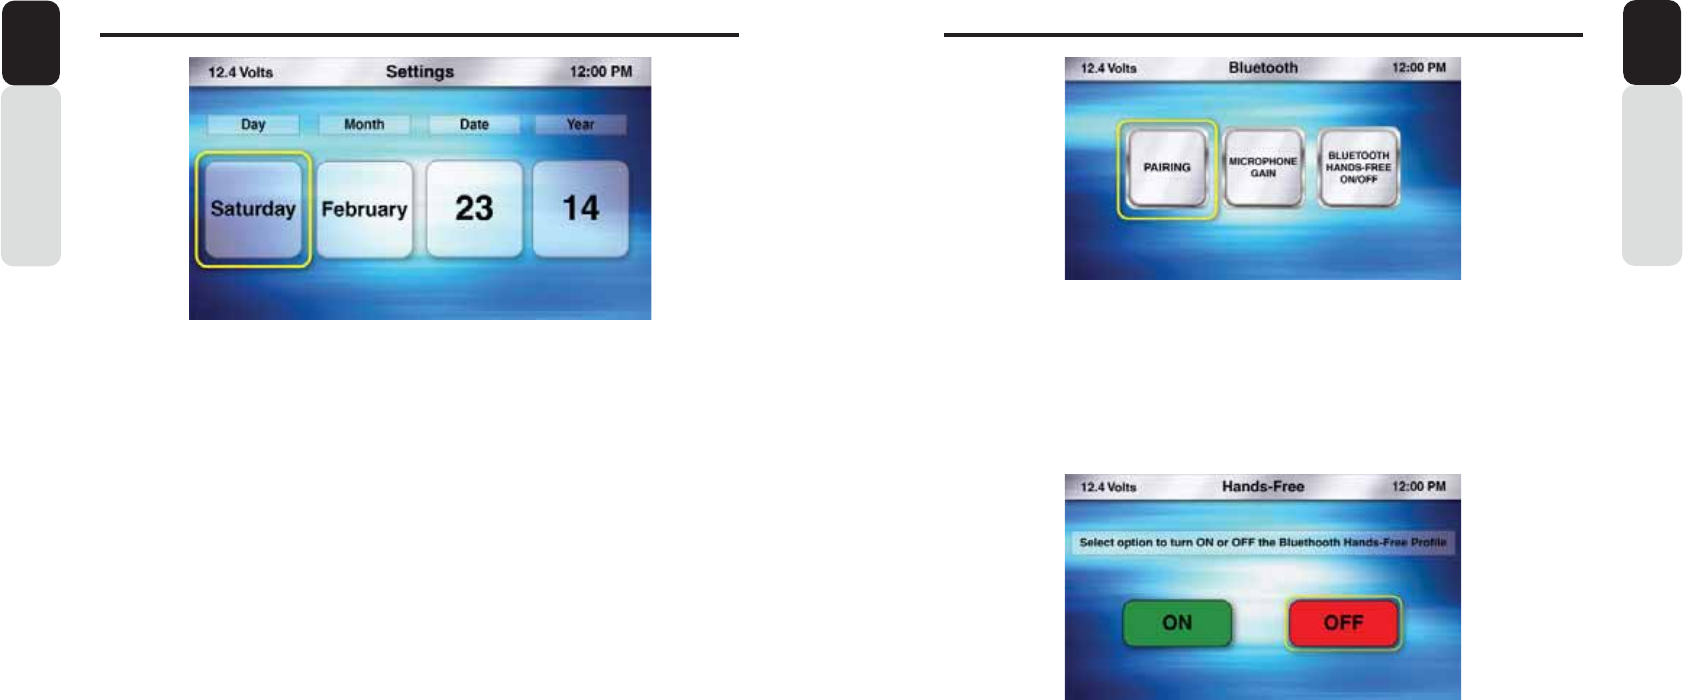
Date
1. Press the Source Button (SRC)
2. Use the volume knob to scroll through the sources
3. When the Settings Icon is in the middle of the carousel, Press in on the volume knob to select
Settings
4. Once in Settings, rotate the volume knob to Date
5. Press in on the volume knob to enter the Date Settings
- Day
- Month
- Date
- Year (Default = 2013)
** The halo will always default to Day adjustment first, then Month, Date, and Year
6. With the halo around Day, rotate the volume knob to adjust to the correct Day
7. Press in on the volume knob to set the Day
8. The halo will automatically shift to Month
9. With the halo around the Month, rotate the volume knob to adjust to the correct Month
10. Press in on the volume knob to set the Month
11. The halo will automatically shift to Date
12. With the halo around the Date, rotate the volume knob to adjust to the correct Date
13. Press in on the volume knob to set the Date
14. The halo will automatically shift to Year
15. With the halo around the Year, rotate the volume knob to adjust the Year
16. Press in on the volume knob to set the year
17. After the Date has been set, you will return to the Settings Menu
7KH'DWH,QIRUPDWLRQZLOO2QO\EHGLVSOD\HGRQWKH/DUJH&ORFN
3OHDVHUHIHUWRWKH'LVSOD\6HWWLQJVWRHQDEOHWKH/DUJH&ORFNWREH
GLVSOD\HGDIWHUVHFRQGVRIQRDFWLRQ
42 43
6HWWLQJV
Owner’s Manual
English
Bluetooth (Paired/Connected Device Information Screen)
*After Pairing a Device you will be taken to this screen.
You can access this screen when Pairing a Device is not necessary
Access the Paired/Connected Device Information Screen
1. Press the Source Button (SRC)
2. Use the volume knob to scroll through the sources
3. When the Settings Icon is in the middle of the carousel, Press in on the volume knob to select Settings
4. Once in Settings, rotate the volume knob to Bluetooth
5. Press in on the volume knob to enter Bluetooth Settings
6. Use the volume knob until the halo is around the Pairing Icon
7. Use the volume knob and move the halo until it is around the Paired Device that you would like to:
- Switch To This Device (Changes Bluetooth Connection)
- Delete This Device (Select to Delete a Paired Bluetooth Device)
Press the Back Button to return to the Bluetooth Settings Screen
This screen is where you can view the Paired Bluetooth Information, Switch Bluetooth connection
to a different Paired Device and Delete the Paired Device
6HWWLQJV
Owner’s Manual
English
Bluetooth (Pairing)
The 0: Bluetooth Pairing sequence is based on the Bluetooth SSP (Simple Secure Pairing
Profile) and will Not require input of a PIN Code to Pair Bluetooth Devices
1. Press the Source Button (SRC)
2. Use the volume knob to scroll through the sources
3. When the Settings Icon is in the middle of the carousel, Press in on the volume knob to select Settings
4. Once in Settings, rotate the volume knob to Bluetooth
5. Press in on the volume knob to enter Bluetooth Settings
6. Rotate the volume knob and move the halo until it is around the Pairing Icon
7. With the halo around Pairing Icon, Press in on the volume knob to select Bluetooth Device Pairing
8. You will now see the Bluetooth Pairing Screen that displays Five Icons that will populate with the
“+ ADD” or “Paired Device Names”
* If No Devices have been Paired, you will see Five “+ ADD” Icons
9. Use the volume knob to toggle through the Icons to select the position to save the Paired Device
Information
10. Press in on the volume knob to select a “+ ADD”
11. The 0: is now in Bluetooth Pairing Mode
12. Confirm that your Bluetooth Device is “ON” and the Bluetooth on the device is “ON”
13. When the 0: has found a Bluetooth Device, you will see a pop-up window appear asking you to
Confirm the PIN Information from the 0: to the Device
* Confirm that the PIN Number on the screen of the 0: is the same as the PIN Number that is being
Displayed on the screen of the Bluetooth Device
14. If both PIN Numbers are the same
15. Press in on the volume knob to select “PAIR”
16 Once the 0: and the Bluetooth Device are Paired, you will now be taken to the Bluetooth
Paired/Connected Device Information Screen

44 45
6HWWLQJV
Owner’s Manual
English
Bluetooth (Delete This Device)
1. When you are at the Paired/Connected Device Info
r
mation Screen
2. Use the volume knob and move the halo until it is around Delete This Device
3. Press in on the volume knob to Delete This Device
4. Now a pop-up window will appear asking you to confirm you want to Delete This Device
5. Use the volume knob to
T
oggle between “YES” or “NO”
6. Press in on the volume knob to select your choice
7. If you select “YES”, then you have now Deleted This Device and you will return back to the Bluetooth
Settings Screen
8. If you select “NO”, then you will return back to the Bluetooth Settings Screen
Bluetooth (Delete This Device)
* Follow these steps if you are Not in the Paired/Connected Device Information Screen
1. Press the Source Button (SRC)
2. Use the volume knob to scroll through the sources
3. When the Settings Icon is in the middle of the carousel, Press in on the volume knob to select Settings
4. Once in Settings, rotate the volume knob to Bluetooth
5. Press in on the volume knob to enter Bluetooth Settings
6. Rotate the volume knob and move the halo until it is around the Pairing Icon
7. With the halo around Pairing Icon
8. Press in on the volume knob to select Bluetooth Device Pairing
9. You will now see the Bluetooth Pairing Screen that displays Five Icons that will populate with the
“+ ADD” or “Paired Device Names”
10. Use the volume knob and move the halo until it is around the Paired Device you would like to Delete
11. Press in on the volume knob to select the Device you would like to Delete
12. You will now be taken to the Paired/Connection Device Information Screen
13. Use the volume knob and move the halo until it is around Delete This Device
14. Press in on the volume knob to Delete This Device
15. Now a pop-up window will appear asking you to confirm Delete This Device
16. Use the volume knob to
T
oggle between “YES” or “NO”
17. Press in on the volume knob to select your choice
18. If you select “YES”, then you have now Deleted This Device and you will return back to the Bluetooth
Settings Screen
19. If you select “NO”, then you will return back to the Bluetooth Settings Screen
6HWWLQJV
Owner’s Manual
English
Bluetooth (Switch To This Device)
1. When you are at the Paired/Connected Device Information Screen
2. Use the volume knob and move the halo until it is around Swtich To This Device
3. Press in on the volume knob to switch Bluetooth Connection to this device
4. Now a pop-up window will appear asking you to Confirm Connection to this Device
5. Use the volume knob to Toggle between “YES” or “NO”
6. Press in on the volume knob to select your choice
7. If you select “YES”, then you have now transferred Bluetooth Connection and you will return back to the
Bluetooth Settings Screen
8. If you select “NO”, then you will return back to the Bluetooth Settings Screen
Bluetooth (Switch To This Device)
* Follow these steps if you are Not in the Paired/Connected Device Information Screen
1. Press the Source Button (SRC)
2. Use the volume knob to scroll through the sources
3. When the Settings Icon is in the middle of the carousel, Press in on the volume knob to select Settings
4. Once in Settings, rotate the volume knob to Bluetooth
5. Press in on the volume knob to enter Bluetooth Settings
6. Rotate the volume knob and move the halo until it is around the Pairing Icon
7. With the halo around Pairing Icon
8. Press in on the volume knob to select Bluetooth Device Pairing
9. You will now see the Bluetooth Pairing Screen that displays Five Icons that will populate with the
“+ ADD” or “Paired Device Names”
10. Use the volume knob and move the halo until it is around the Paired Device you would like to switch
Bluetooth Connection to
11. Press in on the volume knob to select the Device you would like to switch Bluetooth Connection to
12. You will now be taken to the Paired/Connection Device Information Screen
13. Use the volume knob and move the halo until it is around Switch To This Device
14. Press in on the volume knob to switch Bluetooth Connection to this device
15. Now a pop-up window will appear asking you to confirm Connection to this Device
16. Use the volume knob to Toggle between “YES” or “NO”
17. Press in on the volume knob to select your choice
18. If you select “YES”, then you have now transferred Bluetooth Connection and you will return back to the
Bluetooth Settings Screen
19. If you select “NO”, then you will return back to the Bluetooth Settings Screen
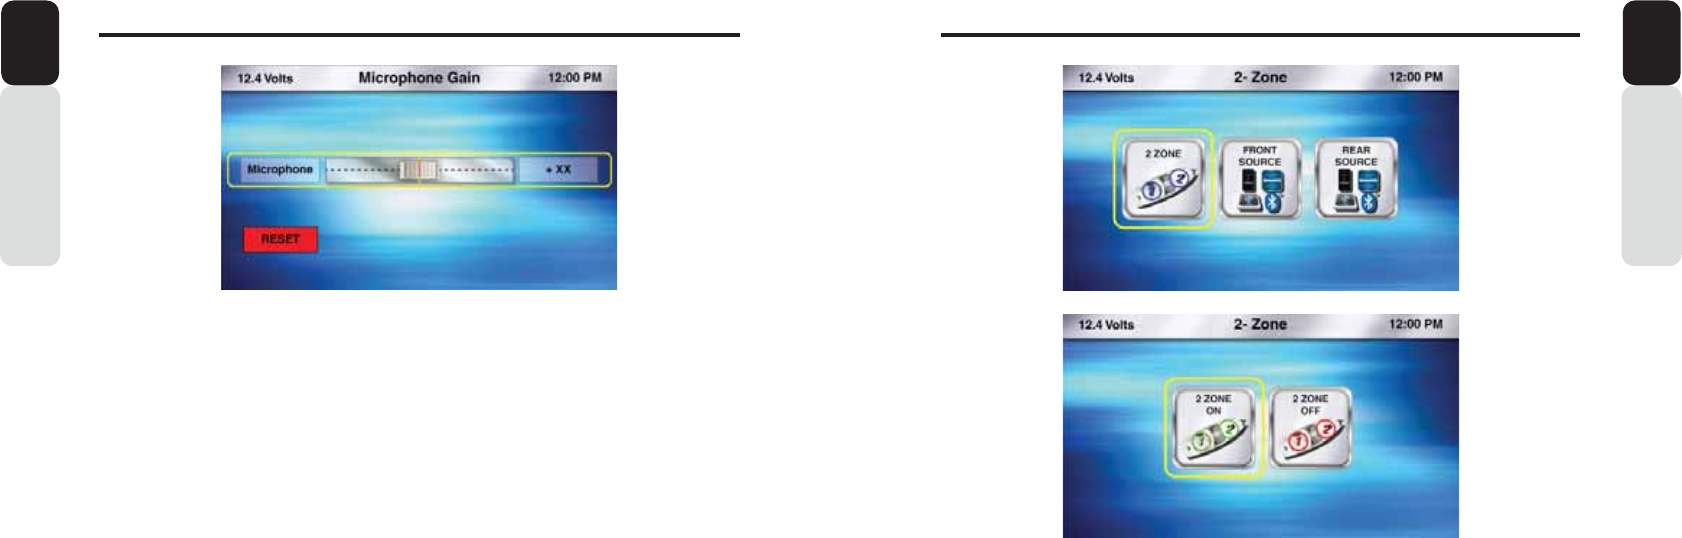
46 47
Owner’s Manual
English
6HWWLQJV
2-Zone (ON / OFF)
1. Press the Source Button (SRC)
2. Use the volume knob to scroll through the sources
3. When the 2-Zone Icon is in the middle of the carousel, Press in on the volume knob to select 2-Zone
4. Once in 2-Zone, rotate the volume knob until the halo is around 2-Zone
5. Press in on the volume knob to turn the 2-Zone Feature ON or OFF
6. Rotate the volume knob and move the halo until it is around 2-Zone ON or 2-Zone OFF
7. If you select ON, then the 2-Zone Feature will be enabled
8. If you select OFF, then the 2-Zone Feature will be disabled
9. With 2-Zone ON, you will return to the 2-Zone Menu to select Front and Rear Sources
10. With 2-Zone OFF, you will return to the Main Source Menu
NOTE:
Once a source has been selected for each Zone, you can go to the source for
Zone 1 or Zone 2 for operation and functionality.
Owner’s Manual
English
=RQH2SHUDWLRQ
Bluetooth (Microphone Gain)
1. Press the Source Button (SRC)
2. Use the volume knob to scroll through the sources
3. When the Settings Icon is in the middle of the carousel, Press in on the volume knob to select Settings
4. Once in Settings, rotate the volume knob to Bluetooth
5. Press in on the volume knob to enter Bluetooth Settings
6. Rotate the volume knob and move the halo until it is around the Microphone Gain Icon
7. With the halo around Microphone Gain Icon
8. Press in on the volume knob to select Microphone Gain
9. You will now be taken to the Microphone Gain Adjustment Screen
- The halo will automatically go around the Microphone Gain Slider
- You can use the volume knob to move the halo to the Reset Microphone Gain Icon
- If you Reset the Microphone Gain level, it will default to the middle level (+5)
10. Use the volume knob to adjust the Microphone Gain from “0” to “+10”
11. Press in on the volume knob to select the Microphone Gain level
12. You will return back to the Bluetooth Settings Screen
Note:
The Bluetooth Microphone is an optional accessory and is not included with
this unit.
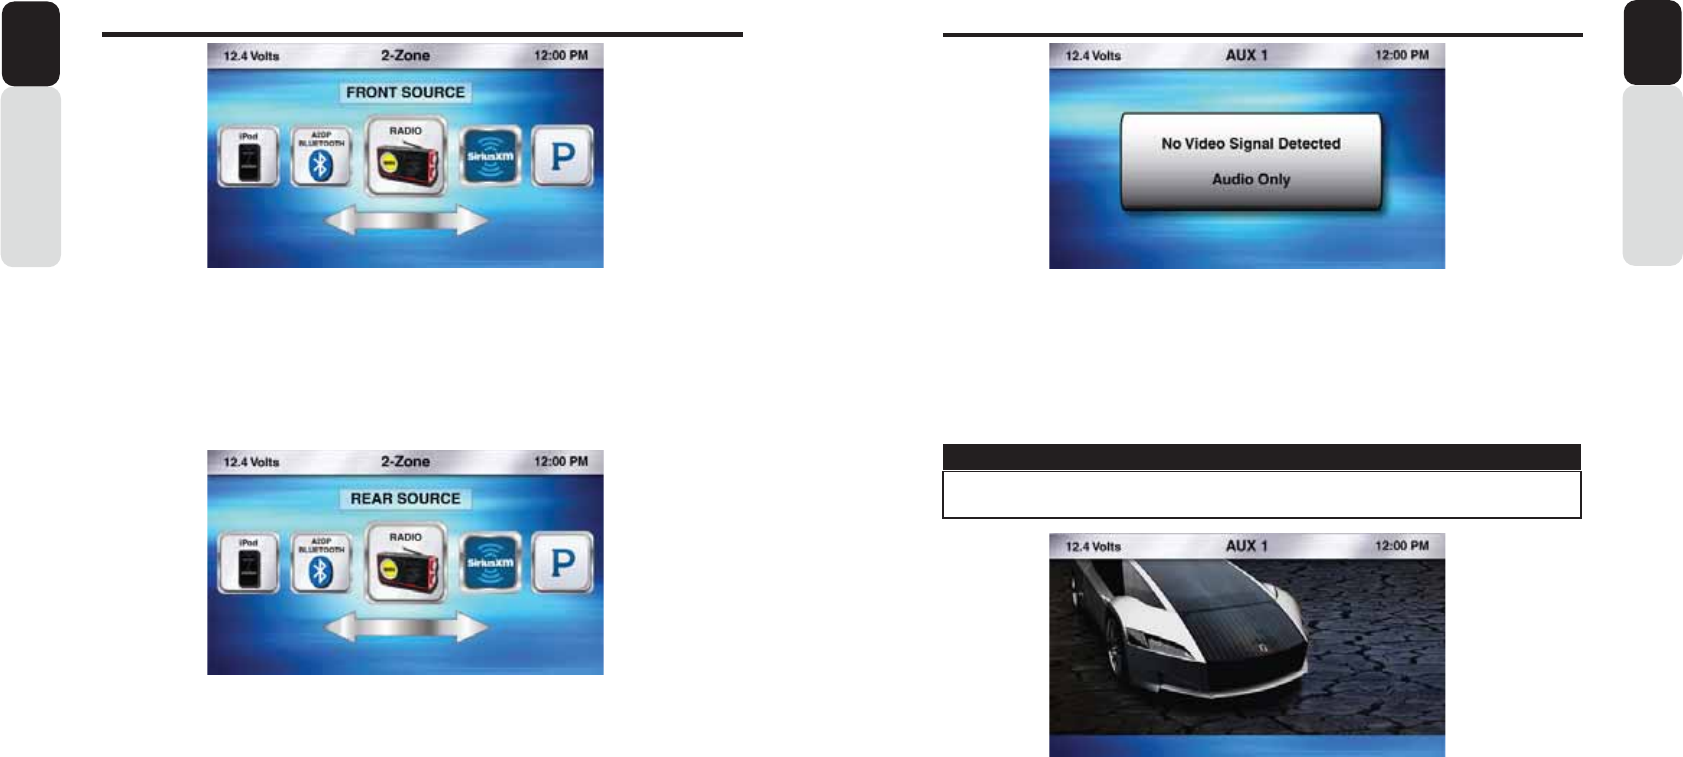
48 49
Owner’s Manual
English
=RQH2SHUDWLRQ
AUX 1 and AUX 2 (Audio)
1. Press the Source Button (SRC)
2. Use the volume knob to scroll through the sources
3. When the AUX 1 or AUX 2 Icon is in the middle of the carousel
4. Press in on the volume knob to select AUX 1 or AUX 2
5. You can now listen to the device that has been connected to the AUX 1 or AUX 2 RCA Inputs
** If you have a device that plays Audio and Video and you are not seeing the video image,
please check the video input on the 0: has been connected to the video output from your
Audio and Video Device.
AUX 1 and AUX 2 (Video)
1. Press the Source Button (SRC)
2. Use the volume knob to scroll through the sources
3. When the AUX 1 or AUX 2 Icon is in the middle of the carousel
4. Press in on the volume knob to select AUX 1 or AUX 2
5. You can now watch video from the device that has been connected to the AUX 1 or AUX 2 RCA
Inputs
** If you have a device that plays Audio and Video and you are not seeing the video image, please check
the video input on the 0: has been connected to the video output from your Audio and Video
Device.
** Verify the Video Interlock Wire has been connected and the correct sequence has been followed.
Note: When the video signal is detected in AUX1/AUX2, then the status bar would appear displaying
the batte
r
y voltage, Source name (AUX1/AUX2) and the clock for 3 secondsand then disappear.
VIEWING A VIDEO SIGNAL ON ANY DASH MOUNTED MONITOR WHILE IN MOTION
IS PROHIBITED BY LAW.
WARNING
$8;DQG$8;2SHUDWLRQ
Owner’s Manual
English
2-Zone (Front Source)
1. Press the Source Button (SRC)
2. Use the volume knob to scroll through the sources
3. When the 2-Zone Icon is in the middle of the carousel, Press in on the volume knob to select 2-Zone
4. Once in 2-Zone, rotate the volume knob until the halo is around Front Source
5. Press in on the volume knob to select Front Source
6. You will now see the Main Source Menu with a prompt to select the Front Source
7. Use the volume knob to scroll through the Sources you would like to use for the Front Source
8. Once you select a source for the Front Source (Zone 1), you will be taken to the 2-Zone Menu to make
a Source selection for the Rear Source (Zone 2)
2-Zone (Rear Source)
1. Press the Source Button (SRC)
2. Use the volume knob to scroll through the sources
3. When the 2-Zone Icon is in the middle of the carousel, Press in on the volume knob to select 2-Zone
4. Once in 2-Zone, rotate the volume knob until the halo is around Rear Source
5. Press in on the volume knob to select Rear Source
6. You will now see the Main Source Menu with a prompt to select the Rear Source
7. Use the volume knob to scroll through the Sources you would like to use for the Rear Source
8. Once you select a source for the Rear Source (Zone 2), you will return to the Play Screen for the Front
Source.
9. If you want to chnage the volume level for Rear Source,
You need to press AUDIO Button and select
the source 2 ZOne. Then it appears the 2 Zone Volume seytting and volume can be changed for both
Zone 1 and Zone 2 separatel
y
. other setting like bass treble will remain same as Zone 1 source and
cannot be changed
Note: While 2 Zone setting is
T
urned ONand if you press any other source than (excluding FRONT
Source or REAR source) 2 Zone Source, there won’t be any response.
T
o select any other
source, you need to first
T
urn OFF the 2 Zone setting and then select any other source to Pla
y
.
It is not allowed to select same source as FRONT and REAR source. If you select also, there
won’t be any response from DC.
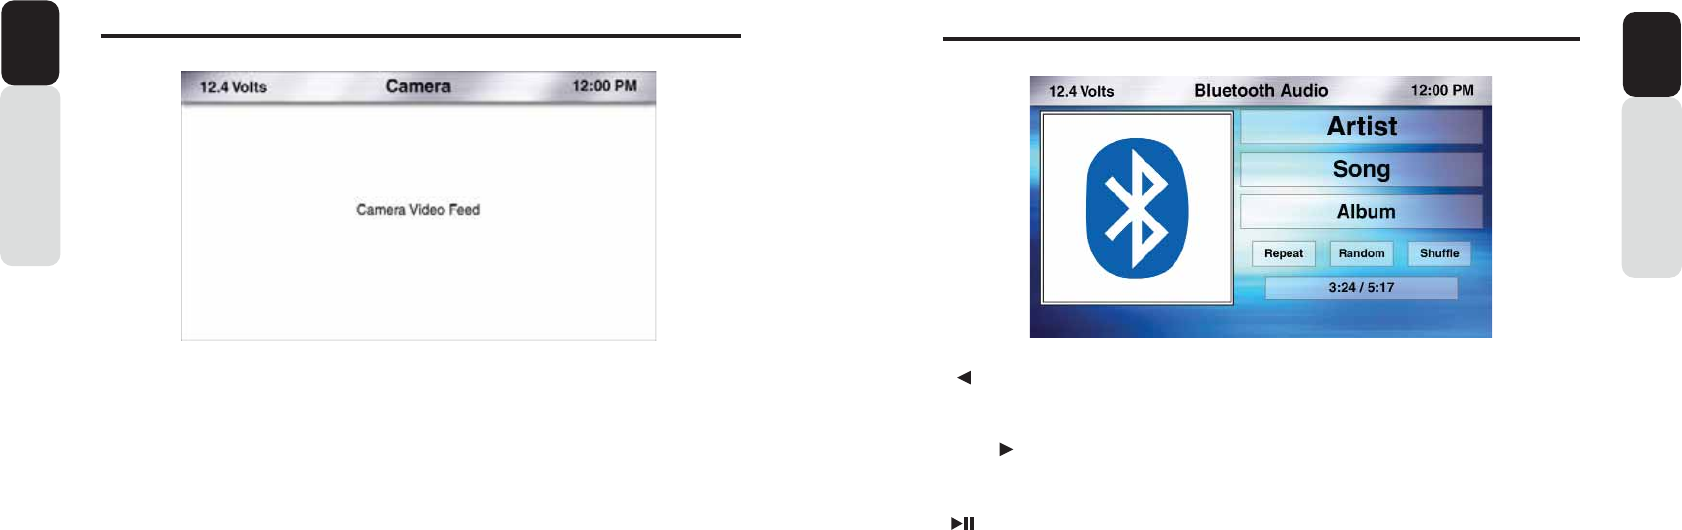
50 51
&DPHUD2SHUDWLRQ
[ SEEK] Seek Back Button
- Press and release button to go back to previous song
- Press and Hold for Three Seconds to scan back through song, release and song will continue playing
[SEEK ] Seek Forward Button
- Press and release button to advance to next song
- Press and Hold for Three Seconds to scan through song, release and song will continue playing
[ ] Play / Pause Button
- Press to PAUSE current song
- When track is PAUSED, press again to continue playing current song (iPod, Bluetooth Audio, USB, and
Pandora)
[BACK] Back Button
- Press to go back to previous Menu or Settings Screen
- Press to backwards in multiple Menu Screens
- Press to return to current source play screen from Menu or Settings Screen
Bluetooth Audio
1. Press the Source Button (SRC)
2. Use the volume knob to scroll through the sources
3. When the Bluetooth Audio Icon is in the middle of the carousel
4. Press in on the volume knob to select Bluetooth Audio
5. You will now be taken to the Bluetooth Audio Play Screen
Owner’s Manual
English
%OXHWRRWK$XGLR2SHUDWLRQ
Owner’s Manual
English
Camera
1. Press the Source Button (SRC)
2. Use the volume knob to scroll through the sources
3. When the Camera Icon is in the middle of the carousel
4. Press in on the volume knob to select Camera
5. You can now view the image from the Camera
** If you see a “No Video Signal Detected” message on the screen, please check the Camera RCA input on
the 0: has been connected to the video output from your Rear Vision Camera (Page 88).**
Verify the Video Interlock Wire has been connected and the correct sequence has been followed.
Camera (Using Camera Trigger Wire)
1. While in any source, listening to audio from that source and then view Camera Image
2. Provide a +12v signal to the Camera Trigger Wire (Purple) on the 0: from a +12v Switch or an Open
Accessory Switch.
3. When the switch is ON, you can view the Camera Image and listen to the audio source
4. If you want to change channels or any other features for the source that is playing, you can place the
Switch to the OFF position and the Camera Image will go away and you will now see the source you
Want to adjust or change.
5. To return back to viewing the Camera Image, place the switch to the ON position
** Refer to the Installation Guide for wiring a switch with and without using a SPDT Relay (Page 88).
2-Zone with Camera
1. Press the Source Button (SRC)
2. Use the volume knob to scroll through the sources
3. When the 2-Zone Icon is in the middle of the carousel
4. Press in on the volume knob to select 2-Zone
5. Select Camera for the Front Source (Zone 1)
6. Select an Audio Source for the Rear Source (Zone 2)
7. You can now view the image from the Camera
8. Audio will only be heard out of the speakers connected to Zone 2.
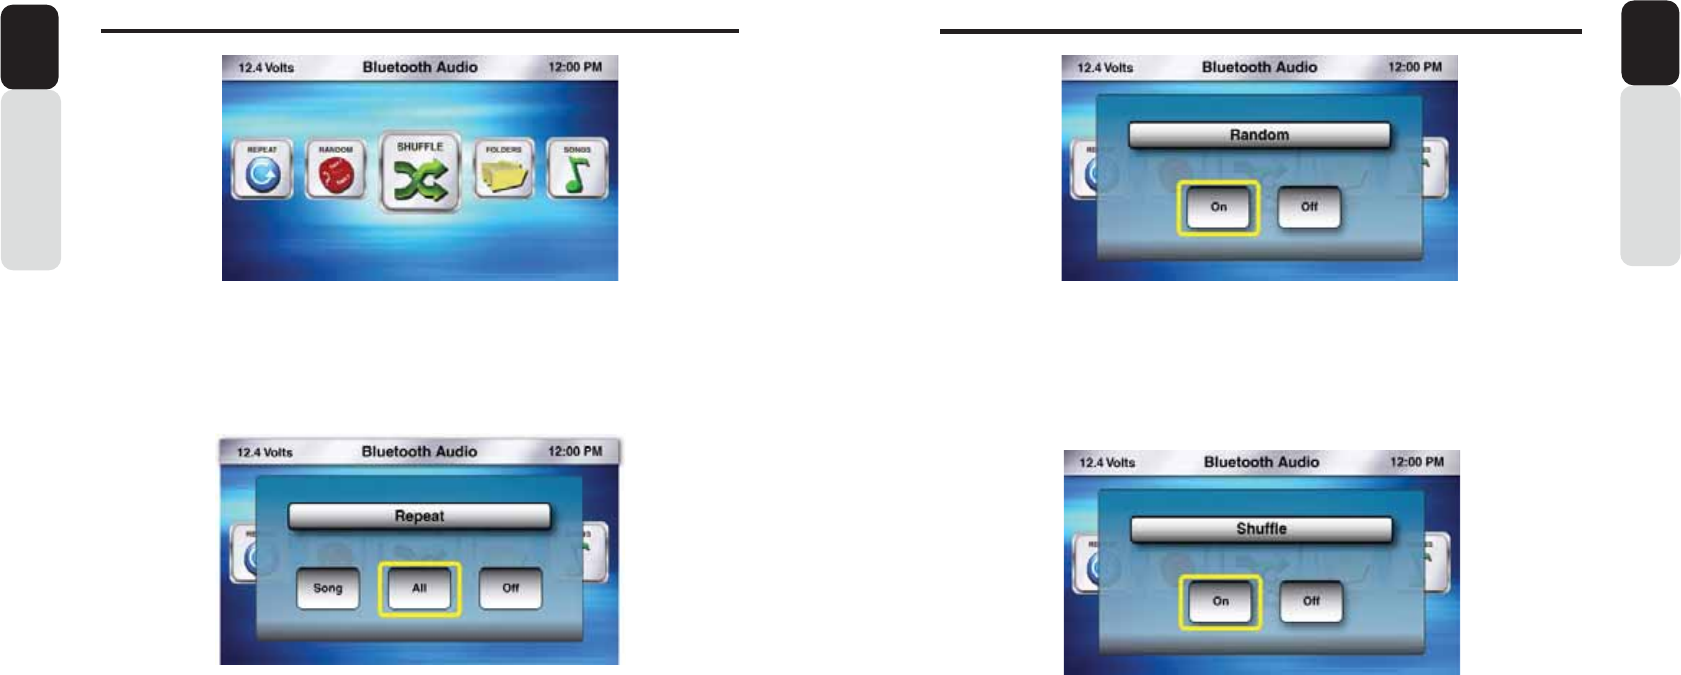
52 53
%OXHWRRWK$XGLR2SHUDWLRQ
Owner’s Manual
English
Shuffle
1. From the Bluetooth Audio Play Screen, Press the MENU Button
2. Use the volume knob to scroll through options until the Shuffle Icon is in the middle of the carousel
3. Press in on the volume knob to select Shuffle
4. Now a pop-up window will appear with Shuffle options:
- ON (Turns the Shuffle Feature ON)
- OFF (Turns the Shuffle Feature OFF)
5. After your choice has been made, you will see the Shuffle Icon appear on the Bluetooth Audio Play
Screen
Folder Browsing
1. From the Bluetooth Audio Play Screen, Press the MENU Button
2. Use the volume knob to scroll through options until the Folders Icon is in the middle of the carousel
3. Press in on the volume knob to select Folders
4. Now a pop-up window will appear with “AVRCP 1.4 not supported” when connected device does not
support AVRCP 1.4 profile
5. When AVRCP 1.4 profile is supported, then list of folder will appear when Folder Option is selected
6. To search the folder, Press Menu and select alphabet/Numbers. Then list of folders starting wiith
entered alphabet/number will appear
Random
1. From the Bluetooth Audio Play Screen, Press the MENU Button
2. Use the volume knob to scroll through options until the Random Icon is in the middle of the carousel
3. Press in on the volume knob to select Random
4. Now a pop-up window will appear with Random options:
- ON (Turns the Random Feature ON)
- OFF (Turns the Random Feature OFF)
5. After your choice has been made, you will see the Random Icon appear on the Bluetooth Audio Play
Screen
%OXHWRRWK$XGLR2SHUDWLRQ
Owner’s Manual
English
[MENU] Menu Button
Press to access additional options
- Repeat (Song, Playlist, All, Off)
- Random (ON or OFF)
- Shuffle (ON or OFF)
- Folder Browsing
- Paired Devices
Repeat
1. From the Bluetooth Audio Play Screen, Press the MENU Button
2. Use the volume knob to scroll through options until the Repeat Icon is in the middle of the carousel
3. Press in on the volume knob to select Repeat
4. Now a pop-up window will appear with Repeat options:
- Song (Repeats current song)
- All (Repeats All songs)
- Off (Turns OFF the Repeat Feature)
5. After your choice has been made, you will see the Repeat Icon appear on the Bluetooth Audio Play
Screen

54 55
%OXHWRRWK$XGLR2SHUDWLRQ
Owner’s Manual
English
Bluetooth (Delete This Device)
1. When you are at the Paired/Connected Device Information Screen
2. Use the volume knob and move the halo until it is around Delete This Device
3. Press in on the volume knob to Delete This Device
4. Now a pop-up window will appear asking you to confirm you want to Delete This Device
5. Use the volume knob to Toggle between “YES” or “NO”
6. Press in on the volume knob to select your choice
7. If you select “YES”, then you have now Deleted This Device and you will return back to the Bluetooth
Audio Settings Screen
8. If you select “NO”, then you will return back to the Bluetooth Audio Settings Screen
Bluetooth (Switch To This Device)
1. When you are at the Paired/Connected Device Information Screen
2. Use the volume knob and move the halo until it is around Switch To This Device
3. Press in on the volume knob to switch Bluetooth Connection to this device
4. Now a pop-up window will appear asking you to Confirm Connection to this Device
5. Use the volume knob to Toggle between “YES” or “NO”
6. Press in on the volume knob to select your choice
7. If you select “YES”, then you have now transferred Bluetooth Connection and you will return back to
the Bluetooth Audio Settings Screen
8. If you select “NO”, then you will return back to the Bluetooth Audio Settings Screen
%OXHWRRWK$XGLR2SHUDWLRQ
Owner’s Manual
English
Paired Devices (Paired/Connected Device Information Screen)
This screen is where you can view the Paired Bluetooth Information, Switch Bluetooth connection
To a different Paired Device and Delete the Paired Device
Paired Devices
1. From the Bluetooth Audio Play Screen, Press the MENU Button
2. Use the volume knob to scroll through options until the Paired Devices Icon is in the Middle of the
carousel
3. Press in on the volume knob to select Paired Devices
4. Now you will see your Paired Device Icons
5. Use the volume knob to move The halo until it is around the Paired Device that you would like to either
Switch Connection or Delete
6. Press in on the volume knob to select the Paired Device
7. Once your selection has been made, you will be taken to the Bluetooth Paired/Connected Device
Information Screen
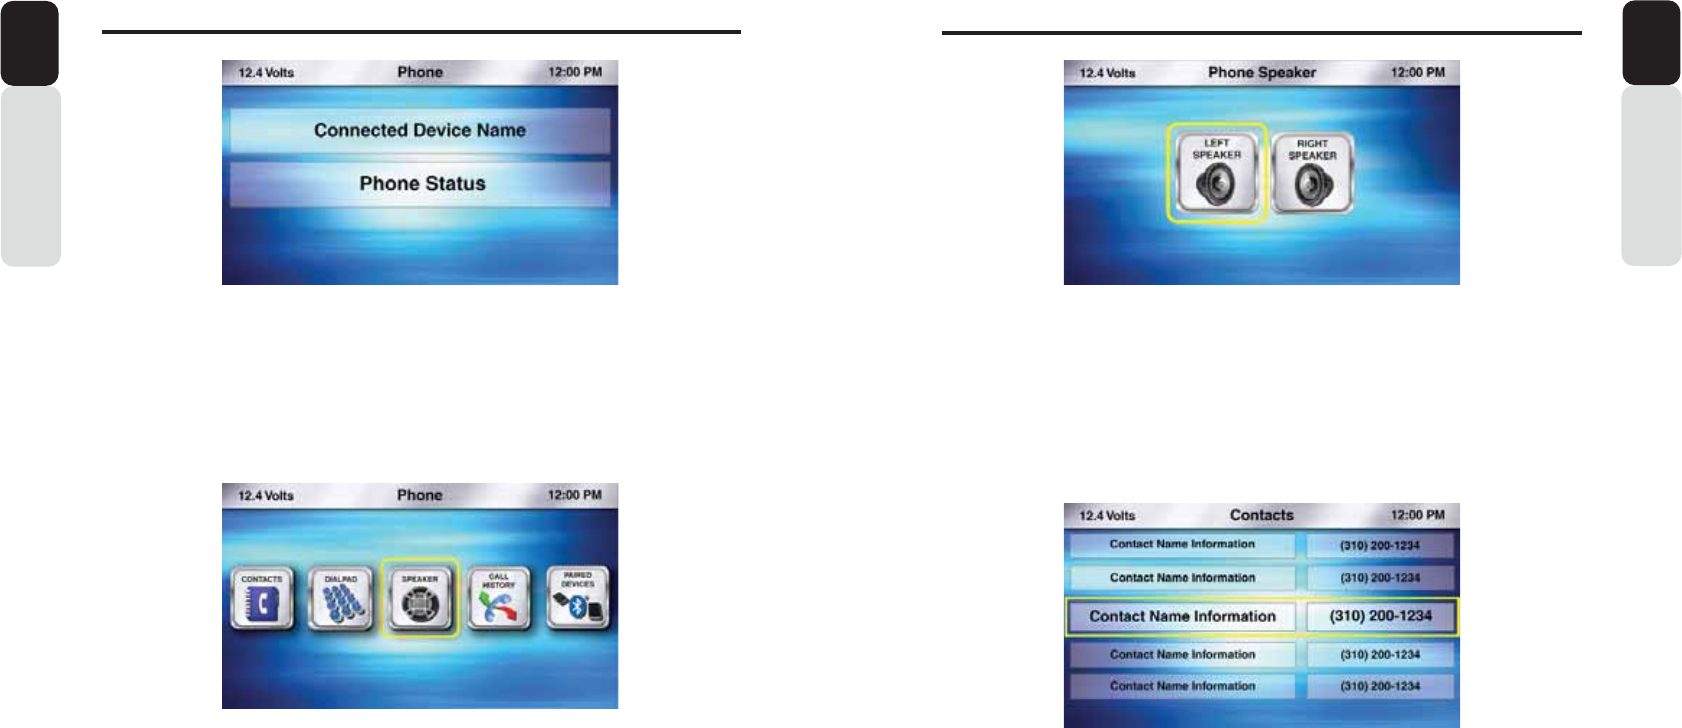
56 57
3KRQH2SHUDWLRQ
Owner’s Manual
English
Speaker
1. While in the main Phone Screen
2. Press the Menu Button
3. You will now see the Phone Menu Options
4. Use the volume knob to move the halo until it is around the Speaker Icon
5. Press in on the volume knob to select Speaker
6. Use the volume knob to change which speaker you would like your Phone Call Audio to be heard from.
* Default = Right Front Speaker
Contacts
1. While in the main Phone Screen
2. Press the Menu Button
3. You will now see the Phone Menu Options
4. Use the volume knob to move the halo until it is around the Contacts Icon
5. Press in on the volume knob to select Contacts
6. You will now see the list of Contacts that are on the Paired and Connected Phone
7. Use the volume knob to scroll through your list of Contacts
8. By pressing in on the volume knob to select a Contact, you will now place a phone call to that contact
3KRQH2SHUDWLRQ
Owner’s Manual
English
Phone
1. Press the Source Button (SRC)
2. Use the volume knob to scroll through the sources
3. When the Phone Icon is in the middle of the carousel
4. Press in on the volume knob to select Phone
5. You will now be taken to the main Phone Screen
Phone Menu
1. While in the main Phone Screen
2. Press the Menu Button
3. You will now see the Phone Menu Options
- Speaker (Select Left Front or Right Front Speaker for Hands-Free Calling Audio)
- Contacts (View list of Contact from Paired and Connected Phone)
- Dial Pad (To Manually Enter in a Phone Number to Call)
- Call History (View your Missed Calls, Incoming Calls, Outgoing Calls)
- Paired Devices (View Paired/Connected Phone Information, Switch Paired Device, Delete Device)
4. Press in on the volume knob to make your selection
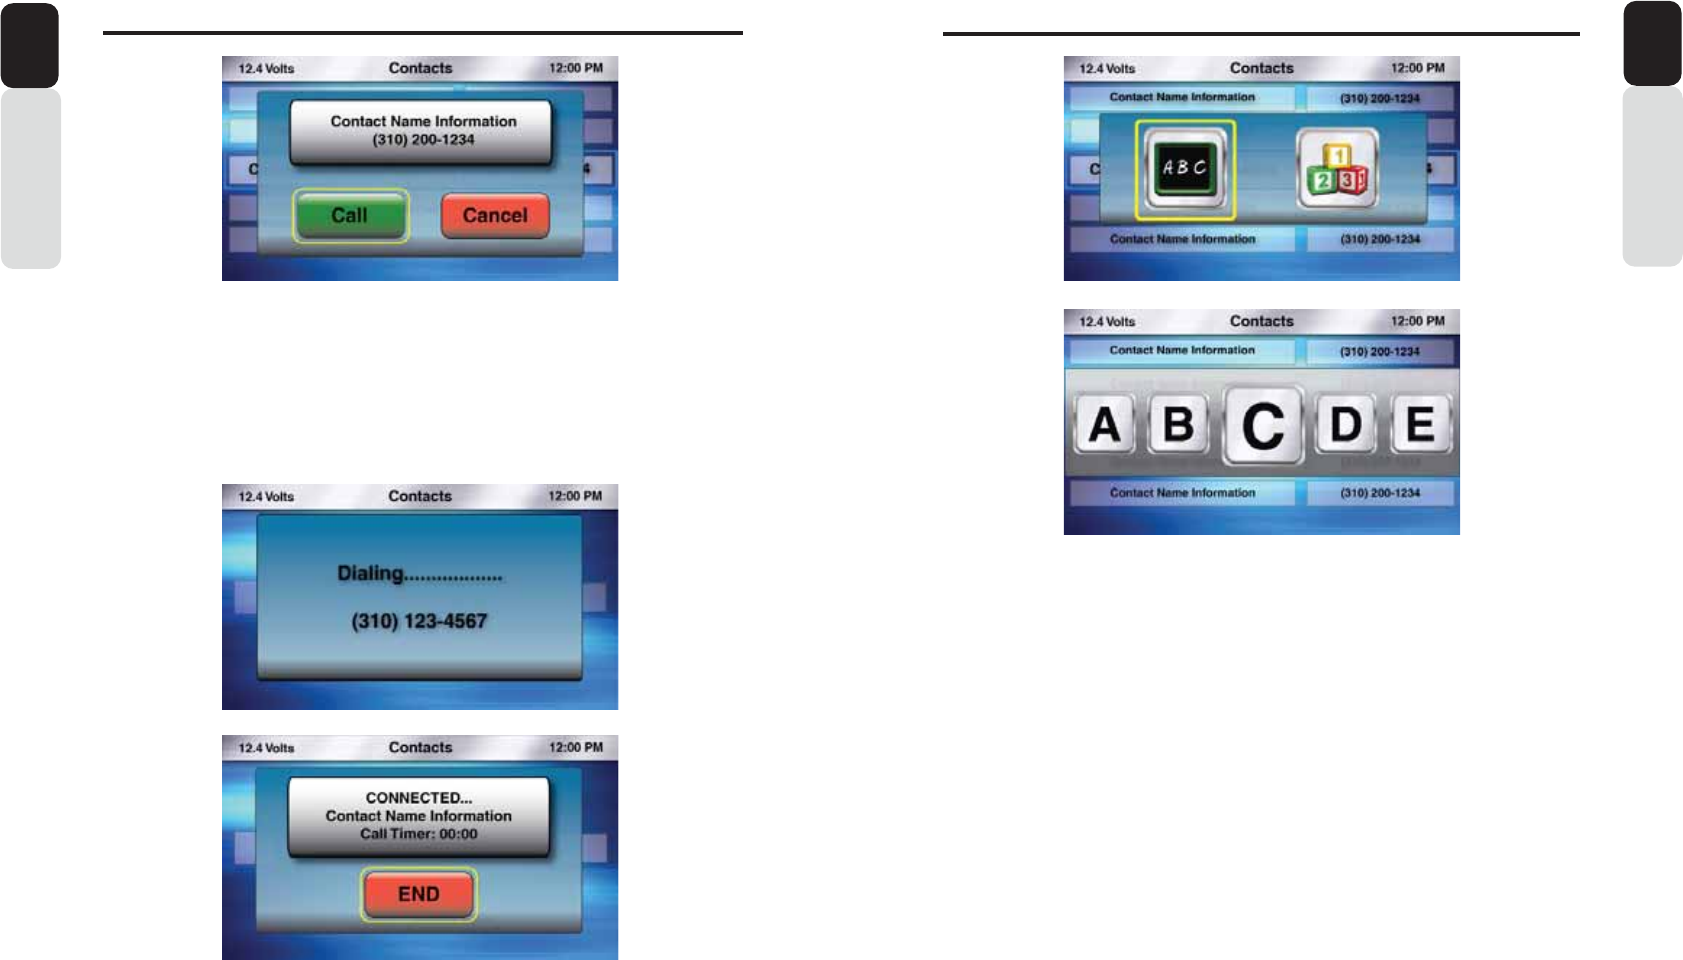
58 59
3KRQH2SHUDWLRQ
Owner’s Manual
English
Contact Search by ABC or 123
1. From the main Phone Screen, Press the MENU Button
2. Use the volume knob to scroll through options until the Contacts Icon is in the middle of the carousel
3. Press in on the volume knob to select Contacts
4. The list of your Contacts will now appear
5. Press the MENU Button
6. Now a pop-up window will appear with two options to choose from: “ABC” or “123”
- “ABC” is search by Letter
- “123” is search by Number
7. Use the volume knob to toggle between the two options by moving the halo around the ABC icon
8. Press in on the volume knob to select “ABC” or “123”
9. Now a pop-up window will appear with Letters/Numbers in icons
10. Use the volume knob to scroll through the Letters/Numbers until the Letter/Number you want is in the
middle of the carousel.
11. Press in on the volume knob to select that Letter/Number
12. You will now see a list of Contacts
13. Use the volume knob to scroll through the list of Contacts
14. When the Contact you would like to call is in the middle of the screen
15. Press in on the volume knob to dial that Contact
16. A pop-up window will appear with options to place a CALL or CANCEL
17. If you select CALL, the call will be placed and the display will show “DIALING....”, then “CONNECTED”
18. With the phone call in place, the display will show the Caller ID, Timer and a END CALL Button
19. When the call is ended, you will go back to the last played source
Note: In all search option (for all source option) , Searching is restricted to starting Alphabet/Number only
3KRQH2SHUDWLRQ
Owner’s Manual
English
Placing a Call from Contact List
1. While in list of Contacts
2. Use the volume knob to scroll through your list of Contacts
3. When the Contact Person’s Information is in the middle of the screen
4. Press in on the volume knob to place a call to that Contact
5. A pop-up window will appear with options to place a CALL or CANCEL
6. If you select CALL, the call will be placed and the display will show “DIALING....”, then “CONNECTED”
7. With the phone call in place, the display will show the Caller ID, Timer and a END CALL Button
8. When the call is ended, you will go back to the last played source
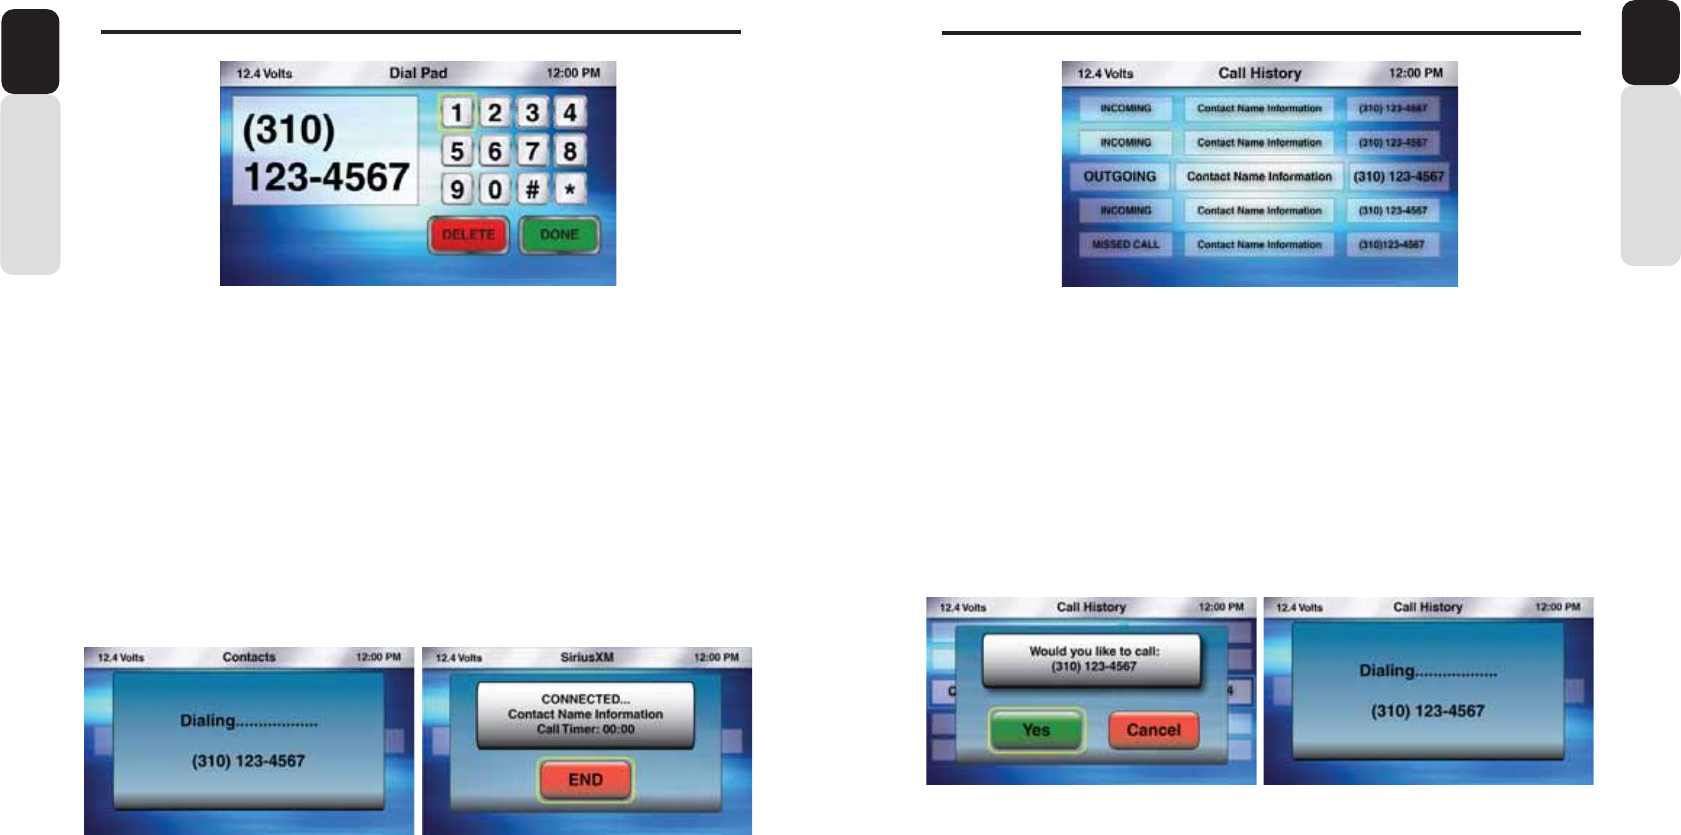
60 61
3KRQH2SHUDWLRQ
Owner’s Manual
English
Phone Call History
1. From the main Phone Screen, Press the MENU Button
2. Use the volume knob to scroll through options until the Call History Icon is in the middle of the
carousel
3. Press in on the volume knob to select Call History
4. The Phone’s Call History will now be listed and indicating Missed Call, Incoming Call, Outgoing Call
5. Use the volume knob to scroll through the list of your Call History
6. When the middle of the screen shows a Missed Call, Incoming Call or Outgoing Call that you would
like to call
7. Press in on the volume knob to place a call
8. A pop-up window will appear with options to place a CALL or CANCEL
9. If you select CALL, the call will be placed and the display will show “DIALING....”, Then “CONNECTED”
10. With the phone call in place, the display will show the Caller ID, Timer and a END CALL Button
11. When the call is ended, you will go back to the last played source
3KRQH2SHUDWLRQ
Owner’s Manual
English
Phone Dial Pad
1. From the main Phone Screen, Press the MENU Button
2. Use the volume knob to scroll through options until the Dial Pad Icon is in the middle of the carousel
3. Press in on the volume knob to select Dial Pad
4. The Phone Dial Pad will now appear
5. Use the volume knob to scroll through the numbers, and Press in on the volume knob to select one
number at a time
6. Select all numbers necessary to place the phone call
7. Once the phone number is complete, use the volume knob to scroll to the bottom of the screen until
you place the halo around the DONE Button
8. If you input a wrong number, scroll to the bottom of the screen until you place the halo around the
DELETE Button. Press in on the volume knob to Delete the wrong number, then scroll back to the
Numbers and re-enter the correct number
9. If you select the DONE Button, you will now be asked to confirm that you would like to dial the number
you had entered
10. If you select “YES” the phone call will be placed
11. If you select “CANCEL” you will return back to the Phone Menu Screen
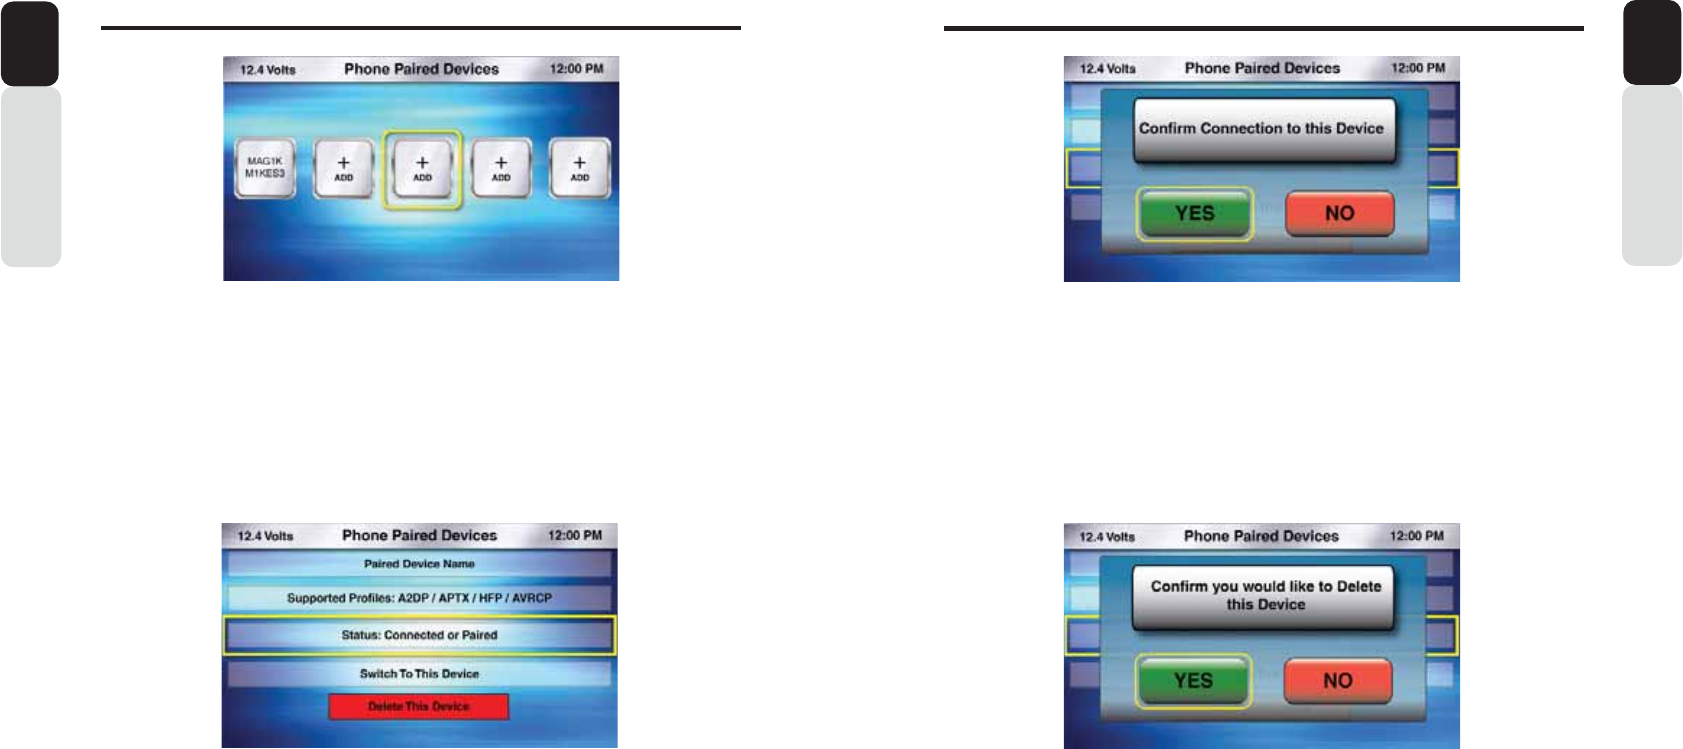
62 63
3KRQH2SHUDWLRQ
Owner’s Manual
English
Phone (Delete This Device)
1. When you are at the Paired/Connected Device Information Screen
2. Use the volume knob and move the halo until it is around Delete This Device
3. Press in on the volume knob to Delete This Device
4. Now a pop-up window will appear asking you to confirm you want to Delete This Device
5. Use the volume knob to Toggle between “YES” or “NO”
6. Press in on the volume knob to select your choice
7. If you select “YES”, then you have now Deleted This Device and you will return back to the Last
played source
8. If you select “NO”, then you will return back to the Phone Menu Screen
Phone (Switch To This Device)
1. When you are at the Paired/Connected Device Information Screen
2. Use the volume knob and move the halo until it is around Switch To This Device
3. Press in on the volume knob to switch Phone Connection to this device
4. Now a pop-up window will appear asking you to Confirm Connection to this Device
5. Use the volume knob to Toggle between “YES” or “NO”
6. Press in on the volume knob to select your choice
7. If you select “YES”, then you have now transferred Phone Connection and you will return back to the
last played source
8. If you select “NO”, then you will return back to the Phone Menu Screen
3KRQH2SHUDWLRQ
Owner’s Manual
English
Paired Devices (Paired/Connected Device Information Screen)
This screen is where you can view the Paired Bluetooth Information, Switch Bluetooth connection
to a different Paired Device and Delete the Paired Device
Paired Devices
1. From the main Phone Screen, Press the MENU Button
2. Use the volume knob to scroll through options until the Paired Devices Icon is in the middle of the
carousel
3. Press in on the volume knob to select Paired Devices
4. Now you will see your Paired Device Icons
5. Use the volume knob to move the halo until it is around the Paired Device that you would like to either
Switch Connection or Delete
6. Press in on the volume knob to select the Paired Device
7. Once your selection has been made, you will be taken to the Phone Paired/Connected Device
Information Screen
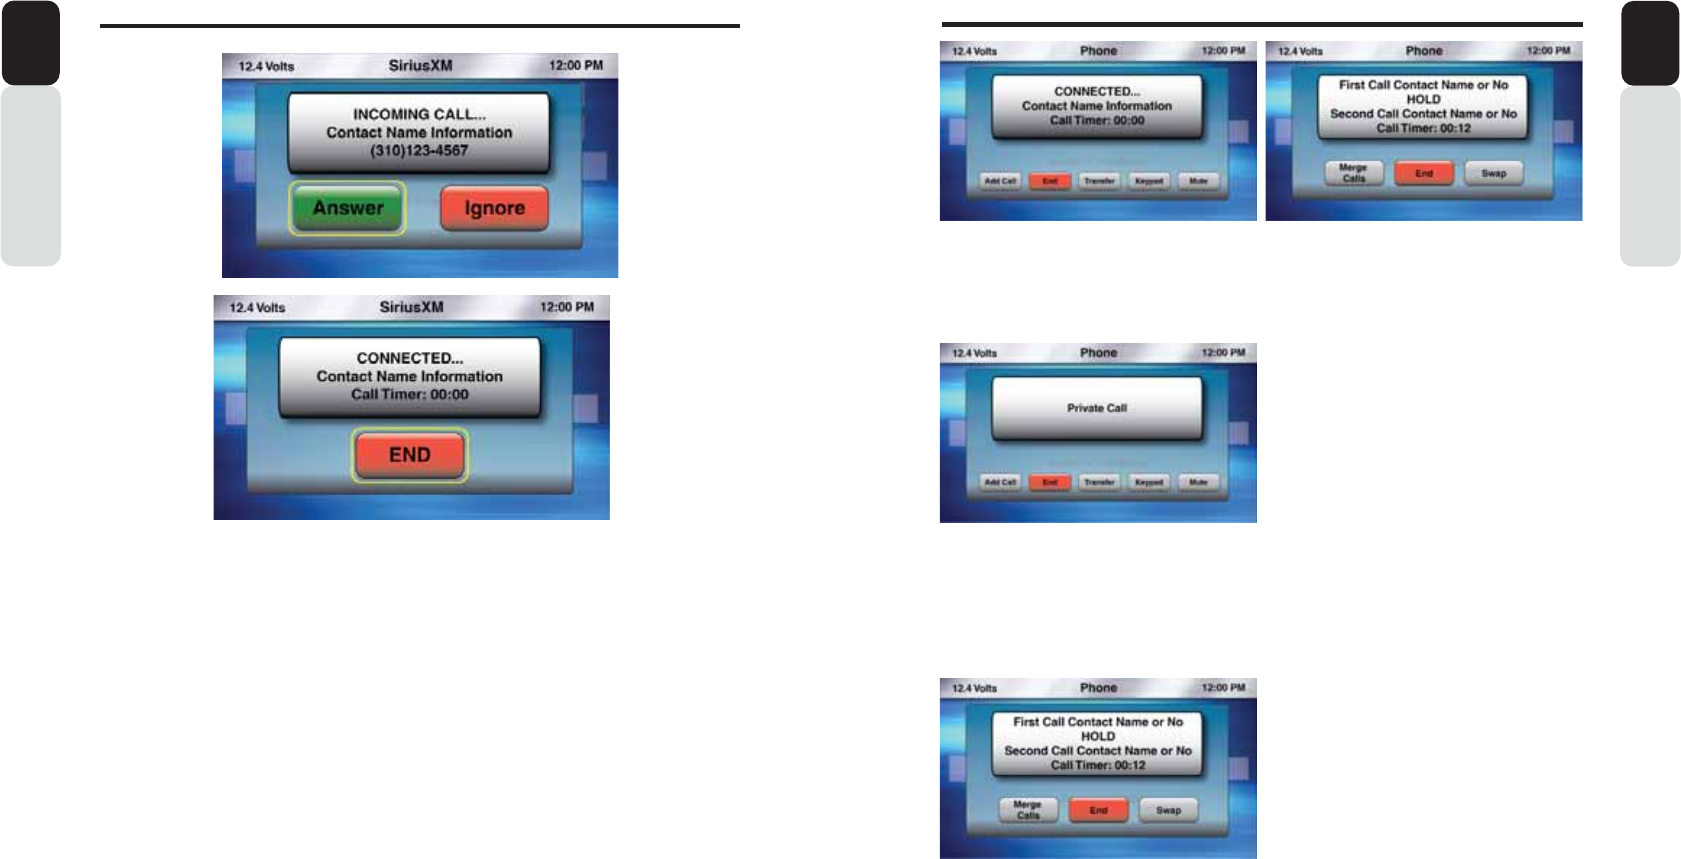
64 65
3KRQH2SHUDWLRQ
Make a second Incoming Call (Call Waiting)
1. When you are in the Active call and you want to have a second incoming call
2. Press Answer button the DC when the incoming call screen is appeared
3. Once the 2nd call is answered by press of ANSWER button, the first call goes to Held
3KRQH2SHUDWLRQ
Owner’s Manual
English
Owner’s Manual
English
Incoming Call
1. If you receive an Incoming Call while in any source, a pop-up window will appear
2. You can choose to ANSWER or IGNORE the incoming phone call
3. The halo will default to the ANSWER Button, so to Answer the call you would just press in on the
Volume knob to answer the phone call
4. Use the volume knob to move the halo to the IGNORE Button and then press in on the volume knob to
ignore the phone call and return to the play screen of the source you are currently using
5. If you answer the phone call, a pop-up window will appear showing the call status and an option To END
the phone call
6. While the phone call is in progress, this Call Status window will stay active until you End the phone Call
or if the call has been ended by the person calling in
7. When the call has been completed, you will return to the source you are currently using
Transfer Call
1. When you are in the Active call press the TRANSFER button
2. 0: suppo
r
ted transfer from Hands Free mode to private mode (0: to Mobile Phone)
3. 0: suppo
r
ted from Private mode to Hands free mode (Mobile Phone to 0:)
4. During an incoming (in band ringtone) or outgoing call the 0: cannot establish an audio connection
with the linked Mobile phone, the 0: shall transfer to private call
5. When the call is ended, you will go back to the last played source
Swap Call / Conference Call
1. User can swap the two call by pressing Swap option on Display Controller
2. User can also merge the 3 calls to make it conference call, press merge button on the screen.
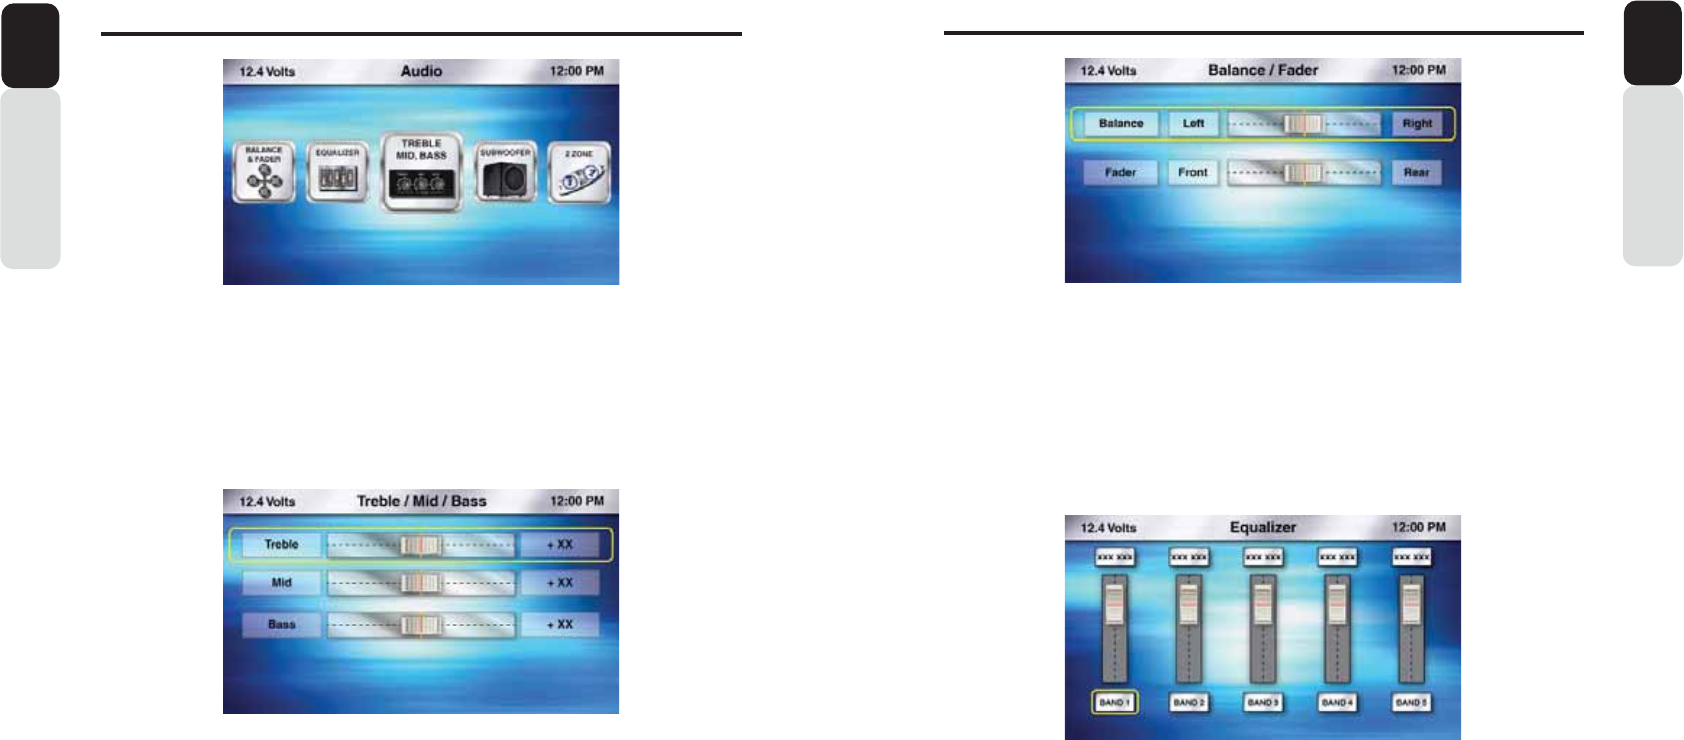
66 67
$XGLR6HWWLQJV $XGLR6HWWLQJV
Owner’s ManualEnglish
Audio Settings
1. Press the Audio Button
2. Use the volume knob to scroll through the Audio Settings Carousel
3. Press in on the volume knob to select the Audio Settings you would like to adjust
- Treble / Mid / Bass (Adjust the Treble, Mid and Bass levels from -10 to 10)
- Balance / Fader (Adjust the sound position from 0 to 60 from Left to Right and Front to Rear)
- Equalizer (Adjust the frequency from -10 to 10 and level for 5-bands)
- Source Volume Control (SVC) (Adjust the volume level for each source from 0 to 60)
- Subwoofer (Adjust the Volume from 0-60, Frequency and Phase from -10 to 10)
- 2-Zone (Adjust the volume from 0-60 for Zone 1, Zone 2 and Both)
Treble / Mid / Bass
1. Press the Audio Button
2. Use the volume knob to scroll until the Treble/Mid/Bass Icon is in the middle
3. Press in on the volume knob to select Treble/Mid/Bass
4. Rotate the volume knob to adjust the Tweeter level (-10 to +10)
5. When you have completed adjusting the Tweeter level, press in on the volume knob
6. You will see the halo around the Mid sound adjustment slider
7. Rotate the volume knob to adjust the Mid Level (-10 to +10)
8. When you have completed adjusting the Mid level, press in on the volume knob
9. You will see the halo around the Bass sound adjustment slider
10. Rotate the volume knob to adjust the Bass Level (-10 to +10)
11. When you have completed adjusting the Bass Level, press in on the volume knob
Owner’s Manual
English
Balance / Fader
1. Press the Audio Button
2. Use the volume knob to scroll until the Balance/Fader Icon is in the middle
3. Press in on the volume knob to select Balance/Fader
4. Rotate the volume knob to adjust the Balance Level (Left, Center, Right)
5. When you have completed adjusting the Balance level, press in on the volume knob
6. You will see the halo around the Fader Level adjust met slider
7. Rotate the volume knob to adjust the Fader Level (Front, Center, Rear)
8. When you have completed adjusting the Fader level, press in on the volume knob
9. You will see the halo around the Reset Button. If you select Reset, all adjustments will Adjust back to
the default level (0)
10. Press the Back Button to return to the Audio Settings Carousel
Equalizer
1. Press the Audio Button
2. Press in on the volume knob to switch Equalizer Bands. Each Press of the volume knob will advance
you to the next Equalizer Band
3. Adjust the Equalizer Band by rotating the volume knob
4. Once the Equalizer Band has been adjusted, Press in on the volume knob to switch to the next Band
5. If you would like to reset the Equalizer, Press in on the volume knob until the halo is around the
Defeat Icon. Then Press in on the volume knob to reset the Equalizer back to Flat (level = 0)
6. Press the Back Button to return to the Audio Settings Carousel when finished
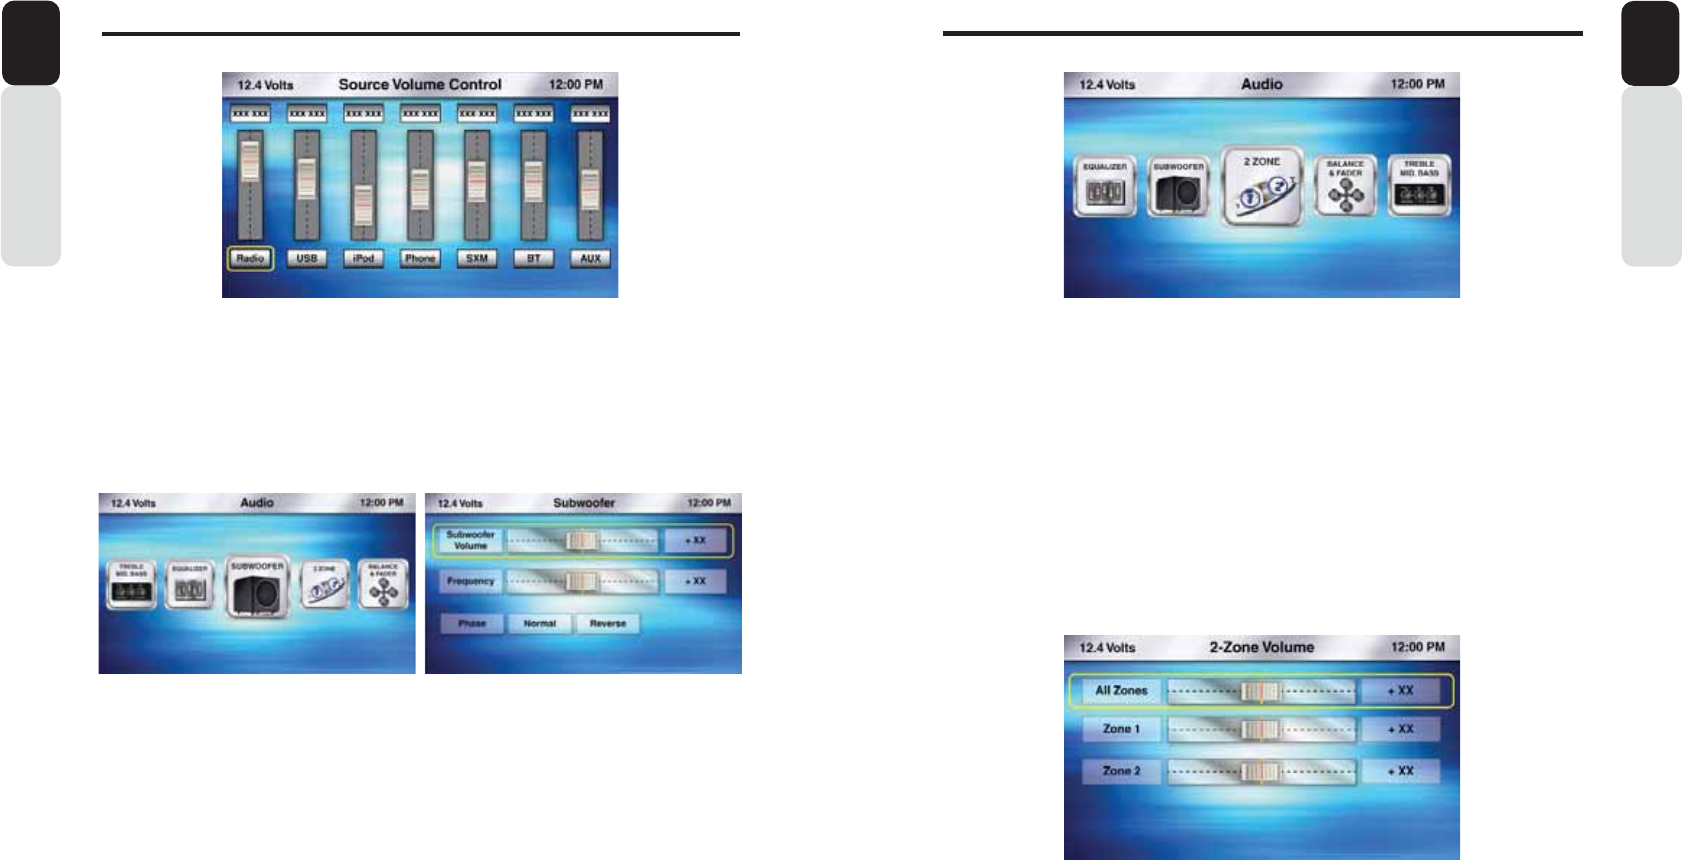
68 69
$XGLR6HWWLQJV
Owner’s Manual
English
$XGLR6HWWLQJV
Owner’s Manual
English
Source Volume Control (SVC)
1. Press the Audio Button
2. Press in on the volume knob to switch through Sources. Each Press of the volume knob will advance
you to the next Source.
3. Adjust the Source Volume by rotating the volume knob
4. Once the Source Volume has been adjusted, Press in on the volume knob to switch to the next Source
5. Press the Back Button to return to the Audio Settings Carousel when finished
Subwoofer
1. Press the Audio Button
2. Use the volume knob to scroll until the Subwoofer Icon is in the middle
3. Press in on the volume knob to select Subwoofer
4. Rotate the volume knob to adjust the Subwoofer Volume (-10 to +10)
5. When you have completed adjusting the Subwoofer Volume, press in on the volume knob
6. You will see the halo around the Frequency adjustment slider
7. Rotate the volume knob to adjust the Frequency
8. When you have completed adjusting the Frequency, press in on the volume knob
9. You will see the halo around the Subwoofer Phase
10. Rotate the volume knob to move the halo around Normal or Reverse
11. Press in on the volume knob to select Normal or Reverse Phase (Default = Normal)
12. Press the Back Button to return to the Audio Settings Carousel
2-Zone
1. Press the Audio Button
2. Use the volume knob to scroll until the 2-Zone Icon is in the middle
3. Press in on the volume knob to select 2-Zone
4. Rotate the volume knob to adjust the volume level (-10 to +10) for All Zones (Zone 1 + Zone 2)
5. When you have completed adjusting the volume level for All Zones, press in on the volume knob
6. You will see the halo around the Zone 1 volume adjustment slider
7. Rotate the volume knob to adjust the Zone 1 volume level (-10 to +10)
8. When you have completed adjusting the Zone 1 volume level, press in on the volume knob
9. You will see the halo around the Zone 2 volume adjustment slider
10. Rotate the volume knob to adjust the Zone 2 volume Level (-10 to +10)
11. When you have completed adjusting the Zone 2 volume Level, press in on the volume knob
12. You will see the halo around the Reset Button. If you select Reset, all adjustments will adjust back to
the default level (0)
13. Press the Back Button to return to the Audio Settings Carousel
Note:
When 2-Zone is ON you cannot select USB as a Front and Rear Source at the same time.
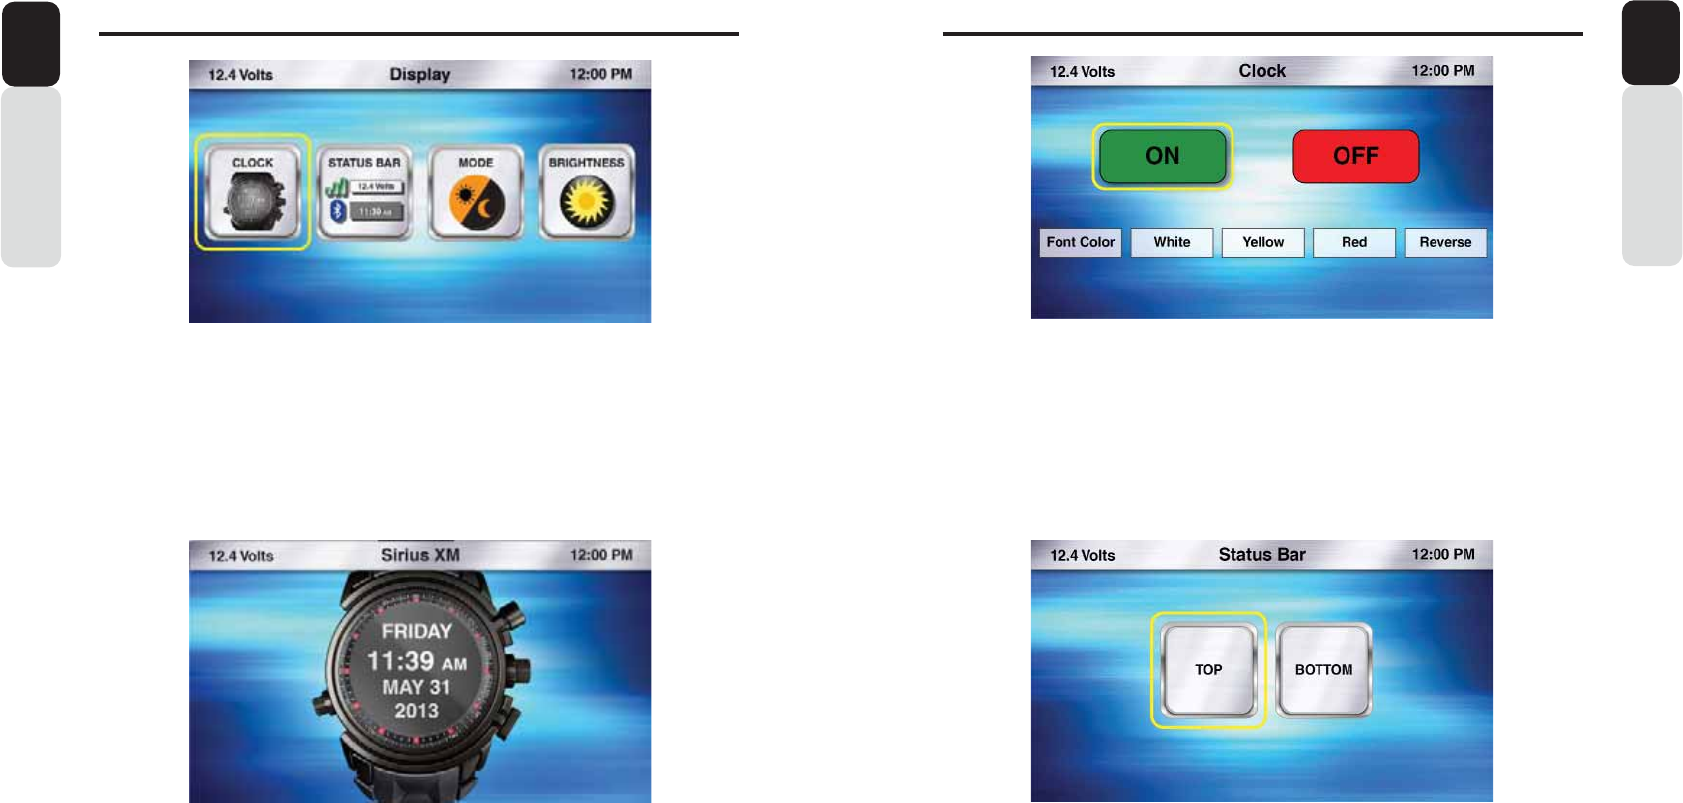
70 71
'LVSOD\6HWWLQJV
Owner’s Manual
English
'LVSOD\6HWWLQJV
Owner’s Manual
English
Display
1. Press the Display Button
2. Use the volume knob to move the halo to the Display Option you would like to adjust
3. Press in on the volume knob to select the Display Option
- Clock (Large Clock Display after 25 seconds of no action)
- Status Bar (View the Status Bar on Top or Bottom of Screen)
- Mode (Change from Day Mode to Night Mode)
- Brightness (Adjust the screen Brightness (-10 to +10)
Clock
1. Press the Display Button
2. Use the volume knob to scroll until the halo is around the Clock Icon
3. Press in on the volume knob to select Clock
4. Rotate the volume knob to adjust the Clock appearance
- ON (Default) Large Clock will be displayed after 25 seconds of no action
- OFF (Large Clock will not be displayed)
- Font Color (Change the Font Color: White, Yellow, Red and Reverse)
5. Selection of Reverse option chnages the background color from Black to White
6. When finished, press the Back Button to return to the Display Settings
Status Bar
1. Press the Display Button
2. Use the volume knob to scroll until the halo is around the Status Bar Icon
3. Press in on the volume knob to select Status Bar
4. Rotate the volume knob to change the Status Bar position
- Top (Default) Status Bar will be displayed on the Top of the Screen
- Bottom (Status Bar will be displayed at the Bottom of the Screen)
5. When finished, press the Back Button to return to the Display Settings
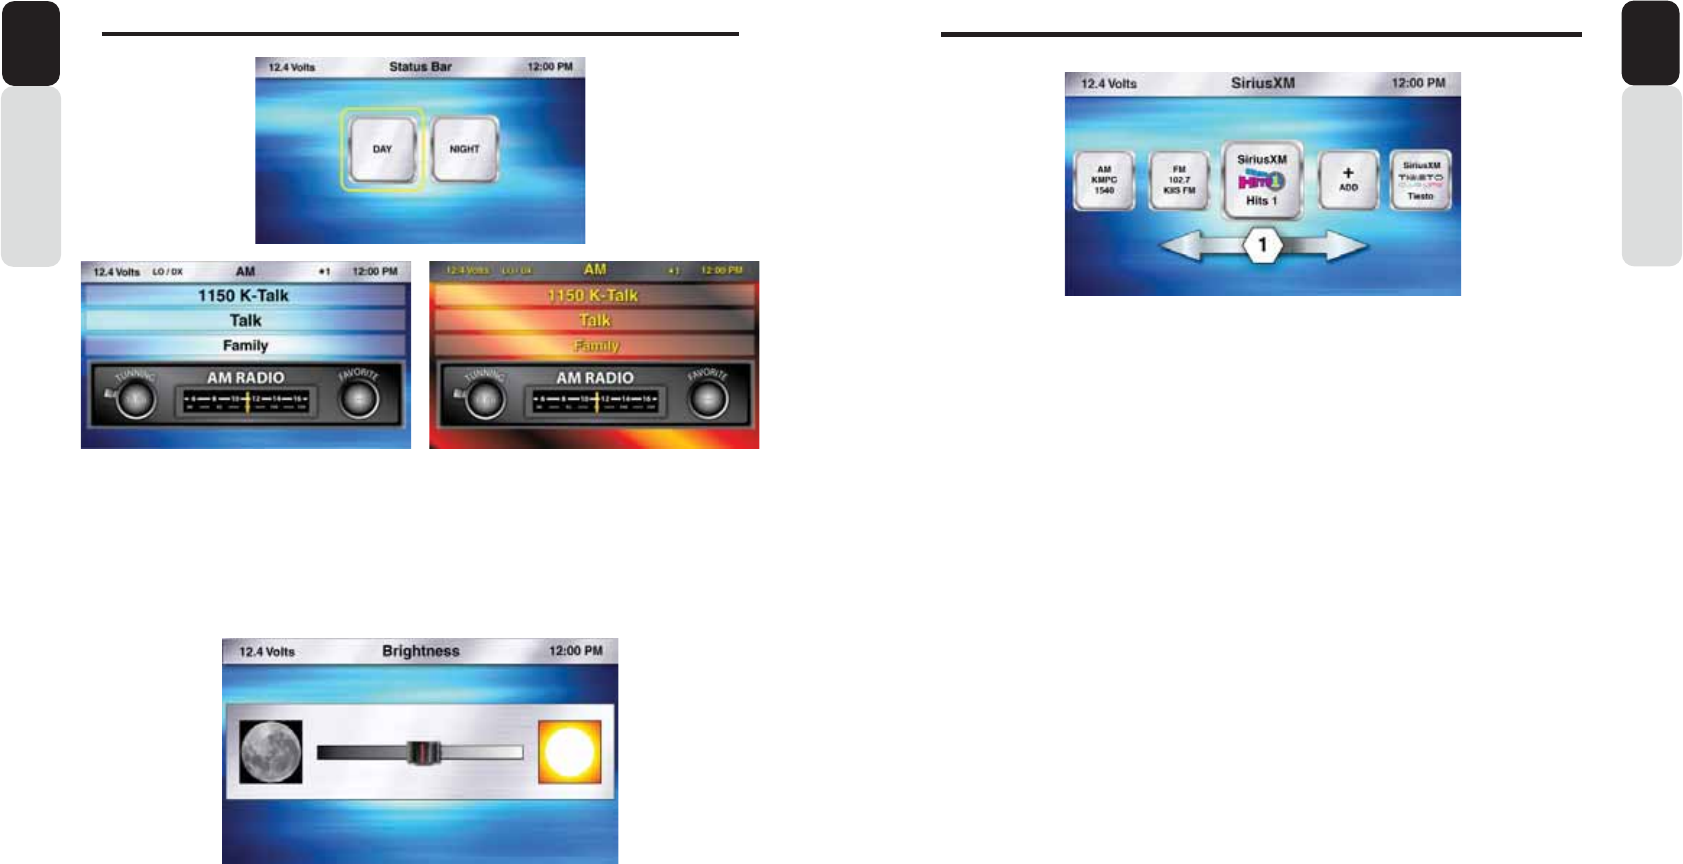
72 73
$XGLR6HWWLQJV
Owner’s Manual
English
)DYRULWHV
Owner’s Manual
English
Brightness
1. Press the Display Button
2. Use the volume knob to scroll until the halo is around the Brightness Icon
3. Press in on the volume knob to select Brightness
4. Rotate the volume knob to adjust the display Brightness
5. When finished, press the Back Button to return to the Display Settings
Mode
1. Press the Display Button
2. Use the volume knob to scroll until the halo is around the Mode Icon
3. Press in on the volume knob to select Mode
4. Rotate the volume knob to change the display Mode
- Day (Default)
- Night
5. When finished, press the Back Button to return to the Display Settings
Day Mode Night Mode
Favorites
Rather than using presets, we are providing you with easier access to your favorite stations and
contacts
1. Press the Favorites Button
2. Use the volume knob to scroll through your saved Favorites
3. Press in on the volume knob to access your saved Favorite
4. It will then change to the source for the Favorite and tune to the saved station
Save or Replace Station or Channel to Favorites
1. Tune to Radio Sation, SiriusXM Channel or Pandora station you would like to save
2. Press the Favorites Button
3. Use the volume knob to scroll through Favorites, until you find the Favorite number position you would
like to save the station or channel to
4. Press in on the volume knob to save station or channel Favorite numbered position
5. After you are finished saving your Favorite, you will return back to the source you are currently using
Save Phone Contact to Favorites
1. Scroll through your list of Phone Contacts
2. When the Contact you would like to save as a Favorite is in the middle of the screen;
3. Press the Favorites Button
4. Use the volume knob to scroll through Favorites, until you find the Favorite number position you would
like to save the Phone Contact to
5. Press in on the volume knob to save the Contact in the Favorite numbered position
6. After you are finished saving your Favorite, you will return back to the source you are currently using
Delete Favorites
1. Press the Favorites Button
2. Use the volume knob to scroll through Favorites, until you find the Favorite you would like to Delete
3. Press in on the volume knob for Three Seconds
4. A pop-up window will appear asking you to confirm you want to Delete the saved Favorite
5. Use the volume knob to scroll through your options
- YES (Deletes the saved Favorite
- CANCEL (Favorite does not get Deleted and you will return to the source you are using)
6. Press in on the volume knob to select your option
7. After your selection has been made you will return to the source you are using
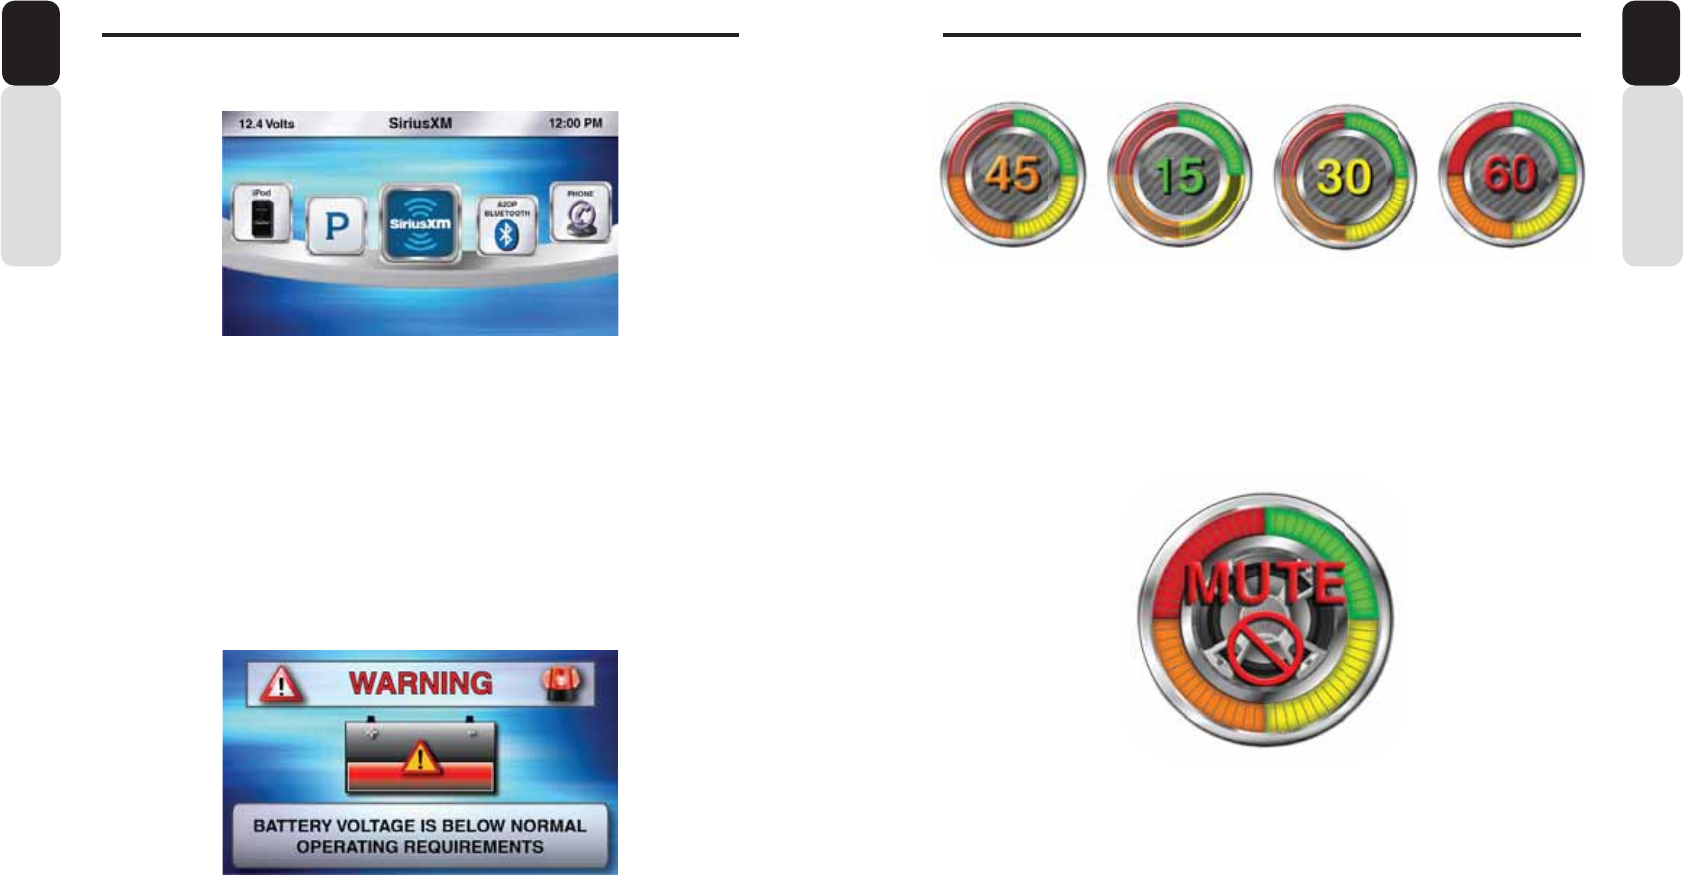
74 75
8QGHUVWDQGLQJWKH*UDSKLFDO8VHU,QWHUIDFH*8,
Owner’s Manual
English
8QGHUVWDQGLQJWKH*UDSKLFDO8VHU,QWHUIDFH*8,
Owner’s Manual
English
7KLVVHFWLRQKHOSVGHILQHDQGH[SODLQWKHRSHUDWLRQDQGIXQFWLRQVRIWKH
*UDSKLFDO8VHU,QWHUIDFH
Main Menu Screen
This carousel of Sources provides a simple and easy way to view Sources and can be accessed anytime
by pressing the Source Button [SRC]
Status Bar
The Status bar will be displayed on either the Top or Bottom of the screen. The Status Bar will disappear
when viewing a video to allow for optimal view area.
The Status Bar provides several icon indicators that will appear when a source or feature requires it.
- Time (Please refer to the Clock Settings to Set the Time)
- Voltage Indication (This displays the voltage based on the Yellow +12v constant wire)
- Bluetooth Logo (When a compatible Bluetooth Device is Paired and Connected)
- Signal Strength Meter (SiriusXM, Phone)
- LO/DX Indicator (Local and Distance for Radio Tuner)
- Favorite Indicator (Star and number will appear if you tune to a station or channel that is a preset and
which Favorite Number it is saved)
Low Battery Voltage Warning
This screen will appear when the Battery Voltage drops to or below 10v.
The audio will stop until voltage increases to 12v or above, then the audio will resume. This will help from
draining too much current from the battery until the voltage increases.
Volume
This type of Volume indication provides a simple and easy way to adjust the volume level. Each detent
“Click” of the Volume Knob represents one bar for volume indication.
- 0 through 15 (Green)
- 16 through 30 (Yellow)
- 31 through 45 (Orange)
- 46 through 60 (Red)
When in a source play screen and the volume knob is rotated, this will adjust the volume level. After the
volume has been adjusted, the volume indicator will stay displayed for 2 seconds, then it will disappear.
Mute
- When you are in a source play screen and would like to Mute the volume, simply press in and release
the volume knob.
- A volume mute indicator will appear letting to know that the volume is on Mute and will stay displayed
until it is unmuted.
- When the volume is muted and if user rotates the volume knob, first volume will be unmuted
automatically and then the volume should change
%H&DXWLRXVDQG$ZDUHRIWKH9ROXPH/HYHOZKHQ\RX0XWHDQG8Q0XWHWKH9ROXPH
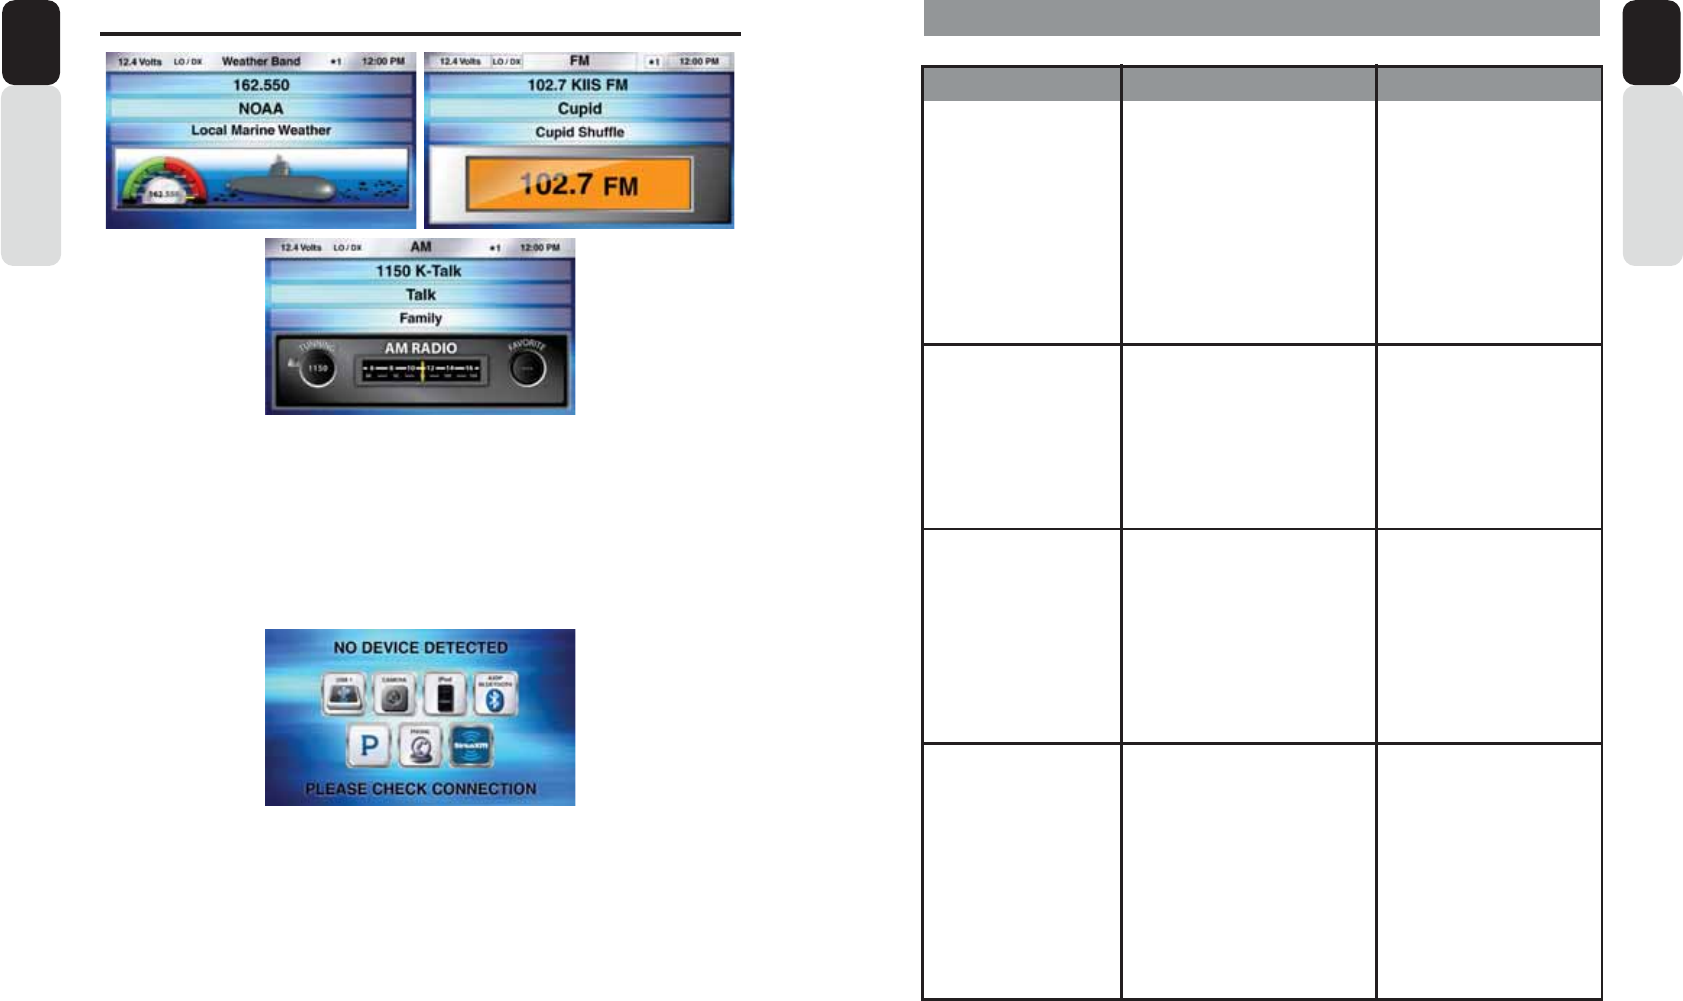
76 77
Owner’s Manual
English
8QGHUVWDQGLQJWKH*UDSKLFDO8VHU,QWHUIDFH*8,
Owner’s Manual
English
Radio Play Screens
Each Radio Play Screen offers a unique look and visual experience.
Radio Channels are changed by pressing the Seek Buttons.
Displays RDS Program Type (PTY) Information for easy reference for music/data identification.
Weather Band
The dial moves according to channel tuning through the Seven NOAA channels.
FM Band
Digital channel indication
AM Band
Analog channel tuning
No Device Detected Screen
This screen will appear if you are trying to use a source that requires a plug in device and or accessory.
- SiriusXM = SXV200 or SXV300
- iPod = iPod or iPhone
- Bluetooth = iPod, iPhone or Smartphone
- Pandora = iPod, iPhone or Smartphone
- Camera = Back up Camera
- USB = USB Flash Drive
6.TROUBLESHOOTING
PROBLEM CAUSE SOLUTION
Unit will not power ON No Power or Ground
Vessel Battery Switch is OFF
Blown Fuse
Bad Grounding Point
Verify Power
Connector to 0: is
connected Properly
Verify Battery Switch is ON
Check in-line Fuse and
Vessel Accessory/Radio
Fuse Ground to metal or
battery
No Sound Mute feature is ON
Low volume level
Speakers and Amplifier
Press in on volume knob To
verify if Mute is ON or OFF
Check volume level
Check speaker connections
And make sure Amp is ON
The controller is not
Responding
Bad cable connection Check the CAT5 Ethernet
Cable.
Unplug the CAT5 Ethernet
Cable, then plug it back in
Verify that you hear a “Click”
when connecting the CAT5
Ethernet Cable
My phone is not
Working or charging
USB Phone cable is not
Connected to USB port
USB Extension Cable is too
Long
Check the USB Phone Cable
is plugged into one of The
USB ports
The maximum USB length
Should not exceed 4-feet.
Longer USB extension’s
Increase the resistance and
Will cause the phone to not
Work properly.
Use the Clarion CCAUSBAV
cable
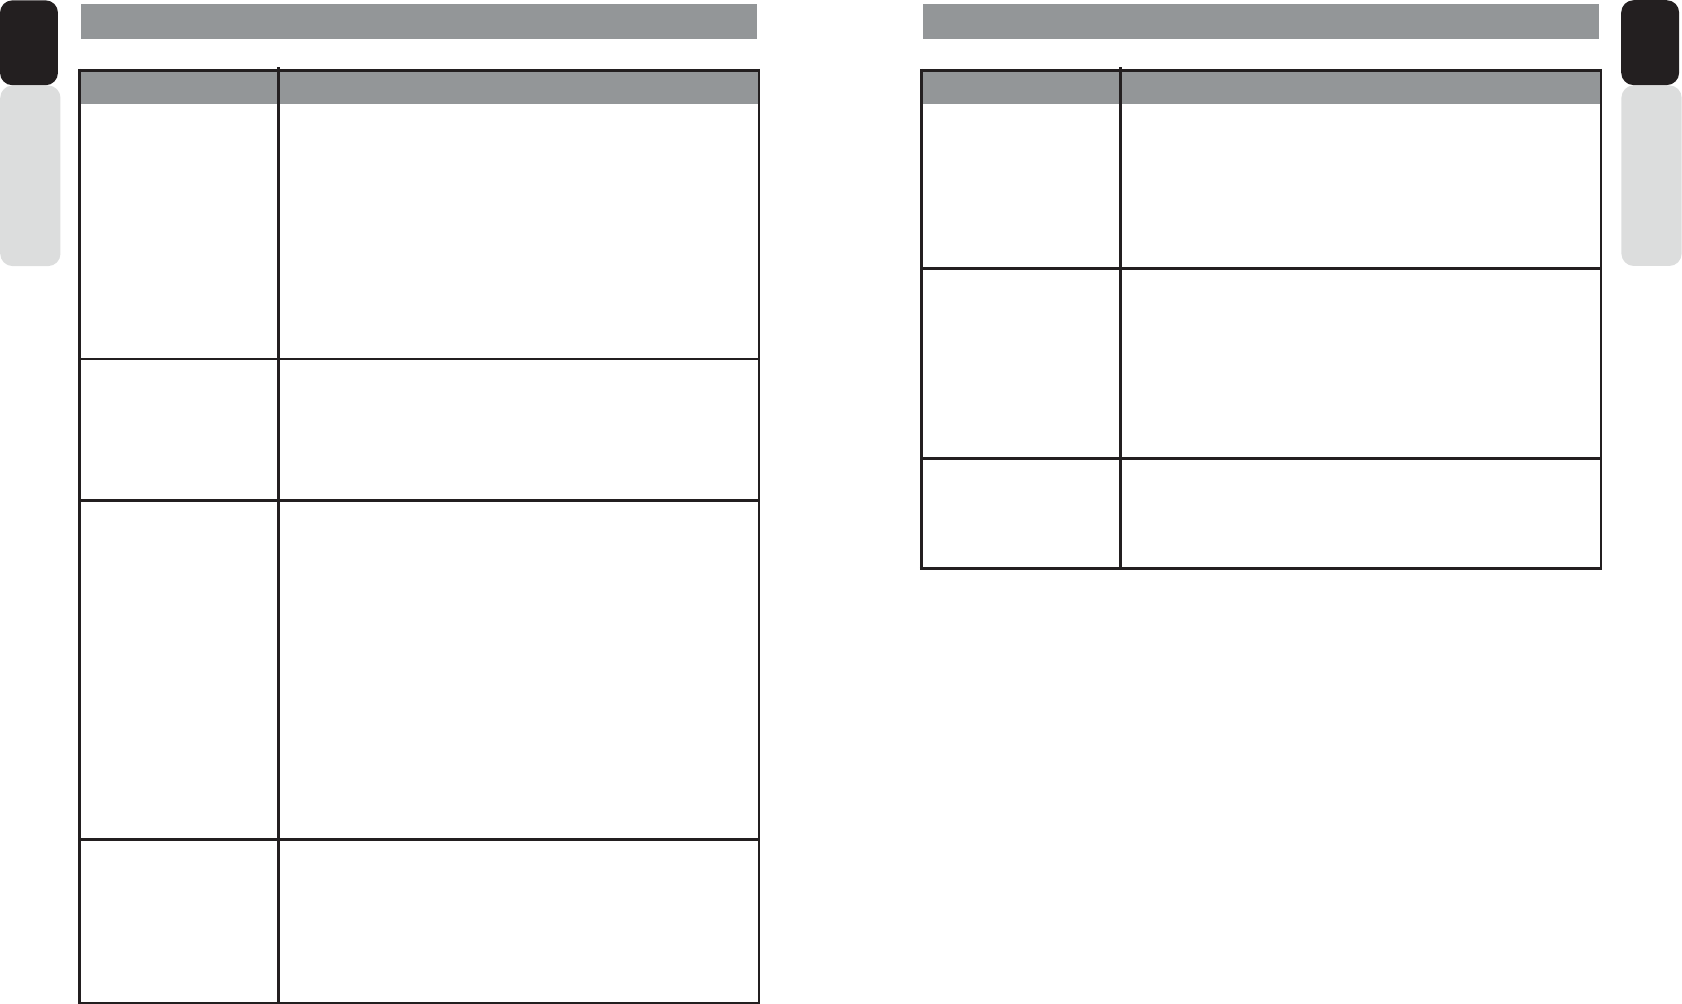
78 79
Owner’s Manual
English
Owner’s Manual
English
6.TROUBLESHOOTING
ADVISORY NAME
Check Antenna The radio has detected a fault with the SiriusXM antenna.
The antenna cable may either be disconnected or damaged.
Verify that the antenna cable is connected to the SiriusXM
Connect Vehicle Tuner.
Inspect the antenna cable for damage and kinks. Replace the
antenna if the cable is damaged.
SiriusXM products are available at your local car audio retailer
or online at www.shop.siriusxm.com
Check Tuner The radio is having difficulty communicating with the SiriusXM
Connect Vehicle Tuner. The tuner may be disconnected or
damaged.
Verify that the SiriusXM Connect Vehicle Tuner cable is
securely connected to the radio.
No Signal The SiriusXM Connect Vehicle Tuner is having difficulty
receiving the SiriusXM satellite signal.
Verify that your vehicle is outdoors with a clear view of the sky.
Verify that the SiriusXM magnetic mount antenna is mounted
on a metal surface on the outside of the vehicle.
Move the SiriusXM antenna away from any obstructions.
Inspect the antenna cable for damage and kinks.
Consult the SiriusXM Connect Vehicle tuner installation
manual for more information on antenna installation. Replace
the antenna if the cable is damaged. SiriusXM products are
available at your local car audio retailer or online at www.shop.
siriusxm.com
Subscription Updated The radio has detected a change in your SiriusXM
subscription status.
Press OK to clear the message.
Visit www.siriusxm.com or call 866-635-2349 if you have any
questions about your subscription.
RECOMMENDED DESCRIPTION
6.TROUBLESHOOTING
ADVISORY NAME
Channel Not Available The channel that ou have requested is not a valid SiriusXM
channel or the channel that you were listening to is no longer
available. You may also see this message briefly when first
connecting a new SiriusXM Connect Vehicle Tuner.
Visit www.siriusxm.com for more information about the
SiriusXM channel lineup.
Channel Not Subscribed The channel that ou have requested is not included in your
SiriusXM subscription package or the channel that you were
listening to is no longer included in your SiriusXM subscription
package.
Visit www.siriusxm.com or call 866-635-2349 if you have
questions about your subscription package or would like to
subscribe to this channel.
Channel Locked The channel that you have requested is Locked by the radio
Parental Control feature. See the section on Parental Control,
page 14 for more information on the Parental Control feature
and how to access locked channels.
RECOMMENDED DESCRIPTION

80 81
Owner’s Manual
English
Owner’s Manual
English
7. SPECIFICATIONS
)07XQHUZLWK5'6
Frequency Range: USA 87.9 ~ 107.9MHz (0.2MHz STEP)
Europe 87.5 ~ 108.0MHz (0.05MHz STEP)
Australia 87.5 ~ 108.0MHz (0.01MHz STEP)
Other Countries 87.5 ~ 108.0MHz (0.01MHz STEP)
$07XQHU
Frequency Range: USA 530 ~ 1710kHz (10kHz STEP)
Europe 531 ~ 1602kHz (9kHz STEP)
Australia 531 ~ 1629kHz (9kHz STEP)
Other Countries 531 ~ 1629kHz (9kHz STEP)
:HDWKHU%DQGZLWK5'6LIDYDLODEOH
NOAA Frequency Range: 162.400MHz ~ 162.550MHz
Channel 1: 162.400MHz Channel 2: 162.425MHz Channel 3: 162.450MHz
Channel 4: 162.475MHz Channel 5: 162.500MHz Channel 6: 162.525MHz
Channel 7: 162.550MHz
$XGLR
Maximum Power Output: 50W x 4
Rated Power Output: 21W x 4 (CEA2006) 1% THD, 1 kHz @ 14.4V
High Pass Filter (Front/Rear): 70/105/140/THROUGH (Speaker and RCA) Low Pass Filer (Subwoofer):
50/75/100/THROUGH
BASS Control: 50Hz Frequency, +14dB ~ -14dB
MID Control: 1k Frequency, +14dB ~ -14dB
TREBLE Control: 12kHz Frequency, +12dB ~ -12dB
*HQHUDO
Power Supply Voltage: 14.4VDC (10.8 to 15.6V allowable)
Grounding System: Negative Ground
Speaker Impedance: 4-8 ohms per channel
Processor: Freescale iMx287 ARM9 454MHz 2GB RAM
ASTM B117 (Salt/Fog Exposure) = Black Box and Controller
ASTM D4329 (UV Exposure) = Black Box and Controller
IP66 (Black Box)
IP67 (Controller)
Dimensions:
Black Box = 2” (H) x 8” (W) x 7” (L)
Controller = 4” (H) x 6” (W) x 1” (D)
Heat Sink: Magnesium/Aluminum
6XSSRUWHG$XGLR)RUPDWV
USB: MP3 and WMA
6$(-
Broadcast Type: Open Broadcast 29 Bit
Bandwidth: 500KB/Second
Clock: 1MB/Second
'LVSOD\&RQWUROOHU
LCD: 4.3” Optically Bonded Color
Resolution: 480 x 272
Luminance: 650 NITS
127(
6SHFLILFDWLRQVDQG'HVLJQDUHVXEMHFWWRFKDQJH:LWKRXWQRWLFHIRUIXUWKHULPSURYHPHQW
INSTALLATION AND WIRE CONNECTIONS
&RQWHQWV
1. BEFORE STARTING
2. PACKAGE CONTENTS
3. INSTALLATION CAUTIONS
4. BLACK BOX INSTALLATION
5. DISPLAY CONTROLLER INSTALLATION
6. WIRE CONNECTIONS
%()25(67$57,1*
1. Read these instructions carefully
2. This unit has been developed exclusively for use in vessels With a negative ground 12V power (batte
r
y/
charging system) source.
3. Be sure to disconnect the batte
r
y (-) Negative terminal before sta
r
ting.
This is to prevent sho
r
t circuits during the installation process. (Figure 1)
3$&.$*(&217(176
Item Quantity
1. 0: Black Box ..........................................................................................................1
2. 0: Display Controller .............................................................................................1
3. 34-Pin Keyed Power/Speaker/RCA Connector/SWI .................................................... 1
4. 26-Pin Keyed Remote/USB1, 2/Wired Remote (MW1,MW2)/
Wired Remote (MW4)/ Display Controller Connector .................................................. 1
5. 34-Pin Keyed AUX/SXM/BT Microphone/Video/J1939 ................................................ 1
6. C
A
T5 Ethernet Display Controller Cable (10-feet) ....................................................... 1
7 Metal Display Controller Mounting Bracket .................................................................. 1
8. Stainless Steel Metric Threaded Studs (M4-.7 @ 4mm-.7 x 38mm) (Controller) ........ 2
9. Stainless Steel Metric Lock Washer (5mm) for Controller ........................................... 2
10. Stainless Steel Metric Flanged HEX Nuts (M4-.7 @ 4mm-.7) (Controller) .................. 2
11. Stainless Steel Metric Self
T
apping Screw (M4) for Mounting Black Box .................... 4
12. 0: Owner’s Manual (English/French/Spanish) - CD ..............................................1
13. 0: Installation Guide (English) - Printed ................................................................1
14. 0: Installation Guide (French) - On Owner’s Manual CD ......................................1
15. 0: Installation Guide (Spanish) - On Owner’s Manual CD ....................................1
16. 0: Quick Sta
r
t Guide (English) - Printed ................................................................1
17. 0: Quick Sta
r
t Guide (French) - On Owner’s Manual CD ......................................1
18. 0: Quick Sta
r
t Guide (Spanish) - On Owner’s Manual CD ....................................1
,167$//$7,21&$87,216
1. In order to avoid any interference, do not install the Black Box or Display Controller in the Proximity of the
engine compa
r
tment.
2. The use of unauthorized pa
r
ts can cause permanent damage to the unit.
3. Always check your wire connections to ensure proper installation before turning the unit ON.
4. Consult with your nearest dealer for proper installation or if common pa
r
ts are needed.
* Seek professional assistance if modifications or drilling holes in the vessel are needed.
5. Do not install the system where it will be subjected to excessive moisture, dust, di
r
t, foreign pa
r
ticles or
vibration. Areas of high temperature from the engine, direct sunlight, heater or hot Air should be avoided.
6. Do not install the system in a location where it will interfere with the vessels operation, or it will injure the
passengers if there is a sudden or emergency stop.
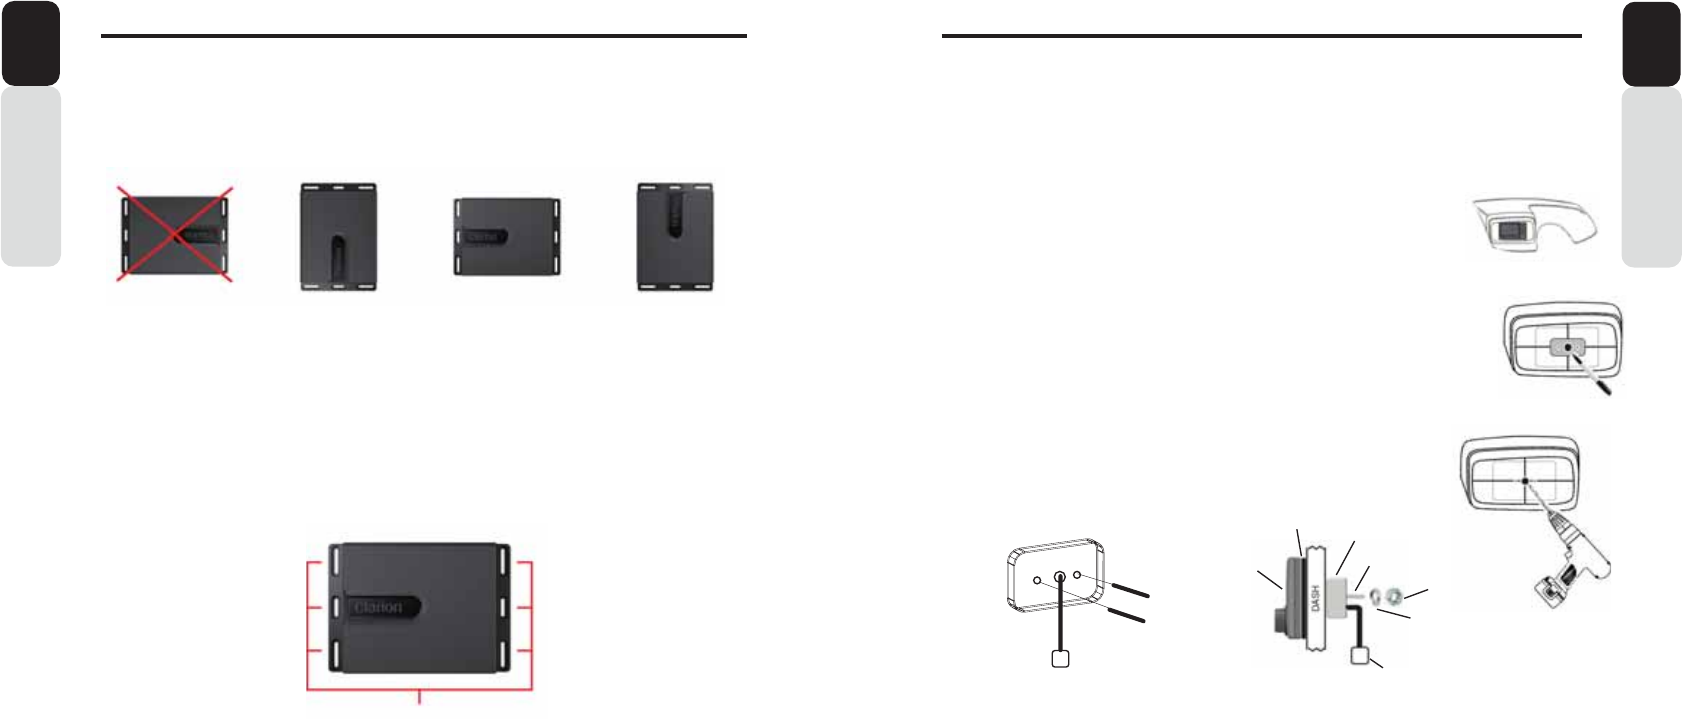
82 83
Owner’s Manual
English
Owner’s Manual
English
',63/$<&21752//(5,167$//$7,21
Mounting Bracket Installation:
Step 1
Place Rubber Neoprene Gasket to back of the Display Controller
Step 2
Screw Stainless Steel Metric Threaded Posts into the Metric Threaded Inserts on the back of the Display Controller (Figure 4)
Step 3
Slide the Metric Threaded Posts and Display Controller Cable pigtail that are attached to the Display Controller through the holes
in the dash (Figure 5)
Step 4
With the Display Controller placed flat on the dash, slide the mounting bracket through the Metric Threaded Posts that are sticking
out on the backside of the dash (Figure 5)
Step 5
Slide one lock washer on each Metric Threaded Post (Figure 5)
Step 6
Fasten one Hex Nut on each Metric Threaded Post and tighten until the display controller does not move around and the back of
the display controller is sitting flat on the dash (Figure 5)
Drilling Holes for Display Controller:
**Place the display controller on the area on the dash that you would like the display controller to be mounted. (Figure 1)
Check for clearance around the display controller to make sure that it does not interfere with any existing gauges or dash contour.
** Before drilling any holes, check behind the dash and make sure that the drill bit will not damage any wires or cables behind the dash.
Step 1
Use masking tape on the area you would like to mount the display controller
Step 2
Place the display controller on the masking tape and use a pen to draw a line around the display controller
Step 3
Remove the display controller once the outside line of the display controller is drawn
Step 4
use a ruler or a straight edge to mark the middle of the display controller (side to side and top to bottom)
Step 5
Place the flat surface of the mounting bracket on the masking tape in the middle of the display controller area
Step 6
Use a pen to draw inside of each cut out on the mounting bracket (Left Hole, Middle Hole and Right Hole)(Figure 2)
Step 7
Remove the mounting bracket
Step 8
Drill out each hole until the lines are no longer visable. (1/8” for side holes and 1” for center hole)
(Figure 3)
After holes are drilled, remove the masking tape and proceed to “Mounting Bracket Installation”.
Figure 1
Figure 4
DASH
Controller
Gasket
Lock Washer
HEX Nut
Controller Cable
Connector
Figure 5
Figure 2
Figure 3
(2) Stainless Steel Metric Threaded Studs (M4-.7 @ 4mm-.7 x 38mm)
(2) Stainless Steel Metric Lock Washer (5mm)
(2) Stainless Steel Metric Flanged HEX Nuts (M4-.7 @ 4mm-.7)
Post
Bracket
.8%/$&.%2;,167$//$7,21
2. Please refer to the diagram below for the mounting screw hole positions. Always use the provided
0: Metric Stainless Steel Self
T
apping Screws to mount the 0: Black Box.
3. Extension of the wires/cables may be necessa
r
y to route the harness and cable throughout the vessel.
NOTE: Retain some slack in the harness/cable to prevent damage to the wires.
It is recommended to relieve the stress on all wires and cables.
4. Always read through the wiring diagram in this manual first, and then follow all provided wiring diagrams
carefull
y
. All connections should be soldered using heat shrink tubing or electrical tape to ensure proper
connections. Zip Tie all wires and cables to prevent interference of existing components and or body pa
r
ts
(example: Foot, Arm, Leg, Hand, etc.)
5. Once the wiring connections are completed, re-connect the Negative
T
erminal on the batte
ry
, turn the
vessel batte
r
y accesso
r
y switch ON and power on the unit to check if it is operating correctl
y
.
If abnormalities occur, disconnect the Negative
T
erminal on the batte
ry
, recheck all wiring and Re-connect
the Negative
T
erminal on the batte
ry
, turn the vessel batte
r
y accesso
r
y switch ON, Power ON the unit,
verify the system powers ON and is working correctl
y
. Please refer to the
T
roubleshooting section for
assistance.
BLACK BOX MOUNTING
Mounting Screw Holes
1. Select an area with sufficient ventilation for the mounting of the 0: Black Box in order to preventthe
Black Box from overheating.
You may mount the Black Box in a horizontal or ve
r
tical position. If the
Black Box is mounted in a ve
r
tical position, do not mount the Black Box with the harnesses directly
pointing upwards to prevent water collecting on top of the harnesses.
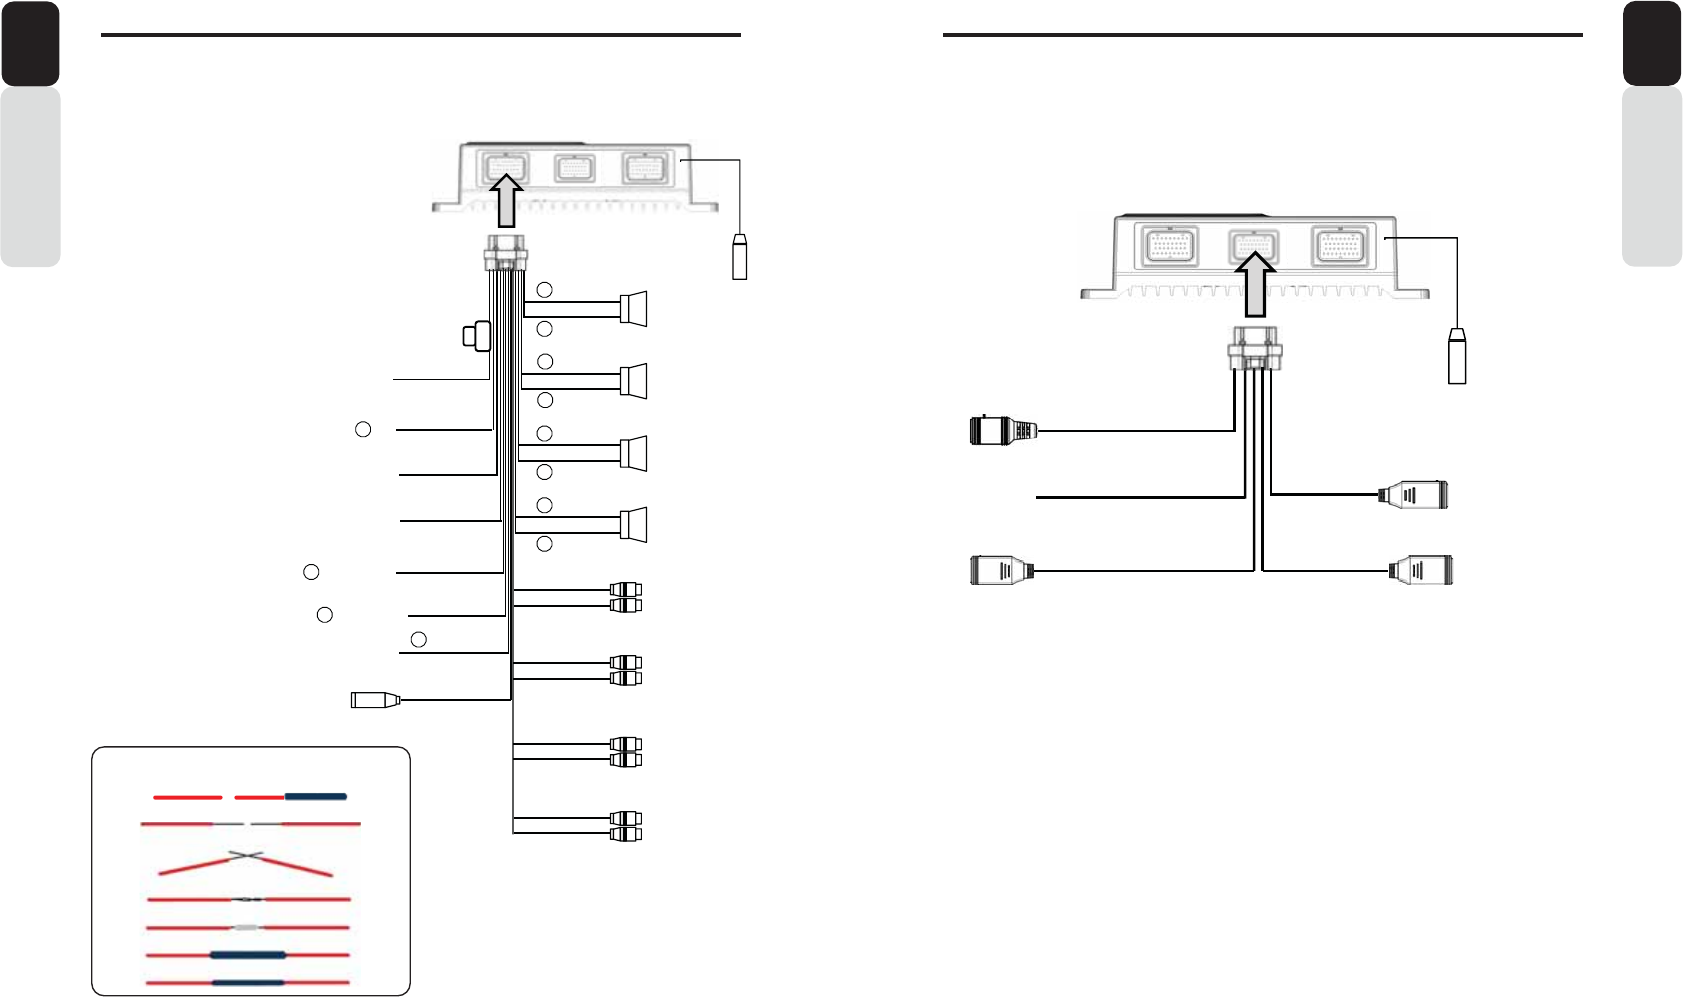
84 85
Owner’s Manual
English
Owner’s Manual
English
Please follow these connection diagrams carefully and solder all wire
connections.
:,5(&211(&7,216
CN1 (LEFT) Connection Diagram
Please follow these connection diagrams carefully and solder all wire
connections.
:,5(&211(&7,216
CN2 (CENTER) Connection Diagram
Wired Remote Connector (Black)
(MW1/MW2)
Wired Remote Connector (Blue)
USB 1 (2.1A) USB 2 (2.1A)
(MW4)
Ethernet to CMS Controller
Antenna
Connect directly to battery
Yellow Wire (Memory back-up lead)
Red Wire (Power lead)
Ignition 12V
Green/Black
Orange/White Wire (Illumination lead)
Connect to illumination Lead
Black Wire (Ground lead)
Connect to chassis ground
Connect to
Switched wire
Purple/White Wire (Camera Trigger)
Connect to
Light Green Wire (Video Interlock)
Grey/Black
White/Black
OEM Steering Wheel Interface (3.5mm)
White
Purple
Grey
Green
Purple/Black
Grey
Rear Left
Connect to remote turn-on lead of ampliſer
Switched wire
Blue/White
Front Right
Line Out
White
Green
Front Left
Red
Black
Purple
Red
Red
Red
White
White
White
Subwoofer Left
2- Zone Left
2- Zone Right
Rear Right
Subwoofer Right
Right Rear
Right Front
Left Rear
Left Front
Antenna
Line Out
Line Out
Line Out
Line Out
Line Out
Line Out
Line Out
Slide heat shrink tubing around soldered wire
Wrap ends of wire together
Cross ends of stripped wire (make a “X”)
Strip off 1” of insulation from each end
Apply solder to the wrapped wire
Slide a 1” piece of heat shrink tubing over one side of the wire
Wire Soldering
WARNING
VIEWING A VIDEO SIGNAL ON ANY DASH MOUNTED MONITOR
WHILE IN MOTION IS PROHIBITED BY LAW
Video Interlock Wire:
These steps must be followed to view a video on the 0:
Display Controller.
* Switch is NOT included, Illustration purpose only *
1. Connect the Light Green Wire (Video Interlock) to a Normally
Open Grounded Switch
2. Switch ON (Ground)
3. Switch OFF (No Ground)
4. Switch ON (Ground), remains ON
Now the RCA Video Inputs will allow the video to be displayed
on the 0: Display Controller.
+
+
-
+
-
+
-
+
-
+
-
+
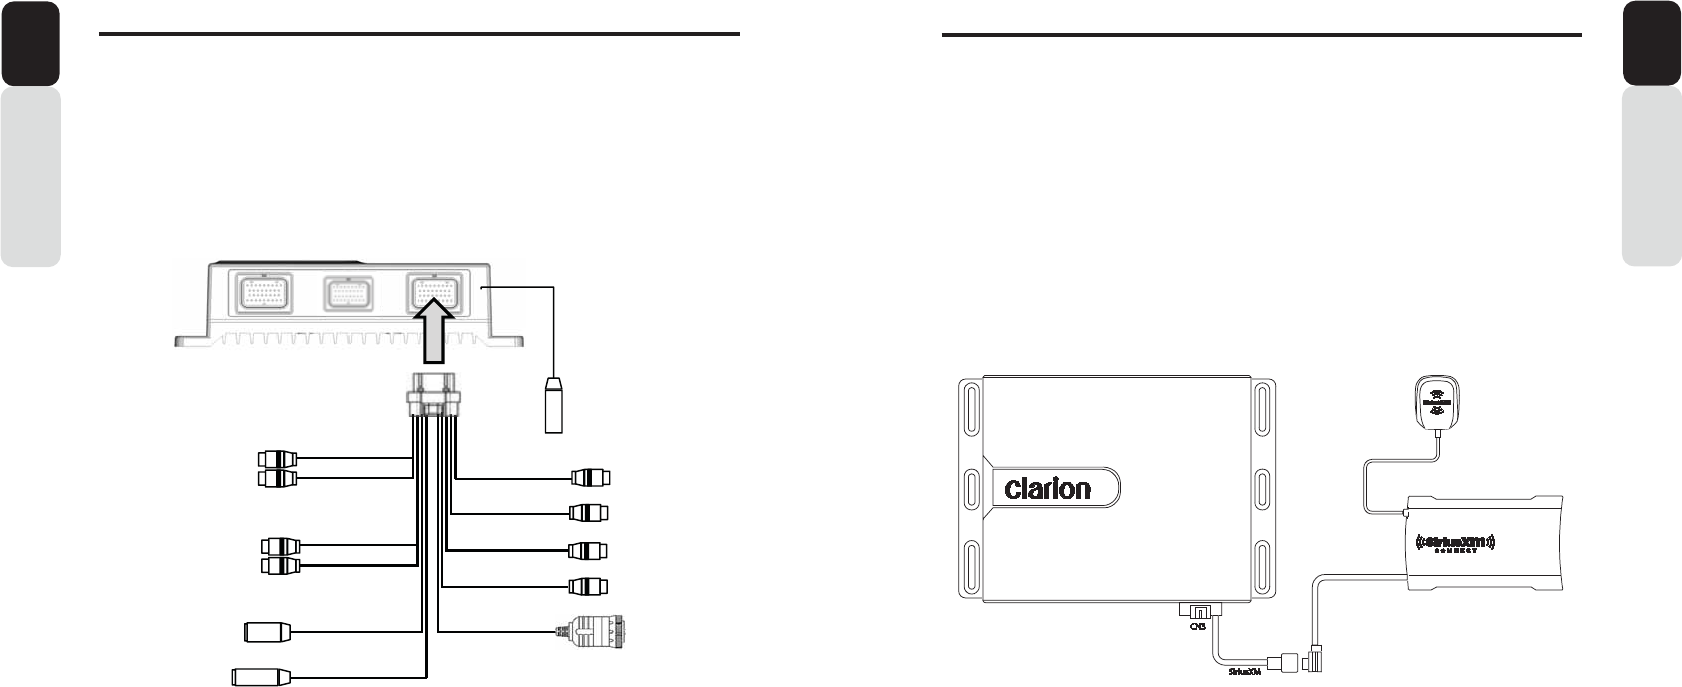
86 87
Owner’s Manual
English
:,5(&211(&7,216
Owner’s Manual
English
:,5(&211(&7,216
Please follow these connection diagrams carefully
CN3 (RIGHT) Connection Diagram
** SiriusXM Satellite Radio Tuner is sold separately **
SiriusXM Installation:
1. Mount the included SXM Antenna with clear view to the sky
2. Run Antenna Cable to the SXM Tuner location
3. Connect SXM Antenna to the SXM Antenna Connector on Tuner
4. Connect SXM Cable from SXM Tuner to the SXM Connector (CN3) on the 0: Black Box
AUX 1 Left
Line Input
AUX 1 Right
AUX 2 Left
Bluetooth Mic
White
Red
AUX 2 Right
Antenna
Yellow
Video 1 Input
Video 2 Input
Camera Input
Video Out
Line Input
Line Input
Line Input
White
Red
Red
Red
Yellow
Yellow
Yellow
Sirius XM J1939 (CAN)
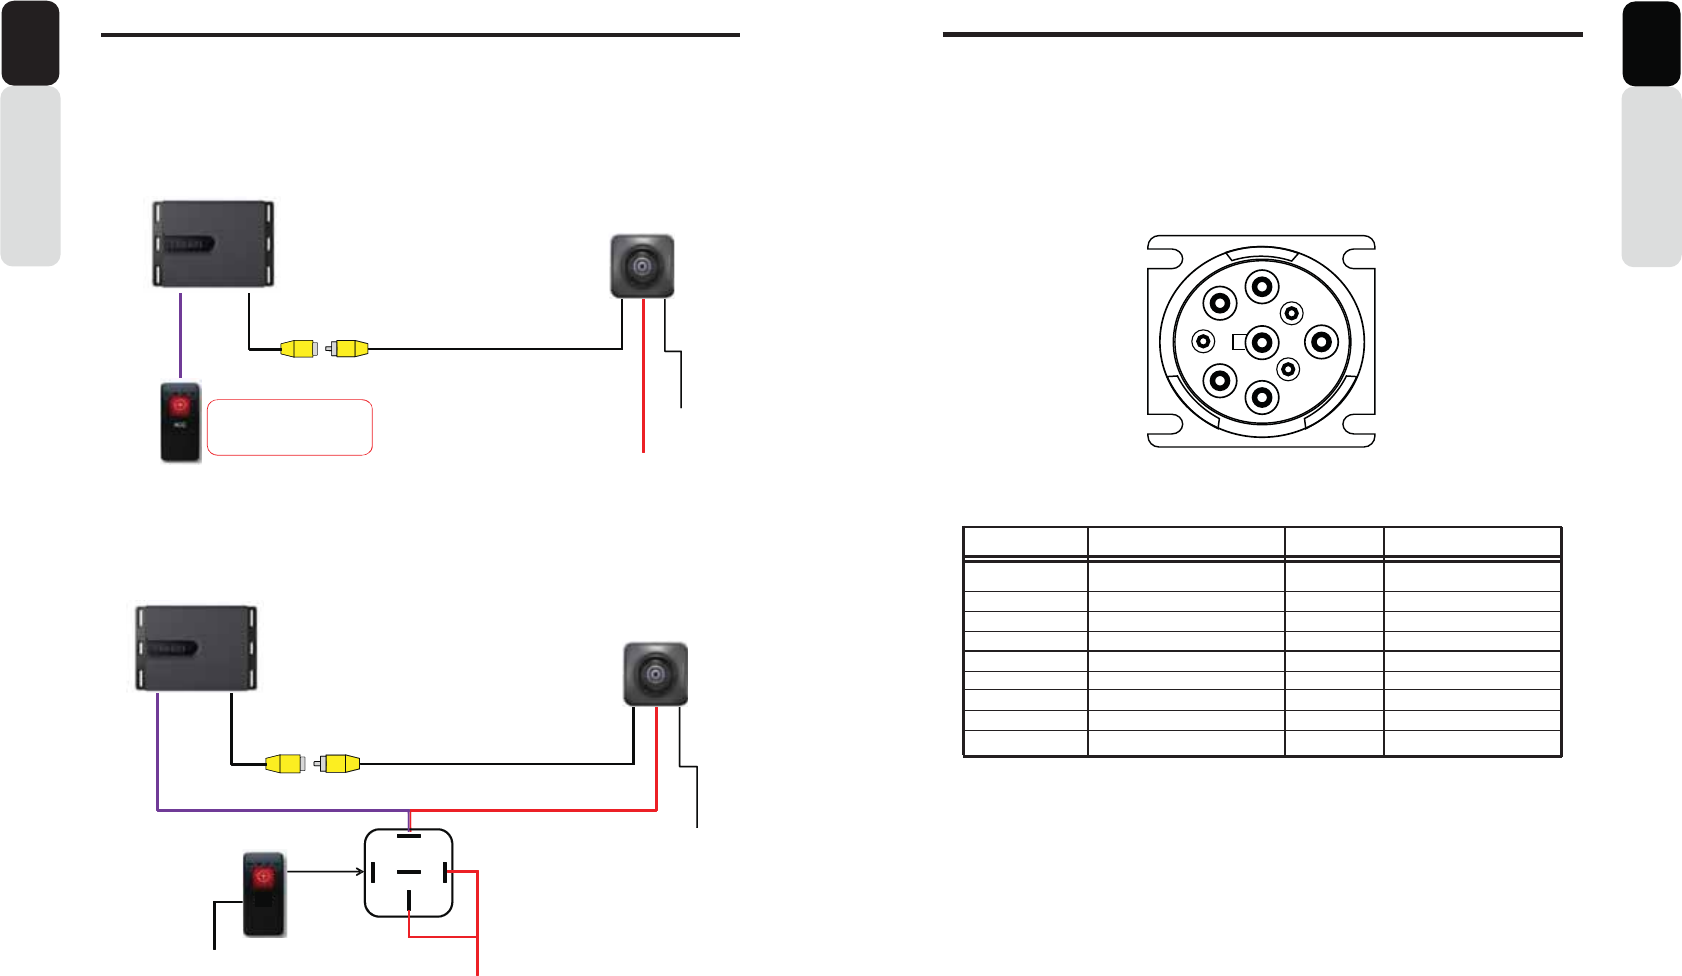
88 89
Owner’s Manual
English
Please follow these connection diagrams carefully
:,5(&211(&7,216
Rear Vision Camera Connection Diagram
CC510 or any backup Camera-
Dtϰ Black Box
12 Volt Switched (Ignition)
Ground
RCA Video Output from Camera to dedicated
Camera Input on Dtϰ Black Box
Connect Purple Camera (+)
Trigger Wire to a 12V +
Switch
When switched ON it will provide
a +12V to the Purple 12V (+)
Camera Input Trigger to the DWϰ
Black Box
Option: 1
Rear Vision Camera Connection Diagram
RCA Video Output from Camera to dedicated Camera Input
on DWϰ Black Box
CC510 or any back-up Camera
Ground
30
86
85 87A
87
12 Volt Switched (Ignition)
Ground
DWϰ Black Box
Camera
Input
Option: 2
Owner’s Manual
English
Please follow these connection diagrams carefully
:,5(&211(&7,216
NOTE:
This J1939 CAN Connector contains insulated twisted wires that are
Connected by terminating resistors on the dedicated CAN on the main
PCB of the 0: Black Box.
View: Front of J1939 Connector
J1939 Connector
PIN NUMBER NAME GAUGE COLOR
A CAN B - 20 WHITE
B CAN B + 20 PURPLE
C CAN HIGH 20 YELLOW
D CAN LOW 20 GREEN
E CAN - DRAIN 20 BLACK
F NOT USED
G NOT USED
H NOT USED
J NOT USED
Only use this J1939 Connector to compatible Multi-Function Displays (MFD)
ON
OFF
CAMERA
AB
C
D
E
G
F
H
J

2015/010:
All Rights Reserved. Copyright © 2013: Clarion Corporation of America
Printed in China / Imprime` au Chine / Impreso en China
Clarion Corporation of America
FCC NOTE:
This device complies with Part 15 of the FCC Rules.
Operation is subject to the following two conditions: (1) this device may not cause harmful
interference, and (2) this device must accept any interference received, including
interference that may cause undesired operation.
THE MANUFACTURER IS NOT RESPONSIBLE FOR ANY RADIO OR TV
INTERFERENCE CAUSED BY UNAUTHORIZED MODIFICATIONS OR CHANGE TO
THIS EQUIPMENT. SUCH MODIFICATIONS OR CHANGE COULD VOID THE USER’S
AUTHORITY TO OPERATE THE EQUIPMENT.