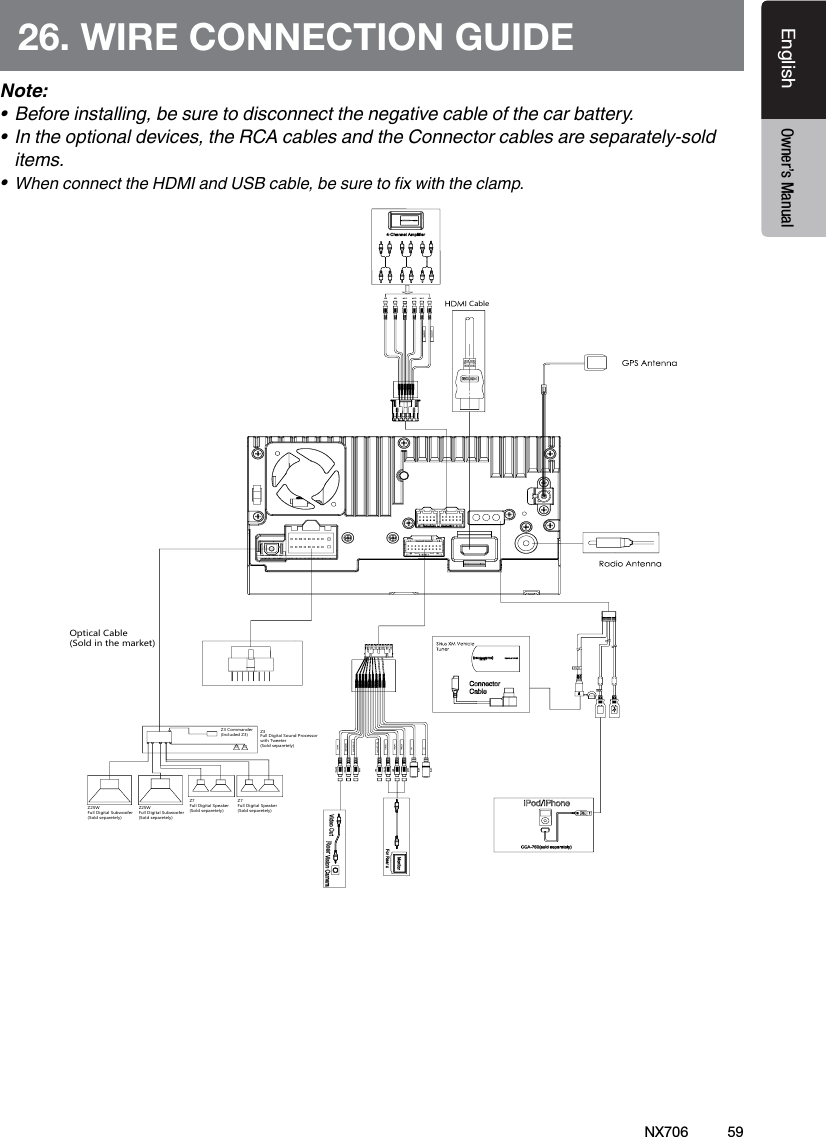
SKYPINE ELECTRONICS NX706 ALL IN ONE DVD PLAYER User Manual
SKYPINE ELECTRONICS (SHEN ZHEN) CO., LTD. ALL IN ONE DVD PLAYER
UserManual.wiki
>
SKYPINE ELECTRONICS
>
NX706 User Manual
>
User Manual
Contents
1.
Users Manual
2.
User Manual
User Manual
Navigation menu
Upload a User Manual
Namespaces
Wiki Guide
HTML
PDF
Info
Views
User Manual
Discussion / Help
Navigation

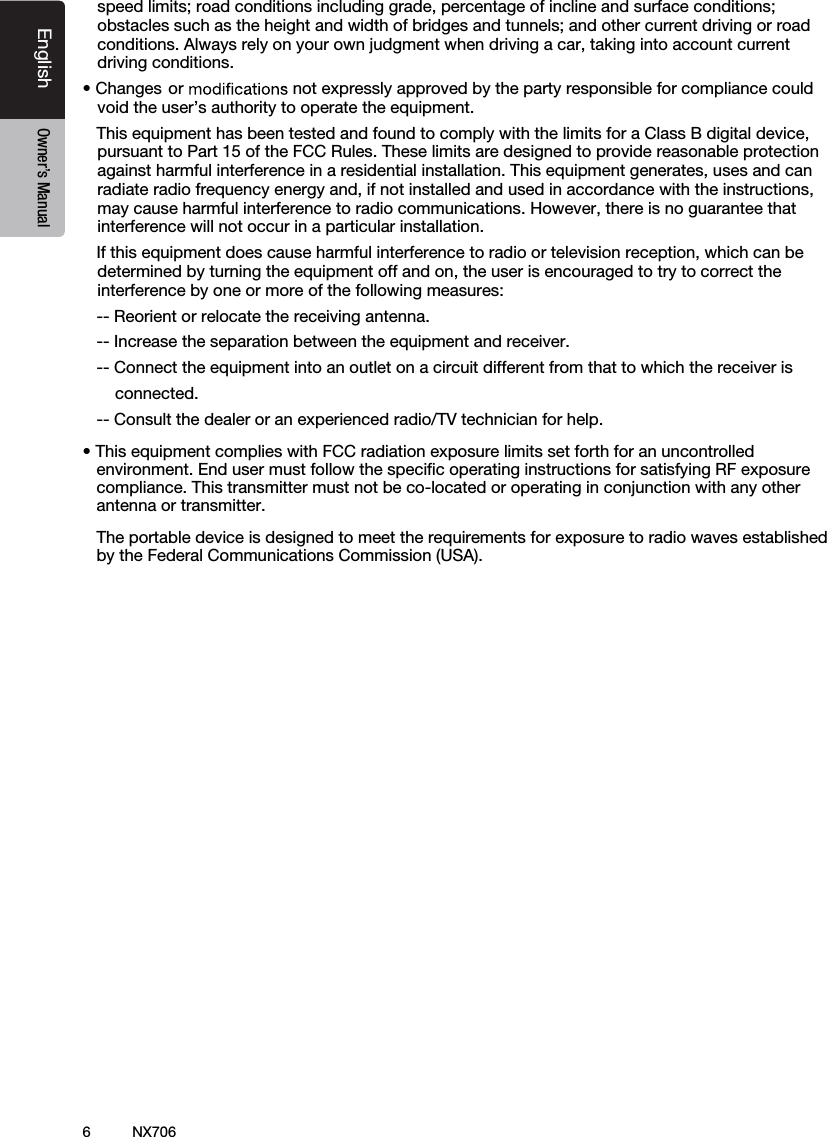

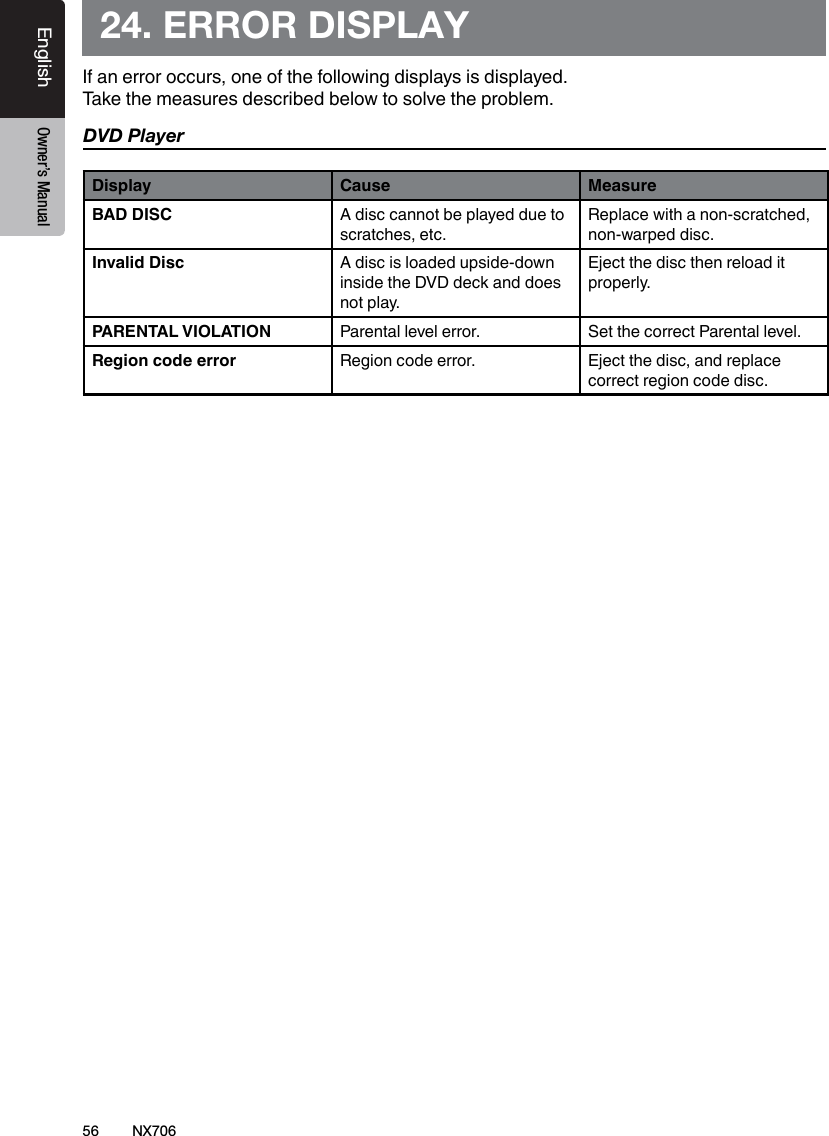
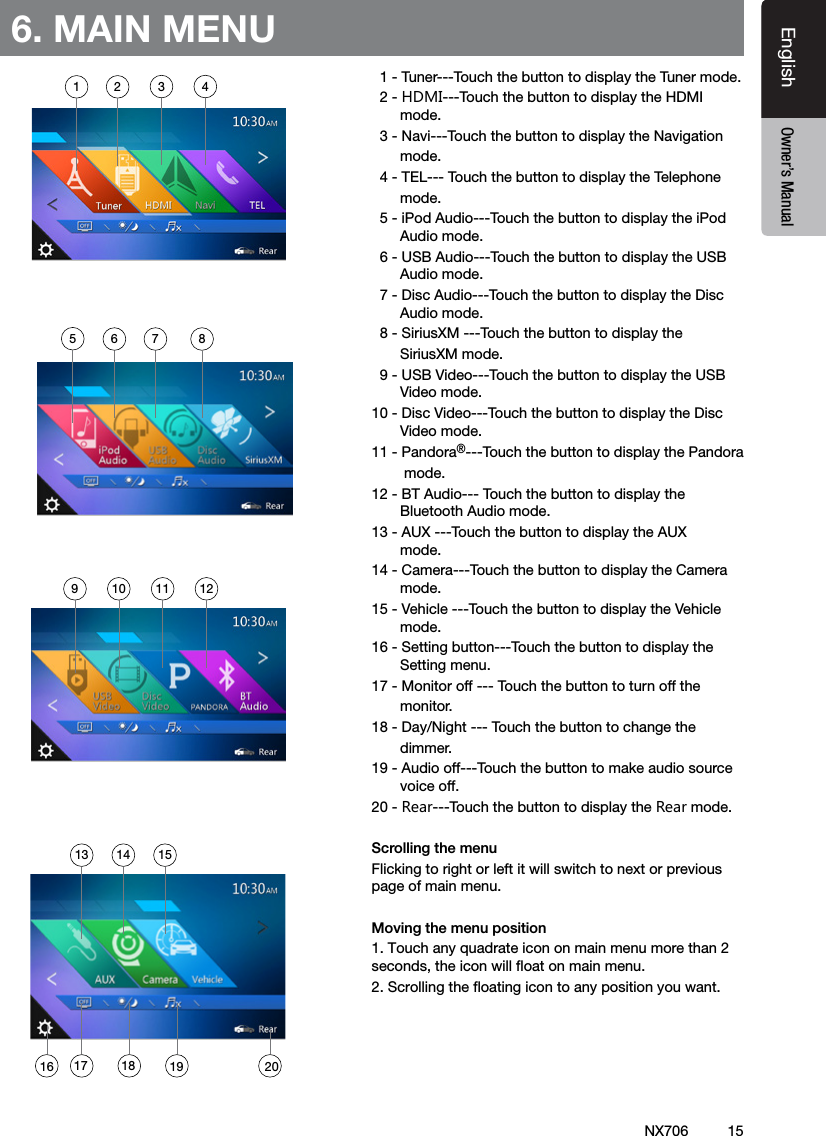
![11EnglishEnglish Owner’s ManualEnglish Owner’s ManualNX706[Microphone][MENU] [MAP/ Power][OPEN][NAVI/AV][IR] [RESET] [-VOL+]4. OPERATION PANELFunctions of Buttons[MAP/ Power] Button• Press this Button to turn on the power. • When the power is already on, it moves to the Navigation mode. If Navigation mode is displayed, it moves to the Navigation menu.• Keep pressing this button more than 2 seconds to turn off the power.[NAVI/AV] Button• Press this button to display NAVI, press again to return current source.• Press and hold this button for 2 seconds to display the Dimmer setting menu.[MENU] Button• Press this button to display main menu; press again to return current source. • Press and hold this button for 2 seconds to turn off the monitor. Press any place of the screen to turn on the monitor again.[RESET] Button• Press this button to hardware reset the unit.Note: When the [RESET] button is pressed, frequencies of radio stations, titles, etc. stored in memory are cleared.[Microphone] This is used for Bluetooth phone.[IR] SENSOR• Receiver for the remote control unit (operating range: 30 degree in all directions).[VOICE] ButtonPress and hold this button until you hear the warning tone, then you can use Siri® Eyes Free function.[OPEN] Button• Press this Button to open and close panel. • Keep pressing this button more than 2 seconds for change the tilt angle.[-VOL+] Button• Press this Button to decrease and increase sound. • Keep pressing this button more than 2 seconds to keep decreasing and increasing sound.Only navigation map card is available and don’t remove it when unit is power on[VOICE]](https://usermanual.wiki/SKYPINE-ELECTRONICS/NX706.User-Manual/User-Guide-2841162-Page-12.png)
![12EnglishEnglish Owner’s ManualEnglish Owner’s ManualNX7065. REMOTE CONTROLReplacing the batteries 1.Press the retention tab and pull out the battery tray and remove the old battery. 2. Insert the new CR2025 battery and slide the battery tray back in the remote control the same direction that you removed it. Please ensure the tray is inserted in the correct direction.• Keep the battery out of the reach of children. Should the battery be swallowed, consult a doctor immediately.• Batteries (battery pack or batteries installed) must not be exposed to excessive heat such as sunshine, re or the like.Signal transmitterOperating range : 30° in all directions[ / ][ 0-9 ][SRCH][BACK][ , , , ][TITLE][ ], [ ][ZOOM][MUTE][AUDIO][POWER/SRC][VOLUME][SET][PIC][TAG][RPT][ ], [ ][SUB.T][OPEN][ANGLE][NAVI/AV][MENU][BAND][ROOT][ENT]CAUTIONRCX005 Remote Control Included](https://usermanual.wiki/SKYPINE-ELECTRONICS/NX706.User-Manual/User-Guide-2841162-Page-13.png)
![13EnglishEnglish Owner’s ManualEnglish Owner’s ManualNX706[ / ] Button• Press this button to play or pause video and audio media.• Press this button more than 1 second to stop video and audio media.• Play/Pause (Replay/TuneMix) in SiriusXM mode. [MUTE] Button• Mute or Unmute the speaker.• The symbol on upper right area of the screen indicates that speaker is muted. [POWER/SRC] Button• Press this button to move the focus to next available source item on main menu.• Press this button to power on when the unit is power off.• Press this button more than 1 second to power off when the unit is power on. [0 - 9] Buttons• Use in the Key Pad screen to select the radio.• Use to select the track in the track list screen.• Press to enter DVD video chapters/titles in the Key Pad screen. [VOLUME] Buttons• Increase and decrease volume. [NAVI/AV] Button• Press this button to switch between current source and current position on navigation map. [SRCH] Button• Press this button to open chapter or title search window while playing DVD. [BAND] Button• Switch to next band alternately. [SET] Button• Press this button to open the Audio setting menu in any mode. [BACK] Button• Press this button to quit main menu if current screen is main menu. [ ], [ ], [ ], [ ] Buttons• Press this button for cursor movement in main menu or Setting mode.• From the main menu, you can select your desired source or change your settings. [MENU] Button• Press this button to enter the MAIN MENU or return current resource. [PIC] Button• Press and hold this button to change your monitor Dimmer. [ENT] Button• Press to x the entered data in the Key Pad screen or enter the item the cursor is on. [TAG] Button• No function. [TITLE] Button• Press to go to the title menu on the DVD. [ROOT] Button• Press to go to the root menu on the DVD.Remote Control FunctionsYou can use the remote control to operate the NX706.Note:• The wireless remote control operation may not be optimal in direct sunlight.CAUTION• Use one CR2025 (3V) lithium battery.• Remove the battery if the remote control is not used for a month or longer.• There is a danger of explosion if battery is incorrectly replaced. Replace only with the same or equivalent type.• Do not handle the battery with metallic tools.• Do not store the battery with metallic objects.• If the battery leaks, wipe the remote control completely clean and install a new battery.• When disposing of used batteries, comply with governmental regulations or environmental public institutions’ rules that apply in your country/area.Important• Do not store the remote control in high temperatures or direct sunlight.• The remote control may not function properly in direct sunlight.• Do not let the remote control fall onto the oor, where it may become jammed under the brake or accelerator pedal.](https://usermanual.wiki/SKYPINE-ELECTRONICS/NX706.User-Manual/User-Guide-2841162-Page-14.png)
![14EnglishEnglish Owner’s ManualEnglish Owner’s ManualNX706 [RPT] Button• Press to perform chapter repeat/title repeat/repeat off while playing DVD mode.• Press to perform Repeat Track/Repeat All while playing CD.• Press to perform Repeat Track/Repeat Folder/ Repeat All while playing MP3/WMA, or video les on disc.• Press to perform Repeat Track/Repeat Folder/ Repeat All while playing MP3/WMA, or video les in USB memory. [ ], [ ] Buttons• Press to select the next preset lower or higher number in Tuner mode. • Press to select the next lower or higher chapter number in DVD video mode.• Press to select the next lower or higher track in CD, USB Video, USB Audio mode.• Press for movement of background source in Navigation mode.• Preset Up/Down, Track Up/Down (TuneMix) in SiriusXM mode. [ ], [ ]Buttons• Press to manually select the next lower or higher station in Tuner modes.• Press to perform fast-backward or fast-forward searching. Press again to change the speed to 2x, 4x, 8x or 16x.• Press for movement of background source in Navigation mode.• Preset Up/Down,, Channel Up/Down in TuneMix.• Channel Up/Down in SiriusXM mode [ZOOM] Button• Press to turn on and zoom in while playing DVD. You can zoom in up to 3x. (No all DVD disc supports this function). [AUDIO] Button• Press to switch the AUDIO channel of the disc while playing DVD. [SUB-T] Button• Press to switch next available subtitle while playing DVD.• Press to display Video menu in iPod mode. [ANGLE] Button• Press to switch the different ANGLE while playing DVD. (No all DVD disc supports this function)• Press to display Audio menu in iPod mode. [OPEN] Button• Press to open/close the front panel.](https://usermanual.wiki/SKYPINE-ELECTRONICS/NX706.User-Manual/User-Guide-2841162-Page-15.png)
![17EnglishEnglish Owner’s ManualEnglish Owner’s ManualNX706Change DVD System SettingsNote: If the setup operation is performed in the middle of DVD video play, the disc will restart from the beginning.Selecting DVD Setup Menu1. Touch the [Settings] button on the Main Menu to access the Video setup menu.2. Touch [Video] button. The video menu is displayed.Setting up the Screen SizeTouch the [DVD Wide Screen Mode] button to turn on or turn off the DVD wide screen mode. The factory default setting is “off”Note: Not all DVD disc support this function.Setting up the password for parental level controlThe factory default pass code is “0000”.1.In Main Menu Touch [Settings] button. Touch [Others] button on the display. Touch the [Set Password] ---- and a numerical key pad will appear.Input a new password and come again. The password is set.Note: When a disc with view restrictions is inserted, you will be prompted to input this password. The disc will not be viewable until the correct password is entered.Set rating for parental level control1.Select Others screen while in Setting mode. Touch [Parental Control] button. Touch the desired rating for level control. Use this table to set the parental level.Kid Safe Kid SafeG General AudiencesPG Parental Guidance SuggestedPG-13 Parents Strongly CautionedPG-R Parental Guidance RestrictedRRestrictedNC-17 No One 17 And Under AdmittedAdult Only Adult • The contents that the parental level restricts vary with the country code.Note: The rating can be selected only under the password unlocked status, and the limits can be set only under the password locked status.Watching to a Disc1. To load a disc: Insert the disc into the center of the insertion slot the label side facing up. CAUTIONFor your safety, the driver should not insert or eject a disc while driving.Note:• Never insert foreign objects into the disc insertion slot.• If the disc is not inserted easily, there may be another disc in the mechanism or the unit may require service.• 8cm (single play) discs cannot be used.2. Disc starts playing automatically. WARNINGSome videos may be recorded at higher than desired volume levels. Increase the volume gradually from the minimal setting after the video has started.Ejecting a disc1. For eject a disc open the front panel by press the open button, then press the eject [ ]button. Then play mode switches to the Tuner mode.When the disc is left to the ejected position for 10case, seconds, the disc is automatically reloaded. In this case, the play mode will remain in the Tuner mode.Note: If you force a disc into before auto reloading, it may damage a disc.](https://usermanual.wiki/SKYPINE-ELECTRONICS/NX706.User-Manual/User-Guide-2841162-Page-18.png)
![18EnglishEnglish Owner’s ManualEnglish Owner’s ManualNX706Showing DVD Player Mode ScreenAfter disc is loaded, the play mode is automatically engaged.Touch any place of the screen to display DVD Video menu touch the screen again to return the playback screen. The display will return to the playback screen, if you do not touch the screen for 10 seconds. 1 - Option button 2 - Show Cursor keys button 3 - Previous Chapter/Fast Backward button 4 - Play/Pause button 5 - Next Chapter/Fast Forward button 6 - Elapsed playing time 7 - Seek bar 8 - Total time 9 - Menu List button10 - System time11 - Bluetooth status indicator12 - DVD playback information13 - Shortcut button14 - Repeat Switching button15 - Audio Channel switching button16 - Subtitle switching button17 - Angle button18 - Direct chapter or title searching button19 - Information buttonOperate the DVD Player MenuYou can select the button items displayed in the DVD menu by directly touching it.Play/Pause Playback1. Touch [ ] button to pause during playback.2. Touch [] button again to resume playback.Skip (Search) a Chapter1. Touch [ ] or [ ] button during playback.Chapters are skipped down or up from current locations, as many times as the button is touched, and playback starts.Skip use seek barTouch the spherical [ ] on seek bar and drag it to any position where you want to start playback.Fast Forward/Fast Backward1. Touch [ ] or [ ] button and hold 2 seconds to start fast backward or fast forward during playback. The playback speed starts at 2x, then will increase to 4x, 8x, and 16x. Release the button will continue playing with normal speed.Note:• No audio is reproduced during fast forward and fast backward operation.• The fast forward and fast backward speed may differ depending on the disc.Search functionYou can locate the beginning of a scene using the chapter numbers or title numbers recorded on the DVD Video disc.1. Showing the DVD Video menu, touch [] button. The Key Pad screen appears with the chapter/Title number input mode. Touching [] button turns the Key Pad to the chapter number input mode. Touching [] button turns the Key Pad to the title number input mode. • Title A large segment to divide the data area of the disc.• Chapter A small segment to divide the data area of the disc.14 15 1619181310111212356894717](https://usermanual.wiki/SKYPINE-ELECTRONICS/NX706.User-Manual/User-Guide-2841162-Page-19.png)
![19EnglishEnglish Owner’s ManualEnglish Owner’s ManualNX7062. Input the number of the title/chapter that you want to play with the [0] to [9] key.3. Touch the [] button. Playback starts from the scene of the input title number or chapter number.NOTE:*If the input title/chapter number does not exist or searching with a title/chapter number is not allowed, the screen image will not change.4. Touch [] button to close the key pad.Repeat PlaybackThis operation plays back chapters recorded on the DVD-Video repeatedly.1. Showing the DVD Video menu, touch [] button.2. Touch [] button once for Repeat Chapter, again for Repeat Title.3. Touch [] button again to turn off the repeat playback.Using the Title MenuOn DVD discs containing two or more titles, you can select from the title menu for playback.1. Showing the DVD Video menu, touch [ ] button during playback.* Depending on the disc, the title menu may not be called.2. Touch the title menu screen. And touch the Show Cursor keys.3. Select the items in the title menu screen by directional buttons.* Depending on the disc, items may not be selected with the directional buttons.4. Touch [] button to x on the selected item.5. Touch [] button.Switching AudioOn discs in which two or more audios or audio languages have been recorded, you can switch among the audio languages during playback.1. Showing the DVD Video menu, touch [] button during playback.• Each time you touch the button, you can switch among audio languages.• It may take time to switch among audios. Depending on the disc, up to 8 kinds of audios may be recorded. For details, see the mark of the disc: (Indicates that 8 audios have been recorded). When the power is turned on and when the disc is changed to a new one, the language set as the factory default is selected. If that language has not been recorded on disc the language is specied on the disc. Depending on the disc, switching may be completely impossible or impossible on some scenes.Switching SubtitlesOn DVD discs in with two or more subtitle languages have been recorded, you can switch among the subtitle languages during playback.1. Showing the DVD Video menu, touch [] button to select a subtitle during playback. Each time you touch the button, you can switch among subtitles.• It may take time to switch among subtitles. Depending on the disc, up to 32 kinds of subtitles may be recorded. For details, see the mark of the disc: ( Indicates that 8 kinds of subtitles have been recorded). Depending on the disc, switching may be completely impossible or impossible on some scenes.2. To turn off subtitles, repeat touching [] button until subtitles are turned off.Displaying the playback statusTouch [ ] button on DVD Player mode screen, Playback status is displayed on screen.Play video filesThis system can play video les stored on disc.Showing Video Files Player Mode Screen1. After disc with video les is loaded, touch [Disc Video] button on MAIN MENU to show video les player mode screen.2. Touch the screen of the playing video le to display Video les player menu touch the screen again to return the playback screen. The display will return to the playback screen, if you do not touch the screen for 10 seconds.](https://usermanual.wiki/SKYPINE-ELECTRONICS/NX706.User-Manual/User-Guide-2841162-Page-20.png)
![20EnglishEnglish Owner’s ManualEnglish Owner’s ManualNX706 1 - Option button 2 - Previous Track/Fast Backward button 3 - Play/Pause button 4 - Next Track/Fast Forward button 5 - Elapsed playing time/Seek bar 6 - List Mode button 7 - System time 8 - Bluetooth status indicator 9 - Playback information10 - Repeat button11 - Audio button 12 - Subtitle buttonOperate the Video Files Player MenuYou can select the button items displayed in the Video les player menu by directly touching it.Play/Pause Playback1. Touch [ ] button to pause during playback.2. Touch [ ] button again to resume playback.Switch to Previous/Next File1. Touch [ ] or [ ] button during playback to play previous/next le Skip using seek barTouch the ball on seek bar and drag it to any position where you want to start playback.Fast Forward/Fast Backward1. Touch [ ] or [ ] button and hold 2 seconds to start fast backward or fast forward during playback. The playback speed starts at 2x, then will increase to 4x, 8x, and 16x. Release the button will continue playback with normal speed.Note:*No audio is reproduced during fast forward and fast backward operation.*The fast forward and fast backward speed may differ depending on the disc.Repeat PlaybackThis operation plays back video les recorded on the disc repeatedly. The repeat set as the factory default is Repeat all.1. Showing the video les player menu, touch [] button.2. Touch [] button once for Repeat Track, again for Repeat Folder.3.Touch [] button again for Repeat All.Switching AudioSome video les will have two or more audio channels; you can switch among the audio channels during playback.1. Touch [] button during playback.• Each time you touch the button, you can switch among audio languages.• It may take time to switch among audios.Depending on the disc, switching may be impossible.Switching SubtitlesSome video les will have two or more subtitles have been recorded; you can switch among these subtitles during playback.1. Touch the [] button to select a subtitle during playback.• Each time you touch the button, you can switch among subtitles.• It may take time to switch among subtitles.Depending on the disc, switching may be impossible.Video Files ListShowing the Video les player menu; touch the [] button to display video les list screen.Video les list operations is almost same as Disc Audio player mode. Please refer to CD Player Operations.Playable Video Disc Formats This system can play video les stored on disc.*.avi les• format: MPEG4 Visual Simple @L1 • Picture size: 720 x 480 • Audio format: MP3 • Audio sampling frequency: 32/44.1/48 KHz10 11 12123456789](https://usermanual.wiki/SKYPINE-ELECTRONICS/NX706.User-Manual/User-Guide-2841162-Page-21.png)
![22EnglishEnglish Owner’s ManualEnglish Owner’s ManualNX706Listening to a Disc/Ejecting a DiscPlease refer to Disc Video Player Operations -watching to a disc and Ejecting a disc.Showing CD Player Mode Screen1. After disc is loaded, the play mode is automatically engaged.2. If disc have been loaded you can touch [Disc Audio] button on main menu to display CD player mode screen. 1 - Option button 2 - Elapsed playing time indicator 3 - Progress bar 4 - Page Turning button 5 - System time 6 - Bluetooth status indicator 7 - Repeat button 8 - Previous Track/Fast Backward button 9 - Shortcut button.10 - Play/Pause button 11 - Next Track/Fast Forward button12 - Shufe button 13 - Direct Searching button14 - Scan Start/Stop button15 - Song Title16 - Artist/album Information17 - Close option menu ButtonOperate the CD Player MenuYou can select the button items displayed in the CD player menu by directly touching it in list.Play/Pause Playback1. Touch [ ] button to pause during playback.2. Touch [] button again to resume playback.Switch to Previous/Next file or trackTouch [ ] or [ ] button during playback to play previous/next le.• Touching [] button starts playback from the beginning of the next track.• Touching [] button starts playback from the beginning of the current track. When this button is touched again within 5 seconds, playback starts from the beginning of previous track.Fast Forward/Fast Backward1. Touch [ ] or [ ] button and hold more than 2 seconds to start fast backward or fast forward during playback. The playback speed starts at 2x, then will increase to 4x, 8x, and 16x. Release the button will continue playback with normal speed.Note:* The fast forward and fast backward speed may differ depending on the disc.Repeat Playback* The repeat set as the factory default is Repeat All. Touch [] button switch between Repeat Folder Repeat All and Repeat Track.Shuffle Playback1. Touch [ ] button to shufe the tracks during playback.2. Touch this button again to turn off the feature.Selecting a track on the Track List ScreenThis function allows you to select tracks from a displayed list.1. Touch the track title on the display list. The selected track will start playing.2. When the desired track is not displayed, touch and ick the track list up or down.3. Touch the desired track title button. The corresponding track is started playback.8. CD PLAYER OPERATIONS 4102113141236158511791617](https://usermanual.wiki/SKYPINE-ELECTRONICS/NX706.User-Manual/User-Guide-2841162-Page-23.png)
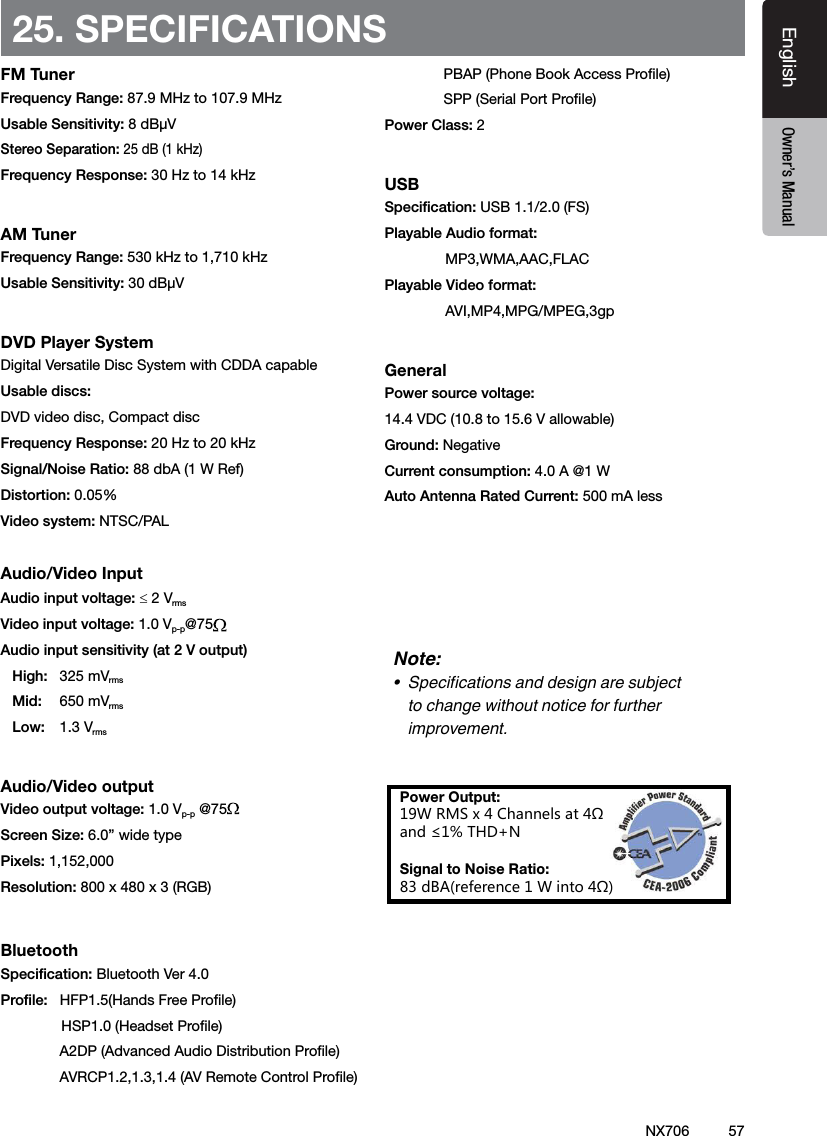
![23EnglishEnglish Owner’s ManualEnglish Owner’s ManualNX706Scanning the Tracks1. Touch [ ] button to show [Scan ] button.2. Touch [Scan ] button during playback.• It will play from next track, and each track will display for 10 seconds.• The [Scan ] button will switch to [Scan ]button.3. Touch [Scan ] button.• It will continue playback from current track.• [Scan ] button will switch to [Scan ] button.* The function will scan all tracks orderly in current folder once. After Scan stopped playback will continue.Searching with the Track NumberThis operation allows searching using the track numbers recorded on the CDs.1. Touch [] button to show [ ] button.2. Touch [] button .The numerical keypad will appear on the screen and touch [ ] button.3. Input the track number that you want to play back with [0] to [9] key and touch [OK] button.Playback starts from the track of the input track number.• If the input track number does not exist or searching with track number is not allowed, the screen image will not change.• Touch the [] button will close the numerical keypad.• Touch [] button will close the option window and display playback screen..Listening to Compressed AudioThis system can play audio les stored on disc.MP3/WMA/AACTag Display FunctionThis unit is an ID3 Tag compatible model.This unit supports the ID3 TAGs of the Version 2.4, 2.3, 1.1 and 1.0.In displaying, this unit gives priority to the Version 2.3 and 2.4 TAGs.Note:• Some CDs recorded on CD-R/RW mode may not be usable.Displaying MP3/WMA/AAC TAG titlesTag information can be displayed for compressed audio le containing Tag information.Tag data: title, artist, albumPrecautions when creating MP3 disc• File extensions1. Always add a le extension “.MP3” or “.mp3” to an MP3 le, and “.WMA” or “.wma” to a WMA and “.m4a” to a AAC le by using single byte letters. If you add a le extension other than specied or forget to add these le extension, the le cannot be played. In addition, if you use upper case and lower case letters (capital and small letters) mixed for le extensions, normal play may not be possible.2. Files other than MP3/WMA/AAC data cannot be played. Playing les with a format not supported will be skipped, and the scan, random and repeat playback mode may be canceled.• File and Disc Not SupportedFiles and discs with following extensions are not supported: *.AAC, *.DLF, *.M3U, *.PLS, *.MP3 PRO les, les with DRM, open session discs.• Logical format (File system)1. When writing an MP3/WMA/AAC le on a disc, please select “ISO9660 level 1 or level 2 (without including expansion format)” as the writing software format. Normal playback may not be possible if the disc is recorded on another format.2. The folder name and le name can be displayed as the title during MP3/WMA/AAC play .• Entering File and Folder NamesNames using the code list characters are the only le names and folder names that can be entered and displayed. Using any other character will cause the le and folder names to be displayed incorrectly.• Folder structure1. A disc with a folder having more than 8 hierarchical levels will conict with the ISO9660 and playback will be impossible.• Number of les or folders1. The maximum allowable number of folders is 200 (including root directory); the maximum allowable number of les is 1500 (max. 200 per folder). This represents the maximum number of tracks that can be played back.2. Tracks are played in the order that they were recorded onto a disc. (Tracks might not always be played in the order displayed on the PC).• Some noise may occur depending on the type of encoder software used while recording.](https://usermanual.wiki/SKYPINE-ELECTRONICS/NX706.User-Manual/User-Guide-2841162-Page-24.png)
![24EnglishEnglish Owner’s ManualEnglish Owner’s ManualNX706• In case of a track recorded at VBR (variable bit rate), the display for the play time of the track may be slightly different from the actual play time. Also, the recommended value of VBR ranges from 32 kbps to 320 kbps.• After disc selection, the play mode is automatically engaged.Playback MP3/WMA/AAC menu1. Repeat PlaybackWhile playing MP3/WMA/AAC touch button can switch between Repeat Folder, Repeat All and Repeat Track, Repeat Folder and Repeat All.2.Current Folder• Showing title of current folder.• The number on the folder symbol is the number of les and folders number in current folder.• Touch the title of current folder, playlist will show les and folders in upper folder.*Other operations about playing MP3/WMA/AAC are almost same as CD Player mode.Stop Playback1. Touch [ ] button to stop playback.2. Touch [ ] button again to resume playback.Playback resumes from start of the folder which playing track is in.•Other operations about playing MP3/WMA/AAC are almost same as CD Player mode.12](https://usermanual.wiki/SKYPINE-ELECTRONICS/NX706.User-Manual/User-Guide-2841162-Page-25.png)
![25EnglishEnglish Owner’s ManualEnglish Owner’s ManualNX706This system can play audio les (MP3/WMA/AAC/FLAC) stored in a USB memory which is recognized as “USB Mass Storage Class device”. You can use your USB memory as an audio device by simply copying desired audio les into it.Note: • This system will not operate or may operate improperly with some USB memory.• Files protected with any DRM cannot be played.Notes on Using USB MemoriesGeneral notes• When no support les, the le list display nothing.Notes on the Audio les• This system can play the MP3/WMA/AAC/FLAC les stored in the USB memory.MP3 les:• format: MPEG1/2 Audio layer3• bit rate: 8k ~ 320kbps• sampling frequency: 8/12/16/24/32/44.1/48KHz • le extension: .mp3WMA les:• format: Windows media Audio standard L3 prole• bit rate: 32 ~ 192kbps• sampling frequency: 32/44.1/48 KHz• le extension: .wmaAAC les • format: Advanced Audio Coding LC-AAC,HE- AAC • bit rate: 32 ~ 320Kbps • sampling frequency: 32/44.1/48 KHz• le extension: .m4aFLAC les• format: Free Lossless Audio Codec • quantization bit rate: 16 or 24 bits• sampling frequency: 44.1~96 KHz• le extension: .acNotes on the folder structure• The folder hierarchy must be within 8 hierarchical levels. Otherwise, playback may be impossible.• The maximum allowable number of folders is 65535 (including root directory and folders with no MP3/WMA/AAC/FLAC le).• The maximum allowable number of les in a folder is 65535.• You can store the MP3/WMA/AAC/FLAC les together in a folder.• The system may become slow if the les or folders exceed the limitation above.Notes on the Tag titles MP3: title, artist, album WMA: title, artist, album AAC: can not display tag information. FLAC: title, artist, albumSelect USB Audio ModeConnect your USB memory with MP3/WMA/AAC/FLAC les to the USB connector. The system will automatically detect the connected device, and the [USB Audio] button on main menu will be enabled. • When an USB memory is already connectedTouch [USB Audio] button to select the USB Audio mode.The system changes to the USB Audio mode and starts playback from the previous position or from the beginning.Note:This system has two USB connectors and can connect two USB.You can select the desired USB by touching the list of USB root menu.This system indicate the USB as “My USB1”, “My USB2” on the list. 1 - Option button9. USB AUDIO OPERATIONS 1920712135648239101111415161718](https://usermanual.wiki/SKYPINE-ELECTRONICS/NX706.User-Manual/User-Guide-2841162-Page-26.png)
![26EnglishEnglish Owner’s ManualEnglish Owner’s ManualNX706 2 - Play/Pause button 3 - Previous Track/Fast Backward button 4 - Next Track/Fast Forward button 5 - Repeat button 6 - Shufe button 7 - Audio les in list 8 - Folders in list 9 - Page turning button10 - System time11 - Bluetooth status indicator12 - Album Art13 - Shortcut button14 - Current ID3 info area15 - Elapsed playing time indicator/Seek bar16 - Playback status information17 - Alphabet search button18 - Category list19 - Direct button20 - Scan button Playing Audio Files in USB MemoryPlay/Pause Playback1. Touch [ ] button to pause during playback.2. Touch [] button again to resume playback.Switch to Previous/Next fileTouch [ ] or [ ] button during playback to play previous/next le.• Touch [] button to start playback from the beginning of the next track.• Touch [] button to start playback from the beginning of the current track; when this button is touched again within about 5 seconds, playback starts from the beginning of previous track.Fast Forward/Fast Backward Touch [ ] or [ ] button and hold more than 2 seconds to start fast backward or fast forward during playback. The playback speed starts at 2x, then will increase to 4x, 8x, and 16x .Release the button will continue playback with normal speed.Note:*The fast forward and fast backward speed may differ depending on the audio files.Repeat Playback* The repeat set as the factory default is Repeat All.Touch the [] button once for Repeat Track, again for Repeat Folder, Repeat All.Shuffle Playback1. Touch [ ] button to shufe the tracks in playing folder during playback.2. Touch this button again to turn off the feature.Alphabet SearchTouch [ ] button to search with alphabet in currentlist.Album Art workIf MP3 audio le contains album art image in ID3, the picture will be displayed in this area.ID3 Information AreaThis area display ID3 information of playing le.Skip Using Seek BarTouch on seek bar and drag it to any position where you want to start playback.Select a Folder on Display ListTouch the folder title on the display list, the display list will display les and folders in selected folder.Selecting a Track on the Display List This function allows you to select tracks from a displayed list.1. Touch the track title on the display list. The selected track will start playing.2. When the desired track is not displayed, touch and ick the track list up or down.3. Touch the desired track title button. The corresponding track is started playback.Scanning the Tracks1. Touch [ ] button to show [Scan ] button.2. Touch [Scan ] button during playback.• It will play from next track, and each track will display for 10 seconds.• The [Scan ] button will switch to [Scan ] button.3. Touch [Scan ] button.• It will continue playback from current track.• [Scan ] button will switch to [Scan ] button.* The function will scan all tracks orderly in current folder once. After Scan stopped, playback will continue.Searching with the Track NumberThis operation allows searching to use the track numbers in playing folder.1. Touch [] button to show [ ] button.2. Touch [] button. The numerical keypad will appear on the screen.3. Input the track number that you want to play back with [0] to [9] key and touch [OK] button.Playback starts from the track of the input track number.• If the input track number does not exist or searching with a track number is not allowed, the screen image will not change.• Touch [] button will close the numerical keypad.• Touch [] button will close the option window and display playback screen.](https://usermanual.wiki/SKYPINE-ELECTRONICS/NX706.User-Manual/User-Guide-2841162-Page-27.png)
![27EnglishEnglish Owner’s ManualEnglish Owner’s ManualNX70610. USB VIDEO OPERATIONSThis system can play USB video les (MP4, 3GP etc.) stored in a USB memory which is recognized as “USB Mass Storage Class device”. You can use your USB memory as an video device by simply copying desired video les into it.Note:• This system will not operate or may operate improperly with some USB memory.• Files protected with any DRM cannot be played.Notes on Using USB MemoriesGeneral notesWhen no support les, the le list display nothing.Notes on the folder structureThe limitations on the folder structure are same as those in USB Audio Player mode.Notes on the Tag titlesThe limitations on the Tag titles are same as those in USB Audio Player mode.Select USB Video ModeConnect your USB memory with video les to the USB connector. The system will automatically detect the connected device, and the [USB Video] button on main menu will be enabled. • When an USB memory is already connectedTouch [USB Video] button on main menu to select the USB Video mode.The system changes to the USB Video mode and starts playback from the previous position or from the beginning.Note: This system has two USB connectors and can connect two USB.You can select the desired USB by touching the list of USB root menu.This system indicate the USB as “My USB1”, “My USB2” on the list. Playing Video Files in USB MemoryIf the video is playing, touch the screen of the playing video to display Operation buttons. * The display will return to the playback screen, if you do not touch the screen for 10 seconds.Playable Video Format*.mp4 les • format: MPEG4 Visual MPEG4 AVC (H.264) • Picture size: 720 x 480 (MPEG4 Visual) 1920 x 1080 (MPEG4 AVC) • Audio format: AAC • Audio sampling frequency: 32/44.1/48 KHz *.m4v les • format: MPEG4 Visual MPEG4 AVC (H.264) • Picture size: 720 x 480 • Audio format: AAC • Audio sampling frequency: 32/44.1/48 KHz *.mpg les • format: MPEG2 • Picture size: 720 x 480 • Audio format: MP3 • Audio sampling frequency: 32/44.1/48 KHz *.3gp les • format: MPEG4 Visual H.263 • Audio format: AAC, AMR • Audio sampling frequency: 8/16/32/44.1/48 KHz Note: The above-mentioned File form is not guaranteeing allof what can reproduce. 1 - Previous Track/Fast Backward button 2 - Play/Pause button 3 - Next Track/Fast Forward button 4 - Elapsed playing time indicator/Seek bar 5 - Menu List 6 - Repeat button 7 - System time 8 - Bluetooth status indicator 9 - Playback information10 - Shortcut button1012349 8 756](https://usermanual.wiki/SKYPINE-ELECTRONICS/NX706.User-Manual/User-Guide-2841162-Page-28.png)
![28EnglishEnglish Owner’s ManualEnglish Owner’s ManualNX706Play/Pause Playback1. Touch [ ] button to Pause playback.2. Touch [] button to resume playback.Switch to Previous/Next fileTouch [ ] or [ ] button during playback to play previous/next le.• Touch [] button to starts playback from the beginning of the next track.• Touch [] button to starts playback from the beginning of the current track; when this button is touched again within about 5 seconds, playback starts from the beginning of previous track.Repeat Playback* The repeat set as the factory default is Repeat All.Touch the [] button once for Repeat Track, again for Repeat Folder, again for Repeat All.Skip Using Seek BarTouch the on seek bar and drag it to any position where you want to start playback.Switching USB Video MenuTouch [ ] button playback will be paused, and the screen will switch to USB Video List. 1 - Option button 2 - Play/Pause button 3 - Previous Track/Fast Backward button 4 - Next Track/Fast Forward button 5 - Repeat button 6 - Shufe button 7 - Video les in list 8 - System time 9 - Bluetooth status indicator10 - Playback status information11 - Album Art12 - Shortcut button13 - Current le information area14 - Elapsed playing time indicator/Seek bar15 - Alphabet search button16 - Direct button 17 - Scan button Play/Pause Playback*On USB Video menu screen, playback status is pause.Touch [] button to resume playback. The screen will go to video screen automatically.Switch to Previous/Next fileTouch [ ] or [ ] button during playback to play previous/next le.• Touch [] button to starts playback from the beginning of the next track.• Touch [] button to starts playback from the beginning of the current track; when this button is touched again within about 5 seconds, playback starts from the beginning of previous track.Repeat Playback* The repeat set as the factory default is Repeat All.Touch the [] button once for Repeat Track, again for Repeat Folder, again for Repeat All.Shuffle Playback1. Touch [ ] button to shufe the tracks in playing folder during playback.2. Touch this button again to turn off the feature.Alphabet SearchTouch [ ] button to search with alphabet in current list.Current File Information AreaThis area displays information of current video le: le name, number of current le/total number in current folder, Elapsed playing time/total time of current le.Skip Using Seek BarTouch on seek bar and drag it to any position where you want to start playback.Select a Folder on Display ListThis operation is same as this in USB Audio mode.Selecting a Track on the Display List This operation is same as this in USB Audio mode.Scanning the TracksThis operation is same as this in USB Audio mode.Searching with the Track NumberThis operation is same as this in USB Audio mode.1135 6 47289101314151121617](https://usermanual.wiki/SKYPINE-ELECTRONICS/NX706.User-Manual/User-Guide-2841162-Page-29.png)
![29EnglishEnglish Owner’s ManualEnglish Owner’s ManualNX70611. iPod OPERATIONSiPod/iPhone can be connected by using the connector cable supplied with the iPod/iPhone, but in this case, you can enjoy its audio sound only. To enjoy video movies stored in the iPod/iPhone with video displaying them on this unit, it is required to use the special connector cable (CCA-750) separately sold.However the new products such as the device with LightningTM connector only can connect 8-pin cable (no video signal output),so these new products cannot display video in video mode.Note:• This system will not operate or may operate improperly with unsupported versions.• For detailed information on the playable iPod/iPhone models, see our home page: www.clarion.comNotes on Using iPod/iPhone• Do not connect an iPod/iPhone to this unit with a headphone connected to the iPod/iPhone.• After the iPod/iPhone has been connected to this unit, the buttons of iPod are disabled for operation in the Music mode. In the Video mode, do not operate the buttons of iPod.• When in the iPod mode, the screen image input from the AUX terminal, is output to the rear monitor.• When no data is present, the title display will remain blank.• Set the language setting of iPod/iPhone to English before connecting your iPod/iPhone. Some characters of the other languages may not be displayed correctly in this system.• Precautions on battery consumption:If the iPod/iPhone is connected to this unit when the internal battery of iPod/iPhone has run down, this function may not operate correctly. You must connect the iPod/iPhone after charging the battery if it has run down.iPod Audio Menu OperationsConnect your iPod/iPhone to the USB connector. The system will automatically detect the connected device and the iPod Audio button will be enabled for operation on the Main Menu screen. Note: 1.This system has two USB connectors, please connect to the USB with the label of “iPod/iPhone”. By connecting another USB cable, iPod/iPhone can’t play back the music. 2.When iOS device is connected via both USB and Bluetooth at the same time and select iPod mode, iOS device is controlled by USB connection.3. When the iPod mode and operate the audio player or internet radio other than iPod, there is a case that iPod doesn’t playback correctly. Please don’t operate the audio player or internet radio other than Pandora® when in the Pandora mode. 4. When an iOS device is connected by Bluetooth, and select the iPod mode, the volume level is controlled by both iOS device and the unit. 5. During iOS device is connected by Bluetooth, Album art image is not displayed.The playback starts after a while, from where the iPod/iPhone has been paused.• When iPod/iPhone is already connectedTouch the [] button on the Main Menu screen. The system changes to the iPod mode, and starts playback from the previous position.iPod Audio ID3 Mode Screen 1 - Option button 2 - Repeat button 3 - Shufe button 4 - Previous Track/Fast Backward button 5 - Play/Pause button 6 - Next Track/Fast Forward button 7 - ID3 Information 8 - Next Page[ ] /Previous Page[ ] button135 3 6 7214101112154981](https://usermanual.wiki/SKYPINE-ELECTRONICS/NX706.User-Manual/User-Guide-2841162-Page-30.png)
![30EnglishEnglish Owner’s ManualEnglish Owner’s ManualNX706 9 - Category list10 - System time11 - Bluetooth status indicator12 - Playback status indicator13 - Art work14 - Shortcut button15 - Progress barPlay/Pause Playback1. Touch [ ] button to pause during playback.2. Touch [] button again to resume playback.Switch to Previous/Next file• Touch [ ] or [ ] button during playback to play previous/next le.• Touch [] button to starts playback from the Touch of the next track.• Touch [] button to starts playback from the beginning of the current track; when this button is touched again within about 5 seconds, playback starts from the beginning of previous track.Fast Forward/Fast BackwardTouch [ ] or [ ] button and hold more than 2 seconds to start fast backward or fast forward during playback.Note:*The fast forward and fast backward speed may differ depending on the audio files.Repeat Playback* depend on iPod.1. Touch the [] button once for Repeat Track, again for Repeat All, again for Repeat Off. Shuffle Playback1. Touch [ ] button to shufe the tracks in playing folder during playback.2. Touch this button again to turn off the feature.Album Art work If current audio le contains album art image in ID3, the picture will be displayed in this area.ID3 Information Area This area display ID3 information of playing le: song title, artist information, album information (Genre, playlist and release time).Category List Select different category songs to play. The category is same as the iPod/iPhone.iPod Audio Playlist Mode Screen 1 - Back to parent folder 2 - Playing list 3 - Page turning button• In the ID3 information mode screen, touch the ID3 info area to switch the playing list, and in the playing list mode screen, touch the button [] to back to the parent folder. If the list is in root, touch it to close the list.iPod Audio List Mode Screen 1 - Back to parent folder 2 - Alphabet search button• Touch the button[ ] to go back to the parent folder. If he list is in root, touch it to close the list.• Touch the button[ ] to search with alphabet in current list21312](https://usermanual.wiki/SKYPINE-ELECTRONICS/NX706.User-Manual/User-Guide-2841162-Page-31.png)
![31EnglishEnglish Owner’s ManualEnglish Owner’s ManualNX706iPod Audio Simple Control Mode Screen 1 - Simple Control button. • If the Simple Control is set to [] in option menu, the screen will become Simple Control Mode.iPod Audio Bluetooth ModeWhen your iPod/iPhone is connected via Bluetooth to this unit, you can also enter iPod Audio mode. The operation is same as the normal iPod Audio mode. 1](https://usermanual.wiki/SKYPINE-ELECTRONICS/NX706.User-Manual/User-Guide-2841162-Page-32.png)
![32EnglishEnglish Owner’s ManualEnglish Owner’s ManualNX70612. Pandora® OPERATIONSSelecting the Pandora Mode1. Turn on Pandora function of your iPod.2. Connect your iPod/iPhone/Android via Bluetooth to the unit.3. When iPod/iPhone/Android is already connected, touch the [Pandora] icon on the Main Menu screen. • Pandora mode now playing on screen/Pandora mode information screen 1 - Art work 2 - Progress bar 3 - Settings button 4 - Thumbs downTouch this button Thumbs-down current track and play next track. 5 - Play/Pause buttonUse to control playback and pause.(1). Touch the button during playback. Playback pauses.(2). To resume playback touch the button again. 6 - Next track button 7 - Thumbs up 8 - System time 9 - List buttonTouch this button to show List Screen. 10 - Current station name 11 - Current titleTouch icon to store current title to track favorites list. 12 - Current artistTouch icon to store current artist to artist favorites list. 13 - Current album name• Skipping a track (Pandora mode)Touch [ ] button during playback, tracks are skipped and starts playback from the beginning of the next track.Note: • Some track are not able to be skipped. • If skip limit has been reached(Skip 6 tracks in 1H), this function will not available.•Track rating Touch [ ] or [ ] button to Thumbs down or Thumbs up current track, and the button will light. Note: •Touch [ ] button will skip to next track (skip limit has not been reached).•Some track is not able to be rated (i.e. audio ads and shared station content). The thumbs buttons will disable.•Bookmarking Touch [ ] button to store current title or artist to track favorites list.Note: •Some track are not able to be bookmarked (i.e. audio ads). In this case the bookmark buttons will disable.• Pandora Mode Station List 1 - [ ]buttonTouch this button to display Information Screen. 2 - [ ]buttonTouch this button to sort the list by rst letter, touch again to sort the list by date. 3 - Station list, touch to select station play.When the desired station is not displayed, touch and ick the station list up or down.• Pandora Mode Setting screen4 5 762311129110138123If you have any issues with the Pandora application on yourmobile phone, please direct them topandora-support@pandora.com. 123](https://usermanual.wiki/SKYPINE-ELECTRONICS/NX706.User-Manual/User-Guide-2841162-Page-33.png)

![34EnglishEnglish Owner’s ManualEnglish Owner’s ManualNX70613. Bluetooth AUDIO PLAYER OPERATIONSSome Bluetooth cellular phones have audio features, and some portable audio players support the Bluetooth feature. These devices will be called as “Bluetooth audio players” in this manual. This system can play audio data stored in a Bluetooth audio player.Note: • This system will not operate or may operate improperly with some Bluetooth audio players.• For detailed information on the playable Bluetooth audio players, see our home page: www.clarion.comSelecting the Bluetooth Audio Mode1. Touch the [BT Audio] button to select the Bluetooth Audio mode. The system changes to the Bluetooth mode. If the connection with a Bluetooth audio player has been already established, you may select the Music function.2. Press MENU button on Operational Panel to return to the Main Menu.• When the connection with blue icon a Bluetooth audio player has been established, the [] icon is displayed at the top of the screen.Bluetooth Audio Player SettingsYou can conrm various information concerning about the Bluetooth Interface features.1. Touch the [] button to display the information on the screen.2. When you nish conrming the Bluetooth information, touch the [] button to return to the previous screen. Registering Your Bluetooth Audio Player (Pairing)You can register up to 5 Bluetooth audio players.Your mobile phone Bluetooth version is under 2.0.Please input PIN code “0000”.1. Turn on the power of the Bluetooth audio player you wish to register.2. Touch the Device button [] to display the Device Select screen.3. Touch the [ ] button to display the Inquiring Device screen.4. Touch your desired device button and touch [] button to register for the Bluetooth audio player. Then select an image of this device.](https://usermanual.wiki/SKYPINE-ELECTRONICS/NX706.User-Manual/User-Guide-2841162-Page-35.png)
![35EnglishEnglish Owner’s ManualEnglish Owner’s ManualNX706And select a type of this device.When the pairing operation completes, the registered Bluetooth audio player is set as the current device, after selecting the favorite icon, the display returns to the device list screen. Touch [] button, the display will return to the Bluetooth audio mode screen.• To delete the Bluetooth audio player registration1. Touch the [ ] button and then push the [ ] button to delete the device.A conrmation screen is displayed.2. Touch the [ ] button to conrm delete.Selecting the Bluetooth Audio PlayerTo change the current Bluetooth audio player to the other device which is already registered, perform the following operation.1. Touch the device button to [] display the Device Select screen.2. Touch the currently connected device button, then touch the [] button to disconnect the active device.3. Touch the desired Device button you wish to use. Touch [] button to select it as your active device. The corresponding cellular phone is set as current telephone.4. Touch the [] button to return to the previous screen.Controlling the Bluetooth Audio PlayerNote:• Occasionally, depending on the environment, playback sounds may be fragmented, or switch noises may be generated.Playing MusicAfter the connection with a Bluetooth audio player is established, the play mode is automatically engaged.• When playback is not started for some devices, touch the [] button manually.Pausing Playback1. Touch the [ ] button during playback.Playback Pauses2. To resume playback, touch the [ ] button. Playback resumes.Skipping a Track Searching3. Touch the [ ] or [ ] button during playback.Stopping Playback4. Touch the [ ] button during playback.Tracks are stopped, touch the [] button to playback the rst Track.Show Track List5. Touch the [ ] button to show the current track list. Touch the [] button to show all of the lists. And you can playback any tracks by touching the items in the list.](https://usermanual.wiki/SKYPINE-ELECTRONICS/NX706.User-Manual/User-Guide-2841162-Page-36.png)
![36EnglishEnglish Owner’s ManualEnglish Owner’s ManualNX706When the connection with your Bluetooth cellular phone is established, the following functions are available on this unit:• Listening to your telephone calls on the car speakers.• Answering to an incoming call.• Making a call using the Ten-Key pad screen.• Making a call using the Phone Book data in the selected cellular phone.• Making a call using the History data of the dialed/received calls.Note:• Some cellular phones may not be able to transfer the Phone Book data to head unit.• The Phone Book data transmission may take a long time. The operations of sending calls are disabled during the data transmission.Select the BT Phone Mode1. Touch the [TEL] button to select the Bluetooth Telephone mode. The Telephone screen is displayed.2. Press MENU button on Operational Panel to return to the Main Menu. • When no Bluetooth telephone is connected, the icon [] is displayed at the top of the screen.• When the connection with a Bluetooth Telephone has been established, the icon [] and signal level indicator are displayed at the top of the screen.Bluetooth Telephone SettingsYou can conrm various information concerning about the Bluetooth Interface features.1. Touch the [] button to display the information on the screen.2. Perform setting for the desired item. See the following sections for detail.3. When you nish conrming the Bluetooth information, touch the [] button to return to the previous screen.Setting Automatic ConnectionThe system automatically reconnects the cellular phone after the connection is lost or the system is restarted.• The factory default setting is “ON”. Touch the [] or [ ] button of the Automatic Connection item to set the function ON or OFF.Setting Automatic AnswerIf a call comes in, answer automatically after 5 seconds. • The factory default setting is “OFF”. Touch the [] or [ ] button of the Automatic Answer item to set the function ON or OFF.Setting Microphone Gain You can adjust the input level of the microphone in 16 levels.• Touch the level indicator button of the Microphone Gain item to adjust the input level.Note:• The input level of the microphone can be affected by its surroundings. Adjust the level if the person on the other end of the telephone has a reception problem.14. Bluetooth TELEPHONE OPERATIONS](https://usermanual.wiki/SKYPINE-ELECTRONICS/NX706.User-Manual/User-Guide-2841162-Page-37.png)
![37EnglishEnglish Owner’s ManualEnglish Owner’s ManualNX706Registering Your Cellular Phone (Pairing)You can register up to 5 cellular phones. The registering method is as same as “Registering your Bluetooth audio player”.Your mobile phone Bluetooth version is under 2.0.Please input PIN code “0000”.1. Turn on the power of the cellular phone you wish to register.2. Touch the Device button [] to display the Device Select screen.3. Touch the [ ] button to display the Inquiring Device screen.4. Touch your desired Cellular button to select the button for the cellular phone to be registered, and touch[] button to register for the Bluetooth cellular phone.• You cannot select the Cellular button of which another cellular phone is already registered. Select a blank Cellular button.5. If entering the Pass Key code is prompted on your cellular phone, enter the Pass Key code set in this unit.• You can change the Pass key setting of this unit from the Bluetooth Info screen under the Telephone Settings screen. When the pairing operation completes, the registered cellular phone is set as the current telephone, and the display returns to the Telephone screen.• To delete the cellular phone registration1. Touch the [ ] button to delete the device. A conrmation screen is displayed.2. Touch the [ ] button to conrm delete.Select the Cellular PhoneTo change the current cellular phone to the other device which is already registered, perform the following operation.1. Touch the [] button to display the Device Select screen.2. Touch the currently connected device, then touch [] button to disconnect the active device.3. Touch the desired Device button you wish to use. Touch [] button to select it as your active device. The corresponding cellular phone is set as the current telephone.• If the power of the cellular phone is not turned on, turn it on.• The cellular phone may prompt to acknowledge the Bluetooth connection or to enter the Pass Key code of this unit. Perform these operations according to the message displayed.4. Touch the [] button to return to the previous screen.Get the Phone Book DataSending the Phone Book data from the cellular phone enables you to make a call using the Phone Book function from this unit.Telephone OperationsMaking a call using the Ten-Key pad1. Touch the [ ] button to display the Ten-Key pad screen.2. Enter the telephone number by using the Ten-Key pad displayed on the screen.](https://usermanual.wiki/SKYPINE-ELECTRONICS/NX706.User-Manual/User-Guide-2841162-Page-38.png)
![38EnglishEnglish Owner’s ManualEnglish Owner’s ManualNX7063. Touch the [ ] (Send) button to call the entered number.• The following Telephone Interrupt screen is displayed during phone call.• Touch the [ ] button to talk by using the cellular phone and canceling the hands-free function (Private Mode). To return to the hands-free mode, touch the [] button again.• Touch the [] button to mute the microphone. Now you can hear the other side, but the other side cannot hear your side.• Touch the [] button to hold the current phone call, now you can answer the other incoming call. Touch again to talk with previous call If during a call with a third-party call, you can keep the current call to answer a third party or hang up the current call to answer a third party. You can also ignore the third-party calls. 4. When the call is nished, touch [ ] button to hang up. Note:• Depending on some special cellular phone, the Telephone Interrupt screen may be closed and the connection with this system may be disconnected when entering the Private mode.Making a Call Using the Phone BookYou can use the Phone Book data obtained from the cellular phone to make a call from this unit.Note:• Before using this function, the Phone Book data must be sent from the cellular phone.• Only the Phone Book items with at least one telephone number registered in the captured Phone Book data are displayed on the Phone Book screen.1. Touch the [] button to display the Phone Book screen.2. Touch the desired name button you wish to dial.• Flick the list up and down to scroll the list.3. Touch the [] button to call the specied number. The Telephone Interrupt screen is displayed, and calling starts.• When the call is nished, touch the [] button to hang up.Making a Call Using the HistoryThe system will memorize the Dialed/Received calls record data in the memory. You can conrm it and use it to make a call from this unit.1. Touch the [] button. The History List screen is displayed.• The items are sorted by Dialed, Missed and Received calls.• Flick the list up and down to scroll the list.2. Touch the desired History item key you wish to dial.3. Touch the [] button to call the specied number. The Telephone Interrupt screen is displayed, and calling starts.• When the call is nished, touch the [] button to hang up.Answering an incoming callWhen a call comes in, the following Telephone Interrupt screen appears.You can answer the incoming call on this system by the following operation.1. Touch the [] button to answer the call.2. When the call is nished, touch the [] button to hang up.](https://usermanual.wiki/SKYPINE-ELECTRONICS/NX706.User-Manual/User-Guide-2841162-Page-39.png)
![39EnglishEnglish Owner’s ManualEnglish Owner’s ManualNX706Using Siri Eyes Free FunctionYou can use the Siri Eyes Free function by the following operation.1. Turn on Siri setting of your iPhone. 2. Press and hold the [VOICE] button until you hear the warning tone.The indicator change as follows. 3. Talk to Siri the same way as using it on the iPhone.4. To finish Siri Eyes Free function, touch the [] button.Notes: Siri Eyes Free is available on iOS 6.1 or higher.Please use external mic when you use the Siri Eyes Free function.](https://usermanual.wiki/SKYPINE-ELECTRONICS/NX706.User-Manual/User-Guide-2841162-Page-40.png)
![40EnglishEnglish Owner’s ManualEnglish Owner’s ManualNX70615. TUNER OPERATIONSListening to the Tuner1. Touch the [Tuner] button on the main menu display. The tuner mode screen is displayed.2. Touch the [FM1/FM2/FM3/AM] button to select the radio band. Each time the button is touched, the radio reception band changes in the following order: FM1->FM2->FM3->AM->FM1... 1 - Preset Scan button 2 - Seek down button 3 - Seek up button 4 - Step down button 5 - Step up button 6 - Frequencies display 7 - System time 8 - Bluetooth status indicator 9 - Preset channel list10 - DX/Local indicator11 - Band button12 - Shortcut button13 - Option buttonSeek Tuning1. Touch the [FM1/2/3/AM] button to select the radio band (FM or AM).2. Touch the [] or [ ] button • When touch the [] button, the station is searched in the direction of higher frequency.• When touch the [] button, the station is searched in the direction of lower frequency.Step Tuning1. Touch the [FM1/2/3/AM] button to select the radio band (FM or AM).2. Touch the [] or [ ] button in frequency menu to tune up or down by one step.Recalling a preset station1. Touch the [FM1/2/3/AM] button to select the desire band (FM or AM) on the tuner.2. Press the preset station (1 to 6) on Preset list.Manual memory1. Touch the desired band button to select the band you wish to store.2. Tune to a station you want to store using the seek tuning, step tuning, or preset tuning.3. Touch and hold the desired Preset button you want to store for about 2 seconds.Auto StoreThe Auto Store is a function for storing up to 6 stations that are automatically searched sequentially. If the number of receivable stations cannot reach to 6, the previous stored station remains.1. Touch the [FM1/2/3/AM] button to select the desired band. (FM or AM)2. Touch the [] button, and then touch the [ ] button to start the Auto Store.A beep sounds and the stations with good reception are stored automatically to the preset list.Notes:1. After auto store, the previous stored stations will be overwritten.2. The unit has 4 bands, but FM3 and AM can store by Auto Store function.Preset ScanThe Preset Scan receives the stations stored in the preset memory in order. This function is useful when searching for the desired station in memory.1. Touch the [FM1/2/3/AM] button to select the desired band. (FM or AM)2. Touch the [] button to start the Preset Scan.The unit starts scanning each station for 10 seconds sequentially. But the station stored is not a valid station; the scanning time is only 2 seconds.3. When the desired station is tuned in, touch the [] button again to stay in that station.DX/Local SettingThe DX/Local setting changes the tuner sensitivity in order to separate closely spaced stations. This feature is useful in areas that have many radio stations in close proximity. 11127891023465113](https://usermanual.wiki/SKYPINE-ELECTRONICS/NX706.User-Manual/User-Guide-2841162-Page-41.png)
![41EnglishEnglish Owner’s ManualNX70616. SiriusXM® Satellite Radio OPERATIONS Only SiriusXM®® brings you more of what you love to listen to, all in one place. Get over 140 channels, including commercial-free music plus the best sports, news, talk, comedy and entertainment. Welcome to the world of satellite radio. A SiriusXM Vehicle Tuner and Subscription are required. For more information, visit www.siriusxm.com.Activating Your SiriusXM Subscription After installing your SiriusXM-Connect Vehicle Tuner and antenna, power on your head unit and select SiriusXM mode. You should be able to hear the SiriusXM preview channel on Channel 1. If you cannot hear the preview channel, please check the installation instructions to make sure your SiriusXM Connect tuner is properly installed. After you can hear the preview channel, tune to addition, the Radio ID is located on the bottom of the SiriusXM Connect Vehicle Tuner and its packaging. You will need this number to activate your subscription. Write the number down for reference.Note: The SiriusXM Radio ID does not include the letters I, O, S or F. In the USA, you can activate online or by calling SiriusXM Listener care: • Visit www.siriusxm.com/activatenow • Call SiriusXM Listener Care at 1-866-635-2349 For Canadian Subscriptions, please contact: • Visit www.siriusxm.ca/activatexm • Call XM customer Care at 1-877-438-9677As part of the activation process, the SiriusXM satellites will send an activation message to your tuner. When your radio detects that the tuner has received the activation message, your radio will display: “Subscription Updated”. Once subscribed, you can tune to channels in your subscription plan. Note, the activation process usually takes 10 to 15 minutes, but may take up to an hour. Your radio will need to be powered on and receiving the SiriusXM signal to receive the activation message.Selecting a Satellite Radio ModeTouch the SiriusXM button on the Main Menu display. The system changes to the SiriusXM Satellite Radio mode. The SiriusXM mode screen is displayed. 1. Band select button 2. Signal status 3. Option Setting button 4. Current Channel Number / Category Name / Preset Number 5. Preset List Button 6. Channel List Button 7. Category List Button 8. List scroll buttons 9. Channel List10. Channel up button11. Channel down button12. Direct Channel Tuning button13. TuneMix button14. Channel Name / Artist Name / Song Title / Content InfoDisplaying the SiriusXM Radio IDTouch the SiriusXM button on the main menu display.The SiriusXM Radio ID is required for activation and can be found by tuning to Channel 0 as well as on the label found on the SiriusXM Connect tuner and its packaging. You can also find it by touching the [Option Setting] button to enter the Setting menu. 3 4 5 6721141312 11 10 98](https://usermanual.wiki/SKYPINE-ELECTRONICS/NX706.User-Manual/User-Guide-2841162-Page-42.png)
![42EnglishEnglish Owner’s ManualEnglish Owner’s ManualNX706Channel Selection by Up/Down Button1. Select the channel with [ ] button. Only channels that can be received are selected. Channels that are locked and channels not covered by the subscription will be skipped. The receiver tunes to the next available channel below or above the current channel. Channel Selection by Channel Number1. Touch the [Direct Channel Tuning] button to enter channels directly. 2. Enter the number of your desired channel by touching the [0] to [9] buttons. If you enter a wrong number, you can cancel it by touching the [Clear] button.3. Touch the [OK] button. The radio will be tuned to the channel you entered. Tuning to Channels from the Channel List1. Touch the [Channel List] button on the SiriusXM Menu display to enter channel list preview mode.2. Touch and flick the category list up or down.3. You can select any channels in the list directly.Tuning to Channels from the Preset Channel ListA total of 6 SiriusXM channels for each band can be stored in the tuner’s memory. You can access the presets by touching the Preset button. This allows you to store your favorite satellite radio channels in the memory for later recall.1. Touch the [Preset List] button on the SiriusXM Menu display to enter preset list preview mode. You can select the desired channel by touching the preset list.2. To store the current channel as a preset, touch and hold a preset button for more than 2 seconds to save the channel to that preset button.Tuning to Channels from the Category ListSatellite Radio allows you to select broadcast channelcategory (contents).1. Touch the [Category List] button on the SiriusXM Menu display to enter category list preview mode.2. Touch and flick the category list up or down.3. Touch the desired category item button to enter channel lists belonging to this category.4. Select the desired channel by touching it on the list.5. Touch the [Return] button to go back to category list.Note: “All Chan” category includes all channels available with your subscription, including locked channels which are displayed with an “(L)”. Parental Control Lock / UnlockThe Parental Control feature allows you to limit access to any SiriusXM channels, including those with mature content. When enabled, the Parental Control feature requires you to enter a passcode to tune to the locked channels. Information on setting up the passcode and locking channels can be found below.1. Touch the [Option Setting] button to enter setting page.2. Touch the [Set] button in “Lock” item to enter passcode screen, enter the right passcode to enter the lock list.3. Touch and flick the channel list up or down.4. Touch and hold the channel item, and it will be locked or unlocked alternately.Setting the Password1. Touch the [Option Setting] button to enter setting page.2. Touch the [Set] button in “Password” item to set a new passcode following the screen indicator. If you enter a wrong number, you can cancel it by touching the [Clear] button .Note:](https://usermanual.wiki/SKYPINE-ELECTRONICS/NX706.User-Manual/User-Guide-2841162-Page-43.png)
![43EnglishEnglish Owner’s ManualEnglish Owner’s ManualNX706You must input the correct passcode to enter the lock list. When you try to tune to a locked channel by the direct tune keypad, it will display the password keypad. Only entering the correct code can tune to that channel, otherwise it will go back to the previous channel.The default passcode is “0000”.ReplayThe Replay feature allows you to pause, rewind and replay live SiriusXM Satellite Radio programming.Operation of the Replay feature can be found below.1. Touch the [Play/Pause] button to start Replay mode.2. In Replay mode you can use the buttons below to control playback.18 752 3 4 69 1. Playback Status. 2. Previous track/program. Fast Backward (long press). 3. Play/Pause Button. 4. Next track/program. Fast forward (long press). 5. Go to Live mode (Only displayed during Replay mode). 6. Remaining time to LIVE. 7. Buffered memory. 8. Playback position. 9. Current track play time .SmartFavoritesSmartFavorites allow you to rewind and replay any missed programming from your current Band of Preset channels. Miss a music, news, talk or sports segment?No Problem, because you can rewind and replay when you tune to one of your Preset channels and hear what you missed.Note:1. Compatible with SXV200 or later tuner models.2. SXM1 band only is assigned as Smart Favorites for SXV200, and SXM1/SXM2/SXM3 bands for SXV300 or later.TuneStart™With the TuneStart™ feature turned ON, you will hear the beginning of the song when you tune to one of your Preset channels. It may take a minute or two forthe feature to work after power up or after changing preset bands. You can turn TuneStart On or Off in the following operation.1. Touch the [Option Setting] button to enter the setting men.2. Touch and slide to select “On” or “Off” in “TuneStart” item.Note:1. Compatible with SXV200 or later tuner models.2. TuneStart will only work for channels in the SXM1 band with a SXV200, and channels in the SXM1/SXM2/SXM3 bands with a SXV300 or later in SXM1/SXM2/SXM3 bands for SXV300 or later.TuneMix™TuneMix™ plays a unique blend of songs from your Preset music channels from the current SiriusXM Preset Band, allowing you to build a custom channelfrom as few as two to as many as 6 music channels. You can even skip songs you don’t want to hear. Operation of the TuneMix Feature can be found below.1. Touch the [TuneMix] button to start playback with the [TuneMix] button highlighted.2. You can operate the buttons for the Replay function while listening to TuneMix. 3. To cancel the TuneMix feature, touch the [TuneMix] button again. Note:1. Compatible with SXV300 or later tuner models.2. When there are not enough channels or tracks, the [TuneMix] button is grayed out.](https://usermanual.wiki/SKYPINE-ELECTRONICS/NX706.User-Manual/User-Guide-2841162-Page-44.png)
![46EnglishEnglish Owner’s ManualEnglish Owner’s Manual18. AUX External peripheral devices, including a game console, camcorder, navigation unit, iPod/iPhone, etc. can be connected to the AUX connector on the front or back of this unit using the AV media cables.Switching to AUX IN Touch [AUX]button on Main Menu to select desired mode (when unit is reading). If the external device connected to AUX input have audio signal, the unit will broadcast audio of external device. Press Menu button on Operational Panel to return to the Main Menu.You cannot directly control external devices connected to AUX input.19. CAMERA INPUT OPERATIONSSwitching to Camera modeTouch [Camera] button on Main Menu.The LCD will display the external camera video. The screen will display “No Video Signal” message, if a valid camera is not connect to this head unit. Press MENU button on Operational Panel to return to the Main Menu.Setting Camera audioSelect “ON” button in the Camera Audio setting of the General setting.The audio from camera will heard when back gear is on. The volume control is available but not indicated on the screen due to the safety.Select “MUTE” button, then mute the audio of the current mode when back gear is on.Select “Off” button, then play the audio of the current mode when back gear is on. Note:If the reverse cable is connected correctly to the car, the unit goes to camera mode automatically when the car is in reverses.As an additional safety feature, the audio from camera with built-in microphones can be heard through the NX706.NX706](https://usermanual.wiki/SKYPINE-ELECTRONICS/NX706.User-Manual/User-Guide-2841162-Page-47.png)
![49EnglishEnglish Owner’s ManualEnglish Owner’s Manual22. SETTING OPERATIONSTouch [ ] button on the Main menu screen.The Setting menu screen will be displayed.General Setup MenuSystem Language: Set the Language for system screen.Shortcut Menu: Select menu to be able to selectfrom Shortcut menu and drag it to lower side area.Time: Set system clock.24-Hour Format: Set the time display mode.Beep: Turn on or turn off the beep conrmation sound.Bluetooth: Set the Bluetooth On or Off.Wallpaper: Choose the desired wallpaper.There are three optional images, which you can import from USB. Select “Imported 1/2/3” and touch [Import]. The format should be jpeg of less than 5M bytes. Illumination Color: Set the illumination color on the panel.Input Aux Sense: AUX input switch, including Low, Middle, High.Tel Speaker: There are two options, Left and Right. For example, if current setting is Right, when BT phone is coming in, only right speaker can hear the phone. Camera Audio: There are three options, Off, On and Mute.Version: Display the software version information.Note:• Time and 24-Hour Format can be adjusted when set the system time not to be synchronized with GPS local time.NX706](https://usermanual.wiki/SKYPINE-ELECTRONICS/NX706.User-Manual/User-Guide-2841162-Page-50.png)
![51EnglishEnglish Owner’s ManualEnglish Owner’s ManualOthers Setup Menu.Set Password: Set the password for DVD parental control.Parental Control: Set the rating of the age. It contains Kid Safe/G/PG/PG-13/PG-R/R/NC-17/Adult.Audio Language: Set the Language for DVD Audio.Subtitle Language: Set the Language for DVD subtitle.Blinking LED: Set blinking LED On or Off. Source Level : Set the each source gain.Audio Signal : Select the audio output Analog or Digital.Screen Calibrate: The function of it is to select the TS Calibrate YES or NO.Factory Default: The function is to select to load factory default or not.Set the Anti-Theft Code1. If your unit is unlocked, hold the [ ] button more than 2 seconds, then the Anti-Theft setting mode will display. Users can change anti-theft code. Touch [YES] button, the numerical keypad is displayed. Enter the new password twice, then anti-theft code is set and your unit is secured. When the Anti-theft is “On”, you need to enter the correct Anti-theft code to turn the unit on. If you enter wrong code three times, the unit is locked, and must be unlocked by the professionals.2. If your unit is secured, hold the [ ] button more than 2 seconds, then the Anti-Theft setting mode will display. The numerical keypad is displayed, enter the right code to unlock.Note:If the anti-theft code is lost or forgotten, a charge will be incurred at the owner’s expense by a Clarion service station to unlock the NX706.NX706](https://usermanual.wiki/SKYPINE-ELECTRONICS/NX706.User-Manual/User-Guide-2841162-Page-52.png)