SMC Networks D81CH D81CH User Manual CK001 user guide 24 May 2010
SMC Networks Inc D81CH CK001 user guide 24 May 2010
Users Manual
D81CH
Quick Reference Manual
1
1. Minimum Requirements
Telephone connection (for making telephone calls)
AC power connection
Broadband Internet access (cable/DSL for accessing D81CH features)
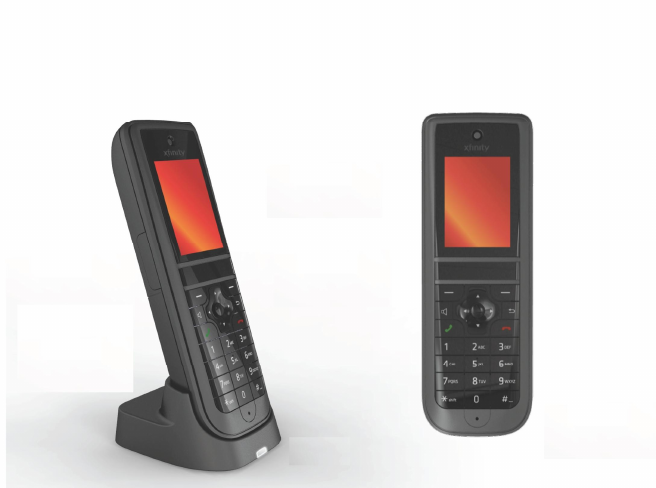
2. Parts Checklist
The package includes the following:
1 Quick Reference Manual
2 Handset
3 Three pieces of AAA NiMH Battery
4 Charger Cradle
5 USB Cable
6 Power Adapter
3. Specifications
Standard DECT 6.0 (Digital Enhanced Cordless
Telecommunications),
GAP (Generic Access Profile)
Number of channels 5 channels
Frequency range 1921.536 MHz to 1928.488MHz
Channel spacing 1,728 kHz
LCD 2.0” Color LCD with 176 x 220 pixels
Power source Input: 120 VAC, 60 Hz
Output: 5VDC 500mA
Power consumption Standby: 1.0W (approx)
Maximum: 4.5 W (approx.)
Dimension Handset: 50mm x 150mm x2.5mm
Charger: 65mm x 70mm x 30mm
Operating conditions Temperature
5 °C–40 °C (41 °F–104 °F),
Relative humidity (dry)
20%–80%
2
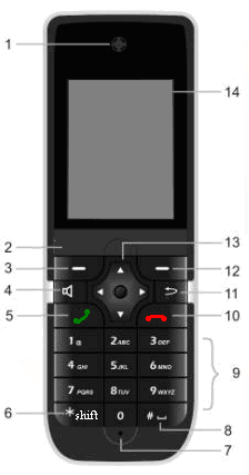
4. D81CH Handset Layout
1 Earphone
Audio output
2 Alert bar
LED indication for incoming
/intercom call, pages or messages
3 Left Softkey (LSK)
Select the function displayed on the
lower left of the screen.
4 Speaker
Turns the speaker on or off.
5 Talk
Activates phone with a dial
tone
6 */ shift Key
Dial a * (star) during calls or toggles
between uppercase, lowercase and
numeric modes during text entry
7 Microphone
Selects the function displayed on the
lower right of the screen.
Audio input
8 # Key
Dial a # (pound) during calls, and
enters space during text entry
9 Keypad
Use for dialing phone numbers
and entering text.
10 Phone Off
Ends a currently active call or
returns screen to Home screen
11 Back
Press quickly to go back one level.
12 Right soft key (RSK)
Selects the function
displayed on the lower
right of the screen.
13 Navigation Keys
[UP][Down][Left][Rig
ht] Navigate menu
screens and position
the cursor during text
entry (Pressing the
center button to open
the selected item)
14 Screen
Handset display.
3
5. Installing the Handset
Install the handset
1. Plug the provided USB cable into the handset charger and connect
the other USB end to the adapter.
2. Plug the power adapter to an electrical outlet.
3. Insert the battery with the correct polarity into the handset.
4. Close the battery door.
5. Place the handset on the charger for charging. (It is recommended
that you charge the handset for 16 hours before first use.)
6. Charger the batteries before the first use and whenever you see the
“low battery indication.
Power On
1. Press the Phone Off key for at least five seconds to turn on the
handset.
2. Once the handset has successfully established a link to the base,
the handset number assigned by the base will appear on the top
left corner of the handset display.
Power Off
1. Press the Phone Off for three seconds until an alert tone is heard.
2. Press the Phone Off continuously to generate a second alert tone.
You’ll be prompted to confirm the Power Off sequence.
3. Press the Yes Softkey to turn off the handset.
Handset Registration
1. For an unregistered handset, press the Register Softkey to
begin the handset registration process.
2. Press the Yes Softkey to confirm the registration.
3. The handset will display “ Please press the registration key on
the base”. Follow the instruction and press the registration
key on the phone base.
Alternative method
1. Enter the Menu Settings.
2. From the Menu Settings, select Phone Settings.
3. From the Phone Settings, select Registration.
4. Press the Yes Softkey to confirm registration.
5. The handset will display “Please press the registration key on the
base”. Follow the instructions and press the registration key on the
phone base.

4
Once the registration is successful, the handset number assigned by the
base will appear in the top left corner of the handset display.
6. Menu Operation
Main Menu
Sub - Menu Description
Call Log
Missed Calls
Answered Calls
Dialed Calls
All Calls
The Call log is provided by the
base.
The Call, Delete, Save number
and Delete All functions are
available for the Call Log
Phone
Settings
Time
Alarm
Sound Settings
Register Handset
De-Register Handset
Handset Settings
Factory Reset
Enables customization of the
handset.
Press the [Up] and [Down]
Navigation keys to navigate, then
press Select or the Center key to
confirm a selection.
Phone Settings
Press the [Up] or [Down] Navigation keys to go to the Phone Settings menu.
Press the Select Softkey or [Center] key to select a setting.
Press the Back Softkey to return to the pervious menu.
Setting Time
Press the [Up] or [Down] Navigation keys to go to the following settings
Time Display Option: 12 hours / 24 hours
Hour and Minutes:
AM/PM (can only be set if the Time Display Option is set to 12 hours)
Register Handset
Follow the instruction displayed on the handset screen to register the handset.
De Register Handset
Follow the instruction displayed on the handset screen to de-register the handset.
5
Alarm
Press the [Up] or [Down] Navigation keys to go to the following Alarm settings
Press the [Center] key or Select Softkey to set the designated item.
Alarm: On/Off
Time: To set the desired alarm time
Snooze: Off, Every 5 min, 10 min, 15 min and 30 min
Freq: Once / Daily
Alarm Melody: 15 melodies
Weekdays only: On/Off
Sound Settings
Press the [Up] or [Down] Navigation keys to go to the followings sound settings.
Press the [Center] key or Select Softkey to set the designated item.
Ring Tone: 15 Melodies
Ring Tone – Intercom: 15 Melodies
Ring Volume: Off, Level 1 to Level 5
Keypad Tone: On / Off
Low Battery: On /Off
Out of Range: On /Off
Notifications: On / Off
Handset Settings
Press the [Up] or [Down] Navigation keys to go to the following Handset
settings.
Press the [Center] key or Select Softkey to set the designated item.
Backlight Timer: 30sec, 1 min, 2 min, 5 min
Screen Saver: Off / Clock / Image
Visual Alerts: Enable / Disable
Brightness: Level 1 to Level 5
Auto Talk: On / Off
6
7. Telephone Operation
Making an Outgoing Call
Dial the number and press the Talk, Speaker or Call Softkeys.
Alternately, press the Talk or Speaker keys first, and then dial the number.
Answering an Incoming Call
Press the Talk or Speaker key on a ringing handset to answer the call.
Making an Intercom Call
A handset can communicate other handsets that are registered to the same
base.
Dial the number of desired handset number (1 to 10) and press the
Intercom Softkey. The target handset will be ring.
Press the Talk or Speaker keys on the ringing handset to answer the
intercom call.
Adjusting the Earpiece / Speaker Volume
During a call, press the [Up] or [Down] Navigation keys to increase or
decrease the Earpiece/Speaker Volume. There are four (1 to 4) volume levels.
Mute
During a call, press the MUTE Softkey to turn off the microphone. The
person on the other side of the call will not hear anything. Press the Un-
Mute Softkey to turn on the microphone again.
Page (Handset Locator)
Press the Page key on the base to ring all registered handsets. Press the Page
key again to stop the ringing on all handsets. To stop the ringing on an
individual handset, press the Phone Off key or End Softkey on the handset.
8. Service Registration
To register the phone with your service provider and to access all of the
features offered by the provider, follow the registration instructions
displayed on the handset. These screens will be provided only during the
phone registration.
If you have any problems during the service registration, call your service
provider for assistance.
To register for an individual feature, follow the displayed screens during
the registration of that specific feature.
7
Federal Communications Commission (FCC)
FCC Part 15
This device complies with Part 15 of the FCC Rules. Operation is subject to the
following two conditions: (1) This device may not cause harmful interference,
and (2) this device must accept any interference received, including interference
that may cause undesired operation.
This equipment has been tested and found to comply with the requirement for a
Class B digital device, pursuant to Part 15 of the FCC Rules. These
requirements are designed to provide reasonable protection against harmful
interference in a residential installation.
This equipment generates, uses, and can radiate radio frequency energy and, if
not installed and used in accordance with the instructions, may cause harmful
interference to radio communications. However, there is no guarantee that
interference will not occur in a particular installation.
If this equipment does cause harmful interference to radio or television
reception, which can be determined by turning the equipment off and on, the
user is encouraged to try to correct the interference by one or more of the
following measures:
– Reorient or relocate the receiving antenna.
–Reorient or relocate and increase the separation between the
telecommunications equipment and receiving antenna.
– Connect the telecommunications equipment into an outlet on a circuit
different from that to which the receiving antenna is connected.
FCC RF Exposure Warning:
The installation of the base unit should allow at least 20 cm (8 inches) between
the base and persons to be in compliance with FCC RF exposure guidelines. For
body worn operation, the handset has been tested and meets FCC RF exposure
guidelines.
This device must not be co-located or operating in conjunction with any other
antenna or transmitter. The changes or modifications not expressly approved by
the party responsible for compliance could void the user’s authority to operate
the equipment.
8
Safety Instructions
When using the handset, basic safety precautions should always be followed
to reduce the risk of fire, electric shock, or personal injury.
1. Read all instructions
2. Follow all warnings and instructions marked on the product.
3. Unplug the product from power outlets before cleaning. Do not use liquid
or aerosol cleaners. Use a moist cloth for cleaning.
4. Do not use the product near water, for example near a bathtub, wash bowl,
kitchen sink, etc.
5. Do not cover slots and openings on the product. They are provided for
ventilation and protection against overheating. Never place the product near
radiators, or in a place where proper ventilation is not provided.
6. Use only the power source marked on the product. If you are not sure of
the type of power supplied to your home, consult your dealer or local power
company.
7. Do not use the product to report a gas leak in the vicinity of the leak.
SAVE THESE INSTRUCTION
9
Warning
To prevent the risk of fire or electrical shock, do not expose the product to
rain or any type of moisture.
If the product emits smoke, an abnormal smell, or makes an unusual noise
unplug the product from power outlets. These conditions can cause fire or
electric shock. Confirm that the phone has stopped emitting smoke and call
your telephone company help desk.
Do not spill liquids (detergents, cleansers, etc.) onto the telephone line cord
plug, or allow it to become wet at all. This may cause a fire. If the telephone
line cord plug becomes wet, immediately pull it from the telephone wall jack,
and do not use.
Do not place or use this product near automatically controlled devices such
as automatic doors and fire alarms. Radio waves emitted from this product
may cause such devices to malfunction resulting in an accident.
Completely insert the AC adaptor/power plug into the power outlet. Failure
to do so may cause electric shock and/or excessive heat resulting in a fire.
Regularly remove any dust, etc. from the AC adaptor/power plug by pulling
it from the power outlet, then wiping with a dry cloth. Accumulated dust
may cause an insulation defect from moisture, etc. resulting in a fire.
Do not excessively pull the receiver cord from the base unit. This may
cause the base unit to fall, resulting in injury.
10
Caution
Installation
Do not touch the plug with wet hands.
Do not install telephone wiring during a lightning storm.
Do not install telephone line jacks in wet locations.
Do not touch uninsulated telephone wires or terminals unless the telephone
line has been disconnected at the network interface.
Use caution when installing or modifying telephone lines The AC adaptor is
used as the main disconnect device.
Ensure that the AC outlet is installed near the product and is easily accessible.
Battery
To reduce the risk of fire or injury to persons, read and follow these
instructions.
Only use the battery specified.
Do not dispose of the battery in a fire, as they may explode. Check with
local waste management codes for special disposal instructions.
Do not open or mutilate the battery. Released electrolyte is corrosive and
may cause burns or injury to the eyes or skin. The electrolyte may be toxic
if swallowed.
Exercise care when handling the battery.
Do not allow conductive materials such as rings, bracelets or keys to
touch the battery, otherwise a short circuit may cause the battery and/or
the conductive material to overheat and cause burns.
Charge the battery provided with or identified for use with this product
only, in accordance with the instructions and limitations specified in this
manual.
11
For Best Performance
Avoiding noise
The base unit and other compatible units use radio waves to communicate with
each other.
For maximum coverage and noise-free communications, place your base unit:
- at a convenient, high, and central location with no obstructions between
the handset and base unit in an indoor environment.
- away from electronic appliances such as TVs, radios, personal computers,
wireless devices or other phones.
- avoid facing radio frequency transmitters, such as external antennas of
mobile phone cell stations (avoid putting the base unit on a bay window or
near a window).
Coverage and voice quality depends on the local environmental conditions.
If the reception for a base unit location is not satisfactory, move the base unit to
another location for better reception.
Environment
Keep the product away from electrical noise generating devices, such as
fluorescent lamps and motors.
The product should be kept free from excessive smoke, dust, high temperature,
and vibration.
The product should not be exposed to direct sunlight.
Do not place heavy objects on top of the product.
When you leave the product unused for a long period of time, unplug the
product from the power outlet.
12
The product should be kept away from heat sources such as heaters, kitchen
stoves, etc. It should not be placed in rooms where the temperature is less than
5 °C (41 °F) or greater than 40°C (104 °F). Damp basements should also be
avoided.
The maximum calling distance may be shortened when the product is used in
the following places: Near obstacles such as hills, tunnels, underground, near
metal objects such as wire fences, etc.
Operating the product near electrical appliances may cause interference. Move
away from the electrical appliances.
13