SMK RXT9400-5800E 2.4 GHz Remote Control Transceiver User Manual remotion manual ok
SMK (UK) Ltd 2.4 GHz Remote Control Transceiver remotion manual ok
SMK >
User manual
two
way
Installation &
user manual

Contents
INSTALLER MANUAL
Important information
General
1. Technical data
2. Description
Installation:
1. Positioning the unit
2. Connection.
3. Parts description.
4. Gas connection.
4.1. Pilot and magnetic group.
4.2. Touch control buttons
4.3. ODS
4.4. Electronic parts.
4.5. Battery connections
5. Pairing.
6. Initial configuration.
USER MANUAL
1. Working with the touch control.
1.1. Switching on.
1.2. Regulating the flame level.
1.3. Switching off.
2. Remote control.
2.1. Description:
2.1.1. LCD display.
2.1.2. Four buttons:
2.1.1. LCD display.
2.1.2. OFF button
2.1.2. Left, middle and right button
2.2. Menu system.
2.3. Switching on
2.4. Adjust Menu
2.5. Setting the control mode
2.6. Day programming menu (Menu Æ Adjust MenuÆ Change Program)
2.6. Other features
3. Troubleshooting
Revision history
Date Changes Final
15/06/2009 Preliminary document
23/06/2009 Corrections to English
Important information
• All cables must be connected as described in the installation
manual
• The gas installation must be carried out by a professional
installer.
• Electronics components must be installed in a cool area,
below the fire. If temperature rises above 70 ºC (158 ºF), the
appliance switches off.
• The control unit should be positioned as shown in the
illustration.
• Use only alkaline batteries, and insert batteries with the
polarity correctly aligned.
• No maintenance is required. Cleaning the valve with soapy
water can damage it.
• No component should ever be repaired; if a part
malfunctions, it should always be replaced by a
qualified technician.
• Any change to the type of gas must be carried by a
professional installer.
• Do not pour liquids on any of the components.
• Once the installation process is completed, the
installer should ensure that the appliance is working
properly.
• RF range is dependent on the appliance
characteristics. Manufacturers must check that the
communication distance of their appliance is
adequate.
Consult the instructions before using this system.
The installation of this system must fulfil all the
certifications in force.
Contains FCC ID XO5RXR9400-6000E
This device complies with part 15 of the FCC
Rules. Operation is subject to the following two
conditions: (1) This device may not cause harmful
interference, and (2) this device must accept any
interference received, including interference that
may cause undesired operation.
Place this label on the appliance
The user is cautioned that any changes or
modifications not expressly approved by Copreci
could void the users authority to operate the
equipment.
General
1. Technical data
• Max. flow rate 480 l/hr (air -1mbar) • Power supply current 1.3A
• Temperature range 0-70ºC (32-158 º F) • Protection IP20 (with cover)
• Maximum working pressure 50 mbar • Working position Multipoise
• Inlet connection M12x1, ¼’’ • Power range 8000-40000 BTU/h
• Main burner connection M13x1, ¼’’ • Electronics equipped with
micro-processor
RUCMB-22600
• Pilot outlet connection M8x1, 1/8’’ • Classification AMVVXK
• Power supply 4.5 V • System type Permanent
2. Description
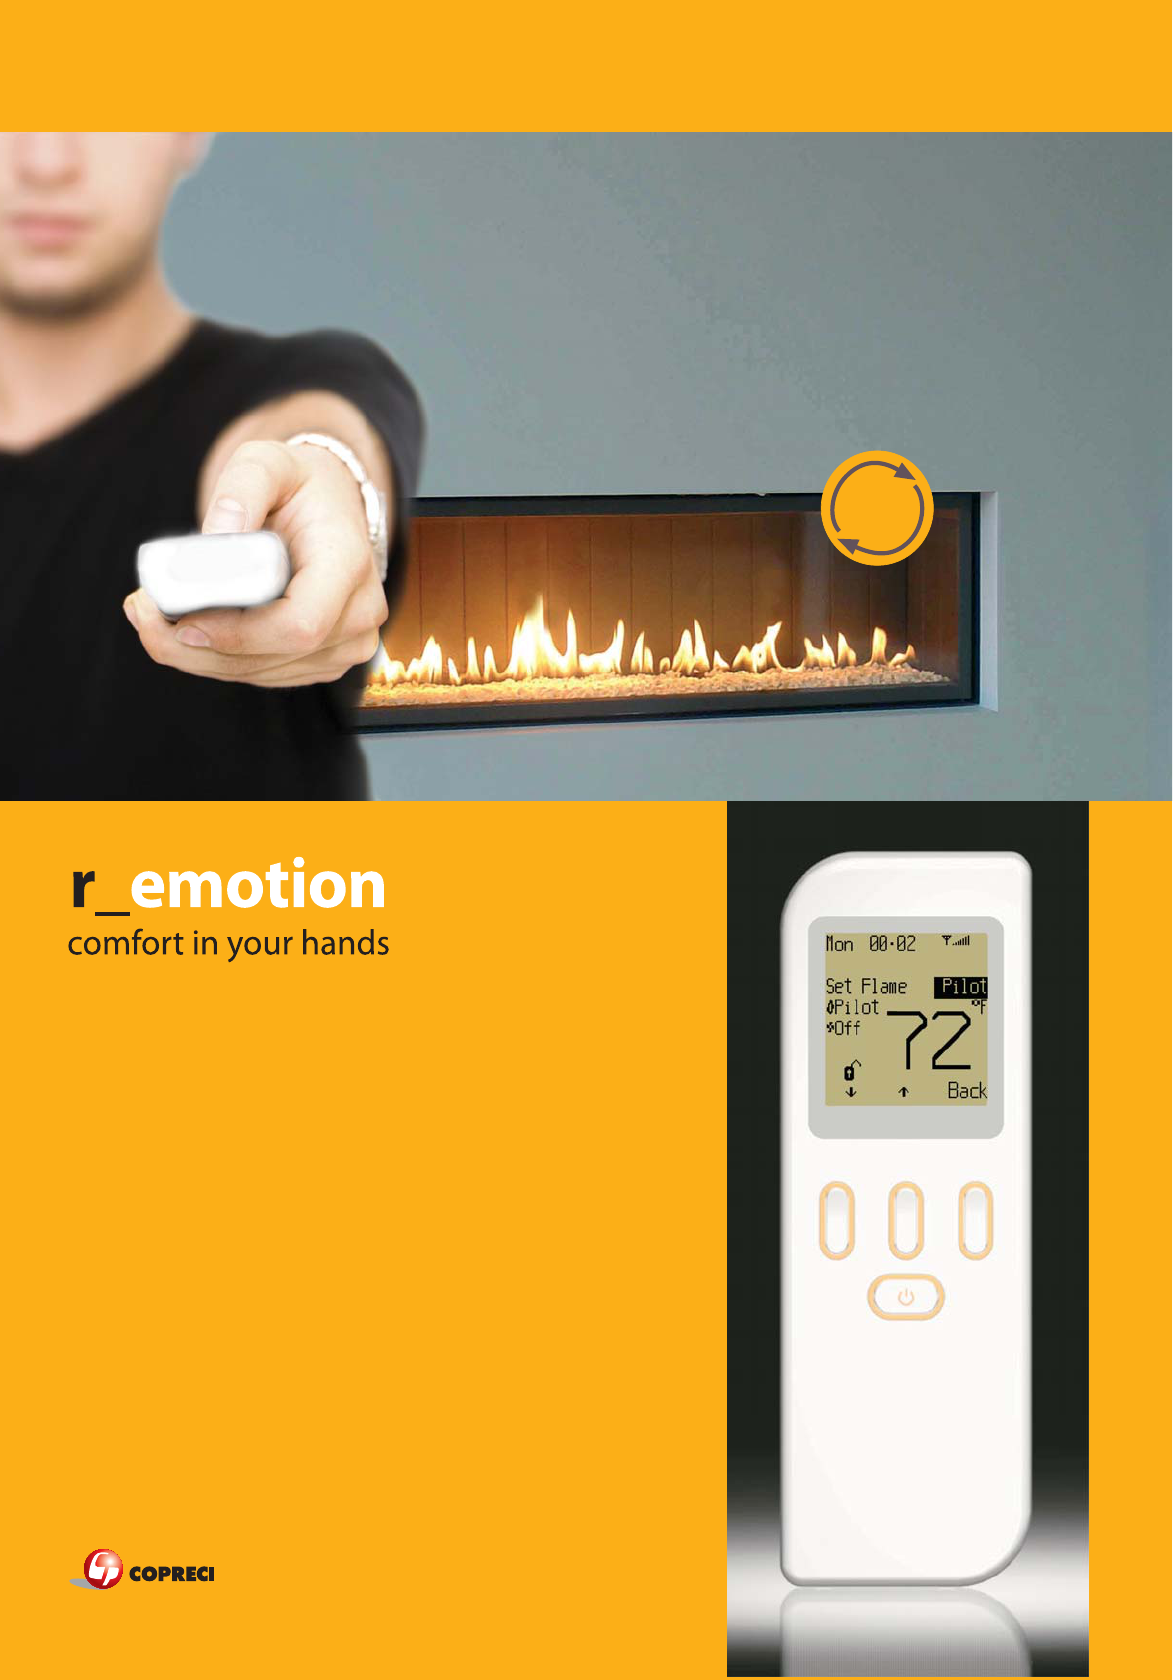
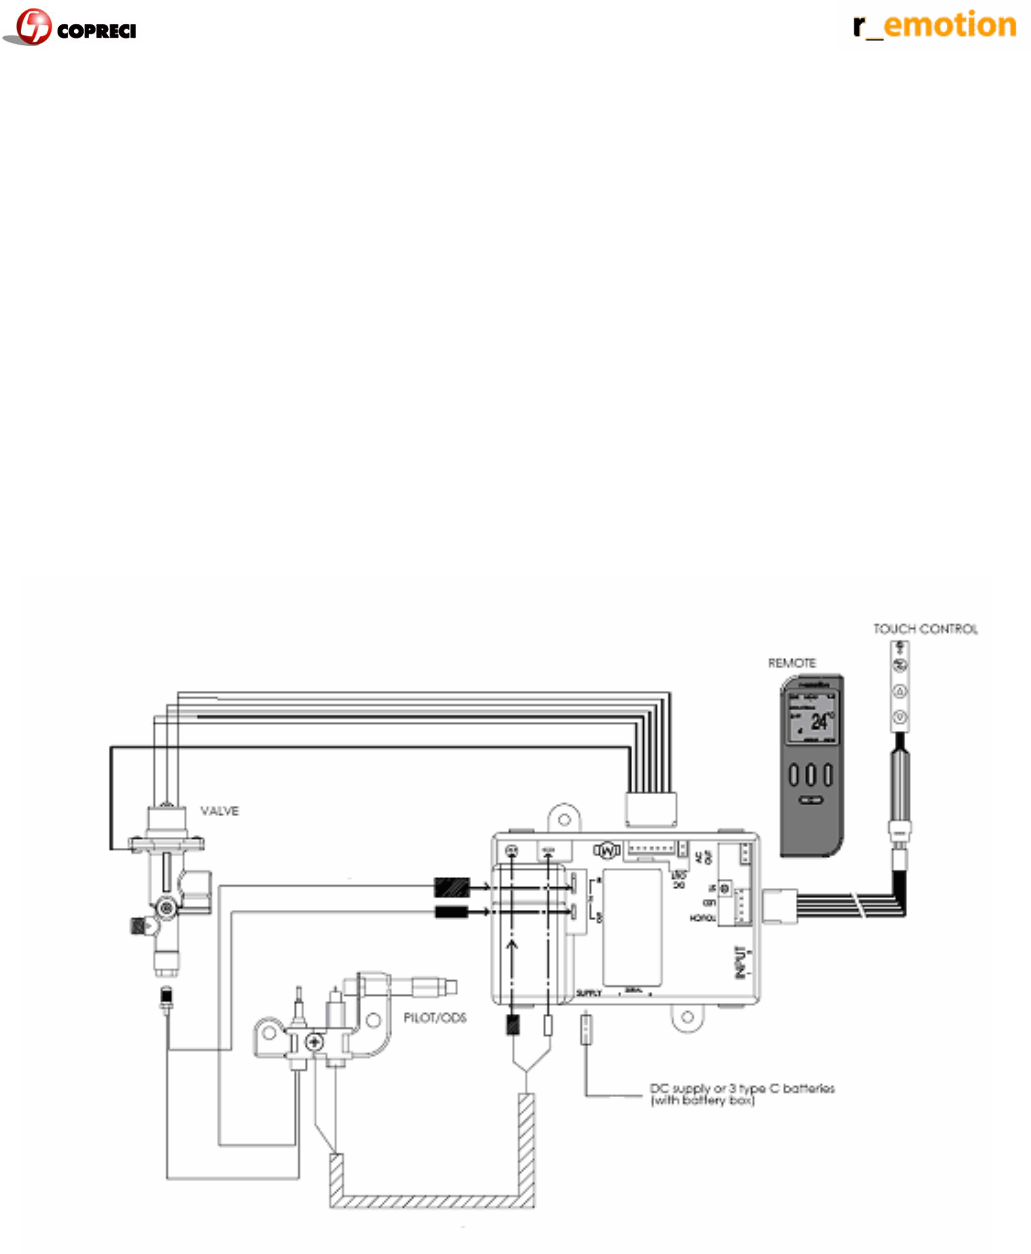
r_emotion is Copreci’s new control system for gas heaters. A system than includes a remote control handset for
significantly improving the user’s communication with the device.
r_emotion consists of a gas valve with an inlet and two outlets (pilot and main outlet), a motor that provides step-
by-step sequence adjustment, and a control unit that offers a wide range of possibilities.
Figure 1. Connection scheme
r_emotion, gas control system - Installer and user manual 2
Installation
3. Positioning the unit
The valve, the control unit and the batteries must be
installed in a position which avoids excessive heat,
humidity, dust, fat and oil. The maximum working
temperature for these parts is 70ºC (158 ºF). Attention
should be paid to the specified maximum temperature
for the alkaline batteries used to power the system.
The control unit should not be covered by metal casing
so that RF communication is not impeded.
The touch control can also be damaged by excessive
heat and should not be placed on a hot surface.
4. Connection.
4.1. Parts description.
1.- Valve 2.- Control unit 3.- Remote
4.- ODS / pilot 5.- ODS cable 6.- Battery box
7.- Touch control 8.- Touch control cable 9.- Assembly parts
Suggested positioning of the valve,
control unit and batteries.
r_emotion, gas control system - Installer and user manual 3
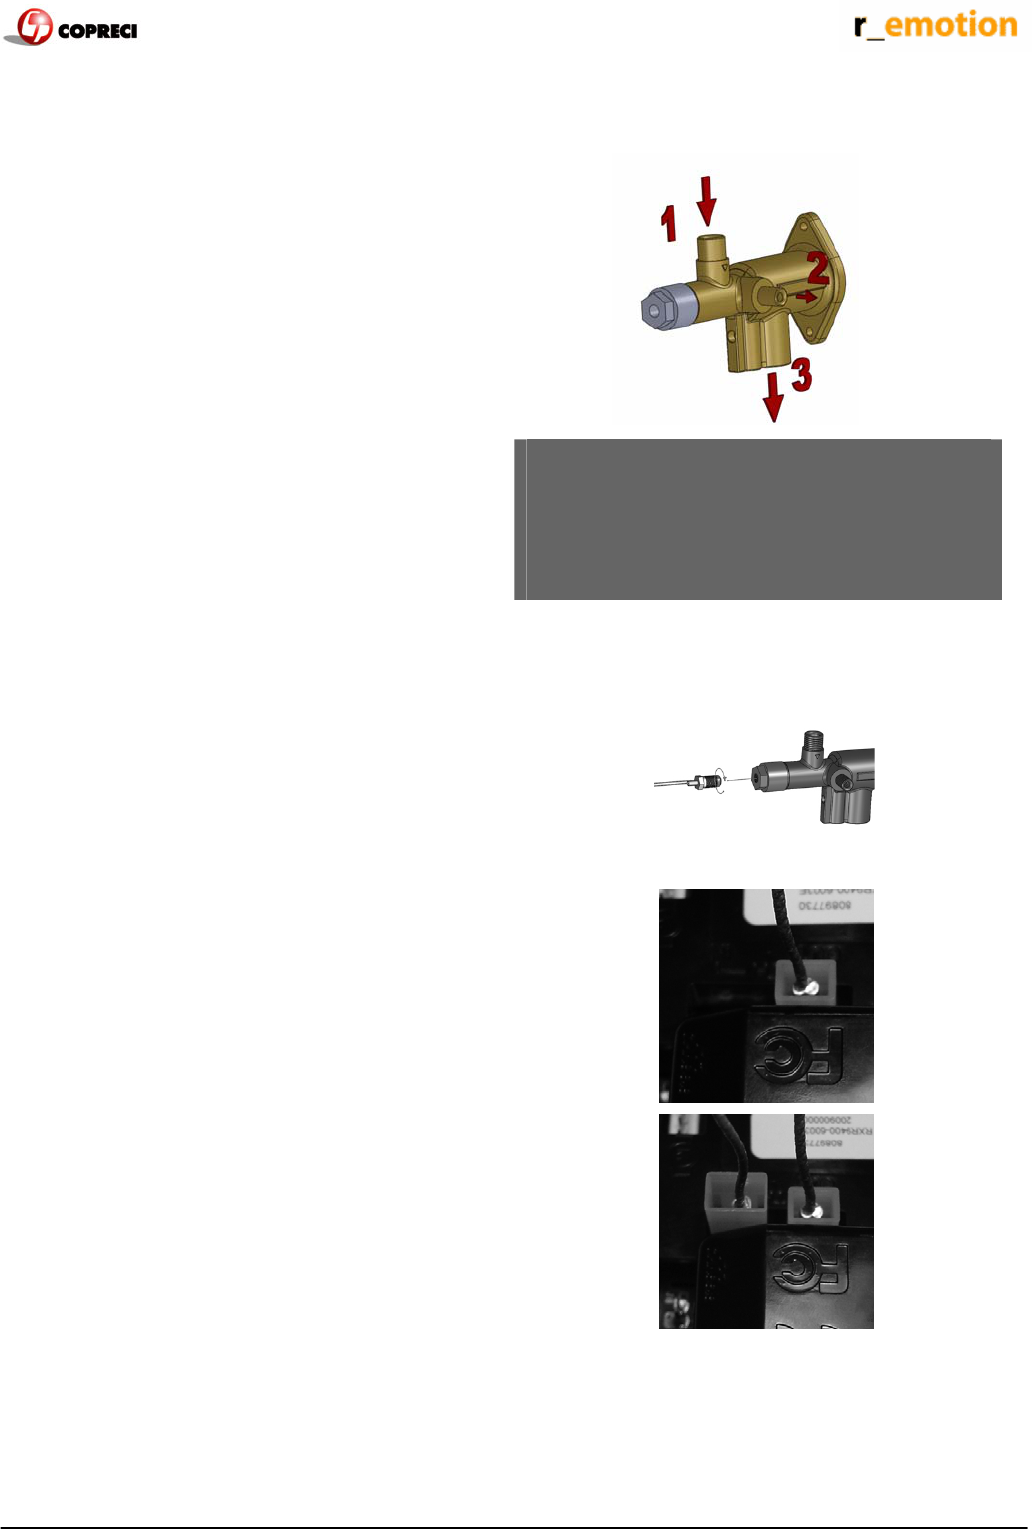
4.2. Gas connection.
As can be seen in the illustration, the gas valve has
one inlet (1) and two outlets: the pilot outlet (2) and the
main burner outlet (3).
Maximum torque to tighten inlet and outlet nuts is 8
N•m(5.9Lbft).
The gas comes through the inlet (1) and when the
valve is turned on, the gas will start flowing to the pilot
outlet (2). After the ignition cycle (which lasts
approximately 10 seconds) has finished, different flame
levels can be selected, allowing gas through the main
burner outlet (3).
All the necessary parts for carrying out the installation
can be found in the box.
Leak testing:
Brush soapy solution onto the valve and
pipe connection areas. If expanding bubbles
appear, there is a leak. Close gas source
immediately and retighten the connections.
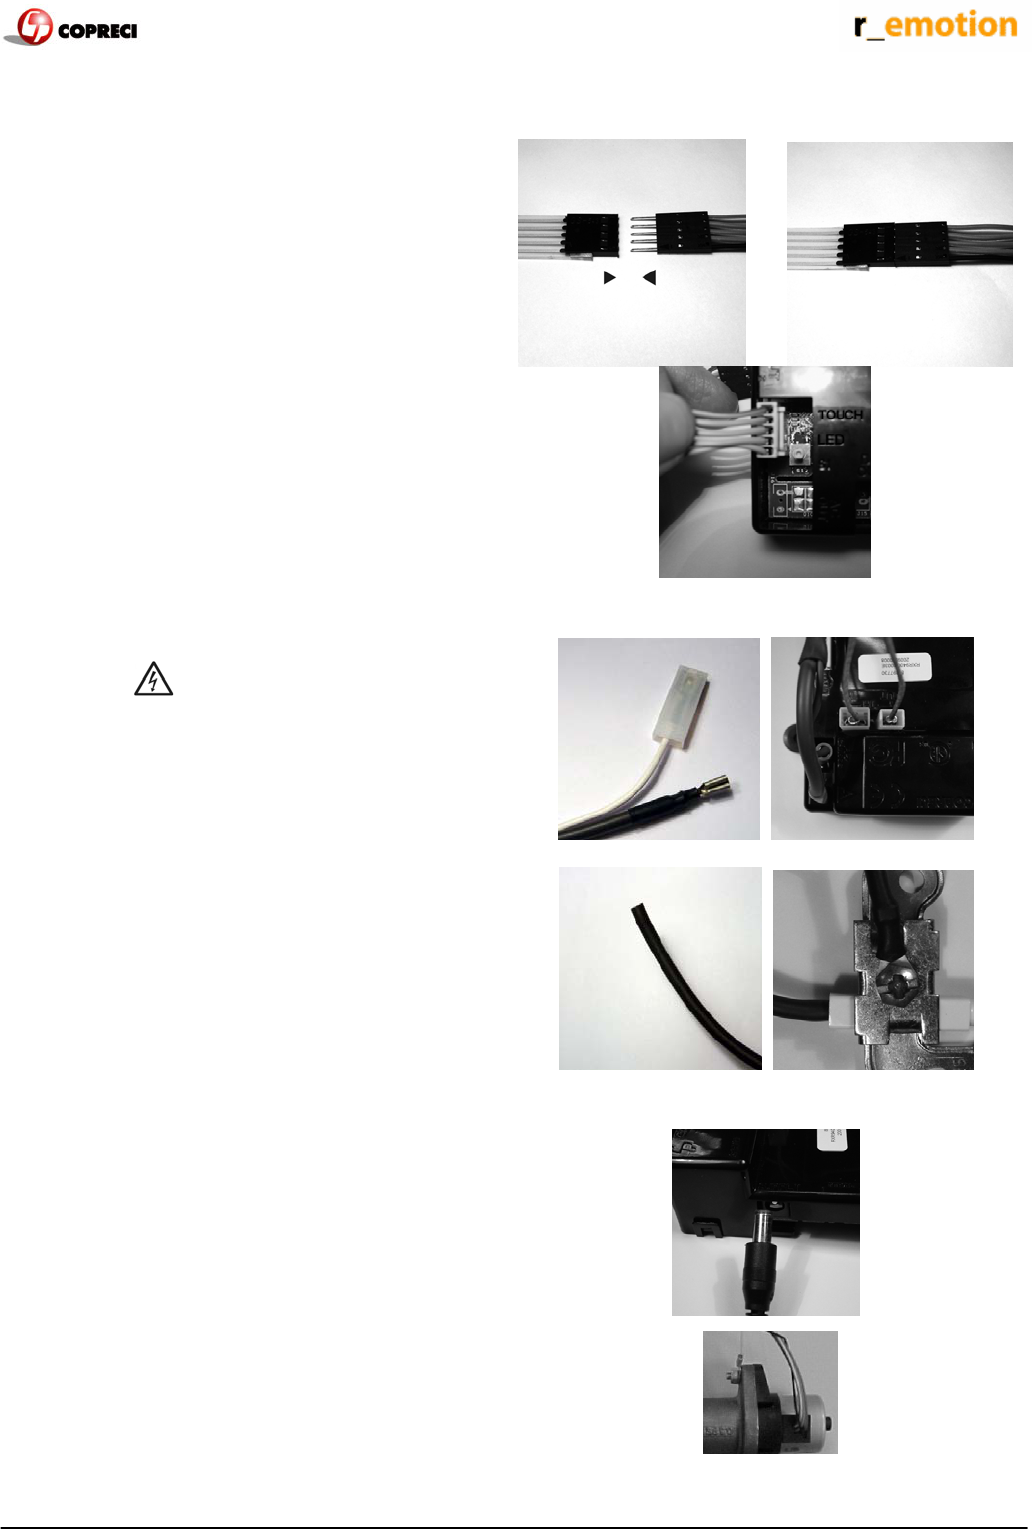
4.3. Pilot and magnetic group.
Insert the thread of the ODS / pilot (4) in the top of the
valve (1) and turn tight. Maximum torque to tighten is
4N•m (2.9LbFt).
Insert the smaller connector of the ODS in the “TH
OUT” male connector on control unit.
Insert the larger connector of the ODS in the “TH IN”
male connector on the control unit.
r_emotion, gas control system - Installer and user manual 4
4. 4. Touch control buttons
Connect the touch control to the touch cable. Ensure
that the triangles on each connector are lined up and
facing each other, as shown in the illustration.
Connect the other end of the touch cable to the control
unit, in the socket marked as TOUCH LED.
4.5. ODS
Insert the two cables of the ODS in the holes marked as
CHASSIS and
Insert the thick black cable into the spark plug on the
ODS. Fix the other cable in place to by inserting the
cable terminal underneath the screw on the ODS and
then tightening the screw.
4.6. Electronic parts.
Insert the end of the battery box cable into the battery
connector on the control unit.
Connect the valve cable to the control unit. Do not
forget to connect the chassis wire to the fixation screw.
A nut is needed to tighten the connector. Maximum
torque to tighten is 4N•m (2.9LbFt).
r_emotion, gas control system - Installer and user manual 5
4.7. Battery connections
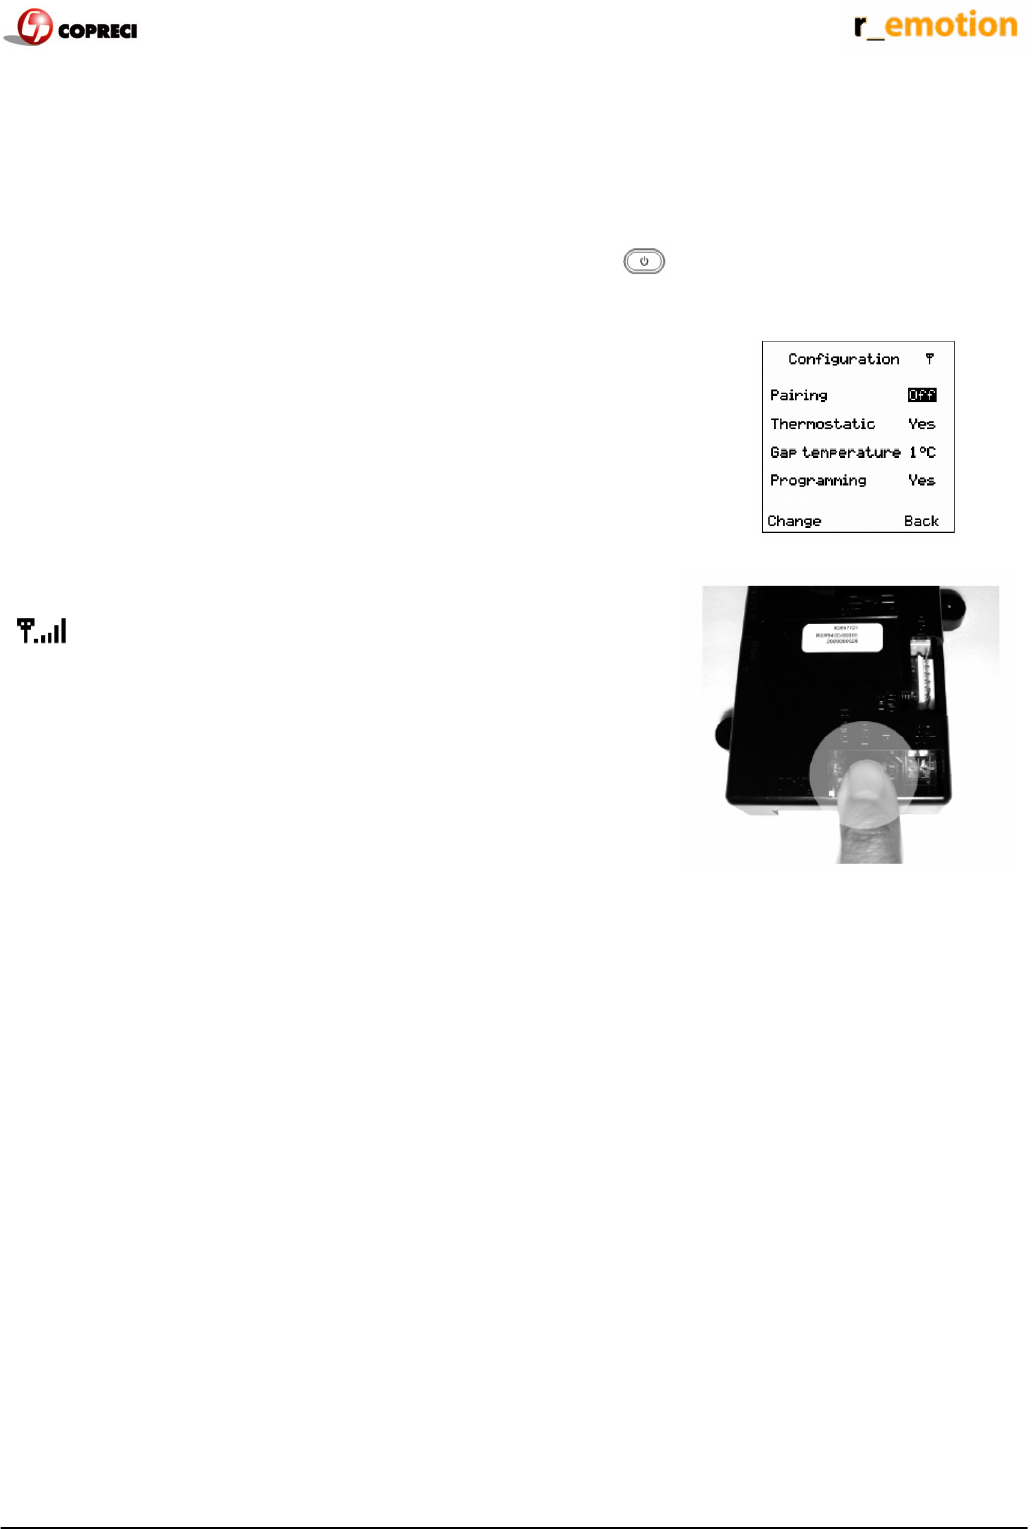
5. Pairing.
Once all connections are done, supply (install batteries) the control unit. After a while the valve motor will start
moving (if not wait one minute from the time of supplying the circuit). Unlock the remote control in case that is
blocked. Once the valve has finished moving, press the OFF button on the remote control for 40 seconds.
During this time the screen may go blank, it is normal. After 40 seconds, the setup menu appears:
All the operation must be done on channel A (go to the last option in the
setup menu by pressing È and select channel A).
After that, go to pairing option again and press the select button (middle
button) and when off is highlighted, press the change button (left button)
off becomes on.
Once the pairing is on, there are 20 seconds to push (press and release)
the button S1 (yellow) in the control unit.
Once this operation is done, you hear a beep in the control unit and in the
control unit will appear:
The indication on the pairing will become off. The pairing is over.
To return to the home screen press the back button until you get to main
screen.
PS: If the pairing has been attempted previously and has not been
achieved, do the following:
- Prepare the command by pressing the key OFF for 40 seconds.
- Set the channel on channel A.
- Select On in the pairing setting.
- Remove the batteries from the control unit (wait 10 seconds) and put the
batteries back.
- Once the valve has finished moving, repeatedly push (press and
release) the S1 button (yellow button on the control unit), until you hear
the beep that confirms that learning has taken place.
6. Initial configuration.
In the configuration menu, it is also possible to configure the appliance with the following options:
• Thermostat: this option enables or disables the auto thermostat mode. To enable it, select Yes. To
disable it select No.
• Gap Temp: this option refers to the tolerance between the desired temperature and the current one. If
the difference is greater than this gap temperature setting, the flame level increases.
For example: the desired temperature is set at 20ºC and the current temperature is 18ºC:
o If the Gap Temp is 0•5ºC: Flame level will go to maximum level because the difference is
2ºC.
o If the Gap Temp is 1ºC: Flame level will go to medium level as difference of 2ºC is two
times the gap setting. (The flame level increases two levels: Pilot → Low → Medium.)
o If the Gap Temp is 2ºC: Flame level will go to minimum level as the difference of 2ºC is
equal to the gap setting. (The flame level increases one level: Pilot → Low.)

r_emotion, gas control system - Installer and user manual 6
• Programming: this option enables or disables the program mode. To enable it, select Yes. To disable
it, select No.
• Fan System: this option enables or disables the fan system. To enable it, select Yes. To disable it,
select No.
• Soft start: this option causes the thermostat mode to work incrementally. When the change of flame
level required by the thermostat involves more than one level, this option makes the change step by
step, with a delay of 10 seconds between each change of flame level. To enable this option, select
Yes. To disable it, select No.
• Ember bed: This option enables or disables the ember bed output. To enable it, select Yes. To disable
it, select No.
• Sounder: This option enables or disables the sounder option. To enable it, select Yes. To disable it,
select No.
• Safety temp: this temperature is the maximum permitted room temperature. If the remote detects that
the temperature is higher than the Safety temp, the appliance is switched off. This temperature can
never be set higher than 40ºC (104ºF). The possible range of values is 25-40ºC (77-104ºF).
• Channel: There are three different channels available: A, B and C. A change of channel should be
done if communication is no good, and only after pairing has been done. Never try to do channel
change and a pairing at the same time. To change the channel just press Select, choose one of the
channels and then reset the control unit by disconnecting the power supply for a short period.
Afterwards the connection between the remote and the control unit will be re-established. This process
can take 10 seconds.
e one of the channels and then reset the control unit by disconnecting the power supply for a short
period. Afterwards the connection between the remote and the control unit will be re-established. This
process can take 10 seconds.
r_emotion, gas control system - Installer and user manual 7
User manual
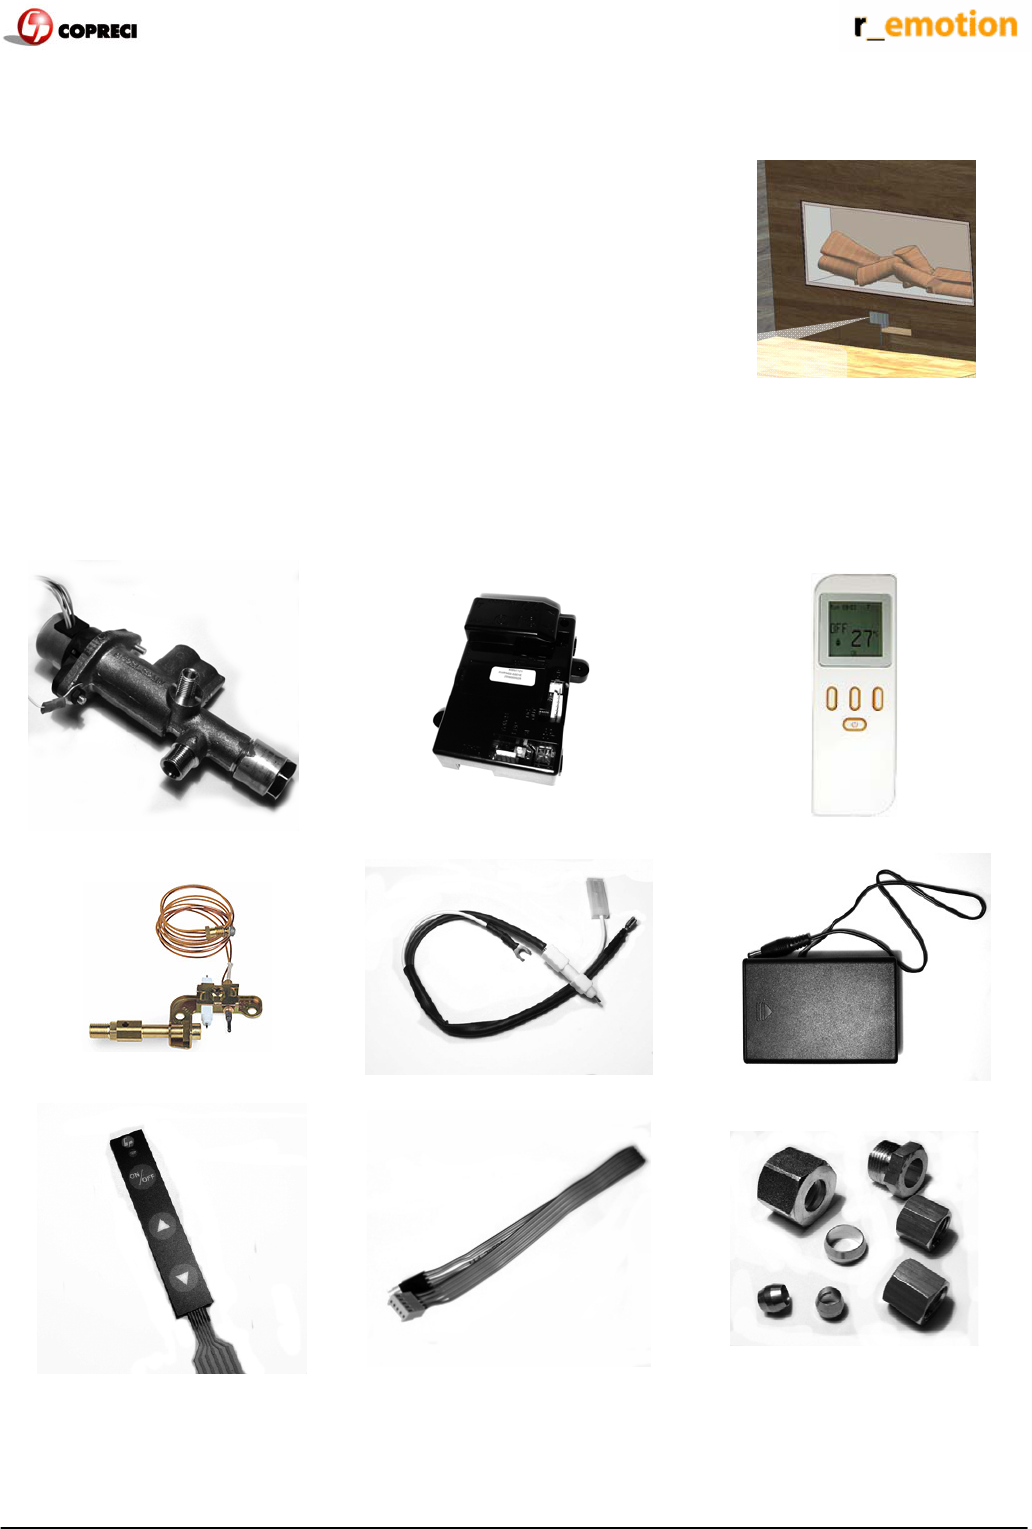
The r_emotion system contains:
• A motorized valve.
• An ODS with a spark plug for the sparking.
• A control unit.
• A battery box or power supply.
• A remote control.
• A touch control (optional).
• A touch control cable (optional).
• An ODS cable.
• Assembly parts.
The system controls a gas fire with the following functions:
• Automatic switch on.
• Automatic switch off.
• 4 different flame levels (pilot, minimum, medium,
maximum).
The flame level can be controlled in 3 different ways:
• Manually (via touch control or remote control).
• Automatically (only via remote control).
• By timed program (only via remote control).
The r_emotion system can be used with two different controls: touch control and remote control. Both methods
can be used at the same time to control the system.
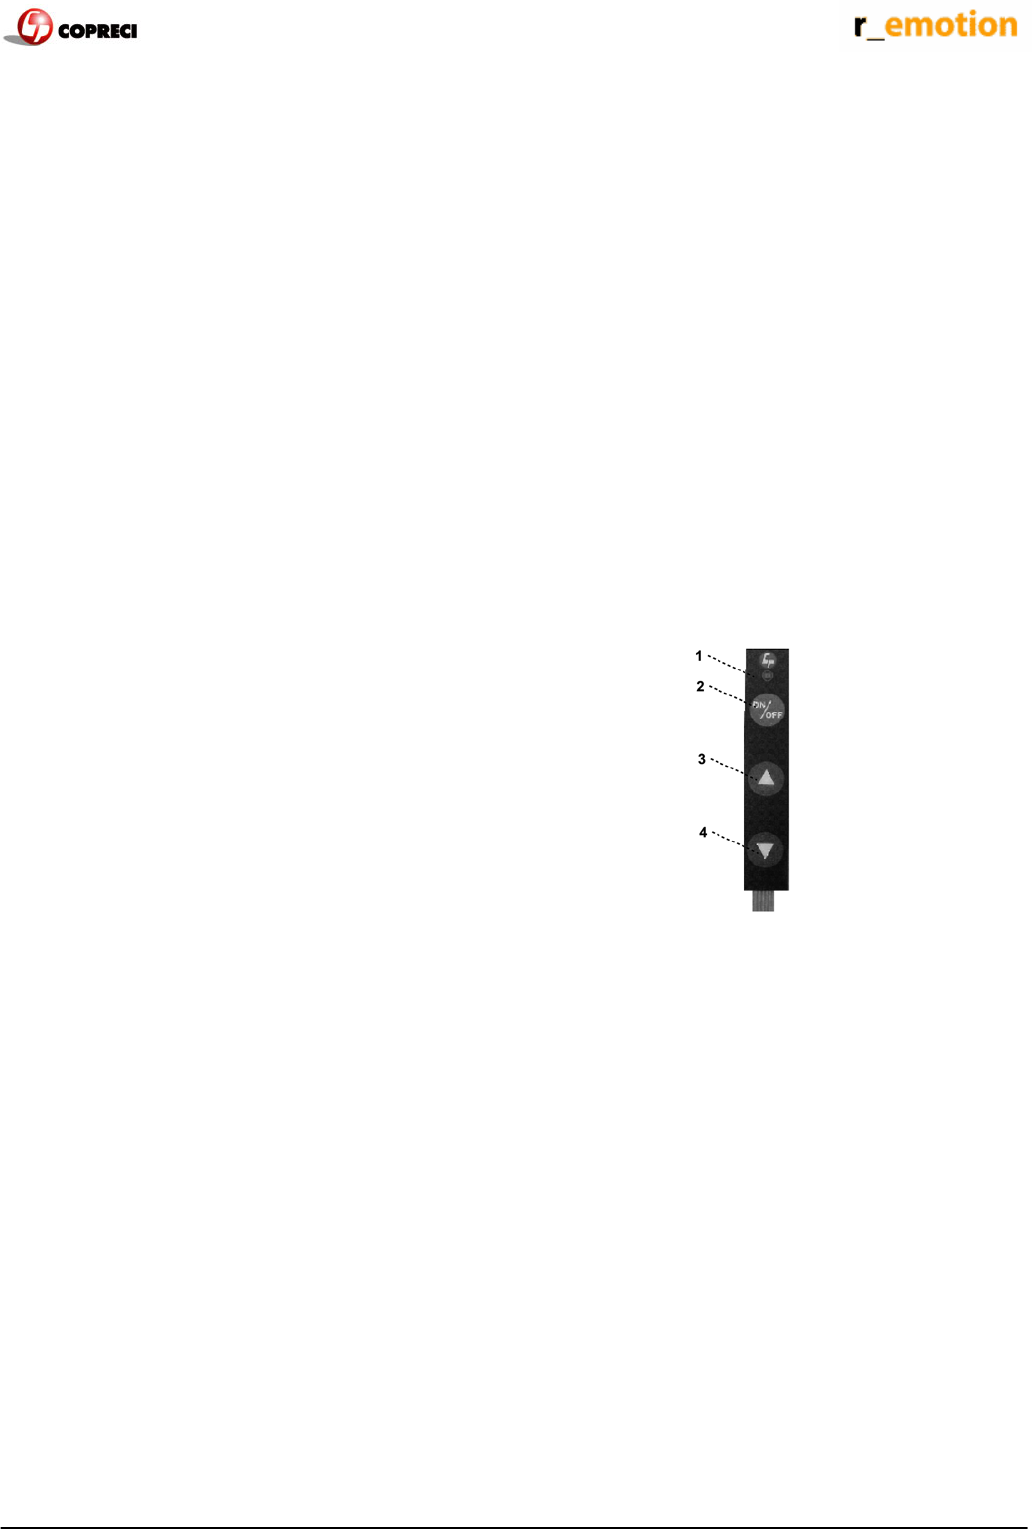
1. Working with the touch control.
This touch control has only 3 buttons for controlling manually the flame of the appliance.
The touch has:
1: Led display.
2: ON / OFF button.
3: UP button (c).
4: DOWN button (d).
With this control it is possible to turn on the fire, turn off the fire and control the flame level.
1.1. Switching on.
To turn the system on just press the ON/OFF button. The system will emit a beep and begin the ignition process,
which can take about 20 seconds. Once the start up process is complete, the pilot flame is lit (if the system does
not have a pilot mode, the main burner is switched on at the lowest level).
1.2. Regulating the flame level.
To increase the flame level, press the up button (c)A beep and a flash of the LED indicate that the system has
accepted the order, and the flame will increase instantly.
To decrease the flame level, press the down button (d)A beep and a flash of the LED indicate that the system has
accepted the order, and the flame will decrease instantly.
r_emotion, gas control system - Installer and user manual 8
1.3. Switching off.
To switch off the fire, the ON/OFF button should be pressed. After the system has emitted a beep, the fire switches
off.
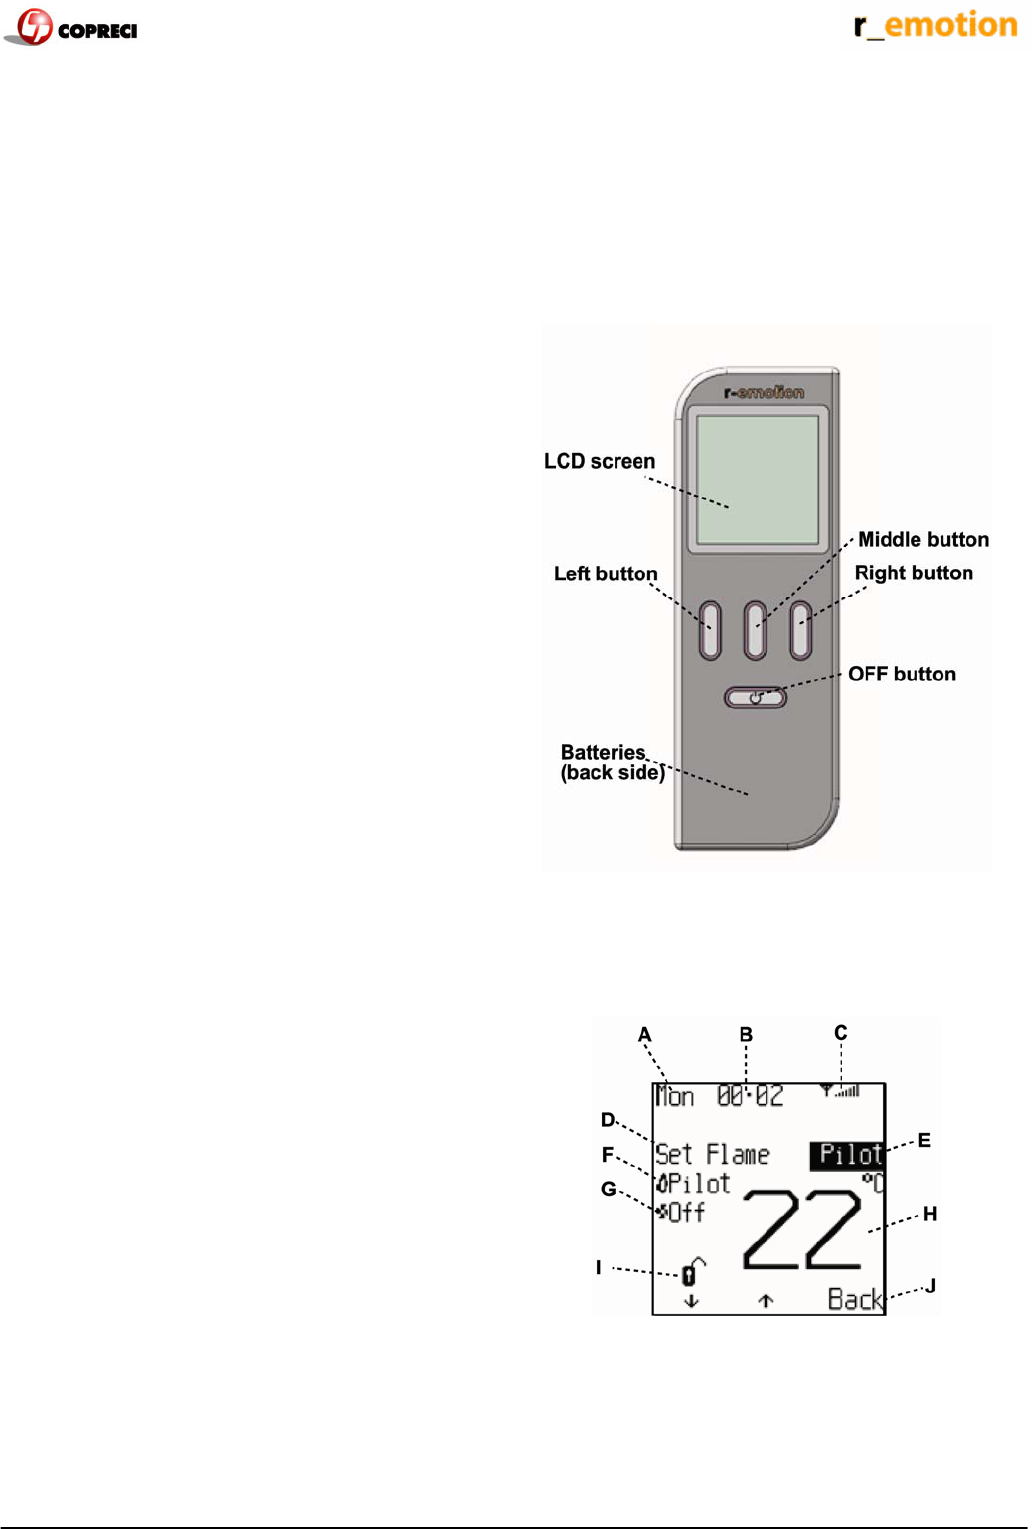
2. Remote control.
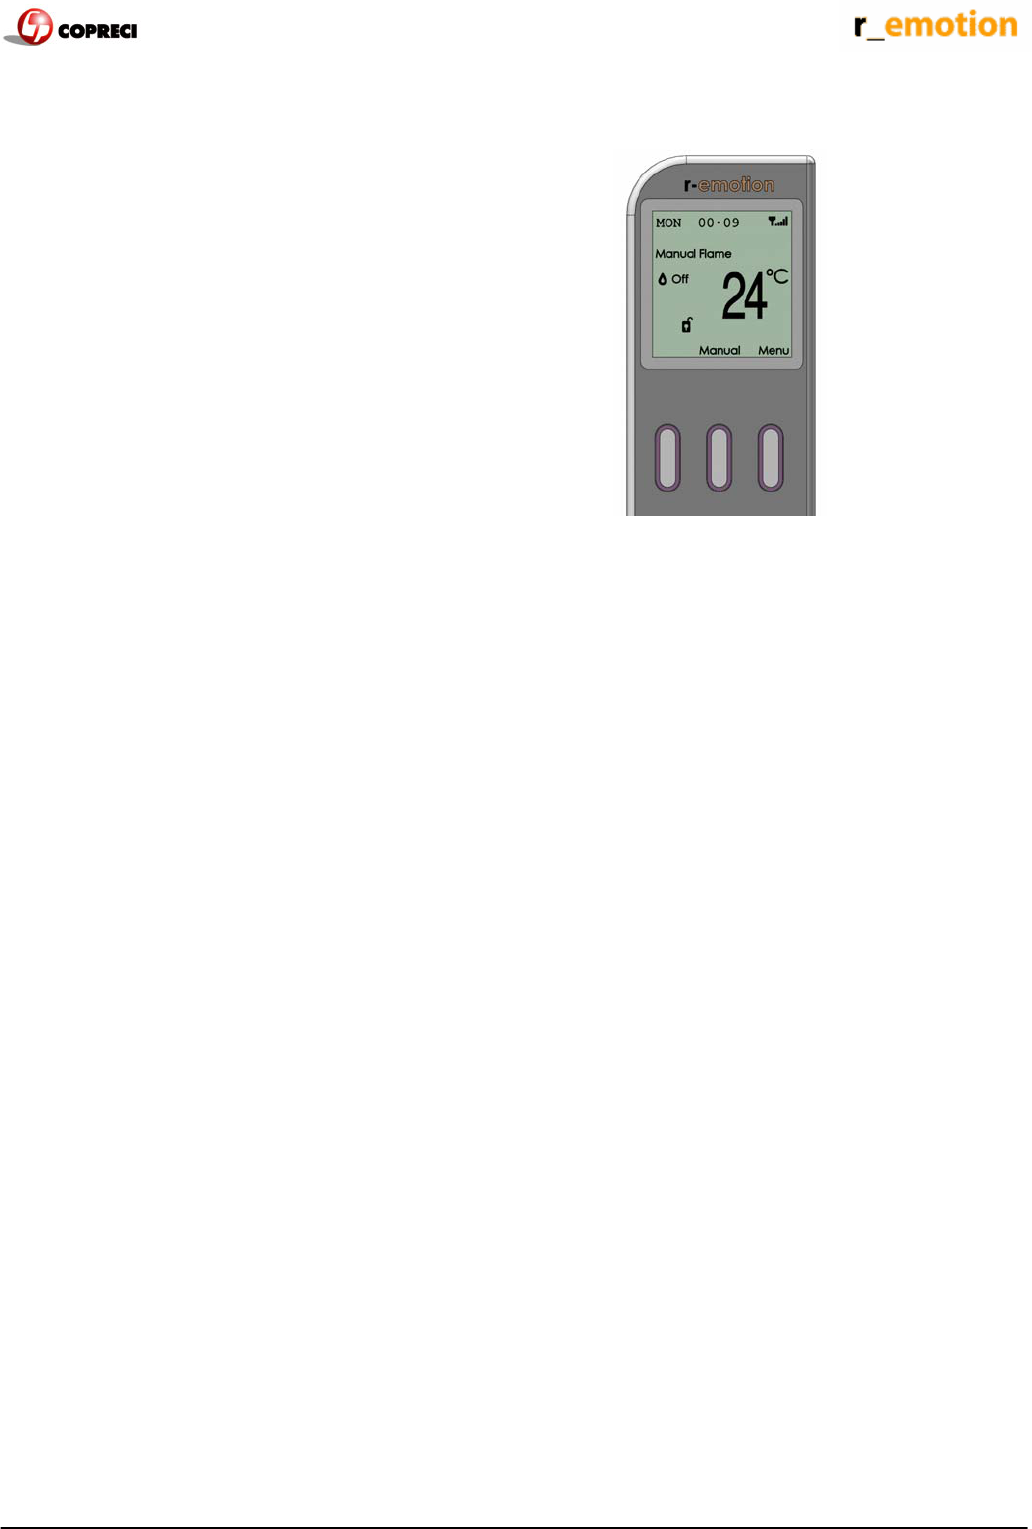
2.1. Description:
The remote control contains:
2.1.1. LCD display.
2.1.2. Four buttons:
OFF button.
Left button.
Middle button.
Right button.
2.1.3 Battery case (on the back).
2.1.1. LCD display.
The LCD screen shows information about the instructions given by the user (desired status) and the current
situation of the device (actual status).
It also helps us select our choices.
- A: Day of the week.
- B: Time.
- C: Signal strength..
- D: Selected working mode.
- E: Selected setting.
- F: Current flame status.
- G: Current fan status.
- H: Current room temperature.
- I: Child lock status.
- J: Button labels (explained below).
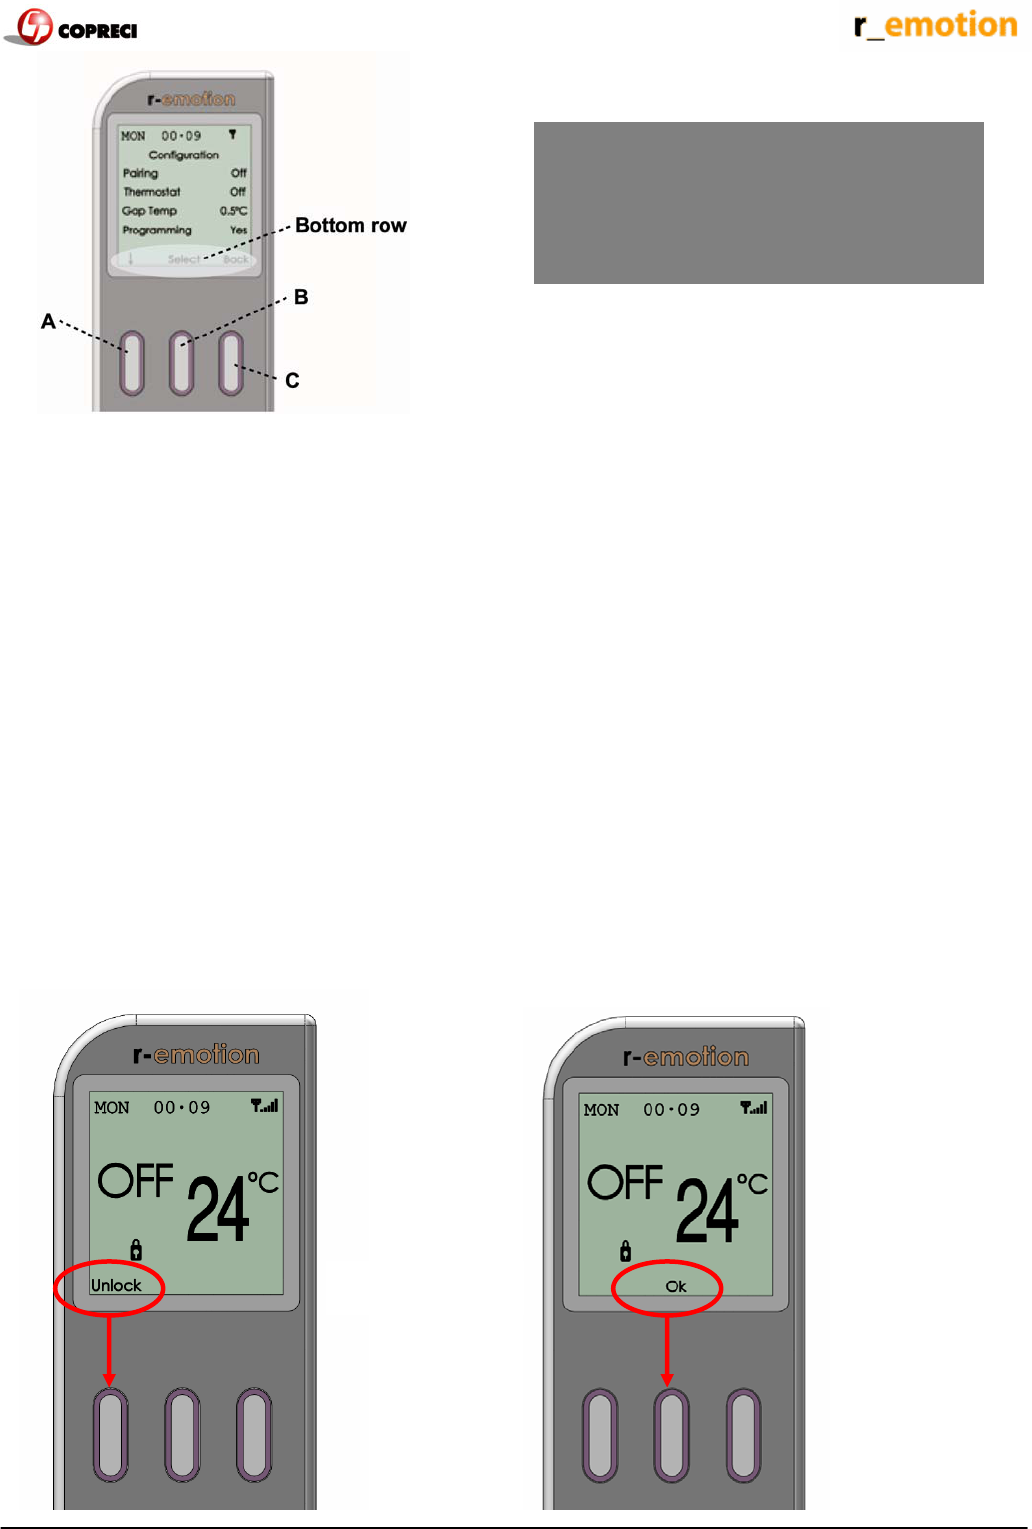
r_emotion, gas control system - Installer and user manual 9
The screen changes depending on the input from the buttons, but the bottom row always displays the button
function labels. The function of each button depends on the options available on the current screen (except for the
OFF button, which has always the same function).
2.1.2. OFF button
This button switches off the appliance. If it is pressed for more than 40 seconds, the configuration menu is
accessed.
2.1.2. Left, middle and right button
These buttons change their function as shown by the on-screen labels. For some screens a button may have no
function and is inactive. The active buttons for a particular screen are initially lit for 5 seconds to indicate that they
are active.
2.2. Menu system.
The remote is organized by means of a menu system.
When first powered the remote starts at the OFF screen (it is possible that the remote is locked in the OFF screen:
to unlock it just press the button below Unlock, and then OK).
Advice: The bottom row of the screen is
indicating buttons functionality. In this case:
• A (È) button decreases the flame level.
• B (Ç) button increases the flame level.
• C (Back) button goes back to the
previous screen.
And then Æ
r_emotion, gas control system - Installer and user manual 10
2.3. Switching on
Once the remote is unlocked, press On (left button) and OK (middle button). A beep from the control unit will be
heard, and the ignition process starts. Note that while in operation the RF signal strength indicator disappears.
Wait until the current flame status displays Pilot.
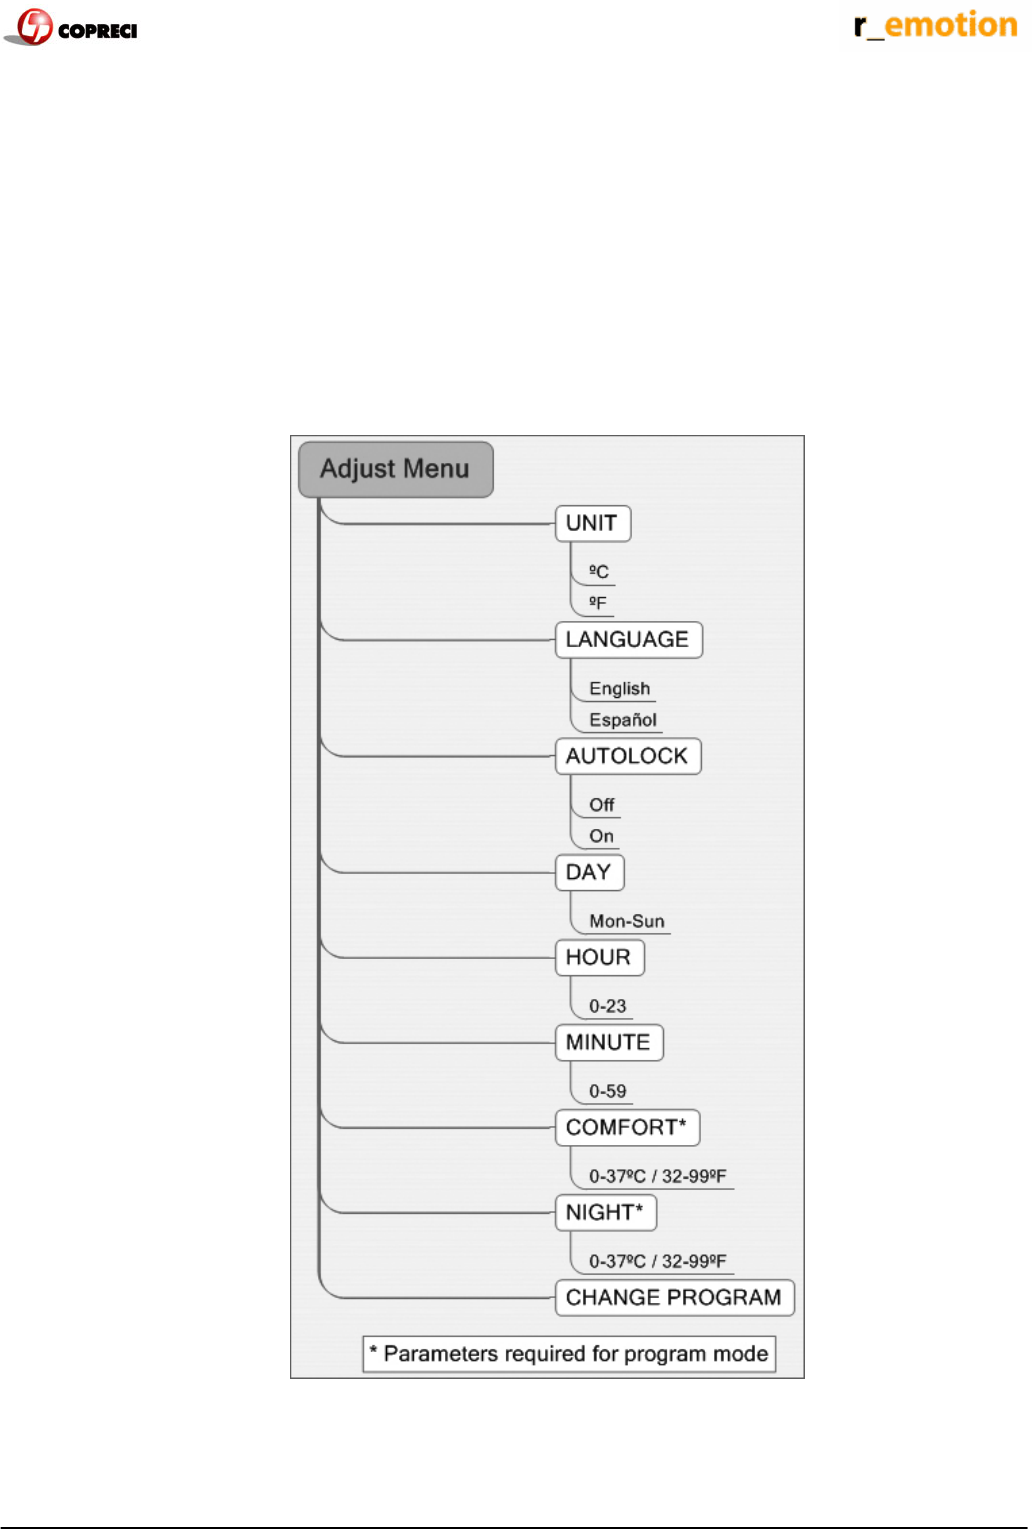
2.4. Adjust Menu
Before using the remote, there are various settings which should be made, such as the date, the language, the
autolock option and the comfort temperature.
For doing this, go to Menu Æ Adjust Menu. There the options shown below can be set. To change any of these
settings just press Select and Change.
r_emotion, gas control system - Installer and user manual 11
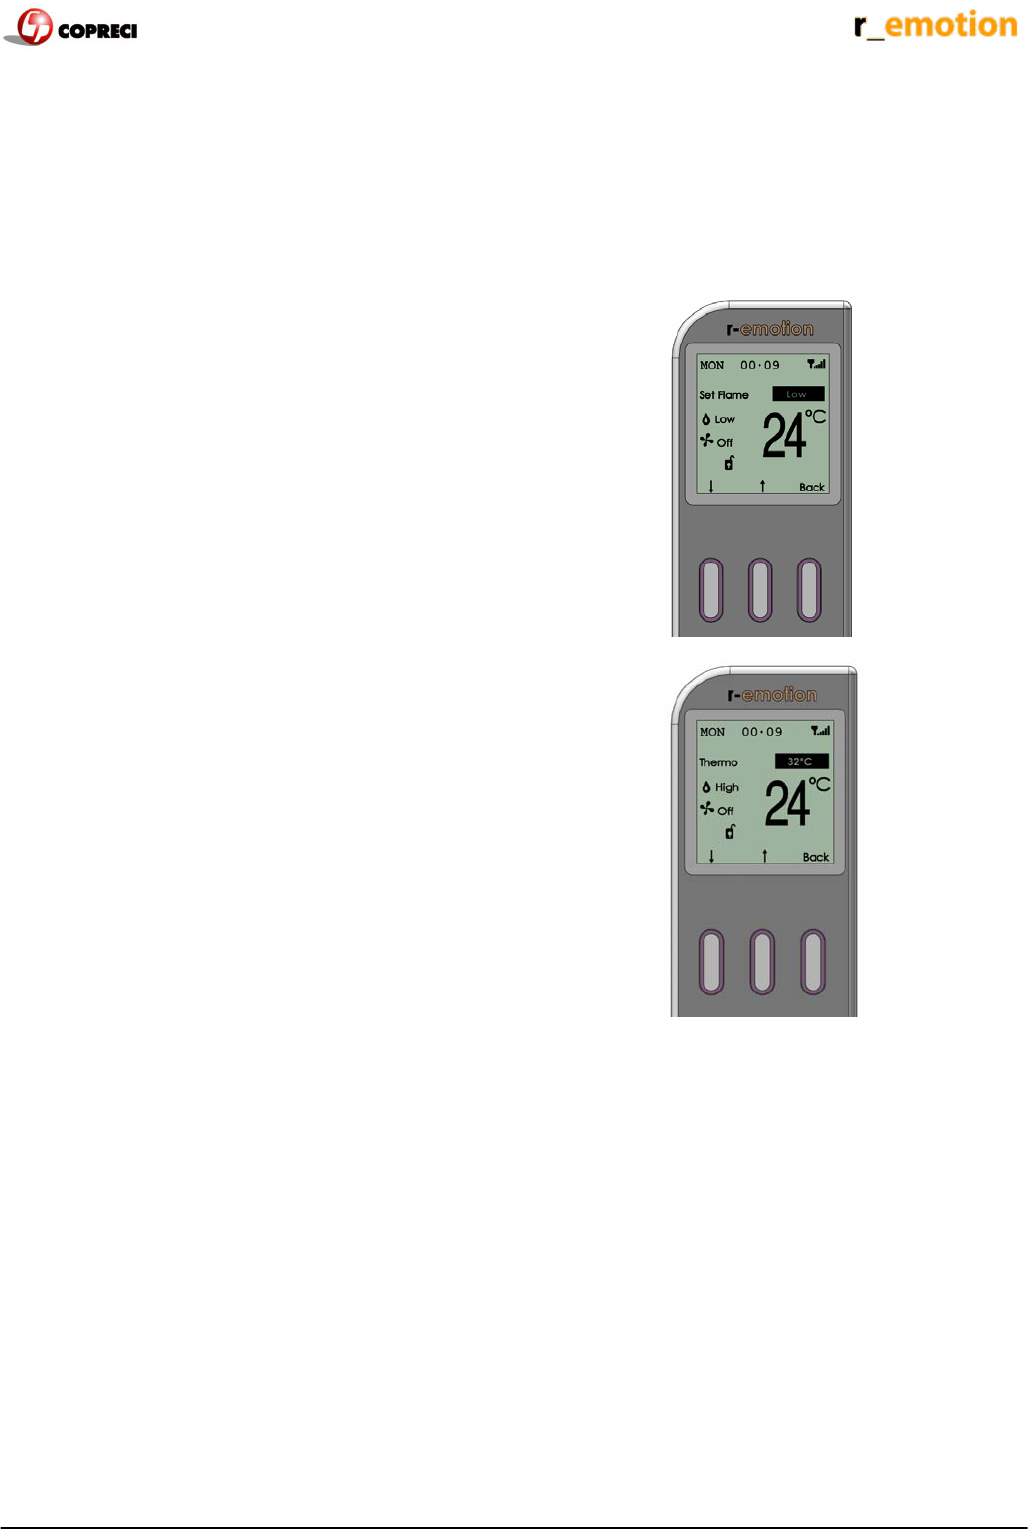
2.5. Setting the control mode
There are three different modes for controlling the
appliance:.
Æ Manual.
Æ Automatic.
Æ Program.
Automatic mode allows you to set a temperature, while
in manual mode the flame level may be set to HIGH,
MEDIUM, or LOW. Program mode offers automatic
temperature control for specific times of the day.
In the initial screen when the remote is turned on, three
options are available: AUTO, MANUAL and MENU.
Auto and Manual are two of the three different modes
for controlling the appliance with the remote.
Manual mode
If Manual is pressed, Pilot appears as the selected
setting. In the bottom row, È and Ç appear, indicating
that the flame level can by changed by just pressing the
left or middle button. Pressing Back (right button),
returns to the initial screen.
Note that a Safety temperature can be previously set in
the configuration menu. This specifies the maximum the
maximum permitted room temperature. This
temperature can never be set higher than 40ºC (104
ºF).
Auto mode
If Auto is pressed in the initial screen, 25ºC (77 º F)
appears as the desired temperature in the selected
setting. In the bottom row, È and Ç appear, indicating
that we can change the desired temperature value by
just pressing the left or middle button. In auto mode the
appliance heats until this temperature is reached. Limits
are 0-37ºC (32-99ºF).
Pressing Back (right button), returns to the initial
screen.
The Auto mode feature is optional and can be enabled
or disabled in the configuration menu.
In this mode the main burner can be switched on and
off.
Program mode
There are two types of program mode: a Daily mode
and a Weekly mode. In the daily mode, every day uses
the same program. In the weekly mode, every day has
its own program, so it is possible have a different
program for each day of the week.
In this mode the main burner can be switched on and
off.
r_emotion, gas control system - Installer and user manual 12
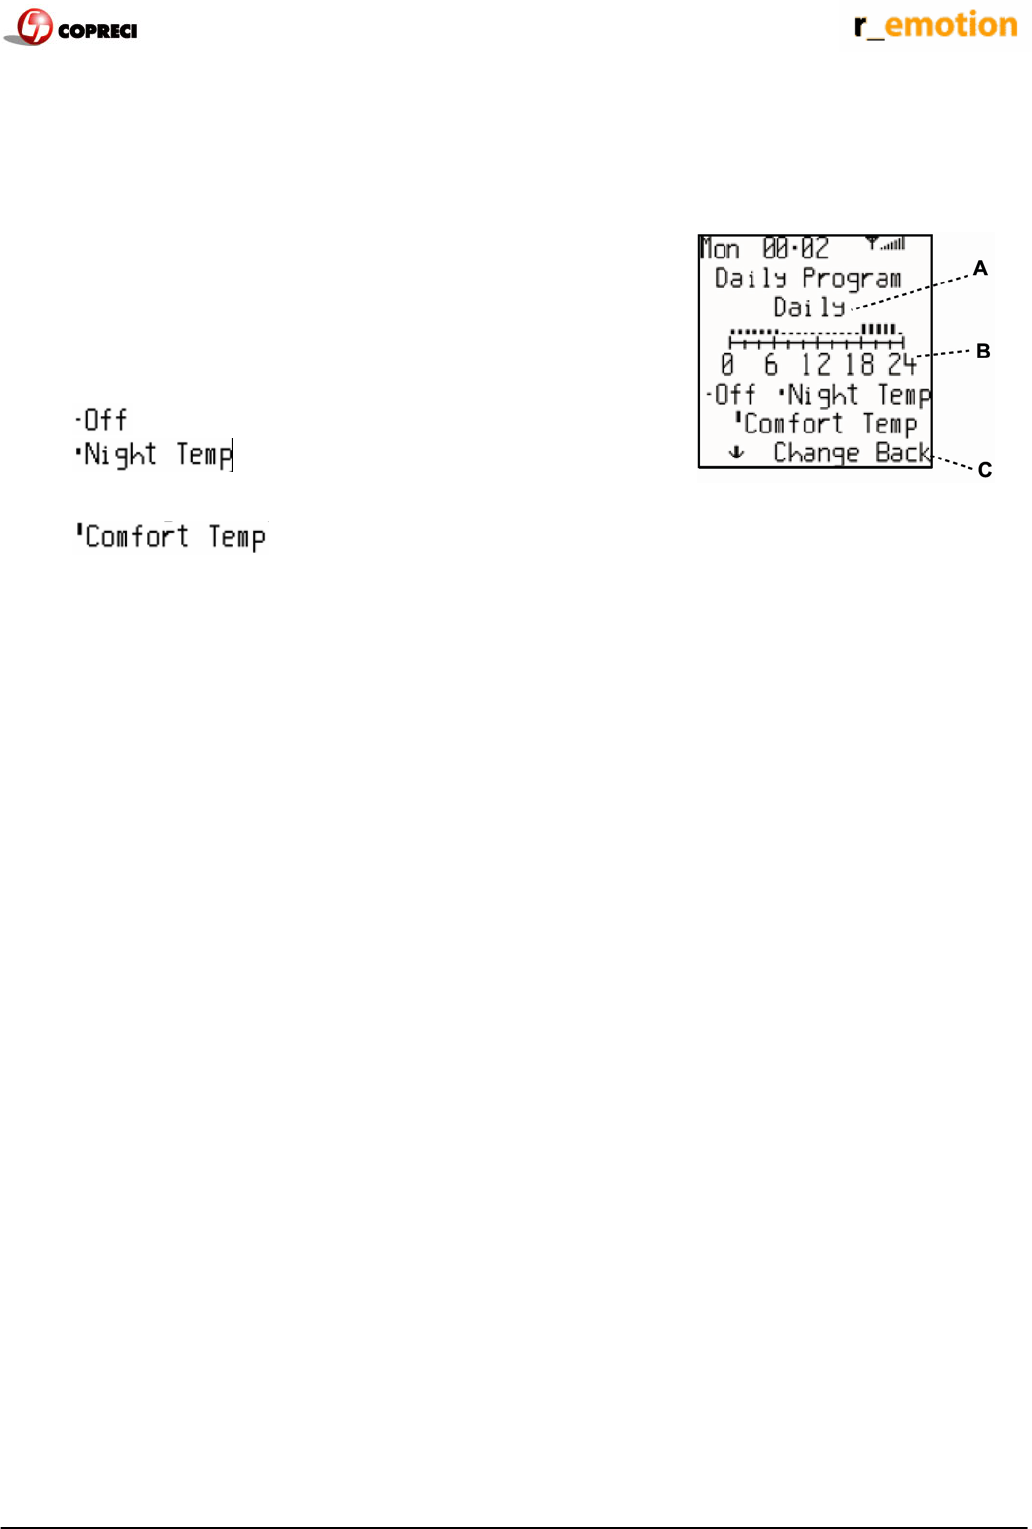
2.6. Day programming menu (Menu Æ Adjust MenuÆ Change Program):
There are 8 menus like this. One for Daily, and the others for each day (Monday, Tuesday, Wednesday, Thursday,
Friday, Saturday and Sunday). This day programming screen consists of:
Title: Daily program.
A: Selected (including “Daily”). The selected day can be changed
by pressing Change (middle button).
B: Day schedule graphic. This bar displays the program for the
whole day by showing the temperature setting for each hour of the
day. To access the day schedule graphic, press È (left button). To
change the desired temperature, go to the hour you want to change
by pressing Æ (left button) and then press change (middle button).
There are 3 temperature settings:
: no temperature control (the appliance is in pilot mode).
: the night temperature is set as the desired
temperature and the appliance will heat until this temperature is
reached.
: the comfort temperature is set as the
desired temperature and the appliance will heat until this
temperature is reached.
Finally, to launch the program mode, in the main menu, set Program to On, and select the desired Program Type
(Daily or weekly).
2.7. Other features
How to change fan speed
In the main screen, press Menu button. Select Fan and press Ç or Èto go to the desired speed.
How to locking and unlock the remote (child lock)
To unlock the remote, press the Unlock button and then OK.
To lock the remote, in the main screen press Menu go to the Lock option, press Select and then Change. The
remote will immediately go into locked mode.
Automatic lock can be selected. This means that if no button is pressed for while, the remote automatically goes
into locked mode.
How to activate or deactivate the sounder
In the main screen, press Menu button. Select Sounder and press Change to activate or deactivate the sounder.
How to activate or deactivate the ember bed
In the main screen, press Menu button. Select Ember Bed and press Change to activate or deactivate the
sounder.
How to select the temperature unit (ºC/ºF)
In the main screen, press Menu button. Select Adjust Menu and then select Unit. To change the temperature unit
press Change button.
r_emotion, gas control system - Installer and user manual 13
2.8. Configuration menu
The remote may be used in easy mode by disabling options in
the configuration menu. If all options are disabled, the remote
works in manual mode only. Furthermore the only on-screen
option are Manual and Menu. Within the menu only Adjust
Menu and Lock are accessible.
This is a list of the settings that can be changed in the
configuration menu:
• Thermostat: this option enables or disables the auto
thermostat mode. To enable it, select Yes. To disable it select
No.
• Gap Temp: this option refers to the tolerance between the
desired temperature and the current one. If the difference is
greater than this gap temperature setting, the flame level
increases. For example: the desired temperature is set at 20ºC and the current temperature is 18ºC:For
example: set temperature is 20ºC and current temperature is 18ºC.
• If the Gap Temp is 0•5ºC: Flame level will go to maximum level because the difference is 2ºC.
• If the Gap Temp is 1ºC: Flame level will go to medium level as difference of 2ºC is two times
the gap setting. (The flame level increases two levels: Pilot → Low → Medium.)
• If the Gap Temp is 2ºC: Flame level will go to minimum level as the difference of 2ºC is equal
to the gap setting. (The flame level increases one level: Pilot → Low.)
• Programming: this option enables or disables the program mode. To enable it, select Yes. To disable it, select
No.
• Fan System: this option enables or disables the fan system. To enable it, select Yes. To disable it, select No.
• Soft start: this option causes the thermostat mode to work incrementally. When the change of flame level
required by the thermostat involves more than one level, this option makes the change step by step, with a
delay of 10 seconds between each change of flame level. To enable this option, select Yes. To disable it,
select No.
• Ember bed: This option enables or disables the ember bed output. To enable it, select Yes. To disable it,
select No.
• Sounder: This option enables or disables the sounder option. To enable it, select Yes. To disable it, select No.
• Safety temp: this temperature is the maximum permitted room temperature. If the remote detects that the
temperature is higher than the Safety temp, the appliance is switched off. This temperature can never be set
higher than 40ºC (104ºF). The possible range of values is 25-40ºC (77-104ºF).
• Channel: There are three different channels available: A, B and C. These different channels make it possible
to have more than one appliance, each with its own remote. To change the channel just press Select, choose
one of the channels and then reset the control unit by disconnecting the power supply for a short period.
Afterwards the connection between the remote and the control unit will be re-established. Change channel only
if necessary.
r_emotion, gas control system - Installer and user manual 14
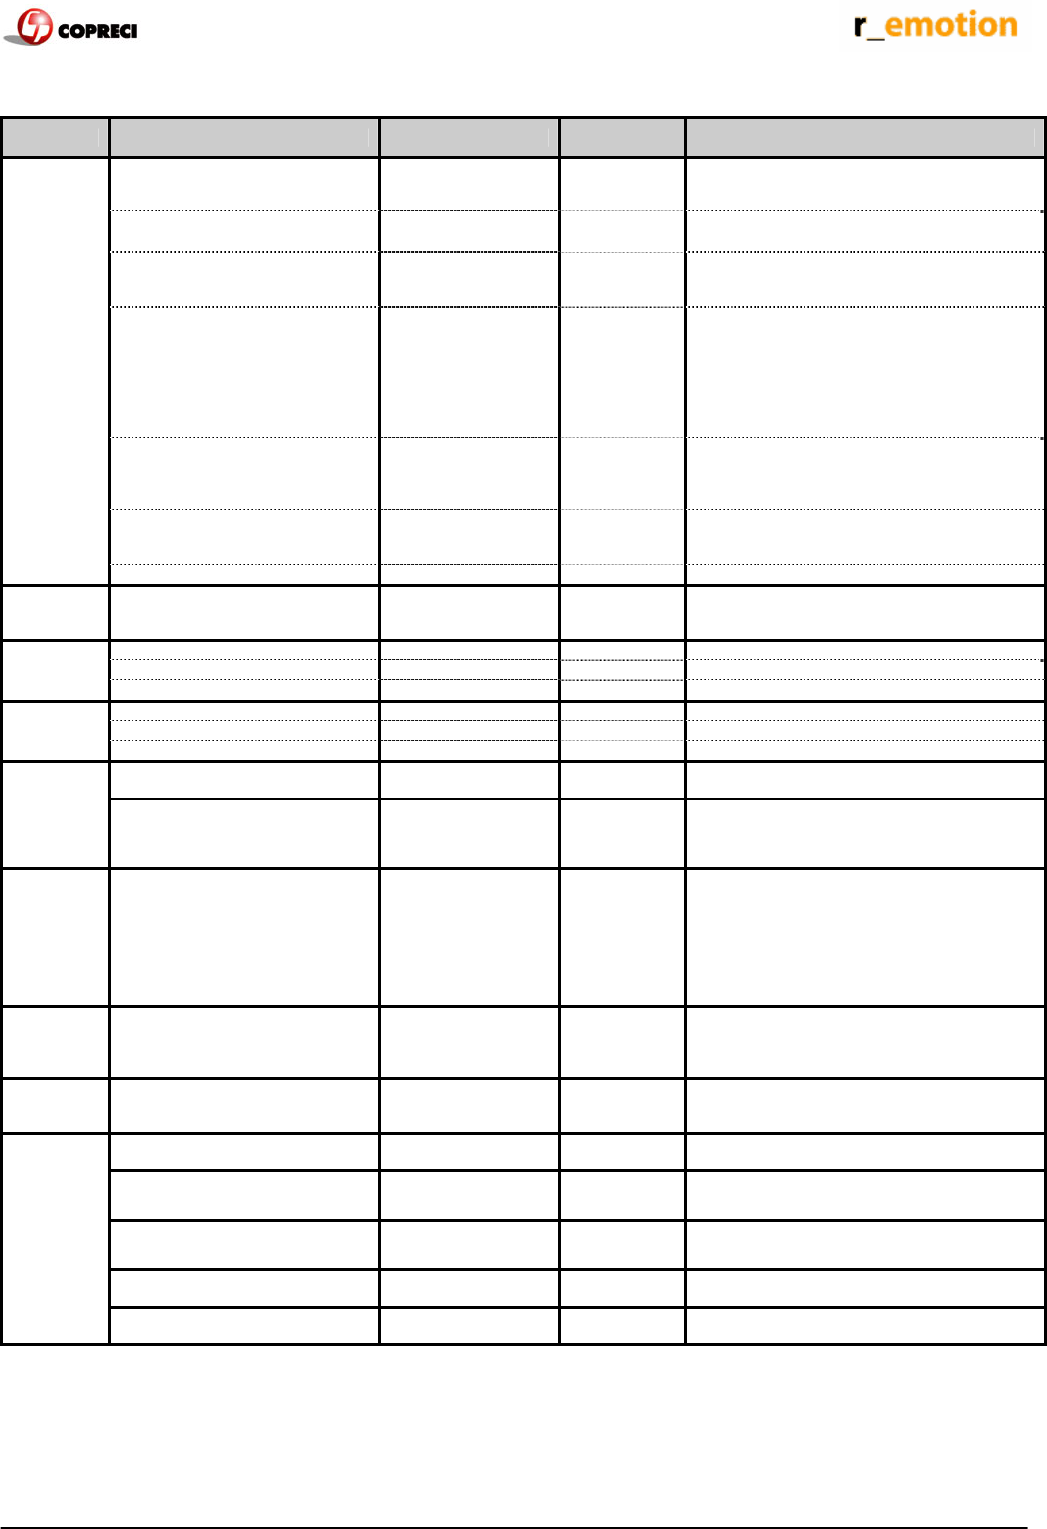
2. Troubleshooting
Problem Cause Error message LCD
display Solution
No batteries or flat batteries in
control unit. 10 beeps
BATTERY
ERROR
Place new batteries in control unit .
ROM Error. 2 cycles of 3 beeps. ROM ERROR
Change control unit.
Support test error. 2 cycles of 5 beeps.
SUPPORT
ERROR
Connect earth cable from battery box to valve.
Bad reception of remote handset
signal.
• Change batteries in the remote handset.
• Check reception of signal from a shorter
distance.
• Try making the pairing again.
• Try changing the channel in the configuration
menu.
No response to touch control
buttons.
Cable loose or broken or connected
the wrong way round.
If LED is continuously
on, the cable is
connected the wrong
way round.
• Ensure the touch control cable is correctly
connected (see installation manual).
• Change touch control.
Supply cable to valve disconnected
or broken. 2 cycles of 5 beeps.
SUPPORT
ERROR
Connect supply cable to valve.
Stove does
not ignite.
Spark cable disconnected or broken. Connect spark cable.
Stove does not
ignite in
program mode
Program mode does not work if soft
start is deactivated. Active soft start.
Gas supply off or no gas. Check gas installation. Open gas valve.
Valve cable disconnected or broken. Connect valve cable correctly.
Sparks but
no pilot
ignition. ODS cable disconnected or broken. Connect correctly or replace ODS cable.
ODS is not warmed up. Check pilot flame and verify that it heats the ODS.
ODS cable badly connected Change polarity of ODS cable.
Pilot ignites
but doesn’t
stay on ODS cable disconnected or broken. Connect ODS cable.
Touch control cable disconnected or
broken. Connect or replace touch control cable.
Ignites
commanding
from remote
handset but
not from
keyboard
Defective touch control buttons. Change touch control.
Ignites
commanding
from
keyboard
but not from
remote
handset.
Bad communication with handset.
• Change batteries in the handset.
• Check reception of signal from a shorter
distance.
• Try making the pairing again.
• Try changing the channel in the configuration
menu.
Stove
switches off
after 6
seconds.
Shortcut in touch control. 5 beeps BUTTON ERROR Change touch control wiring.
Low
batteries in
the remote
Low Battery Change batteries in the remote
2 cycles of 3 beeps CONFIG
ERROR Change control unit.
2 cycles of 3 beeps
EEPRON ERROR
• Try making the pairing again.
• Change control unit.
Loss of communication between
appliance and remote for 18 min. 20 beeps
• The remote is too far from the appliance
• The remote has no batteries.
High temperature on the control unit 1 long beep TEMP ERROR
If this occurs more than once call the technical
service
Appliance
switches off
Ambient temperature higher than
configured Over Temperature Check correct configuration of safety temperature