SONY Digital Camcorder Manual L0703219
HDR-HC5 HDR-HC5 SONY DIGITAL CAMCORDER - Manuals and Guides L0703219 View the owners manual for your SONY DIGITAL CAMCORDER #HDRHC5. Home:Electronics Parts:Sony Parts:Sony DIGITAL CAMCORDER Manual
User Manual: SONY SONY Digital Camcorder Manual SONY Digital Camcorder Owner's Manual, SONY Digital Camcorder installation guides
Open the PDF directly: View PDF ![]() .
.
Page Count: 128 [warning: Documents this large are best viewed by clicking the View PDF Link!]
SONY
Addilion d information on lhis product and answers
Io frequenlly asked questions can be found tit our
Customer Support Websile.
http://www.sony.net/
Printed on 70% or more recycled paper
using VQC (Volatile Organic Compound)-
free vegetable oil based ink.
Printed in Japan
US
2319806110
iiiiiiiiiiiiiiii
iiiiiiiiiiiiiiii
iiiiiiiiiiiiiiii
Digital HD Video Camera Recorder
Operating Guide
HDR-HC5/HC 7
Getting Started
Using the Menu
Dubbing/Editing
Using a Computer U
Troubleshooting
Additional Information
Quick Reference
Spanish Quick Guide/
Gufa r_.pida en espafiol
_l _V M'I3' r_ Digi al _ CP_L_ _H_m_v,_eo _ InfoLITHIUM
_,_ C_Jssett_ _OrYBTI_K ',4 s_rIES
HDV 1080i
© 2007 Sony Corporation
To reduce fire or shock hazard, do
not expose the unit to rain or
moisture.
CAUTION_0_U¢_ THE_ISKOFELECtriC S_OCK
This symbol is inlended to alert
the user to the presence of
unh_sulated "dangerous
voltage" within lhe product's
enclosure lhat may be of
sufficient lnagnitude to
constilule a risk of electric
shock to persons.
This symbol is inlended to alert
tile user 1o the presence of
inlportant operaling and
maintenance (servicing)
instructions in lhe lileralure
accompanying the appliance.
IMPORTANTSAFEGUARDS
For your protection, please read these safety
instructions completely before operating
the appliance, attd keep this manual for
future reference.
Carefully observe all warnittgs, precautions
and ittstructions oil the appliance, or the otte
described iu the operating instructions :utd
adhere to them.
PowerSources
This set should be operated only Ii'om tile type (51
power source indicated on tile marking labeh It
you are not sure oI the type of electrical power
supplied to your home, consull your dealer or
local power conlpany. For those sets designed to
opel_lte |ronl b_lUel y po reel-, or other sources, le |_r
to tile operaling illstructions,
Polarization
This set may be equipped with a polarized ac
power coM phlg (a phlg ha_ing one blade wider
than the olher).
This plug will tit into the power outlet only one
way. This is a satcty Icamre. If you are unable to
insert tile plug tully into the outlet, fly reversing
the plug, If the plug should still Iidl to fit, contact
your electrician to have a suitable outlet installed,
Do not dellrat the salcty purpose of the polarized
plug by lorcing it in.
Overloading
Do not o_,erload w_lll oullets, extensioll cords or
comenience receptacles beyond their capacity',
since this can result in lirc (51"electric shock.
ObjectandLiquidEntry
Ne_er push objects of any kind into tile set
through openings as they nmy touch dangerous
_,oltiJge points Ill"short OUtparts that could rcsu][
in a fire or electric shock. Never spill liquid of any
kind on the set.
Attachments
Do noI use _ltt_lchlllents llOt reCOlllnlended by tile
ii/anul;lclur_2r, as they may cause hazards.
Cleaning
Unplug tile set fi'om the wall outlet belore
cle_uling or polishing it. Do not use liquid cleaners
or _,erosol clemlers. Use _,cloth lightly dampened
with w;tter for cleaning tile exterior OItile set.
Water andMoisture
Do not use power-line operi/ted _ts neilr water
lor example, near a bathtub, washbowl, kitchen
sink, (51"hmndry tub, in it wet basement, or near _l
swinmling pool, etc.
Power-CordProtection
Route tile power cord SOthitt it is llOt likely Iv)be
walked on or pinched by items placed upon or
againsl lhem, paying particular attention to file
plugs, receptacles, and the point where the cord
exits Irom the appliance.
Accessories
Do not place the set Oil illl/instilhle carl, sla,nd,
tripod, bracket, or table. The sel may tall. causing
serious inju W to a child or an adult, and serious
danlzlge to tile set. Use only a carl, stand, tripod,
brackel, or lable recommended by lhe
ii/anuI_lclurcr,
Ventilation
Tile slots and openings in the cabinet mc prm ided
Ior necessmy ventilation. To ensure reliable
operation oI tile set, and to protect it h'oln
overheating, these slots and openings must never
be blocked or covered.
Never cover tile slots and openings with a cloth
or olher nlalerials.
Never block tile slots and openings by placing
tile set on a bed, sol_,, rug, or other silnilar
surlgce.
Never place the set in a confined space, such as
a bookcase, or buill-in cabinel, unless proper
venlilation is provided.
Do not place lhe set near or over a radiator or
Ileal register, or where il is exposed to direct
sunlighl,
Continued._ 3
_?ORTANT SAFEGUARDS(go_i_ed}
Lightning
For added protection t_>rthis _t during _Llighming
slornl, or wllen it is lefi unatlended and unused fi)r
long periods ol time. unplug it hxml tile wall
oullet and disconnect lhe illltelllla or citble systellL
This will prevenl damage to tile set due to
lighming and power-line surges.
SafetyCheck
Upon conlpletion of _uly selvice or repairs to tile
set. ask the service technician to l_erlbrnl routine
salbty checks (as specilied by tile manulacturer)
to determine tlliLt the set is ill siLle operathlg
condition.
DamageRequiringService
Unplug the sel fixml tile wall outlel and rcl_:r
sel_ icing to qualified _r_ice personnel under lhe
tollowing conditions:
When the power cord or plug is damaged or
frayed.
If liquid Ilas been spilled or objects have fallen
into the set.
If the _t has been exposed to rain or water.
If file set has been subject to excessive shock by
being dropped, or the cabinet has been
damaged.
If the set does not opert_te nornlally when
li_llowing the operating instructions. A(liust
only those controls that are specified in the
operating instructions, hnproper adjustment of
other controls nlay resull in damage and will
ol}en require exlensive work by a qualified
technician 1o restol_ the set to normal operalJon,
When the set exhibits a distinct change in
perlormance this indicates a need fi)r service.
Servicing
Do nol alttelnpl to serxice tile sel yourself glS
opening or r_nloving covers may expose you lo
dangerous voltage or olller hazards.
Reler all servicing to qualified service personnel.
Replacementparts
Wllen replacement pal'ls are required, be sure lhe
service technician has used replacement parts
specified by tile manufacturer lhat have tile sanle
cllaracteristics as tile original parls.
Unauthorized substitutions may rcsull ill fire.
electric shock, or olher hazards.

Readthis first
Before operating the unit, please read this
manual thoroughly, and retain it for future
reference.
Replace the battery with the
specified type only. Otherwise, fire
or injury may result.
RECYCLINGLITHIUM-IONBATTERIES
Lithiunl-lon baueries are O
recyclable.
You call help preselwe our
envh-onlllenl by returnhlg your
used rechargeable baueries to the
collection and _cycling location
nearesl you.
For morn in_rmation regarding _cycling of
rechargeable batteries, call toll flee
1-81X)-822-8837, or visil http://www.rbrc.org/
Caution: Do not handle damaged or leaking
Lilhiuln-lon baueries.
Owner'sRecord
Tile model and serial numbers my located on the
boUoln. Record the serial lmnlber in the space
provided below. Reti:r lit these numbers whenex er
you call upon your Sony dealer regarding this
product.
Model No. HDR-HC
Serial No.
Model No. AC-
No.
If you have any questions about this
product, you may call:
Sony Customer hfformation Center 1-800-
222-SONY (7669).
The number below is for the FCC related
matters only.
RegulatoryInformation
Declaration of Conformity
Trade Name: SONY
Model Nit.: HDR-HC5
Responsible Party: Sony Eleclronics Inc.
Address: 16530 Via Esprillo, San Diego, CA
92127 U.S.A.
Telephone Number: 858-942-2230
This device complies wilh Palrl5 of lhe FCC
Rules.
Operation is su_iect 1o file lollowing two
conditions:
(1) This device may not cause harmlul
inlertcmncc, and (2) this device must accepl any
intertcrence received, including interterence
lhal may cause undesired operation.
Declaration of Conformity
Trade Name: SONY
Model Nit.: HDR-HC7
Responsible Parly: Sony Eleclronics Inc.
Address: 16530 Via Esprillo, San Diego, CA
92127 U.S.A.
Telephone Number: 858-942-2230
This device complies with Parr l5 of tl_e FCC
Rules.
Operation is suI_iect t_ tile l_lllowing two
conditions:
! 1)This device may nol cause harmtul
intcrfelvnce, and (2) this device nmst accepl any
interference received, including intertcrence
lhal may cause undesired operation.
CAUTION
You are cautioned thai any changes or
modilications not expressly approved in this
manual could void your authority tit operale this
equipmenL
Continued,,_ 5
Read this first (C+_tim_8_}
Note:
This equipment has been tesled and lonnd to
comply with the limits lor a Class Bdigital
device, pursuanl to Parl 15 of the FCC Rules.
These limils are designed lo pro_ide reasonable
protection against harnltul interlcrcno: in a
residential installation. This equipment generates,
uses, and can radiate radio hequency energy and,
il nol installed and used ill accordance with the
Jnslr/iclions, inay CallSe barll/l/ll illterl_rcnce 1o
radio colntllunications. However, there is no
guarantee lbal inlerlcrence will not occ/ir in a
particular installation. If this equipment does
cause harmflfl inlerl_rence to radio or television
reception, which can be determined by turning the
equipmenl off and on, tile user is encouraged to
try 1o correcl lhe illtcrlcrence by ()lie or lll()lt: of
tile lollowing measures:
Reorient or relocale tile receiving alllenlla.
Increase the separation belween file equipmenl
and receiver.
Connect the equipment into an oullet on a
circuit dilllrrent hom lhat to which lhe receiver
is connected.
Consult the dealer or an experienced radio/TV
technician R)r help.
The supplied intcllacc cable musl be used with the
equipmenl in order 1o comply wilh tile limits flw a
digilal device pursuanl to Subpart B of Parl 15 of
FCC Rules.
Forthe State of California, USA only
Pcrchlorate Material -special handling may
apply, See
www,dtsc,ca.gov/bazardouswasle/perchlorale
Pcrchlorale Material: Lithium battery contains
perchlorate.
Yourcamcorder is suppliedwith two
kindsof manuals
"Operating Guide" (This m:mu:d)
"First Step Guide" for using your
camcorder while connected tu a computer
(stured unthe supplied CD-ROM)
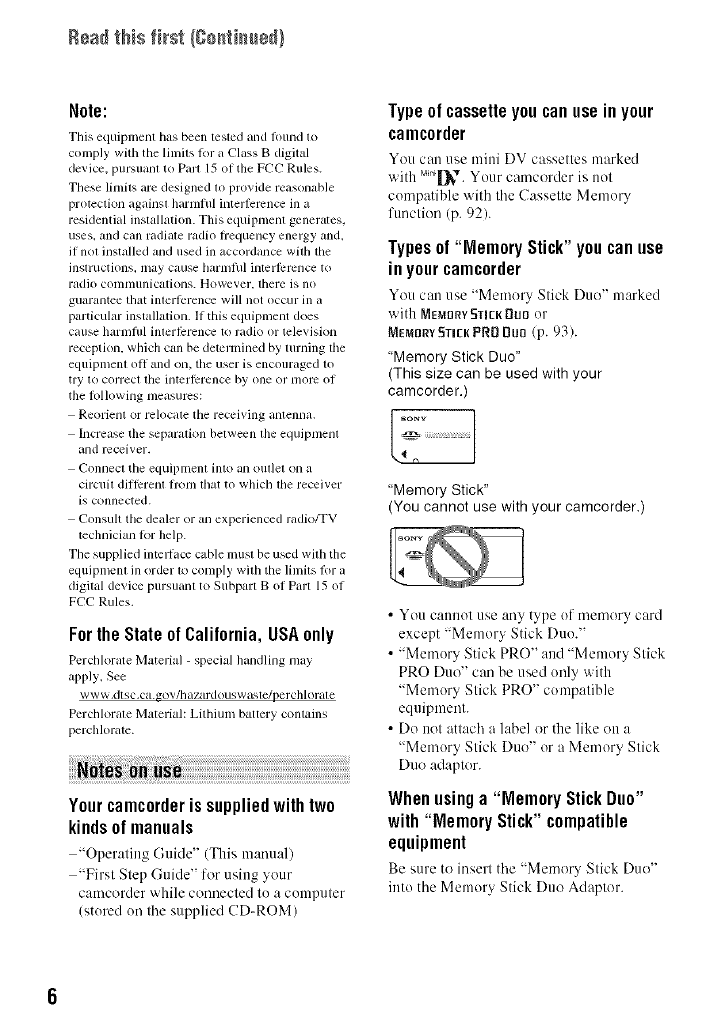
Type of cassette you can use in your
camcorder
You can use mini DV cassettes marked
with M_nq[_v.Your camcorder is not
cumpatible with the Cassette Memo U
function (p. 92).
Typesof "Memory Stick" you can use
inyourcamcorder
You can use "Memory Stick Duo" marked
with ME_II]RYSTIENDtJB or
MEmBRY Stick PRB Bun (p. 93).
"Memory Stick Duo"
(This size can be used with your
camcorder.)
"Memory Stick"
(You cannot use with your camcorder.)
• You cannot use any type uf memory card
except "Memory Stick Duu."
• "Memury Stick PRO" and "Memory Stick
PRO Duo" can be used unly with
"Memory Stick PRO" compatible
equipment.
• Do not attach a label or the like on a
"Memury Stick Duo" or a Memory Stick
Duo adaptor.
Whenusinga "Memory StickDuo"
with "Memory Stick"compatible
equipment
Be sure to insert the "Memor_ Stick Duo"
into the Memory Stick Duo Adaptor.
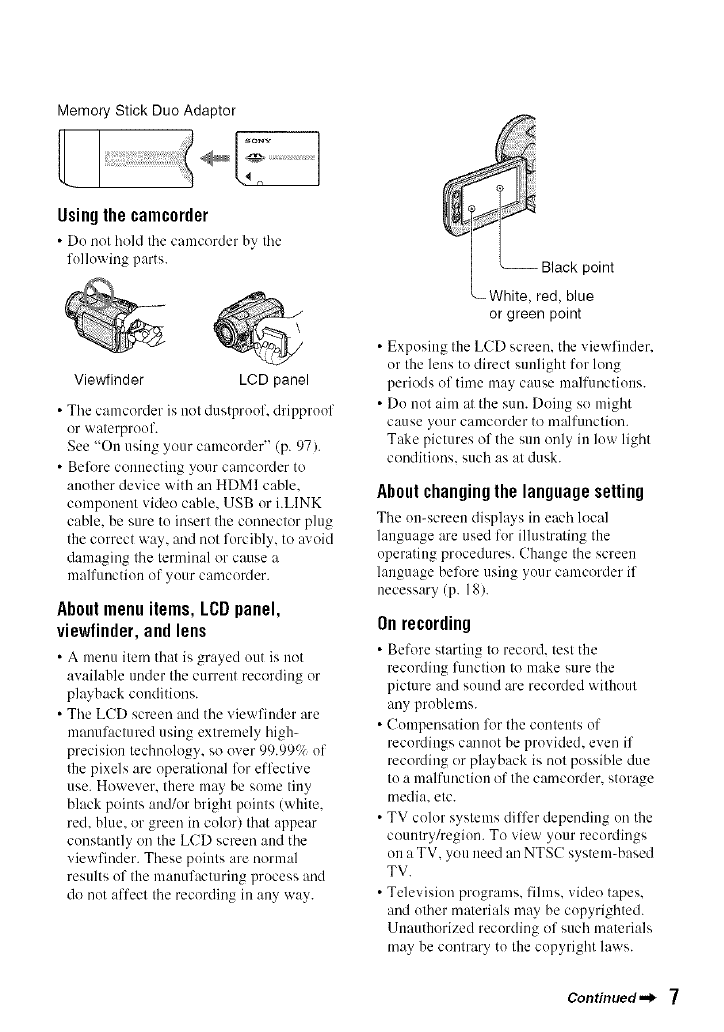
Memory Stick Duo Adaptor
sony
Using the camcorder
• Do not hehl the camcorder by the
following parts.
Viewfinder LCD panel
• Tile camcorder is not dustproof, dripproof
or waterproof.
See "On using your camcorder" (p. 97).
• Belk_reconnecting your camcorder to
another device with an HDMI cable.
component video cable. USB or i.LINK
cable, be sure to insert the connector plug
the correct way, and not forcibly, to avoid
damaging the terminal or cause a
malfunction of your camcerder.
About menu items, LCD panel,
viewfinder,and lens
• A nlenu item that is grayed out is uet
awdlable under the current recording or
playback conditions.
• The LCD screen and the viewfiuder are
manufactured using extremely high-
precision technology, so over 99.999_ of
the pixels are operational lk_reffective
use. However. there may be some tiny
black points aud/or bright points (white.
red. blue. or green in coler) that appear
constantly on the LCD screen and the
viewfinder. These points are normal
results of the manufacturing process and
do not affect the recording in any way.
point
White, red, blue
or green point
• Exposing the LCD screen, the viewfinder.
or the lens to direct sunlight for long
periods of time may cause malfunctions.
•Do not aim at the sun. Doing so might
cause your camcorder te malfunction.
Take pictures of the sun only in low light
conditions, such as at dusk.
About changing the language setting
The on-screen displa>s in each local
language are used for illustraling the
operating procedures. Change the screen
language belk_re using your camcerder if
necessary (p. 1g).
Onrecording
•Before starting te record, test the
recording fimction to make sure the
picture and sound are recorded without
any problems.
• Compensation lk_rthe contents of
recordings cannot be provided, even if
recording or playback is not possible due
to a malfunction of the camcerder, storage
media, etc.
• TV color systems differ depending on the
ceuutry/region. To view your recordings
on a TV, you need an NTSC system-based
TV.
• Television programs, fihns, video tapes,
and other malerials may be copyrighted.
Unauthorized recording of such materials
may be contrary to the copyright laws.
Continued._ 7
Read this first (Co_ti_e_}
On playing hack HDV tapes on other
devices
You cannot pla> back a tape recorded in tile
HDV format on DV fl_rmat video cameras
or on mini DV players/The screen appears
blue).
Check the contents of tapes by playing
them back on this camcorder prior to
playing them back on other devices.
About this manual
• The images of the LCD screen and the
viewfinder used in this manual for
illustration purposes are captured using a
digital still camera, and therefore may
appear different.
• The illustrations used on this manual are
based on the model HDR-HC7. The
model name is indicated on the bottom of
your camcorder.
• Design and specifications of recording
media and other accessories are sut!ject to
change without notice.
Aboutthe Carl Zeiss lens
Your camcorder is equipped with a Carl
Zeiss lens. which was developed jointly by
Carl Zeiss. in Germany, and Sony
Corporation. and produces superior images.
It adopts the MTF measurement system lk_r
video cameras and offers a quality typical
of a Carl Zeiss lens. Also. the lens for your
camcorder is T*-coated to suppress
unwanted reflections and faithfully
reproduce colors.
MTF= Modulation Transfer Function
The number value indicates the amount of
light from a sut!ject coming into the lens.
Table of Contents Note on the icons used in this manual
HDV1080iFo.u,resavail.hiero_theHDV formatonb'
DVFeatures available for the DV format only
IMPORTANT SAFEGUARDS ......... 3
Read this first .................................. 5
Trying out the new HDV format! ... 11
Viewing video recorded in the HDV
format! ......................................... 12
Step 1: Checking supplied items
..................................................... 13
Step 2: Charging the battery pack
.....................................................14
Step 3: Turning the power on and
setting the date and time ............ 17
Step 4: Making setting adjustments
before recording .......................... 19
Step 5: Inserting a tape or a "Memory
Stick Duo" ................................... 20
Playback ....................................... 29
Using PB zoom ........................... 31
Using the guide functions (USAGE
GUIDE) ....................................... 32
Searching for the starting point ..... 33
Searching for the last scene of the
most recent recording (END
SEARCH) .................................. 33
Reviewing the most recently
recorded scenes (Rec review)
................................................... 33
Searching quickly for a desired
scene (Zero set memory) ......... 33
Searching for a scene by date of
recording (Date search) ........... 34
Playing the picture on a TV ........... 35
Selecting the appropriate
connection method (CNNECT
GUIDE) ..................................... 35
Connecting to a high definition TV
................................................... 36
Connecting to a 16:9 (wide) or 4:3 TV
................................................... 37
Easy Recording/Playback (Easy
Handycam) ................................. 22
Recording ..................................... 24
Zooming ...................................... 26
Recording high quality still images
during tape recording (Dual Rec)
................................................... 26
Controlling the image settings
manually with the CAM CTRL dial
(HDR-HC7) ............................... 27
Using the flash ............................ 27
Recording in dark places
(NightShot) ............................... 28
Adjusting the exposure for backlit
subjects .................................... 28
Recording in mirror mode ........... 28
Using the menu items .......... 40
Menu items ................................... 41
_1 CAMERA SET menu ............... 43
Settings to adjust your camcorder to
the recording conditions
MEMORY SET menu ............. ,50
Settings for the "Memory Stick Duo"
PICT.APPU. menu ................ 53
Special effects on pictures or
additional functions on recording/
playback
_-_{8 EDIT/PLAY menu .................. ,56
Settings for editing or playing back in
various modes
STANDARD SET menu ......... 57
Settings while recording on a tape or
other basic settings
_'_ TIME/LANGU. menu .............. 63
Customizing Personal Menu ......... 63
Continued._ 9
Dubbing to VCR or DVD/HDD
recorders .................................... 65
Recording pictures from a VCR ... 68
Dubbing pictures from a tape to a
"Memory Stick Duo". ................... 70
Deleting recorded pictures from the
"Memory Stick Duo". ................... 70
Marking images on the "Memory Stick
Duo" with specific information (Print
mark/Image protection) .............. 71
Printing recorded images (PictBridge
compliant printer) ........................ 72
What you can do with Windows
computer .................................... 74
Installing the "First Step Guide" and
software ...................................... 76
Viewing "First Step Guide" . .......... 78
Using a Macintosh computer ........ 78
Troubleshooting ........................... 79
Warning indicators and messages
.................................................... 88
Using your camcorder abroad ...... 91
Maintenance and precautions ...... 92
Usable cassette tapes ................ 92
About the "Memory Stick" ........... 93
About the "InfoLITHIUM" battery
pack .......................................... 95
About i.LINK ................................ 96
About x.v.Color ............................ 97
On using your camcorder ........... 97
Specifications ............................. 100
Identifying parts and controls ..... 105
Indicators displayed during recording/
playback ................................... 109
Index ........................................... 113
18

/_:_joyi_g pfe_re_* _'f_h Ugh ddin#io,'_ q_m#ty
Tryingout the newHDVformat!
Highimage quality
The HDV format h;ls about 2 times or more the horizontal resolution uf _1stan&_M TV
resulting in about 4 times or more the amount uf pixels providing high quality images.
Being HDV lk_rmat compliant, your camcorder is ready to shout crystal clear, high-definition
images. ,_=
=_
_d
11
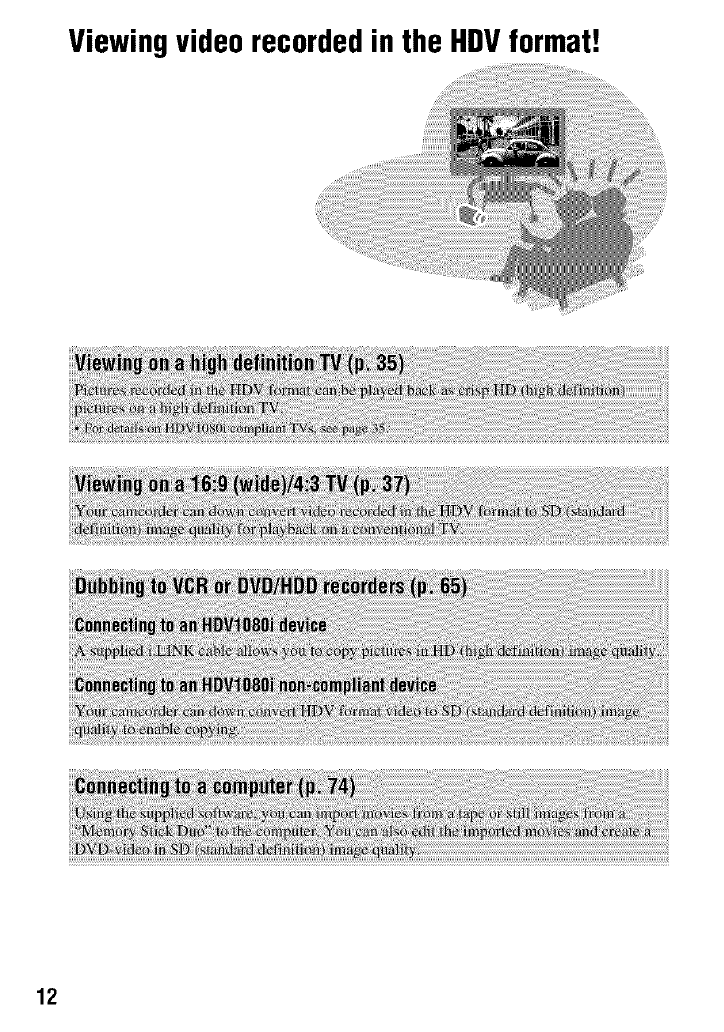
Viewingvideorecordedin the HDVformat!
12
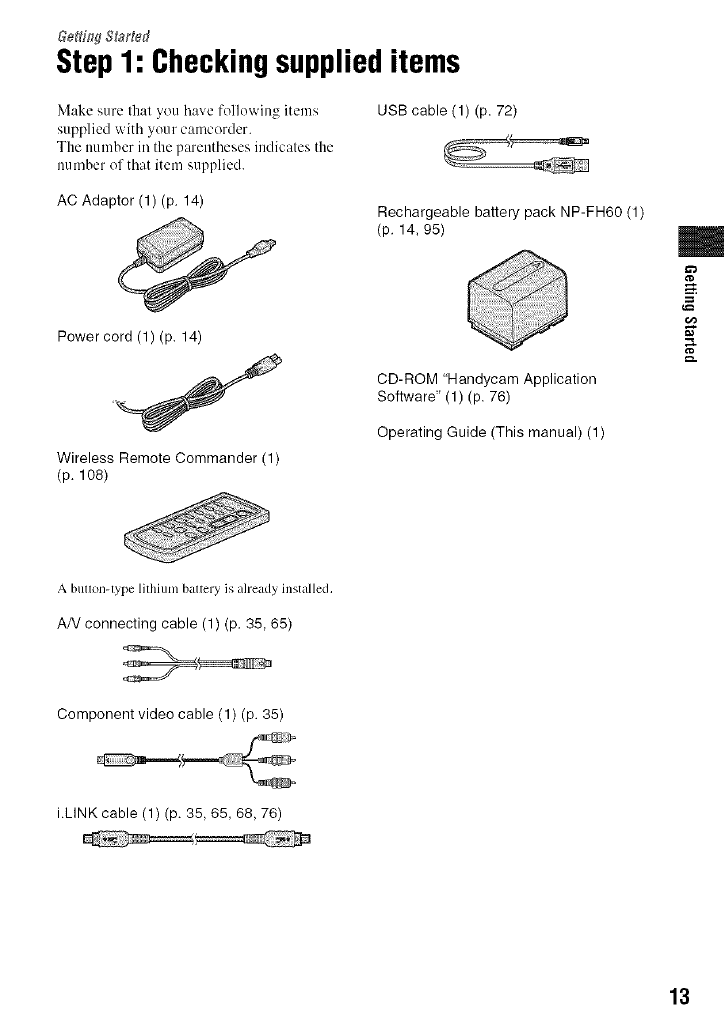
Step1: Checkingsupplieditems
Make _,ure that you bave I-ollowing items
supplied with your camcorder.
The number in the parentheses indicates the
im tuber of that item supplied.
USB cable (1) (p. 72)
AC Adaptor (1) (p. 14) Rechargeable battery pack NP-FH60 (1)
(p. 14, 95)
Power cord (1) (p. 14)
Wireless Remote Commander (1)
(p. 108)
CD-ROM "Handycam Application
Software' (1) (p. 76)
Operating Guide (This manual) (1)
m
A button-type lithium battery is already installed.
AN connecting cable (1) (p, 35, 65)
Component video cable (1) (p. 35)
i.LINK cable (1) (p. 35, 65, 68, 76)
13
Step2: Chargingthe battery pack
IN jack
. )
_ :_?;:o_ POWER
_ switch
Battery pack
To the wall outlet
DC plug
4
AC Adaptor
Power cord
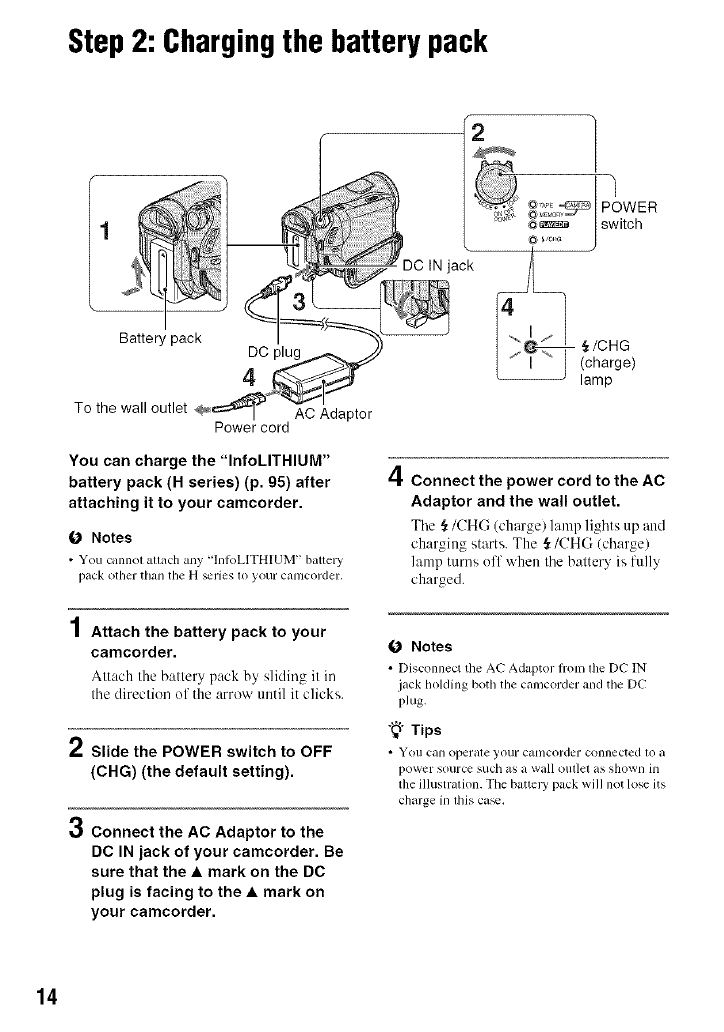
You can charge the "InfoLITHIUM"
battery pack (H series) (p. 05) after
attaching it to your camcorder.
O Notes
• You cannot attach any "]nIoLITH[UM" batte D'
pack othcr thai] the H_I'iCS 10 yOUl" cal]lcorder,
,,,11
/ Attach the battery pack to your
camcorder.
Alt,'-tch the battery pack by sliding it in
the direclien of the arrow until it clicks.
2Slide the POWER switch to OFF
(CHG) (the default setting).
Connect the AC Adaptor to the
DC IN jack of your camcorder. Be
sure that the •mark on the DC
plug is facing to the •mark on
your camcorder.
,{/CHG
(charge)
lamp
4Connect the power cord to the AC
Adaptor and the wall outlet.
The ._/CH(-; (charge) hunp lights up and
charging starts. The _/(!HI:; (charge)
lamp turns off when the battery is fully
charged.
O Notes
• Disconnect tile AC Adaptor fi'onllhe DC IN
jack holding both the camcorder and the DC
plug.
"_° Tips
• You Call operale your cat/lcorder connected 1o a
power SOUrCe such as a wall outlel ils showll hi
tile illustration. Tile battery pack will not lose its
charge in lhis ca_.
14
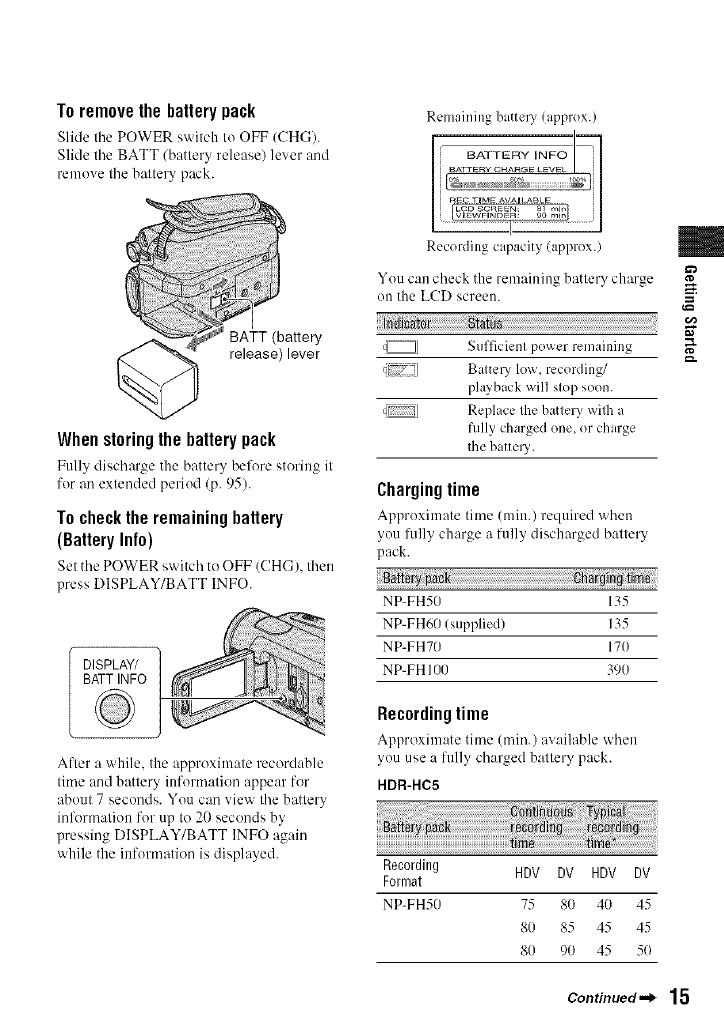
To removethe battery pack
Slide the POWER switch to OFF (CHG).
Slide tbe BATT/battery release) lever and
remove tbe battery pack.
Remaining batte O' !approx.)
BATT (battery
release) lever
When storingthe battery pack
Ful b discbarge the batter_ belk_re s;tering it
for an extended period (p. 95).
Tochecktheremainingbattery
(Battery Info)
Set the POWER switcb te OFF (CHG), tben
press DISPLAY/BATT INFO.
DISPLAY/
BATT INFO
After a while, the approximate recordable
time and battery information appear for
about 7 seconds. You can view tbe battery
inlkwmation for up to 20 seconds by
pressing DISPLAY/BATT INFO again
while the information is displayed.
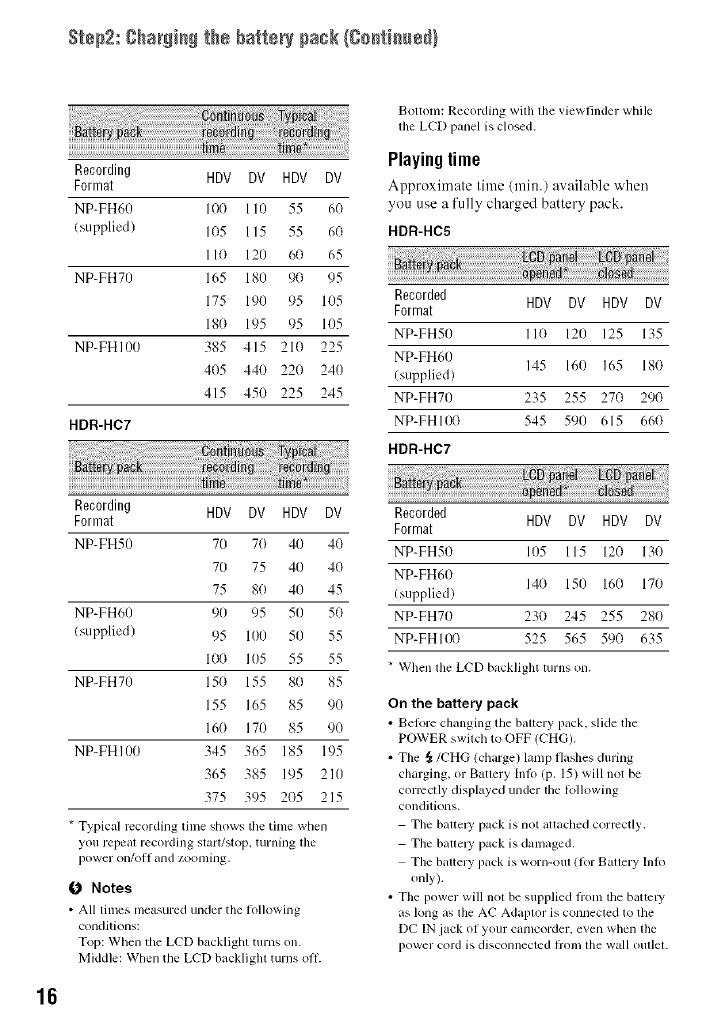
Recording capacity (approx.)
You can check the remaining batlery charge
on the LCD screen.
q_ Sufficienl power remaining
[7_71 Baltel 3' low, recording/
playback will slop soon.
q_ Replace lhe batlery wilh a
fully charged one, or charge
the batt e13'.
Chargingtime
Approximate time (rain.) required when
you fidly charge a fully discharged battery
pack. 0 t,m0
NP-FH50 135
NP-FH60 (supplied) 135
NP-FH70 170
NP-FH I/)O 390
Recordingtime
Approximate time (rain.) available when
you use a fully cbarged battery pack.
HDR-HC5
Recording HDV DV HDV DV
Format
NP-FH50 75 80 40 45
80 85 45 45
80 90 45 50
m
g
g.
Continued._ 15
Step2: ghaNi_ the battery pack/C0_ti_ued/
Recording HDV DV HDV DV
Format
NP-FH60 100 110 55 60
/supplied) 105 115 55 60
110 120 60 65
NP-FH70 165 180 90 95
175 190 95 105
180 195 95 105
NP-FHI00 385 415 21(1 225
4(15 440 22(1 240
415 450 225 245
HDR-HC7
Recording HDV DV HDV DV
Format
NP-FH50 70 70 40 40
70 75 40 40
75 8O 4O 45
NP-FH60 90 95 50 50
(supplied) 95 I/)0 50 55
100 105 55 55
NP-FH70 150 155 80 85
155 165 85 90
16(1 170 85 9(1
NP-FHI()() 345 365 185 195
365 385 195 210
375 395 2(}5 215
Bottonl: Recording with lhe viewfinder while
lhe LCD panel is closed.
Playing lime
Approximate time (nfin.) available "_hen
you use a fully charged battery pack.
HDR-HC5
Recorded
Format HDV DV HDV DV
NP-FH50 110 120 125 135
NP-FH60 145 160 165 180
(supplied)
NP-FH70 235 255 270 290
NP-FHI00 545 590 615 66(1
HDR-HC7
*Typical recording tinle shows tile tinle when
you repeat recording start/slop, turning file
power on/oil and zoonlhlg.
0 Notes
• All times measured under the lollowing
conditions:
Top: When the LCD backligtlt turns on.
Middle: When tile LCD t)itckliglll turns o11.
Recorded HDV DV HDV DV
Format
NP-FH50 105 115 120 130
NP-FH60 140 150 160 170
(supplied)
NP-FH70 230 245 255 280
NP-FHIO0 525 565 59(1 635
*When tile LCD backlight turns on.
On the battery pack
• BeR_re changing the haltery pack, slide tile
POWER swilch to OFF (CHG).
• The _/CHG (charge) lanlp flashes during
charging, or Battery Inlo (p. 15) will not be
correctly displayed under lhe lollowing
conditions.
Tile baUelT pack is not altached correctly,
The batte W pack is damaged.
Tile battery pack is worn-oul (lor Battery Inlo
only).
• Tile power will not be supplied flonl the battc U
as long as file AC Adaplor is connecled to the
DC IN jack of your camcorder, even when file
power cord is disconnected from file wall oul/el.
16
• When attaching an optional video lighl, il is
recomlnended thal you use an NP-FH70 or NP-
FH 100 battery pack.
On the charging/recording/playback time
• Times measured with the calncorder at 25 %"
(77 °F) (10 to 30 %" (50 OF lo 86 °F) is
recommended).
• The recording and playback lime will be shorter
when you ilse yollr camcorder in low
tenlperatures.
• The recording and playback lime will be shorter
depending on the conditions under which you
use yollr can/corder.
On the AC Adaptor
• U_ tile neroby w+dl outlet when using tile AC
Adaptor. Disconnecl the AC Adaptor fi'oln the
wall outlet immediately if any lnaltunction
occurs while using your calncorder,
• Do not use the AC Adaptor placed in a narrow
space, such as between a wall and lurnimre.
• Do not shorl-circuit the DC plug of the AC
Adaptor or baltery lerminal with any melallic
o[_iects. This may cause a malfunction.
• Even if your camcorder is turned off, AC power
(house current) is still supplied to it while
connected to lhe wall outlel via file AC Adaptor.
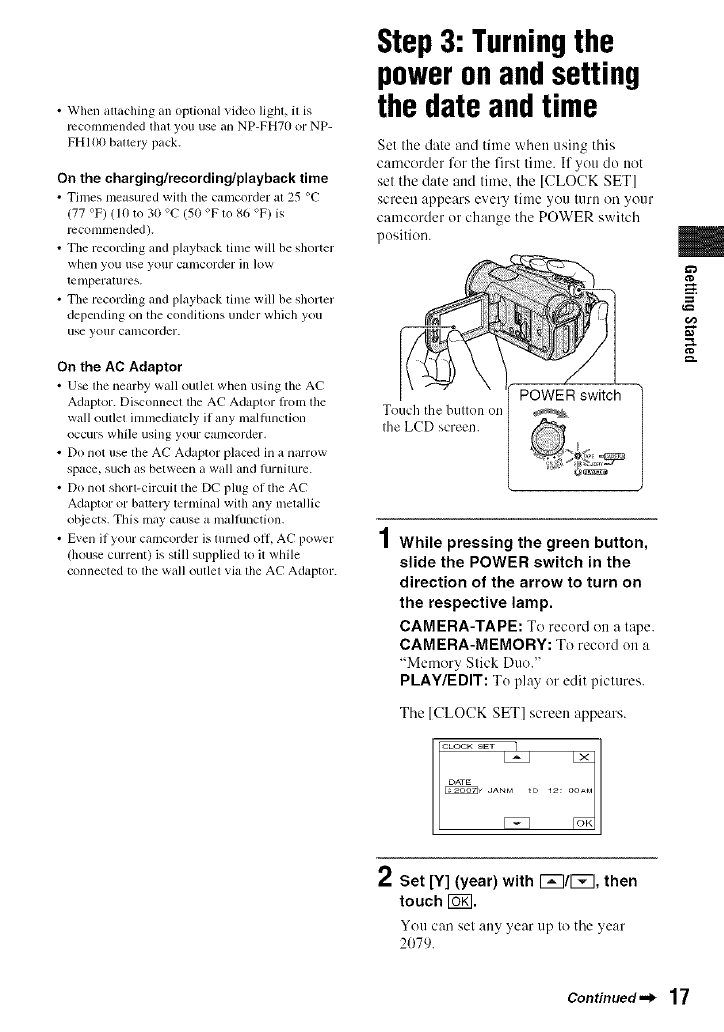
Step3: Turningthe
poweronandsetting
the dateand time
Set the date and time when using this
camcorder %r the first time. If you do not
set the date attd time, the [CLOCK SET]
screen appears every time you turn on your
camcorder or change the POWER switch
pusitiou.
Touch the bulton on
Ihe LCD screen.
POWER_ switch ]
4
/ While pressing the green button,
slide the POWER switch in the
direction of the arrow to turn on
the respective lamp.
CAMERA-TAPE: To recurd on a rope.
CAMERA-MEMORY: To recurd uu a
"Memory Stick Duo."
PLAY/EDIT: Tu play or edit pictures.
The [CLOCK SET] screen appears.
D 12: o
*" Set [Y] (year) with F_l/l_q, then
touch Iogl.
You can set any year up to the year
2079.
m
g
g.
Continued.._ 17
St÷p 3: Tur_i_gthepowero_ a_ s÷N_g lh÷da_¢a_d_im÷{8o_i_÷dl
r_ Set [M] (month), then touch r_K]
and repeat for [D] (day), hour and
minute.
For midnight, set it to 12:I)0 AM.
For midday, set it to 12:1)0 PM.
The clock starts.
i ¸
You can change the on-screen displays to
show messages in a specified language.
Touch IW_N01-+ [MENU] -+ f_ (TIME/
LANGU.)-..+ [LANGUAGE], then select
the desired language.
To torn off the power
Slide the POWER s_,fitch to OFF (CHG).
To resetthe date andtime
You can set the desired date and time by
touching Ig_gff01 -+ [MENU]-+
_'_ (TIME/LANGU.) -+ [CLOCK SET]
(p. 4O).
0 Notes
•If you do not use your camcorder lor about 3
months, tile built-in rcchargeable baltel_' gel',
discharged and the date and time settings may
be cleared l_'om tile memoly. In that case,
dlarge tile redlargeab]e battery and then set the
date and time again (p. 100).
• At tile tilllC of purchase, lhe power is set to [tll'll
Off automatically if you leave your camcorder
without any operalion attempted lot
approximately 5 minutes, to save battery power
([A.SHUT OFF], p. 62).
"_° Tips
• Tile &,tc and lime air not displayed while
rccording, but they arc auton3alically lvcorded
on tile tape, aM can be displayed during
playback (see page 61 h)r [DATA CODEI
(During Easy Handycam operation, you can _t
only [ DATE/TIMEI)).
• Tile lens cover opens automatically when lhe
POWER switch is set to CAMERA-TAPE or
CAMERA-MEMORY.
• If lhe buttons on the touch panel do not work
correctly, adjust the touch panel
(CALIBRATION) (p. 99).
18
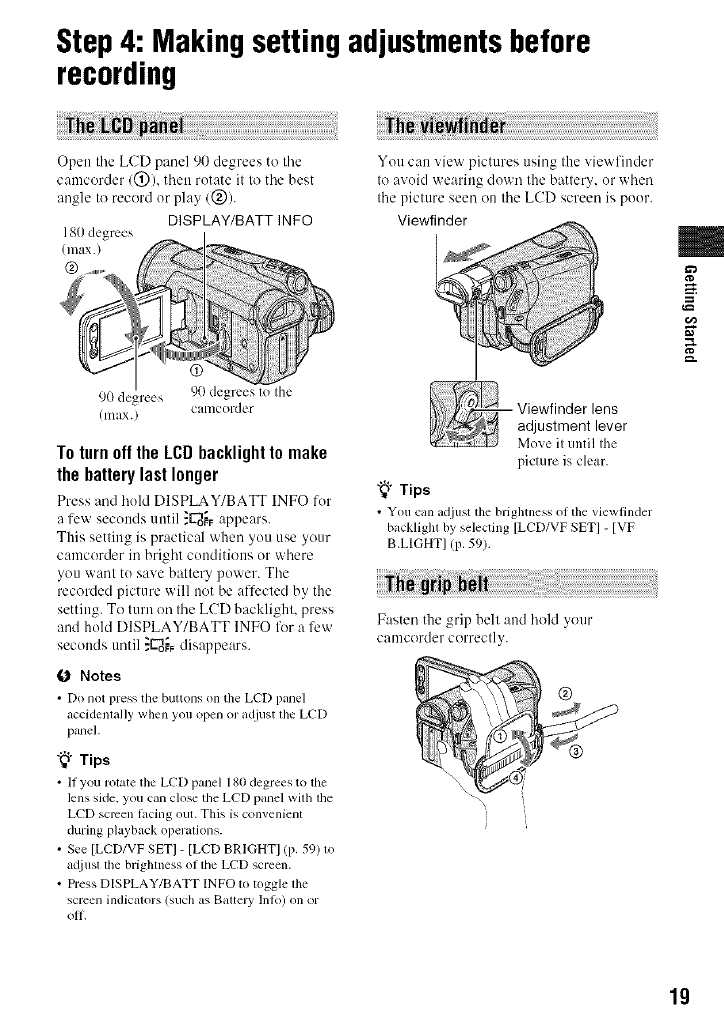
Step4: Makingsetting adjustmentsbefore
recording
Open tile LCD panel 90 degrees to tile
camcorder/@), then rutate it to tile best
angle to record or play/@).
DISPLAY/BATT INFO
180 degrees
(max.)
@
90 degrees 90 degrees Io Ihe
C{ll_lcorder
(lilax.)
To turn off the LCD backlight to make
the battery last longer
Press and huhl DISPLAY/BATT INFO fur
a few seconds until :C-_o_Fappears.
This setting is practical when you use your
camcorder in bright conditions ur where
you want tu save battery power. The
recorded picture will not be affected by the
setting. To turn on the LCD backlight, press
and hold DISPLAY/BATT INFO for a few
seconds until }U_T disappears.
0 Notes
• Do not press the buuons on tileLCD panel
accidentally when youopen or adjust tile LCD
panel.
"_° Tips
• II you rotate tile LCD panel 180degrees to the
lens side, you can ch)se the LCD panel wJlhthe
LCD semen lacing out. This is convenienl
(luringplayback operations.
• See [LCD/VF SET] - [LCD BRIGHTIlP. 5% lo
atliusl lhe brighlness of lhe LCD screen.
• Dess DISPLAY/BATT INFO to toggle lhe
screen indicators (such as Baltel T lnlo) on or
oil.
You can view pictures using the viewfinder
to avoid wearing down the battery, ur when
the picture seen on the LCD screen is puor.
Viewfinder
- Viewfinder lens
adjustment lever
Move it until the
picture is clear.
"_° Tips
• You call adjust lhe brightness ol lhe viewfinder
backlighl by selecting [LCD/VF SET] - [VF
B.LIGHT] (p. 59).
Fasten the grip bell aud hold your
camcorder correctly.
m
g
g.
19

Step5: Insertinga tape or a "Memory Stick
DUO"
You can use mini DV mt+][_*cassettes only
(p. 92).
O Notes
• The recordable time varies depending on [[]
REC MODEl (p, 58). DV
1Slide and hold the F- OPEN/
EJECT lever in the direction of the
arrow and open the lid.
F" OPEN/EJECT lever
3Close the lid.
To eject the cassette
Open tile lid R lit wi1%the same procedure
as described in step 1and remove tile
cassetle.
O Notes
•Do not force the cassette compartment
closed by pressing the portion marked
while it is sliding in. It
may cause a malfunction.
Lid
Tile casselle compartment autenmtically
conies ()tit and ()peels ap.
," Insert acassette with its window
facing outwards, then press
Push Ihe cenler of Ihe back
of the cassette lightly. Window
Cassette
compartment
You can use only a "Memory Stick Duo"
marked with +vlEmorYSTle_Du{]or
MemarYSneKpRgBu0 (p. 93).
"_" Tips
• Tile n/llllber and time of rccordable pictures
vary depending on the image quality or the
inlage size. For details, _e page 50.
1Open the LCD panel.
2Insert the "Memory Stick Duo"
into the "Memory Stick Duo" slot
in the right direction until it clicks.
The cassette compartment
automatically slides back in.
Access lamp
2O
Toejecta "MemoryStickDuo"
Lightly push the "Memory Stick Duo" in
()lice.
0 Notes
• When the access lamp is lit or tl_Lshing, your
Calncorder is rc_ding/wliting d_lta. Do not shake
or kllock yolll" CiUllCOl'del', lure tile power o||_
elect tile "Melnol T Slick Duo," or remove lhe
battery pack. Otherwise, inl_Lgedam may be
damaged.
• II you lorce the "Menlory Slick Duo _into the
slot in tile wrong direction, the 'Melnol T Slick
Duo," tile "Men_ol'y Slick Duo" slot. or image
dam may be damaged.
• When inserting or cjetting the "Memory Slick
Duo," be camfifl that the "Memory Stick Duo"
does not pop out and drop.
m
g
g.
21
Recording/Playback
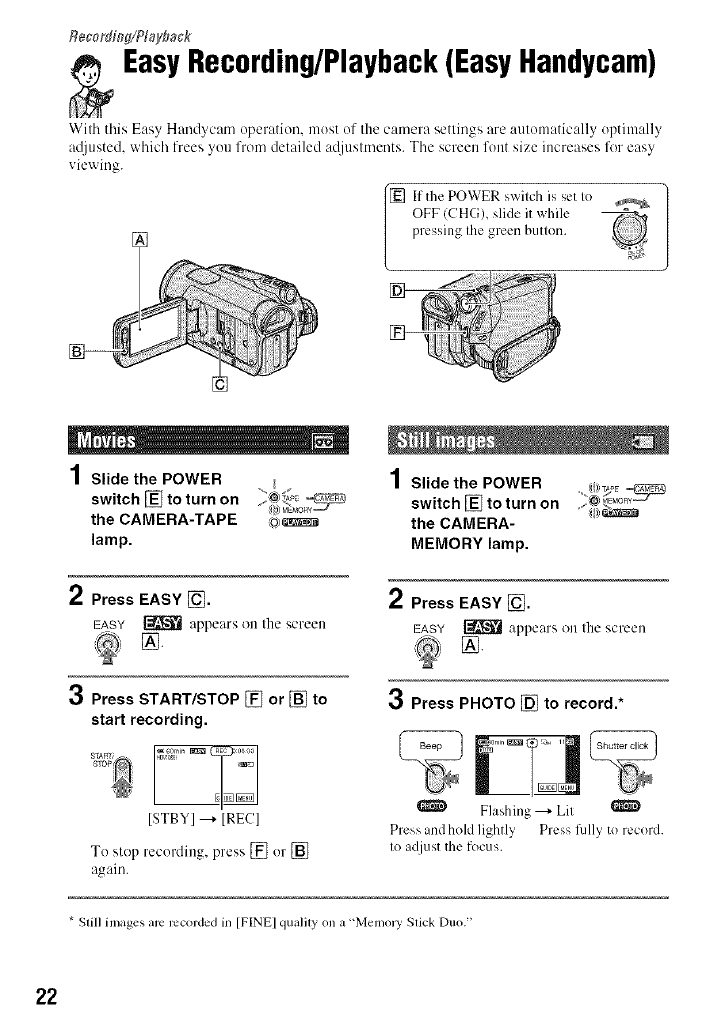
EasyRecording/Playback(EasyHandycam)
With this E_lsy H_md_cnm o_:)erntion, most of the c_,mer_lsettings nre _mtonmtic_dly optinmll_
a_[iusted, which frees you from detailed a_[justments. The screen font size increases tk_reasy
viewing.
[_] f the POWER swilch is set Io
OFF (CHG), slide it while
pressing Ihe green button.
1Slide the POWER
switch [] to turn on
the CAMERA-TAPE co)_
lamp.
3
Press EASY [_.
EASY _ appears on the screen
Press START/STOP [] or [] to
start recording.
ISTBYI _ IRECI
To stop recording, press [] or []
again.
4
/ Slidethe POWER _ _E_T_' _
switch []toturn on i;_ _°_
the CAMERA-
MEMORY lamp.
2Press EASY [_.
EASY [_ appears on the screen
3Press PHOTO [] to record.*
Flashing _ Lit
Press and hoM lightly Press frillyto record.
Io adjust the focus.
* Still images are recorded in [F[NE] quality on a "Men/oly Slick Duo."
22
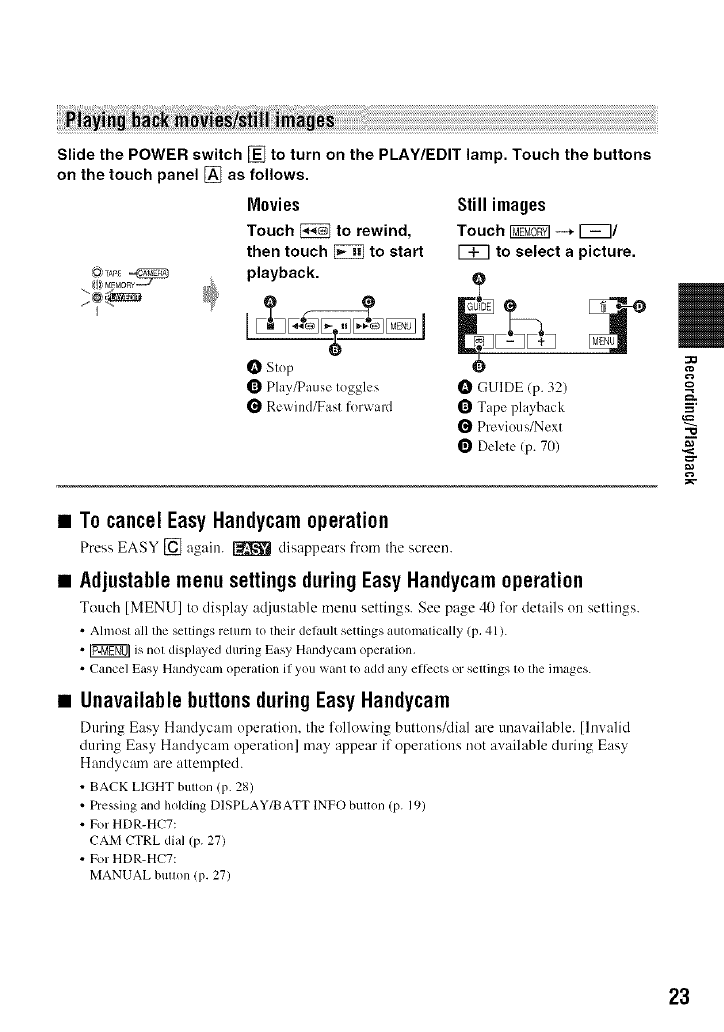
Slide the POWER switch [] to turn on the PLAY/EDIT lamp. Touch the buttons
on the touch panel [] as follows.
Movies
Touch _to rewind,
then touch _to start
playback.
Still images
Touch _ -_ r_7/
[_ to select a picture.
0Slop
Q Play_ause Ioggles
Rex_ind/East forward
GUIDE (p. 32)
Tape playback
Previous/Next
Delete (p. 70)
•To cancel EasyHandycam operation
Press EASY [] again. [_ disappears from tile screen.
•Adjustable menu settings during Easy Handycam operation
Touch [MENU] to display ac{jush,blemenu settings. See page 40 for details on settings.
• Ahnosl all the sellings relurn to their delault settings automalically (p, 41 ).
• _ is not displayed during Easy Handycanl operation,
• Cancel Easy Handycam operation if you want to add any ellccts or seltings 1o file images.
•Unavailable buttonsduring Easy Handycam
Dt]ring Easy Handycam operation, the l'ollo'_ ittg buttons/dial are unavailable. [Invalid
during Easy Handycam operation] may appear if operations not available during Easy
Handycam are attempted.
• BACK LIGHT button (p. 28)
• Pressing and holding DISPLAY/BATT INFO bulton (p. 19)
•For HDR-HC7:
CAM CTRL dial (p. 27)
• For HDR-HC7:
MANUAL bullon (p. 27)
"O
23
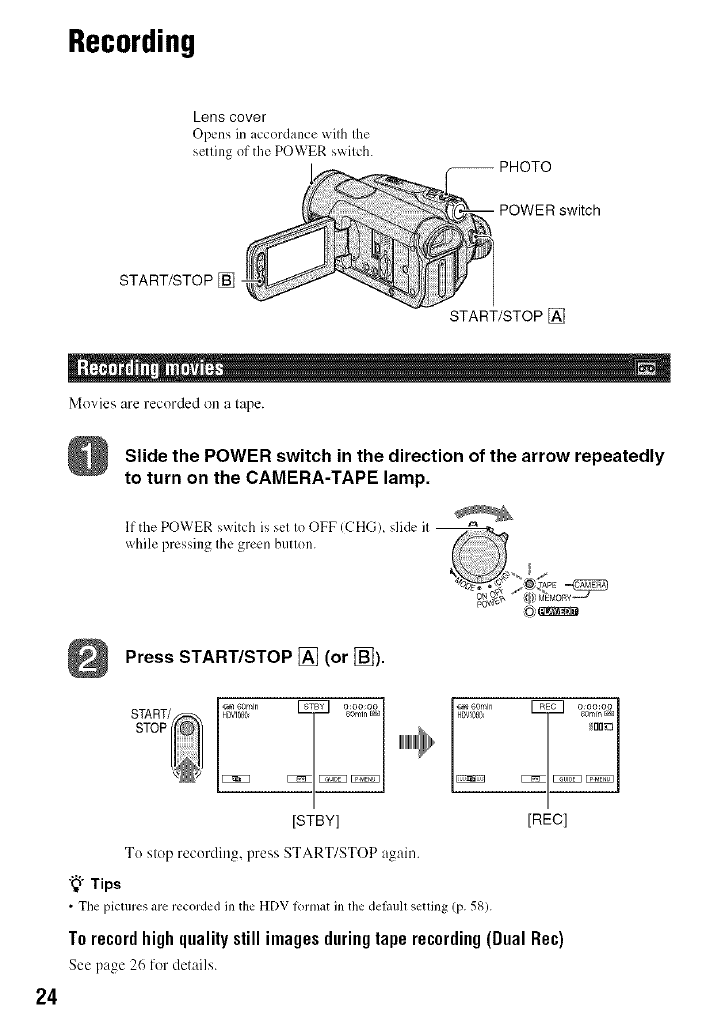
Recording
Lens cover
Opens in accordance wilh Ihe
setling of the POWER swilch.
START/STOP []
START/STOP []
" i!il
]Movies are recorded on a lape.
24
Slide the POWER switch in the direction of the arrow repeatedly
to turn on the CAMERA-TAPE lamp.
If the POWER switch is sel Io OFF (CHG), slide il ------r_._ .
while pressing Ihe green butlon.
v, ,> ,/eL,g_ @
0_'{_v, ((} MEMORY_J
povNg* _}
Press START/STOP [] (or [_).
START/
STOP
6omm _ 6omrn
_o_ IJIJ_
[STBY] [REC]
To step recording, press START/STOP again.
"_" Tips
• Tilepictures are recorded in the HDV lormat in the delaull setlJng (p. 5_).
Torecordhighqualitystill imagesduringtaperecording(Dual Re¢)
See page 26 for details.
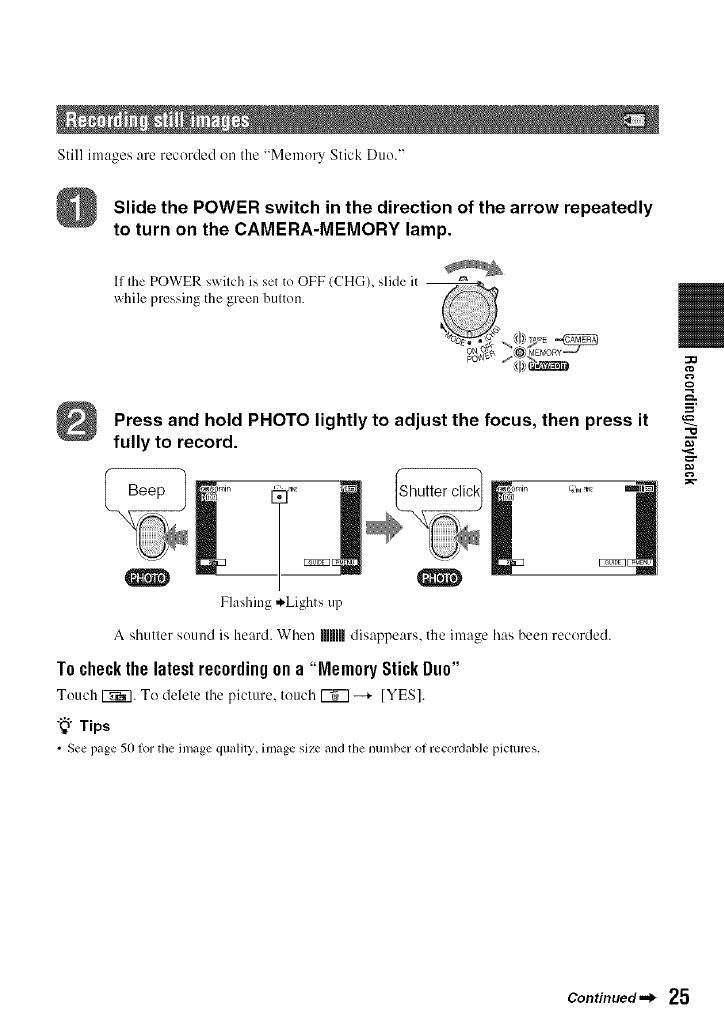
Still images are recorded on the "Memory Stick Duo."
Slide the POWER switch in the direction of the arrow repeatedly
to turn on the CAMERA-MEMORY lamp.
If Ihe POWER swilch is set to OFF (CHG), slide it
while pressing the green bulton.
Press and hold PHOTO lightly to adjust the focus, then press it
Flashing ,._Lights up
fully to record.
A shutter sound is heard. When Illllllldisappears, the image has been recorded.
To check the latest recordingon a "MemoryStick Duo"
Touch K_7. To delete the picture, touch _ --+ [YES].
"_° Tips
• See page 50 fortile image qualily, linage size and tilenumber of recordable pictures.
:O
Q
=__
"10
[
Continued._ 25
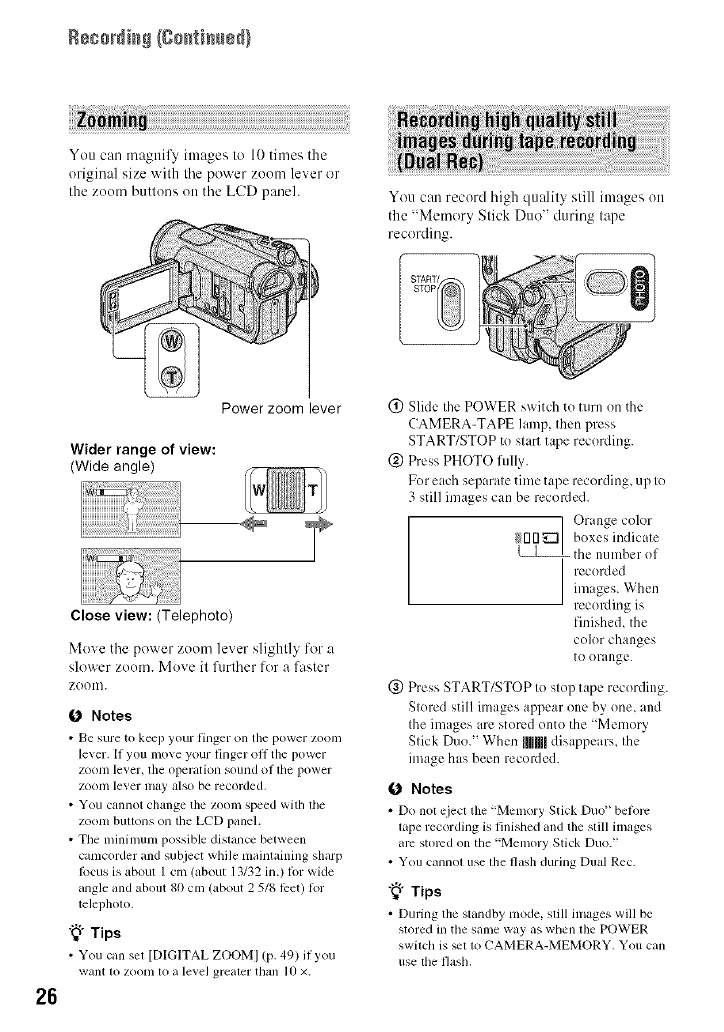
Recording{go_ti_ed)
You can magnify images to 10 times the
original size with the power zoom lever or
the zoom buttons on the LCD paneh You can record high quality still images on
the "Mmnory Stick Duo" during tape
recording.
26
Power zoom lever
Wider range of view:
(Wide angle)
Close view: (Telephoto)
Move the power zoom lever slightly for a
slower zoom. Move it fltrther for a faster
ZOOII].
1_ Notes
•Be sure to kee I) your lhlger on tile power ZOOll/
le_er. If yon lno_e your linger oil tile power
zoom le_ er, tile operation sound ol the I?ower
zoom le_er may also be recorded,
•You cannot change tile zoom speed with lhe
zoom buttons on the LCD panel.
• The nfininmm possible dislance between
cmncorder mid subject while maintaining sharp
locus is about I cm (about 13/32 in.) 1orwMe
angle and about 80 cm (about 2 5/8 li:et) lor
telephom.
"_° Tips
• You call set [DIGITAL ZOOM] (p. 49) 11you
want 1(i zooi/l 1o a level greater than ]0 ×.
(_) Slide the POWER switch to turn on the
CAMERA-TAPE lamp, then press
START/STOP to start tape recording.
(_) Press PHOTO fully.
For each separate time tape recording, up to
3 still images can be recorded.
Orange color
_[]rl_ I boxes indicale
the numher of
recorded
im iges. When
recording is
finishe& the
color changes
tOorange.
@ Press START/STOP to stop tape recording.
Stored still images appear one by one, and
the images are stored onto the "Memor)
Stick Duo." When lUlUlldisappears_ the
image has been recorded.
O Notes
• Do not eject tile "Men_ory Stick Duo' belorc
tape recording is finished and the still images
arc stolvd on tile 'Memory Stick Duo."
• You Gumol use lhe flash during Dual Rec.
"_i° Tips
• During the standby mode, slill images will be
stored in tile same way as when lhe POWER
switch is _1 to CAMERA-MEMORY. You can
use lhe flash,
• For HDR-HC5:
When the POWER switch is set to CAMERA-
TAPE, still images will be recorded al image
size 2.3M in lhe HDV lk_rmal. 1.7M (4:3) or
2.3M (16:9) in the DV lormal.
•For HDR-HC7:
When lhe POWER switch is set to CAMERA-
TAPE, still images will be recorded al image
size 4.6M in the HDV lormal. 3.4M (4:3) or
4.6M (16:9) in the DV lonnat.
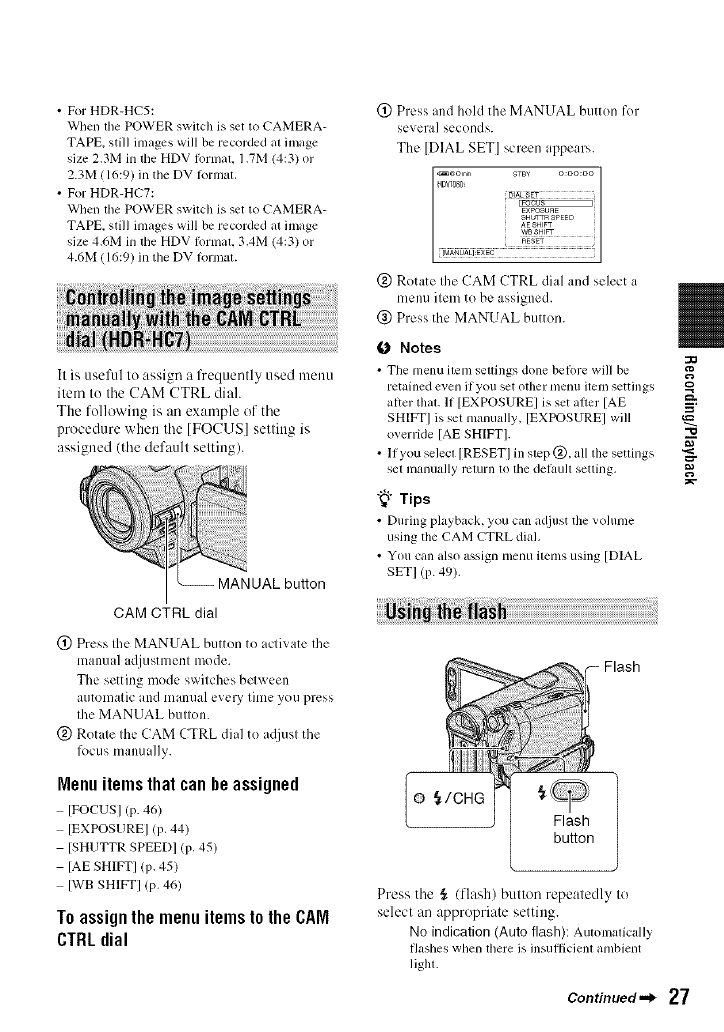
It is useful to assign a frequently used menu
item to tile CAM CTRL dial.
The followittg is an example of tile
procedure when tile [FOCUS] settittg is
assigned (tile default settittg).
_UAL button
CAM CTRL dial
(_ Press the MANUAL button to activate the
manual adjustment mode.
The setting mode switches bclween
automatic and manual every time you press
the MANUAL button.
@ Rotate the CAM CTRL dial to a({iust the
lbcus manually.
Menuitemsthat can he assigned
IFOCUSI (p. 46)
[EXPOSURE] (p. 44)
[SHUTTR SPEEDI (p. 45)
[AE SHIFT] (p. 45)
[WB SHIKFI (p, 46)
Toassignthe menuitemsto theCAM
CTRLdial
(!) Press and hold the MANUAL button R)r
several seconds.
The [DIAL SET] screen appears.
@ Rotate the CAM CTRL dial and select a
menu item to be assigned.
@ Press the MANUAL button.
O Notes
• The menu item seuings done betore will be
relahled even if you set other [/lellll lteln settings
alter that. If [EXPOSURE] is set after [AE
SHIFT] is sel manually, [EXPOSURE] will
override [AE SHIFTI.
• If you selecl [RESETI in step @, all the settings
set Illunually rclurn Io tile delaulI setting.
"_° Tips
• During playback, you can adjust the vohnne
using the CAM CTRL dial.
• You can also assign menu items using [DIAL
SETI (p. 49).
o {/CHG
Flash
button
Press tile _ (flash[ button repeatedly to
select an appropriate setting.
No indication (Auto tlash): Automalically
flashes when there is insuflicienl ambient
liglu.
Continued._ 27

R88o_i_ {go_ti_edl
,{ (Forced flash): Always u£s the flash
regardless oi lhe surrounding brighmess.
t
@ (No flash); Records without flash,
(J Notes
•The recomlnended dislance to tile subject when
using the built-in llash is 0.3 to 2.5 m (l to 8
leer).
•Remove any dust lronl lhe sur£_cc of the flzJsh
lamp belore using iL Flash efl)ct may be
impaired if heat discoloralion or dust obscures
lhe lamp.
• The _/CHG (charge) lamp flickers when
charging the flash, and mlnains Ill when the
flash charge is ready. (In [STBYI of the
CAMERA-TAPE mode, it takes a while to fully
charge the flash.)
• You cilnnot u_ lhe flash during tape recording.
• If you use the flash ill bright places such as
when shooting a backlil subjecL the flash may
nol be elli:ctive,
"_° Tips
•You can change the brightness of tile flash by
Svlling [FLASH LEVEL], or you can prevela
ll/e redeye by selling [REDEYE REDUCI, in
[FLASH SET] (p. 47).
• Adjust the lbcus manually ([FOCUS], p. 46)
when it is hard to locus automatically.
• Do not use these functions in brighl places. This
nlay cause a nla]J/lncth)n.
"_" Tips
• To record an image brighler, use Super
NightShot function (p. 47). To record an image
more laithhll to tile original colors, use Color
Slow Shutter function (p. 48).
BACK LIGHT
To adjust the exposure for backlit subjects,
press BACK LIGHT to display I_. To
cancel the back light function, press BACK
LIGHT again.
28
Infrared port
Set the NIGHTSHOT switch to ON (1_{}
and ["NIGHTSHOT"] appear).
0 Notes
•Tile NightShot aim Super NightShot fimctkms
use inli'ared light. Therelore, do not cover the
intrared polt with your fingers or other objects
and remove lhe conversion lens (oplional).
Open the LCD panel 90 degrees to the
camcorder/@), then rotate it 180 degrees
to the lens side (@).
"_° Tips
• A mirl'or-ilnage of the subject appears on the
LCD screen, but the picture will be normal
when recorded,
Playback
Slide the POWER switch in the direction of the arrow repeatedly to
turn on the PLAY/EDIT lamp.
If the POWER swilch is sel to OFF (CHG)_ slide it _----_ _
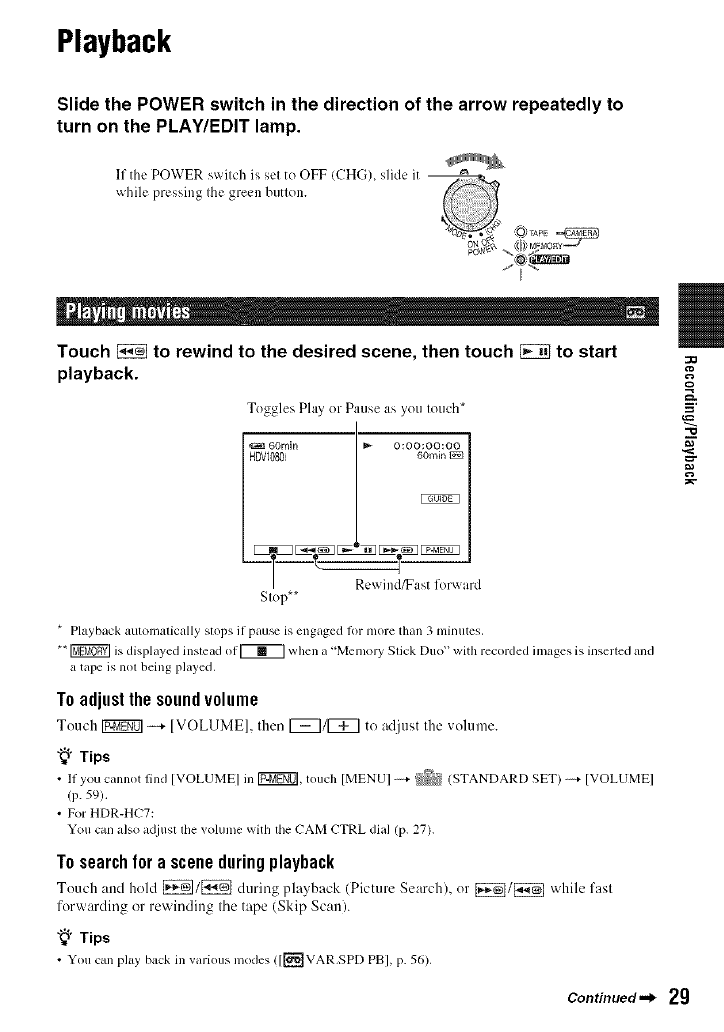
Touch _to rewind to the desired scene, then touch _to start
playback.
Toggles Play or Pause as you Iouch*
I
60rnin I_ 0:00:00 O0
HDV080 l _
Re 'india t f(r _ard
Slop**
33
Q
-o
* Playback automatically stops if pau_ is engaged 1or more than 3 minutes,
** _ is displayed instead of [_ when a "MemoJ_' Stick Duo" with recorded images is inserted and
a tape is not being played,
Toadjustthesoundvolume
Touch [U-ffgff0]-.+ [VOLUME], then r_7/[_ to adjust the volume.
"_" Tips
•11 you cannot find [VOLUME] in [P2_0], touch [MENU] _ _ (STANDARD SET) _ [VOLUME]
(p. 59).
•For HDR-HC7:
You can also acliust the volume with the CAM CTRL dial (p. 27).
Tosearchfora sceneduringplayback
Touch :rod hold [_/[_ during phl_back (Picture Search), or [_/[_ '_ hile fast
forwarding or rewinding the tape (Skip Scan).
"_" Tips
• You cml play back in various modes ([[_VAR.SPD PB], p. 56).
Continued._ 29
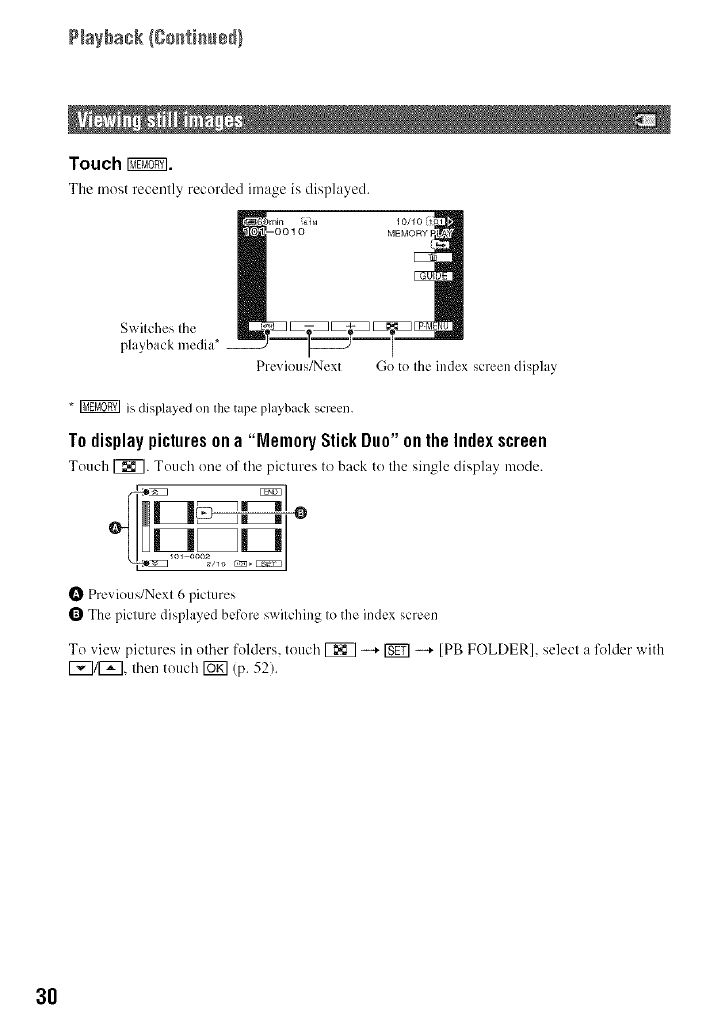
Touch _.
The most recenlly recoMed image is displayed.
Swilches Ihe
playback media*
Previous/Next Go to Ihe index screen display
* _ is displayed on lhe tape playback screen.
Todisplaypicturesona"MemoryStick Duo"ontheIndexscreen
Touch _. Touch one of the pictures to back to II'_e single display mode.
Previous/Next 6 pictures
The picture displayed before s_itching to the index screen
To view pictures in other folders, touch [_ -....+_ -....+ [PB FOLDER], select a lk_lder with
[_]/[_], then touch [_ (p. 52).
3O
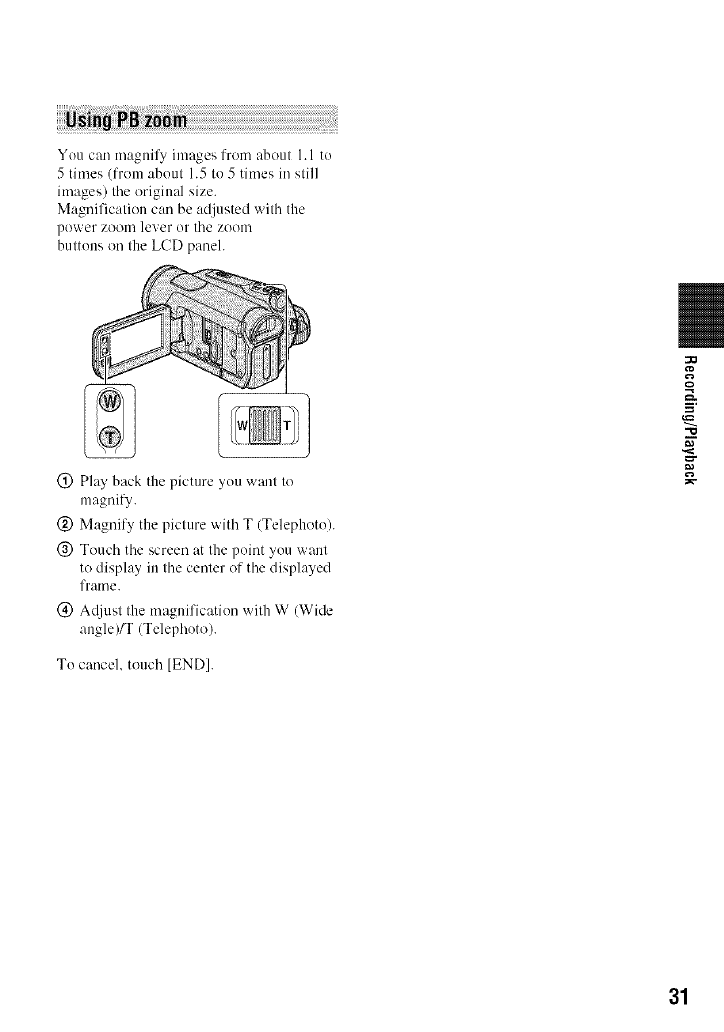
You can magnify images from about 1.1 to
5 times (from about 1.5 to 5 times in still
images) the original size.
Magnification can be adjusted with the
power zoom lever or the zoom
buttons on the LCD paneh
(!) Play back the picture you want to
magnify.
(_) Magnify the picture with T (Telephoto).
@ Touch the screen at the point you want
to display in the center of the displayed
frame.
(_) AcUust the magnification with W (Wide
angle)/T (Telephoto).
To cancel, touch [END].
.=,
31
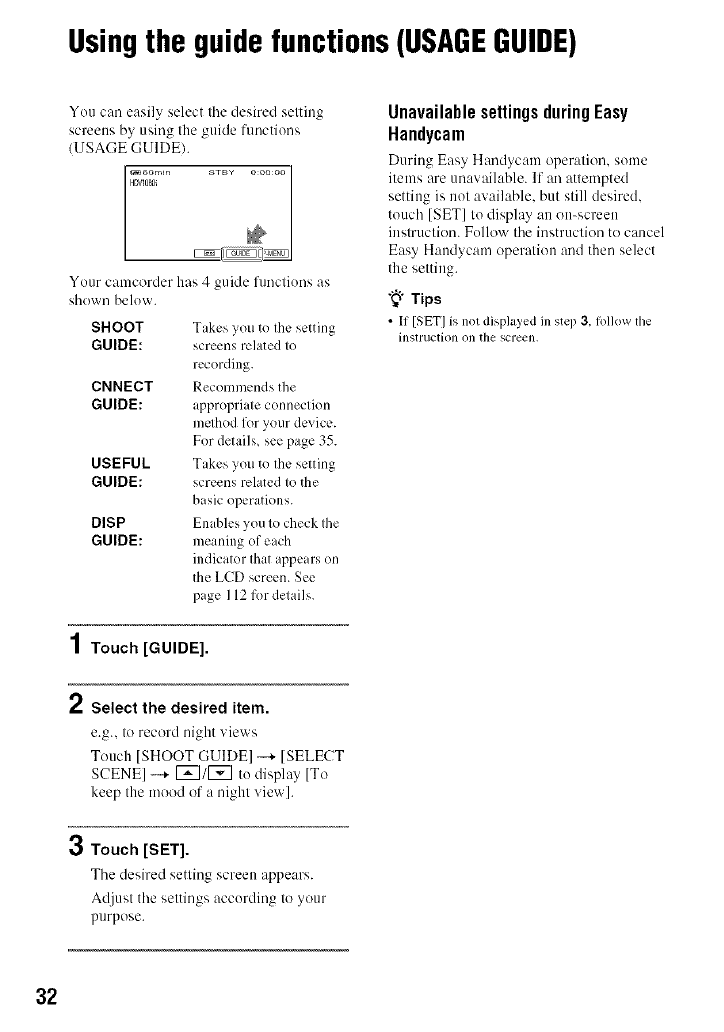
Usingthe guidefunctions(USAGEGUIDE)
You can easily select tile desired setting
screens by using the guide functions
/USAGE GUIDE/.
Your camcorder has 4 guide flmctkms as
shown below.
SHOOT
GUIDE:
CNNECT
GUIDE:
USEFUL
GUIDE:
DISP
GUIDE:
Tikes you to the setting
screens related to
recording.
Recommends the
appropriate connection
method fur your device.
For details, see page 35.
Takes you to the setting
screens related to the
basic operations.
Enables you to check the
meaning of elch
indicator that appears on
the LCD screen. See
page 112 fur details.
1Touch [GUIDE].
2Select the desired item.
e.g., to record night views
Touch ]SHOOT GUIDE] --+ ]SELECT
SCENE] -+ [_]/[_] to display [To
keep the mood of a night view].
3Touch [SET].
Tile desired setting screen appears.
Adjust tile settings according to your
purpose.
Unavailable settings during Easy
Handycam
During Easy Handyc:ml operation, some
items are unavailable. If an attempted
setting is not available, but still desired.
touch [SET] to display an on-screen
instruction. Follow the instruction to cancel
Easy Haudycam operation and then select
the setting.
"_° Tips
• If [SET] is not displ_Jyedin step 3, tk_llowthe
instruction on tile screen,
32
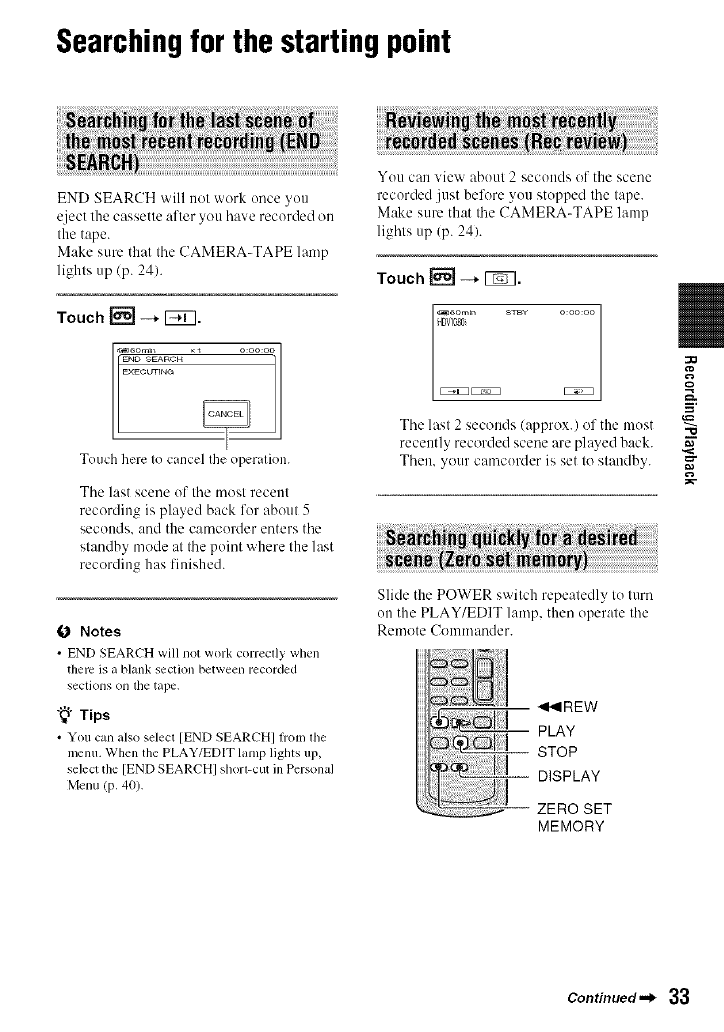
Searchingfor the starting point
END SEARCH will not work once you
eject the cassette after you have recorded on
the tape.
Make sure that the CAMERA-TAPE lamp
lights up/p. 24).
Touch _-* I_TI.
Touch here Io cancel Ihe operalion.
Tile last scene of tile most recent
recording is played back for about 5
seconds, and the camcorder enters tile
standby mode at tile poim where the last
recording has finished.
Notes
• END SEARCH will not work correctly when
there is a blank section between recorded
secliolls Oll lhe tape.
"_° Tips
• You can also select [END SEARCH] h'om the
menu. When the PLAY/EDIT lamp lights up,
select the [END SEARCH] shorl-cut in Personal
Menu (p. 40).
You can view about 2 seconds of the scene
recorded just be%re you stopped tile tape.
Make sure that Ihe CAMERA-TAPE lamp
lights tip (p. 24).
Touch_-_.
Tile lasl 2 seconds (approx.) of the most
recently recorded scene are played back.
Then, your camcorder is set lo slaudby.
Slide the POWER switch repealedly to turn
on the PLAY/EDIT lamp, then operale the
Remote Coulmander.
_REW
-- PLAY
STOP
-- DISPLAY
ZERO SET
MEMORY
Q
=.
"10
Continued._ 33
$÷archi_ for the _af_i_ poi_ {8o_i_÷_)
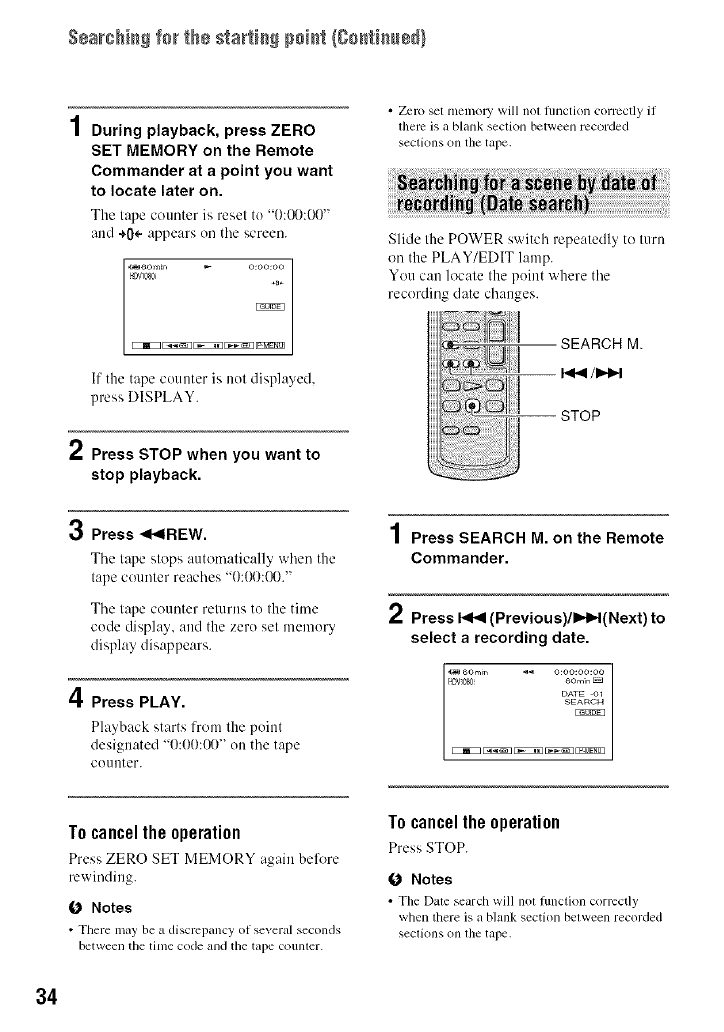
4
/During playback, press ZERO
SET MEMORY on the Remote
Commander at a point you want
to locate later on.
The tape counter is reset to "O:(X):O0"
and +0÷ appears on the screen.
_6o,n_,_ o:oo:oo
_4DVl080 £
KEiKZ _ [3iKZ_ _ D_£N!_
If the tape counter is not displayed,
press DISPLAY.
2Press STOP when you want to
stop playback.
3Press <<IREW.
The tape slops mttomalically when the
tape COtlnler reaches "O:O0:(X)."
Tile tape courtier relurns to the time
code display and the zero set memory
display disappears.
4Press PLAY.
PhLYback starts from the point
designated "0:00:(XF' on tile tape
co/inter.
• Zero set nlemol2i will not functkln correctly if
there is a blank section between recorded
sections on file tape.
Slide the POWER switch repeatedly to turn
on the PLAY/EDIT lamp.
You can locate the point where the
recording date changes.
SEARCH M.
STOP
4
| Press SEARCH M. on the Remote
Commander.
2PressI<1<(Previous)/IHH(Next) to
select a recording date.
F43WD60 6o,,,i_
DATE O1
Tocanceltheoperation
Press ZERO SET MEMORY again before
rewinding.
fO Notes
• There may be a discrcpancy of several seconds
between the time code and the tape counler.
To cancel the operation
Press STOP.
fO Notes
• Tim Date search will not hmction correctly
when there is a blank section between recorded
sections on file tape,
34
Playingthe picture ona TV
Conuectiou methods attd image quality
differ depending on what type of TV is
connected and counecturs used.
Use the supplied AC Adaptor as the power
source (p. 14).
Refer also tu tile instruction manuals
supplied with the device to be connected.
O Notes
• Make all menu settings on your camcorder
before connecting. TileTV may not recognize
the video signal properly ifthe [V('R HDV/DV]
or [i.LINK CONVI setting is changed after the
WVandyour camcorder were connected wilh all
i.LINK cable.
• Piclums recorded ill the DV lormat are played
back as SD(standard definition) images
regardless of the connection.
• When recording, set [X.V.COLORI to [ON] lo
play backon an x.v.Color-compliant TV (p. 49).
Some settings may need to be adjusted on lhe
TV when playing back.
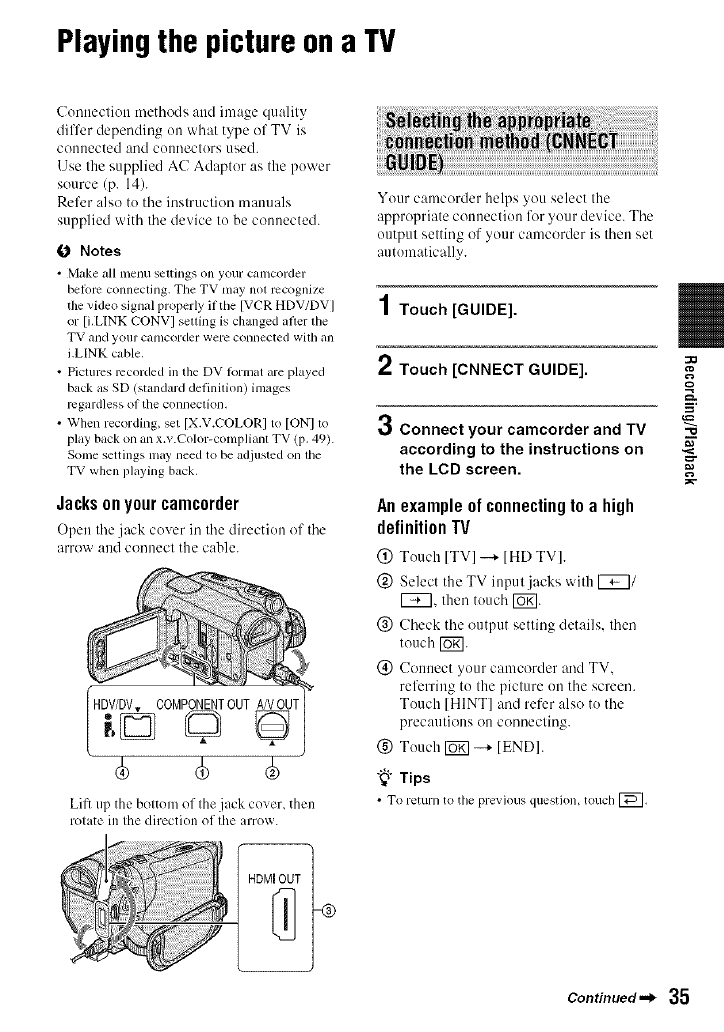
Jacksonyourcamcorder
Open tile jack cover in tile direction of tile
arrow aud counecl the cable.
HDV/DV.,,.COMPONENTOUTANOUT
40 40
Lift up the bolton; of Ihe jack cover, then
rolate ill Ihe direction of Ihe arrow.
Your camcorder helps you select the
appropriate connection lk_ryuur device. Tile
output setting of your camcorder is then set
autumatically.
1Touch [GUIDE].
2Touch [CNNECT GUIDE].
0Connect your camcorder and TV
according to the instructions on
the LCD screen.
An example of connecting to a high
definition TV
(_) Touch ITVI -+ IHD TVI.
(_) Select theTV input jacks with _/
F_q, then touch F6_].
@ Check tile output setting details, then
touch F67].
(_) Connect your camcorder and TV.
referring to the picture on the screen.
Tuuch [HINT] and refer also to the
precautions OU couuectiug.
(_) Touch FUK]--4- [ENDI.
"_" Tips
• To return to the previous question, touch [_.
o
"O
Continued._ 35
/IaIh+I th÷ pi+t+++'÷++ a TWII++Ii++J+l)
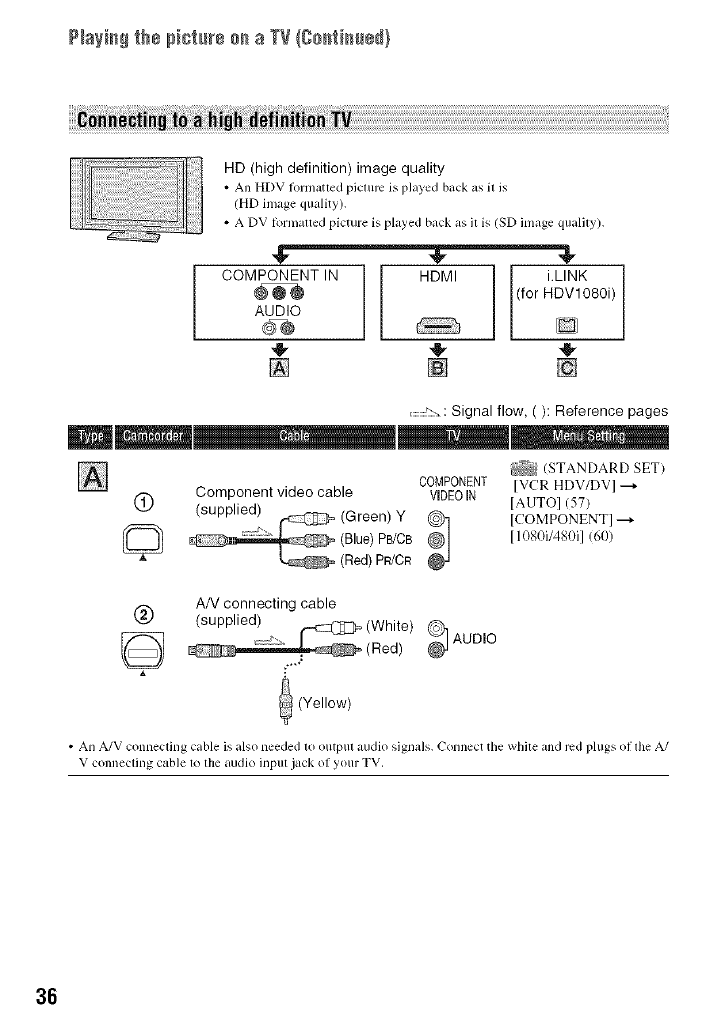
HD (high definition) image quality
• An HDV lbrmatted picture is played back as it is
(HD image quality).
• A DV R_rmatted picture is played back as it is (SD image quality).
COMPONENT IN HDMI (for i.LINK
HDV1080i)
AUDIO D
,_ 4t, ,,_
[] [] []
.............!::-. : Signal flow, ( ): Reference pages
_(STANDARD SET)
COMPONENT IVCR HDV/DVI
(_ Component video cable VIDEOIN IAUTOI C57)
(supplied) -- (Green) Y @ ICOMPONENT]---_
(Red)(Blue)PB/CBpR/CR_] 11080i/480i1 /6t))
AN connecting cable
@(supplied) _(White) 9 AUDIO
(Red)
(Yellow)
• An A/V connecting cable is also needed to output audio signals. Connect tbe white and red phlgs o1 the A/
V connecting cable to the audk_ input ¸jack of your TV,
36
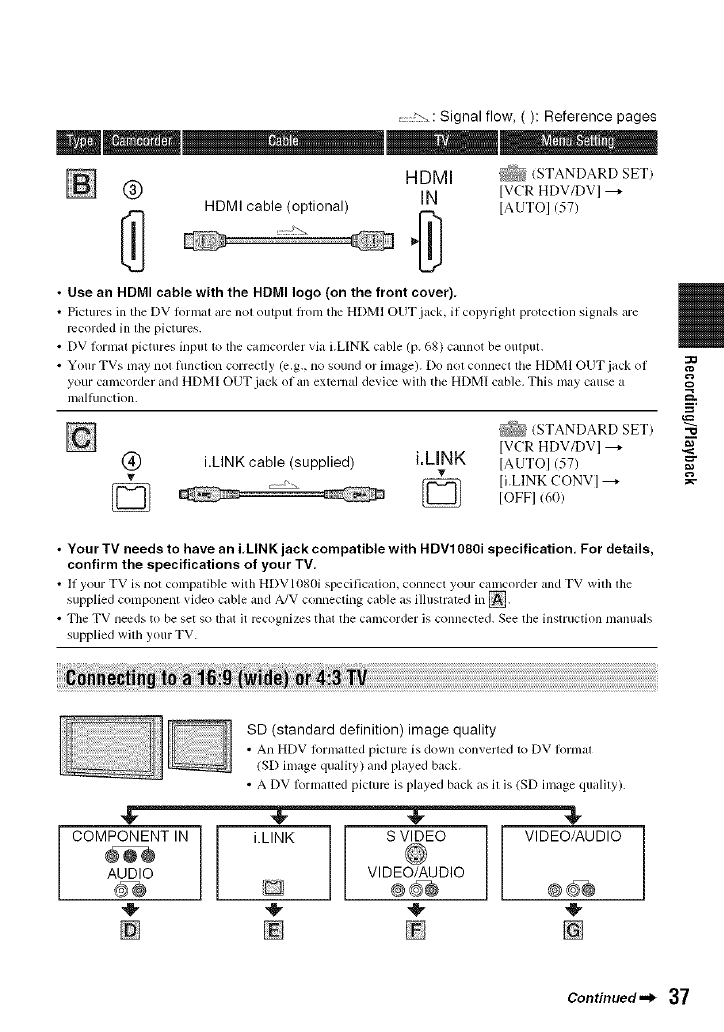
Signal flow, ( ): Reference pages
HDMI (STANDARD SET)
N @ IN [VCRHDV/DV]---+
HDMI cable (optional) [AUTO] (57)
•Use an HDMI cable with the HDMI logo (on the front cover),
• Pictures in tile DV tbnnal are nol outpul fi'oln the HDMI OUT jack, il copyright protection signals are
recorded in the pictures.
• DV lk}rlnal pictures inpul 1o file calncorder via i.LINK cable (p. 68) cannot be outpul.
• Your TVs may nol flmction correctly (e.g., no sound or inlage). Do nol connect die HDMI OUT jack of
your camcorder and HDMI OUT jack of an exlcrnal device wilh the HDMI cable. This nlay cause a
malfunction.
(STANDARD SET
[VCR HDV/DV] ---+
@ i.LINK cable (supplied) i.kINK [AUTOI (57)
v
v_ Q li.LINK CONVI --+
Q IOFFI (6(})
•Your TV needs to have an iilNK jack compatible with HDV1080i specification, For details,
confirm the specifications of your TV.
• II your TV is not compatible with HDVI080i specification, connect your Calncorder and TV wilh lhe
supplied conlponent video cable and A/V connecting cable as illustrated in _.
• Tile TV needs to be set so that it recognizes that tile camcorder is connected. See tile instruction [/lanllals
supplied wilh your TV.
"10
SD (standard definition) image quality
• An HDV lolmalted picture is down con_erled 1o DV Iornlal
(SD image quality) and played back.
• A DV I_}rn3altedpicture is played back as il is (SD image qualily).
COMPONENT IN i.LINK S VIDEO VIDEO/AUDIO
AUDIO VIDEO/AUDIO
[] [] []
Continued._ 37
P+a++_+_th+ p+ct+++÷++ a TV Ig++t+++÷+}
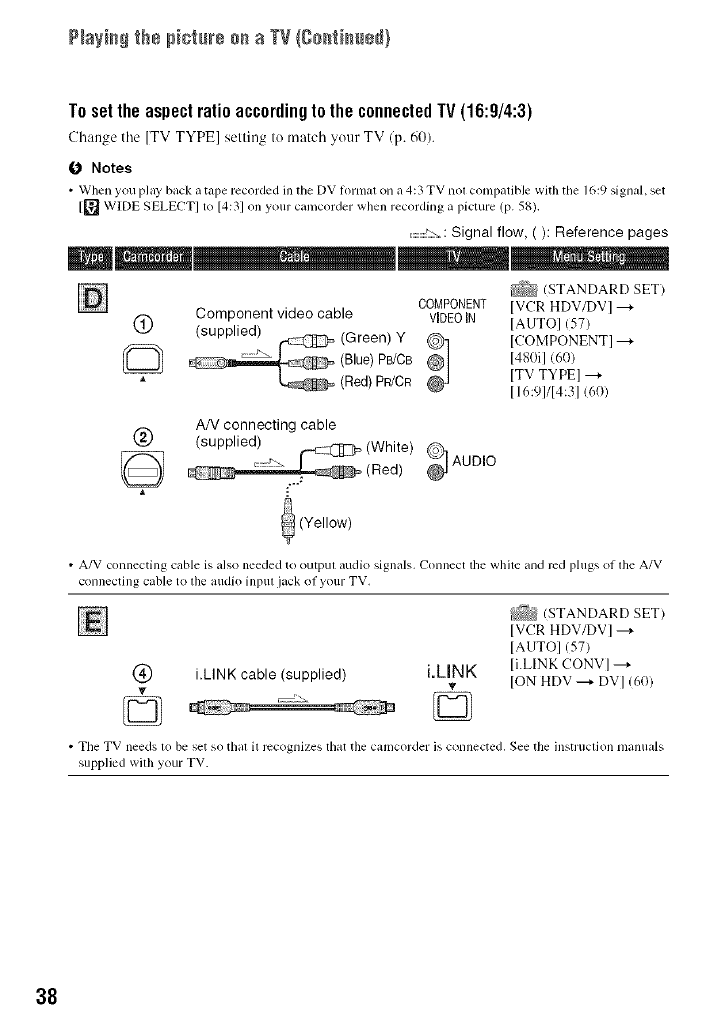
Toset the aspect ratio accordingto the connectedTV (16:9/4:3)
Cbange tile ITVTYPE] setting It>tnatcb your TV (p. 60).
(J Notes
• When you play back +ttape recorded in tile DV Iormat on a 4:3 TV not compatible with tbe 1(,:9 signal, set
[_ WIDE SELECT] to [4b;] on your c+uncorder when recording n picture (p. 58).
........'" : Signal flow, ( ): Reference pages
t_ (STANDARD SET)
COMPONENT IVCR HDV/DVI --_
Component_ video cable VIDE01N IAUTOI (57)
®(supplied I -- (Green) Y @ ICOMPONENTI--_
(Blue) PB/CB _] 148Dil (60)
"_ (Red) PR/CR ITV TYPEI --_
116:91/14:31 (60)
AN connecting cable
@ (supplied)
, _ (White) _ AUDIO
(Red)
(Yellow)
• A/V connecting cable is also needed to outpul audio signals. Connect tile white and red phlgs oI the A/V
connecting cable to the audio input jack of your TV.
(_ i.LINK cable (supplied) i.LINK
.... Q
_(STANDARD SET)
IVCR HDV/DVI ---_
IAUTOI (57)
li.LINK CONVl ---,
ION HDV ---, DVI (6O)
• Tile TV needs to be set so tbal it recognizes that tile c;lMCol+del.is connected, See the ]nstl+tlction lilantl;tls
supplied with youl TV.
38
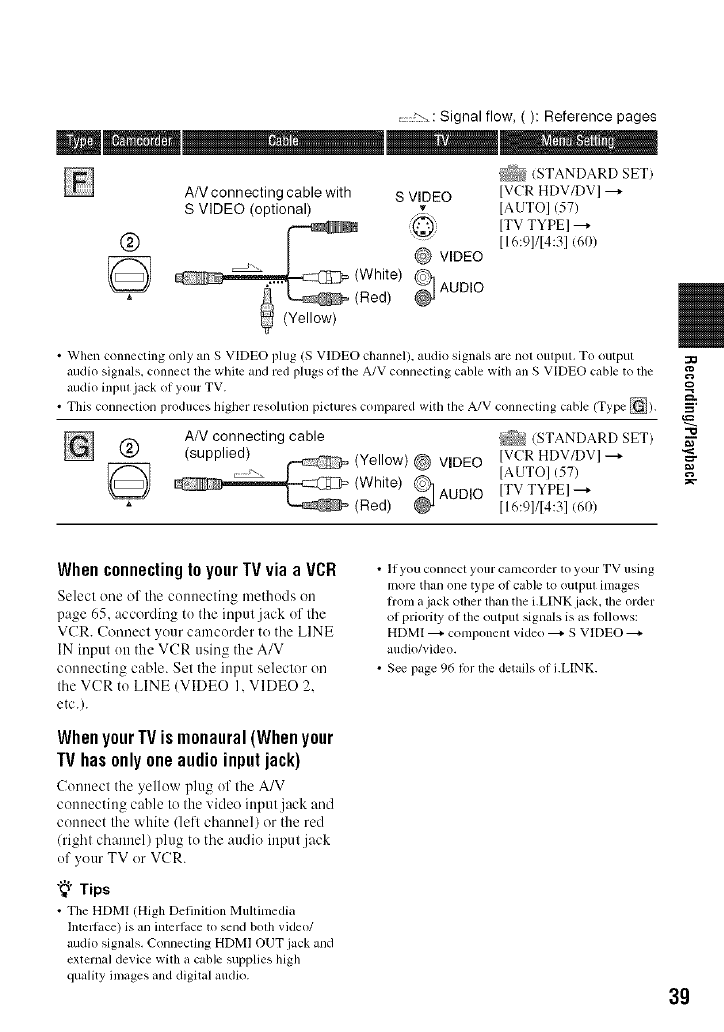
Signal flow, ( ): Reference pages
(STANDARD SET)
AN connecting cable with S VIDEO IVCR HDV/DV]
S VIDEO (optional) vIAUTOI (57)
(_) _ ITV TYPEI --+
" [16:91/14:31(60)
((W:lLt) 9 vIDEO
e) AUDIO
(Yellow)
•When connecting only an S VIDEO plug (S VIDEO channel), audio signals are nol oulpul. To output
audio signals, connect lhe white and red plugs of tile A/V connecting cable with an S VIDEO cable to tile
audio inpul .jack of your TV.
• This conneclion produces higher resolulion pictures compared with the A/V connecling cable (Type []).
AN connecting cable _ (STANDARD SET
(_) (supplied) (Yellow) @ VIDEO IAUTOI (57)
IVCR HDV/DVI ---+
AUDIO [TV TYPEI--+
(White)
(Red) [16:91114:31(60)
gO
"O
When connecting to your TV via a VCR
Select one of the comtecting methods on
page 65. according to the input jack of the
VCR. Connect your camcorder to the LINE
IN input on the VCR ttsing the A/V
connecting cable. Set the input selector on
the VCR to LINE (VIDEO I. VIDEO 2.
etc.).
WhenyourIV ismonaural(Whenyour
IV hasonly oneaudioinputjack)
Connect the yellow phtg of the A/V
connecting cable to the video inpttt jack and
connect the white (left channel) or the red
(right channel) plug to the attdio input jack
of yottr TV or VCR.
"_° Tips
• Tile HDMI (High Definition Multimedia
Intellace) is an interlace to send bolh vide()/
audio signals, Connecting HDMI OUT.jack and
external device with a cable supplies high
quality images lind digital audio.
• If you connecl your camcorder 1o your TV using
Inore than one type of cable to outpul inlages
hom a jack other than the LLINK jack, the order
of priority of the output signals is as lollows:
HDMI _ componenl vide() _ S VIDEO
audio/video.
• See page 96 1i71tile details of LLINK.
3g
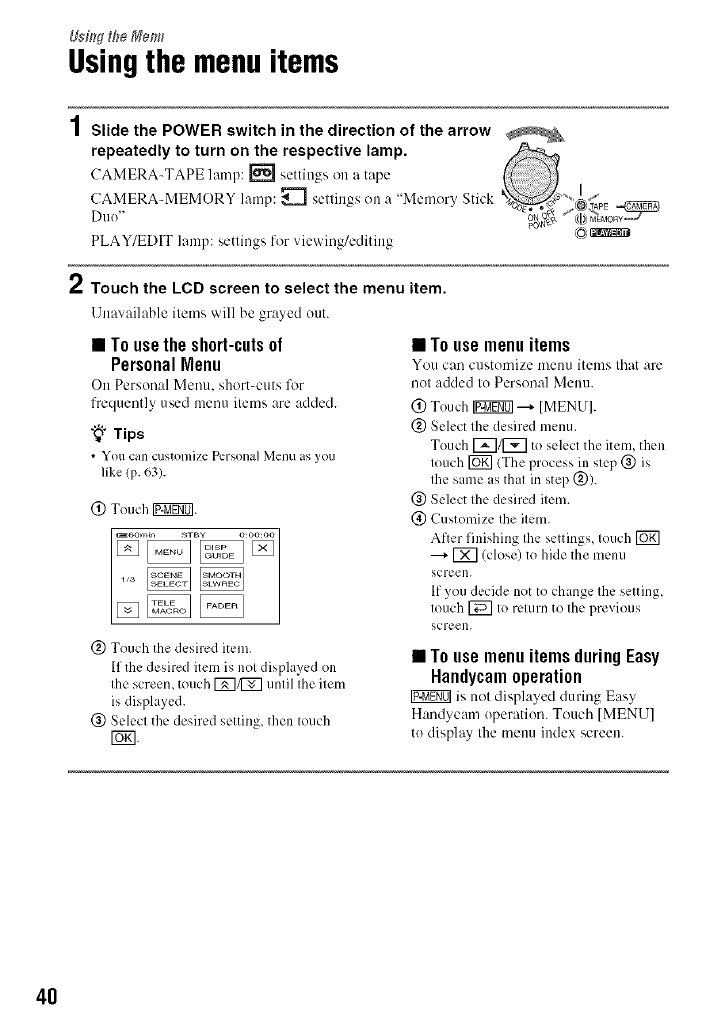
Usingthe menuitems
Slide the POWER switch in the direction of the arrow
repeatedly to turn on the respective lamp.
CAMERA-TAPE lmnp: I'_ settings- on a tape
CAMERA-MEMORY lamp: _ settings on a "Memory Stick ",(;,_
PLAY/EDIT lamp: settings for viewing/editing Co)_z_:_r_
Touch the LCD screen to select the menu item.
Unavailable items will be grayed out.
•To usethe short-cutsof
PersonalMenu
On Personal Mentl, short-cuts lk)r
frequently used menu items are added.
"_° Tips
•Votl can c/istonliz¢ Persona] lvlellu as you
like (p. 63).
@ Touch IXgggO].
@ Touch the desired item.
If the desired item is not displayed on
the screen, touch I_q/I_] until the item
is displayed.
@ Select the desired setting_ then touch
[ZN.
•To use menu items
You can customize men/i items that are
not added to Personal Menu.
(_) Touch [g_g_] --+ [MENUI.
@ Select the desired menu.
Touch [_1[_ to select the item, then
touch [_ (The process in step @ is
the same as that in step @).
@ Select the desired item.
(_) Customize the item.
After finishing Ihe settings, touch [_]
---+ [X] (close) to hide the menu
screen.
If you decide not to change the setting,
touch [_ to return to the previous
screen.
•To use menu items during Easy
Handycam operation
is not displayed during Eas_
Handycam operation. Touch [MENU]
to display the menu index screen.
4O
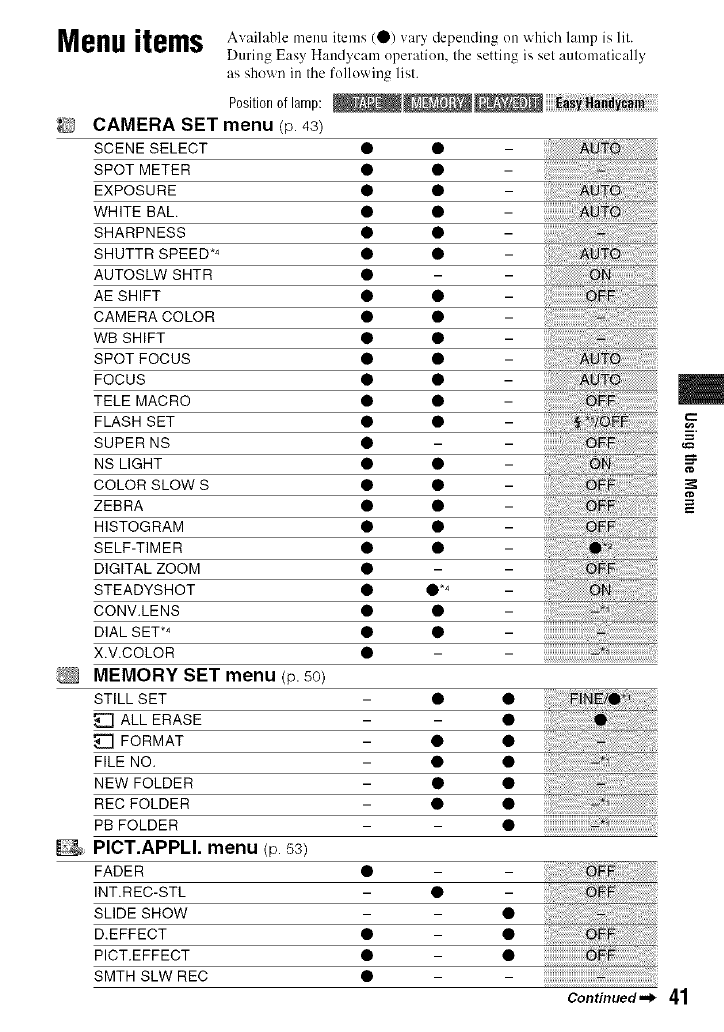
Menuitems Available menu items (0) vary depending on which lamp is lit.
During Easy Handycam operation, tile setting is set automntically
as shown in tile following list.
Position of lamp:
CAMERA SET menu (p 43)
SCENE SELECT • • -
SPOT METER • • -
EXPOSURE • • -
WHITE BAh • •
SHARPNESS • • -
SHUTTR SPEED .4 • • -
AUTOSLW SHTR • -
AE SHIFT • • -
CAMERA COLOR • • -
WB SHIFT • • -
SPOT FOCUS • • -
FOCUS • • -
TELE MACRO • • -
FLASH SET • • -
SUPER NS • -
NS LIGHT • • -
COLOR SLOW S • • -
ZEBRA • • -
HISTOGRAM • • -
SELF-TIMER • • -
DIGITAL ZOOM • -
STEADYSHOT • •*4 _
CONV.LENS • • -
DIAL SET TM • • -
X.V.COLOR •
MEMORY SET menu (p.50)
STILL SET - • •
ALL ERASE - •
FORMAT - • •
FILE NO. - • •
NEW FOLDER - • •
REC FOLDER - • •
PB FOLDER - •
PICT.APPLI. menu (p.53)
FADER • -
INT.REC-STL - • -
SLIDE SHOW - •
D.EFFECT • •
PICT.EFFECT • •
SMTH SLW REC •
Continued._ 41
m
¢D
42
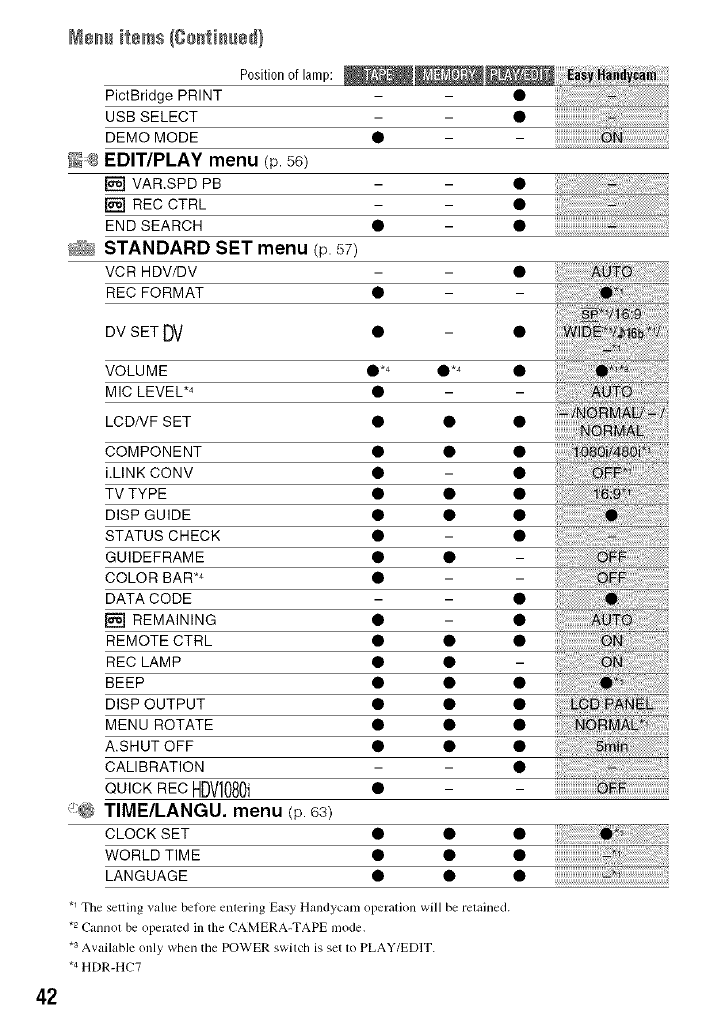
Men# items {C#atia#ed}
Position of lamp:
PictBridge PRINT
USB SELECT
DEMO MODE
N_ EDIT/PLAY menu (p.56)
[] VAR.SPD PB
[] REC CTRL
END SEARCH
_N STANDARD SET menu (p. 57)
VCR HDWDV
REC FORMAT
DV SET DV • - •
iiiiiiiiiiiiiiiiiiiiiiiiiiiiiiiiiiiiiiiiiiiii_ii_:_g_i_!i_i_!i_i_!i_i_!i_i_!i%ii
VOLUME •*4 •*4 •
MIC LEVEL .4 • -
LCD/VF SET • • •
COMPONENT • • •
i.LINK CONV • - •
TV TYPE • • •
DISP GUIDE • • •
STATUS CHECK • - •
GUIDEFRAME • •
COLOR BAR .4 • -
DATA CODE - •
[] REMAINING • - •
REMOTE CTRL • • •
REC LAMP • •
BEEP • • •
DISP OUTPUT • • •
MENU ROTATE • • •
A.SHUT OFF • • •
CALIBRATION - •
QUICKRECHDV1080i • -
TIME/LANGU. menu (p.63)
CLOCK SET
WORLD TIME
LANGUAGE
.1 Tile setting value belorc entering Easy Handycam operation will be retained.
*2 Cannot be operated in tile CAMERA-TAPE mode,
*s Available ()lily when tile POWER switcb is set 1o PLAY/EDIT.
*4 HDR-HC7
CAMERA SETmenu
Settingstoadjustyourcamcordertothe
recordingconditions
The default settings are marked with _'.
The indicators in pm'entheses appear when
the items are selected.
See page 40 for details on selecting
menu items.
You can record pictures effectively in
various silualious with the [SCENE
SELECT] function.
_"AUTO
Sclecl to automatically record pictures
effectively without the [SCENE SELECT]
l_lnction.
TWILIGHT* (._)
Scl,:ct to maintain the darkening
atmosphere of the distant sum)undings in
tx_ilight scenes.
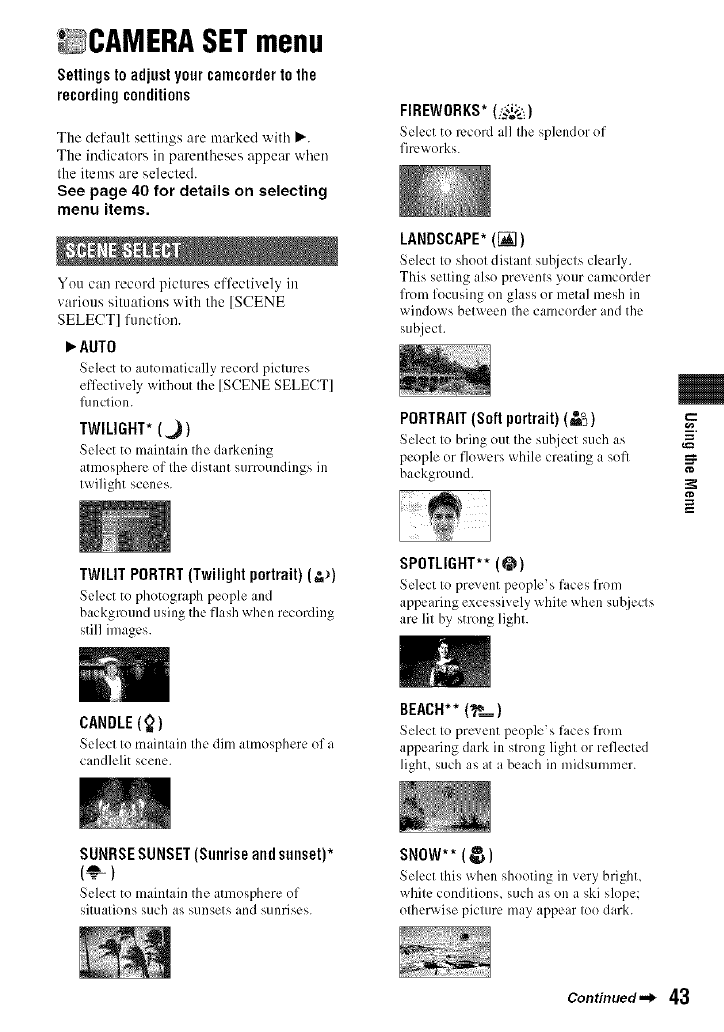
FIREWORKS* (i_:'_)
Seh:cl lo record all Ihe splendor of
fireworks.
LANDSCAPE*(_])
Seh:ct to shoot distant suhjects clearly.
This setting also prevents your camcorder
from focusing on glass or metal mesh in
windows bet_een Ihe camcorder and the
subject.
PORTRAIT(Soft portrait) (=_)
Select to bring out the subject such as
people or flowers while creating a soft
background.
g
TWILIT PORTRT(Twilight portrait) (-'_)
Sch:ct to photograph people and
background using the flash when recording
still images.
CANDLE (_)
SPOTLIGHT**(@)
Seh:ct to prcx ent people s faces from
appearing excessively white when sul!jects
arc lit by strong light.
Selecl Io mainlain Ihe dim almosphere of a
candlelil scene.
BEACH** (__)
Select to ?rexent 1)eo?le's faces from
appearing dark in strong light or reflect,:d
light, such as at a beach in midsummer.
SUNRSESUNSET(Sunriseandsunset)*
(_)
Select to maintain the atmosphere of
situations such as sunsets and sunrises.
SNOW**(_ )
Selecl Ihis when shooting in very brighl,
while condilions, such as on a ski slope:
olherwise piclure may appear Ioo dark.
Continued-_ 43
_gANERA SET mesh (Co_fi_ed}
44
*Ac[iusted to fl)cus on st@iects hulher away
only.
** Ac[iusted not to locus on subjects a short
distance away.
0 Notes
•If you set [SCENE SELECT], tile settings of
[SHUTTR SPEEDI (HDR-HC7) and [WHITE
BAL. I are canceled.
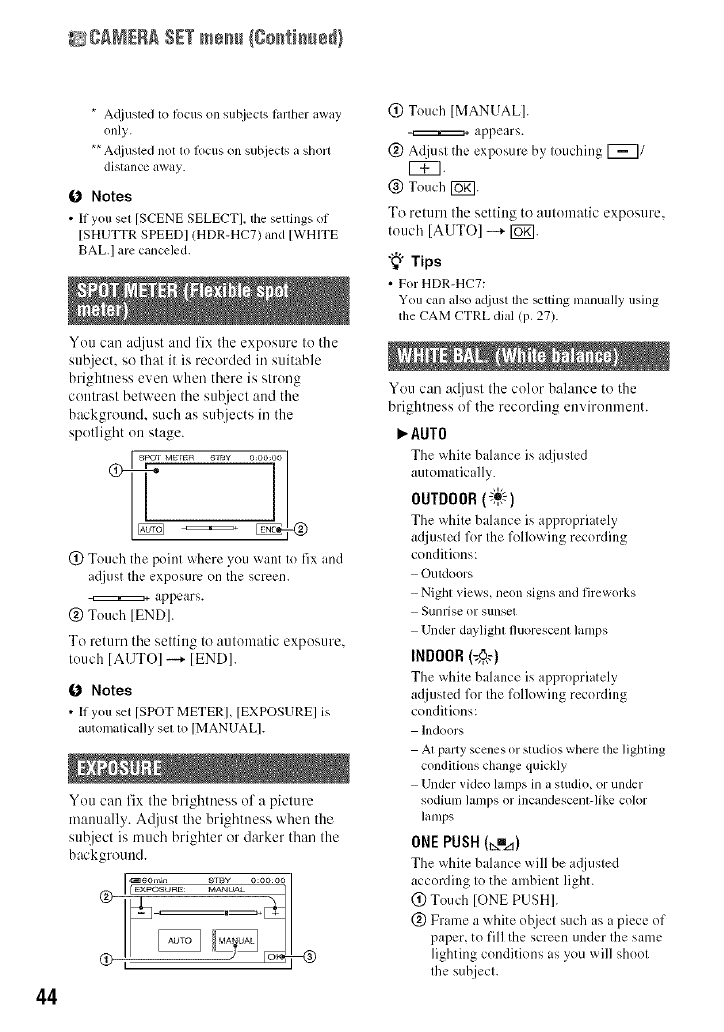
You can a(ljust and fix the exposure to the
su'c)iect, so that it is recorded it/suitable
brightness even when there is strong
contrast between the subject and the
background, such as subjects ill the
spotlight on stage.
spol M_ _ slay o:omoo]
z
(!) Touch the point where you x_ant to fix and
a(ljust the exposure on the screen.
appears.
@ Touch [ENDI.
To return the setting to automatic exposure.
touch [AUTO] --+ [END].
(b Notes
• If you set [SPOT METER], [EXPOSURE] is
automalicldly sel 1o [MANUAL I.
You can fix the brightness of a picture
manually. A@,st the brightness when the
sul2ject is much brighter or darker than the
background.
(!) Touch IMANUAL].
appears.
@ Adjust tile exposure by touching F_/
r_q.
@ Touch [_].
To return the setting to automatic exposure.
touch ]AUTO] --+ [Ugl.
"_° Tips
• For HDR-HC7:
You cam also a({iust tile _uing manually using
the CAM CTRL dial (p. 27).
You can ac[ju_,tthe color balance to the
brightness of the recording environment.
AUTO
The _qfite balance is adjusted
automatically.
OUTDOOR(_)
The _hite bahmce is appropri itely
adjusted for tile folh)wing recording
conditions:
Outdoors
Night views, neon signs and fireworks
Sunriseor sunset
Under daylightfluorescent lamps
INDOOR(:_)
The _hite bahmce is appropriately
adjusted for the folh)wing recording
conditions:
Indoors
At party scenes or studios where the lighting
conditions change quickly
Under video lamps in a studio, or under
sodium lamps or incandescenl-like color
lamps
ONEPUSH(_=A)
The _qfite balance _ill be a@lsted
according to the ambient light.
(_) Touch [ONE PUSH].
(_) Frame a white object such as a piece of
paper, to fill the screen under the same
lighting conditions as you will shoot
the subject.
@ Touch Itxm._].
txm_ flashes quickly. When the white
balance has been adjusted and stored in
the memory, the indicator stops
flashing.
O Notes
•Set [WHITE BAL.I to [AUTO] or adjust the
color in [ONE PUSHI under white or cool white
Iluorescent lamps.
• When you seled [ONE PUSHI, keep flaming
white o[_jects while Nmzl is flashing quickly.
• txmzl flashes slowly if [ONE PUSHI could not
be set,
• When [ONE PUSHI was selected, if I_m.d keeps
flashing after touching [_]_ set [WHITE
BALI to [AUTO].
• II you _t [WHITE BALI, [SCENE SELECTI
mlurns to [AUTO].
"_° Tips
• 11 you have changed tile battery pack while
[AUTOI was selected, or taken your camcorder
ouldoors after inside use (or vice vers_,), select
[AUTOI and aim your camcorder at a nearby
white object klr aboul 10 seconds lk)r belier
color balance ac0ustment.
• When file while balance has been sel wilh [ONE
PUSHI. if you change the [SCENE SELECT]
seUings, or bring your canlcorder outdoors llonl
inside the house, or vice versa, you need to redo
the [ONE PUSHI procedure to readjust the
white balance.
You can at[iust the sharpness uf the image
uutline with [_7/[_7. [2] appears when
the sharpness is anything other than the
default setting.
Soften _ Sharpen
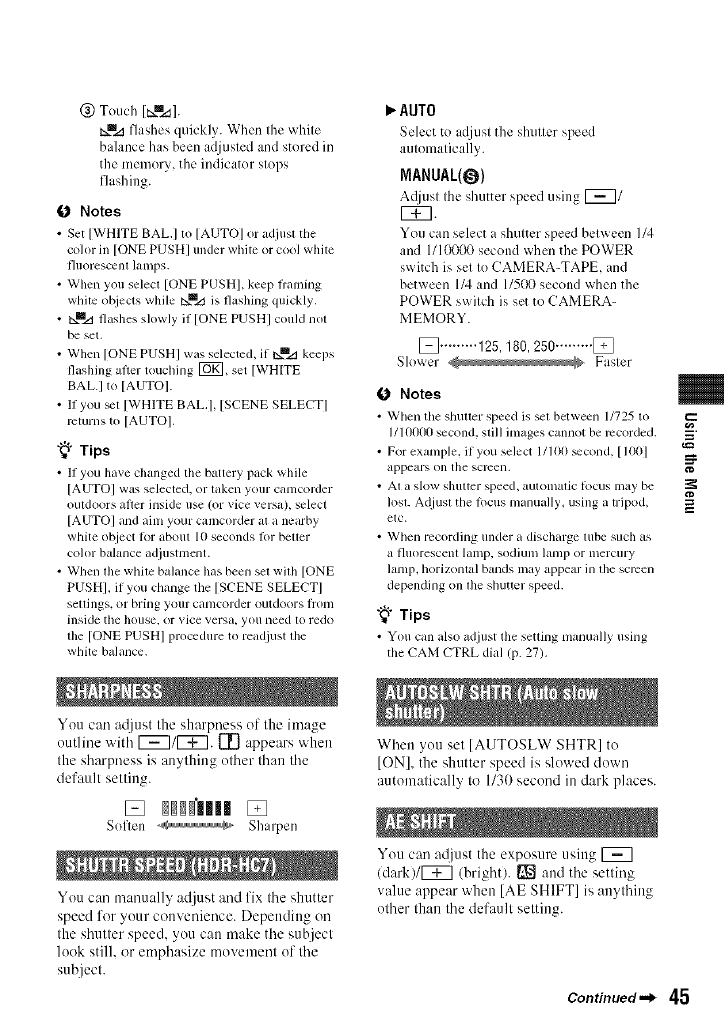
You can manually adjust and fix the shutter
speed for yuur convenience. Depending on
the shutter speed, you can make the subject
look still, or emphasize movement uf the
subject.
_" AUTO
Select to adjust the shutter speed
automatically.
MANUAL(O)
A([iusl Ihe sMiter speed using [_/
f77.
You can select a shutter speed between I/4
and 1110000 second when the POWER
switch is set to CAMERA-TAPE, and
between 1/4 and 1/500 second when the
POWER switch is set to CAMERA-
MEMORY.
[] ......... 125, 180, 250 ......... []
Slower Fasler
0Notes
• _N'hen tile shulter speed is sel between 1/725 to
1/10t}t}Osecond, still images cannot be recorded.
• For example, if you select I/D0 _cond, [ It)01
appears on the screen.
• At a sklw shutter speed, aulolllalic locus may be
IOSLA_ljust the locus manuall L using a tripod,
etc.
• When recording under a discharge tube such as
a fluorescenl lamp, sodium lanlp or mercury
lamp, horizontal bands may appear in file screen
depending on file shutter speed.
"_° Tips
• You can also adjust tile seUing manually using
the CAM CTRL dial (p. 27).
When you set [AUTOSLW SHTR] to
[ON], the shutter speed is sluwed down
automatically to 1130second in dark places.
Yuu can at[just the exposure using [_
(dark)/_ (brightl. I_ and the setting
value appear when [AE SHIFT] is anything
other than the default setting.
Continued._ 45
==
g
gANERA SET mesh (Co_i_e_}
46
"_° Tips
• Touch [_ if tile subject is white or tile
backlight is bright, or touch [_ if the subject
is black or the light is dim,
•You can adjusI tile automatic exposure level to
brighter or darker when [EXPOSURE] is set to
[AUTO].
• For HDR-HC7:
You can also adjust tile selling manually using
the CAM CTRL dial (p. 27).
You can a@tst the color intensity with
[_7/[_7. (_ appears when [CAMERA
COLOR] is anything other than the default
setting.
Decreases color _ hlcreases color
intensity intensity
Yuu can a@tst the white balance to the
desired setting using 1_711_7.
_] and the setting value appear when [WB
SHIFT] is anything other than the default
setting.
"_° Tips
• When tile while balance is set to a lower _alue,
pictures appear bhlish, and when set to a higher
value, pictures appear reddish.
• For HDR-HC7:
You can also adjust the setting manually using
the CAM CTRL dial (p, 27),
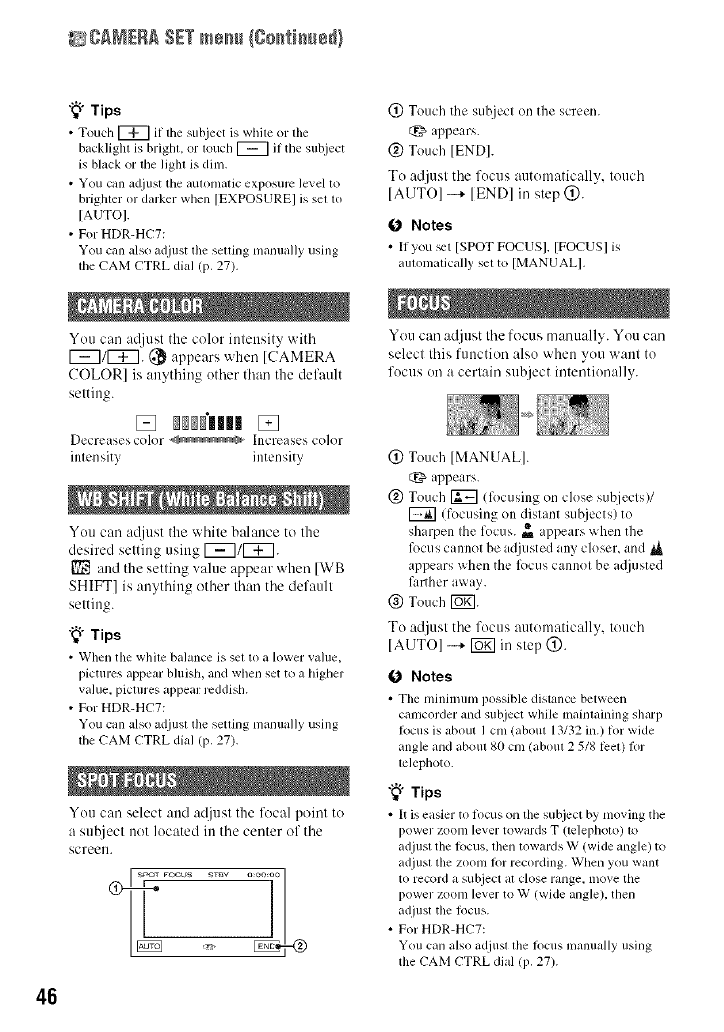
You can select attd at[just the l\_cal point to
a suhject not located in the center of the
screen. .................i01
(_) Touch the subject on the screen.
appears.
@ Touch [ENDI.
Tu adjust the fucus automatically, touch
[AUTOI -+ [ENDI in step @.
0 Notes
• If you _t [SPOTFOCUSI. [FOCUS] is
automatically sel to [MANUAL].
You can adjust the focus manually. You can
select this function also when yuu want to
fucus on a certain subject iuteutkmally.
(2) Touch [MANUAL].
t_. appears.
@ Touch [_] (lbcusing on close subjects)/
(fucusing on distant suhjects) to
sharpen Ihe focus. _= appears when the
R)cus cannot be ,_0usted any closer, and _.
appe its when the R)cus cannot be ac[justed
fimher away.
@ Touch [_.
To adjust the focus atttomatically, touch
[AUTOI -...+lug] in step @.
0Notes
• Tile mininmm possibledistance between
canlcorder and subject while maintaining sharp
locus is about 1cm (about 13/32in.) tot wide
angle and aboul 80 cnl (aboul 2 5/8 lcel) lklr
lelephoto.
"_" Tips
• It is easier to locus on tile subject by moving the
power zoom le_er towmds T (telephoto) to
adjust the locus, then towards W (wide angle) to
adjusl tilezoom for recording. When you want
to record a subject ilt close rallge, lno_, e the
power zoom Ie_¢r to W (wide angle), then
adjusttile lbcus.
•For HDR-HC7:
You can also adjusl lhe locus manually using
the CAM CTRL dial lP. 27).
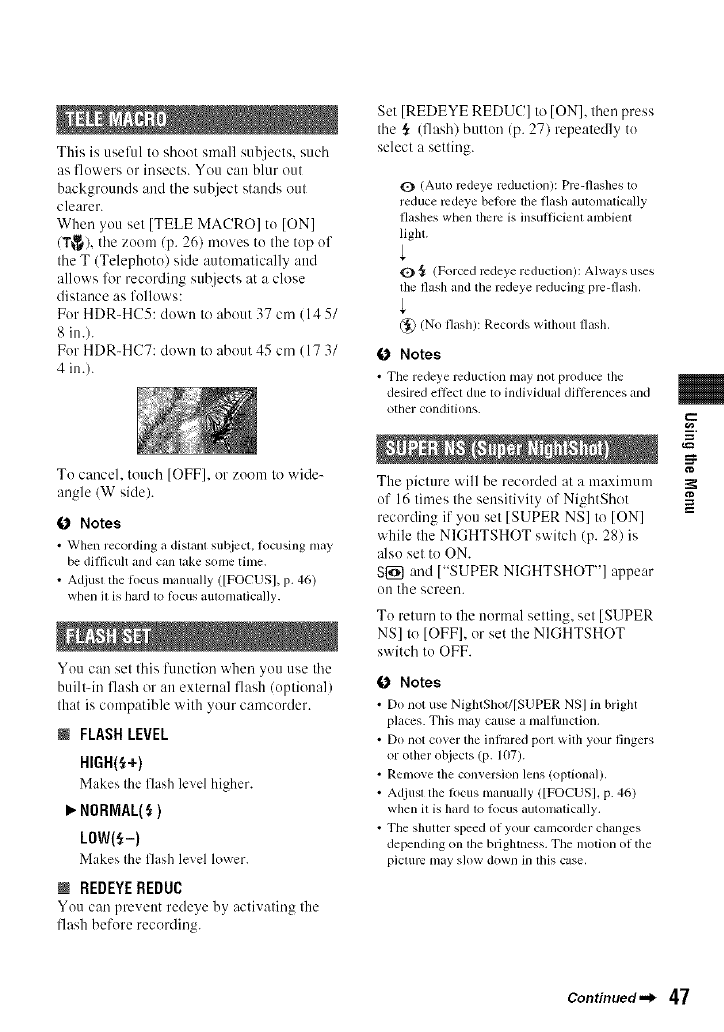
This is useful to shoot small subjects, such
as flowers or insects. You can blur out
backgrounds and tile subject stands out
clearer.
When you set [TELE MACRO] to [ON]
(Y_), tile zoonl (p. 26) moves to Ihe top of
tile T (Telephoto) side automatically attd
allows lk_r recording subjects at a close
distance as follows:
For HDR-HC5: down to about 37 cm (14 5/
8 in.).
For HDR-HC7: down to about 45 cm (17 3/
4 in.).
To cancel, touch [OFF], or zoom to wide-
angle/W side).
0 Notes
•When recording a dislant subject, focusing may
be (lift]cult and can lake some time.
• Adjusl tile locus manually ([FOCUS], p. 46)
when il is hard lo R)cus aulomalically.
You can set this function when you use tile
built-in flash or an external flash (optional)
that is compatible with your camcorder.
NFLASHLEVEL
HIGH(_+)
Makes the flash level higher.
NORMAL(_)
LOW(_-)
Makes tilL' flash level h)wcr.
NREDEYEREDUC
You can prevent redeye by activating tile
flash before recording.
Set [REDEYE REDUC] to ION], then press
tile ,_ (flash) button (p. 27) repeatedly to
select a setting.
O (Auto mdeye reduction): Pro-flashes lo
reduce mdeye belom lfie flash autonlatically
flashes when there is insutlicienl anlbient
light.
1_) {_ (Forced mdeye reduclion): Always uses
file flash and the rcdeye reducing pro-flash.
(_ (NO flash): Records wilhoul flash.
0 Notes
• The redeye rcduction nlay nol produce tile
desired ellcct due to individual ditlcrences mid
other condil fi)ns.
The picture will be recorded at a maximum
of 16 times the sensitivity of NightShot
recording if you set [SUPER NS] to [ON]
while the NIGHTSHOT switch (p. 28) is
also set to ON.
S{_] and ["SUPER NIGHTSHOT"] appear
on the screen.
To return to the normal setting, set [SUPER
NS] to [OFF], or set tile NIGHTSHOT
switch to OFF.
€_ Notes
• Do not use NigIuShot/[SUPER NS] in bright
places. This may cause a nlalfimction.
• Do not cover the infiared porl with your fingers
or other objects (p. 107).
•Remove the conversion lens (optional).
• Adjusl tile filcus tllanually ([FOCUS], p. 46)
when il is hard Iv)lk)cus autonlalically.
• Tile shuuer speed of your cumcorder changes
depending on llle bfighmess. The motfi)n of tile
piclum nlay sh)w down in dfis case.
g
Continued._ 47
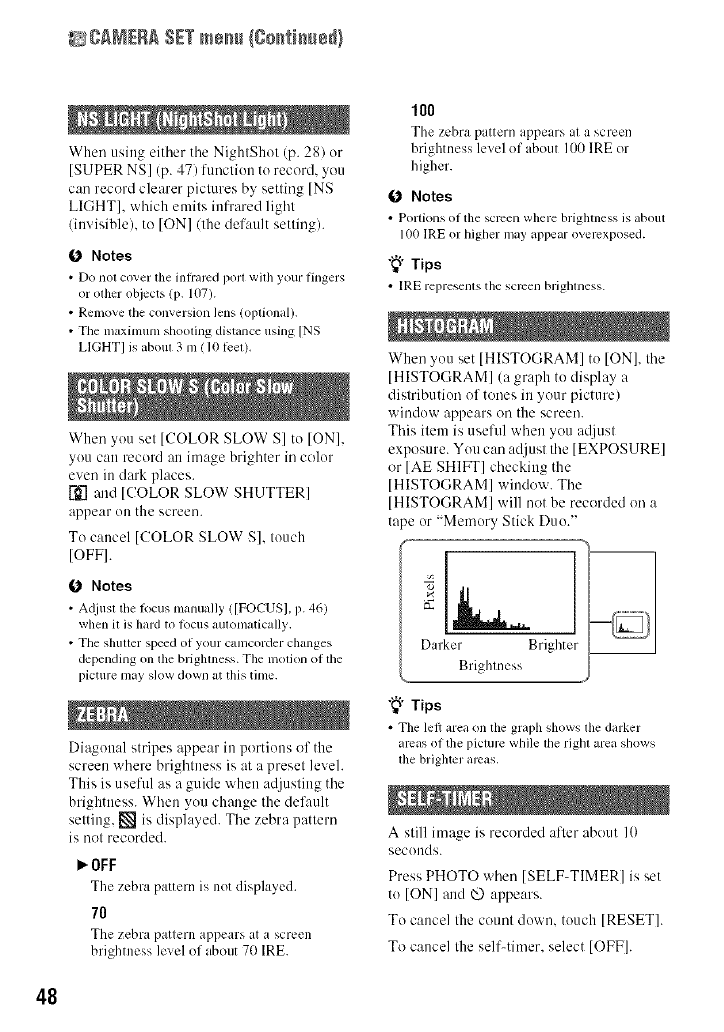
gA_ERA SET mesh {8o_i_e_}
When using either tile NightShot (p. 28) or
[SUPER NS] (p. 47) ftmction tu record, you
can record clearer pictures by setting INS
LIGHT[, which emits infrared light
(invisible), to [ON] (the default setting).
0 Notes
•Do not cover fl_einfi'arcd port wifl_ your lingers
orother objects (p. 107).
• Remove the conversion lens (oplional).
• The maximum shooling distance using INS
LIGHT] is aboul 3 m (10 leel).
When you set [COLOR SLOW S] to ION],
yuu can record :re image brighter in colur
even in dark places.
]L-'_.and [COLOR SLOW SHUTTER]
appear on the screen.
To cancel [COLOR SLOW S], touch
IOFFI.
0 Notes
• A_liusl tile locus manually ([FOCUS], p. 46)
when iI is hard to locus aulomatically.
• The shutter speed of your cumcorder changes
depending on the brighreess. The motion of the
i?icture may slow down at this time.
Diagonal stripes appear in portions of the
screen where brightness is at a preset level.
This is usefid as a guide when adjusting the
brightness. When yuu change the def:relt
setting, [] is displayed. The zebra pattern
is not recorded.
_OFF
The zebra pattern is not displayed.
78
The zebra pattern appears at a screen
brightness level of about 70 IRE.
IO0
The zebra pattern appears at a screen
brightness level of about 100 IRE or
higher.
0 Notes
• Portkms of the sclven where brightness is about
100 IRE or higher may _q)l)ear overexposed.
"_° Tips
• IRE represenls the screen brighreess.
When you set [HISTOGRAM] to [ON], the
[HISTOGRAM] (a graph to display a
distributiun of tones in your picture)
window appears on the screen.
This item is uselill when you adjust
exposure. Yuu can adjust the [EXPOS1JRE]
or [AE SHIFT] checking the
[HISTOGRAM] window. The
[HISTOGRAM] will not be recorded on a
tape or "Memory Stick Duo."
Darker Brighter
Brightness
"_° Tips
• The lel_ area on the graph shows the darker
areas of the picture while tilerighl area shows
tile brighter areas,
A still image is recorded after about 10
secunds.
Press PHOTO when [SELF-TIMER] is set
tu tONI and _ appears.
To cancel the count down, touch [RESET].
To cancel the self-tireer, select [OFF].
48
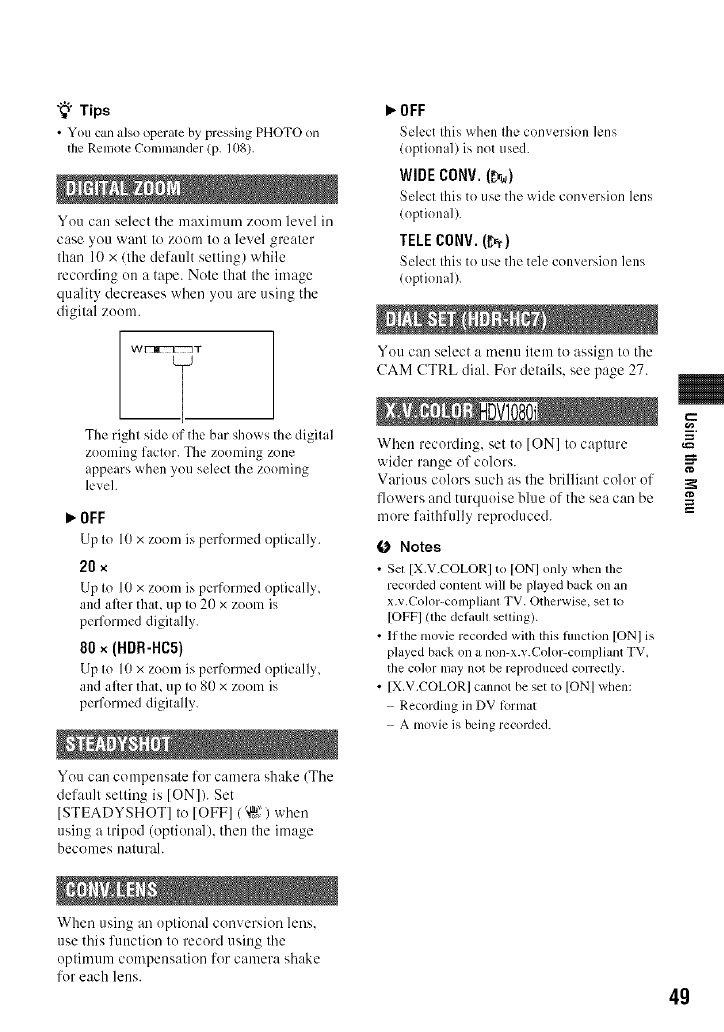
"_° Tips
• You can also operale by pressing PHOTO on
the Remote Commander (p. 108).
You cau select the maximum zoom level in
case >on want to zoom to :, level greater
than 10 x/the default setting) while
recording on a tape. Note that the image
quality decreases when you are using the
digital zoom.
The right side of the bar shows the digital
zooming factor. The zooming zone
appears when you select the zooming
level.
_OFF
Lip to lO x zoom is performed optically.
20 ×
Up to 10 x zoom is performed optically,
and after thaL up to 20 x zoom is
performed digitally.
80 x (HDR-HC5)
Up to l0 x zoom is performed optically,
and after thaL up to 80 x zoom is
performed digitally.
You can compensate for camera shake (The
default setting is [ON]). Set
[STEADYSHOT] to [OFF]/'_?) when
using a tripod (optioualh then the image
beconles uatu rah
_OFF
Seh:ct this v, hen the corn ersion h:ns
(optional) is not used.
WIDE CONV. (_rw)
Select this to use the wide corn ersion lens
(optional).
TELE CONV. (_r)
Select this to use the tele conversion lens
(optional).
You can select a menu ilem to assign Io the
CAM CTRL diah For delails, see page 27.
When recording, set to [ON] to capture
wider range of colors.
Various colors such as the brilliant color of
flowers and turquoise blue of the sea can be
more faithfiflly reproduced.
0 Notes
•Set [X.V COLORI to [ONI only when the
recorded conlent will be played back on an
x.v.Color-compliant TV. Otherwise_ gel lo
[OFFI lthe delaull seUing).
• If the movie recorded with this fimction [ONI is
played back on a non-x.v.Color-compliant TV_
the color may not be reproduced correclly.
• [X.V.COLORI cannot be set to [ONI when:
Recording in DV format
A movie is being recorded.
g
When using an optional conversion lens,
use this function to record using the
optimuul compeusatiou for camera shake
for each lens. 4g
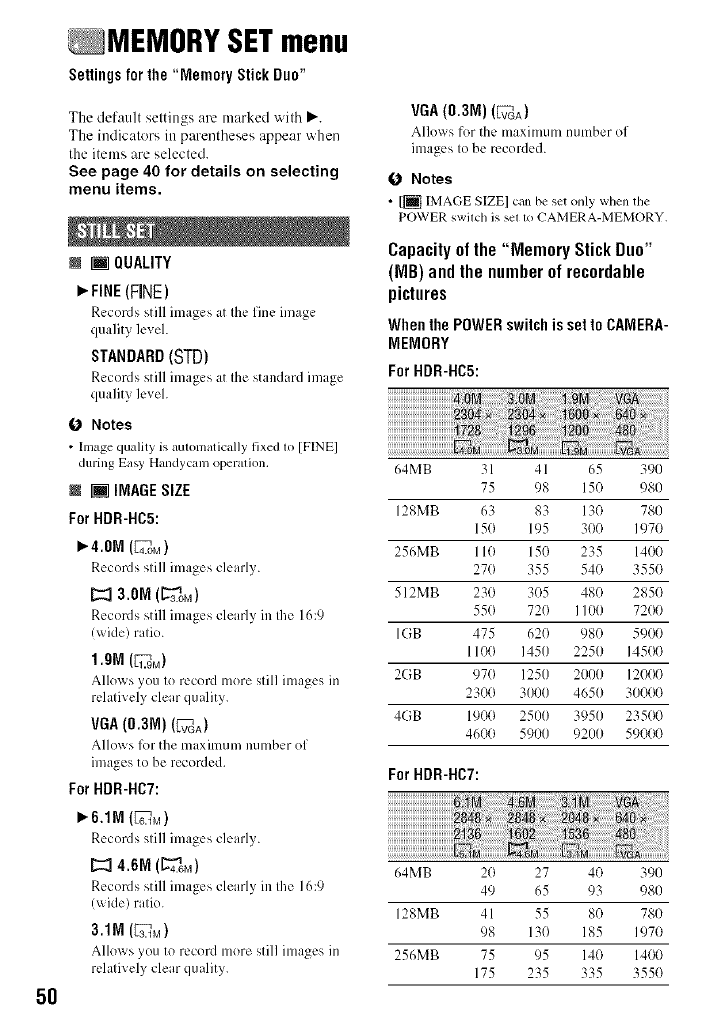
5O
MEMORY SETmenu
Settings forthe "Memory Stick Duo"
The default settings are marked with P,'.
The indicators in parentheses appear when
the items are selected.
See page 40 for details on selecting
menu items.
i [] QUALITY
_. FINE(FINE)
Records still images at the fine image
quality level.
STANDARD($TD)
Records still images at the standard image
quality level.
0 Notes
•Image quMityis automaticallyfixed 1o [FINE]
during Easy Handycmn operalion,
N [] IMAGESiZE
For HDR-HC5:
_4.0M (4_..oM)
Records still images clearly.
I::=13.0M(L_.oM)
Records still images clearly in Ihe 16:9
(_ ide) ratio.
1.ON (IL_.gM)
Allm_ s you to record more still images in
relatively clear quality.
VGA(0.3M) (vFvGA)
Allo_ s l_)rthe nmxinmm number of
images to be recorded.
For RDR-NC7:
P'.6,1M (_M)
Records still images cleml?.
Records still images clearly in the 16:9
(x_ide) ratio.
3.1M(ag_M)
Allows you to record more still images in
relatively clear quality.
VGA(0.3M)(_)
Allo_ s for the maximum number of
images to be recorded.
0 Notes
•1[] IMAGE SIZE] clm be set only when the
POWER swilch is sel lv) CAMERA-MEMORY.
Capacityof the "Memory Stick Duo"
(MB) and the numberof recordable
pictures
WhenthePOWERswitchissettoCAMERA-
MEMORY
For HDR-HC5:
64MB 31 41 65 390
75 98 15(} 980
128MB 63 83 130 780
15(1 195 300 1970
256MB 110 150 235 1400
270 355 540 3550
512MB 230 305 480 2850
55() 72() 1100 72(}(t
IGB 475 62() 98() 5900
1100 1450 2250 145(t(t
2GB 97(} 1250 2000 12000
2300 3000 4650 30000
4GB 1900 2500 3950 235(t0
4600 5900 9200 59000
For HDR-NC7:
64MB 20 27 40 390
49 65 93 980
128MB 41 55 8() 780
98 130 185 1970
256MB 75 95 140 1400
175 235 335 355(}
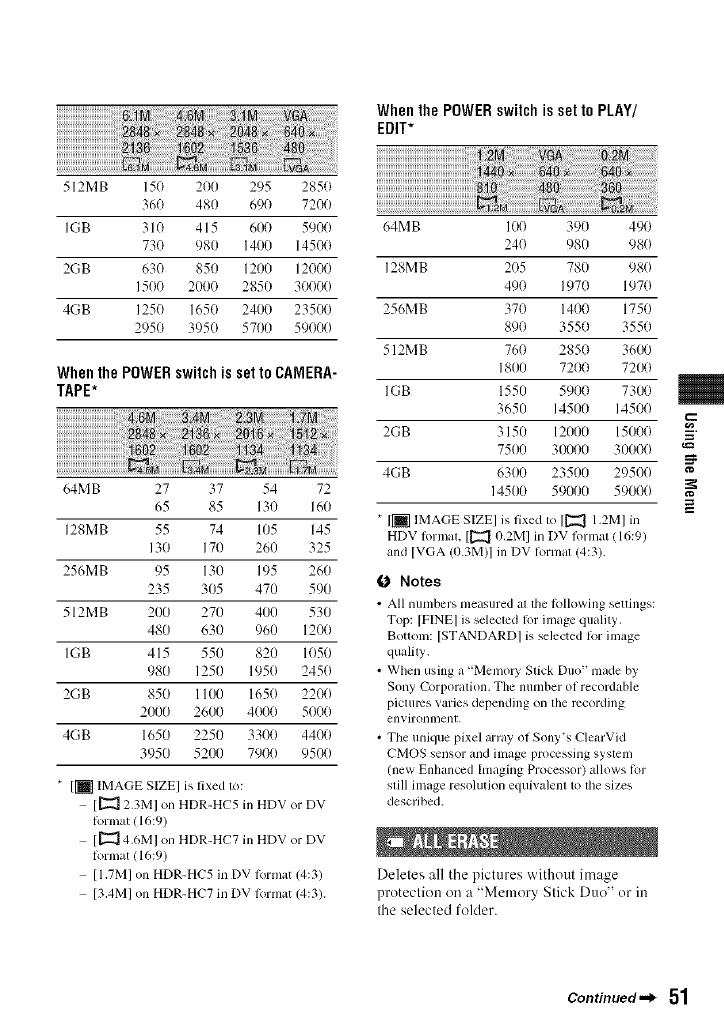
512MB 150 200 295 285(t
360 480 690 7200
IGB 310 415 600 5900
730 980 140014500
2GB 630 850 1200120(t0
1500 201)0 2850 30000
4GB 1250 1650 2400 235(t0
2950 3950 5701) 59000
Whenthe POWERswitch is set to CAMERA-
TAPE*
WhenthePOWERswitchis setto PLAY/
EDIT*
64MB 27 37 54 72
65 85 130 160
128MB 55 74 105 145
130 170 260 325
256MB 95 130 195 260
235 305 470 590
512MB 200 270 400 530
480 630 960 1200
IGB 415 550 820 1050
980 1250 1950 2450
2GB 850 1100 1650 2200
201)0 2600 4000 5000
4GB 1650 2250 3300 4400
3950 5201) 7900 9500
* [_] IMAGE SIZE] is fixed to:
[_12.3M] on HDR-HC5 in HDV or DV
format (16:9)
[_ 4.6M] on HDR-HC7 in HDV or DV
format (16:9)
[I.7M] on HDR-HC5 in DV format (4:3)
[3.4M] on HDR-HC7 in DV format (4:3).
64MB 100 390 490
240 980 980
128MB 205 780 980
490 1970 1970
256MB 370 14(t0 1750
890 3550 3550
512MB 760 2850 3600
1800 7200 7200
IGB 1550 5900 7300
3650 14500 14500
2GB 3150 1201)0 15000
7500 30000 30000
4GB 6300 23500 29500
14500 59000 59000
* [[] IMAGE SIZE] is fixed to [[_ 1,2M] in
HDV fi)rmat, [[22_ (t,2M] in DV fi)rmat (16:9)
and [VGA/tt.3M)I in DV Iormat 14:3).
0 Notes
• All numbers measured at the lollowing seUings:
Top: [FINE] is selected lfir image quality,
Bottom: [STANDARD] is selected k)r image
quality,
• When using a "Memo D' Stick Duo" made by
Sony Corporation, The number of recordable
pictmvs varies depending on the recording
environlllenI.
• The unique pixel array of Sony's ClearVid
CMOS sensor and image processing system
/new Enhanced hnaging Processor) allows R_r
still image resolution equivalent to die sizes
described.
Deletes all the pictures without image
protection on a "Memory Stick Duo" or in
the selected folder.
=
t_
==
Continued._ 51
_EMOR¥ SETmem_(Continued)
52
(_) Select [ALL FILES] or [CURRNT
FOLDER].
[ALL FILES]: Deletes all the images on
the "Memo UStick Duo."
[CURRNT FOLDER]: Deletes all the
images in the selected lk)lder.
@ Touch [YES] tx_ice---+[_].
0 Notes
• The hdder will not be deleted e_en when you
delele all the pictures in the Rdder.
•Do nol do anyof filelollowing while [_
Erasing all data...I is displayed:
Operale the POWER swilch/operadon
bultons,
Eject tile "Menlol T Stick Duo."
The "Memory Stick Duo" has been
formatted at the factory, and dues not
require formatting at purchase.
To execute lk_rmattiug, tuuch [YES] twice
--+ 1_7.
Formatting is completed, and all the images
will be deleted.
(J Notes
• Do nol do any ol tile lollowing while 1_
Pornmtting, ,,I is displayed:
Opel:ale tile POWER swilcll/operadon
buttons.
Eiect the "Menlol T Stick Duo."
• Fonnauing erases evewthing on file "Memory
Stick Duo" inchlding protected image dala and
newly crcaled k)lders.
SERIES
Assigns file numbers in sequence eVL'Uif
the "Memo UStick Duo" is replaced with
another one. The file number is reset when
a new fulder is created or the recording
fulder is replaced with another.
RESET
Resets the file number to O00l each time
the "Memory Stick Duo" is changed.
You can create a new l\_lder ( 102MSDCF
tu999MSDCF) un a "Memory Stick Duo."
When 9,999 images are stored itt the current
folder, a new l\_lder is automatically created
fur storing subsequent images.
Touch IYES] -+ [X].
(J Notes
• You cannot delete the created lolders using your
camcorder. You will have to lornlat the
"Memory Stick Duo" (p. 52), or delete thenl
using your computer.
• The number of recordable pictures on a
"Memory Stick Duo" nmy decrease as the
number of lolders incrca_s.
Select the folder to be used fur recording
with _/[_, then touch [_.
0 Notes
•As tile dehmll _tting, pictures arc saved in the
1111MSDCF lolder.
• Once you record a picture in a Rllder, the same
R_lderwill be set as the delaull lolder lbr
phJyback,
Select the playback lk_lder with [_7/[_],
then touch I_g].
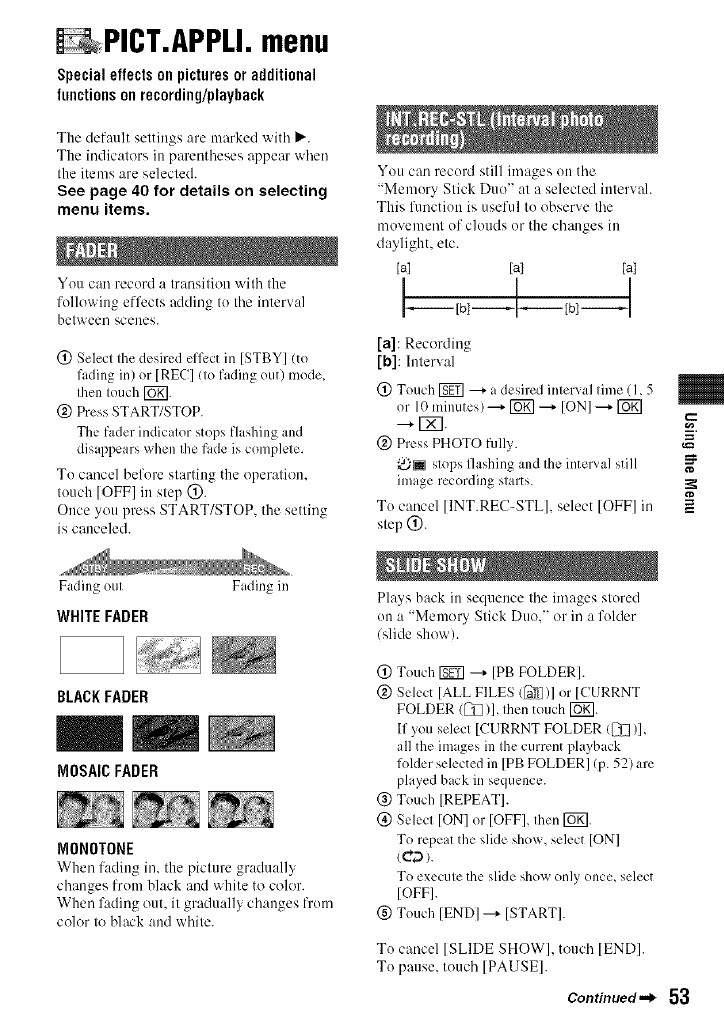
PICT.APPLI.menu
Special effectson pictures or additional
functionson recording/playback
The default settings are marked with P,'.
The indicators in parentheses appear when
the items are selected.
See page 40 for details on selecting
menu items.
You can record a transition with the
following effects adding to tile interval
between scenes.
(2) Select the desired efli:ct in [STBY] (to
fading in) or [REC] (to fading out) mode,
then touch [_.
@ Press START/STOP.
The fader indicator stops flashing and
disappears when the fade is complete.
To cancel before starting the operation.
touch [OFF] in step @.
Once you press START/STOP. the setting
is canceled.
Fading otll
WHITE FADER
BLACKFADER
Fading in
MOSAICFADER
MONOTONE
When fading in, the picture gr:uluall_
changes from black and white to color.
When fading out, it gradually changes from
color to black and white.
You can record still images on the
"Memory Stick Duo" at a selected iuterwd.
This fimction is useful to observe the
movement of clouds or the changes in
daylight, etc.
[a] [a] [at
I I I
F---Ibl--F---Ibl--I
[a]: Recording
[b]: Interval
(!) Touch _ --+ a desired interval time (I, 5
or 10 minutes) ---+ [_ --+ ION] _ [_]
--+ [_].
@ Press PHOTO fillly.
_i_ stops flashing and the interval still
image recording starts.
To cancel [INT.REC_STL], select [OFF] in
step @.
Plays back in sequence the images stored
on a "Memory Stick Duo," or in a folder
(slide show).
(_) Touch _ ---+[PB FOLDER].
@ Select [ALL FILES ([_li])]or [CURRNT
FOLDER (_1[_)1,then touch [_].
If you select [CURRNT FOLDER (_)],
all the im iges in the current playb ick
folder selected in [PB FOLDER[ (p. 52) are
played back in sequence.
@ Touch [REPEAT].
(_) Select [ON] or [OFFI, then IWg].
To repeat the slide show, select [ON]
(ca).
To execute the slide shox_only once, select
[OFF].
(_) Touch [ENDI ---+ [STARTI.
To cancel [SLIDE SHOW], touch [END].
To pause, touch [PAUSE].
Continued._ 53
==
g
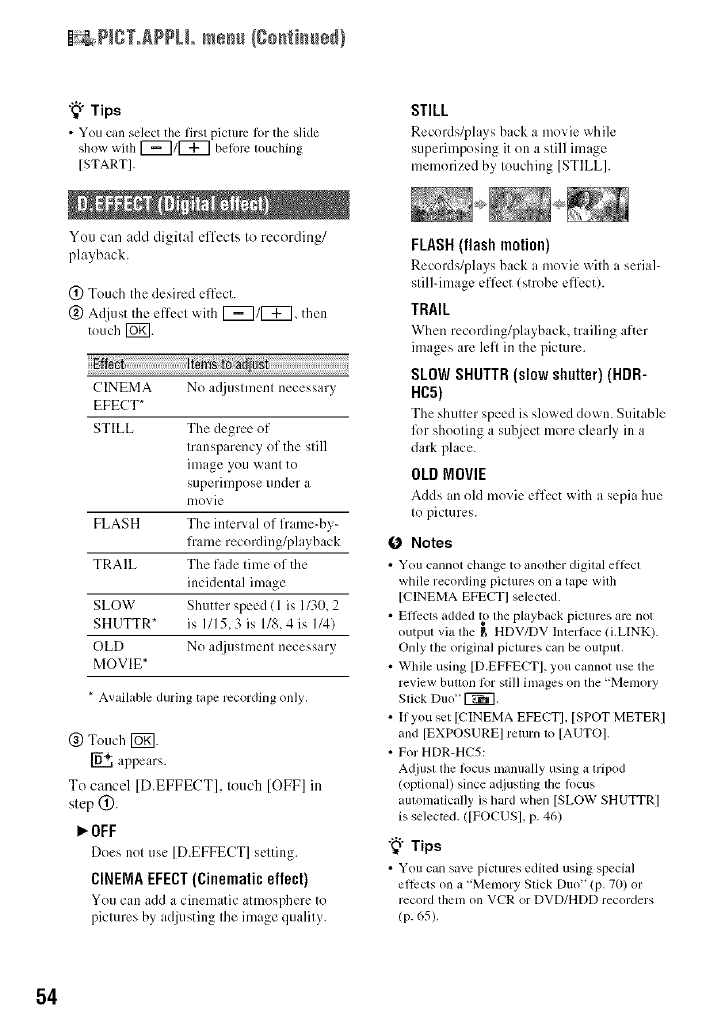
_ P_CT.@PLLme_u (go_ti_u÷d}
"_° Tips
• You can select the first picture 1or tim slide
sllow wilh F_/F_ be/ore louclling
[START].
You can add digital effects to recording/
playback.
(_) Touch the desired effect.
(_) Adjust the effect with F_/_, then
touch FUKI.
No acljustment necessary
CINEMA
EFECT*
STILL The degree of
transp irency of the still
image you want to
superimpose under a
nlovie
FLASH The interval of fr role-by-
frame recording/playback
TRAIL The fade time of the
incidental image
SLOW Shutter speed (1 is 1130,2
SHUTTR* ix I115,3 is 1/8,4 ix I14)
OLD No a(ljustment necessary
MOVIE*
* Available during tape recording only,
(_) Touch F67].
['6+, appears.
To cancel [D.EFFECT], touch [OFF] in
step (_).
_'OFF
Does not use [D.EFFECT] setting.
CINEMA EFECT(Cinematic effect)
You can add a cinematic atmosphere to
pictures by adjusting the image quality.
STILL
Records/pla) s back a movie _hile
superimposing it on a still image
memorized by touching [STILL].
FLASH(flashmotion)
Records/plays back a movie with a seri;,l-
still-image efli:ct (strobe effect).
TRAIL
When recording/playback, trailing after
images are left in the picture.
SLOWSHUTTR(slowshutter)(HDR-
HC5)
The shutter speed is slo_s ed down. Suitable
R)r shooting a subject more clearly in a
dark place.
OLDMOVIE
Adds an old movie effect _ith a sepia hue
to pictures.
0 Notes
• You CallllOtchange to another digital eltccl
while recording piclums on a tape wilh
[CINEMA EFECTI selected.
• Eflccls added to llle playback pictures am not
outpul via file F, HDV/DV Interlace (i.LINK).
Only the original piclures can be output.
• While using [D.EPFECTI, you cannot use the
review bulton tot still images on the "Memory
Slick Diio" F_.
• If you set [CINEMA EFECTI. [SPOT METERI
and [EXPOSUREI return 1o [AUTOI.
•For HDR-HC5:
Adjusl lhe locus manuany using a lripod
(optional) since adjusling the locus
aulomatically is bard when [SLOW SHUTFRI
is selected. ![FOCUS], p. 46)
"_" Tips
• You can save pictures edited using special
el]irOs on a "Memory Stick Duo" (p. 70) or
record them on VCR or DVD/HDD recorders
(p. (_5).
54
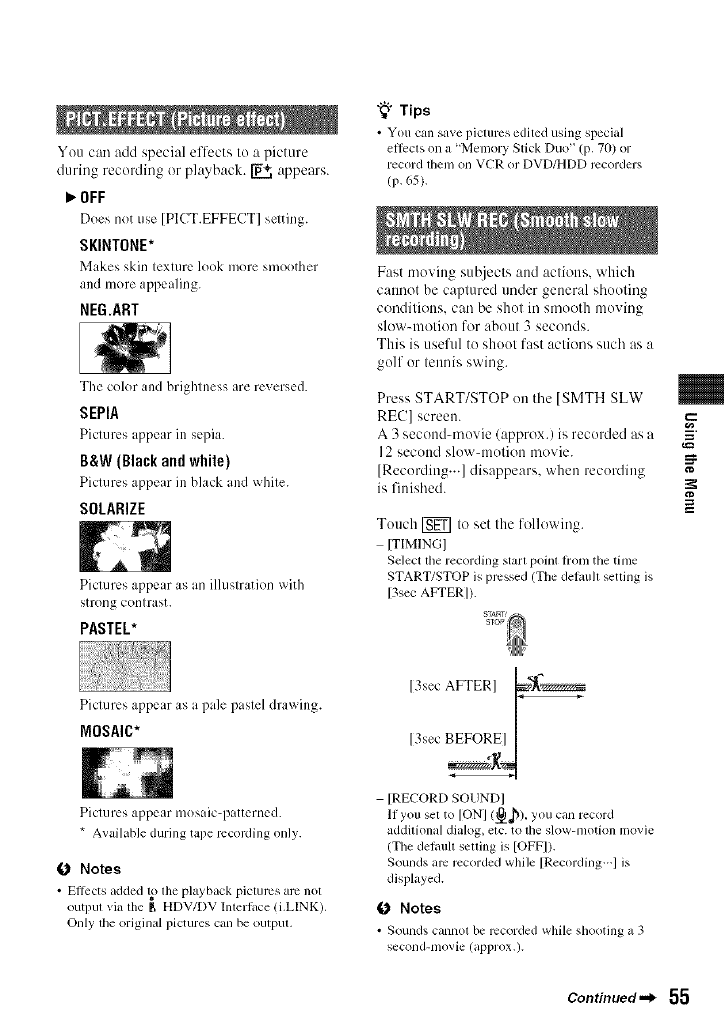
You can add special effects to a picture
during recording or playback. _ appears.
_OFF
Does not use [PlCT.EFFECT] sclting.
SKINTONE*
Makes skin texture look more smoother
and more appealing.
NEG.ART
The color and brightness are reversed.
SEPIA
Pictures appear in s{.,l_i;,.
B&W (Blackand white)
Pictures appear in black and white.
SOLARIZE
Piclures appear as an ilhlslratkm with
strong conllaSt.
PASTEL*
"_° Tips
• You can save pictures edited using special
effects on a "Memory Stick Duo" (p, 70) or
record lhenl on VCR or DVD/HDD recorders
(p, 65),
Fast moving subjects attd actions, which
cannot be captured under general shooting
conditions, can be shot in smooth moving
slow-motion for about 3 seconds.
This is usefill to shoot fast actions such as a
golf or tennis swing.
Press START/STOP ()it the [SMTH SLW
RE(?] screen.
A 3 second-movie (approx.) is recorded as a
]2 secolld slow-nlolion movie.
[Recording...] disappears, when recording
is finished. g
Tottch [_ to set the following.
[TIMINGI
Select tile recording starl point honl the lime
START/STOP is pressed (The delaull setting is
[3sec AFTERI).
Pictures appear as a pale paslel drawing.
MOSAIC*
Pictures appear lllosaic-p itterned.
* Available during tape recording only.
O Notes
• Effects added 1_}the playback pictures arc not
output _ia the g HDV/DV haert, lce (i,LINK),
Only lhe origin_d pictures can be oulpul,
13sec AFTERI
[3see BEFORcEI I
IRECORD SOUND]
If you set to ION] (_), you can record
additional dialog, eic. to the slow-motion movie
(The delhult seiting is IOFFI).
Sounds am recorded while [Recording--] is
displayed.
O Notes
• Sounds cannot be recorded while shooting a 3
second-movie (approx.).
Continued.._ 55
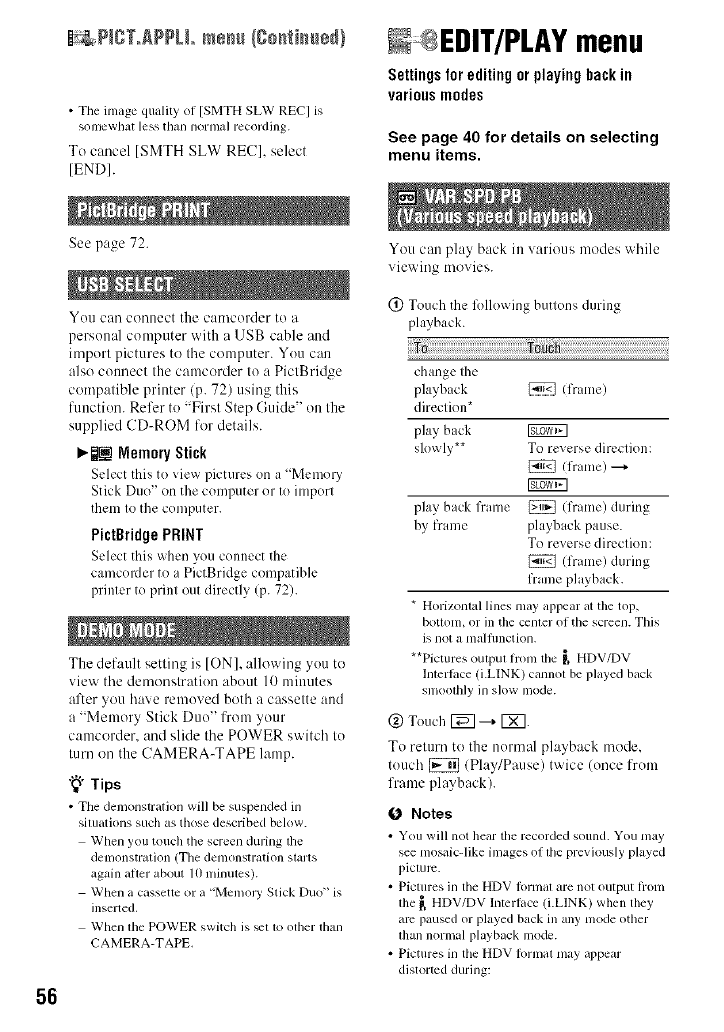
56
_ NCT.APPLL mesh (go,timber}
• The image quality of [SMTH SLW REC] is
sonlewhat less tball llornla] recordhlg.
To cancel [SMTH SLW REC], select
IENDI.
See page 72.
You carl connect the camcorder to a
personal computer with a USB cable and
import pictures to tile computer. You can
also commct the camcorder to a PictBridge
compatible printer/p. 72) using this
function. Refer to "First Step Guide" on the
supplied CD-ROM for details.
_._ Nemory Stick
Select this to vie_ l)icturcs on a Mcmoly'
Stick Duo" on the computer or to imporl
them to the computer.
Pictgridge PRINT
Select this _hcn you connect the
camcorder to a PictBridge compatible
printer to print out directly (p. 72).
The default setting is ION], allowing you to
view the demonstration about 10 minutes
after you have removed both a cassette and
a "Memory Stick Duo" from your
camcorder, and slide the POWER switch to
turn on the CAMERA-TAPE lamp.
"_" Tips
• Tile demonstration will be suspended in
situations such as those described below.
When you touch tile screen during lhe
denlonstration (Tile denlonslration SialIS
again after about 10 ndnutes).
When a cassette or a "Melnol T Stick Duo" is
inserted.
When file POWER switch is _t 1o olher lhan
CAMERA-TAPE.
N®EDIT/PLAYmenu
Settingsforeditingor playinghackin
various modes
See page 40 for details on selecting
menu items.
You can play back in various modes while
viewing movies.
(_) Touch the lk)llowing buttons during
playback.
6 h
change the
playback _ (frame)
direction*
play back [g_T_i7]
slowly** To reverse direction:
[_ (frame) ---+
play back frame _ (frame) during
by frame playback pause.
To reverse direction:
[_ (frame) during
frame playback.
* Horizonlal lines may appear at tile top,
botlonl, or in tile cenler of tile screen. This
is not a nlalftmction.
**Pictures outpul fronl the _ HDV/DV
Interlace (i.LINK) cannol be played back
snloolhly in slow nlode.
@ Touch [_ ---_ [X]-
To return to the norm:ll ph,yback mode.
touch [_ (Play/Pause) twice (once from
frame playback).
0Notes
• You wiU not hear the recorded sound. You may
see mosaic-like images ol tile previously played
picture.
• Pictures in the HDV lormal are not output holn
file _, HDV/DV Interlace (LLINK) when riley
am paused or played back in any mode other
lhan normal playback mode.
• Pictures in the HDV Iormal may appear
distorlcd during:
Picture se_lr ¢h
Reverse playback
•Playing back slowly to tim reverse direction and
playing back l?ame by fiame 1o lhe reverse
dflcction arc not available in HDV format.
See page 68.
EXEC
The most recently recorded picture is
played back for about 5 seconds and then
stops automatically.
CANCEL
Stops [END SEARCH].
O Notes
• [END SEARCH] will not workonce you ejecl
the casseUc after you have recorded Olltile tape.
STANDARDSET
menu
Settings while recordingon a tape or other
basicsettings
The def:mlt settings are marked with P".
The iudicators in parentheses appear when
the items are selected.
See page 40 for details on selecting
menu items.
Select the playback signal. Normally select
[AUTO].
When your camcorder is connected to
another device using :m i.LINK cable.
select the signal to inpul/output from the _,
HDV/DV Interface (i.LINK). The selected
signal is recorded or played back.
P,"AUTO
S_itches the signals betwe*_,nHDV and
DV furmat automatically when playing
back a tape.
With an i.LINK connection, switches the
signals between HDV and DV formats
automatically, and inputs/outputs from the
_,HDV/DV Interface li.LINK).
HOV
Plays back only the portions recorded in
HDV funnat.
With an i.LINK connectiom inputs/outputs
only HDV lk)rmatted signals from the _,
HDV/DV Interface li.LINK), and records/
plays back. You can also select this when
connecting the camcorder tO a COlllputer_
etc.
DV
Plays back only the portions recorded in
DV furmat.
With an i.LINK connection, inputs/outputs
only DV lkmnatted signals fi'om the _,
HDV/DV Interface (i.LINK), and records/
plays back. You can also select this when
connecting Ihe cau/corder to a computer,
etc.
g
Continued._ 57
_STANDARD SETme_ {go_ti_ue_}
O Notes
• Disconnect the i.LtNK cable belbrc changing
lhe [VCR HDV/DV] _tting, Otherwise, tile
connected device, such as a VCR, may not be
able 1o recognize the vide() signal lrom your
canlcorder.
• When [AUTO] is _lected, if the signal switches
belween HDV and DV Rwmats, the picture and
sound are imerrupted lemporarily.
• When El.LINK CONVI is _11o [ON HDV --+
DV], pictures are OUtl)Ulas lollows:
at [AUTOI, an HDV signal is convelled to the
DV lormat and outpul; a DV signal is output
as it is.
at [HDV I, an HDV signal is converted to the
DV lormat and outpul; a DV signal is not
outpul.
at [DV], a DV signal is output as il is; all
HDV signal is not output.
You can select a recording format.
_. HDV10S0i (HDVI080i)
Records in the HDV 1080i specification.
DV(DV)
Records in the DV format.
O Notes
• If you output tile recording picture using an
i.LINK cable, sel [i.LINK CONV] accordingly,
The l\_llowing functions are available when
recording in DV format.
M [_J RECMODE(Recording mode)
SP (_P)
Records inthe SP/Standard Play) mode on
a cassette.
LP (_P)
Increases the recording time to 1.5 times
the SP mode/Long Play).
O Notes
• If you record in die LP nlode, pictures may
appear mosaic-like or sound nlay be interlupted
when you play back tile rope on other
cilnlcorders or VCRs.
• When you mix recordings in tile SP mode and in
tile LP nlode on one tape, tile playback picture
may be distorted or tile time code may not be
written properly between tile scenes.
[] WIDE SELECT
You can select the aspect ratio ice(ruling
to the TV connected when recording. Refl:r
also to the instruction manuals supplied
with your TV.
_. 16:9 WIDE
Records pictures in the full screen lbr a
16:9 (_ide) TV screen.
4:3 (4_1
Records pictures in the lhll screen lbr a 4:3
TV screen.
O Notes
• Set [TV TYPE] correctly according to tile TV
connected lot playback (p, 60).
I [] AUDIOMODE
),.12BIT
Records in the ]2-bit mode 12 stereo
sounds).
16BIT (a_lCb)
Records in the 16-bit mode (1 stereo sound
with high quality).
O Notes
• When recording ill tile HDV lornmt,sound is
autom+,ticallyrecorded ill [ICBIT]mode,
M [] AUDIOMIX
During tape playback, you can monitor the
sound recorded by other camcorders using
audio dubbing or 4ch microphone
recording.
58

Touch _/_ to a{ljttst the balance of tile
original sound (ST l) attd tile sound
recorded afterwards (ST2), then touch [_.
0Notes
• The origimdsound (STI) is output at the delaull
setling,
Touch 1_711_7 to atljust the volume
(p. 29).
"_i° Tips
• For HDR-H¢'7:
You can also a_ljusl lhe setting using lhe CAM
CTRL dial (p. 27),
You can atlittst the recording sound level
manually.
_" AUTO
Seh:ct to acliust the recording sound h:w:l
automatically.
MANUAL
Touch _/_ Io acljust the recording
sound level during recording or standby.
The recording sound level adjustment bars
appear on the screen. The recording sound
level increases as the bar goes to the right.
The recording level meier appears when
the recording sound level is other than
default setting.
0 Notes
• Usv he_ldphonesto nlonitor the sound when
atliusting it.
The recorded picture will not be affected by
this operation.
m LCOBRIGHT
You can at!just the brightness of the LCD
screen.
(2) Adjust the brightness wilh 1_7/1_7.
@ Touch [_.
MLCDBL LEVEL
You can atljust the brightness of the LCD
screen's backlight.
_" NORMAL
Standard brightness.
BRIGHT
Brightens Ihe LCD screen.
0 Notes
•Whell SOil connect yollr Call/corder to oulside _,
power sources, [BRIGHT] is _.=lom_,tically
selected till"file_lling.
• When you select [BRIGHTI. balrelT lilk:is
slighlly reduced during rccording.
m LCDCOLOR
You can ac!iustthe color on the LCD screen
with 1_7/1_7.
Low intensity High intensity
mVFB.LIGHT
You can a{tjust the brightness of the
vie'_xfinder.
NORMAL
Standard brightness.
BRIGHT
Brightens the _ie_ finder screen.
0Notes
• When you connect your Ctllncorder to outside
power sources, [BRIGHT] is _.=lonlatically
selecled lln lhe _tling.
• When you select [BRIGHTI. balrelT lilk:is
slightly reduced during rccording.
Continued._ 5g
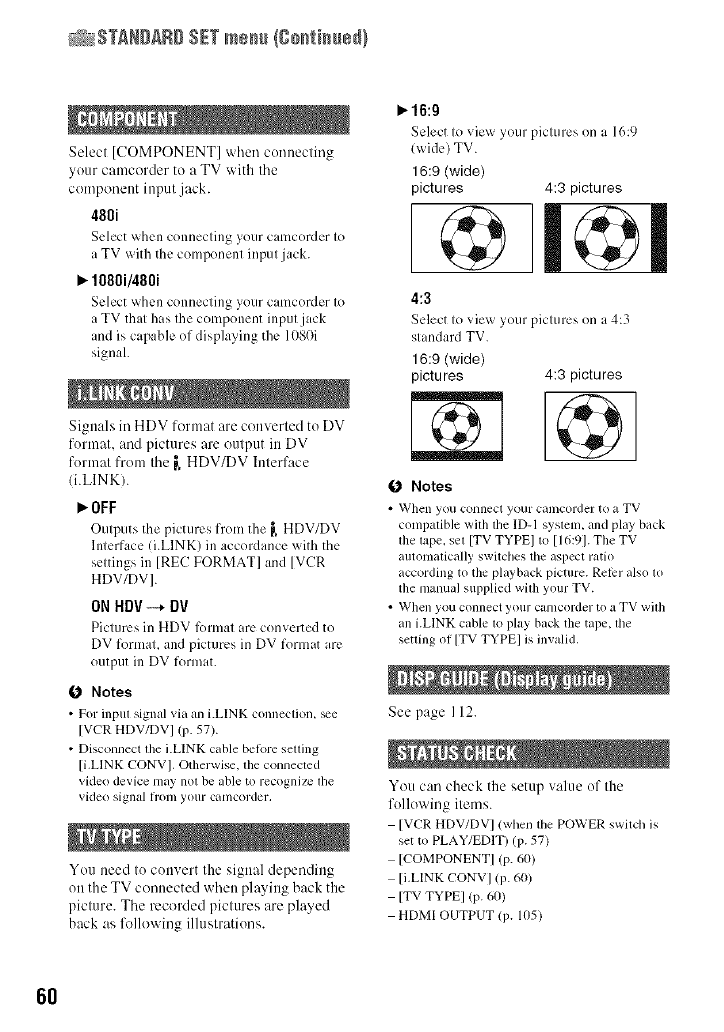
_STANDARD SETme_/go_i_ue_}
Select [COMPONENT] when conuecting
your camcorder to a TV with tile
component input jack.
480i
Select _hcn connecting )our camcorder to
a TV with the component input jack.
10801/4801
Select when connecting your camcorder to
a TV that has the component input jack
and is capable of displaying the 1080i
signah
Signals in HDV format are converted to DV
format, and pictures are output in DV
format from the _, HDV/DV Interface
/i.LINK).
I_OFF
Outputs tile pictures from the I, HDV/DV
Interface d.LINK) in accordance with the
settings in [REC FORMAT] and [VCR
HDV/DVI.
ON HDV-_ DV
Pictures in HDV l_mnat arc converted to
DV formal and pictures in DV format arc
output in DV format.
O Notes
•For inpul signal xia an i.LINK connection, _e
[VCR HDV/DV] (p. 57).
• Disconnect lhe i.LINK cable belore selling
[i.LINK CONVI. Otherwise, the connecled
video device may nol be able to recognize lhe
video signal [1"oi/1 your cat/lcorder,
You need to convert the signal depending
on the TV connected when playing back the
picture. The recorded pictures are played
back as lk_llewing illustrations.
P,"16:g
Select to vie_ your pictures on a 16:9
(wide) TV.
16:9 (wide)
pictures 4:3 pictures
4:3
Select to _ie_ your pictures on a4:3
standard TV.
16:9 (wide)
pictures 4:3 pictures
Notes
• _Vhen yo/i C'Ollnecl yo/ir cilmcorder to _1 TV
compatible with tile ]D-I system, and play back
llle tape, set [TV TYPEI to 116:91.The TV
automatically switches the aspect ratio
according to the playback picture. Relcr also 1o
the manual supplied wilh your TV.
• When you connect your camcorder to a TV wilb
all i.LINK cable 1o play back the tape, lhe
seuing of [TV TYPEI is invalid,
See page I 12.
You can check the setup value of the
following items.
[VCR HDV/DV I !when tile POWER switch is
set to PLAY/EDIT)/P. 57)
[COMPONENT] /P- 60)
[i.LINK CONV] (P- 601
[TV TYPE] (P- 60)
HDMI OUTPUT lP. 1(15)
6O

You can display the frame attd check that
the subject is horizontal or vertical by
setting [GUIDEFRAME] to [ON].
The lhame is not recorded. Press DISPLAY/
BATT INFO to make tile lhame disappear.
"_° Tips
• Placing tile subject at tile cross poinl OItile
guide flame makes a balanced compositkm.
You catt display the color bar or record it on
tile tape by setting [COLOR BARI to [ONI.
It is convenient to a@lst the color on the
monitor connected.
During playback, displays the ittformalion
(data code) recorded automatically at tile
time of recording.
_'OFF
Data code is not displayed.
DATE/TIME
Displays the date and time.
CAMERADATA(below)
Displays camera setting data.
[] SteadyShot off
[] Exposure
[] White bahmce
[_Gain
[] Shutter speed
[] Aperture value
O Notes
• The exposure ac[iustnlent value (OEV), a shutter
speed, and tile aperture _alue appear when still
images on a "Menlory Stick Duo" me phJyed
back.
• ._ appears lot a picture recorded using a flash.
• In the DATE/TIME data display, the dale and
time are displayed in tile same area. If you
record a picture without _etting tile clock, [.....
.... I and [--:--:--I will appear.
• During Easy Handycan_ operation, you can _t
only [DATE/TIMEI.
_" AUTO
Displays the remaining tape indicator for
about 8 seconds in situations such as those
described below.
• When you set tile POWER switch to PLAY/
EDIT or CAMERA-TAPE with a cas_lte
inserted. :1_
• Wbell you Iollch [_ (Play/Pause). =
ON
Alx_ays disphlys Ihe remaining lape
indic ator.
The default setting is [ON], allowittg you to
use the supplied Remote Commander
(p. 108).
"_° Tips
• Set to [OFF] to pre_ent your camcorder flon/
responding to a command sent by ren/ote
COlllro] UllitSof ot]ler can/corders or V('ts.
The camera recording lamp will nol light up
during recording when you set this to [OFF]
(The defaull setting is tON]).
Continued._ 61
_STANDARD SETme_/go_i_ue_}
62
I,,.ON
A be%:_ingsound starts when you stall/stop
recording, or operate the touch paneh
OFF
Cancels the beeping sound and shutter
sound.
_"LCD PANEL
Shox_s displays such as the time code on
the LCD screen and in the viewfinder.
V-OUT/PANEL
Shox_s displays such as the time code on
the TV screen, LCD screen, and in the
viewfinder.
NORMAL
Scrolls the menu items downwards by
touching [_.
OPPOSITE
Scrolls the menu items uD_ards by
touching [_.
_5min
Tile camcorder is automatically turned off
when you do not operate your camcorder
fur more than approximately 5 minutes.
NEVER
The camcorder is not automatically turned
off.
O Notes
•_vVhen you connecl your calncorder Io a wall
outlet, [A.SHUTOFF] is mmml+tticallyset to
INEVERI.
Seepage _)9.
You can slightly reduce the recurding start
point time when you start recording by
pressing START/STOP. This function is
useful tu compensate fur time lapse at the
click of the shutter.
OFF
Takes more time to reach tile recording
start point, but a smooth transition can be
recorded.
ON (R_)
Slightly reduces the time it takes to slarl
recording when you attempt to record right
after you switch on the camcorder (set the
POWER switch to CAMERA-TAPE frum
the OFF (CHG) position), or when you
attempt to record when Ihe recording
stanby mode is canceled.
Notes
•If [QUICK REC] is set to [ON], the interval
between scenesIrce/cs lk)ra [llOlllelll(editing on
your conlpuler is rccomll/ended).
"_° Tips
• If tile recording standby mode continues more
Illan _lpproxinlmely3 minutes,tile drum will
stop rolling, andthestandby modeiscanceled.
This is Iv>protect tile tape andto pre_.entll-Oln
unnecessarily bauery exhausling,
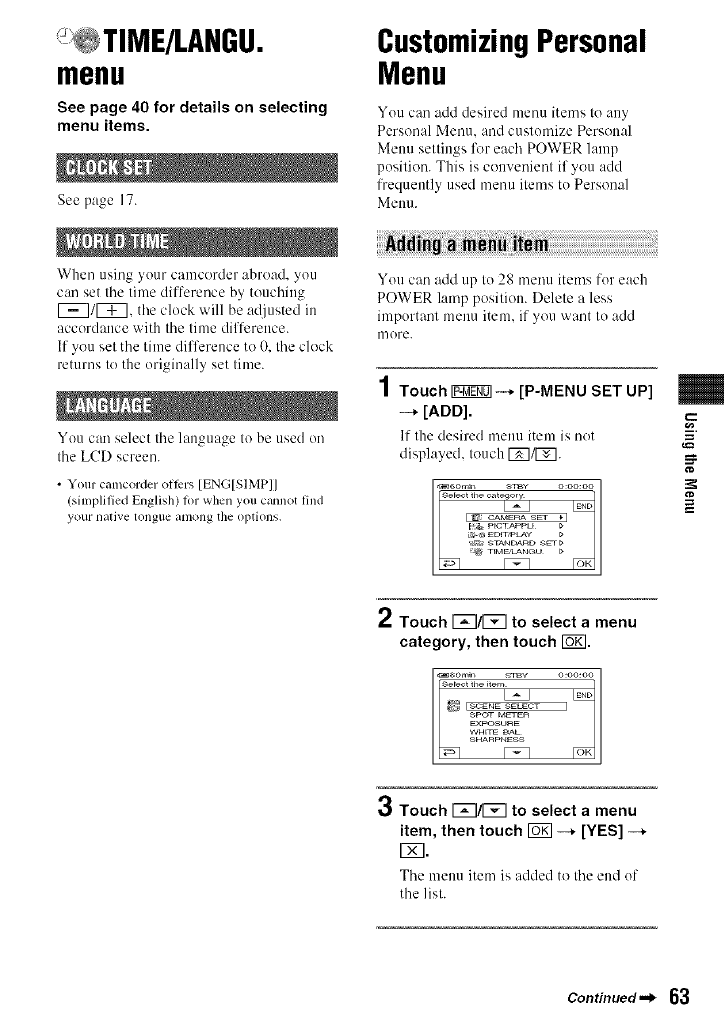
menu
See page 40 for details on selecting
menu items.
See page 17.
When using your camcorder abroad, you
can set tile time difference by touching
1_7/1_7, tile clock will be adjusted in
accordance with tile time difference.
If you set tile time difference to O, tile clock
returns to the originally set time.
You can select tile language Io be used on
the LCD screen.
•Your camcorder olti_rs [ENG[SIMP]]
(simplified English) for when you c_mnot lind
your llaliv¢ tongtl¢ alnong the options.
CustomizingPersonal
Menu
You can add desired menu items to any
Personal Menu. and customize Personal
Menu settings for each POWER lamp
position. This is convenient if you acid
frequently used menu items to Personal
Menu.
iiiiiiN ii iii! iii !iiiiiii!i i!N :i iii i !;!!i
You can add up to 28 menu items for each
POWER lamp posiliou. Delele a less
important menu item. if you want to add
mere.
4
/ Touch _--+ [P-MENU SET UP]
-* [ADD].
If the desired menu item is not
displayed, Iouch [_/[_.
2Touch [B/_ to select a menu
category, then touch I_ffl.
Touch F_I/[_ to select a menu
item, then touch _--* [YES] --*
V_l.
The menu item is added to the end of
the lisl.
g
Continued._ 63
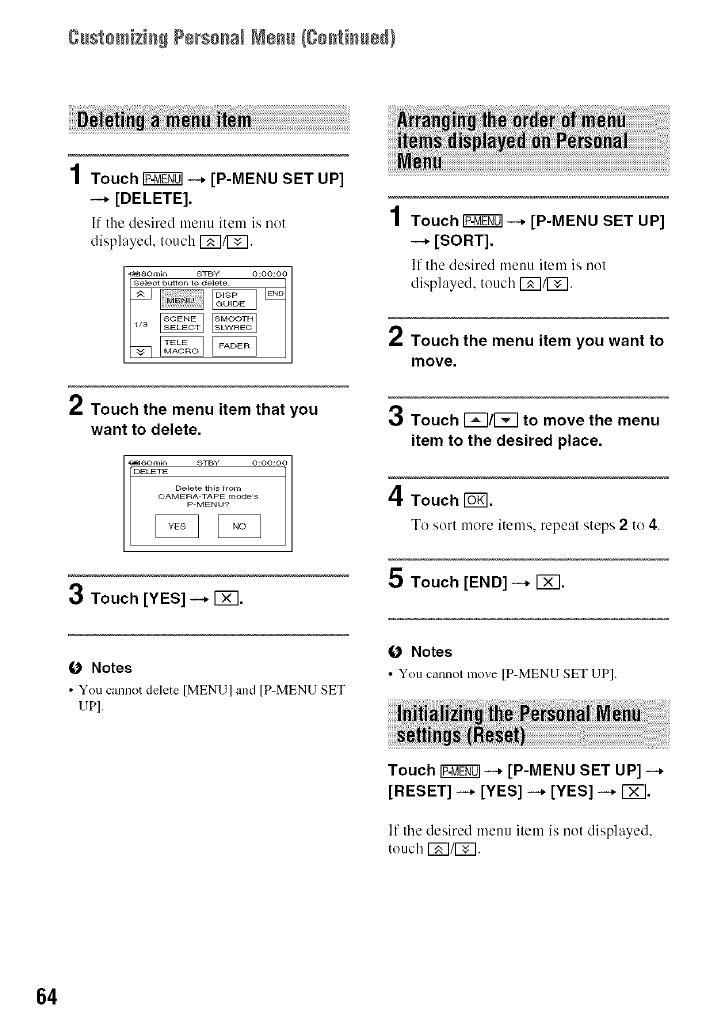
g++st+mk+++P÷rs++++ ++++÷++Ig++t+++÷+)
4
/ Touch _ --+ [P-MENU SET UP]
--* [DELETE].
It the desired menu item is not
displayed, touch r_]/][_+
*" Touch the menu item that you
want to delete.
DELETE
D÷_ete m_ +tom
_ [_OAMERAPMENo?TAPEm_s
3Touch [YES] --+ [_7.
O Notes
• You cannot delete [MENU] and [P-MENU SET
UPI.
1Touch I?_ggg0]--+ [P-MENU SET UP]
-+ [SORT].
If tile desired menu item is not
displayed, touch [_]/[_].
2Touch the menu item you want to
move.
3Touch 1_7/1_7 to move the menu
item to the desired place.
4Touch+<.
To sort more items, repeal steps 2to 4.
5 Touch [END]--+ IX].
O Notes
• You cannot move [P-MENU SET UP].
Touch IF_gg01--* [P-MENU SET UP] -+
[RESET] --* [YES] --* [YES] --* [_.
If the desired menu item is not displayed,
touch [_]/[Z].
64
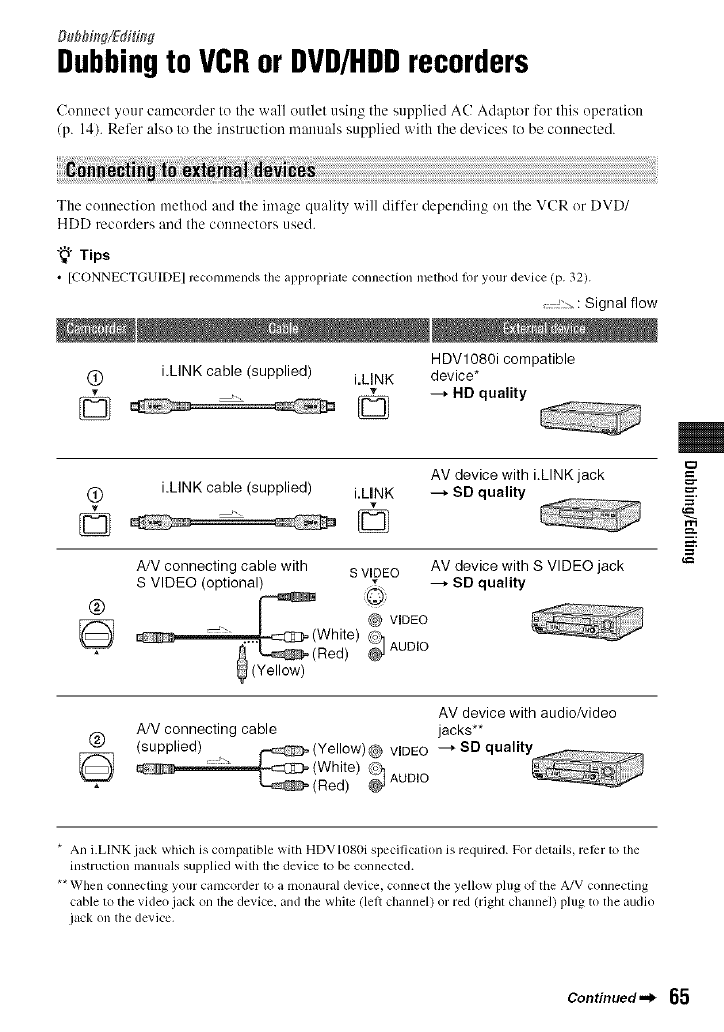
Dubbing/Edit[fig
Dubbingto VCRor DVD/HDDrecorders
Ctmnecl your camcorder Io Ibe wall eullel u_,ing the supplied AC Adapler for Ibis operalion
/p. 14). Refer also to tile inslruclion manuals supplied with lhe devices Io be connected.
The connection nlethod and Ibe image qualily will differ depending on Ibe VCR or DVD/
HDD recorders and Ihe connecters used.
"_" Tips
• [CONNECTGUIDE] recommends the al_l_ropriate connection method for your device (p. 32).
: Signal flow
H DVl080i compatible
(_ i.LINK cable (supplied) i.MNK device*
_ --, HD quality
AV device with i.LINK jack
(_ i.LINK cable (supplied) i.LINK --_ SD quality
© ©
®
A/V connecting cable with s WDEO AV device with S VIDEO jack
S VIDEO (optional) _ --_ SD quality
@ VIDEO
White) AUD 0
_(Red)
(Yellow)
AV device with audio/video
(_) A/V connecting cable jacks**
(supplied) _ U.=::C2_(Yellow)@ VIDEO ---_SDqualit
_ _0:3_3=(White) _ AUDIO
(Red)
=
m.
=
* An i.LINK jack which is compatible with HDVI080i specification is required. For details, mlbr 1o lhe
instruction manuals supplied with the device 1o be connected.
** When connecting your camcorder to a monaural device, conned lhe yellow plug of the A/V connecling
cable to the video jack on file device, and file while (lelt channel) or red (rigbl channel) plug to the audio
jack on the device.
Continued._ 65
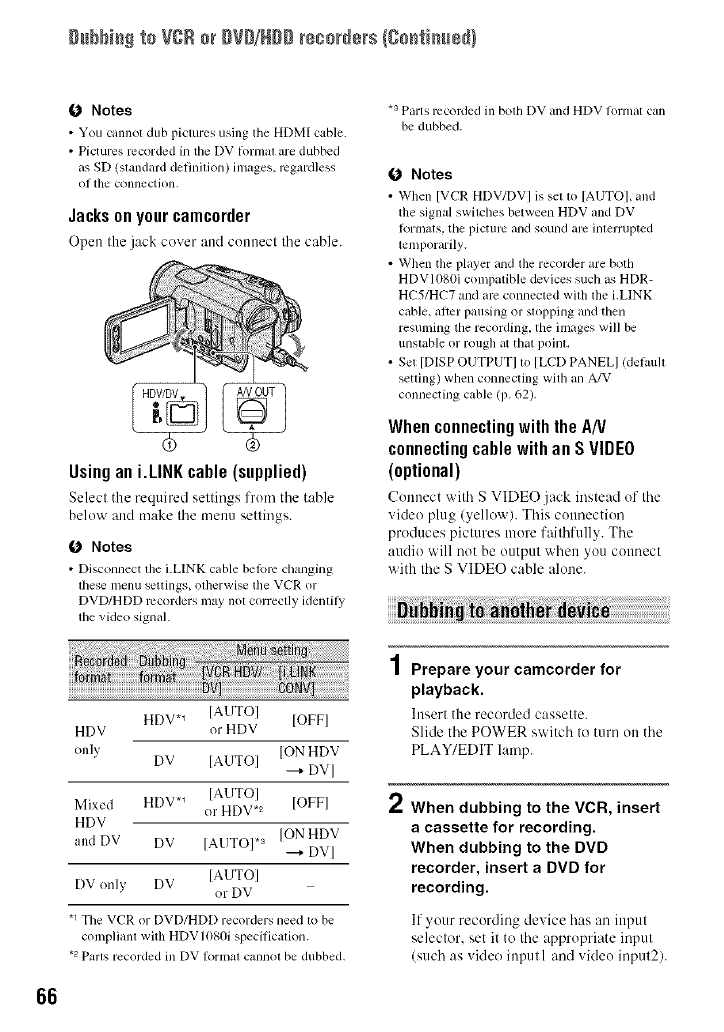
gubbi_ te VSB e_gVD/Hgg recorders {Coati,B@}
O Notes
• You cannot dub pictures using the HDMI cable.
• Pictures recorded in tile DV hmmd are dubbed
asSD (standm'ddetinJdon) images, regardless
Ol the connection,
Jacksonyourcamc0rder
Open Ille jack cover and connect the cable.
Usingan i.LINKcable(supplied)
Select the required settings from the table
below and make the menu settings.
O Notes
• Disconnect lhe i.LINK cable belore changing
lhese menu settings, olberwise tile VCR or
DVD/HDD recorders Inay noI correctly identily
lbe video signal.
HDV. _ [AUTOI [OFFI
HDV or HDV
only [ON HDV
DV [AUTOI --+ DV]
Mixed HDV. _ [AUTO]
or HDV .2 [OFF]
HDV
and DV DV [AUTO]. a [ON HDV
--+ DV]
DV only DV [AUTO]
"or DV
.1 Tile VCR or DVD/HDD recorders need to be
complianl with HDV ]080i specification.
.2 Paris recorded in DV Iorlnal callllOI be dubbed,
.3 Parts recorded in bodl DV and HDV fol:mal can
be dubbed.
Notes
• When [VCR HDV/DV I is set tl) [AUTO], and
the signal switches between HDV and DV
lormats, the picture and sound arc inlerrupted
temporarily.
• When the player and tim recorder are both
HDVI080i compatible devices such _JsHDR-
HC5/HC7 and am connected witll the i.LINK
cable, a/_cr pausing or stopping and then
resuming tile recording, tile images will be
unslable or rougll at that poinl,
• Set [DISP OUTPUTI to [LCD PANELI (delaull
setting) when connecting wilb an A/V
connecting cable (p. 62).
Whenconnectingwith theAN
connectingcablewith an SVIDEO
(optional)
Connect with S VIDE()jack instead of the
video plug (yellow). This connection
produces pictures more faithfully. The
audio will not be output when you connect
with lhe S VIDEO cable alone.
4
/ Prepare your camcorder for
playback.
htsert the recorded cassette.
Slide the POWER switch to turn on the
PLAY/EDIT lamp.
2When dubbing to the VCR, insert
a cassette for recording.
When dubbing to the DVD
recorder, insert a DVD for
recording.
If your recording device has an iupul
selector, set it to the appropriate inpul
(such as video iupull and video inpul2).
66
3Connect your recording device
(VCR or DVD/HDD recorder) to
your camcorder.
See page 65 fin"connection details.
/I
N. Start playback on your
camcorder, and recording on the
recording device.
Refer to the operntittg instructions
supplied with your recording device for
details.
•When dubbing to a DVD recorder hom your
canlcorder tllrough an i.LINK cable, you may
not operale your canlcorder on yotlr DVD
recorder even if ils hlstruclion t/lalltla] says yoll
can.
II you can sel tile input nlode to HDV or DV on
your DVD recorder and can input/output
pictures, k)llow lhe steps in "Dubbing 1oanother
device."
• When you use an i.LINK cable, the vide() and
sound signals are transmitted digitally,
producing high quality pictures.
• When an i.LINK cable is connected, the k)rmat
ol tile outpul signal (HDVouT _ or DVOUT
) will be indicated on file LCD screen ol
your camcorder.
5 When dubbing is complete, stop
your camcorder and the
recording device.
O Notes
•When connecting \viltl an A/V connecling cable,
set [TV TYPE] according to tile playback
device (TV, etc.) (p. 60).
• To record tile date/linle and canlera settings data
when connected by the A/V connecting cable,
display lheln on tile screen (p, 61 ).
• The lollowing cannot be output via file _, HDV/
DV imerli_ce (i.LINK):
Indicalors
Pictures edited with [PICT.EPFECTI (p. 55)
or [D.EFFECTI (p. 54)
Titles that are recorded on ol]ler camcorders
• Pictures recorded in the HDV lomlal am not
output lrom the _ HDV/DV Interlace (i.LINK)
during playback pause or in ally playback mode
otller than nomlal playback.
• Note tile lollowing wllen connecling wilh an
i.LINK cable:
Tile recorded picture beconles rough when a
picture is paused on your camcorder while
recording 1o a VCR or DVD/HDD recorder.
[)atz_ codes (date/tinle/canlera settings data)
nlay not be displayed or recorded depending
on the device or application.
VOIlcannot record tile pictllrc and sound
separalely.
=
m.
g
67
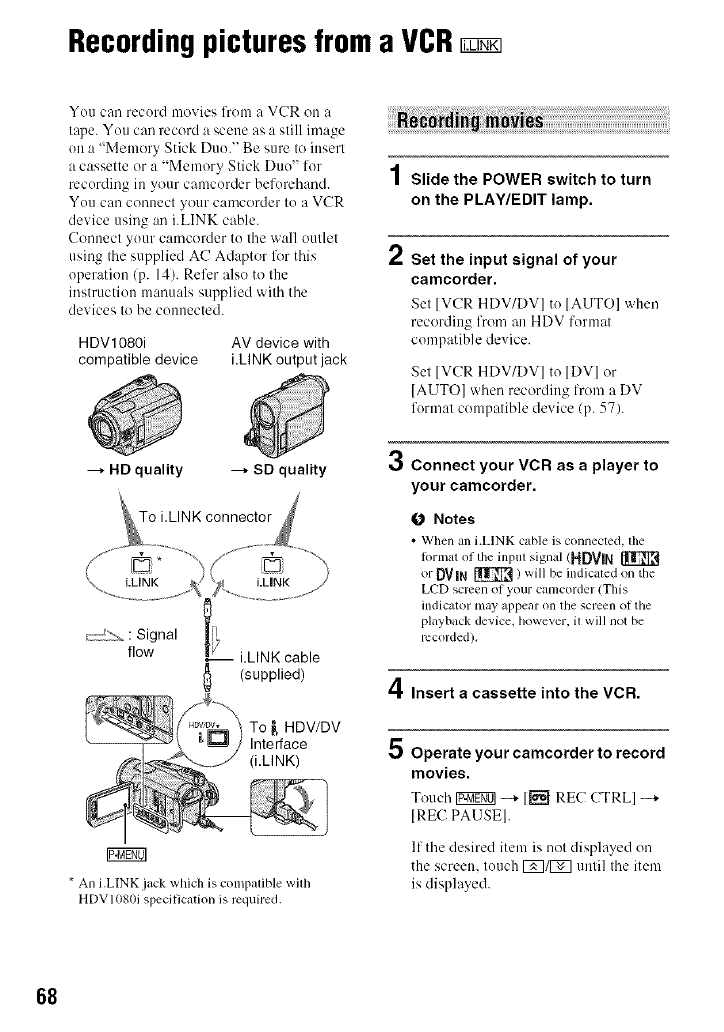
Recordingpicturesfroma VCR
You call record movies from a VCR on a
tape. You call record a scene as a still image
on a "Memory Stick Duo." Be sure to insert
a cassette or a "Memory Stick Duo" for
recording in your camcorder beforehand.
YOU call conuect your camcorder to a VCR
device using all i.LINK cable.
Connect your camcorder to the wall outlet
using tbe supplied AC Adaptor lk_rtbis
operation (p. 14). Refer also to the
instruction manuals supplied witb tbe
devices to be connected.
HDV1080i AV device with
compatible device i.LINK output jack
--_ HD quality --_ SD quality
(supplied)
4
/Slide the POWER switch to turn
on the PLAY/EDIT lamp.
2Set the input signal of your
camcorder.
Set [VCR HDV/DV] to [AUTO] when
recording fron/an HDV format
compatible device.
Sel [VCR HDV/DV] to [DV] or
[AUTO] wlmn recording from a DV
fornml compalible device (p. 57).
3Connect your VCR as a player to
your camcorder.
O Notes
•When an i.LINK cable is connected, tim
lOrllla[ olthe input signal (HDVlN
or DVIN _ / will be indicated on the
LCD screen of your camcorder (This
indicator may appear on the screen of the
playback device, however, il will not be
recorded).
4Insert a cassette into the VCR.
* An i.LINK jack which is colnpalible wilh
HDV1080ispecification is required.
Operate your camcorder to record
movies.
Tom.'b IV:ggg01-+1_ RE(; CTRLI -+
IRE(: PAUSEI.
If tim desired item is uol displayed on
the screen, touch [_]/[_ unlil Ibe item
is displayed.
68
101 Start playing the cassette on your
VCR.
Tile picture played on the connecled
device appears on the LCD screen of
yOUr calncorder.
7Touch [REC START] at the point
you want to start recording.
8 Stop recording.
Touch _ (Slop) or IREC PAUSEI.
9Touch 1_7 --+ [_].
0 Notes
•You need ml bLINK cable tin"tiffs opel'atiolL
•You cannot record TV programs lrom lhe _,
HDV/DV huert_,ce (i.LINK).
• You can record pictures ti'om DV devices only
ill llle DV lormaL
• N0tc the lollowing when connecting wilh an
i.LINK cable:
The recorded picture becomes rough when a
picture is pau_d on a VCR while recording 1o
your cmncorder.
VOIlcannol record tile pictllrc and sound
separalely.
If you pau_ or stop lhe recording and restart
it, the picture may niu be recorded smoothly.
• When a 4:3 video signal is input, il appears with
black bands on the right and left sides on the
screen of your camcorder.
1Perform steps 1 to 4 in
"Recording movies."
2Start playing the cassette.
The piclures on Ille VCR appear ()it Ihe
screeu of yo/lr camcorder.
3Press PHOTO lightly at the scene
you want to record. Check the
image and press it fully.
r2J
g
_=.
g
6g
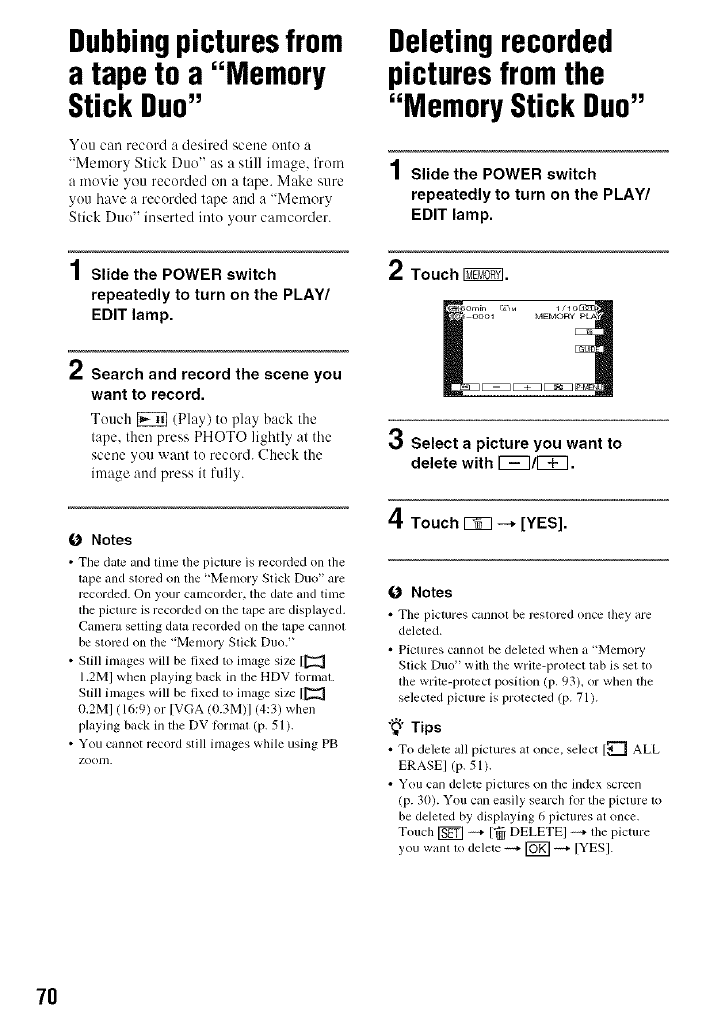
Dubbingpicturesfrom
a tape to a "Memory
Stick Duo"
You cau record a desired scene OiltU a
"Memory Stick Duo" as a still image, from
a movie you recorded on a tape. Make sure
you have a recorded tape and a "Memory
Stick Duo" inserted into your camcurder.
1Slide the POWER switch
repeatedly to turn on the PLAY/
EDIT lamp.
/Search and record the scene you
want to record.
Touch _ (Play) to play back the
tape, then press PHOTO ]ightl_ at the
scene you want to record. Check the
image and press it fully.
(J Notes
• Tile date and time tl_e picture is recorded on the
tape and stored on the "Memory Stick Duo" are
recorded. On your camcorder, the date and time
tile picture is recorded on the tape are displayed.
Calnera setting data recorded on tile tape cannot
be stored on the "Memory Stick Duo. _
• Still images will be fixed to image size [[_
1.2M] when playing back in the HDV lormat.
Still images will be fixed to image size [[_
0.2M] lib:9) or [VGA lt).3M)] 14:31 when
playing back in the DV Rtrmat (p. 51 ).
• You cannot record still images while using PB
ZOO111.
Deletingrecorded
picturesfromthe
"Memory Stick Duo"
1Slide the POWER switch
repeatedly to turn on the PLAY/
EDIT lamp.
2Touch I_.
oool MEMORYP_
3Select a picture you want to
delete with r_7/1_7.
4Touch r_q -_ [YES].
0 Notes
• The pictures cannot be restored once they are
deleted.
• Pictures cannot be deleted when a 'Memol T
Stick Duo" with file write-protect tab is set to
the write-protect position (p. 93). or when the
selected picture is protected (p. 71).
"_° Tips
• To delete all pictures at once. select [_ ALL
ERASE] (p. 51).
• You can delele pictures on the index screen
(p. 30). You can easily search lor tile picture to
be deleted by displaying 6 pictures at once.
Touch _ ++++[_ DELETEI ++++the picture
you wahl to delete ++++[_] ++++[YES].
7O
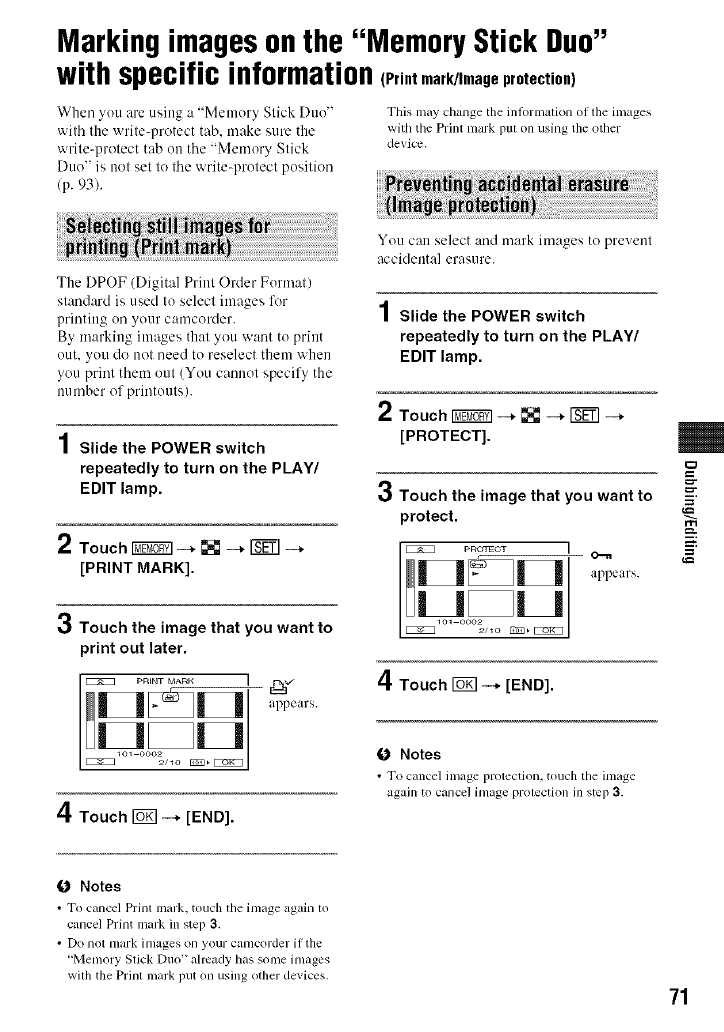
Markingimagesonthe "Memory Stick Duo"
with specific information(Print mark/Image protection)
When you are using a "Memory Stick Duo"
with the write-protect tab. make sure the
write-protect tab on the "Memory Stick
Duo" is not set to lhe write-protect position
(p. 93).
This may change the inlornmlion ol the images
with tile Print nlark put on using the other
cievice.
The DPOF (Digital Print Order Format)
standard is used to select images l\w
printing on your camcorder.
By marking images that you want to print
out. you do not need to reselect them when
you print them out (You cannot specify the
nutuber of printouts).
1Slide the POWER switch
repeatedly to turn on the PLAY/
EDIT lamp.
2Touch I_ --* [] --* _--*
[PRINT MARK].
3Touch the image that you want to
print out later.
Pn_NT MAnK I
appears.
4Touch _--* [END].
You C{'tll select aud mark images to prevenl
accidenta] erasure.
1Slide the POWER switch
repeatedly to turn on the PLAY/
EDIT lamp.
2Touch 1_7_1 --* [] --* [_ --*
[PROTECT].
3Touch the image that you want to
protect.
P RO_FUCT 1
o%Ul
appears.
4Touch _--* [END].
0Notes
• To cancel image protection, touch tile image
again to cancel image prolection m step 3.
=
m.
g
0Notes
• To cancel Prillt lllilrk, touch tile inlilge agahl lo
cancel Print mark in step 3.
• Do not mark images on your camcorder if the
"Memory Stick Duo" ahcady has sl)me images
with the Prinl mark put on using other devices. 71
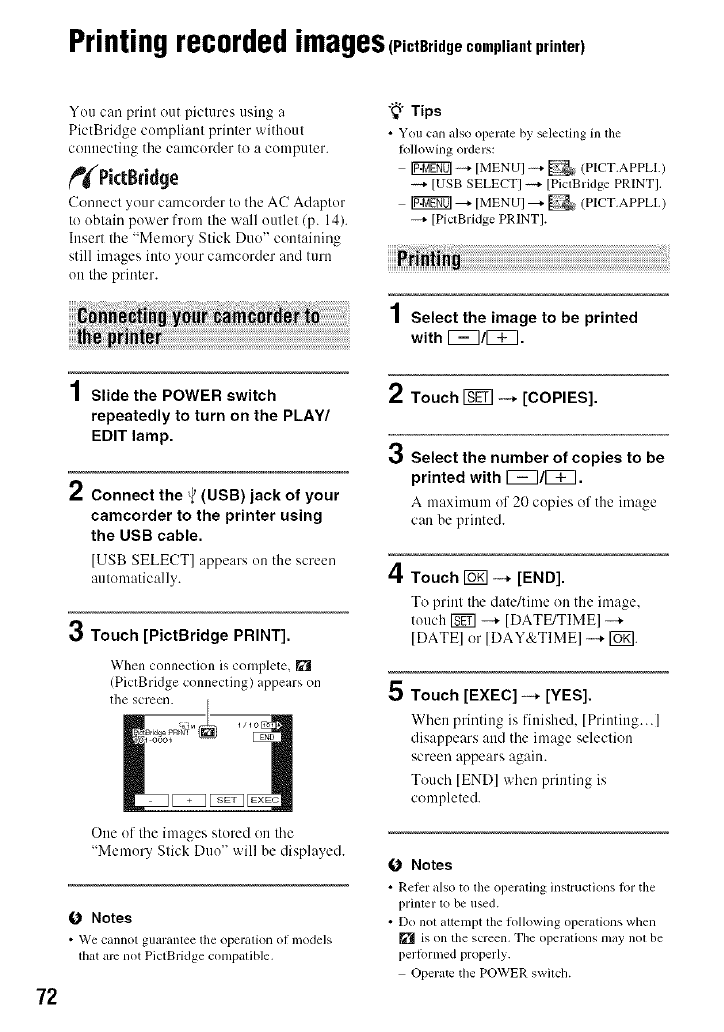
Printingrecordedimages(PictBridge compliant printer)
72
You can print out pictures using a
PictBridge compliant printer without
couuectillg the camcorder to a computer.
_PictBridge
Conuect _our camcorder to tile AC Adaptor
to obtain power from the wall outlet/p. 14).
Insert the "Memory Stick Duo" containing
still images into your camcorder and turn
oi1the printer.
1Slide the POWER switch
repeatedly to turn on the PLAY/
EDIT lamp.
2Connect the _'(USB) jack of your
camcorder to the printer using
the USB cable.
[USB SELECT] appears on the screen
automatically.
3Touch [PictBridge PRINT].
When conneclion is complete, []
(PictBridge connecting) appears on
the screen.
One of tile images stored on tile
"Memory Slick Duo" will be displayed.
0 Notes
• We canno[ gllaranlee the operallOll ()_ inodeJs
that are not PictBridge compatible.
"_" Tips
• You cnn _dso oper_Lle by _lecling in lhe
Io]]owing orders:
Ig_gff0] _ [MENU] _ _ (PICT.APPLL
----+[USB SELECT] ----+[PictBridge PRINT].
[U_K_] _- [MENU] _- _ (PICT.APPL1.)
--+ [PictBridge PRINT].
1Select the image to be printed
with 1_7/1_7.
2
3
4
5
Touch _ --+ [COPIES].
Select the number of copies to be
printed with 1_7/1_7.
A maximunl (If 20 copies of tile image
can be printed.
Touch _ -+ [END].
To print tile date/time on the image,
touch _ --+ [DATE/TIME] -+
[DATEI or [DAY&TIMEI --+ I_g].
Touch [EXEC] -+ [YES].
When plinting is finished, [Printing...]
disappears and the image selection
screen appears again.
Touch [END] when printing is
completed.
0 Notes
• Relcr idso to tile operiflillg illslr/ictiolls l_ll"the
prinler 1<)be used.
• Do nol aUempt the lollowing operations when
[] is on the screen. The operalions may nol be
perlormed properly.
Operalc the POWER swilch.
Disconnecl tile USB cable hom lhe printer.
Remove file '_Men]oly Stick Duo" fl;onl your
camcorder.
• If tile printer stops working, disconnect tile USB
cable, turn the printer off and on again and
rcstarl the operation fl:om tile beginning.
• Some printers may cut off left, right, lop and
lower parts of tile image. Especially, when the
image is recorded with a 16:9 (wide) ratio, left
and righl parts II]ay be largely cut <ill.
• Some printer models may not support lhe date/
time printing ftmcfion. RelPr 1o your prinler's
operating inslructions lot details.
• We cannot guarantee the printing of ftnages
recorded with a device other lhan your
camcorder.
• PiclBridge is all industry sland_lrd established
by the Camera & Imaging Products Association
(CIPA). You can print still images withoul using
a computer by connecting a printer dimclly to a
digital video camera or digilal still camera,
regardless of model or ii]alluftlclurer. =
E
m.
g
73
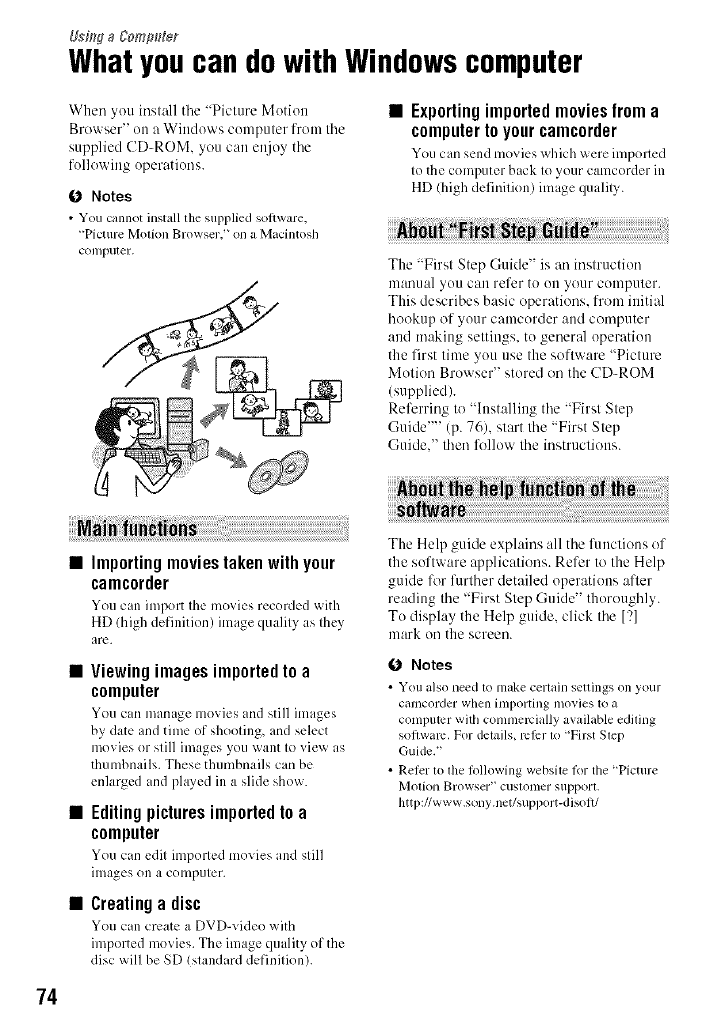
UsflqgaCom#_eg
Whatyoucan dowith Windowscomputer
When you install the "Picture Motion
Browser" on a Windows computer from the
supplied CD-ROM. you call enjoy the
following operatiuus.
0 Notes
• You cannot install the supplied soltware,
"Picture Motion Browser,' on a M_tcintosh
coil/purer.
•Exporting imported movies from a
computer to your camcorder
You can send lnoxits _@ich x_,ele inlported
to the computer back to your camcorder in
HD (high definition) image qualily.
The "First Step Guide" is art iItstruction
ulartual yuu Call refer to uu your cuutputur.
This describes basic operations, from initial
hookup of your camcurder and computer
aud makiug settings, tu general operation
the first time you use the software "Picture
Motion Bruwser" stored on the CD-ROM
(supplied).
Referring to "Installing the "First Step
Guide'"' (p. 76), start the "First Step
Guide," lhun follow lhe instructions.
74
Importing movies taken with your
camcorder
You can import the movies recorded with
HD (high definition) image quality as they
arc.
Viewing images imported to a
computer
You can manage movies and still images
by date and time of shooting, and select
movies or still images you want to view as
thumbnails. These thumbnails can be
enlarged and played in a slide show.
Editingpicturesimportedto a
computer
You can edit imported movies and still
images on a computer.
Creatinga disc
You can create a DVD-video _ith
imported movies. The image quality of the
disc will be SD (standard definition).
The Help guide explains all the functions of
the software applications. Refer to the Help
guide lk_rfurther detailed operations after
reading the "First Step Guide" thoroughly.
Tu display the Help guide, click the [?]
mark on the screen.
0Notes
• YOll idso lleed to/nilke cerlilill seUings on your
calncorder when hllporting inovies to a
compulcr with commelvially available edding
software. For details, rclbr 1o "First Slep
Guide."
• Refer to ll_e lbllowing websile lor the "Picture
Motion Browser" cuslolller silpport.
http://www.sony.net/support-disolt/
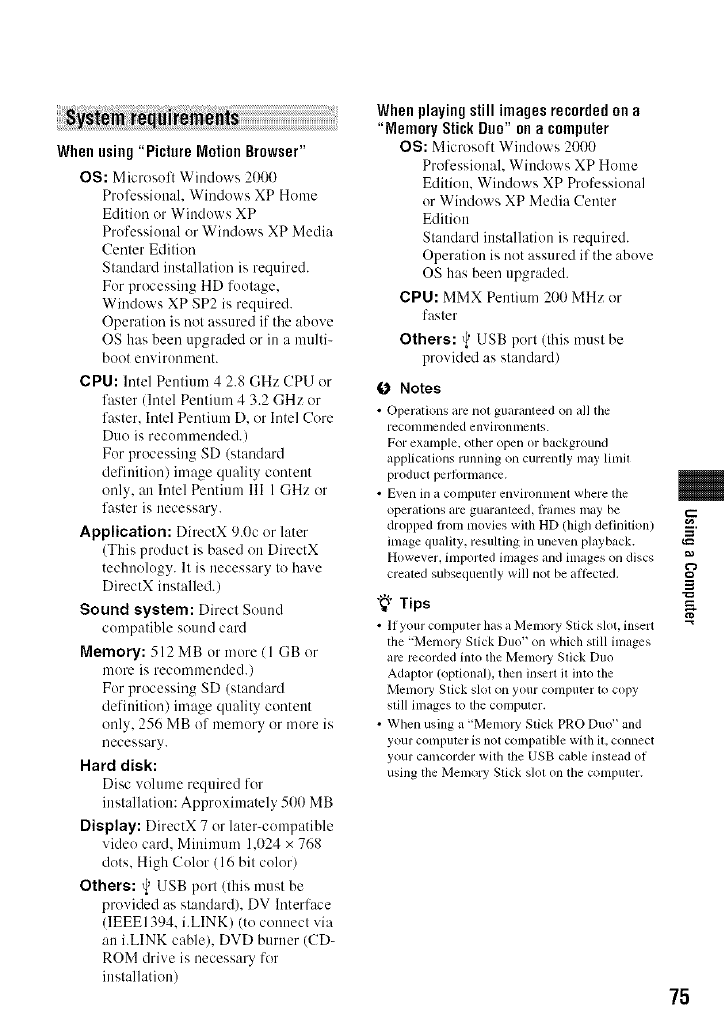
i ¸i i ii¸ i i i! i I iiiiiiiiiiiiiiiiiiiiiiiiiiiiiiiiiiiiiiiiiiiiiiiiiiiiiiiiiiiiiiiiiiiiiiiiiiiiiiiiiiiiiiiiiiiiiiiiiiiiiiJ !ii !
When using "Picture Notion Browser"
OS: Microsoft Windows 2000
Profession:d. Windows XP Home
Edition or Windows XP
Professional or Windows XP Media
Center Edition
Standard installation is required.
For processing HD footage,
Windows XP SP2 is required.
Operation is not assured if the above
OS has been upgraded or in a mttlti-
boot environment.
CPU: lntel Pentiunl g 2.8 GHz CPU or
faster lintel Pentium ¢ 3.2 GHz or
faster. Intel Pentium D. or Intel Core
Duo is recommended.)
For processing SD (standard
definition) image quality content
only, an Intel Pentium llI 1 GHz or
faster is necessary.
Application: DirectX 9.0c or later
(This product is based on DirectX
technology. It is necessary to have
DirectX installed.)
Sound system: Direct Sound
compatible sound card
Memory:512 MB or more/l GB or
more is recommended.)
For processing SD (standard
definition) image quality content
only, 256 MB of memory or more is
necessary.
Hard disk:
Disc vohune required for
installation: Approximately 500 MB
Display: DirectX 7 or later-compatible
video card. Minimum 1.024 x 768
dots. High Color (16 bit color)
Others: _USB port (this musl be
provided as standard), DV Interface
(]EEE1394. i.LINK) (to connect via
an i.LINK cable), DVD burner (CD-
ROM drive is necessary for
installation)
When playing still images recorded on a
"Memory Stick Duo" on a computer
OS: Microsoft Windows 2000
Professionah Windows XP Home
Edition. Windows XP Professional
or Windows XP Media Center
Edition
Standard installation is required.
Operation is not assured if the above
OS has been upgraded.
CPU: MMX Pentium 200 MHz or
faster
Others: _USB port (Ihis musl be
provided as standard/
0 Notes
•Operations arenot guaranteed on aUthe
leconllllcnded e n'_'i l_)n lilt nts.
For example, other open or background
applications running on currently may lime
producl per|ornlance.
• Even in a colnputcr environlllcnt where the
operations are guarameed, fl'atlles may be
dropped fl'ommovies wuh HD (high definition)
imagequality, resulting inuneven playback.
However.imported images and images on discs
crealed subsequendy will not be aflecled.
"_" Tips
• 11your computer hasa Menlory Slickslot. insert
the "Memory Stick Duo" on which still imz_ges
am recorded into the MemoW Slick Duo
Adaptor (optional), then inert il into the
Memoly Stick slot on your computer lo copy
slill imagesIv)the computer.
• When using a "MemoW Slick PRO Duo" and
your conlplltcFis not compaUblewilhU.connect
your camcorder with tile USB cable insleadof
using the Memory Slick s]ol on tile compuler.
m
g
75

Installingthe "First StepGuide"andsoftware
You need to install tile "First Step Guide"
and software to your Windows computer
before connecting your camcorder
to the computer. The installation is
required only for the first time.
Contents to be installed and procedures
may differ dependiug on your OS.
"_" Tips
•Seepage 78 when you use a Macintosh
COlllptlter.
4Click [FirstStepGuide].
5 Select the desired language and
the model name of your
camcorder from the pull-down
menu.
1Confirm that your camcorder is
not connected to the computer.
2Turn on the computer.
O Notes
• Log on as an Administrator l_w installation.
• Close all _lpplications running on tile
conlputer bel_re installing tile software.
3Place the supplied CD-ROM in the
disc drive of your computer.
The hlsta]lation screen appears.
6Click [FirstStepGuide(HTML)].
Installation starts.
When [Save is complele] appears, click
[OK] to finish the installation.
Toview the "First Step Guide" in PDF
In step 6, click [FirstStepCuide(PDF)].
To installthe software"Adobe
Reader" to displaythe PDFfile
In step 6, click [Adobe(R) Reader(R)].
If the screen does not appear
@ Click [Start], then click [My
Computer]. (For Windows 2000.
double-click [My Computer].)
@ Double-click [SONYP[CTUTIL (E:)]
(CD-ROM) (disc drive)."
* Drive names (such as (E:)) may vary
depending on file compuler.
1Perform steps 1to 3 in "Installing
the "First Step Guide'"' (p. 76).
2Click [Install].
3Select the language for the
application to be installed, then
click [Next].
76

,/I
HI" Check your area and country/
region, then click [Next].
Tile software to he installed "_ill be
configured according to your country/
region.
5 Read [License Agreement], select
[I accept the terms of the license
agreement] when you agree, then
click [Next].
6Slide the POWER switch
repeatedly to turn on the PLAY/
EDIT lamp after the connection
confirmation display appears.
7Connect your camcorder and
computer with an i.LINK cable or
USB cable.
When connecting with a USB
cable, [USB SELECT] appears on
the screen of your camcorder.
Select [l_[] Memory Stick].
Click [Next] after connection is
complete.
A message stating that you need to
restart may appear, but you do not need
to restart at this time. Restart tile
computer after the installation is
complete.
O Follow the on=screen instructions
to install the software.
Depending on the computer, you may
need to inslall third parly software
(shown below). If Ihe inslallatiou screen
appears, follow tile inslructions Io
inslall the required software.
• Microsofl DireclX 9.0c-Software
required to handle movies
• Windows Media Fommt 9 Series
Runtime (Windows 2000 onl))-Sol_ware
required to create a DVD
Restart the computer if required to
complete tile installation.
9Remove the CD-ROM from the
disc drive of your computer.
Tile short-cut icons, such :is I ]
("Picture Motion Browser"), appear on
the desktop.
"_" Tips
•For the inlormalion aboul disconnecling the
cable, rel_r 1o "First Step Guide. _
After you install the software,
a shortcut icon for the
customers registration website
is created on the desktop.
• Once you register on the website, you
can get secure and useful customer
support.
http://www.sony.net/registration/di/
m
g
77
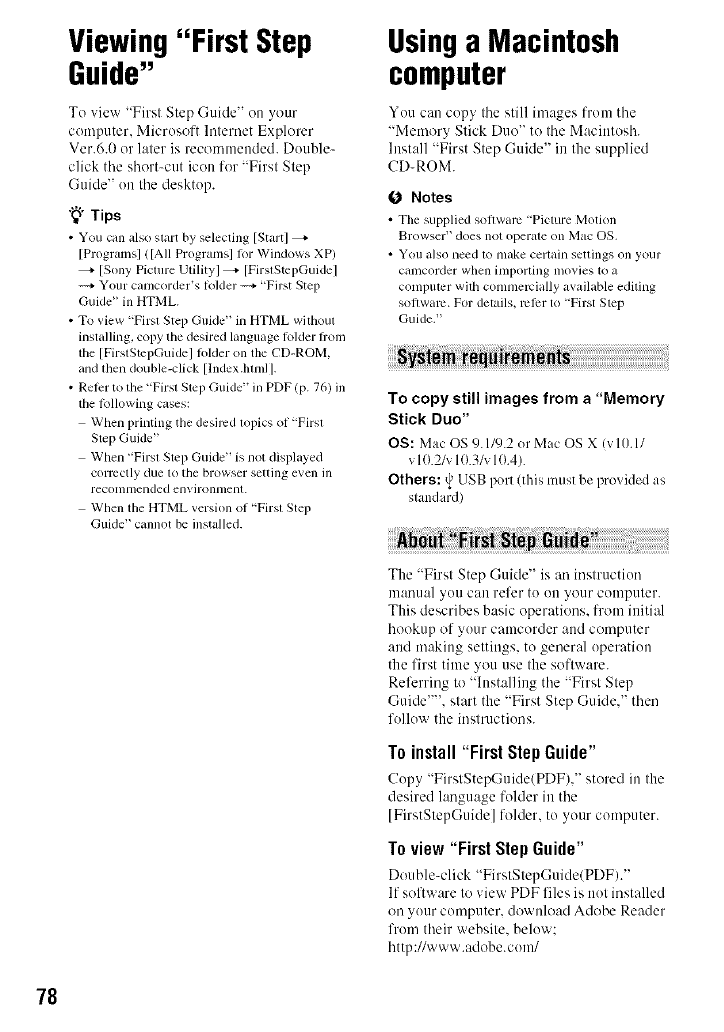
78
Viewing"First Step
Guide"
To view "First Step Guide" on your
computer. Microsoft ]ntemet Explorer
Vet.6.0 or later is recommended. Double-
click the short-cut icon for "First Step
Guide" on the desktop.
"_° Tips
• You can also start by selecting [Start]
[Programs] ![All Programs] lor Windows XP/
[Sony Picture Utilityl _*- [FirstStcpGuidel
----+Your camcorder's Iolder ----+"First Step
Guide" in HTML.
• To view "Firsl Step Guide" in HTML wifllout
installing, copy the desired language lolder flom
the [ FirslStcpGuidel lolder on the CD-ROM,
and lllen double-click [lndex.hmd I.
•Reler to the "Firsl Step Guide" in PDF (p. 76) ill
the klllowing cases:
When printing the desired lopics of "Firsl
Step Guide"
When "Firsl Step Guide" is not displayed
correctly due to tile browser setting even ill
reconllnended environment.
When the HTML version of"Firsl Step
Guide" cannot be installed.
Usinga Macintosh
computer
You can copy the still images from the
"Memory Stick Duo" to the Macintosh.
Install "First Step Guide" in the supplied
CD-ROM.
0 Notes
• The supplied software 'Picnue Motkm
Browser' does nol opel'ale on _lac OS,
• You a]so lleed to lllilke certi=ill settings on your
elullcorder when importing llloxies to al
computer wilh conlnlercially axailab]e editing
software. For details, lvl_:r to "First Step
Guide."
To copy still images from a"Memory
Stick Duo"
OS: Mac OS 9.119.2 orMac OS X IvlO. l/
v 10.2/v 10.3/v 10.4).
Others: ¢. USB port (this liltlStbe provided as
standard)
The "First Step Guide" is an instruction
manual you can refer to on your computer.
This describes basic operations, from initial
hookup of your camcorder and computer
and making settings, to general operation
the first time you use the software.
Referring to "Installing the "First Step
Guide'"'. start the "First Step Guide." then
follow the instructions.
To install "First StepGuide"
Copy "FirstStepGuide/PDF)," stored in the
desired language folder in the
[FirstStepGuide] folder, to your computer.
Toview "First Step Guide"
Double-click "FirstStepGuide/PDF)."
If software to view PDF files is not installed
on your computer, download Adobe Reader
from their website, below:
http://www.adobe.com/
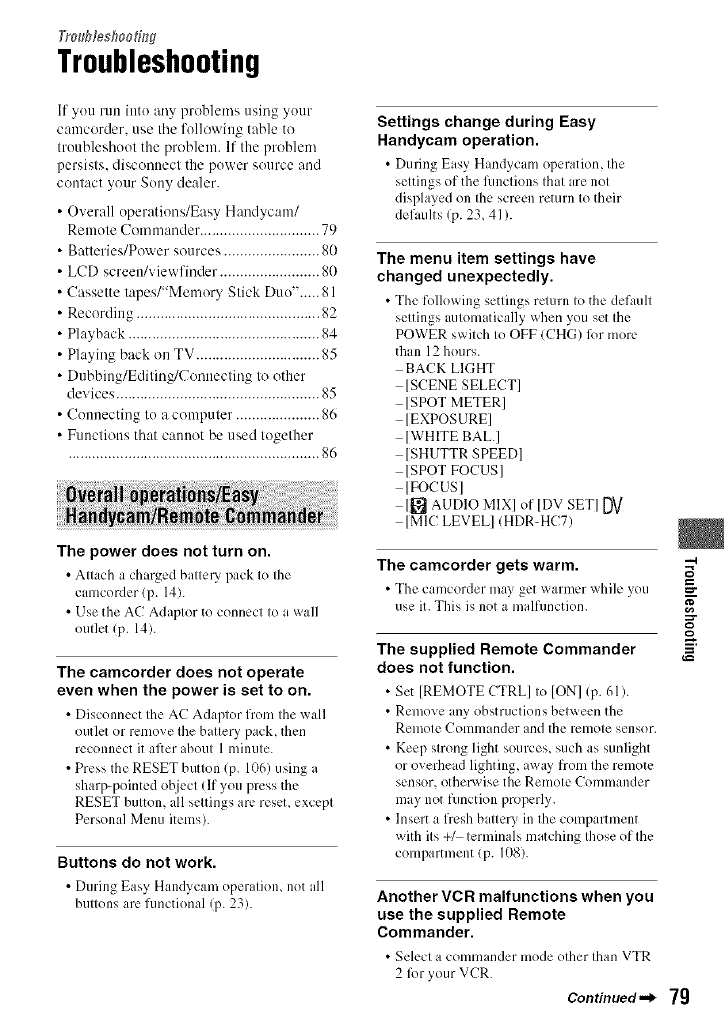
Tra_fesflooh_g
Troubleshooting
If you run into any problems using your
camcorder, use tile following table to
troubleshoot the problem. If the problmn
persists, discom_ect the power source and
contact your Sony dealer.
• Overall operations/Easy Handycam/
Remote Commander .............................. 79
• Batteries/Power sources ........................ 80
• LCD screen/view finder ......................... 80
• Cassette tapes/"Mmnory Stick Duo"..... 81
• Recording .............................................. 82
• Playback ................................................ 84
• Playing back on TV ............................... 85
• Dubbing/Editing/Com_ecting to other
devices ................................................... 85
• Connecting to a computer ..................... 86
• Functions that cannot be used together
............................................................... S()
The power does not turn on.
• Attach a charged battery pack to the
camcorder (p. 14).
• Use the AC Adaptor to connect to a wall
outlet (p. 14).
The camcorder does not operate
even when the power is set to on.
• Disconnect the AC Adaptor from tile _all
outlet or remove the battery pack, then
reconnect it after ahout 1 nfinute.
• Press the RESET button (p. 1(t6) using a
sharp-pointed object (If you press the
RESET button, all settings arc, reseL except
Personal Menu items).
Buttons do not work.
• During Easy Handycan/operatiom not all
buttons are functional (p.23).
Settings change during Easy
Handycam operation.
• During Easy Hand3cam operation, the
settings of the fimctions that are not
displayed on the screen return to their
defaults (p. 23, 41 ).
The menu item settings have
changed unexpectedly.
• The follo_ing settings return to tile default
settings automatically when you set the
POWER switch to OFF (CHG) R)r more
than 12 hours.
BACK LIGHT
[SCENE SELECT]
]SPOT METER]
[EXPOSURE]
[WHITE BALI
[SHUTTR SPEED]
[SPOT FOCUS]
IFOCUSI
[[_ AUDIO MIX] of [DV SET] DV
[MIC LEVEL] (HDR-HC7)
The camcorder gets warm.
• The camcorder may get "_,alulcr _xhilc you
use it. This is not a malfunction.
"-4
r,_
=r
The supplied Remote Commander
does not function.
• Set [REMOTE CTRL] to ION] (p. 61).
• Remove any obstructions between the
Remote Commander and the remote sensor.
• Keep strong light sources, such as sunlight
or overhead lighting, away from the remote
sensor, otherwise the Remote Commander
may not function properly.
• Insert a fresh b atery in the compartment
with its+/ terminalsmatchingthoseofthe
compartment (p. 108).
Another VCR malfunctions when you
use the supplied Remote
Commander.
• Select a commander mode other than VTR
2lbr your VCR.
Continued._ 79
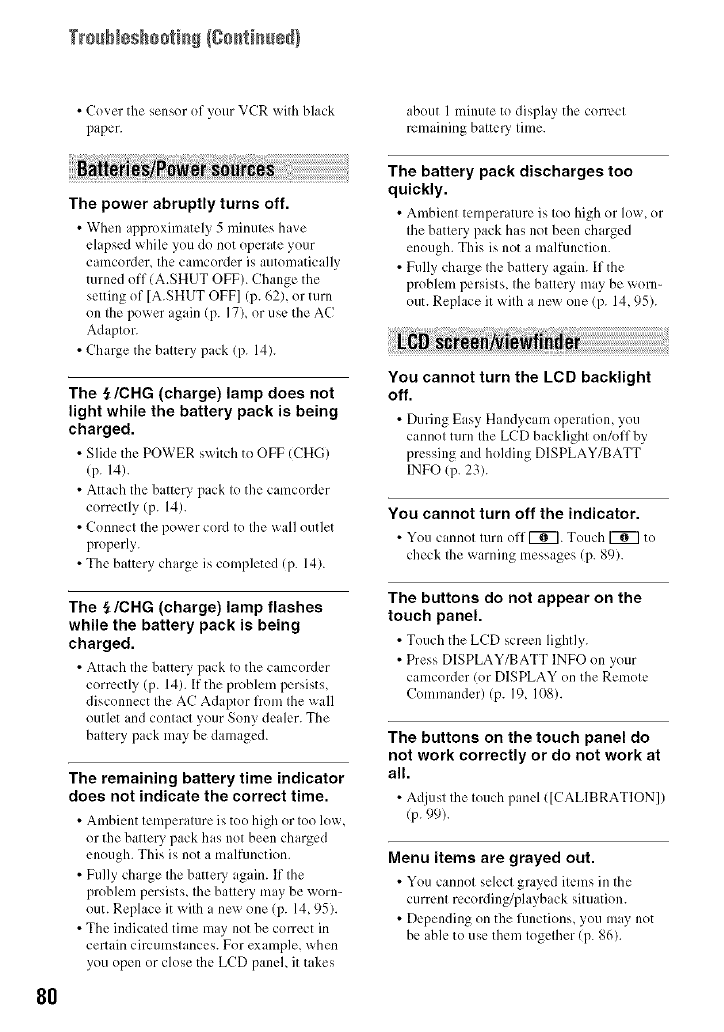
Trs@_sshsstisS/Ssstisssd)
8O
• Cover the sensor of your VCR with black
paper
The power abruptly turns off.
• When approximately 5 minutes ha_e
elapsed while you do not operate your
camcorder_ the camcorder is automatically
turned off (A.SHUT OFF). Change the
setting of [A.SHUT OFF] (p. 62), or turn
on the power again (p. 17)_ or use the AC
Adaptor.
• Charge tile battery pack (p. 14).
The _/CHG (charge) lamp does not
light while the battery pack is being
charged.
• Slide the POWER switch to OFF (CHG)
(p. 14).
•Attach tile battery pack to the camcorder
correctly (p. 14).
• Connect the power cord to the wall outlet
properly.
• The battery charge is completed (p. 14).
The _/CHG (charge) lamp flashes
while the battery pack is being
charged.
• Attach the battery pack to the camcordcr
correctly (p. 14). If the problmn persists,
disconnect the AC Adaptor lron_ the wall
outlet and contact your Sony dealer. The
battery pack may be damaged.
The remaining battery time indicator
does not indicate the correct time.
• Ambient temperature is too high or too low,
or the battery pack has not been charged
enough. This is not a malfunction.
• Fully charge the battery again. If the
problem persists, the battery may be worn-
out. Replace it with a new one (p. 14, 95).
• The indicated time may not be con'ect in
certain circumstances. For examp]e, when
you open or close the LCD panel, it takes
about 1 minute to display the correct
remaining battel 3' time.
The battery pack discharges too
quickly.
• Ambient temperature is too high or low_ or
the battery pack has not been charged
enough. This is not a inalfunction.
• Fully charge the battery again. If the
problem persists, the b atery rely be worn-
out. Replace it with a new one (p. 14, 95).
You cannot turn the LCD backlight
off.
• During Easy Handycan_ operation, you
cannot turn the LCD backlight on/offby
pressing and holding DISPLAY/BATT
INFO (p 23).
You cannot turn off the indicator.
• You cannol lurn off_. Touch g_7 to
check the warning messages (p. 89).
The buttons do not appear on the
touch panel.
• Touch the LCD screen lightl}.
• Press DISPLAY/BATT INFO on your
camcorder (or DISPLAY on the Remote
Comlnander) (p. 19, 108).
The buttons on the touch panel do
not work correctly or do not work at
all.
• Adjust the touch panel ([CALIBRATION])
(p. 99).
Menu items are grayed out.
• You cannot select grayed items in tile
current recording/playback situation.
• Depending on the functions, you may not
be able to use them together (p. 86).
is not displayed.
• During Easy Handycam operation, not all
menu items arc functional. Cancel Easy
Handycam operation (p. 23).
The picture in the viewfinder is not
clear.
• Mo_e the vic_ finder lens adjustment lew:r
until the picture appears clearly (p. 19).
The picture in the viewfinder has
disappeared.
•Close the LCD paneh Thepicture is not
displayed in the viewfinder when the LCD
panel is open (p. 19).
The cassette cannot be ejected from
the compartment.
• Make sure the po_ cr source (battery pack
or AC Adaptor) is connected correctly
!p. 14).
• Moisture condensation has occurred inside
Ibe camcorder (p. 97).
The Cassette Memory indicator or
title display does not appear while
using a cassette with Cassette
Memory.
• This camcorder does not support Cassette
Memol3', so the indicator does not appear.
The remaining tape indicator is not
displayed.
• Set I_ REMAINING] to IONI to al_ ays
display the remaining tape indicator (p. 61).
The cassette is noisier during
rewinding or fast-forwarding.
• When using the AC Adaptor, rewind/fast
for_ ard speed increases (compared _ith
battery operation) and therefore increases
noise. This is not a malfiuaction.
You cannot operate functions using
a"Memory Stick Duo," even if a
"Memory Stick Duo" is inserted.
• Slide the POWER s_ itch to turn on the
CAMERA-MEMORY or PLAY/EDIT
lamp (p. 17).
• lfyou use a "Memory Stick Duo" lbrmattcd
on a computer, format it again on your
camcorder (p. 52).
You cannot delete the recorded
picture on the tape.
• You cannot delete a recorded picture on
tape; you can only rewind the tape and
record ,gain. The new recording overwrites
the existing one.
You cannot delete pictures or format
a"Memory Stick Duo."
• Cancel image protection on the picture
(p. 71).
• The maxinmm number of pictures that you
can delcle on the index screen at one time is
100.
Image protection cannot be applied,
or you cannot mark pictures for
print.
• Release the lock on the _ritc-protcct tab of
the "Memory Stick Duo" if there is one
(p.93).
• Perlbrm the operation again on the index
screen (p. 30, 71).
• The maximum number of pictures you can
mark for print is 999.
--4
,::r
Continued._ 81
TrssNsshsstisS/Ssstisssd)
The data file name is not indicated
correctly, or flashes.
•The file is danmged.
•Use the file format compatible with your
camcorder (p. 93).
Refer also to "Cassette tapes/"Memory
Stick Duo'"' section (p. 81 ).
The tape does not start when you
press START/STOP.
• Slide the POWER switch to turn on the
CAMERA-TAPE lamp (p. 24).
• The tape has reached Ihe end. Re_ ind it, or
insert a new cassette.
• Set the write-protect tab to REC or insert a
new cassette (p. 92).
• The tape is stuck to the drum due to
moisture condensation. Remove the
cassette and leave your camcorder l()r at
least I hour, then reinsert the cassette
(p. 97).
You cannot record on the "Memory
Stick Duo."
• The 'Memory Stick Duo" is fulh Insert
another "Memory Stick Duo" or format the
"Memo UStick Duo" (p. 52). Or, delete
unnecessary pictures recorded on the
"Memory Stick Duo" (p. 70).
• When the POWER switch is set to
CAMERA-TAPE, you cannot record still
images on the 'Memo UStick Duo" with:
When [SHUTTR SPEED] is set between
11725to 1110000second
While executing ]FADER]
[D.EFFECT]
[PICT.EFFECT]
[SMTH SLW RE(:]
[COLOR BAR]
The recording image view looks
different.
• The recording image view may look
different depending on tile condition of
your camcorder. This is not a malfimction.
You cannot record a smooth
transition on a tape from the last
recorded scene to the next.
• Perform END SEARCH (p. 33).
• Do not remove the cassette (The picture
will be recorded continuously without a
break even when you turn the power off).
• Do not record pictures in the HDV and DV
lbrmats on the same tape.
• Do not record pictures in SP mode and LP
mode on the sanle tape. DV
• Avoid stopping then recording a movie in
Ihe LP mode. DV
•When [QUICK REC] is set to [ON], you
cannot record a smooth transition (p. 6%
HDVI080i
The flash does not work.
• You cannot use tile flash during tape
recording.
• Even if auto flash or (B' (Auto rcdeye
reduction) is selected, you cannot use the
internal flash with:
]TWILIGHT], [CANDLE], [SUNRSE
SUNSET], [FIREWORKSL
[LANDSCAPE], ]SPOTLIGHT],
[BEACH] or ]SNOW] of [SCENE
SELECT]
]SPOT METER]
IMANUAL] of IEXPOSURE]
[END SEARCH] does not work.
• Do not qjcct the cassette after recording
lp. 33).
• Them is nothing recorded on the cassette.
• There is a blank section between recorded
sections of the tape. This is not a
mall_mction.
82
[COLOR SLOW S] does not operate
correctly.
•[COLOR SLOW S] may not oper ire
correctly in total darkness. Use NightShot
or [SUPER NS].
You cannot use [SUPER NS].
•Tile NIGHTSHOT switch is not set to ON
(p. 28).
The auto focus does not function.
• Set [FOCUS] to [AUTO] (p. 46).
• The recording conditions are not suitable
fi)r auto fi)cus. A(ljust the focus manually
(p. 46).
[STEADYSHOT] does not function.
•Set [STEADYSHOT]to ION](p.49).
The BACK LIGHT function does not
function.
• The BACK LIGHT lhnction does not work
during Easy HaMycam operation (p. 23).
The [FLASH LEVEL] cannot be
changed.
• ]FLASH LEVEL] (p. 47) cannot be
changed during Eas} Hand._cam operation.
Tiny spots in white, red, blue, or
green appear on the screen.
• The spots appear when the shutter speed is
slow or when you arc' recording in [SUPER
NS] or [COLOR SLOW S]. This is not a
mallhnction.
The subjects passing fast by the
frame might appear crooked.
• This is called tile focal phmc phenomenon.
This is not a malfunction. Because of the
way the image device ICMOS sensor) reads
out image signals, the subjects passing by
the frame rapidly might ,ppear crooked
depending on the recording conditions.
The color of the picture is not
correctly displayed.
• Deactivate the NightShot l/Inction (p. 2g).
The screen picture is bright, and the
subject does not appear on the
screen.
• Set tile NIGHTSHOT switch (p. 28) to
OFF, or cancel the BACK LIGHT function
(p.28).
The screen picture is dark, and the
subject does not appear on the
screen. --t
• Press and hokl DISPLAY/BATT INFO for __
a few seconds to turn on the backlighl
(p. 19).
Horizontal bands appear.
• This may occur _hcn recoMing pictures
under lighting from a discharge tube, such
as a fluorescent lamp, sodiunl lamp, or
mmvury lamp. This is not a mallhnction.
• For HDR-HC7:
This may be alleviated by a_0usting the
shutter speed (p. 45).
Black bands appear when you
record a TV screen or computer
screen.
• For HDR HC5:
Set [STEADYSHOT] to [OFF] (p 49)
• For HDR HC7:
Adjust [SHUTTR SPEED] (p 45)
Continued.._ 83
TrssNeshsstisS {gsstisssS)
Refer also to "Cassette tapes/"Memory
Stick Duo'"' section (p. 81 ).
You cannot play back a tape.
•Slklc the POWER s_itch to turn on the
PLAY/EDIT lamp.
• Rex_ind the tape (p. 29).
You cannot play back in reverse
direction.
•Reverse playback is not possible with the
tape recorded in the HDV format.
Image data stored on a "Memory
Stick Duo" cannot be played back.
• Image data cannot bc pl@cd back it"you
have modified file names or lblders, or
have edited the data on a computer (In this
case, the file imme flashes). This is not a
m dfimction (p. 94).
• Pictures recorded on other de;ices may not
be played back or m,y not appe ir in their
actual size. This is not a malflmction
(p. 94).
Horizontal lines appear on the
picture. The displayed pictures are
not clear or do not appear.
• Clean tile hem using the cleaning cassette
(optional) (p. 98).
You cannot hear the sound recorded
with 4CH MIC REC on another
camcorder. DV
•Adjusl 1_ AUDIO MIX] lit. 58).
Fine patterns flicker, diagonal lines
look jagged.
•A@,st ISHARPNESS] to the [_7 (soften)
side (p. 45).
No sound or only a low sound is
heard.
• Turn up the volume (p. 29).
• Adjust [_J AUDIO MIX] from the [ST2]
(additional sound) side until the sound is
heard appropriately (p. 58).
• If you are using an S VIDEO plug or
component video plug, make sure the red
and white plugs of the A/V connecting
cable arc also connected (p. 35).
• Sounds cannot be recorded while shooting a
3 second-movie (approx.) using [SMTH
SLW REC].
The picture or sound breaks off.
• Tile tape _as rccoMed in both the HDV aM
DV formats. This is not a inMfunction.
The movies freeze for a while, or the
sound breaks off.
• This occurs if the tape or qdeo head is dirty
(p. 98).
• Use the Sony mini DV cassette.
"---" is displayed on the screen.
• The tape you arc playing _as recorded
without setting the date and time.
• A blank section on the tape is being played.
• The data code on a tape x_itha scratch or
noise cannot be read.
Noises appear and _or _is
displayed on the screen.
• The tape was recorded in aTV color system
other than that of your camcorder (NTSC).
This is not a malfimction (p. 91 ).
Date Search does not work correctly.
• _e SUFL _ tO r_col'd lnore tllan 2 IIlin[IteS alley
the date changed. If one day's recording is
to() short, your calllcorder may Plot
accurately find the point x_here the
recording date changes.
84
• There is a blank section between recorded
sections of the tape. This is not a
malflmction.
No picture appears during [END
SEARCH] or Rec Review.
• The tape _as recorded in both HDV and
DV formats. This is not a malflmction.
J_4ch=12bappears on the LCD screen.
• This appears _@cn you play back a tape
recorded on other recording devices using a
4ch microphone (4CH MIC REC). This
camcorder does not comply with the 4ch
microphone recording stand ird.
You cannot view the picture on the
TV connected with the i.LINK cable.
• You cannot _iew the picture ill the HD
(high definition) image quality on the TV
which is not compatible with the
HDV 1080i specification (p. 35). Refer to
the instruction manuals supplied wilh your
TV.
• Down convert the pictures recorded in
HDV format to DV ftwmat and play back in
SD (standard definition) image quality
(p. 60).
• Play back pictures using allother connecting
cable (p. 35).
You cannot view the picture or hear
the sound on the TV connected with
the component video cable.
• Set [{-'OMPONENTI on tile
(STANDARD SET) menu according to the
rcquiren/ents of the connected device
(p. 60).
• When you are using the component video
cable, make sure the red and white plugs of
the A/V connecting cable are connected
(p. 35).
You cannot view the picture or hear
the sound on the TV connected with
the HDMI cable.
• Pictures in the DV lbrmat u-c not output
fron/the HDMI OUT jack, if copyright
protection signals are recorded in the
pictures.
• DV format pictures input to the camcorder
via i.LINK cable (p. 68) cannot be output.
• This occurs if you record on a tape in both
HDV and DV lbnnats. Disconnect and
connect the HDMI cable, or slide the
POWER switch to turn on your camcorder
again.
The picture appears distorted on a
4:3 TV.
• This happens when viewing a picture
recorded in the 16:9 (wide) mode on a 4:3
TV. Set [TV TYPE] on the
(STANDARD SET) metal (p. 60) and play
back the picture.
Black bands appear at the top and
bottom on a 4:3 TV.
• Tbis happens when viewing a picture
recorded in 16:9 (wide) mode on a 4:3 TV.
This is nol a m dfimction.
Pictures from connected devices
cannot be zoomed.
• YOU cannot ZOOlIl pictures frolIl connectL_d
de_ ices on your camcorder (p. 31).
Time code and other information
appear on the display of the
connected device.
•Set [DISP OUTPUT] to [LCD PANEL]
while connected _;ith an A/V connecting
cable (p. 62).
"-4
Continued._ 85
TrssN÷shsstisS/Ssstisssd)
86
You cannot dub correctly using the
A/V connecting cable.
• You cannot input cxternall 3 fl'om _Jdevice
connected with the A/V connecting cable.
• The A/V connecting cable is not connected
properly.
Make sure that tile A/V connecting cable is
connected to the input jack of the other
device lbr dubbing a picture from your
camcorder.
When connected using an i.LINK
cable, no picture appears on the
monitor screen or the picture is
distorted during dubbing.
•Set [VCR HDV/DV] on the _
(STANDARD SET) menu iccording to the
requirements of the connected device
(p. 57).
• If tile device to be connected is not
compatible with HDVI080i specificatiom
you cannot dub in HD (high definition)
image quality (p. 65). For details, refer to
the instruction manuals supplied with the
device to be connected.
• Down convert the pictures recorded in
HDV format to DV lkmnat and dub in SD
(standard definition) image quality (p. 65).
You cannot add sound to the
recorded tape.
• You cannot add sound to the recorded tCJpe
on this unit.
You cannot dub correctly using the
HDMI cable.
• You cannot dub pictures using the HDMI
cable.
New sound added to arecorded tape
on another camcorder is not heard.
DV
• Adjusl 1_ AUDIO MIXI frolIl Ihe [STI]
(original sound) side until the sound is
heard appropriately (p. 58).
Still pictures cannot be dubbed from
a tape to a "Memory Stick Duo."
• You cannot record or _1distorted picture
may be recorded if the tape has been used
repeatedly for recording.
The computer does not recognize
your camcorder. _
• Install Picture Motion Blo_ser" (p. 74).
• Disconnect USB devices other than the
keyboard, the mouse, and the camcorder
from Ihe _ (USB) jack on Ihe compuler.
• Disconnect the cable from the computer
and camcorder, restart the computer, then
connect them again correctly.
You cannot install the supplied
software, "Picture Motion Browser,"
on a Macintosh computer,
• You cannot use 'Picture Motion Blo_ ser"
on a Macintosh computer.
Depending on the functions, you may not
be able to use them together. The following
list shows examples of menu items and
functions that cannot be used at the same
time.
a !
BACK LIGHT [FIREWORKS],
Nnction [SPOT METERL
[MANUAL] of
[EXPOSURE[
[SCENE SELECT] NightShot, [TELE
MACRO],
[CINEMA EEECT],
[OLD MOVIE[,
[COLOR SLOW S]
[SPOT METER] NightShot,
[CINEMA EFECT]
}i[_i_i_!_¸!i¸_i_i_iiiil_{_iiiiiiiiiiiiiiiiiiiiiiiiiiiiiiiiiiiiiiiiiiiiiiiiiiiiiiiiiiiiiiiiiiiiiiiiii_:_!__!i_i!i;:N _i!_!i_!_:!__i_ig lii_iii!_!__ililililililililili!il[
[EXPOSURE] NightShot
[WHITE BAL.] NightShot
[SHARPNESS] [CINEMA EFECT]
[SHUTTR SPEED] NightShok
of the CAM CTRL [CINEMA EFECT]_
dial (HDR-HC7) [OLD MOVIE],
[SMTH SLW REC]
[AE SHIFT] [FIREWORKS],
[MANUAL] of
[EXPOSURE],
[CINEMA EFECT]
]SPOT FOCUS] [SCENE SELECT]
[TELE MACRO] ]SCENE SELECT],
during tape recording
[COLOR SLOW S] NightShot, [SCENE
SELECT],
[MANUAL] of
[SHUTTR SPEED]
(HDR-HC7),
[FADERI,
[D.EFFECT]
[HISTOGRAM] [DIGITAL ZOOM],
[D.EFFECT], while
displaying the {late
and time
[DIGITAL ZOOM] [TELE MACRO]
[FADERI [CANDLE],
[FIREWORKS],
[SUPER NS],
[COLOR SLOW S],
[D.EFFECT]
[D.EFFECT] ISUPER NS],
[COLOR SLOW S],
[FADER]
[OLD MOVIE] of [SCENE SELECT],
[D.EFFECT] [PICT.EFFECT],
when [_ WIDE
SELECT] is set to
14:31
}i[_i_i_i_i!_i¸_i_!iiji_!:i_%%%_i_]ii_!_!_i:ii_ii!:_i_i_i_i_g!:!_:_!i!i!_i!_i!_i!_i!_i!_i!_i!_i!_i!_i_i
[CINEMA EFECT] [SCENE SELECT],
of [DEFFECT] [SPOT METER],
[MANUAL] of
[EXPOSURE], other
Ihan 0 in [AE
SHIFT],
[PICT.EFFECTI,
when [_ W[DE
SELECT] is set to
14:31
[SMTH SLW REC] [CANDLE],
[FIREWORKS],
[MANUAL] of
[SHUTTR SPEED]
(HDR-HC7),
[SUPER NS],
[COLOR SLOW S],
[D.EFFECT],
[PICT.EFFECT]
• For HDR-HC7:
When [COLOR BAR] is set, all the "Not
available" menu items on the list arc not
available.
-4
e,_
87
Warningindicatorsandmessages
If iudicaturs appear on tile LCD screen or in
the viewfiuder, check the fullowiug.
Some symptoms you can fix by yuurself. If
the problem persists even alter you have
tried a couple of times, contact yuur Sony
dealer or local authorized Sony service
facility.
C:(or E:) r-iN:r-lr-i (Self-diagnosis
display)
C:04:r-lr-I
• The batter? pack is not an
InfuLITHIUM" battery pack IH
series). Use an qnfuLITHIUM" battery
pack (H series) (p. 95).
• Connect the DC plug of the AC
Adaptor to the DC IN .jack of your
camcorder securely (p. 14).
C:21:r-ID
• Moisture condensation has occurred.
Remove the cassette and leave your
camcorder fur at least 1 hour, fllen re-
inserl the cassette (p. 97).
C:22:F-ID
• Clean the head using a cleaning
cassette (optional) (p. 98).
C:31 :F-ID /C:32:F-ID
• Symptoms that are not descrihed above
have occurred. Remove and insel< the
cassette, then operate your camcorder
again. Do not perfurm this procedure if
moisttlrc condensation has occtlrred
(p. 97).
• Ueulove tile power source. Reconnect it
and operate your camcorder again.
• Change the cassette. Press RESET
(p. 106), and operate your camcorder
again.
E:61 :r-lr-I /E:62:F-ID /E:91 :r-l[3
• Contact your Sony dealer or local
authorized Sony service facility, lnlbrm
them of the 5-digit code, which starts
from E."
101-1001 (Warning indicator
pertaining to files)
• The file is damaged.
• The file is unreadable (p. 93).
c\n (Battery level warning)
• The batter?, pack is m:arly used up.
• Depending on the operating,
envirunment, or battery conditions_ c\_
may flash, even if there arc
approximately 5 to 10 minutes
remaining.
[] (Moisture condensation warning)*
• t_icct the cassette, remove the power
source, and then leave it fur about 1
hour with the cassette lid ()pen (p. 97).
(Warning indicator pertaining to
"Memory Stick Duo")
•A "Memol3' Stick Duo" is not inscrled
(p.2o).
g_ (Warning indicators pertaining to
"Memory Stick Duo" formatting)*
• The "Memo O' Stick Duo" is damaged.
• The 'Memo O' Stick Duo" is not
lbrmatted correctly (p. 52, 93).
(Warning indicator pertaining to
incompatible "Memory Stick Duo")*
•An incompatibh: "Memory Stick Duo"
is inserted (p. 93).
88
(Warning indicators pertaining to
the tape)
Slow flashing:
• There is less than 5 minutes remaining
on the tape.
• No cassette is inserted.*
• The w rite-protect tab on the cassette is
set to lock (p. 92).*
Fast flashing:
• The tape has run out.*
_-- (Eject cassette warning)*
Slow flashing:
• The x_rite-protect tab on tile cassette is
set to lock (p. 92).
Fast flashing:
• Moisture condensation has occurred
(p. 97).
• The seltLdiagnosis display code is
displayed (p. 88).
o--. (Warning indicator pertaining to
image deletion)*
• The image is protected (p. 71).
c-. (Warning indicator pertaining
to the write-protect of the "Memory
Stick Duo")*
• The _ rite-protect tab on the "Memory
Stick Duo" is set to lock (p. 93).
{_ (Warning indicator pertaining to
the flash)
Slow flashing:
• Still charging
Fast flashing:
• The scltLdiagnosis display code is
displayed (p. 88)7
• There is something wrong with the
flash.
'_, (Warning indicator pertaining to
camera-shake warning)
• Tile unount of lights is not sufficient,
so camera-shake easily occurs. Use the
flash.
• The canlcoRler is unsteady, SOcanlera-
shake easily occurs. Hold the
camcorder steady with both hands and
shoot the image. However, note that the
camera-shake warning indicator does
not disappear.
* You hear a melody when the warning indicators
appear on the screen (p. 62).
If messages appear on the screen, follow the
instructions.
"_° Tips
• When [_] is displayed, tile message call be
turned into _ by louching [_, Touch
to disl?lay lhe message again.
• Moisturecondensation
r__ Moisture condensation. Eject
the cassette (p 97)
[] Moisture condensation. Turn off
for 1 H. (p. 97)
• Cassette/Tape
_-- Reinsert the cassette. (p 20)
• Check it"the cassl:ttc, is damaged.
Lo__ The tape is locked -check the
tab. (p. 92)
"-4
Continued._ 8g
WarsisS is_icats_s ass msssasss (8o_tiss÷_)
• "Memory StickDuo"
_1 Reinsert the Memory Stick.
(p.20)
• Rcinscrt the 'Memory Stick Duo" a
le_ times. If even then the indicator
flashes, the "Memo1)' Stick Duo" might
be damaged. TI)' with another
"Memory Stick Duo."
_This Memory Stick is not
formatted correctly.
• Check the format, then format the
Memory Stick Duo" as necessal}'
(p. 52, 93).
Memory Stick folders are full.
•You cannot create folders exceeding
999MSDCF. You cannot delete created
folders using your camcorder.
• You will have to lbrmat the _Memory
Stick Duo" (p. 52), or delete them using
your computer.
•DualRec
Cannot save still picture.
•Do not _ject Memo17Stick Duo"
while still images are being stored onto
it (p. 26).
• PictBridgecompliantprinter
Check the connected device.
• Switch off the printer and switch it on
agaim then disconnect the USB cable
and reconnect it.
Cannot print. Check the printer.
•S_itch off the printer and switch it on
agaim then disconnect the USB cable
and reconnect it.
9O
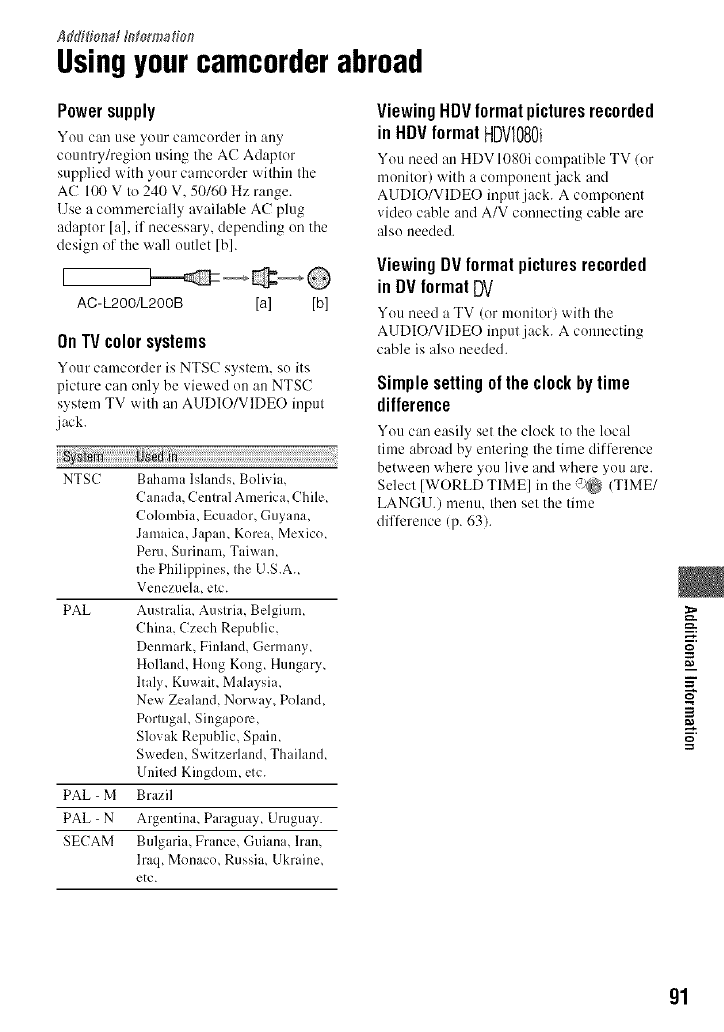
Addi[iot;d _torm_[id_
Usingyourcamcorderabroad
Powersupply
You c_ use your camcorder in any
countlT/region using the AC Adaptor
supplied with your camcorder within the
AC 100 V to 240 V. 50/60 Hz range.
Use a commercially available AC plug
mlaptor [al, if necessary, depending on the
design of the wall outlet [b].
AC-L200/L200B [a] [b]
OnTVcolorsystems
Your cmncorder is NTSC system, so its
picture can only be viewed on an NTSC
system TV with an AUDIO/VIDEO input
jack.
NTSC Bahama Islands, Bolivia,
Cant&t, Central America, Chile,
Colombia, Ecuador, Gnyana,
Jamaica, Japan, Korea, Mexico,
Peru, Surinam, Taiwam
the Philil)pines. the U.S.A.
Venezuela, etc.
PAL Australia, Austria, Belgium,
China, Czech Republic,
Denmark, Finland, Germany,
Holland, Hong Kong, Hungary,
Italy, KuwaiL Malay_.ia,
New Zealand, Norway, Poland,
Portugal, Singapore,
Slovak Republic, Spain.
Sweden, Switzerland, Thailand,
United Kingdom, etc.
PAL - M Brazil
PAL - N Argemina, Paraguay, Uruguay.
SECAM Bulgaria, France, Guiana, lran,
lraq, Monaco, Russia, Ukraine,
etc.
Viewing HDV format pictures recorded
in HDV format HDVl080i
You need an HDV 1080i compatible TV (or
monitor) with :. component jack and
AUDIO/VIDEO input jack. A component
video cable and A/V connecting cable are
also needed.
Viewing DV formatpictures recorded
in DV formatDV
You need a TV (or monitor) with the
AUDIO/VIDEO inputjack. A connecting
cable is also needed.
Simple setting of the clock by time
difference
You can easily set the clock to the local
time abroad by entering the time difference
between where you live and where you are.
Selecl [WORLI) TIME] in Ihe {_r_ (TIME/
LANGU.) memo. then set the time
difference (p. 63).
E
W.g
m
91
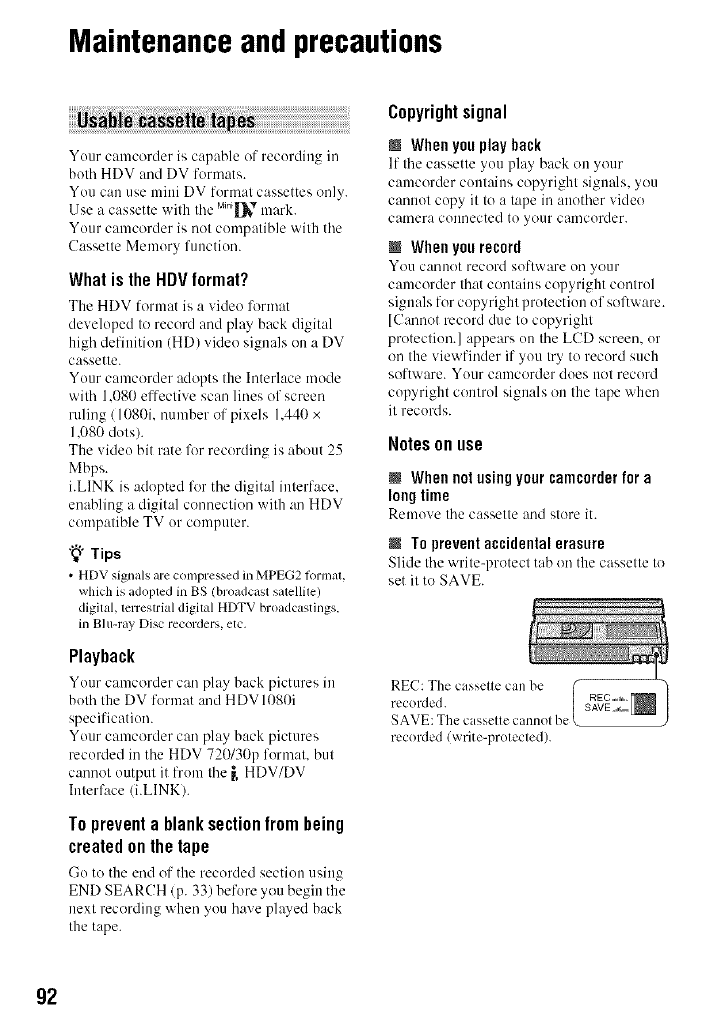
Maintenanceand precautions
Your camcorder is capable of recording in
both HDV and DV formats.
You can use mini DV format cassettes only.
Use a cassette with tile M_n_[_,mark.
Your camcorder is not compatible with the
Cassette Memory function.
What is the HDV format?
The HDV format is a video l'ormat
developed to record and play back digital
high definition (HD) video signals on a DV
cassette.
Your camcorder adopts the Interlace mode
with 1.080 effective scan lines of screen
ruling/1080i, number of pixels 1.440 x
1.080 dots).
The vide() bit rate for recording is about 25
Mbps.
i.LINK is adopted l\_rtile digital interface.
enabling a digital connection with an HDV
compatible TV or computer.
"_" Tips
• HDV signals are compressed in MPEG2t_)rlnzll,
which is adopted in BS (broadcast satellUe)
digital, terrestrial digUal HDTV broadcastings.
in Blu-ray Disc recorders, etc.
Playback
Your cmncorder c:m play back pictures in
both the DV format and HDV 1080i
specification.
Your camcorder carl play back pictures
recorded in the HDV 720130p format, but
cannot output it from the _, HDV/DV
Interface/i.LINKI.
To prevent a blank section from being
created on the tape
Go to the end of the recorded section using
END SEARCH/p. 33) before you begin the
next recording when you have played back
the tape.
Copyrightsignal
NWhen you play back
If tile cassette you play back ou _otlr
camcorder contains copyright signals, you
cannot copy it to a tape in another video
camera couuected to your camcorder.
NWhen you record
x!'o/1 c:lnuot record soflw;ire on yo/lr
camcorder that contains copyright control
signals for copyright protection of software.
[Cannot record due to copyright
protection.] appears on tile LCD screen, or
on the viewfinder if you try to record such
software. Your camcorder does uot record
copyright control signals on the tape when
it records.
Notes onuse
NWhennotusingyourcamcorderfor a
longtime
Remove tilecassette and store it.
NTo prevent accidental erasure
Slide tile "_xrite-protect tab on the cassette to
set it to SAVE.
REC: The casselle can l_
recorded. REC_,_ISAVE,_ |
SAVE: The casselle cannol be )
recorded (write-protected).
92
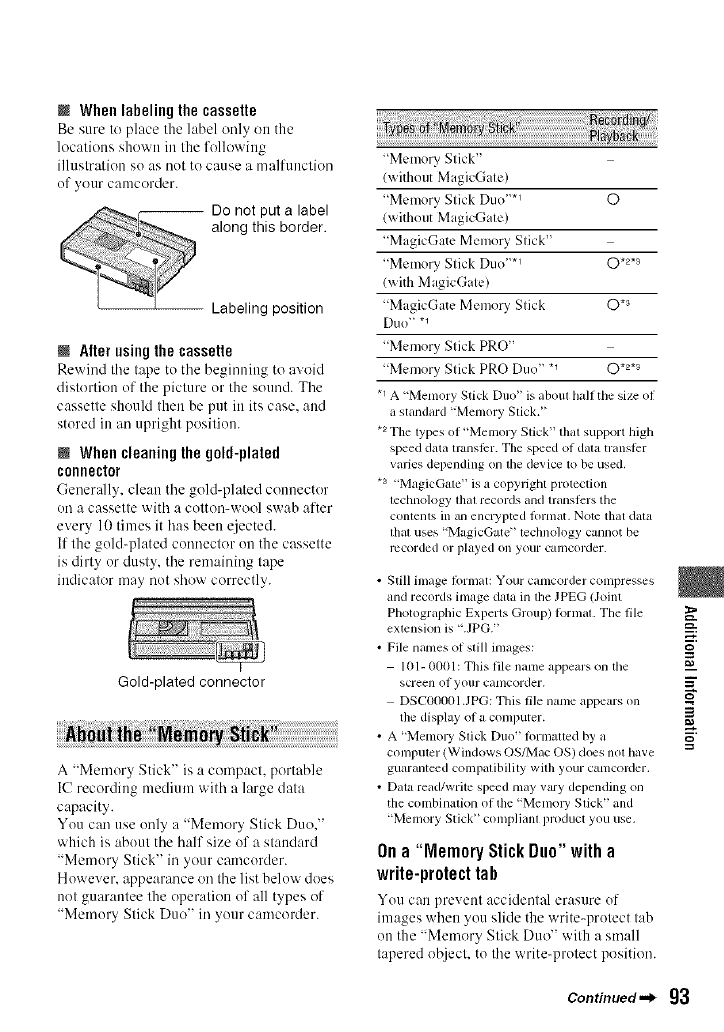
MWhen labeling the cassette
Be sure to place the label only ott the
1ocatious showu ill the followiug
illustratiott so as not to cause a malfuuction
of your camcorder.
-- Do not put a label
along this border.
Labeling position
NAlter using the cassette
Rewind tile tape to tile begimtittg to avoid
distortiott of the picture or the sound. Tile
cassette should then be put itt its case. and
stored in an upright position.
NWhencleaning the gold-plated
connector
(-;enerall_, cle:m the gold-plated counector
on a cassette with a cotton-wool swab after
every 10 times it has beett ejected.
If the gold-plated connector ott the cassette
is dirty or dusty, the remaining tape
indicator may nut show correctly.
Gold-plated connector
A "Memory Stick" is a compact, portable
IC recording medium with a large data
capacity.
You can use only a "Memory Stick Duo."
which is about the half size of a stattdard
"Memory Stick" in your camcorder.
However. appearance on the list below does
not guarantee the operatiott of all types of
"Memory Stick Duo" in your camcorder.
"Memo UStick"
(without MagicGate)
"Memory Stick Duo "*_ O
lwithout MagicGate)
"MagicGate Memo UStick"
"Memo UStick Duo ''*_ 0 .2._
(with MagicGate)
"MagicGate Memo UStick 0 *3
Duo" *1
"Memory Stick PRO"
"Memory Stick PRO Duo" *_ O *2*s
.1 A "Memory Stick Duo" is aboul half the size of
a standard "Memory Stick."
*aThe types of"Memory Stick" that support high
speed data transli:r. The speed of dala transtcr
varies depending on lhe device to be used,
*a "Magic&ue" is a copyright protection
lechnology lhal records and lransl)rs the
contents in an encryptcd lortllat, Note that data
lhal uses "MagicGate" lechnology cannot be
recorded or played on your camcorder.
• Still hi]age ]ol'mat: Your Calllcorder conlpresses
and records image data ill lhe JPEG lJoint
PhotographicExperts Group) R}rmal.The file _.
extension is ".JPG." =a.
•File names ol slill images:
101-0001: This file name appears on lhe _a
screen of your canlcorder. _"
DSC00001.JPG: This file name appears on _'
the display of a computer.
A "Memory Slick Duo" tOllllaued by a _"
computer (Windows OS/Mac OS) does not have
guaranteed compatibility with your camcoMer.
• Data read/write speed lllay V_llpydepending on
the combinatk}n of the ' Memol T Stick" and
"Memory Stick" complianl product you use,
On a"Memory Stick Duo" with a
write-protect tah
You can prevettt accident_ erasure of
images whett you slide the write-protect tab
ott the "Memory Stick Duo" with a small
tapered object, to the write-protect position.
Continued._ 93
Maistssasss ass p_÷sa[tisss {gsstiss÷_}
Notes on use
Damaged or lost image data will not be
compensated for. and may occur in the
following cakes:
•If you eject tile "Menlory Stick Duo," turn file
i?ower oil on your canlcorder, or remo_e tile
baltel_' pack lot replacemcnl while your
canlcorder is reading or writing image files on
lhe 'Memory Stick Duo" (while the access hunp
is lit or flashing).
• If you use tile "Memory Stick Duo" near
magnets or magnetic fields,
It is recommended you make a back-up of
important data on the hard disk of a
computer.
M On handlinga "Memory Stick"
Keep the lk_llowing in mind _hen handling
a "Memory Stick Duo."
• Be carefifl not to apply excessive lorce when
wriling on amelno area on a"memory Stick
Duo. '_
Do nol altach a hJbel or file like on a "Memory
Stick Du<F or a Memory Stick Duo adaptor.
When you carry or store a "Memory Stick Duo."
i?ut it in ils case.
Do nol touch, or allow metallic objects 1o come
inlo contact with the ternlinals.
Do nol bend, drop or apply strong lorce to file
"Melno W Stick Duo."
Do nol disassemble or inodiI_i the "Memo W
Stick Duo."
Do nol lel die "Memory Stick Duo" get wet.
• Be camfifl to keep "Memoly Stick Duo" media
<)tit of the reach of small children. There is
danger that a child mighl swallow it.
• Do no( insert anything other than a "Memory
Stick Duo" into the "Memory Stick Duo" slot.
Doing so may cause a malfimction.
@ Ona locationforuse
Do not use or keep the "Memory Stick
Duo" in the following locations.
• Places subject to extrcnmly high tenll_eralurc,
such as a car parked outside in the summer.
• Places under direct sunlight.
• Places wilh extremely high hun/iddy or subject
to corrosive gases.
IOnthe Memory Stick Duo adaptor
After inserting a "Memory Stick Duo" into
the Memory Stick Duo adaptor, you can use
it with a shmdard "Memory Stick"
compliant device.
• When using a "Memol T Stick Duo" with a
"Memory Stick" compliam device, be sure to
insert the "Memory Stick Duo '_ inlo a Memoly
Stick Duo adaplor.
• When inserting a "Memory Stick Duo" into a
Memoly Stick Duo adaptor, make sure tile
"Memory Stick Duo _ is inselted lacing in lhe
correct direction, then insert it all the way in. If
you torte tile "Memory Stick Duo '_ into tile
Memoly Stick Duo adaptor in tile wrong
direction or insert it inconlpletely, il may cause
a malhmction.
• Do nol inserl a Memory Slick Duo adaptor
without a "Memory Stick Duo" attached. Doing
so nlay rcsull in inalfilnctions of tile unil.
I Ona"Memory Stick PRODuo"
• Tile maximun/n_emory capacity oI a "Menloly
Stick PRO Duo +that can be used on your
camcorder is 4 GB.
Onimagedatacompatibility
•Image data tiles recorded on a "Men_ory Stick
[)UO _ by your calncorder conh)llll to Ihe
"Design lule Ior Camera File system" unix ersal
standaM established by tile JEITA (Japan
Electronics and Inlonnation Technology
hldustries Association).
• On your camcorder, you cannol play back still
images recorded on other devices (DCR-
TRV9IX) or DSC-D700/D770) thai do not
conionn to file universal slandard (These
models are not sold in some regions).
• If you cannot use a "Memo W Stick Duo" thai
has been used with another device, klrnlat il
with your camcorder (p. 52). Note that
lormatling erases all inlornlation on tile
"Menlory Slick Duo."
• You may nol be able to play back images with
your canlcorder:
When playing back image data modified on
your comp/llgr.
When playing back image data recorded with
other devices.
g4

This unit is compatible wilh an
"InfoLITHIUM" battery pack (H series).
Your camcorder operates only with an
"InfoLITHIUM" battery pack.
"InfoLITHIUM" H series battery packs
have the _y_,o.r.,.__ mark.
What is an "InfoLITHIUM" battery
pack?
An "hffoLITHIUIVI"battery pack is :,
lithium-ion battery pack that has functions
for communicating information related to
operating conditions between your
camcorder and an optional AC Adaptor/
charger.
The "hffoLITHIUM" battery pack
calculates the power consumption
according to the operating conditions of
your camcorder, and displays the remaining
battery time iraminutes.
With an AC Adaptor/charger. the remaining
battery time and charging time appear.
To chargethe batterypack
•Be sure to charge tile baUelT pack belore you
glilrt ushlg your calncorder.
• We recommend charging tile battery pack ill all
ambienl lcmperature of between 10 °C to 30 °C
(50 °F to 86 °F) until tile _/CHG (charge) lamp
turns olE If you charge tile bauery pack outside
of this temperature range, you may nol be able
to charge il eflicienlly,
• After charging is complete, disconnect file cable
fl'om tile DC IN.jack on your camcorder or
rt2nlove tile battely pack,
To usethe batterypackeffectively
• Bauery pack performance decreases when the
surrounding temperature is l/} °C 150 OF) or
below, and the length o1 time you can use tile
battery pack becolnes sllorter, hi that case, do
one of the kdlowhlg to use lhe bauely pack k)r a
longer trine,
Put file battery pack ill a pocket to warm it up,
and insert il in your camcorder rigbl belorc
you start taking shols.
Use a large capacity battery pack: NP-FH70/
FH 100 (oplional).
•Pmquenl use of the LCD screen or a ftcquent
playback, last lorward or rewind operalion
wears out tile bauery pack laster.
We reconlmend using a large capacily bauery
pack: NP- FH7ft/FH 1(t(t (optkmal).
• Be sure lo sel the POWER switch to OFF
(CHG) when not recording or playing back on
your camcorder. The batte Upack is also
consunled when your canlcorder is in recording
slandby or playback pause.
• Have spare battery packs ready lot lwo or lhree
tinles file expected recording time, and nlake
trial recordings beft)re making the actual
recording.
• Do not expose file barrel T pack lo water, The
bauery pack is not water resistanl,
Aboutthe remainingbatterytime
indicator
• When the power goes oil e_en though tile
relnainillg bauery time illdicalor indicutcs that
tile battery pack has enough power 1o operale,
charge file baltery pack lhlly *lgain. Remaining
bauery time will be indicatcd correctly. Note,
however, that the baltcry indication will not be
reslored if it is used in high temperatures lot a
long tinlc, or il left in a hdly charged state, or
when file baltery pack is flcquently used. Use
tile remaining bauery time indicalion as a rough
guide only.
• Tile c\3 mark that indicates low batte W flashes
even if lherc alv still 5 to 10 minutes of baucry
time renlaining, depending on the operaling
Colldilions or anlbielll tenlperalure.
Aboutstorageof the battery pack
• It the battery pack is not used lot a h)ng time,
hilly chm'ge tile battel T pack and use it up on
your calncorder once a year to lnahll_lhl proper
lunction. To store the battery pack, rcnlo_, e it
h'onl your canlcorder and put it ill a dry, cool
place.
• To discharge tile battery pack (in your
canlcorder completely, set [A.SHUT OFF] to
[NEVER] on the _ (STANDARD SET)
Illenll and leave your catllcor(ler in lape
recording slandby unlil the power goes oil
(p. 62).
Continued._ g5
g
i
Naistssasss ass pr÷sa[tioss {gostiss÷_}
About battery life
•Baltmy capacity decreases over thne and
through repeated use. It decreased us_ge time
between charges becomes significant, it is
probably time to replace il with a new one.
•Each battery's litc is governed by storage,
operating and emironnmntal conditions.
The HDV/DV Interface on this unit is an
i.LlNK-compliant Interface. This section
describes the i.LINK standard and its
features.
What is i.LINK?
i.LINK is a digital serial interface %r
transferring digital video, digital audio, aud
other data to other i.LINK-compatible
devices. You can also control other devices
using the i.LINK.
i.LlNK-compatible devices can be
connected using an i.LINK cable. Possible
applications are operations and data
transactions with various digital AV
devices.
When two or more i.LlNK-compatible
devices are daisy-chained with the unit.
operation becomes possible from any
device in the chain. Note that operation
method may vary, or data transactions may
not be possible, depending on specifications
and characteristics of the connected
devices.
fO Notes
• Normally, only one device can be connected to
thisunit witl_an i.LINK cable, When
connecting this unit to an HDV/DV compalible
device having two or mole _ HDV/DV
Inlerlaces, relcr to tile operaling inslrtlclionsof
tiledevice 1obe connected.
"_"Tips
•i.LINKis a more tmnilimlcrnl tot the
IEEE1394data transporlbus proposed bySony.
and is a trademark approxed by many
corporilliOllS,
• IEEEI394 is an internalional standard
standardized by tile Instilule of Electrical and
Electronics Engineers.
Aboutthe i.LINK Baudrate
i.LINK's maximum baud rate varies
according to the device. There are 3 types.
Sl0t)/approx. 100Mbps*)
$200/approx. 200Mbps)
$400 (approx. 400Mbps/
The braid rate is listed under
"Specifications" in the operating
instructions of each piece of equipment. It
is also indicated near the i.LINK interface
on some devices.
The baud rate may differ from the indicated
value when the unit is connected to a device
with a different maximum baud rate.
*Whatis IVlhps?
Mbps stands lor "megabits per second." or
the amount of data that can be sent or
received in one second. For example, a
baud rate of 100 Mbps means that 100
megabits of data can be sent in one second.
Touse i.LINK functionson this unit
For details on how to dub when this unit is
connected to other video devices having an
i.LINK Interface. see page 65.
This unit can also be connected to other
i.LlNK-compatible devices made by Sony
(e.g. a VAIO series personal computer) as
well as to video devices.
Some i.LINK compatible video devices.
such as Digital Televisions. DVD.
MICROMV or HDV recorders/players are
not compatible with this unit. Before
connecting to other devices, be sure to
confirm whether the device is compatible
with an HDV/DV device or not. For details
on precautions and compatible application
software, refer also to the operating
instructions for the device to be connectecl.
96
O Notes
• _'hen connecUng your CalllCol'der to alloU/er
i.LlNK-comp_,Uble dex ice. be sure to turn off
tile power of the de_ice and disconnect tile AC
Adaptor h'om tile waU outlet before connecting
or disconnecting the i.LINK citble.
Abouttherequiredi.LINKcable
Use the Sony i.LINK 4q_in-to-4-pin cable
/during HDV/DV dubbing).
• x.v.Color is a more lamiliar term for tile xvYCC
standard proposed by Sony, and is a trademark
of Sony.
• xvYCC is an international standard Rir color
space in vide<>.This standard cam express a
wider color range than tile currently used
broadcast standard.
Onuseandcare
• Do llOl use or store tile canlcorder alld
accessories ill tile Iollowing loc_Ltions.
Anywhere extremely hot or cold. Ne_er ]ea_e
them expo_d to temperatures abme 60 °C
(140 °F), such as under direct sunliglu, nero
beaters or ill a car parked ill the sun. Tbey
may tllall/incli()n or become delormed.
Near strong magnetic fields or mechanical
vibraUon. Tile camcorder may malhlnction.
Near strong radio waves or radiation. The
camcorder may not be able to record properly.
Near AM receivers and video equipmenL
Noise lllay occur.
On a sandy beach or anywhere dusty. If sand
or dusl gets in your camcorder, U may
malhlnction. Sometimes tills u]alfllncUon
cannot be repaired.
Near windows or outdoors, where the LCD
screen, the viewfinder, or the lens may be
exposed to direct sunliglu. This damages the
inside of the viewfinder or the LCD screen.
Anywhere velT humid.
• Operate your ctmlcorder on DC 7.2 V (battery
pack) or DC 8.4 V (AC Adaptor).
• For DC or AC operation, use the accessories
recommended in these operating instrucUons.
• Do not let your camcorder get wet, R)r example,
honl rain or sea water. If your ctuncorder gets
weL il may mall/inction. Solnethnes this
malfimcfion cgmnot be repaired.
• If any solid o[_iect or liquid gets inside the
casing, unplug your camcorder and have it
checked by a Sony dealer belore operating il
any lhrther.
• Avoid rough handling, disassembling,
modilying, physical shock, or impact such as
hammering, dropping or stepping on the
product. Be i?articularly carehd of the lens.
• Keep the POWER swUch setting to OFF (CHG)
when you are not using your canlcorder,
• Do not wrap your calncorder with a towel, lot
example, and operate it. Doing so might cause
heat to build up inside.
• When disconnecling tile power cord, pull il by
tile plug and not tile cord.
• Do not damage tile power cord such as by
placing anything heavy on U.
• Keep metal contacts clean.
• Keep the Remote Commander and button-type
bauery out of children's re_ch. If the battery is
accidentaUy swallowed, consult a doctor
immediately.
• If the bauery electrolytic liquid has leaked,
consull your local aulhorized Sony _lvicc
I_cility.
wash oil any liquid that may have contacted
your skin.
if any liquid gets in your eyes, wash with
plenty of water and consult a doclor.
JWhennotusingyourcamcorderfor a
longtime
• Periodically turn on tile camcorder and play _L
ciLssettc lor about 3 minutes.
• Use up tile bauery piLck completely betorc
storing it.
Moisturecondensation
If your camcorder is brought directly from a
cold place to a warm place, moisture may
condense inside your camcorder, ou the
surface of the tape, or on the lens. In this
state, the tape may stick to the head drum
and be damaged or your camcorder may not
operate correctly. If there is moisture inside
your camcorder, [Ilia Moisture
condensation. 1Eiectthe cassette] or [1it
Continued._ 97
g
m
Naistssasss ass pr÷sa[tisss {gsstiss÷_}
Moisture condensation. Turn off fur IH.]
appears. The indicator will not appear when
the moisture condenses on the lens.
MIt moisturecondensationhas occurred
Nuue uf the functions except cassette
ejection will wurk. Eject the cassette, turn
off yuur camcorder, attd leave it for about
one hour with the cassette lid open. Your
camcorder can be used again when both uf
the following cuuditions are met:
• The warning message does nol appear when lhe
power is turned on.
• Neilher [] or _ flash whena cassette is inserled
andvideo operation butlons arc louched.
If muisture starts to cuudeuse, yuur
camcorder sometimes cannot detect
condensalion. If this happens, the cassette is
sumetimes not eiected lbr 10 secuuds after
the cassette lid is opened. This is not a
malfunction. Du not close the cassette lid
until the cassette is eiected.
NNote on moisturecondensation
Moisture may condense "_hen yuu bring
yuur camcorder from a culd place into a
warm place (or vice versa) or when you use
your camcorder in a humid place as shown
below.
• When you bring your camcorder hom a ski
slope inlo a place warmed up by a heating
device.
• When you bring your camcorder from an air
conditioned car or room inloa hot place outside.
• When you use your camcorder after a squall or a
shower.
• Whell you use your canlcorder ill a hol and
humid place.
NNow to avoid moisturecondensation
When you bring your camcorder lhom a
cold place into a warm place, put your
camcorder in a plastic bag and seal it
tightly. Remove the bag when the air
temperature inside the plastic bag has
reached the surrounding temperature (after
about oue hour).
Videohead
If you play back a tape recoMed in HDV
furmat, the image and sound may freeze lk_r
a while (about (1.5 seconds).
This occurs if the HDV signals cannot be
recorded or played back correctly because
of dirt on the tape or video head. Depending
on the cassette, this fairly inlhequently
occurs even if the cassette is brand new ur
is not used a lot.
If this freezing point is created while
playing back, yuu can solve this prublem
and see the pictures by rewinding alter
slightly forwarding. Such a freezing point
cannot be recovered if it was created while
recording.
To prevent such a problem, use the Suny
mini DV cassette.
• If the lollowing problem occurs, clean lhe video
heads kw 10seconds with tile Sony DVM-
12CLDcleaning cassette (optional).
Playback pictures do not move.
Playback picturesdo not appear.
Tile sound breakso11.
1_ Dirty video head. U_ a cleaning
cas_ette.] appears on lhe screen during
recording,
The lollowing phenomenon occurs in HDV
J(ll'nlal.
The playback The playback screen
screen pauses, goes blank.
(Solid bhle screen)
Tile loUowing phenomenon occurs in DV
J(ll'nlal.
Block-noise appears.
g8
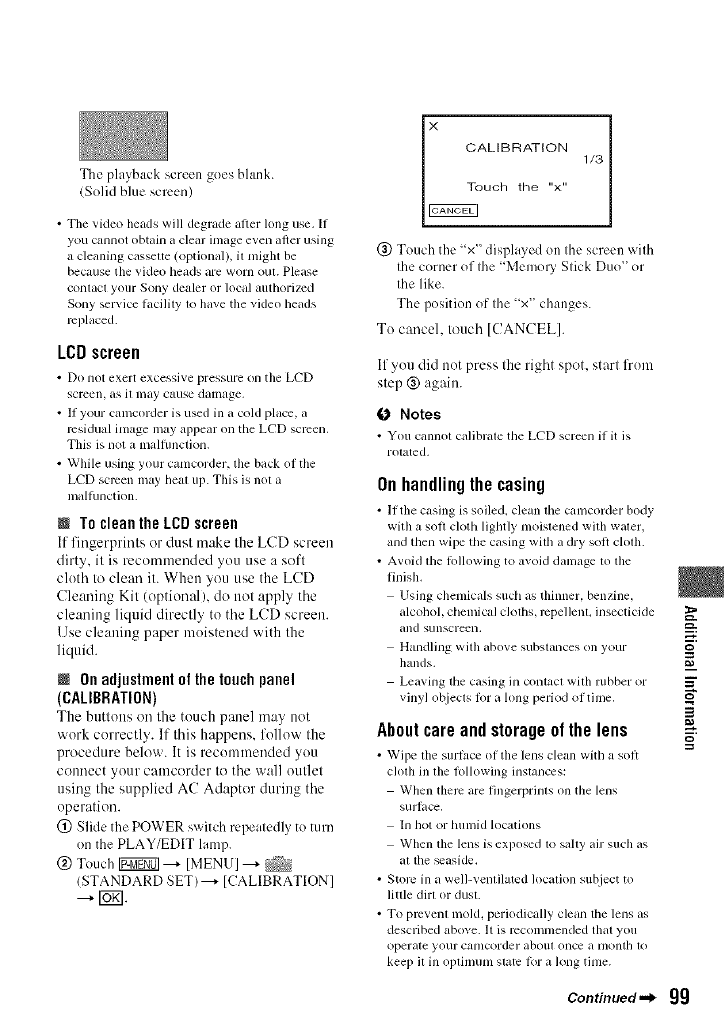
The playback screen goes blank.
iSolid blue screen)
• Tile vkleo heads will degrade after long use. If
you cannot obtain a clear inlage even after using
a cleaning casselte (optional/, it nlight be
because the video heads are worn out. Please
conlact your Sony dealer or local authorilcd
Sony service lacility to ]lave tile video beads
replaced.
LCDscreen
• Do not exert excessive pressure on tile LCD
screen, as it may CglUSedamage.
• II your calncorder is used in a cold place, a
residual inlage may appear on the LCD screen.
This is not a mMflmcfion.
• While using your canlcorder, the back of the
LCD screen may heal up. This is not a
malhmction.
NTo clean the LCDscreen
If fingerprints or dust make the LCD screen
dirty, it is recommended you use a soft
cloth to clean it. Whett you use the LCD
Cleaning Kit (optionalh do trot apply the
cleaning liquid directly to the LCD screen.
Use cleaning paper moistened with the
liquid.
NOnadjustmentof thetouchpanel
(CALIBRATION)
The buttous oil the totlch pauel may uot
work correctly. If this happens, follow the
procedure below. It is recommended you
connect your camcorder to the wall outlet
using the supplied AC Adaptor during the
operation.
(_) Slide the POWER switch repeatedly to turn
on the PLAY/EDIT lamp.
@ Touch Igggff0] ---+ [MENU I ---+ _
(STANDARD SET)---+ [CALIBRATION]
---+ [_.
CALIBRATION 1/3
uch the "x"
(_) Touch the "x" displayed on the screen with
the corner of the "Memo UStick Duo" or
the like.
The position of the "x" changes.
To cancel, touch [CANCEL].
If you did trot press the right spot. start from
step ® again.
0 Notes
•You cannot calibrale tile LI_'D screen if it is
r(Uated,
Onhandlingthe casing
• lithe casing is soiled, clean tile canlcorder body
with a soil cloth lightly moislened with waler,
and then wipe the casing wilh a dry soft clofll.
•Avoid tile lollowing to avoid danlage to the
finish.
Using chenlicals stlch as thinner, benzine,
alcohol, chenlical cloths, repellenL insecticide _'
and sunscreell, =."
Handling with abo'_'e subslallces on yoLIr
hands. I_
Leaving tile casing in contact with rubber or _"
vinyl o[_iects 1(51a long period ol time, _'
Aboutcareandstorageofthelens
• Wipe tile surface (51tile lens clean with a soft
chub ill file lonowing inslances:
When there are fingerprims on the lens
surlace,
In hot or hulnid locations
When the lens is exposed 1o sally air such as
al tile _aside.
• Store in a well-ventilated location subject to
little dirl or dusL
• To pmvenl mold, periodically clean the lens as
described above. It is recommended that you
operate your canlcorder abolu once a lnontb 1o
kee I) il ill Ol)lhnunl stale lor a long time.
Continued._ gg
Mai. ÷.a.ce p esa tio.s Specifications
Onchargingthepre-installed
rechargeahlebattery
Your camcorder has a pre-installed
rechargeable battery to retain the dale. time.
and other settings even when the POWER
switch is set to OFF (CHG). The pre-
installed rechargeable battery is always
charged while your camcorder is connected
to the wall outlet via the AC Adaptor or
while the battery pack is inserted. The
rechargeable battery will be fully
discharged in about 3 months if you do
not use your camcorder at all without the
AC Adaptor connected or the battery pack
attached. Use your camcorder after
charging the pre-installed rechargeable
battery.
However. even if the pre-installed
rechargeable battery is not charged, the
camcorder operation will not be affected as
long as you are not recording the date.
NProcedures
Connect _oLIrcaulcorder to a vxall outlet
using the supplied AC Adaptor. and leave it
with the POWER switch set to OFF/CHG)
for more than 24 hours.
System
Video reeording system (HDF)
2 rotary heads. Helical scanning system
Video reeording system (DV)
2 rotary heads. Helical scanning system
Still image recording system
Exif Ver. 2.2 *_
Audio recording system (HDV)
Rotary heads. MPEC- 1Audio Layer-2.
Quautization: 16 bits (Fs 48 kHz.
stereo)
transfer rate: 384 kbps
Audio recording system (DV)
Rotary heads. PCM system
Quautizatiou: 12 bits (Fs 32 kHz. stereo
1. stereo 2), 16 bits (Fs 48 kHz. stereo)
Video signal
NTSC color. EIA standards
1080160i specification
Usable cassette
Mini DV cassette with the Mni_,Vmark
printed
Tape speed (HDV)
Approx. 18.81 mm/s
Tape speed (DV)
SP: Approx. 18.81 mm/s
LP: Approx. 12.56 mm/s
Recording/l)layback time (HDV)
60 rain (using a DVM60 cassette)
Recording/playback time (DV)
SP: 60 rain/usiug a DVM60 cassette)
LP: 90 miu (using a DVM60 cassette)
Fast liwward/rewind time
Approx. 2min 40 s/using a DVM60
cassette and rechargeable battery pack l
Approx. 1 miu 45 s/using a DVM60
cassette and AC Adaptor)
Viewfinder
Electric view finder (color)
100
Image device
HDR-HC5:
5.9 mm (1/3 type) CMOS sensor
Recording pixels (still, 4:3):
Max. 4.0 mega 12 304 x 1 728) pixels .2
Gross: Approx. 2 I(X)000 pixels
Effective (movie, 16:9):
Approx. 1430 000 pixels
Effective (movie, 4:3):
Approx. 1080 000 pixels
Effective (still, 16:9):
Approx. l 490 000 pixels
Effective (still, 4:3):
Approx. 1 990 000 pixels
HDR-HC7:
6.3 mm( 1/2.9 type) CMOS sensor
Recording pixels (still, 4:3):
Max. 6.1 mega 12 848 x 2 136) pixels .2
Gross: Approx. 3 2(_,)000 pixels
Effective (movie. 16:9):
Approx. 2 280 000 pixels
Effective (movie, 4:3):
Approx. 1 710 000 pixels
Effective (still, 16:9):
Approx. 2 280 000 pixels
Effective (still, 4:3):
Approx. 3 040 000 pixels
Lens
HDR-HC5:
Carl Zeiss Vario-Sonnar T*
10x (Optical), 20 x. 80 x/Digital)
HDR-HC7:
Carl Zeiss Vario-Sonnar T*
10x (Optical), 20 x/Digital)
Focal length
HDR-HC5:
1=5.1 - 51 mm (7/32 - 2 1/8 in.)
When converted to a 35 mm still
camera
In CAMERA-TAPE *a: 41.3 ~ 485 mm
(1 11/16- 19 1/8 in.) (16:9), 50.5 ~
594 mm 12 - 23 1/2 in./(4:3)
In CAMERA-MEMORY: 40.4 -
404 mm (1 5/8 - 16 in.) 116:9), 37
370 mm (1 1/2 - 14 5/8 in.) (4:3)
F1.8 - 2.9
Filter diameter: 37 mm (1 I/2 in.)
HDR-HC7:
1-5.4 - 54 mm (7/32 - 2 1/4 in.)
When converted to a 35 mm still
camera
In CAMERA-TAPE: 40 ~ 400 mm
(l 5/8 - 15 3/4 in.) (16:9), 49 - 490 mm
(l 15/16- 19 3/8 in.) (4:3)
In CAMERA-MEMORY: 4(I - 40(I mm
(l 5/8 - 15 3/4 in.) (16:9), 37 - 370 mm
(l 1/2 - 14 5/8 in.) (4:3)
F1.8 - 2.9
Filter diameter: 37 mm/I I/2 in.)
Color temperature
[AUTO], lONE PUSH], [INDOOR]
(3 2OO K),
[OUTDOOR] (5 800 K)
Minimum illumination
2 lx (lux) ([AUTOSLW SMTR] ION],
Shutter speed 1/30 sec)
0 lx (lux) (during NightShot function)
*_"ExiF_is a file lk)rmatlk)rstill images,
established by the JEITA (Japan
Electronics and lnlk)rmation Technology
Industries Association). Files in this
format can have additional information
gulch as your canlcorder_s setting
inli)rmation at the time of recording.
*2The unique pixel mTay of Sony's
ClearVid CMOS sensor and image
processing system (new Enhanced
hnaging Processor) allows for still
image resohltion equivalent tothe sizes
described.
*3The focal length figures are actual
figures resulting from wide angle pixel
read-out.
_=..
g
m
Continued._ 101

Input/Output connectors
Audio/Video output
IO-pin connector
Video signal: 1 Vp-p, 75 K-)(ohms)
Luminance signal: 1Vp-p, 75 f) (ohms)
Chrominance signal: 0.286 Vp-p, 75 f-)
(ohnas)
Audio signal: 327 mV (at load
hnpedance 47 k£2 (kilohms)), Output
hnped:mce with less than 2.2 k(-}
(kilohms)
COMPONENT OUT jack
Y: I Vp-p, 75 t-) (ohms)
PB/PR, (?B/CI<:_+350 mV, 75 £-}(ohms)
HDMI OUT jack
TypeA (19-pin)
Headphone jack (HDR-HC7)
Stereo minijack 10 3.5 ram)
LANC jack
Stere() mini-minijack (0 2.5 ram)
USB jack
mini-B
MIC (PLUG IN POWER) jack
(HDR-HC7)
Stereo minijack (0 3.5 ram)
_,HDV/DV jack
i.LINK Interf:Jce (IEEE1394, 4-pin
connector S I {X))
LCD screen
Picture
6.9 cm (2.7 type, aspect ratio 16:9)
Total dot number
21 I 200 (960 x 22(I)
General
Power requirements
DC 6.8 V/7.2 V (battery pack)
DC 8.4 V (AC Adaptor)
Average power consumption
HDR-HC5:
During camera recording using the
viewfinder with normal brightness:
HDV recording 3.8 W
DV recording 3.5 W
During camera recording using the
LCD with normal brightness:
HDV recording 4.1 W
DV recording 3.8 W
HDR-HC7:
During camera recording u sing the
viewfinder with normal brightness:
HDV recording 4.2 W
DV recording 4.0 W
During camera recording using the
LCD with normal brightness:
HDV recording 4.5 W
DV recording 4.3 W
Operating telnperature
0'C to +40 'C (32 'Fto 104 'F)
Storage temperature
-20 'C to + 60 'C (-4 'Fto + 140 T)
Dimensions (approx.)
HDR-HC5:
82x82x 134ram
(3 1/4 x 3 1/4 x 5 3/8 in.) (w/h/d)
including the projecting parts
82x82x 134ram
(3 1/3,x 3 1/4 x 5 3/8 ill.) (w/h/d)
including the projecting parts with the
supplied battery pack NP-FH60
attached
HDR-HC7:
82 x82 x138 toni
(3 1/4 x 3 1/4 x 5 1/2 in.) (w/h/d)
including the prqjecting parts
82x82x 138mm
(3 1/4 x 3 1/4 x 5 1/2 in.) (w/h/d)
including the projecting parts with the
supplied battery pack NP-FH60
attached
102
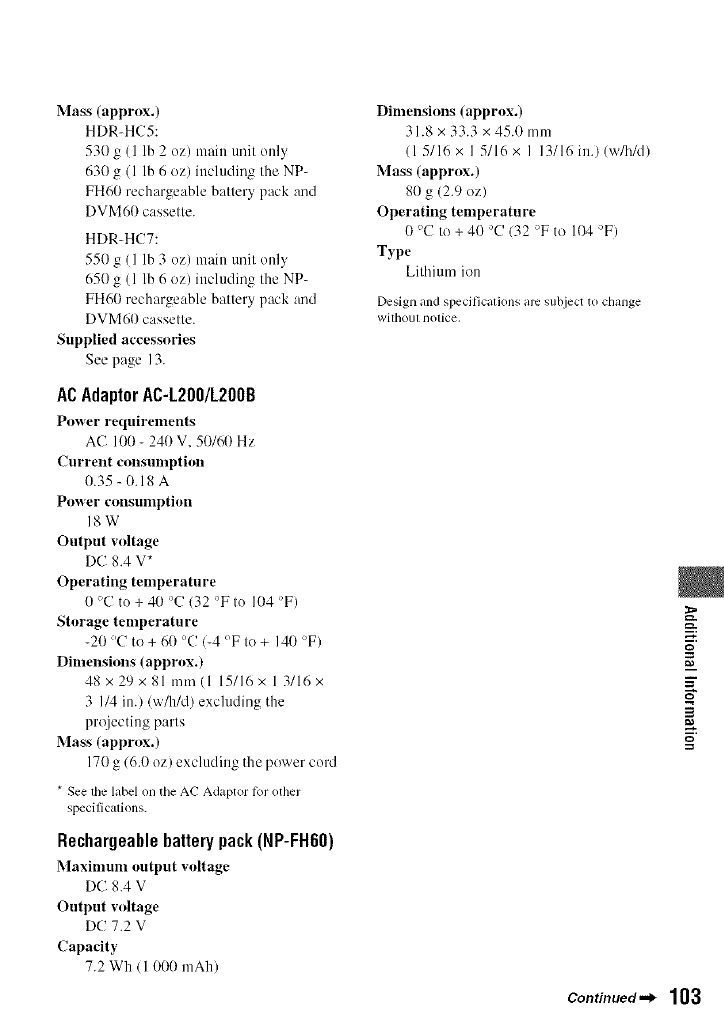
Mass (approx.)
HDR=HC5:
530 g (1 lb 2 oz) main anit only
630 g (l lb 6 oz) including the NP:
FH60 rechargeable battery pack and
DVM60 cassette.
HDR:HCT:
550 g (1 lb 3 oz) main unit only
650 g (l lb 6 oz) including the NP:
FH60 rechargeable battery pack and
DVM60 cassette.
Supplied accessories
See page 13.
ACAdaptorAC-L200/L200B
Power requirements
AC 100 - 240 V, 50/60 Hz
Current consumption
0.35 : 0.18 A
Power consumption
18W
Output wdtage
DC 8.4 V*
Operating temperature
0'C to + 40 'C (32 'Fto 104 'F)
Storage temperature
-20 'C to+ 6(I 'C 1-4 °F to+ 140 'F)
Dimensions (approx.)
48 x 29 x 81 mm (l 15/16 x l 3/16 x
3 I/4 in.) (wN/d) excluding the
projecting parts
Mass (approx.)
170 g 16.0 oz) excluding the power cord
* See the label on the AC Adaptor tot other
specifications.
Rechargeablebatterypack(NP-FH60)
Maximum output voltage
DC 8.4 V
Output voltage
DC 7.2 V
Capacity
7.2 Wh (I 000 mAh)
Dimensions (approx.)
31.8 x 33.3 x 45.0 mm
(1 5/16x I 5/16x I 13/16 in.) (w/h/d)
Mass (approx.)
80 g (2.9 oz)
Operating temperature
0 'C to+40 'C 132 'Fto 104 'F)
Type
Lithium ion
Design and specifications arc subject to change
without notice,
_=."
g
m
Continued.._ 103
Ontrademarks
• "Handycam' and
__:¢'_r_ are
registered trademarks of Sony Corporation.
• HDV and the HDV logo are trademarks of Sony
Corporation and Victor Company of Japan, Lid.
• _Me } S ck, ",_, "Me no y S ck
Duo," "MEMORY 51ilk DU0," "Memory Stick
PRO Duo," "MEMORY 5TI[K PR8 DUO,"
"MagicGate," "MZXG I C GZkTE ,'
"MagicGate Memoiy Stick" and "MagicGate
Memol T Stick [)11(5" arc trademarks of Sony
Corporation.
• "lnIoLITHIUM" is a trademark of Sony
Corporation,
• i.LINK and I, arc trademarks of Sony
Corporation.
Mini 'II-_'T _¢t_t .
Video IS atradell'lark.
• _ c_sse;e
• "x._.Color" is a trademark of Sony Corporation.
• Microsoft, Windows, and Windows Media arc
trademarks or registered tradelnarks of U.S.
Microsolt Corporation in the U.S. and other
countries.
• Macintosh and Mac OS are trademarks of Apple
Computer, Inc ill lhe U.S. and other countries,
• HDML the HDMI logo, and High-Definilion
Multimedia Interlace are trademarks (51
rcgislered trademarks of HDMI Licensing LLC.
• Intel, lntel Core and Pentium are either
rcgislered trademarks or trademarks of Intel
Corporation and its subsidiaries ill tile United
States and/or other countries.
• Adobe and Adobe Reader are either registered
trademarks or trademarks of Adobe Systems
Incorporated in tile United States and/or other
countries.
All <)tiler product names mentioned herein may be
the trademarks or registered tradem*wks of their
respective companies. Furtherlnom. ix1 and "_3"
arc not menlioned ill each case in Ibis iÀlanllal.
NotesontheLicense
ANY USE OF THIS PRODUCT OTHER THAN
CONSUMER PERSONAL USE lN ANY
MANNER THAT COMPLIES WITH THE
MPEG-2 STANDARD FOR ENCODING
VIDEO INFORMATION FOR PACKAGED
MEDIA lS EXPRESSLY PROHIBITED
WITHOUT A LICENSE UNDER APPLICABLE
PATENTS lN THE MPEG-2 PATENT
PORTFOLIO_ WHICH LICENSE IS
AVAILABLE FROM MPEG LA, L.L.C., 250
STEELE STREET, SUITE 300, DENVER,
COLORADO 8(12(16.
104
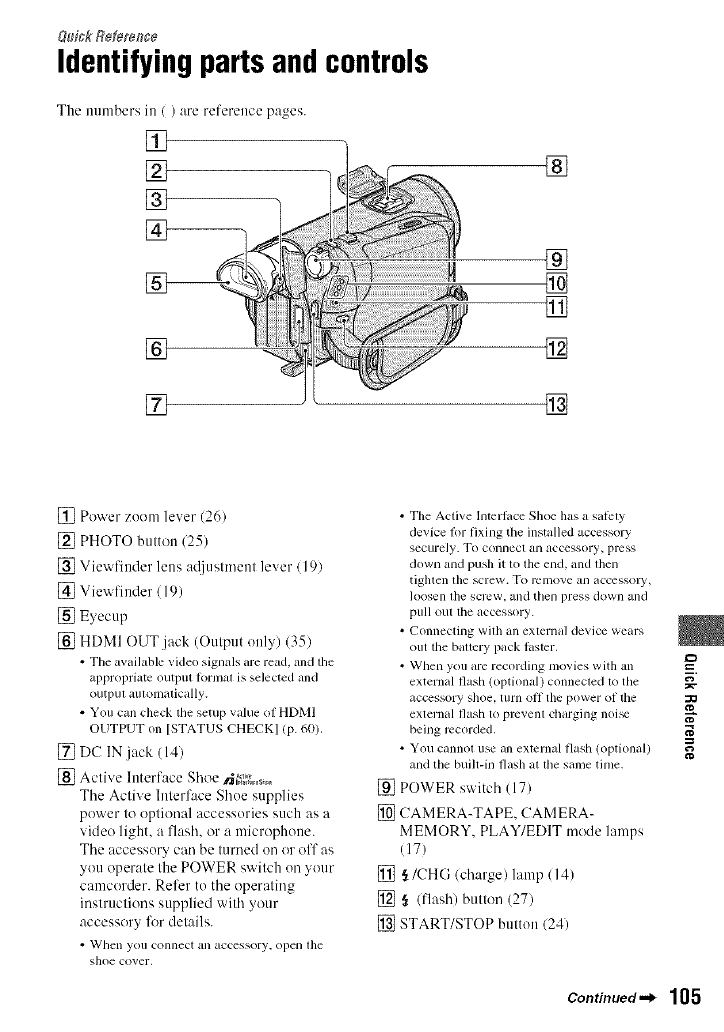
Identifyingpartsandcontrols
The mnnbers in / ) are reference pages.
[]
[]
%
[]
[]
[]
[]
[]
[]
[]
[]
[] Power zoom lever (261
[] PHOTO button 125)
[] Viewfiuder lens ac{iustmeut lever / 191
[] Viewfiuder (19)
[] Eyecup
[] HDMI OUT jack (Output only) (35)
• The available video signals are read, and tile
appropriate output k_rmat is selected and
output automatically.
• You call check the setup value of HDMI
OUTPUT on [STATUS CHECKI (p. 60).
[] DC IN.jack (14)
[] Active Interface Shoe N_+_+.,_.0
The Active Interface Shoe supplies
power to optional accessories such as a
video light, a flash, or a microphone.
Tile accessory call be t/lrned oil or off as
you operate the POWER switch on your
camcorder. Refer to tile operating
instructions supplied with your
accessory for details.
• When yotl COllllect all accessory, open l]le
shoe cover.
• Tile Active Interlace Shoe has a salcty
device fi)r fixing tile installed accessory
securely. To connect an accessory, press
down and push it to the end. and then
tighten tilescrew. To relllOVeall accessoly,
loosen lhe screw, andthell press down and
pull out the accessory.
• Connecting with allexternal device wears
outthe bauery pack laster.
• When you are recording movies with an
external flash (optional) connected to tile
accessory shoe, turn oll tile power of tile
external flash to prevent charging noi_
being recorded.
• You cannot use all external flash (optional)
and the built-in flash at the same tinle.
[] POWER switch (17)
[] CAMERA-TAPE, CAMERA-
MEMORY, PLAY/EDIT mode lamps
(17)
[] ,_/CHG/ch:,rge) lamp /14)
[] § (l]ash) button (27)
[] START/STOP button (24)
=_
N"
g
Continued._ 105

N÷_tifyi_S pa_ts a_ co_tm_s (Co,timber}
[]
%--
[]
[]
®
®
[]
[]
[]
[] HDR-HC7:
MANUAL button (27)
[] HDR-HC7:
CAM CTRL dial (27)
[] NIGHTSHOT switch (28)
[] BACK LIGHT button (28)
[] Zoom buttons (26)
[] START/STOP button (24)
[] DISPLAY/BATT INFO breton (15)
[] _ (USB)jack (72)
[] Speaker
Playback soullds come out from the
speaker. For how to a@lst the volmne.
see page 29.
[] Access lamp (20, 93)
[] "Memory Stick Duo" slot (20)
[] EASY button (22)
[] LCD screen/touch panel (7, 19)
[] RESET button
Initializes all the settings, including tim
setting of the date and time (Menu items
customized oil Persoual Menu are licit
initialized).
[] _,_ LANC jack (blue)
The LANC control jack is used for
controlling the tape transport of video
devices and peripherals ccmuected to it.
[] _ HDV/DV Interface (i.LINK) (35.66.
68.76)
[] COMPONENT OUT jack (35)
[] A/V (audio/video) OUT.jack (35, 66)
[] HDR-HC7:
Q (Headphone)jack
106
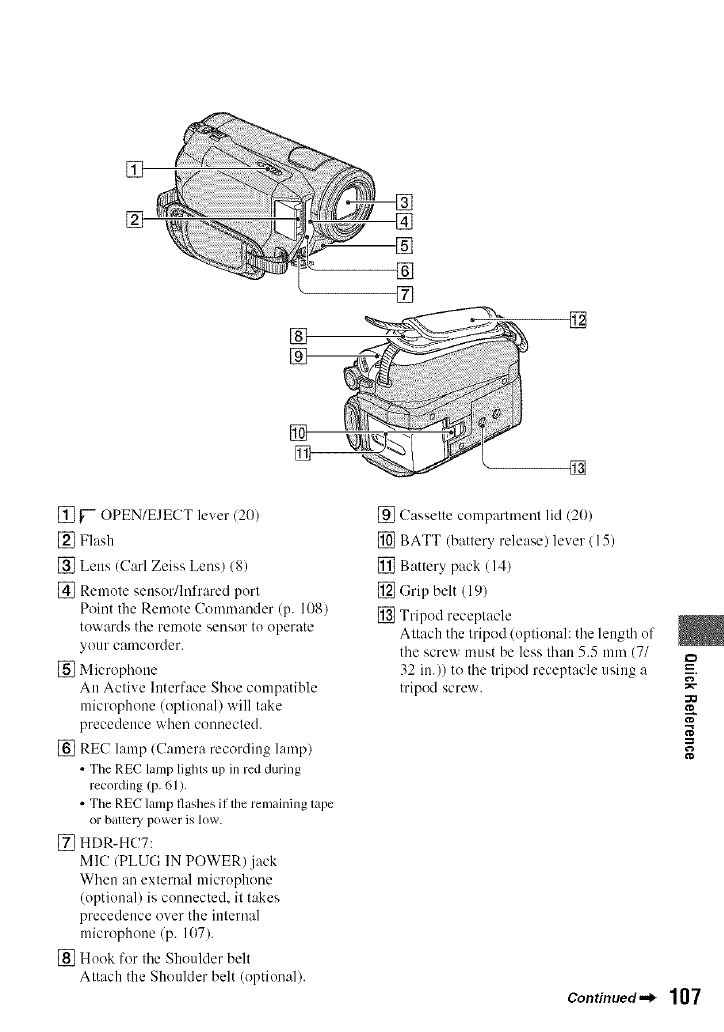
[]
[] []
[]
[]
[] }"- OPEN/EJECT lever (20)
[] Flash
[] Lens (Carl Zeiss Lens) (8)
[] Remote sensor/Infrared port
Point the Rmnote Commander (p. 108)
towards the rmnote sensor to operate
your camcorder.
[] Microphone
An Active Interface Shoe compatible
microphone (optional) will take
precedence when connected.
[] REC lamp (Camera recording lamp)
• The REC lamp lights up in red during
recording (p. 61).
• The REC lamp flashes if lhe remaining lape
or batlcry power is low.
[] HDR-HC7:
MIC (PLUG IN POWER).jack
When an external microphone
(optional) is connected, it t&es
precedence over the internal
microphone (p. 107).
[] Hook for the Shoulder belt
Attach the Shoulder belt (optional).
g_
[] Cassette compartment lid (20)
[] BATT (battery release) lever (15)
[] Battery pack (14)
[] (;rip belt (19)
[] Tripod receptacle
Attach the tripod (optional: the length of
the screw must be less than 5.5 mm (7/
32 in.)) to the tripod receptacle using a
tripod screw.
=_
i,
g
Continued._ 107
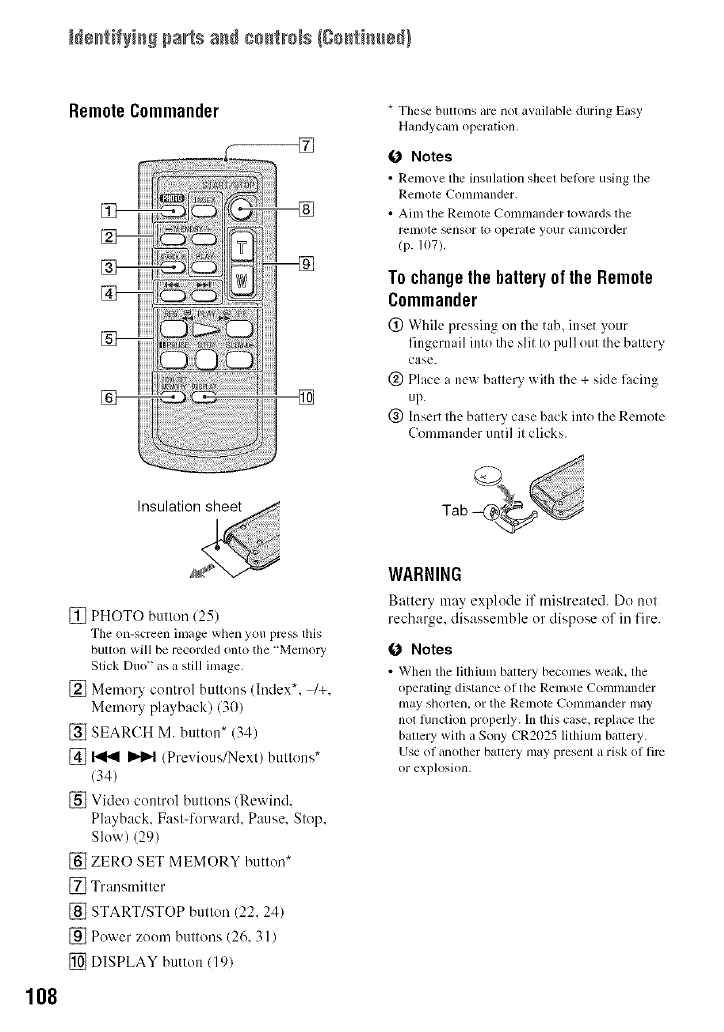
N÷_tifyi_S pa_ts a_ co_tm_s (Co,timber}
Remote Commander * These buttons are not available during Easy
Handycam operation.
O Notes
•Renlo_e the insulation sheel belore usingthe
Relnote Conltllander.
• Aim the Remote Conmlander towards the
relnote _nsor to operale your calncorder
(p. 107).
To change the battery of the Remote
Commander
(_) Whih: pressing on the tab, inset your
fingernail into the slit to pull out the battery
case.
@ Place a new batte Uwith the + side facing
up.
@ Insert the battery case back into the Remote
Commander until it clicks.
108
[] PHOTO button (25)
Tile on-screen inlagewhen you press this
button will be recorded onto tile "Menlo W
Slick Duo" as a still inlage.
[] Memory control buttons (Index*. _+.
Memory playback) (30)
[] SEARCH M. button* (34)
[] _ _ (Previous/Next) buttons*
(34)
[] Video control buttons (Rewind.
Playback. Fast-forward. Pause. Stop,
Slow) (29)
[] ZERO SET MEMORY button*
[] Transmitter
[] START/STOP button (22, 24)
[] Power zoom buttons (26, 31 )
[] DISPLAY button (19)
WARNING
Battery may explode if mistreated. Do not
recharge, disassemble or dispose of in fire.
O Notes
• When tile lithiunl battery beconles weak. tile
operaling dishmce ol tile Renlote Comnlander
hilly shortell, o1: tile Remote {_'Ollllllander ill[iN
not flmction properly. In this case, lvplace tile
ballery wilh a Sony CR2025 lithiunl baltery.
Use of anolher batlery nlay presenl a risk of fire
or explosion,

Indicatorsdisplayedduringrecording/playback
[] [] [] []
[] Recording format/HDVI080i orDV)
(58)
Recording mode S_ or _) is also displayed
in the DV lormat.
[] Remaitting batte U(approx.)
[] Recording status ([STBY] (standby) or
[REC] (recording))
[] During recordittg:
Tape counter (hour: minute: second/
During playback:
Time code (hour: minute: second:
frame)
[] Recording capacity of the tape (approx.)
(61)
[] Review button lk)r still images on the
"Memory Stick Duo" (25)
Appears when "Memory Stick Duo" is
in_llcd.
[] END SEARCH/Rec review display
switch button (33)
[] GUIDE button (I 12)
[] Personal Menu button (40)
Recording still images during tape
recording(DualRec)
[] Recording folder (521
[] hnage size (50)
[] Quality ([FINE] or ISTD]) (5(})
[] Number of recorded still images 126)
[] "Memory Slick Duo" irMicator and the
number of images that caFi be recorded
(approx.)
ta
The date/time during recording and the
camera setting data will be recorded
automatically. They do not appear on the
screen during recording, but you can check
them as [DATA CODE[ during playback
(p. (q).
ff
Continued.._ 109
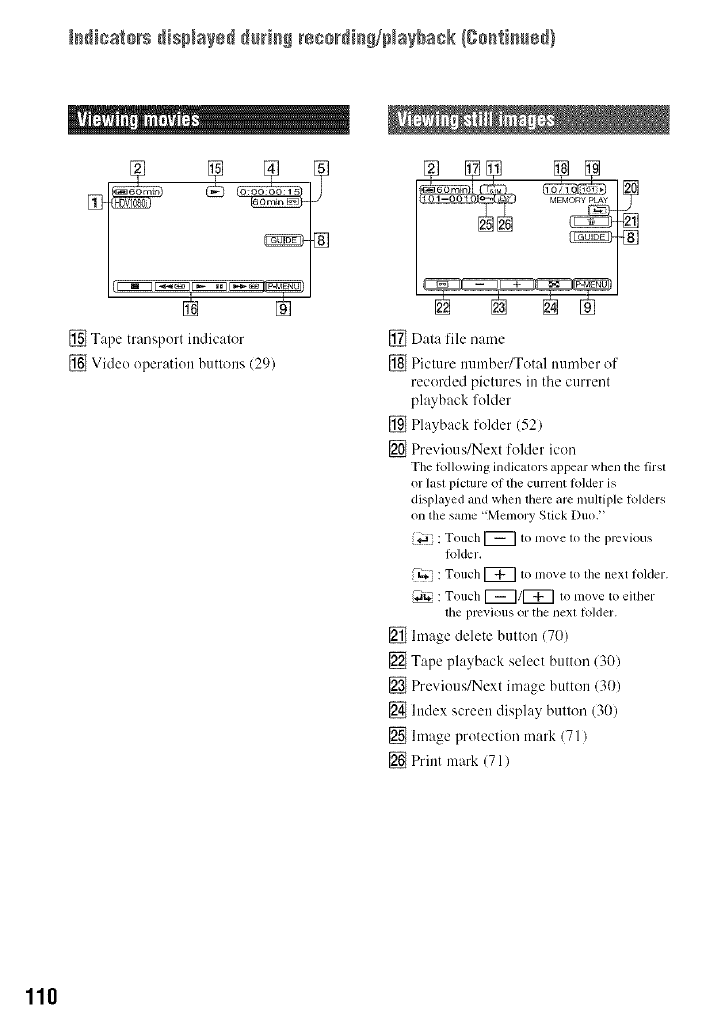
[s_icats_s disp_a_sd_t_isS recs_di_S/ptayback {go_fi_ed}
[] Tape transport indicator
[] Video operation buttons (29)
[] Data file name
[] Picture number/Total ttumber of
recorded pictures in the current
playback folder
[] Playback folder (521
[] Prevkms/Next folder icon
The lollowing indicators appear when the first
or last picture of the current lolder is
displayed and when there are nmltiple lolders
on tile same "Memory Stick Duo."
: Touch I_ to move to tile previous
k_lder.
_ : Touch r_ to move to tile next folder.
(_'. : Touch r_/r_ to move to either
the plvvious or tile next k)lder.
[] hnage delete button (70)
[] Tape playback select button (30)
[] Previous/Next image button (30)
[] Index screen display button (30)
[] hnage protection mark (71)
[] Print mark (71 )
110
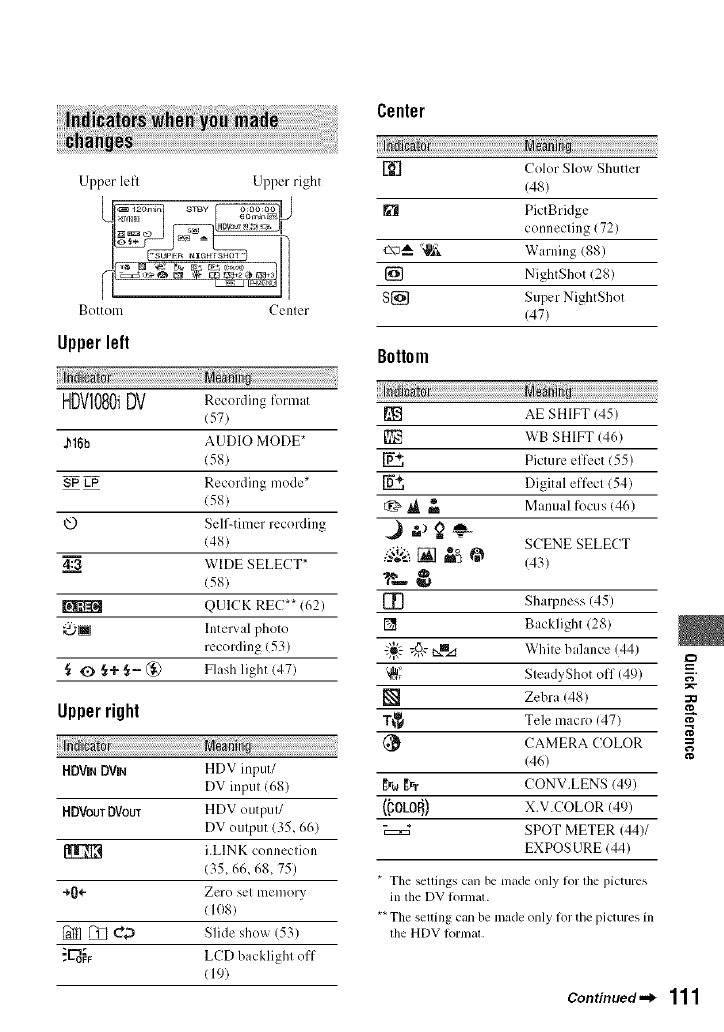
Bottom Ccnlcr
Upperleft
HDVI080iDV Recording for,nat
(57)
J_16b AUDIO MODE*
(58)
SP LP Recording mode*
(58)
@ Self-timer recording
(48)
4:=_a WIDE SELECT*
(58)
QUICK REC** (62)
_Interval photo
recording (53
,_ O,_+ ,_- @ Flash light (47)
Upperright
HDVINOVlN HDV input/
DV input (68)
HDVouTDVOUT H DV outpul/
DV output (35_ 66)
i.LINK conneclion
(35, 66, 68, 75)
+0÷ Zero set memory
(108)
[_ _ _D Slide show (53)
"E_o_ LCD backlight off
(19)
Center
L'{_'] Color Slox_ Shutter
(48)
[] PictBridge
c(mnecting (72)
+-\_*_--"_lPJk Warning (88)
[] NightShot (28)
S[] Super NightShot
(47)
Bottom
P_ AE SHIFT (45)
[] WB SHIFT (46)
P_ Picture effect (55)
Digital effect (54)
t:_ _ _ Manual focus (46)
SCENE SELECT
_#_;;-'t[] "°
m'_ @ (43)
[_ Sharpness (45)
[] Backlight (28)
£_- @,v_ White balance (44)
'_ SteadyShot off (49)
[] Zebra (48)
T_I_ Tele macro (47)
(_ CAMERA COLOR
(46)
{r_ _rTCONV.LENS (49)
(,COLOR') X.V.COLOR (4'))
SPOT METER 144)/
EXPOS URE (44)
* Tile setlings can be nlade only for lhe pictures
in tile DV tornlat.
**The setting can be made only for the pictures in
tile HDV tormal.
=_
¢0
N"
_+
g
Continued.,_ 111
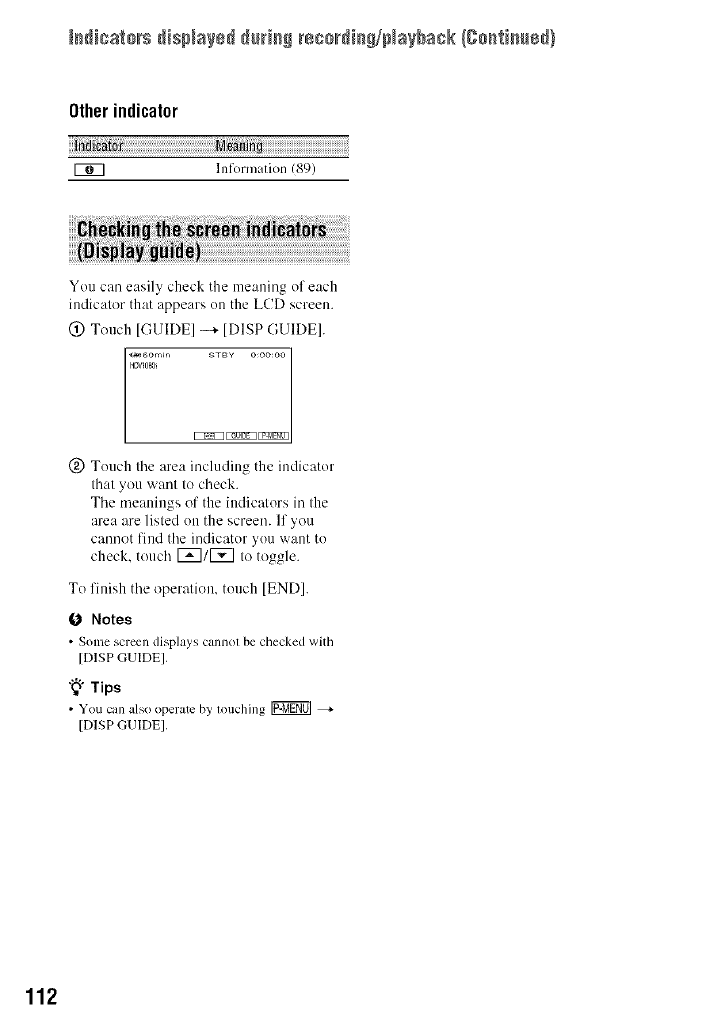
[s_icats_s disp_a_sd_t_isS ress_di_S/ptaybask (ge_ti_ed)
Other indicator
U_7 lnfornmtion (89)
You can easily check the meaning of each
indicator that appears on the L(!D screen.
(_) Touch [GUIDE] --_ [DISP GUIDE].
_;Zgo............
(_) Touch the area including the indicator
that you want to check.
The meanings of the indicators in the
area are listed on the screen. If you
cannot find the indicator you want to
check, touch [_1[_ to toggle.
To finish the operation, touch [END].
0 Notes
• Sortie screen displays cannot be checked with
[DISP GUIDE],
"_" Tips
•You can _,lso operate by touching _
[DISP _-;UIDE].
112
Index
Numeric
1080i/480i ............................. 60
12BIT .................................... 58
16BIT .................................... 58
480i ....................................... 60
A
AC Adaptor ........................... 14
AE SHIFT ....................... 45, 87
ALL ERASE ......................... 51
AUDIO MIX ......................... 58
AUDIO MODE ..................... 58
AUTOSLW SHTR
(Aulo slow shutter) ............... 45
A,SHUT OFF
(Aulo shut olf) ...................... 62
A/V connecting cable .....36, 65
A/V OUT jack ............... 35, 106
B
BACK LIGHT ................ 28, 83
Battm T .................................. 14
BEACH ................................. 43
BEEP .................................... 62
C
CALIBRATION ................... 99
CAM CTRL dial ................... 27
CAMERA COLOR ............... 46
CAMERA DATA ................. 61
CAMERA SET menu ........... 43
CANDLE .............................. 43
C_ssette ........................... 20, 92
CD-ROM .............................. 74
Charging time ....................... 15
Cleaning cassette .................. 98
CLOCK SET ......................... 17
CNNECT GUIDE ........... 32, 35
COLOR BAR ....................... 61
COLOR SLOW S (Color Slow
Shutter) ..................... 48, 83, 87
COMPONENT ..................... 60
COMPONENT OUT jack
...................................... 35. 106
Componem video cable ........ 36
Coml?uler .............................. 74
CONV.LENS ....................... 49
D
DATA CODE ................. 18.61
I/ate search ........................... 34
DATE/TIME .......... 18, 61. 109
Delete pictures ...................... 70
DEMO MODE ..................... 56
DIAL SET ............................ 49
DIGITAL ZOOM ........... 49. 87
[lISP GUIDE
(Display guide) ................... 112
[lISP OUTPUT
(Display outpul) ................... 62
Display indicalors .............. 109
Down converl fimction ......... l l
Dual Rec ............................... 26
Dubbing ................................ 65
DV l_)r/nal ............................ 57
DV SET ................................ 58
D.EFFECT
(Digilal ellccl) ................ 54.87
E
Easy Handycam .............. 22, 40
EDIT/PLAY menu ............... 56
END SEARCH ............... 33, 57
EXPOSURE ................... 44_ 87
F
FADER ........................... 53.87
FILE NO. (File number) ...... 52
FIREWORKS ....................... 43
First Step Guide ............. 74.78
Flash ..................................... 82
FLASH LEVEL ............. 47, 83
FLASH SET ......................... 47
FLASH (Flash motkm) ......... 54
FOCUS ........................... 46, 83
FORMAT ............................. 52
Frame-by-t_anle Playback ....56
G
Getting Starled ...................... 13
GUIDEFRAME .................... 61
H
HD (high definition) image
quality ................................... 36
HDMI cable .......................... 37
HDMI OUT jack ........... 35, 105
HDV Iormat .......................... 57
HDV1080i ...................... 11,58
HDV/DV Inlerlace ....... 35, 106
I
hnage protection ................... 71
hnage size
(IMAGE SIZE) ..................... 50
INDOOR ............................... 44
"InR_LITHIUM" battery pack
.............................................. 95
lnslall .................................... 76
INT.REC-STL =_
(Inlelval pholo recording),,,,,53 --.
i.LINK .................................. 96 ::o
i.LINK cable ....... 37, 66, 69, 77
i.LINK CONV ...................... 60 g
L
LANDSCAPE ....................... 43
LANGUAGE ........................ 63
LCD BL LEVEL
(LCD back lighl level) .......... 59
LCD BRIGHT ...................... 59
LCD COLOR ........................ 59
LCD/VF SET ........................ 59
Lens cover ...................... 18, 24
LP (Long Play) ..................... 58
Continued ._ 113
114
Iv1
Macintosh ............................. 78
Maintenance and precautions
.............................................. 92
MEMORY SET menu .......... 50
"Memory Stick". .................. 93
"Memory Stick Duo". ........... 20
FORMAT ...................... 52
Menu ..................................... 40
MIC LEVEL ......................... 59
Mirror mode ......................... 28
Moisture condensation ......... 97
MONOTONE ....................... 53
MOSAIC FADER ................ 53
N
NEG.ART ............................. 55
NEW FOLDER .................... 52
NS LIGHT
(NightShot Ligh0 ................. 48
NTSC .............................. 84, 91
Number of recordable pictures
.............................................. 50
0
OLD MOVIE ........................ 54
ONE PUSH ........................... 44
OUTDOOR .......................... 44
P
PAL ...................................... 91
PASTEL ............................... 55
PB FOLDER
(Playback lblder) .................. 52
PB zoom ............................... 31
Personal Menu ................ 40, 63
Picture Motion Browser .......74
PICT.APPLI. menu (Picture
Application menu) ................ 53
PICT.EFFECT
(Picture ellkct) ...................... 55
Playback ............................... 29
Playing time ......................... 16
P-MENU ... See Personal Menu
PORTRAIT (Sol} portrad)... 43
Power cord ........................... 14
Prinl ...................................... 72
Prinl nmrk ............................ 71
I1
QUALlTY ............................ 50
QUICK REC
(Quick recording) ................. 62
R
REC CTRL
(Recording conlrol) .............. 68
REC FOLDER
(Recording R_lder) ................ 52
REC MODE
(Recording mode) ................ 58
Rec review ........................... 33
Recording ............................. 24
Recording lime ..................... 15
REDEYE REDUC ............... 47
REMAINING ....................... 61
Remaining ballely ........ 15, 109
Remote Commander. ......... 108
REMOTE CTRL
(Remole control) .................. 61
Reversal Playback ................ 56
s
S VIDEO jack .......... 35, 37, 65
SCENE SELECT ........... 43, 86
SD (standard definition) ilnage
quality .................................. 37
Searclfing liar the starting point
............................................. 33
SELF-TIMER ...................... 48
SEPIA .................................. 55
SHARPNESS ................. 45, 87
SHUTTR SPEED ................. 45
SKINTONE ......................... 55
SLIDE SHOW ..................... 53
SLOW SHUTTR
(Slow shmler) ....................... 54
SMTH SLW REC (Smooth
slow recording) ............... 55, 87
SNOW .................................. 43
SOLARIZE ........................... 55
SP (Slandard Play) ............... 58
Specifications ..................... 100
SPOT FOCUS ................ 46, 87
SPOT METER
(Flexible spot meter) ......44, 86
SPOTLIGHT ........................ 43
STANDARD ........................ 50
STANDARD SET n/enu ...... 57
STATUS CHECK ................ 60
STEADYSHOT .............. 49, 83
STILL ................................... 54
Still image .......... 25, 30, 50, 93
STILL SET ........................... 50
SUNRSE SUNSET
(Sunri_ and sunsel) ............. 43
SUPER NS
(Super NighlShot) ................ 47
T
Tape counter, ...................... 109
TELE MACRO .............. 47, 87
Time code ........................... 109
TIME/LANGU. menu .......... 63
TRAIL .................................. 54
Tripod ................................. 107
TV ......................................... 35
TV color systems .................. 91
TV TYPE .............................. 60
U
USAGE GUIDE ................... 32
USB jack ............................ 106
USB SELECT ...................... 56
Using abroad ........................ 91
V
VAR.SPD PB
(Various speed playback) ,.,.,56
VF B.LIGHT
(Viewfinder brightness) ........ 59
VOLUME ............................. 59
W
Warning indicators ................ 88
Warning inessages ................ 89
WB SHIFT
(White Balallce Shifl) ........... 46
WHITE BAL,
(White bahmce) ............... 44, 87
WHITE FADER ................... 53
Windows ......................... 74, 75
WORLD TIME ..................... 63
Write-protect tab ............. 92, 93
x
X.V.COLOR ................... 49, 97
Z
ZEBRA ................................. 48
Zero set melnoly, .................. 33
Zoom ..................................... 26
=_
::O
N"
g
115
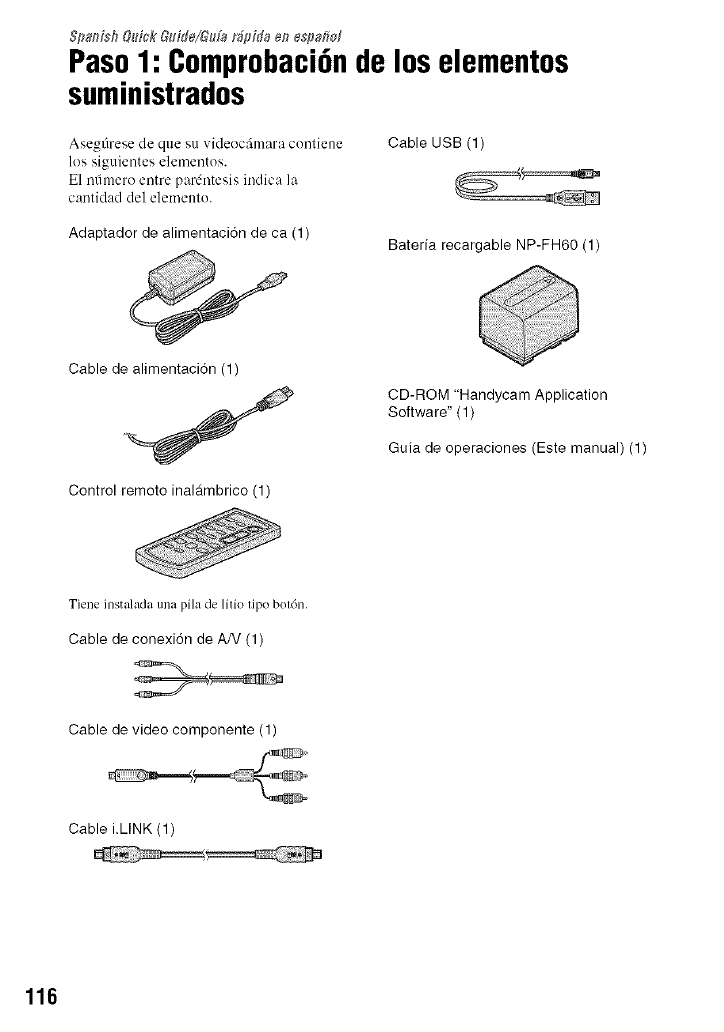
$pa#isb Q_#_kGdde/G_da r_pida en espa#ol
Paso1: Comprobaci6nde loselementos
suministrados
Asegfirese de que su videecfimara contiene
les siguientes elementos.
E1 mimero entre pardntesis indica la
cantidad del elemento.
Adaptador de alimentaci6n de ca (1)
Cable USB (1)
Bateria recargable NP-FH60 (1)
Cable de alimentacidn (1)
Control remoto inalambrico (1)
CD-ROM "Handycam Application
Software" ( 1 )
Guia de operaciones (Este manual) (1)
Tiene instalada una pila de litio tip() botdn.
Cable de conexidn de AN (1)
Cable de video componente (1)
Cable i.LINK (1)
116
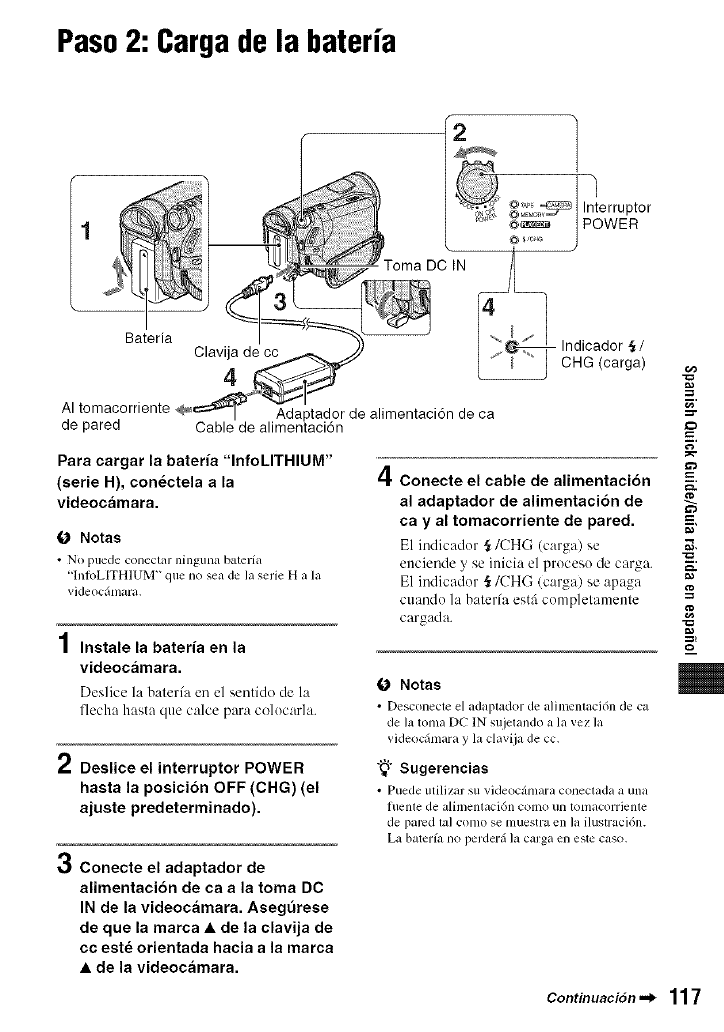
Paso2: Cargade la bateria
roma DC IN
Interruptor
POWER
Bateria
AI tomacorriente
de pared
Clavija de cc
4
,tador de alimentaci6n de ca
Indicador §/
CHG (carga)
Para cargar la bateria "InfoLITHIUM"
(serie H), con_ctela a la
videocamara.
O Notas
•NO puede conectar ninguna balm'ilL
"lnIbLITHIUM" que no sea de la serie H a la
vid¢ocfimara,
4
/ Instale la bateria en la
videocamara.
Deslice la balerfa en el sentido de la
flecha has;ta que calce para colocarla.
2Deslice el interruptor POWER
hasta la posicibn OFF (CHG) (el
ajuste predeterminado).
oConecte el adaptador de
alimentaci6n de ca a la toma DC
IN de la videocamara. Aseg0rese
de que la marca •de la clavija de
cc este orientada hacia a la marca
•de la videocamara.
f
=3"
4c onecte el cable de alimentaci6n -=.
al adaptador de alimentaci6n de
ca y al tomacorriente de pared. =,,=
E1 indicador _/CHG (carga)se
enciende yse inicia el proceso de carga.
E1 indicador ._/CHG (carga) se apaga
cuando la balerfa estfi complelamenle
cargada.
g,
O Notas
• Desconecteel adaplador de alinlentaci6n de ca
de la tolna DC IN sujetando a la vez la
vMeoc&naray la davija de co,
"_° Sugerencias
• Puede IlIilizar SLI videoc;_lllara COllecIada a ulla
fllente de alhi/entaci6n colno nil K)lllacorriente
de pared kd COlllO se lnuestra ell ]a ilustraci6n.
La baterfa 11o perderfi ]a carga ell este caso,
Continuaci6n ._ 117
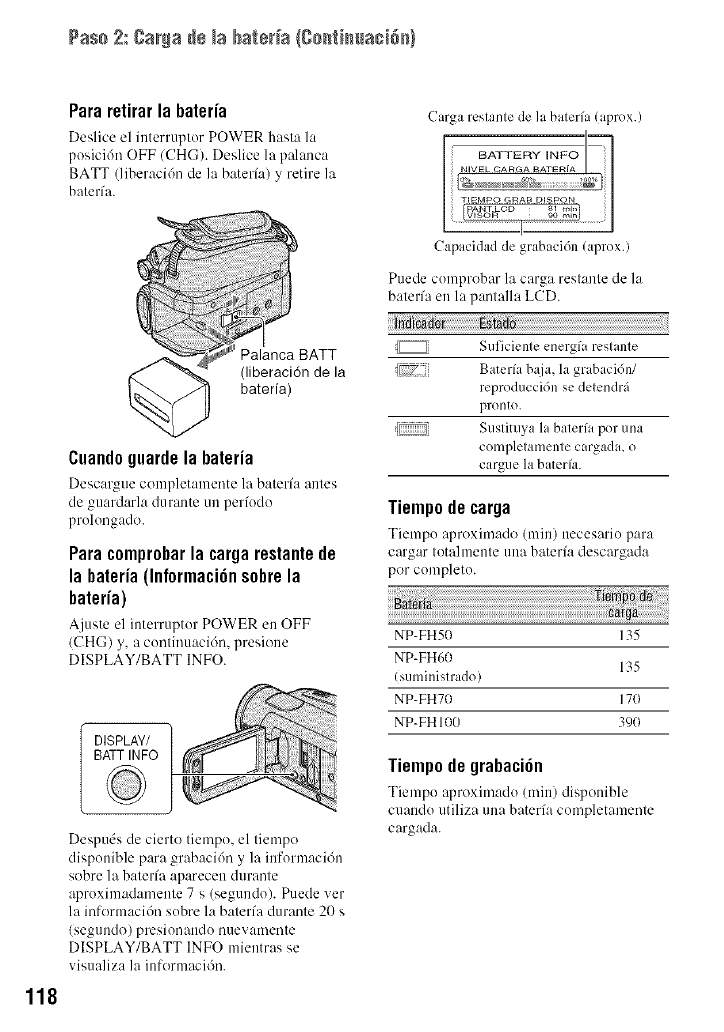
Paso 2: gar_a de _abateda {ge_ti_uaci6N
Pararetirarla bateria
Deslice el interruptor POWER hasta la
posicidn OFF (CHG). Deslice la palanca
BATT (liberaci6n de la baterfa) y retire la
baterfa.
Carga restante de la baterfa (aprox.)
118
Palanca BATT
(liberaci6n de la
bateria)
Cuandoguardela bateria
Descargue complet:unente la baterfa antes
de guardarla durante un perfodo
prolongado.
Para comprobarla carga restantede
la bateria (Informaci6nsobre la
batefia)
Ajuste el interruptor POWER en OFF
(CHG) y, a continuaci6n, presione
DISPLAY/BATT INFO.
DISPLAY/ ]
BATT INFO
Despuds de cierto tiempo, el tiempo
disponible para grabaci6n y la informaci6n
sobre la baterfa aparecen durante
aproximadamente 7 s (segundo). Puede vet
la informacidn sobre la baterfa durante 20 s
(segundo) presionando nuevamente
DISPLAY/BATT INFO mientras se
visualiza la informacidn.
Capacidad de grabaci6n (aprox.)
Puede comprobar llt carga restante de llt
baterfa en la pantalla LCD.
Suficienle energfa reslanle
J[zi_} Bater/a baja, la gr ibacidn/
reproduccidn se detendrfi
pronto.
[ Suslituya la balerfa por una
completamente cargada, o
cargue labaterfa.
Tiempode¢arga
Tiempo aproximado (rain) necesario par:l
cargar totalmente una bateria descargada
pot completo.
NP-FH5D 135
NP-FH6D 135
(suministrado)
NP-FH7D 17(1
NP-FH 1D0 39(1
Tiempodegrabaci6n
Tiempo aproximado (rain) disponible
cuando utiliza una baterfa completamente
cargada.
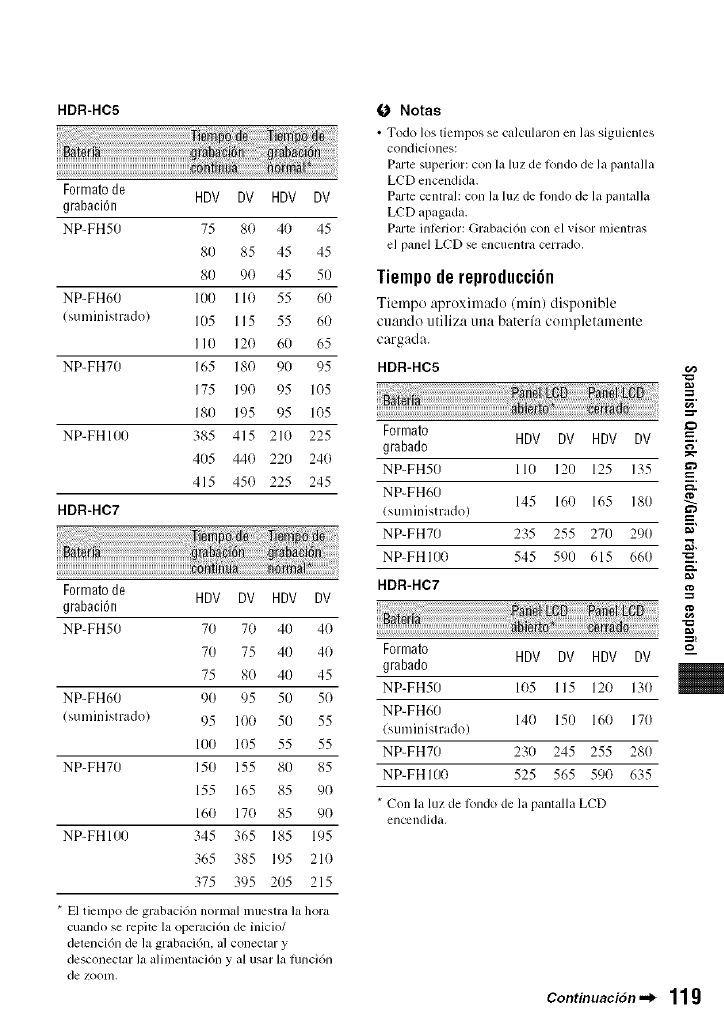
HDR-HC5
Formato de HDV DV HDV DV
grabacibn
NP-FH50 75 80 40 45
80 85 45 45
80 90 45 50
NP-FH60 100 110 55 60
(suministrado) 105 115 55 60
I IO 120 60 65
NP-FH70 165 180 90 95
175 190 95 105
180 195 95 105
NP-FHI00 385 415 210 225
405 440 220 240
415 450 225 245
HDR-HC7
Formato de HDV DV HDV DV
grabacibn
NP-FH50 70 70 40 40
7O 75 4O 4O
75 8O 4O 45
NP-FH60 90 95 50 50
(suministrado) 95 100 50 55
100 105 55 55
NP-FH70 150 155 80 85
155 165 85 90
160 170 85 90
NP-FHI00 345 365 185 195
365 385 195 210
375 395 205 215
* El tiempo de grabacidn norlnal mueslra la hora
cuando se repitc la operaci6n de inicio/
detencidn de la grabacidn, al conectar y
desconectar la alimentaci6n y al usar la hmcidn
de zootn.
(J Notas
• Todo los tielnpos se calcularon en ]as siguientes
condiciolms:
Parte superior: con ]a ]uz de londo de ]a panmHa
LCD enccndida.
Parte central: con la luz de londo de la pantalla
LCD apagada.
Parte interior: Grabaci6n con el visor mientras
el panel LCD se encuentra cerrado,
Tiemp0derepr0ducci6n
Tiempo :q)roximado (rain) disponible
cuando utiliza una baterfa completamente
cargada.
HDR-HC5
LC::
Formato
grabado HDV DV HDV DV
NP-FH50 110 120 125 135
NP-FH60 145 160 165 180
(suministrado)
NP-FH70 235 255 270 290 _"
NP-FHI00 545 590 615 660
HDR-HC7
Formato HDV DV HDV DV
grabado
NP-FH50 105 115 120 130
NP-FH60 140 150 160 170
(suministrado)
NP-FH70 230 245 255 280
NP-FHI00 525 565 590 635
* Con la luz de londo de la pantalla LCD
encendida,
#
g
g
g,
ContinuaciSn._ 11g
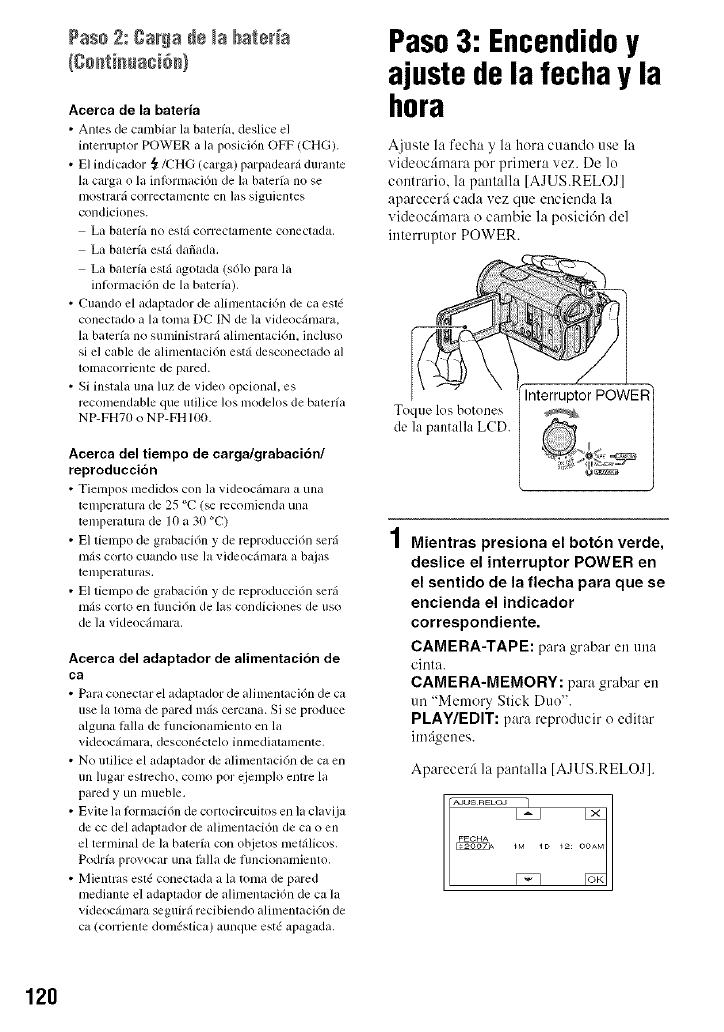
Paso Z: gaNa d÷ _abate_a
Acerca de la bateria
• Antes de cambim" la baterfa, deslice el
interluptor POWER a la posicidn OFF (CHG).
• El indicudor ,_/CHG (carga) parpadearfi duranle
la carga o la inlbrmaci6n de la balerfa no se
l/los[r;lra correctamenle ell ]as siguientes
condiciones.
La bateria no estfi correctamenle conectada,
La baleria estfi dafiada.
La baler/a estfi agotada (s61o para la
inkwmaci6n de la balerfa).
• Cuando el adaptador de alimentaci6n de ca esl6
conectado a la toma DC IN de la videocfimara,
la baterfa no suministrarfi alimentaci6n, incluso
si el cable de alimemaci6n estfi desconeclado al
Iolnacorrienle de pared.
• Si instala una luz de vide<) opcional, es
rccomendable que utilice los modelos de baterfa
NP-FH70 o NP-FH 100.
Acerca del tiempo de carga/grabaci6n/
reproduccion
• Tiempos medidos con la videocfimara a una
telnper_Ltura de 25 _'C (_ rccomien&t una
temperaluri_ de 10 ii 30 _'C)
• El tiempo de grabaci6n y de reproducci6n serfi
m_is corto cuando use la videocilmara a bajas
telnperaluras,
• El tiempo de grabaci6n y de reproducci6n serfi
mils corto en lhnci6n de las condiciones de uso
de la videocfimara.
Acerca del adaptador de alimentaci6n de
ca
• Para conecmr el adaptador de alilncnlaci(m de ca
use la loma de pm'ed in,is cel'Calm. Si se produce
alguna hdla de hmcionanfielm_ en la
videoc_hnilril, descontSctelo hl//ledi_lhllllellle,
• No ulilicc el mlaptador de alilnentaci6n de c_ en
1111lllgar eslr_cho, C'.)[/IO por ejelnp]o elllre lit
pared yun mueble.
• E_ite la lbrlnacidn de cortocircuitos en la clavija
de cc del adaplador de alimenlaci(m de ca o en
el ternfinal de la baler_a con objetos met_ilicos.
Podrfa prm ocar una lMla de hmcionanfielm_.
• Miemras esl6 coneclada a hi totmt de pared
medial_te el adaplador de alimentacidn de ca la
videoc_hnara seguirfi recibiendo alilnelmtci6n de
C_l (corlienle dom6stica) aunque est6 apagada.
Paso3: Encendidoy
ajuste dela fecha y la
hora
Ajuste la fecha y la hora cuando use la
videoc4mara pot primera vez. De lo
contrm'io, la pantalla [AJUS.RELOJ]
aparecerfi cada vez que encienda la
videocfmara o cambie la posici6n del
interruptor POWER.
Toque los botones
de la pantalla LCD.
Mientras presiona el boton verde,
deslice el interruptor POWER en
el sentido de la flecha para que se
encienda el indicador
correspondiente.
CAMERA-TAPE: para grabar en un:,
cinta.
CAMERA-MEMORY: para grabar en
un "Memory Stick Duo".
PLAY/EDIT: para reproducir o editar
im:igenes.
Aparecer4 la pantalla IAJUS.RELOJ].
_M ID _2: O
g_
120
2Ajuste [A] (afio) con F_3/r_7,
luego toque IoKI.
Puede seleccionar cualquier afio hasta el
aiio 2079.
3Ajuste [M] (rues), luego toque
y repita el procedimiento para [D]
(alia), hora y minuto.
A.juste la medianoche a las 12:00 AM.
Ajuste el mediodfa alas 12:00 PM.
E1 reloj se pone en funcionamiento.
Paraapagarla vide0c_mara
Deslice el interruptor POWER hasta la
posicidn OFF (CHG).
Pararestablecerla re€hay la h0ra
Para @1star la fccha y la hora deseadas.
toque IEggg0l --.,- [MENU] -+
5_)_ (HORA/LANGU.) -+
[AJUS.RELOJ].
O Notas
•Si no us_ la xideocfimara duranle
aproximadamente 3meses, ]a balerfa
rccargable incorporada se descarga y es posible
que los i/iusles de la lcclla y la hora se borren de
]a lnetlloria. En este caso, cargue la baterfa
mcargable y ajuste la lccha y la hora
nuevanlente.
•AI momento de la compra, la alimentaci6n se
a_iusta para desconeclarse aulonlfiticatllente si no
se opera la videocfimara durame unos 5 [llhl
(minuto) para ahorrar energfa de la balmfit
([APAGADO AUTO]).
"_° Sugerencias
• La l_clla y hora no aparecen durante la
grabacidn, peru se graban automfiticamente en
la cinm y pueden visualizarse duranle la
roproducd6n ([CODVIO DATOS] (Durante el
hmcionanfienlo de Easy Handycam, s61o puede
ajusmr [FECHA/HORA])).
• La tapa del objetivo se abre automfiticmnenle al
a.iustar el inlerruptor POWER en CAivIERA-
TAPE o CAMERA-MEMORY.
• Si los botones del pzmel sensible al laclo no
flmcionan COlTeclanlente, ajuste el panel
sensible al tacto (CAL1BRACION).
Puede cambiar las indicaciones en panlalla
para que muestren mens_{jesen un idioma
en particular.
Toque IgNgff01-+ [MENUI -+ ;:_
(HORA/LANGU.) -...+ [LANGUAGE], y
luego seleccione el idioma deseado.
f
r,'
g
g
g,
121
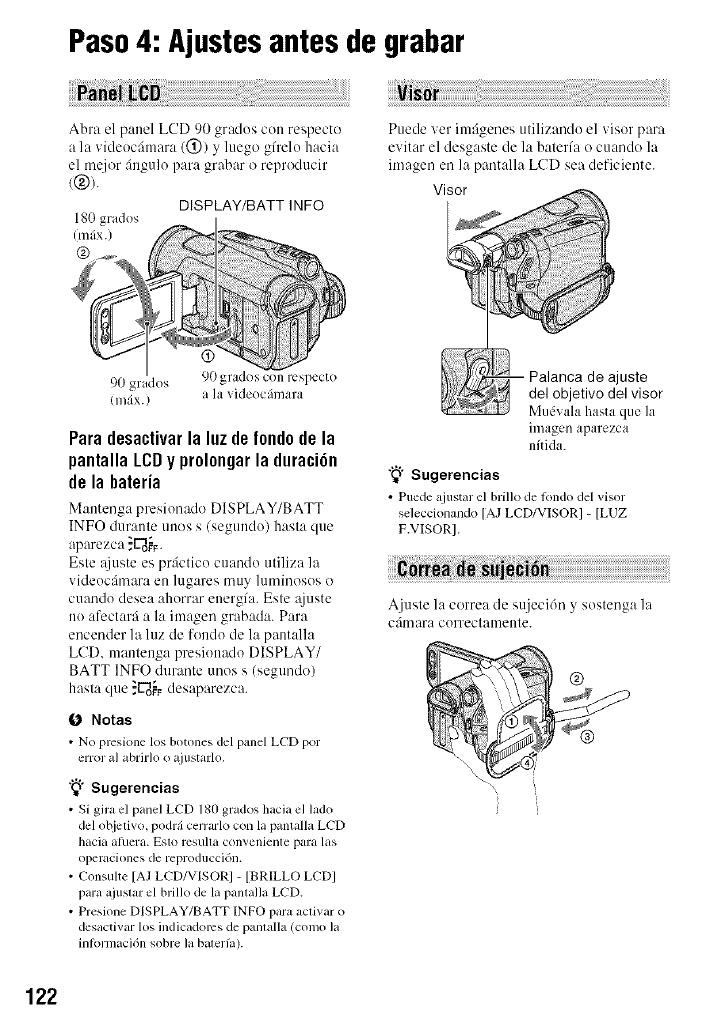
Paso4: Ajustesantes de grabar
Abra el panel LCD 90 grados con respecto
a la videocfimara (@) y luego gfrelo hacia
el m@_r &_gulo para grabar o reproducir
((g)).
DISPLAY/BATT INFO
180 grados
(infix.)
@
Puede ver imfigenes utilizando el visor para
evitar el desgaste de la baterfa o cuando la
imagen en la pantalla LCD sea deficiente.
Visor
90 gr idos 90 grados con respecto
(m_ix.) a la videocfimara
Para desactivar la luz de fondo de la
pantalla LCD y prolongar la duraci6n
de la hateria
M:mtenga presionado DISPLAY/BATT
INFO dur:mte unos s (segundo) hasta que
aparezca _U_o_._.
Este :tiuste es prgictico cuando utiliza la
videocfinmra en lugares nmy luminosos o
cuando desea ahorrar energfa. Este _{juste
no afcctarfi a la imagen grabada. Para
encender la luz de fondo de la pantalla
LCD. mantenga presionado DISPLAY/
BATT INFO durante unos s (segundo)
hasta que }U_o_desaparezca.
0 Notas
• No prcsione los botones del panel LCD por
error a] abrMo o ajustarlo.
"_" Sugerencias
•Si gira el panel LCD 180 grados hacia el lado
del objeliw_,podr_icerrarlo con la pantallaLCD
hacia atuera. Esto rcsulla convenielllepara las
operaciones de reproduccidn.
•Consulte [AJLCD/VISORI - [BRILLO LCDI
paraajuslar el brillo de la panlalla LCD.
•Presione DISPLAY/BATT INFO para aclivar o
desactivar los indicadoms de panlalla (como la
inlormaci6n sobre la baleHa).
Palanca de ajuste
del objetivo del visor
Mudvala hasta que la
imagen aparezca
nflida.
"_° Sugerencias
• Puede ajnstar el brillo de londo del visor
seleccionando [AJ LCD/VISOR] -[LUZ
F.VISOR].
Ajuste la correa de sujeci6n y sostenga la
c:im ara correctamente.
122
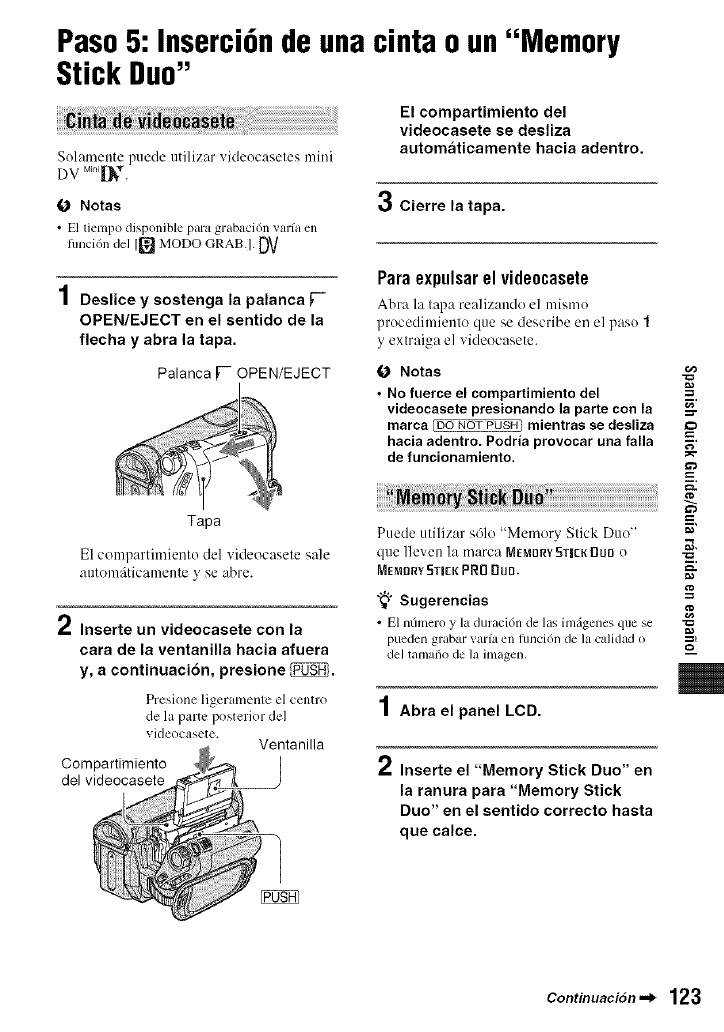
Paso5: Inserci6nde unacinta o un"Memory
Stick Duo"
Sulamente puede utilizar videucaseles mini
DV M_0i[_.
O Notas
•El tiempo disponible para grabaci6n varfa en
hmci6n del 1_ MODO GRAB.]. DV
1Deslice y sostenga la palanca F-
OPEN/EJECT en el sentido de la
flecha y abra la tapa.
Palanca [-- OPEN/EJECT
El compartimiento del
videocasete se desliza
automaticamente hacia adentro.
3Cierre la tapa.
Para expulsarel vide0casete
Abra la tapa realizandu el lnismo
prucedimientu que he describe en el paso 1
y extraiga el videucasete.
O Notas -=_
• No fuerce el compartimiento del
videocasete presionando la parte con la =-_"
marca Coo NOT PUSH) mientras se desliza
hacia adentro. Podria provocar una falla
de funcionamiento,
Tapa
E1 cumpartimientu del videucasete sale
autum_itJcamente y se abre.
2Inserte un videocasete con la
cara de la ventanilla hacia afuera
y, a continuaci6n, presione _.
Presione ligeramente el centro
de la parte posterior de]
videocasete. Ventanilla
Compartimiento
del videocasete
Puede utilizar s61u "Memory Slick Duu"
clue lleven la marca MEMORV5TICKDUn u
MEMnRY5TI[K PRO BuD.
"_° Sugerencias =_
• El nfimero y la duraci6n de las inl_genes que se "_
pueden grabar val-fa ell lllllci(511 de la calidad o _!
del talnafio de la imagen.
1Abra el panel LCD.
Inserte el "Memory Stick Duo" en
la ranura para "Memory Stick
Duo" en el sentido correcto hasta
que calce.
Continuaci6n._ 123
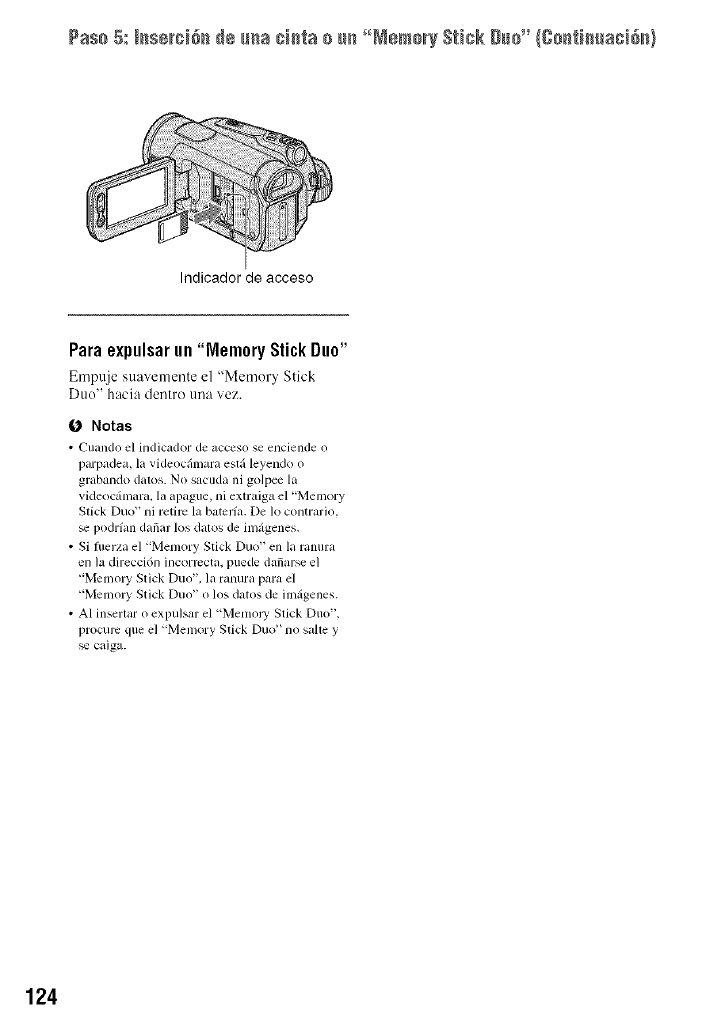
Paso 5:_serci&_de _ma ciliao u_ _°MemoryStickDuo" ICo_fl_uaci&_l
Indicador de acceso
Para expulsarun "Memory Stick Duo"
Empuje stmvemente el '_Memor_ Stick
Duo" hacia dentro [lI/_ vez.
(3 Notas
•Cuando el indicador de acccso se enciende o
parpadea, la videocfimara esli] leyendo o
grabando datos. No sacuda ni golpee la
videocgimara, la apague, ni exlraiga el "Memory
Stick Duo" ni retire la batcrfa. De 1o contrario.
podr/an dafiar los datos de imzigenes.
• Si fllerza el "Memory Stick Duo" en la ranura
en la direcci6n incormcta, puede dafiarse el
"Memo W Stick Duo", la ranura para el
"Memo W Stick Duo" o los datos de imgigenes.
• AI insertar o expulsar el "Memol T Stick Duo",
procure que el "Memory Stick Duo '_no salle y
caiga.
124
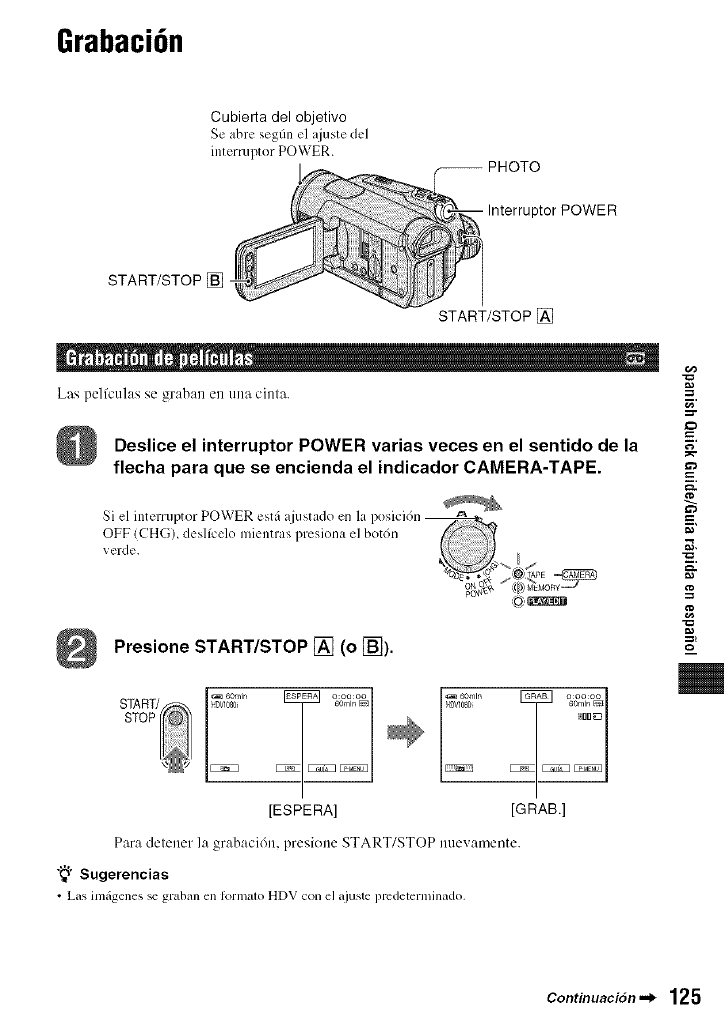
Grabaci6n
Cubierta del objetivo
Se abre segfin el ajuste del
interruptor POWER. -- PHOTO
Interruptor POWER
START/STOP[]
. q
Las pel/culas se graban en una cinla.
Deslice el interruptor POWER varias veces en el sentido de la
flecha para que se encienda el indicador CAMERA-TAPE.
Presione START/STOP [] (o [_).
[ESPERA] [GRAB.]
Para delener la grabacidn, presione START/STOP nuevamente.
"_" Sugerencias
• Las imfigenes _ graban en Iormalo HDV con el ajuste predeterminado,
f
g,
Continuaci6n._ 125
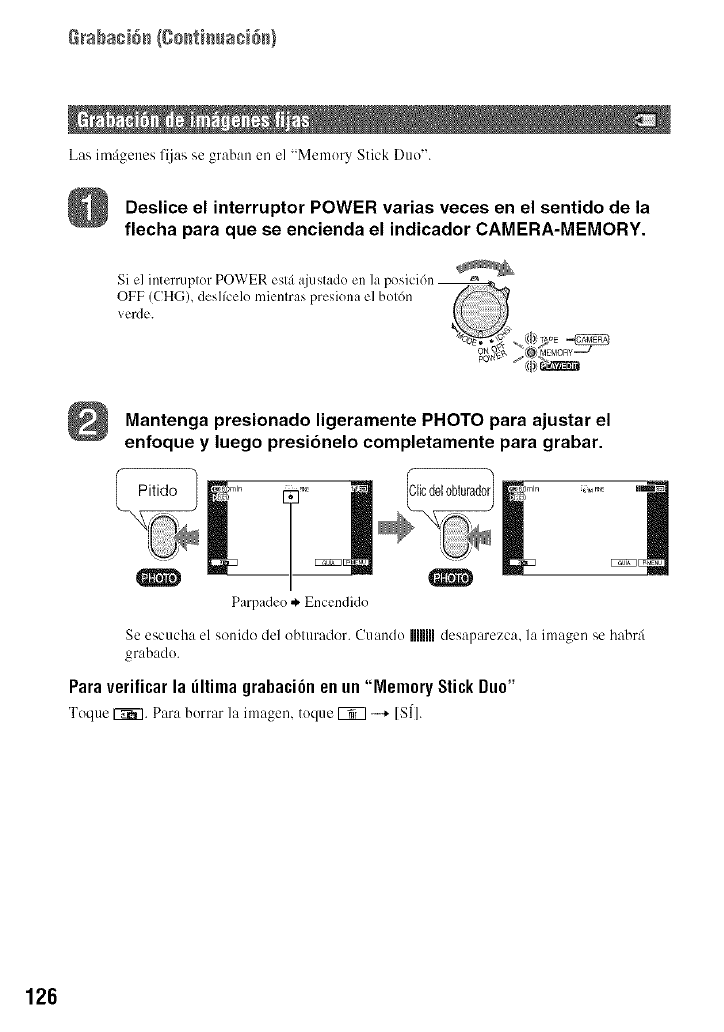
Las imfigenes fijas se graban en el "Memory Stick Duo".
Deslice el interruptor POWER varias veces en el sentido de la
flecha para que se encienda el indicador CAMERA-MEMORY.
Mantenga presionado ligeramente PHOTO para ajustar el
enfoque y luego presionelo completamente para grabar.
..... .....
Parpadeo ,*. Encendido
Se escucha el sonMo del obturador. (?uando MlU desaparezca, la imagen se habr:i
grabado.
Paraverificarla iltima grabaci6nenun"Memory StickDuo"
ToqueF7_7.Paraborrarla imagen,toqueFT3-...+[SI].
126
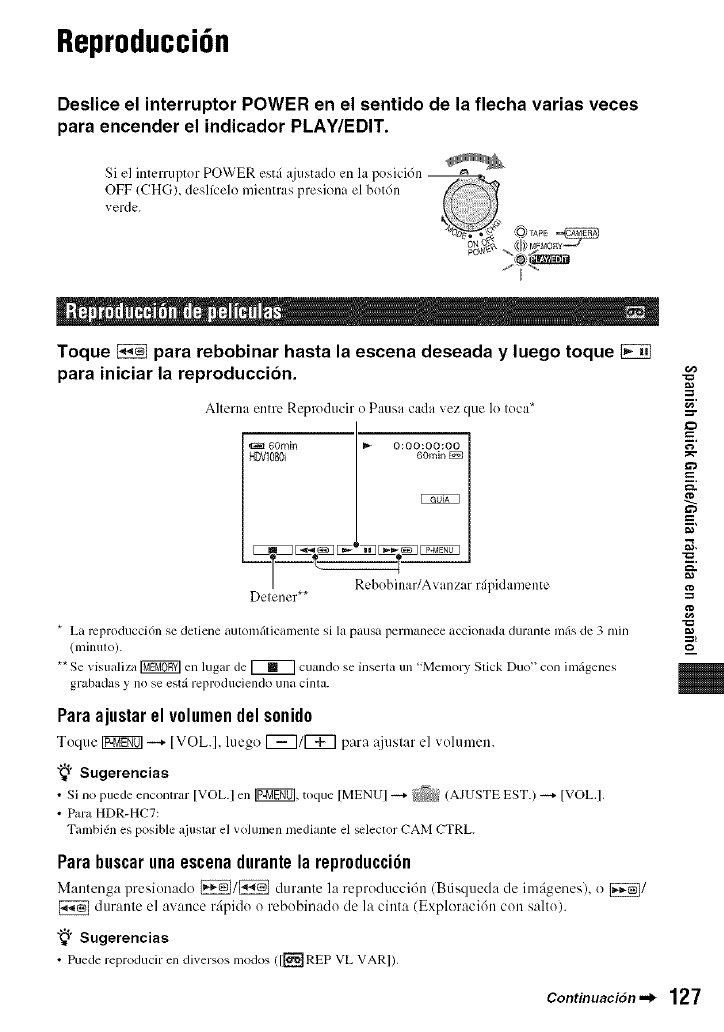
Reproducci6n
Deslice el interruptor POWER en el sentido de la flecha varias veces
para encender el indicador PLAY/EDIT.
Toque _para rebobinar hasta la escena deseada y luego toque
para iniciar la reproduccion.
A]lclna en[l-L* Reprodtlcir o P_lusit c_l(lit \'ez clue 1o Iota*
6Omin _ o:oo:oo;oo 1
Rebobinar/Avanzar r_ipidamente
Delenel**
* La lx:producci6n se detiene automfiticamente si la pausa pernmnece accionada durante mils de 3 rain
(minuto).
** Se visualiza _ en lugar de _ cuando se inserta un "Memory Stick Duo" con imfigenes
grabadas y no se estgireproduciendo una cinta.
r,'
g
g
g,
Paraajustarel v01umendels0nid0
Toque Igggff01 -...+ [VOL.I, hlego 1_7/1_7 para :_just:,r el vohunen.
"_" Sugerencias
• Si no puede enconlrar [VOL.I en Ig_gffOl, toque [MENUI --4 _ (AJUSTE EST.) --4 IVOL.I.
• Para HDR-HC7:
Tambidn es posible ajuslar el volumen mediante el _lector CAM CTRL.
Parabuscarunaescenadurantela repr0ducci6n
Mantenga presionado _/_ durante la reproducci6n (Btisqueda de imfigenes), o _/
durante el avance rfipido o rebobinado de la cinta (Exploraci6n con salto).
"_° Sugerencias
• Puede reproducir en diversos modos ([[_REP VL VARI).
Continuaci6n._ 127
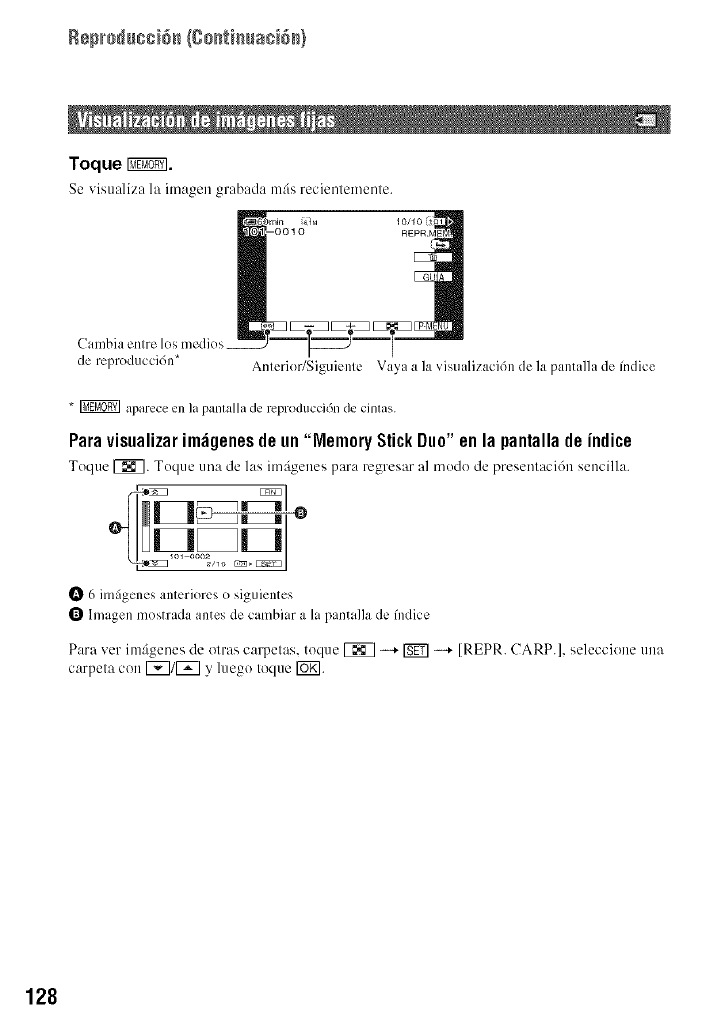
Rep_oducci6_ (Co_immci_)
Toque _.
Se visu_lliz_l la itn_gen gl'_lb_ld_l mils recientemente.
Cambia enlre los medios
de reproducci6n* Anlerior/Siguienle Vaya a la visualizaci6n de la pantalhl de fndice
* _ aparece en la pantalla de reproducci6n de cintas.
Paravisualizarim;igenesdeun"MemoryStick Duo"enla pantallade indite
Toque _. Toque una de las im_igenes para regresar al modo de preseniaci6n sencilla.
_ 6 imfigenes anterior_:s () siguientes
_ lmagen mostrada antes de cambiar a hi pantalla de fndice
Par_ vet imfigenes de olr_ts carpelas, toque _ -* _ -* IREPR. CARP.l, seleccione una
carpeta con [_]/[_] y luego toque [_.
128
