SOUNDMAX ELECTRONICS DP6290 Car Radio User Manual 2
Soundmax Electronics Limited Car Radio 2
User Manual
General
Power Supply
Operating Temperature
Dimension (WxHxD)
Fuse
Suitable speaker impedance
Maximum power output
Continous power output
12V DC (11V to 16V), negative ground
-20~+60
188 x 58 x 137.8mm
15A
4-8Ω
4x40W
20W x 4RMS (4Ω10%T.H.D)
2.0V
Radio Tuner
Frequency
Range
FM Tuner
AM Tuner
FM 87.5MHz to 108.0MHz
522kHz to 1620kHz
0.8uV
30 uV
AM
Usable Sensitivity (S/N=20dB)
Sensitivity/Selectivity (S/N=20dB)
Pre-AMP output voltage
Aux-In level ≥500mV
DP-6290DAB
Size: 525x296mm (After Folding size: 105x148mm )
Color: 4 color printing
Paper: 105g粉纸
Printing: Double side printed
Front
www.grundigcarradio.com
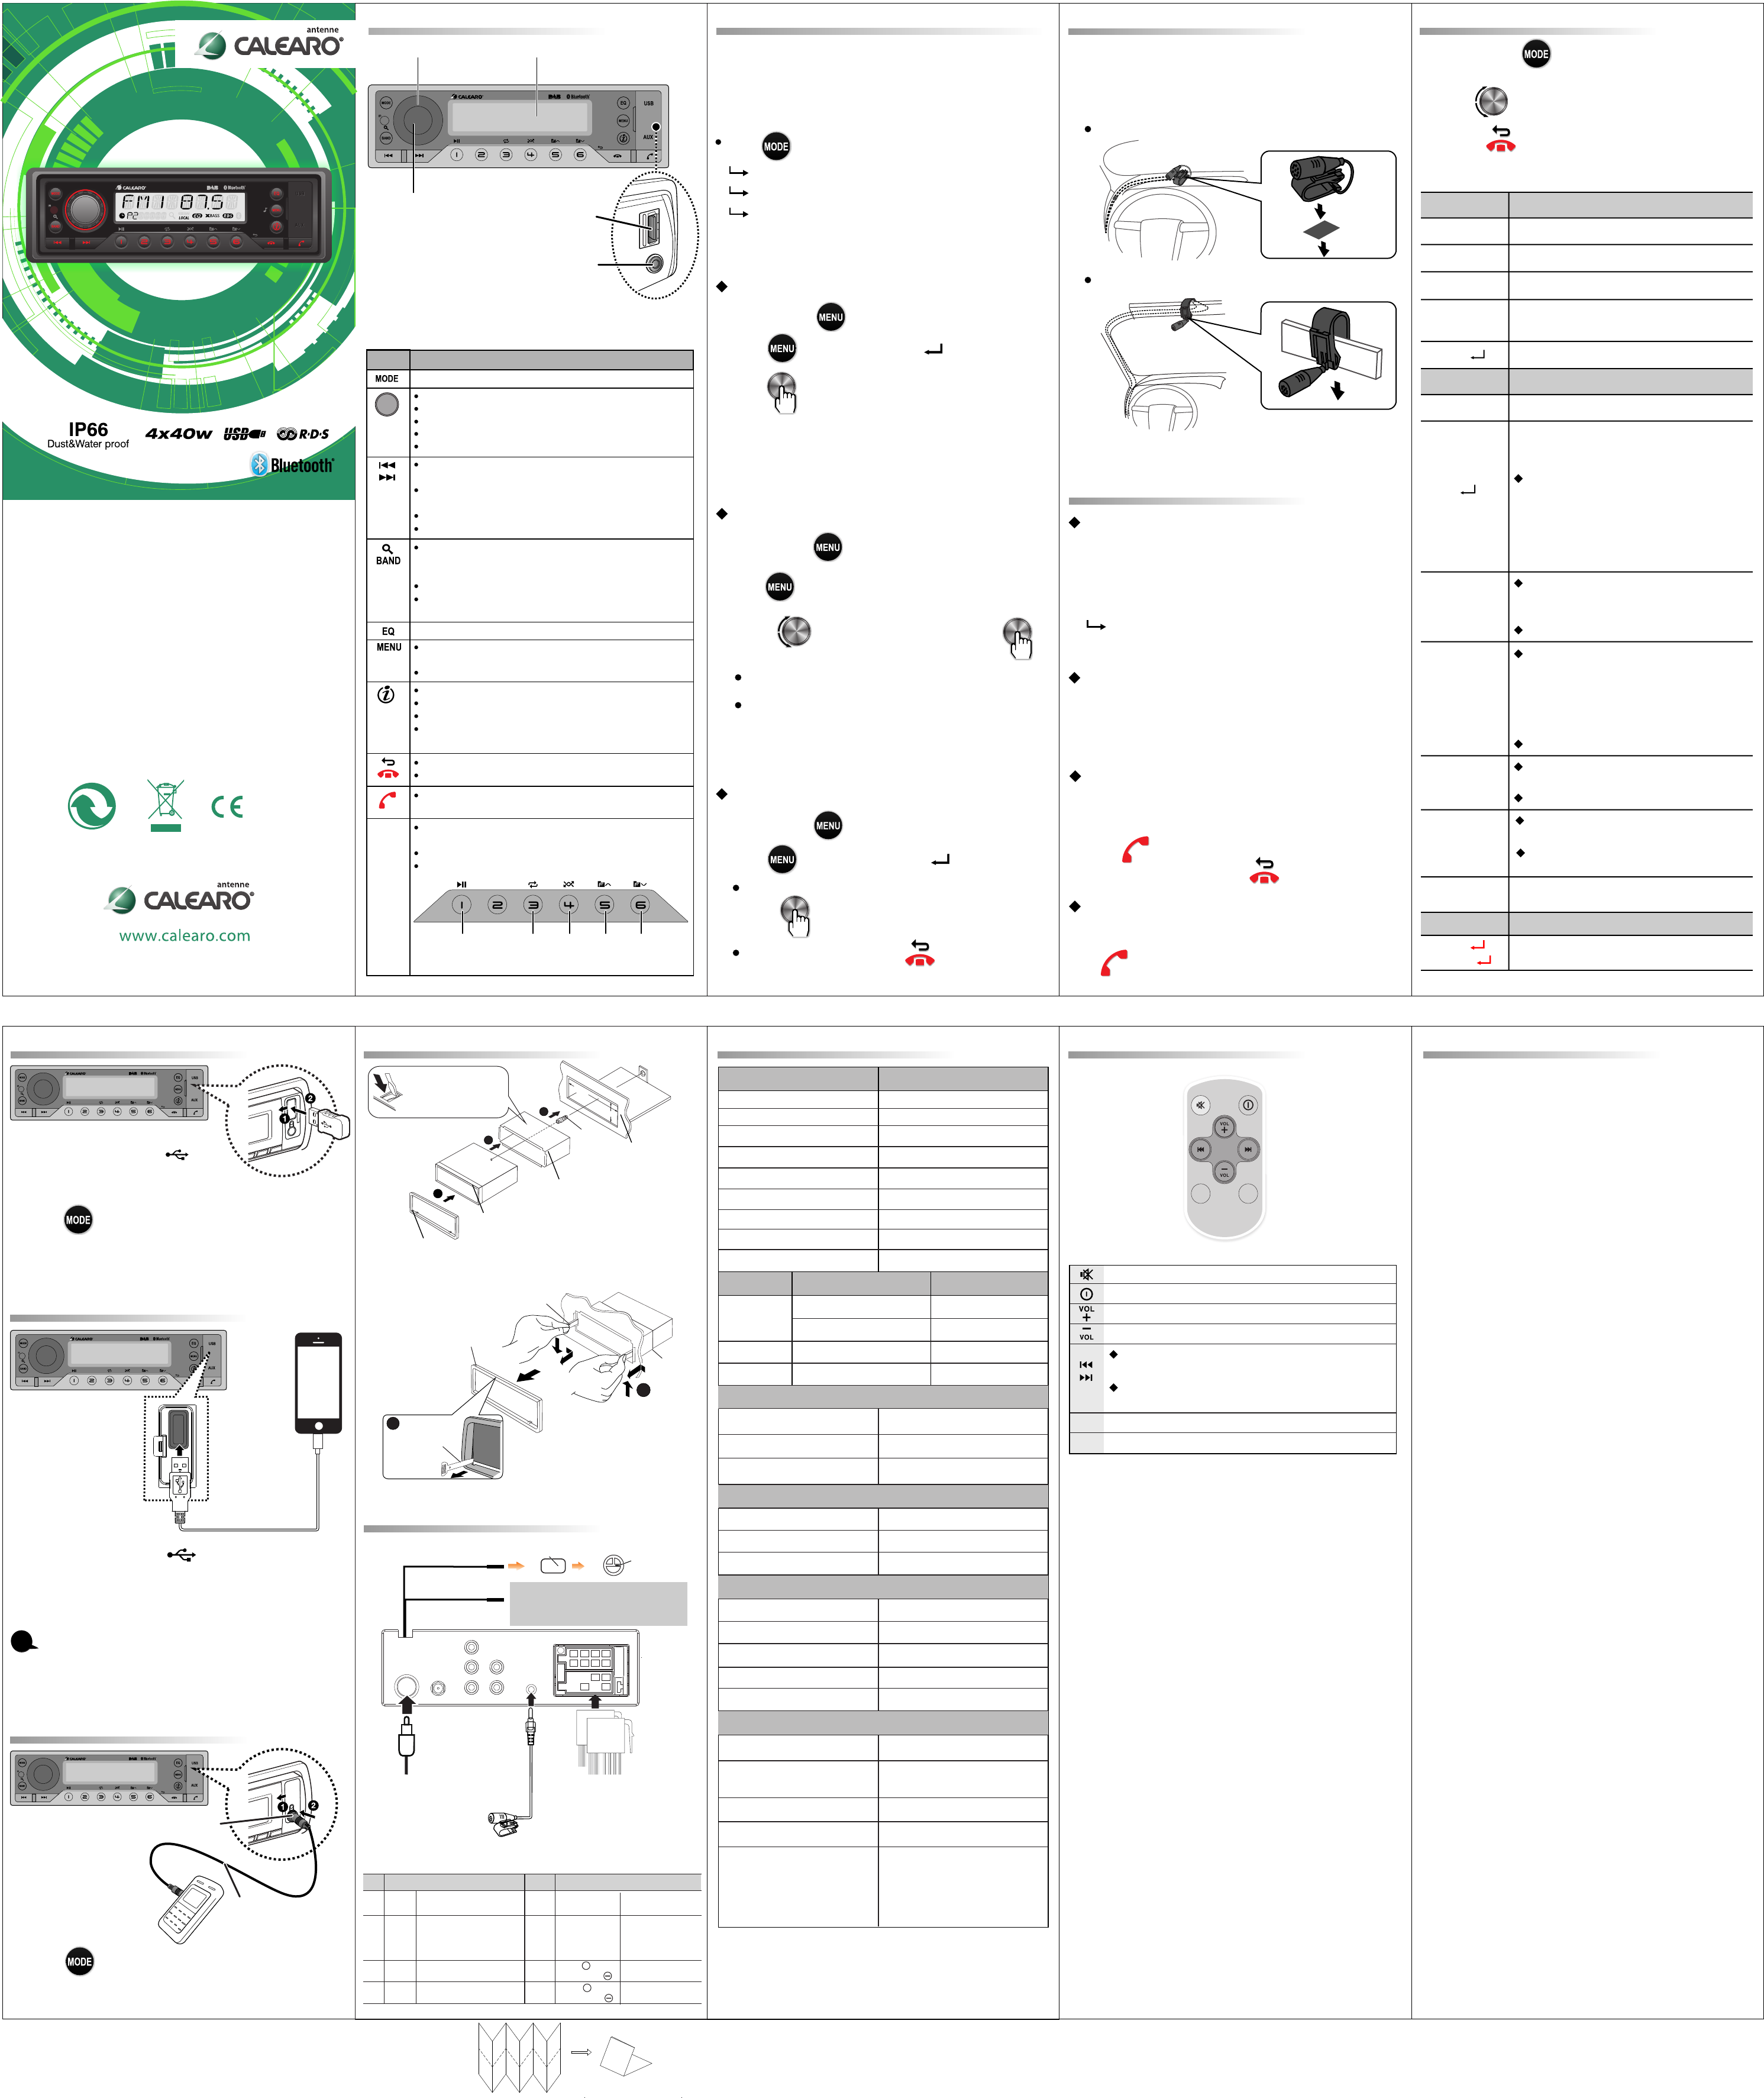
Installing the unit
Remove the unit
Remove the unit
18 2mm
53mm
1
2
3
Screw
Dashboard
Sleeve
Trim
Plate
Control
Panel
Bend the appropriate
tabs to hold the sleeve
firmly in place.
ISO Connector
Wiring Connection
Disassembly
Sleeve
Trim plate
2
ISO Connector
ISO Connector Wiring Chart
Pin
A5
A4
A8
A7
Yellow
Black
Red
Blue
Connect to system control
terminal of the power AMP
or auto antenna relaycontrol
terminal (Max 150MA12VDC)
Battery(+)
Ignition(ACC)
Ground
B1/B2
B3/B4
Violet/Black
Violet
Grey/Black
Grey
White/Black
Green/Black
White
Green
B5/B6
B7/B8
Right rear speaker
Right front speaker
Left front speaker
Left rear speaker
+
Color and function Pin Color and function
Antenna
Jack
Antenna
Jack
Press increas the volume.
Press decreas the volume.
AUDIO
SRC
Remote Control Operation
Tuner Mode: Press to enter into the Auto Seek mode, press and
hold to enter into the Manual Seek mode.
Press to access into the Audio Menu mode.
Press to mute or restore volume.
Select the available Source.
SRC
AUDIO
(Optional)
SWC adaptor (not include)
SWC adaptor (not include) Steering wheel
remote(SWC)
Steering wheel
remote(SWC)
OE SWC IR Remote In (Purple)
OE SWC IR Remote In (Purple)
(OPTIONAL)
Note: You can operate this unit using the Steering Wheel
remote controller ( SWC ). For details & compatible SWC
adaptor or black box, please consult the same car audio
dealer as where this unit is purchased.
Ground (Black)
Tuner Mode: Press to enter into the Auto Seek mode, press and hold to enter
into the Manual Seek mode.
Media Playback Mode: Press to track Up/Down, press and hold for fast
forward/backward.
BT Audio Mode: Press to track Up/Down.
DAB Mode: Press to tune to a detected station.
Tuner Mode: Select the FM bands (FM1/FM2/FM3) or AM1/AM2. Press and hold
to access into Auto Store mode, the six strongest stations of the selected band will
be saved in preset channel automatically: FM1, FM2, FM3(1-6), AM1, AM2.
Media Playback Mode: Press to access into search Folder/File music mode.
DAB Mode: Press repeatedly to select a band: DAB1,DAB2 or DAB3. Press and hold
to starts searching for on-air DAB radio stations.
Returns to the previous item.
BT Handfree Mode: To reject/end a call.
Press and hold to switch between Clock and Source Name.
Tuner Mode: Press to view RDS received information.
Media Playback: Press to view ID3 informations.
DAB Mode: Press repeatedly to display available information that is transmitted
by a DAB radio station.
Tuner Mode: Press the Numeric buttons to recall the preset stations. Press
and hold the Numberic buttons to store the listening station.
Media Playback: Press the Numeric buttons to perform the below operation:
DAB Mode: Press the Numberic buttons to store the listening station.
BT Handfree Mode: During a telephone conversation, press and hold to
transfer the call back to the Hand phone for privacy.
Select the available Source. if the,power is turned on.
Use Bluetooth Device
Pairing the Bluetooth device
Making a call
Receiving a Call
Call Transfer
On your Bluetooth-enabled device, follow the steps below.
1. Search for Bluetooth devices.
2. In the device list, select DP6290.
3. Enter the default password "0000", and then confirm the
password entry.
If the pairing is successful, the device name will be
displayed on the LCD screen of this system.
You can dial number through the mobile phone.
1. Use the Mobile Phone to dial and make an outgoing call
2. Once completed the dialing, the phone number and [CALLING]
is displayed.
1. If there is an incoming call, the phone number will be displayed.
If the incoming call has no phone number, [PHONE IN] will be
displayed.
You can transfer voice from car speakers to mobile phones during a
telephone conversation. During a telephone conversation, press and
2. Press to answer / accept the call.
3. When conversation ends, press to terminate the call.
Product Specifications
+
Listen to Digital Audio Broadcasts (DAB)
Digital Audio Broadcasting (DAB), is a way of broadcasting radio
digitally through a network of transmitters. It provides you with
more choice, better sound quality and more information.
Overview of the unit
Main Display
Main Display
Encoder Volume Knob
Encoder Volume Knob
1. Press and hold access into the Setup Menu.
2. Press repeatedly until [ SCAN ] is displayed.
3. Press , the product starts scanning for on-air DAB radio
stations, the detected stations are saved in the flash memory.
1. Press and hold access into the Setup Menu.
2. Press repeatedly until [PRUNE ] is displayed.
Scan for on-air stations
To remove invalid stations from the listof scanned stations,
press .
To exit the system menu, press .
Adjust Setup Menu Settings
When you press or hold the following button(s)...
Playing a USB device
1. Slide the USB socket cover to
right.
2. Insert the USB device into the USB socket.
3. Press to select USB mode, the unit starts playing from
the USB device.
1. Slide the USB socket cover to right.
2. Insert the iPhone/Smart Phone device into the USB socket.
3. Once he iPhone/Smart Phone is connected and recognized, the
iPhone/Smart Phone begins to charge.
NOTE
This USB only can charge Phones, but cannot play or
decode music files stores inside the Smart Phones.
USB Smart Phone 1A charging
1. Press to select AUX mode.
2. Turn on the external component and start playing.
Listening to external Aux input
Aux input jack
Aux input jack
REAR FRONT
L L
RR
FUSE
A
B
1
2
3
4
4
5
5
6
7
7
8
8
SUB-W
ANTEENA
SOCKET DAB
SOCKET
Ground (Black)
DP-6290DAB
DP-6290DAB
DIGITAL RADIO TUNER
DAB/DAB+
Power/Mute
Power/Mute USB terminal
Aux-In jack
When you press or hold the following button(s)...
General operation
Main Unit
Preset
Numeric
Buttons
USB terminal
Aux-In jack
Short press to mute or restore volume.
Turn the unit on. Press and hold again to turn the unit off.
Confirm selection.
Rotate it to increase or decrease the volume.
Rotate it to select items.
Press repeatedly to select a preset sound equalizer.
Press to access into the Audio Menu mode to adjust the below options:
FLAT->POP->USER->TECHNO->ROCK->CLASSIC->JAZZ->VOCAL
Press and hold to access into the System Menu.
Play/Pause Intro Repeat Folder
Down
Folder
Up hold voice transfers from car speakers to mobile phone.
1. Press and hold access into the Setup Menu.
Antenna Power Supply 12V On/Off
[12V ON]: Disable Antenna power supply (12V).
[12V OFF]: Enable Antenna power supply (12V).
For the first time when DAB mode is switched on.
Press on the main unit repeatedly to select DAB/DAB+.
The system performs auto scan.
All the available DAB stations are stored.
The radio tunes to the first available station
2. Press repeatedly until [12V ON] or [12V OFF] is displayed.
3. Rotate to select an option, and then press to
confirm.
Erase the DAB station list
Adjust Microphone Position
For better sound quality in make/receive phone call through Bluetooth,
place the microphone near the mouth.
1. Make sure the supplied microphone is connected to the car audio system.
2. Place the microphone at a proper location, for example:
Stick it onto the dashboard
clip it on the sun-shield
Tape
1. Press and hold access into the Setup Menu, and then
press repeatedly to select the item to be adjusted
2. Rotate to select a value/option.
3. Press the button to exit.
System Mode
Tuner Mode
BT Mode
Selectable setting
Selectable setting
Selectable setting
Adjust the Hours and Minutes
Turn On or Off the RDS function.
Select the time format 12H or 24H
ON: The unit will search for another station with
stronger signal, but with the same program
identification as the current station automatically.
OFF: Turn off AF function
Adjust the LCD display backlight level between Hight
or Low
ON: Turn on the RDS clock. Time shown on the unit
will synchronizes with the clock time of the RDS station.
OFF: Turn off the RDS clock.
Turn On or Off this beep sound
ON: When there is traffic announcement,unit will
automatically switch to the tuner mode (regardless
of the current mode) and begins to broadcast the
announcemet on traffic conditions. When the
traffic announcement is over, unit will automatically
return to the previous mode.
Clock Set
RDS On/Off
Clock Format
AF
(Alternate
Frequencies)
CT
(Clock Time)
Beep Tone
Dimmer
TA
(Traffic
Announcement)
Once inside the PTY mode, press the get into program
type item, and rotat encoder volume knob to selected
category.
PTY
(Program Type)
Available Program Type:
POP M; ROCK M; EASY M; LIGHT M; CLASSICS; OTHER M;
JAZZ M; COUNTRY; NATION M; OLDIES M; FOLK M; A-TEST;
ALARM; NEWS; AFFAIRS; INFO; SPORT; EDUCATE; DRAMA;
CULTURE; SCIENCE; VARIED; WEATHER; FINANCE; CHILDREN;
SOCIAL; RELIGION; PHONE IN; TRAVEL; LEISURE; DOCUMENT
OFF: Traffic announcement does not cut in.
This feature allows to Re-connect or Dis-connect to the
paired mobile phone or Bluetooth device by manually.
RE-CON
/DIS-CON
ON: only stations with strong signal can be
broadcast. The Local indicator will light up.
Local
Area Select suitable country area for this unit:
EUROPE; ASIA; MID-EAST; AUSTRIA; USA; LATIN;
OFF: Stations of both strong and weak signals
can be broadcast.
Reset
Restore the factory default settings.
DP-6290DAB
DP-6290DAB
DP-6290DAB
3.5 mm Cable
(not included)
3.5 mm Cable
(not included)
MIC
Audio Format 60000
Play Back Folder 255
FLAC/WAV/MP3/WMA Folder 60000
USB USB1.1 Full speed
USB Port Type A
USB Voltage 5.0V
Supports Audio Format
Maximum USB Memory Size 32G
USB Flash Drive and Hard FAT16/FAT32
USB Device
DAB Tuner
Sensitivity -100dBm(Band III)
Selectivity 40dB
Frequency Range 174 - 240MHz
Bluetooth
Frequency Band 2.4000 Ghz - 2.4835GHz ISM
Band
Compatible Bluetooth Profiles
Hands-Free Profiles (HFP)
A2DP(Advanced Audio Distribution
Profile)
AVRCP1.3(Audio/Video Remote
Control Profile)
Range 3 meters (free space)
Standard Bluetooth 2.1 specification
Output Power Class 2
External
Microphone
External
Microphone
Disassembly
1
Media Playback Mode: Press to track Up/Down, press
and hold for fast forward /backward.
0700
(OPTIONAL)
BT ID: B018387
FCC STATEMENT
1. This device complies with Part 15 of the FCC Rules. Operation is
subject to the following two conditions:
(1) This device may not cause harmful interference,and
(2) This device must accept any interference received, including
interference that may cause undesired operation.
2. any Changes or modifications not expressly approved by the party
responsible for compliance could void the user's authority to operate
the equipment.
NOTE: This equipment has been tested and found to comply with the
limits for a Class B digital device, pursuant to Part 15 of the FCC Rules.
These limits are designed to provide reasonable protection against
harmful interference in a residential installation.
This equipment generates uses and can radiate radio frequency nergy
and, if not installed and used in accordance with the instructions, may
cause harmful interference to radio communications.
However, there is no guarantee that interference will not occur in a
particular installation. If this equipment does cause harmful
interference to radio or television reception, which can be determined
by turning the equipment off and on, the user is encouraged to try to
correct the interference by one or more of the following measures:
Reorient or relocate the receiving antenna.
Increase the separation between the equipment and receiver.
Connect the equipment into an outlet on a circuit different from that
to which the receiver is connected.
Consult the dealer or an experienced radio/TV technician for help.
FCC Radiation Exposure Statement
This equipment complies with FCC radiation exposure limits set forth
for an uncontrolled environment. This equipment should be installed
and operated with minimum distance 20cm between the radiator &
your body