STEELMATE BT515401 Transmitter User Manual DS7 ops rev 11 06 12
STEELMATE CO., LTD. Transmitter DS7 ops rev 11 06 12
UserManual.wiki
>
STEELMATE
>
BT515401 User Manual
Users Manual
Navigation menu
Upload a User Manual
Namespaces
Wiki Guide
HTML
PDF
Info
Views
User Manual
Discussion / Help
Navigation

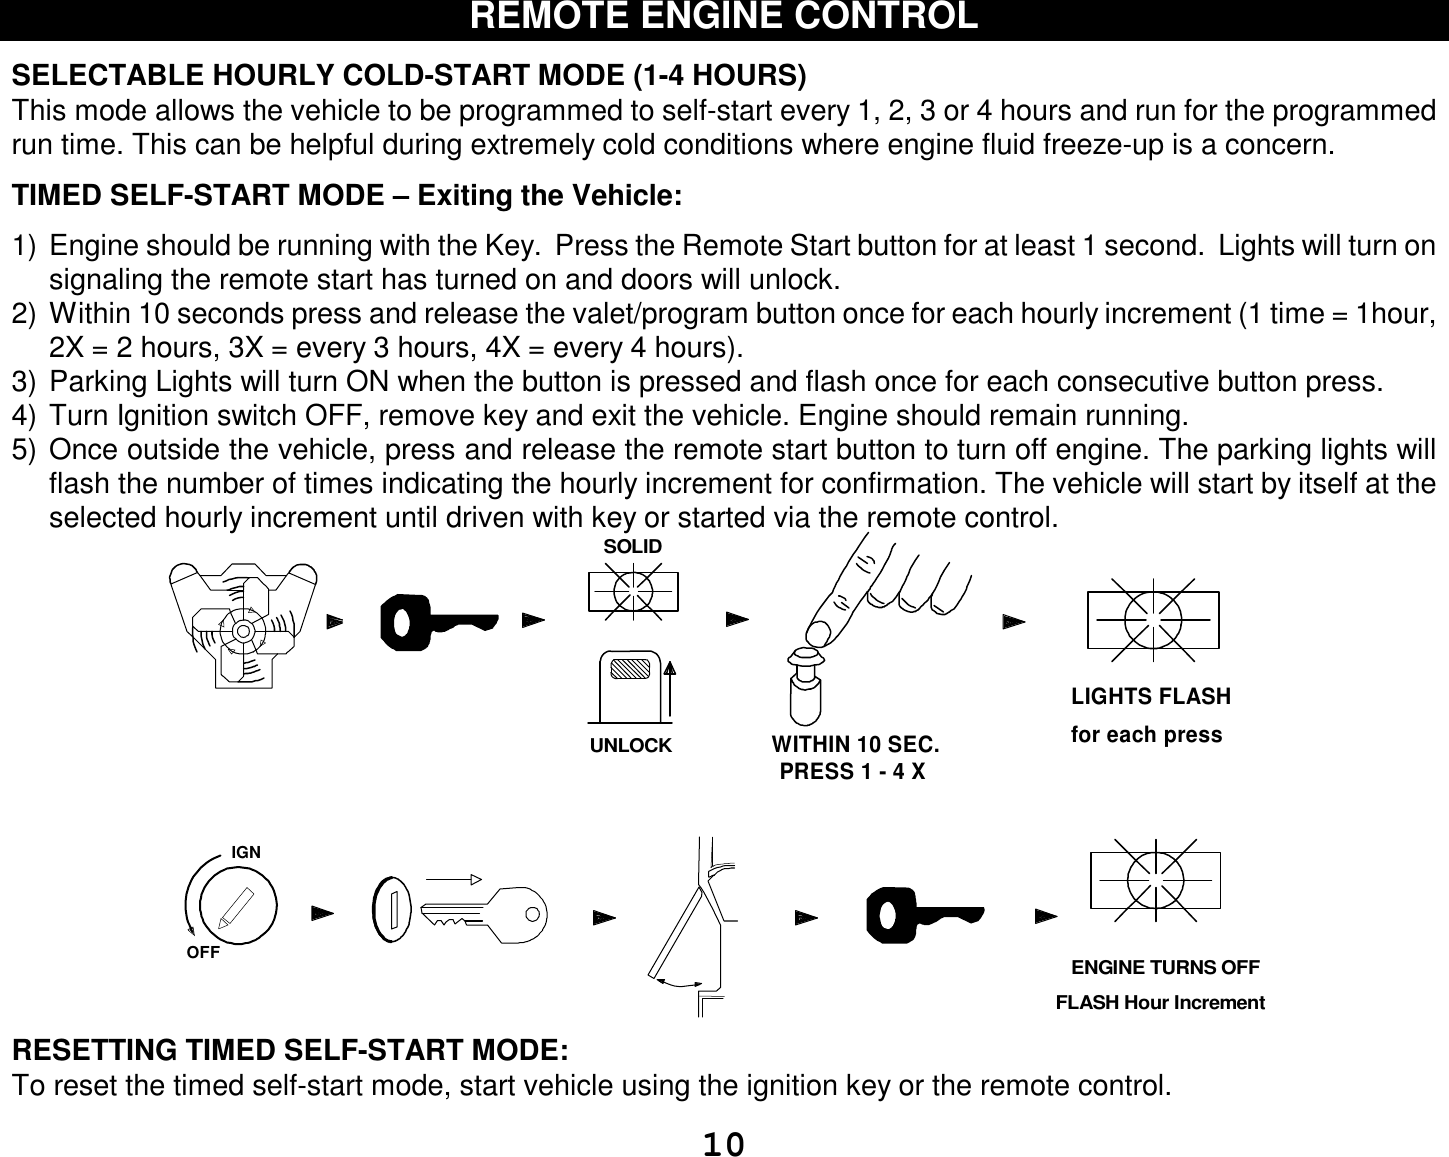
![11 TURBO TIMER MODE (Option 22) The optional Turbo Timer mode allows the CoolStart system to keep a Turbo or Turbo Diesel vehicle running for 1, 3 or 5 minutes [selectively] after you remove the key and exit the vehicle. This is handy for turbo cool-down without the need for expensive turbo timers. The Default = OFF. To Activate Turbo Timer: With the engine running by key, press Remote Start Button with brake pedal depressed. As you release the brake pedal, the Parking Lights and Status LED will blink the number of minutes for the Turbo Timer setting. The doors unlock after confirmation. REMOVE KEYFLASH 1-5XEXIT VEH.PRESSAND HOLDBRAKERUNNING RELEASEBRAKELIGHTSRUNNINGREMAIN1-5 MIN.PRESS START](https://usermanual.wiki/STEELMATE/BT515401/User-Guide-1851466-Page-11.png)
![14CONVENIENCE AND SAFETY FEATURESVALET MODEBefore servicing your vehicle or handing the keys over to a Valet we recommend putting the unit into Valet Mode.The Remote Start function WILL NOT operate when in Valet Mode.1. To Activate Valet Mode Manually: Turn the ignition on andpress the Valet button [about 5-6 seconds] untilthe LED turns on solid. Repeat the process to exit VALET mode.2. To Activate Valet Mode with the Remote:Press and hold both the Lock and Unlock Buttontogether for about 3 seconds until 3 chirps areheard(horn must be connected). Repeat this stepto exit via the remote transmitter. Lock / Unlock and AUX features will stilloperate in VALET Mode howeverRemote Start is inhibited.HOOD OPEN SAFETY (Requires hood pin switch)Prevents remote starting engine whenhood is open. Eliminates risk of injury to someone working under the hood ofthe vehicle with a properly working hood pin installed. If Remote Start button is pressed with the hoodopen, theparking lights will flash twice and the unit will not attempt a start. The system willabort Remote Start any time thehood is opened. See Remote Start Diagnostics on page 17.BRAKE PEDAL RESET:Prevents starting or turns off a remote started vehicle when this circuit is active. Prevents Unauthorized Driving ofVehicle. This circuit shuts the system down immediately whenbrake pedal is pressed. Turn the ignition key to the“ON” position before the brake pedal is pressed. If Remote Start button is pressed with the brake pressed, theparking lights will flash once and the unit will not attempt a start. See Remote Start Diagnostics on page 17.OEM ALARM INTERFACEThis feature is designed to Disarm and Re-arm Factory equipped security systems in conjunction with remote startand keyless entry (if needed for your vehicle). This feature will maintain the original integrity and security of yourvehicle’s factory equipped systems before, during, or after remote start.OEM REMOTE START: 3 Press Lock = Remote Start thru DataThis mode allows the system to use the OEM Remote Control to Remote Start or Stop with 3 successive Lockpulses. This feature only works on newer CANBUS vehicles using a Data Module that supports this feature.With this option you can use both the OEM and Crimestopper remote. The databus module may require customprogramming to enable this feature. Consult with your installer.](https://usermanual.wiki/STEELMATE/BT515401/User-Guide-1851466-Page-14.png)