SUNVALLEYTEK TT-SK15 SOUND BAR User Manual
SUNVALLEYTEK INTERNATIONAL, INC. SOUND BAR
User Manual

USER MANUAL
TT-SK15
SOUND BAR

Features .....................................................................................................................2
For your Attention........................................................................................................3
Panel.......................................................................................................................4-5
Connections.............................................................................................................6-7
Remote Control........................................................................................................8-9
Basic Playback..........................................................................................................10
Trouble shooting........................................................................................................11
Specifications...........................................................................................................12
Contents
Contents
-1-

Features
-2-
Thanks for your purchase of our product. Please read through this manual before making
connections and operating this product. Retain this manual for future reference.
Line input
AUX input
Optical input
Coaxial audio input
Full function remote control
Bluetooth playback
Package Contents:
User manual
User manual
Remote control

To reduce the risk of electric shock or fire, do not open the cover. Refer servicing to qualified
service personnel.
IMPORTANT NOTES
For Your Attention
The lightning flash is intended to alert the user to the presence of dangerous voltage within the
product's enclosure, and touching the internal components may result in a risk of electric shock
to persons.
The exclamatory mark is intended to alert the user to the presence of important operating
instructions.
RISK OF ELECTRIC SHOCK
DO NOT OPEN
CAUTION
CAUTIONCAUTION
Please read through this manual before making connections and operating this product. Retain this manual for
future reference.
Don't open the cabinet of this unit. No user-serviceable parts inside. Refer servicing to qualified personnel only.
Switch off the unit when you don't use it. Switch off the unit and disconnect it from the AC power supply when it is
not being used for a long time.
Don't install the unit in a place exposed to heating sources or direct sunshine.
Don't install the unit in a place exposed to moisture or rain.
The apparatus shall not be exposed to dripping or splashing and any object filled with liquids, such as vases shall
not be placed on it.
Install the unit on a horizontal, flat and firm surface with good ventilation. Never block the vents which will cause
malfunction resulted from overheating.
Use a soft and clean rag to clean the outside of the unit . Never clean it with chemicals or detergent.
This book is only a guide for user's operation, not a criterion for configuration.
Only use attachments/accessories specified by the manufacturer.
Where the Mains plug is used as the disconnect device, the disconnect device shall remain readily operable.
WARNING: The batteries shall not be exposed to excessive heat such as sunshine, fire or the like.
CAUTION: Danger of explosion if battery is incorrectly replaced.Replace only with the same or equivalent type.
-3-

FCC STATEMENT
1. This device complies with Part 15 of the FCC Rules. Operation is subject to the following two
conditions:
(1) This device may not cause harmful interference,and
(2) This device must accept any interference received, including interference that may cause
undesired operation.
2. any Changes or modifications not expressly approved by the party responsible for compliance
could void the user's authority to operate the equipment.
NOTE: This equipment has been tested and found to comply with the limits for a Class B digital
device, pursuant to Part 15 of the FCC Rules. These limits are designed to provide reasonable
protection against harmful interference in a residential installation.
This equipment generates uses and can radiate radio frequency energy and, if not installed and
used in accordance with the instructions, may cause harmful interference to radio communications.
However, there is no guarantee that interference will not occur in a particular installation. If this
equipment does cause harmful interference to radio or television reception, which can be
determined by turning the equipment off and on, the user is encouraged to try to correct the
interference by one or more of the following measures:
Reorient or relocate the receiving antenna.
Increase the separation between the equipment and receiver.
Connect the equipment into an outlet on a circuit different from that to which the receiver is connected.
Consult the dealer or an experienced radio/TV technician for help.
FCC Radiation Exposure Statement
This equipment complies with FCC radiation exposure limits set forth for an uncontrolled
environment. This equipment should be installed and operated with minimum distance 20cm
between the radiator & your body
-4-
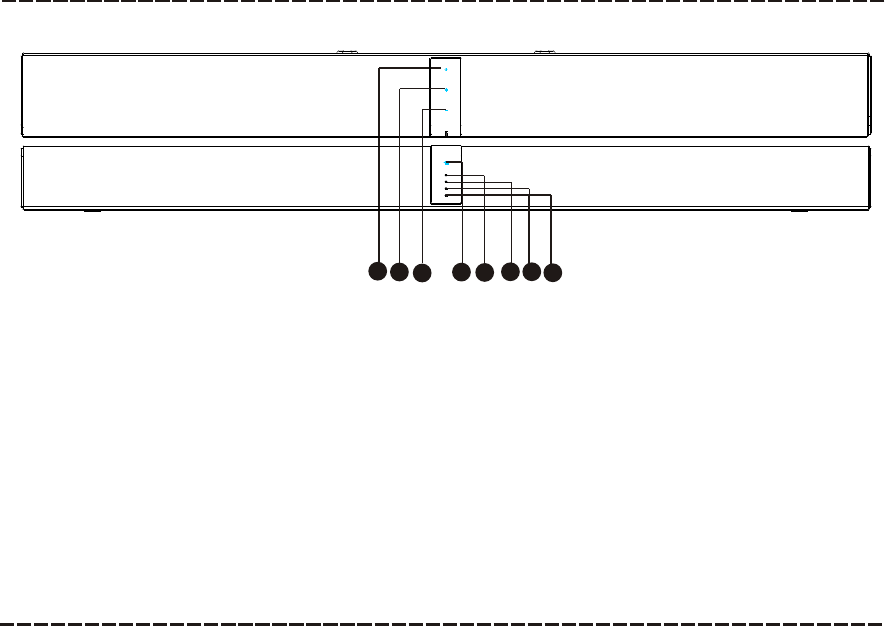
FRONT PANEL:
Panel
-5-
1 STANDBY
Press to switch on the sound base; Press it again to put the sound base in standby mode.
(STANDBY--red indicator, BLUETOOTH--red and blue indicator is ready for pairing enabled device, blue indicator flahing means has
connected to the sound base.)
2 VOLUME+ (Press to turn up the volume)
3 VOLUME- (Press to turn down the volume)
4 SOURCE
Press repeatedly to switch among BLUETOOTH, LINE IN, AUX IN, ,OPTICAL IN and COAXIAL IN mode.
5 STANDBY/ON INDICATOR(STANDBY-red indicator)
6 BT INDICATOR(BLUETOOTH-blue indicator)
7 LINE/AUX INDICATOR(LINE-green indicator,AUX-red indicator)
8 COAXIAL/OPTICAL INDICATOR(COAXIAL-green indicator,OPTICAL-red indicator)
2244
3355
11
BT
LINE/AUX
COAX/OPT
Standby/ON
667788
(Note: All the button on the front panel are touch keys)
Panel
-6-
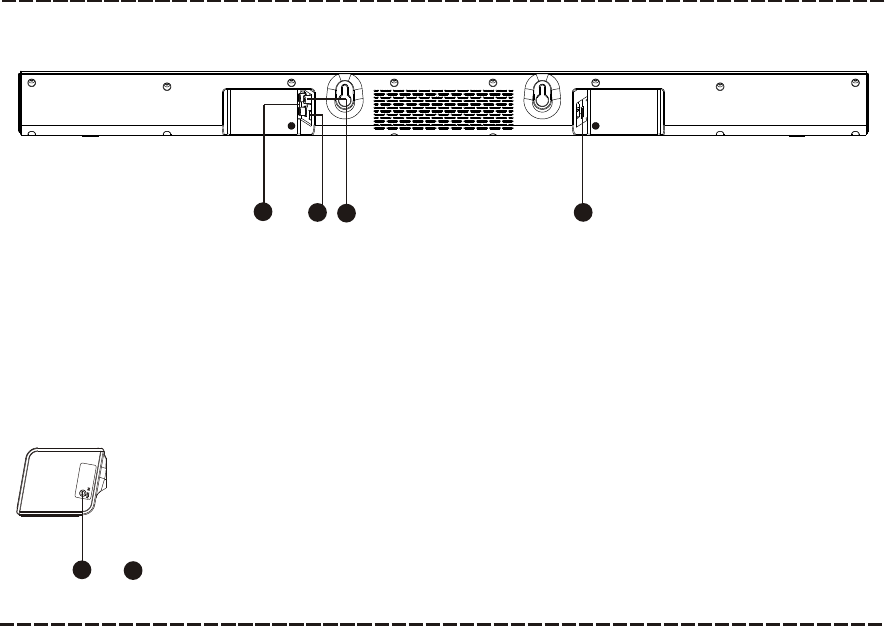
REAR PANEL:
11
3344
22
1 LINE INPUT
2 OPTICAL INPUT
3 COAXIAL DIGITAL AUDIO INPUT
4 AC INPUT
SIDE PANEL:
1 AUX INPUT
1122
Connections
-7-
AUX IN/LINE IN
This sound base has an extra group of
audio input terminals. You can input the
analogue stereo audio signals from extra
devices such as VCD, CD, VCR, DVD
player, etc.
Use the audio cable to connect the stereo
audio output terminals of a VCD, CD,
VCR,DVD player to the stereo input
terminals AUX IN/LINE IN of this sound
base.
Its corresponding signal source is AUX
IN/LINE IN which can be available by
pressing [AUX]/[LINE] on the remote
control.
Coaxial Digital Audio
Use a coaxial cable to connect the coaxial
input of this sound base to the coaxial
output of VCD, CD, VCR, DVD player .
Digital Audio Input
Connections
-6-
AUX IN/LINE IN
This sound base has an extra group of
audio input terminals. You can input the
analogue stereo audio signals from extra
devices such as VCD, CD, VCR, DVD
player, etc.
Use the audio cable to connect the stereo
audio output terminals of a VCD, CD,
VCR,DVD player to the stereo input
terminals AUX IN/LINE IN of this sound
base.
Its corresponding signal source is AUX
IN/LINE IN which can be available by
pressing [AUX]/[LINE] on the remote
control.
Coaxial Digital Audio
Use a coaxial cable to connect the coaxial
input of this sound base to the coaxial
output of VCD, CD, VCR, DVD player .
Digital Audio Input
COAXIAL
COAXIAL
Digital Audio Output
OPTICAL
Optical Input
Optical Output
Use the optical cable to connect the optical
input of this sound base to the optical
output of VCD, CD, VCR, DVD player.
Optical Input
AUX Output
AUX Input
Connections
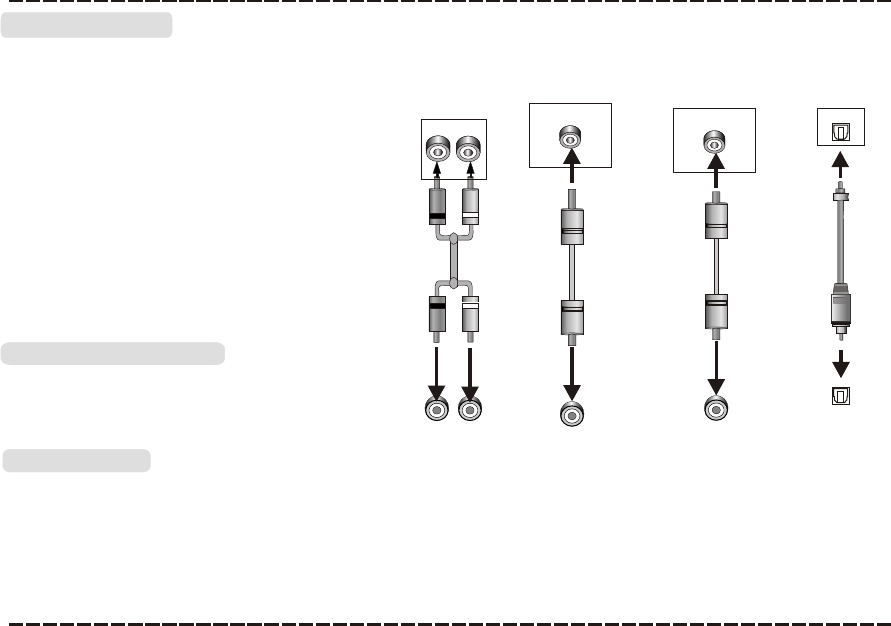
AUX IN/LINE IN
This sound base has an extra group of
audio input terminals. You can input the
analogue stereo audio signals from extra
devices such as VCD, CD, VCR, DVD
player, etc.
Use the audio cable to connect the stereo
audio output terminals of a VCD, CD,
VCR,DVD player to the stereo input
terminals AUX IN/LINE IN of this sound
base.
Its corresponding signal source is AUX
IN/LINE IN which can be available by
pressing [AUX]/[LINE] on the remote
control.
Coaxial Digital Audio
Use a coaxial cable to connect the coaxial
input of this sound base to the coaxial
output of VCD, CD, VCR, DVD player .
Digital Audio Input
COAXIAL
COAXIAL
Digital Audio Output
OPTICAL
Optical Input
Optical Output
Use the optical cable to connect the optical
input of this sound base to the optical
output of VCD, CD, VCR, DVD player.
Optical Input
AUX Output
AUX Input
R
L
L
R
Connections
AUX IN/LINE IN
This sound base has an extra group of
audio input terminals. You can input the
analogue stereo audio signals from extra
devices such as VCD, CD, VCR, DVD
player, etc.
Use the audio cable to connect the stereo
audio output terminals of a VCD, CD,
VCR,DVD player to the stereo input
terminals AUX IN/LINE IN of this sound
base.
Its corresponding signal source is AUX
IN/LINE IN which can be available by
pressing [AUX]/[LINE] on the remote
control.
Coaxial Digital Audio
Use a coaxial cable to connect the coaxial
input of this sound base to the coaxial
output of VCD, CD, VCR, DVD player .
Digital Audio Input
COAXIAL
COAXIAL
Digital Audio Output
OPTICAL
Optical Input
Optical Output
Use the optical cable to connect the optical
input of this sound base to the optical
output of VCD, CD, VCR, DVD player.
Optical Input
AUX Output
AUX Input
R
L
L
R
Line Output
AUX IN
Line Input
AUDIO INPUT
AUDIO OUTPUT

Connections
-8-
Press standby button to power on the sound base, then
press source button to switch the corresponding bluetooth
mode, the blue indicator flashing , the sound base is in
searching bluetooth signal status,
The blue indicator keeps solid blue means bluetooth was
connected, d
Note: Bluetooth connection range in 10 meters.
The model HSB3818 in your device was not deleted.
use your smart phone to
search the bluetooth signal of the sound base, select
HSB3818 on your list, input the password 0000 if need the
password prompt, the sound base will synchronize to play
songs on your mobile phone while they connected
successfully.
isconnected the bluetooth on the smart phone
to switched off the bluetooth connection.
In bluetooth mode,[PLAY/PAUSE],[NEXT], [PREVIOUS],
[VOLUME+/-] etc. are also active.
Bluetooth
Model:HSB3818
BLUETOOTH
BT/USB
LINE/AUX
COAX/OPT
Standby/ON
-9-
Remote control
Insert the batteries into the remote control. Point the remote control at the remote sensor on the front
panel. The remote control works within a distance of about 8 metres from the sensor and within an
angle of about 30 degrees from the left and right side.
Note:
Remove the battery when you do not intend to use the remote control for a long time.
Weak batteries can leak and severely damage the remote control.
The battery must not be exposed to excessive heat source, such as sunshine, fire or any other
things like that.
Be environmentally friendly and dispose of batteries according to your government regulations.
Remote Control Operation
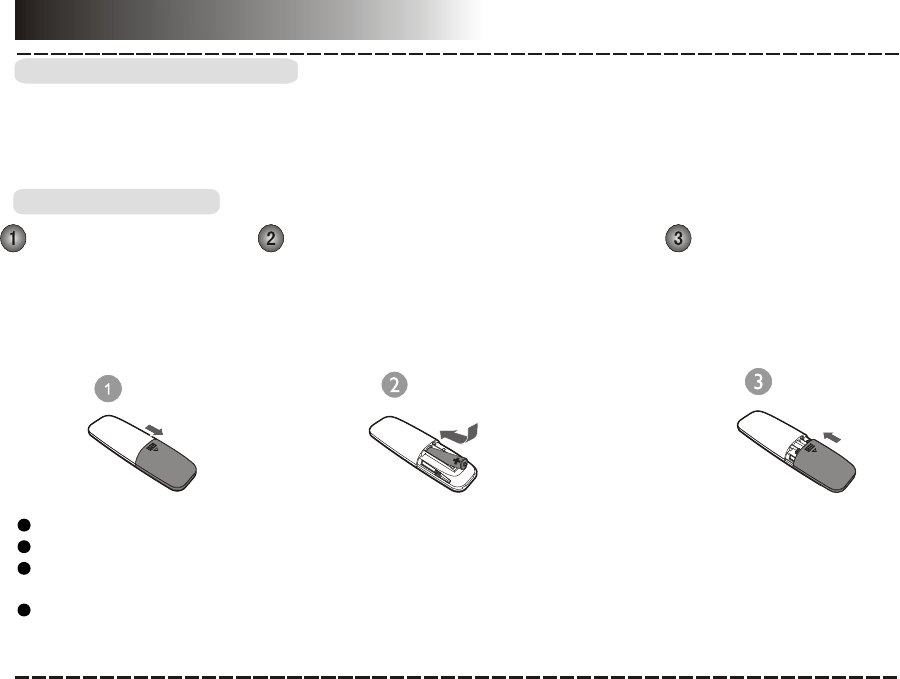
Battery Installation
Remove the battery
compartment cover on
the back of the remote
control.
Load one AAA/1.5V battery into the
battery compartment making sure that
the battery have been inserted with the
correct polarities matching the symbols +,
- as indicated inside the battery
compartment.
Replace the cover.
Remote Control
-10-
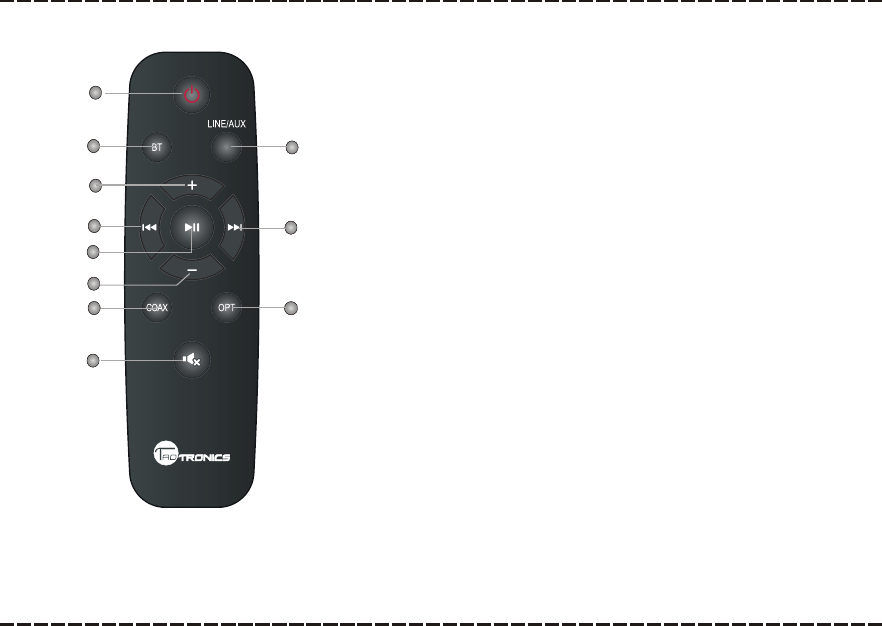
1 STANDBY
2 BT
3 VOLUME+
4 PREVIOUS
5 PLAY/PAUSE
6 VOLUME-
7 COAXIAL
8 MUTE
9 LINE/AUX
10 NEXT
11 OPTICAL
2
7
6
1
3
4
5
8
9
11
10

STANDBY
Press to switch on the unit. Press it again to put the unit in standby mode.
Press to temporarily pause a playback. Press it again to resume the playback.
Hold down this button for 3 seconds to disconnect bluetooth.
Basic Playback
-11-
Operation
Press to enter to COAXIAL IN mode.
Press to skip to the next chapter/track.
Press to return to the previous chapter/track.
Press to enter to bluetooth..
Press repeatedly to switch between LINE and AUX IN mode.
Press to enter to OPTICAL IN mode.
LINE/AUX
Press to temporarily switch off the sound . Press it again to switch it on.
MUTE
Press [VOLUME+] to turn up the volume.
Press [VOLUME-] to turn down the volume.
-12-
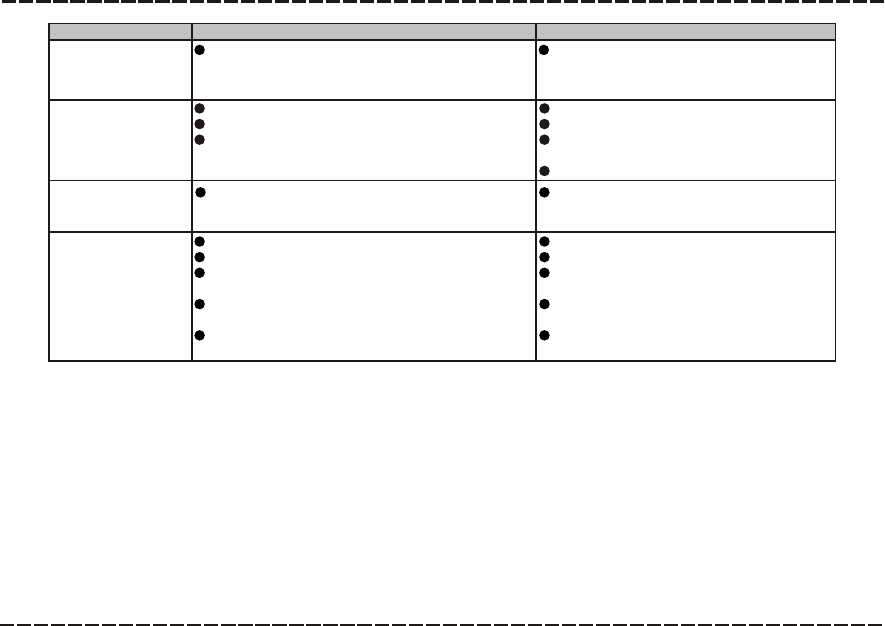
Troubleshooting
Before resorting to maintenance service, please kindly check by yourself with the following chart.
Sound
There is no sound or
the sound is
distorted.
The audio cables aren't connected securely.
The volume is set to the minimum level.
The sound is switched off.
Connect the audio cables securely.
Turn up the volume.
Press [MUTE] on the remote control to
switch on the sound.
Press [PLAY/PAUSE].
The remote
control does not
function.
Symptom Cause(s) Remedy
The buttons on the
unit doesn't work.
Switch off and unplug the unit.
Then connect the plug to the power supply
and switch it on again.
The unit is being interfered with static electricity
etc.
The DC power cord is not connected to the power
supply or is not connected to a power supply
securely.
Please check that the DC power cord
is connected securely.
No Power
There is no battery in the remote control.
The batteries are out of charge.
The remote control isn't pointed to the remote
sensor.
The remote control is out of its operating area.
The unit is shut down.
Install one AAA/1.5V battery in it.
Replace the batteries with new ones.
Make sure that the remote control is
pointed to the remote control sensor.
Make sure the remote control is within
the operating area.
Switch off the unit and disconnect it from
the DC outlet. Then power on the unit again.
-13-
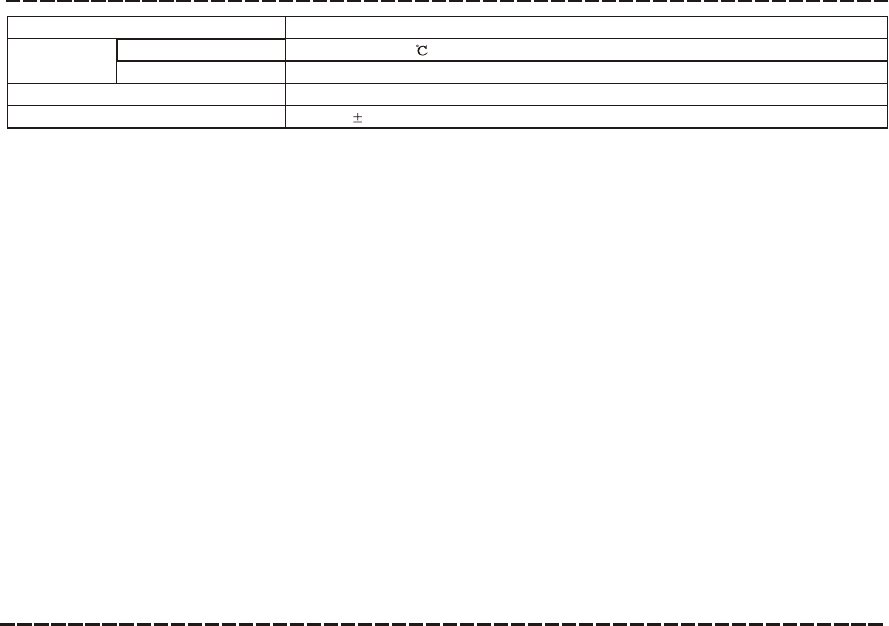
Specifications
20WX2
Power supply
AC ~100-240V,50/60Hz 20W
Working
environment
Temperature -10~+35
Relative humidity
5%~90%
Power output (Max)
Frequency response
3dB(20Hz~20kHz)