SYM Technology ISUG01 iSpectrum Uplink Guard User Manual ISUG 01 V1 0 100912
SYM Technology, Inc. iSpectrum Uplink Guard ISUG 01 V1 0 100912
User Manual
iSpectrumISUG‐01 1
234 E. Colorado Blvd., Suite 410
Pasadena CA 91101
iSpectrum ISUG-01
User Manual

iSpectrumISUG‐01 i
THIS PAGE INTENTIONALLY LEFT BLANK
iiiSpectrumISUG‐01
ISUG-01 User Manual
Revision History
Date Author Version Description
09/25/12 Peter Son 1.0.0 Initial

iSpectrumISUG‐01 iii
iSpectrum ISUG-01 User Manual
TableofContents
1.
AboutthisGuide....................................................................................................1
1.1. WhoShouldUseThisGuide?.................................................................................................................1
2.
General..................................................................................................................2
2.1. Warning,Cautions,andSafety..............................................................................................................2
2.2. HumanExposuretoRFRadiation.......................................................................................................2
2.3. Manufacturer’sLimitedWarranty......................................................................................................3
3.
ProductOverview..................................................................................................4
3.1. Introduction.................................................................................................................................................4
3.2. Whatisinthebox?.....................................................................................................................................5
3.3. ISUG‐01ataGlance...................................................................................................................................6
4.
Installation.............................................................................................................7
4.1. Mounting........................................................................................................................................................7
4.2. Connection....................................................................................................................................................9
5.
LaptopNetworkSettings(PC)..............................................................................12
6.
Web‐basedGUi....................................................................................................13
6.1. Web‐basedGUILogin............................................................................................................................13
6.1.1.GUILayeredAccessRights.................................................................................................................14
6.2. Tabs...............................................................................................................................................................14
6.2.1.Status...........................................................................................................................................................14
6.2.2.Spectrum....................................................................................................................................................15
6.2.3.Configuration...........................................................................................................................................21
6.2.4.Setup............................................................................................................................................................23
6.2.5.Account.......................................................................................................................................................25
7.
Specifications.......................................................................................................26

iSpectrumISUG‐01 1
1. ABOUT THIS GUIDE
This purpose of this document is to explain installation, setup and operation of the ISUG-
01 by SYM Technology. It is intended to provide all necessary information and guidance
to use the system.
The installation guidelines are of a general nature due to the wide variety of installation-
specific requirements within individual base stations. SYM Technology prides itself on
ensuring that installation is successful. Please contact SYM Technology directly if
additional installation information is required (see section 1.4 for contact information).
1.1. WHO SHOULD USE THIS GUIDE?
This guide is intended for use by trained telecommunication professionals responsible
for base transceiver station (BTS)/Distributed Antenna Systems (DAS) performance,
including:
RF Performance Engineers
Operations Engineers
BTS Site Technicians
SYM Technology assumes installation personnel will have understanding of RF
engineering principles and typical BTS site architecture.
It is the operator’s responsibility to ensure that this equipment is properly installed and
operated within SYM Technology operating specifications to obtain proper performance
of the ISUG-01 and to comply with regulatory requirements.
Warning: Failure to follow the installation and configuration
recommendations contained herein may result in service
interruptions and/or damage to the unit.
Warning: This equipment may be installed in close proximity to
cables, connectors, or components carrying high RF power.
Installation and operation must be completed by qualified
personnel.

2iSpectrumISUG‐01
ISUG-01 User Manual
2. GENERAL
2.1. W
ARNING
,
C
AUTIONS
,
AND
S
AFETY
There are several simple guidelines to operating the ISUG-01 properly and safely.
Avoid exposing the ISUG-01 to extreme temperatures, either hot or cold. The
ISUG-01 is for indoor use only.
Keep the unit in a clean, well-ventilated and dust-free place.
Avoid exposing the ISUG-01 to rain or liquid spills. If the ISUG-01 gets wet,
immediately turn off the power and dry the unit completely.
Use only the power supply adapter that comes with the unit. Replacement power
supply adapters may be ordered from SYM Technology.
Treat the ISUG-01 with care. Avoid dropping, throwing, or sitting on it. Rough
treatment may damage the unit and void the warranty.
Do not attempt to disassemble your unit. If the warranty seal has been broken,
the warranty is no longer valid.
Any changes or modifications to your unit not expressly approved in this
document could void your warranty.
2.2. H
UMAN
E
XPOSURE TO
RF
R
ADIATION
This system complies with Part 15 of the FCC Rules. Operation is subject to the
following two conditions:
(1) This system may not cause harmful interference
(2) This system must accept any interference received, including interference that may
cause undesirable operation.
Changes or modifications not expressly approved by the party responsible for
compliance could void the user’s authority to operate the equipment.
Note: This system has been tested and found to comply with the limits for a Class B
digital device, pursuant to the FCC Rules.

iSpectrumISUG‐01 3
iSpectrum ISUG-01 User Manual
2.3. M
ANUFACTURER
’
S
L
IMITED
W
ARRANTY
SYM Technology, Inc. (“SYM”) offers a limited warranty that the enclosed unit (“Product”)
will be free from defects in material or workmanship as follows:
ONE (1) YEAR LIMITED WARRANTY: For a period of one (1) year from the date of
original purchase, SYM will, at its option, either repair or replace a defective Product
(with new or rebuilt parts/replacement).
LIMITED WARRANTY ON REPAIRED/REPLACED PRODUCTS: After SYM repairs or
replaces the Product, the repaired or replaced Product shall be covered by warranty for
the remaining time of the original warranty period or for ninety (90) days from the date of
repair, whichever is longer. Repair or replacement may include the use of functionally
equivalent reconditioned units. Replaced faulty parts or components will become the
property of SYM Technology.
This limited warranty does not cover and is void with respect to the following: (i)
Products which have been improperly installed, maintained, modified, or repaired; (ii)
Products which have been subject to outdoor use, misuse, physical damage, abnormal
use or operation, improper handling or storage, exposure to fire, water, excessive
moisture or extreme temperature; (iii) Products operated outside published maximum
ratings; (iv) Products on which warranty seals or Product serial numbers have been
removed, broken, or altered; (v) cost of installation, set up, removal or reinstallation; (vi)
signal reception problems or network problems (unless caused by defect in material or
workmanship); (vii) damage as a result of fire, flood, power surge, lightening, acts of God
or other acts which are not the fault of SYM and which the Product is not specified to
tolerate; (viii) any Products which have been opened, modified, or repaired by anyone
other than SYM or a SYM authorized service center.
REPAIR OR REPLACEMENT, AS HEREINABOVE PROVIDED, IS YOUR SOLE AND
EXCLUSIVE REMEDY FOR BREACH OF THE LIMITED WARRANTY. SYM SHALL
HAVE NO LIABLITY FOR ANY INCIDENTAL OR CONESQUENTIAL DAMAGES,
INCLUDING, BUT NOT LIMITED TO, LOSS OF PROFITS, LOSS OF SALES, OR
LOSS OF USE OF THE PRODUCT. SYM MAKES NO OTHER EXPRESS WARRANTY,
EITHER WRITTEN OR ORAL, WITH RESPECT TO THE PRODUCTS. THE
DURATION OF IMPLIED WARRANTIES, INCLUDING IMPLIED WARRANTIES OF
MERCHANTABILITY AND FITNESS FOR A PARTICULAR PURPOSE, IS LIMITED
TO THE DURATION OF THIS EXPRESS WARRANTY.
SYM Technology, Inc.
Attention: Customer Service
Phone: (626) 394-6630
Email: support@symtechnology.com

4iSpectrumISUG‐01
ISUG-01 User Manual
3. PRODUCT OVERVIEW
3.1. I
NTRODUCTION
The ISUG-01 is an RF uplink spectrum analyzer that enables users to consistently
monitor and analyze uplink noise and RF signals. With the increase in wireless data
usage, the network is experiencing a rise in uplink noise levels, ultimately leading to the
noise floor quickly nearing or at alarm levels. The ISUG-01 eliminates the need to wait in
order to diagnose spectrum health.
The ISUG-01 is designed to perform regular analysis of the RF uplink spectrum health.
The system is capable of wideband analysis from 700 MHz to 2.7 GHz. Bands can be
customized for multiple carriers or to suit the needs of one mobile service provider
without any software or hardware modifications.
Users have 24/7 access to the system once it is properly installed. Multiple personnel
can access the real-time RF uplink waveform simply by using an Internet connection to
log onto the Web-based guided user interface (GUI). Users can view channel power,
port status, modify configuration settings and set alarm threshold levels.
The ISUG-01 sends out SNMP based alarm notifications. The ISUG-01 can support
SNMP polling. The system generates two types of alarms: power and spurious alarms.
These alarms can be set by users via upper and lower threshold limits. Users can
choose to set these threshold values for early detection of noise floor rise or for alarming
status. The ability to consistently view the spectrum enables users to take a proactive
approach to diagnosing the uplink spectrum and maintaining overall spectrum health.
The ISUG-01 was designed to give users a proactive tool for analyzing the RF uplink
spectrum. Once properly installed, the ISUG-01 will undoubtedly improve maintenance
and troubleshooting procedures before or during an alarm.
All information necessary to properly use the ISUG-01 will be described in the following
chapters. The steps required to install and configure this system will be described in
detail, however if information or assistance is required, please contact:
SYM Technology, Inc.
Technical Support: support@symtechnology.com
Live Support: (626) 394-6630.
iSpectrumISUG‐01 5
iSpectrum ISUG-01 User Manual
3.2. W
HAT IS IN THE BOX
?
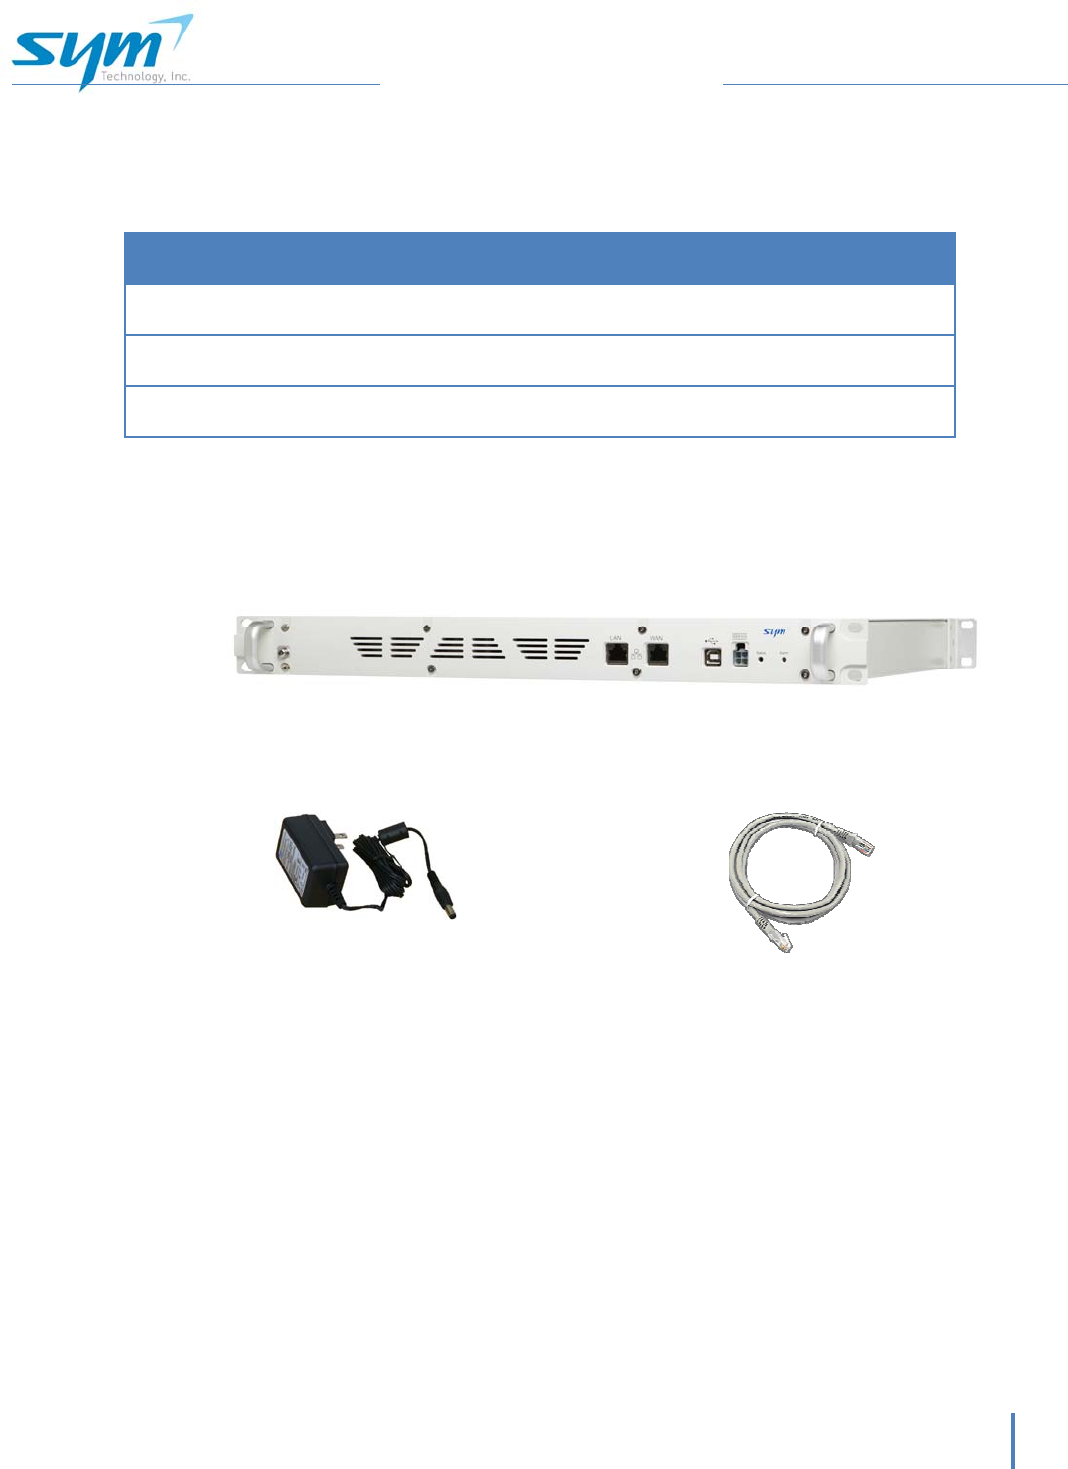
No Item Description Qty.
1 ISUG-01 RF Signal Analyzer 1
2 AC/DC Power Adapter 24 – 27 VDC/2.5 A 1
3 LAN cable (RJ-45) Straight through, 10 ft 1
1
3
2
6iSpectrumISUG‐01
ISUG-01 User Manual
3.3. ISUG-01
AT A
G
LANCE
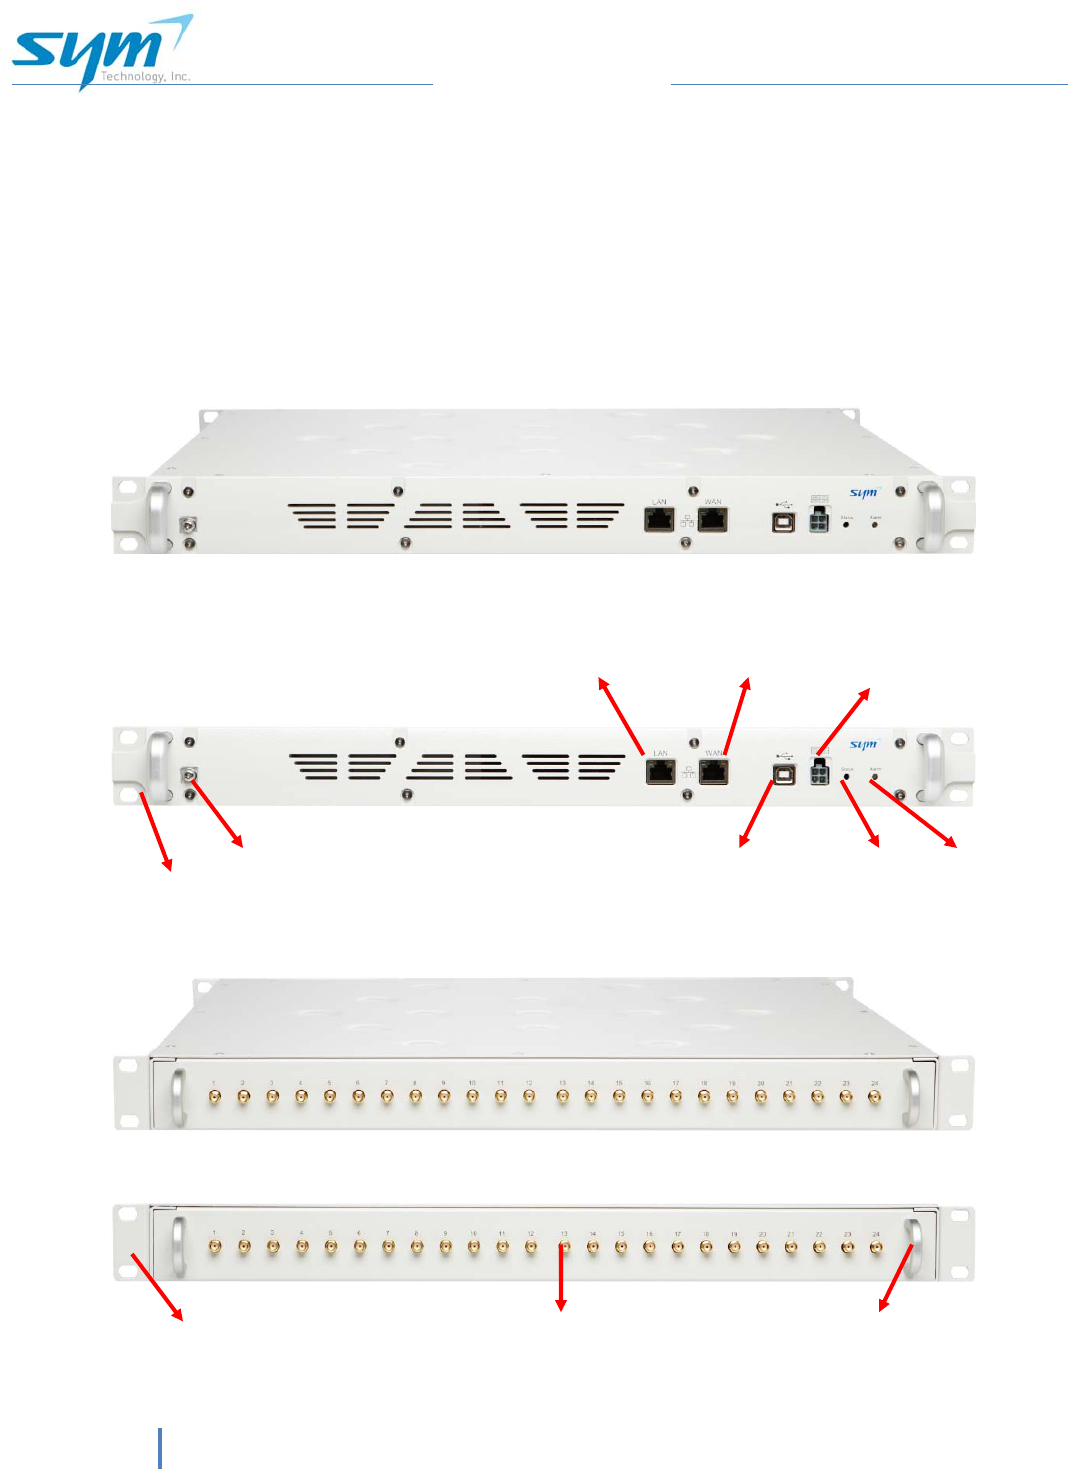
The ISUG-01 is a system designed to monitor and analyze RF waveforms of elements
within the DAS system. The ISUG-01 has the capability to display real time spectrum
waveforms and track interference sources of uplink frequencies. With a frequency range
of 700 MHz to 2.7GHz and 24 input ports, the ISUG-01 can be a fundamental
component of the network. It can be widely used in a DAS environment to monitor and
analyze spectrum waveforms and create appropriate SNMP alarm notifications to a
designated IP address.
RF Port (SMA Female)
Rear Bracket Handle
Grounding port
Front Bracket
LAN port for
local access WAN port for
remote access
USB for debug
27VDC
Power Input
Status & Alarm LEDS
iSpectrumISUG‐01 7
iSpectrum ISUG-01 User Manual
4. INSTALLATION
4.1. M
OUNTING
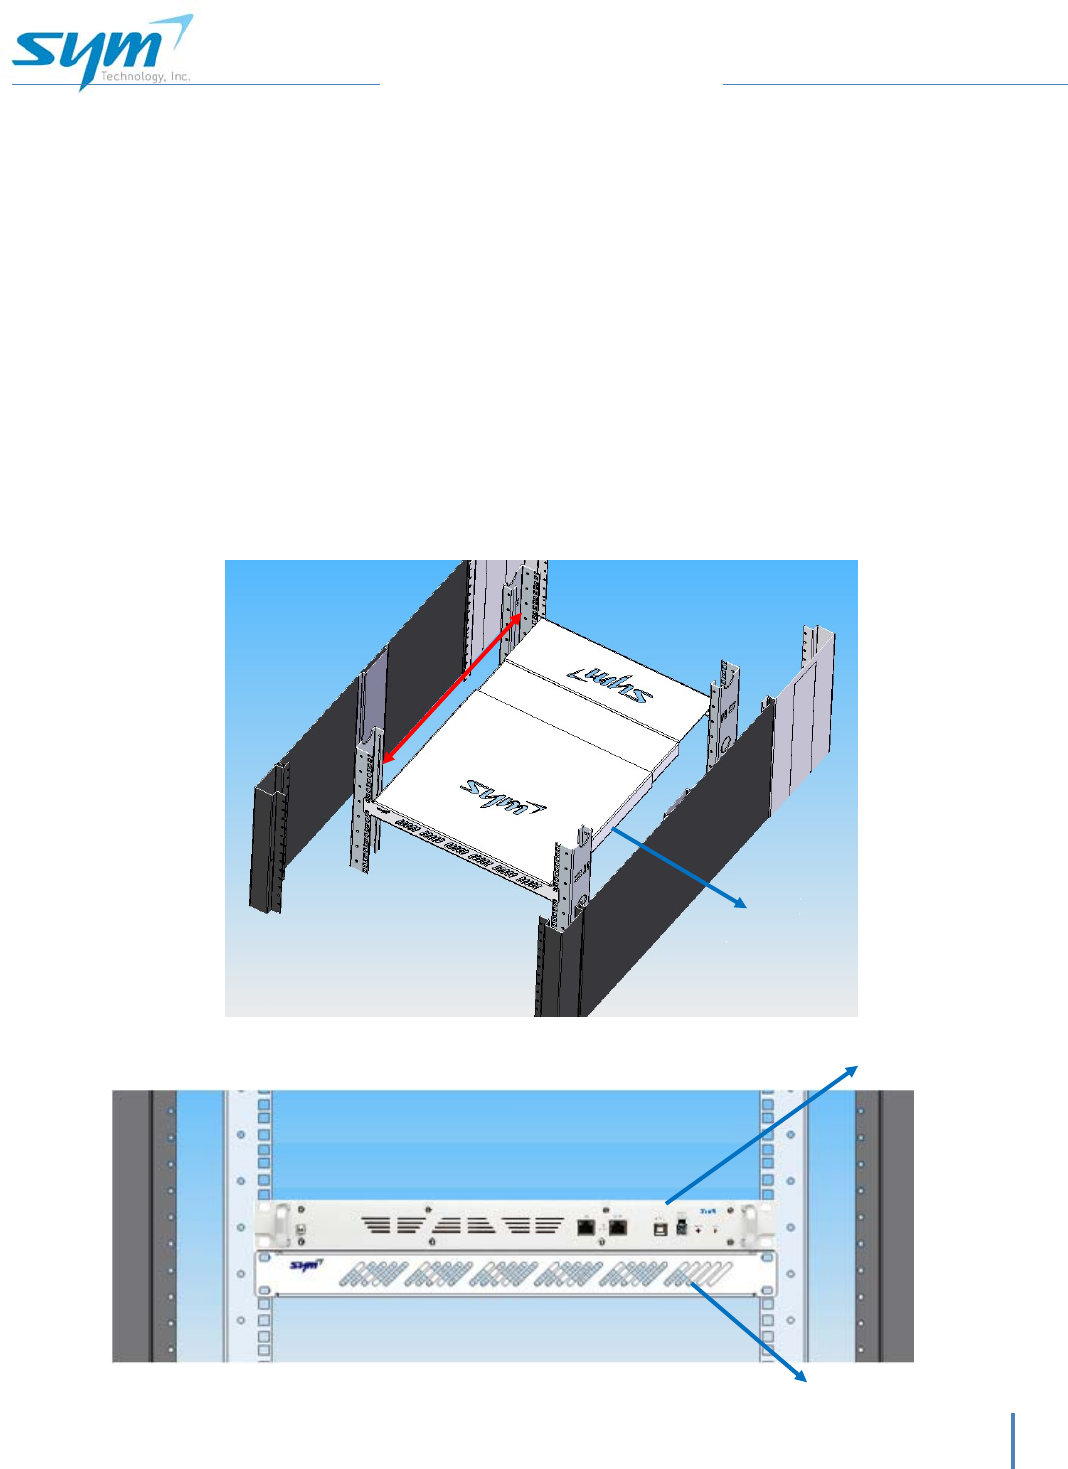
The ISUG-01 is a 19 inch rack mountable unit. It can be mounted into a 4 post rack
utilizing faceplate mounting. The faceplate with side securing can be placed at the front,
rear or both ends of the unit. The unit also requires a supporting mounting shelf as
shown below.
a. 4 post mounting
The variable depth of shelving between front and rear posts in the 4 post rack
system require a supporting shelf for the ISUG-01.
Supporting Shelf
Supporting Shelf
ISUG-01
Post to post depth can vary
8iSpectrumISUG‐01
ISUG-01 User Manual
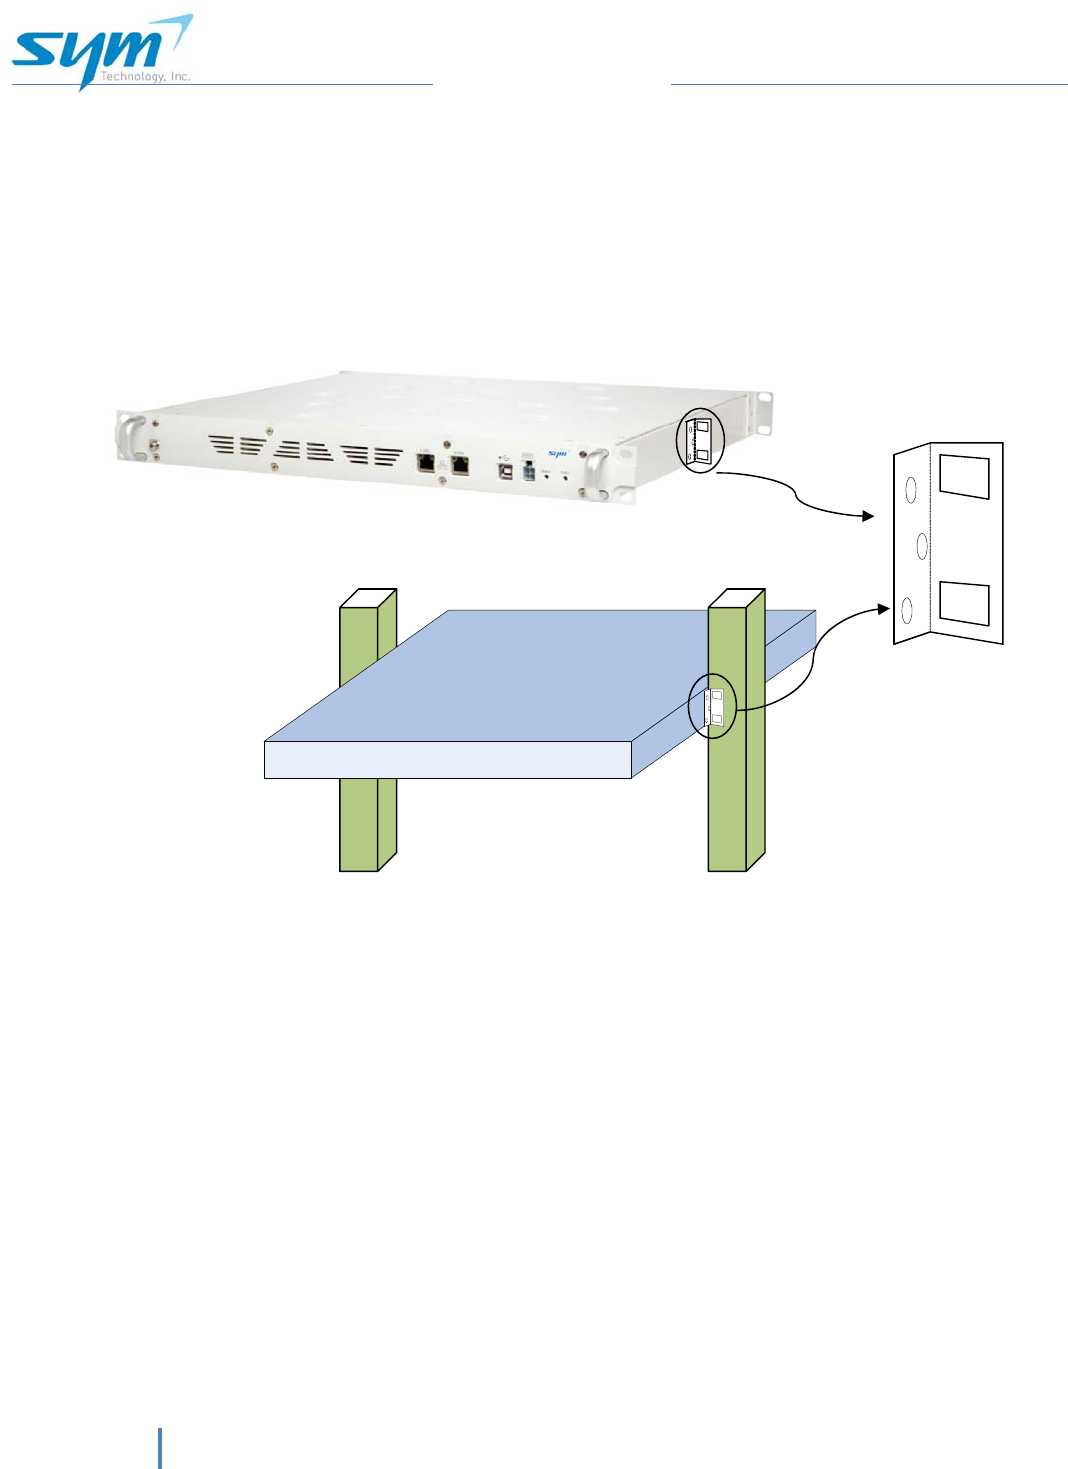
b. 2 post mounting
When the ISUG-01 is installed in a 2 post rack system, a 19 inch supporting shelf
will not be required. A detachable side mounting bracket can be mounted at the
middle of the ISUG-01 as shown below.
Mounting brackets at the middle of the unit will allow for 2 post rack mounting.
Side mounting
bracket
ISUG-01

iSpectrumISUG‐01 9
iSpectrum ISUG-01 User Manual
4.2. C
ONNECTION
4.2.1 RF cable connection
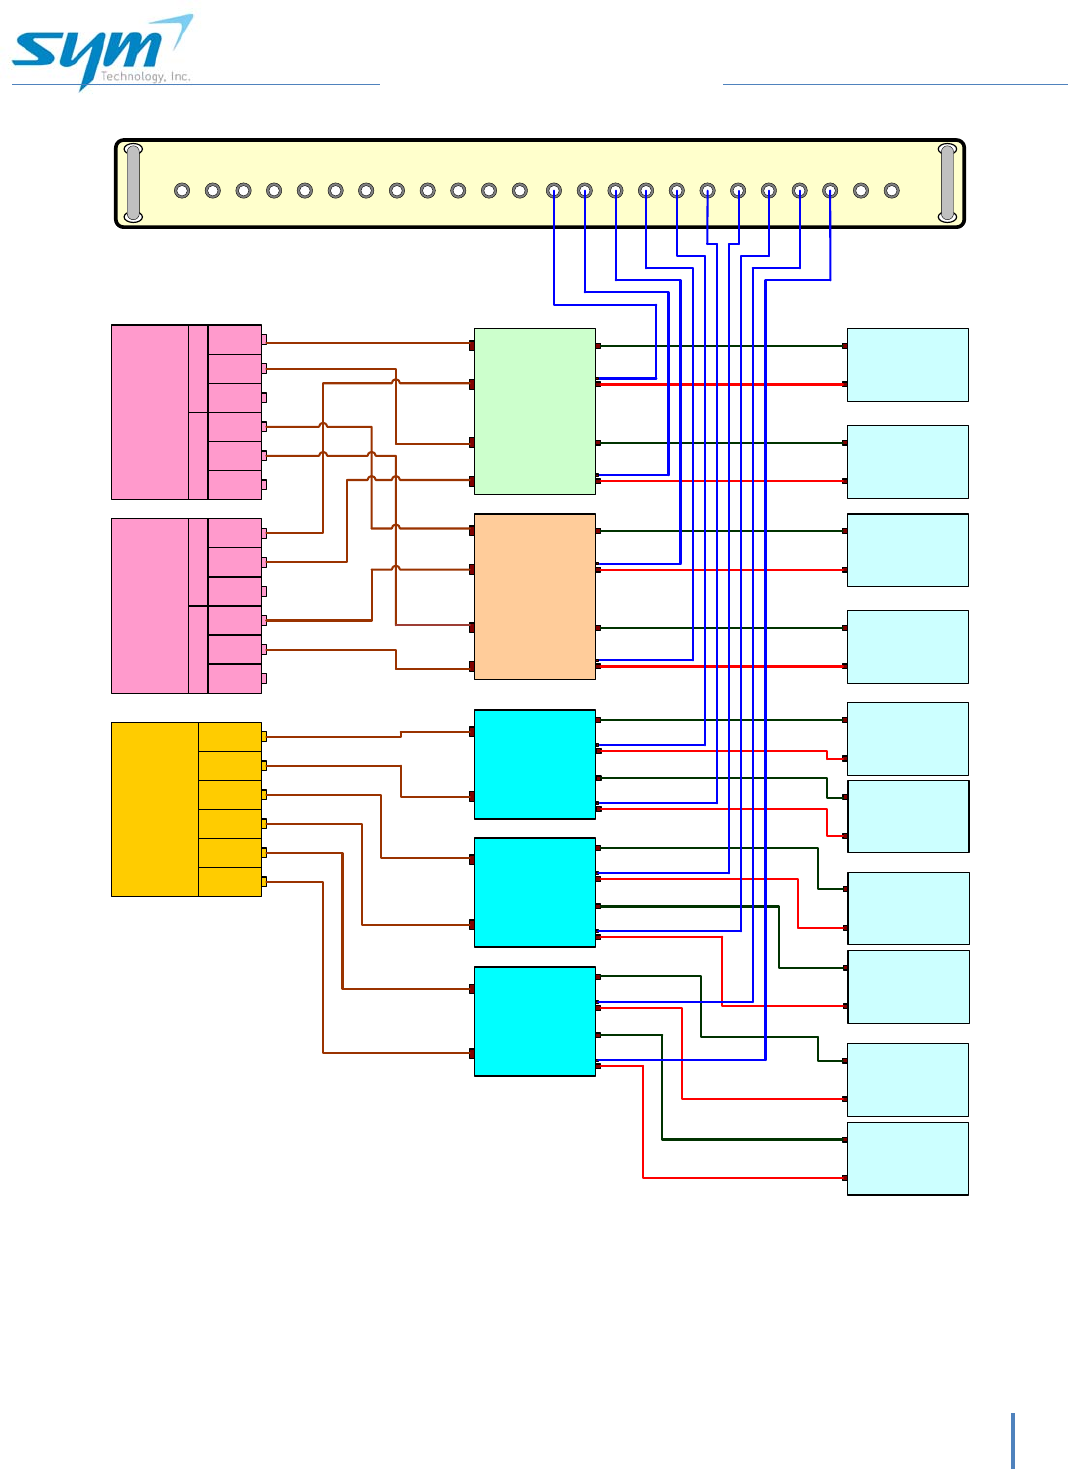
The ISUG-01 needs to be installed between BTS (or in cases where applicable DAS
conditioner) and DAS head end unit for monitoring uplink noise and RF signals.
If the DAS head end unit has a test ports or extra uplink ports available, it is
recommended to connect those ports to the ISUG-01 for monitoring the uplink spectrum
in real time.
RF input signal level should be in the normal operating range: -50 to -100 dBm/30kHz.
WARNINGS:ExposuretoRadioFrequencyRadiation
TheradiatedoutputpowerofthisdeviceisfarbelowtheFCCradiofrequency
exposurelimits.Nevertheless,thisdeviceshouldbeusedinsuchamannerthat
thepotentialforhumancontactduringnormaloperationisminimized.Inorder
toavoidthepossibilityofexceedingtheFCCradiofrequencyexposurelimits,
theminimumseparationdistanceof7.9inches(20cm)mustbemaintained
betweenhumanbodyandantennaoftheVisiontosatisfyFCCRFexposure
requirements.FormoreRFexposureinformation,pleasevisittheFCCwebsiteat
www.FCC.gov
4.2.2 Ethernet connection
The Ethernet ports are located on front of the ISUG-01 as shown in section 3.3.
LAN Ethernet Port (for laptop connection)
The ISUG-01 can be configured locally with the built-in web-based graphical user
interface. Using a standard Ethernet cable, connect your laptop to the “LAN” port on the
ISUG-01. The LAN connection is simple to set up. The LAN connection should be used
for initial setup and whenever the operator is at site.
Before you connect your laptop to the LAN port, verify your laptop’s Local Area
Connection setting. For more detail information, please refer to section 6 laptop network
setting”.
After a proper connection is made, the red and green LEDs near the ISUG-01 Ethernet
connector will flash. The network hardware will determine the highest speed supported
by both devices. With most PCs, the operating system will automatically establish the
hardware and software network connection.
10iSpectrumISUG‐01
ISUG-01 User Manual
4.2.3 Power connection
The ISUG-01 needs +27VDC power through using AC/DC power adaptor. If rack system
has +24V to +27VDC power available, it can be directly connected to the ISUG-01. If
ground is needed, ground port (ground cable is not included) can be connected to the
rack system.
WARNINGS:
Thisunitusesdangerousvoltages.Lossoflife,severepersonal
injuryorpropertydamagecanbetheresultiftheinstructionscontainedinthis
manualarenotfollowed.Itiscompulsorytogroundtheunitbeforeconnecting
power.
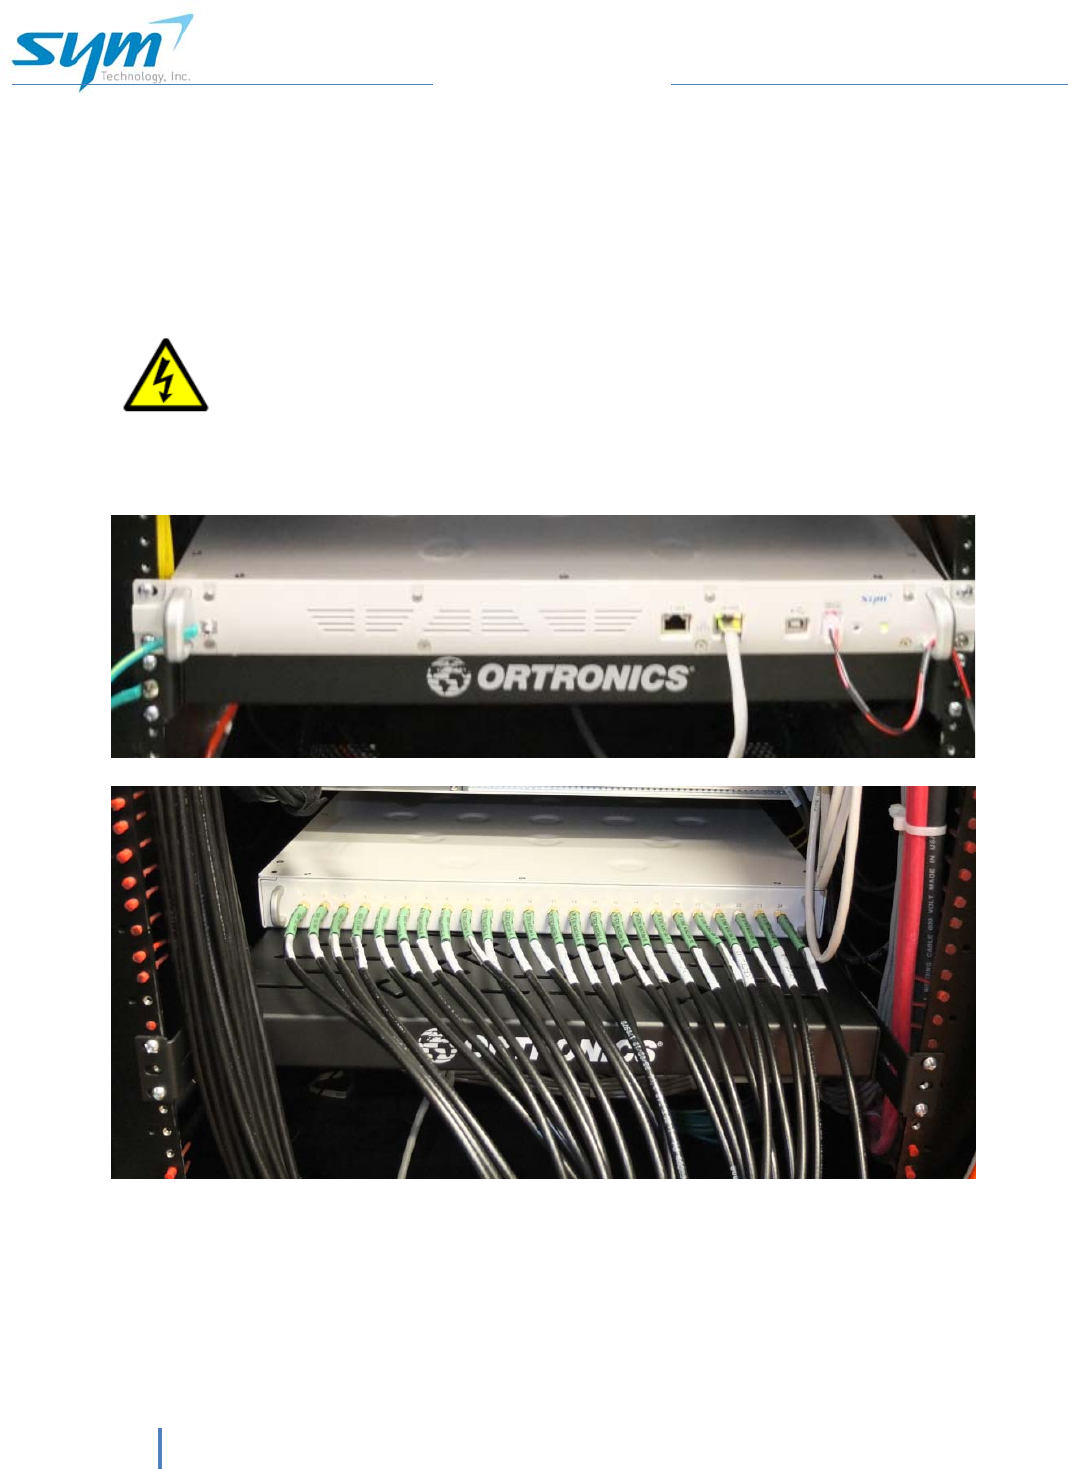
ISUG-01 Installation example
iSpectrumISUG‐01 11
iSpectrum ISUG-01 User Manual
TX/RX1
TX/RX3
TX/RX2
UMTS
Cabinet
BTS 1
TX/RX2
TX/RX1
TX/RX3
850 MHz
Cellular SPOI
1900 MHz
PCS SPOI
8
5
0
1
9
0
0
TX/RX1'
TX/RX3'
TX/RX2'
UMTS
Cabinet
BTS 2
TX/RX2'
TX/RX1'
TX/RX3'
8
5
0
1
9
0
0
TX/RX1
TX/RX2
TX/RX3
700 LTE
BTS
TX/RX1'
TX/RX2'
TX/RX3'
700 MHz
LTE SPOI 1
850 DAS 1
850 DAS 2
1900 DAS 1
1900 DAS 2
700 DAS 1
SISO
700 DAS 1
MIMO
700 DAS 2
SISO
700 DAS 2
MIMO
700 DAS 3
SISO
700 DAS 3
MIMO
1 2 3 4 5 6 7 8 9 101112 131415 1617 1819202122 2324
TX1/TX2
RX1/RX2
TX1'/TX2'
RX1'/RX2'
TX1/TX2
RX1/RX2
TX1
RX1
TX1'
RX1'
TX/RX1
TX/RX1'
TX/RX2
TX/RX2'
TX/RX1
TX/RX1'
TX/RX2
TX/RX2'
TX/RX1
TX/RX1'
iSpectrum ISUG-01
(Uplink Guard)
POI: Point Of Interface
700 MHz
LTE SPOI 2
TX/RX2
TX/RX2'
700 MHz
LTE SPOI 3
TX/RX3
TX/RX3'
TX2
RX2
TX2'
RX2'
TX3
RX3
TX3'
RX3'
RX1/RX2 MON
RX1'/RX2' MON
RX1/RX2 MON
RX1 MON
RX1'/RX2' MON
TX1'/TX2'
RX1'/RX2'
RX1 ' MON
RX2 MON
RX2 ' MON
RX3 MON
RX3' MON
ISUG-01 RF signal connection between BTS and DAS
12iSpectrumISUG‐01
ISUG-01 User Manual
5. LAPTOP NETWORK SETTINGS (PC)
Before using Web GUI, make sure the Ethernet connection between user’s laptop (or PC)
and the Controller, LAN port of the Vision is established.
To begin network connection, proceed as follows:
(1) Connect the ISUG-01 LAN port to Laptop (or PC) using Ethernet Cable (RJ-
45).
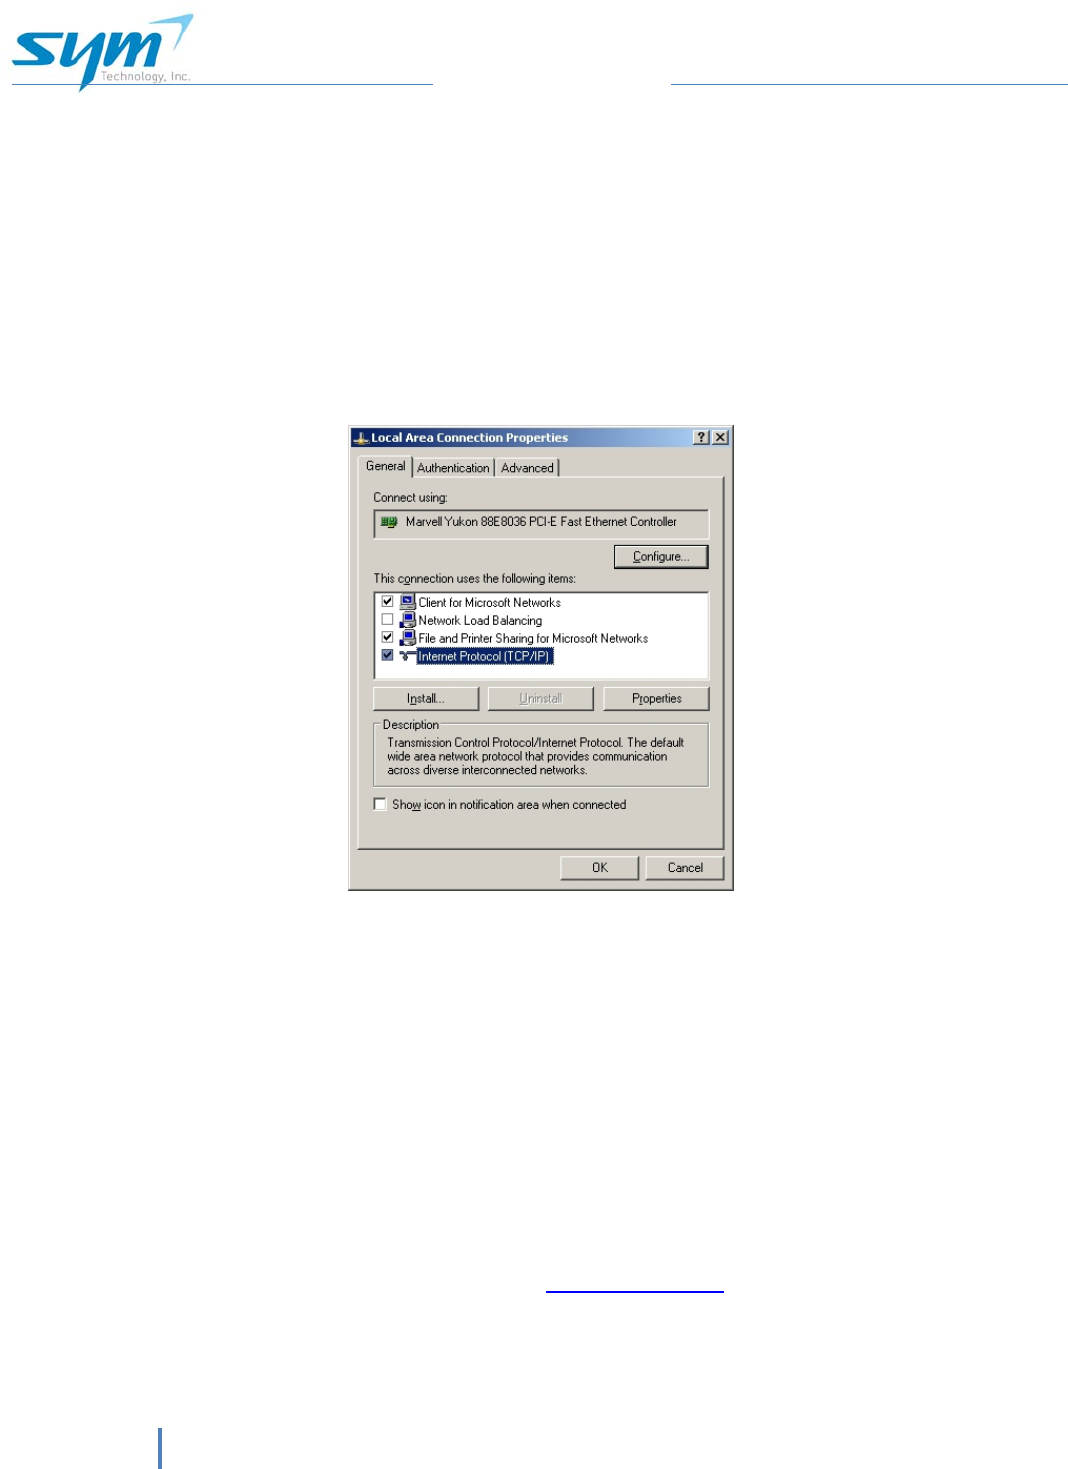
(2) Select TCP/IP in Local Network Properties.
[Figure 5-1] Local Area Connection Properties
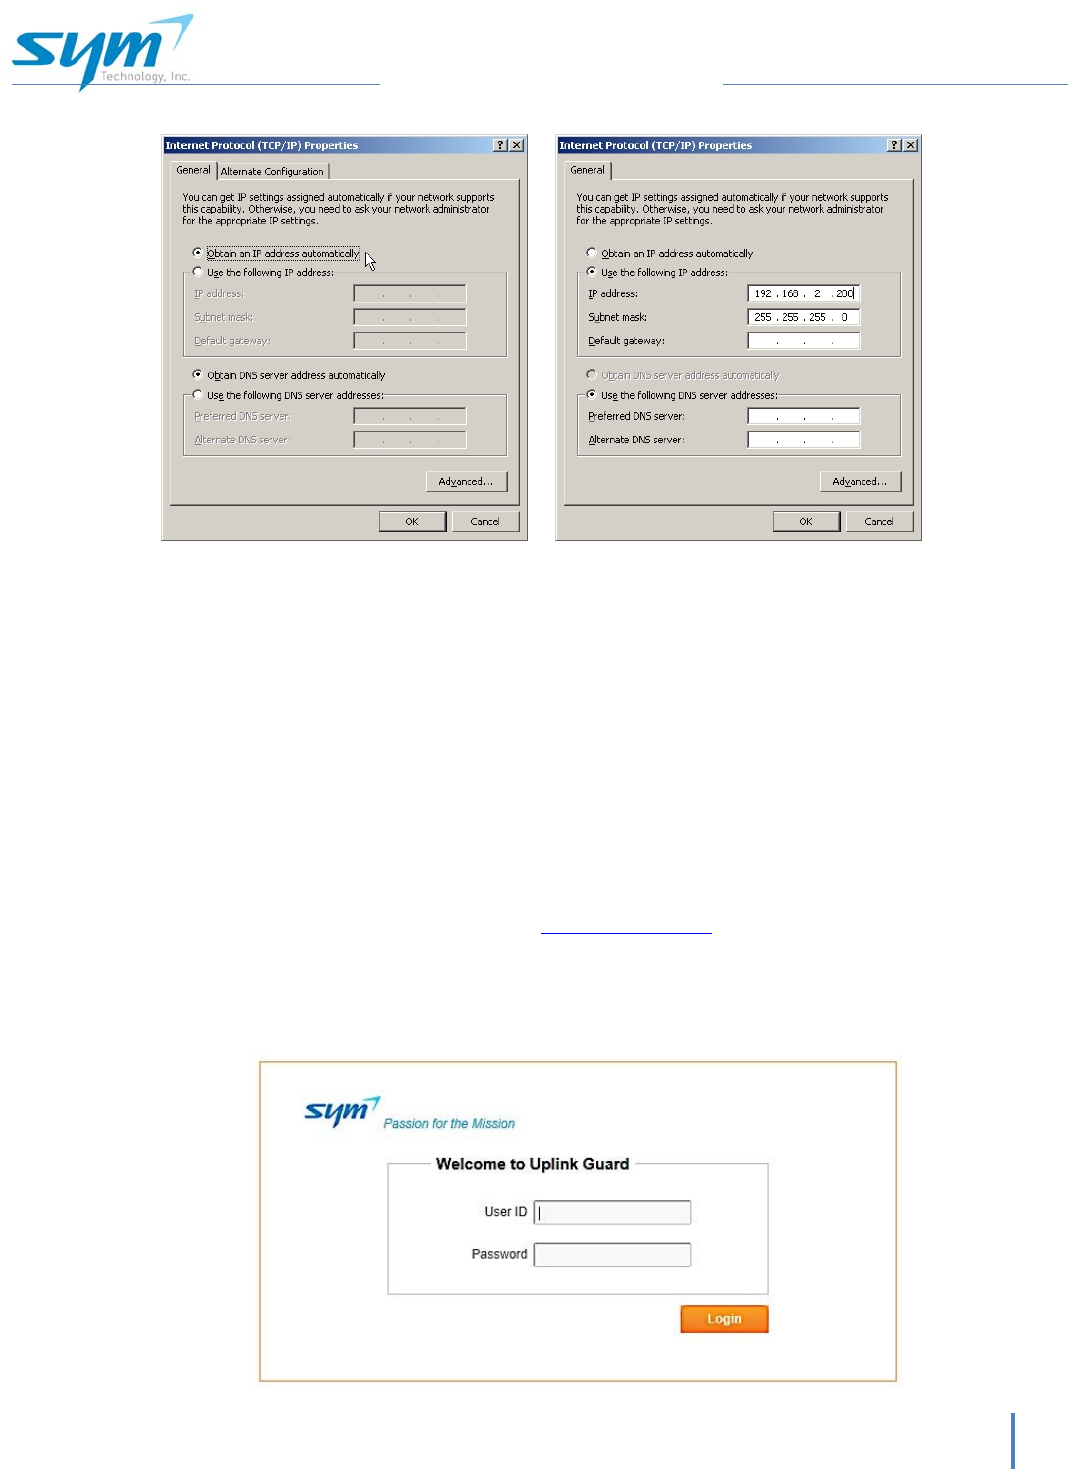
(3) IP Setting
Under Internet Protocol (TCP/IP) properties, make sure to select “Obtain an IP
address automatically” Or “Use the following IP address”, input 192.168.1.XXX
and the recommended IP address is 192.168.2.200.
Assign the IP addresses as follows:
IP address: 192.168.1.200
Subnet mask: 255.255.255.0
Default gateway: Leave it blank
(4) Open Internet Explorer and type in http://192.168.2.1
(5) Once login screen appears, login to the ISUG-01.
iSpectrumISUG‐01 13
iSpectrum ISUG-01 User Manual
Automatically (Dynamic) IP assignment Manually (Static) IP assignment
6. WEB-BASED GUI
6.1. W
EB
-
BASED
GUI
L
OGIN
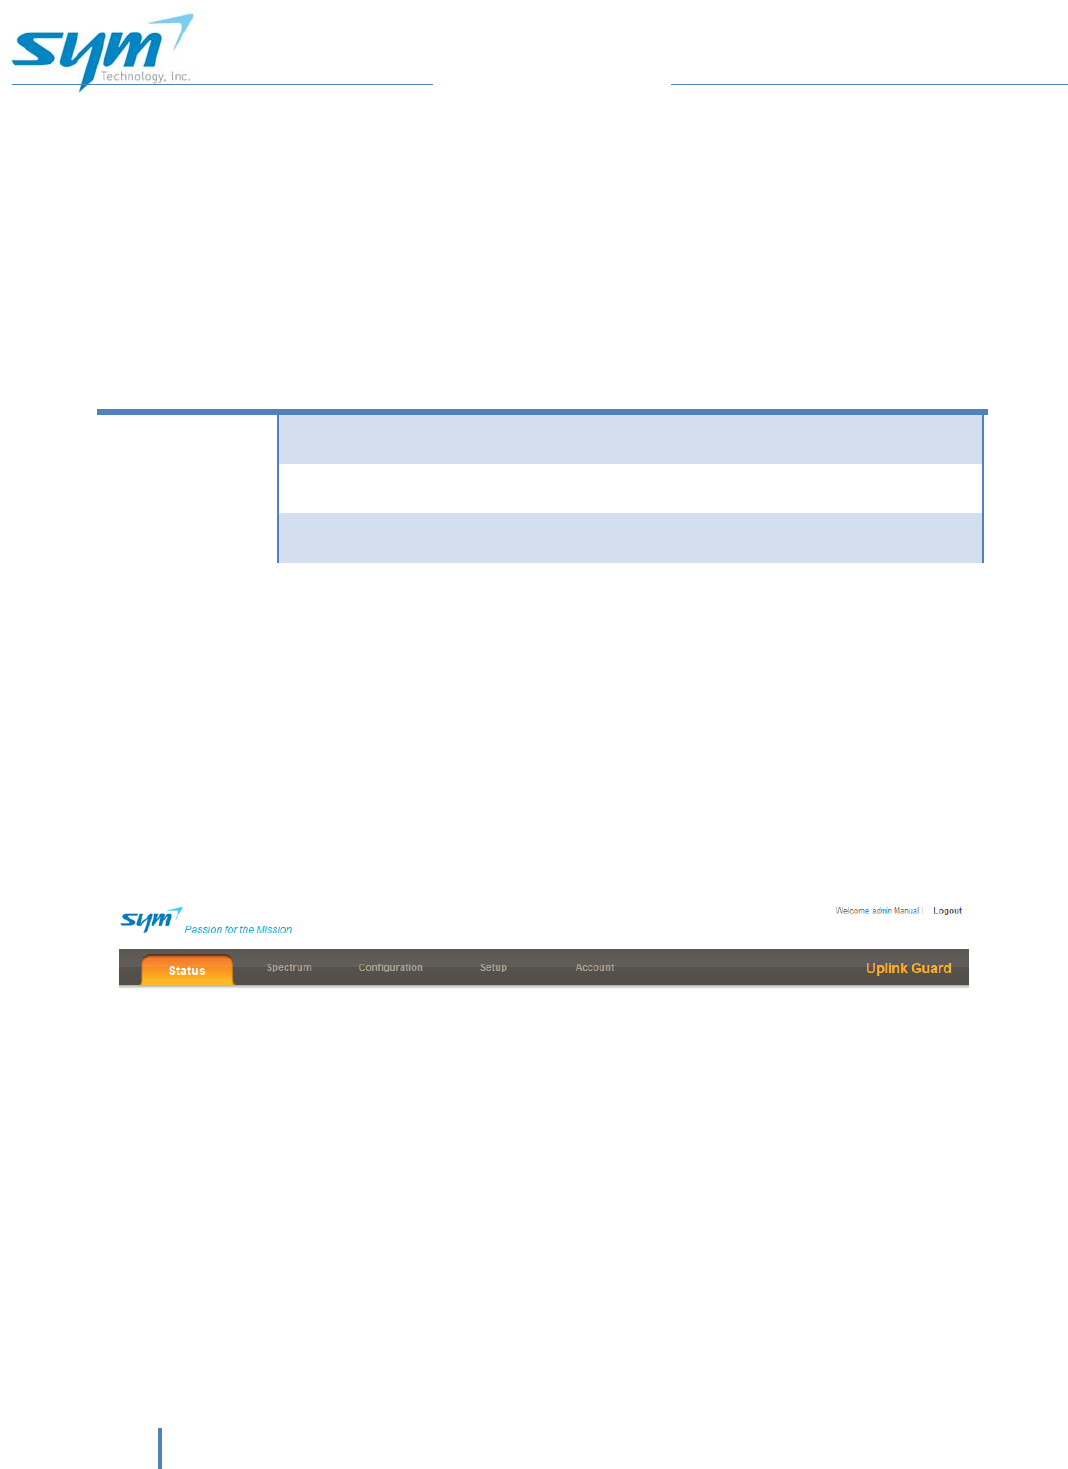
For security purposes, only authorized users can log into the Web GUI.
1. Connect laptop or PC to the LAN port of the ISUG-01.
2. Open a web browser
a. Recommended Internet Explorer, Google Chrome, or Firefox
3. Type in IP address for ISUG-01 unit: http://192.168.2.1
4. Enter User ID and Password assigned by administrator.
a. Default admin login: admin/password:admin
5. Click Login button.
14iSpectrumISUG‐01
ISUG-01 User Manual
6.1.1. GUI Layered Access Rights
There are three types of access listed in the left column. Each access right allows for
viewing the tab and/or viewing and setting values on the tab. See the table below.
TYPES OF
ACCESS Status Spectrum Configuration Set Up Account
Read View View/Set View View n/a
Read/Write View/Set View/Set View/Set View/Set n/a
Administrative View/Set View/Set View/Set View/Set View/Set
6.2. T
ABS
The ISUG-01 has 6 tabs as shown in below. The “Account” tab will only be visible to
admin access accounts. All other menus can be accessed by clicking directly onto the
tab.
Login name will be displayed in the right top corner. User manual in PDF format will also
be displayed and available.
6.2.1. Status
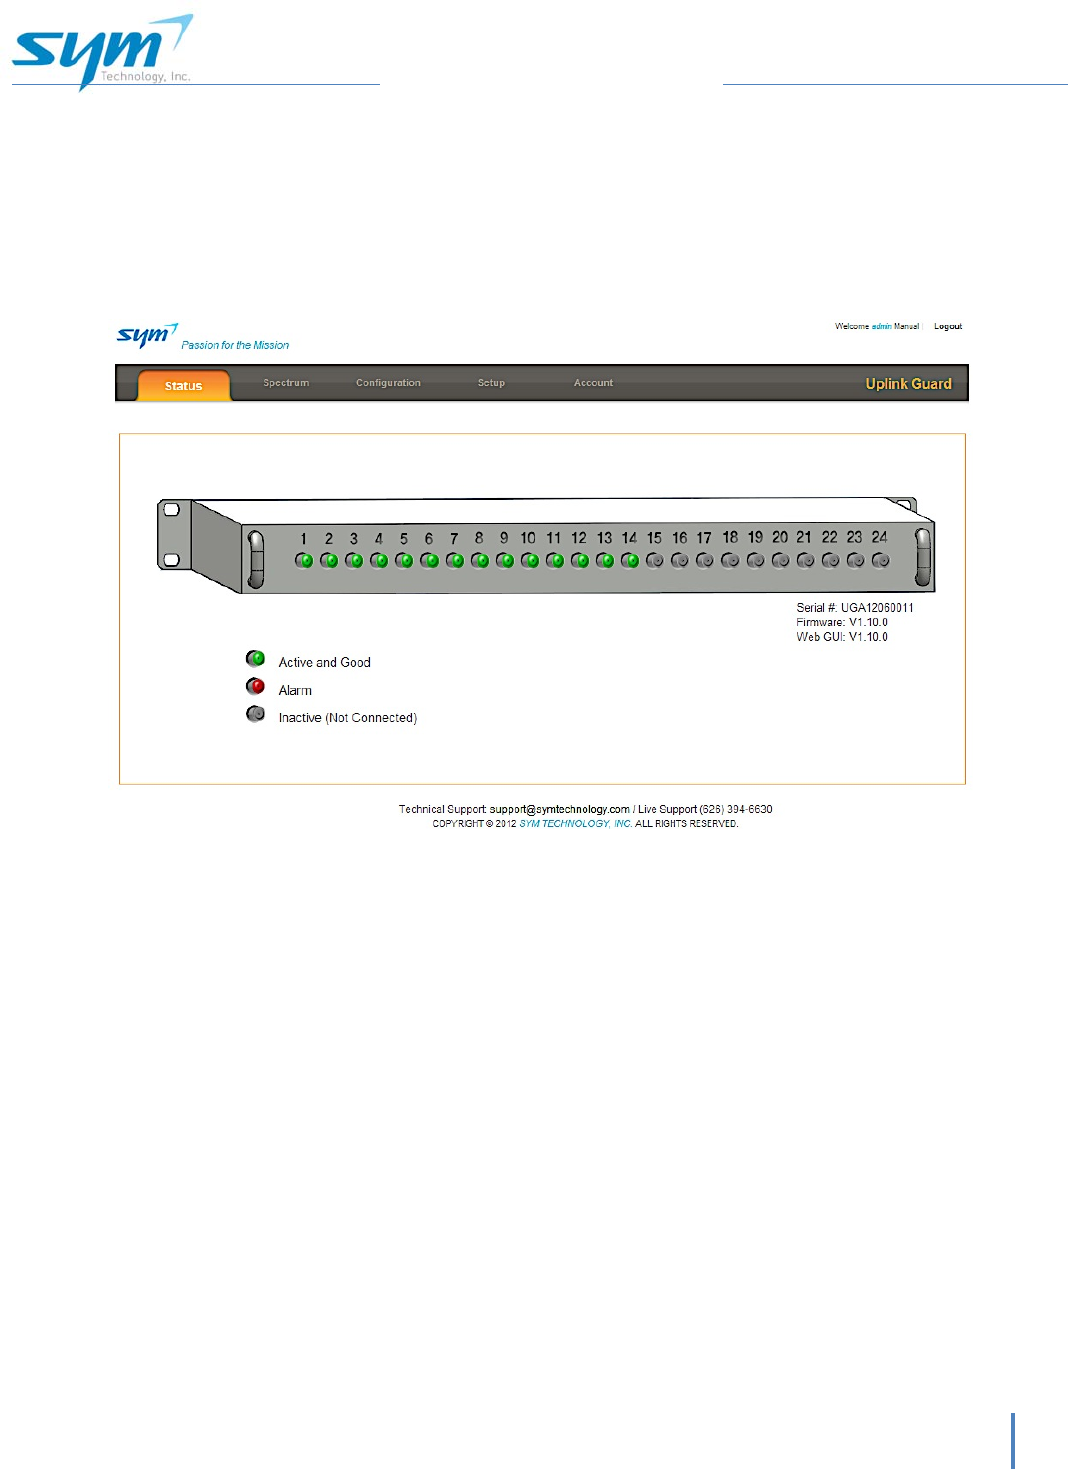
The Status tab is the first display upon successful login. From this page, a virtual display
of the backside of the unit and all 24 input ports will be displayed. Each port number on
the virtual display corresponds to the input port number on the unit installed on site.
Ports are color coded as follows:
* green = active and good
* red= alarm status
* gray = inactive (not connected)
iSpectrumISUG‐01 15
iSpectrum ISUG-01 User Manual
Tip – Additional Status Information Display Technique
In order to access additional information regarding input ports from this screen, simply
place the cursor over the input port number and the display will pop up with the following
information: mobile service provider, sector, node and note.
Unit serial number, firmware and web GUI version are shown in the “Status” page.
6.2.2. Spectrum
Click on the Spectrum tab to view the waveform for any of the 24 RF input ports. In
order to choose a specific port, use the drop down menu to choose a port then click go.
The appropriate corresponding frequency range, mobile service provider, and sector will
automatically be displayed directly to the right of the port selection.
Tip – Click to View Option
Users can also get to the spectrum page and display by clicking directly on the
appropriate input port from the status page.
16iSpectrumISUG‐01
ISUG-01 User Manual
10 11
12
13
14
1
2 3
4
5 6 7 8 9
15
16
17
18
19
20
21

iSpectrumISUG‐01 17
iSpectrum ISUG-01 User Manual
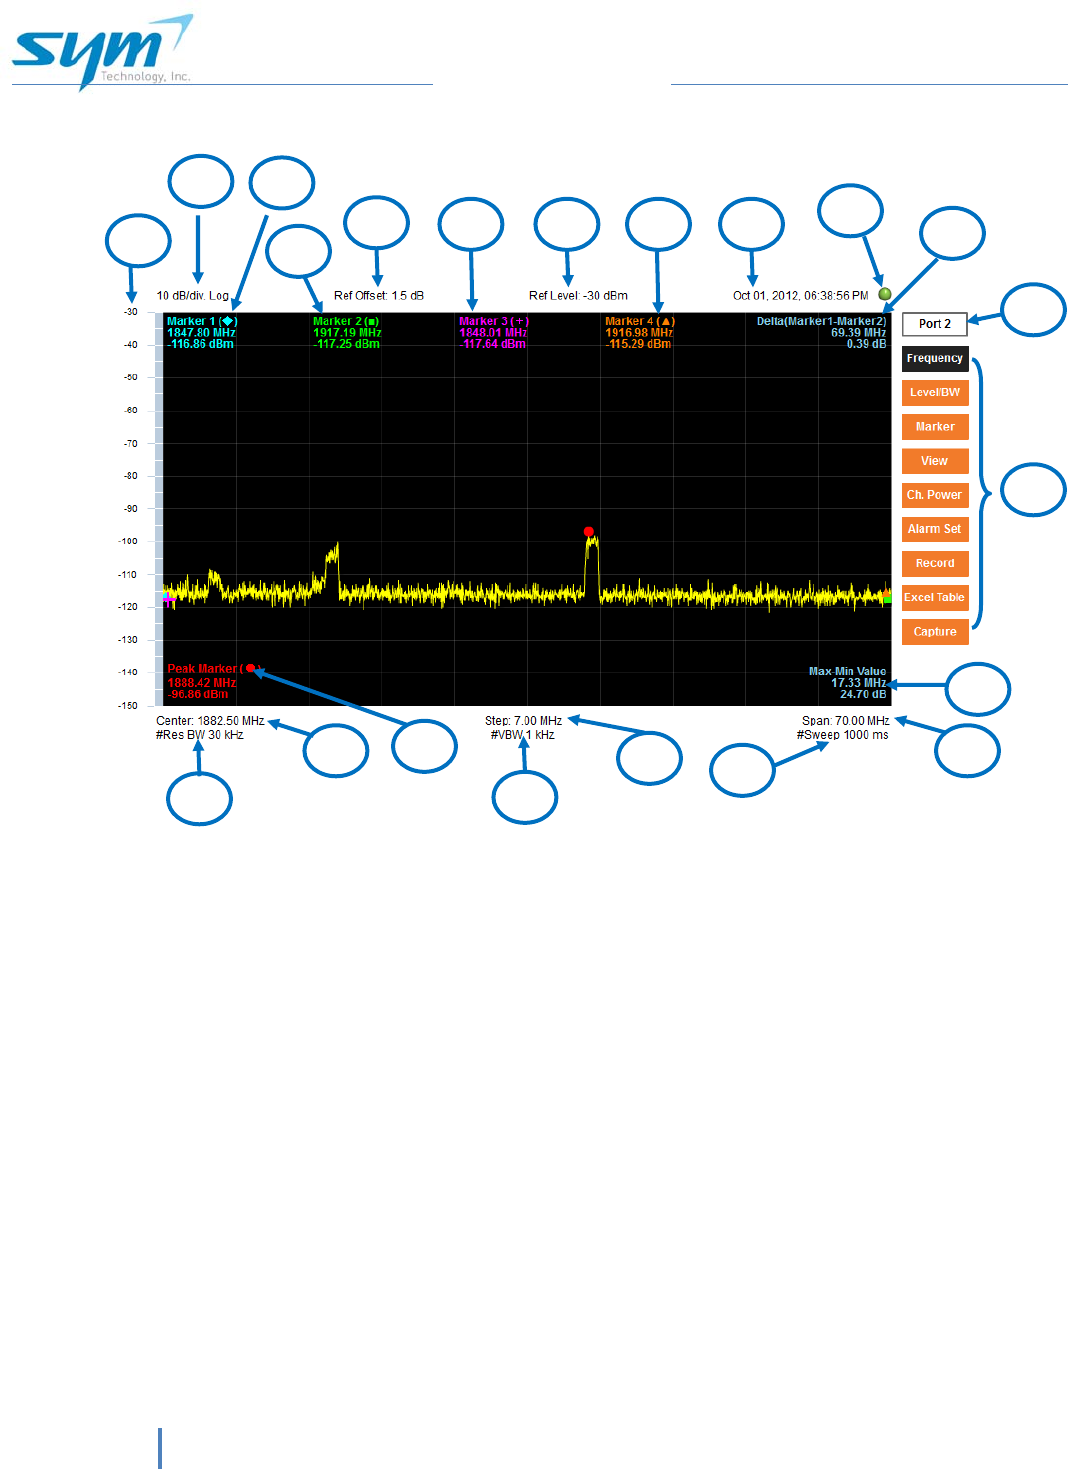
6.2.2.1. Spectrum Display Screen (via web-based GUI)
Item Description Notes
1 Amplitude Reference Level (Y-axis)
2 Amplitude Scale
3 Marker 1 Frequency
4 Marker 2 Frequency
5 Reference Offset
6 Marker 3 Frequency
7 Reference Level
8 Marker 4 Frequency
9 Date and Time Display
10 Spectrum Data Communication Status Indicator
11 Delta (difference) between Marker 1 and Marker 2
12 Port Number
13 Soft Key Menu Title see section 8.2.2
14 Delta (difference) between Max and Min value
15 Frequency Span (X-axis)
16 Sweep Time
17 Step Increments
18 Video Bandwidth
19 Peak Marker
20 Center Frequency (X-axis)
21 Resolution Bandwidth
18iSpectrumISUG‐01
ISUG-01 User Manual
6.2.2.2. Frequency
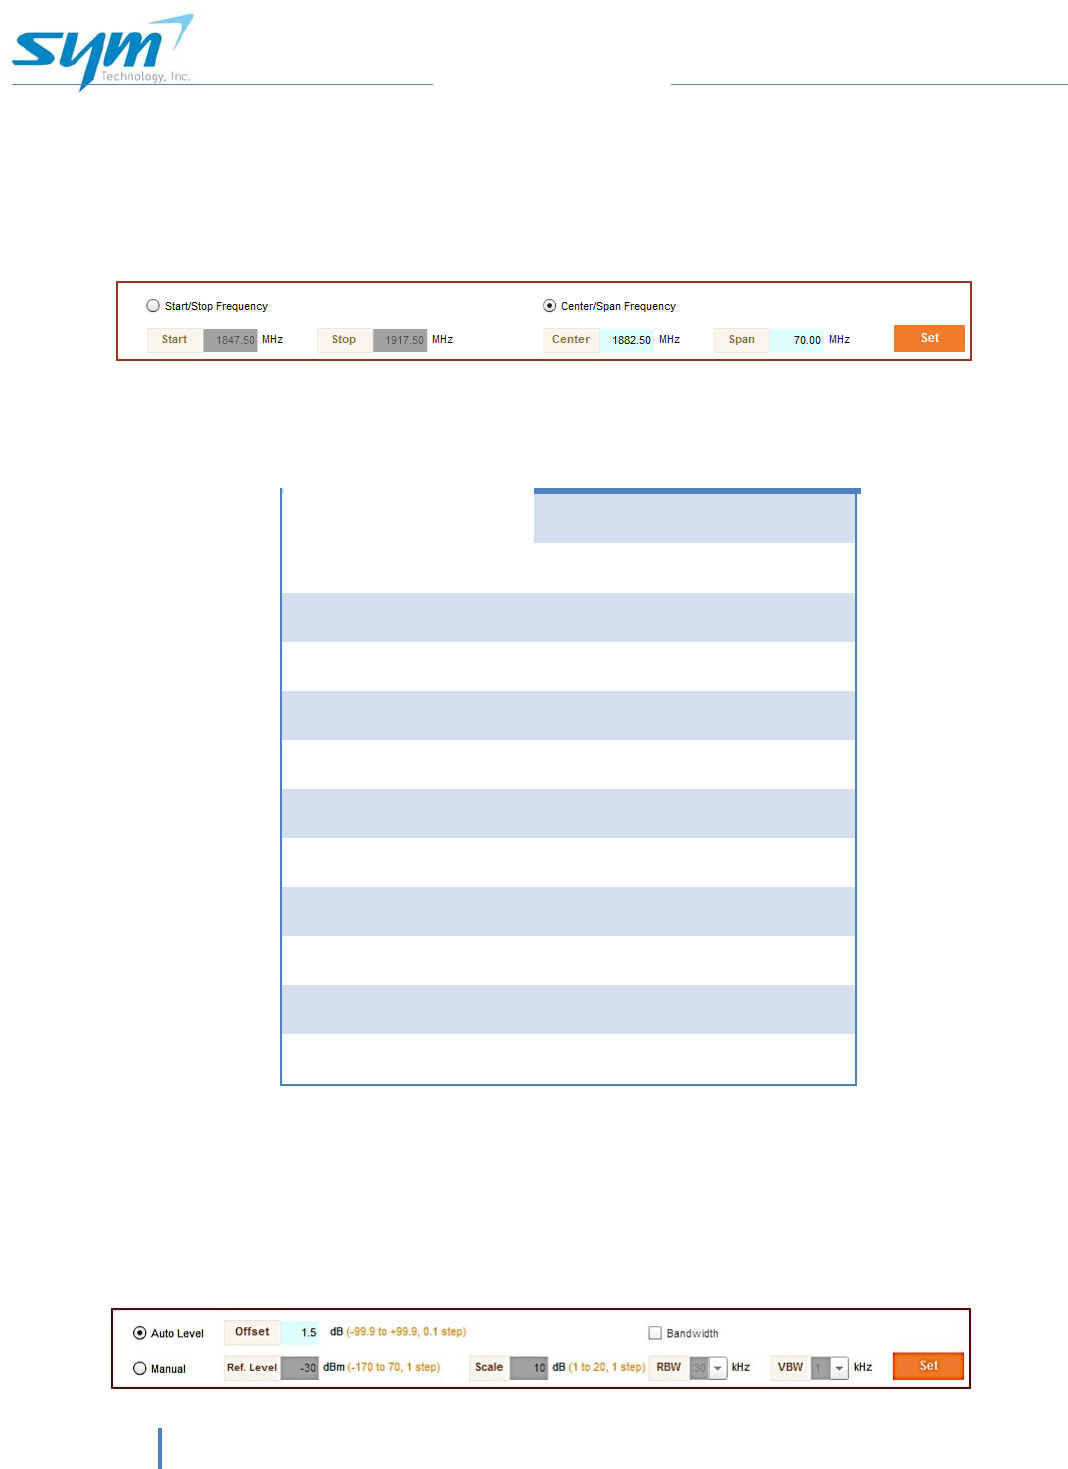
Frequency settings can be adjusted and set using the tool bar that can be found at the
bottom of the spectrum display. Start/Stop and Center/Span Frequency settings can be
customized by typing in desired values and checking to enable then clicking the set key.
No. Band Name
Maximum Bandwidth (70 MHz)
Start (MHz) Stop (MHz)
1 700 MHz Lower LTE 672 742
2 700 MHz Upper LTE 746.5 816.5
6 700 MHz Public Safety 765 835
4 800 MHz Public Safety 780 850
5 850 MHz Cellular 801.5 871.5
6 900 MHz SMR 863.5 933.5
7 1700 MHz AWS 1697.5 1767.5
8 1900 MHz PCS 1847.5 1917.5
9 2.5 GHz Lower WiMAX 2498 2568
10 2.6 GHz Middle WiMAX 2561 2631
11 2.6 GHz Upper WiMAX 2622 2692
6.2.2.3. Level/BW (bandwidth)
The level/BW tool bar is shown at the bottom of the screen and enables adjustment of
the reference value for amplitude (Y-axis) using either auto-leveling or manual settings.
The offset value for the port can also be modified for viewing purposes (permanent offset
configuration set by installer will not be lost).
iSpectrumISUG‐01 19
iSpectrum ISUG-01 User Manual
6.2.2.4. Marker
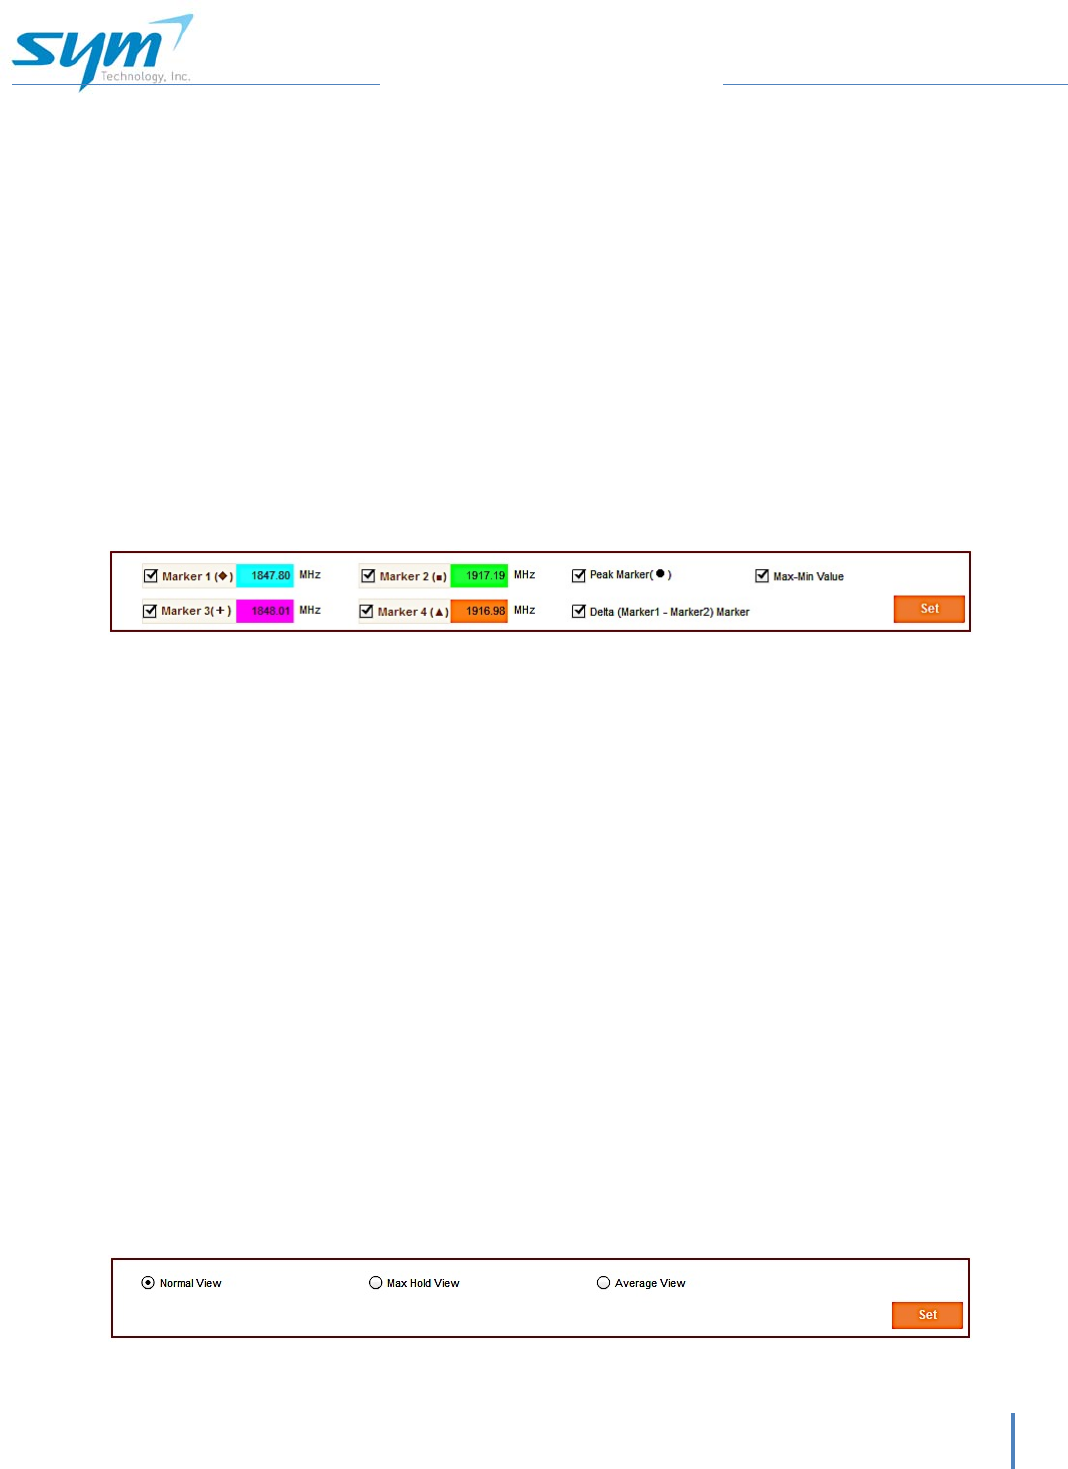
Adjustable Markers 1-4
There are four markers displayed on the spectrum graph. The four marker values can be
changed by using the cursor to drag and drop to desired locations on the spectrum.
From the Marker soft key individual values can be input by users. Markers can also be
disabled and removed from the display by un-checking the box beside the marker title.
Fixed Marker Values
Peak Marker Value remains set and will adjust automatically as the waveform changes.
Delta (Marker 1 – Marker2) displays the frequency and amplitude differences between
marker 1 and marker 2. Max – Min Value marker displays the difference between the
maximum and minimum values for frequency and amplitude.
6.2.2.5. View
The View soft key allows for three different view settings of the spectrum. Choose the
view to display then push set to change view setting.
a. Normal View: This view displays the normal spectrum display and is the default
setting.
b. Max Hold View: This view has 2 options.
Trace Off
This ISUG-01 will automatically display the maximum amplitude values for each
frequency creating a max hold display with the trace function off.
Trace On
The ISUG-01 will display the previously mentioned max hold view with the streaming live
spectrum in white for a dual trace view.
c. Average View: This view will display the average spectrum display as defined by the
number of continuous sweeps (number of times) designated by the user. The average
will be calculated in a matter of seconds and displayed frozen on the display.
20iSpectrumISUG‐01
ISUG-01 User Manual
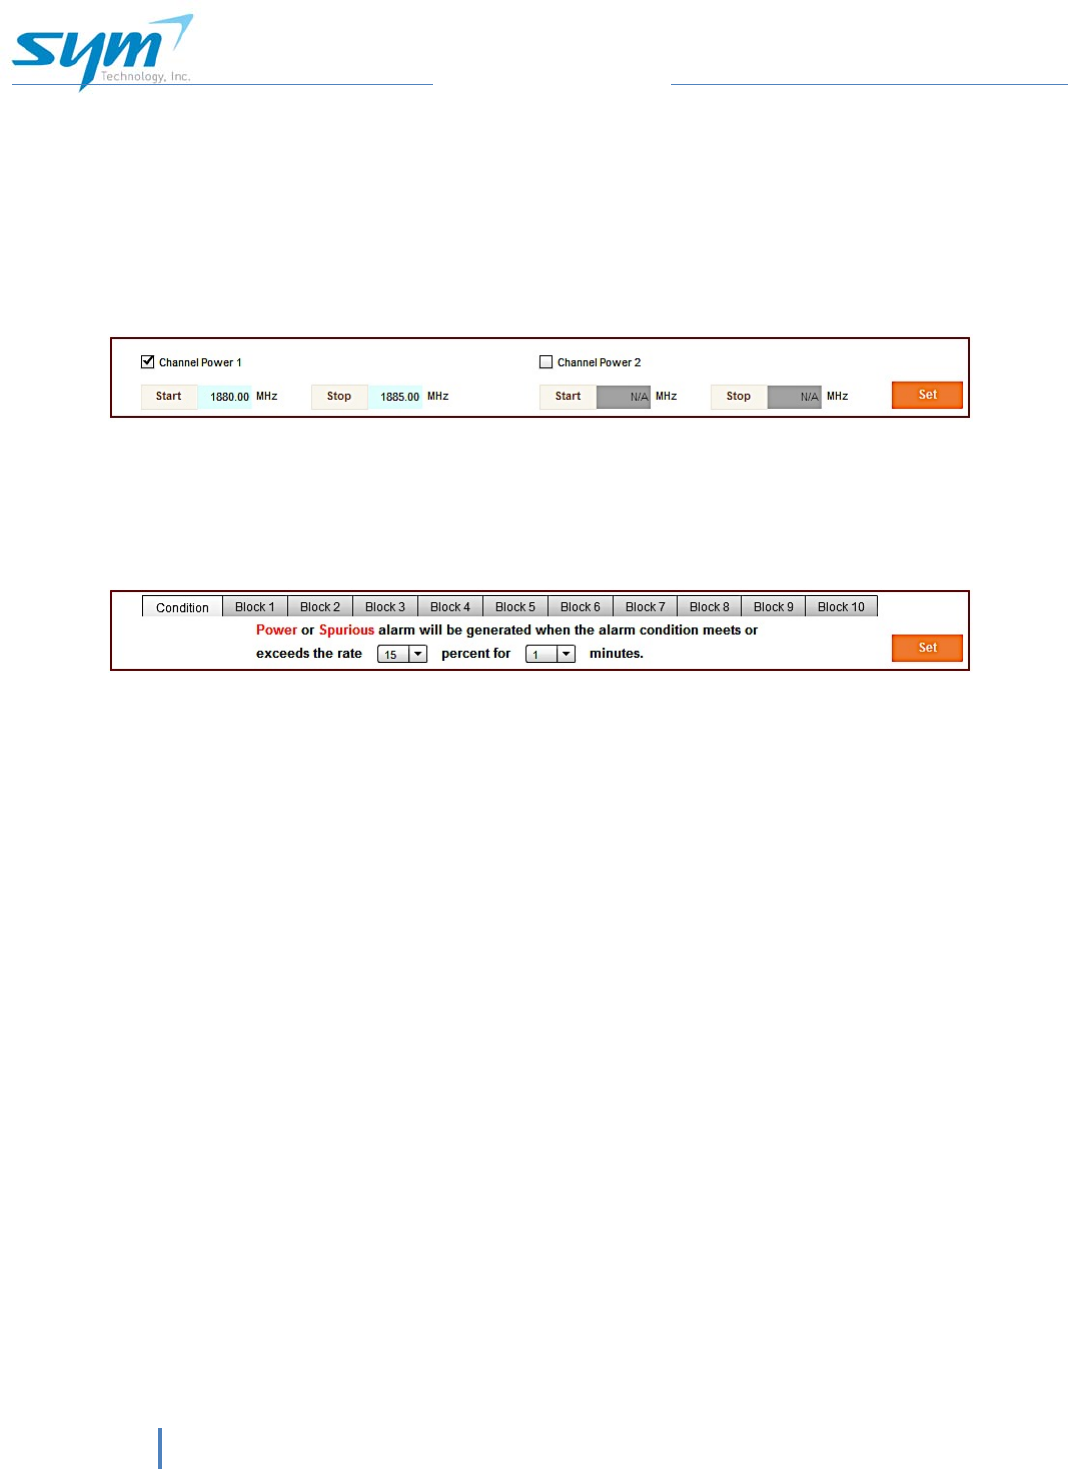
6.2.2.6. Channel Power
The Channel Power setting allows users to set channel power measurements for a
selected frequency range for two separate channel power measurements. In order to set
channel power, enter start/stop frequencies for the channel power measurement, check
the box to enable and click the set key. Channel Power will be displayed with vertical
lines on the spectrum and numerical values at the bottom center of the display.
6.2.2.7. Alarm Set
Alarm settings are conditional based on frequency (occurrence) and time. There are two
types of alarms that can be generated: Channel Power Alarms and Spurious alarms.
Condition
Exceeds the rate: Choose percentage of alarming that needs to occur in order to
signal an alarm in increments of 5, from 5% to 100%.
For the (value) minutes: The amount of time that the ISUG-01 will perform
continuous sweeps
Alarming will occur when either condition set is met.
Blocks 1-10
Enable: check to activate the alarm for this block
Start: enter beginning frequency for alarm block
Stop: enter ending frequency for the alarm block
Upper: enter upper threshold for alarm value
Lower: enter the lower threshold for the alarm value
Peak to Noise: enter the difference from noise spectrum to peak value for
spurious alarming
iSpectrumISUG‐01 21
iSpectrum ISUG-01 User Manual
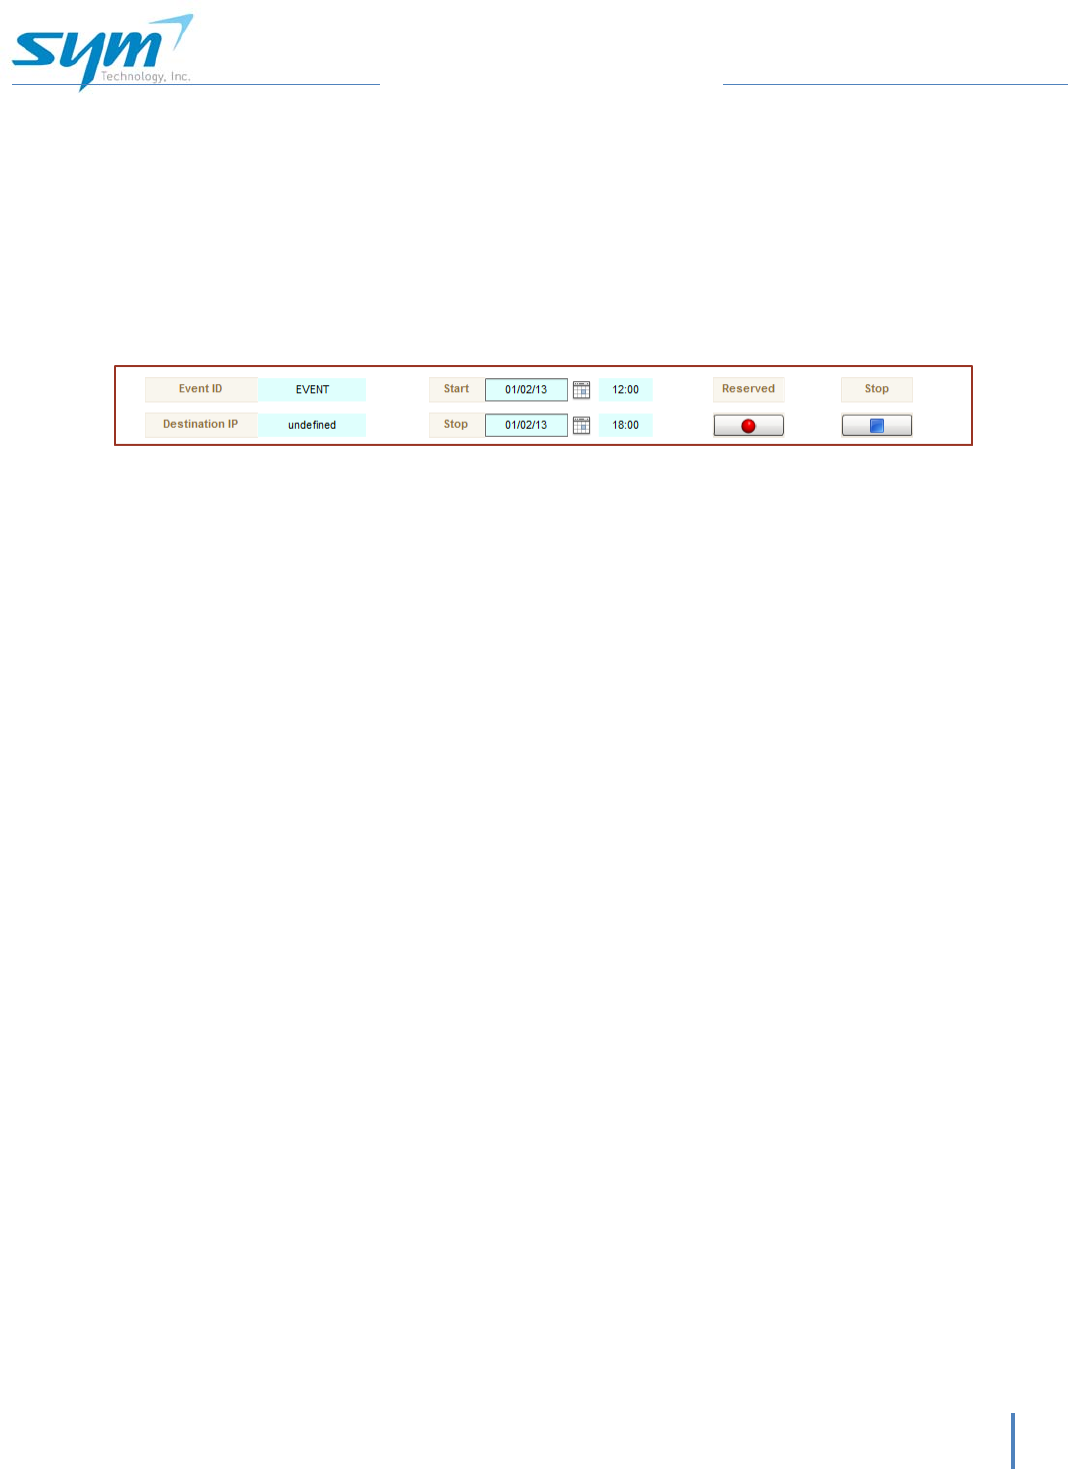
6.2.2.8. Record
The ISUG-01 has spectrum recording for post processing. This feature is a FTP server
based recording. The ISUG-01 will send a recorded file (approx..238 Kbyte/2 minutes)
playing time to the destination IP (FTP server IP address). Multiple files will be sent with
time and date stamps to accommodate the entire recording reserved. To replay the
recorded files, a windows based replayer GUI program will be required. Please contact
SYM Technology to receive instructions for downloading the replayer program.
Event ID: Label event ID. This name will appear for the recorded files sent to the
FTP server.
Destination IP: Wet FTP server IP address for the ISUG-01 to send recorded files.
Start: Enter date and time to begin recording
Stop: Enter date and time to end recording
Record: Click button under record to schedule reserve recording.
Stop: Click button to stop/cancel any recording or reserved recording.
6.2.2.9. Excel Table
Clicking this soft key will allow users to save an excel file containing detailed information
including frequency value and corresponding amplitude value in an excel spreadsheet.
This can be saved to your computer in a designated folder when the pop up screen is
displayed.
6.2.2.10. Capture
The Capture soft key will save a screen capture file (jpg) of the entire screen displayed.
The file can be saved to any location on your computer.
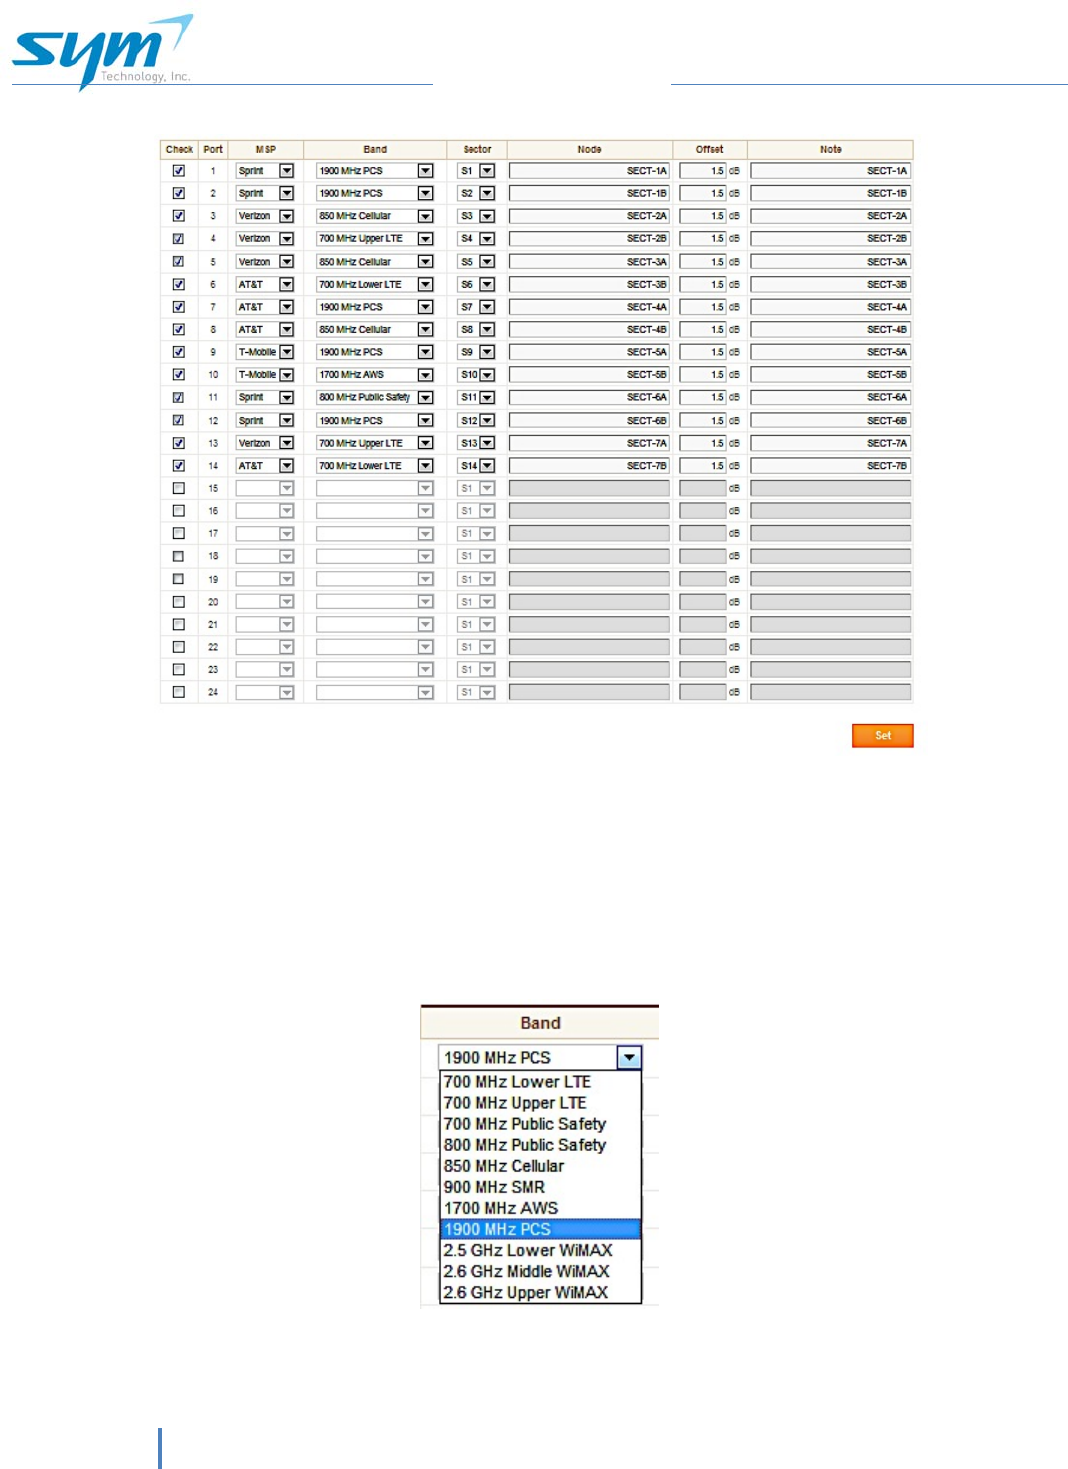
6.2.3. Configuration
The configuration tab enables users to activate or cause individual ports to be inactive
by checking beside the port number. Mobile service provider, frequency band, and
sector can be assigned to individual ports by utilizing a drop down menu.
22iSpectrumISUG‐01
ISUG-01 User Manual
Check: A port is enabled to monitor the input signal.
o When port is disabled (unchecked), the ISUG-01 won’t sweep the port.
MSP: Mobile Service Provider. Assign one of the MSPs.
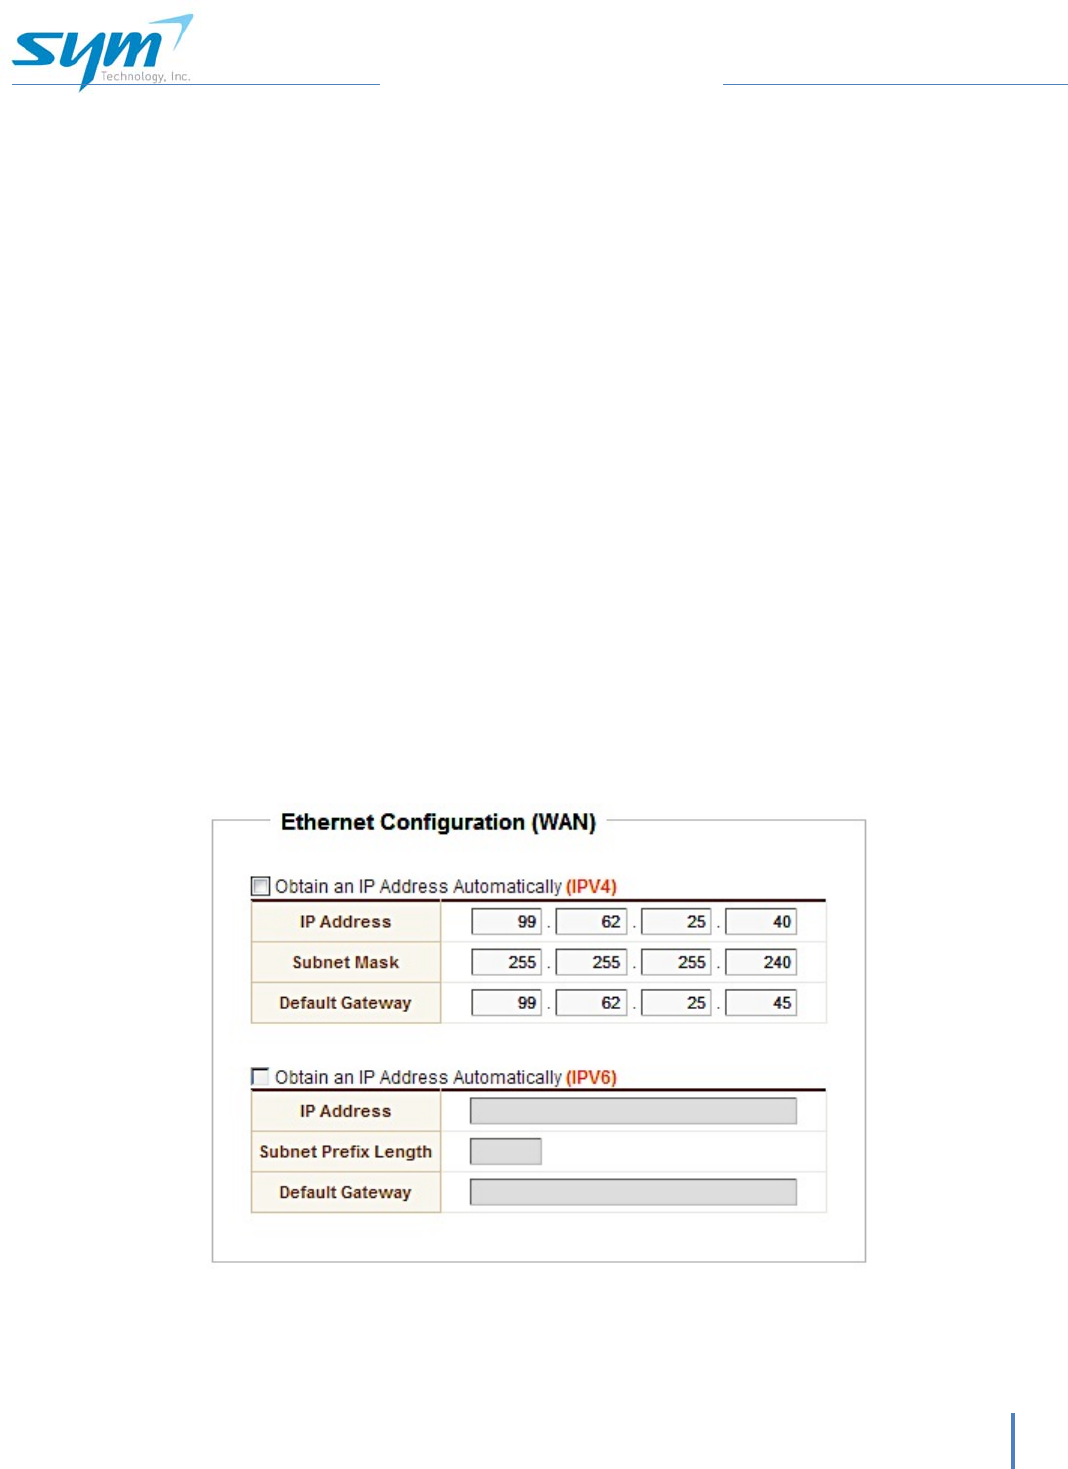
Band: User can select one of the bands to sweep input signal continuously.
All bands are uplink frequency bands within 700 MHz to 2.7 GHz.
Sector: Label Sector number (S1 to S24)
iSpectrumISUG‐01 23
iSpectrum ISUG-01 User Manual
Node: Label this to reflect the signal source. Node can be labeled using up to 30
characters.
Offset: Offset Value should be input by installer at the time of installation. RF
cable loss and coupling loss (if needed) should be entered as an offset value.
Note: The note section can contain up to 30 characters to be used as needed.
In order to set information, users must click the orange set key at the bottom of the page.
Read access users will not have access to set any of the values within the configuration
page.
6.2.4. Setup
6.2.4.1. Network
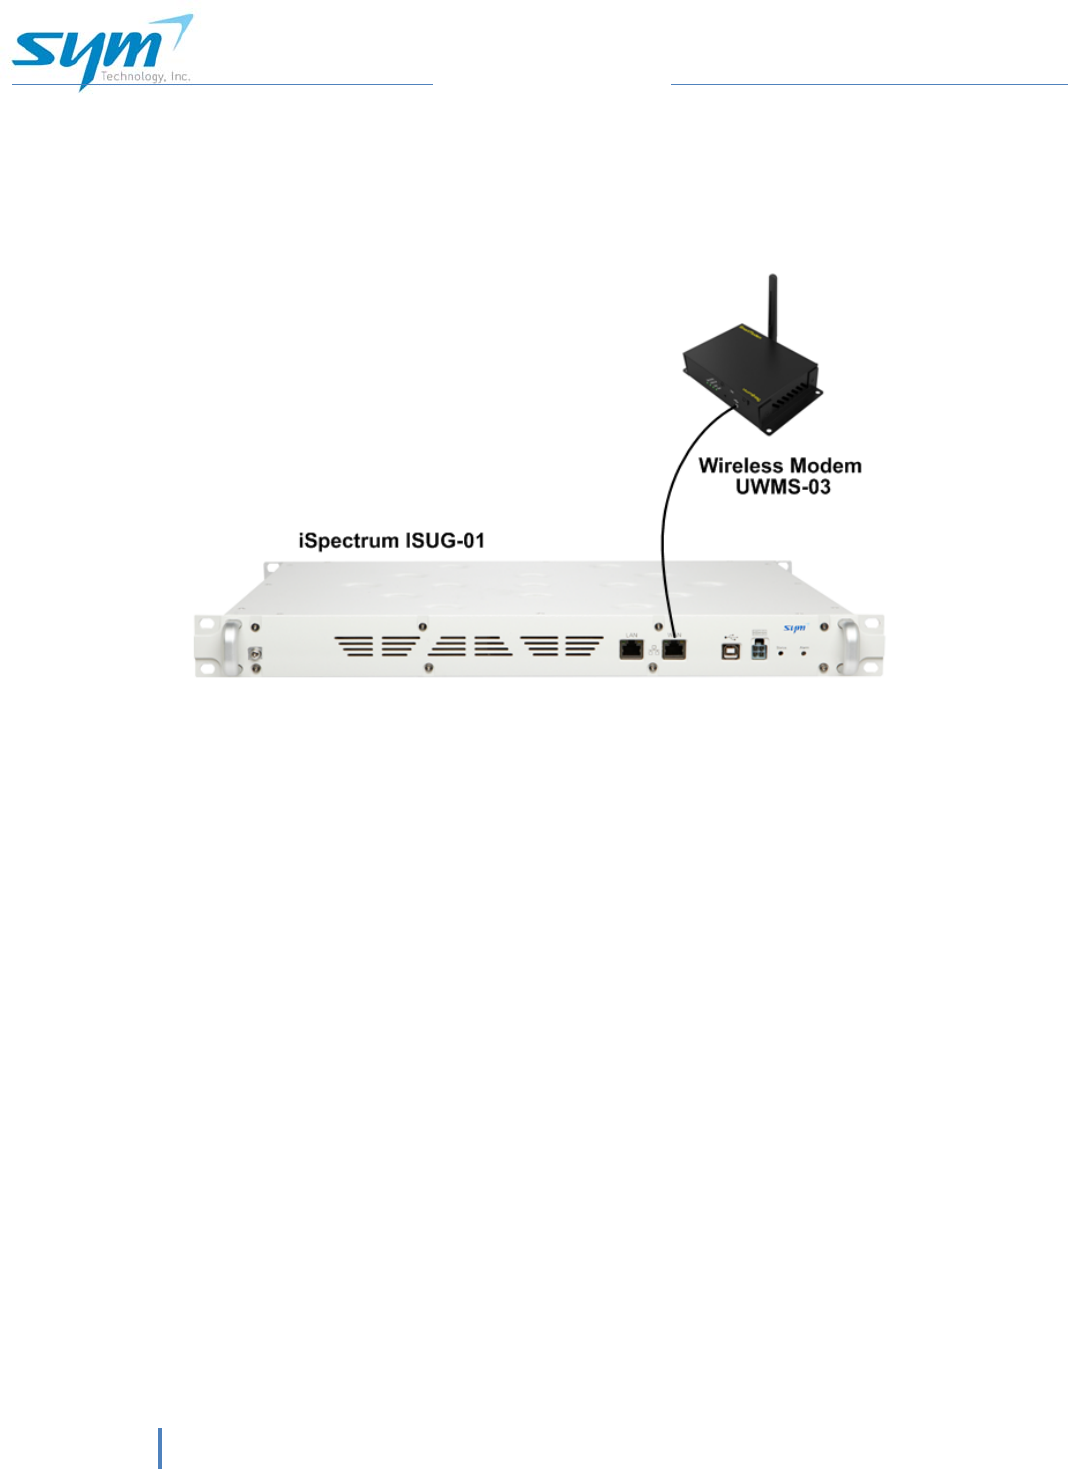
A WAN Ethernet connection should be used to obtain an IP address automatically as
this port works as DHCP client mode. Once a DHCP server is connected to the WAN
port, the ISUG-01 will be assigned with an IP address automatically. This IP address
should be identified and accessible for remote access.
It is highly recommended to use a static IP address rather than “Obtain an IP Address
Automatically (IPV4)” as shown below.
24iSpectrumISUG‐01
ISUG-01 User Manual
If there is no valid wired internet connection, a wireless modem (ex. UWMS-03) can be
connected to the ISUG-01. By configuring the port forwarding table on the wireless
modem, users will be able to access the ISUG-01 remotely using the modem’s PPP IP
address and port forwarding number.
An SNMP Destination IP address must be input for alarm notification. The Site ID should
be labeled and the rate for receiving notification of the ISUG-01’s status can be chosen
using the drop down menu from 1 to 60 minutes. The location section will require the
latitude and longitude of the location. Date and time settings for the unit should be set
based on the location of the site install. At the completion of each section the set button
should be clicked to save these settings.
6.2.4.2. Update
Firmware Updates will be sent out if necessary and can be installed by opening them.
The Factory Set button will reset all settings to default factory settings. All configuration
settings will be lost. The Reboot button will restart the system through power cycling,
information will be saved. If the unit is damaged or needs replacement, the current
configuration can be saved onto a computer using the save configuration key. The same
configurations can then be loaded onto a new unit using the load configuration key.
The Event Log contains all activites that have occurred on the GUI excluding alarm
information. The date time and type of event, such as configuration change, login, etc
will be displayed as a file to be saved to your computer.

iSpectrumISUG‐01 25
iSpectrum ISUG-01 User Manual
6.2.5. Account
The Account Tab includes 3 sub tabs: User List, New Account and New Administrator.
The User List will show all users and enables the administrator to delete accounts. The
New Account sub tab enables the administrator to designate new accounts and security
access. The New administrator tab is for changing administrator user name and
password.

26iSpectrumISUG‐01
ISUG-01 User Manual
7. SPECIFICATIONS
Item Downlink
Uplink Frequency Range 698-716 MHz & 776-787 MHz, 700 MHz LTE
793-805 MHz, 700 MHz Public Safety
806-824 MHz, 800 MHz Public Safety
824-849 MHz, 850 MHz Cellular
896-901 MHz, 900 MHz SMR
1710-1755 MHz, 1700 MHz AWS
1850-1915 MHz, 1900 MHz PCS
2496-2690 MHz, 2.6 GHz WiMAX
Monitoring RF Ports 24 total
Display Bandwidth 70 MHz max referenced to center frequency of each band
Input Power Range -50 to -100 dBm/30 kHz
Minimum Detectable Signal -110 dBm/30 kHz
Measurement Accuracy ±2.0 dB max
Spectrum Resolution 30 kHz RBW & 1 kHz VBW
RF Port to Port Isolation 50 dB
VSWR 2:1 max
Sweep Time 300 ms max with bandwidth 70 MHz
Alarm SNMP Capable
Local/Remote Access Web based GUI, RJ-45 Ethernet Port, 10/100 Mbps
RF Connector SMA Female
Power Supply 27 VDC
Power Consumption 15 W
Power Connector 4 Pin Molex
Operating Temperature -5°C to +50°C
Dimensions 19” x 15” x 1.75”
Weight 15 lbs