SYNTEK Semiconductor BLUEW-2310U Wireless USB Dongle User Manual
SYNTEK Semiconductor Co., Ltd. Wireless USB Dongle Users Manual
Users Manual

Confidential Version1.0
Released Date: 2008.03.31
1
太 欣 半 導 體 股 份 有 限 公 司
SYNTEK Semiconductor Co., Ltd.
STA-UI-A0035
User’s Manual
STA-UI-A0035
(BlueW_2310 USB version)
Wifi 802.11 b/g and Bluetooth v2.0 + EDR
Combo USB Dongle
User’s Manual
太 欣 半 導 體 股 份 有 限 公 司
SYNTEK Semiconductor Co., Ltd.

Confidential Version1.0
Released Date: 2008.03.31
2
太 欣 半 導 體 股 份 有 限 公 司
SYNTEK Semiconductor Co., Ltd.
STA-UI-A0035
User’s Manual
1. Before installation
Requirement environments:
• Windows Vista / Vista-64 / XP sp2 / XP-64 / 2000 sp4 or above
• At least 50 MB of available free hard disk space for installing the drive
• An IEEE 802.11b, or IEEE 802.11g Access Point (for Infrastructure Mode) or
another Wireless Adapter (for Ad-Hoc Mode). Also, the STA-UI-A0035 can
compatible with most 802.11n AP router.
• One Available USB port
• CD-ROM Drive (for Driver installation only)
2. Package Contents Check
9 STA-UI-A0035 Combo USB Dongle x 1
Software CD x 1 include
User’s Manual
IVT BlueSoleil Bluetooth software and driver
3DSP WLAN windows software and driver
This Quick Setup Guide x 1
Warranty Card x 1
# Please informs your dealer if there are any missing or damaged parts.

Confidential Version1.0
Released Date: 2008.03.31
3
太 欣 半 導 體 股 份 有 限 公 司
SYNTEK Semiconductor Co., Ltd.
STA-UI-A0035
User’s Manual
Contents
1. Introduction............................................................................................................4
2. Product Features.....................................................................................................5
3. Install the Drivers and Utilities..............................................................................6
4. Wireless Configuration........................................................................................19
4.1 Configuring Your Wireless Network with Windows XP .........................19
4.2 Single Access Point Network...................................................................21
4.3 Multiple Access Point Network...............................................................22
4.4 Setting Up a Peer-to-Peer Network..........................................................23
4.5 Wireless Performance Considerations .....................................................24
4.6 WiFi Security Considerations ..................................................................25
5. Bluetooth Configuration and Utilities..................................................................26
5.1 Start the Bluetooth Device.......................................................................26
5.2 Manual Configuration Bluetooth Dongle ................................................27
5.3 Start Bluetooth .........................................................................................30
5.4 Establish Bluetooth Connection...............................................................30
5.5 Stop the Bluetooth Device .......................................................................31
6. 3DSP Combo USB Dongle Utility Configuration...............................................33
7. Driver Uninstallation ...........................................................................................34
8. Troubleshooting...................................................................................................37
9. Specifications.......................................................................................................40
10. Contact Information.....................................................................................41

Confidential Version1.0
Released Date: 2008.03.31
4
太 欣 半 導 體 股 份 有 限 公 司
SYNTEK Semiconductor Co., Ltd.
STA-UI-A0035
User’s Manual
1. Introduction
The SYNTEK STA-UI-A0035 product provides the highest level of integration
and most aggressive BOM cost by integrating IEEE 802.11b/g and Bluetooth v2.0 +
EDR into a single MAC/Baseband chip utilizing a single 2.4GHz transceiver.
Integrated on-chip power amplifier and LNA reduce external component count,
while still able to deliver ample transmit power for most applications.
Different from any other wireless LAN and Bluetooth chip set vendor, SYNTEK and
3DSP uses its patented Software Radio technology to implement both wireless LAN
and Bluetooth in software. The highly optimized software radio DSP technology
enables STA-UI-A0035 to integrate class 1 Bluetooth v2.0 + EDR function
without any added cost to the total solution. No extra antenna, PA, RF transceiver,
resistor, capacitor, crystal or any components are needed. The software solution
even guarantees the Bluetooth RF performance if the wireless LAN performance is
tested to be good. It eliminates the need for system manufacturers to separately
test the module’s Bluetooth RF performance, therefore reduce the testing time and
cost.
The STA-UI-A0035 utilizes 3DSP’s patent pending technologies to fundamentally
solve the interference and performance issues existed during 802.11b/g and
Bluetooth coexistence, thus improving both 802.11b/g and Bluetooth performance
and link stability in real environment. As a result, it enhances user experience in a
totally wireless environment, where all devices are connected wirelessly through
either Bluetooth link or 802.11b/g link.
The single installation package allows for easy setup and configuration of both
802.11b/g and Bluetooth devices. Combined user interface is intuitive to use. Once
configured, both wireless links operate transparently in the background.

Confidential Version1.0
Released Date: 2008.03.31
5
太 欣 半 導 體 股 份 有 限 公 司
SYNTEK Semiconductor Co., Ltd.
STA-UI-A0035
User’s Manual
2. Product Features
[WiFi]
9 Data Rate up to 54Mbps.
9 Single-band 2.4-GHz 802.11b/g with Bluetooth v2.0 + EDR
9 RF IC integrated on-chip PA capable of delivering 20dBm output power
9 Low active transmit and receive power dissipation and ultra-low power in
stand-by and idle modes
9 Supports IEEE802.11 b/g
Security:
9 WPA and WPA2 for advanced authentication and encryption
9 AES and TKIP in hardware for reduced power dissipation and encryption speed
9 Worldwide regulatory support
9 Patent pending technology maximizes multimedia streaming performance over
Bluetooth over WLAN in coexistence mode
9 Patent pending Software Radio technology allows single radio, single baseband
integration of multiple standards
9 Advanced network security features include WPA, WPA2, 802.11i and 802.11x
9 Long and short preamble supported
[Bluetooth]
9 Support AFH (Adaptive Frequency Hopping)
9 Support Bluetooth v2.0 + EDR
9 Backward compatible with Bluetooth v1.1 and v1.2
9 Support for up to seven active Bluetooth devices
9 Class 1 with 18dbm PA, 100m range
Confidential Version1.0
Released Date: 2008.03.31
6
太 欣 半 導 體 股 份 有 限 公 司
SYNTEK Semiconductor Co., Ltd.
STA-UI-A0035
User’s Manual
3. Install the Drivers and Utilities
1. Insert the Installation Software CD into CD-ROM drive. If the Auto-Run function
of CD-ROM is disabled, you can utilize the Windows Explorer to browse CD content
and run Setup.exe manually.
If the Auto-Run function of CD-ROM is enabled (in Windows, the default setting of
this function is usually enabled), then a CD menu will appear automatically.
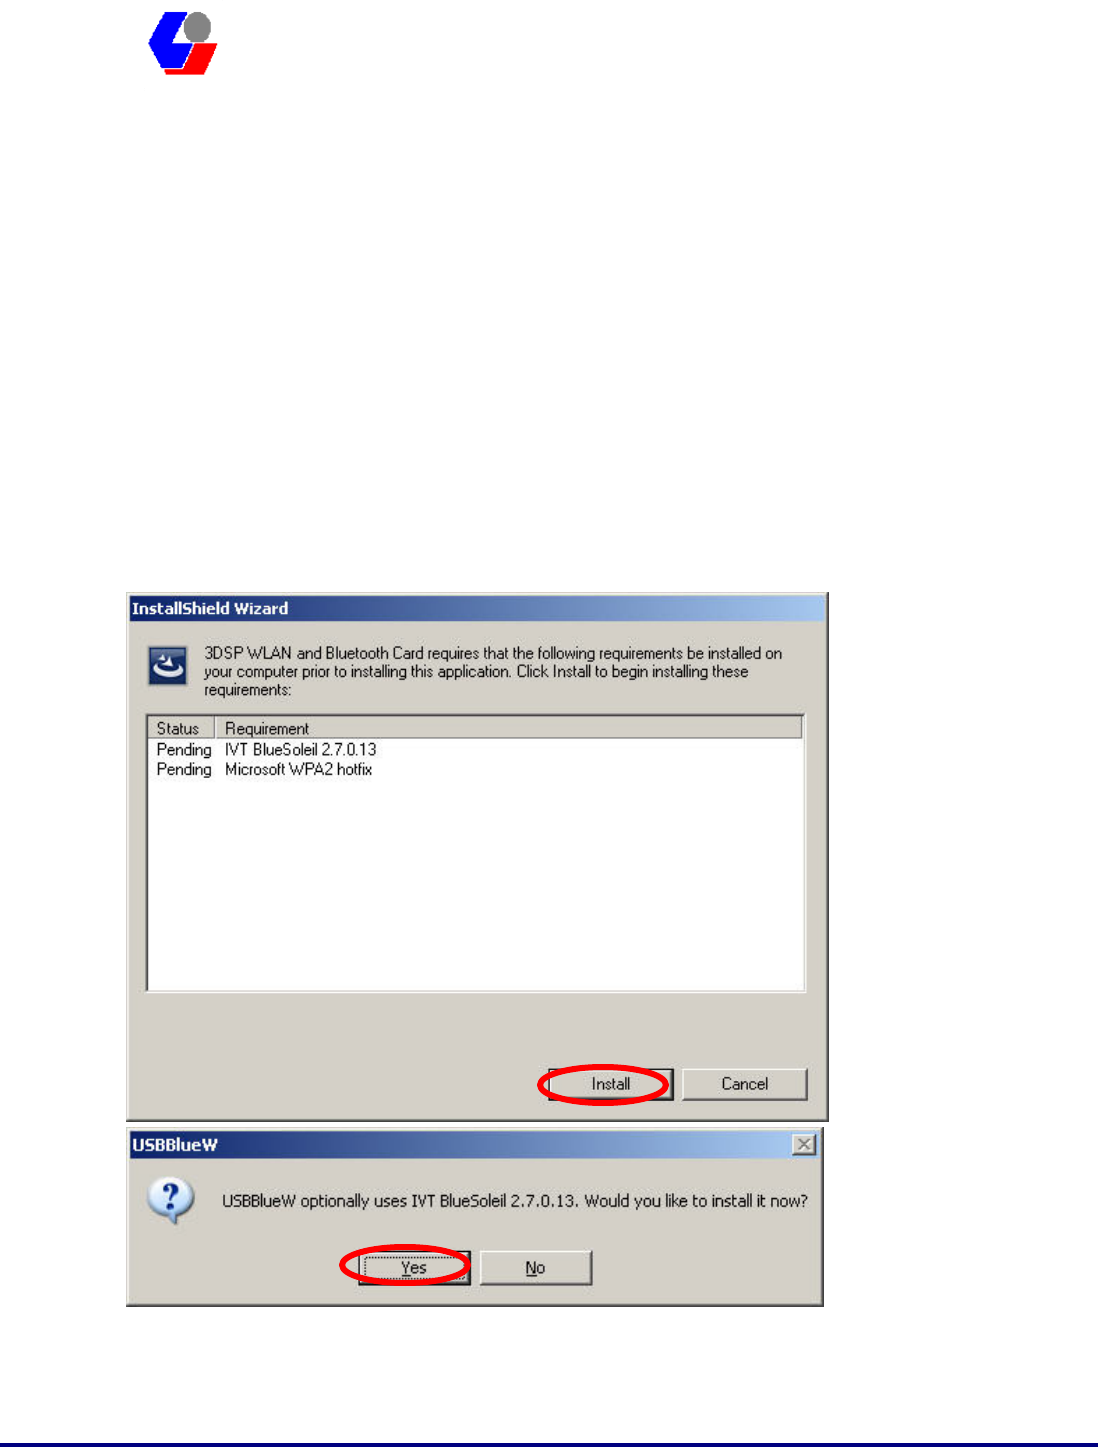
1. The Instillation program before install 3DSP Wireless driver, the installation
program will install the requirement program “IVT BlueSoleil” and “Microsoft
WPA2 hot fix” (This is not necessary in many PCs if installed) . The program will
install IVT BlueSoleil first. Please press the “Yes” button start install BlueSoleil.
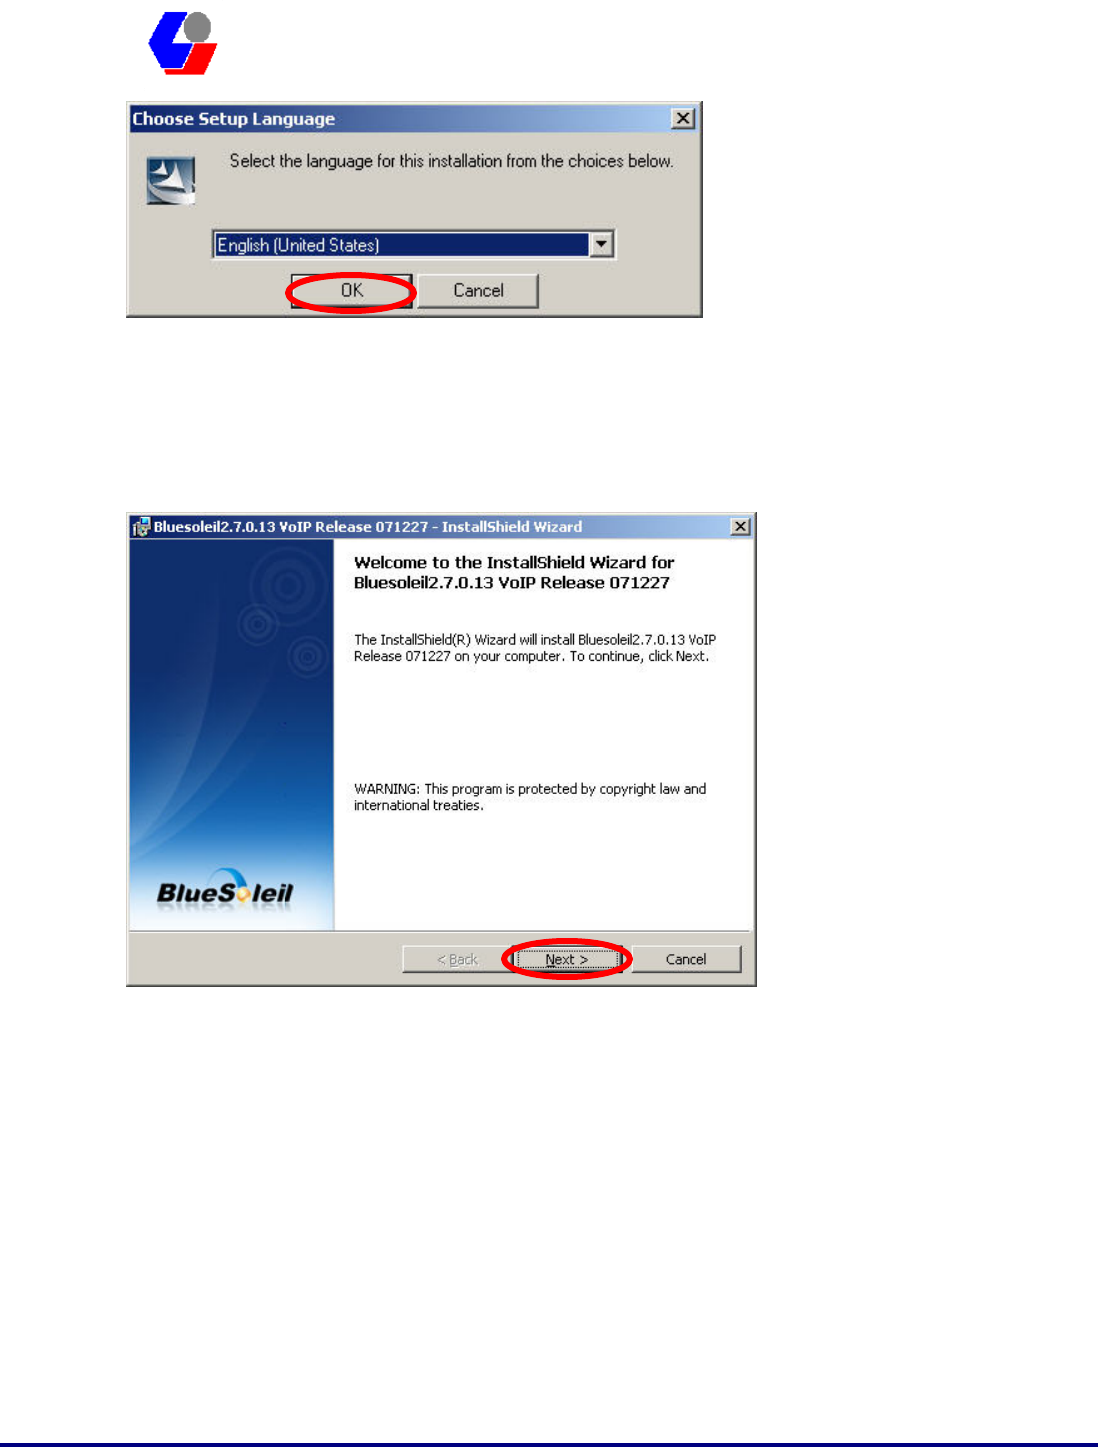
2. Select the Language you want to installation from the combo box, and then press
the “OK” button to continue.
Confidential Version1.0
Released Date: 2008.03.31
7
太 欣 半 導 體 股 份 有 限 公 司
SYNTEK Semiconductor Co., Ltd.
STA-UI-A0035
User’s Manual
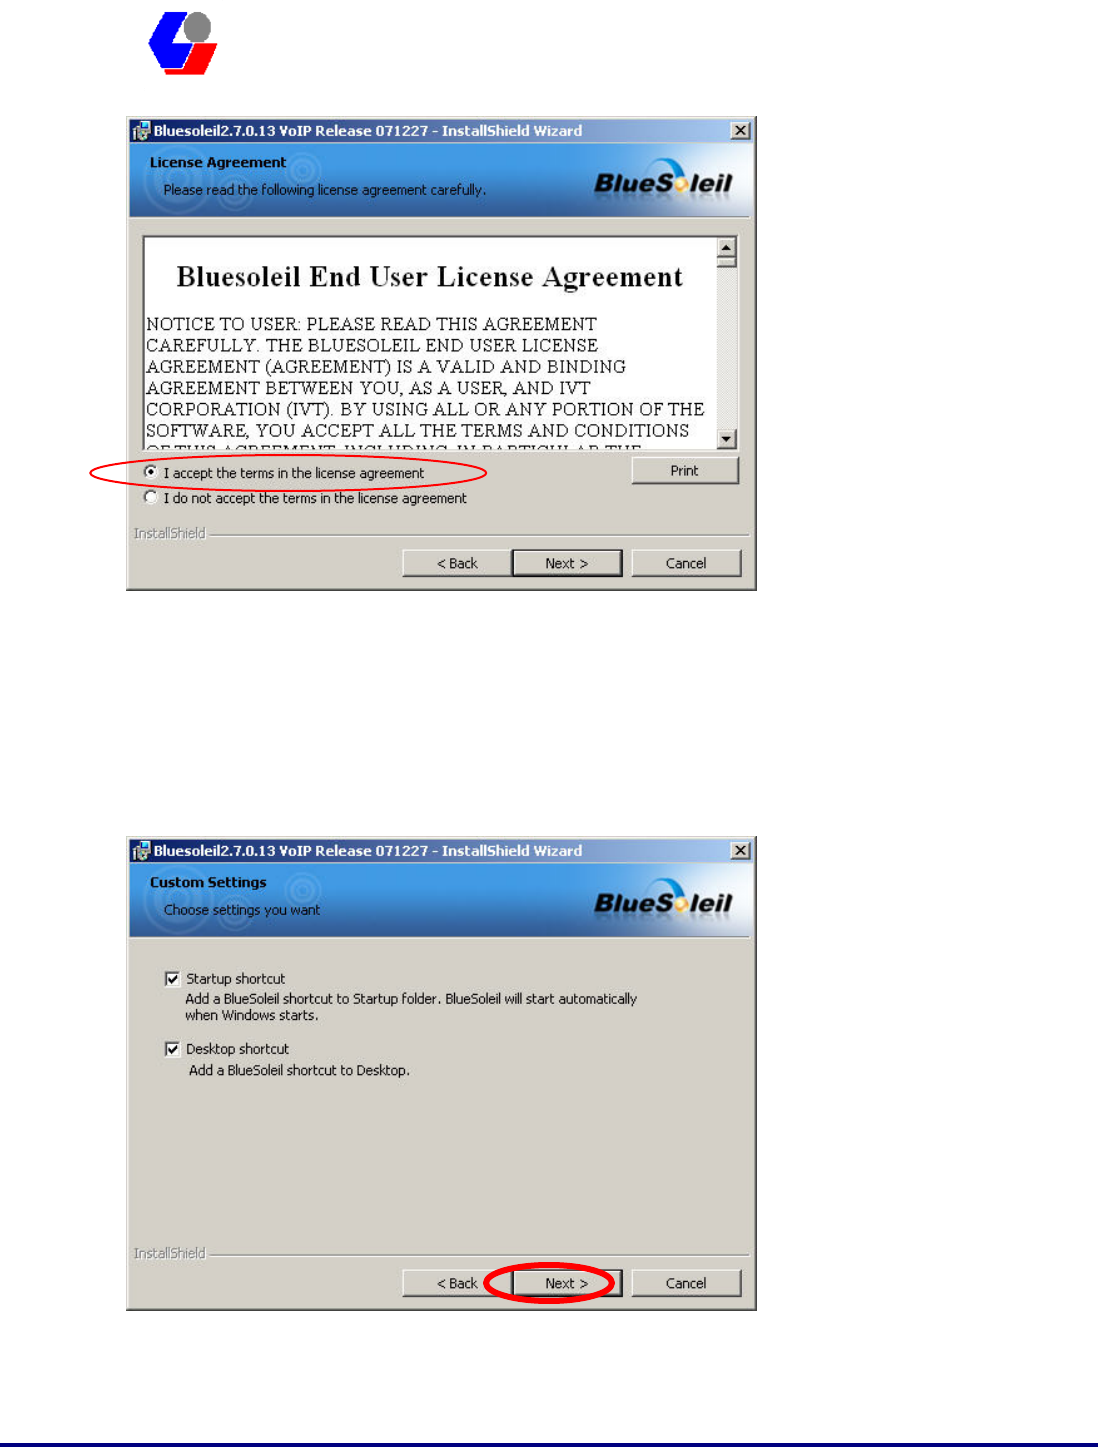
3. Please click Next button several times to continue the software installation. In the
License Agreement window, please read license agreement carefully. Select “I
accept the terms in the license agreement” then click “Next” button to continue.
Confidential Version1.0
Released Date: 2008.03.31
8
太 欣 半 導 體 股 份 有 限 公 司
SYNTEK Semiconductor Co., Ltd.
STA-UI-A0035
User’s Manual
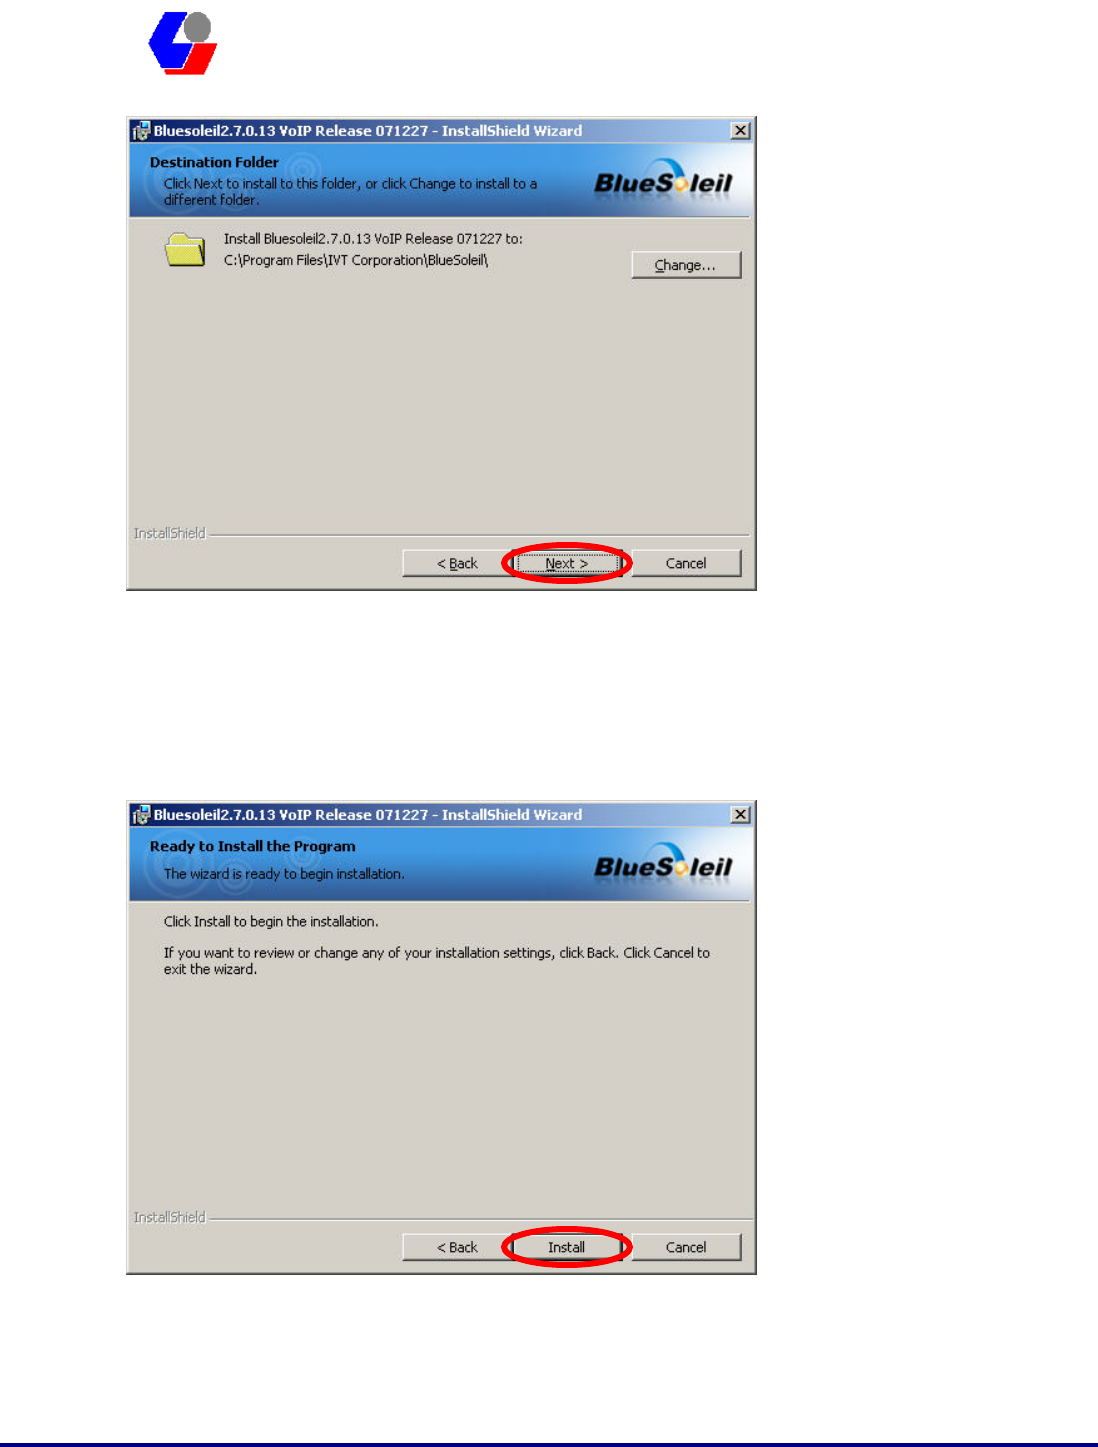
4. Select you want to place the program shortcut, and indicate the location of where
you want Bluetooth Software to be stored; if you do not change the default settings,
it will be stored under C:\Program Files\IVT Corporation\BlueSoleil
(Recommended). Click on “Next” button to continue. Or you can select your
prefers location to install. After finish, the installation program is ready for install.
Confidential Version1.0
Released Date: 2008.03.31
9
太 欣 半 導 體 股 份 有 限 公 司
SYNTEK Semiconductor Co., Ltd.
STA-UI-A0035
User’s Manual
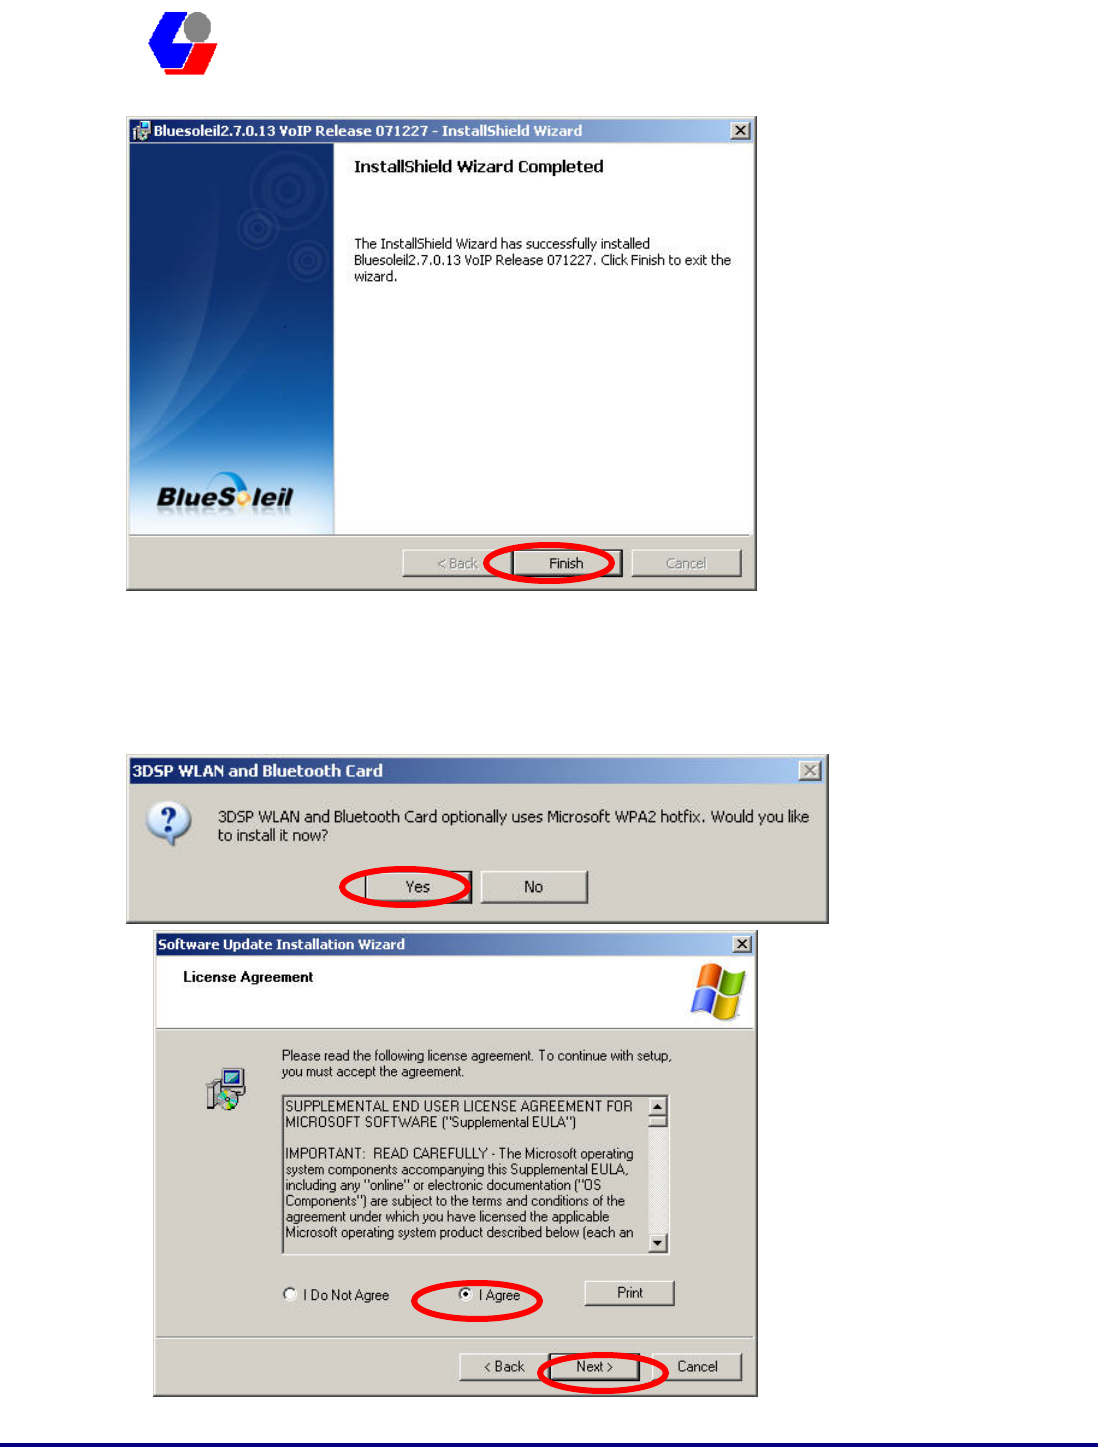
5. The Install Shield Wizard will begin to install the software and copy files to your
hard disk. After copy all the files, the installation will try to install virtual
Bluetooth device in your system. It may take a few minutes, please wait it finishes
the installation.
Confidential Version1.0
Released Date: 2008.03.31
10
太 欣 半 導 體 股 份 有 限 公 司
SYNTEK Semiconductor Co., Ltd.
STA-UI-A0035
User’s Manual
6. After finish installation the IVT Bluesoleil, then the install system will continue
install. If your system is not install the WPA2 hotfix yet. The install program will
ask you install it first.
Confidential Version1.0
Released Date: 2008.03.31
11
太 欣 半 導 體 股 份 有 限 公 司
SYNTEK Semiconductor Co., Ltd.
STA-UI-A0035
User’s Manual
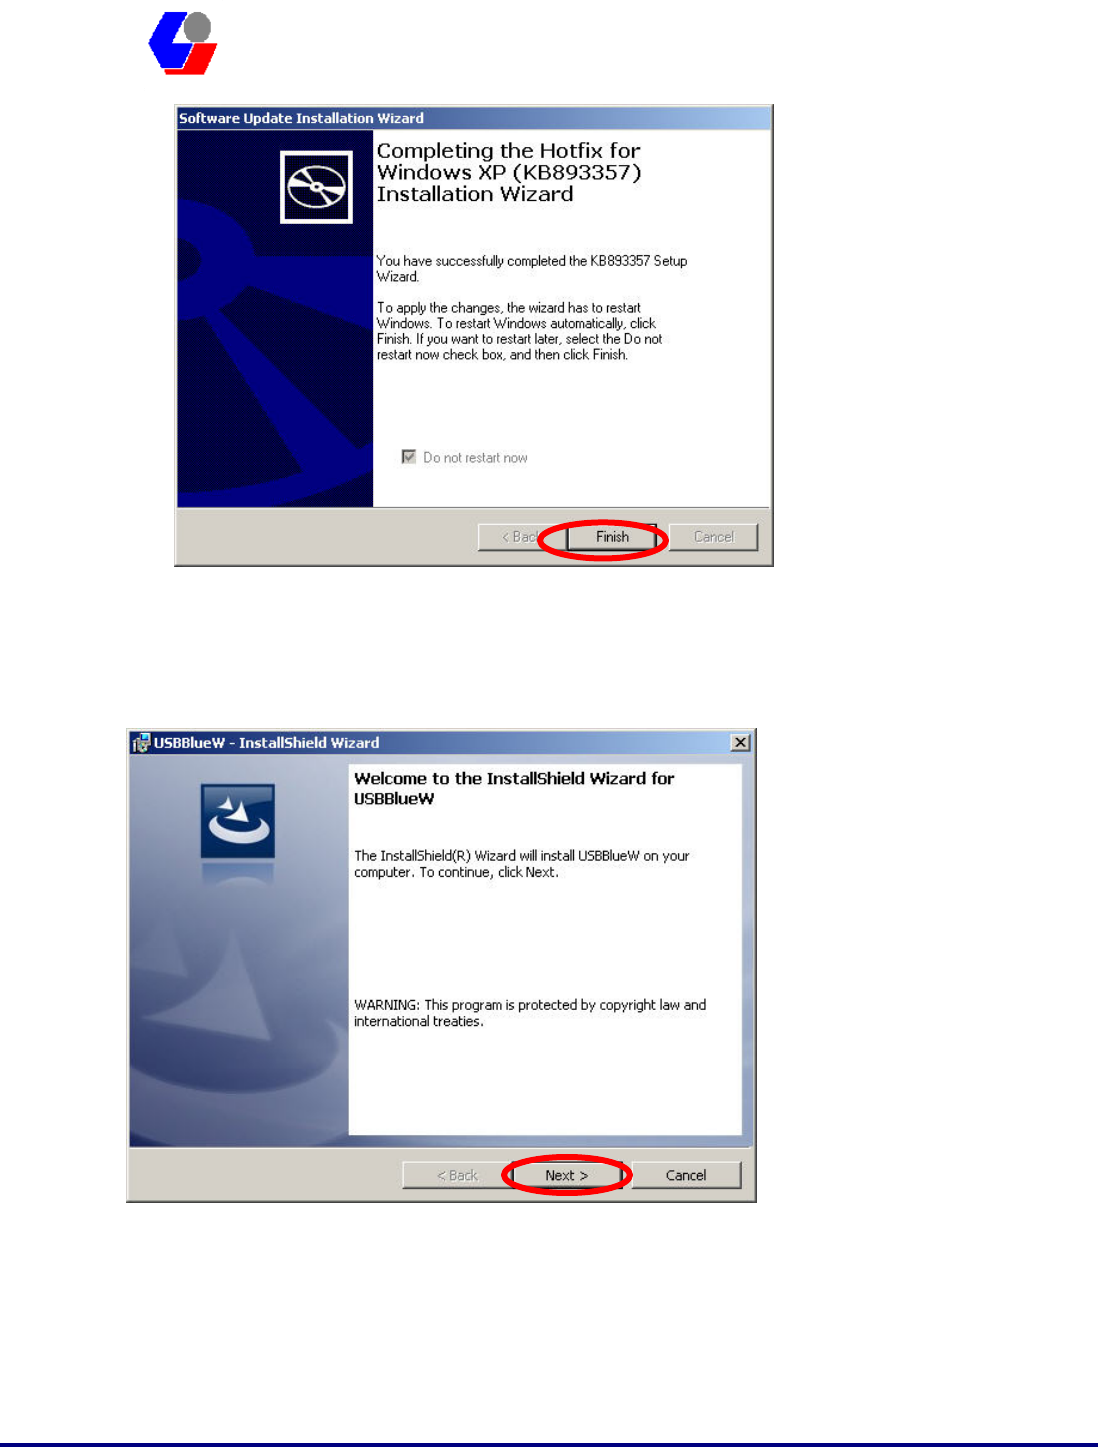
7. Continue install the 3DSP WLAN driver will be stored under C:\Program
Files\3DSP\BluetoothWLAN_usb\. Click the “Next” for continue.
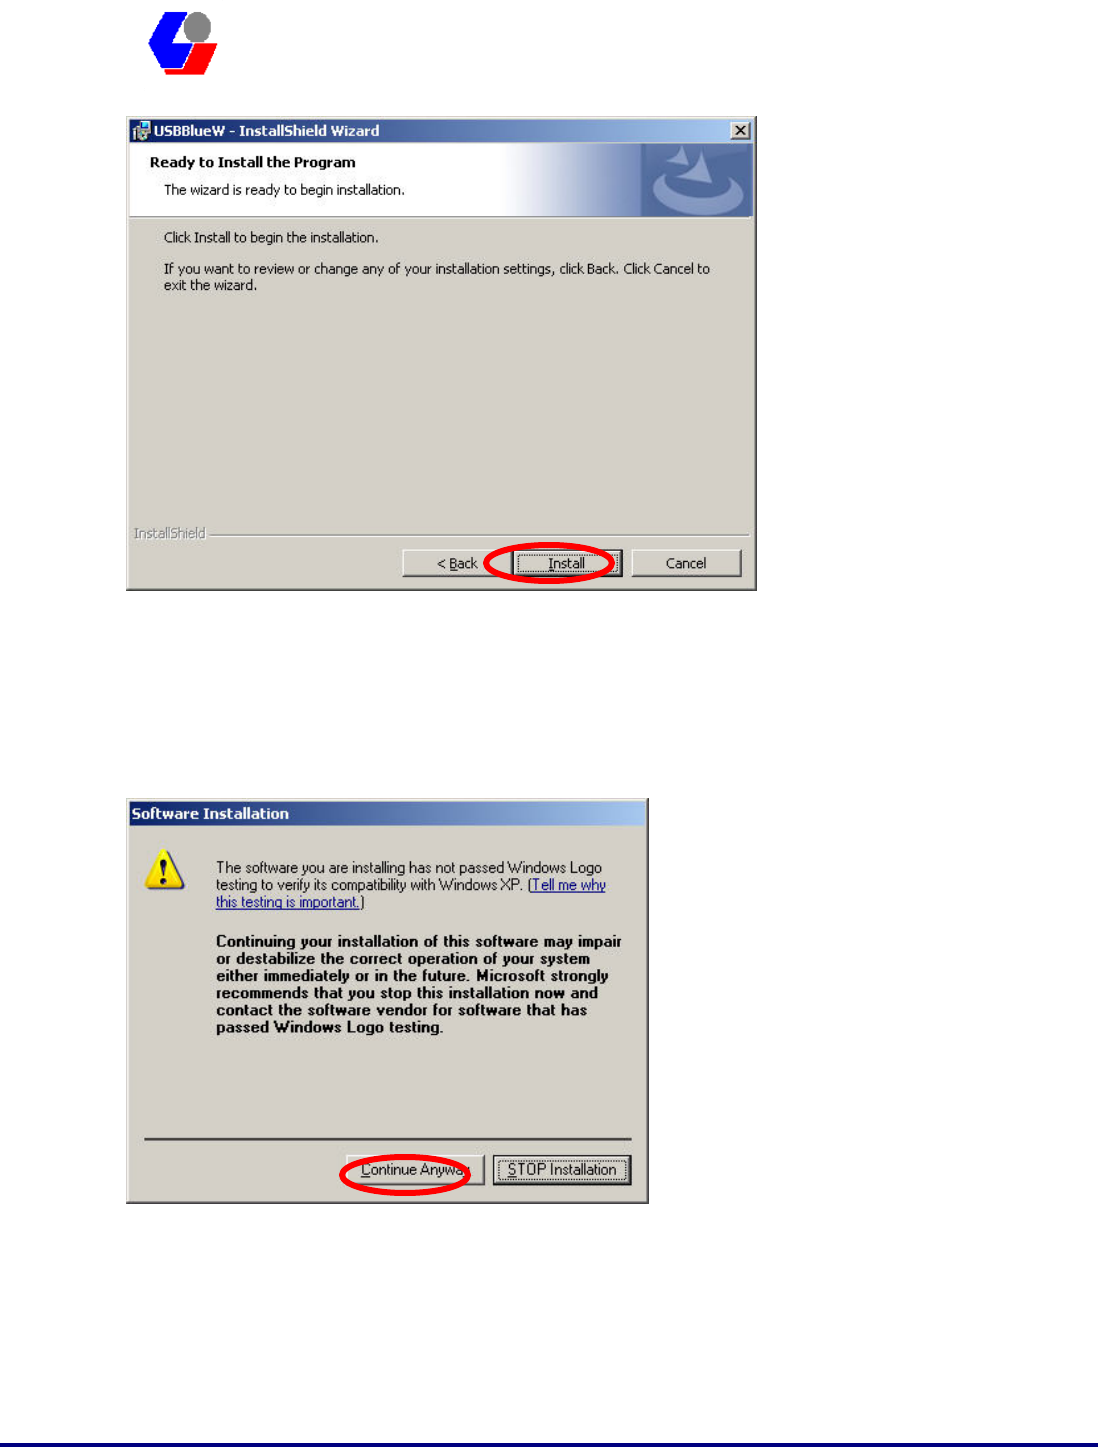
8. The Install Shield Wizard will begin to install the software and copy files to your
hard disk. Please press “Install” for continues.
Confidential Version1.0
Released Date: 2008.03.31
12
太 欣 半 導 體 股 份 有 限 公 司
SYNTEK Semiconductor Co., Ltd.
STA-UI-A0035
User’s Manual
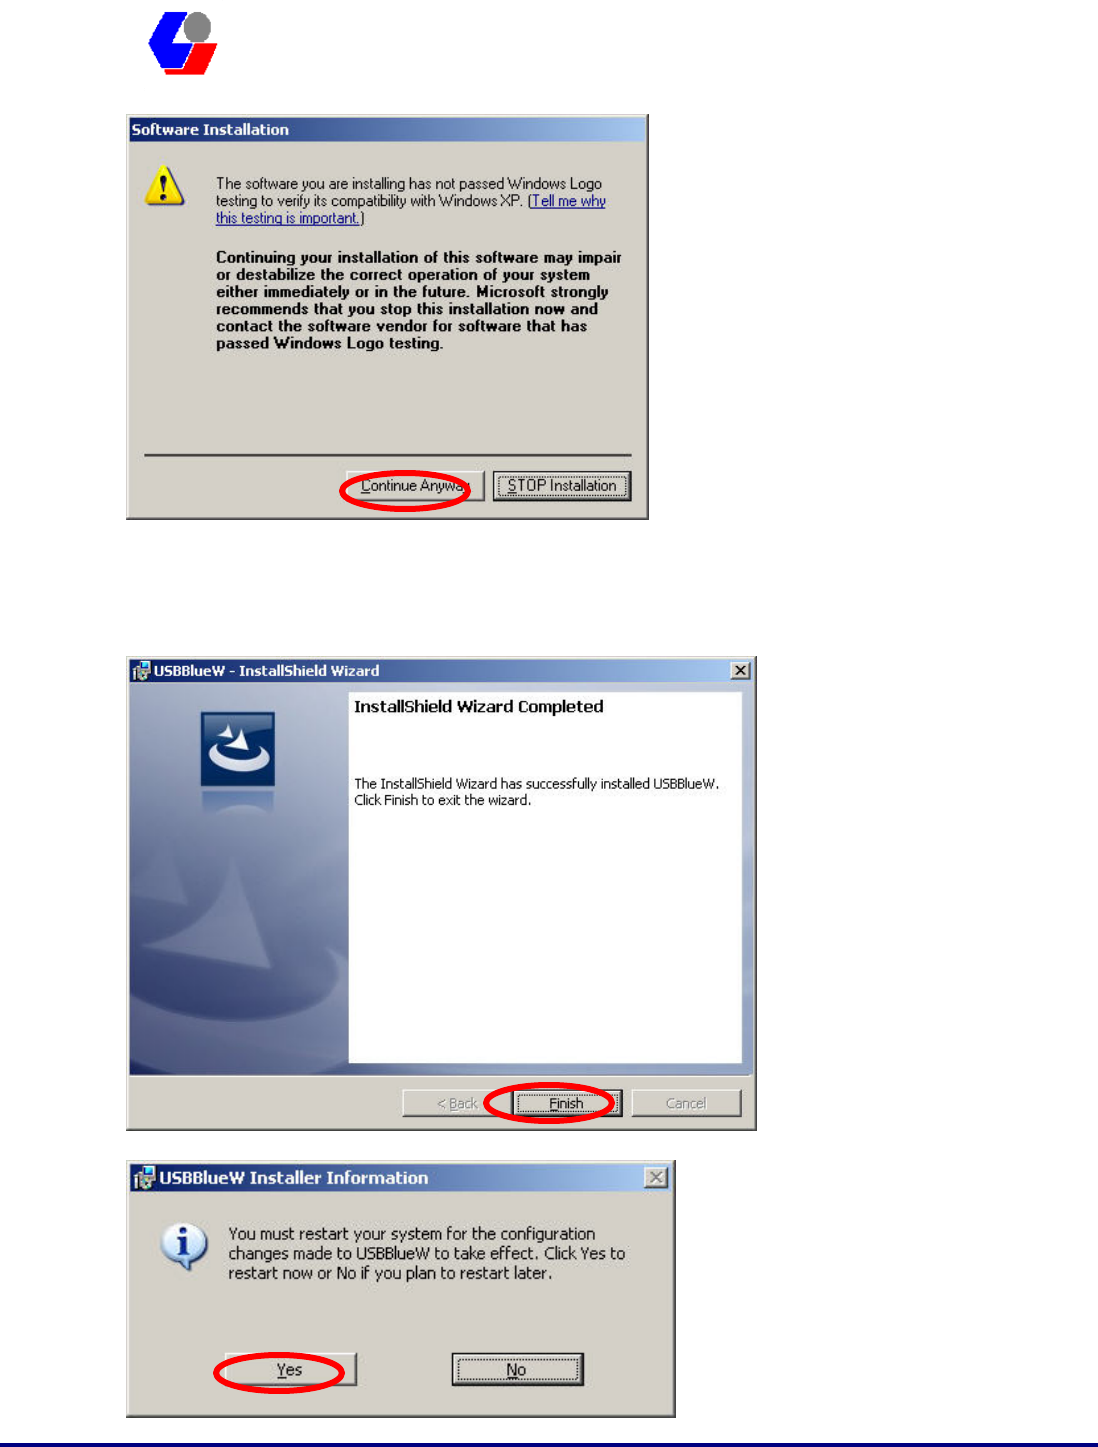
9. While installation, currently driver is not pass the Microsoft WHQL certification.
And the system will promote the caution massage several times. Please press
“Continue anyway” to continue. In the Official release driver will no longer this
issue.
Confidential Version1.0
Released Date: 2008.03.31
13
太 欣 半 導 體 股 份 有 限 公 司
SYNTEK Semiconductor Co., Ltd.
STA-UI-A0035
User’s Manual
10. After finish installation, please select reboot your system to finish the installation.
Or you can select to reboot later.
Confidential Version1.0
Released Date: 2008.03.31
14
太 欣 半 導 體 股 份 有 限 公 司
SYNTEK Semiconductor Co., Ltd.
STA-UI-A0035
User’s Manual
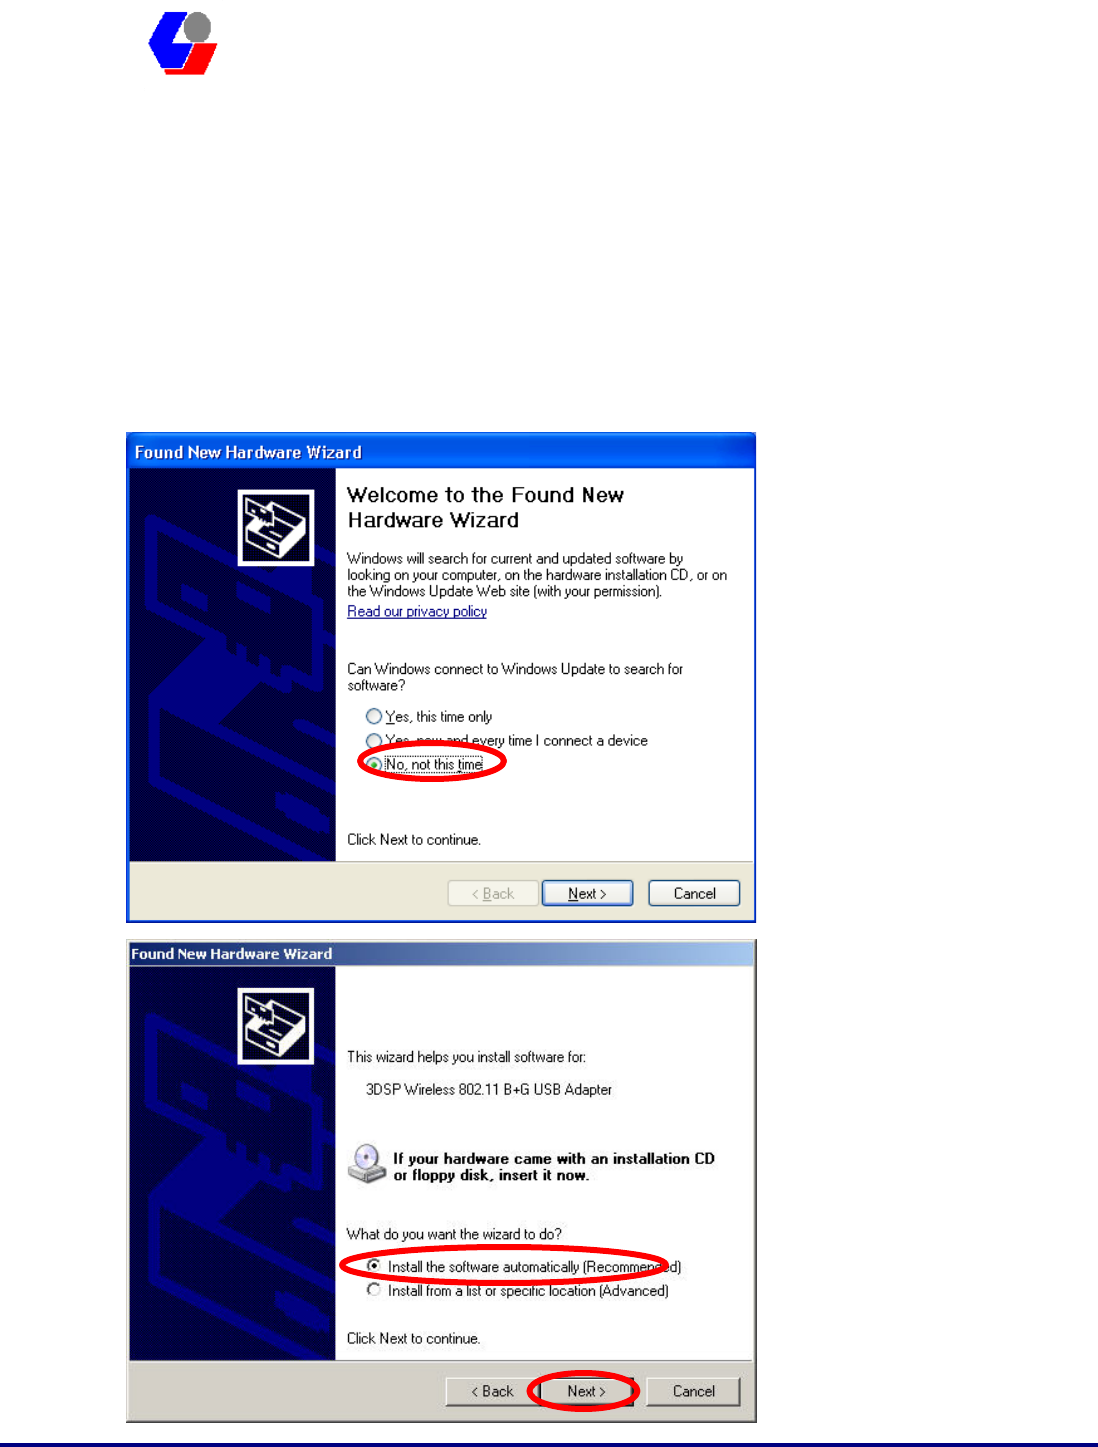
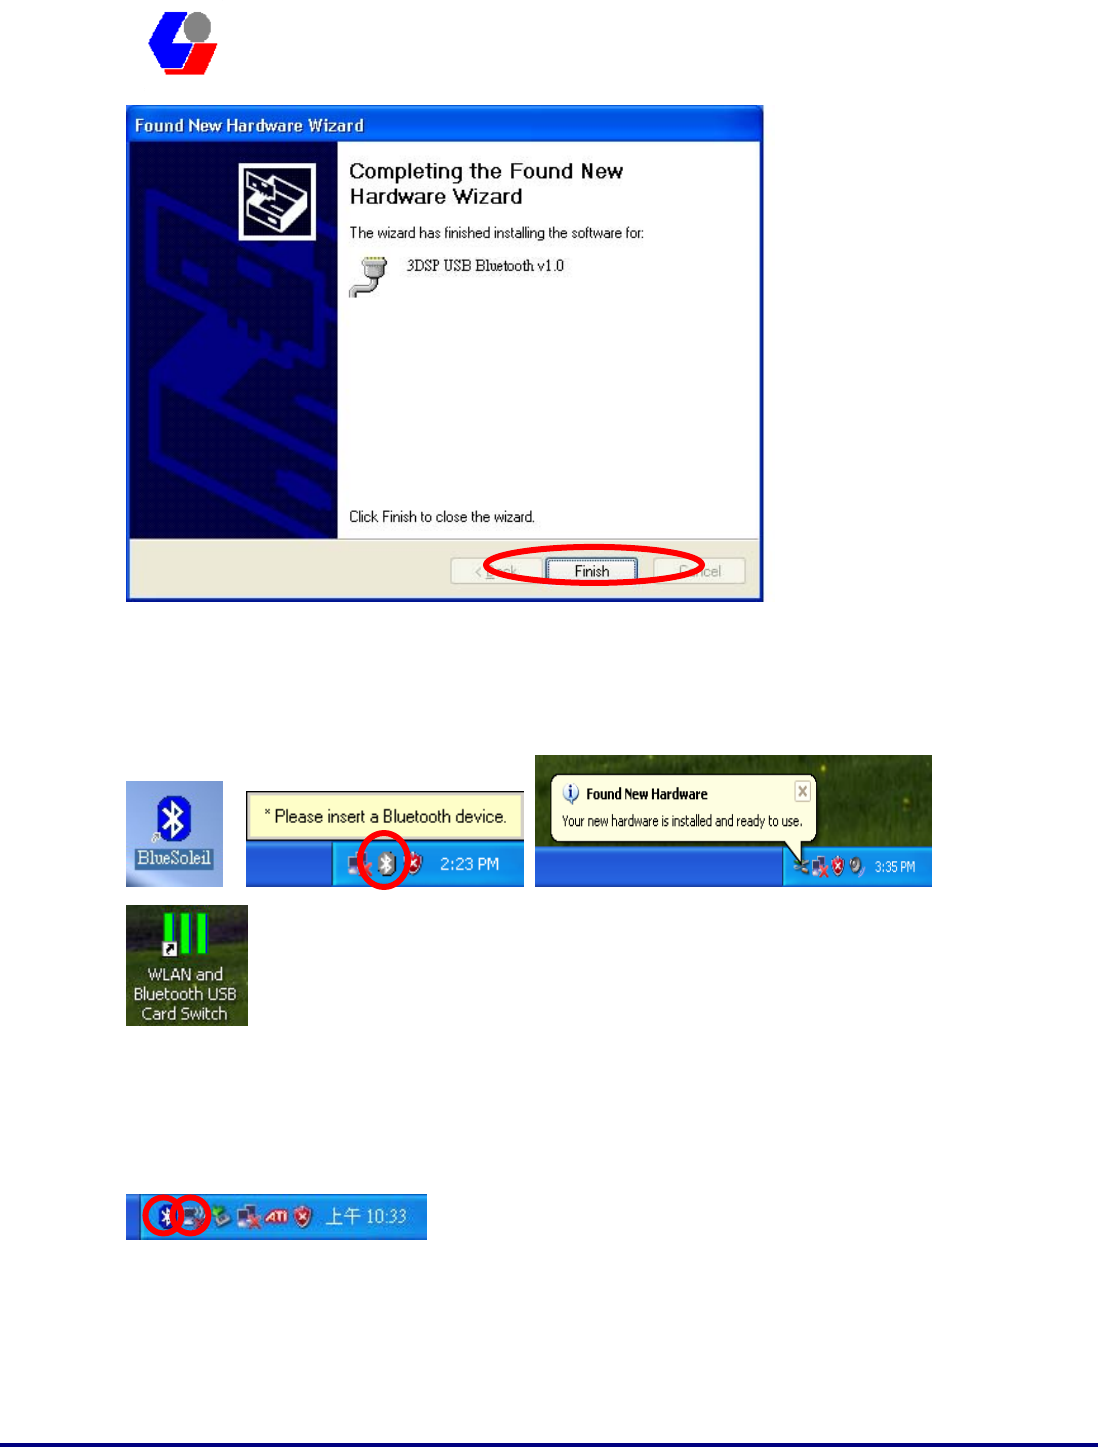
11. Please plug the STA-UI-A0035 USB dongle in your PC USB port. After a few
seconds, another “Found New Hardware” message will appear briefly, as shown on
the fallowing pictures. The system will prompt installation. Windows will find
another new hardware (see above), and the following screen will appear. Select No,
not this time, and click next several times, then select auto installation driver.
Currently driver is not pass the Microsoft WHQL certification. And the system will
promote this massage several times. In the future Official release driver will no
longer this issue.
Confidential Version1.0
Released Date: 2008.03.31
15
太 欣 半 導 體 股 份 有 限 公 司
SYNTEK Semiconductor Co., Ltd.
STA-UI-A0035
User’s Manual
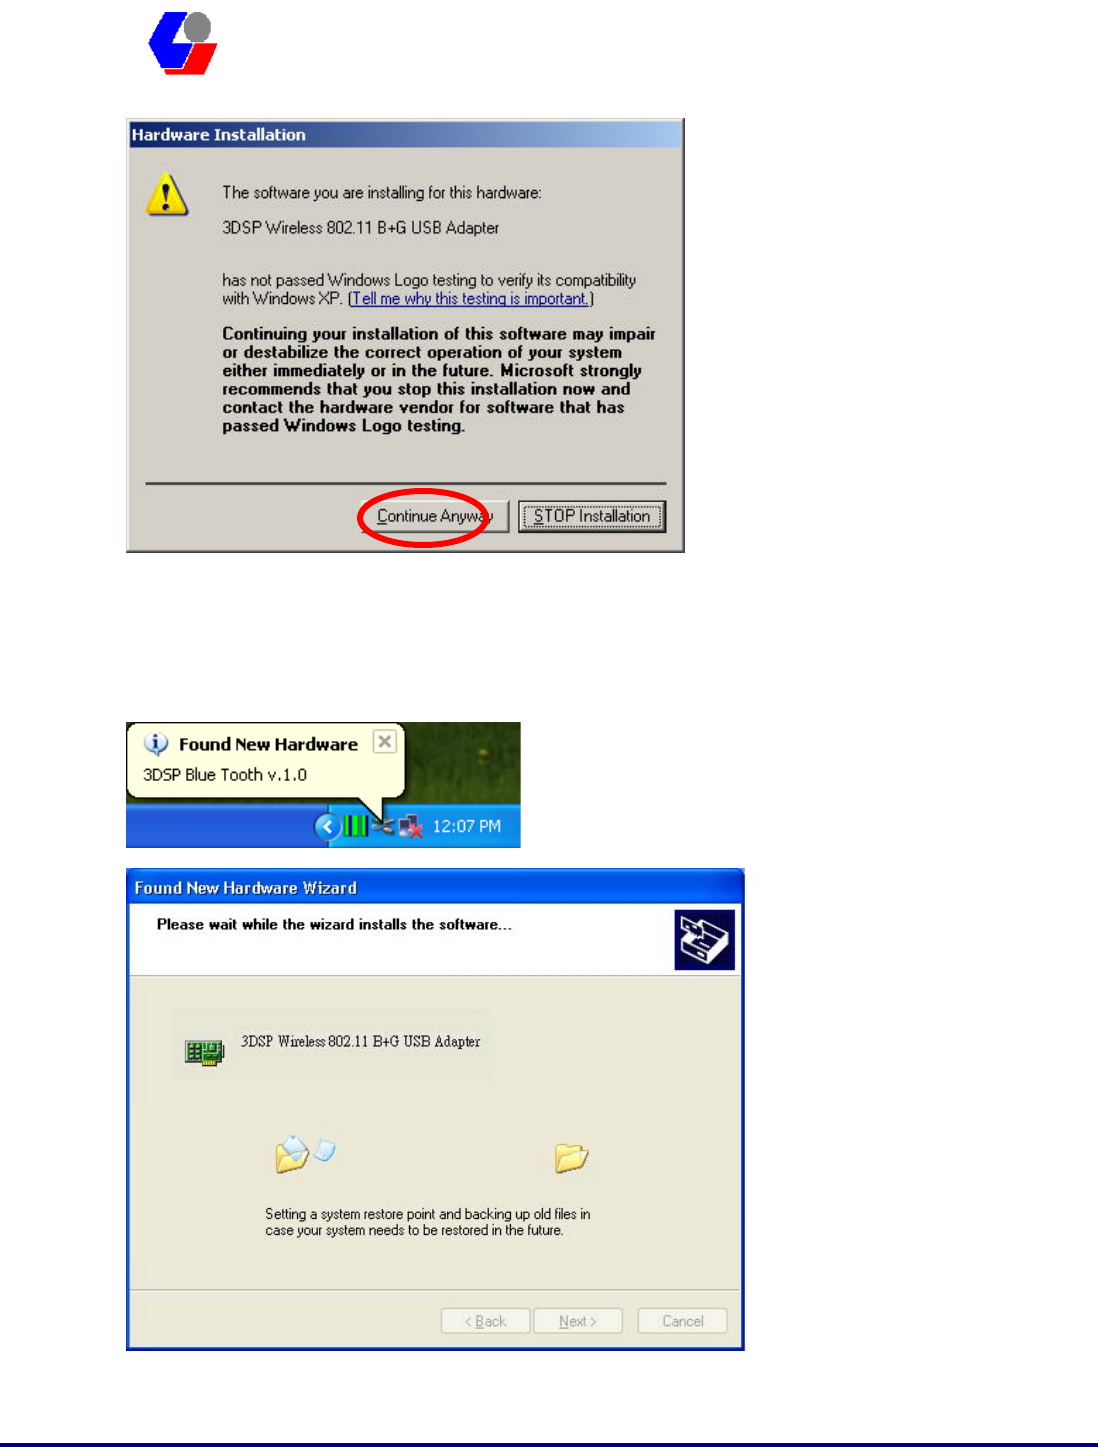
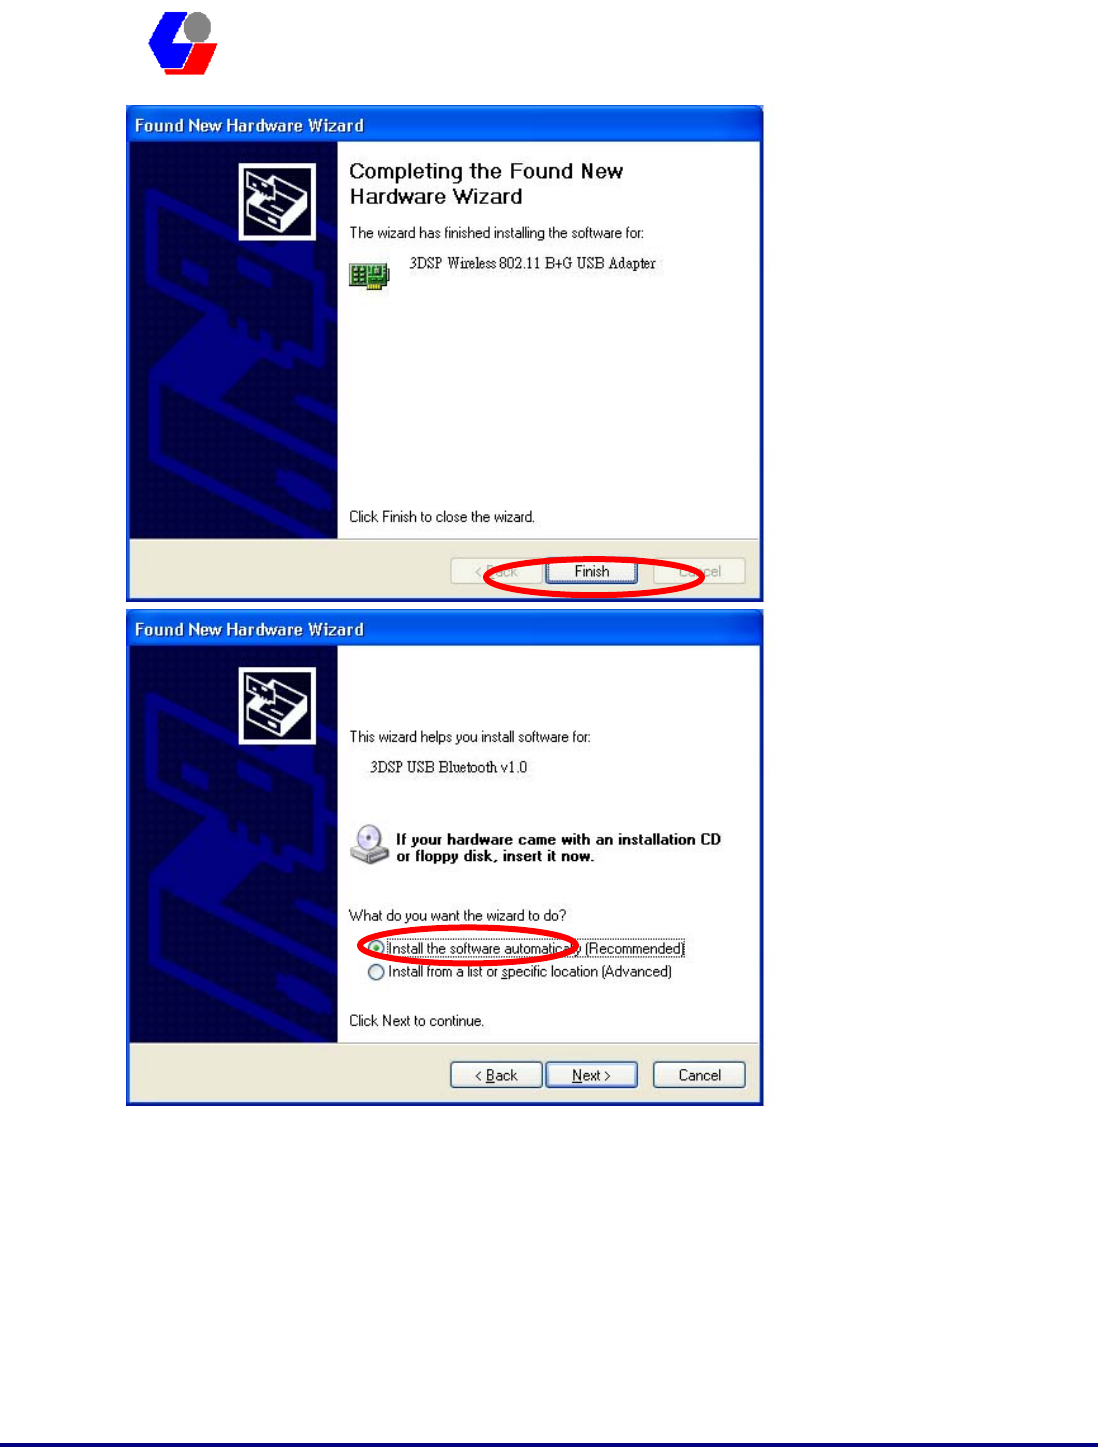
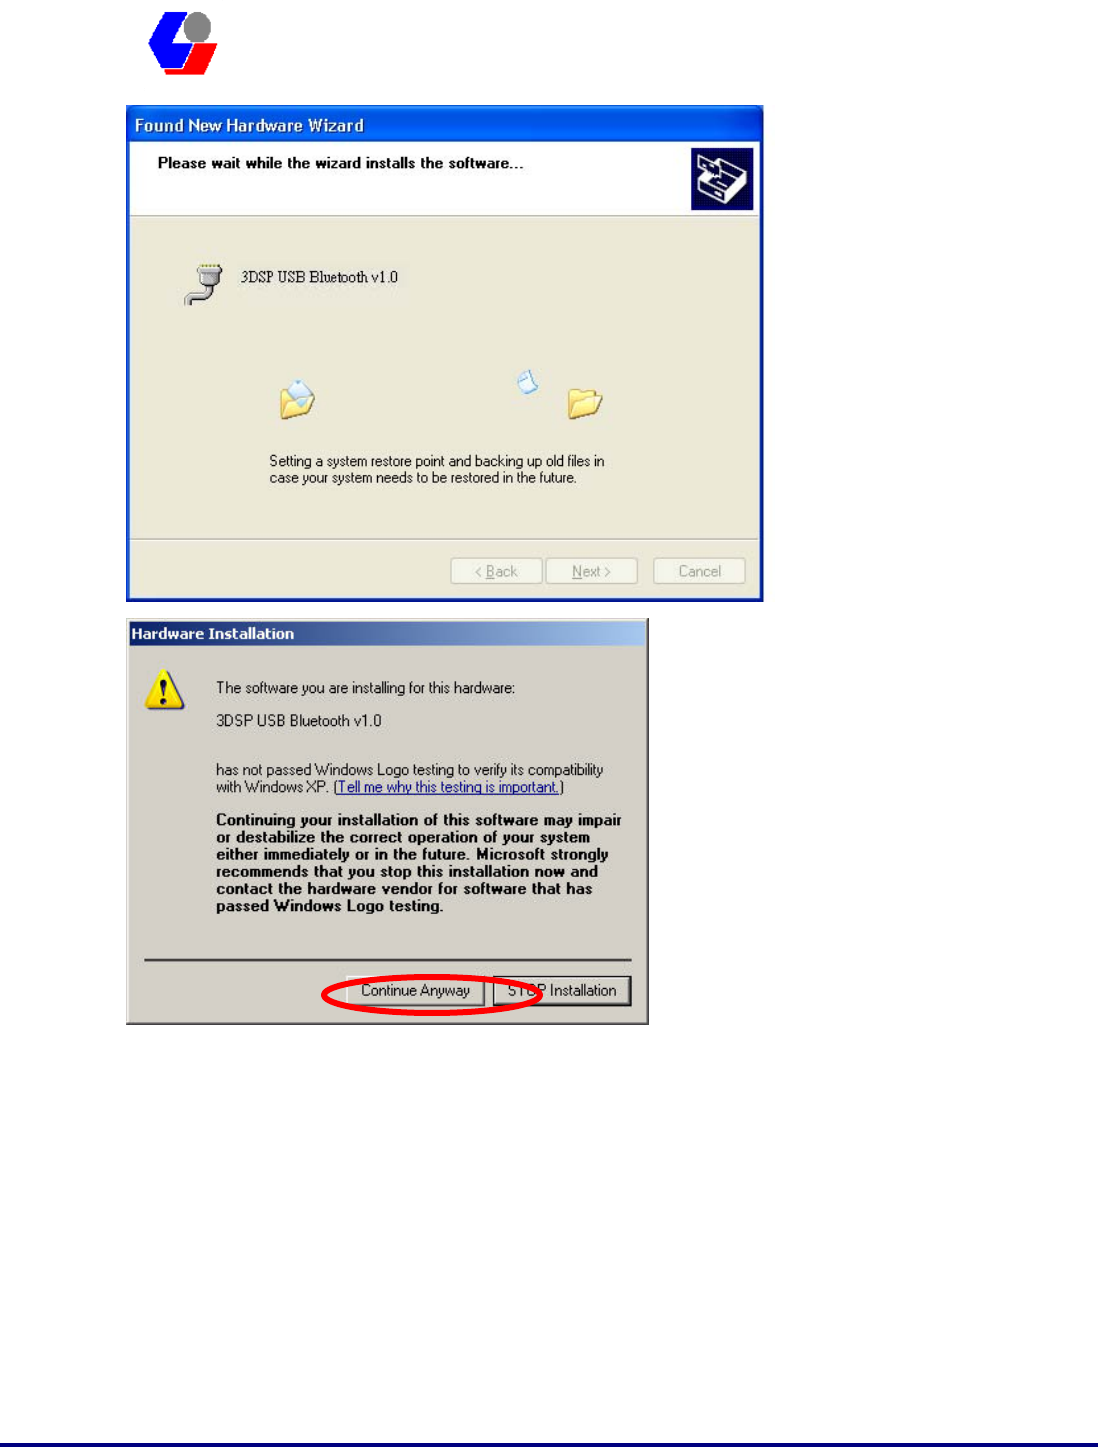
12. The system will prompt now installation the driver for the wireless USB combo
dongle, select continue installation. Because the system will installation both WiFi
and Bluetooth. So, this procedure will repeat several times.
Confidential Version1.0
Released Date: 2008.03.31
16
太 欣 半 導 體 股 份 有 限 公 司
SYNTEK Semiconductor Co., Ltd.
STA-UI-A0035
User’s Manual
Confidential Version1.0
Released Date: 2008.03.31
17
太 欣 半 導 體 股 份 有 限 公 司
SYNTEK Semiconductor Co., Ltd.
STA-UI-A0035
User’s Manual
Confidential Version1.0
Released Date: 2008.03.31
18
太 欣 半 導 體 股 份 有 限 公 司
SYNTEK Semiconductor Co., Ltd.
STA-UI-A0035
User’s Manual
13. There are two new Bluetooth icons appear on the desktop and the windows task
bar respectively when logged in Windows operating system. For more information
on the BlueSoleil, please refer to Chapter 2.
14. Please remove the Software CD after the installation is complete.
15. A Bluetooth icon will appear in your system tray
Click Finish to close the wizard.

Confidential Version1.0
Released Date: 2008.03.31
19
太 欣 半 導 體 股 份 有 限 公 司
SYNTEK Semiconductor Co., Ltd.
STA-UI-A0035
User’s Manual
4. Wireless Configuration
4.1 Configuring Your Wireless Network with Windows XP
The Windows XP SP2 operating system has the “Wireless Zero Configuration”
feature, which can be used to configure and control the STA-UI-A0035 802.11b/g and
Bluetooth v2.0 + EDR Combo USB Dongle. Wireless Zero Configuration is most
appropriately used in home and small office networks and in ad hoc networks.
Wireless Zero Configuration should not be used in medium or large networks or in the
networks where a high degree of security is required.
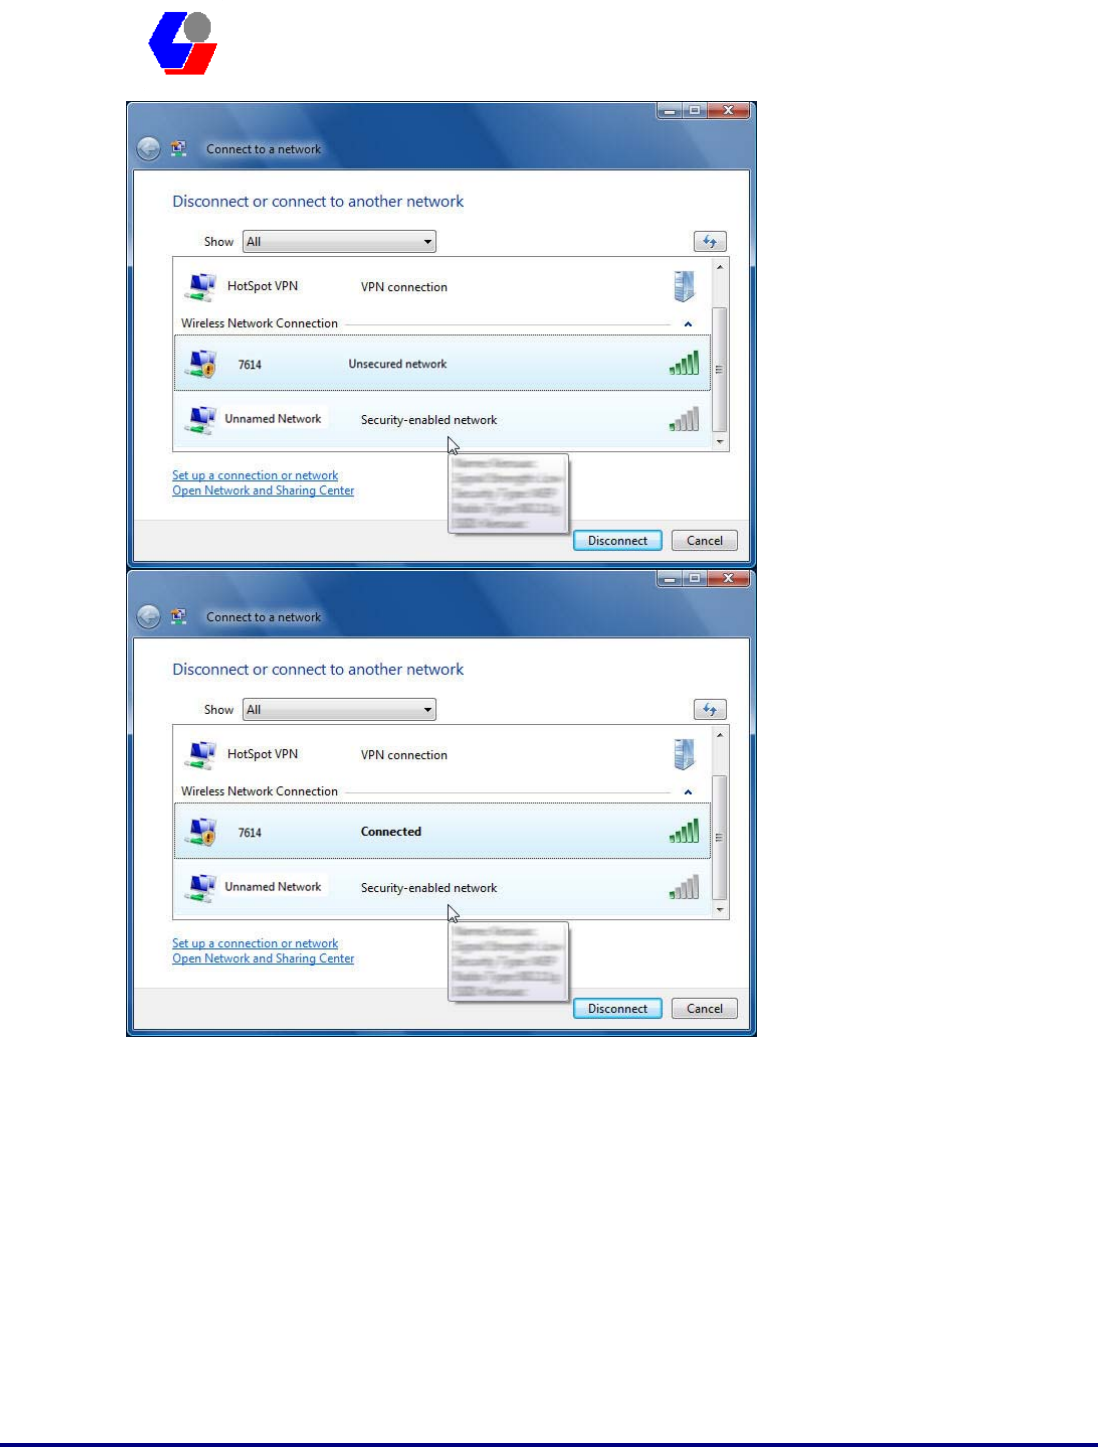
Follow these steps to configure your USB dongle using Wireless Zero Configuration:
1. From the Start menu, select Control Panel.
2. Click Network Connections.
3. Right-click the network connection associated with your Wireless USB Dongle and
select Properties.
4. Click the Wireless Networks tab.
5. Check the Use Windows to configure my wireless network settings checkbox.
6. Click the View Wireless Networks button.
7. Select the Access Point with which you want to connect.
8. Click the Connect button.
9. Type in a network key.
Confidential Version1.0
Released Date: 2008.03.31
20
太 欣 半 導 體 股 份 有 限 公 司
SYNTEK Semiconductor Co., Ltd.
STA-UI-A0035
User’s Manual
Follow these steps to start Wireless Zero Configuration:
1. From the Start menu, select Run. Enter services.msc.
2. Scroll down to Wireless Zero Configuration Service. Double-click on it to open the
settings box.
3. Click the Start button to start the service.
4. Set the Startup type drop-down box to automatic.
5. Insert your wireless USB dongle. Windows XP will configure it for you.
Confidential Version1.0
Released Date: 2008.03.31
21
太 欣 半 導 體 股 份 有 限 公 司
SYNTEK Semiconductor Co., Ltd.
STA-UI-A0035
User’s Manual
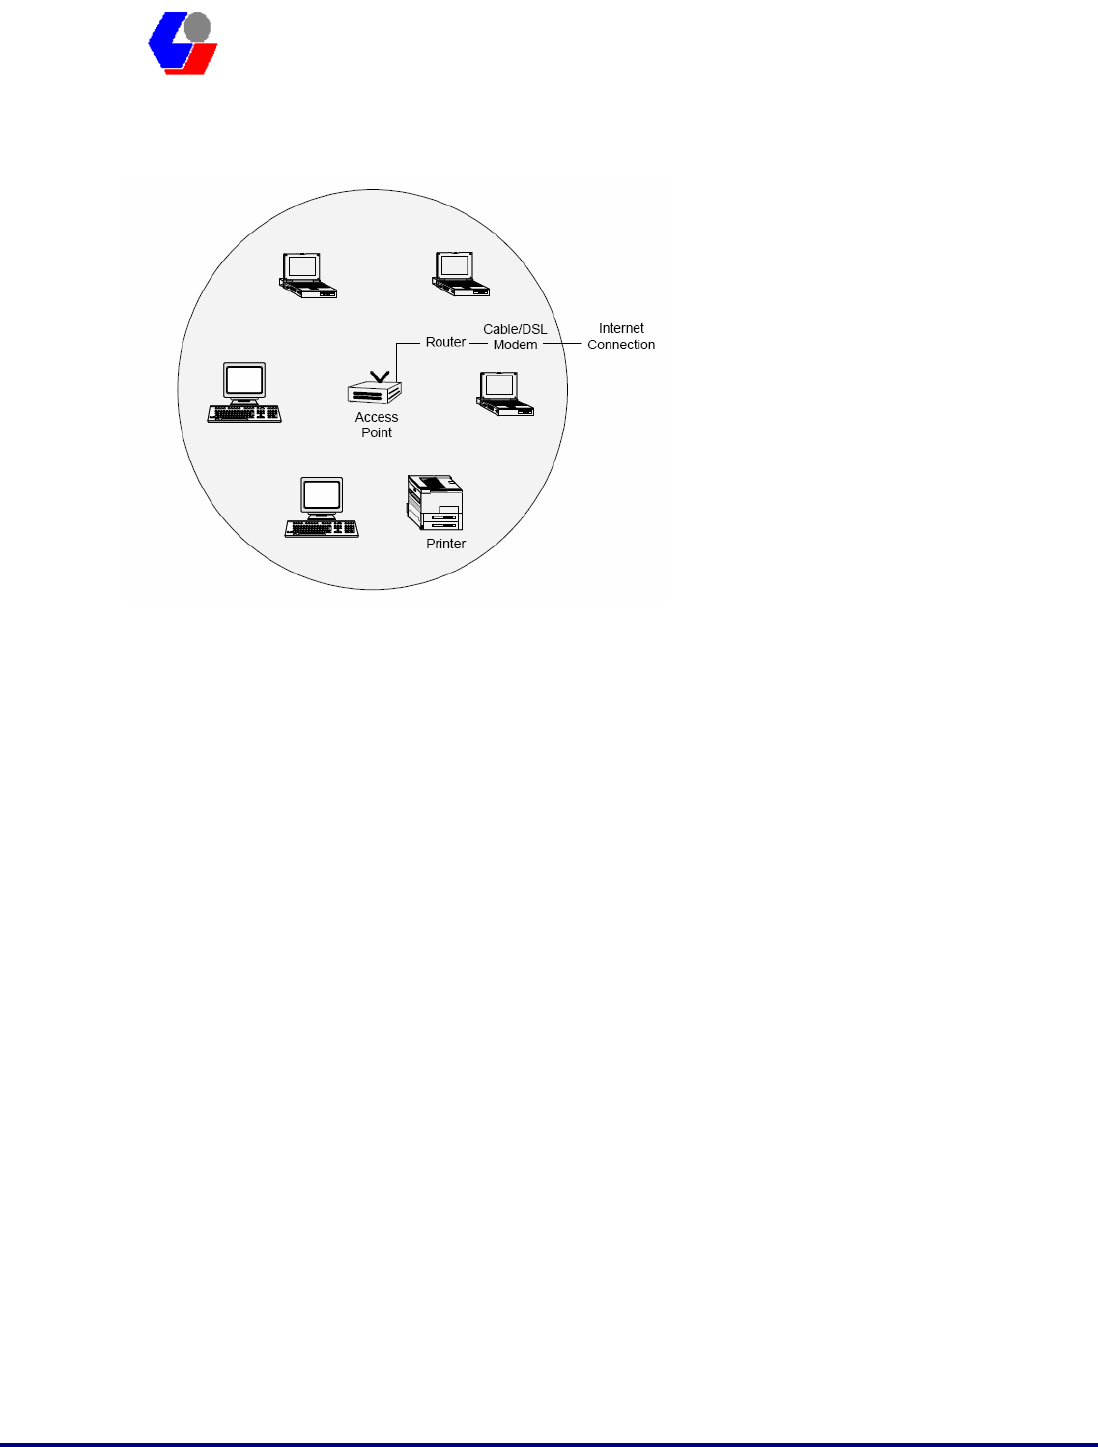
4.2 Single Access Point Network
In a small environment, you can set up a wireless network using a single Access Point
and one or more Wireless USB dongle. This type of network provides a coverage area
sufficient to satisfy the network requirements for many homes and small businesses.
The Access Point connects your network computers to an existing network. Once this
“infrastructure” is in place, you can easily add computers to the network by simply
configuring the Wireless USB Dongle in those computers. This eliminates the time
and expense of running costly cables throughout your network. Notebook users are
now free to roam from office to conference room or from kitchen to outdoor patio.
To create a single Access Point network, the Access Point must be connected to a
router and a cable modem or a DSL modem. This connection lets the wireless network
access the wired network in your home or office and the Internet. Position the Access
Point in the center of your network. If you experience a weak signal or no signal at all
from an outer computer, move the computer with the Wireless USB Dongle closer to
the Access Point or position the Access Point closer to the computer.
Many manufacturers now offer wireless routers, which combine the Access Point and
router in one box. Note that the Access Point and USB Dongles must have the same
security settings to communicate. The Wireless USB dongle supports all types of
Access Points, including 802.11b and 802.11g.
Confidential Version1.0
Released Date: 2008.03.31
22
太 欣 半 導 體 股 份 有 限 公 司
SYNTEK Semiconductor Co., Ltd.
STA-UI-A0035
User’s Manual
4.3 Multiple Access Point Network
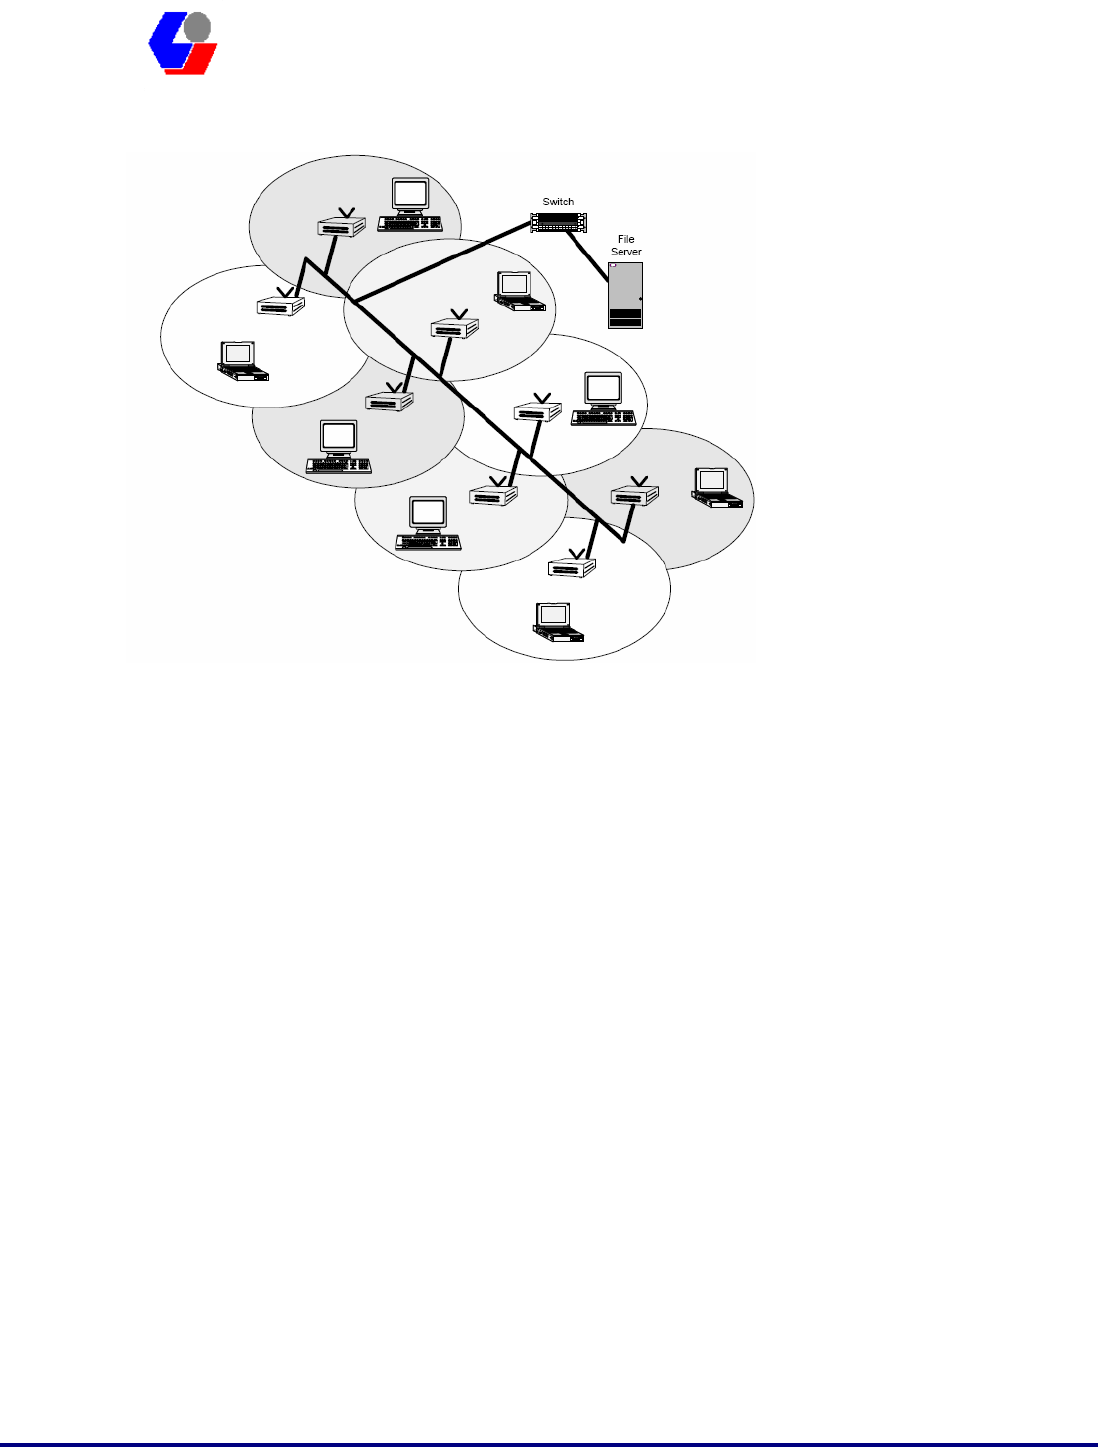
In a large environment, you can set up a wireless network using multiple Access
Points and thereby create a large coverage area. In such a network, computers with
Wireless USB Dongles that “roam” between different locations within the network
area will be served by the various Access Points and maintain the same network
connection. Roaming wireless stations in a multiple Access Point network will
automatically switch between Access Points when necessary.
To create a multiple Access Point network, the Access Points must be connected by
way of a wired backbone. Access Points must overlap to ensure complete connection
coverage for the roaming client. Note that all the Access Points and USB Dongles
must have the same security settings to communicate.
The Wireless USB Dongle supports roaming between all types of Access Points,
including 802.11b and 802.11g.
Confidential Version1.0
Released Date: 2008.03.31
23
太 欣 半 導 體 股 份 有 限 公 司
SYNTEK Semiconductor Co., Ltd.
STA-UI-A0035
User’s Manual
4.4 Setting Up a Peer-to-Peer Network
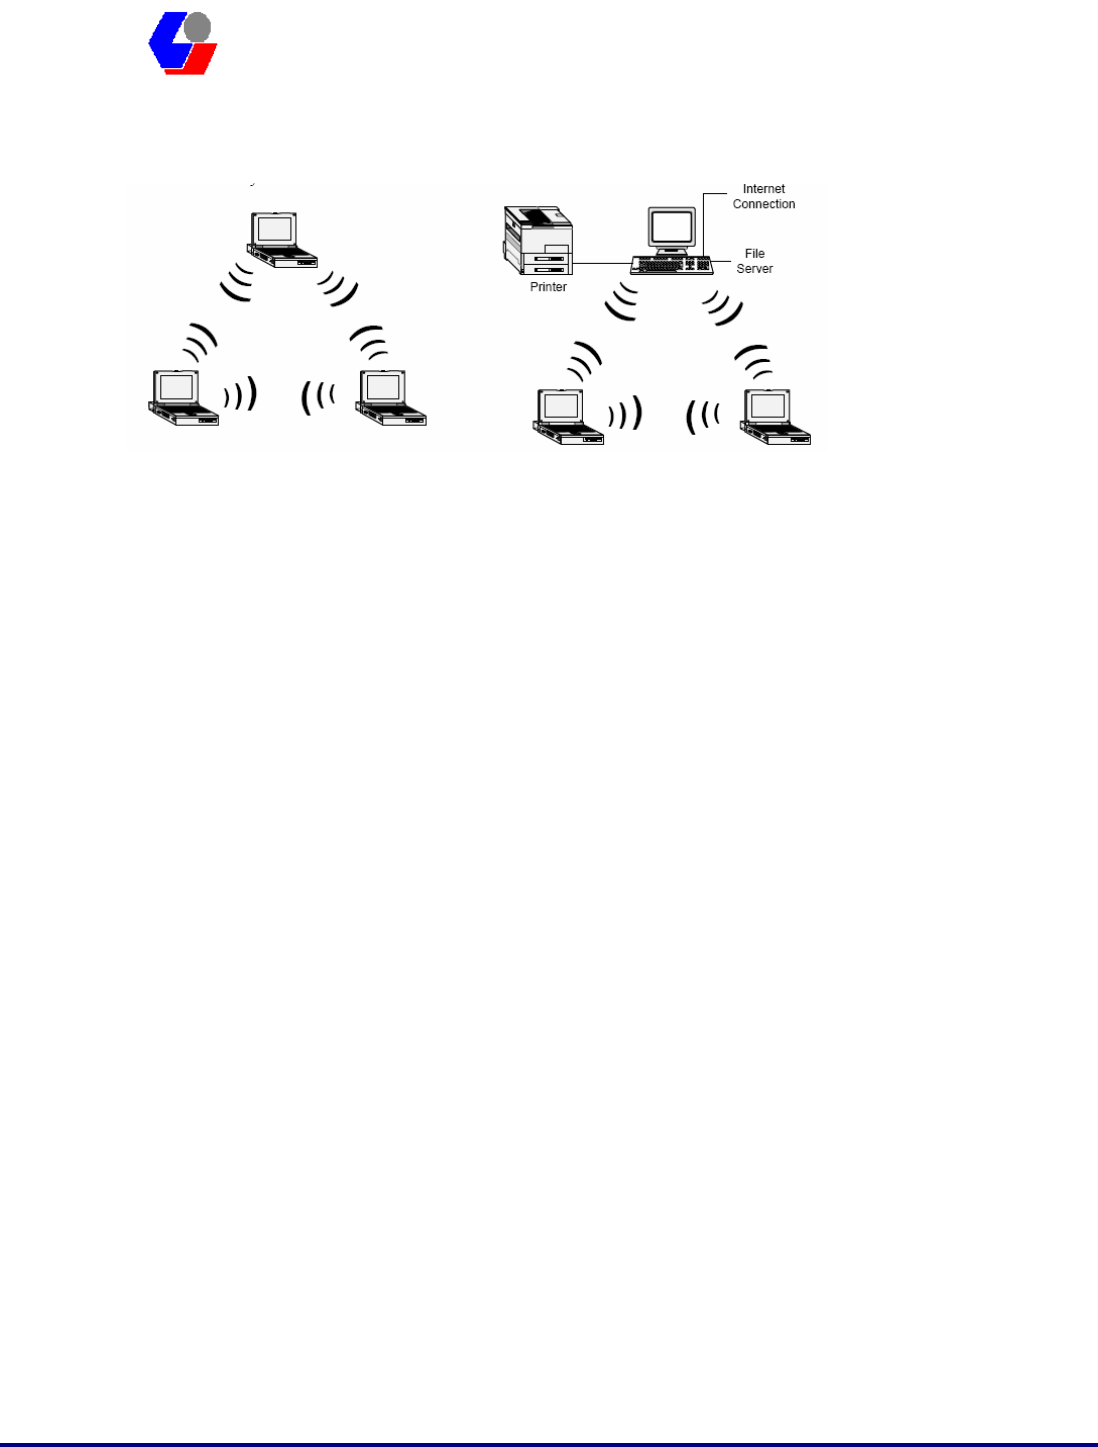
A Peer-to-Peer Network consists of two or more notebook or desktop computers with
Wireless USB Dongles that communicate directly to each other without the use of an
Access Point. Such networks are usually small but they can be very useful.
Co-workers can quickly set up a Peer-to-Peer group in a temporary environment. If
there is a printer nearby that is equipped with a wireless device, the members of the
Peer-to-Peer group can send print files to that printer. In addition, if one member of
the group is connected to an Infrastructure Network (one that uses an Access Point),
all the members of the Peer-to-Peer group can access network storage devices and the
Internet, provided that their computers have been set up with the necessary software.
In wireless-LAN literature, Peer-to-Peer Networks is sometimes referred to as Ad Hoc
Networks. Both terms mean exactly the same thing. The original term was Ad Hoc
(from the Latin “to this”). Ad hoc means done or set up solely in response to a
particular situation or problem. Because of the vagueness introduced by the Latin
term, some manufacturers have been using the more descriptive term “Peer-to-Peer”.
Peer-to-Peer Networks are used far less widely than Infrastructure Networks. Perhaps
that is because users have not learned the simple steps to set up a Peer-to-Peer
Network. One person in the group has to create a profile with a Network Name (SSID)
and other simple settings. After you create the profile, you can communicate that
Network Name (SSID) to the other people in your group. They will see the Network
Name on their Site Survey screen and connect to the network. These are the steps that
the first person, the person who is creating the network, must do on the Connection
Profile screen.
1. Enter a unique Profile Name and Network Name (SSID).
2. Select the Peer-to-Peer radio button.
3. In the Network Type pull-down menu, select the network type that matches all the

Confidential Version1.0
Released Date: 2008.03.31
24
太 欣 半 導 體 股 份 有 限 公 司
SYNTEK Semiconductor Co., Ltd.
STA-UI-A0035
User’s Manual
WiFi device in your Peer-to-Peer Group (802.11b and 802.11g).
4. Establish the Privacy settings that all the computers in the network will be using.
Remember that if you need to enable encryption in your network, the other computers
in the network will need the encryption key.
To share an Internet connection, you will need to purchase Internet Sharing Software
or use the Internet Connection Sharing (ICS) utility provided with Windows XP.
4.5 Wireless Performance Considerations
Many factors determine the range, coverage, and transmission rate of wireless
components (Access Points and Wireless USB Dongle). Be aware of the following:
When a radio signal travels through building materials such as walls, floors,
concrete, and metal framing, its strength is reduced. The best performance is
achieved when wireless components are in direct line-of-sight with one
another. A wall may be six inches thick, but if two wireless components
form an acute angle to the wall, the wall may appear to be three feet thick to
the radio wave.
Place wireless components away from cordless telephones, microwave
ovens, printers, and monitors. Cordless telephones and other devices that
operate in the 5 GHz frequency range can interfere with wireless
transmission. The 2.4 GHz spectrum might be occupied by microwave
ovens, cordless telephones, and Bluetooth devices.
Increasing the distance between wireless components significantly
decreases the number of successfully transmitted packets. If you are far
away from your Access Point, you cannot expect to have the same
transmission rate as someone who is near the same Access Point.
Your actual data throughput will always be less than the data rate of the
device (54 Mbps or 11 Mbps). In addition to the considerations listed
above, the data throughput is less because some of the available bandwidth
is used to send control messages and to regulate the wireless traffic. After
your dongle receives data, the computer processor and operating system that
you are using can cause a further delay in the display of that data.

Confidential Version1.0
Released Date: 2008.03.31
25
太 欣 半 導 體 股 份 有 限 公 司
SYNTEK Semiconductor Co., Ltd.
STA-UI-A0035
User’s Manual
4.6 WiFi Security Considerations
Transmitting data via radio waves presents real security risks. Someone within your
wireless network range could, with a fair amount of effort, access your network and
the data you transmit. You might have heard about the white vans that drive slowly
through neighborhoods and capture account numbers and passwords. Eavesdropping
on computer networks (a.k.a. “sniffing”) requires costly equipment and it is therefore
unlikely that your neighbor is a real threat.
If you want to ensure the security of your data, wireless LAN technology provides
different means to that end. WLAN security standards have progressed from WEP to
TKIP to WPA and AES. Each stage in this progression provides users with more
protection than the previous stage. Using the same type of security standard
throughout the network is a necessity. You cannot configure a profile using WPA and
expect to communicate with an Access Point using WEP.
For those who want an effective security feature, the STA-UI-A0035 802.11b/g and
Bluetooth v2.0 + EDR Combo USB Dongle support the Wired Equivalent Privacy
(WEP) security standard. This feature uses a network key called a WEP key, which
encrypts data so that it is only readable by other computers that have a matching WEP
key. The WEP key must be entered and stored on each wireless device in the network.
You cannot configure a profile using one WEP key and expect to communicate with
an Access Point using a different WEP key. Assigning WEP keys in a large
environment can be problematic for the system administrator. If an employee leaves
your company, new WEP keys should be assigned to protect the network from the
former employee who knows the secret key.

Confidential Version1.0
Released Date: 2008.03.31
26
太 欣 半 導 體 股 份 有 限 公 司
SYNTEK Semiconductor Co., Ltd.
STA-UI-A0035
User’s Manual
5. Bluetooth Configuration and Utilities
5.1 Start the Bluetooth Device
Start the Bluetooth service for ready to service.
1. After you install the USB Dongle, the system tray Icon will become available.
If the Bluetooth Services is not start up, please start the IVT BlueSoleil program on
your system.
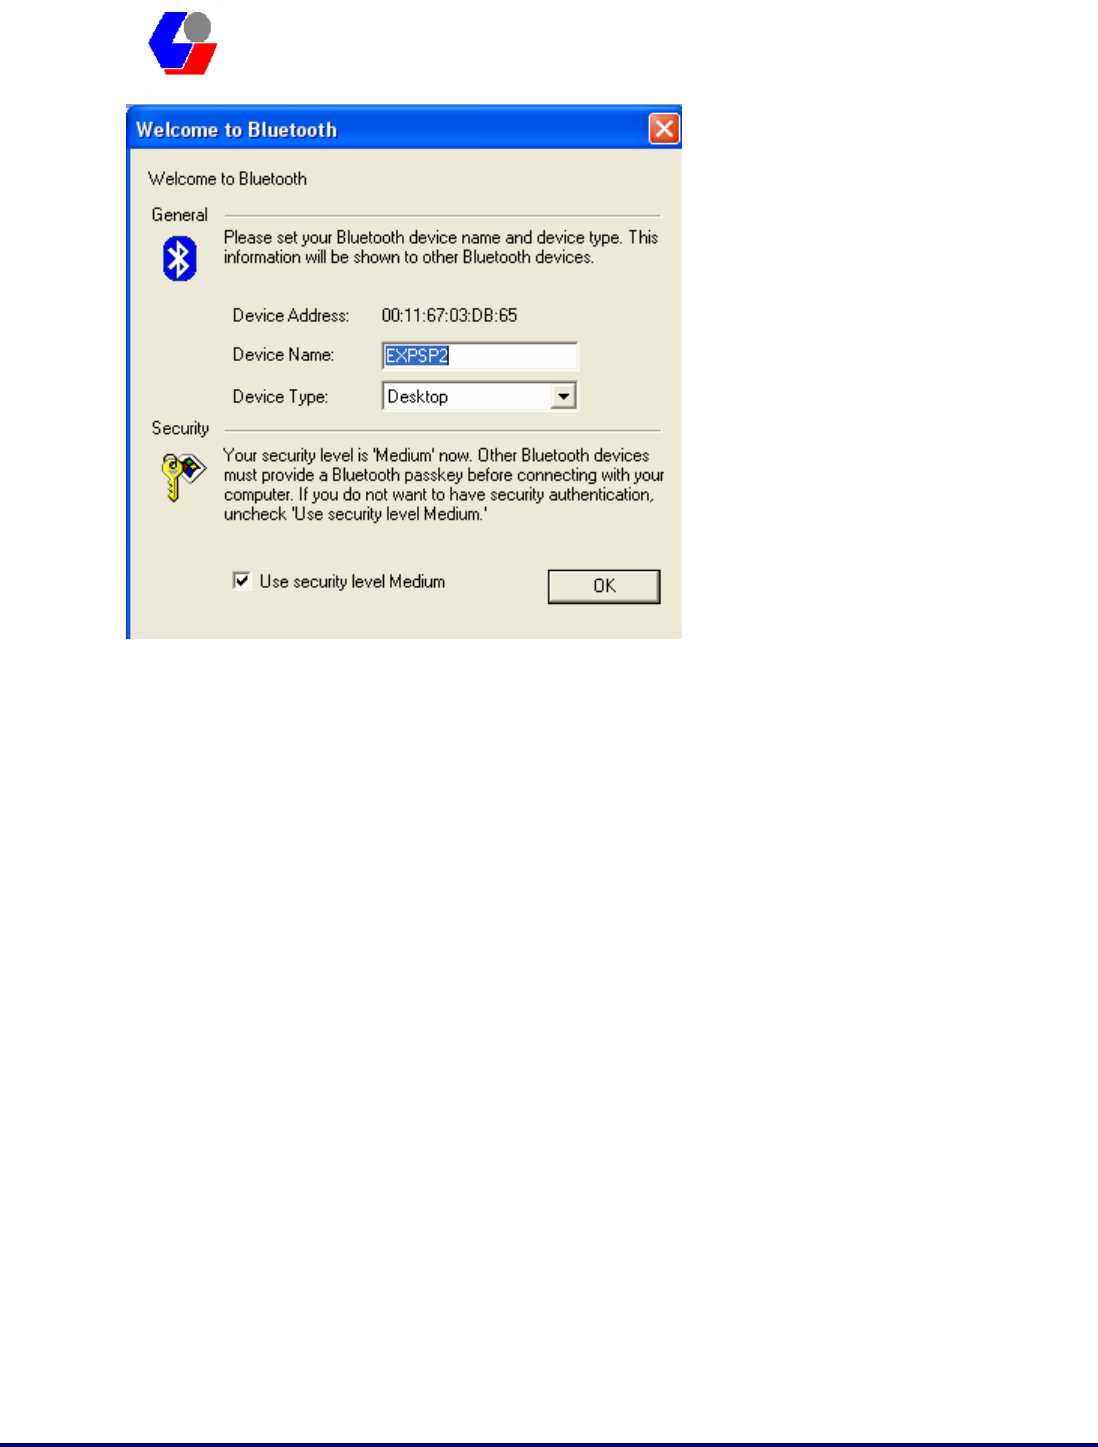
2. Right Click the Bluetooth service tray Icon, press the “Display”.
3. Give this Bluetooth service computer a name and computer type, let the other
Bluetooth identify.
Confidential Version1.0
Released Date: 2008.03.31
27
太 欣 半 導 體 股 份 有 限 公 司
SYNTEK Semiconductor Co., Ltd.
STA-UI-A0035
User’s Manual
5.2 Manual Configuration Bluetooth Dongle
If the IVT BlueSoleil can not identify the USB Dongle Bluetooth services, there you
can manually configuration the IVT BlueSoleil.
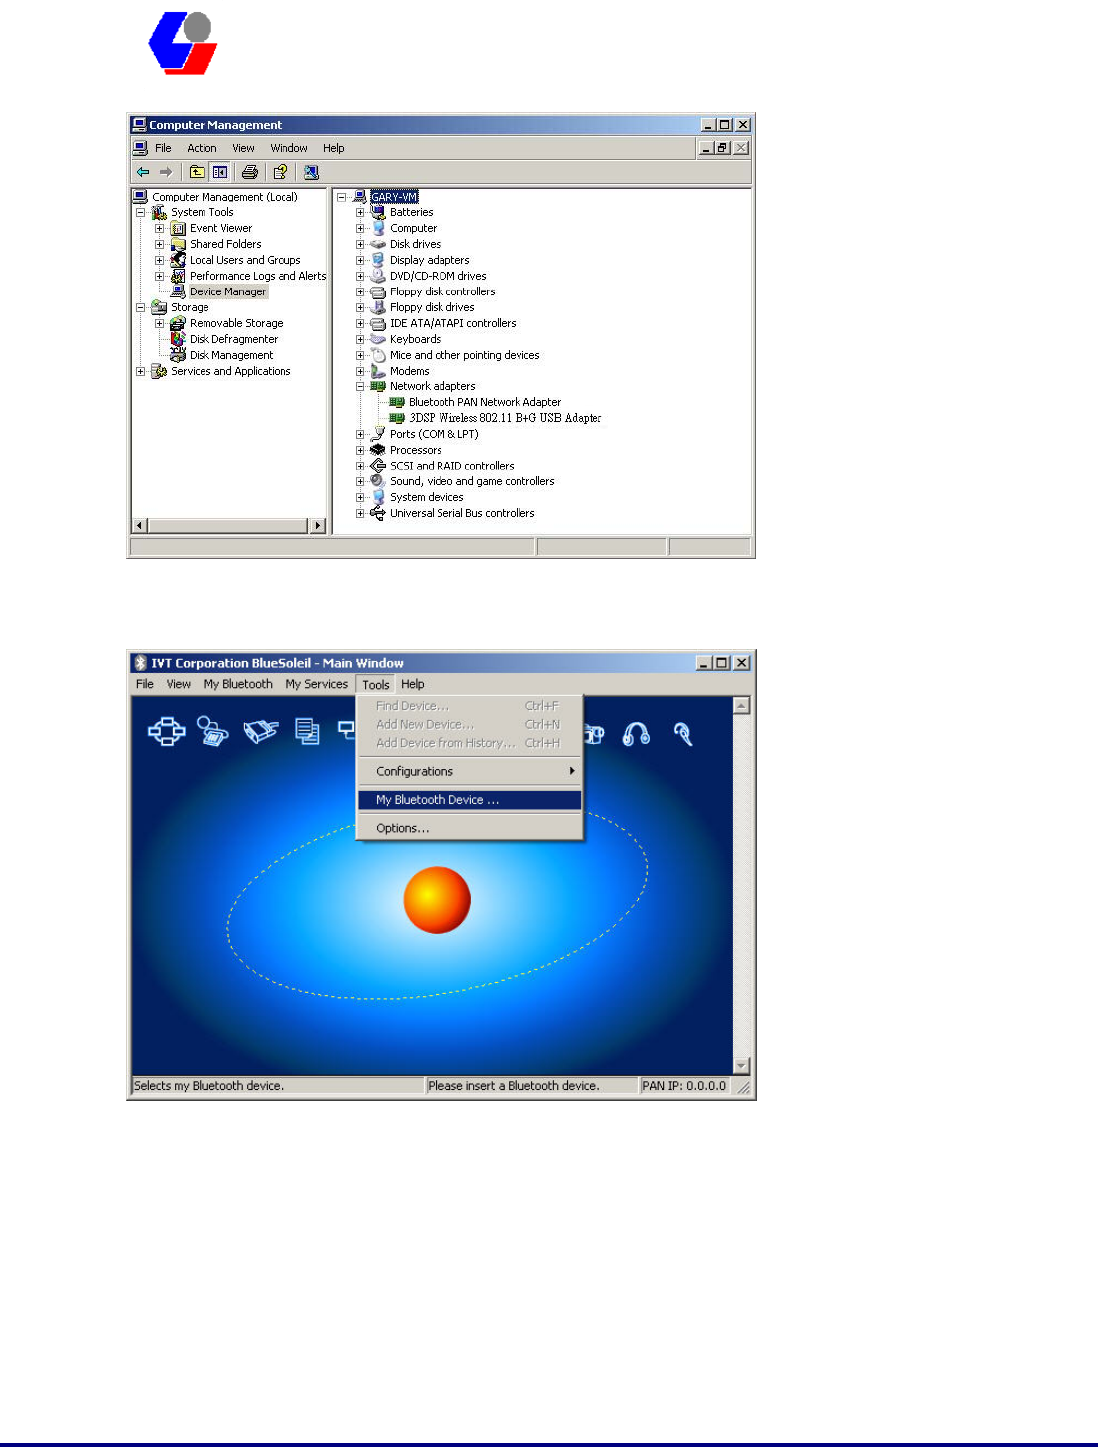
a. Open the Device management of your system. [Setup] => [Windows Control
Panel] => [Device Management]. The search the connection port for 3DSP USB
Bluetooth v1.0 (COM X). X is the COM port assign like the fallowing picture.
Confidential Version1.0
Released Date: 2008.03.31
28
太 欣 半 導 體 股 份 有 限 公 司
SYNTEK Semiconductor Co., Ltd.
STA-UI-A0035
User’s Manual
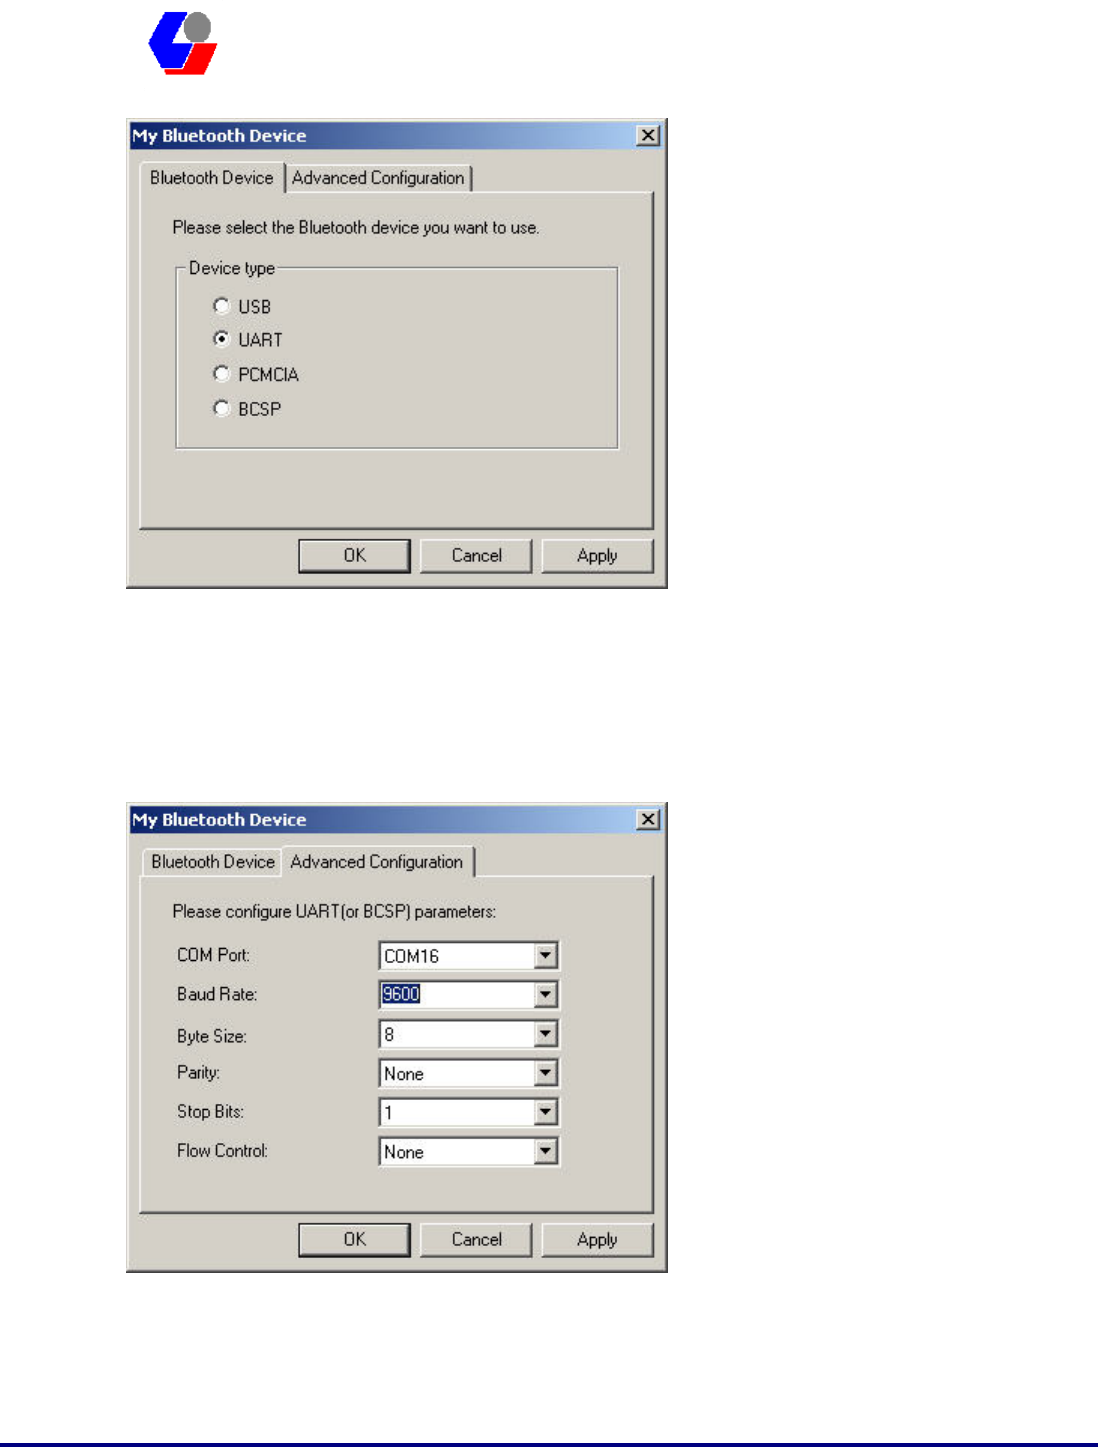
b. Start the IVT BlueSoleil, the go to [Tool] => [My Bluetooth Device].
c. Set as UART device, and then go to the advance setup page.
Confidential Version1.0
Released Date: 2008.03.31
29
太 欣 半 導 體 股 份 有 限 公 司
SYNTEK Semiconductor Co., Ltd.
STA-UI-A0035
User’s Manual
d. Configuration as the fallowing picture setting. Setup the [COM Port] [Transmit
speed] [Data Bit] [Parity Check] [Stop bit] [Fallow control]. As COM Port = X that
reference from the device management information. Transmit speed = 9600, Data Bit
= 8, Parity Check = None, Stop bit = 1, Fallow control = none.
d. After finish setting, please “OK” for finish manually Bluetooth device
configuration.
Confidential Version1.0
Released Date: 2008.03.31
30
太 欣 半 導 體 股 份 有 限 公 司
SYNTEK Semiconductor Co., Ltd.
STA-UI-A0035
User’s Manual
5.3 Start Bluetooth
Start BlueSoleil. (Double click the IVT Bluesoleil icon or in the Start Menu)
5.4 Establish Bluetooth Connection
A connection is normally initiated from the client.
z On the server side, start the service.
z On the client side, initiate the connection.
Start Service on Server
If BlueSoleil provides service, please start the service:
1. Change to Service Window.
2. Right-click the service icon, select Start Service on the pop-up menu.
Initiate Connection on Client
In Main Window:
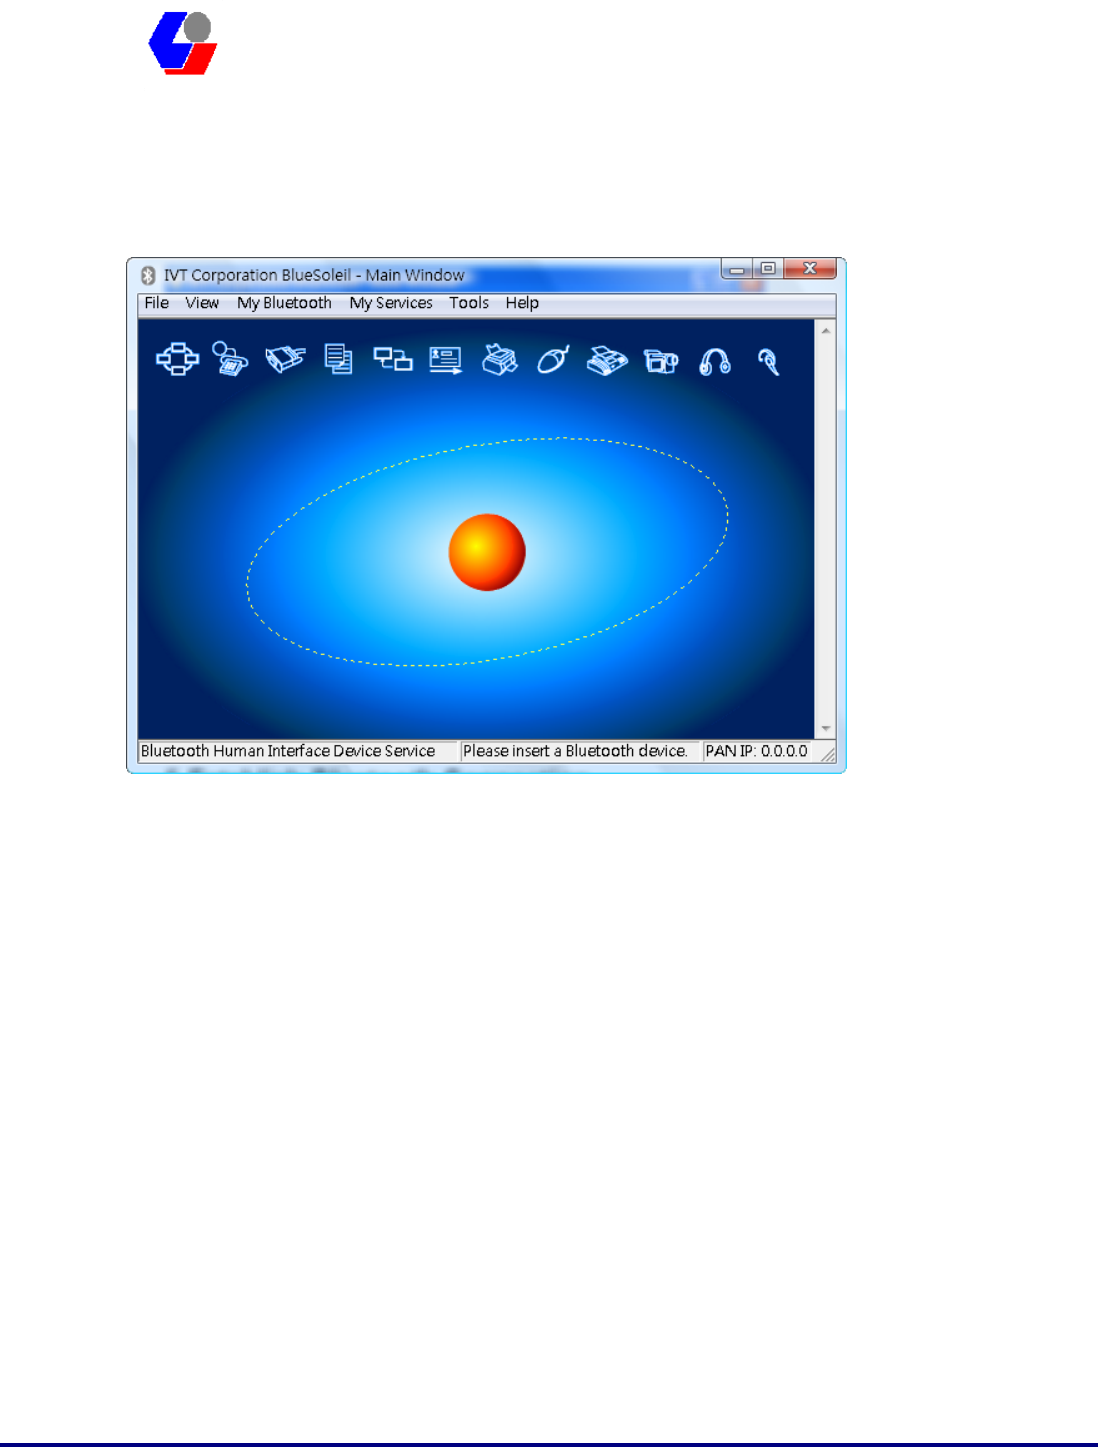
1. Single click my device, the center ball, to search the Bluetooth devices in range.
2. Search the selected Bluetooth device service by double-clicking the device icon.
Service button on the top of the BlueSoleil Main Window will be highlighted if
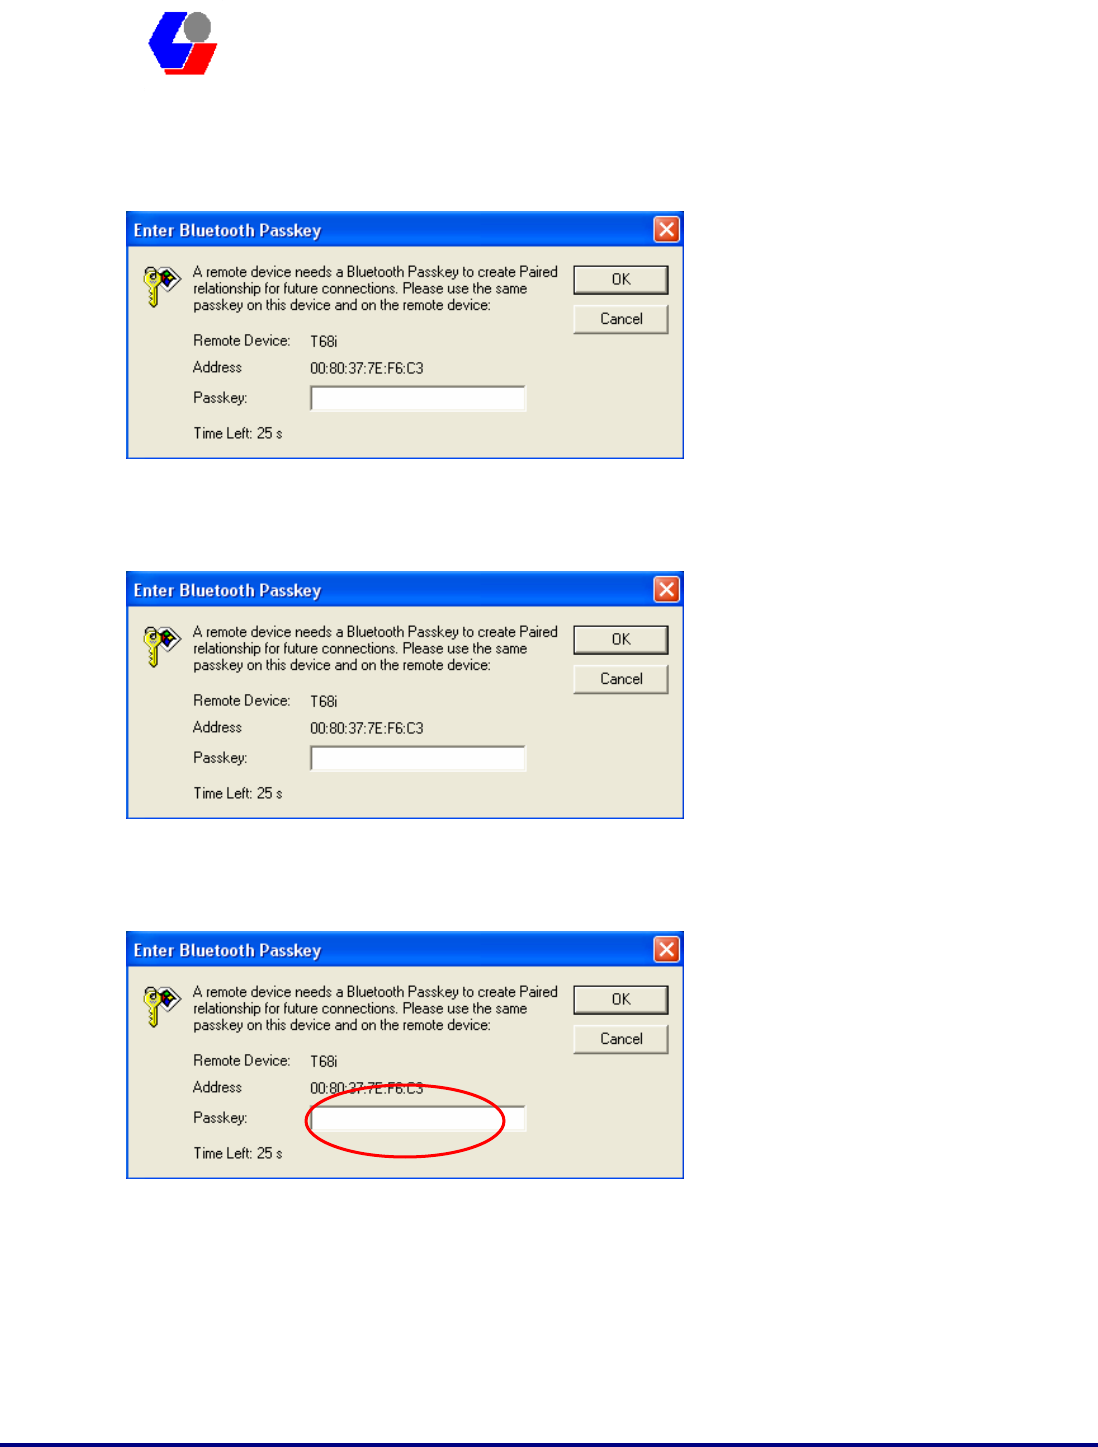
the service is supported by the device. Enter the same Bluetooth passkey on both
devices if necessary to pair the two devices.
Confidential Version1.0
Released Date: 2008.03.31
31
太 欣 半 導 體 股 份 有 限 公 司
SYNTEK Semiconductor Co., Ltd.
STA-UI-A0035
User’s Manual
3. Connect.
Single-click the highlighted service button to establish the connection
4. If the other device needs pair, the Bluetooth Icon in the system tray will show a
warning massage that the Bluetooth connection need input pair numbers.
5. Input the same pair number as you input in the other Bluetooth device. Then
click ok to finish the Bluetooth connection pair procedure.
5.5 Stop the Bluetooth Device
Remove the USB Dongle from the system. The tray bar icon will show the BlueSoleil
is not available.

Confidential Version1.0
Released Date: 2008.03.31
32
太 欣 半 導 體 股 份 有 限 公 司
SYNTEK Semiconductor Co., Ltd.
STA-UI-A0035
User’s Manual
Figure 1-26: The Bluetooth Device is not available.

Confidential Version1.0
Released Date: 2008.03.31
33
太 欣 半 導 體 股 份 有 限 公 司
SYNTEK Semiconductor Co., Ltd.
STA-UI-A0035
User’s Manual
6. 3DSP Combo USB Dongle Utility
Configuration.
9 Right-Click on the green three-bar icon in the system tray, a pop-up list that
displays several options will appear. (Recommended)
1. Click Bluetooth to open the Bluetooth utility.
2. Click WLAN to open the WLAN utility.
3. Click Coexist to use both utilities simultaneously.
4. Click Unplug to stop the utilities.
Confidential Version1.0
Released Date: 2008.03.31
34
太 欣 半 導 體 股 份 有 限 公 司
SYNTEK Semiconductor Co., Ltd.
STA-UI-A0035
User’s Manual
7. Driver Uninstallation
If you want to remove the wireless Combo card driver, please read this chapter
for introduction.
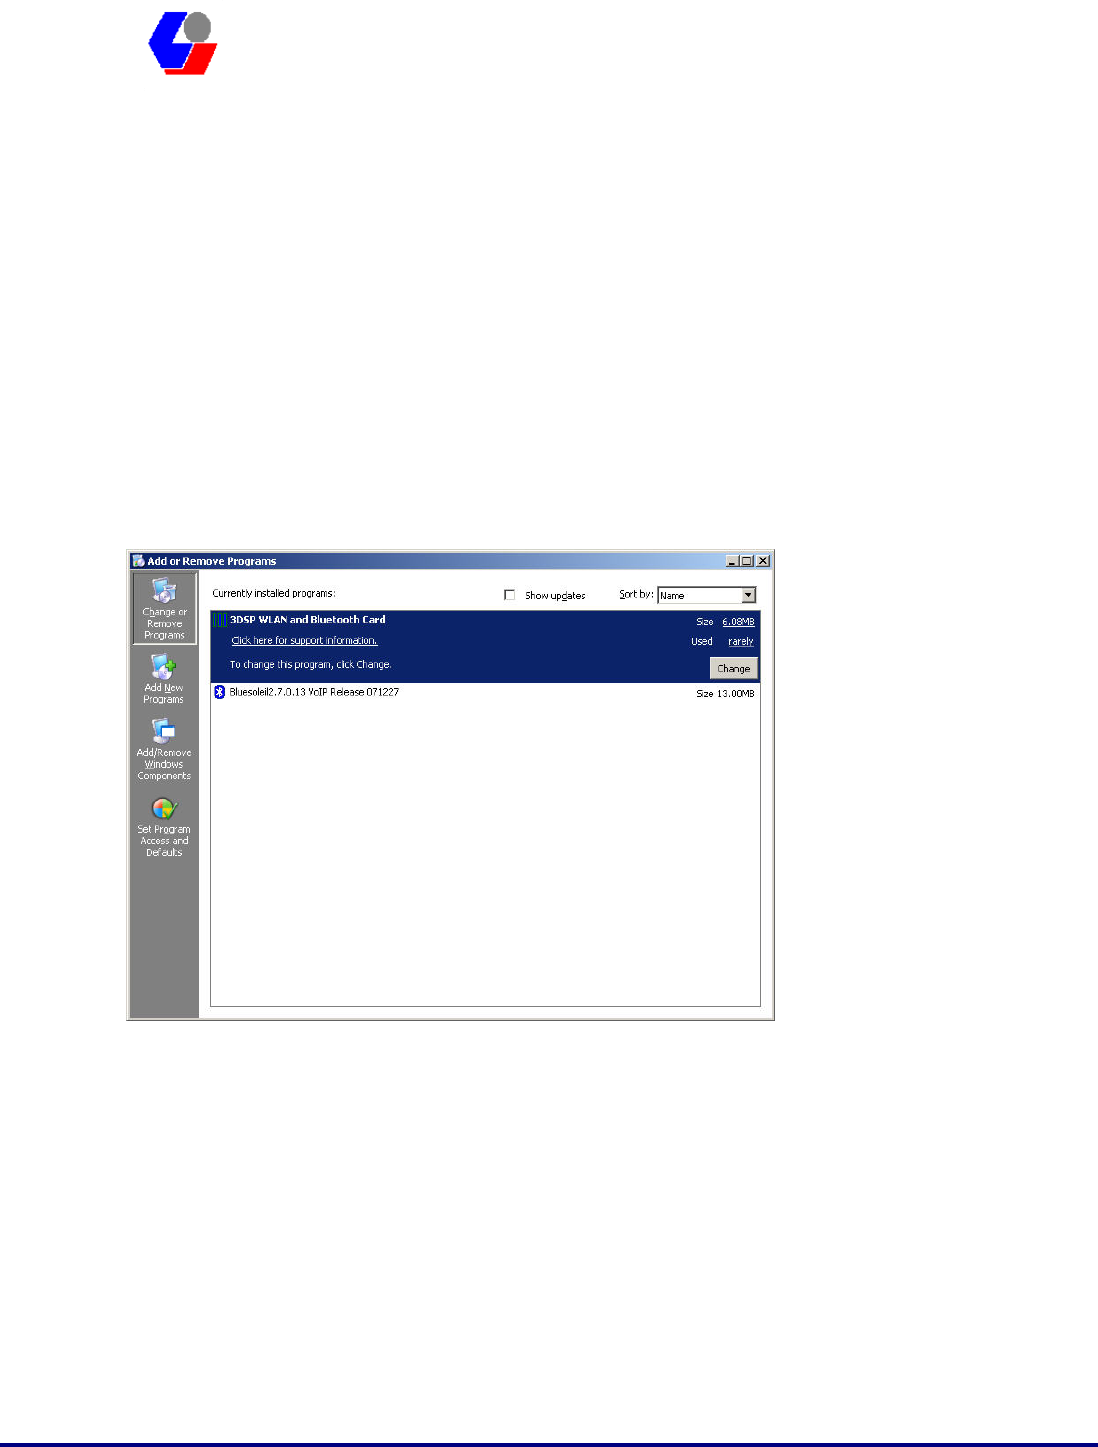
7.1 Go to Windows Control Panel, select and start “Add or remove programs”
service.
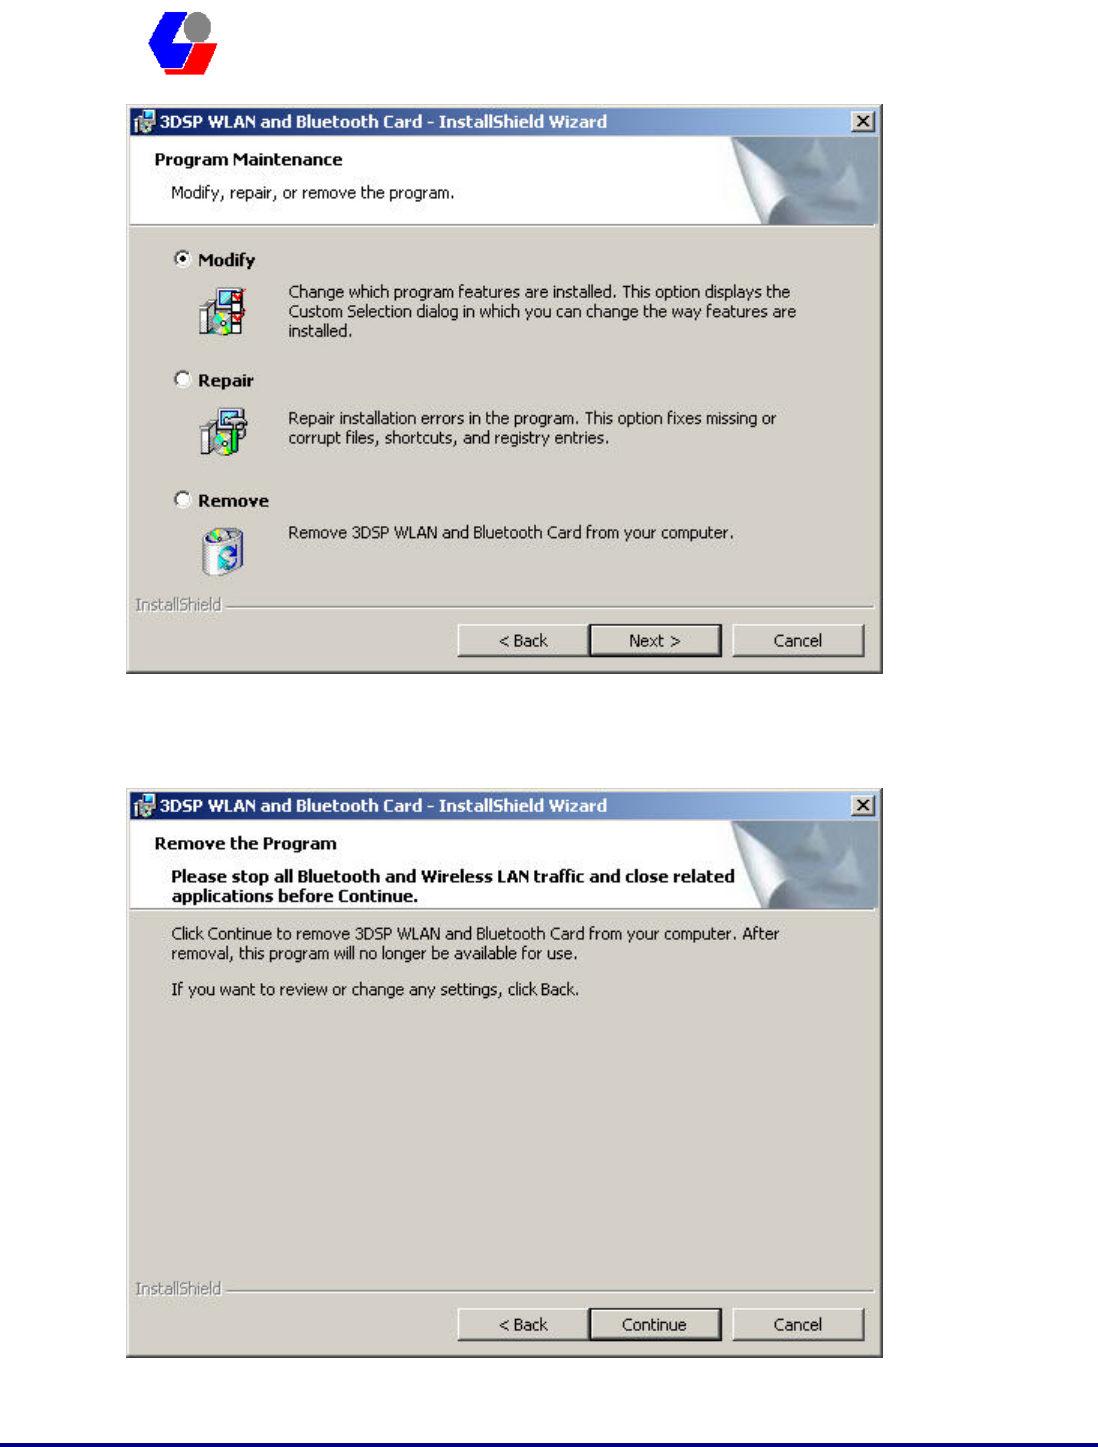
7.2 Click the 3DSP WLAN and Bluetooth Card, and then press the “Change”
button. The system will ask you what you want to do with this program.
Select “Remove” and press the “Next” button for remove the program.
Confidential Version1.0
Released Date: 2008.03.31
35
太 欣 半 導 體 股 份 有 限 公 司
SYNTEK Semiconductor Co., Ltd.
STA-UI-A0035
User’s Manual
7.3 System will ask you again for sure you want to remove it. Click “Continue”
for remove the program.
7.4 Finish removes the program. Please fallow the same method to remove the
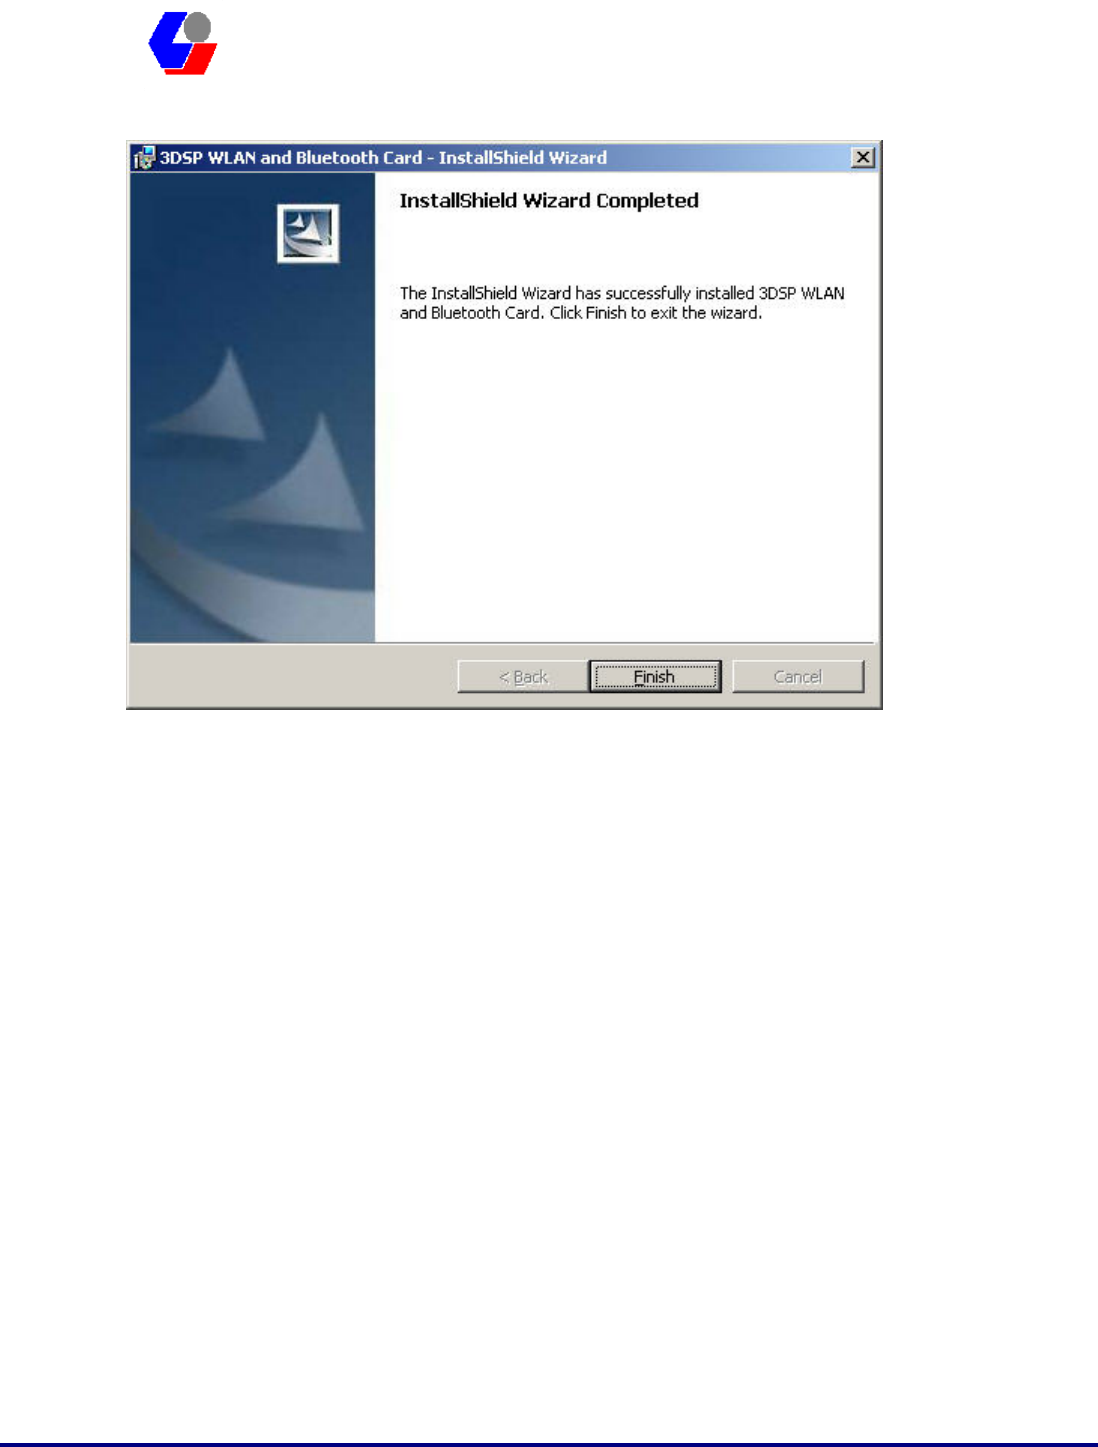
Confidential Version1.0
Released Date: 2008.03.31
36
太 欣 半 導 體 股 份 有 限 公 司
SYNTEK Semiconductor Co., Ltd.
STA-UI-A0035
User’s Manual
IVT BlueSoleil for clean your system.

Confidential Version1.0
Released Date: 2008.03.31
37
太 欣 半 導 體 股 份 有 限 公 司
SYNTEK Semiconductor Co., Ltd.
STA-UI-A0035
User’s Manual
8. Troubleshooting
This section provides solutions to problems that can may occur when trying to use the
STA-UI-A0035 802.11b/g and Bluetooth v2.0 + EDR Combo USB Dongle.
Q1. The computer does not recognize the STA-UI-A0035 802.11b/g and
Bluetooth v2.0 + EDR Combo USB Dongle.
A1. Verify that the Wireless USB Dongle is properly inserted into the computer’s USB
port. If the problem still exists, please reinstall the driver.
Q2. The computer with the STA-UI-A0035 802.11b/g and Bluetooth v2.0 + EDR
Combo USB Dongle is unable to connect to the wireless network.
A2.1 In Infrastructure mode, make sure that the exact same Network Name (SSID)
exists on the Wireless USB Dongle Site Survey Screen and on the Access Point settings
screen.
A2.2 In Peer-to-Peer mode, all computers in the network must have the exact same
Network Name (SSID).
A2.3 On the Connection Profile Screen, verify that the Wireless Mode is set correctly
on all computers. It must be Access Point if an Access Point is used or Peer-to-Peer if
an Access Point is not used.
A2.4 If Enable Encryption is checked, verify that the encryption keys entered in your
profile are the same as the encryption keys on the other network computers.
Q3. The STA-UI-A0035 802.11b/g and Bluetooth v2.0 + EDR Combo USB Dongle
are draining my battery’s life.

Confidential Version1.0
Released Date: 2008.03.31
38
太 欣 半 導 體 股 份 有 限 公 司
SYNTEK Semiconductor Co., Ltd.
STA-UI-A0035
User’s Manual
A3. Any wireless adapter will shorten your battery’s life to some extent. Heavy
network activity (Transmitting and receiving lots of data) will drain your battery
much more than if the USB dongle is in idle mode. To get the best energy efficiency, go
to the Connection Profile Screen and check Enable Power Saving.
Q4. When I want to install a new version of the software, I have to uninstall the
older version. But when I do it, it always asks me for the location of the
wlcard50.sys file.
A previous installation did not cleanly remove its driver and INF file. Click ‘Cancel’
to allow the current uninstallation to complete. Then do the following steps to remove
any leftover INF file(s):
A4.1 Open a My Computer view of the files in your Windows \INF folder.
z This folder is hidden when Windows is installed. To make it visible,
click on the \Windows directory, and then select “Folder Options…”
from the “Tools” menu. Select the “View” tab, select “Show hidden
files and folders”, and click “OK”. Then click on the INF folder to see
the contents.
A4.2 Make a backup copy of the INF folder before continuing, and follow the
procedure very carefully. Your system may become unusable if you delete INF files for
devices other than the 3DSP Wireless LAN.
A4.3 Click the “Search” button in the toolbar, and select “All files and folders”.
Enter *.INF for the file name, and “3d5b” for the text to search for in the file, and
then click “Search”.
A4.4 For all matching files found, delete both the .INF and the corresponding PNF
files. Repeat for all *.INF files that are found to contain “3d5b”. For example, if
oem6.inf is found to contain “3d5b”, delete oem6.inf and oem6.pnf.
A4.5 Reboot the machine and follow the normal installation procedure.
Q6. I upgrade my driver from V2.1 to V2.2 and use 2.2 version’s uninstallation
shortcut to uninstall driver and utilities, but c:\Program Files\3DSP folder still

Confidential Version1.0
Released Date: 2008.03.31
39
太 欣 半 導 體 股 份 有 限 公 司
SYNTEK Semiconductor Co., Ltd.
STA-UI-A0035
User’s Manual
exists after uninstallation.
A6. If you use v2.2’s 3DSP Wireless LAN uninstallation shortcut or running setup.exe
to uninstall and your machine has the previous released v2.1CD installed, a
wlancfgdlg.ico and its 3DSP folder will exist after uninstallation. You can manually
remove 3DSP folder under program files after the driver uninstallation.
This problem will not exist if you use v2.2CD and later version to upgrade or remove
programs.
If your machine has the previously released version 2.1 installed, it is recommended
to use Add\Remove Programs to uninstall the driver and manually remove c:\program
files\3DSP folder before upgrading to version 2.2. You don’t need to do this step in the
future driver upgrading.
Q7. I’ve plugged in the USB dongle before running setup.exe, but I am still asked
to attach the device at the end of the installation.
A7. If you plug in the USB Dongle before running setup.exe and this is your first time
installing driver on a machine, you will be asked to attach the device at the end of the
installation. The installation will continue and complete if you remove the device and
plug it back in.
There won't be a problem if it is a driver upgrade. The installation program can detect
the USB Dongle. You do not need to remove the USB Dongle and plug it back in.
Q8. My PC is Microsoft Windows XP SP2, why I can’t make connection with the
AP Router which encryption is WPA2-AES or WPA2-TKIP?
A8. It’s because the Microsoft XP SP2 original version is not support the Wireless
WPA2. It needs a hotfix pack (KB903357) to solve this problem. In the driver install
CD, there are the hotfix files in the folder (Microsoft WPA2 hotfix for XP Service
Pack2). We put the English, Simple Chinese and Traditional Chinese version on it. If
your environment is different languages, please download it form Microsoft and
install.

Confidential Version1.0
Released Date: 2008.03.31
40
太 欣 半 導 體 股 份 有 限 公 司
SYNTEK Semiconductor Co., Ltd.
STA-UI-A0035
User’s Manual
9. Specifications
WLAN Spec IEEE 802.11b/g
Transmit Power 13 dBm to 17 dBm
Sensitivity -74dBm@54Mbps, -85dBm@11Mbps
Frequency Channel 14
Modulation 802.11g: OFDM / 802.11b: DSSS
Security Features WEP, WPA, AES, TKIP, WPA2
WEP Key Bits 64 / 128 bit
Protocol TCP/IP
Bluetooth Spec Bluetooth v1.2 and v2.0 + EDR
Transmit Power ≦20dBm
Sensitivity 3DH5@BER=1%%, -76dBm;2DH5@BER=1%%,
-90dBm;GFSK@BER=0.1%, -88dBm
Frequency Channel 79
Modulation DQPSK, D8PSK, GFSK
Profile SPP, DUN,HID, HSP, A2DP, OPP, SYN, LAN, PAN,
FAX, FTP, BIP
Operating Temperature 32˚F to 131˚F (0˚ C to 55˚ C)
Storage Temperature 04˚F to 185˚F (-20˚ C to 85˚ C)
Operating Humidity 10% to 85%, Non-Condensing
Storage Humidity 5% to 90%, Non-Condensing
Interface Standard USB 2.0
Power DC: 3.3V@USBs, Normal 320mA / Peak 500mA
Certifications CE, FCC Class B, Wi-Fi Certification(802.11b/g),
BQB , WHQL: Vista 32-bit, Vista-64bit, XP, 2000

Confidential Version1.0
Released Date: 2008.03.31
41
太 欣 半 導 體 股 份 有 限 公 司
SYNTEK Semiconductor Co., Ltd.
STA-UI-A0035
User’s Manual
10. Contact Information
SYNTEK Semiconductor Co., Ltd.
Taipei Office:
10F, No.1, Alley 30, Lane 358, Rui-Guang Road, Neihu, Taipei Taiwan R.O.C. 114
Tel: 886-2-2659-0055
Fax: 886-2-2659-0077
FEDERAL COMMUNICATIONS COMMISSION INTERFERENCE STATEMENT
This equipment has been tested and found to comply with the limits for a Class B digital
device, pursuant to Part 15 of the FCC Rules. These limits are designed to provide
reasonable protection against harmful interference in a residential installation. This
equipment generates, uses and can radiate radio frequency energy and, if not installed
and used in accordance with the instructions, may cause harmful interference to radio
communications. However, there is no guarantee that interference will not occur in a
particular installation. If this equipment does cause harmful interference to radio or
television reception, which can be determined by turning the equipment off and on, the
user is encouraged to try to correct the interference by one or more of the following
measures:
– Reorient or relocate the receiving antenna.
– Increase the separation between the equipment and receiver.
– Connect the equipment into an outlet on a circuit different from that to which the
receiver is connected.
– Consult the dealer or an experienced radio/TV technician for help.
CAUTION:
Any changes or modifications not expressly approved by the party responsible for
compliance could void the user's authority to operate the equipment.
This device complies with Part 15 of the FCC Rules. Operation is subject to the following
two conditions:
(1) This device may not cause harmful interference and
(2) This device must accept any interference received, including interference that may
cause undesired operation.
FCC RF Radiation Exposure Statement
This equipment complies with FCC radiation exposure limits set forth for an uncontrolled
environment.
SAR compliance of this product has only been verified for use with typical laptop
computers.
To comply with RF exposure limits, user must not simultaneously operate wireless
products in adjacent USB-ports or cardbus slots.
Max. SAR Measurement (1g)
802.11b: 0.504 W/kg