SZ DJI TECHNOLOGY 201309581 5.8G Transmitter User Manual
SZ DJI TECHNOLOGY CO., LTD 5.8G Transmitter
User Manual

©2013 DJI Innovations. All Rights Reserved.
PHANTOM VISION
User Manual V1.00
Thank you for purchasing this DJI product. Please strictly follow these steps to use this product, including
PHANTOM VISION and DJI VISION App.
Please regularly check the web pageof PHANTOM VISIONat our websitewww.dji-innovations.com,
which is updated regularly. Product information, technical updates and manual corrections will be available on
this web page. Due to unforeseen changes or product upgrades, the information contained in this manual is
subject to change without notice.
This manual is only referenced for basic assembly and configuration; you can obtain more details and advanced
instructions when using the Assistant software or DJI VISION App. To assure you have the latest information,
please visit our website and download the latest manual and software.
If you have any problem that you cannot solve during usage, please contact your dealer.
PVT581

©2013 DJI Innovations. All Rights Reserved.
Index
INDEX ............................................................................................................................. 2
DISCLAIMER &WARNING ................................................................................................ 3
BATTERY USAGE & CHARGING CAUTIONS..................................................................... 4
TRADEMARK .................................................................................................................. 5
IN THE BOX ..................................................................................................................... 5
REQUIRED ITEMS .......................................................................................................... 6
SYMBOL INSTRUCTION ................................................................................................... 6
ASSEMBLY ...................................................................................................................... 7
MOUNT THE PROPELLERS ......................................................................................................... 7
MOUNT THE RANGE EXTENDER ................................................................................................ 7
VIEW OF MOBILE PHONE MOUNT ............................................................................................. 7
MOUNT THE MOBILE DEVICE MOUNTING................................................................................... 7
BASIC USAGE .................................................................................................................. 8
BATTERY AND CHARGER KNOWLEDGE ........................................................................................ 8
BatteryCharge Procedure ............................................................................................... 8
Battery Usage Knowledge ............................................................
错误!未定义书签。
TRANSMITTERKNOWLEDGE ...................................................................................................... 9
View of Transmitter ........................................................................................................ 9
How to Power on the Transmitter .................................................................................. 9
Transmitter State Introduction ....................................................................................... 9
TransmitterOperation Mode ........................................................................................ 10
RANGE EXTENDERKNOWLEDGE ............................................................................................... 11
View of Range Extender ............................................................................................... 11
Function Description .................................................................................................... 11
How to Use the Range Extender ................................................................................... 11
How to Do the Camera &Range Extender &DJI App Rebind ........................................ 12
AIRCRAFT OF PHANTOM VISION KNOWLEDGE ....................................................................... 13
View of PHANTOM VISION (including aircraft and camera) ........................................ 13
Get the Aircraft Ready .................................................................................................. 13

©2013 DJI Innovations. All Rights Reserved.3 |
Compass Calibration Procedures .................................................................................. 14
Failsafe Function .......................................................................................................... 16
Low Voltage Protection ................................................................................................ 17
CAMERAOF PHANTOM VISION KNOWLEDGE ......................................................................... 18
MainFunction Description ............................................................................................ 18
DJI VISION APP ............................................................................................................. 20
BEFORE USE ....................................................................................................................... 20
Downloadand Installation ............................................................................................ 20
Wi-Fi Network Selection ............................................................................................... 20
Register and Login ........................................................................................................ 20
Main Page .................................................................................................................... 21
CAMERA PAGE ..................................................................................................................... 22
Basic Usage .................................................................................................................. 22
Camera Settings ........................................................................................................... 24
ALBUM PAGE ...................................................................................................................... 26
Album inCamera SD Card ............................................................................................. 26
Album In mobile device ................................................................................................ 28
NEWS PAGE ........................................................................................................................ 29
SETTINGS PAGE .................................................................................................................... 30
APPENDIX ..................................................................................................................... 33
ASSISTANT SOFTWARE& MC/PMU FIRMWARE UPGRADE ........................................................... 33
AUTOPILOT SYSTEM LED DESCRIPTION ..................................................................................... 33
SPECIFICATION ..................................................................................................................... 34
WARNING .......................................................................................................................... 35
Disclaimer &Warning
Please read this disclaimer carefully before using the product. By using this product, you hereby
agree to this disclaimer and signify that you have read them fully. THIS PRODUCT IS NOT
SUITABLE FOR PEOPLE UNDER THE AGE OF 18.
Despite the built-in autopilot system and our efforts in making the control as safe as possible, we strongly
recommend users to remove all propellers when calibrating and setting parameters. Make sure all connections
are good, and keep children and animals away during firmware upgrade, system calibration and parameter setup.
DJI Innovations accepts no liability for damage(s) or injuries incurred directly or indirectly from the use of this
product in the following conditions:

©2013 DJI Innovations. All Rights Reserved.4 |
1. Damage(s) or injuries incurred when users are drunk, taking drugs, drug anesthesia, dizziness, fatigue,
nausea and any other conditions no matter physically or mentally that could impair your ability.
2. Damage(s) or injuries caused by subjective intentional operations.Any mental damage compensation
caused by accident.
3. Failure to follow the guidance of the manual to assemble or operate.
4. Malfunctions caused by refit or replacement with non-DJI accessories and parts.
5. Damage(s) or injuries caused by using third party products or fake DJI products.
6. Damage(s) or injuries caused by mis-operation or subjective mis-judgment.
7. Damage(s) or injuries caused by mechanical failures due to erosion, aging.
8. Damage(s) or injuries caused by continued flying after low voltage protection alarm is triggered.
9. Damage(s) or injuries caused by knowingly flying the aircraft in abnormal condition (such as water, oil, soil,
sand and other unknown material ingress into the aircraft or the assembly is not completed, the main
components have obvious faults, obvious defect or missing accessories).
10. Damage(s) or injuries caused by flying in the following situations such as the aircraft in magnetic
interference area, radio interference area, government regulated no-fly zones or the pilot is in backlight,
blocked, fuzzy sight, and poor eyesight is not suitable for operating and other conditions not suitable for
operating.
11. Damage(s) or injuries caused by using in bad weather, such as a rainy day or windy (more than moderate
breeze), snow, hail, lightning, tornadoes, hurricanes etc.
12. Damage(s) or injuries caused when the aircraft is in the following situations: collision, fire, explosion, floods,
tsunamis, subsidence, ice trapped, avalanche, debris flow, landslide, earthquake, etc.
13. Damage(s) or injuries caused by infringement such as any data, audio or video material recorded by the use
of aircraft.
14. Damage(s) or injuries caused by the misuse of the battery, protection circuit, RC model and battery
chargers.
15. Other losses that are not covered by the scope of DJI Innovations liability
Battery Usage & Charging Cautions
1. Do not put the battery into water; store the battery in a cool and dry environment.
2. Only use the correctly specified batteries
3. Batteries must be kept out of the reach of children; if a child accidentally swallows the battery you should
immediately seek medical assistance.
4. Do not use or store the battery near fire.
5. Battery should be charged with proper standard charger.
6. Do not connect the battery reversed in positive and negative terminals in the charger or equipment.
7. Do not connect the battery directly to the wall plugs or vehicle-mounted socket.

©2013 DJI Innovations. All Rights Reserved.5 |
8. Do not put the battery into a fire or heat the battery.
9. Do not let the battery terminals (+and-) touch together to cause short-circuit.
10. Do not transport or store the battery together with metal objects.
11. Do not hit or throw the battery.
12. Do not weld the battery terminals together.
13. Do not drive a nail in, hit with a hammer, or stomp on the battery.
14. Do not disassemble or alter the battery.
15. Do not use or store the battery in extreme heat environments, such as direct sunlight or in the car in hot
weather. Otherwise, the battery will overheat, may cause fire (or self-ignite), this will affect the performance
of the battery, shorten the service life of the battery.
16. Do not use the battery in strong electrostatic areas, otherwise the electronic protection may be damaged
which may cause a hazard.
17. If you get the battery electrolyte leakage into your eyes, don't rub, first wash your eyes with clean water
then seek medical assistance immediately. If not handled in a timely manner, eyes could be damaged.
18. Do not use the battery when it emits an odour, high temperature, deformation, change in colour or other
abnormal phenomena; if the battery is in use or charging, you should stop charging or using immediately.
19. If the battery terminal gets dirty, please clean it with a dry cloth before using. Otherwise it will cause a poor
contact, thus causing energy loss or inability to charge.
20. Discarded battery could lead to a fire; you should completely discharge the battery and wrap the output
terminal with insulating tape before discarding.
Trademark
DJI and PHANTOM VISION are registered trademarks of DJI Innovations. Names of product, brand, etc., appearing
in this manual are trademarks or registered trademarks of their respective owner companies. This product and
manual are copyrighted by DJI Innovations with all rights reserved. No part of this product or manual shall be
reproduced in any form without the prior written consent or authorization of DJI Innovations. No patent liability
is assumed with respect to the use of the product or information contained herein.
In the Box
PHANTOMVISION X1
5.8GHz Transmitter X1
Range ExtenderX1
Propellers X3
mobile device MountingX1
Assistant Wrench X1

©2013 DJI Innovations. All Rights Reserved.6 |
Battery X8
ChargerX1
Cable X2
Screw X10
AC Adapter X3
Accessories Box X1
Required Items
Phillips Screwdriver x1
5# AA Batteries x4
Micro-SD Card
Symbol Instruction
Forbidden(Important)
Cautions
Tip
Reference
©2013 DJI Innovations. All Rights Reserved.7 |
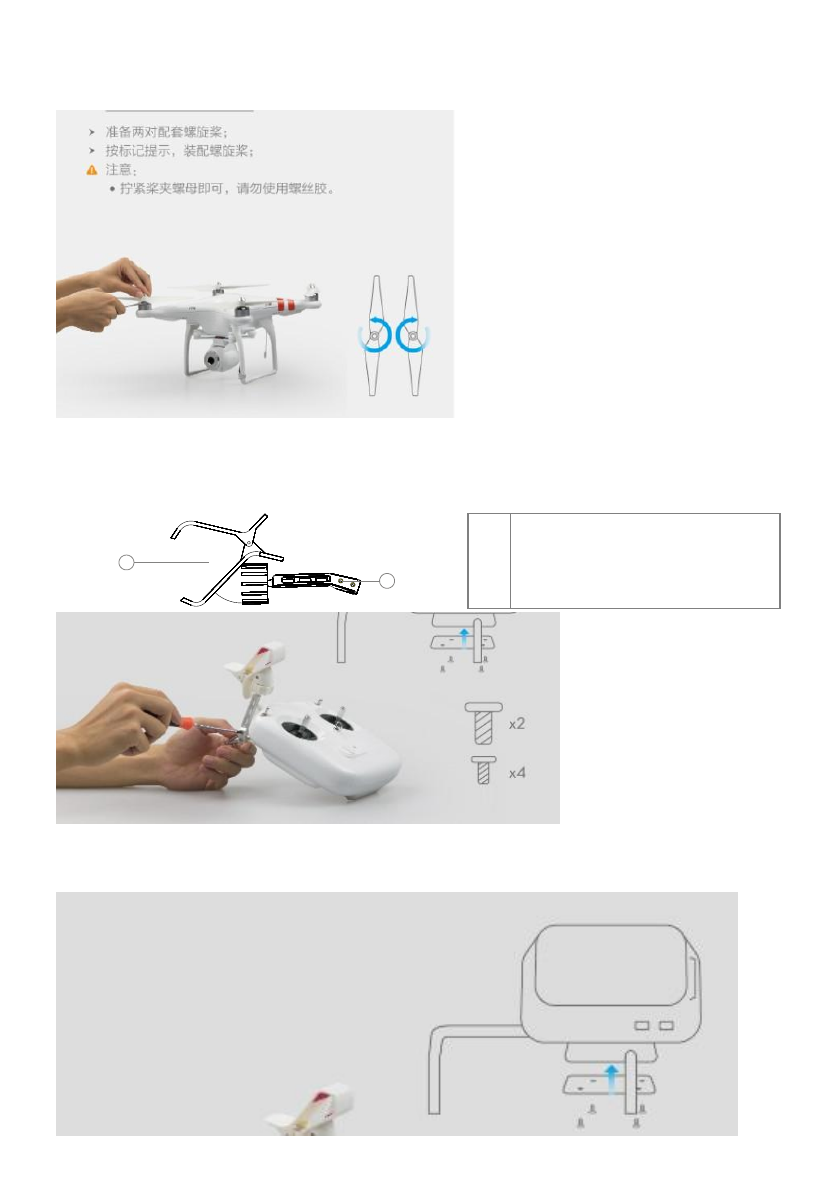
Assembly
Mount the propellers
Mount the Range Extender
View of Mobile Phone Mount
1
2
For Mobile Phone Fixing
For Screw Fixing
Mount the Mobile Device Mounting
1
2

©2013 DJI Innovations. All Rights Reserved.8 |
Basic Usage
Battery and Charger Knowledge
BatteryCharge Procedure
1. Connect the battery to the charger.
2. Connect the charger to a wall socket AC.
3. You can use the Charger Status LED to figure out the changing status.
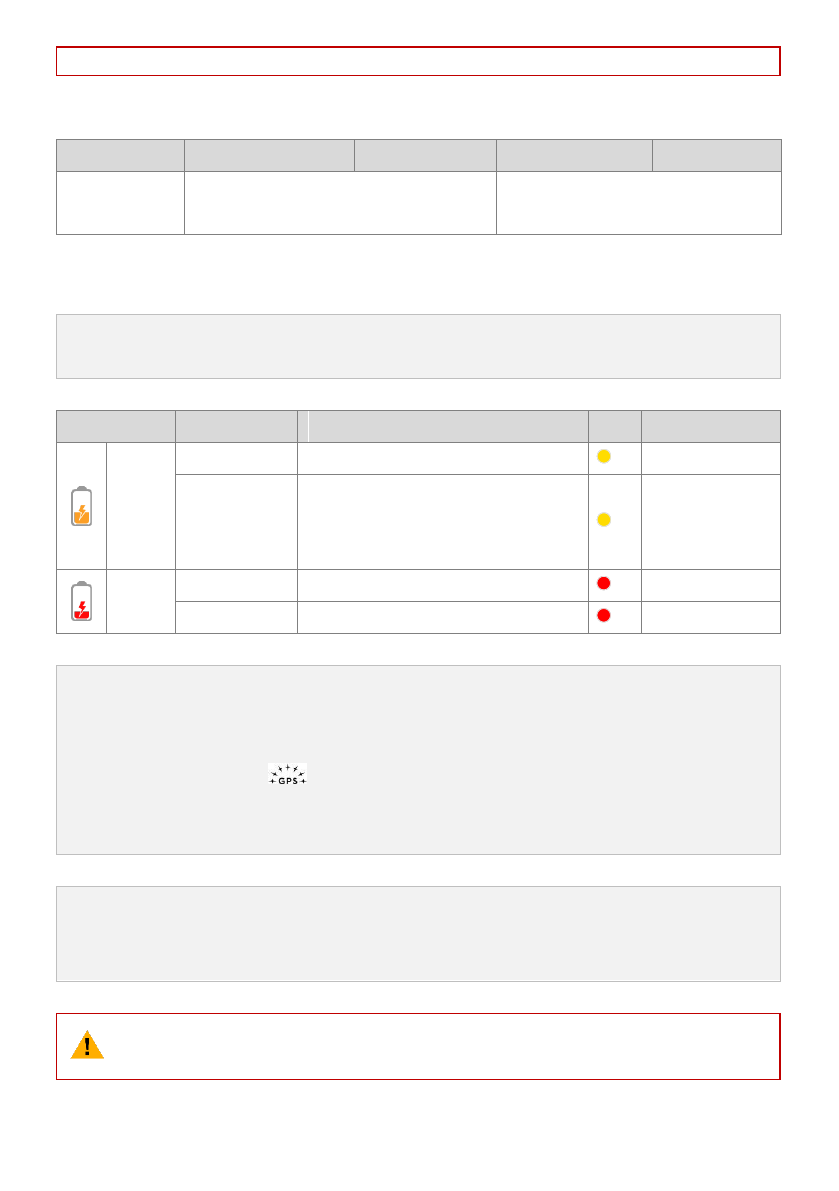
Charger Status LED
Charging
Charge complete
©2013 DJI Innovations. All Rights Reserved.9 |
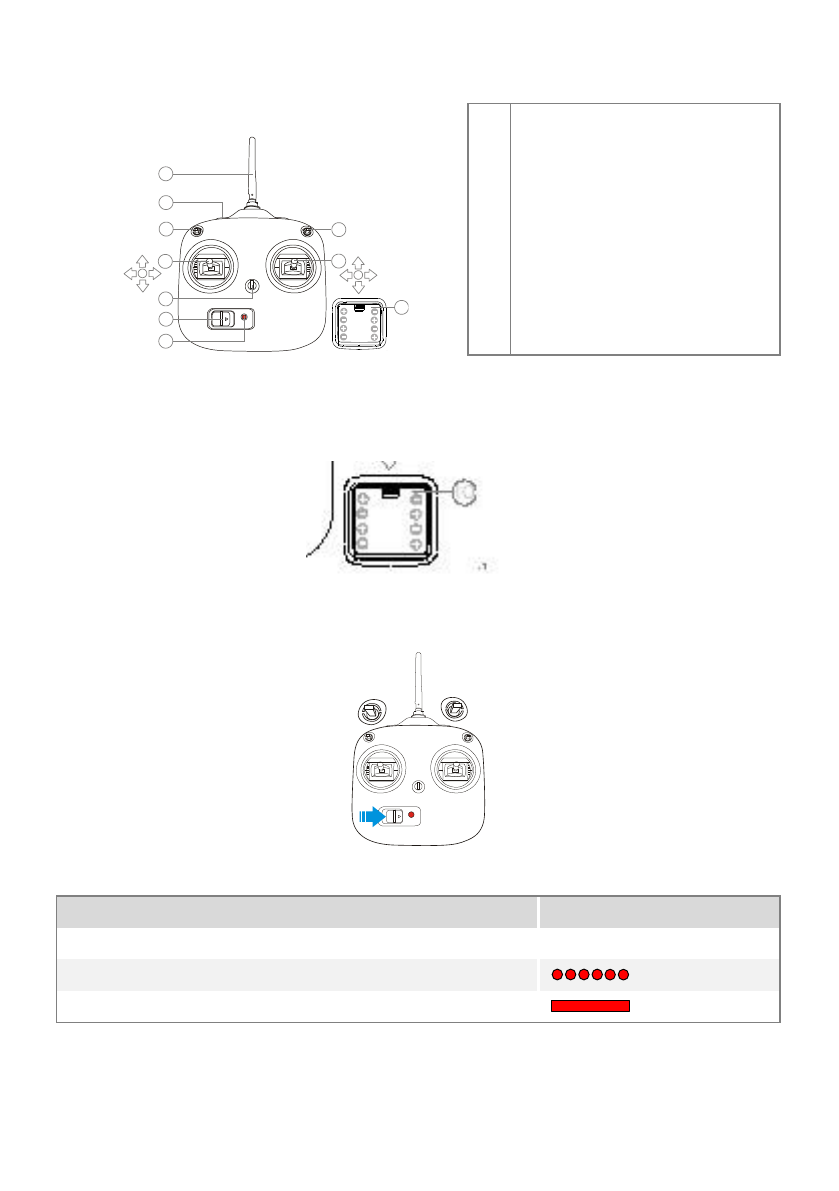
TransmitterKnowledge
View of Transmitter
Front View
1
2
3
4
5
6
7
8
9
10
Antenna
Carrying Handle
Switch(S1: Control Mode: GPS/ATTI/ATTI)
Switch(S2: IOC Mode: OFF/CL/HL)
Stick(J1: Roll, J2: Pitch)
Stick(J3: Throttle, J4: Yaw)
Neck Strap Attachment
Power Switch
Power LED
Battery Compartment (On the back)
How to Power on the Transmitter
1. Install the 5# Batteries
2. Put the Switch S1 to the GPS stop and the S2 to the OFF stop, and then turn on the power switch.
Transmitter State Introduction
Transmitter State
Introduction
Low-battery Alert (Need to change the battery)
BB…………
Linking between the Transmitter and the Receiver
Normal Operation
1
2
3
4
5
6
7
8
9
(J1)
(J2)
(J3)
(J4)
10
S2 OFF
:
S1 GPS
:
©2013 DJI Innovations. All Rights Reserved.10 |
TransmitterOperation Mode
Definitions
Stick neutral position and stick released means the stick of Transmitter is pushed to the central position.
Command Stick means the stick of Transmitter is pushed away from the central position.
Transmitter
(Mode 2)
Aircraft
(is the nose direction)
Operation Mode details
The throttle stick is for aircraft up& down control.
The aircraft will hold the height automatically if the stick is
centered. You should Push the throttle stick to the neutral
position to take-off.
The yaw stick is for aircraft rudder control.
The command stick controls the angular velocity of the
aircraft, with the maximum rudder angular velocity of
200°/s. The left stick command gives counter clock-wise
rotation of the aircraft, & vice versa.
The roll stick is for aircraft left/right control and pitch stick
is for front/back control. The command stick controls the
angle of aircraft.The stick neutral position is for 0˚, its
endpoint is 35˚. The roll and pitch sticks return to the central
position when released.
In GPS Mode, the aircraft will hover (hold horizontal
position) when sticks released.
In ATTI. Mode, the aircraft will keep attitude stabilizing
without horizontal position (different from hover in GPS
Mode).
GPS ATTI. ATTI. ATTI.
(Manual or
Failsafe is
selectable
in
software.)
3-position switch (S1) on the Transmitter for mode control.
Only after Compass Module connection and Compass
calibration, GPS ATTI. Mode is available. Otherwise, all
switch positions are for ATTI. Mode. Pay attention because
the GPS ATTI. Mode is dependent on the number of
GPSsatellites acquired by the main controller. Refer to the
LED Indicator. When GPS signal has been lost for 3s, system
enters ATTI. Mode automatically. You can enable the Manual
Mode or FailSafe (also known as One-key Go-home) in the
assistant software->Basic->R/C->Control Mode.
OFF Course Lock Home Lock
3-position switch (S2) on the Transmitter for Intelligent
Orientation Control (IOC). Set the switch to OFF in basic
flight.This function is defaulted to off. If you want to use this
function refer to the advanced manual, and enable it in the
assistant software. Use IOC when you are familiar with basic
flight.
©2013 DJI Innovations. All Rights Reserved.11 |
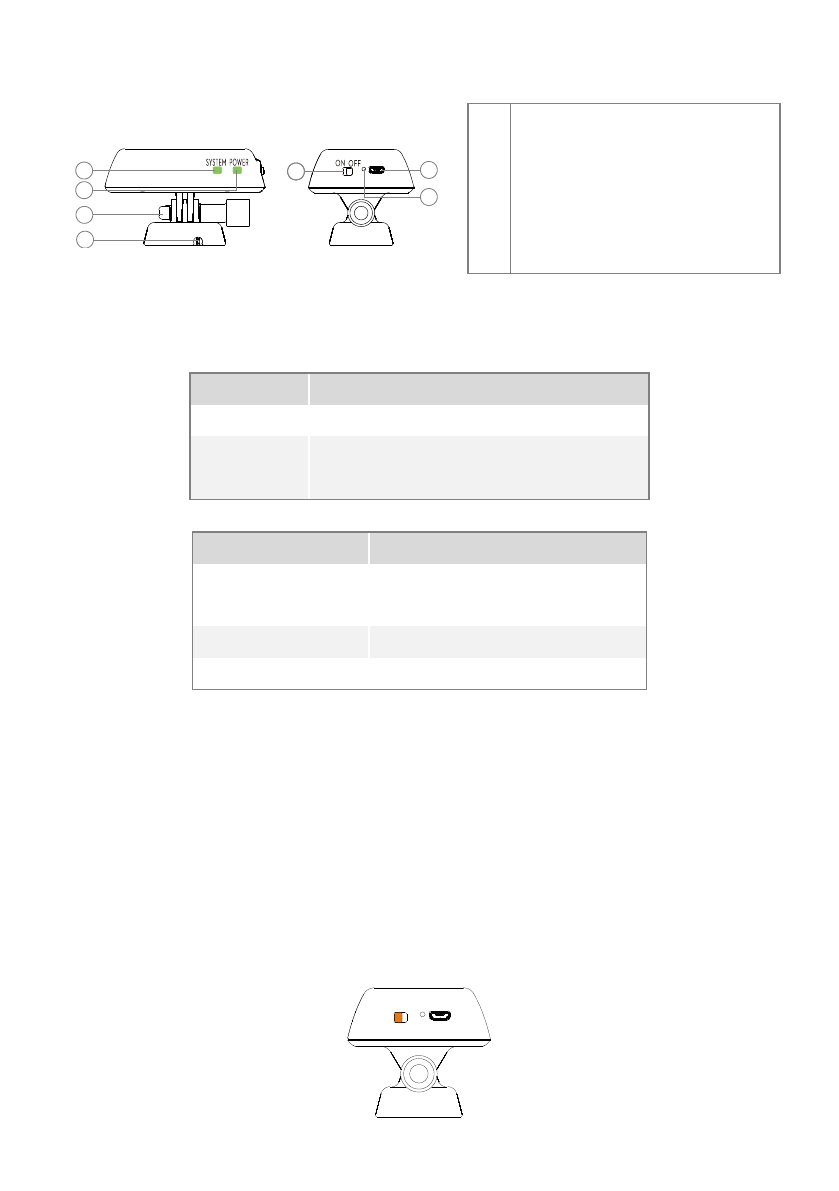
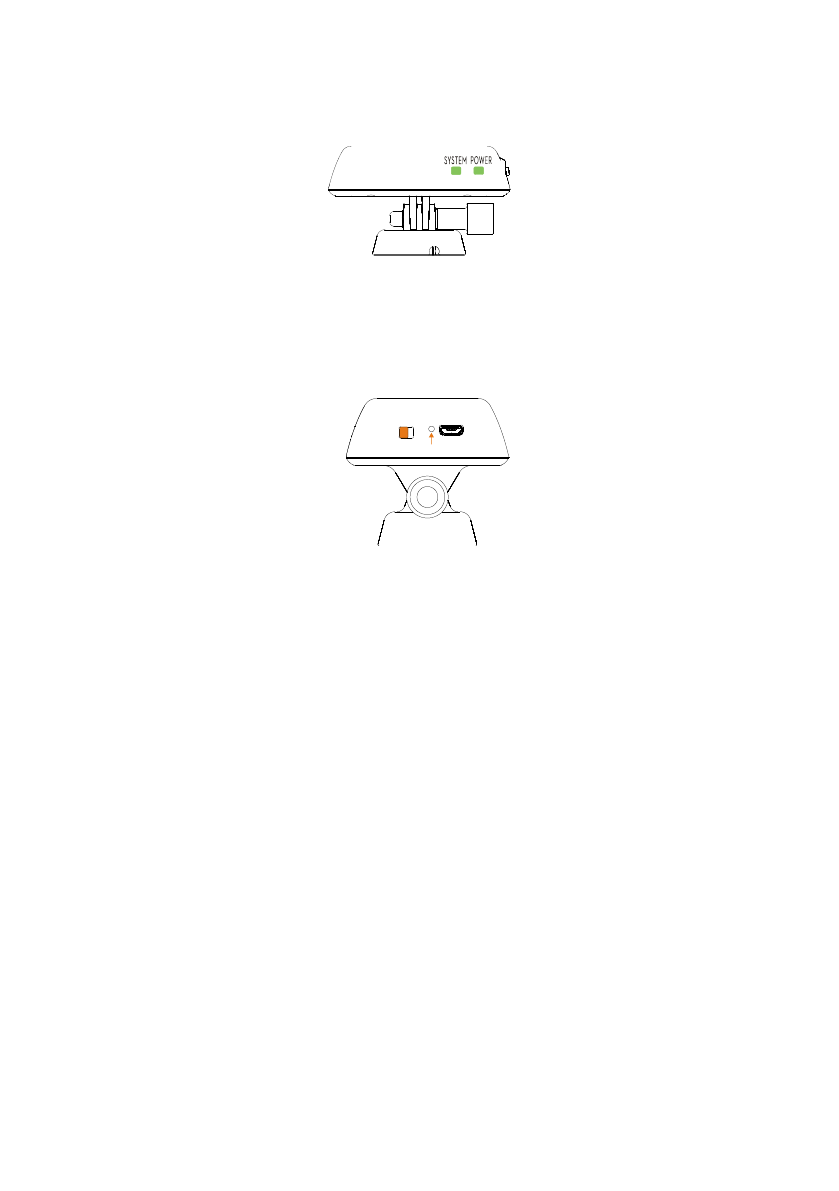
Range ExtenderKnowledge
View of Range Extender
Front View Right View
1
2
3
4
5
6
7
System LED
Power LED
Screw for Fixing
Mount Slot
Power Switch
USB Charging Port
Rebinding Button
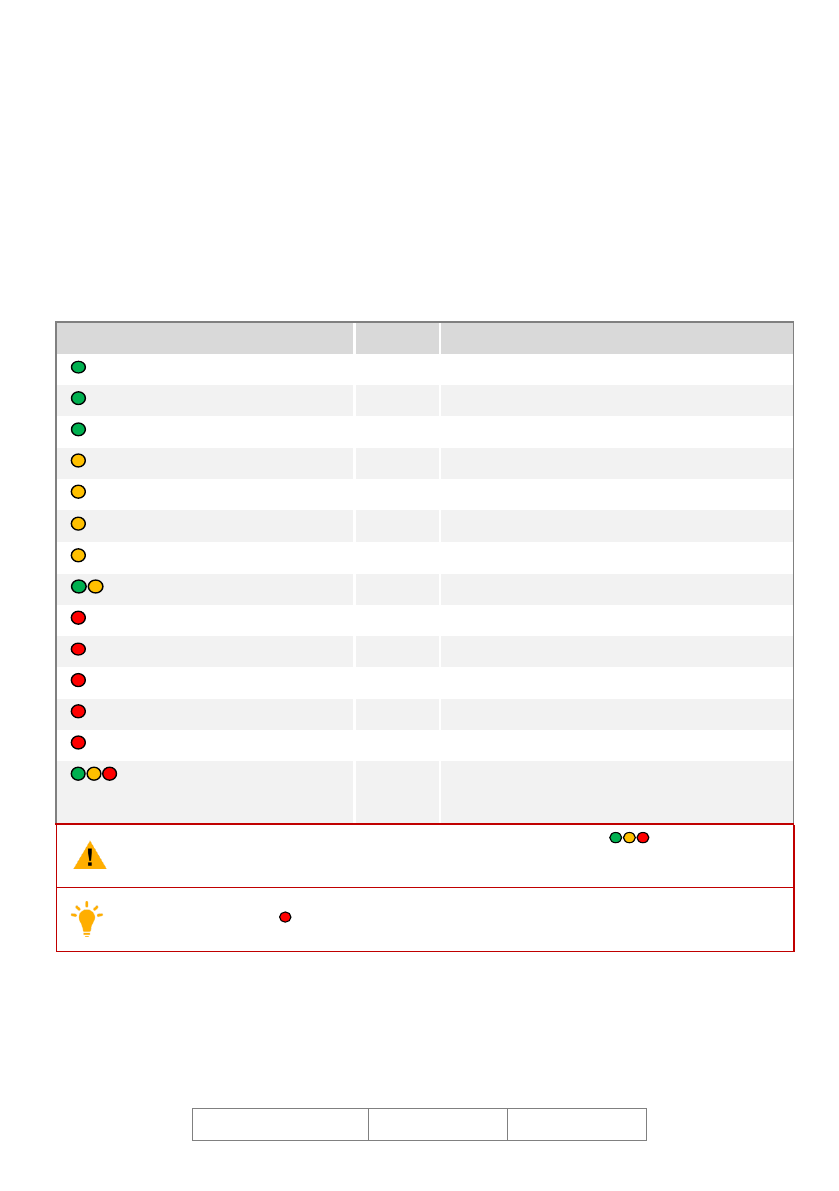
Function Description
① System LED
Wifi Indicator
Description
Green blink
The Range Extender system is working normally.
LED Off
The Range Extender system is working
abnormally.
② Power LED
Power Status Indicator
Description
Green Solid on
The Range Extender is working
normally.
Red Solid on
Low voltage alert.
Yellow Solid on
The Range Extender is charging.
③Screw for Fixing
④Mount Slot:For mounting the Range Extender on the right side of Transmitter Carrying Handle.
⑤Switch: (1) OFF – Power off
(2)ON –Power on
⑥ USB Port: For charge the Range Extender.
⑦Rebind Button: Press to rebind system.
How to Use the Range Extender
1. Turn the Power Switch of Range Extender to ON stop.
56
7
1
2
3
4
OFF
ON
©2013 DJI Innovations. All Rights Reserved.12 |
2. Wait about 20 seconds.
The PowerLED: solid Green means that it is fully charged.
The System LED: blinks Greenmeans that it is normally communicating.
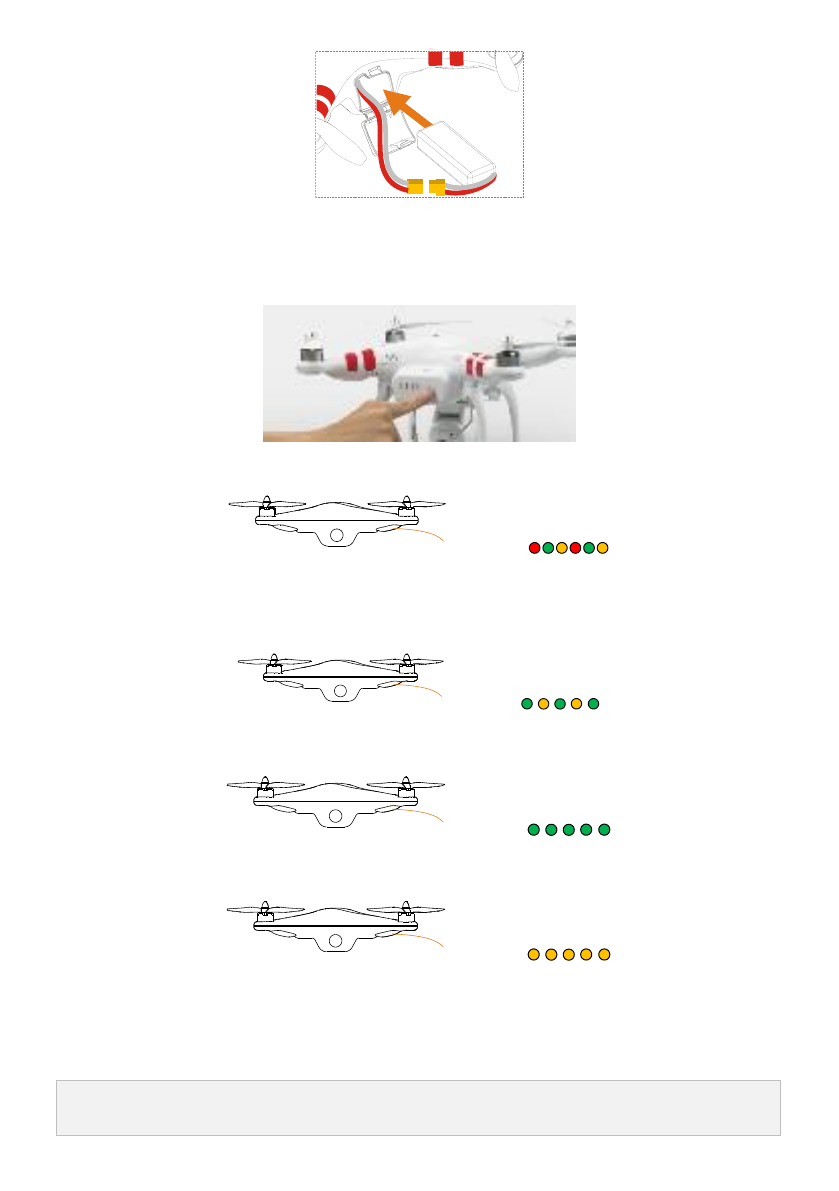
How to Do the Camera &Range Extender &DJI App Rebind
In the condition that your camera or range extender has been repaired or replaced by a new one, you need to
rebind camera and range extender to rebuilt a wifi-network, and use your DJI App to find the new wifi-network.
Step1: power on the camera and range extender, 10s later press the Rebind Button on Range Extender with a
cuspidal object, 5s later the SYSTEM LED is off.
Step2: wait patiently, the WiFi system of range extender will be restored about 25s later, and the SYSTEM LED will
blink green.
Step3:open DJI VISION App on your mobile device. Enter the SETTINGS->Binding,scan QR code on product
packaging, and follow instructions onDJI VISION App to operate. Finally a new Mac address will be acquired,
which indicates camera and range extender rebinds.
Step4:About 25s later, select the PHANTOM_xxxxxx network from WLAN of mobile device. Binding finished.
OFF
ON
Rebind Button

©2013 DJI Innovations. All Rights Reserved.13 |
Fig.3 SETTING Page Fig.4QR code
Aircraft of PHANTOM VISION Knowledge
View of PHANTOM VISION (including aircraft and camera)
Front View
Back View
Built-in Flight Control System
Including modules: Main Controller, GPS, Compass, Receiver
1
2
3
4
5
6
7
8
9
10
11
12
Propeller
Motor
Sticker
Nose LED
Battery Compartment
Damper
Camera Mount
Camera
Camera Lens
Compass
Landing Gear
Receiver Antenna (5.8GHz)
13
14
15
16
17
18
19
Flight LED
Camera Power Switch
Micro-SD Card Slot
Camera Function Button
Camera LED
Camera Power Plug
Camera Power Cable
Get the Aircraft Ready
1. Put the Battery into the Battery Compartment, and make sure it is firmly fixed.
1
2
10
4
5
6
7
11
9
3
8
12
13
14
15
16
17
18
19
©2013 DJI Innovations. All Rights Reserved.14 |
2. Press the power button twice to power on the aircraft. The power LED turns solid green on and the power
capacity LEDs are on showing the voltage situation. For more battery details please refer to the <Battery
and Charge Knowledge> section.
3. Keep the aircraft stationary until the system start and self-check has finished.
4. Aircraft is warming up.
Note: Motor Start is disabled duringaircraft warming up.
5. Ready to Fly
Ready to fly (non-GPS)
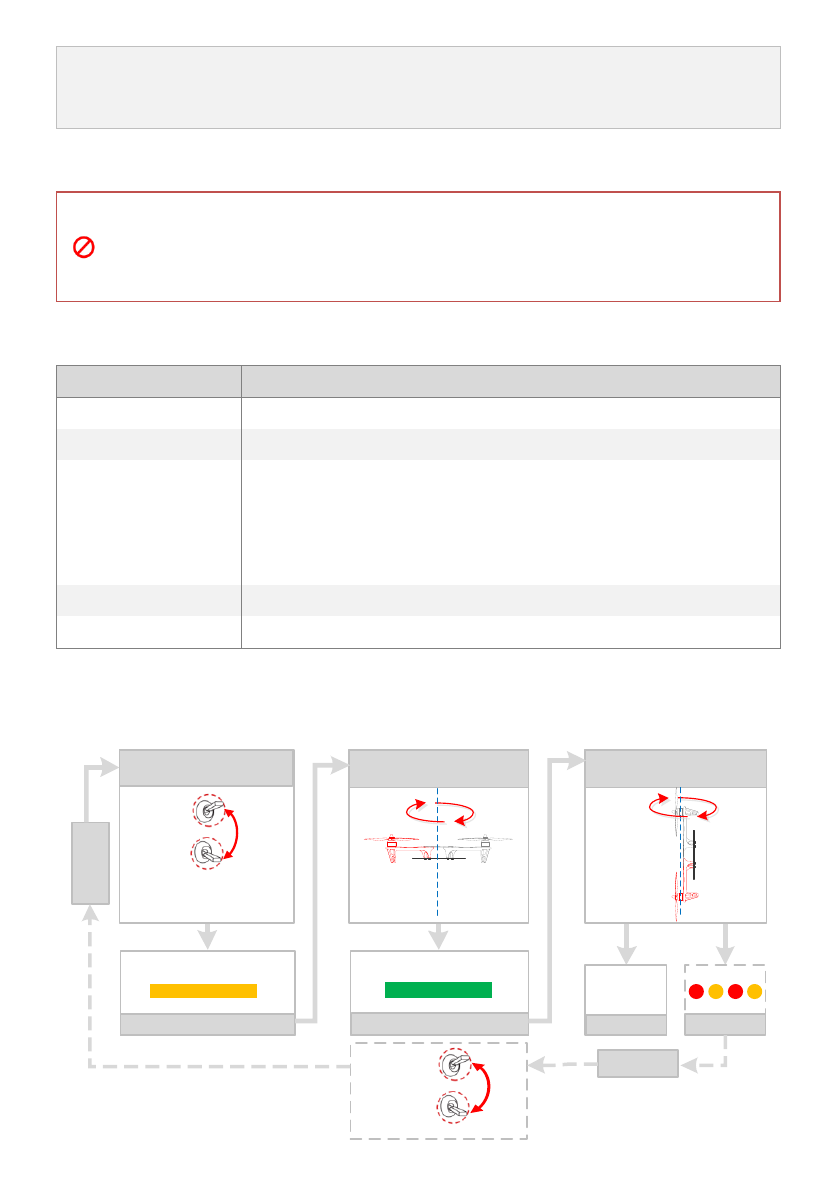
Compass Calibration Procedures
IMPORTANT: Make sure to do the Compass Calibration for the first time use.
The built-in Compass can assistant to position the aircraft, which is very important during flight. As we know,
the compass is very sensitive to electromagnetic interference, which will cause abnormal compass data, and
Aircraft LED
Aircraft LED
Aircraft LED
Aircraft LED
©2013 DJI Innovations. All Rights Reserved.15 |
lead topoorflight performance or even flight failure. Compass Calibration MUST be done for the first time use.
It is recommended to calibrate the compass outdoorsafter the Controller Unit finds 7 or moreGPS satellites.
Regular calibration enables the compass to keep optimal performance.
Calibration Cautions
(1) DO NOT calibrate your compass where there is strong magnetic interference, such as magnetite,
car park, and steel reinforcement under the ground.
(2) DO NOT carry ferromagnetic materials with you during calibration, such as keys or cell phones.
(3) Compass Calibration is very important; otherwise the flight control system cannot work.
Situations that require recalibration
Situations
Descriptions
CompassData abnormal
LED blinks red and yellow alternatively.
Flying field altered
Flying field has changed over a long distance.
Mechanical alteration
The mounting position of GPS-COMPASS PRO modulechanges.
Electronic units such as Controller Unit, CAN-HUB, battery etc. have been added,
removed, remounted or other alterations.
Mechanical structures of the aircraft has changed
Drifting during flying
Evident drifts occurred in flight such as the aircraft doesn’t fly straight
Attitude errors
LED often blinks error indicator when the aircraft turns around.
Calibration Procedures
Choose an open space to carry out the following procedures.
Control
Mode LED
Aircraft LED
Aircraft LED
Quickly flip the control
mode switch
360o Rotate the aircraft
horizontally
360oRotate the aircraft
vertically (Nose downward)
Manual
GPS
Manual
GPS
GPS->Manual->GPS once
Start horizontal calibration Start vertical calibration Succeed Fail
GPS->Manual->GPS
Flip 6~10 times
Start
cali
Re-calibrate
Aircraft LED
©2013 DJI Innovations. All Rights Reserved.16 |
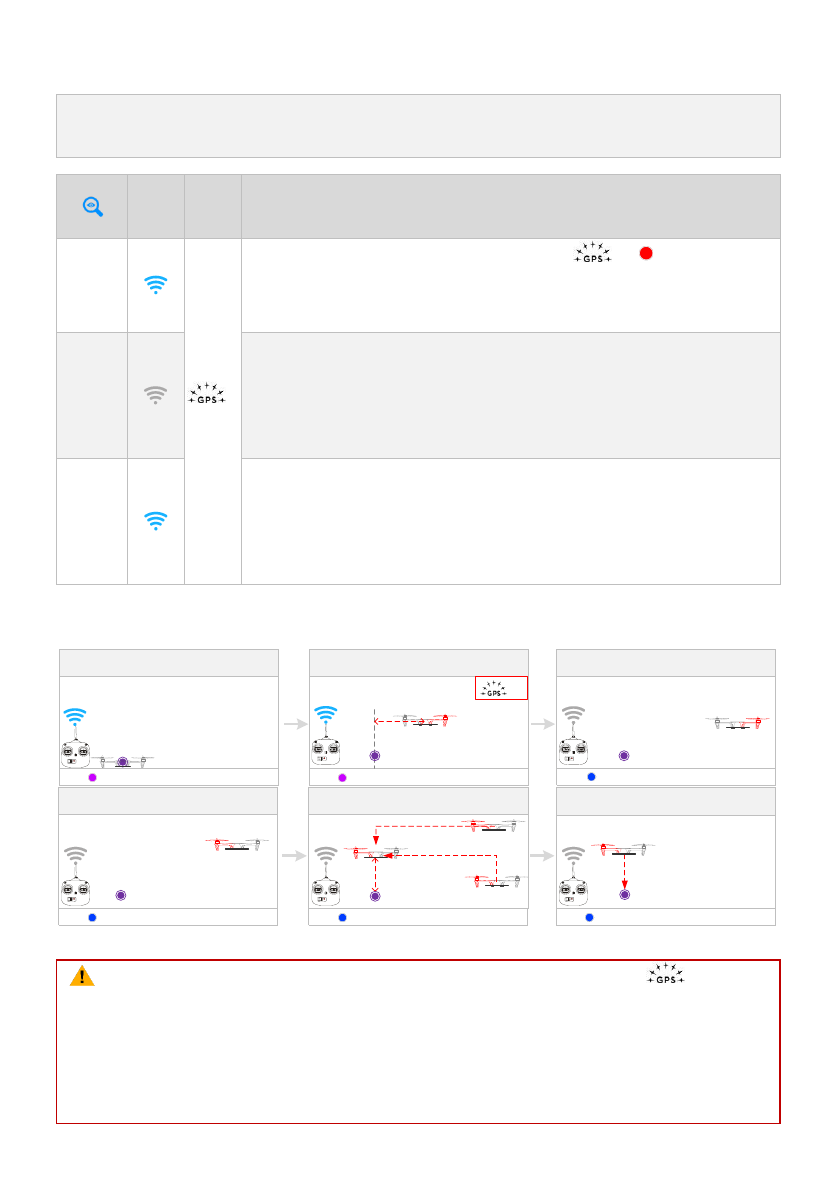
Failsafe Function
FailSafe works when the Transmitter (TX) signal is lost, the flight control system will automaticallycontrol the
aircraft to reduce injuries or damage.
TX
signal
Descriptions
Home
Point
(HP)
≥
6
30secs later after power on; 10secs later after ≥6( or no Red LED);
Motors have been started; auto-record the position as home point at the first time
the throttle stick is raised.
FailSafe
Flight control system can automatically control the aircraft after Transmitter signal
is lost. It should be set in Assistant software->Advanced->F/S, while Hover,
Go-Home or Alt Go-Home is optional.Additionally, a Go-Home switch can be
enabled.
One-Key
Go Home
Go Home switch can be used to trigger a “go home” without FailSafe. If One-Key
Go Home is enabled during flying, you no longer have controlof the aircraft, the LED
blinks in its Control Mode. If One-Key Go Home is disabled, you regain the control
at once. If already in a Failsafe condition, then the switch will not work.
Failsafe and Go Home procedures
1 Record Home Point (HP) 2 Confirm Home Point 3 Transmitter Signal Lost
5Go Home(20m can be customized)4 Signal Lost Lasts 3secs.
Height over HP<=20m
Height over HP>20m
6 Landing after Hovering 15secs
20m Elevate to 20m
LED LED LED
LED LED LED
<8m
≥7
(∝)(6) (∝)
(∝) (∝)(∝)
(1) The aircraft will not go home (only attitude stabilizing)in the condition that <6 or GPS is
not working, even if Transmitter signal is lost or Go Home switch is triggered.
(2) Itis recommended to set the Go Home switch in the Assistant software. Users are suggested to
enter Failsafe and go home by using the Go Home switch rather than turning off the Transmitter
in emergencysituations.
(3) Make sure there are no obstacles during aircraft go home and users are familiar with the
©2013 DJI Innovations. All Rights Reserved.17 |
methods to regain control.
How to regain control in FailSafe
GPS
ATTI 2
ATTI 1
Manual
Regain control
You have to toggle the control mode switch
once to regain control if the signal recovers, y.
Regain control as soon as signal recovers.
Low Voltage Protection
Low voltage protection is used to alert low battery voltage during flight; in this case, users should promptly
fly back the aircraft and land to avoid unexpected damages.
Protections
Option Selected
Conditions
LED
Aircraft
First
level
LED
----
(∝)
None
GH & Landing
Make sure the home point is recorded and
no obstacles in going home and landing
path.
(∝)
Go-Home & Landing
Second
level
LED
----
(∝)
None
Descending
----
(∝)
Descending directly
Go-Home & Landing Usage Tips
(1) The home point recorded is the same in both Failsafe and Low voltage protection. The aircraft will not
go home in the following cases :
a) Control mode is in Control Mode 1 (Manual or ATTI 1)
b) GPS signal is bad( <6)
c) The distance between aircraft and the home point is less than 25m, and the height over the
Home point less than 20m.
Descending Usage Tips
The aircraft will not hover when the throttle stick is at the mid point. Push the throttle stick to 90% of
endpoint, the aircraft will still ascend slowly if you continue to pull the throttle stick, and the control of Pitch,
Roll and Yaw are the same as before.
Please pay attention to the LED alert of low voltage and make sure the power is enough for go home
and landing.Insufficient power reserve will cause the aircraft to crash and other consequences.
©2013 DJI Innovations. All Rights Reserved.18 |
Cameraof PHANTOM VISION Knowledge
MainFunction Description
①Power Switch(on the back of the camera)
Three stops:
(1) OFF – Powered off
(2) CAM ON – Power on, Wi-Fi off
(3) WIFI ON –Power and Wi-Fi are both on
②LED Indicator (on the back of the camera)
LED
WIFI
CAMERA
Solid on
OFF
Power On; Idle State
Slow Blink (0.2s on, 1.8s off)
ON
Idle State
Fast Blink (0.1s on, 0.3s off)
ON
Accessing photos and videos in the camera
Solid on
OFF
Recording
Blink Once(0.2s on, 0.3s off)
ON/OFF
making a single capture
Blink 3 Times(0.1s on, 0.1s off)
ON/OFF
making a multiple capture,3 or 5 pictures per shot
Fast Blink(0.1s on, 0.3s off)
ON/OFF
Firmware Upgrading
(0.2s green, 1.8s amber)
ON
Recording
Solid on
ON/OFF
Critical error
Blink Slow (0.2s on, 1.8s off)
ON/OFF
Sensor error
Blink Once(0.2s on, 0.3s off)
ON/OFF
Operation failed
Blink 3 Times(0.1s on, 0.1s off)
ON/OFF
SD Card error
Blink Fast(0.1s on, 0.3s off)
ON/OFF
Upgrade error
(0.5s Green, 0.5s Amber,
0.5s Red, 0.5s Off)
ON/OFF
Camera overheat
When camera temperature goes above 80℃, the LED indicator will blink and the camera will
automatically power off when the temperature goes above 85℃
Statuses including Red is either error or malfunction
③Micro-SD Card Slot(on the back of the camera)
Make sure that the Micro-SD card is inserted before you take any pictures or make any videos.
④Function Button(on the bottom of the camera)
Camera in idle state
short press (<2s)
single capture

©2013 DJI Innovations. All Rights Reserved.19 |
long press (≥2s)
record
Camera in non-idle state
any press
back to idle state
©2013 DJI Innovations. All Rights Reserved.20 |
DJI VISION App
DJI VISION App is installed for remote control of Camera Setting, Capture and Recording, Camera Pitch Control,
Aircraft Yaw Control, and GPS Assistant Orientation.
Before Use
Downloadand Installation
Approach 1: Scan QR code to get the DJI VISION App andinstall it on your mobile device.
Approach 2:
For iOS User: Search”DJI VISION”in the App Store, download and install it on your mobile device.
For Andriod User: Search”DJI VISION”in the Google Play, download and install it on your mobile device.
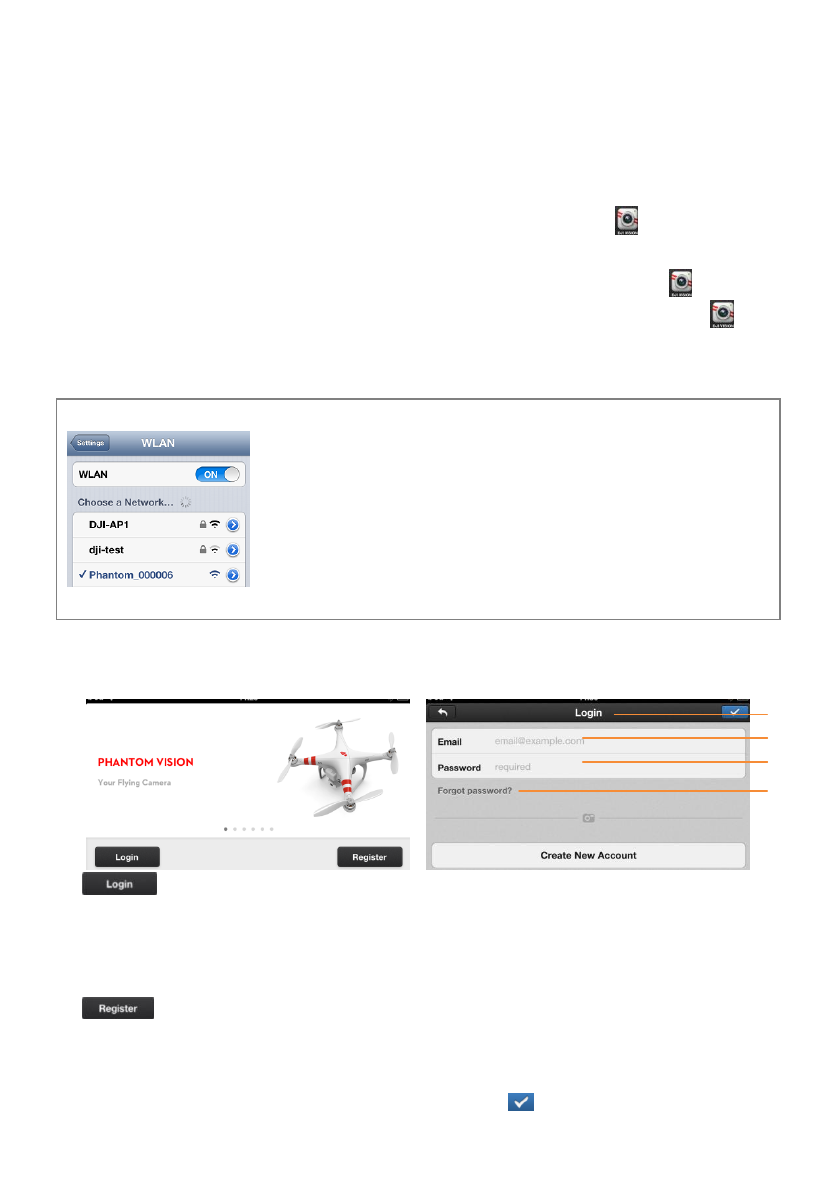
Wi-Fi Network Selection
1) Turn on the WLAN of your mobile device and connect to the
PHANTOM_xxxxxx (SSID) network for remote control by DJI VISION App.
2) Select a Wi-Fi network to the Internet if you want to share your photos
or videosor read DJI news.
Note1: For the first time you open the DJI VISION app, Internet accessibility is
necessary for you to finish login or new account creation.
Note 2: the SSID is unique for each Camera.
Register and Login
[1] LoginButton:
The first time you usethe DJI VISIONApp you should login in.
Note: (1) Internet accessibility is necessary.
(2)You can change your user/password in the App Settings page.
[2] RegisterButton
Create a new account if you do not have one already.
[3] [4][5]Login Page
Enter your registered email address and password here. And then click to login.
[6] Forget Password
[3]
[4]
[5]
[6]
©2013 DJI Innovations. All Rights Reserved.21 |
If you do have an account, but forget the password, click to retrieve it.
[7] Using Tips
Using tips will display for welcoming your first entering into.
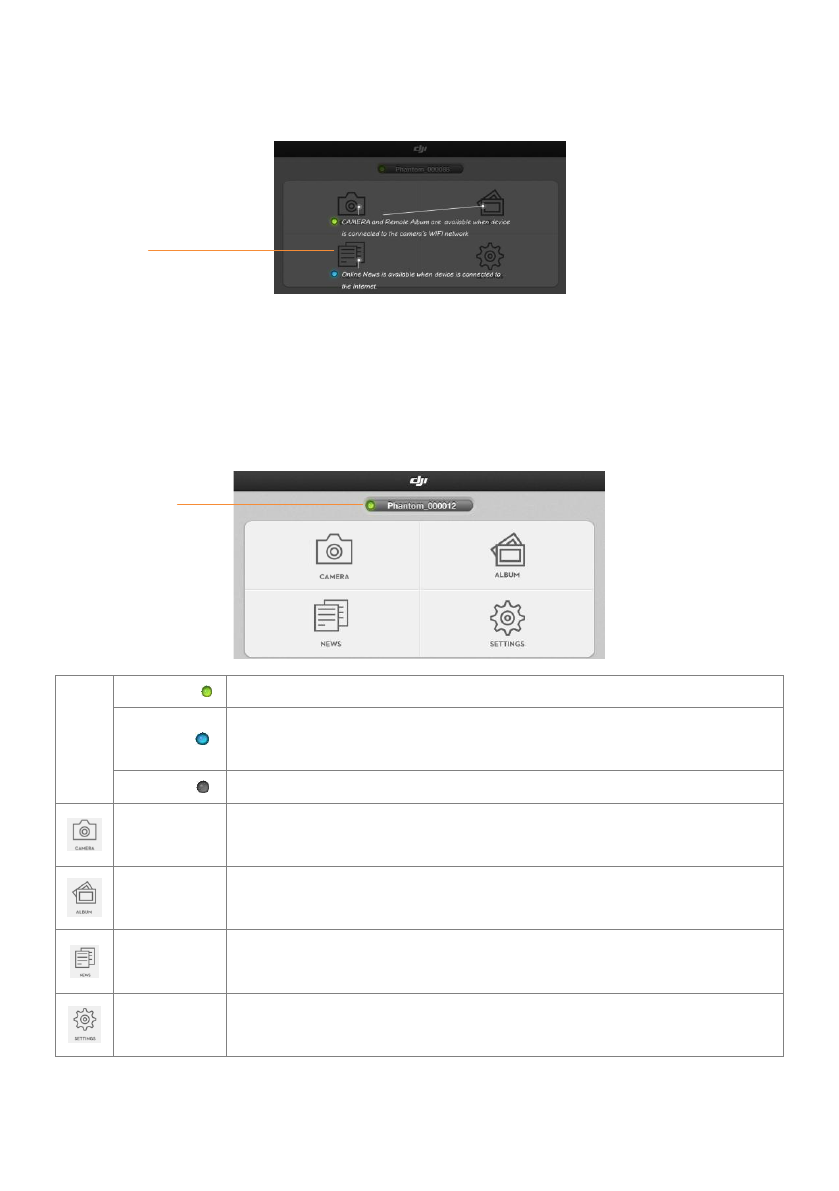
Main Page
After login you will come to the main page. In this page, you can see the current Wi-Fi connection, and four icons
that represent the four functionalities of this App.
[1]
Green Light
Camera has been connected to, and the Camera and SD Card album are available.
Blue Light
Internet has been connected, photos and videos can be shared and DJI news can be
refreshed.
Gray Light
No Wi-Fi connection
Camera
Click to enter the camera preview page
Album
Click to enter the Album page
News
Click to enter the DJI news page
Settings
Click to enter the App settings page
[7]
[1]

©2013 DJI Innovations. All Rights Reserved.22 |
Camera Page
Basic Usage
[1] Return to the preview page
[2] Camera gimbal control switch
1) In normal state: the camera gimbal is controlled by theupwardarrow [3] and downward arrow [4]
on the preview page. Press to turn up the camera, and to turn down the camera.
2) In high light state (blue): the camera gimbal is controlled by the iOS’s gyroscope sensor and gravity
sensor.
Camera Original StateCamera Pitch Down
[5] Flight attitude
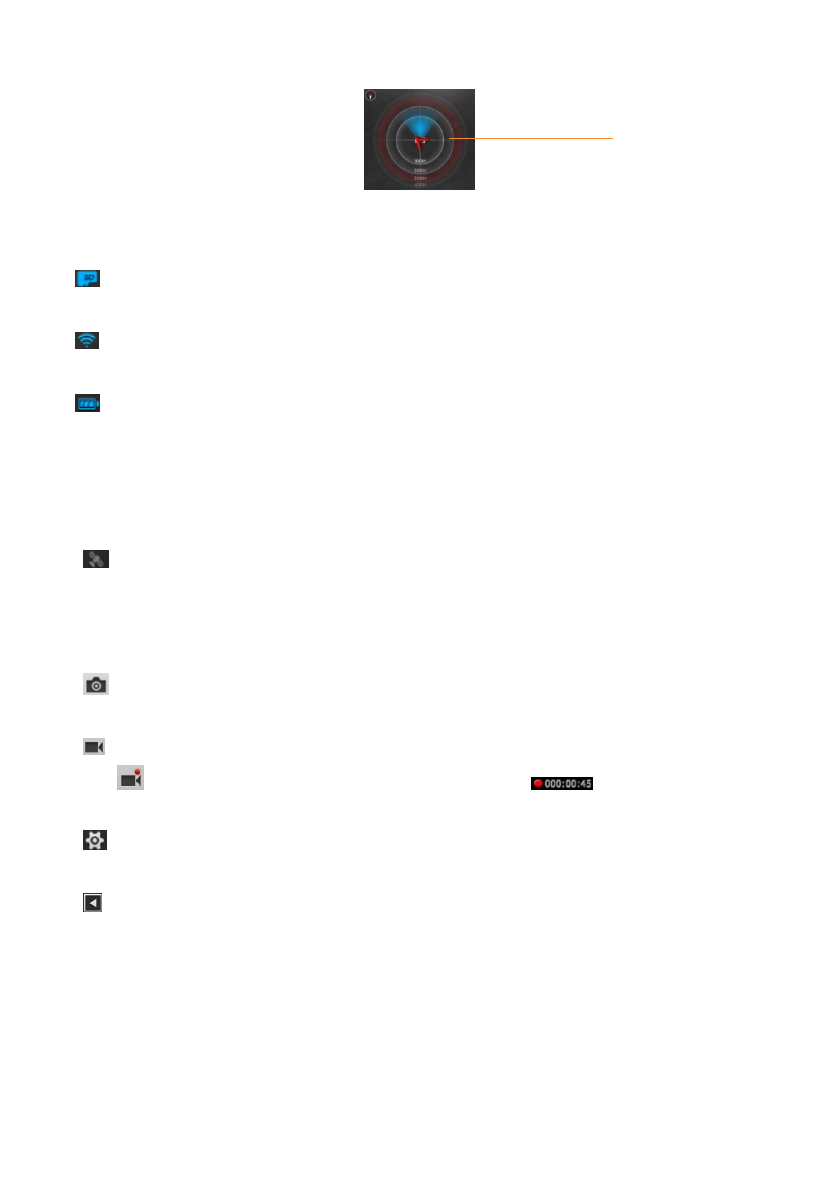
Click it to obtain the Pitch, Roll and Yawinformation, which can help you find the aircraft if the aircraft fly far away
[1]
[2]
[3]
[4]
[5]
[6]
[7]
[8]
[9]
[10]
[11]
[12]
[13]
[14]
[15]
Pitch up
©2013 DJI Innovations. All Rights Reserved.23 |
from you.It is also known as the Radar function.
[6]Flight parameters
If the connection between the camera and the NAZA is ok, these “N/A”s should be meaningful digits
[7] SD Card Status
Highlighted when a valid SD card is inserted, otherwise, grayed out.
[8] Wi-Fi Signal Intensity
The Camera is connected to the Range Extender correctly and Wi-Fi is working normally.
[9] Aircraft Battery Level
3 grids: > 11.80V
2 grids: 11.30V to 11.80V
1 grid: 11.20V to 11.30V (should fly back)
0 grid: <= 11.20V (should land immediately)
[10] Aircraft GPS status
Highlighted when more than 6 satellites are found, otherwise, grayed out.
[11]Remained shots
It is calculated based on the current selected photo size. Zero if SD card is not inserted
[12] Camera Capture Button
Capture Button is disabled during the process of recording.
[13] Camera Record Button
A red dot blinks when the camera is recording, and the time elapsed is displayed on the top right
corner of the preview screen.
[14] Hide or show camera settings
Click to enter camera settings, and click again to exit.
[15] Hide or show flight parameters.
Click to hide flight parameters, and click again to show flight parameters.
[17]
©2013 DJI Innovations. All Rights Reserved.24 |
Camera Settings
[1]Capture Mode
Single Capture. One picture per shot.
Multiple Captures. 3 pictures per shot.
Multiple Captures. 5 pictures per shot.
Continuous Capture. Also needs to select:
a) Intervals between two shots (1~60
seconds)
b) Number of shots (2~254, or infinite shots)
Note: Capture Button changes accordingly.
[2]Photo Format
JPEG
Raw(one *.jpg and one *.raw will be generate simultaneously per
shot when this option is selected)
Note: raw photo format is not supported by multiple capture mode or continuous capture mode.
[3]Photo Size. Below options are supported.
Large: 4608 x 3456, 4:3, 16MP
Sub-large: 4384 x 3288, 4:3, 14.4MP
Medium: 4384 x 2922, 3:2, 12.8MP
Small: 4384 x 2466, 16:9, 10.8MP
[4] Video Resolution. Below options are supported.
1920x1080 60i, 16:9
1920x1080 30p, 16:9
1280x960 30p, 4:3
[1]
[2]
[3]
[4]
[5]
[6]
[7]
[8]
[9]
[10
]
[11
]
[12
]
[13
]
©2013 DJI Innovations. All Rights Reserved.25 |
1280x720 60p, 16:9
1280x720 30p, 16:9
640x480 30p, 4:3 (VGA)
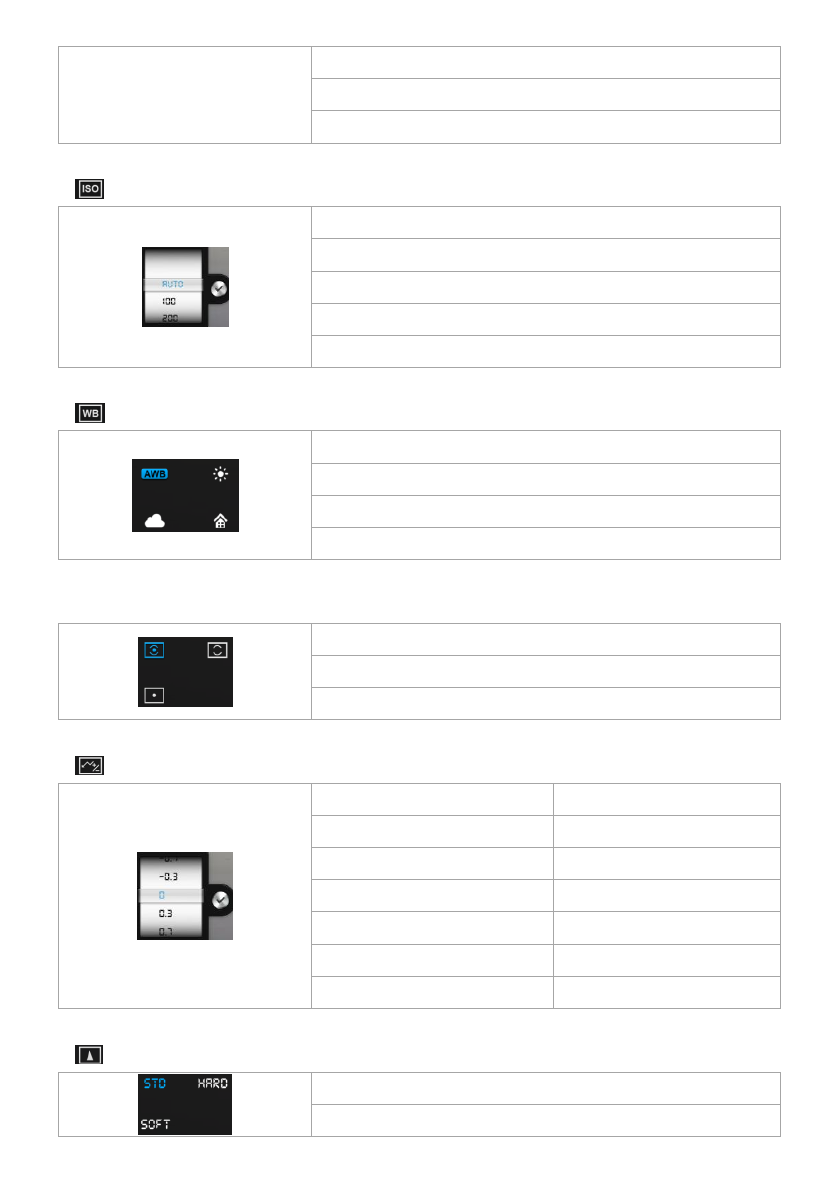
[5] ISO. Below options are supported.
AUTO
100
200
400
800
[6] White Balance. Below options are supported.
AWB (auto)
Sunny
Cloudy
Indoor
[7]Exposure Metering. Below options are supported.
Center
Average
Spot
[8] Exposure Compensation. Below options are supported.
-2.0
2.0
-1.7
1.7
-1.3
1.3
-1.0
1.0
-0.7
0.7
-0.3
0.3
0
[9] Sharpness. Below options are supported.
Standard
Hard
©2013 DJI Innovations. All Rights Reserved.26 |
Soft
[10] Contrast. Below options are supported.
Standard
Hard
Soft
[11] Anti-flicker. Below options are supported.
Auto
50Hz
60Hz
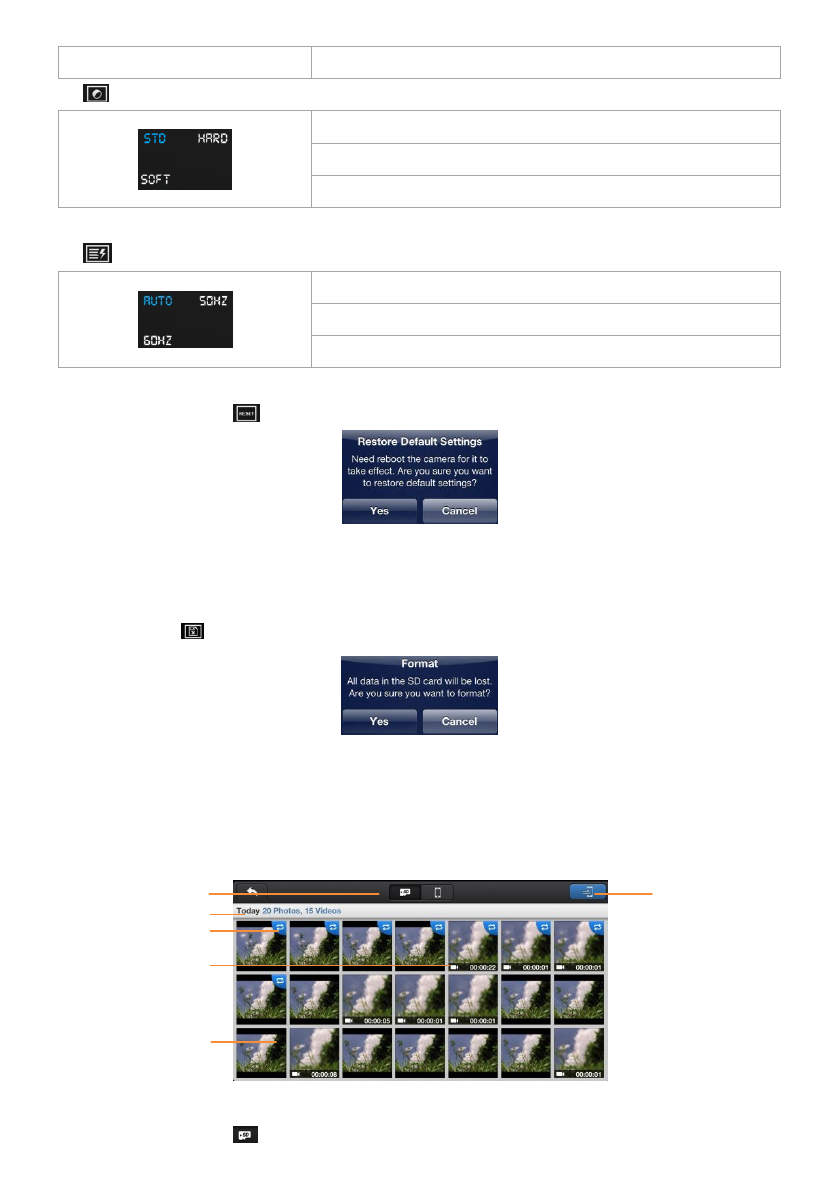
[12]Restore Default Settings .
Note:
1) Reboot is needed to make it take effect.
2) Restore default settings are recommended after each firmware upgrade.
[13]Format SD Card
Note: all data in the SD card will be lost after format operation, so be sure to do data backup before doing it.
Album Page
Album inCamera SD Card
[1]In Camera SD CardAlbum
[1]
[2]
[3]
[4]
[5]
[6]
©2013 DJI Innovations. All Rights Reserved.27 |
You can browse all photos and videos in the SD card, view a selected picture or play a selected video.
[2]Photos and Videos are listed and grouped by date.
[3]All those photos and videos that had been synchronized to the mobile device are identified .
[4] Video thumbnails, with a recorder token and time duration on them. Click a video thumbnail to play a single
video.A play progress bar appears at the bottom of the screen.
[5]Photo thumbnails that hasn’t been synchronized to the mobile device.Click a Photo thumbnail to view a single
picture. You can slip left or right to view the previous or next picture.
[6]Synchronize Button . Click this button to enter synchronize mode.
In Synchronize Mode
(1) A synchronization progress bar (1) appears in this mode with a “tick” on the right.
(2) You can select photos or videos and then click , the synchronization process then begins.
(3) You can exit synchronize mode by a click on button (3).
(3)
(2)
(1)
©2013 DJI Innovations. All Rights Reserved.28 |
(4) You can synchronizesingle pictureor video,or synchronize and pay a video at the same time.
Synchronizea picture Synchronize and pay a video
You can also synchronizemultiple pictures or videos at a time.
(1) Click thumbnails to select photos or videos to synchronize to your mobile device. The thumbnails identified
by this tokenaresuccessfully selected.
(2) Or you can select one or more groups to be synchronized.
(3) The number of photos and videos that have been selected is displayed here.
(4) Synchronizing…
You can click to stop the synchronization process. Those photos and videos that have been copy to your
iPhone in this synchronization process will remain there as a result.
Album In mobile device
[1]Album In mobile device
You can browse all photos and videos in the album created by the App on your mobile device, view a selected
picture or play a selected video.
[2]Sorted by capture time .Pictures and videos are listed in thumbnail style
(1)
(2)
(2)
(3)
(2)
(4)
[2]
[3]
(2)
[1]
[5]
[4]
(2)
©2013 DJI Innovations. All Rights Reserved.29 |
[3]Sorted by places .GPS information is embedded into the pictures and videos.
Note: Accessibility to the Internet is necessary for it to refresh the map.
[4] Click any picture to view a single picture. You can slip left or right to view the previous or next picture.
[5] Click any video toplay a single video. A play progress bar appears at the bottom of the screen.
[6] Share your pictures and videos to social network sites.
Note1: Accessibility to the Internet is necessary to share pictures or videos.
Note2: video sharing is not available currently, but it will be ready in the near future, including youtube, vimeo.
News Page
[1]News List
(1) Scroll up to update
(2) Scroll down to load more
Note: need connection to the Internet.
[2]News Detail
Click any item of news list to get news detail.
[6]
(2)
[1]
(2)
[2]
(2)
©2013 DJI Innovations. All Rights Reserved.30 |
Settings Page
Turn the switch from left to right to enable it.
[1]Toolbar Auto Hide. Turn the switch from left to right to enable it.
Auto HideDisabledAuto Hide Enabled
[2]Use GPS Data.Turn the switch from left to right to enable it.
When this option is enabled, your mobile device will send its own GPS information, if it has, to the camera upon
its connection establishment to the camera. So the camera can have an initial GPS information in case the
PHANTOM GPS module could not find enough satellites (>6). This initial GPS information may be overridden by
the GPS information got from the PHANTOM GPS module by the camera afterwards.
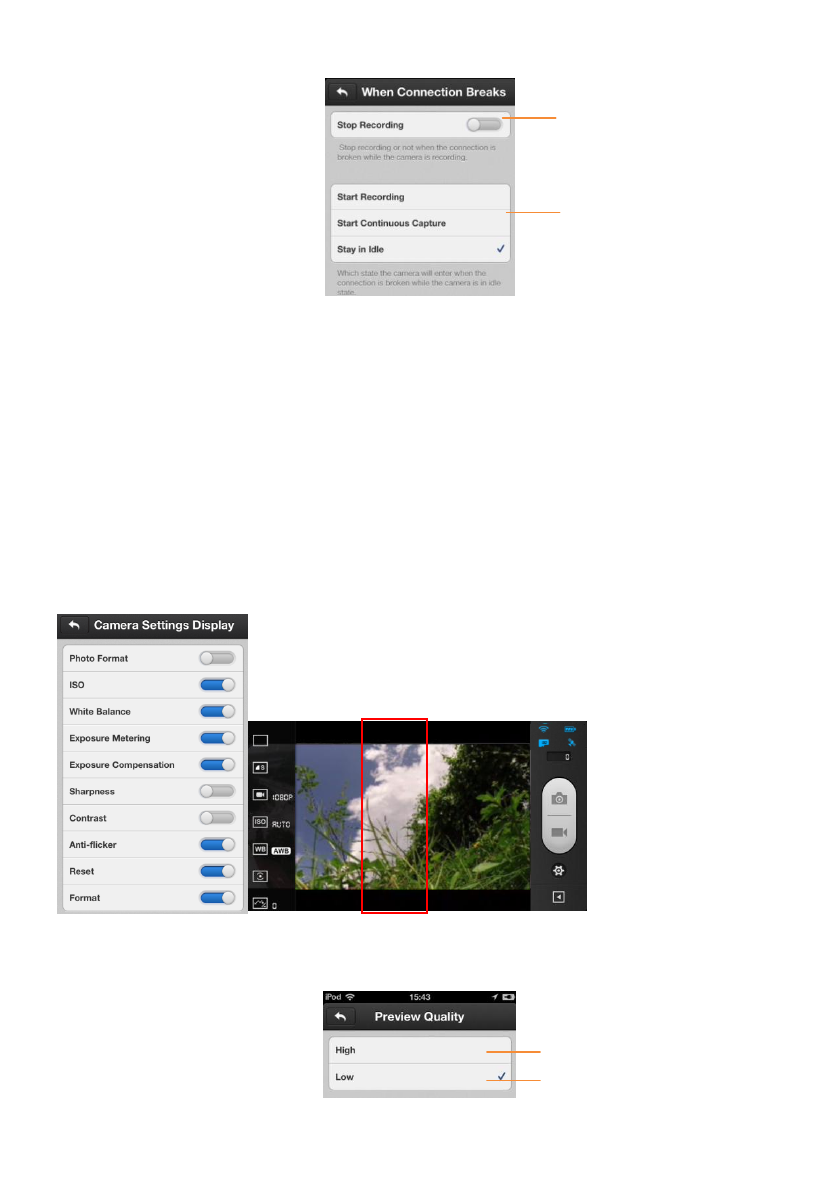
[3]When connection breaks. Click this item to enter the detailed page.
[1]
[2]
[3]
[4]
[5]
[6]
(2)
[7]
[8]
[9]
[10]
[11]
[12]
[13]
[14]
[15]
[16]
©2013 DJI Innovations. All Rights Reserved.31 |
(1) If enabled, the camera stops recording when the connection between your iPhone and the camera breaks
while the camera is in recording state. If disabled, the camera keeps recording when the connection
between your iPhone and the camera breaks while the camera is in recording state.
(2) Here you can select what the camera to do when the connection between your mobile device and the
camera breaks while the camera is in idle state. This is for those cases that the connection is lost but you
don’t want to miss the scenes that should have been taken by this flight.
[4]Camera Settings Display. Click this item to enter the detailed page.
These options determine which camera parameters will be shown in the camera parameter list in the camera
preview page. For example, here disable the Photo Format item, and then it is hidden.
[5]Preview Quality. Click this item to enter the detailed page.
(1) High: 320x240@30fps
(1)
(2)
(1)
(2)
©2013 DJI Innovations. All Rights Reserved.32 |
(2) Low: 320x240@15fps, recommend to be used under weak Wi-Fi signal condition.
Note: may add an option of 640x480@30fps in the future.
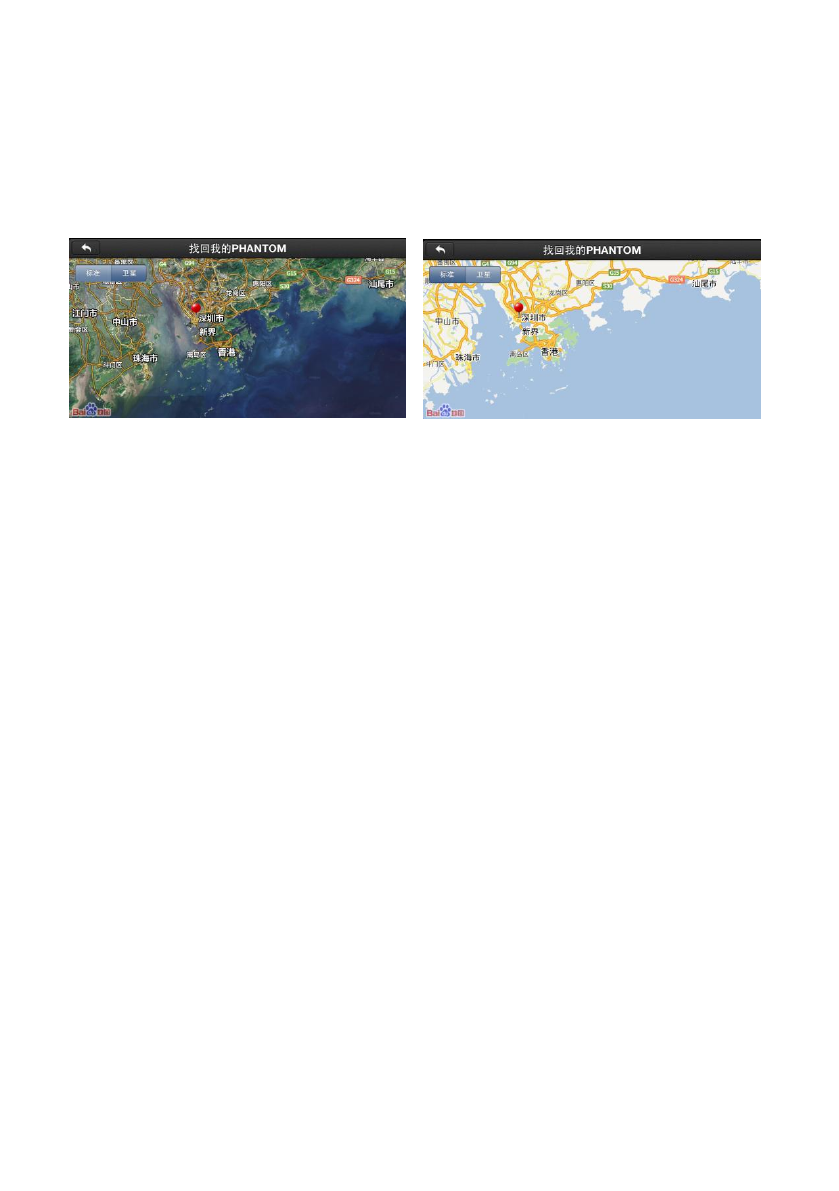
[11]Binding
[12] Find MY PHANTOM
Fig.1:Satellite mode
Fig.2:Standard mode
©2013 DJI Innovations. All Rights Reserved.33 |
Appendix
Assistant software& MC/PMU Firmware Upgrade
Before upgrade, make sure your computer is connected to the Internet and close anti-virus software and firewall
during the firmware upgrade.Please follow belowsteps to update software and firmware.
1. Open your PC, power on PHANTOM VISION and connect it to PC with USB extender.DO NOT break
connections until firmware upgrade is finished.
2. Run the Assistant software and confirm MC is connected.
3. Click “Info” to view your current software version, if there has updates you can down and install.
4. Click “Upgrade” to view your current firmware version, if there has updates you can down and install.
5. Wait until the Assistant software shows “finished” and power cycle. Up to date OK.
Note: If firmware upgrade failed, the system will enter waiting for firmware upgrade status automatically,
please try again with above steps.
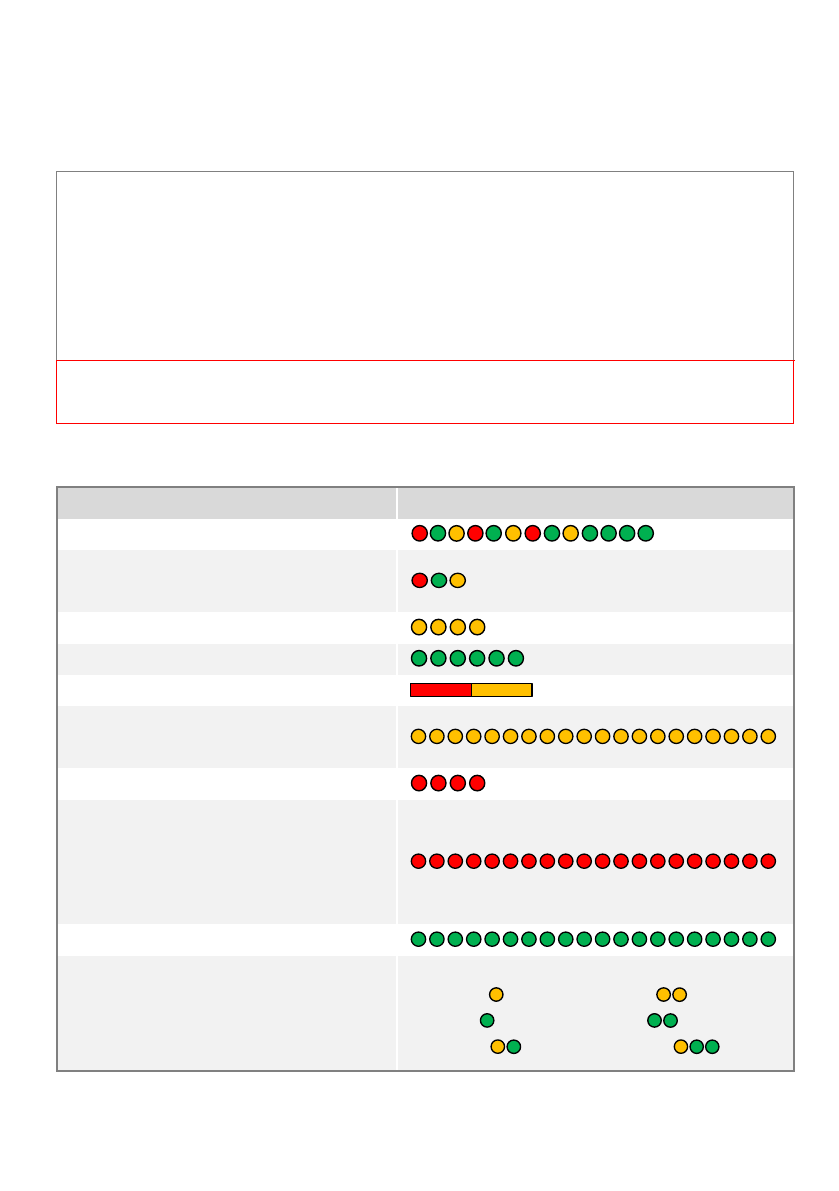
Autopilot System LED Description
System Status
LED Flashing
System start and self-check
IMU abnormal data or need advanced
calibration*
Warm up after power on
The aircraft is moved or bias of sensors too big
Compass error too big, need recalibration.
Transmitter (TX) signal lost, enter the FailSaf
e.
TX stick(s) mid point error too big
Low voltage alert or other abnormal alert*
(e.g. Configuration error, TX data error, Enab
le low voltage protection without PMU, SN er
ror or Compass abnormal work.)
Record forward direction or home point
Control Mode Indictor
Manual Mode**: None
ATTI. Mode: ( stick(s) not at center )
GPS Mode: ( stick(s) not at center )
IOC Mode**: ( stick(s) not at center )

©2013 DJI Innovations. All Rights Reserved.34 |
GPS Signal State Indicator
(GPS/Compass Module is necessary)
GPS Signal is Best(GPS Satellite number > 6): None
GPS Signal is Well(GPS Satellite number = 6):
GPS Signal is Bad (GPS Satellite number = 5) :
GPS Signal is Worst (GPS Satellite number < 5):
*You can figure out the error by connecting the autopilot system to the Assistant Software.
**Should be enabled on the Assistant Software.
Specification
General
Features
Aircraft and camera integration, less weight, multi-functions
Camera remote-controlled by DJI VISION app on mobile
device
WIFI communicating distance enlarged to 300m by Range
Extender
Built-in anti-vibration gimbal
High safety by Low-voltage alert and forcing landing
Auxiliary GPS locating for disappearing aircraft
Electrical & Mechanical
Working Voltage Range(Aircraft with camera)
12.4V
Power Consumption(Aircraft with camera)
Stationary after power on: 9V
Start Motors: 18V
Operating Temperature
-10~40oC
Weight
Aircraft(With gimbal & camera):
Transmitter
MobileDevice Mounting
Range Extender
Aircraft(Flight parameterscan be effected by mechanical performance and payloads)
Supported Battery
4400mAh Lipo Battery
Flying Load
<1200g
Hovering Accuracy (GPS Mode)
Vertical:± 0.8m;Horizontal:± 2.5m
Max Yaw Angular Velocity
200°/s
Max Tilt Angle
35°
Max Ascent / Descent Speed
±6m/s
Max Flying Speed
10m/s
wheelbase
350mm
Tilting Range of Gimbal
0°-60°

©2013 DJI Innovations. All Rights Reserved.35 |
Transmitter
Operating Frequency
5.728GHz~5.844GHz
Channel Numbers
16
Communication Distance(open outside)
300m
Receiver Sensitivity(1%PER)
>-93dBm
Transmitting Power
<18dBm
Working Current/Voltage
60 mA@6V
Battery
4 AA Batteries(5#)
Operating Temperature
0°C~40°C
Camera
Resolution
14 Mega Pixels
FOV
140 °/ 120° / 90 °
Sensor size
1/2.3’
Functions
Remote-controlled and parameter set by mobile device
Support multi-capture, continuous capture and timed
capture
Recording supports HD,1080p30,1080i60
Single capture supports RAW and JPEG
Operating Temperature
0°C~40°C
Range Extender
Operating Frequency
2412-2462MHz
Communication Distance(open outside)
200m
Transmitting Power
<=17dBm
Power Consumption
1.5W
Operating Temperature
0°C~40°C
DJI VISION App
mobile device Supported
iOS 6.0 vision or above(iPhone recommended)
Functions
Camera parameters setting
FOV scene real-time display
Remote-control aircraft and camera
Auxiliary GPS locating
Warning
This equipment complies with FCC RF radiation exposure limits set forth for an uncontrolled environment.
This device complies with part 15 of the FCC rules. Operation is subject to the following two conditions: (1) this
device may not cause harmful interference, and (2) this device must accept any interference received, including
interference that may cause undesired operation.

©2013 DJI Innovations. All Rights Reserved.36 |
NOTE: The manufacturer is not responsible for any radio or TV interference caused by unauthorized
modifications or changes to this equipment. Such modifications or changes could void the user’ authority to
operate the equipment.
NOTE: This equipment has been tested and found to comply with the limits for a Class B digital device, pursuant
to part 15 of the FCC Rules. These limits are designed to provide reasonable protection against harmful
interference in a residential installation. This equipment generates uses and can radiate radio frequency energy
and, if not installed and used in accordance with the instructions, may cause harmful interference to radio
communications. However, there is no guarantee that interference will not occur in a particular installation. If
this equipment does cause harmful interference to radio or television reception, which can be determined by turn
ing the equipment off and on, the user is encouraged to try to correct the interference by one or more of the
following measures:
- Reorient or relocate the receiving antenna.
- Increase the separation between the equipment and receiver.
-Connect the equipment into an outlet on a circuit different from that to which the receiver is connected.
-Consult the dealer or an experienced radio/TV technician for help
When using the device, ensure that the antenna of the device is at least 20cm away from all persons.
CAUTION RISK OF EXPLOSION IF BATTERY IS REPLACED BY AN INCORRECT TYPE. DISPOSE OF USED
BATTERIES ACCORDING TO THE INSTRUCTIONS.
Hereby, SZ DJI TECHNOLOGY Corporation declares that this device is in compliance with the essential
requirements and other relevant provisions of Directive 1999/5/EC.