SZ DJI TECHNOLOGY AG4051701 AGRAS MG-1S User Manual
SZ DJI TECHNOLOGY CO., LTD AGRAS MG-1S
User Manual
AGRAS MG-1S
User Manual
V1.0 2017.01
© 2017 DJI All Rights Reserved. 2
Contents
Overview ....................................................................................................................................................................................... 3
Aircraft .................................................................................................................................................................................. 3
Remote Controller ........................................................................................................................................................... 4
Remote Controller .................................................................................................................................................................... 5
Using the Remote Controller ..................................................................................................................................... 5
Remote Controller LEDs ............................................................................................................................................... 7
Aircraft ........................................................................................................................................................................................... 9
Flight Modes ...................................................................................................................................................................... 9
Operation Modes............................................................................................................................................................. 9
Terrain Follow System ................................................................................................................................................. 13
System Data Protection ............................................................................................................................................. 15
Manual Obstacle Avoidance .................................................................................................................................... 15
Empty Tank Warning ................................................................................................................................................... 17
Flight ............................................................................................................................................................................................ 18
Starting and Stopping the Motors ....................................................................................................................... 18
Appendix .................................................................................................................................................................................... 19
Specifications .................................................................................................................................................................. 19
Aircraft Status Indicator Description ................................................................................................................... 21
© 2017 DJI All Rights Reserved. 3
Overview
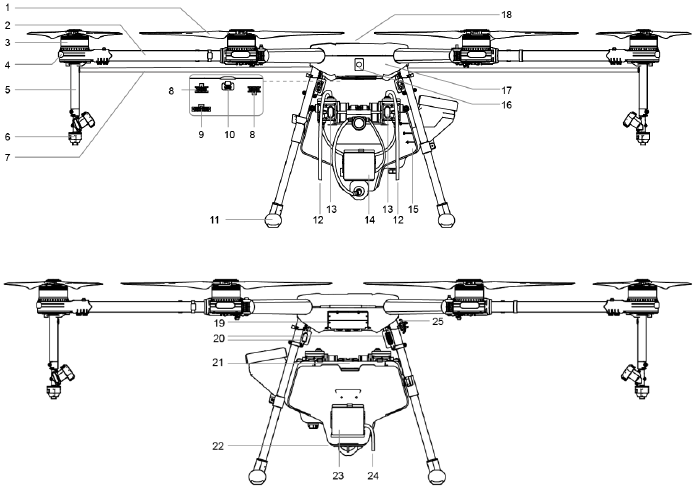
Aircraft
1 Propellers
2 Frame Arms
3 Motors
4 Orientation LEDs
5 Sprinklers
6 Nozzles
7 Hoses
8 Pump Motor Port
9 Radar Port
10 Micro USB Port
11 Landing Gear
12 Pump Motor Cable
13 Delivery Pump
14 Rear Radar Module (Terrain Follow System)
15 Spray Tank
16 Aircraft Status Indicator (Aircraft's Rear)
17 Aircraft Body
18 GPS Module
19 Intake Vent (Aircraft's Front)
20 Power Ports
21 Battery Compartment
22 Downward Radar Module (Terrain Follow System)
23 Forward Radar Module (Terrain Follow System)
24 Radar Cable
25 Remote Controller Holder
© 2017 DJI All Rights Reserved. 4
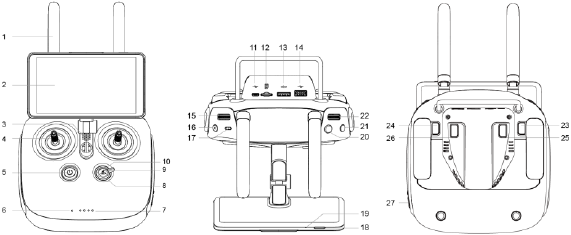
Remote Controller
1 Antennas
Relays the aircraft control signals.
2 Display Device
With Android system to run DJI MG-1S app.
3 Speaker
Audio output.
4 Control Sticks
Controls the aircraft movement. Can be set to
Mode 1 or Mode 2, or to a custom mode.
5 Power Button
Used to turn the remote controller on and off.
6 Status LED
Indicates whether the remote controller is linked
to the aircraft.
7 Battery Level LEDs
Display the current battery level.
8 RTH Status LED
Circular LED around the RTH button which
displays the RTH status.
9 Operation Mode Switch
Used to switch between Smart, Manual and
Manual Plus Operation Mode.
10 RTH Button
Press and hold this button to initiate Return-to-
Home (RTH).
11 Micro USB Port
Reserved.
12 Micro SD Card Slot
Provide extra storage space for the display
device, maximum supporting 128 GB.
13 CAN Port
Used to connect other accessories, such as a GPS
module.
14 USB Port
USB device support.
15 Spray Rate Dial
In Manual Operation Mode, turn the dial to
adjust the spray rate.
16 Spray Button
In Manual Operation Mode, press to start/stop
spraying.
17 Flight Mode Switch
Used to switch between P-mode (Positioning), A-
mode (Attitude) and M-mode (Manual).
18 Sleep/Wake Button
Press to sleep/wake the screen, press and hold to
restart.
19 Microphone
Reserved.
20 Button A
Records Point A of the operation route.
21 Button B
Records Point B of the operation route.
22 Flying Speed Dial
In Smart Operation Mode, turn and press the dial to
adjust the flying speed.
23 Button C1
Press to choose operation route L for Smart
Operation Mode.
In Manual Plus Operation Mode, press to fly the
aircraft left for one operation gap.
24 Button C2
Press to choose operation route R for Smart
Operation Mode.
In Manual Plus Operation Mode, press to fly the
aircraft right for one operation gap.
25 Button C3
In Manual Operation Mode, press to use only the
front two sprinklers.
26 Button C4
In Manual Operation Mode, press to use only the rear
two sprinklers.
27 Power Port
Connects to a power source to charge the remote
controller’s internal battery.
© 2017 DJI All Rights Reserved. 5
Remote Controller
Using the Remote Controller
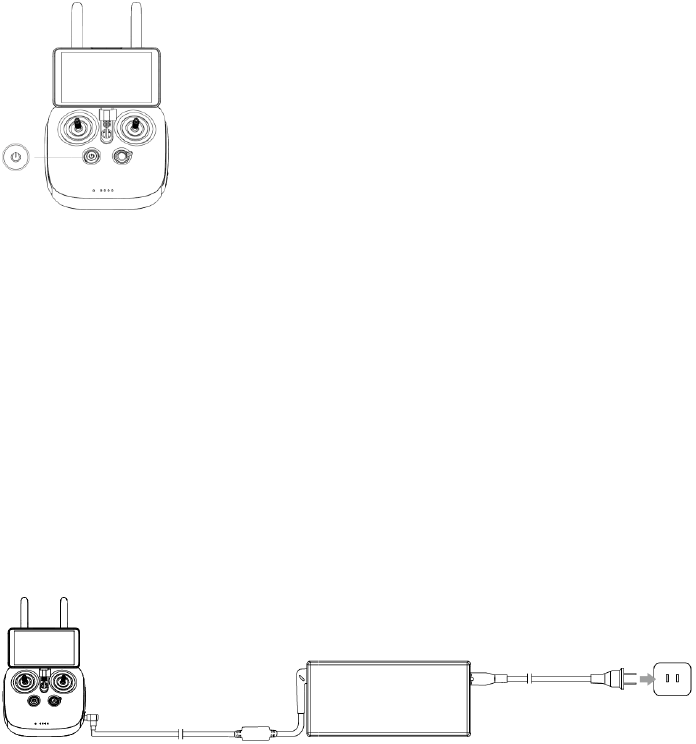
Turning the Remote Controller On and Off
The remote controller is powered by a 2S rechargeable battery that has a capacity of 6000 mAh.
The battery level is indicated via the Battery Level LEDs on the front panel. Follow the steps below
to turn on your remote controller:
1. When the remote controller is turned off, press the Power Button once. The Battery Level LEDs
will display the current battery level. Charge the battery if the battery level is low.
2. Press the Power Button once. Then press again and hold the Power Button to turn on the remote
controller.
3. The remote controller will beep when it is turned on. The Status LED will rapidly blink green,
indicating that the remote controller is linking to the aircraft. The Status LEDs will glow solid green
when linking is complete.
4. Repeat Step 2 to turn off the remote controller.
Charging the Remote Controller
Charge the remote controller using the included charger. Refer to the figure below for more details.
© 2017 DJI All Rights Reserved. 6
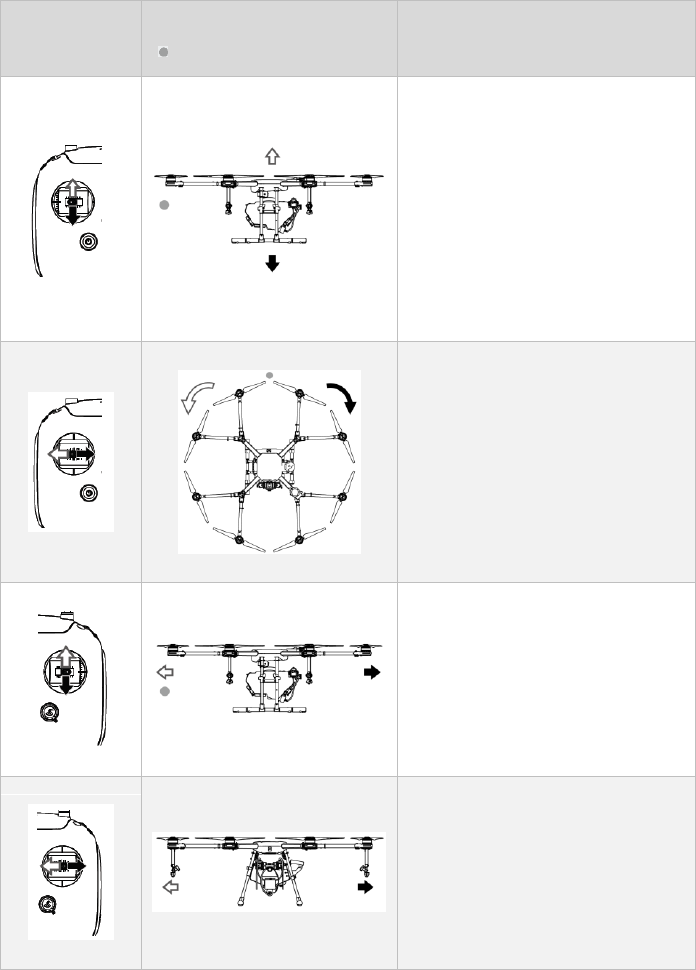
Controlling the Aircraft
Remote
Controller
(Mode 2)
Aircraft
( Indicates Nose Direction)
Remarks
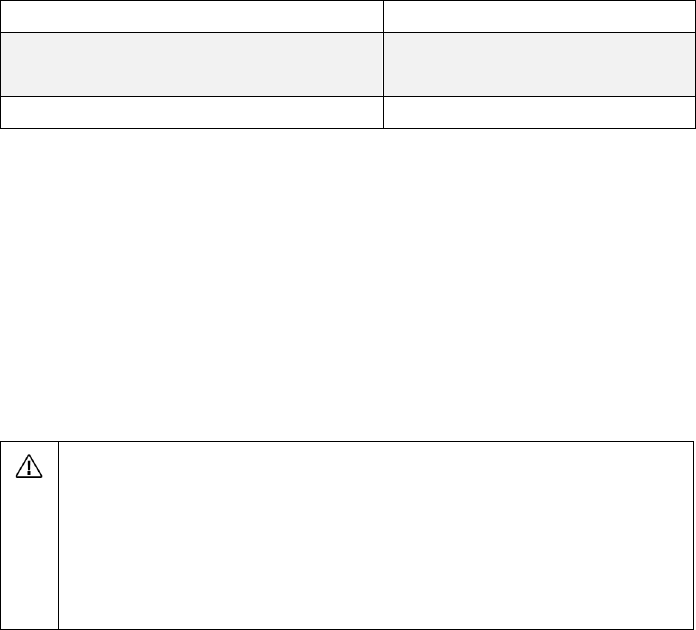
Throttle Stick: Vertical movement of
the left stick controls the aircraft’s
elevation. Push up to ascend and press
down to descend. Use the left stick to
take off when the motors are spinning
at idle speed. The aircraft will
hover in place if the stick is in the
central position.
The more the stick is pushed away
from the central position, the faster the
aircraft will change elevation.
Yaw Stick: Horizontal movement of
the left stick controls the aircraft's
heading. Move left to rotate the
aircraft anticlockwise and move right
to rotate the aircraft clockwise. The
aircraft will hover in place if the stick is
in the central position.
The more the stick is pushed away
from the central position, the faster the
aircraft will rotate.
Pitch Stick: Vertical movement of the
right stick controls the aircraft’s pitch.
Push up to fly forwards and press
down to fly backwards. The aircraft will
hover in place if the stick is in the
central position.
Move the stick further for a larger pitch
angle and faster flight.
Roll Stick: Horizontal movement of
the right stick controls the aircraft’s
roll. Move the stick left to fly left and
right to fly right.
The aircraft will hover in place if the
stick is in the central position.
Move the stick further for a larger roll
angle and faster flight.
© 2017 DJI All Rights Reserved. 7
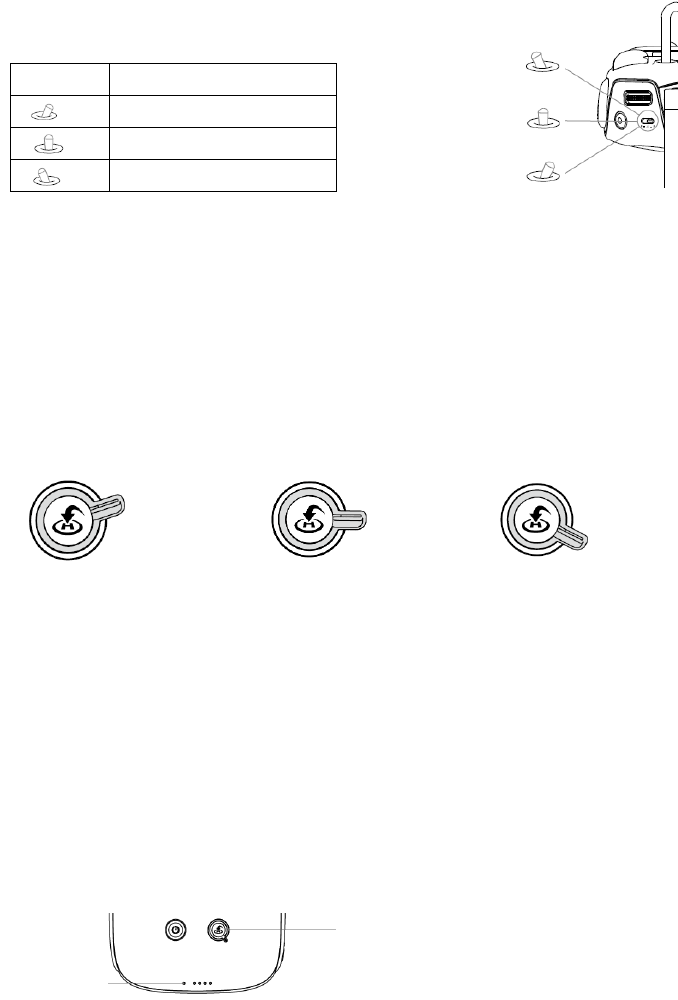
Flight Mode Switch
Toggle the Flight Mode Switch on the remote controller to one of
the three modes.
Figure
Flight Mode
P
P-mode (Positioning)
A
A-mode (Attitude)
F
F-mode (Function)
P-mode (Positioning): The aircraft uses GPS for positioning. In P-mode, when the GPS signal is
strong, users can start the motors.
A-mode (Attitude): GPS is NOT used for positioning and aircraft can only maintain altitude using
the barometer. Aircraft can still record its position and return to the Home Point if a GPS signal is
present.
F-mode (Function): Users can plan operation mission in the DJI MG-1S app and then the aircraft
will operate automatically.
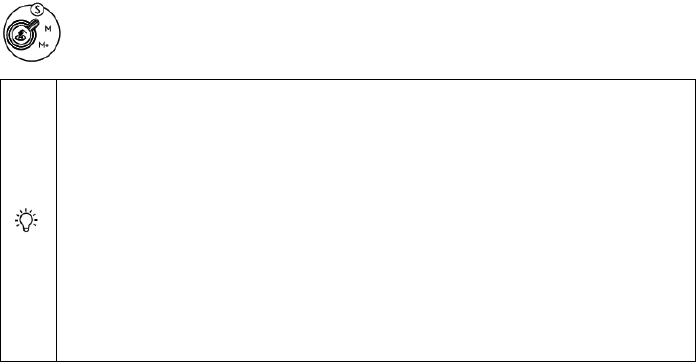
Operation Mode Switch
Toggle the Operation Mode Switch on the remote controller to one of the three modes.
S M M+
Smart Operation Mode (S) Manual Operation Mode (M) Manual Plus Operation Mode (M+)
1. Smart Operation Mode: When the aircraft is in P-mode and the GPS signal is strong, toggle the
switch to this mode after Points A and B are recorded. The aircraft will fly and spray liquid along
the specified route.
2. Manual Operation Mode: In Manual Operation Mode, users can control all the movements of
the aircraft and spray liquid via the Spray Button and Button C3 and C4.
3. Manual Plus Operation Mode: In Manual Plus Operation Mode, the flying speed is restricted
and the aircraft’s heading is locked. Users can control the movement of the aircraft except for
the heading. Press Button C1 or C2 and the aircraft will fly one operation width to the left or right.
Remote Controller LEDs
F
A
P
RTH Status LED
Status LED

© 2017 DJI All Rights Reserved. 8
The Status LED indicates the connection status between the remote controller and the aircraft. The
RTH Status LED indicates the Return-to-Home status of the aircraft. See the table below for details
on these indicators.
Status LED
Sound
Remote Controller Status
Solid Red
The remote controller is not connected to the
aircraft.
Solid Green
The remote controller is connected to the
aircraft.
Blinks Red
1 slow beep repeating
Remote controller error.
RTH Status LED
Sound
Aircraft Status
Solid White
chime
Return-to-Home procedure is initiated.
Blinks White
1 beep repeating
Sending Return-to-Home command to the
aircraft.
Blinks White
2 beeps repeating
The aircraft is returning to the Home Point.
© 2017 DJI All Rights Reserved. 9
Aircraft
Flight Modes
The MG-1S provides P-mode, A-mode and F-mode. Switch to one of the three modes via the
Flight Mode Switch on the remote controller.
P-mode (Positioning)
The aircraft uses GPS for positioning. In P-mode, toggle the Operation Mode Switch to select from
the three operation modes. When the GPS signal is strong, users can start the motors.
A-mode (Attitude)
GPS is NOT used for positioning and aircraft can only maintain altitude using the barometer.
Aircraft can still record its position and return to the Home Point if a GPS signal is present.
F-mode (Function)
Enter Course Plan Mode to plan operation mission in the DJI MG-1S app and then the aircraft will
operate automatically.
Operation Modes
The MG-1S provides Smart Operation Mode, Manual Operation Mode and Manual Plus Operation
Mode. Switch to one of the three modes via the Operation Mode Switch on the remote controller.
Smart Operation Mode
In Smart Operation Mode, the aircraft will travel along a pre-planned route. Operation resumption,
data protection, and terrain follow system are available in this mode. Use the Flying Speed Dial on
the remote controller to adjust flying speed, spray rates will automatically adjust accordingly.
Smart Operation Mode is recommended for large, rectangular spray areas.
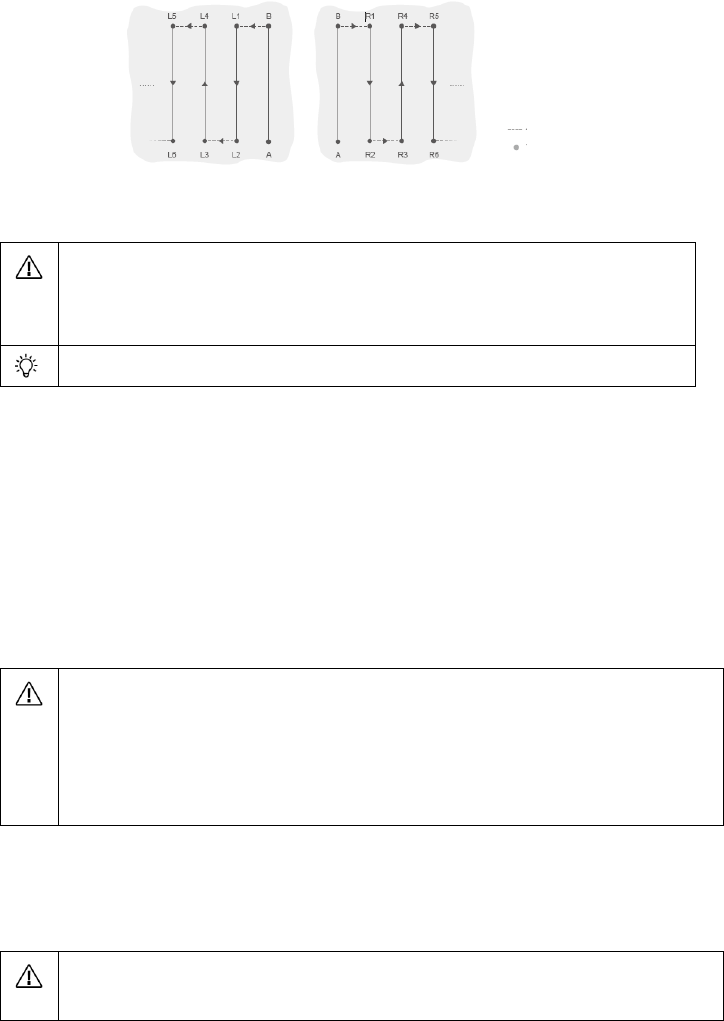
Operation Route
The aircraft will travel along pre-designated square zig zag route after the turning points A and B
have been recorded. The altitude difference between the aircraft and vegetation is maintained
under optimal working conditions. The aircraft will spray liquid automatically while flying along
the route and stop spraying liquid while hovering at the turning points. The length of the dotted
lines, which are called Operation Gaps, can be adjusted in the app.
© 2017 DJI All Rights Reserved. 10
Operation Procedure
Maintain line of sight of the aircraft at all times.
Ensure that the Flight Mode Switch is toggled to the “P” position and the GPS signal
is strong. Otherwise, Smart Operation may be unreliable.
Always inspect operating environments before flying.
Ensure that Flight Mode Switch on the remote controller is toggled to the “P” position and a
strong GPS signal is present. In addition, ensure that the Operation Mode Switch on the remote
controller is toggled to the “M” position.
1. Record Points A and B in Order
Users cannot toggle the Operation Mode Switch to Smart Operation Mode unless points A and B
are recorded.
Fly the aircraft to the starting point, depicted as Point A (B), hover, and then press Button A (B) on
the remote controller. The Aircraft Status Indicator will blink red (green) after the starting points
have been recorded.
Points A and B cannot be recorded if the spray tank is empty.
Update Point B by flying the aircraft to a new position and record this position. Note that
if a Point A has been updated, then Point B is also required to be updated accordingly.
It’s recommended to keep the direction of Point A to B parallel to one side of the
rectangular spray area for optimal effect.
2. Select the Route
Press Button C1 or Button C2 on the remote controller to select the operating pattern. Press Button
C1 for Route L and Button C2 for Route R. The default route pattern is Route R, if no selection has
been made.
The route can be selected only in Manual Operation Mode. If the aircraft is in Smart
Operation Mode, select the route after switching to Manual Operation Mode.
Operation Gap
Turning Point
Route L Route R Legend
© 2017 DJI All Rights Reserved. 11
3. Configure the Aircraft Altitude
Configure the desired altitude in the app and adjust the aircraft altitude to a value within the
working range of the Terrain Follow System (1.5 - 4.5 m) by using the throttle stick before entering
Smart Operation Mode, and the Terrain Follow System will start working automatically and
maintain the spraying distance between the aircraft and the vegetation. Refer to Terrain Follow
System for details.
4. Using Smart Operation Mode
Ensure that the Flight Mode Switch on the remote controller is toggled to the “P” position and
a strong GPS signal is present, then toggle the Operation Mode Switch to the “S” position to
enable Smart Operation Mode. The aircraft will align with the line between Point A and Point B
with its heading pointing toward Point B.
Aircraft nose will always point from Point A to Point B regardless of the flight direction.
Heading cannot be adjusted.
In Smart Operation Mode, if using the control sticks to control the aircraft flying
forward, backward, left or right, the aircraft will switch to Manual Operation Mode
automatically, complete corresponding flight behavior and then hover. Toggle the
Operation Mode Switch back-and-forth to “S” position, and the aircraft will be back
to Smart Operation Mode then fly back to the operation route. Refer to Manual
Obstacle Avoidance for details.
Flying speed, altitude, spray rate and other parameters can be adjusted in the app.
5. Starting the Operation
a. Press the Button C1 and Button C2 on the remote controller simultaneously to have the aircraft
traverse from Point B to L1 (R1). The aircraft will then hover at Point L1 (R1) and wait for further
commands.
b. Repeat ‘a’ and the aircraft will fly to the next turning point along Route L (R) and hover.
c. Enable Continuous Smart Operation Mode by pressing and holding the Button C1 and Button
C2 on the remote controller for 2 to 4 seconds when the aircraft is hovering at any given turning
point. The Aircraft Status Indicator will turn solid purple for one second. The aircraft will then fly
along Route L (R) continuously.
d. To exit Continuous Smart Operation Mode, press the Button C1 and Button C2 and hold for 2
© 2017 DJI All Rights Reserved. 12
to 4 seconds. The aircraft will fly to the next turning point and hover.
You will only be able to press and hold the C1 and C2 buttons for steps 'a' to 'c' when
the aircraft is hovering at a turning point.
If the GPS signal is weak during operation, the aircraft will switch to Attitude Flight
Mode automatically. Exit Smart Operation Mode and control the aircraft manually.
When the MG-1S regains GPS signal, it will fly to the next turning point automatically.
If you press Button A or Button B during operation, data for Point A and B of the current
route will be erased and the aircraft will hover in place.
The Operation Gap is set to 5m by default. Customize it from 3m to 10m in the app.
Use the control sticks to control the aircraft to avoid obstacles when it is in operation,
even though the heading of the aircraft cannot be adjusted. Refer to Manual Obstacle
Avoidance for details.
The aircraft sprays liquid automatically when flying, and does not spray when hovering.
Manual Operation Mode
Toggle the Operation Mode Switch to enter Manual Operation Mode. You can control all the
movements of the aircraft, spray liquid via the spray button on the remote controller, and adjust
the spray rate via the dial on the remote controller. Manual Operation Mode is ideal when the
operating area is small.
Manual Plus Operation Mode
Toggle the Operation Mode Switch to enter Manual Plus Operation Mode. The maximum flying
speed is 8 m/s and the aircraft’s heading is locked in Manual Plus Operation Mode. Press the
Button C1 or Button C2 on the remote controller to steer the aircraft to fly to the left or right. The
aircraft sprays liquid automatically when flying forward and backward, and does not spray when
flying left and right or hovering. Manual Plus Operation is ideal for irregularly shaped operating
areas.
1. Elevate the aircraft to a desired altitude within the working range of the Terrain Follow System
(1.5 - 4.5 m) before entering Manual Plus Operation Mode. The Terrain Follow System starts
working automatically by maintaining the spraying distance between the aircraft and the
vegetation below. Refer to Terrain Follow System for details.
2. Ensure that the aircraft is in P-mode and ensure that GPS signal is strong. Then toggle the
Operation Mode Switch to the “M+” position to activate Manual Plus Operation Mode.

© 2017 DJI All Rights Reserved. 13
Terrain Follow System
Profile
The Terrain Follow System is consist of forward, rear and downward radar modules and uses
microwave technology for terrain following. Under optimal operating environment, the system
can predict the distance between the aircraft and the crops or other surfaces in forward, rear and
downward directions, so that the aircraft can fly at a constant spraying distance from them to
ensure even spraying. The radar module is enabled by default, and can be disabled in the app. If
it is enabled, the aircraft will fly above the crops at a constant spraying distance in Smart Operation
Mode and Manual Plus Operation Mode and F-mode. The system can also measure the spraying
distance above the crops or other surfaces, but the aircraft will not be able to fly at a constant
spraying distance when performing this function in Manual Operation Mode.
How to Use
1. Ensure that the Terrain Follow System is enabled in the app.
2. Configure the desired spraying distance (between 1.5 and 4.5 m) in the app.
3. If using Smart Operation Mode or Manual Plus Operation Mode, ensure that the Flight Mode
Switch is toggled to “P” position and the Operation Mode Switch is toggled to “M” position.
If using F-mode, ensure that the Flight Mode Switch is toggled to “F” position. Fly the aircraft
above the vegetation and adjust the distance between the aircraft and the vegetation to a value
within the working range (1.5 - 4.5 m).
4. Toggle the Flight Mode Switch and Operation Mode Switch to the desired position to enter the
corresponding mode. If operating environment is ideal, the aircraft will fly above the vegetation
at the pre-set height.
The Altitude Stabilization System will only maintain a fixed distance from vegetation
within its working range (1.5 - 4.5 m).
Observe the aircraft’s distance from the vegetation at all times.
Operate with extra caution when flying over inclined surface.
Obey local radio transmission laws and regulations.
Radar Status Display
The Radar Status Indicator shows the current status of the Terrain Follow System. See the table
below:
Blinking Pattern
Description
Solid (Forward Radar: Blue, Rear Radar: Green,
Warming up.
© 2017 DJI All Rights Reserved. 14
Downward Radar: Yellow)
Blinking (Forward Radar: Blue, Rear Radar: Green,
Downward Radar: Yellow)
Working.
Off
Disconnected.
Operation Resumption
The operation resumption function allows you to temporarily pause an operation (e.g. to refill the
spray, change the battery, etc.) and then resume operation. Exit Smart Operation Mode or Course
Plan Mode through one of the following methods and the aircraft will record its location as a
stopping point if the GPS signal is strong enough.
1. Toggle the Operation Mode Switch to exit Smart Operation Mode.
2. Toggle the Flight Mode Switch to exit P-mode or F-mode.
3. Move the Pitch Stick or Roll Stick on the remote controller.
4. Initialize the RTH procedure.
Ensure that the GPS signal is strong when using the operation resumption function.
Otherwise, the aircraft cannot record and return to the stopping point.
The stopping point will be updated as long as the Operation Mode Switch is toggled
from Smart Operation Mode to any other mode, the Flight Mode Switch is toggled
from P-mode or F-mode to any other mode, or RTH (Smart RTH, Failsafe RTH or Low
Battery RTH) is triggered during Smart Operation Mode or Course Plan Mode.
Follow the instructions below to use this function:
1. Exit Smart Operation Mode or Course Plan Mode through one of the 4 methods above. The
current location of the aircraft will be recorded as the stopping point.
2. Fly the aircraft to a safe location before resuming the operation. If the Terrain Follow System is
enabled, adjust the spraying distance between the aircraft and the vegetation to be within the
working range (1.5 – 4.5 m).
3. Back to the corresponding mode
Enter the corresponding mode as shown below and then follow the prompts in the app.
Smart Operation Mode:
a. If the Flight Mode Switch is in “P” position, toggle the Operation Mode Switch to “S”
position.
b. If the Flight Mode Switch is in “A” or “F” position, the operation mode will be Manual
Operation Mode by default after the Flight Mode Switch is toggled to “P” position. Users should

© 2017 DJI All Rights Reserved. 15
toggle the Operation Mode Switch back-and-forth to “S” position to enter Smart Operation
Mode.
Course Plan Mode:
Toggle the Flight Mode Switch to the “F” position.
4. Return route
If the aircraft is in the operating area, there will be prompt in the app. Users can select from
returning to the stopping point or returning to the operating route along a path vertical to the
operating route. If the aircraft is out of the operating area, it will return to the stopping point
directly and resume the operation.
5. Users can control the aircraft flying forward, backward, left and right, if obstacle avoidance is
required during returning procedure. Refer to Manual Obstacle Avoidance for details.
System Data Protection
The System Data Protection feature enables the aircraft to retain vital system data (e.g. the
positions of Point A, Point B and the stopping point) for about 1 minute after the aircraft is
powered off. Retaining vital system data allows the aircraft to resume operation after a short,
temporary pause. Follow the instructions below to use this feature:
1. Exit Smart Operation Mode or Course Plan Mode through any method. The current location of
the aircraft will be recorded as the stopping point.
2. Land the aircraft and stop the motors.
3. System Data Protection is triggered automatically once the aircraft is powered off. The Aircraft
Status Indicator will glow solid green to show that System Data Protection is successfully triggered.
4. Replace the battery within the 1 minute window
5. Restart the aircraft and enter Manual Operation Mode.
6. Ensure that the GPS signal is strong enough. Then start the motors.
7. Follow the instructions in Operation Resumption to resume the operation.
The system data can only be retained for 1 minute. DO NOT power off the aircraft for
more than 1 minute if you want to resume operation because the system data will be
lost.
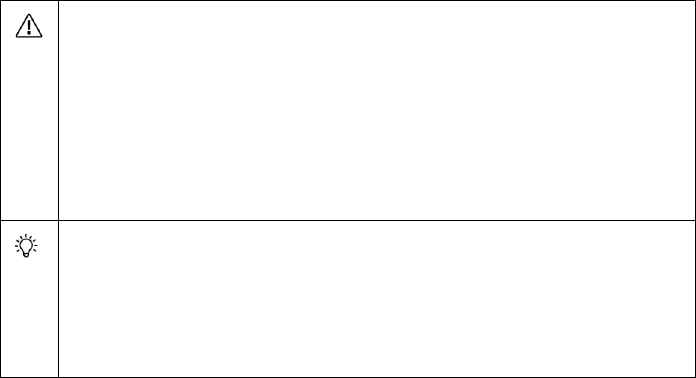
Manual Obstacle Avoidance
In Smart Operation Mode, users can control the aircraft flying forward, backward, left and right to
avoid obstacles on the operation route or when there are emergency cases (e.g. abnormal aircraft

© 2017 DJI All Rights Reserved. 16
behavior exists).
C
DE
规划航线
手动飞行路径
自动回航路径
图例
航线节点
障碍物
1. Exit Smart Operation Mode
In Smart Operation Mode, if using the control sticks to control the aircraft flying forward, backward,
left or right (i.e. move the pitch or roll stick), the aircraft will switch to Manual Operation Mode
automatically, record the current position as a stopping point, then complete corresponding flight
behavior and hover.
When moving the control stick to exit Smart Operation Mode, the aircraft will have a
braking distance. Ensure that there is a safe distance between the aircraft and the
obstacles.
2. Avoid the Obstacle
After switching to Manual Operation Mode, users can control the aircraft to avoid the obstacle
from Point C to D.
3. Resume Operation
Toggle the Operation Mode Switch back-and-forth to “S” position. If the aircraft is in the
operating area, there will be prompt in the app. Users can select from returning to the stopping
point or returning to the operating route along a path vertical to the operating route. If the aircraft
is out of the operating area, it will return to the stopping point directly and resume the operation.
Ensure that the aircraft has absolutely avoided the obstacle before operation
resumption to avoid risk.
After handling emergency cases, ensure that the aircraft is in normal status and then
fly the aircraft manually to a safe area to resume operation.
Step 1 to 3 can also be used to exit and resume operation if there is emergency
case (e.g. obstacle avoidance is required) during returning procedure.
Obstacle
Turning Point
Operation Route
Manual Flying Route
Auto-Returning Route
Legend
© 2017 DJI All Rights Reserved. 17
Empty Tank Warning
Profile
When the spray tank is empty, there will be a prompt in the app and the aircraft will move
depending on the operation mode - ascend 3 meters and hover (Smart Operation Mode or F-
mode) or hover in place (Manual Operation Mode or Manual Plus Operation Mode).
How to Use
1. Press the Spray Button on the remote controller to turn off the sprinklers when the empty tank
warning is triggered in Manual Operation Mode. Failure to do so may cause the idling of the pump
of the motor and subsequently damage the parts. The sprinklers will automatically turn off in F-
mode, Smart Operation Mode or Manual Plus Operation Mode when there is only 300ml liquid
left in the spray tank.
2. Ensure the aircraft is in Manual Operation Mode, and then land the aircraft and stop the motors.
Refill the liquid tank and tighten the lid.
3. Press the Spray Button on the remote controller to discharge the remaining air in the pump
until the empty tank warning in the app disappears. Press the Spray Button again to stop
discharging.
4. Ensure the aircraft is in Manual Operation Mode, and then take off.
5. Elevate the aircraft to a desired altitude in F-mode, Smart Operation Mode or Manual Plus
Operation Mode. Adjust the spraying distance between the aircraft and the vegetation to be within
the working range (1.5 - 4.5 m). Refer to the Terrain Follow System for details. Then toggle the
Operation Mode Switch or Flight Mode Switch to enter the desired mode.
© 2017 DJI All Rights Reserved. 18
Flight
Starting and Stopping the Motors
Starting the Motors
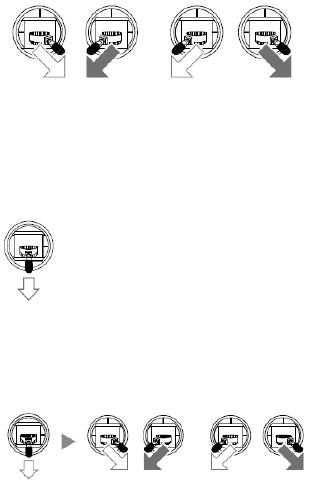
The Combination Stick Command (CSC) listed below is used to start/stop the motors. Ensure you
perform the CSC in one continuous motion. The motors will begin to speed at an idle speed.
Release both sticks simultaneously. Take off immediately after the motors are spinning, or else the
aircraft may lose balance, drift or even takeoff by itself and injure nearby people.
or
Stopping the Motors
There are two methods to stop the motors.
1. When the aircraft has landed, push the throttle down and hold. The motors will stop after 3
seconds.
Throttle Stick
2. When the aircraft has landed, push the throttle stick down, then perform the CSC command to
stop the motors. Release both sticks once the motors have stopped.
or
Throttle Stick

© 2017 DJI All Rights Reserved. 19
Appendix
Specifications
Airframe
Diagonal Wheelbase
1520 mm
Frame Arm Length
625 mm
Dimensions
1471 mm1471 mm482 mm (Frame arms unfolded,
propellers removed)
780 mm780 mm482 mm (Frame arms folded)
Propulsion System
Motors
Stator Size
6010 mm
KV
130 rpm/V
Max Thrust
5.1 kg/rotor
Max Power
770 W
Weight (With cooling fan)
280 g
ESCs
Max Allowable Current (Continuous)
25 A
Operating Voltage
50.4 V (12S LiPo)
Signal Frequency
30 Hz to 450 Hz
Drive PWM Frequency
12 kHz
Foldable Propeller
Material
High-performance engineered plastics
Diameter × Pitch
217 inch
Weight
58 g
Spraying System
Liquid Tank
Volume
10 L
Standard Operating Payload
10 kg
Max Battery Size
151 mm195 mm70 mm
Sprinklers
Model
XR11001VS
Quantity
4
Max Spray Rate
0.45 L/min (Single nozzle, using water)
Spray Width
4 - 6 m (4 nozzles, 1.5 – 3 m above the crops)
Droplet Size
XR11001VS: 130 - 250 μm (Depending on operating
environment and spraying speed)

© 2017 DJI All Rights Reserved. 20
Terrain Follow System
Detection Range
1 - 5 m
Working Range
1.5 - 4.5 m
Detection Accuracy
< 10 cm
Flight Parameters
Total Weight (Excluding battery)
9.5 kg
Standard Takeoff Weight
23.5 kg
Max Takeoff Weight
24.5 kg (At sea level)
Max Thrust-Weight Ratio
1.73 (Takeoff weight of 23.5 kg)
Battery
DJI approved battery pack (Model: MG-12000S)
Max Power Consumption
6400 W
Hovering Power Consumption
3250 W(Takeoff weight of 23.5 kg)
Hovering Time*
24 min(Takeoff weight of 13.5 kg)
10 min(Takeoff weight of 23.5 kg)
*At sea level and in wind speeds under 3 m/s
Max Operating Speed
8 m/s
Max Flying Speed
12 m/s
Max Service Ceiling Above Sea Level
2000 m
Operating Temperature
0° to 40° C
Remote Controller
Model
DLG60A
Operating Frequency
Max Transmission Range
1
km
(Unobstructed and free of interference)
Built-in Battery
2S LiPo
Display Device
5.5 inch screen, 1920×1080,
1000 cd/m2, Android
system, 4G RAM
+
16G ROM
Operating Temperature
-10° to 40° C
Charging Temperature
5° to 40° C
Remote Controller Charger
Model
A14-057N1A
Voltage
17.4
V
Rated Power
57
W
LB:2408
~2475.5 MHz
WIFI:2412
~2462,5180~5240MHz,5745~5825 MHz

© 2017 DJI All Rights Reserved. 21
Aircraft Status Indicator Description
Blinking Patterns
Description
Blinking Red, Green and Yellow
Self-testing
Blinking Yellow for 4 times
Warming up
Blinking Purple Slowly
P-mode (GPS)
Blinking Yellow Slowly
A-mode or P-mode/F-mode (no GPS)
Blinking Green Slowly
F-mode (GPS)
Solid Red
System error. Restart the aircraft, if not work, contact
DJI Support.
Blinking Red and Yellow
Alternately
Abnormal compass data, compass calibration required
Blinking Red Several Times
Rapidly
Point A recorded
Blinking Green Several Times
Rapidly
Point B recorded
Blinking Blue Several Times
Rapidly
The aircraft flies to the next turning point in Smart Operation
Mode.
Solid Purple for one second
Enters Continuous Smart Operation Mode
Blinking Yellow Slowly
Remote controller signal lost
Blinking Red Slowly
Low battery level
Blinking Red Rapidly
Critically low battery level
Solid Green
System Data Protection function working
FCC Compliance Notice
This device complies with Part 15 of the FCC Rules. Operation is subject to the following
two conditions: (1) This device may not cause harmful interference, and (2) This device
must accept any interference received, including interference that may cause
undesired operation.
Any changes or modifications not expressly approved by the party responsible for
compliance could void the user’s authority to operate the equipment.
© 2017 DJI All Rights Reserved. 22
This equipment has been tested and found to comply with the limits for a Class B digital
device, pursuant to part 15 of the FCC Rules. These limits are designed to provide
reasonable protection against harmful interference in a residential installation. This
equipment generates, uses and can radiate radio frequency energy and, if not installed
and used in accordance with the instructions, may cause harmful interference to radio
communications. However, there is no guarantee that interference will not occur in a
particular installation. If this equipment does cause harmful interference to radio or
television reception, which can be determined by turning the equipment off and on,
the user is encouraged to try to correct the interference by one or more of the
following measures:
—Reorient or relocate the
receiving antenna.
—Increase the separation between the equipment and receiver.
—Connect the equipment into an outlet on a circuit different from that to which the
receiver is connected.
—Consult the dealer or an experienced radio/TV technician for help.
KCC Warning Message
“해당무선설비는
운용
중
전파혼신
가능성이
있으므로
인명안전과
관련된
서비스는
할
수
없습니다.”
“해당
무선설비는
운용
중
전파혼신
가능성이
있음”
RF Exposure Information
complies with FCC radiation exposure limits set forth for an uncontrolled environment.
In order to avoid the possibility of exceeding the FCC radio frequency exposure limits, human
proximity to the antenna shall not be less than 20cm during normal operation.
For model DLG60A,SAR tests are conducted using standard operating positions accepted by the
FCC with the device transmitting at its highest certified power level in all tested frequency
bands, although the SAR is determined at the highest certified power level, the actual SAR level
of the device while operating can be well below the maximum value. Before a new model is a
available for sale to the public, it must be tested and certified to the FCC that it does not
exceed the exposure limit established by the FCC, Tests for each product are performed in
positions and locations as required by the FCC. For Handheld operation, this device has been
tested and meets the FCC RF exposure guidelines when used with an accessory designated for
this product or when used with an accessory that contains no metal.
3W-DJI-8-10-015

© 2017 DJI All Rights Reserved. 23
인증받은자의 상호 : SZ DJI TECHNOLOGY CO., LTD
제품명 / 모델명 : AGRAS MG-1S / 3W-DJI-8-10-015
제조자 및 제조국가 : SZ DJI TECHNOLOGY CO., LTD
제조년월 : 2017.01
인증번호 : MSIP-CRM-dji-AG405
해당 무선설비는 전파혼신 가능 성이 있으므로 인명안전과 관련된 서비스는 할 수 없음
EU Compliance Statement: SZ DJI TECHNOLOGY CO., LTD. hereby declares that this
device is in compliance with the essential requirements and other relevant provisions
of the R&TTE Directive.
A copy of the EU Declaration of Conformity is available online at www.dji.com/euro-
compliance