SZ DJI TECHNOLOGY GL3581511 C1 User Manual 1
SZ DJI TECHNOLOGY CO., LTD C1 1
UserManual.wiki
>
SZ DJI TECHNOLOGY
>
GL3581511 User Manual
>
User Manual 1
Contents
1.
User Manual 1
2.
User Manual 2
3.
Users Manual 1
4.
Users Manual 2
User Manual 1
Navigation menu
Upload a User Manual
Namespaces
Wiki Guide
HTML
PDF
Info
Views
User Manual
Discussion / Help
Navigation
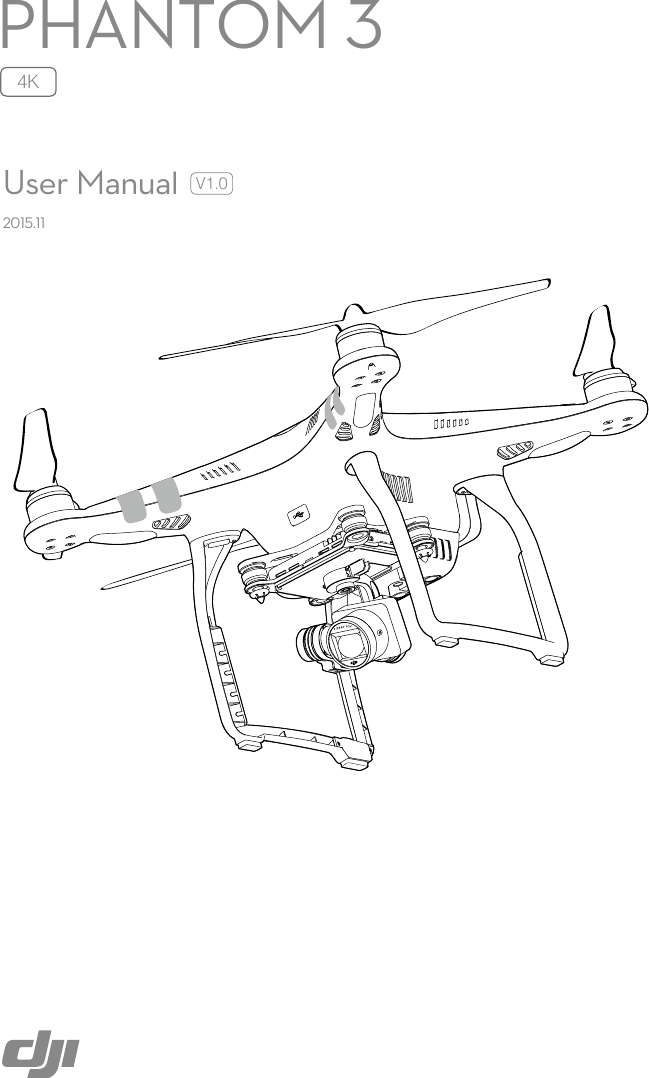


![8 © 2015 DJI. All Rights Reserved. Product ProfilePhantom 3 4K User ManualAircraft DiagramRemote Controller Diagram[1] AntennasRelays aircraft control and video signal. [2] Mobile Device HolderSecurely mounts your mobile device to the remote controller. [3] Control StickControls the orientation and movement of the aircraft.[4] Return Home (RTH) ButtonPress and hold the button to initiate Return to Home (RTH).[1][2][4][5][6][7][8][3][1] GPS[2] Propeller [3] Motor[4] Front LED Indicator[5] Landing gear[6] Gimbal and Camera[7] Camera Status Indicator[8] Aircraft Micro-USB Port[9] Aircraft Status Indicator[10] Intelligent Flight Battery[11] Vision Positioning Sensors[12] Antennas[13] Camera Micro-SD Card Slot[14] Camera Micro-USB Port[15] Link Button[1][2][3][4][5][9][12][10][11]HD[13][15][14][6][8][7]](https://usermanual.wiki/SZ-DJI-TECHNOLOGY/GL3581511.User-Manual-1/User-Guide-2830944-Page-8.png)
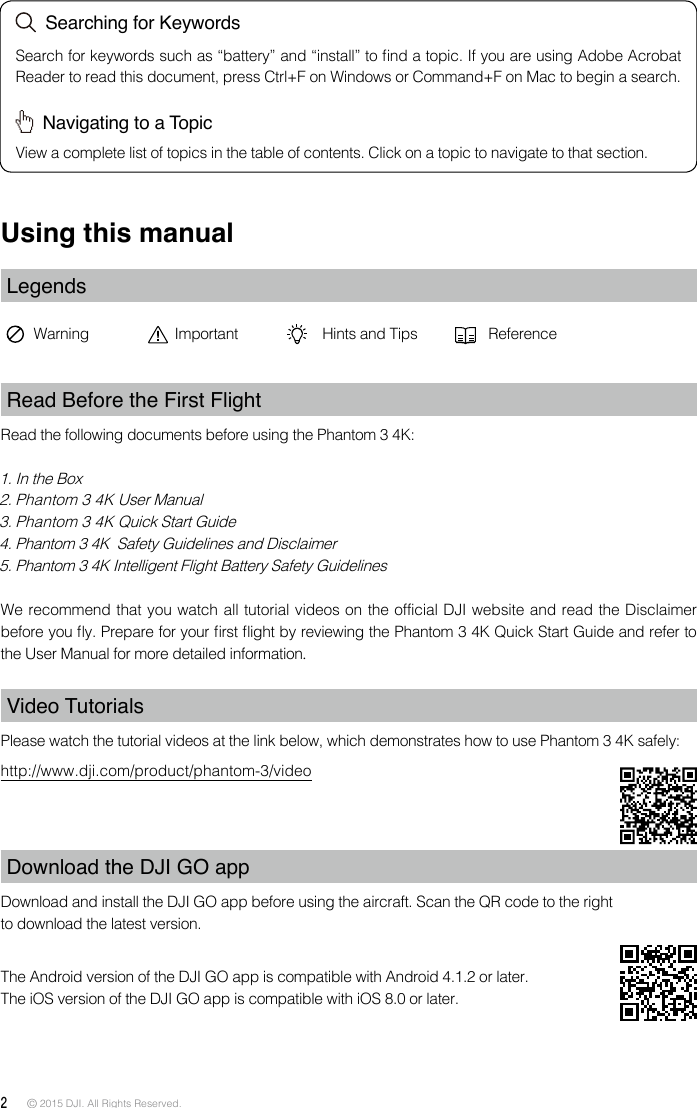
![© 2015 DJI. All Rights Reserved. 9Product ProfilePhantom 3 4K User Manual [5] Battery Level LEDsDisplays the battery level of the remote controller. [6] Status LEDDisplays the remote controller's system status. [7] Power ButtonUsed to turn the remote controller on and off.[8] RTH LED Circular LED around the RTH button displays RTH status. [16][18][17][9] Camera Settings Dial Turn the dial to adjust camera settings. (Only functions when the remote controller is connected to a mobile device running the DJI GO app. )[10] Playback Button Playback the captured images or videos.(Only functions when the remote controller is connected to a mobile device running the DJI GO app.)[11] Shutter Button Press to take a photo. If burst mode is selected, the set number of photos will be taken with one press.[12] Flight Mode SwitchSwitch between P-mode, A-mode, and F-mode.[13] Video Recording ButtonPress to start recording video. Press again to stop recording.[14] Gimbal DialUse this dial to control the tilt of the gimbal. [15] Mircro-USB PortReserved port.[16] C1 ButtonCustomizable through the DJI GO app.[17] C2 ButtonCustomizable through the DJI GO app.[18] Power PortConnect to the DJI Phantom 3 Charger to charge the battery of the remote controller. [10][11][15][9][12][13][14]](https://usermanual.wiki/SZ-DJI-TECHNOLOGY/GL3581511.User-Manual-1/User-Guide-2830944-Page-9.png)


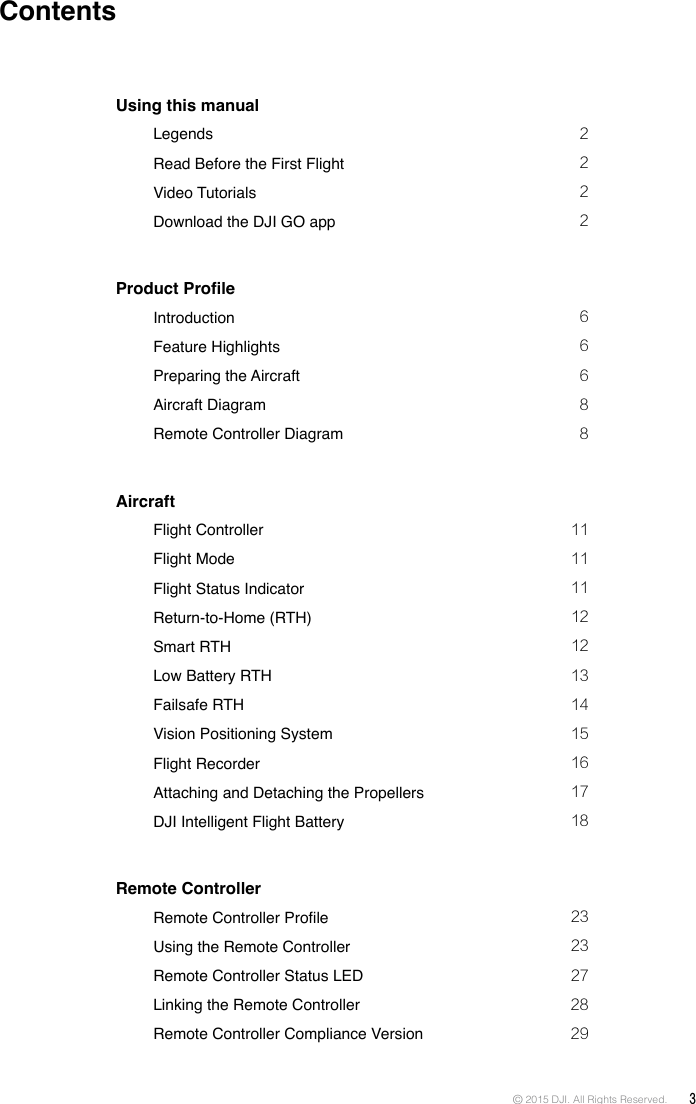
![14 © 2015 DJI. All Rights Reserved. AircraftPhantom 3 4K User ManualFailsafe RTHIf the Home Point was successfully recorded and the compass is functioning normally, Failsafe RTH will be automatically activated if the remote controller signal is lost for more than three seconds. The Return-to-Home process may be interrupted and the operator may regain control of the aircraft if the remote controller signal connection is re-established.Failsafe Illustration When Critical battery level warning is triggered and the aircraft begins to land automatically, you may push the throttle upward to make the aircraft hover at its current altitude, giving you an opportunity to navigate to a more appropriate landing location. The colored zones and markers on the battery level indicator bar reflect the estimated remaining ight time. They are automatically adjusted according to the aircraft’s current location and status.Height over HP<=20m 5 RTH (adjustable altitude)Fast Blinking Yellow 1 Record Home Point Blinking Green 3 Remote Controller Signal LostFast Blinking Yellow 2 Conrming Home PointBlinking Green 6 Landing (after hovering for 5 secs)Fast Blinking Yellow 4 Signal Lost Lasts (after 3 sec.)Fast Blinking YellowHeight over HP>20mElevate to 20m20m>3S×××× Aircraft cannot return to the Home Point when GPS signal is weak ( [ ] displays grey) or unavailable. Aircraft automatically descends and lands if RTH is triggered when the aircraft ies within a 20 meters (65 feet) radius of the Home Point. Aircraft will stop ascending and immediately return to the Home Point if you move the throttle stick if the aircraft reaches 20 meters (65 feet) altitudes or beyond during Failsafe. The aircraft cannot avoid obstruction during the Failsafe RTH, therefore, it is important to set an suitable Failsafe altitude before each ight. Launch the DJI GO app and enter “Camera” and select “MODE > Advanced Settings > Failsafe mode” to set the Failsafe altitude. User cannot control the aircraft while the aircraft is ascending to its failsafe altitude. However, user can press RTH button once to exit ascending and regain control.20米 20米HThe aircraft cannot avoid obstruction during the Failsafe RTH, therefore, it is important to set an suitable Failsafe altitude before each ight. Launch the DJI GO app and enter “Camera” and select “MODE > Advanced Settings > Failsafe mode” to set the Failsafe altitude.Failsafe Safety Notices](https://usermanual.wiki/SZ-DJI-TECHNOLOGY/GL3581511.User-Manual-1/User-Guide-2830944-Page-14.png)
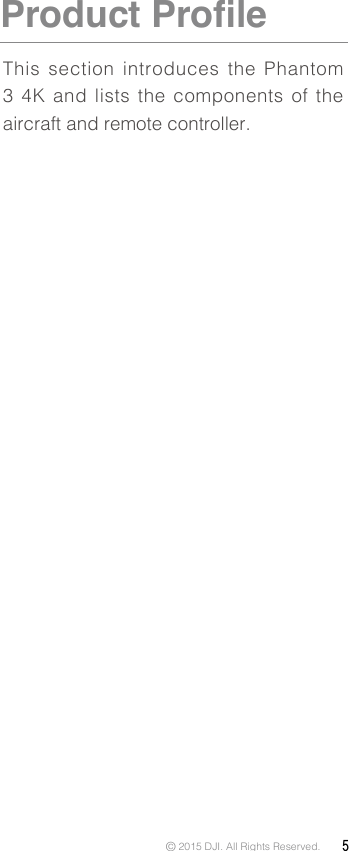
![© 2015 DJI. All Rights Reserved. 15AircraftPhantom 3 4K User Manual Vision Positioning SystemThe DJI Vision Positioning System uses ultrasound and image data to help the aircraft maintain its current position. With the help of Vision Positioning, your Phantom 3 4K can hover in place more precisely and fly indoors or in other environments where a GPS signal is not available. The main components of the Vision Positioning System are located on the bottom of your Phantom 3 4K; they include [2] two ultrasonic sensors and [1] one monocular camera.[1][2]20 m20 mHIf the aircraft is ying under 20 meters (65 feet) and Failsafe (including Smart RTH, Lower Battery RTH ) is triggered, the aircraft will first automatically ascend to 20 meters (65 feet) from the current altitude. You can only cancel the ascending by exiting the Failsafe. Refer to “RTH Button” on page 26 for more information on how to exit the Failsafe and regain the control of the remote controller. 20 m20 mHAircraft automatically descends and lands if RTH is triggered when the aircraft ies within a 20 meters (65 feet) radius of the Home Point. Aircraft will stop ascending and immediately return to the Home Point if you move the throttle stick if the aircraft reaches 20 meters (65 feet) altitudes or beyond during Failsafe.20米 20米HAircraft cannot return to the Home Point when GPS signal is weak ( [ ] displays grey) or unavailable.20米 20米Hif you move the throttle stick after the aircraft rises above 65 feet (20m) but below the pre-set Failsafe RTH altitude, the aircraft will stop ascending and immediately return to the Home Point.Using Vision Positioning Vision Positioning is activated automatically when the Phantom 3 4K is turned on. No further action is required. Vision Positioning is typically used in indoor environments, where GPS is unavailable. Using the sensors that are built into the Vision Positioning system, the Phantom 3 4K can hover precisely even without GPS.](https://usermanual.wiki/SZ-DJI-TECHNOLOGY/GL3581511.User-Manual-1/User-Guide-2830944-Page-15.png)