SZ DJI TECHNOLOGY HG3001606 ZENMUSE M1 User Manual l
SZ DJI TECHNOLOGY CO., LTD ZENMUSE M1 l
Users Manual
:
OSMO Mobile
Osmo Mobile
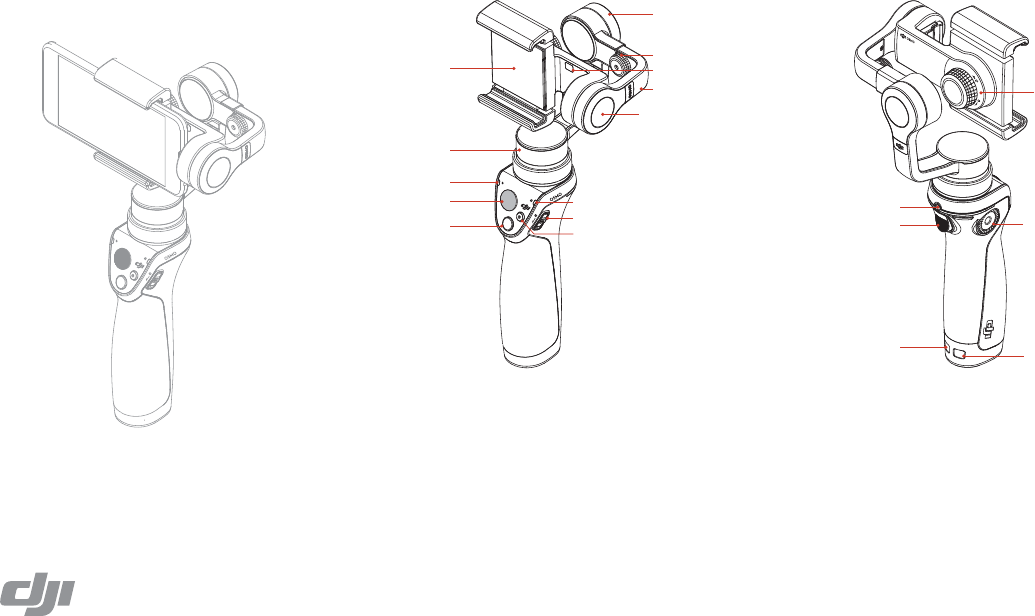
1 Mobile Phone Holder
2 Pan Motor
3 Camera Status LED
4 Joystick
5 Shutter Button
6 Record Button
7 Power Switch
8 System Status LED
The OSMOTM Mobile is a professional mobile phone
gimbal that stabilize your phone while in motion.
Powerful features such as ActiveTrack and Motion
Timelapse are available through the DJI GO app.
14 Holder Lock Knob
15 Charging/Upgrade Port
16 Trigger
17 DJI Rosette Mount
18 Lanyard Hole
19 Battery Cover
9 Tilt Motor
10 Adjustable Arm
11 Mobile Phone Detect
Sensor
12 Adjustable Arm Lock
Knob
13 Roll Motor
V1.0
Quick Start Guide
OSMO Mobile
www.dji.com
OSMOTM is a trademark of DJI.
Copyright © 2016 DJI All Rights Reserved.
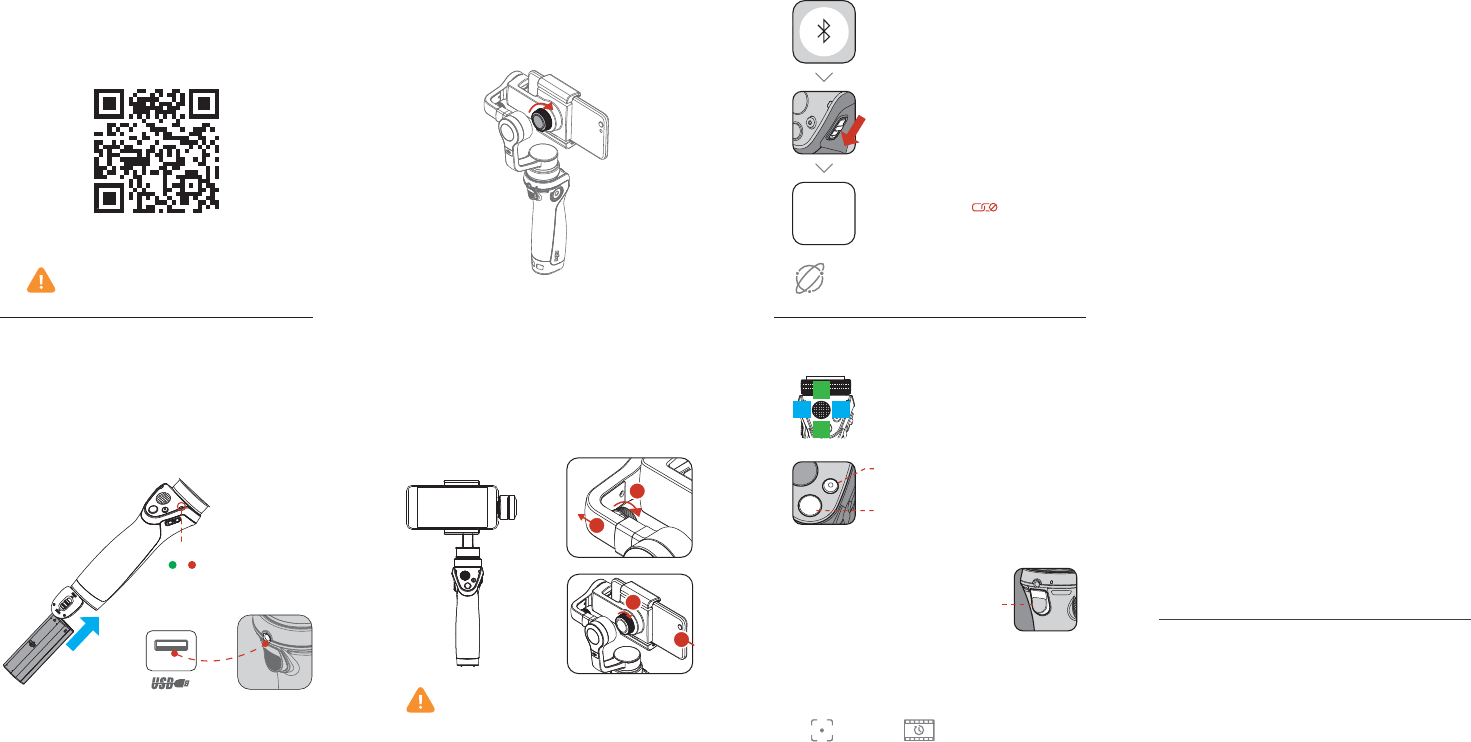
To Power On:
Pull down on the switch
Pull down again > Sleep
Pull down and hold for 1.5 s > Power Off
ČThis Quick Start Guide is subject to change without prior notice.
Specifications
džHandle
Dimensions 2.4 x 1.9 x 6.4 inch
(61.8 x 48.2 x 161.5 mm)
Weight (battery included) 201 g
džGimbal
Name Zenmuse M1
Dimensions 125.06 x 109.15 x 90.98 mm (Folded)
Weight 300 g
Angular Vibration Range ±0.03°
Controllable Range Pan: ±150°
Roll: ±25°
Tilt: -125° to +35°
Mechanical Range Pan: ±165°
Roll: -50° to +90°
Tilt: -140° to +50°
Max Controllable Speed 120°/s
Mobile Phone Width Range 2.31-3.34 inch (58.6-84.8 mm).
Minimum width approx. that of
the iPhone 5S, Maximum width
approx. that of the Huawei Mate
8 Max
džWireless
Model Bluetooth Low Energy 4.0
džIntelligent Battery
Model HB01-522365
Type LiPo
Capacity 980 mAh
Energy 10.8 Wh
Voltage 11.1 V
$IBSHJOH5FNQFSBUVSF _ě¡_¡'
0QFSBUJOH5FNQFSBUVSF _ě
Printed in China
Search for ‘DJI GO’ on the App Store or Google
Play, and install the app on your mobile phone.
3. Mount and Balance the Mobile Phone
To balance the system, place the Osmo Mobile
and mobile phone on a level surface as shown.
The system is balanced if the mobile phone
remains level when released, balanced only by
the gimbal.
A. If the roll axis tilts to the left, loosen the
Adjustable Arm Lock Knob and pull out the
arm until the roll axis remains level.
B. If the roll axis tilts to the right, adjust the mobile
phone to the left until the roll axis levels out.
2. Prepare the Battery
Fully charge the battery before using it for the
first time to activate it.
Insert the battery as shown.
ȕDJI GO supports iOS 8.0 (or later) and
Android 4.3 (or later).
ȕDo not power on the Osmo Mobile without a
mobile phone. The Osmo Mobile will not work if no
device is detected by its sensor.
ȕIt is important to balance the mobile phone in order
to achieve optimal performance. The Osmo Mobile
should only be balanced when powered off.
To charge the Osmo Mobile,
connect the USB adapter (not
included) to the charging port
using the provided power cable.
5. Controls
džUse the joystick to pan or tilt the mobile
phone.
džShutter Button: Press once to take a
photo. Press and hold for burst capture.
džRecord Button: Press once to start
recording, and again to stop recording.
džTrigger
Hold down to enable Lock Mode.
Tap twice to center the mobile phone.
Tap three times to switch between the
mobile phone’s front and rear cameras.
Loosen the Holder Lock Knob, place the mobile
phone in the mobile phone holder and tighten
the knob to secure its position.
4. Connect to the DJI GO App
High Low
Battery Level
Activate the Osmo Mobile when using it for the
first time. This requires an internet connection.
Internet
Enable Bluetooth on your mobile phone
%+*(0
"QQ
"
#
DJI GO advanced features:
ActiveTrack Motion Timelapse
1. Install the DJI GO App
Launch the DJI GO app and tap Enter
Camera View. Tap and then follow
the instructions to connect to the Osmo
For more information, read the User Manual:
www.dji.com/product/osmo-mobile
Consumption Static: 2.2 W; Dynamic: 3 W
FCC Compliance Notice:
This device complies with Part 15 of the FCC Rules. Operation is subject to the following two
conditions: (1) This device may not cause harmful interference, and (2) This device must accept any
interference received, including interference that may cause undesired operation.
changes or modifications not expressly approved by the party responsible for compliance could void the
user’s authority to operate the equipment.
This equipment has been tested and found to comply with the limits for a Class B digital device,
pursuant to Part 15 of the FCC Rules. These limits are designed to provide reasonable protection
against harmful interference in a residential installation. This equipment generates, uses and can radiate
radio frequency energy and, if not installed and used in accordance with the instructions, may cause
harmful interference to radio communications. However, there is no guarantee that interference will not
occur in a particular installation.
If this equipment does cause harmful interference to radio or television reception, which can be
determined by turning the equipment off and on, the user is encouraged to try to correct the
interference by one or more of the following measures:
-- Reorient or relocate the receiving antenna.
-- Increase the separation between the equipment and receiver.
-- Connect the equipment into an outlet on a circuit different from that to which the receiver is
connected.
-- Consult the dealer or an experienced radio/TV technician for help.
RF Exposure Information
IC RSS Warning
This device complies with Industry Canada license-exempt RSS standard(s). Operation is subject to the
following two conditions: (1) this device may not cause interference, and (2) this device must accept any
interference, including interference that may cause undesired operation of the device.
Le présent appareil est conforme aux CNR d'Industrie Canada applicables aux appareils radio
exempts de licence. L'exploitation est autorisée aux deux conditions suivantes : (1) l'appareil ne
doit pas produire de brouillage, et (2) l'utilisateur de l'appareil doit accepter tout brouillage
radioélectrique subi, même si le brouillage est susceptible d'en compromettre le fonctionnement.
RF Exposure Information:
CAN ICES-3 (B)/NMB-3(B)
EU Compliance Statement: SZ DJI TECHNOLOGY CO., LTD. hereby dec
compliance with the essential requirements and other relevant provisions of the R&TTE Directive.
A copy of the EU Declaration of Conformity is available online at www.dji.com/euro-compliance
EU contact address: DJI GmbH, Industrie Strasse. 12, 97618, Niederlauer, Germany
This equipment complies with IC radiation exposure limits set forth for an uncontrolled environment .
This transmitter must not be co-located or operating in conjunction with any other antenna or
transmitter.
This equipment complies with FCC radiation exposure limits set forth for an uncontrolled environment .
This transmitter must not be co-located or operating in conjunction with any other antenna or
transmitter.
Cet appareil est
conforme aux limitesd'exposition de rayonnement RF IC établiespour un environnement non contrôlé.
Cetémetteur ne doit pas être co-implanté oufonctionner en conjonction avec toute autreantenne ou transmetteur.