SZ DJI TECHNOLOGY WM3221507 Phantom 3 Advanced User Manual Part I
SZ DJI TECHNOLOGY CO., LTD Phantom 3 Advanced Users Manual Part I
Contents
- 1. Users Manual Part I
- 2. User Manual Part II
Users Manual Part I
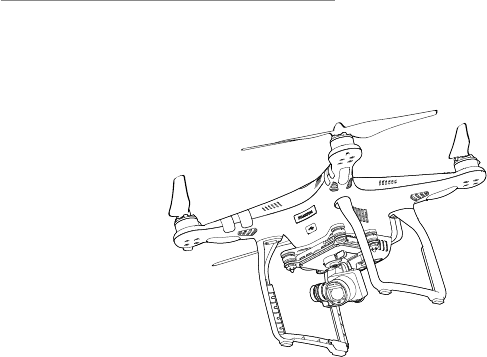
PHANTOM 3 Advanced
V1.0
2015.03
User Manual
2
© 2015 DJI. All Rights Reserved.
Using this manual
Legends
Warning Important Hints and Tips Reference
Read Before the First Flight
Read the follow documents before using the Phantom 3 Advanced for the rst time.
1. Disclaimer
2. Phantom 3 Advanced Quick Start Guide
3. Phantom 3 Advanced User Manual
4. In the Box
5. Safety Guidelines
6. Intelligent Flight Battery Safety Guidelines
It is recommended to watch all the tutorial videos on DJI ofcial website and read the Disclaimer before
your rst ight. Prepare for your rst ight by using the Phantom 3 Advanced Quick Start Guide. Refer to
the user manual for more detailed information.
Video Tutorials
Please watch the tutorial video below to learn how to use Phantom 3 Advanced safely:
http://www.dji.com/product/phantom-3-advanced/video
Download the DJI Pilot app
Download and install the DJI Pilot app before use. Scan the QR code below to download.
For Android version of the DJI Pilot app is compatible with Android 4.1.2 or later.
For iOS version of the DJI Pilot app is compatible with iOS 8.0 or later.
© 2015 DJI. All Rights Reserved.
3
Using this manual
Legends 2
Before Flight 2
Watch the video tutorials 2
Download the DJI Pilot app 2
Product Prole
Introduction 6
Feature Highlights 6
Assemble the Aircraft 7
Aircraft Diagram 8
Remote Controller Diagram 9
Aircraft
Flight Controller 12
Flight Mode 12
Flight Status Indicator 12
Return to Home (RTH) 13
Smart RTH 13
Low Battery RTH 14
Failsafe RTH 15
Dynamic Home Point 15
Vision Positioning System 16
Flight Recorder 17
Attaching and Detaching the Propellers 17
DJI Intelligent Flight Battery 18
Remote Control
RemoteControllerProle 24
Remote Controller Operations 24
Remote Controller Status LED 29
Linking the Remote Controller 29
Remote Controller Compliance Version 30
Contents
4
© 2015 DJI. All Rights Reserved.
Camera and Gimbal
CameraProle 32
Gimbal 33
DJI Pilot App
Camera 36
Map 40
Academy 40
User Center 40
Flight
Flight Environment Requirements 42
Flight Limits and Flight Restriction Area 42
PreightChecklist 46
Calibrating the Compass 46
Auto Take-off and Auto Landing 47
Flight Test 48
Starting/Stopping the Motors 48
Troubleshooting (FAQ)
Appendix
Specications 53
Intelligent Orientation Control (IOC) 56
FCC Compliance 57

© 2015 DJI. All Rights Reserved.
5
Product Prole
This chapter introduces the Phantom 3
Advanced and lists the components on
the aircraft and remote controllers.

6
© 2015 DJI. All Rights Reserved.
Product Profile
Product Prole
Introduction
The Phantom 3 Advanced is a brand new quadcopter capable of capturing HD video and transmitting
an HD video signal out of the box. The built-in camera has an integrated gimbal to maximize stability and
weight efciency while minimizing space. Even when no GPS signal is available, Vision Positioning sys-
tem provides hovering precision.
Feature Highlights
Camera and Gimbal: The Phantom 3 Advanced camera records video at up to 1080P and it is capable of
capturing 12 megapixel stills.
HD Video Downlink: Low latency, HD downlink powered by an enhanced version of the DJI Lightbridge
system.
DJI Intelligent Flight Battery: 4480 mAh DJI Intelligent Flight Battery employs new battery cells and a bat-
tery management system.
Flight Controller: The next generation ight controller system provides a more reliable ight experience. A
new ight recorder stores the ight data from each ight, and Vision Positioning enhances hovering preci-
sion when ying indoors and no GPS is available.
© 2015 DJI. All Rights Reserved.
7
Product Profile
Phantom 3 Advanced User Manual
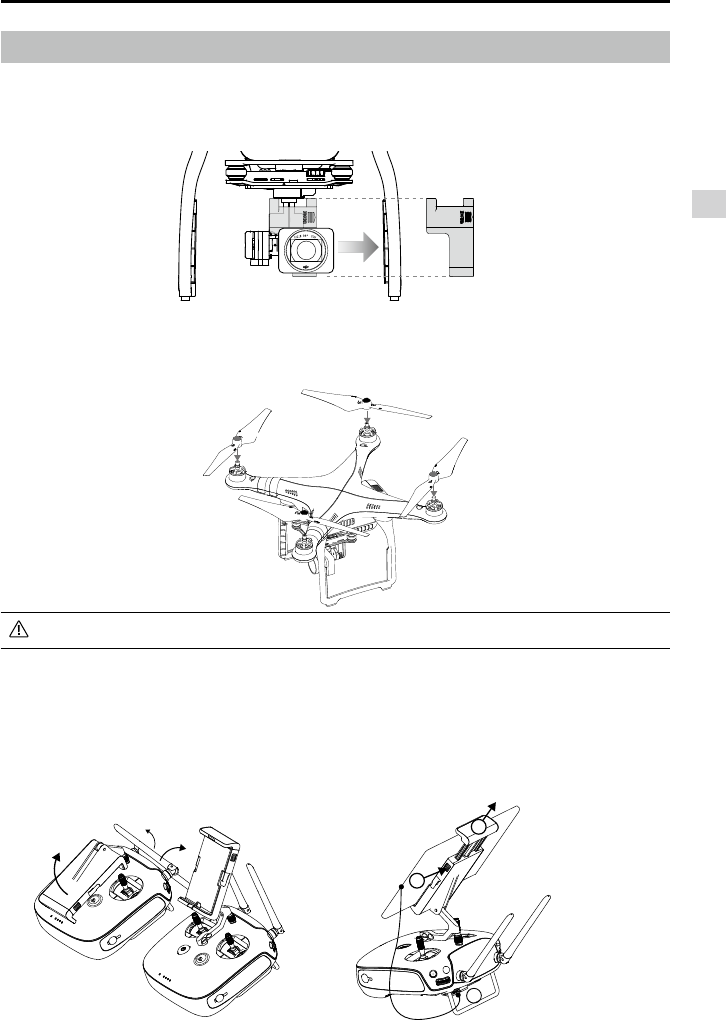
Assemble the Aircraft
Removing Gimbal Clamp
Remove the gimbal clamp in the direction as shown below:
Attaching Propellers
Attach the propellers with the black nut onto motors with the black axis and spin counter-clockwise to se-
cure. Attach propellers with grey nut onto motors without a grey axis and spin clockwise to secure.
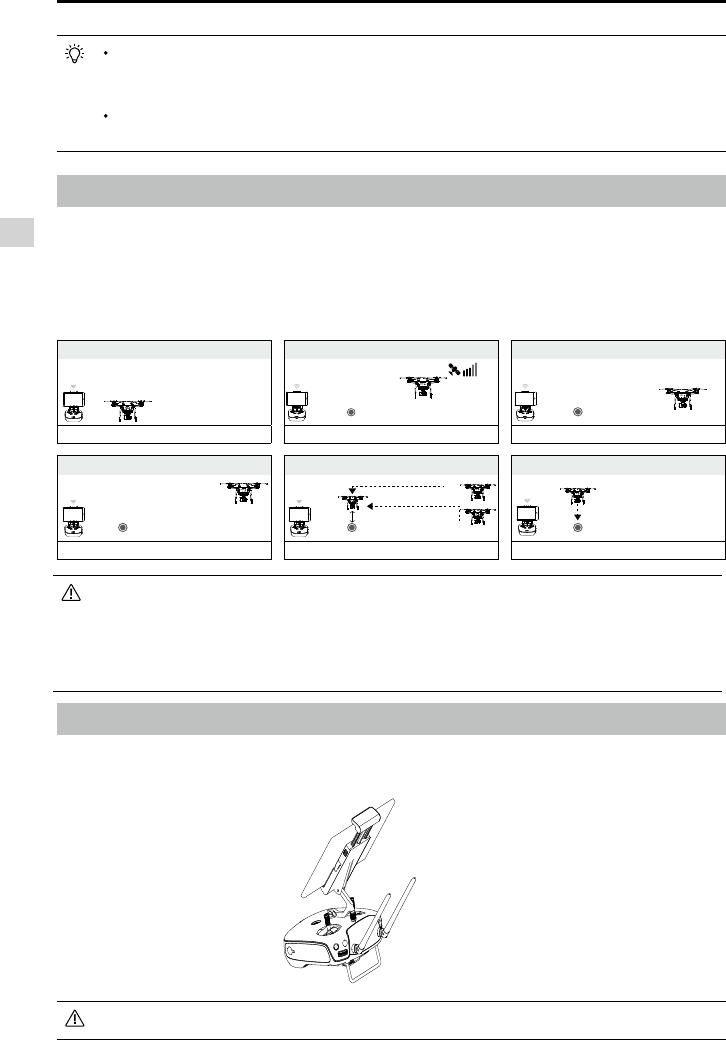
Preparing Remote Controller
Tilt the Mobile Device Holder to the desired position then adjust the antennas.
1. Press the button on the side of the Mobile Device Holder to release the clamp, adjust the clamp to t
the size of the mobile device.
2. Connect the mobile device to the remote controller with a USB cable.
3. Plug one end of the cable into the mobile device, and the other end into the USB port on the back of
the remote controller.
Place all propellers onto the correct motor and tighten by hand to secure its position.
1
3
2
8
© 2015 DJI. All Rights Reserved.
Product Profile
Phantom 3 Advanced User Manual
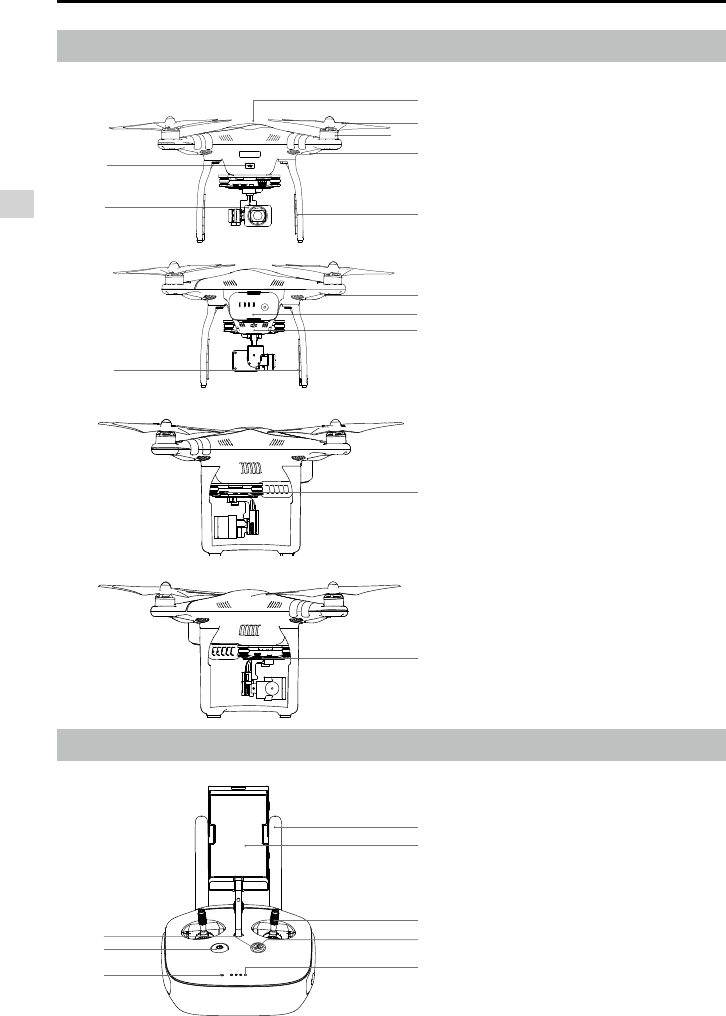
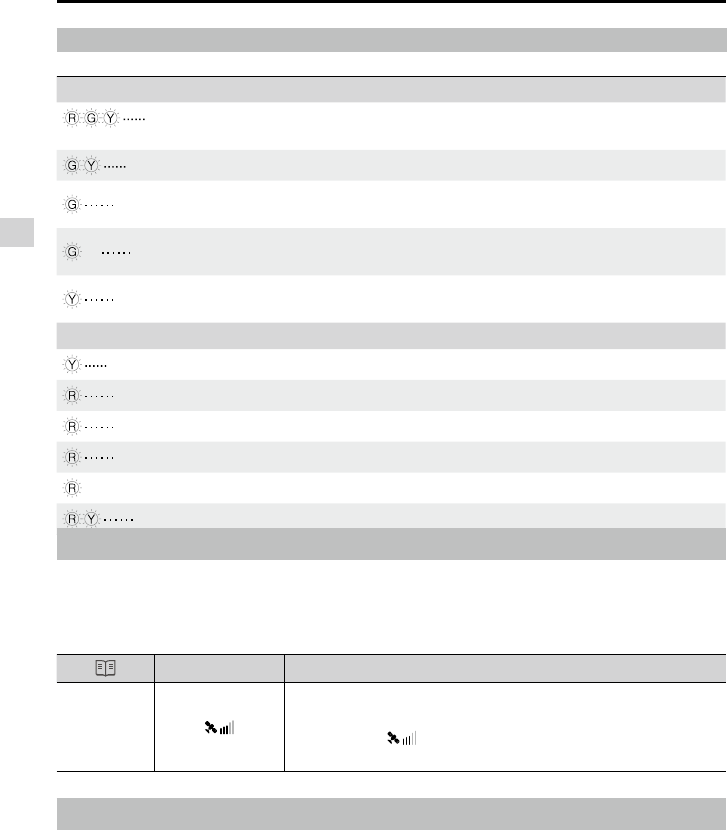
Aircraft Diagram
[1] GPS
[2] Propeller
[3] Motor
[4] Front LED
[5] Landing gear
[6] Gimbal and Camera
[7] Aircraft Micro-USB Port
[8] Aircraft Status Indicator
[9] Intelligent Flight Battery
[10] Vision Positioning Sensors
[11] Antennas
[12] Camera Micro-SD Card Slot
[13] Camera Micro-USB Port
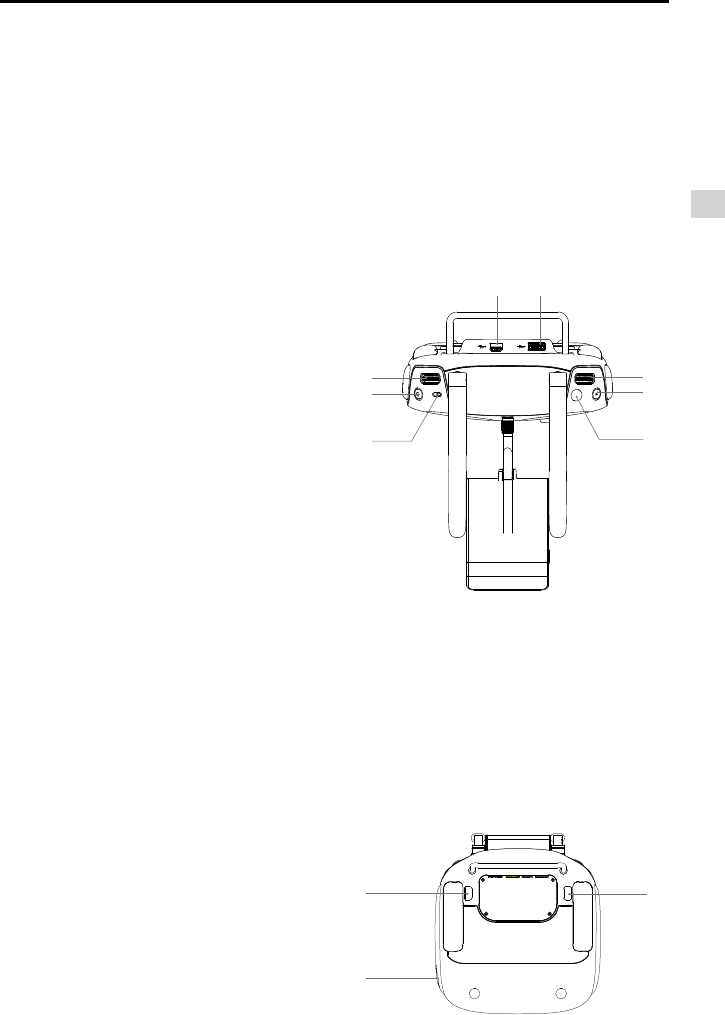
Remote Controller Diagram
[1] Antennas
Relays aircraft control and
video signal.
[2] Mobile Device Holder
Mounting place for your mobile
device.
[3] Control Stick
Controls aircraft orientation.
[4] Return Home (RTH) Button
Press and hold the button to
initiate Return to Home (RTH).
[1]
[2]
[3]
[4]
[5]
[6]
[7]
[8]
[11]
[9]
[10]
[12]
[13]
[1]
[2]
[4]
[5]
[6]
[7]
[8]
[3]
© 2015 DJI. All Rights Reserved.
9
Product Profile
Phantom 3 Advanced User Manual
[5] Battery Level LEDs
Displays the battery level of the remote
controller.
[6] Status LED
Displays the remote controller's system status.
[7] Power Button
Used to power on or power off the remote
controller.
[8] RTH LED
Circular LED around the RTH button displays
RTH status.
[17]
[19]
[18]
[9] Camera Settings Dial
Turn the dial to adjust camera settings.
Only functions when the remote controller is
connected to a mobile device running the DJI
Pilot app.
[10] Playback Button
Playback the captured images or videos.
[11] Shutter Button
Press to take a photo. If in burst mode, the
set number of photos will be taken with one
press.
[12] Flight Mode Switch
Switch between P, A and F mode.
[13] Video Recording Button
Press to start recording video. Press again to
stop recording.
[14] Gimbal Dial
Use this dial to control the tilt of the gimbal.
[15] Mircro-USB Port
Connect to a SD card reader to upgrade the
rmware.
[16] USB Port
Connect to mobile device or to a USB thumb
drive for rmware upgrdae.
[17] Back Right Button
Customizable button in DJI Pilot app.
[18] Back Left Button
Customizable button in DJI Pilot app.
[19] Power Port
Connect to a power source to charge the bat-
tery of the remote controller.
[10]
[11]
[15] [16]
[9]
[12]
[13]
[14]
10
© 2015 DJI. All Rights Reserved.
Aircraft
This chapter introduces the features of
the flight controller, Vision Positioning
System and the Intelligent Flight Battery.
© 2015 DJI. All Rights Reserved.
11
Aircraft
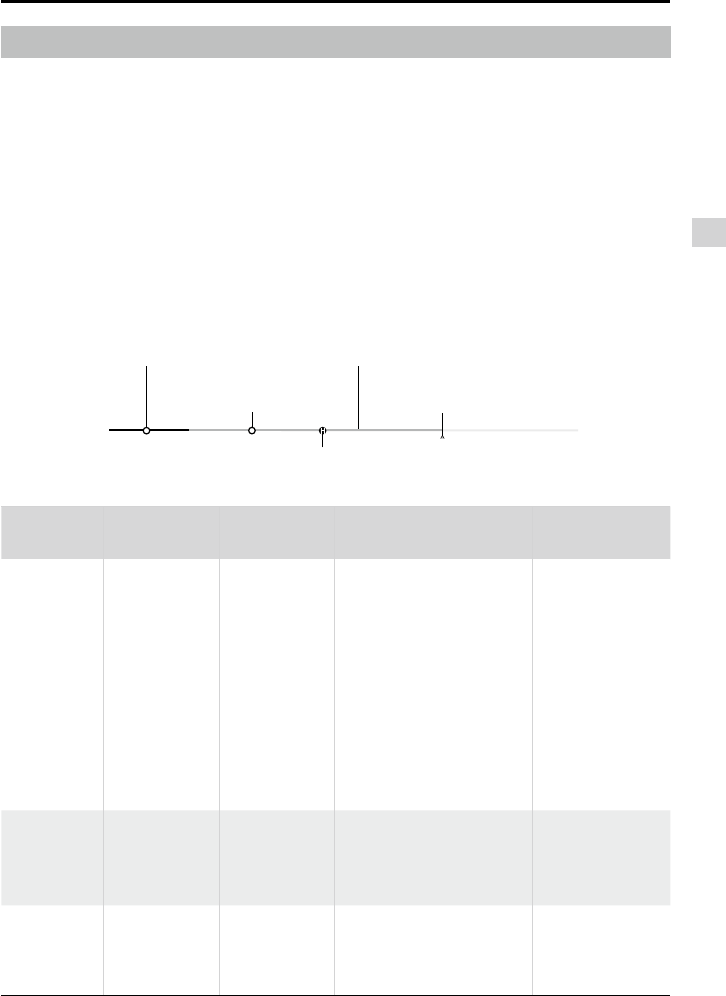
Flight Status Indicator
The Phantom 3 Advanced comes with the Front LED and Aircraft Status Indicator. The positions of these
LEDs are shown in the gure below:
The Front shows the orientation of the aircraft. The Front LED displays solid red. Aircraft Status Indicator
shows the system status of the ight controller. Refer to the table below for more information about the
Aircraft Status Indicator:
Aircraft
Flight Controller
The Phantom 3 Advanced’s ight controller is based on DJI ight controller with several enhancements
such as new ight mode. Three safe modes are available: Failsafe, Return Home and Dynamic Home
Point. These features ensure the safe return of your aircraft if the control signal is lost. The ight controller
can stores crucial ight data to the on-board storage device for each ight.
Flight Mode
Three ight modes are available. The details of each ight mode are found in the section below:
P mode (Positioning) : P mode works best when GPS signal is strong. There are three different states of P
mode, which will be automatically selected by the Phantom 3 Advanced depending on signal strength
of GPS and Vision Positioning sensors :
P-GPS: GPS and Vision Positioning both are available, and the aircraft is using GPS for positioning.
P-OPTI: Vision Positioning is available but the GPS signal is not. Aircraft is using only Vision Position-
ing for hovering
P-ATTI: Neither GPS or Vision Positioning available, aircraft is using only its barometer for positioning,
so only altitude is controlled.
A mode (Attitude): GPS and Vision Positioning System is not used for stabilization. The aircraft only uses its
barometer to stabilize. The aircraft can automatically return home if remote control signal is lost if the Home
Point is recorded successfully.
F mode (Function): Intelligent Orientation Control (IOC) is activated in this mode. For more information
about IOC, refer to the IOC section in the Appendix.
Use the Flight Controller mode switch to change the ight mode of the aircraft, refer to the “Flight
Mode Switch” on P24 for more information.
Front LED
Aircraft Status Indicator
12
© 2015 DJI. All Rights Reserved.
Aircraft
Phantom 3 Advanced User Manual
Aircraft Status Indicator Description
Normal
Red, Green and Yellow Flash
Alternatively Power on and self-check
Green and Yellow Flash Alternatively Aircraft warming up
Green Flashes Slowly Safe to Fly (P mode with GPS and Vision
Positioning)
X2 Green Flashes Twice Safe to Fly (P mode with Vision Positioning but
without GPS)
Yellow Flashes Slowly Safe to Fly (A mode but No GPS and Vision
Positioning)
Warning
Fast Yellow Flashing Remote Controller Signal Lost
Slow Red Flashing Low Battery Warning
Fast Red Flashing Critical Low Battery Warning
Red Flashing Alternatively IMU Error
—
Solid Red Critical Error
Red and Yellow Flash Alternatively Compass Calibration Required
Return to Home (RTH)
The Return to Home (RTH) brings the aircraft back to the last recorded Home Point. There are three cases
that will trigger RTH procedure; they are Smart RTH, Low Battery RTH and Failsafe RTH. The remaining
part of this section will describe these three cases in details.
GPS Description
Home Point
The Home Point is the location at which your aircraft takes off when the
GPS signal is strong. You can view the GPS signal strength through
the GPS icon ( ). Aircraft status indicator will blink rapidly when
home point is recorded.
Smart RTH
Use the RTH button on the remote controller (refer to “RTH button” on P28 for more information) or tap the
RTH button in the DJI Pilot app when GPS is available to start Smart RTH. The aircraft returns to the latest
recorded Home Point, you may control the aircraft's orientation to avoid collision during the Smart RTH.
Press and hold the Smart RTH button once to start the process, press the Smart RTH button again to exit
Smart RTH and regain the control.
© 2015 DJI. All Rights Reserved.
13
Aircraft
Phantom 3 Advanced User Manual
Battery Level
Warning Remark Aircraft Status
Indicator DJI Pilot app Flight Instructions
Low battery
level warning
The battery
power is low.
Please land the
aircraft.
Aircraft status
indicator blinks
RED slowly.
Tap “Go-home” to have
the aircraft return to the
Home point and land
automatically, or “Cancel” to
resume normal flight. If no
action is taken, the aircraft
will automatically go home
and land after 10 seconds.
Remote controller will sound
an alarm.
Fly the aircraft
back and land
it as soon as
possible, then
stop the motors
and replace the
battery.
Critical Low
battery level
warning
The aircraft
must land
immediately.
Aircraft status
indicator blinks
RED quickly.
The DJI Pilot app screen will
ash red and aircraft starts to
descend. Remote controller
will sound an alarm.
The aircraft
will begin to
descend and land
automatically.
Estimated
remaining
ight time
Estimated
remaining ight
based on current
battery level.
N/A N/A N/A
Low Battery RTH
The low battery level failsafe is triggered when the DJI Intelligent Flight Battery is depleted to a point that
may affect the safe return of the aircraft. Users are advised to return home or land the aircraft immediately
when these warnings are prompted. DJI Pilot app will advise user to return the aircraft to the Home Point
when low battery warning is triggered. Aircraft will automatically return to the Home Point if no action is
taken after 10 seconds countdown. User can cancel the RTH by pressing once on the RTH button. The
thresholds for these warnings are automatically determined based on the current aircraft altitude and its
distance from the Home Point.
Aircraft will land automatically if the current battery level can only support the aircraft to land from the
current altitude. User can use the remote controller to control the aircraft’s orientation during the landing
process.
The Battery Level Indicator is displayed in the DJI Pilot app, and is described below
Battery level Indicator
Critical Low battery level
warning(Red)
Low battery
level warning(Yellow)
Sufcient battery
level(Green)
Remaining ight time
Power requires
to return home
14
© 2015 DJI. All Rights Reserved.
Aircraft
Phantom 3 Advanced User Manual
Aircraft cannot avoid obstruction during the Failsafe RTH, therefore it is important to set an
suitable Failsafe altitude before each ight. Launch the DJI Pilot app and enter “Camera” view
and select “MODE” to set the Failsafe altitude.
Aircraft will stop ascending and return to the Home Point immediately if throttle stick is moved
during the Failsafe RTH procedure
Failsafe RTH
Failsafe RTH is activated automatically if remote controller signal (including video relay signal) is lost for
more than 3 seconds provided that Home Point has been successfully recorded and compass is working
normally. Return home process may be interrupted and the operator can regain control over the aircraft if
a remote controller signal is resumed.
Failsafe Illustration
When the critical battery level warning activates and the aircraft is descending to land
automatically, you may push the throttle upward to hover the aircraft and navigate it to a more
appropriate location for landing.
Color zones and markers on the battery level indicator reect estimated remaining ight time
and are adjusted automatically, according to the aircraft’s current status.
Height over HP<=20m<=20m
Dynamic Home Point
Dynamic home point is useful in situations when you are in motion and require a Home Point that is
different from the takeoff point. You may only use the Dynamic Home Point feature on the GPS - enabled
mobile device.
Ensure the space above the GPS module is not obstructed when using Dynamic Home Point.
5
Go Home(altitude adjustable)
Fast Blinking Yellow
1 Record Home Point (HP)
Blinking Green
3 Remote Controller Signal Lost
Fast Blinking Yellow
2 Conrm Home Point
Blinking Green
6 Landing after Hovering 5 secs
Fast Blinking Yellow
4
Signal Lost Lasts 3secs.
Fast Blinking Yellow
Height over HP>20m
Elevate to 20m
20m
>3S
×
×
××