SZ DJI TECHNOLOGY WM3231507 Phantom 3 Professional User Manual Part II
SZ DJI TECHNOLOGY CO., LTD Phantom 3 Professional Part II
UserManual.wiki
>
SZ DJI TECHNOLOGY
>
WM3231507 User Manual
>
User Manual Part II
Contents
1.
Users Manual Part I
2.
User Manual Part II
User Manual Part II
Navigation menu
Upload a User Manual
Namespaces
Wiki Guide
HTML
PDF
Info
Views
User Manual
Discussion / Help
Navigation
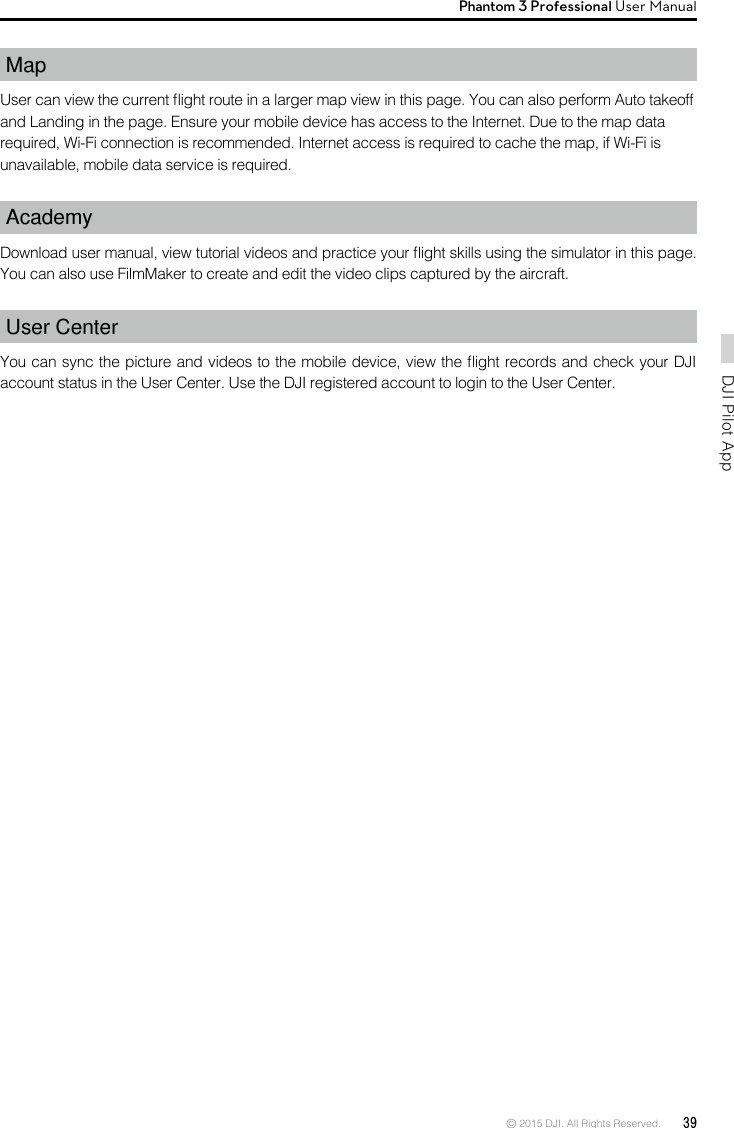
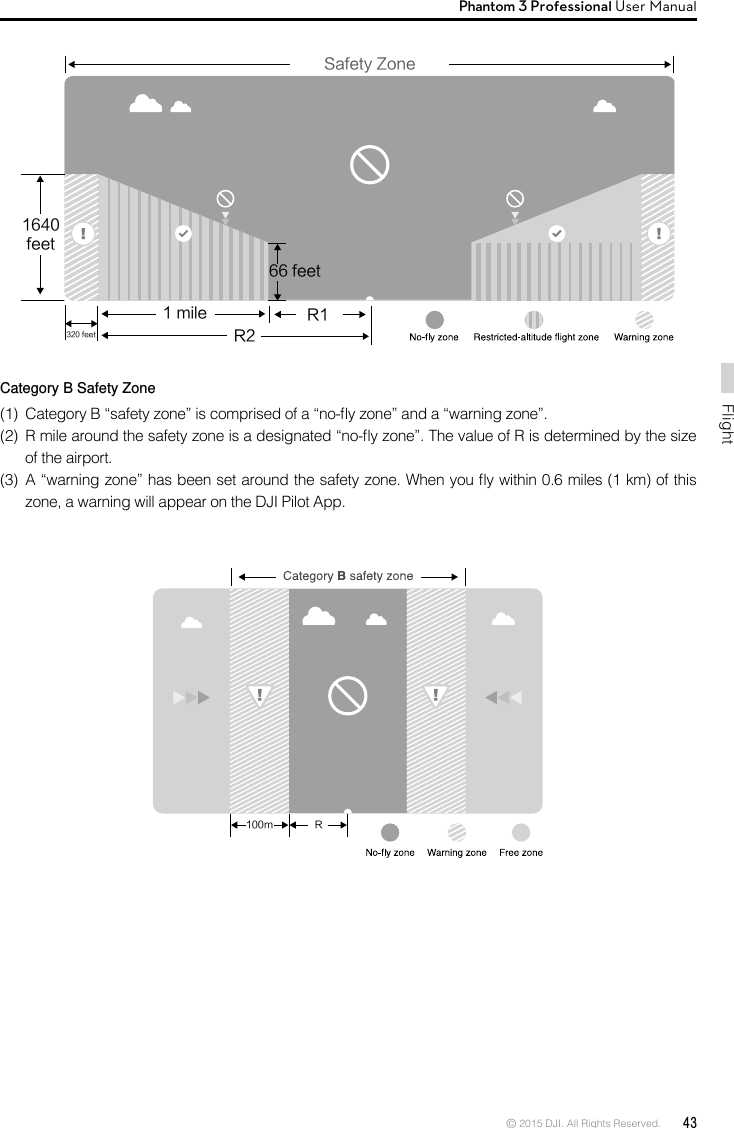
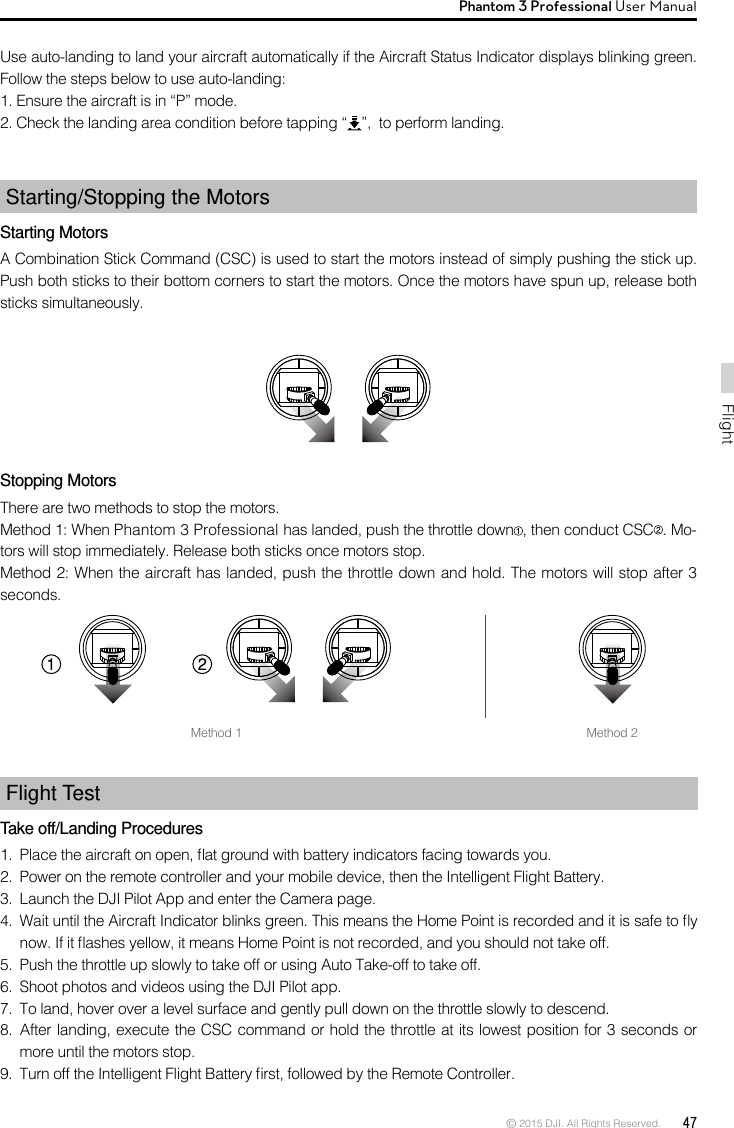
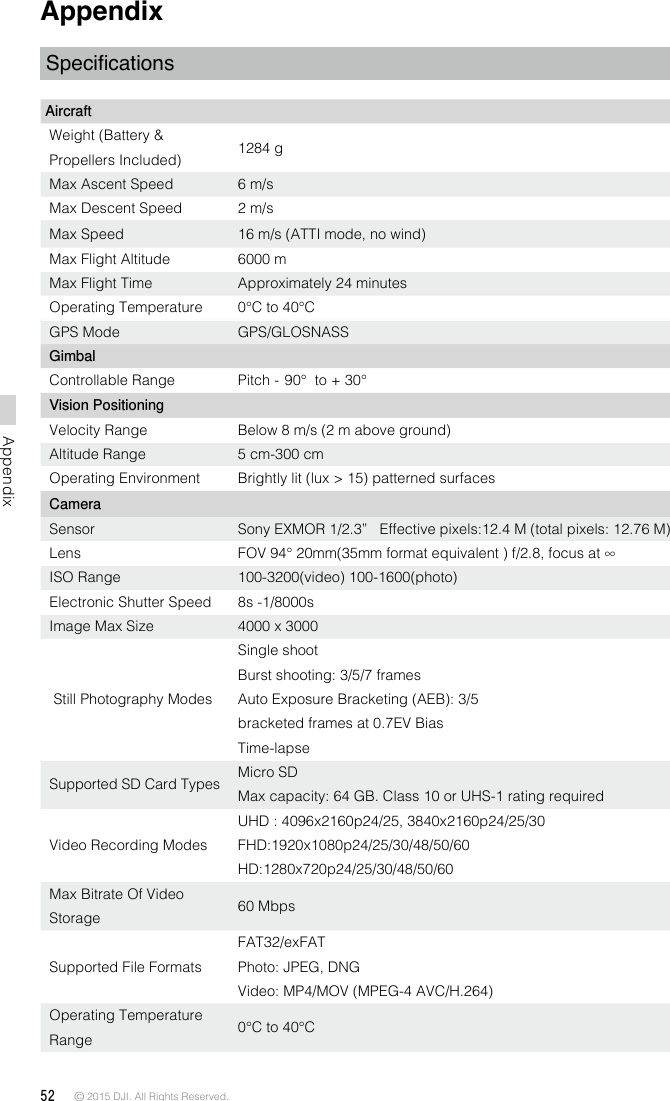
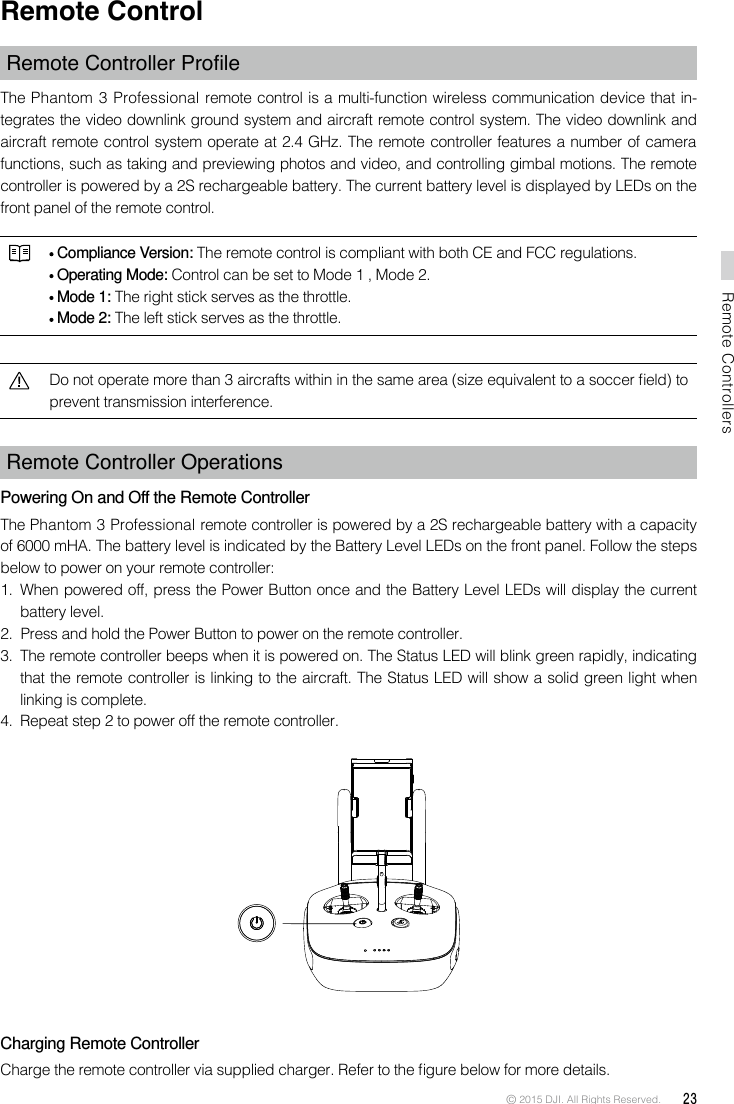
![© 2015 DJI. All Rights Reserved. 15AircraftPhantom 3 Professional User Manual There are two options for Dynamic Home Point.1. Set the aircraft current coordinate as the new Home Point. 2. Set the mobile device's coordinate as the new Home Point. Setting Up Dynamic Home PointFollow the steps below to setup Dynamic Home Point:1. Connect to the mobile device and launch the DJI Pilot app and go to the “Camera” page.2. Tap“ ”and select“ ”, to set the mobile device’s coordinates as the new Home Point.3. Tap“ ”and select“ ”, to set the aircraft’s coordinates as the new Home Point.4. The aircraft status indicator blinks green to show Home Point is set successfully.Vision Positioning SystemDJI Vision Positioning is a positioning system that uses ultrasonic and image data to help the aircraft identify its current position. With the help of Vision Positioning, your Phantom 3 Professional can hover in place more precisely and y indoors or in other environments where there is no GPS signal available. The main components of DJI Vision Positioning are located on the bottom of your Phantom 3 Professional, including [1] one monocular camera and [2]two sonar sensors. Using Vision Positioning Vision Positioning is activated automatically when the Phantom 3 Professional is powered on. No manual action is required. Vision Positioning is typically used in the indoor environment where no GPS is available. By using the sensors on the Vision Positioning system, Phantom 3 Professional can perform precision hovering even when no GPS is available. [1][2]](https://usermanual.wiki/SZ-DJI-TECHNOLOGY/WM3231507.User-Manual-Part-II/User-Guide-2691611-Page-1.png)

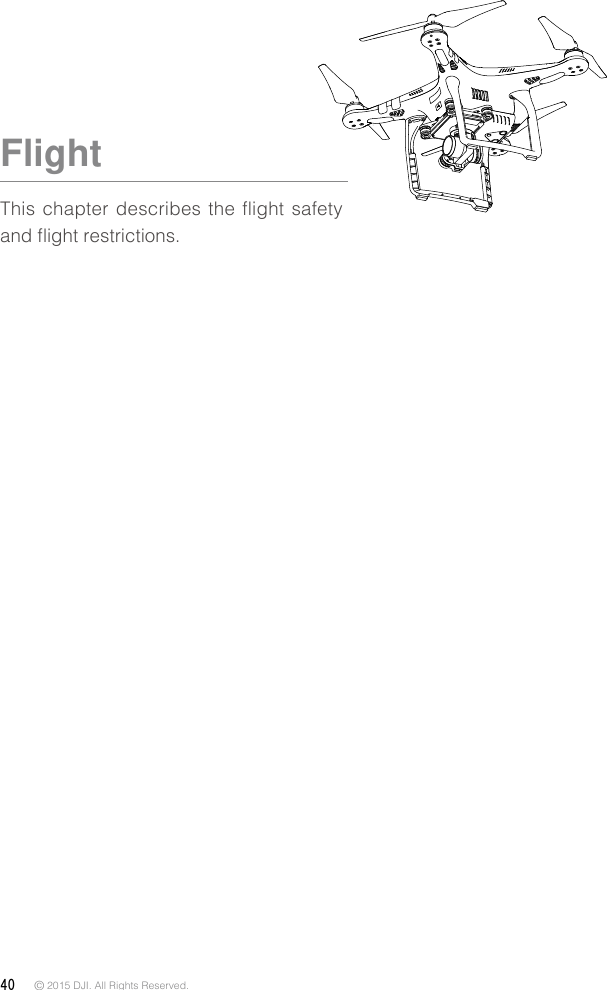
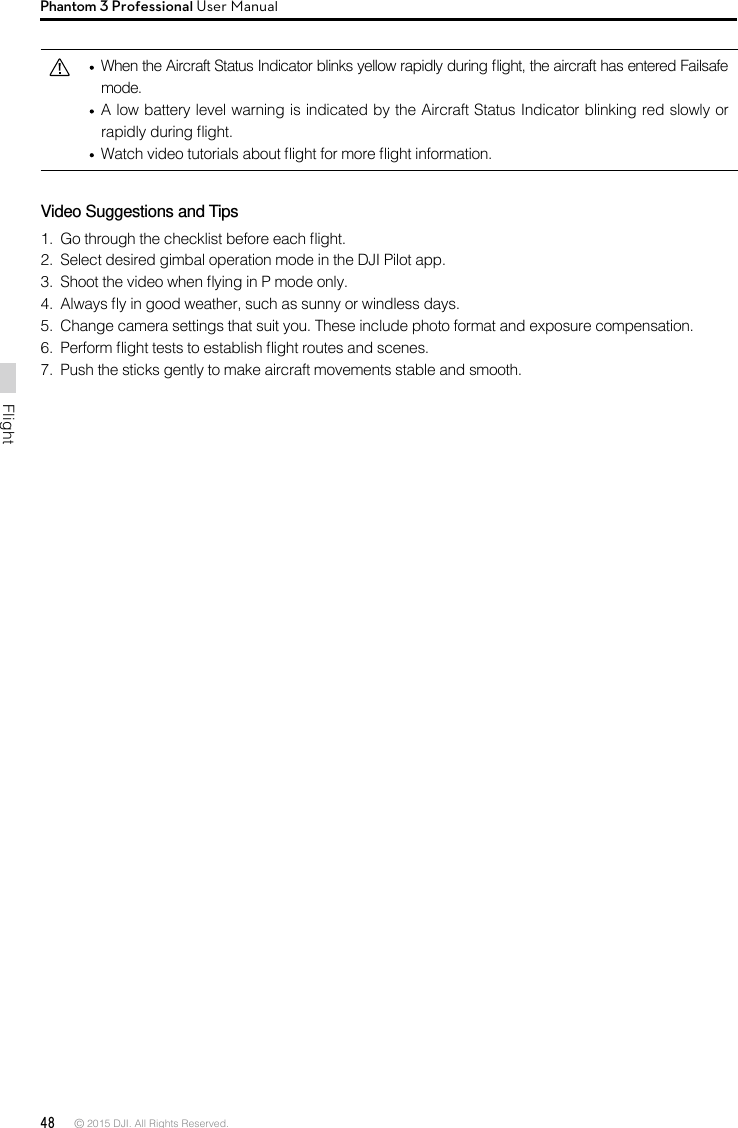
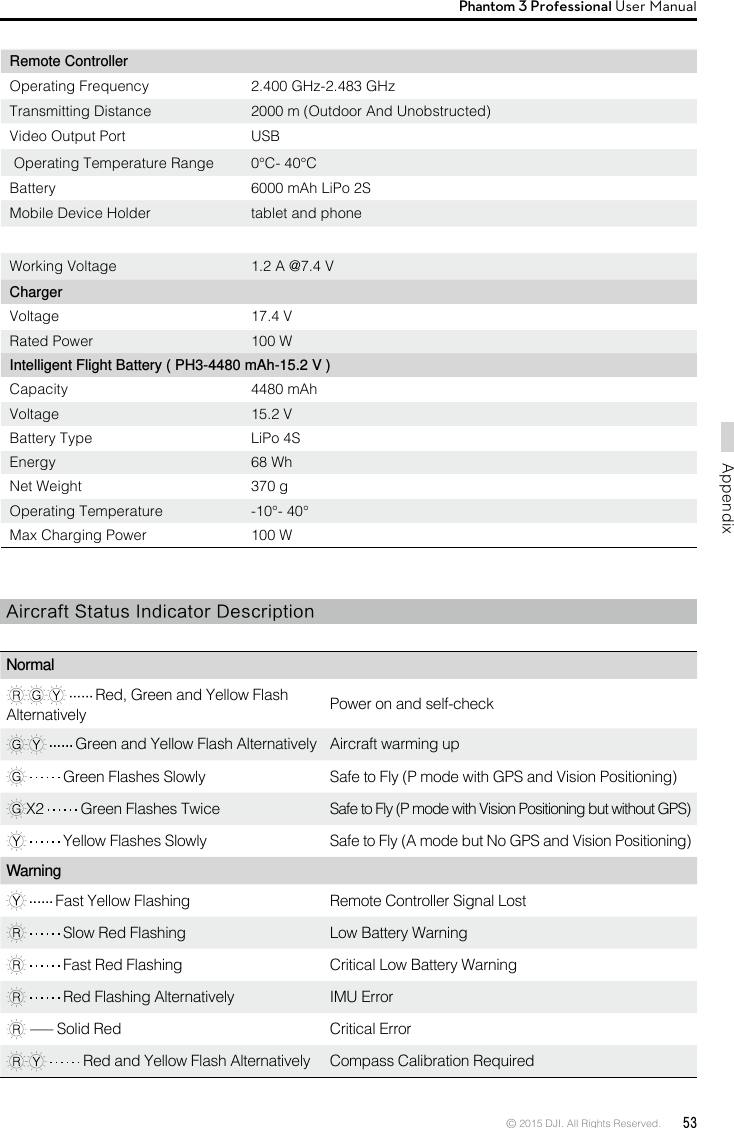
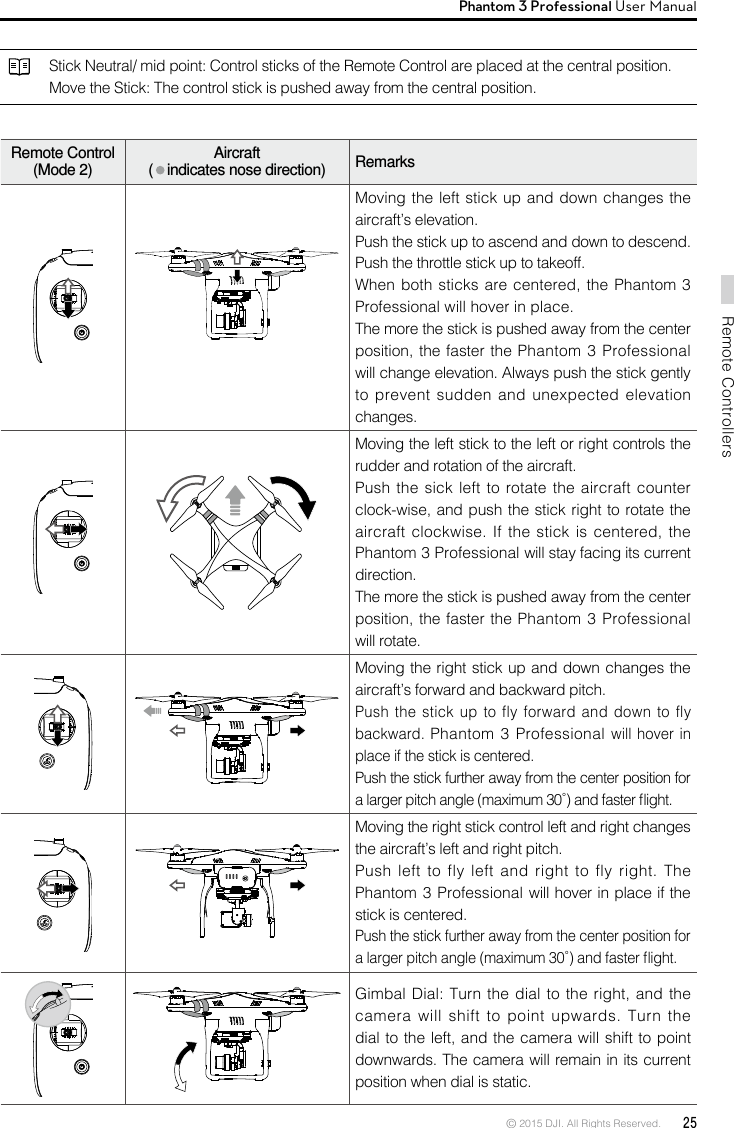
![24 © 2015 DJI. All Rights Reserved. Remote ControllersPhantom 3 Professional User ManualChargerPower OutletPower ButtonControlling CameraShoot videos or images and adjust camera settings via the Shutter Button, Camera Settings Dial, Play-back Button and Video Recording Button on the remote control. [1] Camera Settings DialTurn the dial to quickly adjust camera settings such as ISO, shutter speed, and aperture without letting go of the remote controller. Move the dial button to left or right to view the pictures or videos in playback mode.[2] Playback ButtonPress to view images or videos that have already been captured.[3] Shutter ButtonPress to take a photo. If burst mode is activated, multiple photos will be taken with a single press.[4] Recoding ButtonPress once to start recording video, then press again to stop recording. [5] Gimbal DialUse this dial to control the tilt of the gimbal. Controlling Aircraft This section explains how to control the orientation of the aircraft through the remote controller. The Remote Control is set to Mode 2 by default. [1][2][3][4][5]](https://usermanual.wiki/SZ-DJI-TECHNOLOGY/WM3231507.User-Manual-Part-II/User-Guide-2691611-Page-10.png)
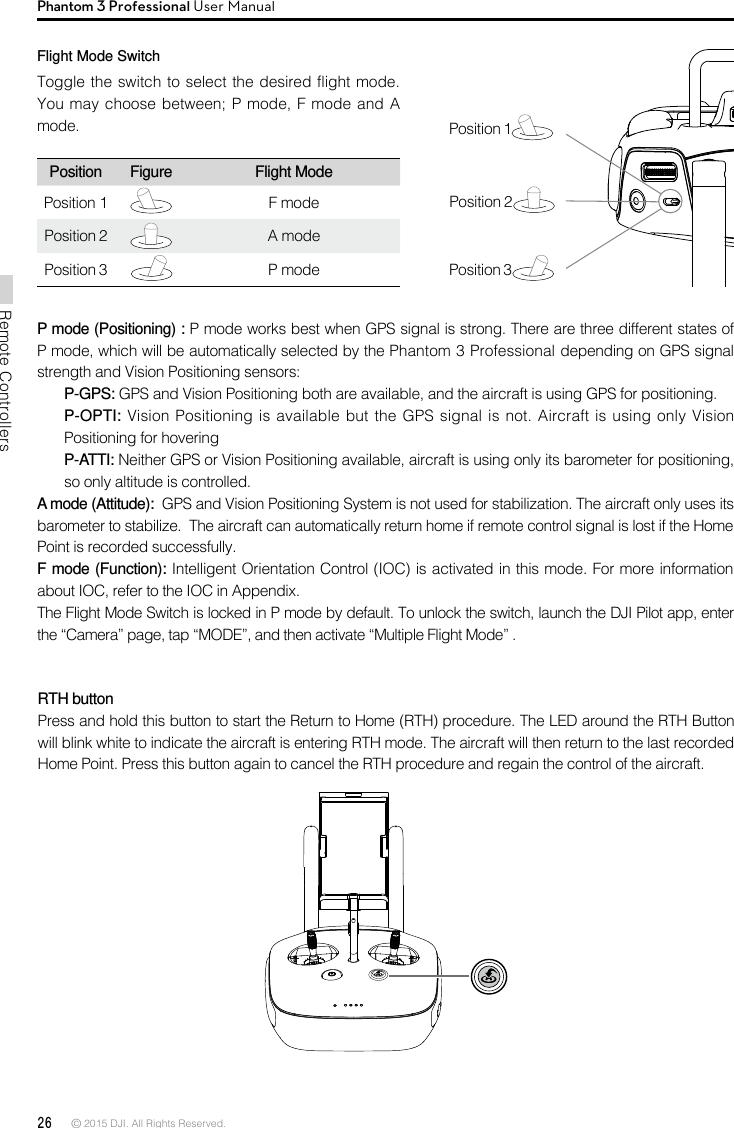
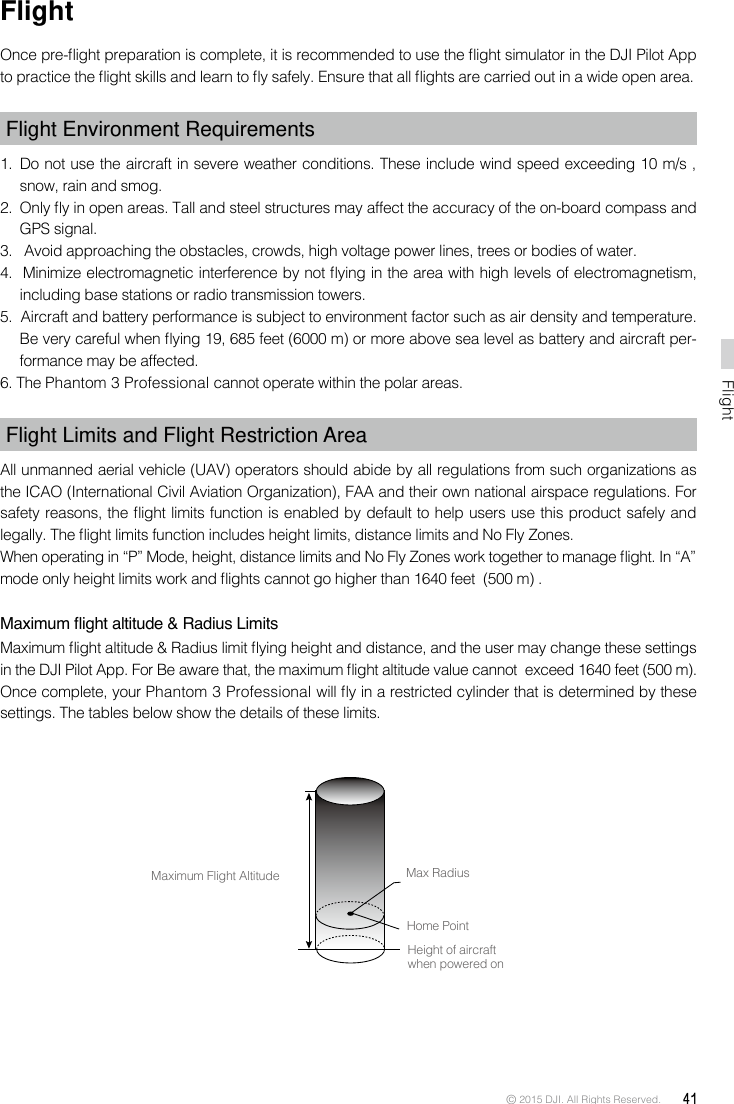
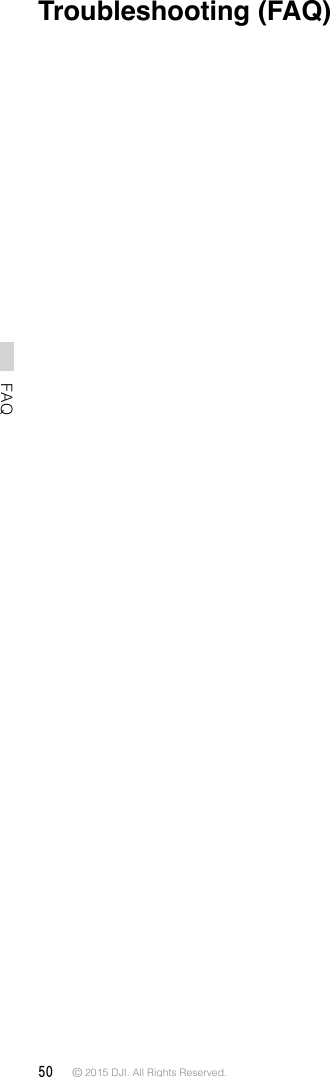
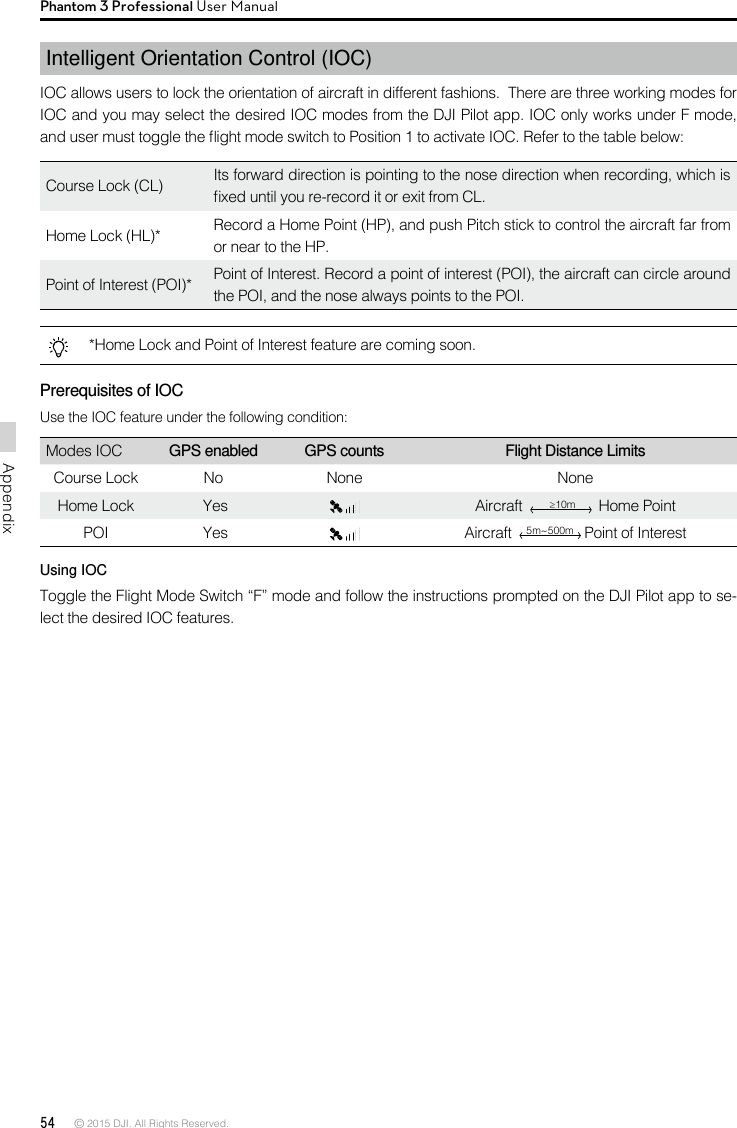
![© 2015 DJI. All Rights Reserved. 33Gimbal CameraPhantom 3 Professional User Manual ②①③Anti-drop KitThe Anti-drop Kit helps keep the gimbal and camera connected to the aircraft. Two have been mounted on delivery. If new ones are required, take the gimbal and press part [1] through the center hole of the Vibration Absorber the center hole of part [2]. Lock them together as shown in [3]. Mounting the Anti-drop Kit diagonally is recommended.](https://usermanual.wiki/SZ-DJI-TECHNOLOGY/WM3231507.User-Manual-Part-II/User-Guide-2691611-Page-19.png)
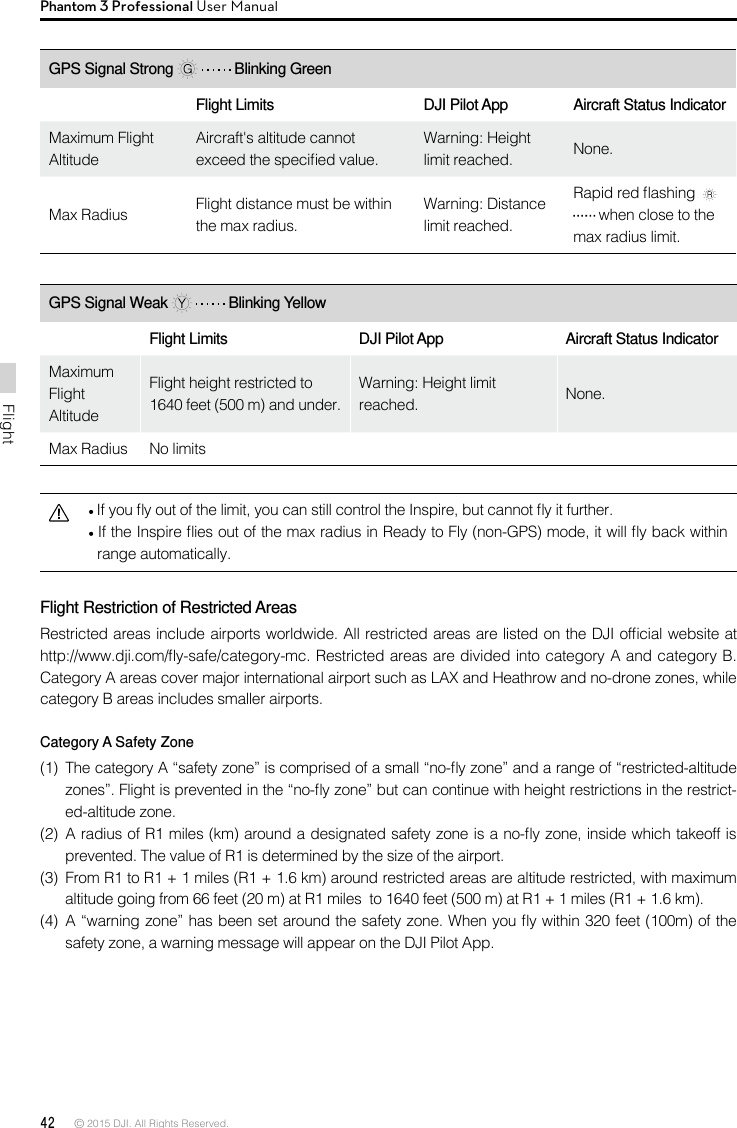
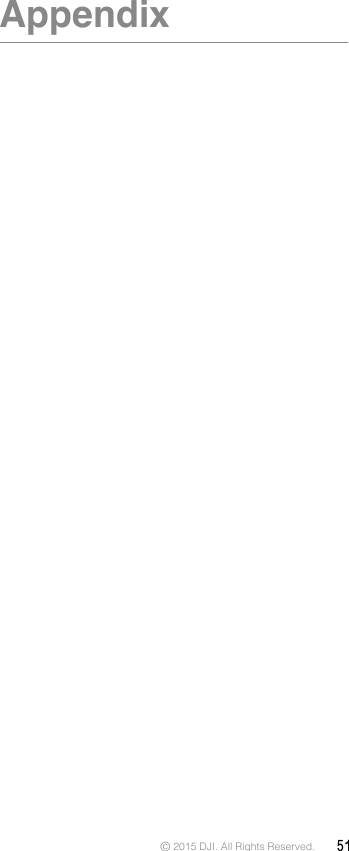
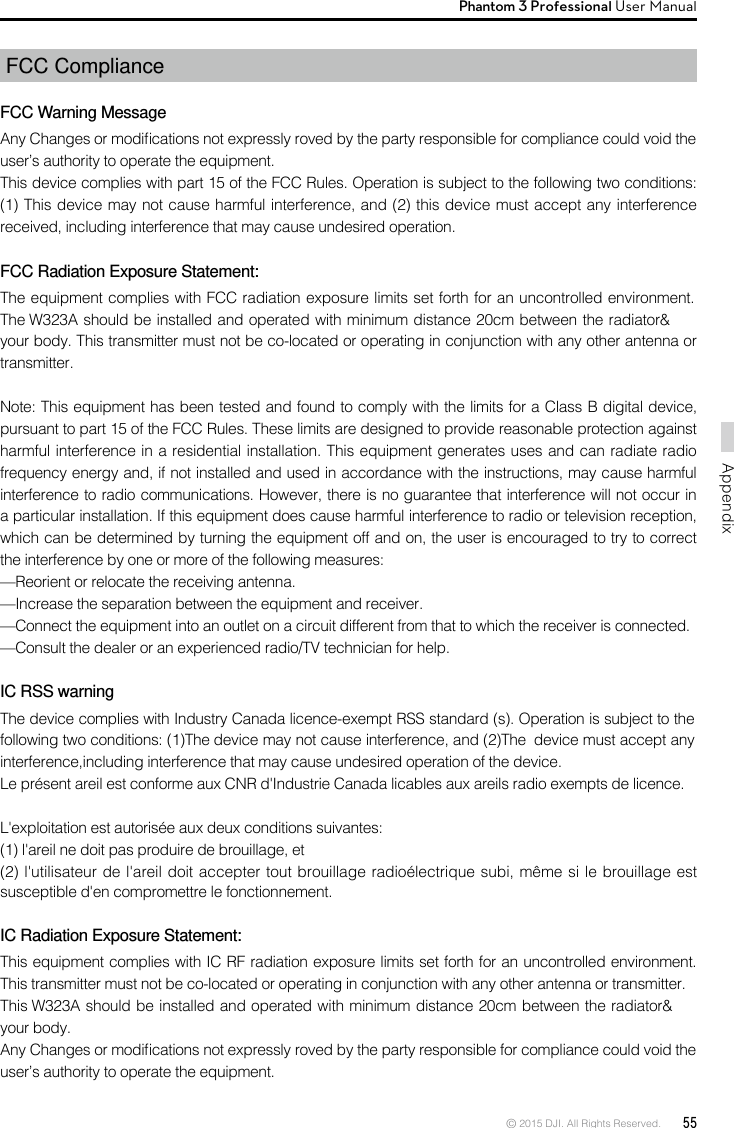
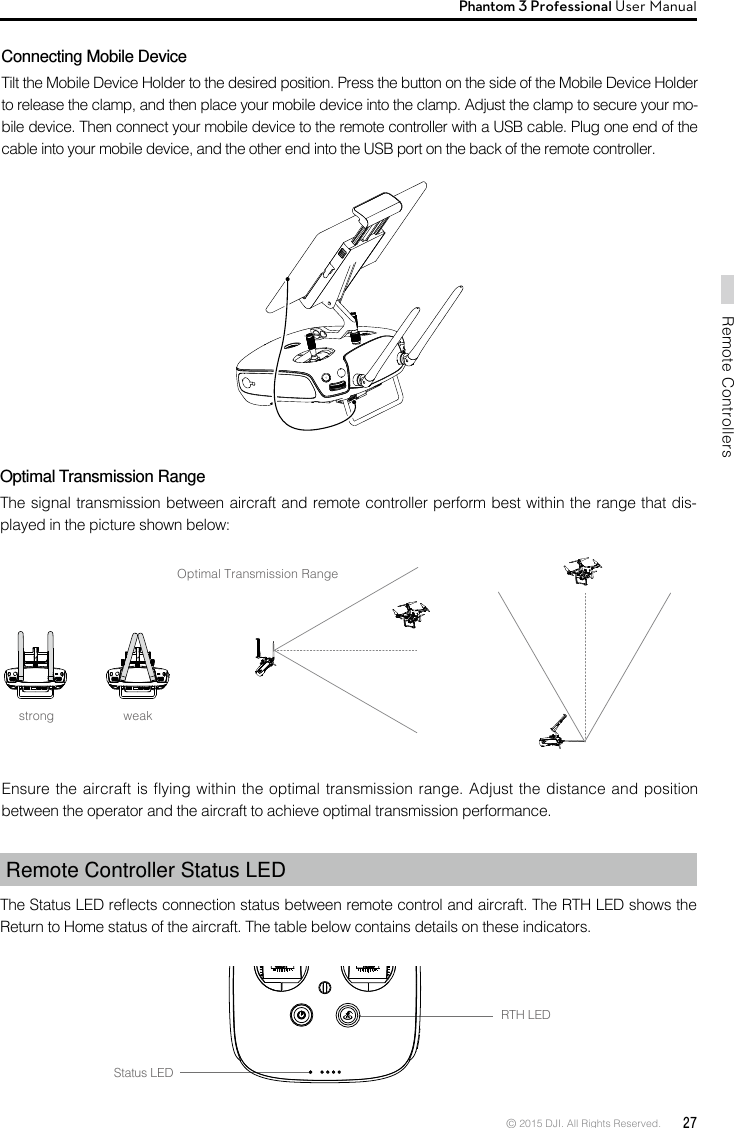
![© 2015 DJI. All Rights Reserved. 35DJI Pilot App DJI Pilot AppThe DJI Pilot app is a mobile app designed specically for the Phantom 3 Professional. Use this app to control the gimbal, camera and other features of your ight system. The app also comes with Map, Acad-emy and User Center, for conguring your aircraft and sharing the photos and videos with your friends. It is recommended that you use a tablet for the best experience.CameraThe Camera page contains a live HD video feed from the Phantom 3 Professional’s camera. You can also congure various camera parameters from the Camera page. CAMERA ACADEMY USER CENTERMAPUnited StatesMountain View1/320 4821JPEG 4K 30ISO 100 EV 0 00:22:16Safe to Fly (GPS)MODECLP-GPSH: D:V.SM/S M/SH.S24.28.3 1.2M2M39M200m0 200m0[16][15][14][13] [11][12][10][9][8][7][6][5][4][3][2][1]](https://usermanual.wiki/SZ-DJI-TECHNOLOGY/WM3231507.User-Manual-Part-II/User-Guide-2691611-Page-21.png)
![36 © 2015 DJI. All Rights Reserved. DJI Pilot App Phantom 3 Professional User Manual[1] Flight Mode: The text next to this icon indicates the current ight mode. Tap to enter MC (Main Controller) Settings. Modify ight limits, perform compass calibration, and set the gain values. [2] GPS Signal Strength: This icon shows the current strength of GPS signals. Green bars indicates adequate GPS strength. [3] IOC Settings : This icon shows which IOC setting that the aircraft has entered when in F Mode. Tap to enter IOC setting menu and select the desired IOC setting.[4] System Status : This icon shows current aircraft system status, such as GPS signal health.[5] Battery Level Indicator : The battery level indicator dynamically displays the battery level. The color zones on the battery level indicator represent different battery levels. [6] Remote Controller Signal : This icon shows the strength of remote controller signal.[7] HD Video Link Signal Strength : This icon shows the HD video downlink signal strength between the aircraft and the remote controller. [8] Battery Level: This icon shows the current battery level.Tap to enter battery information menu, set the various battery warning thresholds and view the battery warning history in this page.[9] General Settings : Tap this icon to enter General Settings page. Select parameter metric, reset the camera, enable the quick view feature, adjust the gimbal pitch value and toggle ight route display on this page. [10] Camera Operation BarShutter : Tap this button to take a single photo. Press and hold this button to select burst or time-lapsed shooting. Record : Tap once to start recording video, then tap again to stop recording. You can also press the Vid-eo Recording Button on the remote controller, which has the same function.Playback : Tap to enter playback page. You can preview photos and videos as soon as they are](https://usermanual.wiki/SZ-DJI-TECHNOLOGY/WM3231507.User-Manual-Part-II/User-Guide-2691611-Page-22.png)
![© 2015 DJI. All Rights Reserved. 37DJI Pilot App Phantom 3 Professional User Manual captured.Camera Settings : Tap to enter the camera exposure value setting. User may switch from Auto exposure mode to Advance or Manual mode.[11] MapDisplaytheightpathofthecurrentmission.TaptoswitchfromtheCameraGUItotheMapGUI.[12] Vision Positioning : This icon shows the distance between the surface and the Vision Positioning System's sensors.[13] Flight TelemetryVision Positioning StatusIcon is highlighted when Vision Positioning is in operation.Flightattitudeisindicatedbytheightattitudeicon.(1) The red arrow shows which direction the aircraft is facing.(2) Light blue and dark blue areas indicate pitch.(3) Pitching of the boundary between light blue and dark blue area shows roll angle.[14] Return to Home (RTH) : Initiate RTH home procedure. Tap to have the aircraft return to the last recorded home point.200m0 200m0](https://usermanual.wiki/SZ-DJI-TECHNOLOGY/WM3231507.User-Manual-Part-II/User-Guide-2691611-Page-23.png)
![38 © 2015 DJI. All Rights Reserved. DJI Pilot App Phantom 3 Professional User Manual[15] Auto Takeoff/Landing / : Tap to initiate auto takeoff or landing.[16] Back : Tap to return to the main GUI.](https://usermanual.wiki/SZ-DJI-TECHNOLOGY/WM3231507.User-Manual-Part-II/User-Guide-2691611-Page-24.png)