SZ DJI TECHNOLOGY WM3231510 Phantom 3 Professional User Manual Part Two
SZ DJI TECHNOLOGY CO., LTD Phantom 3 Professional Users Manual Part Two
Contents
- 1. Users Manual Part One
- 2. Users Manual Part Two
- 3. Users Manual Part Three
Users Manual Part Two
20
© 2015 DJI. All Rights Reserved.
Aircraft
Phantom 3 Professional User Manual
Battery Life
LED1 LED2 LED3 LED4 Battery Life
90%~100%
80%~90%
70%~80%
60%~70%
50%~60%
40%~50%
30%~40%
20%~30%
below 20%
When battery life reaches 0%, it can no longer be used.
For more information about the battery, launch DJI Pilot app and check the information under the
battery tab.
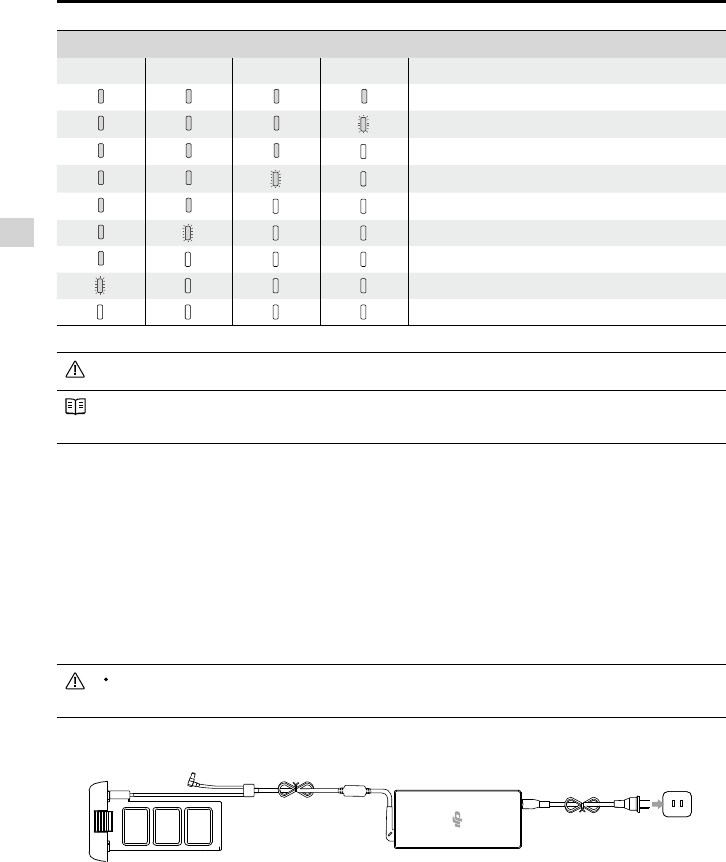
Charging the Intelligent Flight Battery
1. Connect Battery Charger to a power source (100-240 V 50/60 Hz).
2. Open the Protection Cap and connect the Intelligent Flight Battery to the Battery Charger. If the battery
level is above 95%, turn on the battery before charging.
3. The Battery Level Indicator will display the current battery level during charging.
4. The Intelligent Flight Battery is fully charged when Battery Level Indicators are all off.
5. Air cool the Intelligent Flight Battery after each ight. Allow its temperature to drop to room temperature
before storing it for an extended period.
Always turn off the battery before inserting it or removing it from the Phantom 3 Professional.
Never insert or remove a battery when it is powered on.
ChargerIntelligent Flight Battery Power Outlet

© 2015 DJI. All Rights Reserved.
21
Aircraft
Phantom 3 Professional User Manual
Battery Level Indicators while Charging
LED1 LED2 LED3 LED4 Battery Level
0%~25%
25%~50%
50%~75%
75%~100%
Fully Charged
Charging Protection LED Display
The table below shows battery protection mechanisms and corresponding LED patterns.
Battery Level Indicators while Charging
LED1 LED2 LED3 LED4 Blinking Pattern Battery Protection Item
LED2 blinks twice per second Over current detected
LED2 blinks three times per second Short circuit detected
LED3 blinks twice per second Over charge detected
LED3 blinks three times per second Over-voltage charger detected
LED4 blinks twice per second Charging temperature is too low
LED4 blinks three times per second Charging temperature is too high
After any of the above mentioned protection issues are resolved, press the button to turn off the Bat-
tery Level Indicator. Unplug the Intelligent Flight Battery from the charger and plug it back in to resume
charging. Note that you do not need to unplug and plug the charger in the event of a room temperature
error, the charger will resume charging when the temperature falls within the normal range.
DJI does not take any responsibility for damage caused by third-party chargers.
How to discharge your Intelligent Flight Battery:
Slow : Place the Intelligent Flight Battery into the Phantom 3 Professional’s Battery Compartment
and power it on. Leave it on until there is less than 8% of power left, or until the battery can no
longer be turned on. Launch the DJI Pilot app to check battery levels.
Rapid : Fly the Phantom 3 Professional outdoors until there is less than 8% of power left, or until
the battery can no longer be turned on.
22
© 2015 DJI. All Rights Reserved.
Remote Controllers
This chapter describes the features of
the remote controller that includes, how
to operate the aircraft and camera.
© 2015 DJI. All Rights Reserved.
23
Remote Controllers
Remote Control
RemoteControllerProle
The Phantom 3 Professional remote control is a multi-function wireless communication device that in-
tegrates the video downlink ground system and aircraft remote control system. The video downlink and
aircraft remote control system operate at 2.4 GHz. The remote controller features a number of camera
functions, such as taking and previewing photos and video, and controlling gimbal motions. The remote
controller is powered by a 2S rechargeable battery. The current battery level is displayed by LEDs on the
front panel of the remote control.
Compliance Version: The remote control is compliant with both CE and FCC regulations.
Operating Mode: Control can be set to Mode 1 , Mode 2.
Mode 1: The right stick serves as the throttle.
Mode 2: The left stick serves as the throttle.
Do not operate more than 3 aircrafts within in the same area (size equivalent to a soccer eld) to
prevent transmission interference.
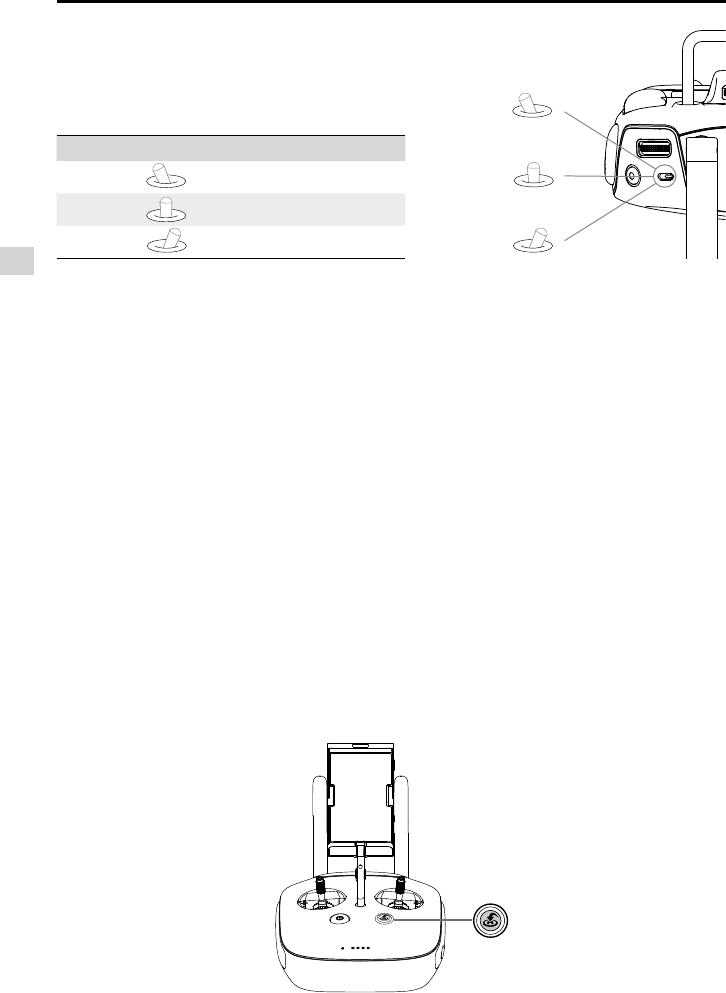
Remote Controller Operations
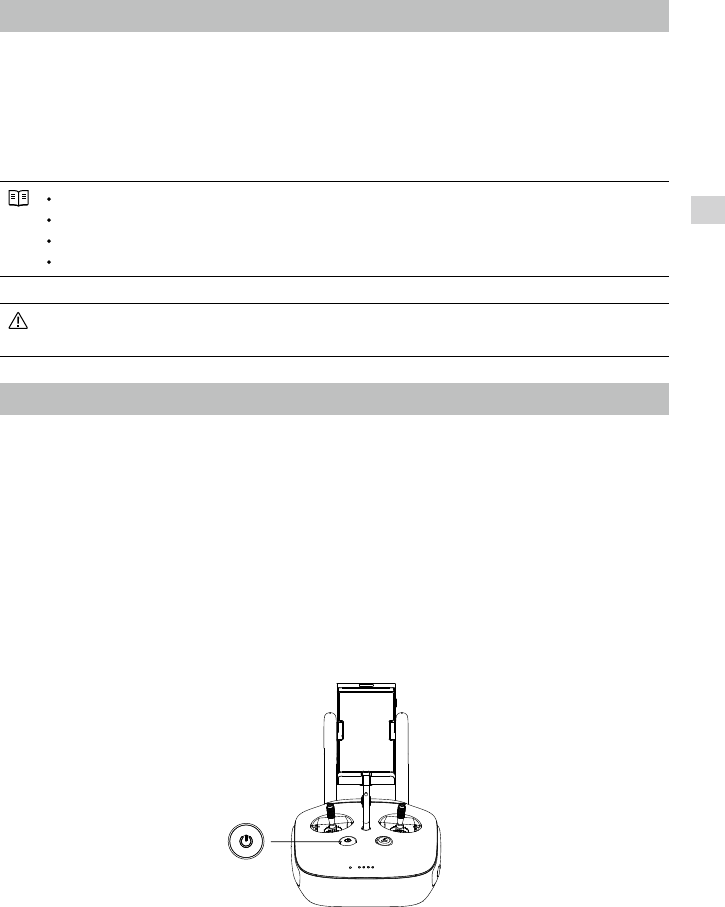
Powering On and Off the Remote Controller
The Phantom 3 Professional remote controller is powered by a 2S rechargeable battery with a capacity
of 6000 mHA. The battery level is indicated by the Battery Level LEDs on the front panel. Follow the steps
below to power on your remote controller:
1. When powered off, press the Power Button once and the Battery Level LEDs will display the current
battery level.
2. Press and hold the Power Button to power on the remote controller.
3. The remote controller beeps when it is powered on. The Status LED will blink green rapidly, indicating
that the remote controller is linking to the aircraft. The Status LED will show a solid green light when
linking is complete.
4. Repeat step 2 to power off the remote controller.
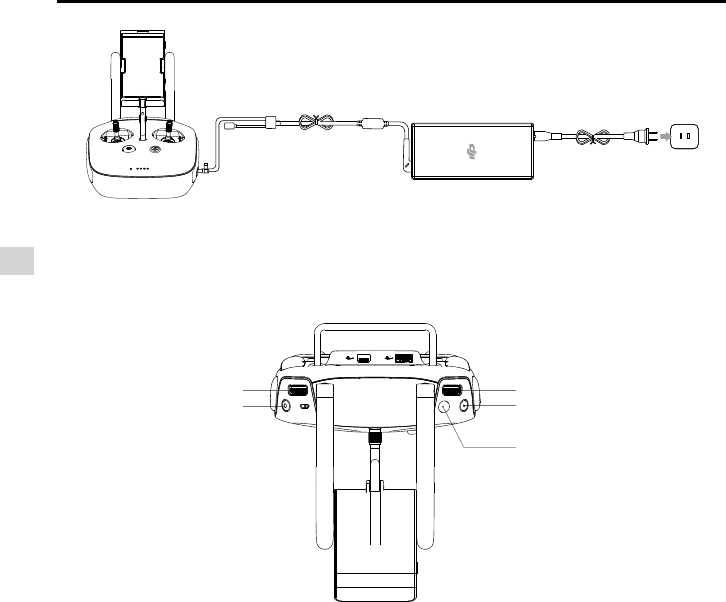
Charging Remote Controller
Charge the remote controller via supplied charger. Refer to the gure below for more details.
24
© 2015 DJI. All Rights Reserved.
Remote Controllers
Phantom 3 Professional User Manual
Charger
Power Outlet
Power Button
Controlling Camera
Shoot videos or images and adjust camera settings via the Shutter Button, Camera Settings Dial, Play-
back Button and Video Recording Button on the remote control.
[1] Camera Settings Dial
Turn the dial to quickly adjust camera settings such as ISO, shutter speed, and aperture without
letting go of the remote controller. Move the dial button to left or right to view the pictures or videos in
playback mode.
[2] Playback Button
Press to view images or videos that have already been captured.
[3] Shutter Button
Press to take a photo. If burst mode is activated, multiple photos will be taken with a single press.
[4] Recoding Button
Press once to start recording video, then press again to stop recording.
[5] Gimbal Dial
Use this dial to control the tilt of the gimbal.
Controlling Aircraft
This section explains how to control the orientation of the aircraft through the remote controller. The
Remote Control is set to Mode 2 by default.
[1]
[2]
[3]
[4]
[5]
© 2015 DJI. All Rights Reserved.
25
Remote Controllers
Phantom 3 Professional User Manual
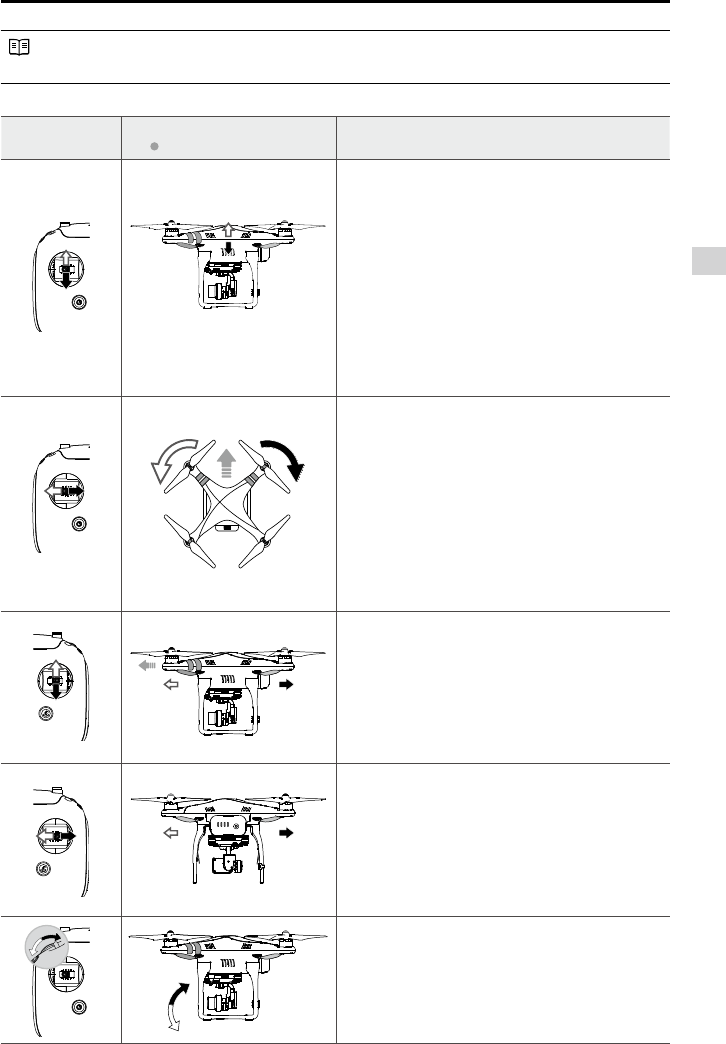
Stick Neutral/ mid point: Control sticks of the Remote Control are placed at the central position.
Move the Stick: The control stick is pushed away from the central position.
Remote Control
(Mode 2)
Aircraft
( indicates nose direction) Remarks
Moving the left stick up and down changes the
aircraft’s elevation.
Push the stick up to ascend and down to descend.
Push the throttle stick up to takeoff.
When both sticks are centered, the Phantom 3
Professional will hover in place.
The more the stick is pushed away from the center
position, the faster the Phantom 3 Professional
will change elevation. Always push the stick gently
to prevent sudden and unexpected elevation
changes.
Moving the left stick to the left or right controls the
rudder and rotation of the aircraft.
Push the sick left to rotate the aircraft counter
clock-wise, and push the stick right to rotate the
aircraft clockwise. If the stick is centered, the
Phantom 3 Professional will stay facing its current
direction.
The more the stick is pushed away from the center
position, the faster the Phantom 3 Professional
will rotate.
Moving the right stick up and down changes the
aircraft’s forward and backward pitch.
Push the stick up to fly forward and down to fly
backward.
Phantom 3 Professional
will hover in
place if the stick is centered.
Push the stick further away from the center position for
a larger pitch angle (maximum 30˚) and faster ight.
Moving the right stick control left and right changes
the aircraft’s left and right pitch.
Push left to fly left and right to fly right. The
Phantom 3 Professional will hover in place if the
stick is centered.
Push the stick further away from the center position for
a larger pitch angle (maximum 30˚) and faster ight.
Gimbal Dial: Turn the dial to the right, and the
camera will shift to point upwards. Turn the
dial to the left, and the camera will shift to point
downwards. The camera will remain in its current
position when dial is static.
26
© 2015 DJI. All Rights Reserved.
Remote Controllers
Phantom 3 Professional User Manual
Position Figure Flight Mode
Position 1 F mode
Position 2A mode
Position 3P mode
Flight Mode Switch
Toggle the switch to select the desired flight mode.
You may choose between; P mode, F mode and A
mode. Position 1
Position 2
Position 3
P mode (Positioning) : P mode works best when GPS signal is strong. There are three different states of
P mode, which will be automatically selected by the Phantom 3 Professional depending on GPS signal
strength and Vision Positioning sensors:
P-GPS: GPS and Vision Positioning both are available, and the aircraft is using GPS for positioning.
P-OPTI: Vision Positioning is available but the GPS signal is not. Aircraft is using only Vision
Positioning for hovering
P-ATTI: Neither GPS or Vision Positioning available, aircraft is using only its barometer for positioning,
so only altitude is controlled.
A mode (Attitude): GPS and Vision Positioning System is not used for stabilization. The aircraft only uses its
barometer to stabilize. The aircraft can automatically return home if remote control signal is lost if the Home
Point is recorded successfully.
F mode (Function): Intelligent Orientation Control (IOC) is activated in this mode. For more information
about IOC, refer to the IOC in Appendix.
The Flight Mode Switch is locked in P mode by default. To unlock the switch, launch the DJI Pilot app, enter
the “Camera” page, tap “MODE”, and then activate “Multiple Flight Mode” .
RTH button
Press and hold this button to start the Return to Home (RTH) procedure. The LED around the RTH Button
will blink white to indicate the aircraft is entering RTH mode. The aircraft will then return to the last recorded
Home Point. Press this button again to cancel the RTH procedure and regain the control of the aircraft.
© 2015 DJI. All Rights Reserved.
27
Remote Controllers
Phantom 3 Professional User Manual
Connecting Mobile Device
Tilt the Mobile Device Holder to the desired position. Press the button on the side of the Mobile Device Holder
to release the clamp, and then place your mobile device into the clamp. Adjust the clamp to secure your mo-
bile device. Then connect your mobile device to the remote controller with a USB cable. Plug one end of the
cable into your mobile device, and the other end into the USB port on the back of the remote controller.
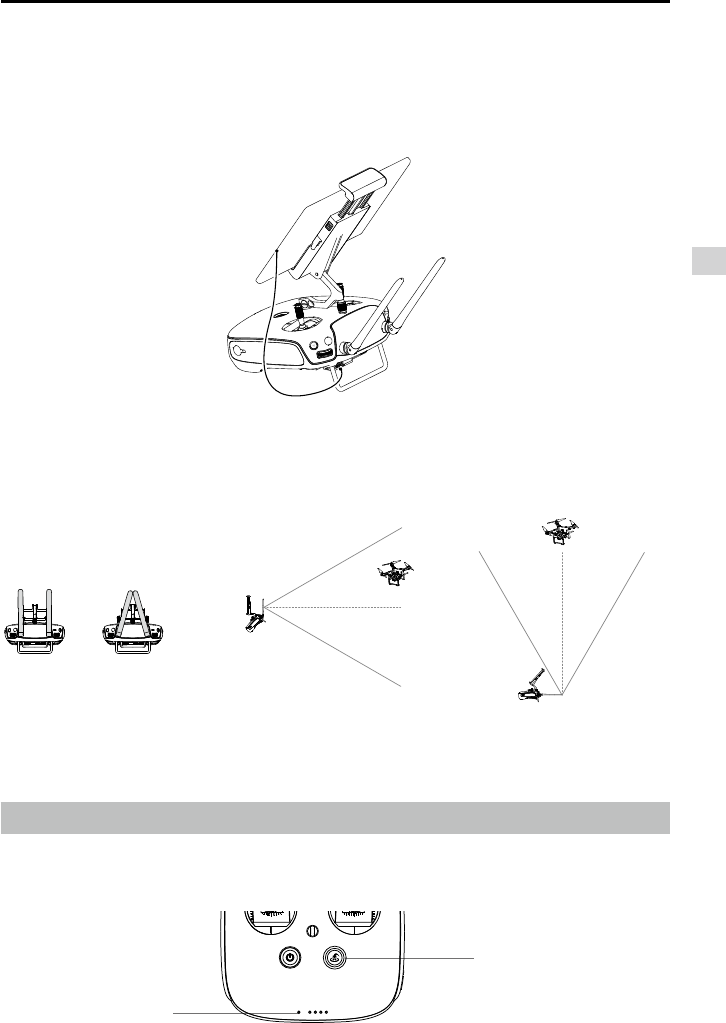
Optimal Transmission Range
The signal transmission between aircraft and remote controller perform best within the range that dis-
played in the picture shown below:
Optimal Transmission Range
strong weak
Ensure the aircraft is flying within the optimal transmission range. Adjust the distance and position
between the operator and the aircraft to achieve optimal transmission performance.
Remote Controller Status LED
The Status LED reects connection status between remote control and aircraft. The RTH LED shows the
Return to Home status of the aircraft. The table below contains details on these indicators.
RTH LED
Status LED
28
© 2015 DJI. All Rights Reserved.
Remote Controllers
Phantom 3 Professional User Manual
Status LED Alarm Remote Controller Status
—
Solid Red chime The remote controller is disconnected from the aircraft.
—
Solid Green chime The remote controller is connected with the aircraft.
Slow Blinking Red D-D-D...... Remote controller error.
/
Red and Green/ Red and
Yellow Alternate Blinks
None HD downlink is disrupted.
RTH LED Sound Remote Controller Status
—
Solid White chime Aircraft is returning home.
Blinking White D . . . Sending Return to Home command to the aircraft.
Blinking White DD .. .. .. Aircraft Return to Home in progress.
The Remote Status Indicator will blink red, sound an alert, when the battery level is critically low.
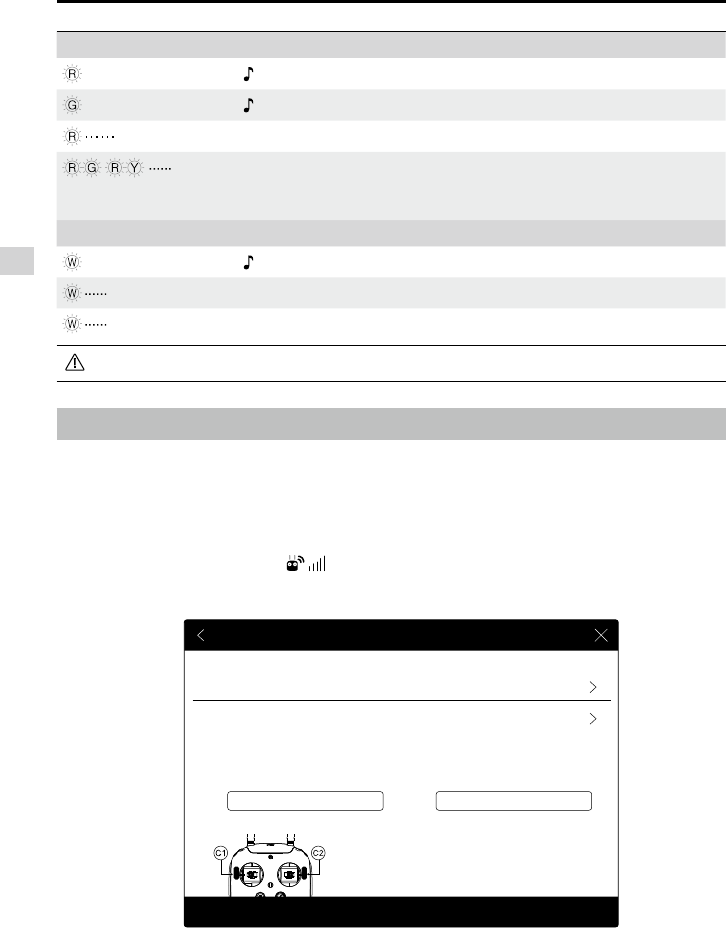
Linking the Remote Controller
The remote controller is linked to your aircraft before delivery. Linking is only required when using a new
remote controller for the rst time. Follow these steps to link a new remote controller:
1. Power on the remote controller and connect to the mobile device. Launch DJI Pilot app.
2. Power on the Intelligent Flight Battery.
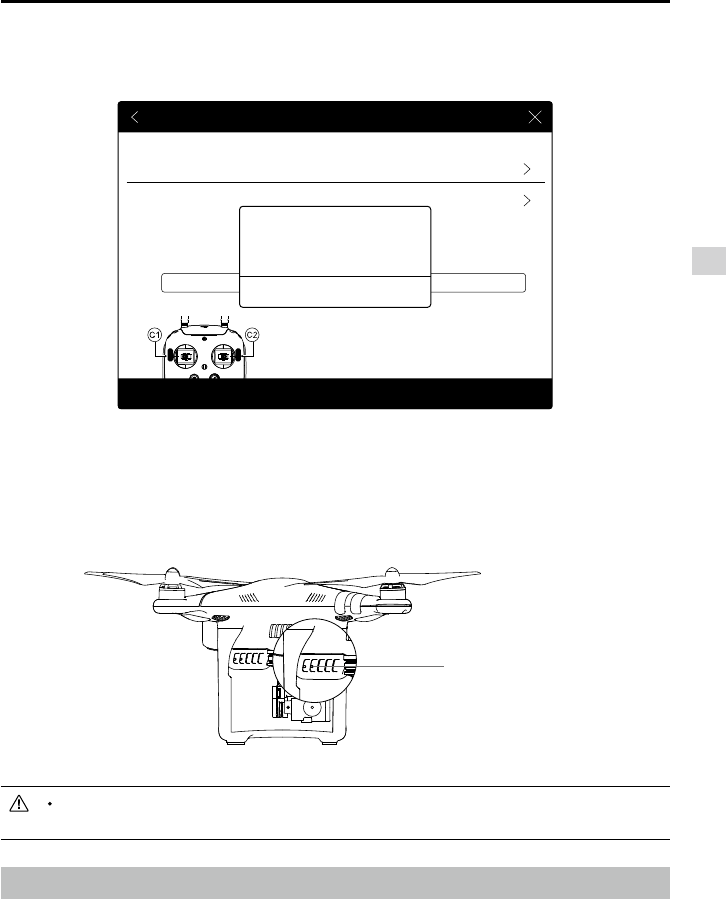
3. Enter “Camera” view and tap on and then tap “Linking RC” button as shown below.
RC Control Setting
RC Calibration
Stick Mode
Battery infoC1 C2 Battery info
Default stick mode is Mode 2, changing stick modes alters the way the aircraft is controlled.
Do not change unless familiar with your new mode.
You can customize the C1 and C2 buttons on the back
of the RC.
Linking RC
© 2015 DJI. All Rights Reserved.
29
Remote Controllers
Phantom 3 Professional User Manual
Remote controller will disconnect from the linked aircraft if a new remote controller is linked to
the same aircraft.
Remote Controller Compliance Version
The remote controller is compliant with both CE and FCC requirements.
Linking Button
RC Control Setting
RC Calibration
Stick Mode
Battery infoC1 C2 Battery info
Default stick mode is Mode 2, changing stick modes alters the way the aircraft is controlled.
Do not change unless familiar with your new mode.
You can customize the C1 and C2 buttons on the back
of the RC.
Linking RC
Searching for aircraft frequency,
timeout in 54 seconds
Cancel
Press the linking button on the aircraft
to link this remote controller
5. Locate the Linking button on the side of the aircraft, as shown in the gure shown below. Press the
Linking button to start linking. The LED to the left of the linking button blinks green to indicate that the
aircraft is ready to link, and it blinks solid green when linking is complete. The Remote Controller Status
Indicator will display solid green if Link is succeed.
4. The remote controller is ready to link. The Remote Controller Status Indicator blinks blue and "beep"
sound is emitted.

30
© 2015 DJI. All Rights Reserved.
Gimbal Camera
This chapter provides the technical
specifications of the camera, explains
the operating mode of the gimbal.
© 2015 DJI. All Rights Reserved.
31
Gimbal Camera
Camera and Gimbal
CameraProle
The on-board camera supports 4K video capture up to 4096 x 2160p24 and 12M pixel photos capture
by using the 1/2.3 inch CMOS sensor. You may export the video in either MOV or MP4 format for editing.
Available picture shooting modes include burst, continuous, and time-lapse mode. A live preview of what
the camera is seeing before you shoot videos and pictures is supported through the DJI Pilot App.
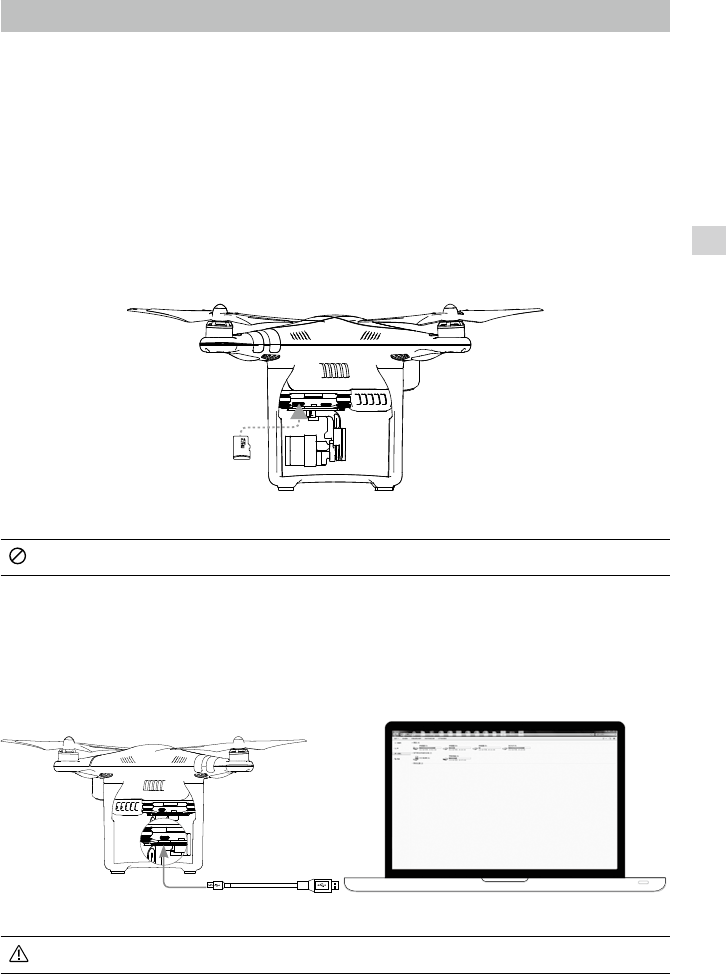
Camera Micro-SD Card Slot
To store your photos and videos, plug in the Micro-SD card into the slot shown below before
powering on the Phantom 3 Professional. The Phantom 3 Professional comes with a 16 GB Micro-
SD card and supports up to a 64 GB Micro-SD card. A UHS-1 type Micro-SD card is recommended,
because of the fast read and write capability of these cards enables you to store high-resolution
video data.
Do not remove Micro-SD card from the Phantom 3 Professional when it is powered on.
Camera Data Port
Power on the Phantom 3 Professional and then connect a USB cable to the Camera Data Port to down-
load photos or videos from the camera to your computer.
Power on the aircraft before attempting to access the les on the Micro-SD card.
32
© 2015 DJI. All Rights Reserved.
Gimbal Camera
Phantom 3 Professional User Manual
Camera Operation
Use the Shutter and Record button on the remote controller to shoot the images or the videos through the
DJI Pilot app. For more information about how to use these buttons, refer to “Controlling Camera”.
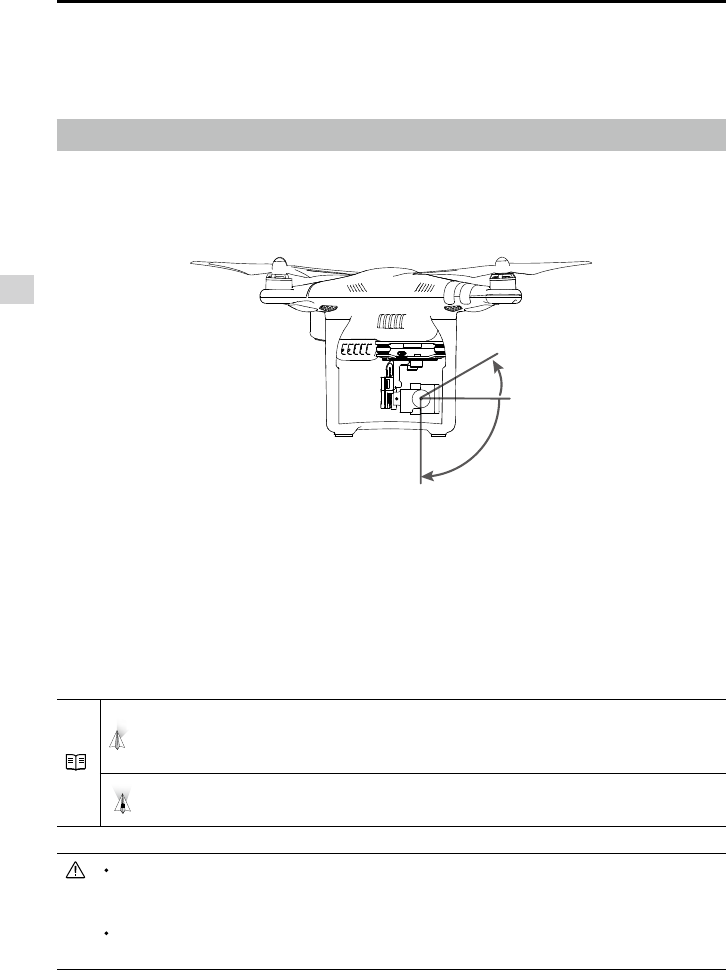
Gimbal
GimbalProle
The 3-axis Gimbal provides a steady platform for the attached camera, allowing you to capture stabilized
images and video. The Gimbal can tilt the camera up to 120 degrees.
Use the gimbal dial on the remote controller to control pitch movement of the camera by default. Note that
you cannot control the pan movement of the camera by default.
Gimbal Operation Modes
Two Gimbal operation modes are available. Switch between the different operation modes on the Camera
page of the DJI Pilot App. Note that your mobile device must be connected to the remote controller for
changes to take effect. Refer to the table below for details:
Follow Mode
The angle between Gimbal’s orientation and aircraft’s nose remains
constant at all times. One user alone can control the pitch motion of the
gimbal.
FPV Mode The Gimbal will lock to the movements of the aircraft to provide a First-
Person-View ying experience.
Gimbal motor error may occur in these situations: (1) Gimbal is placed on uneven ground. (2)
Gimbal has received an excessive external force, e.g. a collision. Please take off from at, open
ground and protect the gimbal after powering up.
Flying in heavy fog or cloud may make the gimbal wet, leading to a temporary failure. The
gimbal will recover when it dries out.
-90°
0°
30°
© 2015 DJI. All Rights Reserved.
33
Gimbal Camera
Phantom 3 Professional User Manual
②
①
③
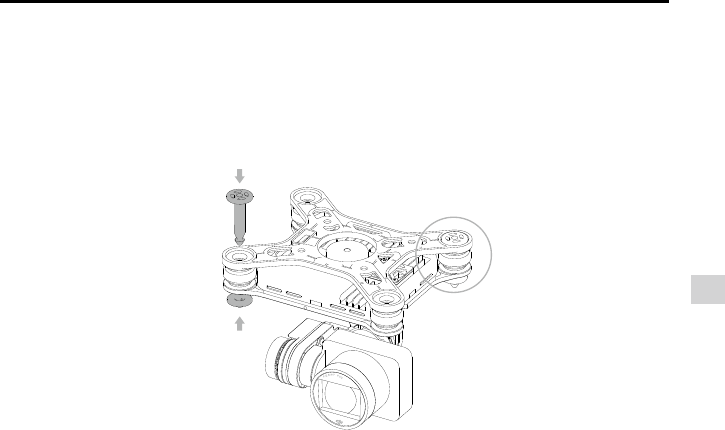
Anti-drop Kit
The Anti-drop Kit helps keep the gimbal and camera connected to the aircraft. Two have been mounted
on delivery. If new ones are required, take the gimbal and press part [1] through the center hole of the
Vibration Absorber the center hole of part [2]. Lock them together as shown in [3]. Mounting the Anti-drop
Kit diagonally is recommended.

34
© 2015 DJI. All Rights Reserved.
DJI Pilot App
This chapter introduce the four main
sections of the DJI Pilot app.
© 2015 DJI. All Rights Reserved.
35
DJI Pilot App
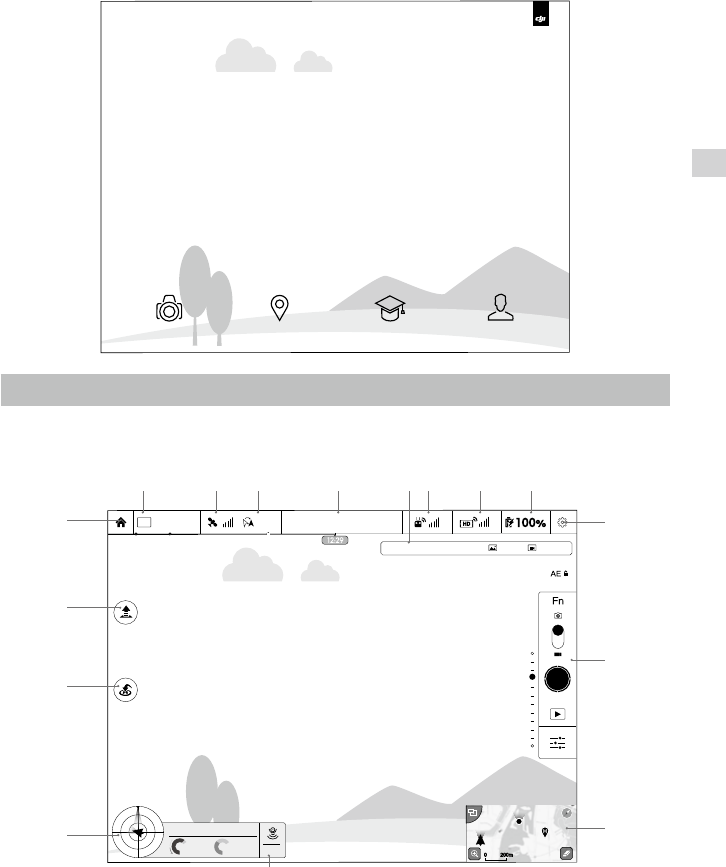
DJI Pilot App
The DJI Pilot app is a mobile app designed specically for the Phantom 3 Professional. Use this app to
control the gimbal, camera and other features of your ight system. The app also comes with Map, Acad-
emy and User Center, for conguring your aircraft and sharing the photos and videos with your friends. It
is recommended that you use a tablet for the best experience.
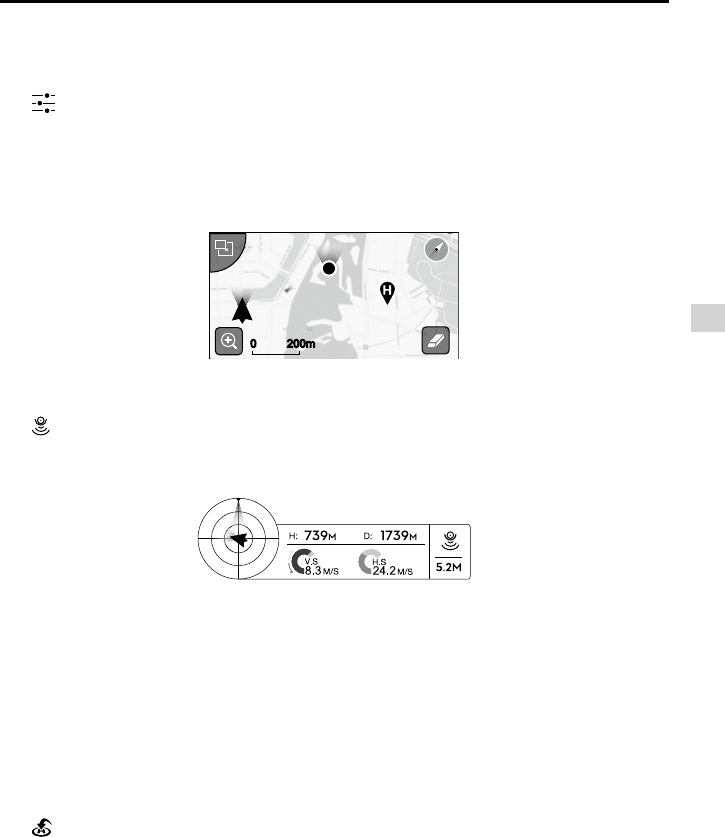
Camera
The Camera page contains a live HD video feed from the Phantom 3 Professional’s camera. You can
also congure various camera parameters from the Camera page.
CAMERA ACADEMY USER CENTER
MAP
United States
Mountain View
1/320 4821
JPEG 4K 30
ISO 100 EV 0 00:22:16
Safe to Fly (GPS)
MODE
CL
P-GPS
H: D:
V.S
M/S M/S
H.S
24.28.3 1.2M
2M39M
200m0 200m0
[16]
[15]
[14]
[13] [11]
[12]
[10]
[9]
[8][7][6][5][4][3][2][1]

36
© 2015 DJI. All Rights Reserved.
DJI Pilot App
Phantom 3 Professional User Manual
[1] Flight Mode
: The text next to this icon indicates the current ight mode.
Tap to enter MC (Main Controller) Settings. Modify ight limits, perform compass calibration, and set
the gain values.
[2] GPS Signal Strength
: This icon shows the current strength of GPS signals. Green bars indicates adequate GPS
strength.
[3] IOC Settings
: This icon shows which IOC setting that the aircraft has entered when in F Mode.
Tap to enter IOC setting menu and select the desired IOC setting.
[4] System Status
: This icon shows current aircraft system status, such as GPS signal health.
[5] Battery Level Indicator
: The battery level indicator dynamically displays the battery level. The color zones on the
battery level indicator represent different battery levels.
[6] Remote Controller Signal
: This icon shows the strength of remote controller signal.
[7] HD Video Link Signal Strength
:
This icon shows the HD video downlink signal strength between the aircraft and the remote
controller.
[8] Battery Level
: This icon shows the current battery level.
Tap to enter battery information menu, set the various battery warning thresholds and view the battery
warning history in this page.
[9] General Settings
: Tap this icon to enter General Settings page. Select parameter metric, reset the camera, enable
the quick view feature, adjust the gimbal pitch value and toggle ight route display on this page.
[10] Camera Operation Bar
Shutter
: Tap this button to take a single photo. Press and hold this button to select burst or time-lapsed
shooting.
Record
: Tap once to start recording video, then tap again to stop recording. You can also press the Vid-
eo Recording Button on the remote controller, which has the same function.
Playback
: Tap to enter playback page. You can preview photos and videos as soon as they are
© 2015 DJI. All Rights Reserved.
37
DJI Pilot App
Phantom 3 Professional User Manual
captured.
Camera Settings
: Tap to enter the camera exposure value setting. User may switch from Auto exposure mode to
Advance or Manual mode.
[11] Map
Displaytheightpathofthecurrentmission.TaptoswitchfromtheCameraGUItotheMapGUI.
[12] Vision Positioning
: This icon shows the distance between the surface and the Vision Positioning System's sensors.
[13] Flight Telemetry
Vision Positioning Status
Icon is highlighted when Vision Positioning is in operation.
Flightattitudeisindicatedbytheightattitudeicon.
(1) The red arrow shows which direction the aircraft is facing.
(2) Light blue and dark blue areas indicate pitch.
(3) Pitching of the boundary between light blue and dark blue area shows roll angle.
[14] Return to Home (RTH)
: Initiate RTH home procedure. Tap to have the aircraft return to the last recorded home point.
200m0 200m0
38
© 2015 DJI. All Rights Reserved.
DJI Pilot App
Phantom 3 Professional User Manual
[15] Auto Takeoff/Landing
/ : Tap to initiate auto takeoff or landing.
[16] Back
: Tap to return to the main GUI.