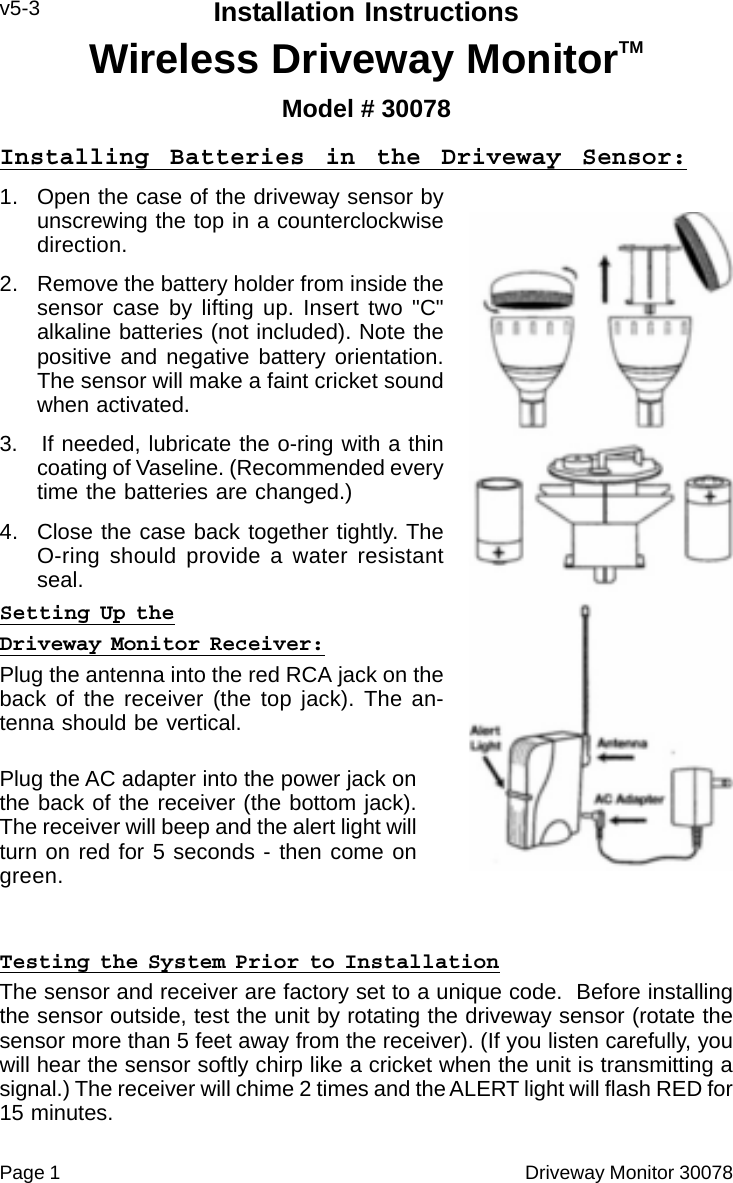
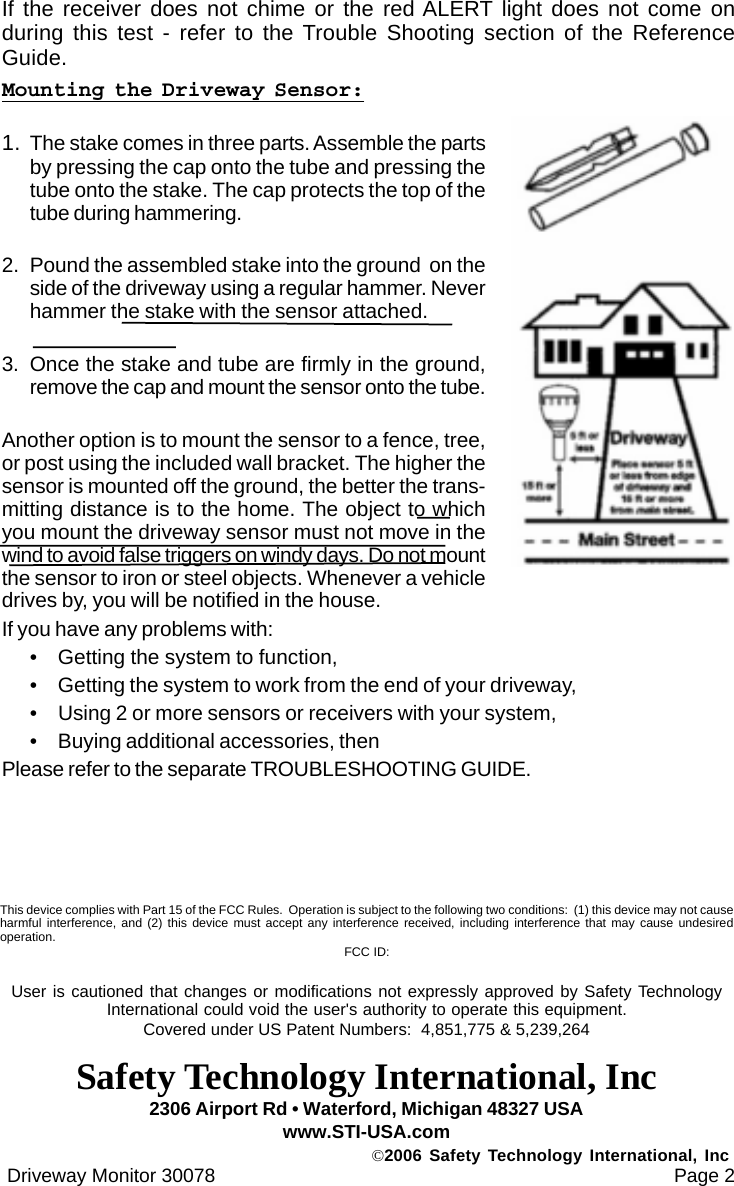
Safety Technology 30072 WIRELESS DRIVEWAY MONITOR User Manual 30078 STI v5 3 Instal p65

Safety Technology International, Inc. WIRELESS DRIVEWAY MONITOR 30078 STI v5 3 Instal p65

USER MANUAL

Page 1                                                                                                Driveway Monitor 30078Installation InstructionsWireless Driveway MonitorTMModel # 30078v5-3Installing Batteries in the Driveway Sensor:1. Open the case of the driveway sensor byunscrewing the top in a counterclockwisedirection.2. Remove the battery holder from inside thesensor case by lifting up. Insert two "C"alkaline batteries (not included). Note thepositive and negative battery orientation.The sensor will make a faint cricket soundwhen activated.3.   If needed, lubricate the o-ring with a thincoating of Vaseline. (Recommended everytime the batteries are changed.)4. Close the case back together tightly. TheO-ring should provide a water resistantseal.Setting Up theDriveway Monitor Receiver:Plug the antenna into the red RCA jack on theback of the receiver (the top jack). The an-tenna should be vertical.Plug the AC adapter into the power jack onthe back of the receiver (the bottom jack).The receiver will beep and the alert light willturn on red for 5 seconds - then come ongreen.Testing the System Prior to InstallationThe sensor and receiver are factory set to a unique code.  Before installingthe sensor outside, test the unit by rotating the driveway sensor (rotate thesensor more than 5 feet away from the receiver). (If you listen carefully, youwill hear the sensor softly chirp like a cricket when the unit is transmitting asignal.) The receiver will chime 2 times and the ALERT light will flash RED for15 minutes.
If the receiver does not chime or the red ALERT light does not come onduring this test - refer to the Trouble Shooting section of the ReferenceGuide.Mounting the Driveway Sensor:1. The stake comes in three parts. Assemble the partsby pressing the cap onto the tube and pressing thetube onto the stake. The cap protects the top of thetube during hammering.2. Pound the assembled stake into the ground  on theside of the driveway using a regular hammer. Neverhammer the stake with the sensor attached.3. Once the stake and tube are firmly in the ground,remove the cap and mount the sensor onto the tube.Another option is to mount the sensor to a fence, tree,or post using the included wall bracket. The higher thesensor is mounted off the ground, the better the trans-mitting distance is to the home. The object to whichyou mount the driveway sensor must not move in thewind to avoid false triggers on windy days. Do not mountthe sensor to iron or steel objects. Whenever a vehicledrives by, you will be notified in the house.If you have any problems with:• Getting the system to function,• Getting the system to work from the end of your driveway,• Using 2 or more sensors or receivers with your system,• Buying additional accessories, thenPlease refer to the separate TROUBLESHOOTING GUIDE. Driveway Monitor 30078                                                                                      Page 22306 Airport Rd • Waterford, Michigan 48327 USAwww.STI-USA.com©2006 Safety Technology International, IncThis device complies with Part 15 of the FCC Rules.  Operation is subject to the following two conditions:  (1) this device may not causeharmful interference, and (2) this device must accept any interference received, including interference that may cause undesiredoperation. FCC ID:User is cautioned that changes or modifications not expressly approved by Safety TechnologyInternational could void the user's authority to operate this equipment.Covered under US Patent Numbers:  4,851,775 & 5,239,264Safety Technology International, Inc

Navigation menu