Sage Software Welding System Mas 500 Users Manual SalesLogix Product Bulletin
MAS 500 to the manual 361f275a-0d6e-4087-a13f-167d4909213f
2015-02-02
: Sage-Software Sage-Software-Welding-System-Mas-500-Users-Manual-487643 sage-software-welding-system-mas-500-users-manual-487643 sage-software pdf
Open the PDF directly: View PDF ![]() .
.
Page Count: 45
- Product Overview
- Availability
- Compatibility
- Features Overview
- Setup and Configuration
- ERP Login Parameters
- Setup Wizard
- Setup ERP Selection
- Select ERP Instance
- Default Values for ERP Customers – Customer Templates
- ERP Customer Template Maintenance
- Assign CRM Users to a ERP Customer Template
- Default Values for ERP Contacts – Contact Templates
- Default Values for ERP Address – Address Templates
- Default Values for ERP Sales Orders – Sales Order Templates
- Default Values for ERP Invoices – Invoice Templates
- CRM to ERP Field Mapping
- ERP Data Query Wizard
- Sites / Warehouses
- Products / Items
- Features and Comparison to Sage DynaLink
- Frequently Asked Questions

Pre-Release Guide for
Sage SalesLogix for Sage MAS 500
January 2008

Table of Contents
Product Overview.......................................................................................................... 2
Availability ..................................................................................................................... 3
Compatibility ................................................................................................................. 3
Features Overview ........................................................................................................ 4
Consistent Customer Record.................................................................................................4
Create Invoices from CRM Service Contracts ......................................................................7
Accurate Product Information................................................................................................8
Generate Orders from CRM Opportunities .........................................................................10
Setup and Configuration ............................................................................................ 12
ERP Login Parameters..........................................................................................................13
Setup Wizard..........................................................................................................................13
CRM to ERP Field Mapping ..................................................................................................21
ERP Data Query Wizard........................................................................................................27
Sites / Warehouses ...............................................................................................................38
Products / Items ....................................................................................................................40
Features and Comparison to Sage DynaLink........................................................... 41
Frequently Asked Questions...................................................................................... 44
Product Overview
Sage SalesLogix® is the Customer Relationship Management (CRM) solution that drives sales
performance in small to mid-sized businesses through Sales, Marketing, and Customer Support
automation and integration to accounting and business management applications.
The combination of Sage SalesLogix CRM and Sage MAS 500 ERP provides your organization
access to the most current product information, pricing, discounts, and inventory when creating
quotes or taking orders. In addition, without having to leave Sage SalesLogix, they can view all
relevant customer data, such as credit status, terms, and account balance so they can better
service customers.
Advanced customization capabilities enable Sage SalesLogix to work in concert with your
unique sales and customer interaction processes, and to accommodate growth and changing
business requirements.
Through robust functionality, ease of use, and ease of customization, Sage SalesLogix provides
your small to mid-sized business an affordable CRM solution with low cost of ownership, rapid
time to productivity, and high return on investment.
Page 2 of 45

With more than 8,000 companies using Sage SalesLogix worldwide, Sage SalesLogix is the
CRM leader for small to mid-sized businesses.
Availability
Sage Saleslogix 7.2 for Sage MAS 500 is currently scheduled for be available in March, 2008.
Compatibility
Sage SalesLogix v7.2 Service Pack 1 (Windows client) or later
Sage MAS 500 Rel 7.05 Service Pack 3 & Aug 2007 MU (7.05.11) or later
Page 3 of 45

Features Overview
Sage SalesLogix for Sage MAS ERP allows you to maintain your company customer
information while also maintaining your customer’s financial accounts. Simply knowing the
customers name and address is not enough to beat the competition. You need access to all of
the communications that you have had with that potential or existing customer is vitally
important in maintaining a strong customer relationship for continued sales.
Sage SalesLogix for Sage MAS ERP allows you to:
• Provide Consistent Customer Records
• Create Invoices from CRM Service Contracts
• Maintain Accurate Product Information
• Generate Orders from CRM Opportunities
Consistent Customer Record
By joining Sage SalesLogix CRM with Sage MAS ERP, you finally have a single view of you
customers. Back-office customer information such as invoice history, open invoices, credit
rating, and more can now be viewed along with notes, activities, history, and more from your
CRM system.
This consistent customer record provides additional benefits to your entire organization:
• Seamless data entry – end-users do not have to worry about entering data in separate
CRM and ERP systems
• Customer information available anytime – using powerful synchronization capabilities
built into Sage SalesLogix, many customer details are available to the mobile sales force
• Complete customization – using the tools provided in Sage SalesLogix, developers can
customize the solution to better meet the needs of their companies
To achieve this customer record, Sage SalesLogix Accounts are seamlessly linked to Sage
MAS Customers. Likewise, Contacts and Addresses are linked so that they remain consistent
across systems. This linking is simple to setup, automatic to use, and requires no maintenance.
Adding ERP Customers from CRM
From Sage SalesLogix Accounts, you may lookup the matching ERP Customer record to
create a link. You may also add ERP Customers directly from Sage SalesLogix if they
do not exist as an ERP Customer.
The Customer will be created using the Company Code, and Customer ID provided. The
Company Code is required, and Customer ID is optional. If the Customer ID is not
provided the next customer number will be selected.
The customer will be created in the selected MAS 500 Company, along with all
associated addresses and contacts if selected in the setup options.
Page 4 of 45
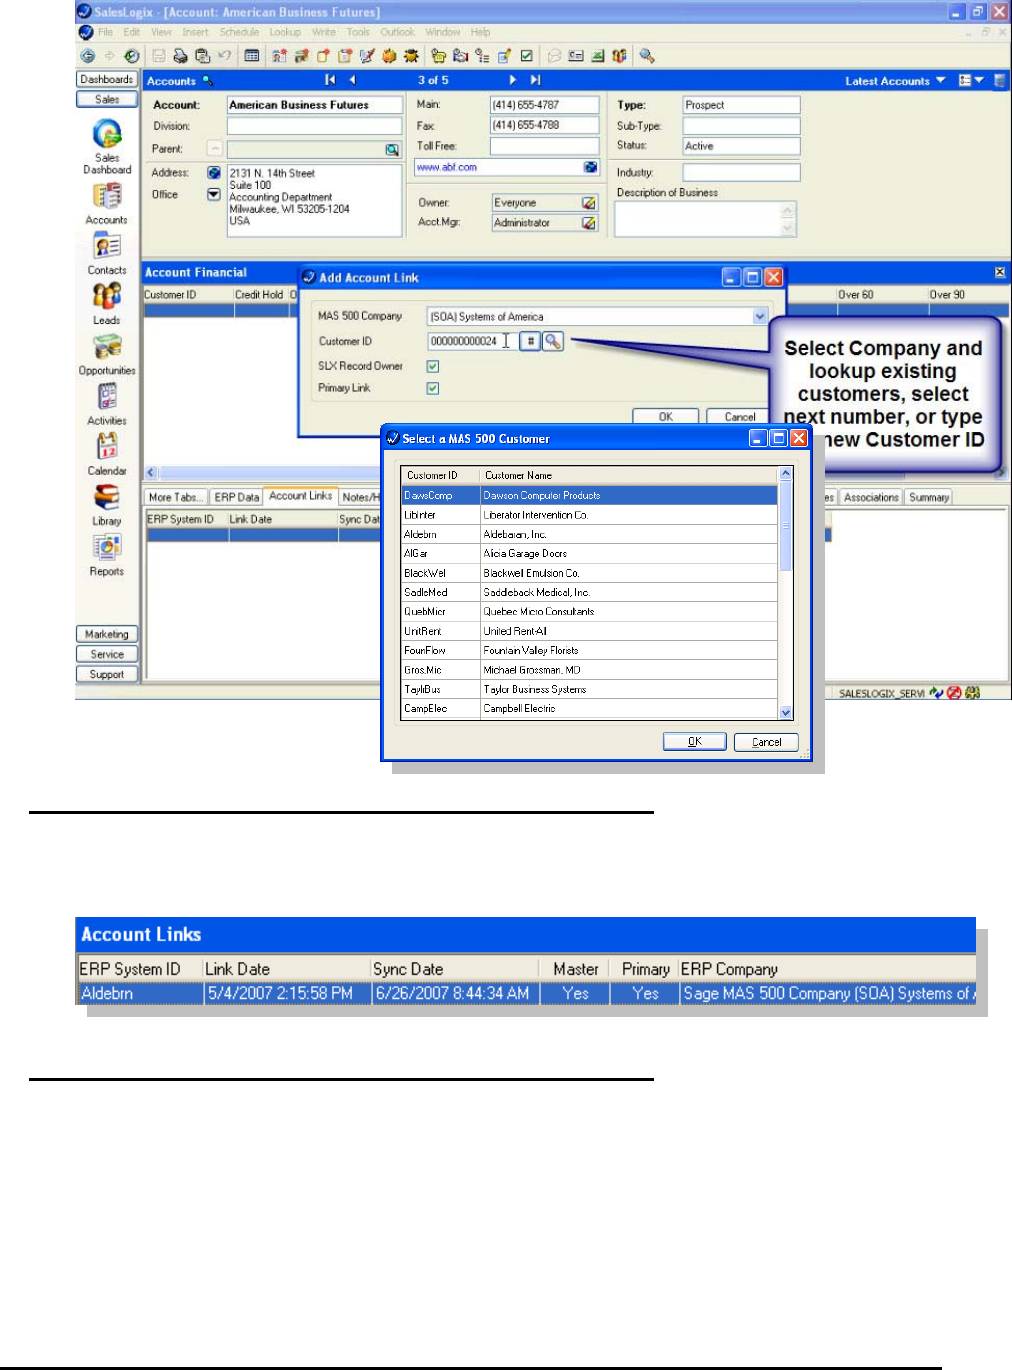
CRM Accounts to ERP Customers Link
Customer and Account relationships are many to many and are maintained in the
SalesLogix ERP Account Links on the SalesLogix Account.
Relating CRM and ERP Contacts
In the same way you can add or link Sage SalesLogix Accounts to Sage MAS
Customers, you can also add and match Contacts between the systems.
Contact to Contact relationships are many to many and are maintained in the ERP Link
Contact Links on the SalesLogix Contact
Page 5 of 45
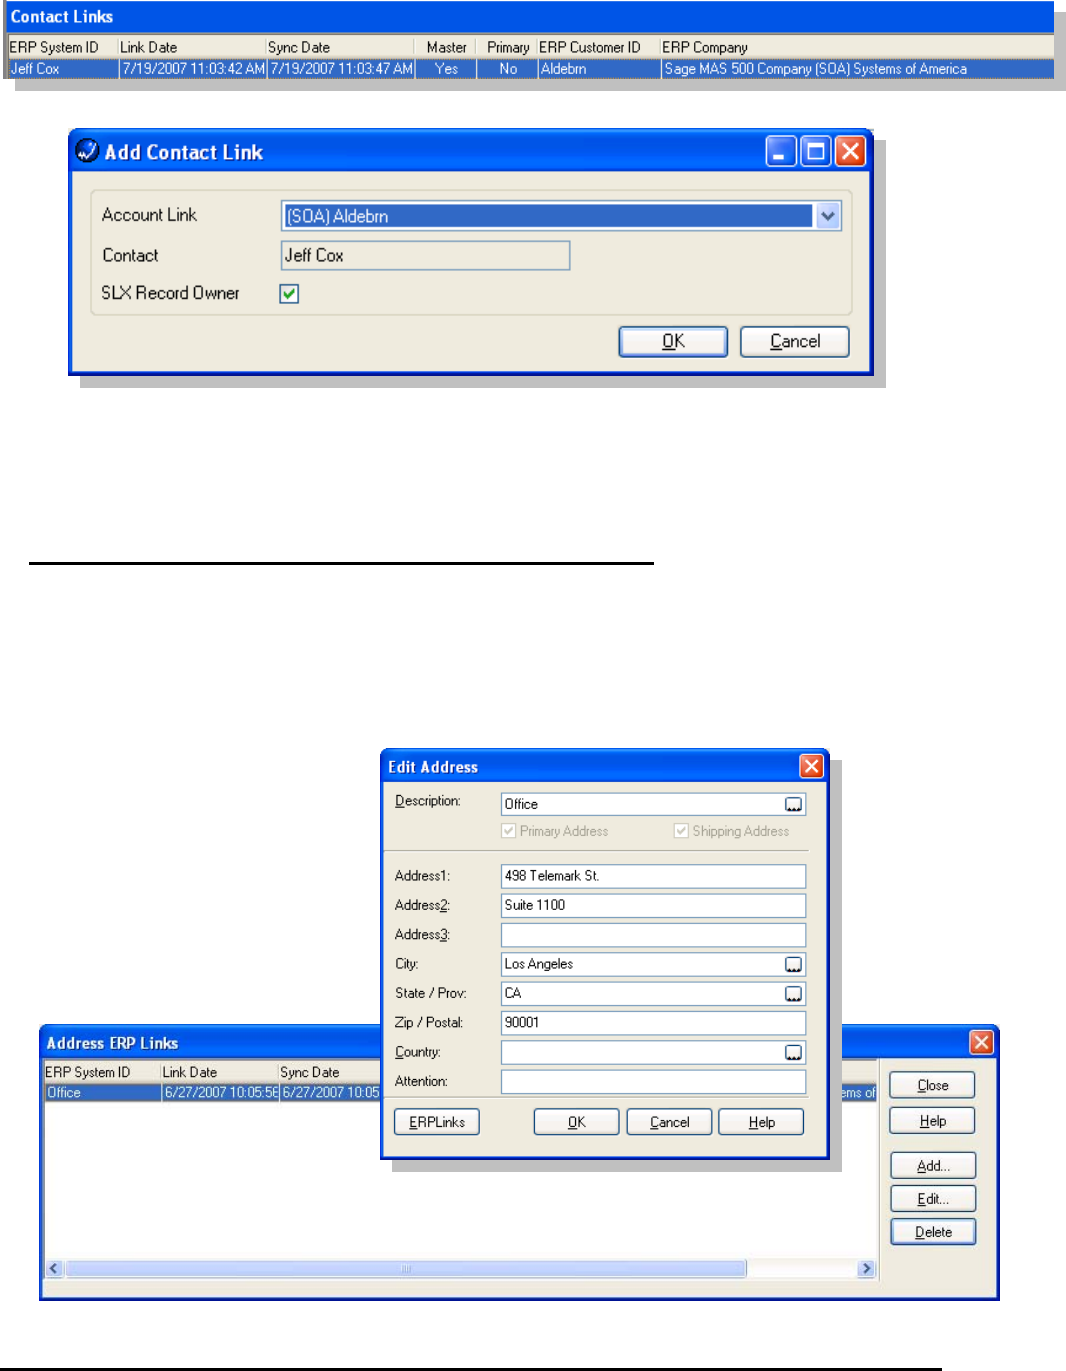
Relationships can be added and edited through this view.
The contact will be created using the Company Code, Customer ID defined in the
selected link. Contact links for Sage MAS 500 are based on the Contact Name, and
cannot be changed.
Contacts may also be created in the Sage MAS 500 system automatically when the
Account is refreshed, depending on the options select during setup.
Address Maintenance
You may link any address in Sage SalesLogix to an address in Sage MAS ERP from the
edit address dialog, ERPLinks button. Address to Address relationships are one to one
and maintained on each address record in Sage SalesLogix. Addresses may also be
created in the Sage MAS ERP system automatically when the Account is refreshed,
depending on the options select during setup.
Multiple addresses may be
linked for each Account.
Page 6 of 45
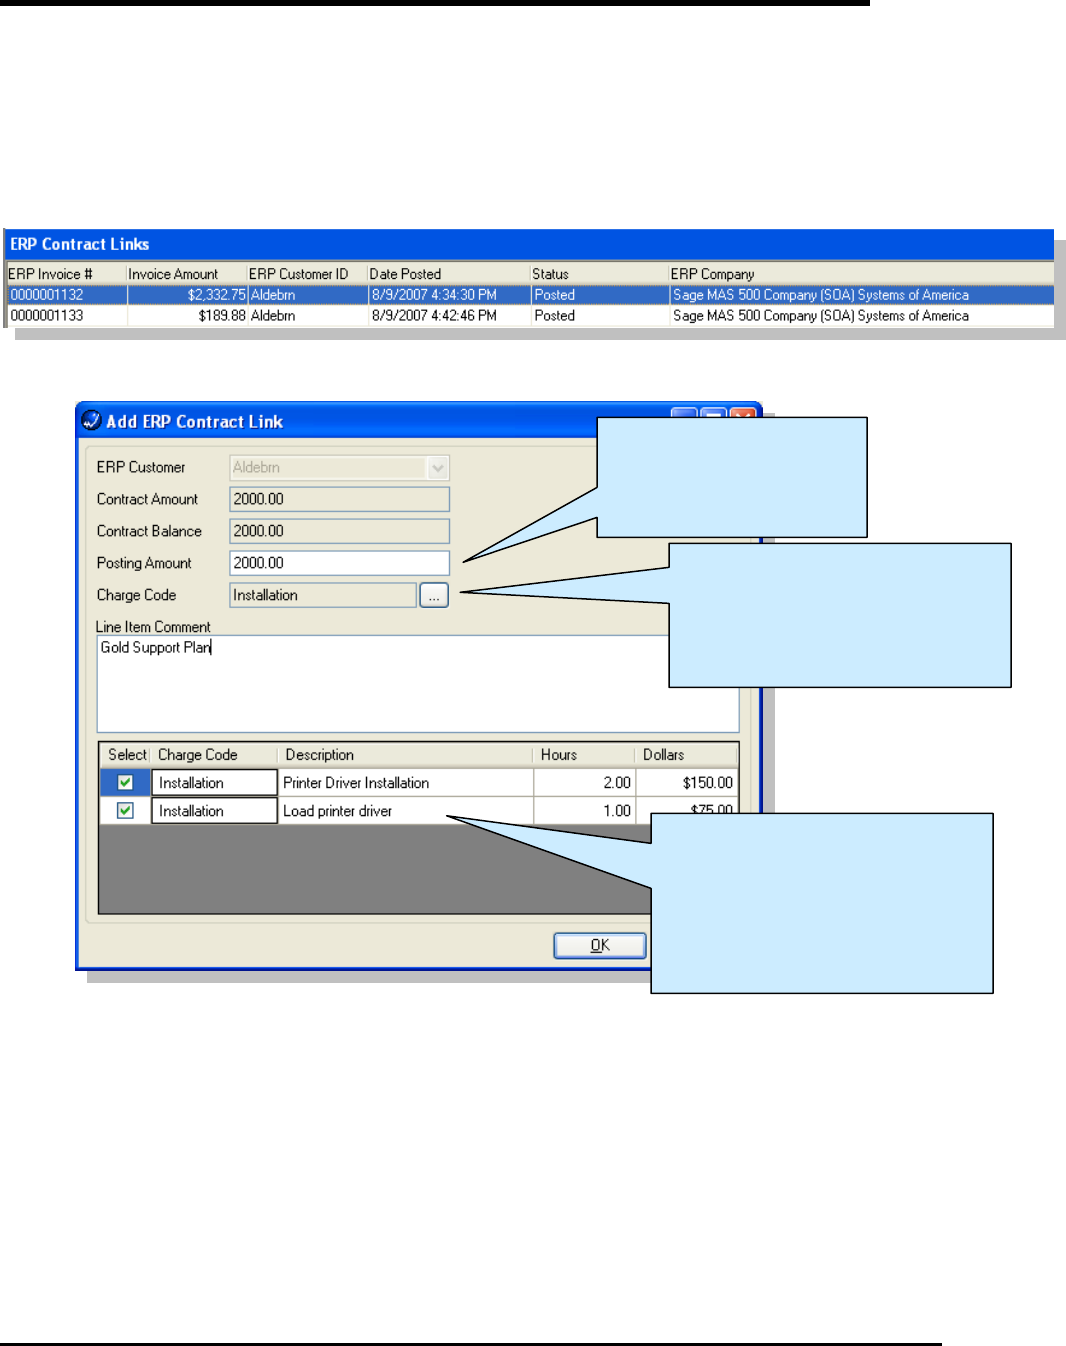
Create Invoices from CRM Service Contracts
From Sage SalesLogix, you may create a back-office invoice directly from a Service Contract.
This will collect all Ticket activity related to the Contract, allow editing of details, and then submit
it as an invoice. From that point, the ERP system will process as a regular invoice and a link
from the Contract to the Invoice will be maintained in Sage SalesLogix.
Contract to Invoice relationships are one to many and are maintained for each Contract on the
Contract view.
Right click the ERP Contract Links grid and select Add… to create a new invoice for the
selected contract.
The charge code to be used
when creating the invoice. The
lookup button will be displayed
if the user is allowed to override
the charge code.
The amount to be
posted in the new
invoice - defaults to
contract balance
If the Post Tickets option is
selected in setup, all unposted
Ticket charges will be shown
here. Tickets may be
unselected and Charge Code
may be changed.
Page 7 of 45
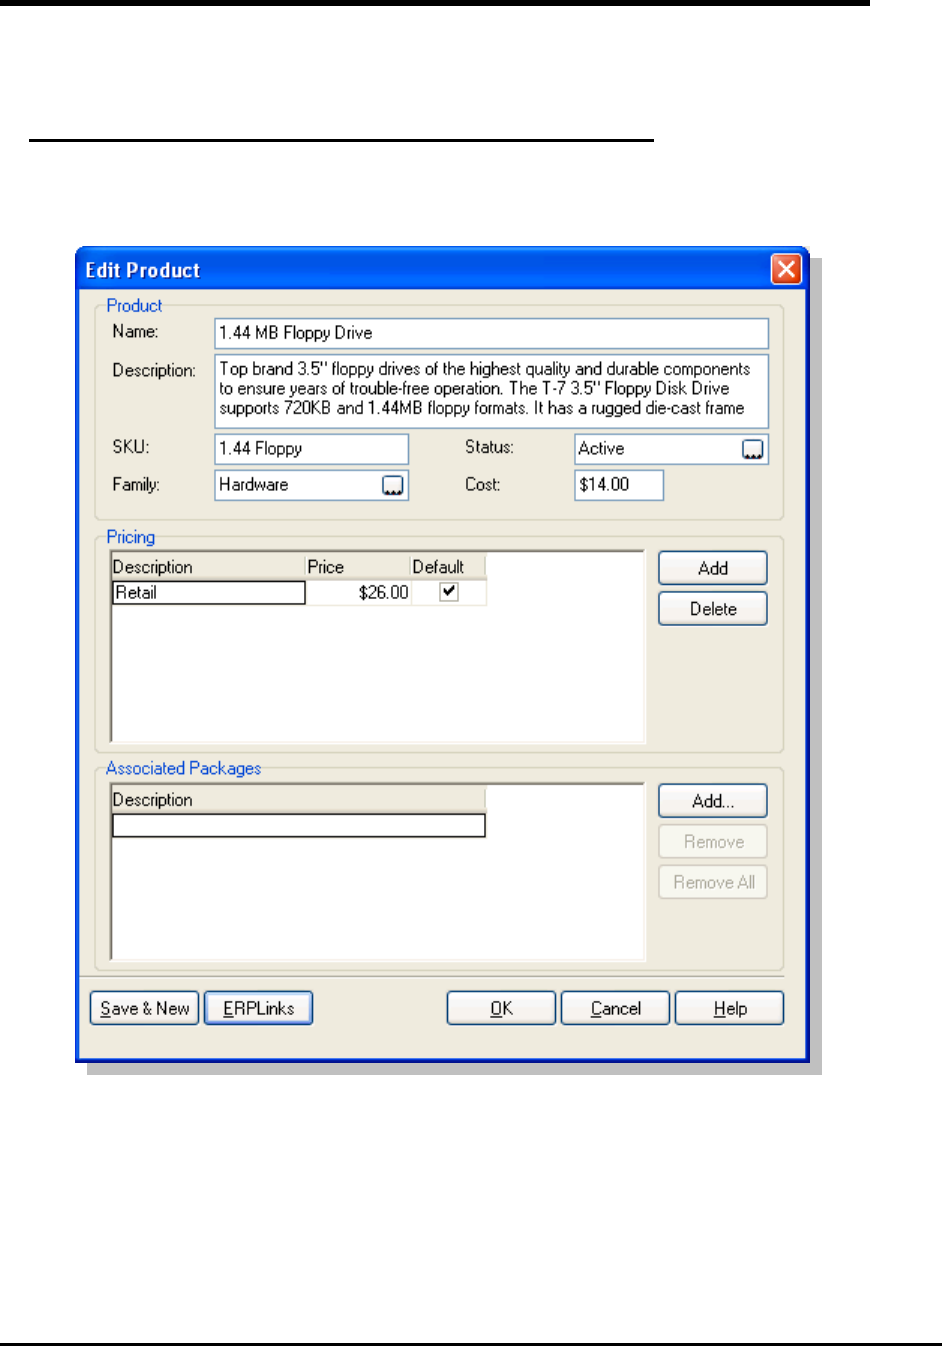
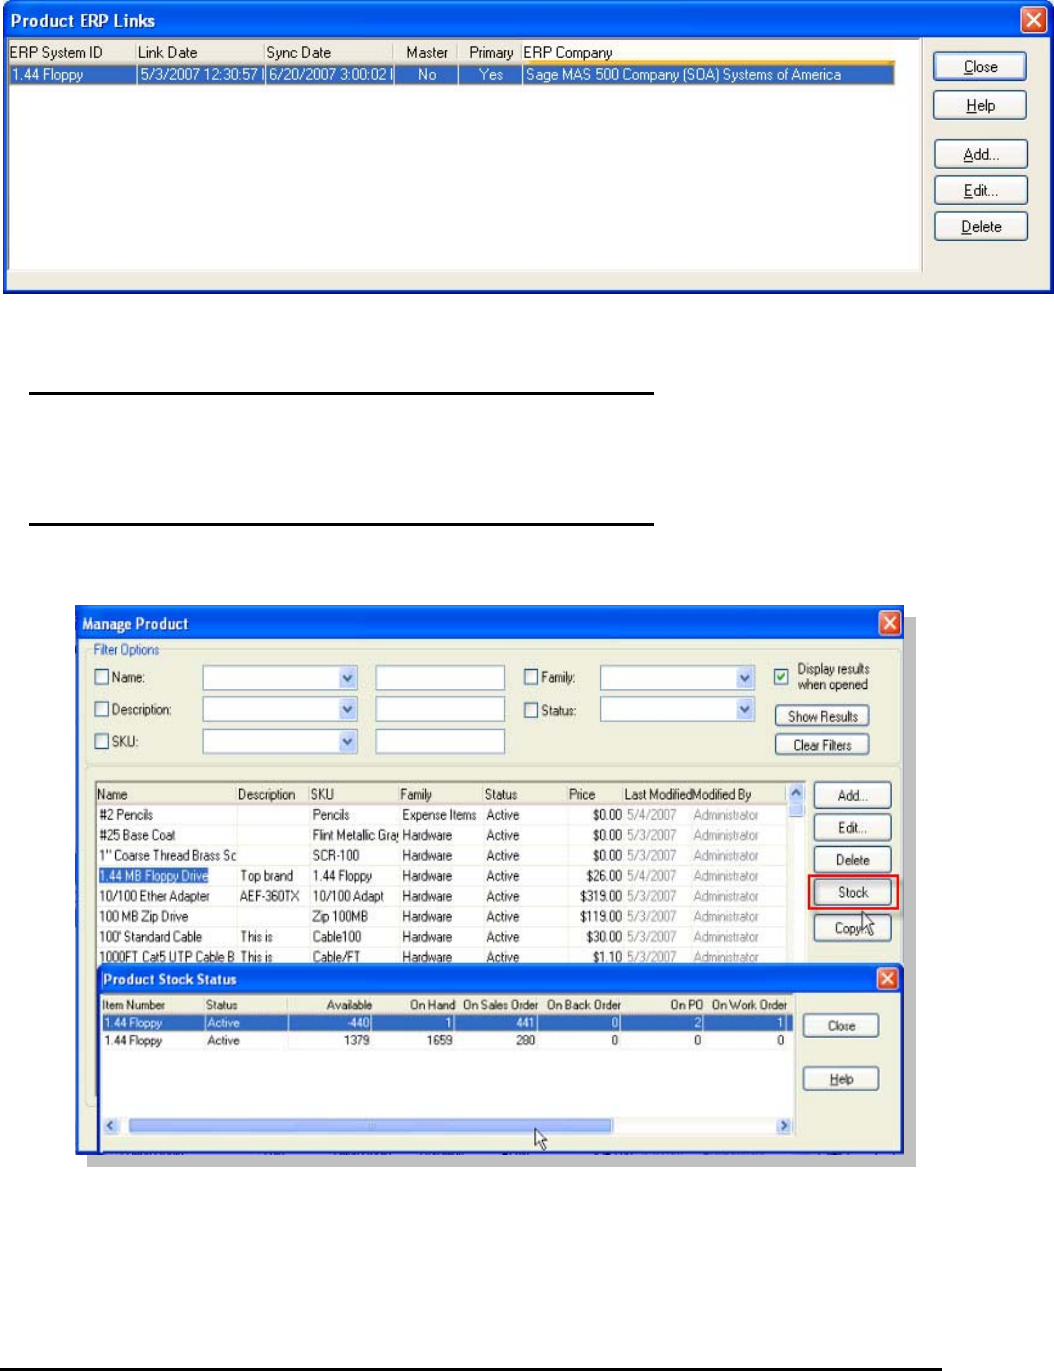
Accurate Product Information
Sage SalesLogix Products are seamlessly linked to Sage MAS Items so you can maintain
accurate information on products.
Relating CRM Products to ERP Items
The Product to Item relationship is many to many and is maintained on each product
record in Sage SalesLogix.
A SalesLogix Product can be associated to several MAS 500 Inventory Items across one
or more MAS 500 Companies. When products are added to an opportunity the products
are checked to ensure availability in the selected company and the user may be
presented with a warning, or not be allowed to add the item to the opportunity, based on
setup options.
Page 8 of 45
The Item to Product relationships allow for proper price checking during opportunity
entry.
Adding ERP Items
Currently, adding Sage MAS ERP Inventory Items is not available from within Sage
SalesLogix.
Product Inventory
View inventory status across multiple warehouses for each product.
Page 9 of 45
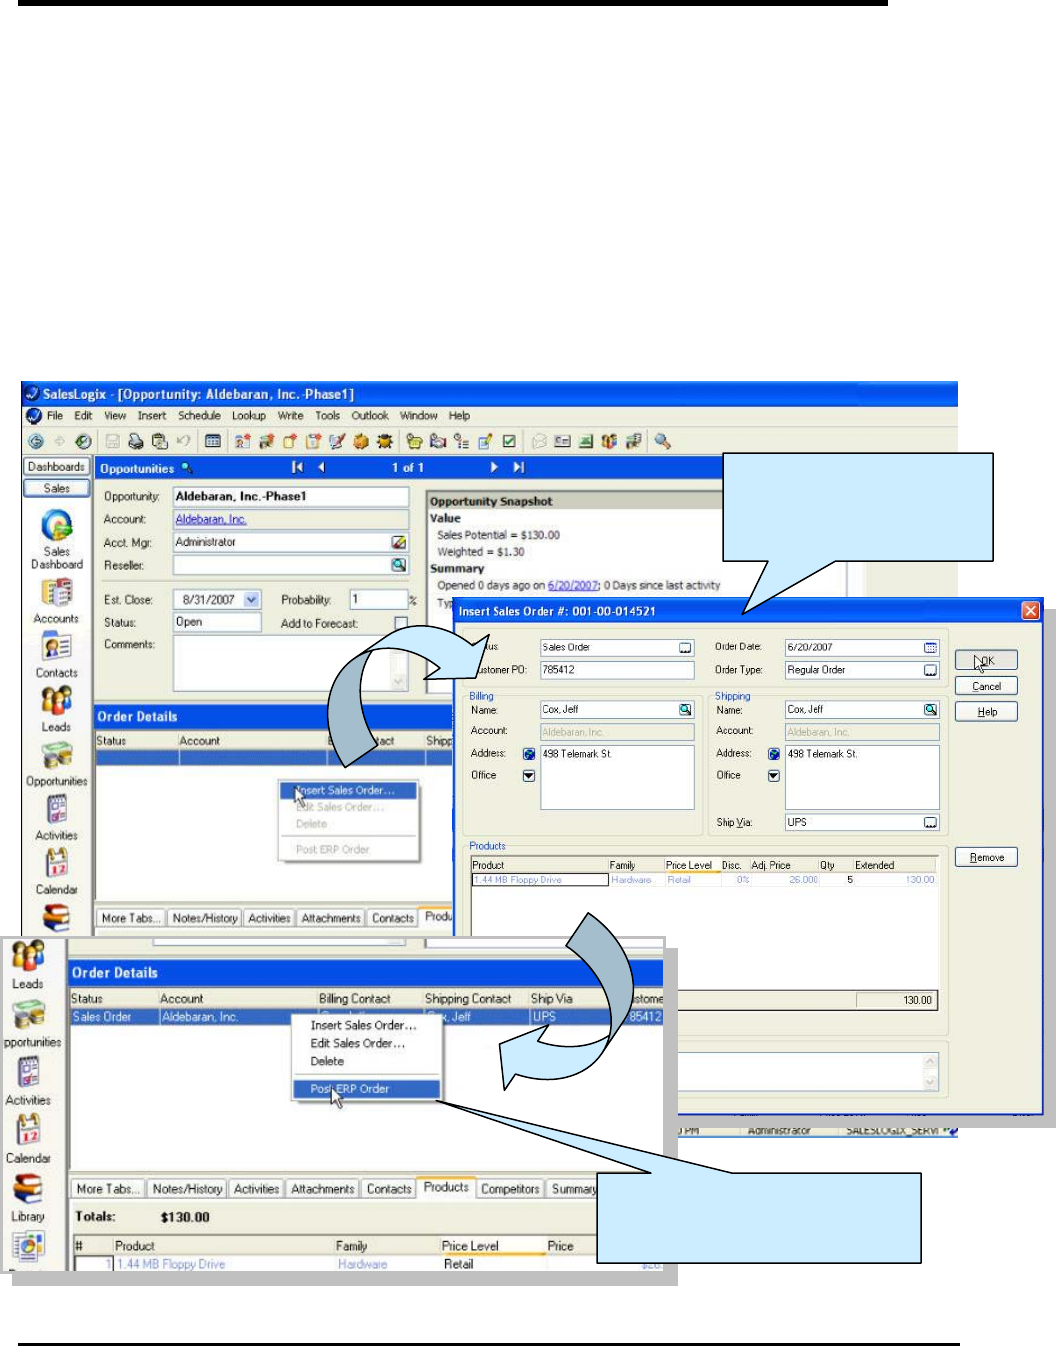
Generate Orders from CRM Opportunities
Sales Quotes While not connected to the network, remote salespeople can change account
information and enter basic sales quotes. The next time they synchronize, the information is
transferred into the SalesLogix database, and then into the accounting system.
Sales Orders Workgroup users have the ability to toggle between their sales management tool
and MAS 90, MAS 200, or MAS 500 to create a sales order for the current SalesLogix account.
This allows them to take advantage of information in MAS 90, MAS 200, or MAS 500, such as
sales pricing, customer discounts, and sales tax calculation.
Inventory items If inventory items are included in the replicated data in SalesLogix, users can
select their inventory items as line items on the quotes. In addition, they can look up quantities
in the warehouse (site). This information is as current as the last synchronization.
From Sage SalesLogix,
you can insert a Sales
Order…
…and post into ERP - on
hold, pending approval.
Page 10 of 45

Expand to see Sales
Order details
From Sage SalesLogix
Account, see all customer
Sales Order and Invoices,
double-click to view
Once posted to ERP, the
Sage SalesLogix user
cannot edit the Sales Order.
Right-click to open in Sage
MAS to edit the Sales Order
Page 11 of 45

Setup and Configuration
Once installed, you must define how the CRM and ERP interoperate. This configuration is
made easier by wizards and automated where possible. From Sage SalesLogix, select
the menu Tools > Manage > ERP Link to configure the following:
• Login Parameters (for Sage MAS ERP login)
• Setup Wizard
• Entity Mapping Wizard
• Data Query Wizard
• Load / Refresh Products
• Load / Refresh Accounts
Page 12 of 45
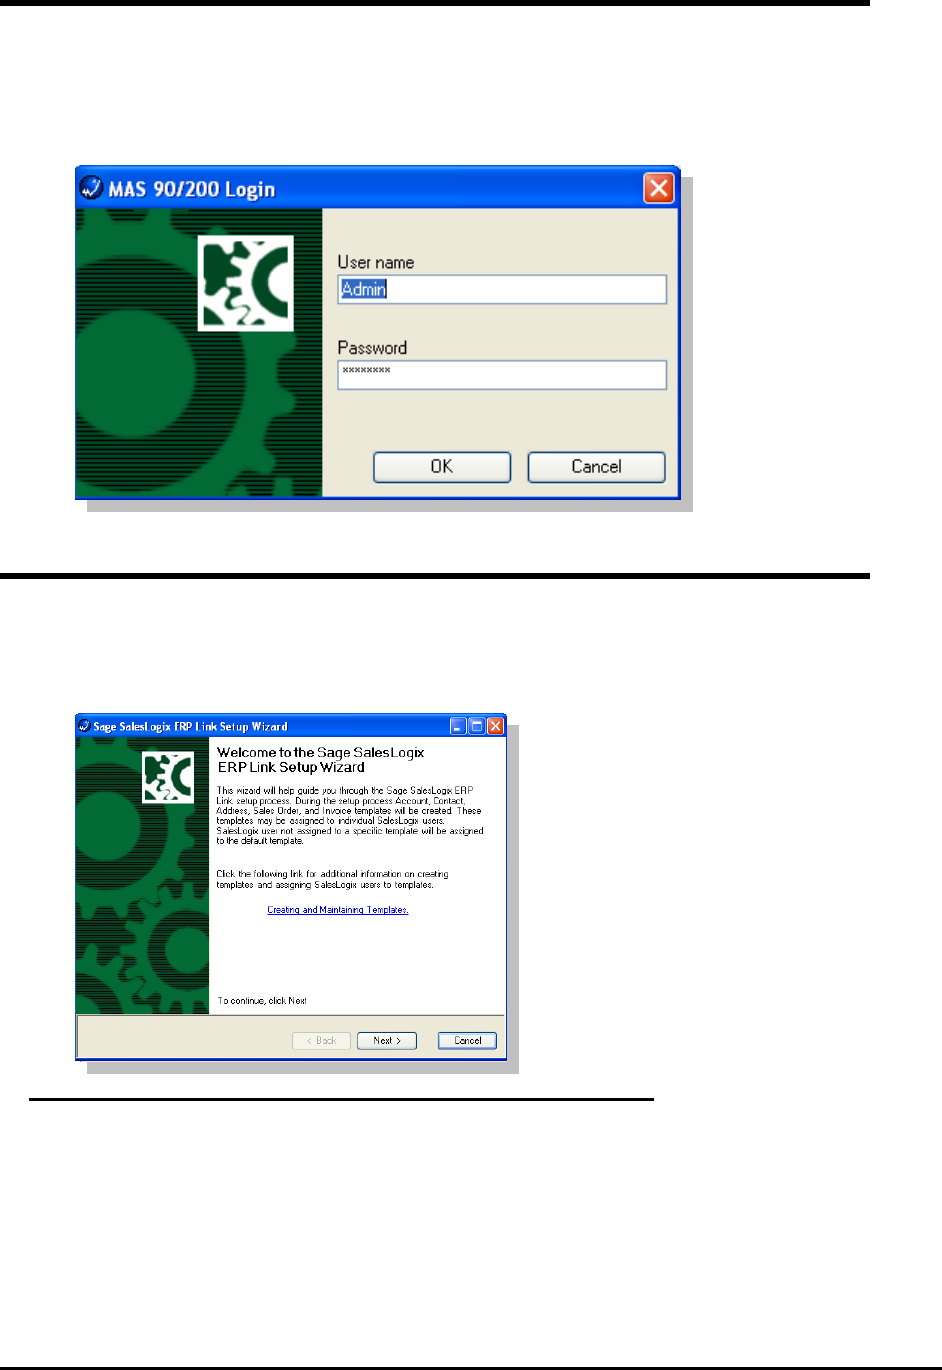
ERP Login Parameters
The Login Parameters allow the Sage SalesLogix user to enter the credentials to be
used to access the Sage MAS ERP system. These credentials are stored by Sage
SalesLogix user, and each Sage SalesLogix user that will be accessing Sage MAS ERP
will be required to set these credentials.
Setup Wizard
The Setup Wizard allows the Sage SalesLogix Administrator to set options which will
define how the two systems will operate. The following are the options currently
available.
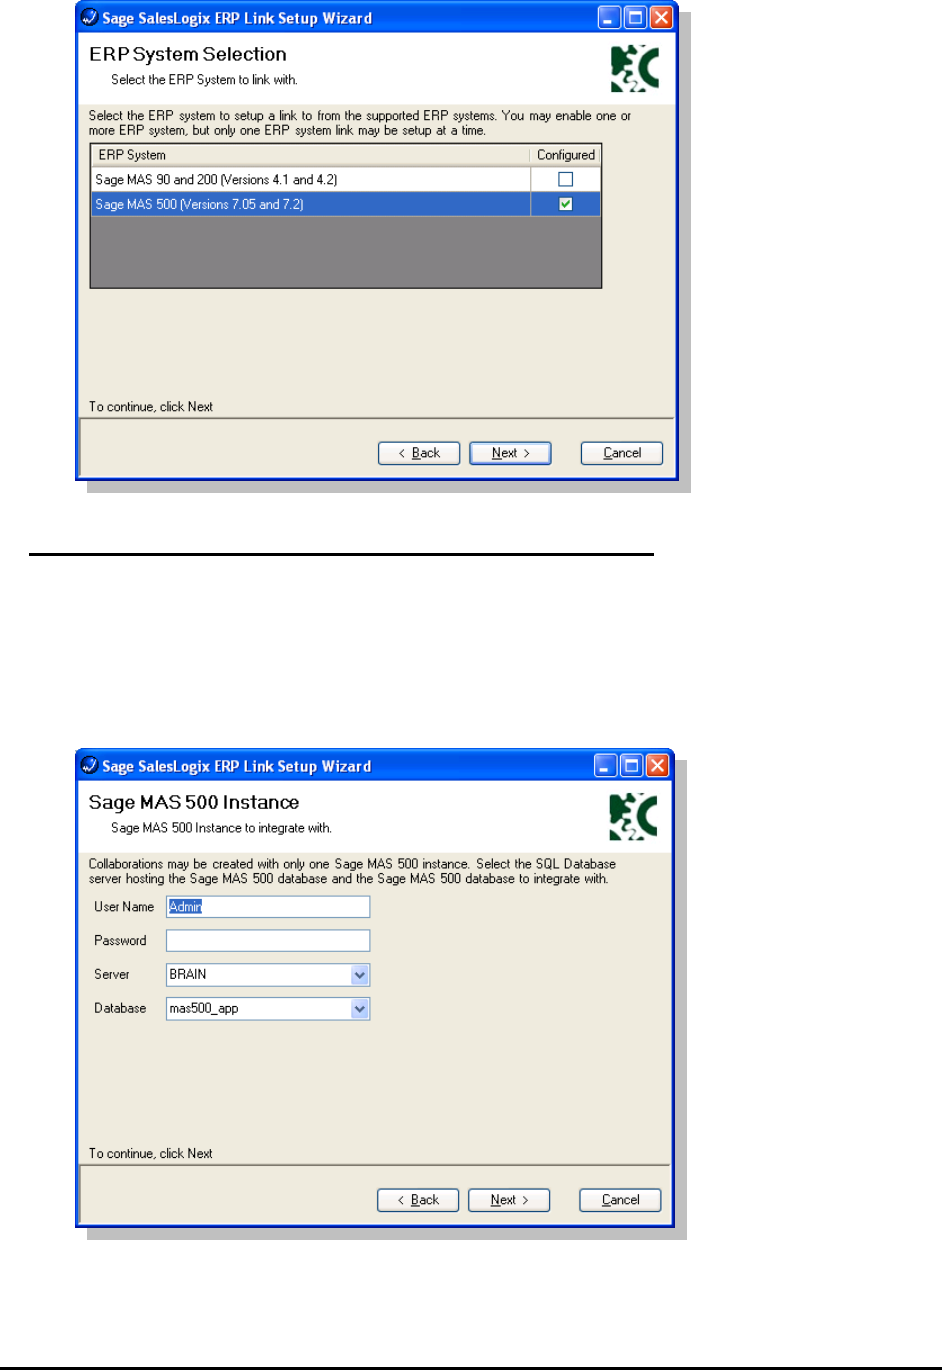
Setup ERP Selection
ERP System Selection allows the user to select the ERP application that will be
configured for integration with SalesLogix. The ERP System(s) available depend on the
installed plugins.
Page 13 of 45
Select ERP Instance
You must define the specific instance of the back-office to connect to Sage SalesLogix.
A valid ERP user name and password is required to connect to each specific server and
database.
Please note: for proper configuration, this must be a Sage MAS 500 User Account that
does not use Application Roles.
Page 14 of 45
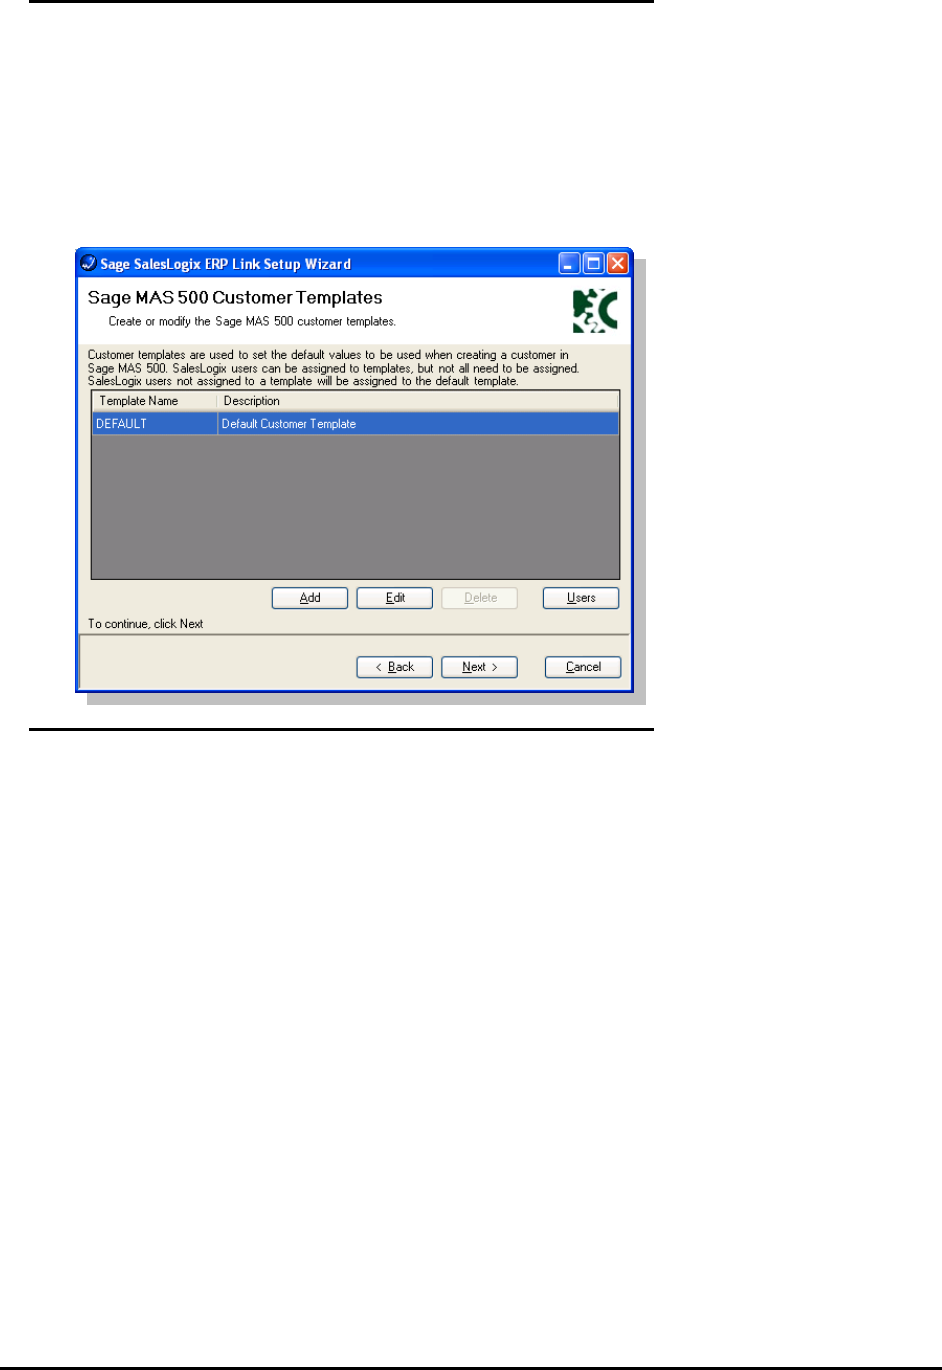
Default Values for ERP Customers – Customer
Templates
Customer templates are used to define the default values when new customers are
created in the back-office system by Sage SalesLogix. You may assign different
templates to different Sage SalesLogix users depending on rights and values to be
entered for a new customer record.
Customer templates can be assigned to users. If a Sage SalesLogix user does not have
a template assigned, the DEFAULT template will be applied.
ERP Customer Template Maintenance
ERP Customer Template Maintenance defines several items required when creating a
new ERP customer from CRM. This configuration is specific to your ERP system – refer
to ERP documentation for information on the options.
Page 15 of 45
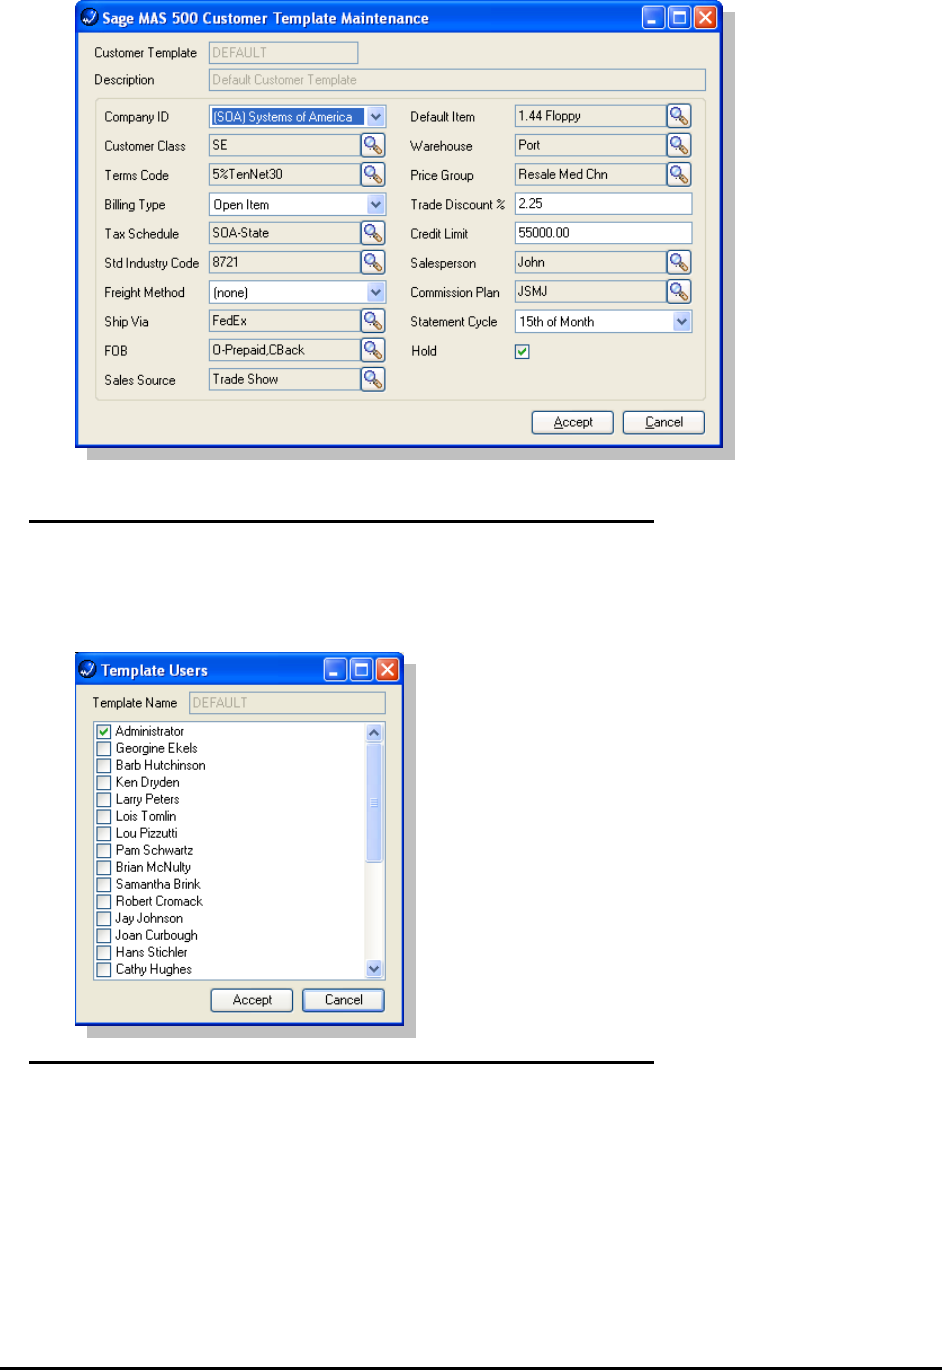
Assign CRM Users to a ERP Customer Template
Template users are assigned by selecting the template and clicking the Users button. To
assign a user to a template place a check by the name of the user. This list will contain
all CRM users.
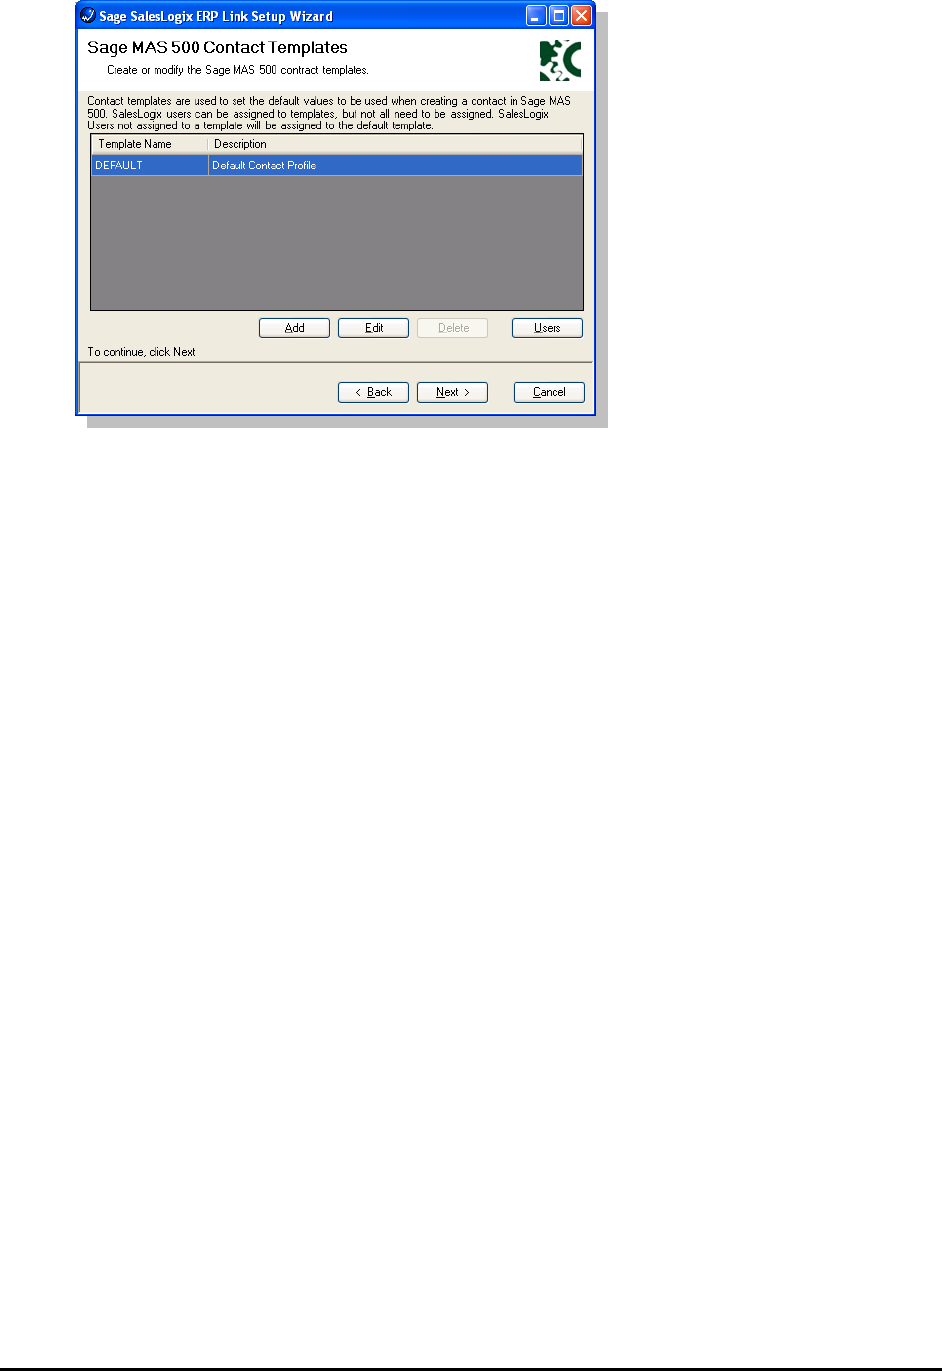
Default Values for ERP Contacts – Contact Templates
Similar to Customer templates, Contact templates are used to define the default values
when new contacts are created in the back-office system by Sage SalesLogix. You may
assign different templates to different Sage SalesLogix users depending on rights and
values to be entered for a new customer record.
Contact templates can be assigned to users. If a Sage SalesLogix user does not have a
template assigned, the DEFAULT template will be applied.
Page 16 of 45
Page 17 of 45
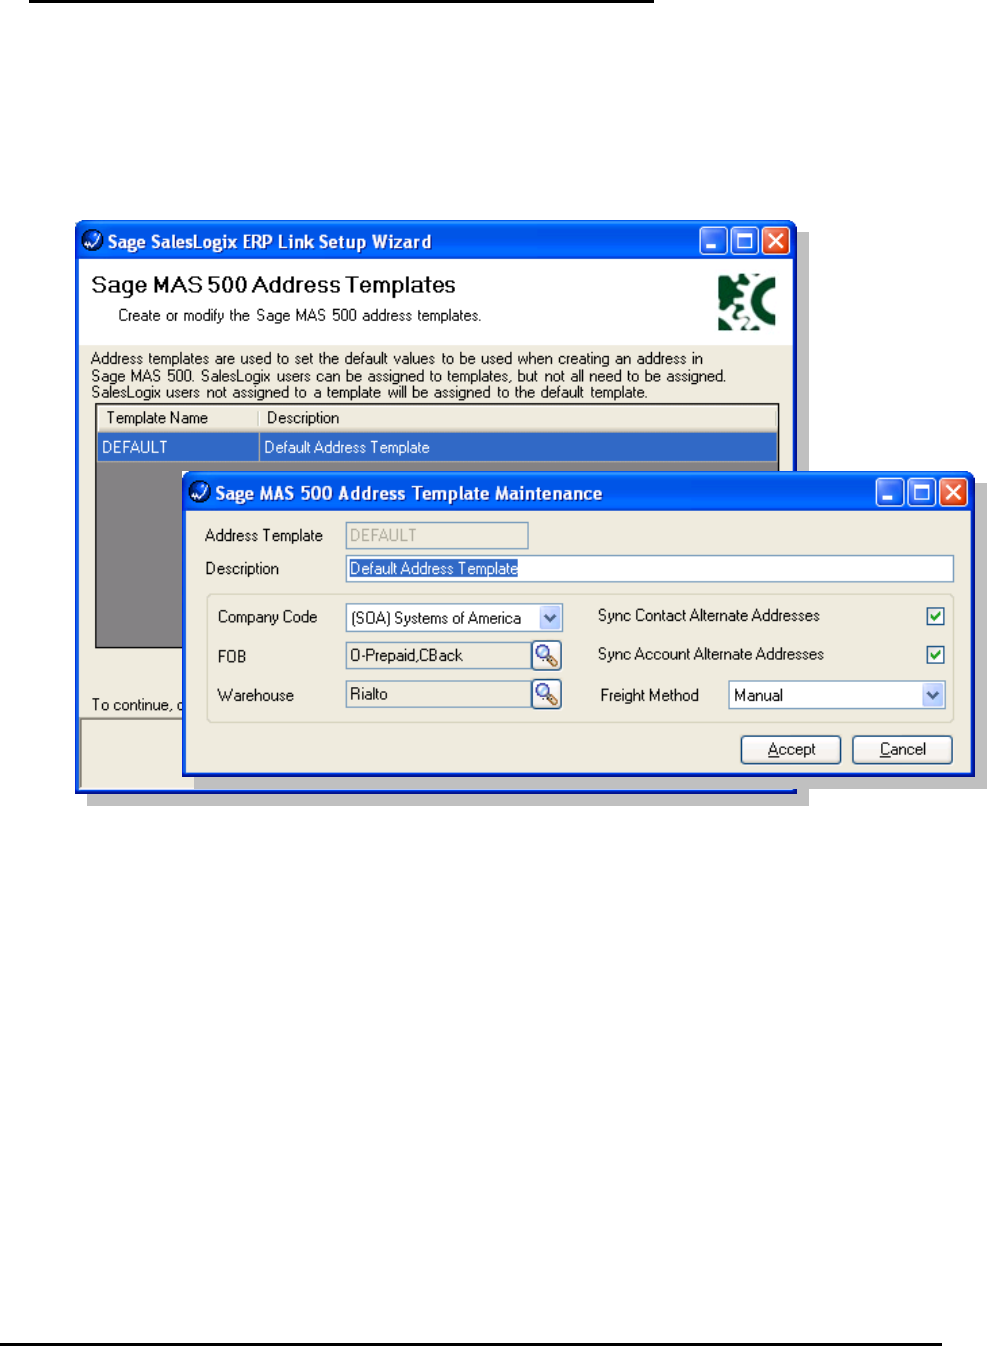
Default Values for ERP Address – Address Templates
Similar to Customer templates, Address templates are used to define the default values
when new addresses are created in the back-office system by Sage SalesLogix. You
may assign different templates to different Sage SalesLogix users depending on rights
and values to be entered for a new customer record.
Address templates can be assigned to users. If a Sage SalesLogix user does not have a
template assigned, the DEFAULT template will be applied.
Sync Contact Alternate Addresses defines how ERP will handle contact alternate
addresses from Sage SalesLogix. When enabled all contact alternate addresses, for
linked contacts, will be created in Sage MAS ERP.
Sync Account Alternate Addresses defines how ERP will handle account alternate
addresses from Sage SalesLogix. When enabled all account alternate addresses, for
linked accounts, will be created in Sage MAS ERP.
Refer to Sage MAS ERP documentation for a detailed description of FOB, Warehouse
and Freight Method.
Page 18 of 45
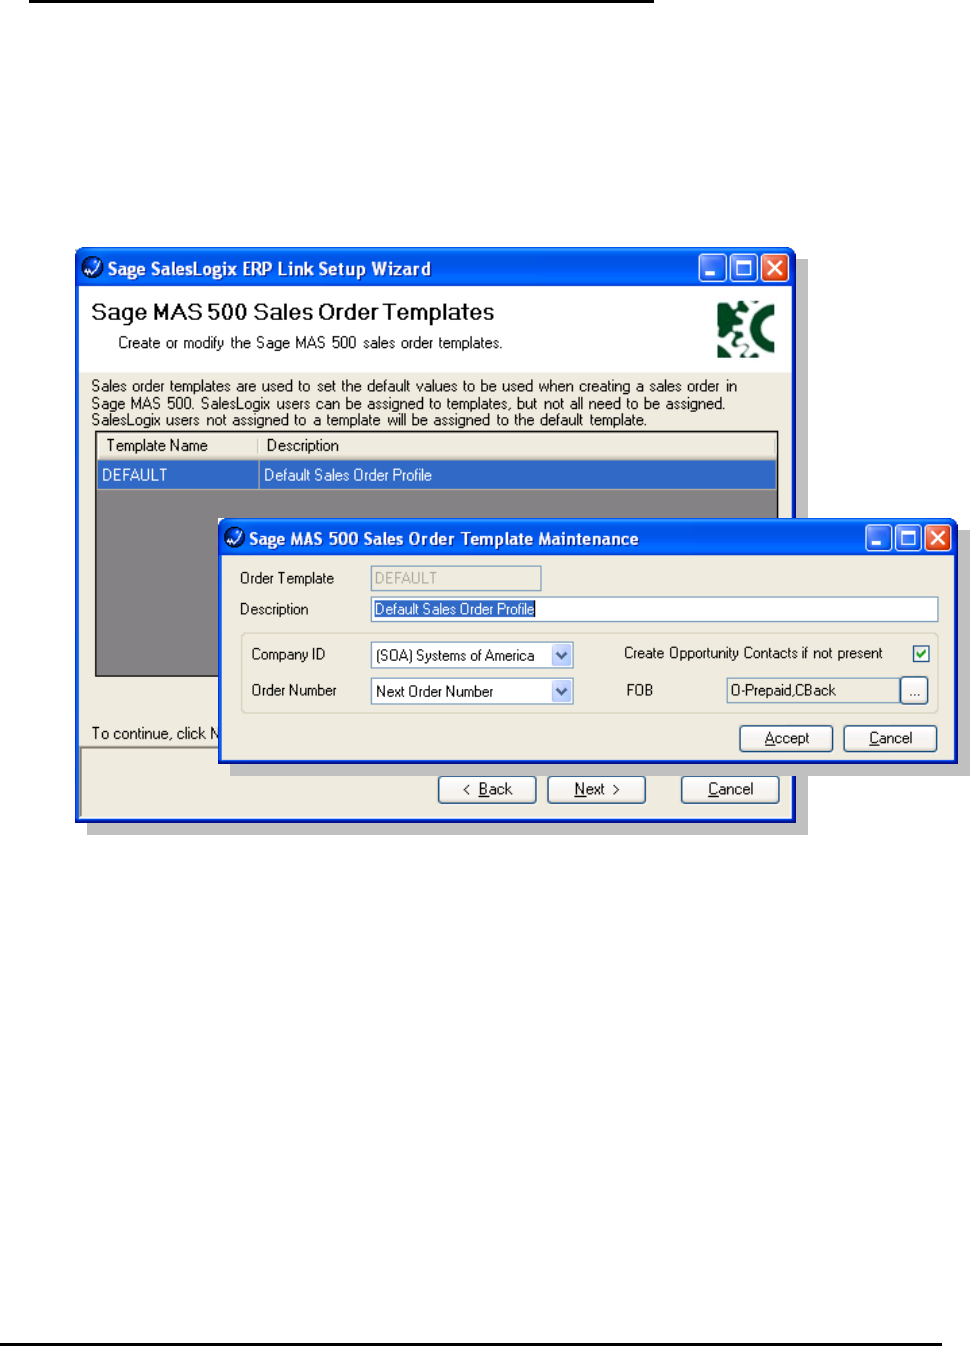
Default Values for ERP Sales Orders – Sales Order
Templates
Similar to Customer templates, Sales Order templates are used to define the default
values when new sales orders are created in the back-office system by Sage
SalesLogix. You may assign different templates to different Sage SalesLogix users
depending on rights and values to be entered for a new customer record.
Sales Order templates can be assigned to users. If a Sage SalesLogix user does not
have a template assigned, the DEFAULT template will be applied.
Order Number defines the method used to select the next sales order number to be
used. The options are:
• Next Order Number
• Sales Order ID
Create Opportunity Contact if not present will automatically create an ERP Contact if
the Contact does not exist in the Sage MAS ERP system.
Page 19 of 45
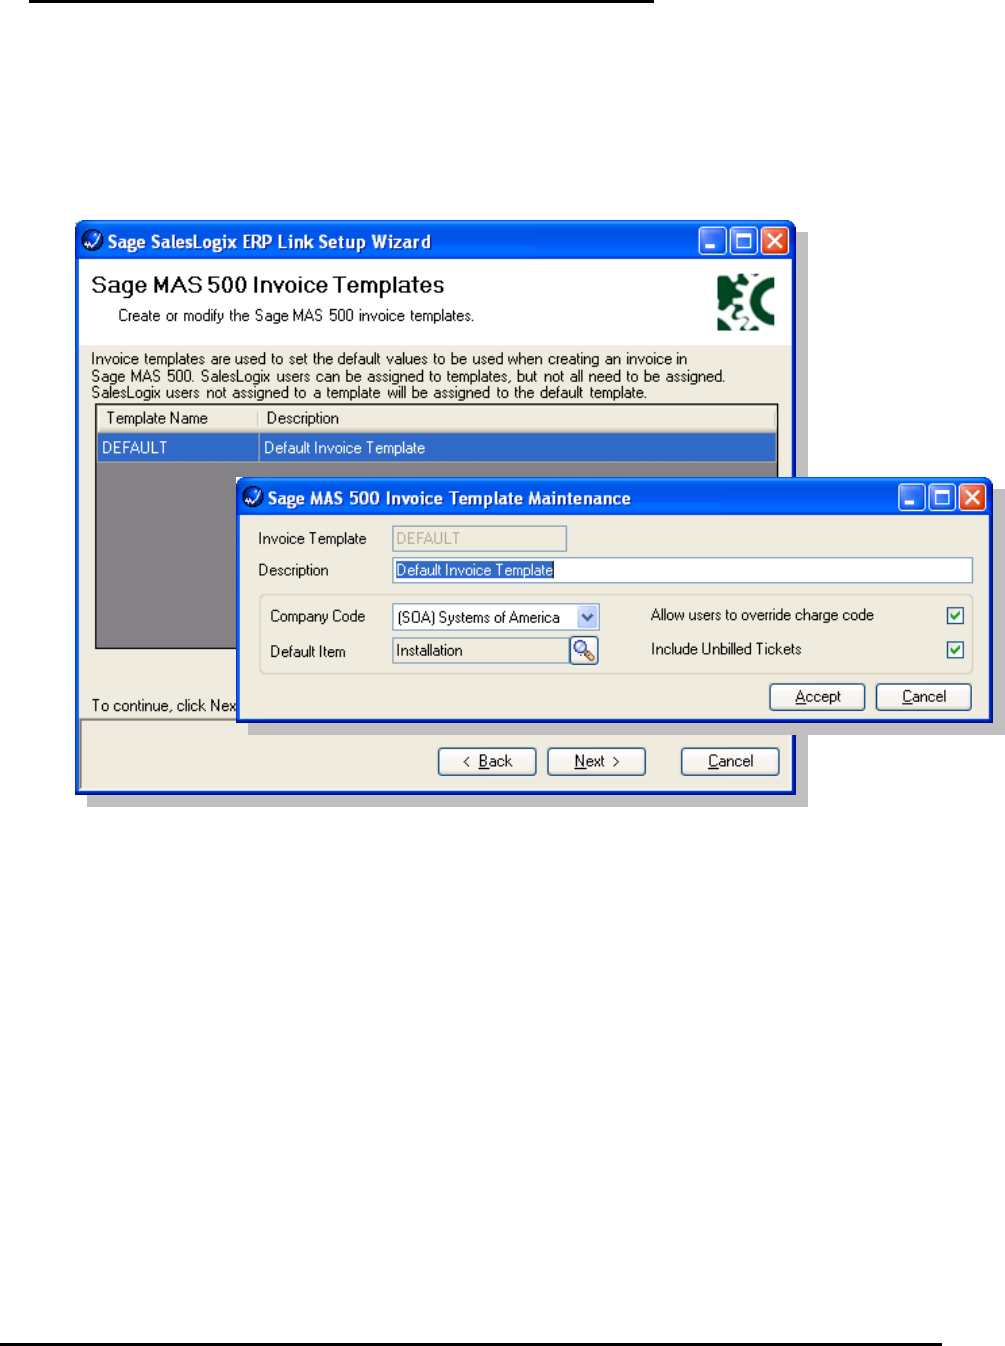
Default Values for ERP Invoices – Invoice Templates
Similar to Customer templates, Invoice templates are used to define the default values
when new invoices are created in the back-office system by Sage SalesLogix. You may
assign different templates to different Sage SalesLogix users depending on rights and
values to be entered for a new customer record.
Invoice templates can be assigned to users. If a Sage SalesLogix user does not have a
template assigned, the DEFAULT template will be applied.
Default Item defines the default charge code to be used when creating the invoice.
Allow users to override charge code allows the user select a different charge code
when creating the invoice in Sage MAS ERP.
Include Unbilled Tickets allows the user to include unbilled ticket items on the invoice
that is created in Sage MAS ERP.
Page 20 of 45
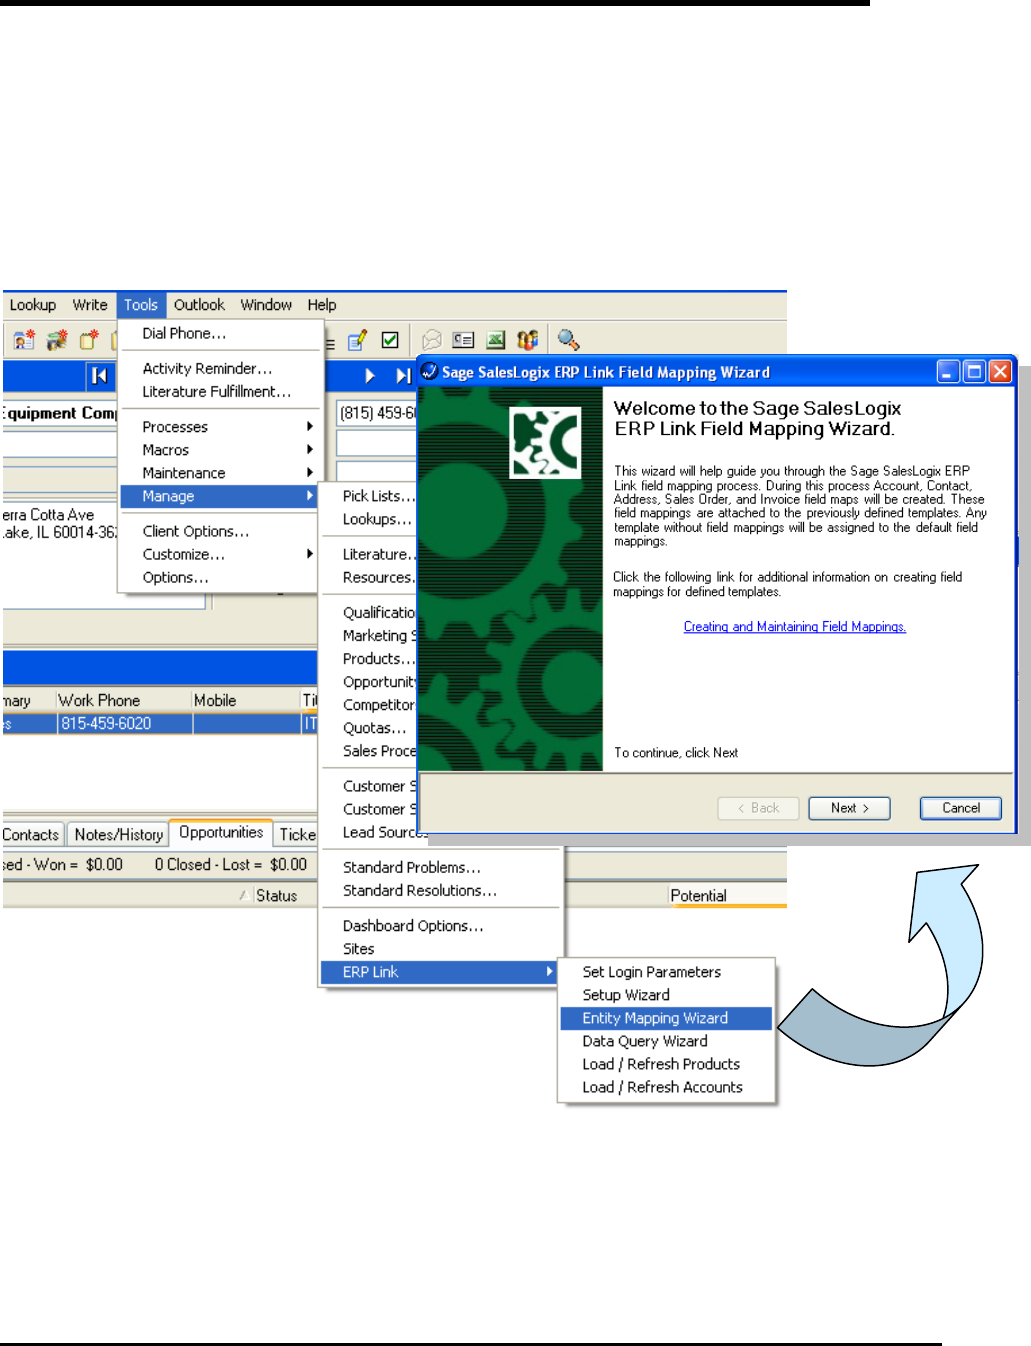
CRM to ERP Field Mapping
You may define how CRM and ERP data moves between systems. This field mapping can
include functions to convert data formats and conditionally move data between CRM and ERP.
This configuration is made easier by wizards and automated where possible.
Each Template (see previous section) can have different field mappings associated depending
on the complexity and needs of individual customers. This section will give an overview of field
mapping.
From Sage SalesLogix, select the menu Tools > Manage > ERP Link > Entity Mapping Wizard
to configure Account, Contact, Address, Sales Order, and Invoice field maps.
Page 21 of 45
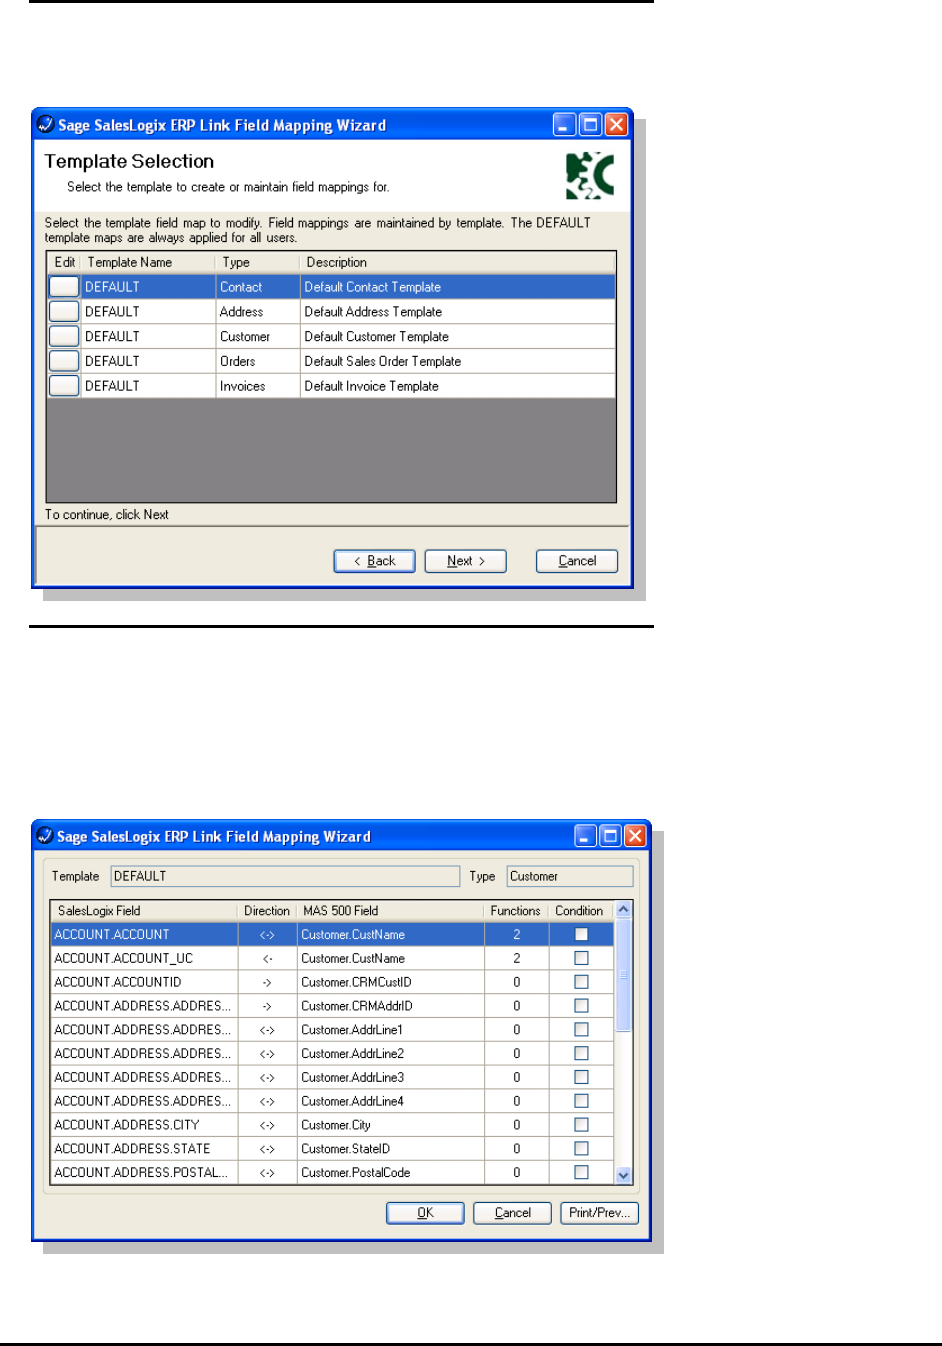
Selecting a Template
The first step of the Wizard is to select which Template to configure field mappings. Default
templates are shown, but any template may have a different field map.
Defining the Field Mapping
We will use the Customer Template as an example for field mapping. Contact, Address,
Sales Order, and Invoice templates are mapped in the same fashion.
Note: Invoice mappings have restrictions. The A/R Invoice has header and line items, but
only header items can be mapped. Line entries are strictly controlled to prevent incorrect or
invalid data.
Page 22 of 45
Some notes about this setup. First, the Direction indicates how the data flows:
• <– Indicates the data flow from Sage MAS ERP into Sage SalesLogix CRM
• -> Indicates the data flows from Sage SalesLogix CRM into Sage MAS ERP
• <-> indicates the record ownership will determine the direction of data flow
Additionally, each field link can have functions applied and/or conditions enforced before the
data is moved.
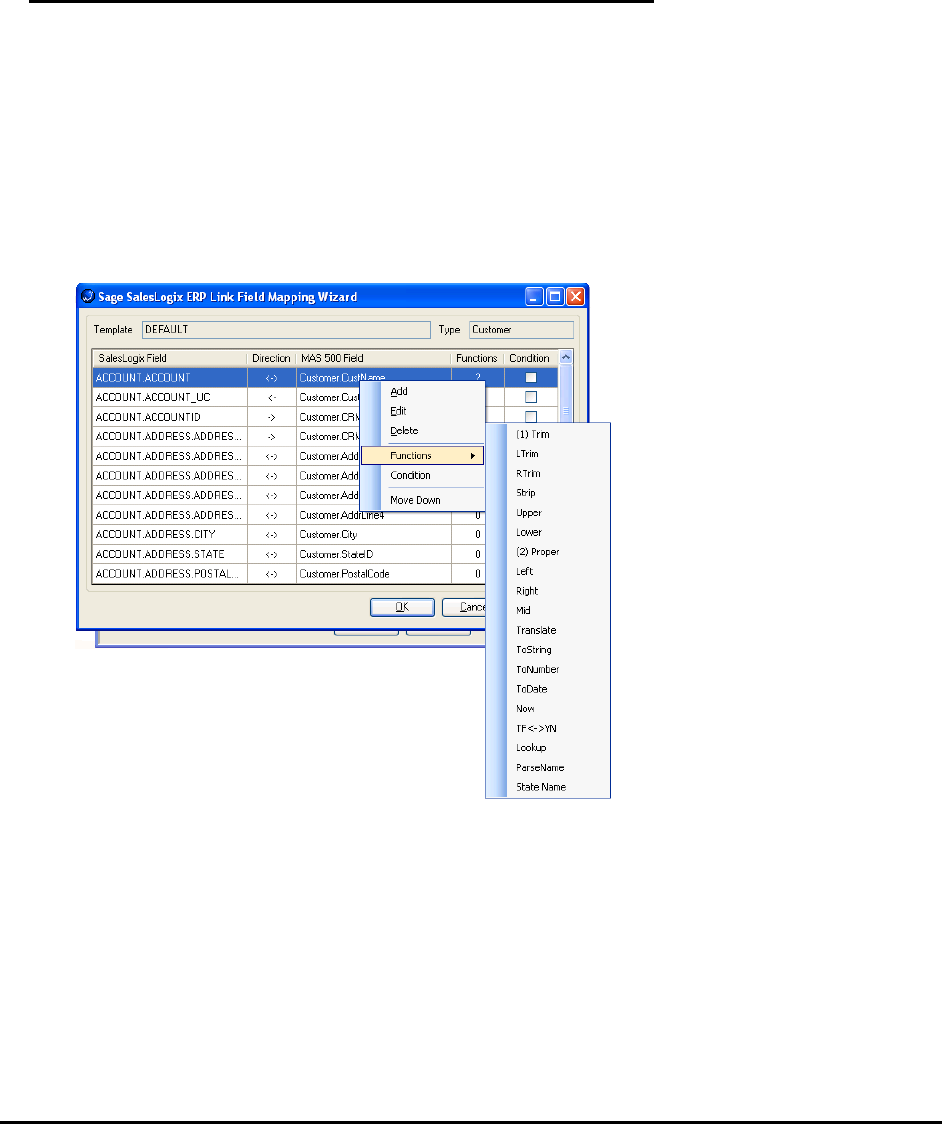
Field Mapping Functions
Using the Customer Name ERP field as an example, before we move the data from ERP
to CRM, we want to trim it of extra spaces (due to way data is stored) and convert to
Proper case. You can see from previous screen shot that there are two fuinctions
assigned.
These two functions can be accessed by right-clicking on the field, choosing Functions,
then choosing from available functions. The execution of functions occur in the
numerical order shown below (Trim occurs first followed by Proper).
Several functions can be combined for complex data transformation.
Available Functions include:
• Trim – Trims leading and trailing blanks spaces
• LTrim – Trims leading blanks spaces
• RTrim – Trims trailing blank spaces
• Upper – Convert string to upper case
• Lower – Convert string to lower case
Page 23 of 45

• Proper – Convert string to proper case, based on windows settings.
• Left – Returns left(x) characters from a string, where x is the number of
characters.
o Parameters: Length
• Right – Returns right(x) characters from a string, where x is the number of
characters.
• Parameters: Length
• Mid – Returns a portion of a string, based on a supplied starting position and
number of characters
o Parameters: Starting Position, Length
• Translate – Used to convert one string value to another (for example used to
convert string “IN” to “Invoice”)
• Parameters: Search String, Replacement String; Comma separated strings (for
example: “INCMDM”, “Invoice,Credit Memo,Debit Memo”)
• ToString – Converts a value to a string
• ToNumber – Converts a value to a number
• ToDate – Converts a value to a date
• Now – Return the current system date and time
• TF<->YN – Converts TF to YN respectively
• LookUp – Used to retrieve a value from the SalesLogix database, based on a
value from the ERP System
o Parameters: Lookup Table, Lookup Key, Return Field
• ParseName – Used to parse a single name field, into First, Last, Middle, Prefix,
and Suffix
o Parameters: Name Part, 0=First, 1=Last, 2=Middle, 3=Prefix, 4=Suffix
• State Name – Returns the complete State Name from an abbreviation
Page 24 of 45

Field Mapping Conditions
In some cases data should not be moved unless certain conditions apply. In such cases
you can apply Conditions to specify when the data should move. Change Conditions by
right-clicking on the field and choosing Conditions.
In the example below, the Sage SalesLogix Data Field ACCOUNT.TYPE must contain a
value equal to “Prospect” before the data is moved.
In this example, the Sage MAS ERP CONTACT.LASTNAME field cannot be blank.
Page 25 of 45
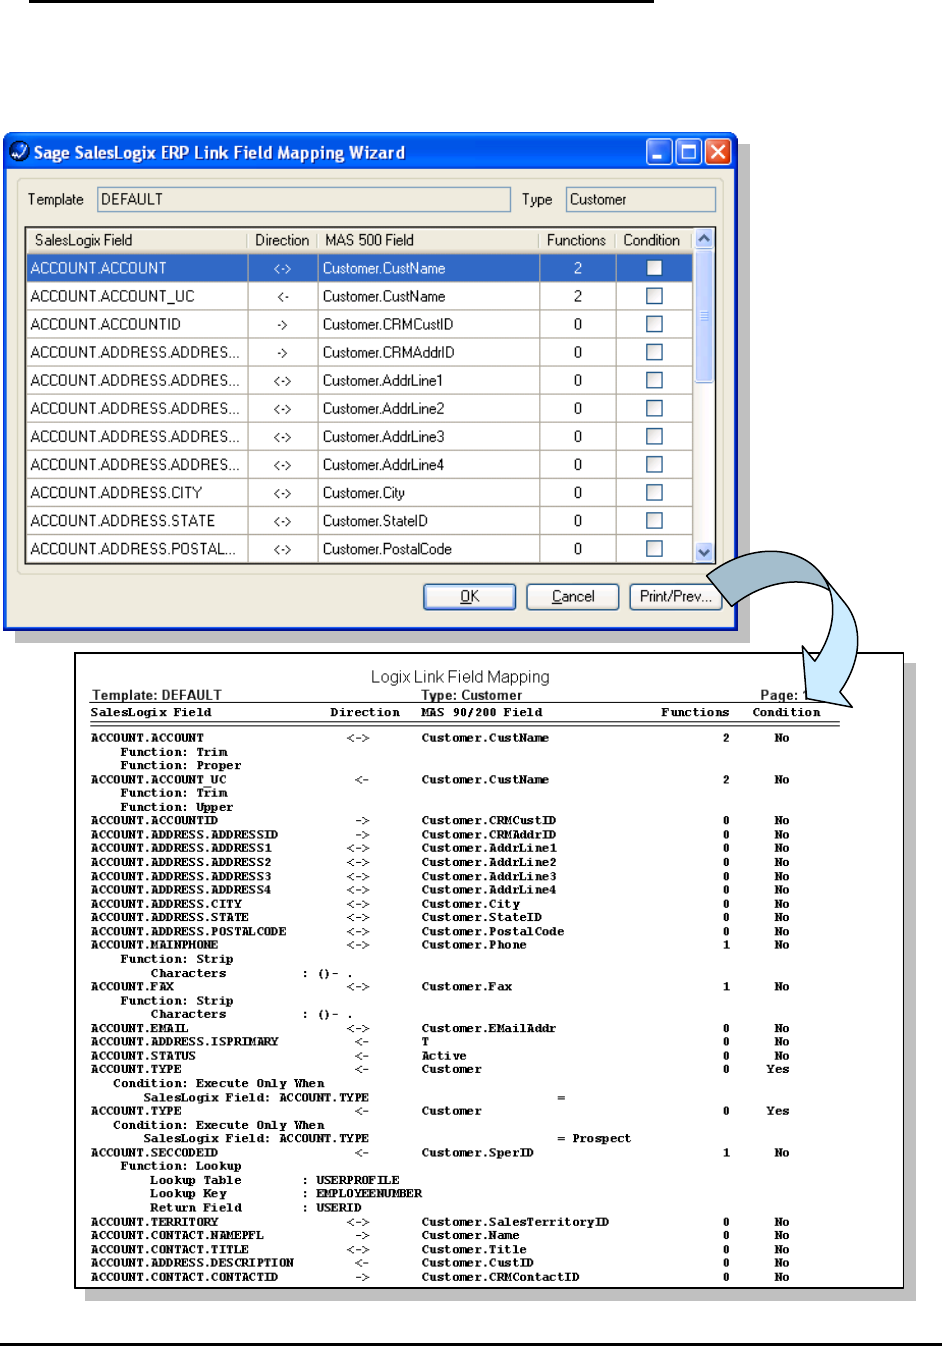
Reviewing Field Mapping
When you have completed mapping of all fields and applied the appropriate functions
and conditions, you may preview the entire map and print a report of the map for future
reference by using the Print/Prev button.
Page 26 of 45
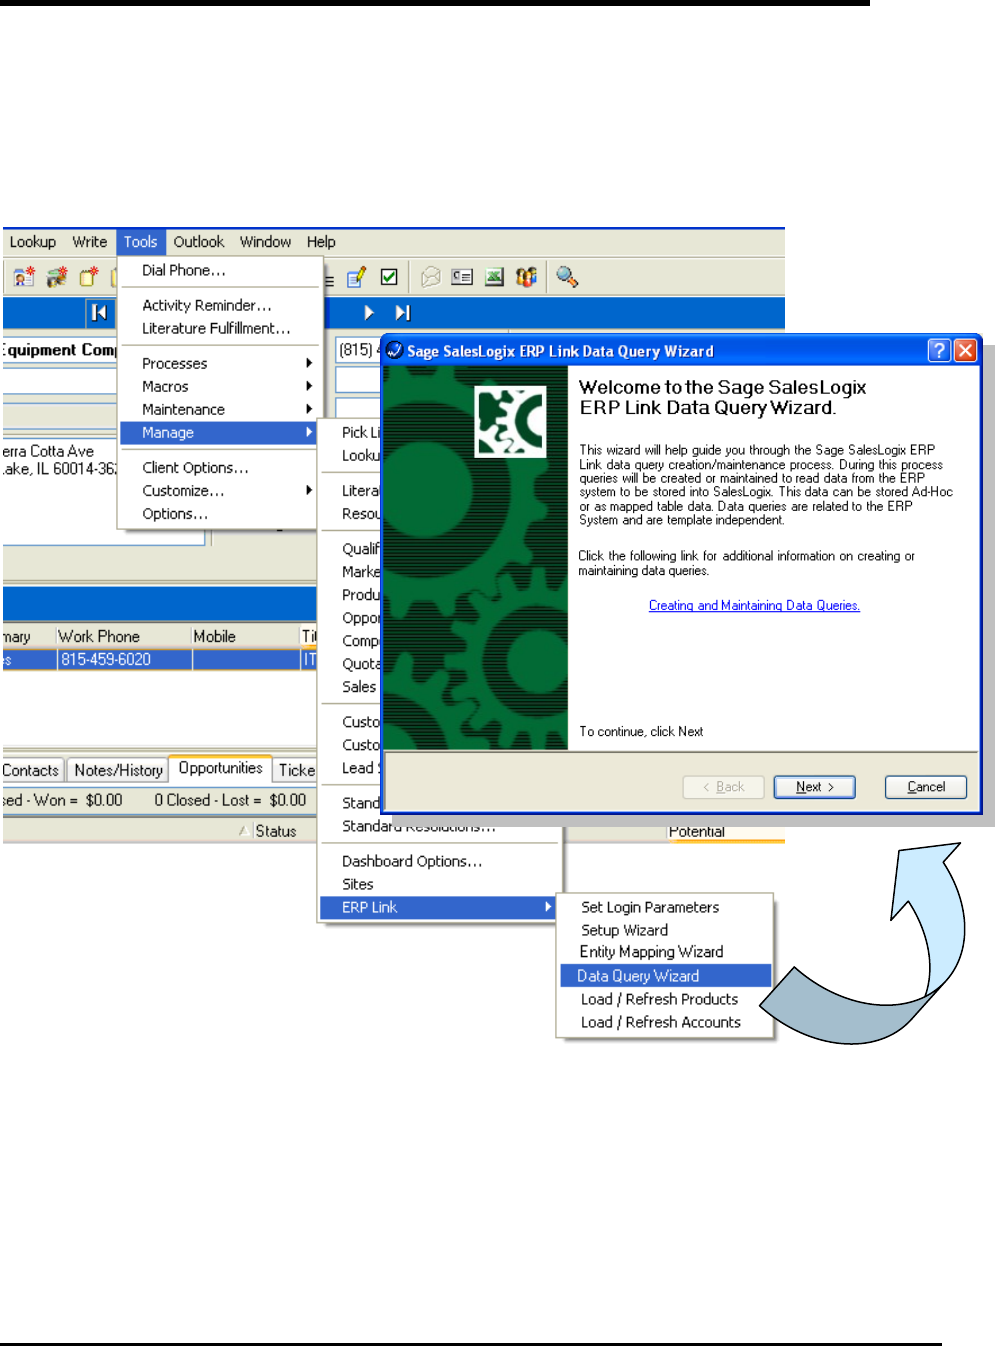
ERP Data Query Wizard
A data query is the definition of how Sage SalesLogix requests information from the ERP
system. Data Queries are specific to the ERP system but are template independent. You can
store this data in an ad-hoc fashion (for a “view” of data) or as mapped table data (relational
fields/tables in the Sage SalesLogix database).
From Sage SalesLogix, select the menu Tools > Manage > ERP Link > Data Query Wizard to
configure how data is requested from the ERP system.
The Data Query Wizard allows the user to create and maintain data queries that will read
information from the ERP system, and then populate that data into SalesLogix.
Page 27 of 45
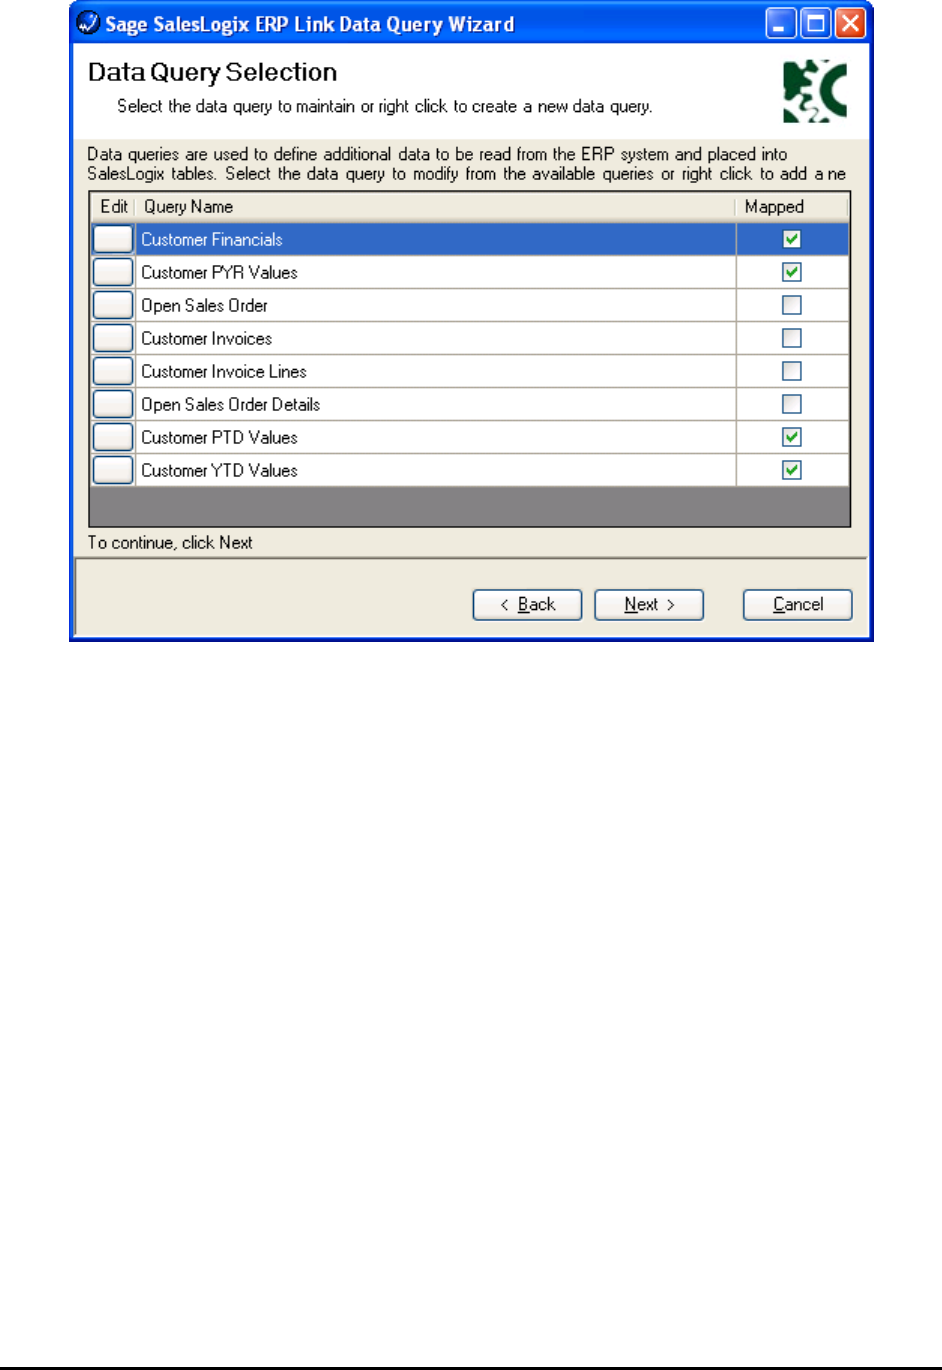
Data queries may be added, edited, or deleted, from the right click menu, or edited from the Edit
button in the display grid.
Page 28 of 45

Page 29 of 45
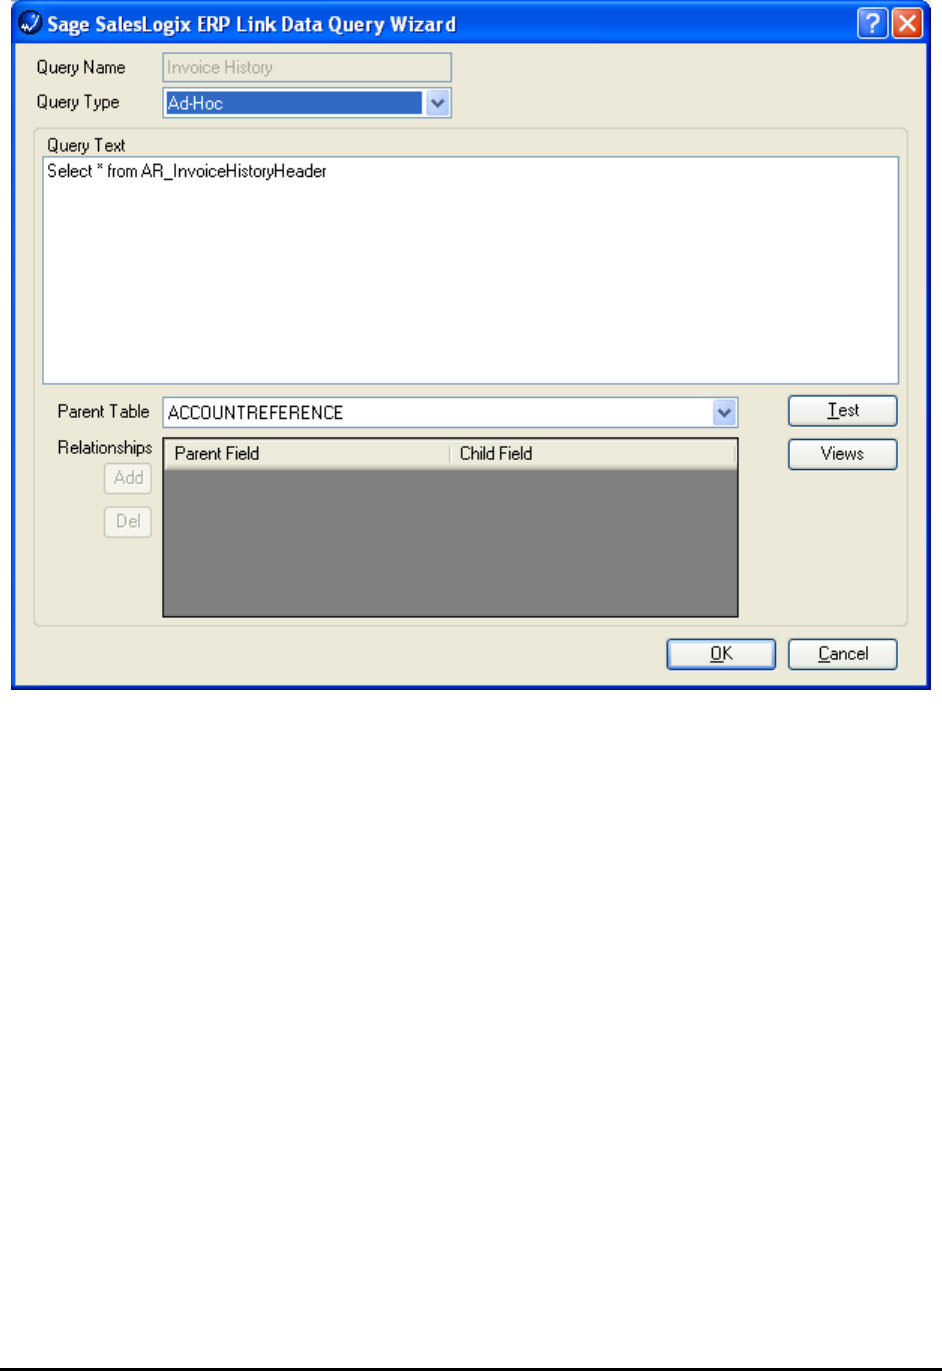
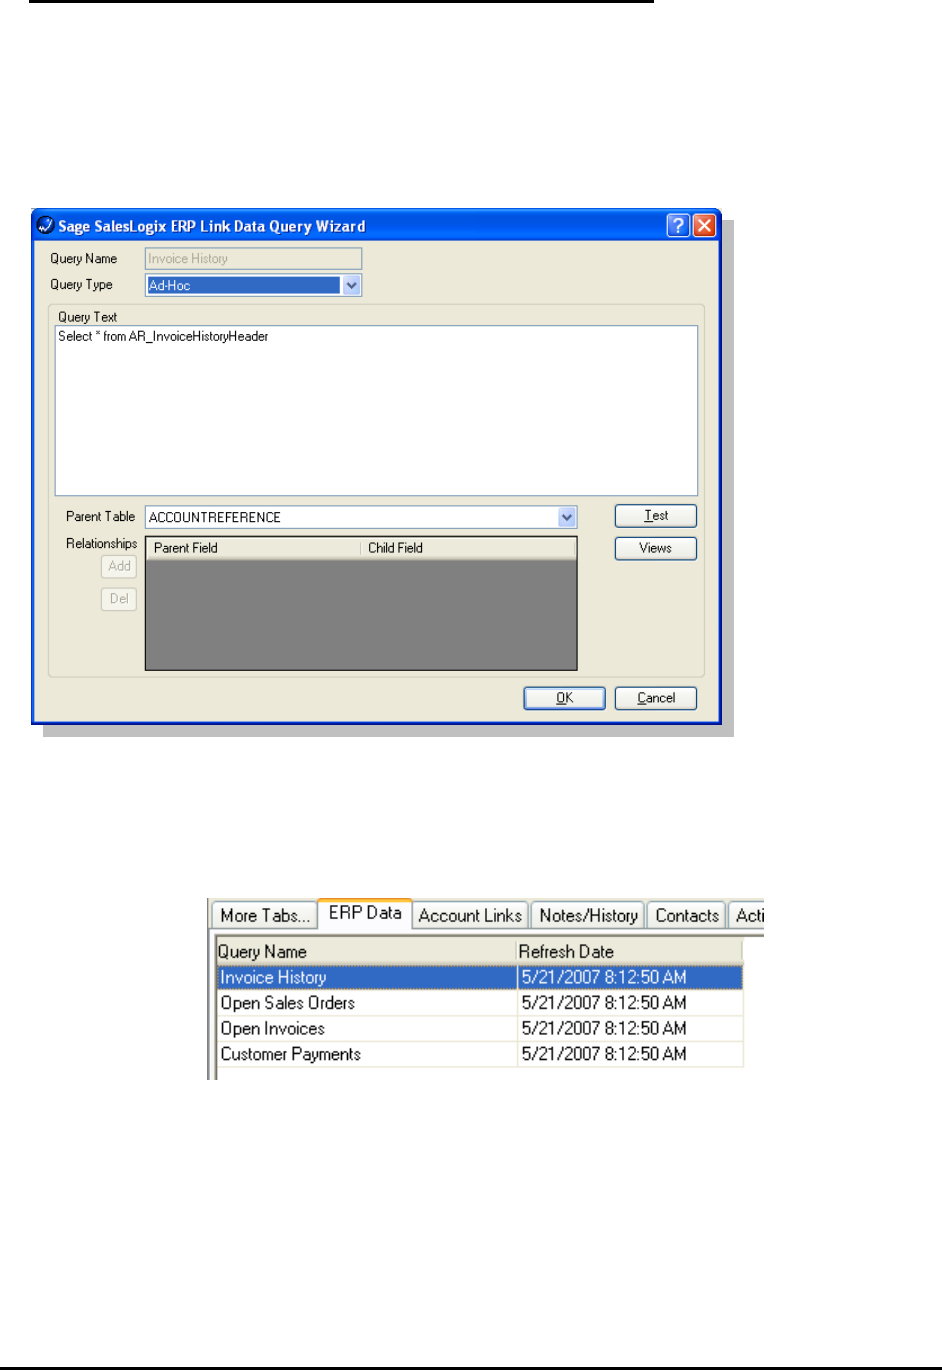
When adding a new data query the following options are available.
Query Name – Identifies the query and will be displayed in the ERP Data view inside the
SalesLogix Client.
Query Type – The data query must be a Mapped or Ad Hoc data query
Mapped data queries require the data to be mapped to a physical table in SalesLogix.
Ad Hoc data queries collect and store the information in an XML format in SalesLogix.
Data Table – This option is only available for mapped queries, and defines the table the data will
be
mapped to.
Enable Record Parsing – The option is only available for mapped queries, and defines that
records created
In the mapped table will be removed when they are removed from the ERP System.
Query Text – Used to define the text of the query to execute.
Parent Table – Defines the parent table the data is related to. The items available depend upon
the type of
Page 30 of 45
query selected.
For mapped queries only ACCOUNTREFERENCE and blank are available.
The Parent Table for Ad Hoc queries may be ACCOUNTREFERENCE or any of the
previously defined data queries. When the parent table is a previously defined data
query the results of the current query will be displayed as a child table in the data viewer.
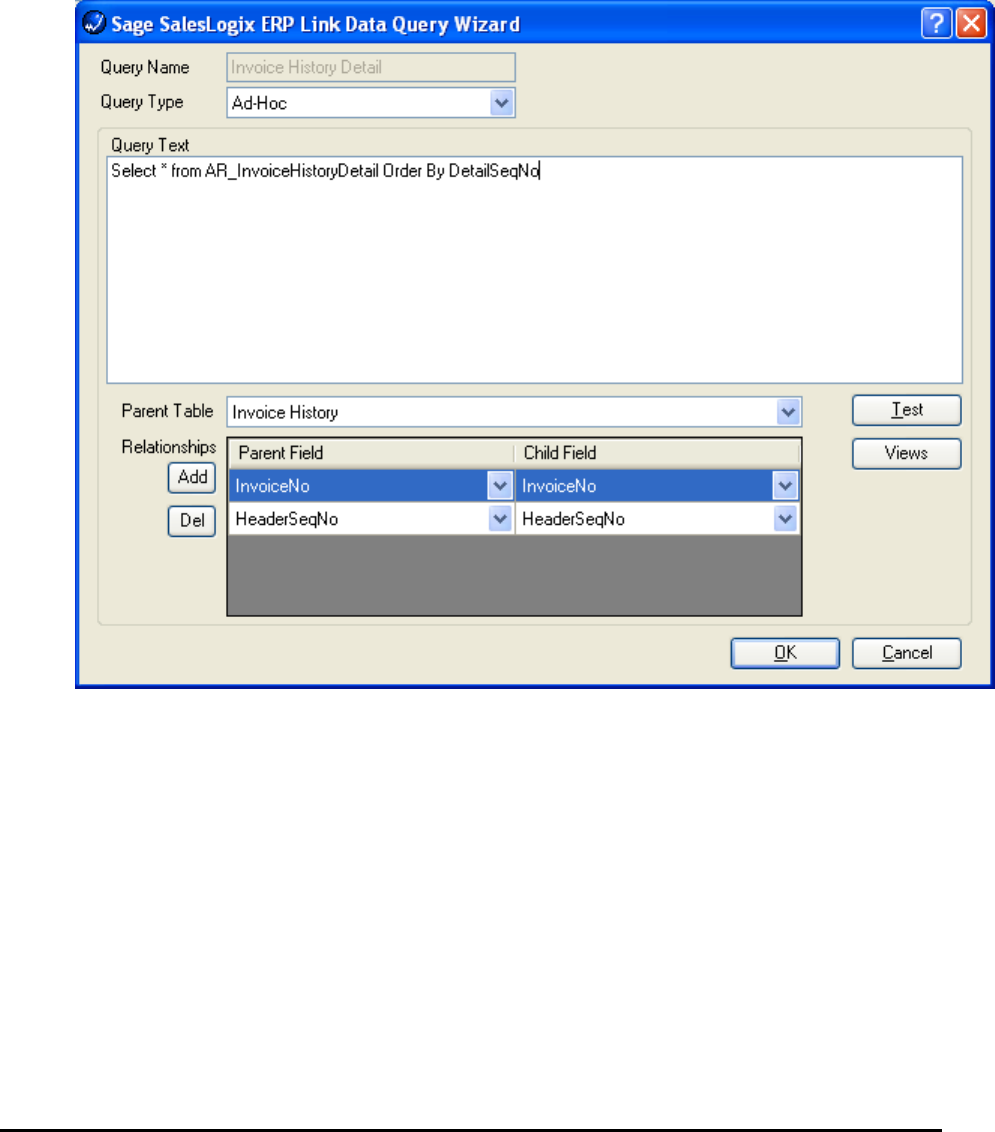
If the parent table selected is another data query the parent/child relationship must be
created. The parent child relations define how the parent table is related to the current
query.
Relationships – This grid defines the parent and child fields that create the relationship between
the Parent
Table and the current query. The Add button allows the user to add a new row to the
grid, and the
Del button deletes the currently selected row from the grid.
Test – Allows the user to test the query.
Views – Allows the user to add ERP System views to the selected query data. ERP System
views are
described in the next section.
Page 31 of 45
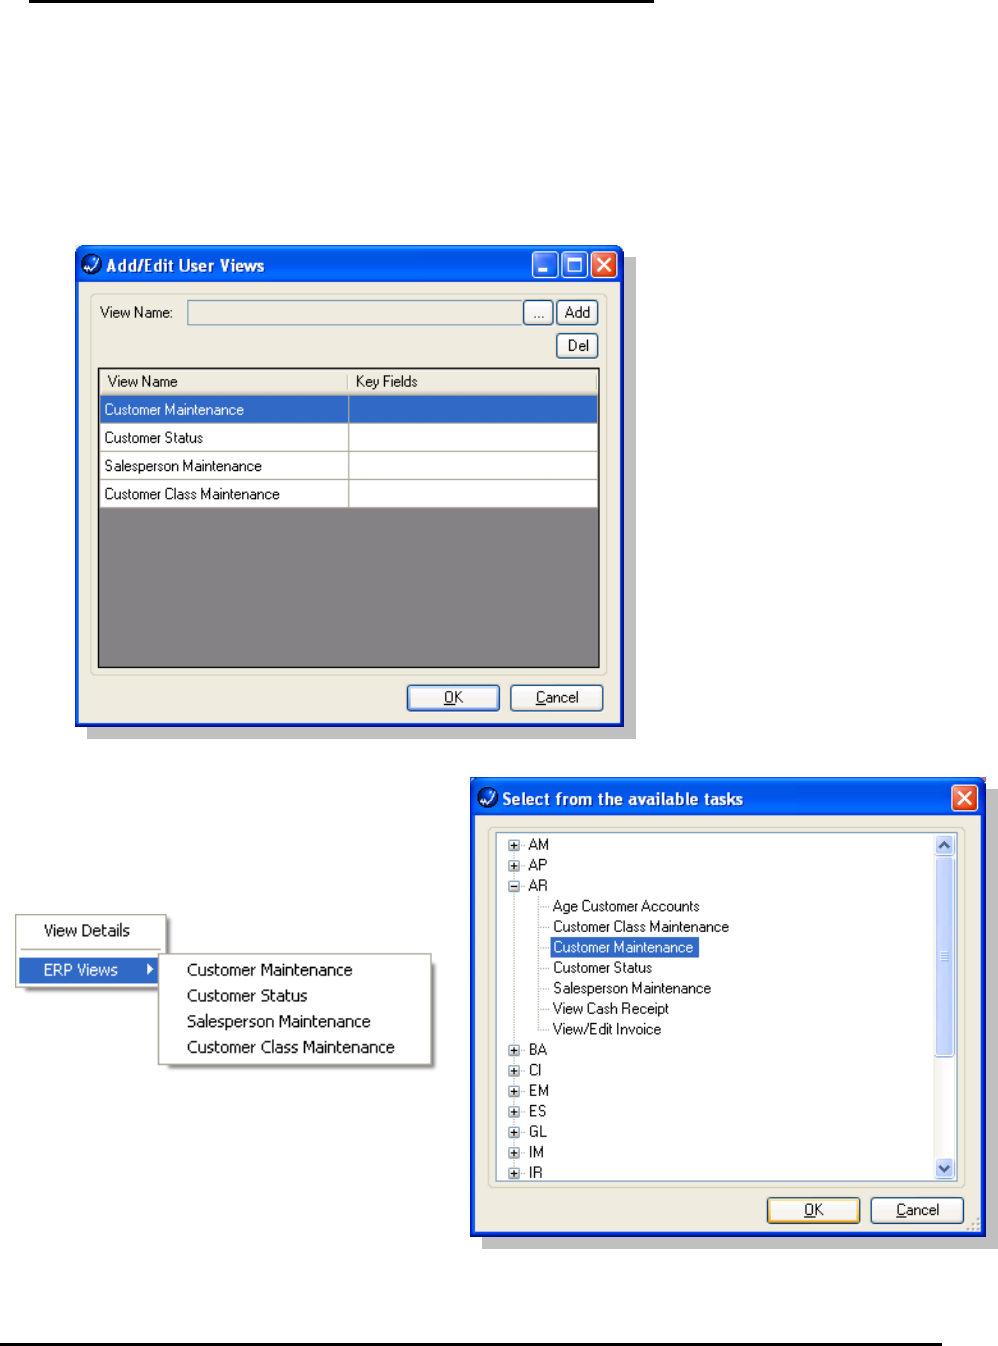
ERP System Views
ERP System Views allow the user to launch into ERP system application and, if available,
select the related record automatically. ERP System Views may be added to any query,
Mapped or Ad Hoc, but only Ad Hoc views will automatically display the options. Additional
Mapped queries require a view to display the data and will also need the code to display and
launch the ERP System Views added to them.
To add a new ERP System View to a data query click the ellipse “…” button beside the View
Name field.
The available ERP system views are
displayed in a tree view window, grouped by
module code. Select from the available view
to add. After the view has been selected, click
OK to add the view to the available list.
Page 32 of 45
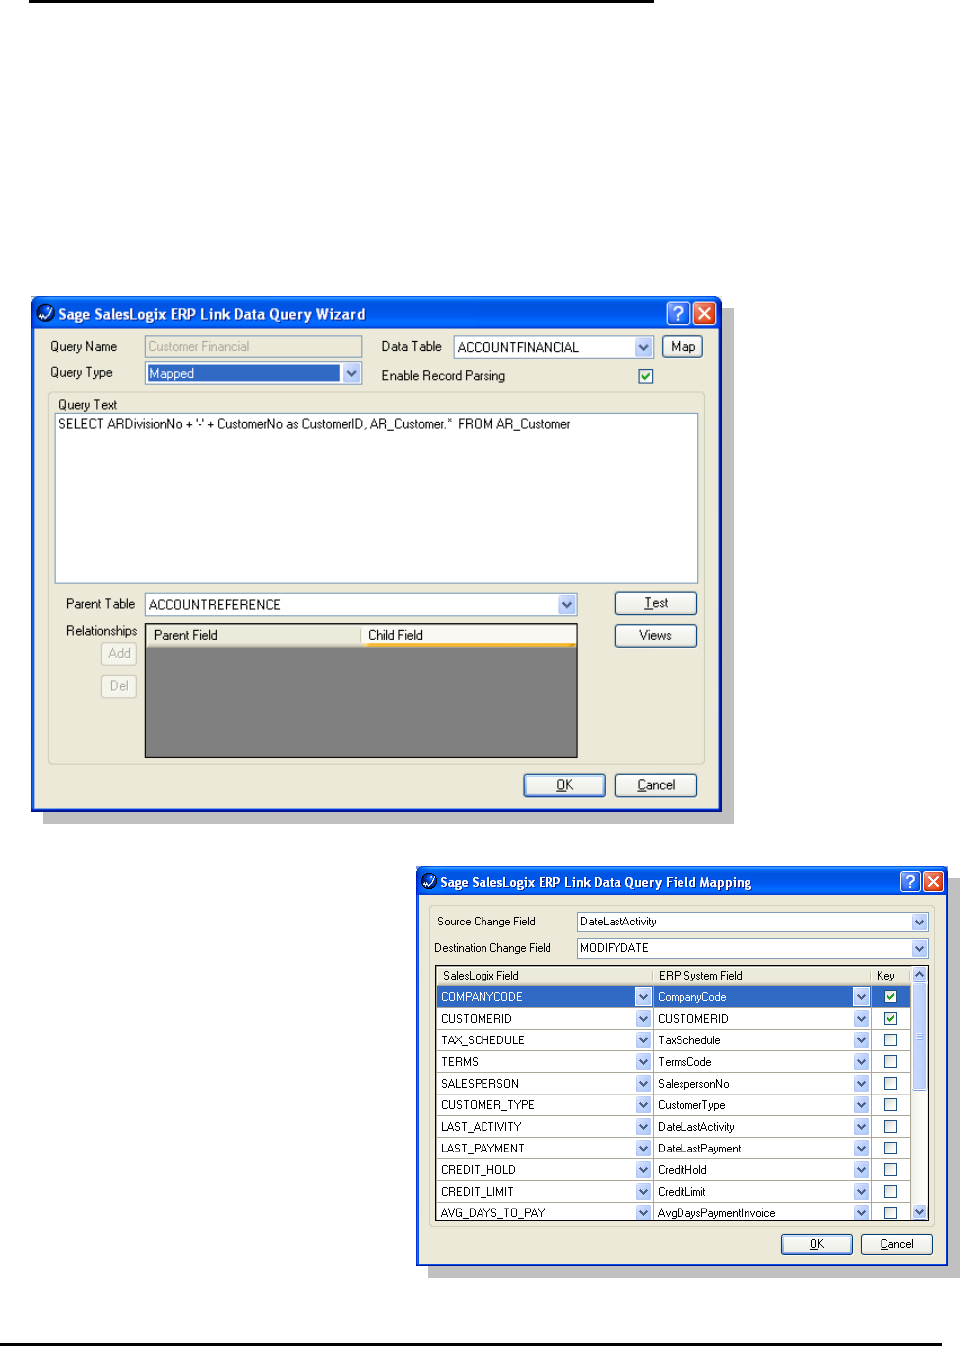
Mapped Queries
Mapped queries are used to import data from the ERP system into Sage SalesLogix tables.
Mapped queries can be related or unrelated queries, to the Sage SalesLogix Account.
Related queries are used to define data that is related to the Account through the Account
Reference.
Unrelated queries are used to import general data from the ERP System into Sage
SalesLogix that is not related to the Account, i.e. defined available payment terms. The data
table must be selected from the list of available tables. After the data query and the data
table have been selected the Map button can then be used to define the field mappings of
the data from the data query.
The field mapping grid allows the
user to define the field mapping of
the data selected from the query. The
user can also define the key fields
which will be used to locate existing
records for updating. The Source
Change Field and Destination
Change Field are used to define
fields from SalesLogix and the ERP
System to check for change from the
previous execution. If the value of
both fields has not changed, the data
mapping will not take place, which
can increase data query
performance.
Page 33 of 45
Ad Hoc Queries
Ad Hoc queries allow the user to define fast, simple queries that may also have a
parent/child relationship with other queries. The resulting data from Ad Hoc queries is stored
in the SalesLogix database, but in an XML format. This prevents the data from being used to
create SalesLogix groups, or other SalesLogix functions that require the data to reside in
individual fields. The data from Ad Hoc queries is viewed view the Query Data Viewer
described in the next section.
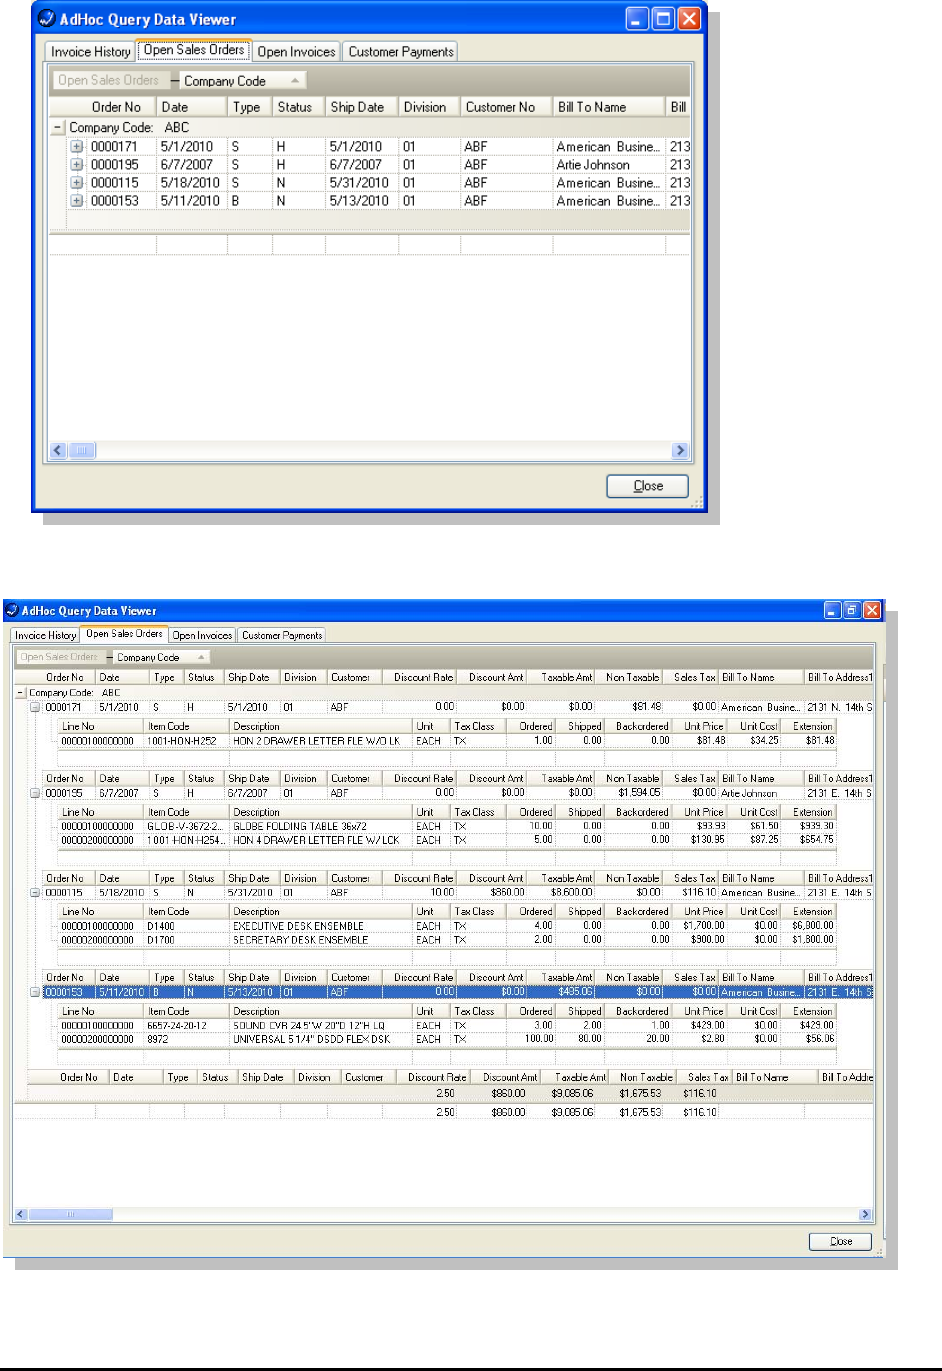
Ad Hoc Query Data Viewer
The results of the Ad Hoc queries are stored in the SalesLogix database in an XML format,
and the Ad Hoc queries with the Account Reference parent are displayed in the ERP Data
tab.
To view the data stored by these queries the user can double click on any one of the items
listed and the Ad Hoc Query Data Viewer will open.
The Ad Hoc Query Data Viewer displays all of the available XML data for the selected
account. The root queries are displayed on individual tabs in the viewer. Parent/Child data is
displayed in the Query Data Viewer in a hierarchical view.
Page 34 of 45
The data displayed in the Query Data Viewer can be grouped, sorted, and filtered by the user.
Page 35 of 45

Right clicking on a record displays a popup menu from which the user can select several
different options.:
• Available Fields – Displays a popup window containing a
list of available fields which can be added to the selected
grid row.
• Format “Field Name” – Displayed only when a current
grid field is selected. Allows the user to format the
current column.
• Hide “Field Name” – Displayed only when a current grid
field is selected. Allows the user to hide the selected
column.
• Show/Hide Filter Row – Allows the user to show or hide
the filter row.
• Calculations – Allows the user to select Sum, Average,
Count, Min., Max., STD Deviation, Value Count, and
None. Calculations are shown in the Group Totals, or Totals row.
• Layout – Allows the user to select List View or Card View, along with Load, Save and
Reset Layout, and Table Captions.
• List View is the default grid view, which lists the records.
• Card View displays each record on a card in the grid.
• Load Layout allows the user to load an existing grid layout from file.
• Save Layout allows the user to save the current grid layout to file.
• Reset Layout will reset the grid layout to the table schema of the displayed data.
• Table Captions allows the user to set the table name to be displayed in the group
window.
• Totals – Allows the user to turn Group, and Grand total row on or off.
• Printer Setup – Allows the user to select the printer to be used when the grid data is
printed.
• Page Setup – Allows the user to select page properties options to be used when the
grid data is printed.
o
Page 36 of 45

o Fit Columns Mode – Determines how the columns should be sized to fit in a
page.
No Fit - Specifies that columns should be printed as they are seen in
the screen.
Zooming - Specifies that the print document will be scaled to fit all the
columns in one page.
Sizing Columns - Specifies that columns should be resized to fit all the
columns in one page.
o Card Columns Per Page - Specifies the number of card columns to print in a
page.
o Repeat Column Headers - Determines whether column headers should be
printed on any page or only in the first page.
o Page Size – Specifies the page size to be used when printing or previewing.
Available items are dependent on available page sizes of the current selected
printer.
o Page Orientation – Used to specify Portrait or Landscape printing.
o Print Collapsed Rows - Determines whether collapsed rows should be
printed.
o Print Hierarchical - Determines whether the grid should print its hierarchical
structure or as a single table.
o Page Margins – Specifies the margin spaces of the printed page.
• Print – Prints the selected grid contents to the selected printer.
• Preview – Previews the selected grid contents.
• ERP Views – Displays a sub menu of ERP System views the user may launch into,
depending on ERP System security.
Page 37 of 45
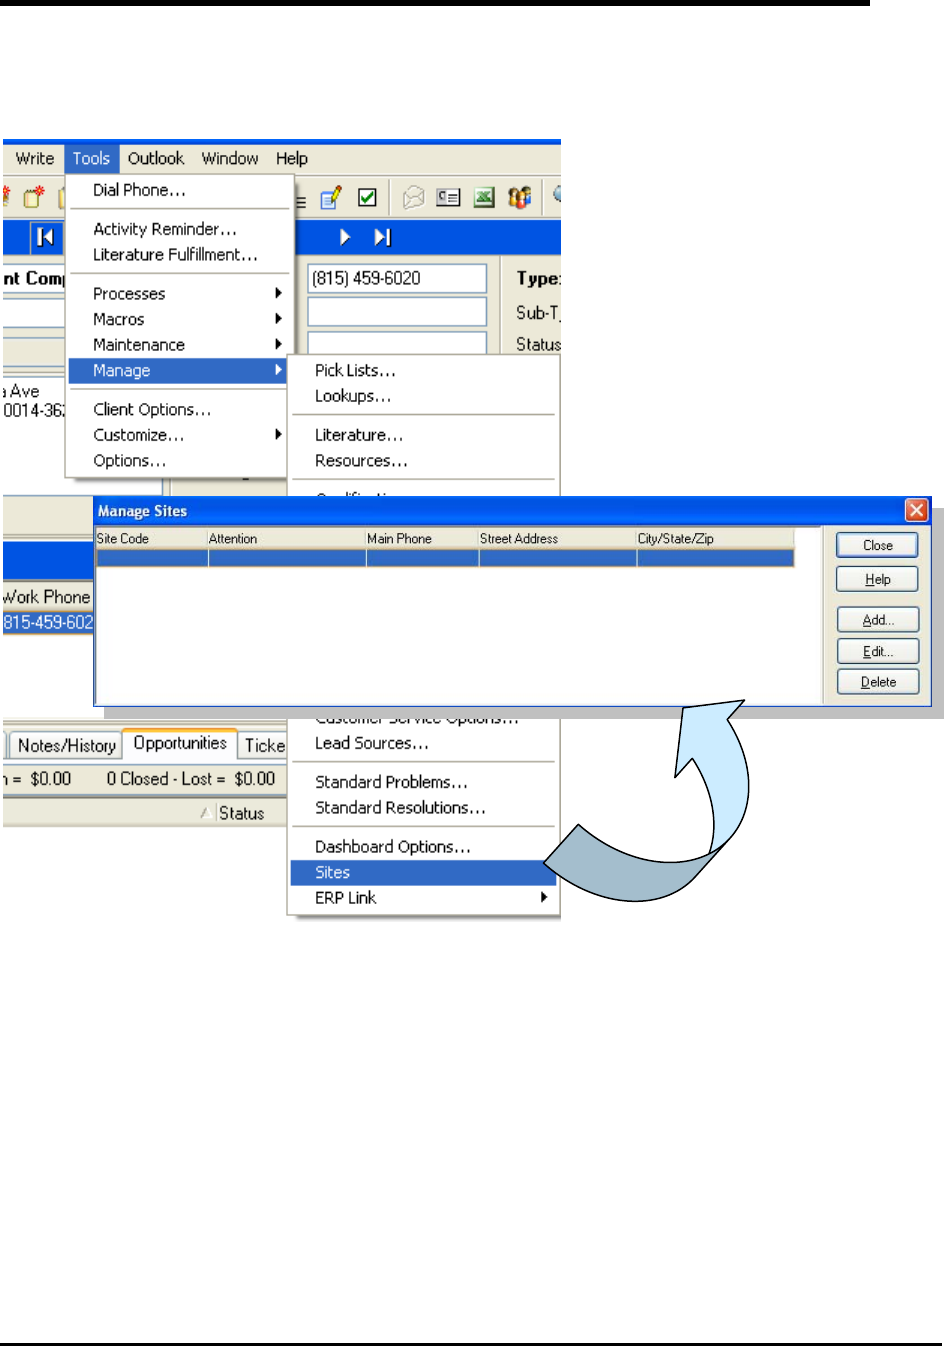
Sites / Warehouses
You may define Sites within Sage SalesLogix for product inventory. Sites can be created to link
to the ERP Warehouses for stock status. Choose Tools > Manage > Sites from the Sage
SalesLogix menu.
Page 38 of 45

Once the Site is created in Sage SalesLogix, it may be associated to a Warehouse in the ERP
system.
Page 39 of 45
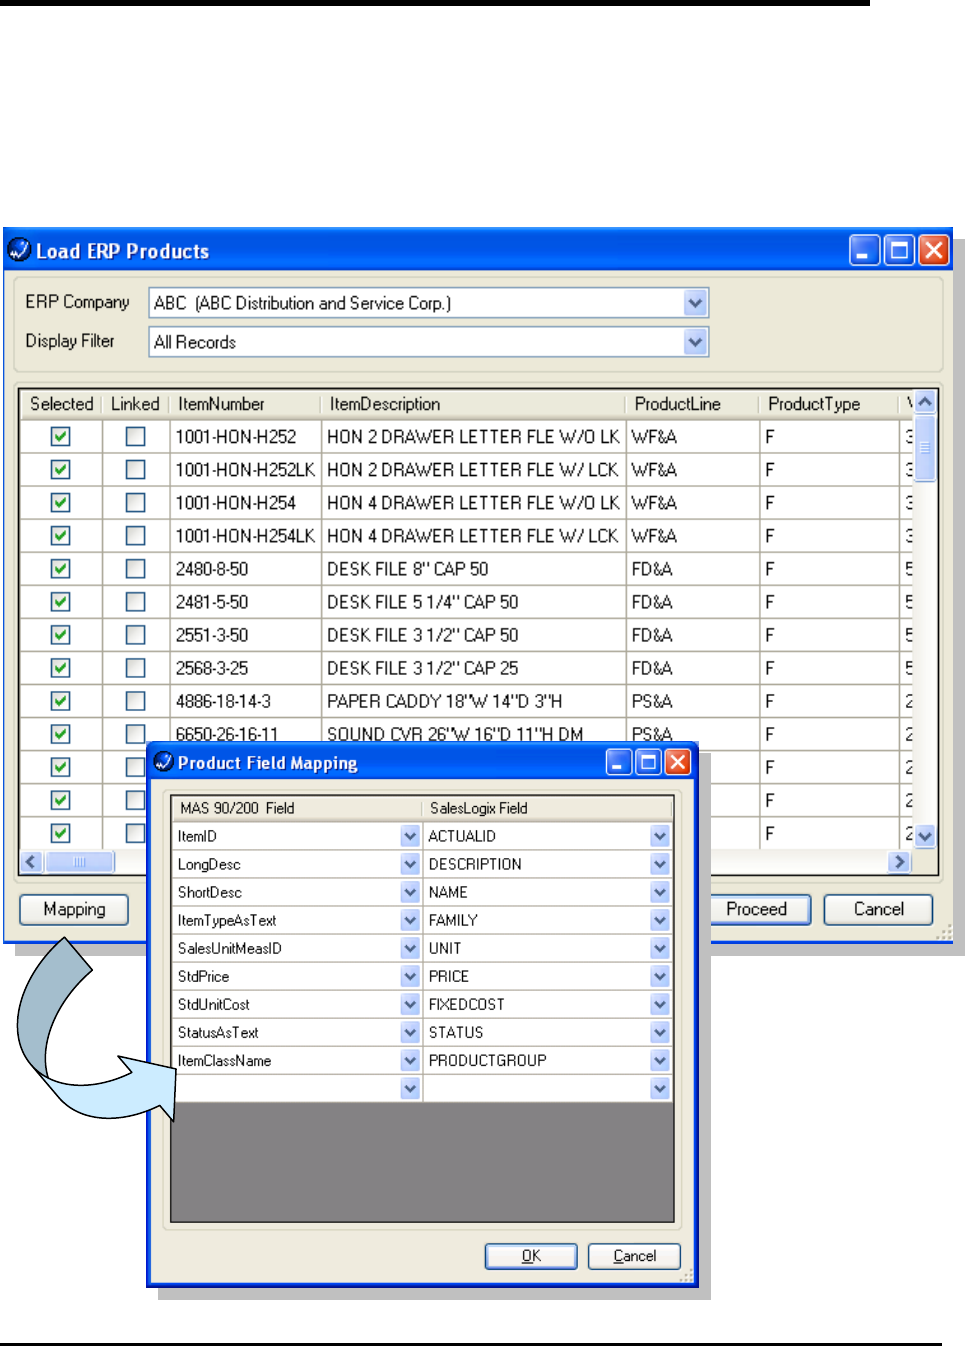
Products / Items
You may link ERP items to Sage SalesLogix Products to allow for accurate quotes and orders.
Choose Tools > Manage > ERP Link > Load / Refresh Products from the Sage SalesLogix
menu to define this process.
Select the Products to link. If more than one back office company is configured, they will appear
in the ERP Company drop down list. You may also change how the product fields are mapped
from this screen.
Page 40 of 45

Features and Comparison to Sage DynaLink
NEW ERP Contract
• Pulls posting amounts, notes and tickets over from MAS
o Can select a different charge code from MAS 500
o Posting in SLX means that it is pending in MAS until completed in MAS
Improved User Experience
• On Demand, per record linking and synchronization of records
• Phoenix introduces more seamless integration functionality e.g.
• When a user selects a product to add to an opportunity in SLX the unit price for the
quantity selected is calculated in real time by the ERP system and seamlessly populated
into SLX. The user sees the back office price for that product without needing to engage
a ERP sync.
• ERP Data presented in a more user friendly drill-able data grid in Sage SalesLogix
• ERP has a simple button that pushes a CRM account into ERP in one easy step - not
dependent upon a sales order
Look-ups
• Can be done by class values – pre-set templates for:
o Contact
o Address
o Sales Order
o Customer
o Invoice
• No typing in value, can choose from drop-down menu
• Can assign specific users for the templates
Sites (Warehouse)
• Sites returned to Sage SalesLogix to manage stock quantities for individual products at
individual warehouses
Synchronization
• Improved Data Synchronization performance
• With the ERP integration, now can do batching and users can force a sync (on demand).
Can also be scheduled as well as an immediate refresh
• DynaLink synchronized only in batch mode, and a CRM user couldn’t force (push) out a
sync
Architecture Improvements
• No longer need a separate server
Page 41 of 45

• Entirely Customizable via SalesLogix and .Net Extensions
• Improved Installation experience (SLX Bundle) instead of separate install routine
Staging Tables
• Specify SLX field that matches (maps) with MAS 500 field
o Select conditions and values
o Map data to primary (parent), but cannot map data to child
*Parent/child feature, nor drill down capability to any level does not exist
in Dynalink*
o Preview mapping detail profile to view conditions / function
o Mapping fields are set as:
SLX Field MAS 500 Field
Account Customer
Contacts Contacts
Addresses Addresses
Orders Quotes
Invoices Invoices
Sites Warehouses
o Customized SLX fields / MAS fields are available
o Have 4 – 6 user open fields to help map one customized field to another
Queries
• Can placed view into data query to see query executed and data returned
• Map query
o SLX field goes out to MAS 500 to gather data and then maps back to SLX
• Ad hoc query
o XML data placed into specific fields in database
o *Ad hoc query does not exist in Dynalink*
Load ERP Products
• Choose ERP component
• Display filter with all records
• Loads all MAS 500 pieces into SLX (in real-time)
o Green = OK
o Red = Problem with record (i.e. Map field too long to fit into destination)
• Show status values for each item: backorder, shipped, etc.
• Click on specific item and retrieve details
Page 42 of 45

Accounts
• Query back-office system for full listing => populates listing from MAS 500
o Will designate if duplicate accounts exist in SLX
o Auto Link test for same / similar values in ERP also in CRM (like a de-dupe)
o Tighter validation
• Difference results number represents how far off the similar accounts are from each
other (like a Google results search)
o Can set decreasingly less stringent matches
• Dynalink did not have the efficiency of this capability except to manually sort through and
review records
• ERP data tab at bottom of Account Record illustrates the ad hoc query details that come
over
o Can double click ad hoc listing and see details of sales records / invoice records
o Can drag and drop fields around
o Can create groups and subgroups
o Preview data will show parent record with associated children
• Click on sales order in SLX and it will launch MAS 500 to show details of the sales order
record
• In Dynalink, the user did not have the ability to specify views
• Account Details maps over directly
o Right click into customer maintenance because “sitting” within MAS 500
Opportunity Product
• While adding opportunity products, will pull ERP item pricing, including specials
Not Available
• Vendor linking is not available in this release of Phoenix out of box (available through
customization)
Page 43 of 45

Frequently Asked Questions
Is Sage MAS 500 Visual Integrator required?
No. This integration does not require the use of MAS Visual Integrator as previous integrations
required.
How do I install?
Installed as a Bundle in Sage SalesLogix. No separate “server” to install or maintain.
What is the price and licensing restrictions?
The integration is free for Sage MAS ERP customers who are current on maintenance and
support.
How does this integration work with Sage SalesLogix v7.2 Web Client?
Any of the SalesLogix entities edited through the Web Client that are mapped using the
synchronization and scheduled to run (Accounts, Products, Contact) will work the same as the
Windows Client with the exception that you the Windows Client allows you to induce a sync run
for the individual record without scheduling, the Web Client doesn't have this UI out of the box.
All of the integration with custom forms - i.e. ERP views, and any out of box views that are
modified to consume ERP data (like the Opp_Product pricing) will only work in the Windows
Client out of the box (there is no equivalent Web Client UI delivered as part of this current
integration.
The current Web Client cannot create a Sales Order and that functionality is not available with
this integration out-of-box. It is possible to customize the Web Client to accomplish nearly all of
the functionality available in this integration. The only functional items that may be difficult to
replicate is the direct integration to the ERP application including the adhoc query.
We do plan to extend this integration to the Web Client in the future.
Page 44 of 45
56 Technology Drive
Irvine, CA 92618-2301
800-854-3415
www.sagemas.com
The information contained in this document represents the current view of Sage Software, Inc. on the issues discussed as of the
date this document was prepared. Sage Software cannot guarantee the accuracy of any information presented after the date of
publication. The capabilities, system requirements and/or compatibility with third-party products described herein are subject to
change without notice. Contact Sage Software for the most current information. Always consult a network specialist to discuss the
security risks involved before implementing any Internet solution. Sage Software is not responsible for the content or maintenance of
third-party Web sites referred to herein. This document is for informational purposes only and may not be distributed to third parties.
Sage SOFTWARE MAKES NO WARRANTIES, EXPRESSED OR IMPLIED, IN THIS DOCUMENT.
© 2007 Sage Software, Inc. All rights reserved. Reproduction in whole or in part without permission is prohibited. Sage Software and
the Sage Software product and service names mentioned herein are registered trademarks or trademarks of Sage Software, Inc.
and/or its affiliated entities. All other trademarks are the property of their respective owners.
Page 45 of 45
