Sakar Internation CAM760V2 MID User Manual
Sakar Internation Inc. MID Users Manual
Users Manual
AndroidFamilyTablet
UserManual

1
CONTENT
1.FEATURES.....................................................................................................3
1.1AboutYourCamelio2™Tablet.........................................................................................................3
1.2What’sIncluded...............................................................................................................................3
2.GETTINGSTARTED........................................................................................4
2.1GettingtoKnowYourCamelio2Tablet............................................................................................4
2.2ChargingYourTablet........................................................................................................................5
2.3PoweringOnYourTablet.................................................................................................................5
2.4LockingandUnlockingYourTablet..................................................................................................5
3.INITIALSETUP..............................................................................................8
3.1ChoosingaLanguage........................................................................................................................8
3.2SelectingWi‐Fi..................................................................................................................................8
3.3GoogleAccountSetUp....................................................................................................................9
3.4LicenseAgreement.........................................................................................................................13
3.5Tutorial...........................................................................................................................................14
3.6ParentalControlSetUp.................................................................................................................14
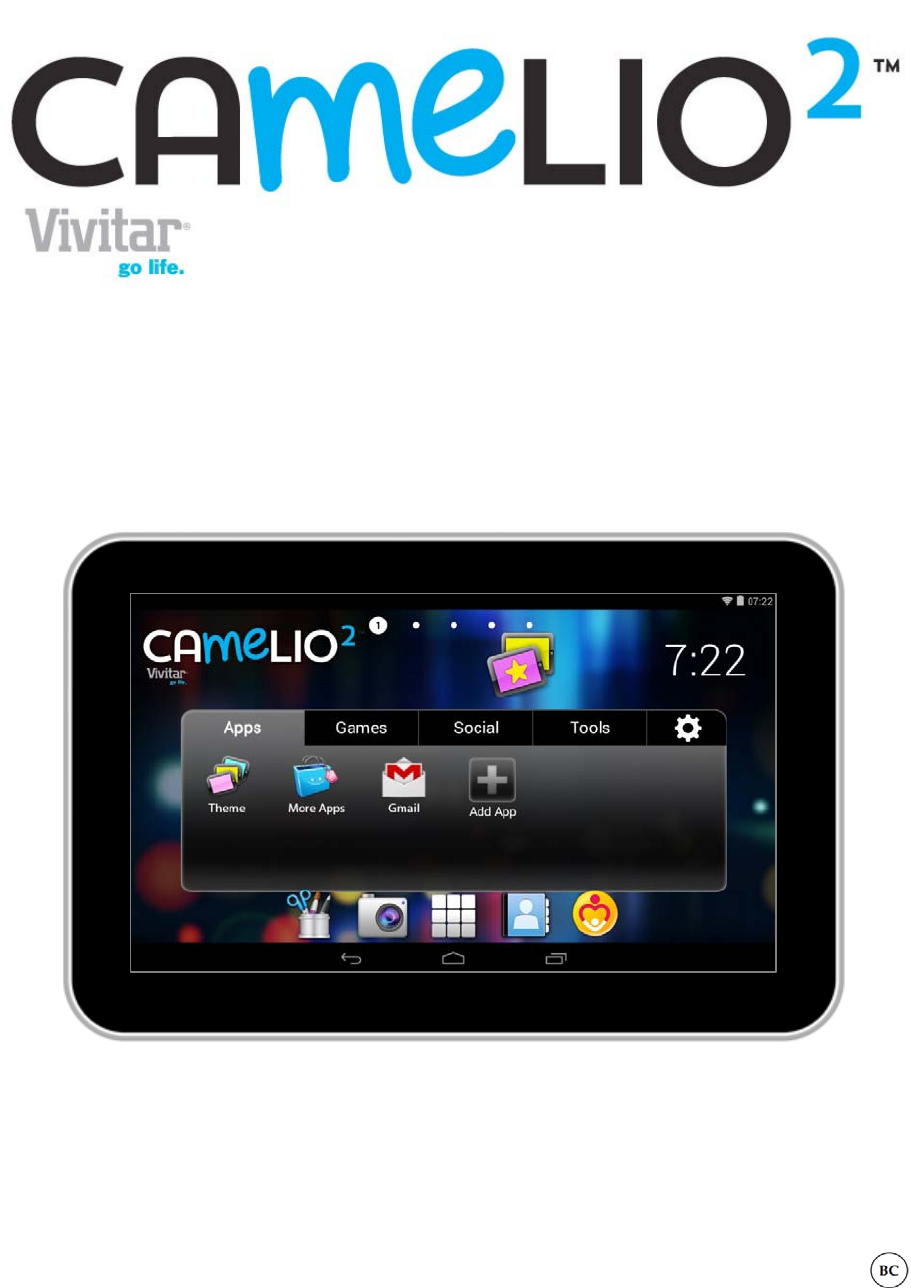
4.HOMESCREEN............................................................................................15
4.1PortraitandLandscapeOrientation...............................................................................................15
4.2HomeScreenInterface..................................................................................................................16
4.3HomeScreenFeatures...................................................................................................................17
5.OVERTHEAIRUPDATES(OTA)....................................................................20
6.TABBEDAPPSMANAGER............................................................................21
6.1AddAppShortcutUsingtheTabbedAppsManager.....................................................................21
6.2Add/RemoveAppShortcutUsingtheAppSettings.......................................................................23
6.3MoreApps......................................................................................................................................26
7.PARENTALCONTROL...................................................................................27
7.1Overview........................................................................................................................................27
7.2WelcometoParentalControl........................................................................................................27
7.3ParentalControlSetup:.................................................................................................................28
2
8.THEMEMANAGER......................................................................................36
8.1Overview........................................................................................................................................36
8.2UsingtheThemeManager.............................................................................................................37
9.ADDUSERS.................................................................................................42
9.1Overview........................................................................................................................................42
9.2AddingaNewUser.........................................................................................................................43
9.3AddingAdditionalUsers.................................................................................................................45
9.4MultipleUsers................................................................................................................................47
10.TOOLBARSHORTCUTS...........................................................................48
10.1Camera...........................................................................................................................................49
10.2PhotoEditor...................................................................................................................................53
10.3Apps................................................................................................................................................56
10.4Contacts.........................................................................................................................................58
10.5ParentalControl.............................................................................................................................67
11.TABLETSPECIFICATIONS.........................................................................68
12.VIVITARONEYEARWARRANTY..............................................................69
13.FAQ.......................................................................................................72

3
1. FEATURES
ThankyouforpurchasingtheCamelio2™AndroidFamilyTabletbyVivitar®!
1.1 AboutYourCamelio2™Tablet
TheVivitar®Camelio2™AndroidFamilyTabletisauniqueAndroidtabletthat
allowsyoutocustomizeandpersonalizeyourtabletwithyourfavoritecharacters!
Upto5users(andanadditionalparentuser)caneasilycreatetheirownprofile
andcustomizetheiraccountwithCamelio“ThemePacks”,soldseparatelyinthe
CamelioCustomizerKit.TheThemeManagerallowsyoutoaddThemePacksand
includescustomizedwallpaper,widgets,cameraandphotoeditor.The
Camelio2™AndroidFamilyTabletisequippedwithallofthefeaturesparents
havecometoexpectfromafamilytablet:builtinWi‐Fi,Bluetooth,frontandrear
cameras,video,touchscreenandparentalcontrols.
TheCamelio2™AndroidFamilyTabletistheultimateincustomizedfunctionality
andfunfortheentirefamily!
1.2 What’sIncluded
• LatestAndroidOperatingSystem
• ThemeManagerletsyoupersonalizeyourTabletwithyourfavorite
charactersaddingasmanyasyouwantandchangingasoftenasyouwant
• Supports5users‐eachwiththeirownthemeandapplicationpreferences
• SeparateParentalControlsforeachtheme
• Built‐inBluetooth
• HighResolution(1024x600)7Inchdisplay
• Front&RearCameras
• BuiltInGooglePlayStoreletsyoudownloadhundredsofthousandsoffree
appsandappsavailableforpurchase
• ExtraLongLifeBattery
4
2. GETTINGSTARTED
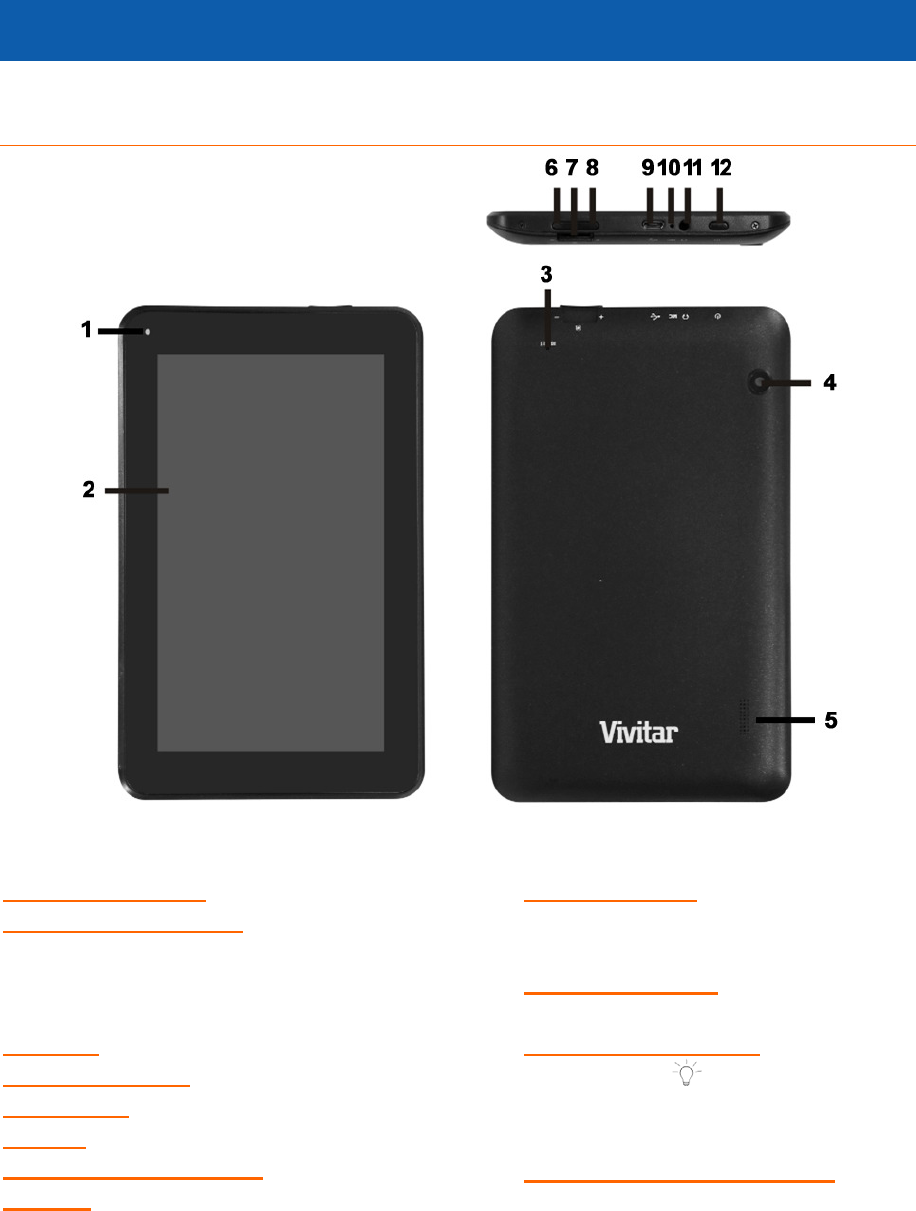
2.1 GettingtoKnowYourCamelio2Tablet
FRONTBACK
1.FRONTCAMERA:Front‐facingcamera.
2.TOUCHLCDSCREEN:Displayscreenthatis
alsoaninputdevicetothetablet.The
orientationofthedisplayscreenrotateswith
thetabletasyouturnit.
3.RESET:Resetsthetablet.
4.BACKCAMERA:Rear‐facingcamera.
5.SPEAKER:Exportssounds.
6.VOL‐:Decreasesthevolume.
7.MICROSDCARDPORT
8.VOL+:Increasesthevolume.
9.USB/CHARGE: UsingtheUSBcable,your
tabletcanbeconnectedtothecomputer
andrecharged.
10.MICROPHONE:Usedforaudiochatting
andsoundrecording.
11.HEADPHONEJACK:Audiooutputjack
forearphone.NOTE:Speakeroutputis
automaticallydisabledwhenheadphoneis
connectedtothetablet.
12.POWERON/OFFBUTTON:Pressto
turnthetableton,ortoturnthescreenon
andoff(standby).Pressandholdtoaccess
thepoweroffmenu.

5
2.2 ChargingYourTablet
Youneedtochargethetabletforatleast3hours;however,wesuggestthatyou
chargethetabletovernightbeforeyouuseitforthefirsttime.
TheCamelio2TabletissuppliedwithaUSBcableandACCharger.Tochargeyour
tablet,connecttheUSBcabletoyourTabletononeendandconnecttheother
endoftheUSBcabletoeitheryourcomputerUSBPortortotheACCharger
(whichisthenconnectedtoanelectricoutlet).
2.3 PoweringOnYourTablet
Onceyourtabletisfullycharged,pressandholdthePowerbuttonfor2seconds
toturnonyourTablet.
NOTE:
‐ InordertopoweroffourTablet,pressandholdthePowerbuttonfor2
seconds.Awindowappearswithmodeoptions.TouchPoweroff,and
thentouchOKtoconfirm.
‐ WhenyourTabletisinSleepMode,simplypressthePowerbuttontore‐
activateyourTablet.
2.4 LockingandUnlockingYourTablet
2.4.1 LockingYourTablet
AfteryourTablethasbeenpoweredon,tolockyourTabletquickpress
thePowerbutton.
2.4.2 AutomaticLock/SleepMode
YourtabletincludesanAutomaticLock.Afterthetablethasbeen
inactiveforaperiodoftimeitwillgointoSleepMode.Thissaves
batterypowerandrequiresashorteractivationtime.Thisalso
automaticallylocksyourTabletandtheTabletLockscreenappears.In
ordertouseyourtabletyouwillneedtounlockit.
6
NOTE:ThelengthoftimeyourTabletremainsinactivebefore
goingintoSleepModecanbemodified.Tochangethelengthof
time:
• EntertheAndroidSettingsbytouchingtheSettingsicon
fromtheAndroid‘Apps’screen.
• TouchDisplaytoopentheTabletDisplayfeatures.
• TouchtheSleepfeaturetoopenthe‘Sleep’window.
Thisdisplaysthelistoftimeoptions.
• SelectalengthoftimeyouwouldlikeyourTablettobeinactive
priortogoingintoSleepMode.
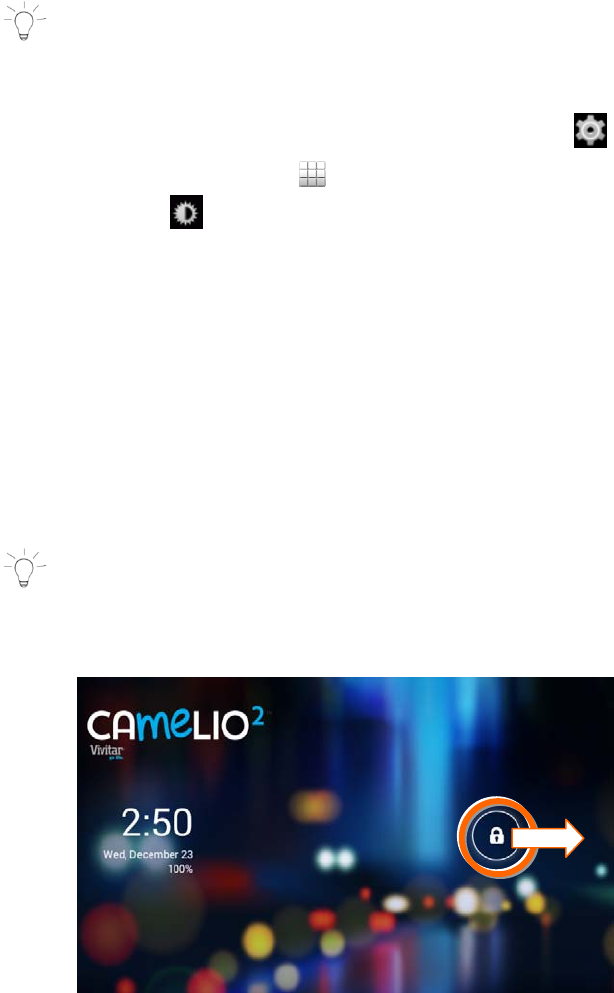
2.4.3 UnlockingYourTablet
TounlockyourtabletandactivatetheHomescreen,touchandholdthe
Lockicon.Whenitturnsintoacircledragittowardstheright,tothe
Unlockicon.Onceunlocked,theHomescreeninterfaceisactivated.
NOTE:Tounlockandactivatethecamera,touchandholdtheLock
icon,andwhenitturnsintoacircledragittowardstheleft,tothe
Cameraicon.
2.4.4 UnlockingYourTablet–WhenUserisLockedvia
ParentalControls
IfyouhavesettheParentalControltoONandhavelockedtheuser,the
Passwordmustbeenteredtounlockyourtabletonceithasbeenin
standbymodeorhasbeenpoweredonandyouhaveswipedittothe
unlockicon.TounlockyourtabletandactivatetheHomescreen:

7
1. TouchandholdtheLockicon.Whenitturnsintoacircledragit
towardstheright,totheUnlockicon.
2. Ifthereismorethanoneuser,thentouchthedesiredusername
fromthelist.
3. EnterthePasswordfortheselecteduserthentouchNext.
2.4.5 UnlockingAppWhenLaunchingaLockedApp
WhentheParentalControlissettoONandyouhavesetupthe
applicationsthatrequiretheParentalLockCode,theseapplications
thenrequiretheParentalpasswordtobeenteredbeforelaunching
them.EnterthepasswordandthentouchUnlocktounlockandlaunch
theapplication.

8
3. INITIALSETUP
Whenturningonfortheveryfirsttime,yourCamelio2™Tabletwillpromptyou
throughasetupprocesswitheasystepsincludingchoosingthelanguage,
selectingWi‐Fi,viewingthelicenseagreement,andthesettingupParental
ControlincludingGoogleaccountregistration.
NOTE:Itisrecommendedtofullychargeyourtabletbeforefirstuse.
3.1 ChoosingaLanguage
Touchoneofthelanguageoptionsonthe‘Welcome’screentoselecttheon
screenlanguageforyourCamelio2™Tablet.ThelanguageoptionsincludeEnglish,
Spanish(SA),French,Portuguese(BR)andGerman.
TouchNexttocontinue.
NOTE:Youcansetyourtablettootherlanguagesincludedinthetablet’s
Settings.ThiswillonlysetthelanguagefortheAndroidSetupmenus.
3.2 SelectingWi‐Fi
The‘SelectWi‐Fi’screenappearswithalistofavailablenetworks.
TouchoneoftheavailableWi‐Ficonnectionslistedonscreen.IftheWi‐Fi
connectsautomatically,touchConnect.Ifapasswordisrequiredyouwillbe
promptedtofirsttypeintheWi‐FipasswordandthentouchConnect.
IfyouchoosetocontinuethesetupwithoutconnectingtoaWi‐Finetwork,touch
Skip.
9
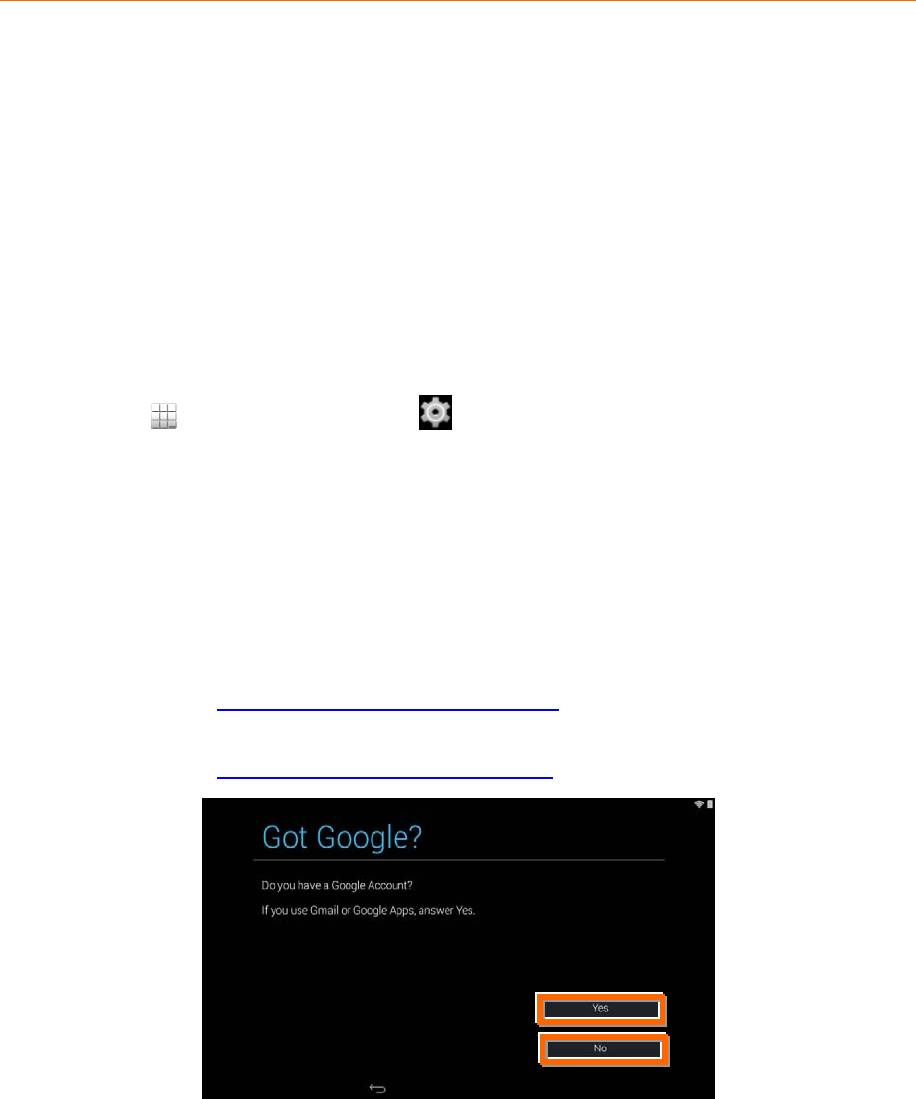
3.3 GoogleAccountSetUp
Next,the‘GotGoogle?’screenappears.YoumustaddaGoogleAccountinorder
touseParentalControl,GmailorotherGoogleAppsthatrequireanactiveGoogle
Account.Ifyoudon’thaveaGoogleAccountyoucancreateone.
Onceyouhavecreatedanewaccountorregisteredyourexistingaccount,you
cansetuptheParentalControlsduringtheInitialSetup.
TheGoogleAccountSetUpcanbeaccessedinthefollowingways:
• DuringtheInitialSetupbeforesettingupParentalControlsyouwillbe
promptedtofollowtheinstructionstoaddaGoogleAccount.Followthe
instructionstoaddyourGoogleAccount.
• ItcanalsobesetmanuallyatanytimebyusingtheAndroidSettings.
ToaccesstheAndroidSettings:
TouchApps,thentouchtheSettingsapp.Underthe‘WIRELESS&
NETWORKS’settingoption,makesureWi‐FiisONandconnected.Under
thesettingoption‘ACCOUNTS’,touch+AddAccountandthentouch
Google.FollowtheinstructionstoeithersigninorcreateanewGoogle
account.
HowtoAddaGoogleAccountonceyouhaveaccessedtheGoogleSetUp:
• TouchYesifyoualreadyhaveaGoogleAccountandcontinuetothe
instructions:SignintoYourGoogleAccount
• TouchNoifyoudonothaveaGoogleAccountandcontinuetothe
instructions:CreateaNewGoogleAccount
10
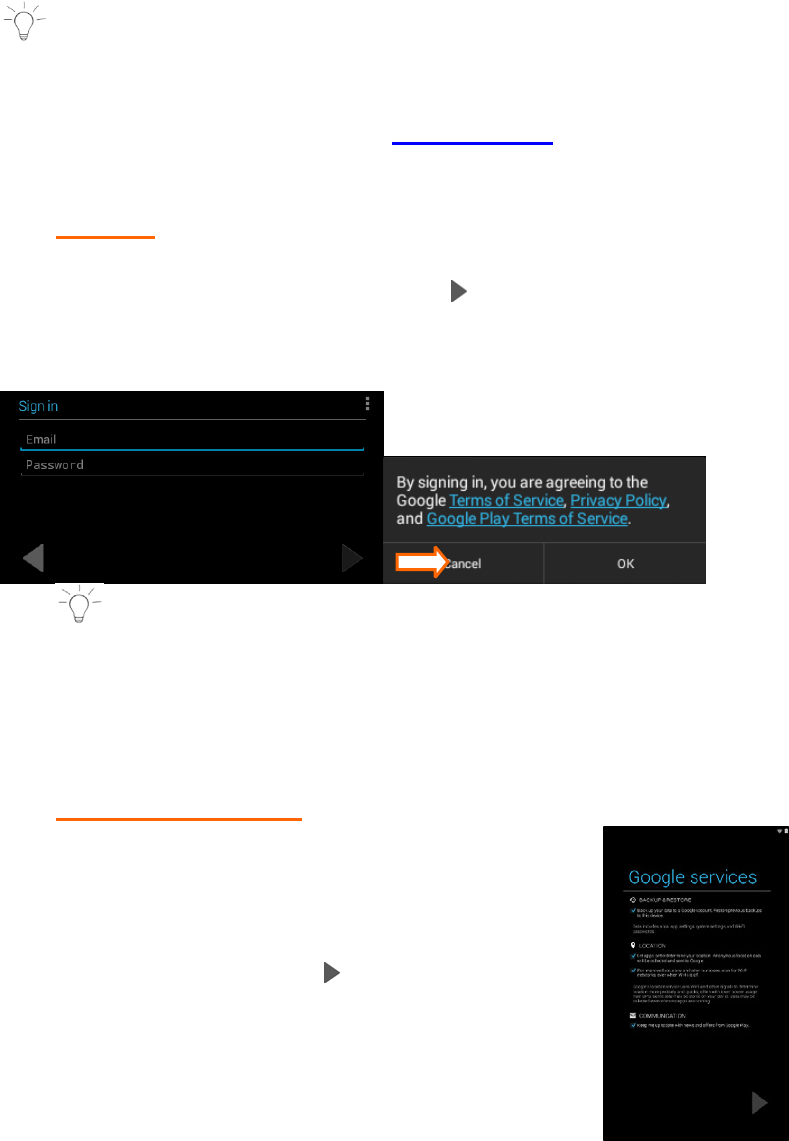
3.3.1 SignintoYourGoogleAccount
IfyouhaveaGoogleAccountandhavetouchedYesonthe‘Got
Google?’screen,pleasefollowtheinstructionsbelow.
NOTE:AWi‐FiconnectionisrequiredtoregisteryourGoogle
account.IfyouarenotconnectedtoWi‐Fi,youwillbepromptedto
connectyourtablettoaWi‐Finetwork.TouchNextwhenthe
connectioniscomplete.PleaseseeSelectingWi‐Fiforfurther
informationregardingWi‐Fisetup.
1. SIGNIN
TosignintoyouraccountenteryourEmailandPasswordusingthe
onscreenkeyboard,andtouchNext orDonetocontinue.Then
touchOKtoagreetothewindowthatappearsregardingTermsof
Service,PrivacyPolicy,andGooglePlayTermsofService.
NOTE:Youmayberequiredtosigninontheweb.Ifyouare
promptedtodoso,touchNexttostartbrowsersign‐inandfollowthe
instructions.YoumaybepromptedtojoinGoogle+.Touch
JoinGoogle+tojoinorcontinuewithoutjoiningbytouching
Notnow.
2. GOOGLESERVICES:
TheGoogleservicesoptionappears.The
defaultistheoptiontokeepyouuptodate
withnewsandoffersfromGooglePlay.Ifyou
donotwantthisoption,thentouchtheboxto
un‐checkit.TouchNext tocontinue.
Next,youmaybepromptedtosetuppayment
information.TouchContinuetocontinuethe
paymentprocessorSKIPtocontinueinthe
Googlesetup.
11
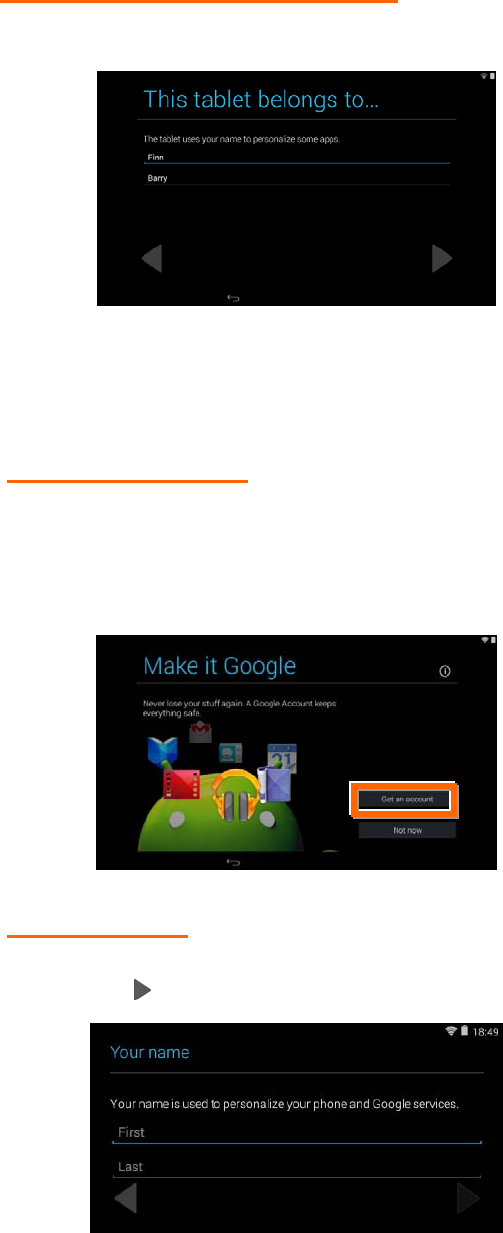
3. PERSONALIZATIONOFTABLET:
Nextyouwillbepromptedtoenteryournameinordertoallow
thetablettopersonalizesomeapps.
3.3.2 CreateaNewGoogleAccount
IfyoudonothaveaGoogleAccountandhavetouchedNoonthe‘Got
Google?’screen,pleasefollowtheseinstructions.
1. GETANACCOUNT:
The‘MakeitGoogle’screenappears.TocreateanewGoogle
account,touchtheGetanaccountbutton.
Ifyoudecidenottocreateanewaccount,touchNotnowto
continuewiththetabletsetup.
2. ENTERNAME:
Youwillbepromptedtoenteryourfirstandlastname.
TouchNext orDoneoncecomplete.
12
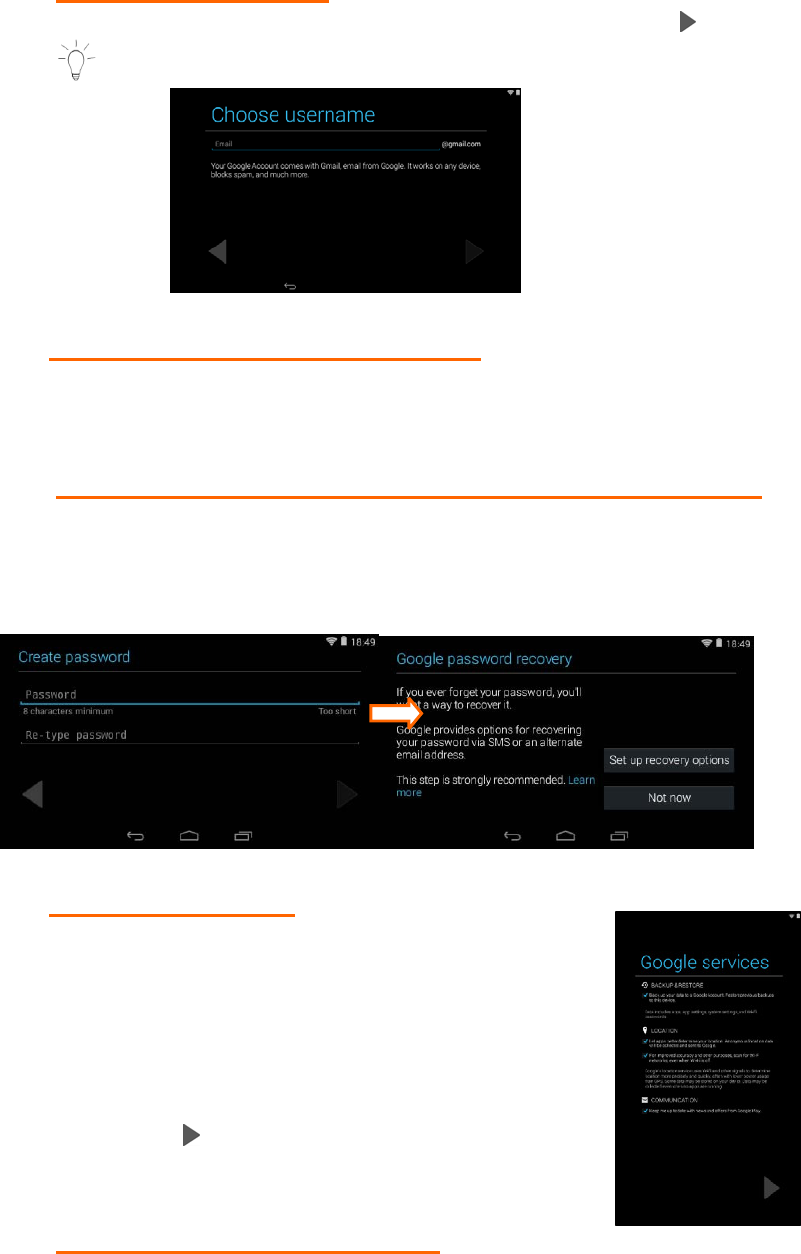
3. CHOOSEUSERNAME:
Enterausername,whichwillbeyouremail,thentouchNext orDone.
NOTE:Theemailenteredwillbecheckedforavailability.
4. PERSONALIZATIONOFACCOUNT:
Next,thescreenappearswithyourenteredname,whichwillbe
usedtopersonalizeyourtabletandGoogleservices.
5. CREATEPASSWORD/PASSWORDRECOVERYOPTIONS:
Typeyourpasswordforyouraccount(minimumof8characters)
andretypetoconfirmyourpassword.TouchDonewhencomplete.
ThentouchSetuprecoveryoptionsifyouwouldliketouse
Googlepasswordrecovery,ortouchNotnowtocontinue.
6. GOOGLESERVICES:
Next,theGoogleservicesoptionappears.The
defaultistheoptiontokeepyouuptodatewith
newsandoffersfromGooglePlayandtoback
upyourdatatoyourGoogleaccount.Ifyoudo
notwantthisoption,thentoucheachboxtoun‐
checkit.
TouchNext tocontinue.
7. FINISHACCOUNT‐TERMSOF
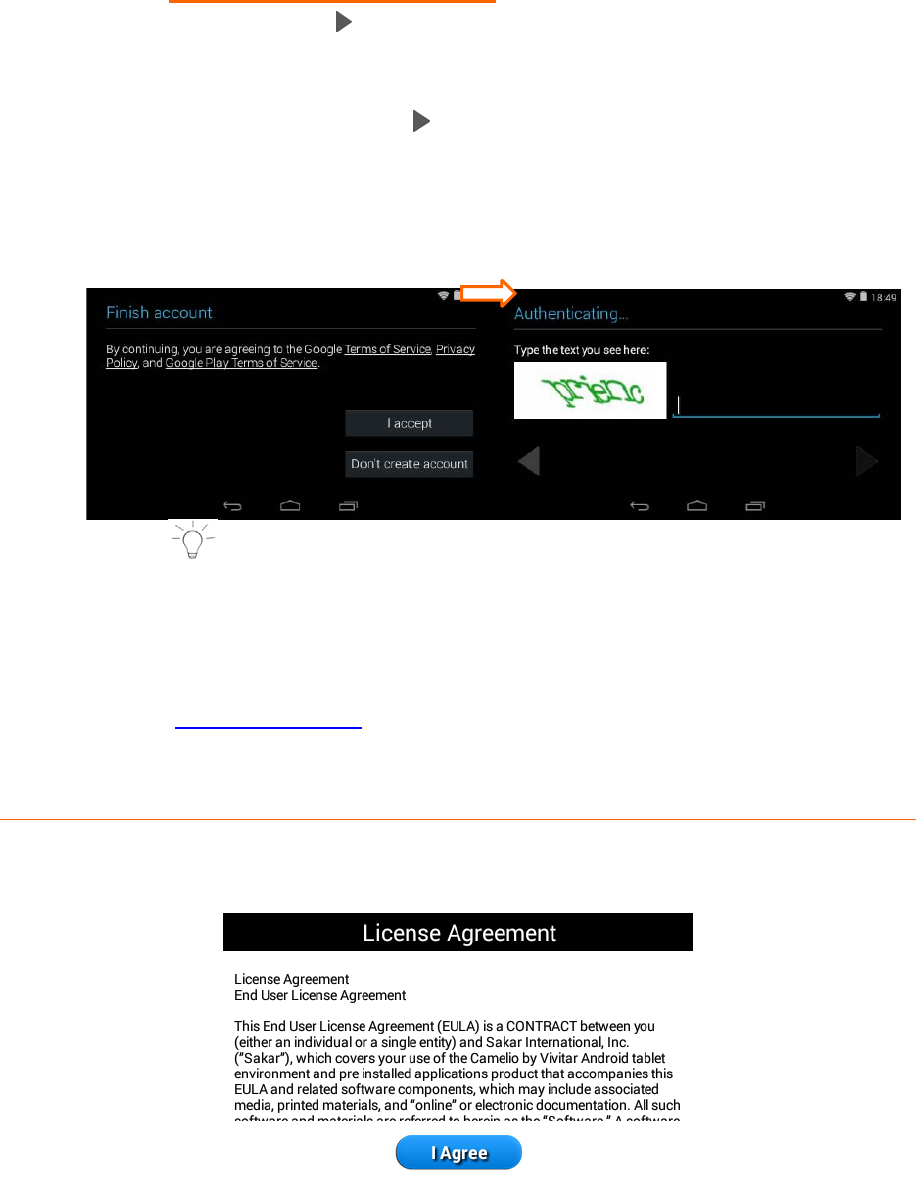
13
SERVICE/AUTHENTICATE:
TouchIaccepttoaccepttheGoogleTermsofService,Privacy
PolicyandGooglePlayTermsofService.
Then,toauthenticateyouraccount,typetheworddisplayedinthe
textfield.TouchNexttofinishsettingupyourGoogleaccount.
Next,youmaybepromptedtosetuppaymentinformation.Touch
ContinuetocontinuethepaymentprocessorSKIPtocompletethe
Googlesetup.
NOTE:IfyouwereattheinitialsetupoftheParentalControls
whenyouwerepromptedtoregisteryourGoogleAccount,then
afteryoufinishregisteringyourGoogleAccount,youwill
automaticallyreturntotheParentalControlsetup.Formore
informationregardingParentalControlSetUpseethe
‘ParentalControl’section.
3.4 LicenseAgreement
ReviewtheEndUserLicenseAgreementandthentouchIAgreetocontinueto
theTutorial.

14
3.5 Tutorial
Avideotutorialbeginsplayingintroducingyoutotheincredibleworldofthe
Camelio2Tablet.TouchSkipifyouwouldliketostopthevideotutorialand
continuethesetup.
NOTE:IfyouwouldliketowatchtheCamelio™TabletTutorialvideoagain,
touchtheSettingsiconlocatedontheTabbedAppsManageronthe
Homescreen,andthentouchTutorial.
3.6 ParentalControlSetUp
TheParentalControlSetUpallowsyoutohavefullcontrolofwhatyourchildcan
accessonthetablet.Thefollowingoptionsappear:
• NEXT:
TouchNexttocontinuetotheParentalControlsetup.
Seethe‘ParentalControl’sectionformoreinformationaboutsettingup
yourParentalControl.
• SKIP:
TouchSkiptocontinuetotheHomescreenwithoutsettingupParental
Control.
• REMINDMELATER:
TouchRemindmelatertocontinuetotheHomescreen.Eachtimethe
tabletispoweredon,anotificationwillbedisplayedonthestatusbar
remindingyoutosetuptheParentalControls.
NOTE:
‐ Ifyouchoose‘Skip’or‘RemindmeLater’duringthisinitialtabletsetup,
youcansetupyourParentalControlsettingsatanytimebyopeningthe
ParentalControlappfromthe Appslist.
‐ UponinitialParentalControlsetup(orwhenaccessingGmailorthe
GooglePlayStoreforthefirsttime),youwillbepromptedtoregistera
Googleaccountbyeithersigningintoanexistingoneorbycreatinga
newaccount.FormoreinformationregardingParentalControlSetUp
seethe‘ParentalControl’section.
15
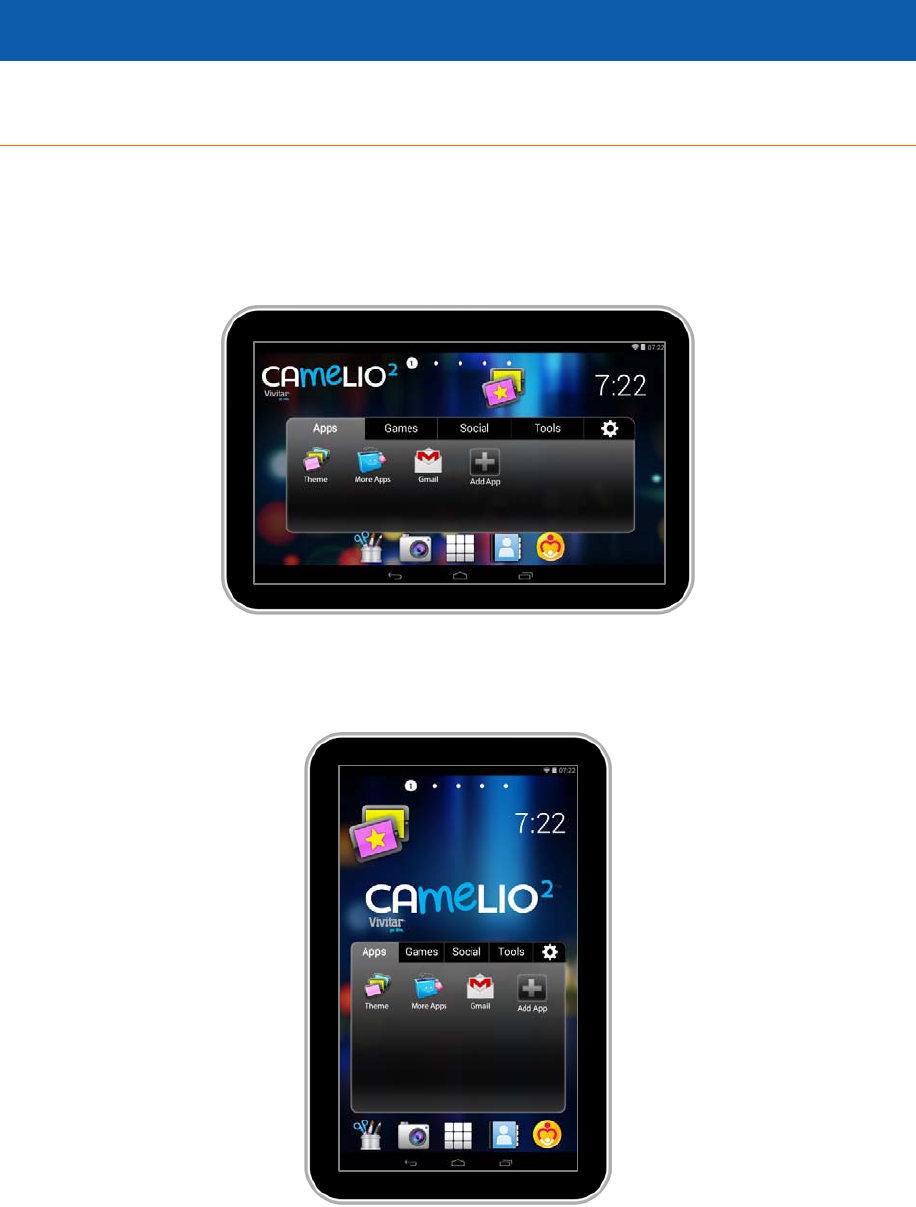
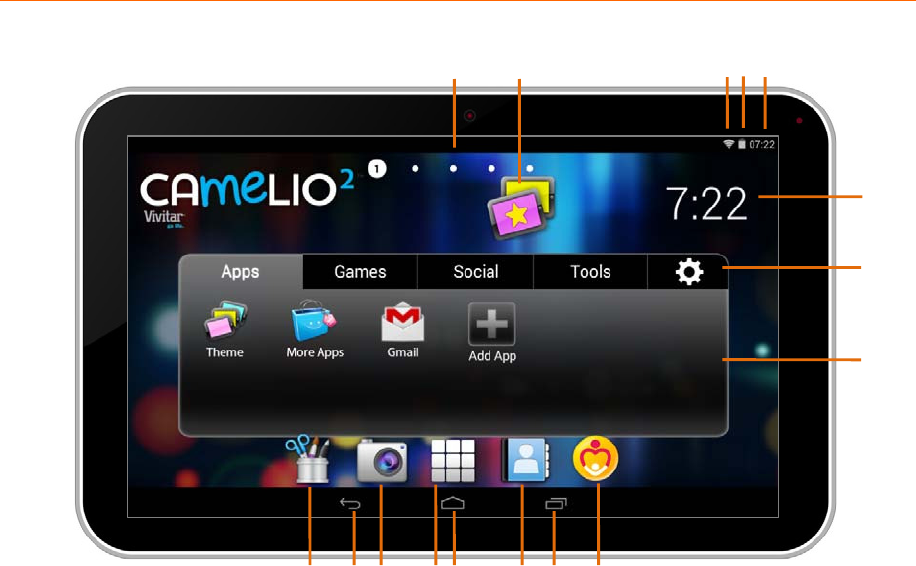
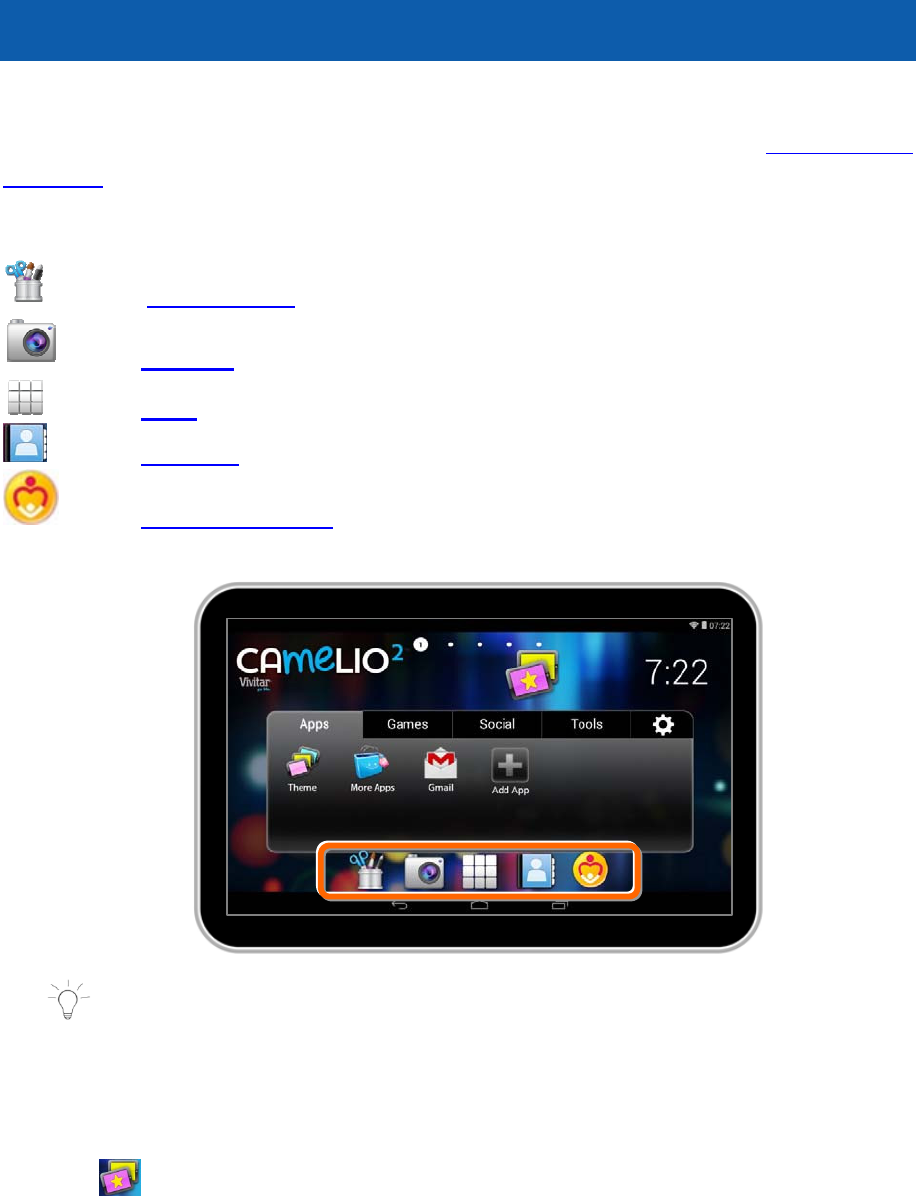
4. HOMESCREEN
4.1 PortraitandLandscapeOrientation
OnceyouhavecompletedtheInitialSetuptheHomescreenappears.
Theorientationofthedisplayscreenrotateswiththetabletasyouturnit.
LandscapeOrientation
PortraitOrientation
16
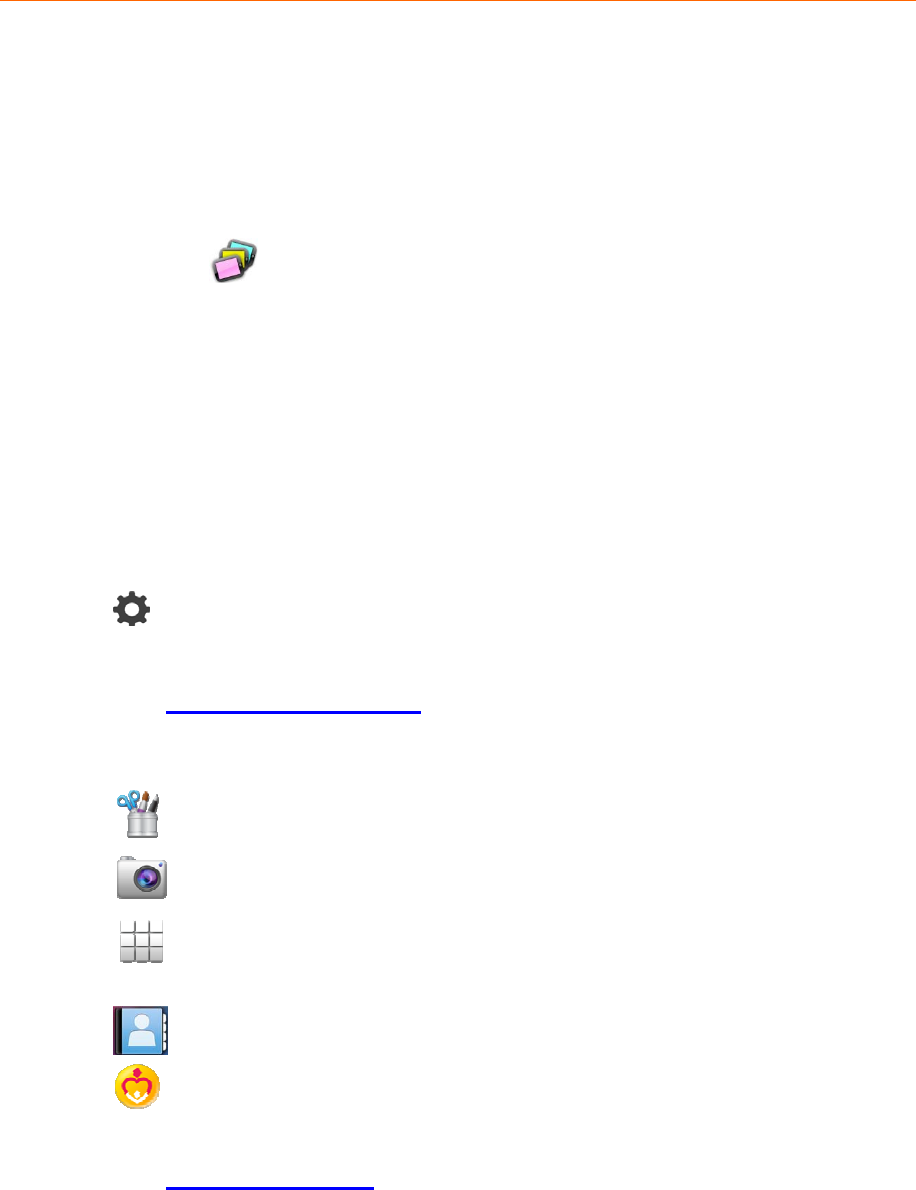
4.2 HomeScreenInterface
1. Pagecounter9. ImageEditor
2. ThemeSwitcher10. Back
3. Wi‐FiConnectionSignal11. Camera
4. BatteryPowerLevel12. AndroidAppsMode
5. Time 13. Home
6. ThemeDigitalClockWidget14. Contacts
7. CamelioSettings 15. RecentApps
8. TabbedAppsManager16. ParentalControl
6
7
8
910111213141516
12 345
17
4.3 HomeScreenFeatures
ThemainHomescreenisthemainentrypointtoyourCamelio2™Tablet.The
TabbedAppsManagerallowsyoutoeasilyorganizeandcreateshortcutstoyour
favoriteapplications.Thebottomtoolbarallowsquickaccesstoallthemain
functionsonyourtablet.
4.3.1 TabbedAppsManagerShortcuts
APPSSelecttheAppstabtoview,addandorganizeappshortcuts.
SelectThemeManagertoswitchyourtablettodifferent
purchasedthemes.ThisisincludedintheAppstab.
GAMESSelecttheGamestabtoview,addandorganizeappshortcuts
toyourfavoritegames.
SOCIALSelecttheSocialtabtoview,addandorganizeappshortcutsto
yourfavoritesocialapps.
TOOLSSelecttheToolstabtoview,addandorganizeappshortcutsto
yourfavoritetablettoolapps.
SelectSettingstoAdd/RemoveApps,viewtheonlineUser
Manual,onlineHelpandAbout.
See‘TabbedAppsManager’formoredetails.
4.3.2 ToolBarShortcuts
SelectPhotoEditortoeditphotos,addframesandclipartitems.
SelectCameratototakepicturesandrecordvideos.
SelecttheAppsscreentoaccessalltheapplicationsonyour
tablet.
SelectContactstoaddandedityourcontacts.
SelectParentalControltospecifywhichapplicationscanbe
used.
See‘ToolBarShortcuts’formoredetails.
4.3.3 AddingShortcutstotheTabbedAppsManager
18
1. SelectatabontheTabbedAppsManager,andthentouchthe
AddAppicon.
NOTE:
• TheAddAppicononlyappearswhentheselectedTabbed
Apphasroomforadditionalshortcuts.
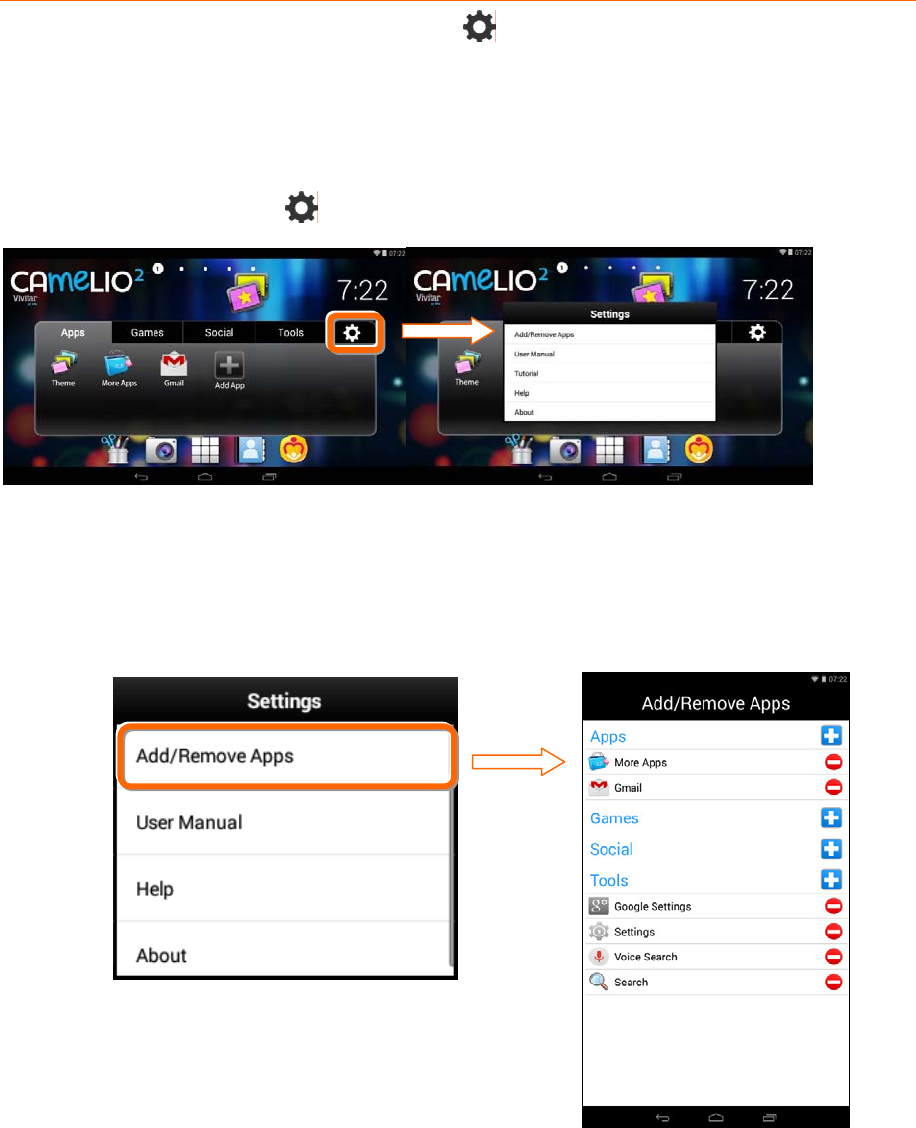
• Alternatively,touchtheSettingsicontoopen
the‘Settings’screen,thenselectAdd/Removeapps.
2. Thelistofallyourapplicationsonyourtabletappearsonthe‘Add
application’screen.Alternatively,youcanalsotouchthe Plusicon
nexttooneofthetabnamesifaccessingthelistusingtheSettings
icon.
3. Touchanapptochoosetheoneyouwouldliketoadd.
4. TheshortcutdisplaysintheselectedtabontheTabbedApps
Manager.
5. ToremoveanAppfromtheTabbedAppsManager:Touchthe
SettingsiconandthenselectAdd/Removeapps.
Inthe‘Add/RemoveApps’screen,touchtheMinusiconnextto
oneofthelistedappstoremovetheshortcutfromtheTabbed
AppsManager.
See‘TabbedAppsManager’formoredetails.
4.3.4 ChangeHomeScreenWallpaper
1. TouchandholdonaHomescreen(notincludingthefirstHome
page)untilthe‘Choosewallpaper’windowappears.
2. TouchCamelio(‘ThemeName’)WallpapersorGallerytoopena
selectionofWallpaperimages.Touchanimagetoviewthe
Wallpaperinthebackground.
3. TouchSetWallpapertosaveandchangethewallpapertoyour
chosenselection.
4.3.5 AddAppShortcutstotheHomeScreen
19
1. TouchtheAppsscreenicononthebottomtoolbartoopenthe
‘APPS’screenthatdisplaysalistofyourAndroidtablet’sapplications.
2. Chooseanapplicationyouwouldliketoaddasashortcutand
thenlongtouchanddragtheselectedapplicationtothedesired
Homescreen.Theapplicationshortcutwillthenappearonthe
selectedHomescreen.
NOTE:
• ApplicationshortcutscannotbeaddedtothefirstHomescreen
usingthedirectionsoutlinedabove.UsetheTabbedApps
ManagertoaddshortcutsonthefirstHomePage.
• Tomoveashortcut:
Touchandholdonashortcut,thendragittoadifferentHome
screentomoveittotheselectedHomescreen.
• Toremoveashortcut:
TouchandholdtheaddedshortcutuntiltheRemoveicon
appearsonthescreen.Thendragtheshortcuttothe
Removeicon.WhentheshortcutandRemoveiconturnred,
releaseyourtouchandtheshortcutwillberemoved.
4.3.6 AddWidgetstotheHomeScreen
1. TouchtheAppsscreenicontoopenthe‘APPS’screenthat
displaysalistofyourtablet’sapplications.TouchtheWIDGETStab
toopenthelistofyourtablet’swidgets.
2. Chooseawidgetyouwouldliketoaddandthenlongtouchand
dragtheselectedwidgettothedesiredHomescreen.Thewidget
willthenappearontheselectedHomescreen.
NOTE:
• WidgetscannotbeaddedtothefirstHomescreen.
• Tomoveawidget:
Touchandholdonawidget,thendragittoadifferentHome
screentomoveittotheselectedHomescreen.
• Toremoveawidget:
TouchandholdthewidgetuntiltheRemoveiconappearson
thescreen.ThendragthewidgettotheRemoveicon.Whenthe
widgetandRemoveiconturnred,releaseyourtouchandthe
shortcutwillberemoved.
20
5. OVERTHEAIRUPDATES(OTA)
TheCamelio2™TabletSoftwareupdatesareavailableovertheair.Whenyour
TabletisconnectedtoWi‐Fi,thesystemautomaticallychecksforsoftwareupdates.
NotificationofanavailablesoftwareupdatewillbesentwirelesslytoyourTablet.
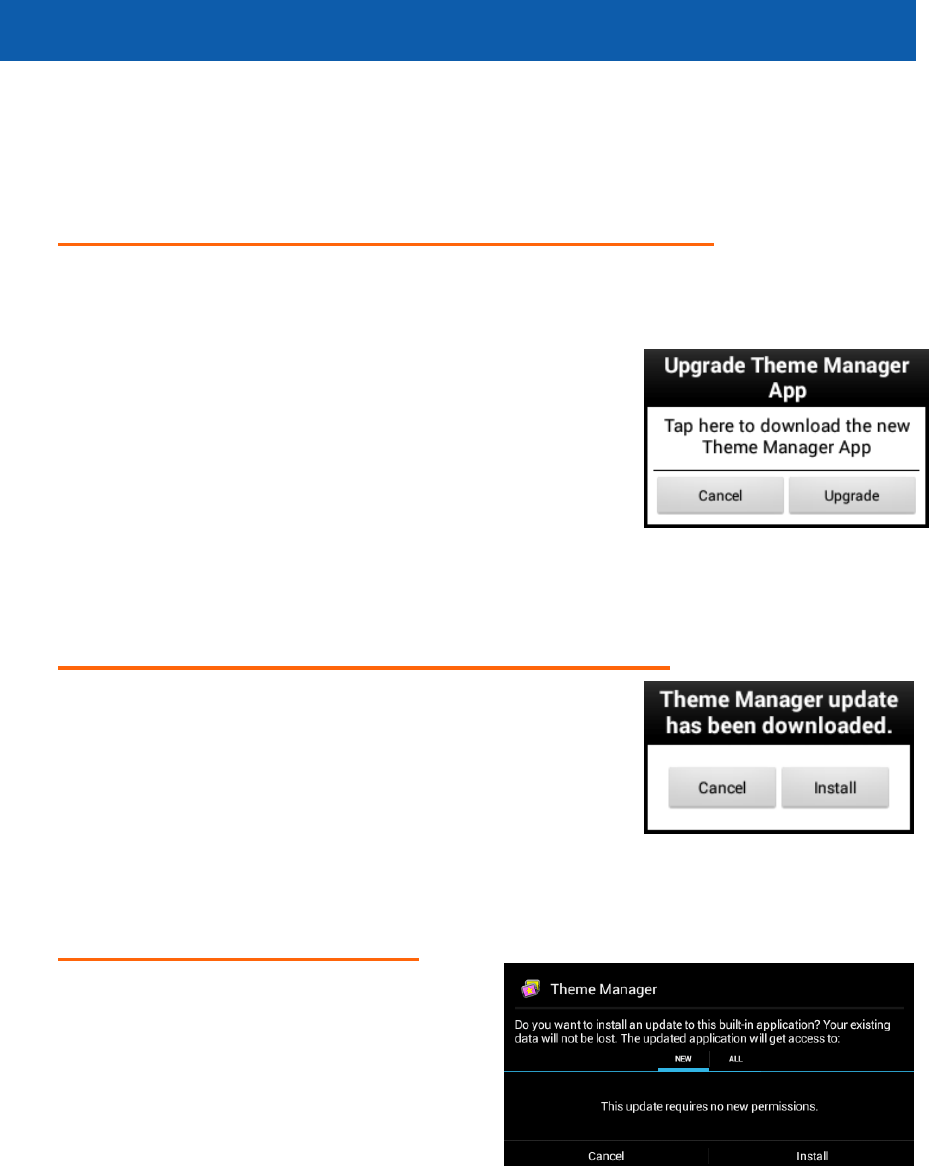
1. DOWNLOADTHE‘THEMEMANGER’UPDATE:
Anotificationwindowappearswhenthereisanewversionofyour
purchasedThemeisavailable.
• Ifyouwouldliketoupgrade,touchUpgradeto
beginthedownloadandinstallationprocess.
Thedownloadthenbeginsandwilltakesome
time.ProgresscanbeseenintheNotifications
bar.
• Ifyouwouldliketoexittheupgradewindow
withoutupgrading,touchCanceltoexitand
returntothepreviousscreen.
2. INSTALLTHE‘THEMEMANAGER’UPDATE:
Anotificationwindowappearsshowingthatyour
purchasedThemehasbeendownloaded.Touch
Installtobegininstallingtheupdate.
Toexitwithoutinstallingtheapplicationupgrade
touchCancel.
3. INSTALLCONFIRMATION:
Awindowaskingifyouwanttoinstall
thisapplicationappearsandnotifies
youwhattheappwillgetaccesstodo.
TouchInstalltoconfirmandcomplete
theinstallation.Toexitwithout
installingtheapplicationupgrade
touchCancel.

21
6. TABBEDAPPSMANAGER
TheTabbedAppsManagerallowsyoutoeasilyorganizeandcreateshortcutsto
yourfavoriteapps.TheseappscanbeaddedtotheHomescreenTabbedApps
Manager.YoucanorganizeandmanageyourAppsbyplacingtheshortcutsinthe
selectedtab.TheTabAppsManagerincludesthefollowingtabs:
Apps,Games,Social,Tools
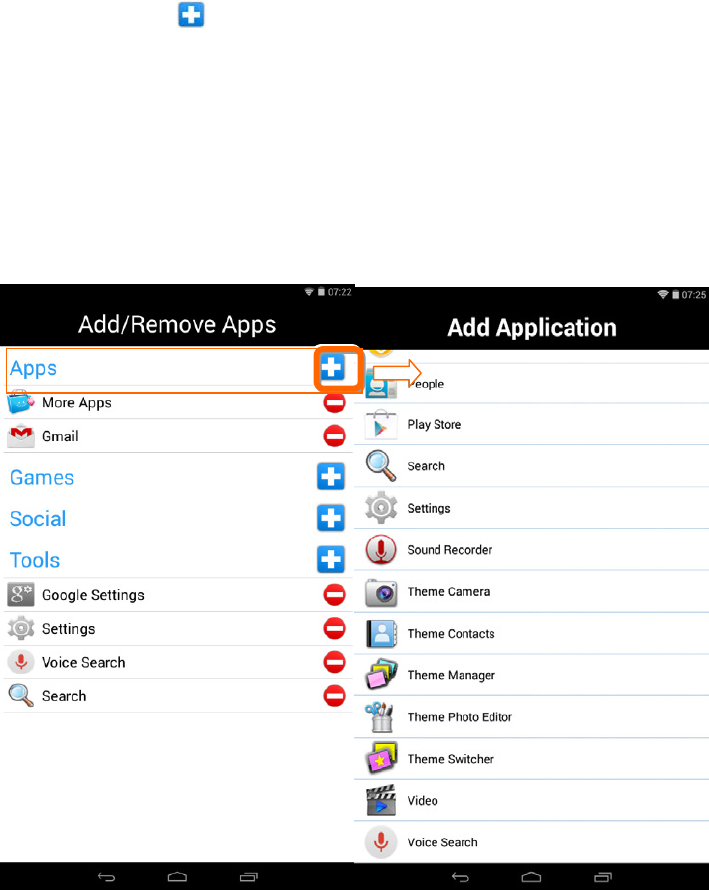
6.1 AddAppShortcutUsingtheTabbedApps
Manager
1. SELECTATAB
FirsttouchaTabtoselectit.Forexample,theAppsTabisthe
defaultTabandisselectedintheimagebelow.
2. SELECTANAPPLICATIONTOADD
TouchtheAddAppicon.TheAddAppiconappearswhenthe
Tabhasroomforadditionalshortcuts.
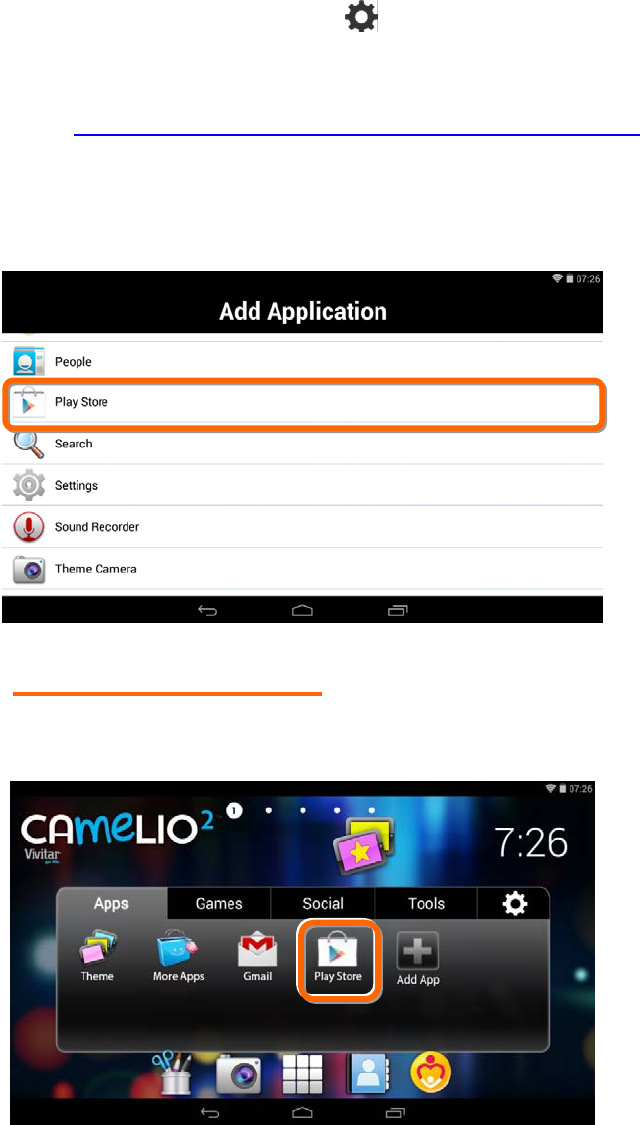
22
NOTE:YoucanalsotouchtheSettingiconontheTabbedApps
ManagertoaddandremoveAppshortcuts.
Formoreinformation,pleaserefertothesection:
‘Add/RemoveAppShortcutUsingtheAppSettings’.
ThelistoftheavailableAppscurrentlyonyourtabletappearson
thescreen.TouchanApptochoosetheoneyouwouldliketo
displayintheselectedTab.
3. VIEWTHESHORTCUT
ViewtheaddedshortcutofyourselectedAppontheTabbedApps
Manager.
23
6.2 Add/RemoveAppShortcutUsingtheApp
Settings
AppshortcutscanalsobeaddedfromtheAppSettingsiconontheTabbedApps
Manager.ThisalsoallowsyoutoremoveanAppshortcutfromtheTabbedApps
Manager.
1. ACCESSTHEAPPSETTINGS:
TouchtheAppSettingsIcontoopenthe‘Settings’window.
2. ACCESSTHE‘ADD/REMOVEAPPS’OPTIONS:
TouchAdd/RemoveAppstoopenthe‘Add/RemoveApps’screen.
ThecurrentAppshortcutsdisplayedineachTabappearslisted
underthenameofeachTab.
24
3. ACCESSTHE‘ADDAPPLICATION’LIST:
ChoosewhichTabyouwouldliketoaddanAppshortcut:
‘Apps’,‘Games’,‘Social’,or‘Tools’
TouchtheAddAppicon(plussymbol)totherightofthatTab
name.
The‘AddApplication’screenappearsdisplayingthelistofallyour
TabletApps.
NOTE:
Thesame‘AddApplication’AppslistappearsforeachTab
(‘Apps’,‘Games’,‘Social’,‘Tools’)whenaddinganApp
shortcut.
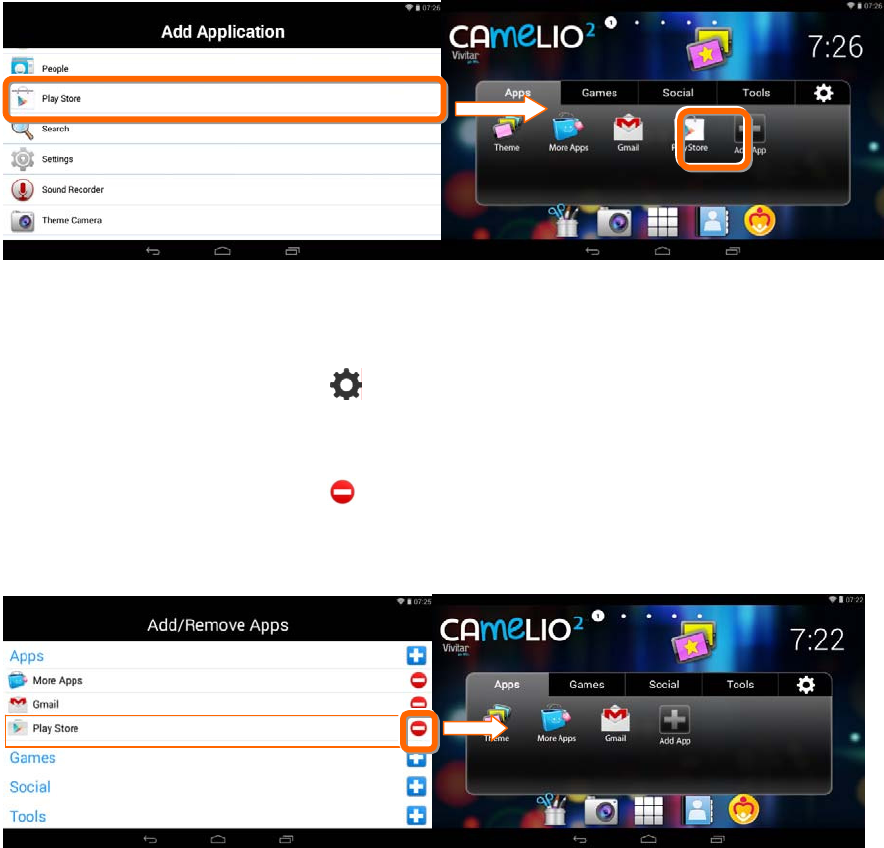
25
4. ADDAPPSHORTCUTTOSELECTEDTAB:
TouchoneofthelistedAppstochoosetheoneyouwouldliketoadd.
TheAppshortcutappearswithintheselectedTab.
5. REMOVEAPPSHORTCUTFROMSELECTEDTAB:
ToremoveanAppshortcutfromtheTabbedAppsManager:
• TouchtheAppSettingsIcontoopenthe‘Settings’window.
• TouchAdd/RemoveAppstoopenthe‘Add/RemoveApps’screen.
• ThelistofcurrentAppshortcutsappearsforeachTab.
• TouchtheRemoveAppicon(minussymbol)nexttooneof
thelistedAppshortcutstoautomaticallyremovetheselected
AppshortcutfromtheTab.
26
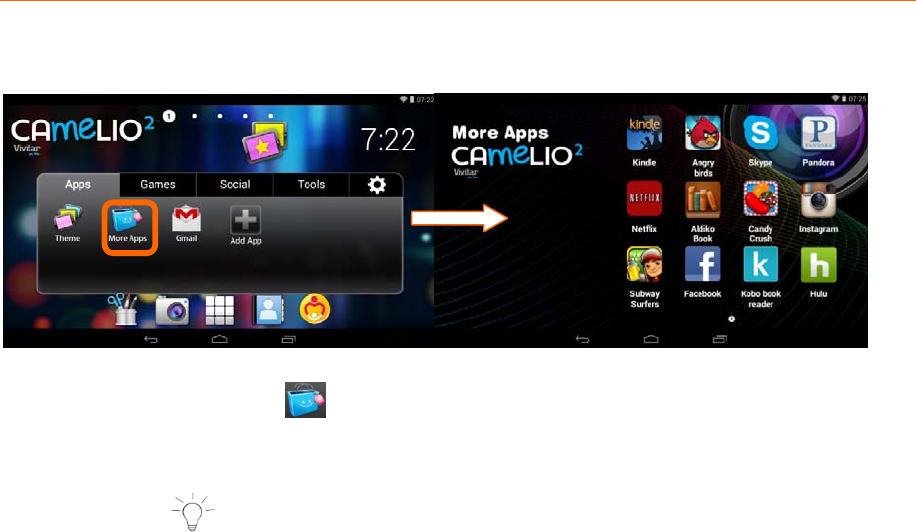
6.3 MoreApps
The‘MoreApps’shortcutoffersyouquickaccesstodownloadsomeofthemost
popularAppsfromtheGooglePlayStore.
1. TouchtheMoreAppsicontoopenthe‘MoreApps’screen.
2. TouchoneoftheAppiconsdisplayedonthe‘MoreApps’screento
begintheselectedAppdownloadandinstallationprocess.
NOTE:MakesuretheTabletisconnectedtoaWi‐Finetwork
andthatyouhavesignedintoyourGoogleAccount.
• WI‐FI:IfyouarenotconnectedtoaWi‐Finetwork,a
windowappearsandnotifiesyoutocheckyourconnection
andtryagain.
TouchConnecttoopenthe‘Settings’window.TurnWi‐Fi
ONandselectanavailablenetworkconnection.
• GOOGLEACCOUNT:Ifyouhavenotalreadysignedinto
yourGoogleaccount,youwillbepromptedtosignintoan
existingaccountorcreateanewone.
3. Thewindowdisplaystheselectedappinformationpage.Touch
InstalltoinstalltheapplicationtoyourTablet.
27
7. PARENTALCONTROL
7.1 Overview
TheParentalControlfeaturecanbeaccessedbytouchingtheParentalControl
icononthefirstHomescreen.Alternatively,touchAndroidAppsandthen
touchParentalControlfromtheAppslist.TheParentalControlallowsyouto
specifywhichAppscanbeaccessedandusedbyyourchildren.Onceyouactivate
ParentalControl,addyouruserinformationandsetyourLockCode,youcanthen
controlforeachuserwhichAppscanbelaunchedwith/withoutacodeaswellas
controltheusagetimeforapplications.
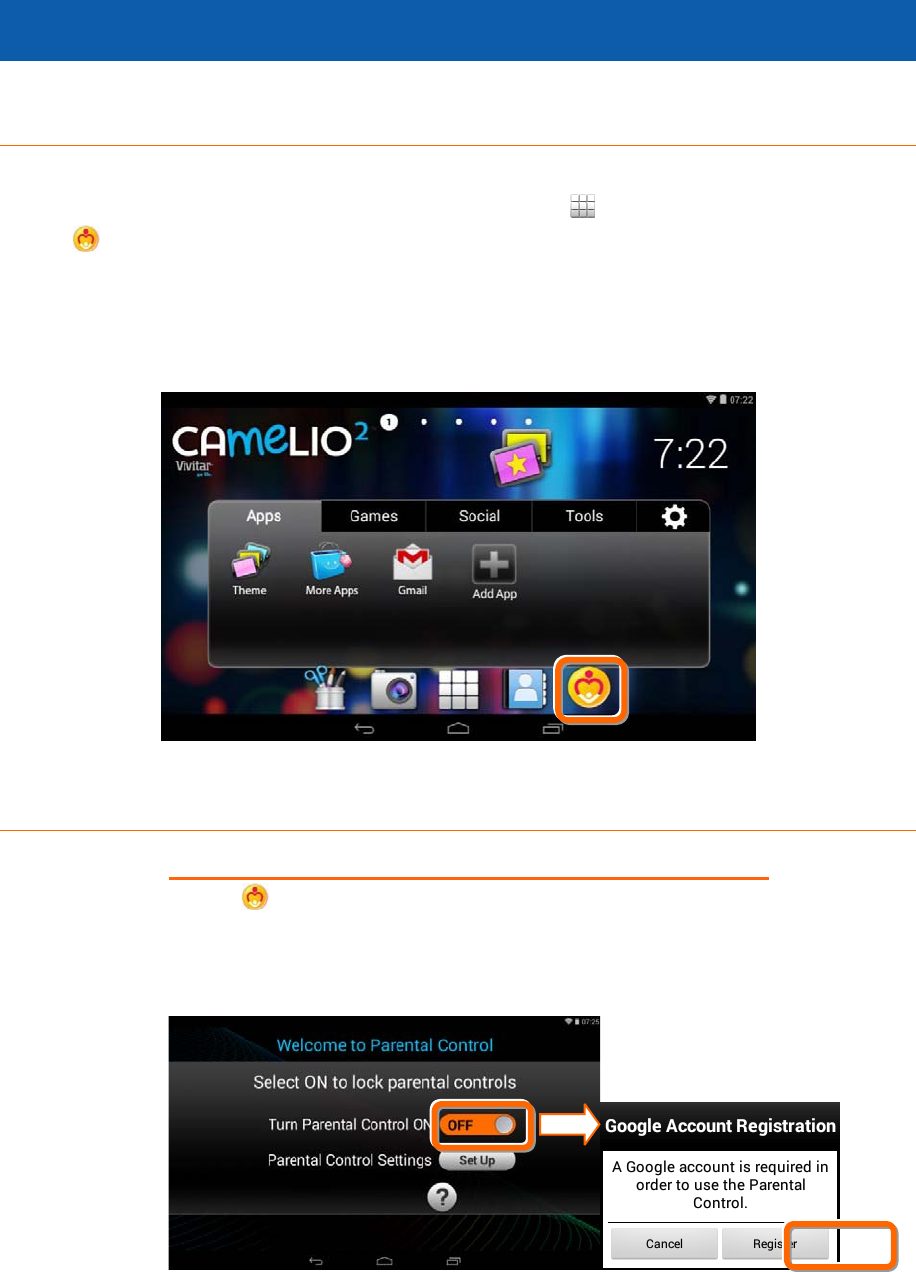
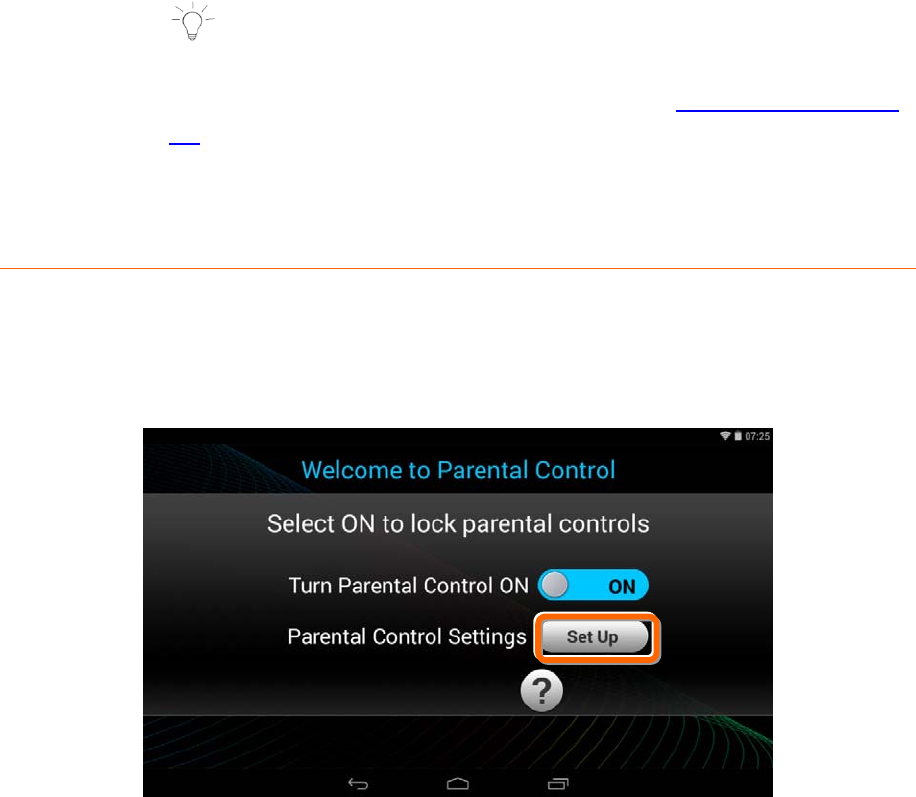
7.2 WelcometoParentalControl
1. SELECTINGPARENTALCONTROLON/OFF:
TouchParentalControltolaunchtheapp.Whenfirstlaunching
theapp(duringinitialsetup)thedefaultsettingisOFF.Toactivate
theParentalControl,touchthe‘TurnParentalControlOn’OFF
optiontoactivateitON.
28
NOTE:YouwillbepromptedtoregisteraGoogleaccount,if
youhavenotalreadycompletedthis.TouchRegistertocontinue
withtheGoogleaccountregistration.SeetheGoogleAccountSet
UpsectionformoredetailsregardingGoogleAccountregistration.
7.3 ParentalControlSetup:
TheParentalControlcanbeactivatedtoONonceyouhavearegisteredGoogle
Account.
TouchtheSetUpbuttontocontinuetheParentalControlsetup.
Touchthe?(QuestionMark)buttontoviewtheonlineHelpandAbout.
NOTE:AssoonasParentalControlissetto‘ON’,thefollowingappsarelocked
andrequiretheParentLockCodetoenter:
• ParentalControlApp.
• ‘ManageUsers’fromtheThemeManagerApp.
29
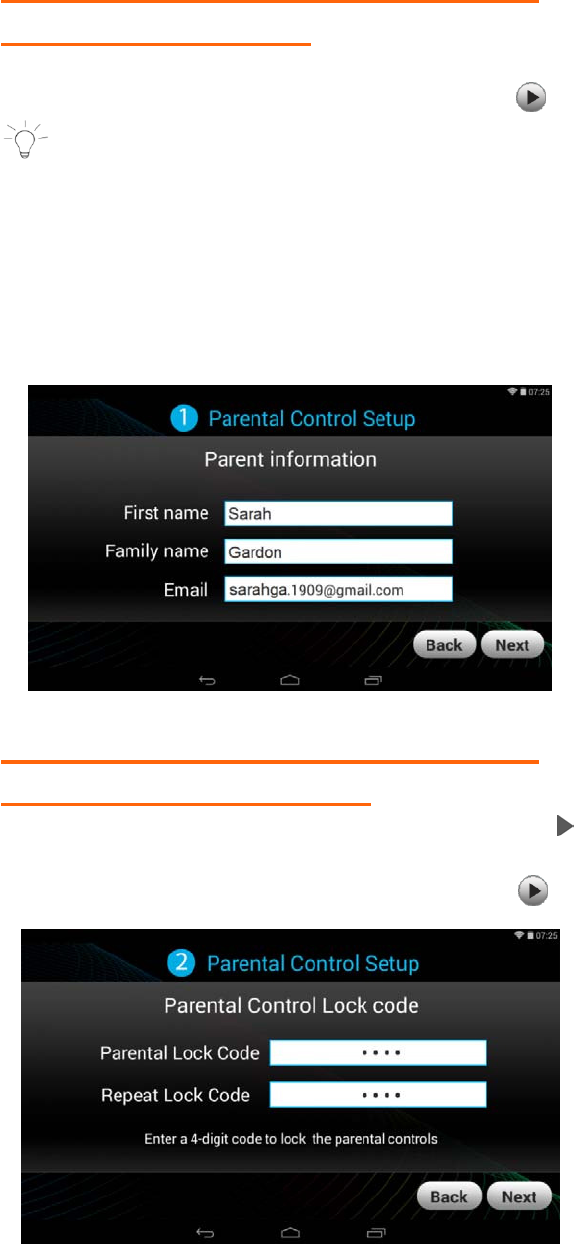
1. PARENTALCONTROLSETUP>STEP1
USERINFORMATION:
Next,youwillbepromptedtoenteryourfirstname,lastnameand
email.EnteryouruserinformationthentouchNext.
NOTE:
• YourexistingGoogleemailorthenewGoogleaccountyou
definedduringtheInitialSetupwillautomaticallyappear.If
youdonothaveaGoogleAccount,youwillbepromptedto
createanewaccount.
• AnotificationwillbesenttoyouremailAccountwithyour
nameandParentalControlLockCodedetails.
2. PARENTALCONTROLSETUP>STEP2
SETTINGTHELOCKCODE:
Entera4‐digitParentalLockCodeandtouchNext(fromthe
onscreenkeyboard).Thenre‐entertheLockCodetoconfirmand
touchDone(fromtheonscreenkeyboard).TouchNexttocontinue.
30
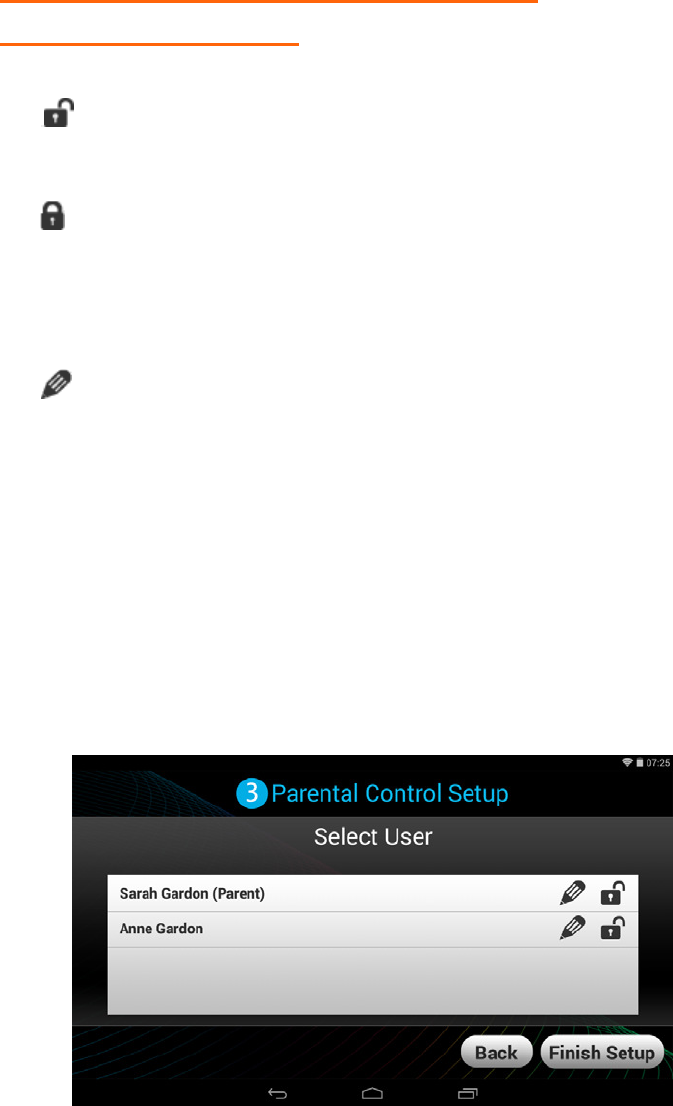
3. PARENTALCONTROLSETUP>STEP3
USERSETTINGSLIST:
EachUserappearswiththefollowingsettingoptions:
• Unlock:ThedefaultsettingisUnlocked.Thismeansno
passwordisrequiredtoentertheselecteduserwhenlaunching
thetabletorwakingthetabletfromSleepMode.
Lock:Toenablepasswordprotection,touchtheunlockicon
anditwillchangetotheLockicon.Thismeansthatthe
password,assetfortheselecteduser,willneedtobeentered
whenlaunchingthetabletorwakingthetabletfromSleep
Mode.
• Set/EditParentalControls:TouchtheEditicontoopenthe
‘Selectappsforsafeenvironment’screen.Thiswillenableyou
tosettheParentalControlsfortheselecteduser.
Back:TouchBacktoreturntotheParentalControlLockCode
screen.
FinishSetup:TouchFinishSetuptosavetheParentalinformation
anduserlocksettings.Amessagewillbesenttoyouremailwith
youruserinformationandParentalControlLockCode.Anytime
youchangeyouruserinformationorLockCodeandthentouch
FinishSetup,anemailwillbesentwiththeupdatedinformation.
31
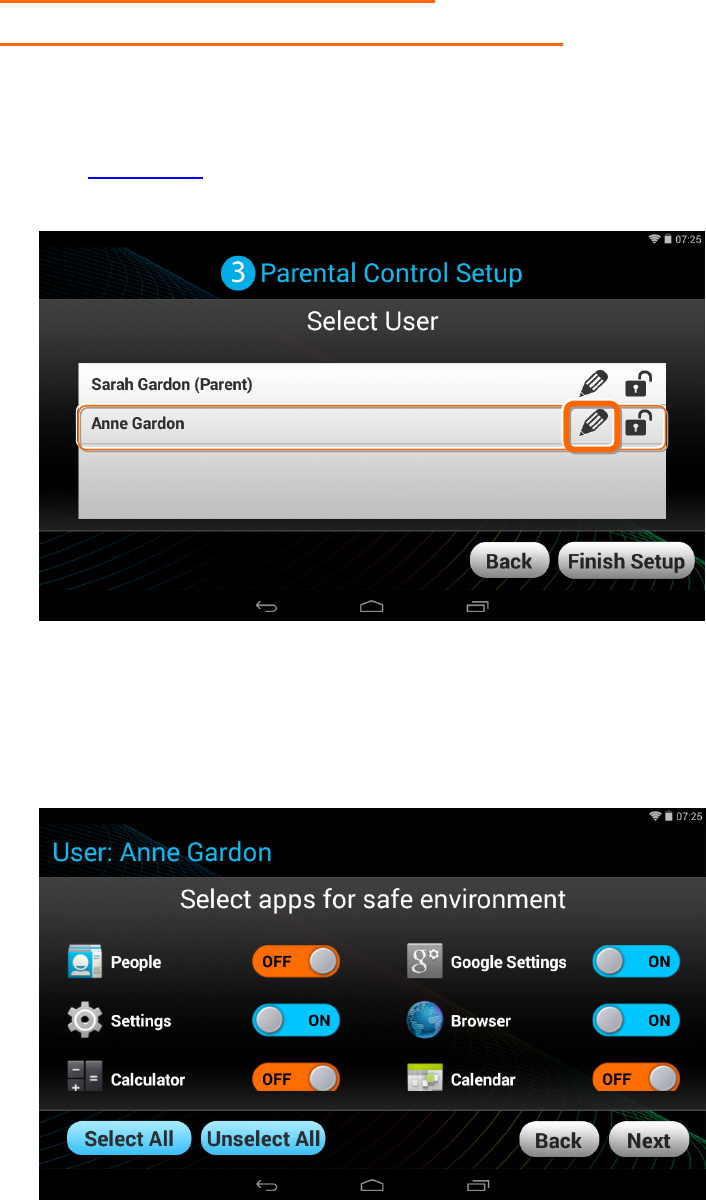
4. PARENTALCONTROLSETUP>
SELECTAPPSFORSAFEENVIRONMENT
TouchtheEditiconfromtheParentalControlUserSettingslist.If
youhavemorethanoneuser,makesuretotouchtheEditicon
thatisdisplayedbytheuserforwhomyouwanttosetthecontrols.
SeetheAddUserssectiononmoreinformationabouthowtoadd
users.
Selectappsforsafeenvironment
The‘Selectappsforsafeenvironment’screenopens.Youcannow
settheParentalControlsfortheselecteduser.

32
Tochangethesettingforanapplication:
TouchONorOFFbuttontotherightoftheApptotogglebetween
theON/OFFoptionsandselectthedesiredParentalControllock
settingforeachapp.Swipeyourfingeracrossthetablettothe
right/lefttoviewthecontinuedlistofApps.
Thefollowingoptionsareavailable:
• OFF:IndicatesthattheselectedAppwillautomaticallylaunch
withoutenteringtheParentalLockCode.
IfyouwouldliketoquicklydeactivateallAppswiththeParental
ControlLocksetto‘OFF’onallApps,youcantouchUnselectAll.
• ON:IndicatesthattheParentalControlhasbeenactivatedfor
theselectedAppandyourParentalLockCodeisrequiredtobe
enteredinordertolaunchthatApp.Whentheusertriesto
launchthelockedapp,aParentalControlnotificationappears
inthestatusbar.TouchtheParentalControlnotificationicon
toopentheUnlockappscreenandentertheParentalLockCode.
IfyouwouldliketoquicklyactivateallAppsatoncewiththe
ParentalControlLock‘ON’youcantouchSelectAll.
• SelectAll:Allappsaresetto‘ON’
• UnselectAll:Allappsaresetto‘OFF’
• Next:TouchNexttocontinuetothe‘ParentalDailyLimits’
settings.
•
Back:TouchBacktoreturntothe‘Selectappsforsafe
environment’screen.
NOTE:Whenopeningthe‘Selectappsforsafeenvironment’
screenforthefirsttime,allAppsarebydefaultselectedwith
the‘OFF’setting.
Whenyouhavecompletedsettingtheappsyouwouldliketobe
locked,touchNexttocontinuesettingyourParentalControls.
5. PARENTALCONTROLSETUP>
PARENTALDAILYLIMITS

33
AllapplicationsthatyouhavenotlockedwiththeParentalControl
appearinthe‘ParentalDailyLimits’screen.
Thissettingallowsyoutocontroltheamounttheseunlockedapps
canbeusedondailybasis(basedon24hours).
Thefollowingoptionsareavailable:
‐ OFF:ThedefaultsettingisOFF.Thisindicatesthatthereisno
timelimit.Allapplicationscanbeusedforanindefinitetime.
‐ ON:WhenturnedON,eachapplicationcanbesettobeinuse
onadailybasisasperHours:Minutes.Thedefaulttimeissetto
24:00.
Oncetheapplication’ssetdailytimelimithasexpired,theapp
automaticallyclosesandislockedfortheremainderoftheday.
Eachtimetheuserwantstore‐launchtheapplicationforthe
remainderoftheday,theappwillneedtobeunlockedwiththe
ParentalLockCode.AParentalControlnotificationappearson
thestatusbarandallowsyoutounlocktheapplication.To
unlocktheapp,touchtheParentalControlnotificationiconto
opentheUnlockAppscreenandentertheParentalLockCode.
Thiswillthenunlockandlaunchtheapplication.
‐ BonusHour:TouchBonusHourtoaddanhourtotheuseofall
appslistedintheParentalDailyLimitslist.Theonehouris
dividedbetweenalltheapplicationsnomatterwhattimehas
beensetperapp.YoucanaddmorethanoneBonusHourperday.
NOTE:TheBonusHourneedstoberesetonadailybasis.

34
Thenextday,allsettingsgobacktotheregularsettingswithout
theadditionaltimesetbytheBonusHour.
Next:TouchNexttocontinuetothe‘GlobalLimits’settings.
Back:TouchBacktoreturntothe‘Selectappsforsafeenvironment’
screen.
ToactivateParentalDailyLimits:
• ActivatethesettingbuttouchingtheOFFbutton.Thebutton
thenchangestotheONsetting.
• Touchthetimetotherightofanapplicationandsetthetime
(Hour:Minutes).
• TouchDone/OKtosetthedailytimelimits.
• Swipeyourfingeracrossthetablettotheright/lefttoviewthe
continuedlistofAppsandsetasdesired.
Whenyouhavecompletedsettingtheappstobelocked,touch
NexttocontinuesettingyourParentalControls.
6. PARENTALCONTROLSETUP>
GLOBALTIMELIMITS
AllapplicationsthatyouhavenotlockedwiththeParentalLock
Codeapplytothe‘GlobalTimeLimits’setting.Thesesettingsallow
youtocontrolhowmanyhourseachusercanusethetabletper
dayandperweek.
Thefollowingoptionsareavailable:
35
‐ OFF:ThedefaultsettingisOFF.Thisindicatesthatthereisno
globaltimelimitset.
‐ ON:TouchtheOFFbuttontoturnON.WhenturnedON,the
applicationscanbesettobeinuseasperHours:Minutes.
Thedefaulttimeissetto24:00.
• TimeLimitPerDay:TheGlobalTimeLimitsallowsyoutoset
theaccesstoappsforaspecificnumberofhoursperday.The
timeisaccumulatedbasedontheuseofapps.Thedefaultis24
hours.
• TimeLimitPerWeek:TheGlobalTimeLimitsallowsyoutoset
theaccessforthespecificnumberofdaysperweek.Thetimeis
countedbasedontheuseofapplicationsSundaythrough
Sunday.Thedefaultis168hours.
• TimeReminder:Touchthetimenexttothe‘TimeReminder’to
addanotificationthatappearsbeforetheexpirationtime.The
timecanbesettingaccordingtoHours:Minutes(upto24hours).
Back:TouchBacktoreturntothe‘ParentalDailyLimits’screen.
FinishSetup:TouchFinishSetuptosaveyourParentalControl
settingsandreturntotheUserOptionListscreen.
NOTE:YoumusttouchFinishSetupintheGlobalLimits
screeninordertosavealloftheParentalControlSettingsyouhave
setfortheselecteduser.IfyouexitParentalControlatanystage
withouttouchingFinishSetuponthisscreen,thenyoursettings
willnotbesaved.Youwillthenneedtore‐entertheParental
Controlforthatuserandre‐enteryoursettings.
7. FINISHINGTHEPARENTALCONTROLSETUP
TouchFinishSetupfromtheGlobalTimeLimitsscreentosave
theParentalControlsyouhavesetfortheselecteduserandthen
returntotheUserSettingsListscreen.
FromtheUsersSettingsList,touchtheFinishSetuptoreturnto
theHomescreen.
36
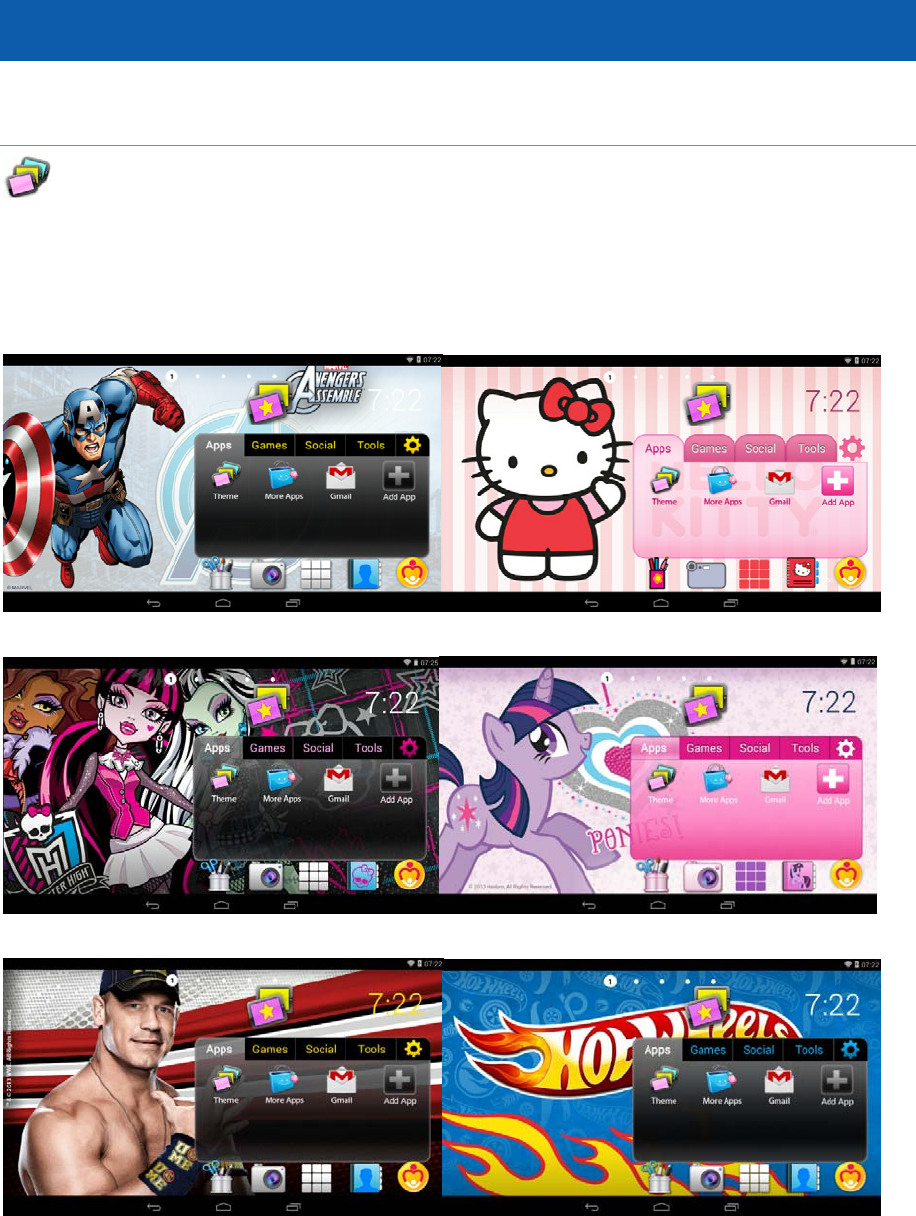
8. THEMEMANAGER
8.1 Overview
TheThemeManagerisaspecialfeaturethatallowsyourCamelio2™Tablet
tochangeintoyourfavoritecharacterwithaThemeAppCard(maybeincluded
orsoldseparately–checkthepackagingofyourtablet).Youcanaddasmany
ThemesasyoulikefromalargecatalogofcharacterssuchasHelloKitty,MyLittle
Pony,Avengers,TeenageMutantNinjaTurtlesandmanymore.
AvengersThemeHelloKittyTheme
MonsterHighThemeMyLittlePonyTheme
WWETheme HotWheelsTheme

37
8.2 UsingtheThemeManager
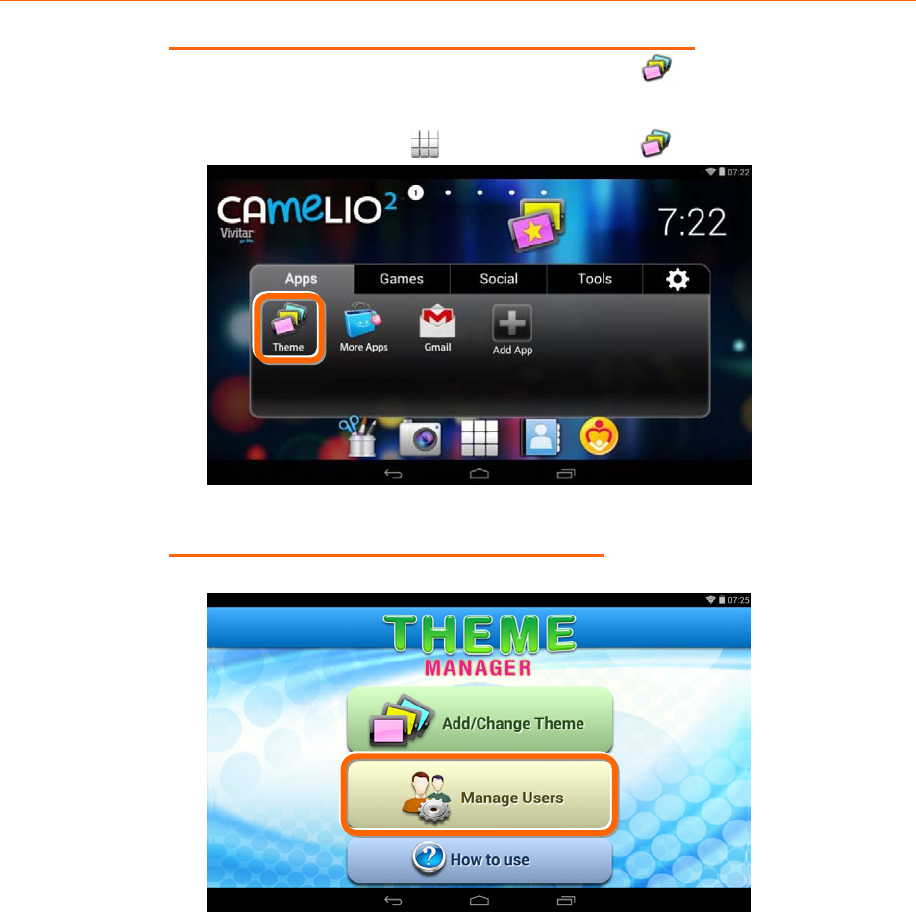
1. LAUNCHINGTHETHEMEMANAGER:
ToopentheThemeManagerAppoptions,touchtheTheme
shortcuticononthe‘Apps’TabbedAppsManagerfromthefirst
Homescreen.
Alternatively,touchtheAppsiconandthentheTheme
Managericon.
The‘ThemeManager’screenappears.
NOTE:MakesureyourtabletisconnectedtoaWi‐Finetwork.
InordertoseethelatestonlinelistofThemesyouwillneedtobe
connectedtotheInternet.

38
2. ACCESSINGTHEONLINECATALOG:
Fromthe‘ThemeManager’screen,touchtheAdd/ChangeTheme
buttontoopentheonlinecatalogofThemes.Fromthisonlinelist,
youcanchoosetoaddanddownloadnewThemes.Youcanalso
selectapurchasedThemeandswitchyourtablettothatTheme.
3. ADDINGANDDOWNLOADINGANEWTHEME:
ADD:ToaddanewTheme,touchtheADDbuttonbytheselected
Theme.The‘ActivateTheme’screenappears.
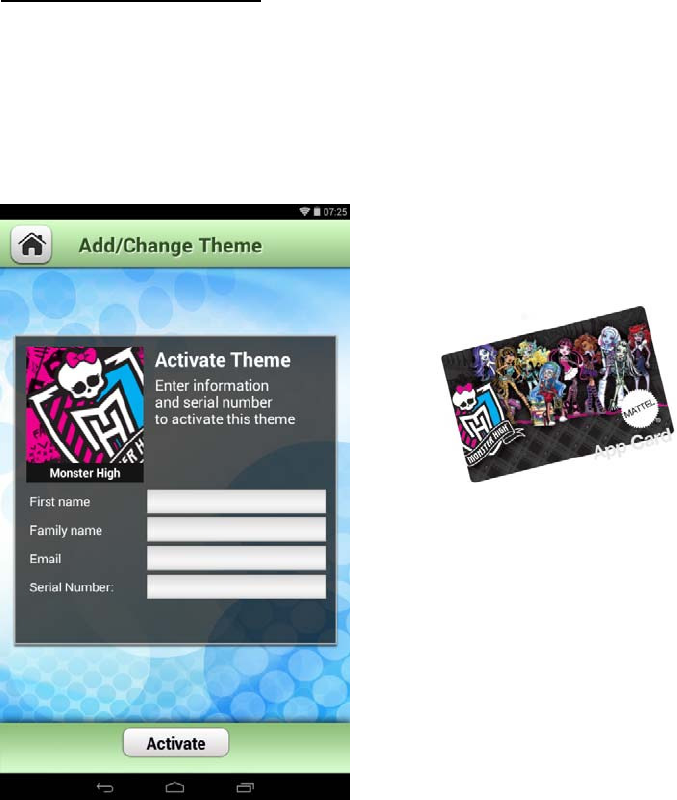
39
ACTIVATENEWTHEME:Enteryourfirstname,familyname,email
andserialnumber.TouchDone(fromtheonscreenkeyboard)
onceyouhavecompletedenteringtheinformation.
NOTE:TheserialnumberisshownontheThemeAppCard
includedintheCamelioCustomizerKit.CamelioCustomizer
Kitsoldseparately.
TouchtheACTIVATEbuttontodownloadandbeginusingyour
newlyaddedTheme.Keepinmindthatthedownloadprocessmay
takeseveralmoments.
Collectallyourfavoritecharacters!
MonsterHighAppCard
withserialnumber
(soldseparately)
40
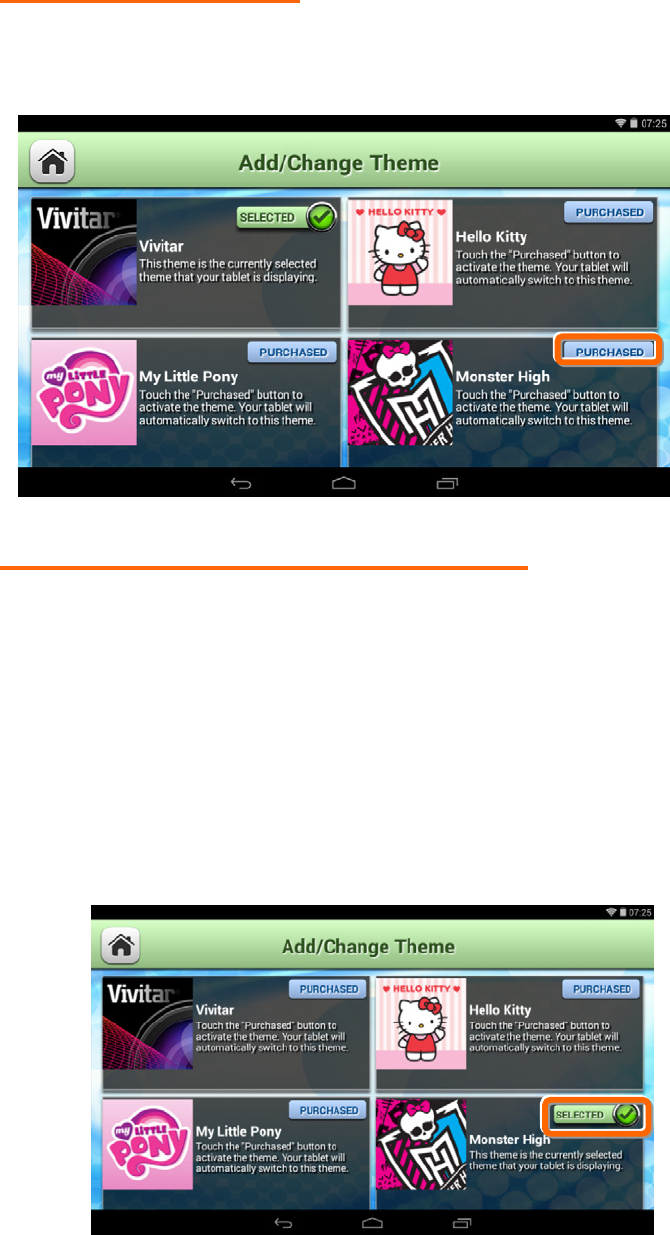
4. PURCHASEDTHEME:
OncethedownloadiscompletethebuttonbythenewThemechanges
fromADDtoPURCHASED.ThisidentifiesaThemethatyouhave
purchasedandaThemethatcanbeappliedtoyourTabletatanytime.
5. SELECTINGTHEPURCHASEDTHEME:
TheVivitarThemeisthedefaultTabletThemeandisautomatically
selecteduponinitialuse.TheVivitarThemeautomaticallydisplaysthe
SELECTEDbutton.Thisindicatesthecurrent,selectedTabletTheme.
OnceyouhavepurchasedandaddednewThemesyoucanchange
theThemeatanytimebytouchingthePURCHASEDbuttonofthe
Themeyouwant.TheselectedThemewillthenappearwiththe
highlightedSELECTEDbuttonandyourtabletwillautomatically
changeintotheThemeyouhaveselected.
NOTE:TheHomescreenfunctionalityisidenticalonallthe
differentthemes.
41
6. SWITCHINGTHEMES:
OnceyouhaveselectedanewTheme,yourtabletisnow
personalizedandactivatedwiththisTheme.Toaddandchange
Themes,followtheinstructionsasdescribedintheprevioussteps.
Remember,youcanaddasmanyThemesasyoulikefromalarge
catalogofcharacters.
NOTE:AThemecanbeselectedforaspecificUserandcanbe
changedforeachuseratanytime.Seethe‘AddUsers’
sectionformoredetails.
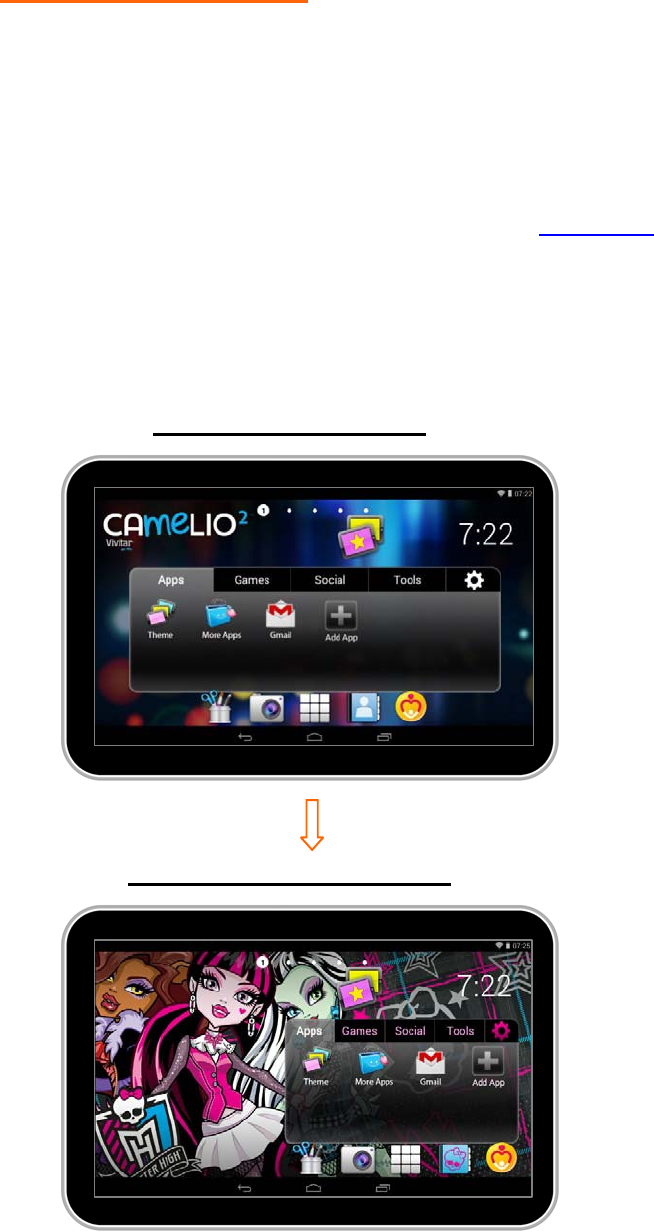
ThefollowingillustratesanexampleofswitchingThemes:
HowtheTabletappearswhenchangingfromthe‘Vivitar’Themeto
thepurchased‘MonsterHigh’Theme(soldseparately).
CurrentTheme‐Vivitar:
NewTheme–MonsterHigh:
42
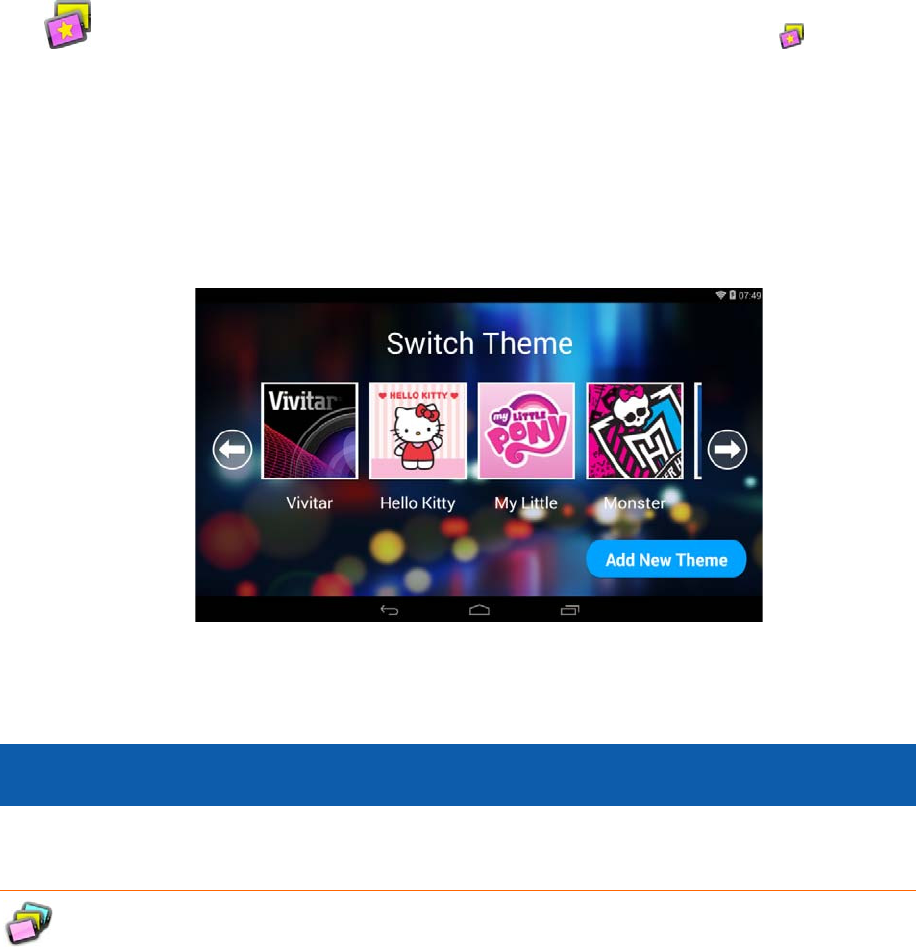
ToeasilychangebetweenyourpurchasedThemes,touchtheSwitch
ThemeiconfromtheHomescreenorfromtheAppsscreen.
TheThemeSwitcherdisplaysallofyourpurchasedThemesandallowsyouto
easilyscrollthroughthemandthenselecttheThemeyouwouldlikeyour
Camelio2totransforminto.
ToaddanewpurchasedTheme,touchtheAddNewThemebuttonand
followtheinstructionsasoutlinedinthepreviousstepstoaddyournew
Theme.
9. ADDUSERS
9.1 Overview
Youcanadduptofivedifferentusers(andanadditionalparentuser)onyour
Camelio2™Tablet.Eachusercanhavehis/herownTheme,profilepicture,
applicationfavoritesdisplayingontheTabbedAppsManagerandParental
Controlsettings.
43
9.2 AddingaNewUser
1. LAUNCHINGTHETHEMEMANAGER:
TomanagetheusersofyourTablet,touchtheThemeManagerapp
shortcuticononthe‘Apps’TabbedAppManagerfromtheHomescreen.
Alternatively,touchtheAppsiconandthenThemeManagericon.
2. ACCESSING‘MANAGEUSERS’:
OncetheThemeManagerappisopen,touchManageUsers.
44
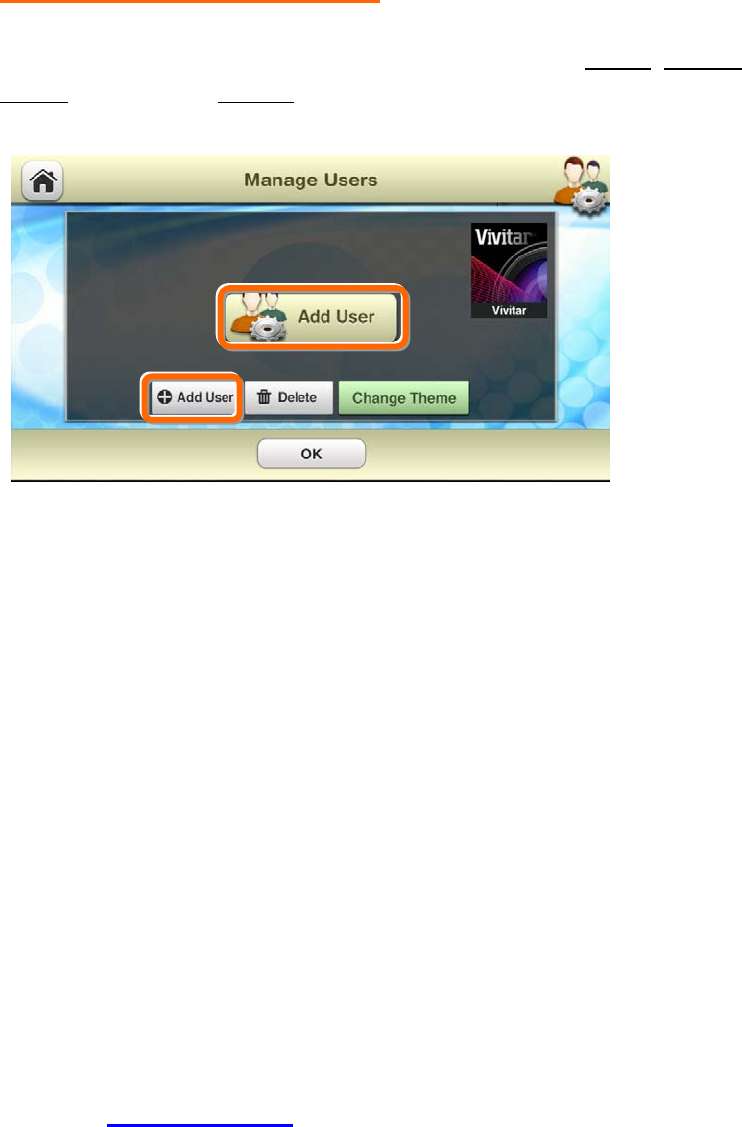
3. ADDINGFIRSTNEWUSER:
ThefirsttimeyouactivatetheManageUsersfeature,the‘Add
User’screenappears.YouwillbepromptedtoaddaName,Profile
Image,andselectaTheme.
TouchAddUsertoaddanewuser.
• ADDINGANAME
Entertheuser’sfirstnameandlastname.
WhencompletetouchDonefromtheonscreenkeyboard.
• SELECTINGAPROFILEIMAGE
Youcanchangethedefaultprofilepicturebytouchingthe
ProfileImageitselfandselectinganexistingphotoonyour
Tablet(fromtheGallery,PhotosorDocuments).
• SELECTINGATHEME
ThecurrentThemefortheUserappearsbelowtheProfileImage.
TouchChangeThemetoopenthe‘Add/ChangeTheme’
options.ThecurrentthemeisdisplayedwiththeSelected
buttonandcheckmarkicon.Ifyouhavealreadypurchased
andaddedanewTheme,theThemeisdisplayedwitha
Purchasedbutton.TochangetoadifferentTheme,toucha
PurchasedThemebutton.
See‘ThemeManager’formoreinformationonhowtoadd
newThemes.
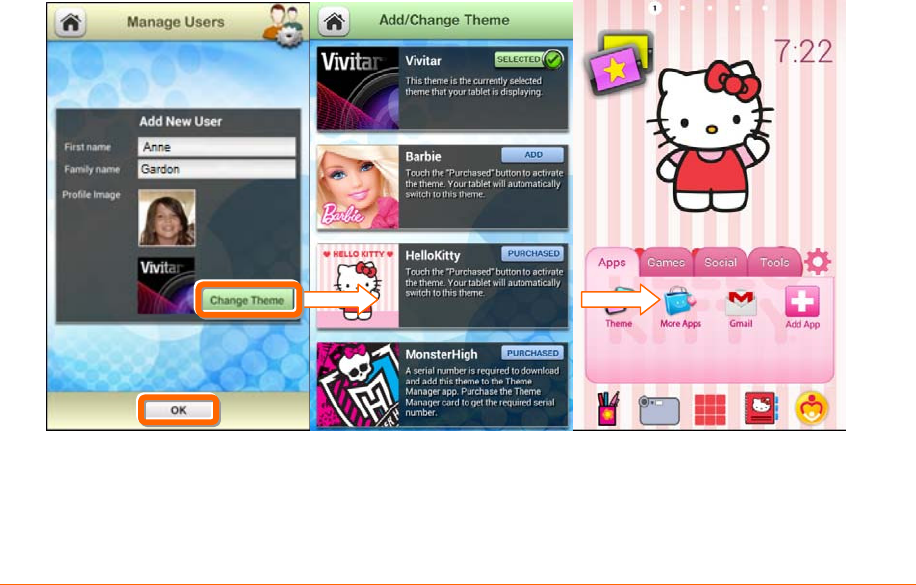
45
NOTE:
‐ ThedefaultThemeisthe‘Vivitar’Theme.Ifyouhavenot
yetpurchasedadditionalThemes,theVivitarwillbethe
availableTheme.
‐ TheADDiconbytheThemeindicatesthattheThemeis
availableforpurchase.Aserialnumberisrequiredtoadd
anewTheme(includedintheThemePacks‐sold
separately).
‐ TheUser’sThemecanbechangedatanytimetooneof
thedifferentPurchasedThemes.EachUsercanselect
his/herownTheme.
• COMPLETINGTHEADDITIONOFTHENEWUSER
OnceyouhaveenteredtheUserfirstandlastname(andifyou
haveselectedaProfilePictureandTheme)touchOKtocreate
thenewUser.
NOTE:IfyouhaveselectedadifferentTheme,your
chosenThemeautomaticallyappearsonyourTablet
afteryouhavetouchedOK.
9.3 AddingAdditionalUsers
46
9.3.1 AddingMoreUsers
ToaddmoreUsers:
1. TouchtheThemeappshortcuticononthe‘Apps’TabbedApp
ManagerfromtheHomescreentoopenthe‘ThemeManager’
screen.
Alternatively,touchtheAppsiconandthenThemeManager
icontoopenthe‘ThemeManager’screen.
2. TouchManageUserstoopenthe‘ManageUsers’screen.
ThecurrentUserishighlighted.
3. TouchAddUsertoopenthe‘AddNewUser’screen.
Followthestepsabove(Section10.2)todefinethenewuser
First/LastName,ProfileImage,andTheme.
NOTE: YoucanincludeuptofivenewUsers(notincludingthe
parentuser).
9.3.2 DeletingaUser
TodeleteaUser:
1. TouchtheThemeappshortcuticononthe‘Apps’TabbedApp
ManagerfromtheHomescreentoopenthe‘ThemeManager’
screen.Alternatively,touchtheAppsiconandthenTheme
Managericontoopenthe‘ThemeManager’screen.
2. TouchManageUserstoopenthe‘ManageUsers’screen.
ThelistofavailableUsersisshownwiththecurrentUserhighlighted.
3. TouchaUser’snamefromthelisttoselectandhighlightit.
4. TouchDeletetoautomaticallydeletetheselectedUser.
NOTE: Aparentusercannotbedeleted,orifthereisnoparent
user,thefirstaddedusercannotbedeleted.
9.3.3 SwitchingUser
ToswitchbetweenUsers:
1. TouchtheThemeappshortcuticononthe‘Apps’TabbedApp
ManagerfromtheHomescreentoopenthe‘ThemeManager’
screen.Alternatively,touchtheAppsiconandthenTheme
Managericontoopenthe‘ThemeManager’screen.
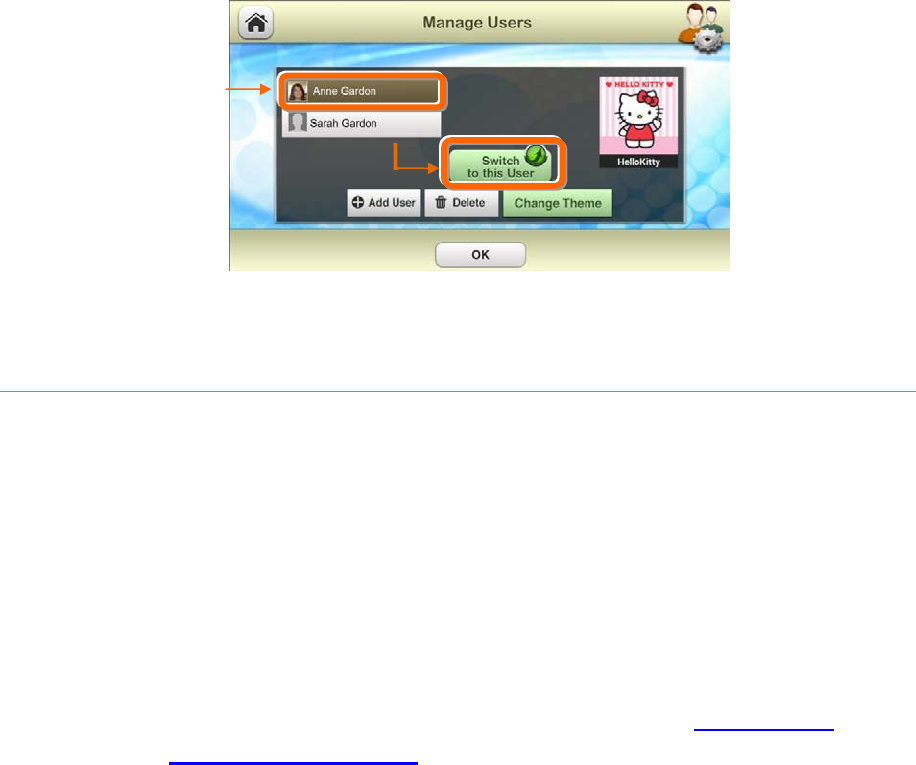
47
2. TouchManageUserstoopenthe‘ManageUsers’screen.
3. ThelistofavailableUsersisshownwiththecurrentUser
highlighted.ThatUser’sThemeisalsodisplayed.Ifyouhavemore
thanthreeusers,scrolldown/uptoseetheotherusers.
4. TouchthedesiredUserNametoselectandhighlightthatUserfromthe
listofUsers.
5. TouchSwitchtothisUser.
6. YourtabletautomaticallychangesandopenstotheHomescreen
oftheselectedUser’sThemeandsettings.
9.4 MultipleUsers
IfyouhaveaddedmultipleUserstoyourtablet,aUserwillneedtobeselected
afterthetablethaseitherbeenpoweredonorbeeninstandby/sleepmode.
1. UnlocktheTabletafterpoweringonorwakinguptheTablet.
2. Onceyouhaveunlockedyourtablet,thelistofavailableUsersappears.
3. TouchoneoftheUsernameslistedtoactivateyourcustomized
tablet(aspertheselectedUser’ssettings)andexperiencetheever
changingworldoftheCamelio2™Tablet!
NOTE:IftheselectedUserrequiresapasswordassetviathe
ParentalControls,theUserwillthenbepromptedtoentertheir
passwordinordertounlockthetablet.SeetheLockingand
UnlockingYourTabletsectionformoreinformationregardinghow
tounlockyourtablet.
CurrentUser
(highlighted)
48
10. TOOLBARSHORTCUTS
ThemainHomescreenistheentrypointtoyourCamelio2™Tablet.Thebottom
toolbarallowsquickaccesstoexcitingfunctionsonyourTablet.TheTabbedApps
Managerallowsyoutoeasilyorganizeandcreateshortcutstoyourfavoriteapps.
TheHomescreenincludesthefollowingToolBarAppshortcuts:
TouchPhotoEditortoeditphotos,addframesandclipartitems.
TouchCameratotakepicturesandrecordvideos.
TouchAppstoviewtheavailableappsonyourtablet.
TouchContactstoaddandedityourcontacts.
TouchParentalControltospecifywhichappscanbeusedbyyourchildren.
NOTE:TheHomescreenalsoincludesquickaccesstotheThemeManager
andSwitchTheme.
TouchThemeManagertoadd,purchaseandswitchyourtabletto
differentThemes.TheThemeManageralsoallowsyoutomanagethe
users.
TouchSwitchThemetoquicklyandeasilychangetooneofyour
themes–purchasedseparately.
49
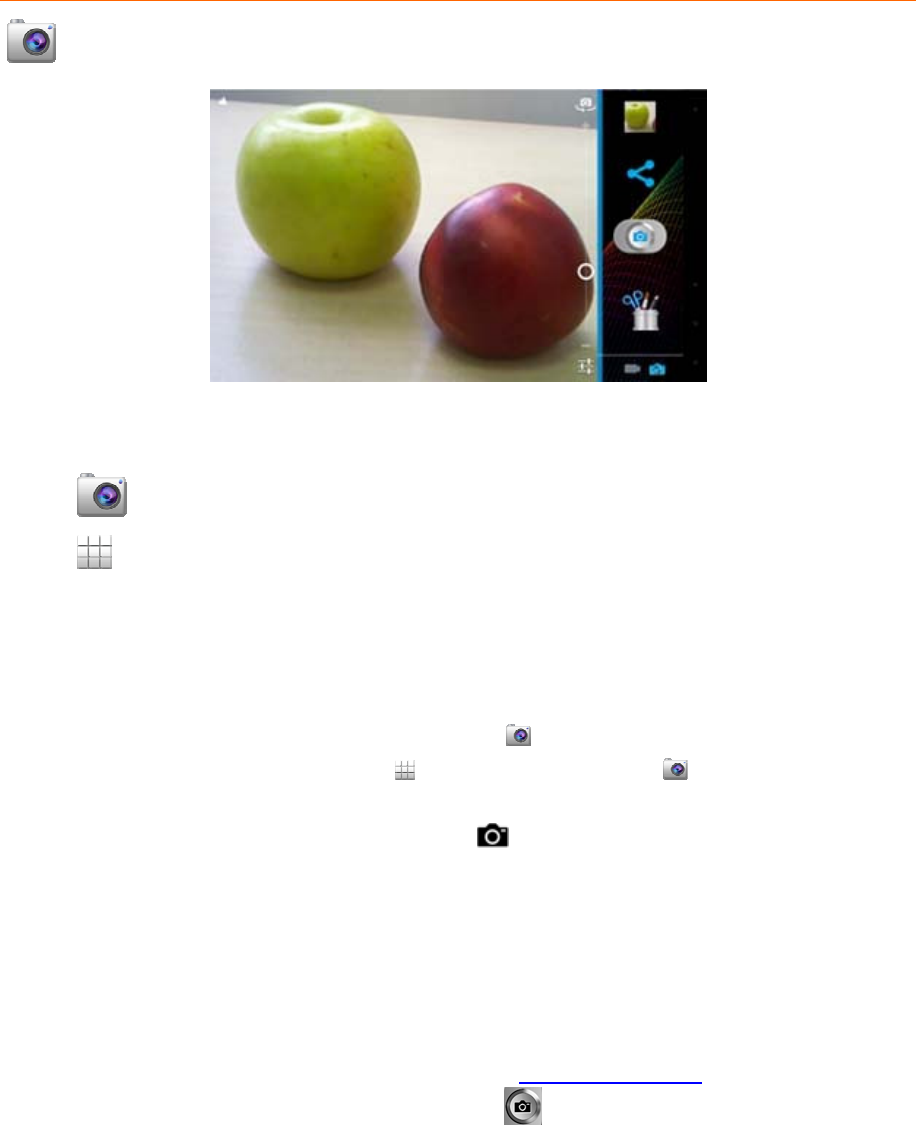
10.1 Camera
Useyourdevice’sbuilt‐incameratotakepicturesandrecordvideos.
ToaccessyourCamera:
‐ FromtheHomescreen,touchtheCameraicon.
‐
Alternatively,touchtheAppsiconfromtheHomescreenandthen
theThemeCameraapplicationicon.
10.1.1 TakingPictures
1. FromtheHomescreen,touchCamera.
Alternatively,touchAppsandthentouchThemeCamera.
2. ThedefaultCaptureModeissettotakephotos–PhotoCapture
Mode.Ifneeded,touchtheCameraicontosettheTabletfor
PhotoCaptureMode.
3. Usingthedisplayasaviewfinder,composeyourpicturebyaiming
thelensatthesubject.
‐ ToZoom:SlideyourfingerontheZoomlineonthescreen
towardsthe(+)ZoomInor(‐)ZoomOuttofocusonthearea
youwant.
‐ Toconfiguresettings,see‘CameraSettings’.
4. Totakethepicture,touchtheTakePhotobutton.
5. Toviewyourimageaftertakingapicture,touchtheImageViewer
(thethumbnailimageofyourlastcapturedphoto)toviewthe
50
pictureinthe‘Gallery’application.
NOTE:Imagescanbedeletedfromthe‘Gallery’app.
6. TouchBackortheCameraicontoreturntotheCaptureModeto
takemorephotosorvideos.
NOTE: SwitchCamera:
‐ TouchtheSwitchCameraicontoswitchbetween
theFrontandRearCamera.
‐ SwitchtotheFrontCameraforSelf‐Portraits.
10.1.2 CameraSettings
1. TouchtheCameraSettingsicontoopentheCameraSettings
options.
2. Touchoneoftheoptionstoconfigurethecamera:
‐ WhiteBalance:
TaponeoftheWhiteBalanceoptionstochooseasettingfor
thelightsource.
Theoptionsinclude:Auto,Incandescent,Daylight,Fluorescent,
Cloudy.
‐ SCNScenemode:
TaponeoftheSceneModeoptionstochooseasettingforthe
scenemodetomatchconditions.TheSCNoptionsinclude:
Auto,Night
‐
CameraSettings:
TheCameraSettingsincludesthefollowingsettings:
Storelocation:Enableordisabletaggingofpictureswiththe
GPSlocation.TheStoreLocationoptionsinclude:Off,On
Picturesize:Thepicturesizeallowsyoutosettheresolutionof
thephoto.ThePictureSizeoptionsinclude:
2Mpixels,1Mpixels,VGA(touchthearrowstotogglebetween
theoptions)
Picturequality:ThePicturequalitysettingsetsthequalityof
thephoto.ThePicturequalityoptionsinclude:Normal,Fine,
SuperFine
Restoredefaults:SetsallCamerasettingstothefactory
defaults.
51
Help:AccesstheOnlineCamelio2™TabletHelp.Youwillneed
tobesignedintoyourGoogleaccountorwillbepromptedto
createanaccountifneeded.
About:DisplaytheCameraversion.
10.1.3 CapturingVideo
1. FromtheHomescreen,touchCamera.
Alternatively,touchAppsandthentouchThemeCamera.
2. ThedefaultCameraModeissettotakephotos–PhotoCapture
Mode.TouchtheVideobuttontosettheTabletforVideo
CaptureMode.
3. Usingthedisplayasaviewfinder,composeyourvideobyaiming
thelensatthesubject.
‐ ToZoom:SlideyourfingerontheZoomlineonthescreen
towardsthe(+)ZoomInor(‐)ZoomOuttofocusonthearea
youwant.
‐ Toconfiguresettings,see‘CamcorderSettings’.
4. Tostartrecording,touchtheRecordVideobutton.
Duringrecording,theredRecordiconappearswiththeelapsed
recordingtime.TheRecordVideobuttonchangestored.
5. Tostoprecording,touchtheRecordVideobuttonagain.
6. Aftertakingavideo,touchtheImageViewer(thethumbnailimage
ofyourlastcapturedvideo)toviewthevideointheGalleryapplication.
NOTE: Imagescanbedeletedfromthe‘Gallery’app.
7. TouchBacktoreturntotheCaptureModetotakemorephotosor
videos.
NOTE:SwitchCamcorder
TouchtheSwitchCamcordericontoswitchbetweenthe
FrontandRearCamera.
52
10.1.4 CamcorderSettings
1. TouchtheCamcorderSettingsicontoopentheCamcorder
Settingsoptions.
2. Touchoneoftheoptionstoconfigurethecamcorder:
‐ WhiteBalance:
TaponeoftheWhiteBalanceoptionstochooseasettingfor
thelightsource.
Theoptionsinclude:Auto,Incandescent,Daylight,Fluorescent,
Cloudy.
‐
TimeLapseInterval:
Chooseavaluetosetthetimelapse:
Off,1s,1.5s,2s,2.5s,3s,5s,10s
‐
CameraSettings:
Storelocation:Storelocation:Enableordisabletaggingof
pictureswiththeGPSlocation.TheStoreLocationoptions
include:Off,On
Restoredefaults:SetallCamerasettingstothefactorydefaults.
Help:AccesstheOnlineCamelio2™TabletHelp.Youwillneed
tobesignedintoyourGoogleaccountorwillbepromptedto
createanaccountifneeded.
About:DisplaystheCameraversion.
10.1.5 SharingYourCapturedPhotos
TouchtheSharebuttontoopenthe‘Share’windowandselecthow
youwouldliketoshareyourphotoswithyourfamilyandfriends.
1. Takeaphoto.Thecapturedphotoappearsinthe‘ImageViewer’
(thethumbnailimagebytheSharebutton).
2. Touchthe Sharebutton.The‘Share’windowopens.
3. Chooseasendingmethod,thenfollowthepromptstosharevia:
Facebook,Twitter,Email,Picasa,Flickr
NOTE: Youwillbepromptedtosignintotheselectedsocial
networkingsite.
InordertoshareyourphotosusingFacebook,pleasemakesure
tofirstinstalltheFacebookApponyourtabletandthenlogin.
53
10.1.6 SwitchingtoPhotoEditor
TouchthePhotoEditoricontoswitchfromtheCameraappto
thePhotoEditorapp.
10.2 PhotoEditor
Enhanceyourpictures,byaddingframesandcliparttosharewithfamily
andfriends.
ToaccessthePhotoEditor:
‐
FromtheHomescreen,touchthePhotoEditoricon.
‐
Alternatively,touchtheAppsiconandthentheThemePhotoEditor
icon.
10.2.1 MenuOptions
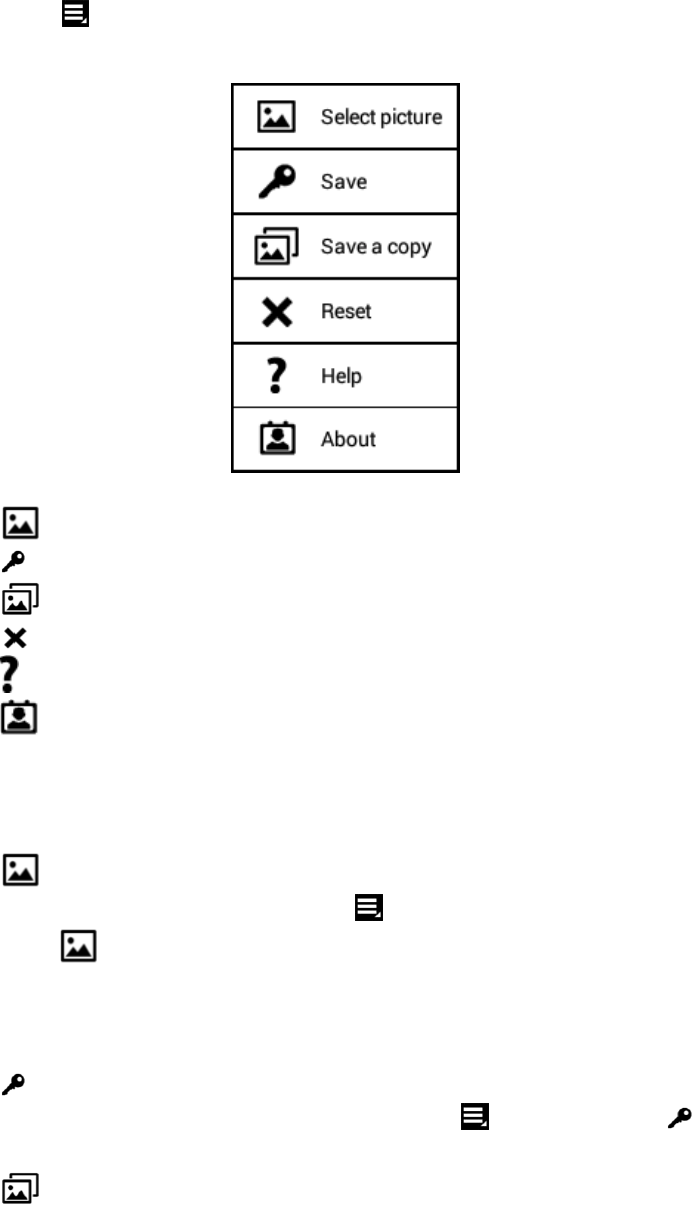
54
TouchtheMenu/SettingsicontoviewthePhotoEditorMenu
options:
1. Selectpicture‐Selectsapicturetoedit.
2. Save–Saveschangesmadeusingtheeditor.
3. Saveacopy–Savesacopyoftheeditedphoto.
4. Reset–Resetsthephototoitsoriginalimage.
5. Help–OpenstheonlineHelp.
6. About–DisplaysthedeviceBuildversion,Copyrights.
10.2.2 ViewingandSavingPictures
1. Selectingapicture:
Toselectpicturestoedit,touch Menuand
thenSelectpicturetoviewpicturethumbnails.Scrollthrough
yourpictures,andthentouchapicturethumbnailtodisplayitin
themediaviewarea.
2.
Savingchanges:
Tosavethepictureaftereditingit,touchMenuandthenSave.
3. Savingacopy:
Tosaveacopyofapictureaftereditingitandwithoutchanging

55
theoriginalpicture,touchMenuandthen Saveacopy.
4. Resettingpictures:
Togobacktotheoriginalpicturewithoutanychangesafterediting
it,touchMenuandthen Reset.
10.2.3 EnhancingYourImage
TouchtheEnhancetabtoautoenhance,croporrotateyourphoto.
AUTOENHANCINGAPICTURE
1. Selectaphoto.
2. SelecttheEnhancetabandthentouchtheAutoEnhanceiconto
autoimproveyourpicture.
CROPPINGAPICTURE
1. Selectaphoto.
2. SelecttheEnhancetabandthentouchtheCropicontoopen
thepictureintheCropmode.
3. TouchanddragtheBoxoutlinedinorangeovertheareathatyou
wanttocrop.
4. Toresizetheboxtothesizeyouwant,touchanddragthesidesof
theboxtoenlargeorreducethesizeofthecroparea.
5. TouchSavetocropthepictureorCanceltoreturntothepicture
withoutcroppingit.
ROTATINGAPICTURE
1. Selectaphoto.
2. SelecttheEnhancetabandthentouchtheRotateicontorotate
thepicture90degreestotheright.
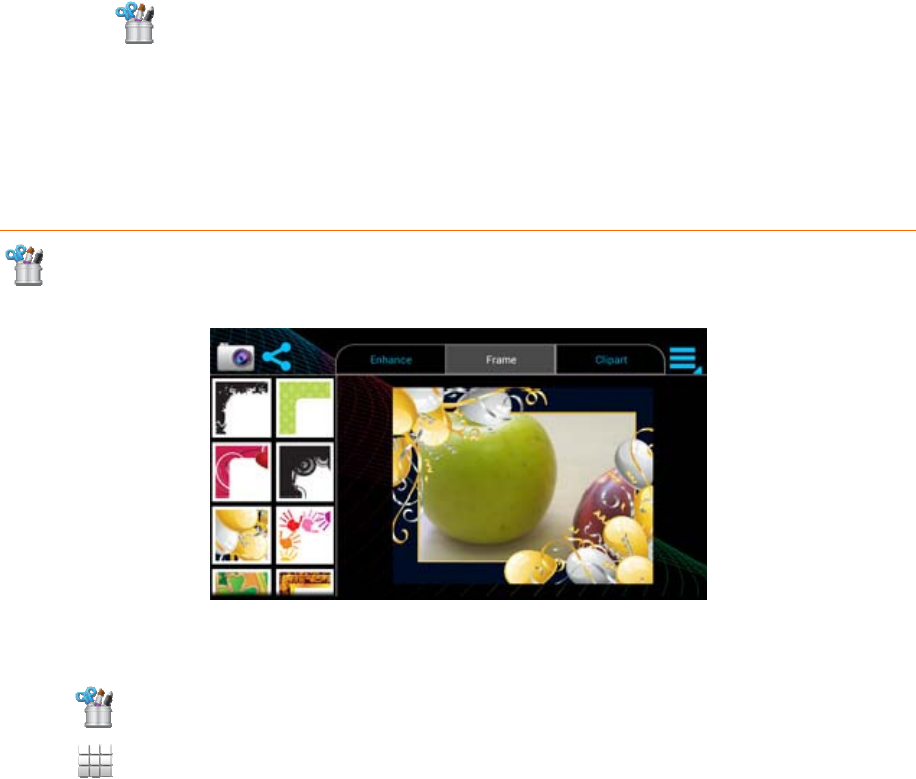
10.2.4 AddingFrames
TouchtheFramestabtoaddcreativeframestoyourphoto.
1. Selectaphoto.

56
2. SelecttheFramestabandthentouchoneoftheframesthat
appearsonthebottomofthescreentoaddittothepicture.
3. Touchanddragthepicturetorepositionitwithintheframe.Pinch
thepicturetoincreaseorreducethepicturesize.
10.2.5 AddingClipart
TouchtheCliparttabtoaddfunandexcitingcliparttoyourphoto.
1. Selectaphoto.
2. SelecttheCliparttabandthentouchoneoftheclipartitemsthat
appearsontheleftsideofthescreentoaddittothepicture.You
canaddmultipleclipartitemstoapicture.
3. Touchanddragthecliparttorepositionitwithinthepicture.Pinch
thecliparttoincreaseorreducetheclipartsize.
10.2.6 SharingPictures
TouchtheSharetabtoopenthe‘Share’yourphotoswithyour
familyandfriends.
1. Selectapicture.
2. Touchthe Sharetab.
3. Chooseasendingmethod,thenfollowthepromptstosharevia:
Facebook,Twitter,Email,Picasa,Flickr
NOTE: Youwillbepromptedtosignintotheselectedsocial
networkingsite.
InordertoshareyourphotosusingFacebook,pleasemakesure
tofirstinstalltheFacebookApponyourtabletandthenlogin.
10.2.7 SwitchingtoCamera
TouchtheCameraicontoswitchfromthePhotoEditorappto
theCameraapp.
10.3 Apps
57
FromtheHomescreen,touchtheAppsicontoaccessallApplicationson
yourCamelio2™Tablet.
10.3.1 ManagingApplications/Widgets
1. FromtheHomescreen,touchthe Appsicon.
2. The‘APPS’screenappearsasthedefaultandlistsallapplications
installedonyourTablet.
3. The‘APPS’tabincludesmultiplescreens.BrowsethelistofAppsby
slidingyourfingerleftorrightacrossthescreenuntilthenext
screenappears.Whenyouinstallnewapps,additionalscreens
maybeaddedtodisplaythem.
4. The‘WIDGETS’tabisnexttothe‘APPS’tab.TouchtheWIDGETS
tabtoviewthelistofallWidgetsinstalledonyourTablet.
10.3.2 AddingshortcutsfromAppstotheHomeScreen
1. FromtheHomescreen,touchthe Appsicon.
2. TouchandholdonanApporWidget,thendragittoaHomescreen.
TheselectedshortcutthenappearsontheHomescreen.
3. ToremoveaShortcut,touchandholdtheShortcut
untilRemoveappearsatthebottomofthescreen,thendrag
theShortcuttotheRemoveicon.
NOTE:APPSandWIDGETSshortcutscannotbeaddedtothe
firstHomescreen.
10.3.3 DownloadingandInstallingNewAppsfromtheGoogle
PlayStore
1. MakesureyourtabletisconnectedtoaWi‐Finetwork.
2. FromtheHomescreen,touchtheAppsicon.
3. TouchthePlayStoreicontoopentheonlineGooglePlayStore.
4. Browsetheappstoreandfollowthepromptstodownloadand
installAppsontoyourTablet.
5. Thenewapplicationappearsonthe‘Apps’screen.
58
10.3.4 UninstallingApps
1. YoucanuninstalltheadditionalAppsyouhavedownloadedand
installed.
NOTE:Pre‐loadedapplicationscannotbeuninstalled.
2. FromtheHomescreen,touchtheAppsicon.
3. TouchtheSettingsicon,andthentouchAppsfromtheSettingslist.
4. ThelistofyourdownloadedAppsappearsunderthe‘Downloaded’
tab.
5. TouchanApptoselectitandthentouchUninstallandfollowthe
promptstouninstalltheapp.
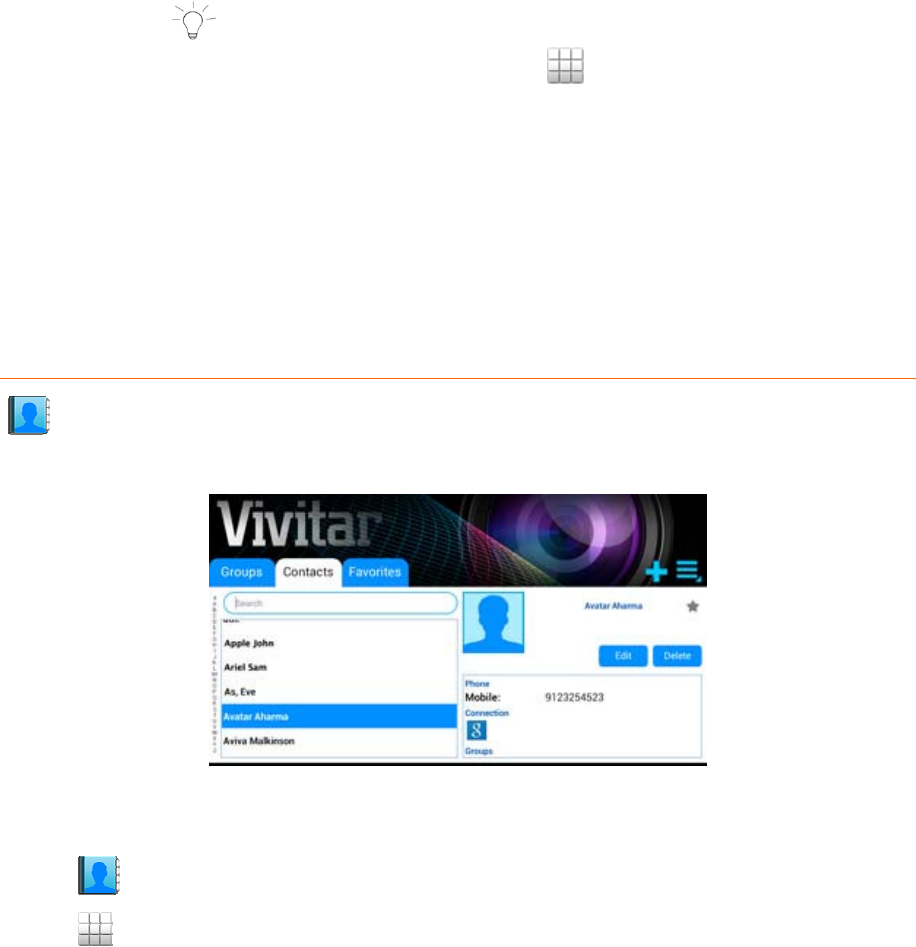
10.4 Contacts
TheContactsappallowsyoutocreatecontactsthatyoucanshare,send
emails,addtogroupsandmarkasfavorites.
ToaccessyourContacts:
‐
FromtheHomescreen,touchtheContactsicon.
‐
Alternatively,touchtheAppsiconandthentheThemeContactsicon.
‐ SelecttheContactsTabtoviewallcontacts.
10.4.1 CreatingaNewContact
59
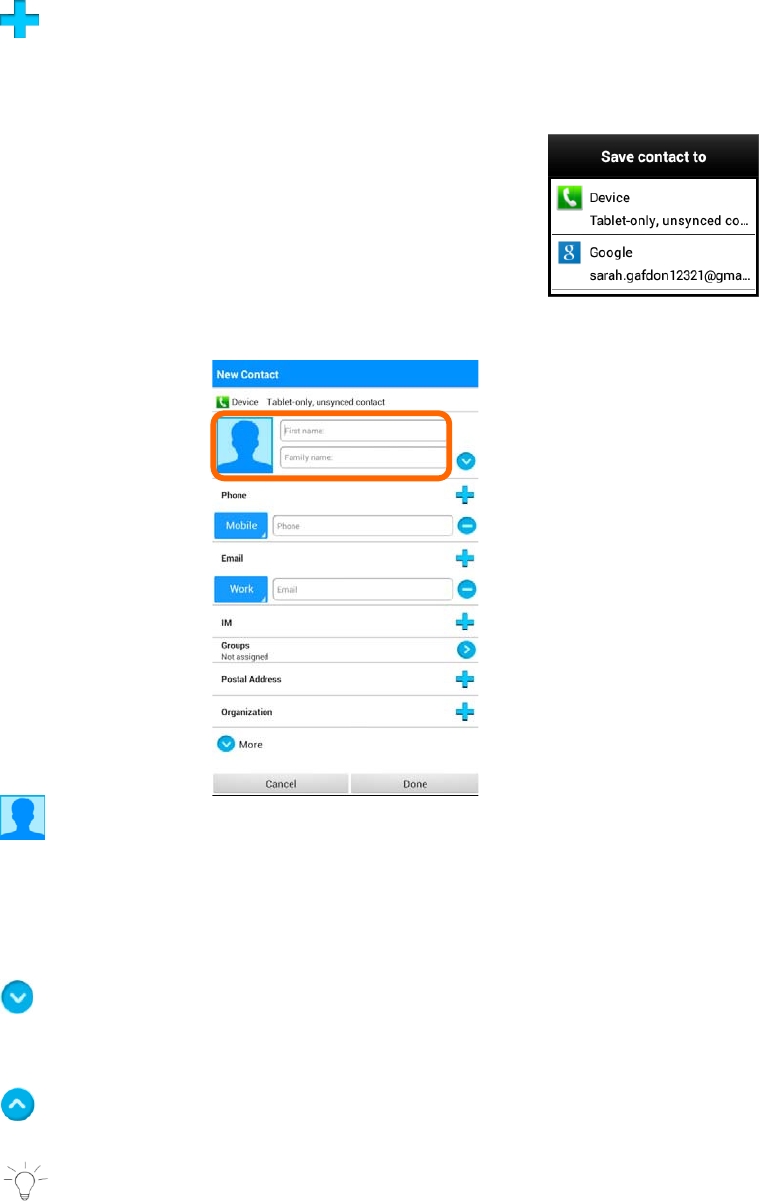
1. TouchtheNewContacticonfromtheContactsMainScreento
addanewcontact.
Thisopensthe‘Savecontactto’screen.
2. Fromthe‘Savecontactto’screen,
touchDevicetosavetheaccounttoyourtablet
Contactsonly,ortouchanaccountfor
synchronizingthecontact(availableoptions
dependontheaccountsyouhavesetupfor
synchronization).Afterselectingwheretosave
thecontact,the‘NewContact’windowappears.
3. TouchthePhotoThumbnailicontoselectanexistingphoto
fromtheGalleryortotakeanewphotothatwillidentifythe
contact.
4. Enterthecontact’sFirstandLastnameintheNamefieldsusing
theonscreenkeyboard.
TouchtheMoreInformationicontoenteradditionalname
relatedfieldssuchasthecontact’sMiddlename,NameSuffix,and
more.
TouchtheLessInformationicontominimizethedetailstoview
thefirstandlastname.
NOTE:Youcantouchthereturnbuttononthekeyboardafter
eachfieldiscompletetomovetothenextfield.

60
5. Continueenteringthecontact’sinformationasspecified‐including
Phone,Email,IM,Groups,PostalAddressandOrganization.
YoucanchangetheContactLabelforPhone,EmailandIMby
touchingacurrentContactLabel.Alistthenappearsofthelabel
options.Touchoneoftheoptionstoselectitandchangethelabel
accordingtothecontactinformationyouhaveentered.
6. Touchthe‘Plus’icontoaddnewfieldsforthecontact.
Touchthe‘Minus’icontoremoveacontactfield.
7. TouchtheMoreiconbelowthe‘Organization’fieldtoview
additionalcontactfieldsincludingNotes,Nickname,Webaddress,
Events,Birthday,Anniversary,OtherandInternetcall.
8. TouchDonewhenyouhavefinishedenteringthecontact
informationtosavethecontactdetailsandexittotheMain
Contactsscreen.
TouchCanceltoexitwithoutsavingthenewcontactdetails.
10.4.2 ManagingYourContacts
UPDATINGCONTACTS
1. ToEditaContact:
‐ TouchanamefromtheContactslisttoselectit.
‐ TouchtheEditbuttontoedittheselectedContact’s
information.
‐ TouchContactfieldstomodifyinformation.
‐ Whenyoufinishenteringtheinformation,touchDone.
2. ToDeleteaContact:
‐ TouchanamefromtheContactslisttoselectit.
‐ TouchtheDeletebuttontodeletetheselectedContact.
‐ Attheprompt,touchOKtoproceedwithdeletingthe
Contact.
‐ TouchCanceltoreturntoContactswithoutdeletingthe
Contact.
NOTE:Deletingacontactwhensyncisenabledwill
onlydeletethecontactfromtheaccountonthedevice.
CONTACTSDISPLAYOPTIONS

61
1. TouchtheMenuicontoopentheContactMenuoptions
andthentouchContactstodisplaytochoosecontactsto
display.
TouchtodisplayeitherAllContacts,Device,oneofyour
accountsorCustomizeListofcontacts.
NOTE:‘CustomizeList’definesacustomview.Selectthe
optionsyouwanttorestricttheview.
CHOOSINGHOWCONTACTSDISPLAY
2. TouchtheMenuicontoopentheContactMenuoptions
andthenscrolldowntoselectSettings.
3. Thefollowingoptionsappear:
Onlycontactswithphones,Listby,Displaycontactsby
‐ TouchOnlycontactwithphonestodisplaycontactsthat
havephonenumbers.
‐ TouchListbytosortcontactsbyfirstorlastname.
‐ TouchDisplaycontactsbytoshowcontactsbyfirstorlast
name.
EXPORTINGANDIMPORTINGCONTACTS
TobackupandrestoreyourContactinformation,youcanexport
yourcontactlisttoanotherdevice,orimportyourcontactlist
(previouslyexported)fromanotherdevice.
1. TouchtheMenuicontoopentheContactMenuoptions
andthentouchImport/Export.
2. Thefollowingoptionsappear:
ImportfromSDcard,ExporttoSDcardvia
‐ Importfrominternalmemory
‐ Exporttointernalmemory
‐ TouchSharenamecardviatoexportthecontactdetails
usingemail.Pleasemakesureyouremailaccountdetails
havebeensetup.Ifyouhavenotyetsetupyouremail
accountyouwillbepromptedtodoso.
SHARINGCONTACTS

62
YoucansendcontactnamecardsasvCardsviathelistedsharing
applications.
NOTE:Ifyouhavenotyetsetupyouremail,youneedtoset
upanaccountfromthedevicesettings.
TosetupaGmailaccount:TouchtheAppsiconfromtheMain
menuthentouchSettings.TouchAccounts&synctoaddan
accountandfollowtheinstructionstocompletetheGmailsetup.
Notalldevicessupporttransfersofmultiplecontacts.Pleasecheck
thetargetdevice’sdocumentation.
1. TouchMenutoopentheContactMenuoptionsandthen
touchSharenamecardvia.
2. Selectcontacts,thentouchSend.
Followthepromptstosendviayourselectedemailaccount.
JOININGCONTACTS
Youmayhavemultiplecontactsforoneperson.Whenyoujoin
contacts,allthecontact’sinformationisdisplayedinonecontact
record.
1. SelectaContact.
2.
TouchtheMenuicontoopentheContactMenuoptions
andthenscrolldownandtouchJoincontact.
Alternatively,touchtheConnectioniconfromthecontact
details.
3. Selectthecontactyouwanttobejoinedtogetherwiththe
previouslyselectedcontact(step#1)andthentouchJoin.
4. ToeditajoinedContact:
‐ Selectacontactwithjoinedinformation.
‐ TouchEditthentouchSelectJoinedContact.
‐ Selectonecontactshowninthe‘SelectContact’listtoedit
theselectedcontactinformation.
‐ TouchDoneonceyouhavefinishededitingthecontact
details.
5. ToseparateajoinedContact:
‐ Selectacontactwithjoinedinformation.
‐ TouchtheConnectioniconintheContacts
information.
63
‐ Selectthecontacttoun‐join,andthentouchOKtoconfirm.
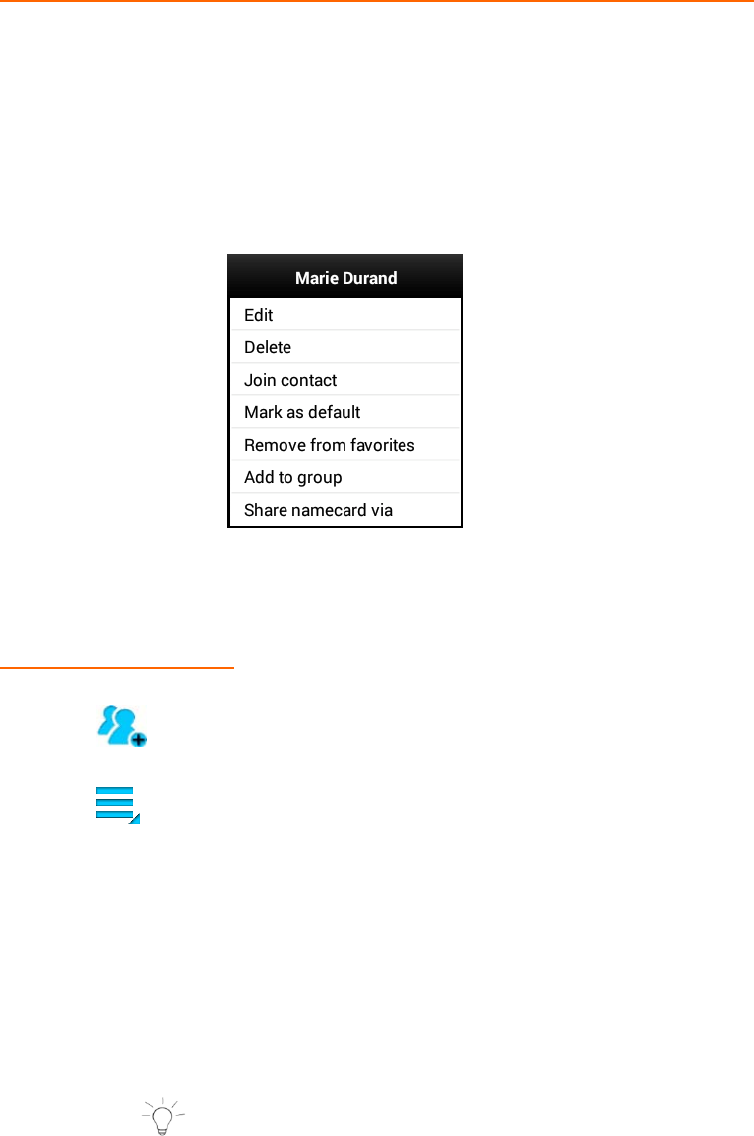
QUICKACCESSTOMANAGINGYOURCONTACTINFORMATION
Toquicklyaccessandmanageyourcontactinformation:
1. TouchtheContactsTab.
2. SelectaContactfromtheContactsList.
3. TouchandholddownontheselectedContactuntilawindow
appearswiththeContactnameandlistofmenuoptions.
4. Selectanoptionandfollowthepromptstomanageyour
Contact.
10.4.3 Groups
CREATINGGROUPS
1. TouchtheGroupsTab.
2. TouchtheNewGroupicontoaddanewgroup.
EnteragroupnameinthefieldandthentouchDone.
3. Selectthenewgroupfromthelistontheleftandthen
touchtheMenuicontoopentheGroupMenuoptions.
‐ SelectAddGroupMember.Alistofyourcontactsappears.
‐ Selectgroupmembersbytouchingtheboxontherightof
eachcontacttocheckitoff.
‐ Whenyouhavefinishedselectingcontactstoaddtoyour
group,touchOKtosaveandexit.
TheGroupmembersyouhaveselectedforyournewGroup
nowappeartotherightoftheGroupslist.
NOTE:TheselectedGroupishighlighted.

64
MANAGINGYOURGROUPS
UpdatingGroups
TouchaGrouptoselectanddisplaytheGroupdetails.
1. ToedittheselectedGroup’sName:
‐
TouchtheMenuiconandthenEditGroupName.
‐ EditthegroupnamethentouchOKtosavethechanges.
2. TodeletetheselectedGroup:
‐ TouchtheMenuiconandthenDeleteGroup.
‐ Attheprompt,touchOK.
NOTE:Newgroupsthatyouhaveaddedcanbedeleted.
ThedefaultGroupswhicharepartoftheappcannotbe
deleted.
AddingGroupMembers
1. TouchaGrouptoselectanddisplaytheGroupdetails.
2. TouchtheMenuiconandthenAddGroupMember.
3. Touchtocheckoffandselectgroupmembersandthentouch
OKtoaddthem.
NOTE:Groupmemberscanalsoberemovedfromthe
groupbyun‐checkingthem.
RemovingGroupMembers
1. TouchaGrouptoselectanddisplaytheGroupdetails.
2. TouchtheMenuiconandthenRemoveGroupMember.
3. Touchtocheckoffandselectgroupmembersandthentouch
OKtoremovethem.
EditingGroupMembers
1. TouchaGrouptoselectanddisplaytheGroupdetails.
2. TouchtheMenuiconandthenEditGroupMember.
3. TouchtocheckoffandselectagroupmemberandtouchOK.
65
4. Touchcontactfieldstomodifyinformation.
Whenyoufinishenteringinformation,touchDone.
SendingaMessagetoGroupMembers
1. TouchaGrouptoselectanddisplaytheGroupdetails.
2. TouchtheMenuiconandthenSendEmailtocreateanew
email.
3. Followthepromptstocomposeandsendtheemail.
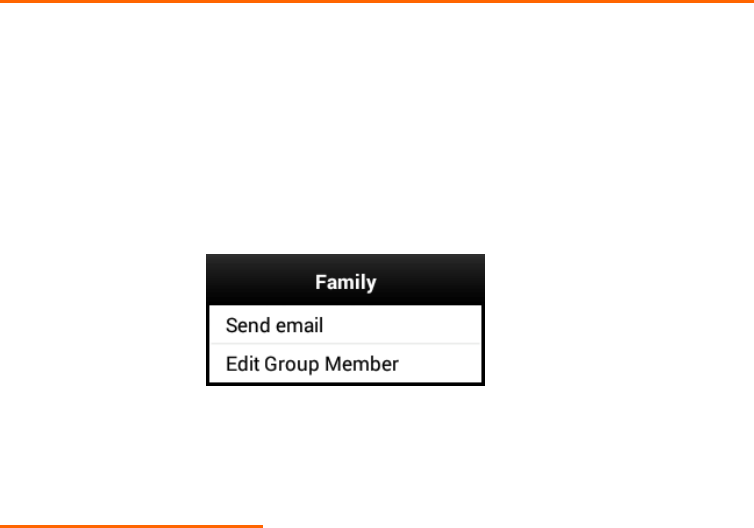
QUICKACCESSTOMANAGINGYOURCONTACTINFORMATION
Toquicklyaccessandmanageyourgroupinformation:
1. TouchtheGroupsTab.
2. SelectaGroupfromtheGroupList.
3. TouchandholddownontheselectedGroupfromtheGroup
Listuntilawindowappearswiththegroupnameandlistof
menuoptions.
4. SelectanoptionandfollowthepromptstomanagetheGroup.
10.4.4 Favorites
MARKINGFAVORITES
MarkyourcontactswithastartoidentifythemasFavorites.Your
FavoritesdisplayintheFavoritesTabforfastviewingormessaging,and
areindicatedbyayellowstarintheContactlist.

66
1. TouchtheContactsTab.
2. ToaddyourContactasaFavorite:
TouchthegrayStarontheContacttomarkit.
Whenmarked,thestarisyellow–indicatingthatithasbeen
addedtoFavorites.
Amessageappearsonthescreen:‘ContactName’hasbeen
addedtoFavorites.
3.
ToremoveyourContactasaFavorite:
TouchayellowStartoremovetheFavoritesmark.Thestar
appearsgray–indicatingthatitisnotincludedasaFavorite.
Amessageappearsonthescreen:‘ContactName’hasbeen
removedfromFavorites.
4. Alternatively,youcanaddorremoveFavoritesfromthe
FavoritesTabusingtheFavoritesMenuoptions.
‐ TouchtheFavoritesTab.
‐ ToaddContactsasFavorites:
TouchtheMenuicontoopentheFavoritesMenu
options.
TouchAddFavorites.
ThelistofyourContactsappears.
Checkofftheboxbythecontactsyouwouldliketoaddas
Favorites.
TouchOKtosaveyourselectedFavorites.
‐ ToremovecontactsasFavorites:
TouchtheMenuicon.
TouchRemoveFavorites.
ThelistofyourContactsappears.
67
Checkofftheboxbythecontactsyouwouldliketoremove
asFavorites.
TouchOKtosaveyourselectionandupdateyourFavorites
list.
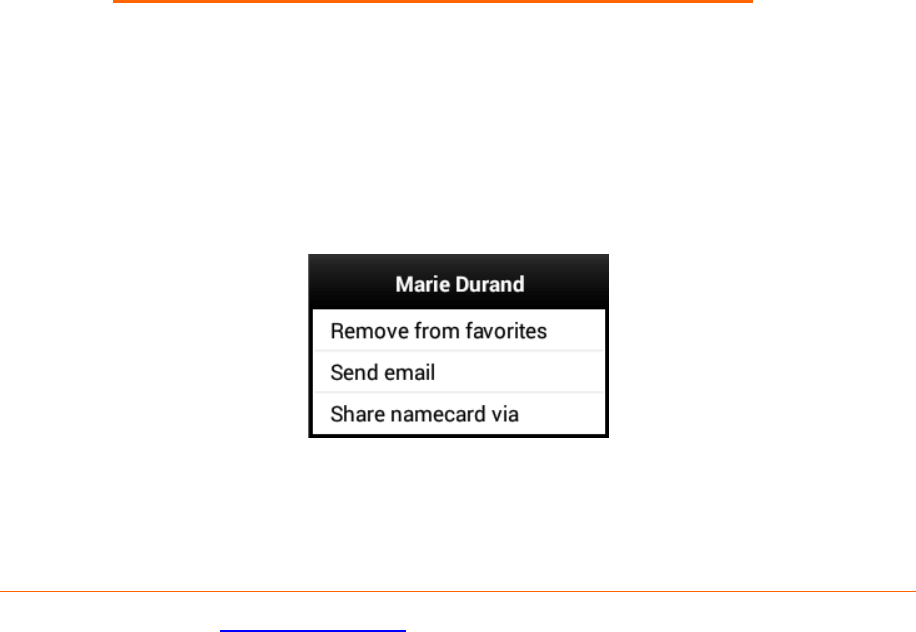
QUICKACCESSTOMANAGINGYOURFAVORITESLIST
ToquicklyaccessandmanageyourFavoriteslist:
1. SelecttheFavoritesTab.
2. SelectaContactfromthelist.
3. TouchandholddownontheselectedContactuntilawindow
appearswiththeContactnameandlistofmenuoptions.
4. Selectanoptionandfollowthepromptstomanagethe
selectedContact.
10.5 ParentalControl
Pleaserefertothe‘ParentalControl’sectionofthismanualfordetails.

68
11. TABLETSPECIFICATIONS
OSANDROID4.4.4KitKat
RAM1GBDDR3
Storage8GBNand‐Flash
ScreenSize7Inch
ScreenResolution 1024*600Pixels
TouchScreenP+G
WirelessConnectionWI‐FI802.11b/g/n
CamerasFrontCamera(0.3MPixelsCMOS)
RearCamera(2.0MPixelsCMOS)
AudioHeadphonejack.
Speaker.
Built‐inMicrophone.
BatteryRechargeableBuilt‐inLithiumBattery
PowerAdapter5V/1.5A
Weight300g
Dimension191.3*11.7*116.5mm

69
12. VIVITARONEYEARWARRANTY
Thiswarrantycoverstheoriginalconsumerpurchaseronlyandisnottransferable.
Thiswarrantycoversproductsthatfailtofunctionproperly
UNDERNORMALUSAGE,duetodefectsinmaterialorworkmanship.Yourproduct
willberepairedorreplacedatnochargeforpartsorlaborforaperiodofone
year.
WhatIsNotCoveredbyWarranty
Damagesormalfunctionsnotresultingfromdefectsinmaterialorworkmanship
anddamagesormalfunctionsfromotherthannormaluse,includingbutlimited
to,repairbyunauthorizedparties,tampering,modificationoraccident.
WarrantyServiceandTroubleshootingInformation
ToobtainWarrantyServiceandTroubleshootinginformation:
Call1‐877‐236‐0183intheU.S.or0‐800‐917‐4831intheUKorVisitourwebsite
atwww.vivitar.com.
ToreceiveWarrantyservicealongwiththenameandaddressofanauthorized
productservicecenter,theoriginalconsumerpurchasermustcontactusfor
problemdeterminationandserviceprocedures.Proofofpurchaseintheformofa
billofsaleorreceiptedinvoice,evidencingthattheProductiswithinthe
applicableWarrantyperiod(s),MUSTbepresentedinordertoobtainthe
requestedservice.Itisyourresponsibilitytoproperlypackageandsendany
defectiveproductsalongwithadatedcopyofproofofpurchase,awritten
explanationoftheproblem,andavalidreturnaddresstotheauthorizedservice
centeratyourexpense.Donotincludeanyotheritemsoraccessorieswiththe
defectiveproduct.Anyproductsreceivedbytheauthorizedservicecenterthat
arenotcoveredbywarrantywillbereturnedunrepaired.
70
NOWARRANTIES,WHETHEREXPRESSORIMPLIED,INCLUDING,BUTNOT
LIMITEDTO,ANYIMPLIEDWARRANTIESOFMERCHANTABILITYORFITNESSFOR
APARTICULARPURPOSE,OTHERTHANTHOSEEXPRESSLYDESCRIBEDABOVE
SHALLAPPLY.DISTRIBUTORFURTHERDISCLAIMSALLWARRANTIESAFTERTHE
EXPRESSWARRANTYPERIODSTATEDABOVE.NOOTHEREXPRESS
WARRANTYORGUARANTYGIVENBYANYPERSON,FIRMORENTITYWITH
RESPECTTOTHEPRODUCTSHALLBEBINDINGONDISTRIBUTOR.REPAIR,
REPLACEMENT,ORREFUNDOFTHEORIGINALPURCHASEPRICE‐AT
DISTRIBUTOR’SSOLEDISCRETION‐ARETHEEXCLUSIVE
REMEDIESOFTHECONSUMER.INNOEVENTWILLDISTRIBUTOR,ITS
MANUFACTURERS,ORSAKARINT.BELIABLEFORANYINCIDENTAL,DIRECT,
INDIRECT,SPECIAL,PUNITIVEORCONSEQUENTIALDAMAGES(SUCHAS,BUT
NOTLIMITEDTO,DAMAGESFORLOSSOFPROFITS,BUSINESS,SAVINGS,DATA
ORRECORDS)CAUSEDBYTHEUSE,MISUSEORINABILITYTOUSETHEPRODUCT.
EXCEPTASSTATEDHEREIN,NOOTHERWARRANTIESSHALLAPPLY.
NOTWITHSTANDINGTHEFOREGOING,CONSUMER’SRECOVERYAGAINST
DISTRIBUTORSHALLNOTEXCEEDTHEPURCHASEPRICEOFTHEPRODUCTSOLD
BYDISTRIBUTOR.THISWARRANTYSHALLNOTEXTENDTOANYONEOTHER
THANTHEORIGINALCONSUMERWHOPURCHASEDTHEPRODUCTANDISNOT
TRANSFERABLE.
Somecountries,statesorprovincesdonotallowtheexclusionorlimitationof
incidentalorconsequentialdamagesorallowlimitationsonwarranties,so
limitationorexclusionsmaynotapplytoyou.Thiswarrantygivesyouspecific
legalrights,andyoumayhaveotherrightsthatvaryfromstatetostateor
provincetoprovince.Contactyourauthorizedretailertodetermineifanother
warrantyapplies.Thisproductismanufactured,distributedandsoldbySAKAR
International,Inc.Allothertrademarksarethepropertyoftherespectiveowner,
whohasnotsponsored,endorsedorapprovedthisproduct.
Thisdevicecomplieswiththepart15oftheFCCrules.Operationissubjecttothe
followingtwoconditions:(1)thisdevicemaynotcauseharmfulinterference,and
(2)thisdevicemustacceptanyinterferencereceived,includinginterferencethat
maycauseundesiredoperation.
Caution:changesormodificationsnotexpresslyapprovedbytheparty
responsibleforcompliancecouldvoidtheuser'sauthoritytooperatethe
equipment.

71
NOTE:Thisequipmenthasbeentestedandfoundtocomplywiththelimitsfora
ClassBdigitaldevice,pursuanttoPart15oftheFCCRules,Theselimitsare
designedtoprovidereasonableprotectionagainstharmfulinterferenceina
residentialinstallation.Thisequipmentgenerates.Usesandcanradiateradio
frequencyenergyand,ifnotinstalledandusedinaccordancewithinstructions.
Maycauseharmfulinterferencetoradioor‐televisionreception,whichcanbe
determinedbyturningtheequipmentoffandon,theuserisencouragedtotryto
correcttheinterferencebyoneormoreofthefollowingmeasures:
__Reorientorrelocatethereceivingantenna.
__Increasetheseparationbetweentheequipmentandreceiver.
__Connecttheequipmentintoanoutletonacircuitdifferentfromthattowhich
thereceiverisconnected.
__Consultthedealerorexperiencedradio/TVtechnicianforhelp.
ThisequipmentcomplieswithFCCradationexposurelimitssetforthforan
uncontrolledenvironment.
Thistransmittermustnotbeco‐locatedoroperatinginconjunctionwithany
otherantennaortransmitter.
EUComplianceStatement
SakarInternationalInc.herebydeclaresthatthiswirelessdeviceisincompliance
withtheessentialrequirementsandotherrelevantprovisionsoftheR&TTEand
EMFDirective.

72
13. FAQ
Q:Whyisn’tmytabletturningon?
A:Beforeusingyourtablet,itisnecessarytochargeitsinternalbatteryusingthe
includedcharger.Forbestresults,giveyourtabletanextendedovernightcharge
beforeusingitforthefirsttime.
Q:IamhavingdifficultiesconnectingtotheInternet.WhatshouldIdo?
A:InordertoaccesstheInternetusingyourtablet,youwillneedtoconnectto
thenearestWi‐Finetwork.Notethatsomenetworksrequireyoutoentera
password.TalktothenetworkadministratorofthatWi‐Finetworkforpassword
information.ConsultthefullUser’sManualofyourdeviceforpreciseinformation
onconnectingtoWi‐Fi.Unfortunately,ifyourdeviceisoutoftherangeofany
nearbynetworksyouwillnotbeabletoaccessanyonlinefeatures.
Q:IamhavingissueswithanappwhichIhavedownloaded.WhatshouldIdo?
A:Forsupportonanythirdpartyapps,softwareoraccessories,youwillneedto
contactthecompany,thesoftwaredeveloperormanufacturerforsupport.
Ifyourequirefurtherassistance,pleasevisitwww.cameliotablet.com.For
phonesupportintheUSpleasecall877‐236‐0183,intheUKcall08009174831.
Ifyouarecallingfromanywhereelse,pleasevisitwww.cameliotablet.comfor
yourlocaltollfreenumber.
©2015SakarInternational,Inc.Allrightsreserved.
SakarUSA SakarUK
195CarterDrive 2D,SiskinParkwayEast
Edison,NJ08817 4020MiddlemarchBusinessPark
Coventry,CV34SU
73
©2015SakarInternational,Inc.Allrightsreserved.