Samson Electronics BJP-15BT Speaker box User Manual
Samson Electronics Inc. Speaker box
User Manual

Samson Electronics Inc.
3400 E. Slauson Ave.
Maywood, CA 90270
Ph: 323.585.6393
Fax: 323.585.6202
Web: http://www.blackmoremobile.com
BJP-15BT Speaker box
Introduction:
The BJP-15BT is a truly portable and amplified PA loudspeaker with integrated music player, collapsible
luggage style carrying handle, built in caster wheels and LED accent lighting. This model boasts a
rechargeable battery, a power supply capable of operating off of 12V DC and a standard AC power
connection making this unit extremely versatile. It comes with an integrated music player that can play
mp3 files from SD cards or USB drives, Bluetooth connectivity for wireless music streaming and FM Radio.
A ¼” guitar jack makes this unit capable of doubling as a guitar amp and built in dual channel VHF
Microphone receivers.
Features:
3 power modes: AC plug, Rechargeable Battery, 12V DC
Music Player with SD Card and USB inputs
Bluetooth Connectivity
FM Radio
LED Accent lighting
Integrated Dual Channel VHF Microphone receivers
15” Subwoofer, titanium dome tweeter, 1000W
Weight: 30 lbs
Dimensions: 18” X 15” X 26 ½ “
Power Supply: 12vDC or AC 110-240V 50/60 Hz
Caution:
Please read All Operating Instructions before using this product
Avoid electrical shock, DO NOT OPEN THIS UNIT, THERE ARE NO REPLACEABLE PARTS INSIDE. Please refer
to your warranty information for service.
Do not Expose this product to Moisture, Water, Rain or Snow. Keep away from direct heat sources.
Damaged items will not be accepted for warranty
Do not clean this unit with solvents or chemicals
Insure that all volume and gain controls are set to “0” when connecting source units
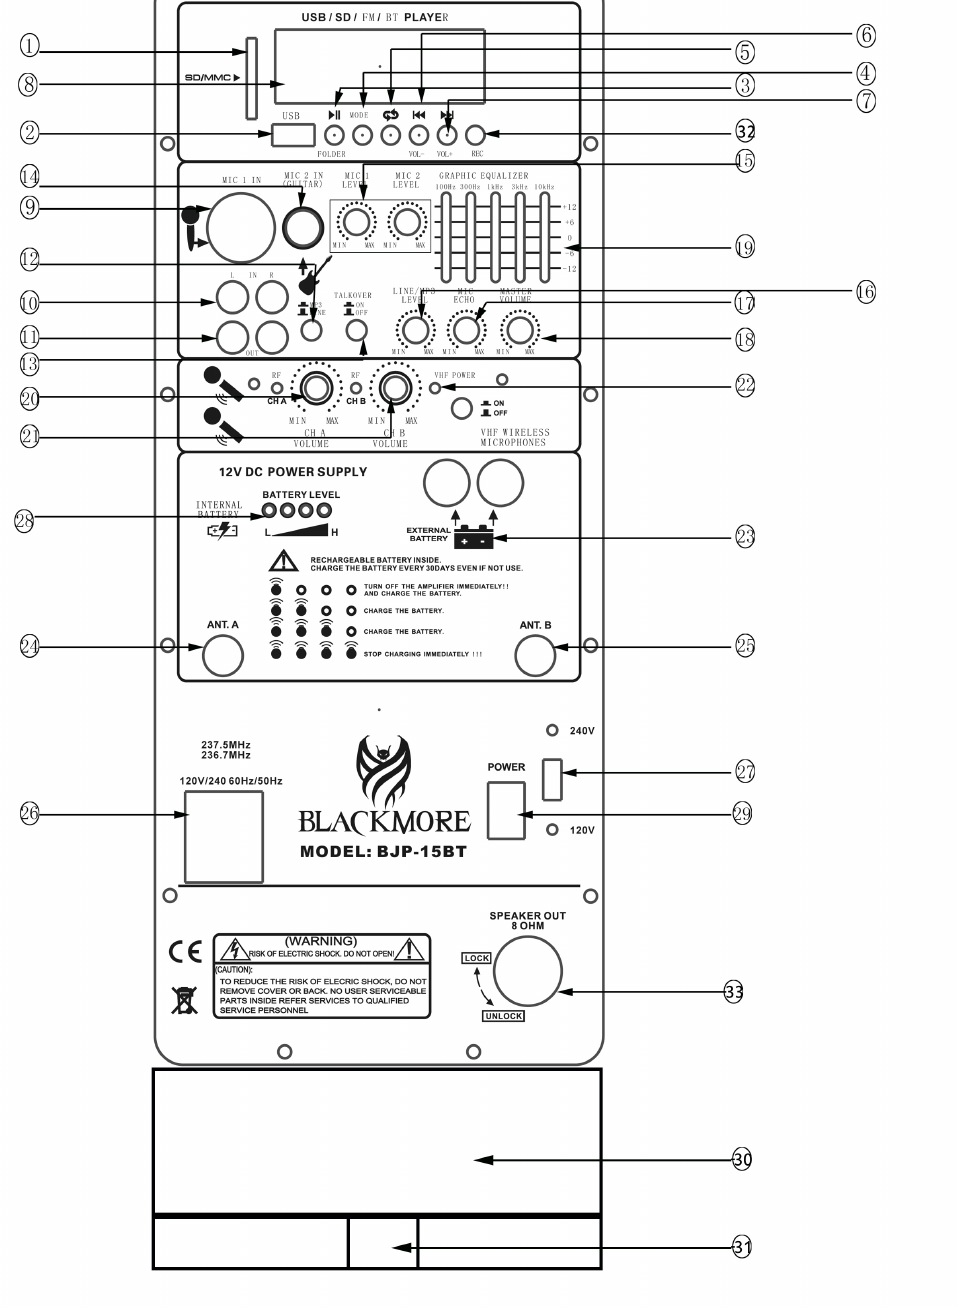

Functions:
1. SD/MMC Card input: This is a combination SDMMC card input. Capable of reading cards up to
4GB. Music files must be formatted as MP3 in order to be played via SD/MMC card.
2. USB Input: This is a full size USB2.0 female input. It has a read capacity of 4GB. Music files must
be formatted as MP3 in order to be played via USB. LED Display: The display shows track
information and menu options
3. Play /Pause/Scan(FM) : Press this button to start or pause an MP3 track played via USB or SD.
In FM mode this button will scan available radio stations. Press scan again to stop at a station.
4. Mode: This button allows you to select between, USB, SD, BT, Or FM Radio for playback.
5. Repeat: Press this button to repeat an MP3 track that is currently being played via USB or SD
6. Previous Track/Volume down: Use this button to go back one track or to lower the mp3 volume
7. Next Track/Volume up: Use this button to play the next track or raise the mp3 volume
8. LCD Display: This display shows track and system information
9. XLR Input: This connection allows the use of professional microphones with XLR terminals.
Microphone gain control: This controls the amount of electrical signal received from the
microphone.
10. RCA Stereo line inputs: These allow input from source units using L/R stereo RCA connections
11. RCA Stereo line outputs: These provide RCA stereo signal to external audio sources and
amplified speakers with Stereo RCA inputs.
12. Line In/MP3 Selector: Use this button to select between receiving an audio source from an
external source via the RCA stereo inputs or the built in MP3 player.
13. MIC talkover selector: Press this button to allow Microphone signal over music playback
14. ¼” Microphone/Guitar input: This connection allows the use of microphones and playback
devices with ¼” audio plugs or electric guitars.
15. Gain level control for XLR MIC 1 input and ¼” MIC/guitar inputs
16. Line In/MP3 Gain Control: This controls the amount of electrical signal received from the RCA
stereo inputs and the built in MP3 player.
17. MIC echo effect level: This controls the amount of echo effect on the Microphone signal
18. Master Volume Control: This controls the overall output of the speakers. This volume control
supersedes all other built in volume controls.
19. 5 band Equalizer: This allows you to adjust the sound frequencies played by the speaker
20. VHF MIC 1 gain control: This controls the signal sent from a VHF microphone to the speaker
21. VHF MIC 1 gain control: This controls the signal sent from a VHF microphone to the speaker
22. VHF System power control: This turns the VHF wireless system on or off
23. 12V DC power input
24. VHF antenna for MIC 1
25. VHF antenna for MIC 2
26. AC power connection only use supplied AC power cord
27. Input voltage selector: This allows you to switch between 110 or 240V power source input.
**Ensure that this setting is correct for your AC power source**
28. Battery Status indicator: This will display if the current charge level and status of the battery
29. Master power switch: Use this switch to power the unit on or off.
30. Battery: Battery is not removable
31. Speaker Stand input
32 Speaker out
33 Recording function

Operation:
Setup:
1. Ensure that the unit is connected to the appropriate power source using the provided AC
power plug.
2. Plug in the AC power cable (25.)but DO NOT turn the master power switch(28.)to the on
position until the battery full indicator (27.) is illuminated. This process allows your battery to
charge to its full capacity continually.
3. Ensure that the master and all gain controls are turned to the “0” position before connecting
any audio source.
4. Place the speaker in a location that is away from any direct heat source, moisture, or extreme
humidity.
Playback:
*Use the Mode select button (7.) to choose between SD Card, USB, or Bluetooth*
1. Using a USB storage device: The player can accept thumb drives and storage devices in USB 2.0
or less format. Files can be played back formatted as MP3 only. The USB connection can read
devices up to 4GB.
2. Using a SD card: The player can accept thumb drives and storage devices in USB 2.0 or less
format. Files can be played back formatted as MP3 only. The SD Card input can read devices up
to 4GB.
3. Using Bluetooth: Ensure that your audio source has bluetooth enabled, next turn your speaker
on and the bluetooth module will attempt to connect. You will hear a beep and a message that
confirms connectivity. Once connected please select the model form your Bluetooth device for
connection.
4. Using Line in: Ensure that your line In RCA connections is securely connected to the speaker
and audio source before powering on this unit. Ensure that the line in gain control (19.) is in the
“0” position. Once connected ensure the selector button (17.) is in the extended position. Once
selected set the gain control (19.) to #5. If your music source has a volume control ensure that
the volume is set to 75%. Begin playing music and adjust the master volume to your desired
level.
5. Using Microphones: Ensure that the Microphone gain control (11. / 14.)is set to “0”. Connect
your microphone to the XLR, or ¼” Jacks located on inputs one and two. (12., 13. 15. 16.).
Ensure that your microphone is turned on. Adjust the Gain (11./14.) to the #5 position and
adjust master volume control (20.) to desired volume.
6. Using Guitar: Plug one end of your ¼” guitar cable to your guitar and the other of your cable to
input (14.) and adjust the gain on (15.)
7.
Using FM: Press the Mode button(4.) till FM is selected. Once selected the unit will
automatically
program all available radio stations. In FM Mode, button (3.) will scan for
available radio stations.
Connecting to other speakers and amplifiers:
To connect to
other speakers or external audio amplifiers please use the RCA Stereo Outputs
(17).
Your Master unit should be connected to Line out (11.) Your slave unit should be
connected to your line “input”. If you are using two BJP-15BT connect one to (11./master and
the other to 10./slave)via RCA stereo cable.

Maintenance and care:
Store and use in a dry environment away from direct heat sources and moisture.
Do not clean with solvents or detergents. Only use a mildly damp cloth to dust or clean.
Use on a flat stable surface or with a Blackmore speaker stand. (BJST-60KG). This unit
will vibrate when played at high volume and will shift position. Please use caution
when placing this on any surface
Use only the correct power source. AC 110-240V 50/60 Hz
Maintain all gain controls at correct levels. Excessive gain controls coupled with high
volume can damage the speaker drivers.
Collapse all antennas and disconnect all cables before moving the unit.
Troubleshooting:
Music files not read: Ensure that your music files are encoded as MP3 Audio Files.
No Sound: Please ensure that all volume and gain controls are not in the “0” position
and that all source units are on and producing volume. Check volume controls at
source units
Bluetooth not connecting: Ensure that the Bluetooth devise you are connecting has
Bluetooth on and is discoverable.
No Power: please ensure that your AC power connection is fully engaged and
connected to a non surging power source.
Sound is distorted: Please ensure that your source volume and input gains on the
speaker are even and balanced. Also check that your connecting cables from source
units are not damaged or broken.
No sound from Microphone: Ensure that the MIC gain control (11. 14.) is not set to “0”
ensure that the microphone is turned on and that all connecting cables are fully
engaged and working properly.
If you are still having technical issues with your product and could use some assistance please contact
us at support@samsonelec.com
FCC Statement
Changes or modifications not expressly approved by the party responsible for compliance could void
the user's authority to operate the equipment.
This equipment has been tested and found to comply with the limits for a Class B digital device,
pursuant to Part 15 of the FCC Rules. These limits are designed to provide reasonable protection
against harmful interference in a residential installation. This equipment generates uses and can
radiate radio frequency energy and, if not installed and used in accordance with the instructions, may
cause harmful interference to radio communications. However, there is no guarantee that interference
will not occur in a particular installation. If this equipment does cause harmful interference to radio or
television reception, which can be determined by turning the equipment off and on, the user is
encouraged to try to correct the interference by one or more of the following measures:
-- Reorient or relocate the receiving antenna.
-- Increase the separation between the equipment and receiver.
-- Connect the equipment into an outlet on a circuit different from that to which the receiver is
connected.
-- Consult the dealer or an experienced radio/TV technician for help
This device complies with part 15 of the FCC rules. Operation is subject to the following two conditions
(1)this device may not cause harmful interference, and (2) this device must accept any interference
received, including interference that may cause undesired operation