Samsung Electro Mechanics SWL-2100P PCI Card Spread Spectrum Transceiver User Manual 2000486 2100P PCI Report
Samsung Electro Mechanics PCI Card Spread Spectrum Transceiver 2000486 2100P PCI Report
Contents
- 1. Users Manual
- 2. Antenna and User Install Manual
Users Manual

360 Herndon Parkway
Suite 1400
Herndon, VA 20170
http://www.rheintech.com
Certification Report For: Samsung Page 40
Document Number: 2000486
22 OPERATION MANUAL
SAMSUNG
MagicLAN SWL-2100
User Manual

1
Notice 1
This manual cannot be reproduced in any form without the prior written permission of
SAMSUNG Electro-Mechanics Co., Ltd.
SAMSUNG Electro-Mechanics Co., Ltd. reserves the right to change this manual and the
specifications to improve products without prior notice. So you can get the most recent
software and user documentation for all MagicLAN products on our web site.
• MagicLAN is the trademark of SAMSUNG.
• Microsoft and Windows are registered trademarks of Microsoft Corporation.
All other brand and product names are trademarks of registered trademarks of their
respective holders.
http://www.MagicLAN.com
Service Dept. +82-331-210-6805
Sales Dept. +82-331-210-6386
SAMSUNG – America Corporation
Western US Marketing Office
85 Tasman Drive
San Jose, CA 95134 USA
Tel: (408) 544-5200 Fax: (408) 544-4967
Eastern US Marketing Office
LanPAL AKOM Corporation
9 Parklawn Dr.
Bethel, CT 06801
Tel: (203) 778-9500 Fax: (203) 778-9525
Copyright 1999 SAMSUNG Electro-Mechanics Co., Ltd.
All rights reserved.

2
Notice 2
The SWL-2100N and SWL-2100P complies with Part 15 of the FCC rules.
Operation is subject to the following two conditions.
(1) This device may not cause harmful interference.
(2) This device must accept any interference received, including interference that may
cause undesired operation.
Note: The SWL-2100N and SWL-2100P have been tested and found to comply with the
limits for a Class B digital device and a low power transmitter, according to Part 15 of the
FCC Rules. These limits are designed to provide reasonable protection against harmful
interference in a residential installation. This equipment generates, uses and can radiate radio
frequency energy and, if not installed and used in accordance with the instructions, may cause
harmful interference to radio communications. However, there is no guarantee that
interference will not occur in a particular installation. If this equipment does cause harmful
interference to radio or television reception, which can be determined by turning the
equipment off and on, the user is encouraged to resolve the problem by one or more of the
following measures;
- Reorient or relocate the receiving antenna.
- Increase the separation between the equipment and the receiver.
- Connect the equipment to an output on a circuit different from that to which the receiver is
connected.
- Consult the dealer or an experienced radio/TV technician for help.

3
Important Safety Information
l Read these simple guidelines. Breaking the rules may be dangerous or illegal. SAMSUNG will not
be responsible for any damages caused by breaking the rules.
l Wireless LAN Card described in this document is approved for use in a wireless local area
network.
l Remember to make backup copies of important data.
l Samsung Wireless PCMCIA LAN card supports 3.3V Notebook computers only.
l When you are transferring data, keep your laptop computer stationary. Roaming between access
points (APs) may break the connection.
l Only qualified service personnel must repair the equipment.
l All wireless devices may get interference, which could affect performance.
l Use approved accessories only. Do not connect incompatible products.
l Use only accessories approved by the wireless LAN Card manufacturer for use with this
particular wireless LAN Card. The use of any other types will invalidate any approval or warranty
applying to the wireless LAN Card, and may be dangerous.
l Use only the region settings appropriate for the area where the wireless LAN Card is used at the
present time. Using the card in any other region or with an incorrect region setting is prohibited
and may be illegal.
l Operation of any radio transmitting equipment, including a Wireless LAN Card, may cause
interference with the functionality of inadequately protected medical devices.
l Do not use the wireless LAN Card on aircraft.
l Do not use the wireless LAN Card at a refueling point.
l Do not use the wireless LAN Card near inflammable materials or chemicals.
l Do not use the wireless LAN Card where blasting is in progress.
l Do not use the wireless LAN Card when the use of wireless device may cause interference or
danger.
l Do not use the wireless LAN Card where the use of cellular terminals is prohibited.
l Microwave oven degrades the performance of wireless LAN drastically. So do not use the
wireless LAN card in the environment where Microwave oven is being used.
Specifications

4
Product Name MagicLAN SWL-2100N MagicLAN SWL-2100P MagicLAN AP SWL-2100AP
General
Type PC Card Type II
N: Internal ANT
PCI 2.0 Dual Antenna
Coverage Area**
Open Space
Office Environment
Up to 500m at 2Mbps / Up to 400m at 11Mbps
Up to 70m at 2Mbps / Up to 50m at 11Mbps
Operating voltage 3.3V +/- 5%, 5V +/- 5% 5V +/- 5% 9V +/- 5%
Current consumption Tx: Max. 350mA
Rx: Max. 200mA
Tx: Max. 390mA
Rx: Max. 220mA
Max. 1A
Data Rates 1,2,5.5, and 11Mbps
Certifications FCC part15, ETSI ETS 300.328 and CE in Europe
Security WEP 40bits encryption
Warranty 1 Year
Network Specifications
Network architecture Ad-hoc, infrastructure Infrastructure
Wireless standard IEEE 802.11b
Operating System Win 95 OSR2/98, Win NT supported
Win 2000/ Win CE (to be supported)
Roaming IEEE 802.11 compliant with enhanced roaming features
Radio Data
Frequency band 2.400~2.471 GHz (US, Canada, and ETSI), 2.471~2.497 (Japan)
Wireless medium Direct Sequence Spread Spectrum
Modulation Techniques CCK, BPSK, QPSK
Sensitivity Min. –90dBm at 2Mbps/ Min. –84dBm at 11Mbps
Output power 56mW
Environmental Specifications
Temperature 0 °C to 55 °C in operation/ -25 °C to 70 °C in storage
Humidity 95% non-condensing
Physical Characteristics
Dimension 113 × 54 × 6 (mm) 141 × 91 × 7 (mm) 180 × 220 × 40 (mm)
Weight 37g 100g 700g
**The operating environment may affect coverage

5
Table of Contents
1. MagicLAN Installation ……………...………..…………………………………...……...6
1.1 Introduction ..………..………………………………………………………………..6
1.2 Technical Background ……………………………………………………………….6
1.3 MagicLAN Overview ………………………………………………….…...………..8
2. Before the Installation …………………………………………………………………...10
2.1 What is in your Package …………………………………………………….……...10
2.2 System Requirement ……………………………………..………………………...10
3. MagicLAN Installation for Windows 95/98 …………………………………….……....11
3.1 Installation Overview ……………………………………………….……………....11
3.2 Installation Procedure of SWL-2100N PCMCIA Card …………….…….………...11
3.3 Installation Procedure of SWL-2100P PCI Card …………………………………...13
3.4 Uninstallation Method ……………………………………………………...……....14
4. MagicLAN Installation for Windows NT 4.0 ………………………..………………….15
4.1 Installation Procedure of SWL-2100N PCMCIA Card ………...……...…………...15
4.2 Installation Procedure of SWL-2100P PCI Card …………………….….....……….17
4.3 Uninstallation Method ……………………………………………...……....………20
5. Configuration Utility …………………………………………………….……...………21
6. Troubleshooting ………………………………………………………......…….……….27
6.1 Procedure to Check the Various Properties of Card after Installation...…………….27
6.2 Probable Symptoms and Diagnosis ………………………………………………...30

6
1. MagicLAN Installation
1.1 Introduction
Thank you for your purchase of SAMSUNG MagicLAN (SWL-2100X) Wireless LAN
Adapter. This new Adapter series includes two different models: SWL-2100N for PCMCIA-
compatible computers and SWL-2100P for PCI-compatible computers. Installing either card
allows the computer to join a wireless network based on the IEEE 802.11b (High Data Rate)
wireless LAN standard. You will be surprised how easy for you are a part of the network
with no bother of twisted cables.
1.2 Technical Background
• What is IEEE 802.11?
The IEEE 802.11 specification is a wireless LAN standard developed by the IEEE (Institute
of Electrical and Electronic Engineering) committee in order to specify an over an air
interface between a wireless client and a base station or Access Point (AP), as well as
among wireless clients. Like other IEEE 802 families, IEEE 802.11 specification addresses
both Physical (PHY) layer and Media Access Control (MAC) layer.
• IEEE 802.11 Physical (PHY) Layer
At the PHY layer, IEEE 802.11 defines three physical characteristics for WLAN: diffused
infrared, direct sequence spread spectrum (DSSS), and frequency hopping spread spectrum
(FHSS). While the infrared PHY operates at the baseband, the other two PHYs operate at the
2.4GHz ISM (Industrial, Scientific, and Medical) band, which can be used for operating
wireless LAN devices without the need of end-user licenses. In order for wireless devices to
be interoperable, they have to be conforming to the same PHY standard.
• IEEE 802.11 Media Access Control (MAC) Layer
The IEEE 802.11 MAC Layer is mainly concerned with the rules for accessing the wireless
medium. There are two network architectures defined: Ad-hoc Network and Infrastructure
Network.
• Ad-hoc Network
Ad-hoc Network is an architecture that supports mutual communication among wireless
clients only. Since Ad-hoc Network does not support access to wired networks, it does not
need an Access Point to be a part of the network. You can use the network immediately after
setting up the operating mode by installing the supplied network driver.
7
• Infrastructure Network
Infrastructure Network is architecture that provides communication between wireless clients
and wired network resources. An Access Point (AP) and the associated wireless clients
define the transition of data. So a wireless client can access all the services that are
available for a regular wired LAN by using an AP.
• Roaming
Roaming is a service that allows wireless clients to use the network in motion by
automatically changing the connection from an old Access Point to a new Access Point when
the clients enter in a new cell. During roaming the clients may observe the loose connection
or delay in accessing the resources of the network.
BSS A BSS B
Server
Server

8
• Scanning, Beaconing & ESS ID
When a wireless client is initialized, it is necessary for it to find and communicate with the
correct group of wireless devices, including AP. At this point, it may search for all the
frequency channels and this process is called scanning.
There may be multiple APs and networks operating at the same time. It may be necessary to
ensure that the station joins with the correct network during the scanning process. To achieve
this, each AP is assigned to be part of a logical group called the Extended Service Set (ESS).
The name of this logical group is the ESS ID. When roaming is operating, there may be
several Access Points as part of the same ESS.
After the power on, wireless clients will listen on its default frequency channel. It will be
listening for beacons sent by another wireless station or AP. Beacon is a short message
containing the ESS ID that will be broadcast roughly ten times a second. When the wireless
station hears a beacon and the ESS ID in the beacon matches its own, the client knows that it
is on the correct channel and can communicate with its group. If no beacons are seen, or if the
ESS ID does not match, the wireless client may move to the next frequency channel and
repeat this listening procedure.
In case of direct sequence spread spectrum (DSSS) physical layer, this scanning process
occurs at start up and may also occur when the client roams between APs.
1.3 MagicLAN Overview
• The MagicLAN SWL-2100P (for Desktop PCs) and SWL-2100N (for Notebook PCs) are
wireless LAN adapter cards that provide wireless connection between computers.
• The MagicLAN is designed to operate with IEEE 802.11 (wireless LAN International
Standard) wireless compliant radio cards and uses a CSMA/CA (Collision Sense Multiple
Access with Collision Avoidance) algorithm as the media access scheme, which makes high
speed communication (with minimal collision probability) possible.
• The MagicLAN supports DSSS (Direct Sequence Spread Spectrum) physical layer. This is
a radio technique, which scrambles the data prior to transmission and uses a correlation
technique on receiver to improve the signal to noise ratio and makes it possible to
communicate in the office having a wall and a compartment.
• The function of the MagicLAN SWL-2100AP (Access Point) is to transfer information from

9
a wired LAN to a wireless LAN and vice versa. When operating, the MagicLAN AP is
invisible to most users (Normally, unless the user is an administrator, the MagicLAN AP
cannot be seen or accessed by users on the network).
• The SWL-2100N for Notebook PC is small and portable as a roaming function is provided
for users who need network services while maintaining mobility.
• The MagicLAN Adapter (only PCMCIA) has an LED (Light Emitting Diode) on the part of
the card. The yellow LED will illuminate when the power is supplied and the card is
inserted properly.
• The MagicLAN supports various network software. The network driver is provided to
support network software such as Windows 95(OSR2)/98, and Windows NT 4.0.
• To install the Samsung MagicLAN Wireless LAN Card for Win 2000 and Win CE
Operating Systems (OS), please visit our website at http://www.magiclan.com to download
the respective drivers.

10
2. Before the Installation
The following section will assist you in installing your wireless LAN Adapter successfully.
You will first install software (driver) and then will insert the SWL-2100P or SWL-2100N
wireless LAN card, and finally set the network properties to accommodate resource sharing
and select the type of wireless network that you wish to install. The MagicLAN can easily be
installed and used, without bothering to connect cables for keeping your computer to use
network resources, as in case of a wired LAN.
2.1 What is in Your Package?
Please check the contents of the box to make sure everything is included and ready for use.
Here is the list of what you should have in your package:
• SWL-2100N (PCMCIA Card) Adapter or SWL-2100P (PCI Card) Adapter
• SWL-2100X Installation CD
• External Antenna (for SWL-2100P only)
2.2 System Requirement
• Operating System: MS Windows 95(OSR2)/98, Windows NT 4.0
• Computer System (both Notebook and Desktop) with a CD-ROM drive
• For Desktop PC Adapter Card (SWL-2100P):
The computer system should have two free (extra) IRQs and I/O address.
• For Notebook PC Adapter Card (SWL-2100N):
The computer system should have PCMCIA Type II or Type III card slot. Notebook PC
should also have an extra IRQ and I/O address.
Important: Notebook PC must support 3.3V Card. If you are not aware of this issue,
please contact your dealer. Some old Notebook PCs may not support 3.3V Card.

11
3. MagicLAN Installation for Windows 95 (OSR2)/98
There are two types of WLAN Cards i.e. PCMCIA and PCI cards for Notebook and
Desktop PCs respectively. Here we explain the procedure of installing both cards under
Windows 95(OSR2)/98 operating system (OS) one by one. We will explain the installation
method for SWL-2100N PCMCIA adapter followed by the installation method for SWL-
2100P PCI adapter.
3.1 Installation Overview
Here are some steps you will perform in establishing your wireless network connection:
• Install the Access Point (SWL-2100AP) at first. AP is needed in case of
Infrastructure network mode.
• Install the software using the Installation CD.
• Now you should install the Wireless LAN Card (SWL-2100N or SWL-2100P).
• Install the network protocol(s) required to communicate on your network. Most likely
you will need the TCP/IP protocol.
3.2 Installation Procedure of SWL-2100N PCMCIA Card
Important: Do not insert the PCMCIA card until you are asked to do so, failure of
which may result in unsuccessful installation of your PCMCIA WLAN card.
Please follow the following steps one by one in order to install the PCMCIA card
successfully.
1. Power on your computer and allow Windows 95(OSR2)/98 to load fully.
2. Be sure that there is no PCMCIA adapter inserted yet.
3. Insert the given Installation CD in the CD-ROM. Select the Software Installation
from the menu and then click on the Install.
4. Accept the license agreement.
5. Give the path of the destination folder. To set the path of your choice click on Browse
and then click Next.
6. Select the type of card. As you are preparing to install the PCMCIA card, select the
PC CARD type and click on Next.
7. Select the ESSID. Default ESSID is ANY. You can change this later also using the
configuration utility or network configuration. Click on Next.
8. Select network type and click on Next. Default is Infrastructure.

12
9. Confirm the current settings of ESSID, Network Mode, and Utility directory and click
on Next.
10. It takes a few seconds for copying the utility files and then click on Finish to complete
the installation.
11. Insert the PCMCIA card. Illuminating LED and Sound confirms the detection of your
PC card. Also you will see the PCMCIA Card icon on the right bottom of your
screen.
12. Check for the SAMSUNG 11Mbps Wireless PCMCIA LAN Card by right clicking
on My Computer using the mouse. Select the Device manager and then Network
Adapters. If you find the Yellow (?) sign on the adapter, it shows the installation is
not successful. Select the adapter and click on Remove. Restart your computer after
uninstalling (See the Uninstallation method in section 3.4) the driver to make the
changes effective. And refer to the Troubleshooting at the end of the manual.
13. Right click on the Network Neighborhood using the mouse.
14. Select Properties from the pop up menu. The network box appears and you see three
main tabs: Configuration, Identification and Access Control.
15. Click on the Configuration tab and then click on the Add button. Select Network
Component Type box appears. Click on the Protocol then click the Add button.
16. Select Network Protocols box appears. From the list of manufactures, click on
Microsoft. From the list of network protocols list, select NetBEUI, then click OK.
17. The NetBEUI protocol is now installed. After clicking on OK return back to
Network Component Type box.
18. Repeat the step 15 and 16 to add IPX/SPX protocol.
19. Repeat the step 15 and 16 to add TCP/IP protocol.
20. Click on the TCP/IP option for setting the IP address for your computer. You can
select either Static or DHCP settings. If you use the static IP setup then enter the IP
value, Subnet masking, DNS, Domain/Workgroup name, and Gateway Address
values. After setting these parameters appropriately, click OK to return to Network
Component Type and you can select the File and Printer Sharing options as well as
the Access to your computer by other users connected to that network by setting the
computer sharing options. Click on OK.
21. Screen message do you want to restart your Computer will pop up. Select Yes. It
will shut down your computer and will restart.
3.3 Installation procedure of SWL-2100P PCI Card
Important: Do not insert the PCI card until you are asked to do so, failure of which may
result in unsuccessful installation of your PCI card.
13
Please follow the following steps one by one to install the PCI card successfully.
1. Power on your computer.
2. Be sure that there is no PCI card inserted yet.
3. Insert the Installation CD. Select the Software Installation from the menu and
click on Install.
4. Accept the license agreement.
5. Give the path of the destination folder. Click on NEXT.
6. Select the type of card as PCI card and click on NEXT.
7. Enter the ESSID default is ANY. You can change it later also using the
configuration utility or network configuration.
8. Select the network mode either Infrastructure or Ad-hoc and click on NEXT.
9. Confirms the current settings of ESS ID, Network Mode, and Utility directory.
Click on Next.
10. Click on Finish to complete the software installation.
11. Switch off your computer and insert the PCI card in the PCI slot.
12. Restart your computer and a message window pops up saying New Hardware
Found.
13. It takes a few seconds in setting up the driver for the new hardware i.e.
SAMSUNG PCI/PCMCIA Bridge and SAMSUNG 11 Mbps PCI WLAN
Card.
14. Check for the SAMSUNG 11Mbps Wireless PCI LAN Card by clicking on the
Device manager. If you find the Yellow sign on the adapter, it shows the
installation is not successful. Select the Adapter and click on Remove. Restart
your computer after uninstalling (See the Uninstallation method in section 3.4)
the driver. And refer the troubleshooting at the end of manual.
15. Right click on the Network Neighborhood using the mouse.
16. Select Properties from the pop up menu. The network box appears and you see
three main tabs: Configuration, Identification and Access Control.
17. Click on the configuration tab and then click on the add button. Select Network
Component Type box appears. Click on the Protocol then click the Add button.
18. Select Network Protocols box appears. From the list of manufactures, click on
Microsoft. From the list of network protocols list, select NetBEUI, then click
OK.
19. The NetBEUI protocol is now installed. After clicking on OK return back to
Network Component Type box.
20. Repeat the steps 17 and 18 to add IPX/SPX protocol.
21. Repeat the steps 17 and 18 to add TCP/IP protocol.
22. Select the TCP/IP option for setting the IP address of your computer. You can

14
select either static or dynamic settings. If you use the static IP setup then enter the
IP value, DNS, Domain/Workgroup name, and Gateway Address values. After
setting these parameters appropriately, click OK to return to Network Component
Type and you can select the File and Printer Sharing options as well as the
access to your computer by other users connected to that network by setting the
appropriate options.
23. Screen message do you want to restart your Computer will pop up. Select Yes.
It will shut down your computer and will restart.
3.4 Uninstallation Method:
If you want to uninstall the PCMCIA/PCI card under Win 95 (OSR2)/98, click on the Start at
the left bottom of your screen. Select the Programs. Click on the MagicLAN Utility and
click on Uninstall. Confirm message about removing the “MagicLAN-uninstall” and all of
its components appear. Click on Yes. UninstallShield removes the software “MagicLAN
uninstall” successfully. Click on OK to finish the uninstall procedure.
Important: Restart your computer to make the changes effective before you reinstall the
driver.
4. MagicLAN Installation for Windows NT 4.0

15
4.1 Installation procedure of SWL-2100N PCMCIA Card
Important: Do not insert the PCMCIA card until you are asked to do so, failure of
which may result in unsuccessful installation of your PCMCIA card.
Important: Some notebook computers for Win NT 4.0 operating system that do not
support 3.3V cards will not install your PCMCIA card successfully. You are advised to
install the driver for PCMCIA Controller available from set manufactures or install the
CardWizard program that will enable the notebook computers supporting 5.0V cards to
support 3.3V cards also and will install your PCMCIA card successfully.
Please follow the following steps one by one to install the PCMCIA card successfully.
There are two cases: one is when there is no Windows NT networking Installed and the other
is when the Windows NT networking is installed.
When Windows NT networking is not installed yet:
1. Power on your PC and allow the Windows NT to load fully.
2. Now insert the Installation CD. Select the software Installation and click on Install.
3. When there is no Windows NT networking installed yet. You should install your
driver manually. To do so, click on start in task bar, go to Settings and then to
Control Panel.
4. Under Control Panel, double click on Network icon.
5. Since there is no Windows NT networking installed yet, you will be asked if you
want to install NT networking first. Click on Next and then you will be asked how
will you access the network: modem or LAN. Check the proper selection and click on
next. In network setup wizard box, click on select from list button.
6. In Select Network Adapter box click on Have Disk button.
7. In Insert Disk box, you may be asked to specify the necessary software directory.
Insert the MagicLAN Installation CD into the CD-ROM drive. Type in D:\nt40
(Where D is the CD-drive of your Notebook) in the blank and click on OK.
8. In Select OEM Option box, we will see Samsung 11Mbps Wireless LAN Card
and click on OK.
9. We confirm the Samsung 11Mbps Wireless LAN Card.
10. Select the network protocols by clicking on the Protocols. And click on TCP/IP.
11. In the next box to choose network services to use, make sure that all the services you
want to use are checked and click on Next.
12. In the next box it is confirmed that necessary NT networking components are selected.
16
Click on Next. When you are asked to specify the directory that the necessary NT
files are copied from; Insert your Windows NT CD and type in D:\i386 in the
location blank.
13. Some files from the D:\i386 directory are copied and you may be prompted the same
box to ask you to specify where NT files are once more.
14. Since it is looking for some files from the installation CD, insert your installation CD
in CD drive and type D:\nt40 in the blank location and click on continue.
15. SAMSUNG 11Mbps Wireless LAN Card setup box may appear. Set each parameter
(I/O Address, Interrupt) for the proper system configuration set up and other
parameters (network mode, ESS ID, and Tx Rate) for the proper LAN card
configuration. If the resource allocation or I/O addresses conflicts with other devices,
change the I/O address or Interrupt using the Windows NT Diagnostic program.
16. Next box will say network installation is done and network is ready to start. Click on
Next.
17. If you select the DHCP option for TCP/IP, you do not need to set the values. If you
select the Static option, enter the IP value, Subnet masking, Gateway, and DNS
values respectively and then click on OK.
18. Add the services that you want to avail. You can add other protocols such as
NetBEUI.
19. Now it is ready for installing networking. Click on NEXT.
20. You can assign the Workgroup/ Domain name. And click on NEXT.
21. Click on the Finish and it will ask you whether you want to restart your computer or
not. Click on Yes.
22. Insert the PCMCIA card in the PCMCIA slot and restart your computer so that the
changes may be placed in effect.
23. If your computer does not detect the PCMCIA WLAN Card or the card is not
functioning properly, refer to the Troubleshooting at the end of the manual.
When Windows NT networking is installed already:
1. Power on your computer.
2. Now insert the Installation CD. Select the Software Installation and click on Install.
3. Right click on the Network Neighborhood using the mouse and select Properties.
4. Select the Adapter. And click on Add.
5. Since it is looking for the driver files, enter the path name D:\nt40 (where D is the
CD drive of your Notebook PC) and click on Have Disk. It copies the driver files.
And you can see Samsung 11Mbps Wireless LAN Card is added in your list of
adapters.
6. Configure Wireless LAN Card box may appear. Set each parameter (I/O base,

17
Interrupt) for the proper system configuration set up and other parameters (network
mode, ESS ID, and Tx rate) for the proper LAN card configuration.
7. Click on Bindings.
8. Click on the Protocol to access the network and share the resources.
9. Select TCP/IP and you can select either DHCP or Static for the IP address. If you
select DHCP, you do not need to specify the IP address. If you select the Static
option, enter the IP value, Subnet masking, Gateway, and DNS values respectively.
Also add the Workgroup/ Domain name
10. You can add the optional protocols such as NetBEUI.
11. After you add the TCP/IP protocol, it will ask you whether you want to restart your
computer or not. Click on Yes to make the changes effective and insert the PCMCIA
card in the PCMCIA slot. Now your network is established successfully, if your
PCMCIA card is detected. If you encounter some problems during installation or your
card is not functioning properly, please refer to the Troubleshooting at the end of the
manual.
4.2 Installation procedure of SWL-2100P PCI Card
Important: Do not insert the PCI card until you are asked to do so, failure of which may
result in unsuccessful installation of your PCI card.
Please follow the following steps one by one to install the PCI card successfully. There are
two cases: when there is no Windows NT networking Installed and the other when the
Windows NT networking is installed.
When Windows NT networking is not installed:
1. Power on your PC on and allow the Windows NT to load fully.
2. Now insert the Installation CD. Select the software Installation and click on Install.
3. Shut down your computer and insert the PCI card in the PCI slot and restart your
computer.
4. Since there is no Windows NT networking installed yet. You should install your
driver manually. To do so, click on start in task bar, go to Settings and then to
Control Panel.
5. Under Control Panel, double click on Network icon.
6. Since there is no Windows NT networking installed yet (If you have already installed
Windows NT networking, jump to the step 13 directly), you maybe asked if you want
to install NT networking first. Click on Next and then you will be asked how will
you access the network: modem or LAN. Check the proper selection and click on next.
18
In network setup wizard box, click on select from list button.
7. In Select Network Adapter box click on Have Disk button.
8. In Insert Disk box, you may be asked to specify the necessary software directory.
Insert the MagicLAN Installation CD into the CD-ROM drive. Type in D:\nt40
(Where D is the CD-drive of your Notebook) in the blank and click on OK.
9. In Select OEM Option box, we will see Samsung 11Mbps Wireless LAN Card
and click on OK.
10. We confirm the Samsung 11Mbps Wireless LAN Card.
11. Select the network protocols by clicking on the Protocols. And click on TCP/IP.
12. In the next box to choose network services to use, make sure that all the services you
want to use are checked and click on Next.
13. In the next box it is confirmed that necessary NT networking components are selected.
Click on Next. When you are asked to specify the directory that the necessary NT
files are copied from, insert your Windows NT CD and type in D:\i386 in the
location blank.
14. Some files from the D:\i386 directory are copied and you may be prompted the same
box to ask you to specify where NT files are once more.
15. Since it is looking for some files form the installation CD, insert your installation CD
in CD drive and type D:\nt40 in the blank location and click on continue.
16. Configure Wireless LAN Card box may appear. Set each parameter (I/O base,
Interrupt) for the proper system configuration set up and other parameters (network
mode, ESS ID, and Tx rate) for the proper LAN card configuration.
17. TCP/IP installation message will pop up. Select NO for DHCP.
18. If you select the DHCP option for TCP/IP, you do not need to set the values. If you
select the Static, enter the IP value, Subnet masking, Gateway, and DNS values
respectively and then click on OK.
19. Binding properties will pop up. Click on NEXT.
20. Add the services that you want to avail. You can add other protocols such as
NetBEUI.
21. Now it is ready for installing networking. Click on NEXT.
22. Networking is confirmed. Click on NEXT.
23. You can assign Workgroup/ Domain name. And click on NEXT.
24. Click on the Finish and it will ask you whether you want to restart your computer or
not. Click on Yes.
25. If your PCI card is not detected or not functioning properly, please refer to
Troubleshooting at the end of the manual.
When Windows NT networking is already installed:

19
1. Power on your computer.
2. Now insert the Installation CD. Select the Software Installation and click on Install.
3. Shut down your computer and insert the PCI card and restart your computer.
4. Right click on the Network Neighborhood using the mouse and select Properties.
5. Select the Adapter. And click on Add.
6. Since it is looking for the driver files, enter the path name D:\nt40 (where D is the
CD drive of your Notebook PC) and click on Have Disk. It copies the driver files.
And you can see Samsung 11Mbps Wireless LAN Card is added in your list of
adapters.
7. Configure Wireless LAN Card box may appear. Set each parameter (I/O base,
Interrupt) for the proper system configuration set up and other parameters (network
mode, ESS ID, and Tx rate) for the proper LAN card configuration.
8. Click on Bindings.
9. Click on the Protocols to access the network and share the resources.
10. Select TCP/IP and you can select either DHCP or Static for the IP address. If you
select DHCP, you do not need to specify the IP address. In case of Static, enter IP
value, Subnet masking, Gateway, and DNS values respectively. Also enter the
Workgroup/Domain name.
11. You can add the optional protocols such as NetBEUI.
12. After you add the TCP/IP protocol, it will ask you whether you want to restart your
computer or not. Click on Yes to make the changes effective. Now your network is
established successfully, if your PCI card is detected. If you encounter some
problems during installation or if your card is not functioning properly, please refer
to the Troubleshooting at the end of the manual.
4.3 Uninstallation Method:
If you want to uninstall the PCMCIA/PCI card under Win NT, right click on the Network
Neighborhood using the mouse. Select Properties and click on adapters. You will see
SAMSUNG 11Mbps Wireless PCMCIA/PCI LAN Card. Click on the card and then click
on Remove. The SAMSUNG 11Mbps Wireless PCMCIA/PCI LAN Card will be removed
and now you can remove it from the PC Card slot of your computer.
Important: Restart your computer to make the changes effective before you reinstall the
driver.
20
5. Configuration Utility
During the installation of your SAMSUNG Wireless LAN Card, configuration utility is also
installed. You can see the icon at the right bottom of your screen. Double clicking on that icon
will show you the screen as shown below.
21
Here we explain the use and meanings of the various screen messages.
SAMSUNG 11Mbps Wireless LAN is the description of the vendor.
MAC Address: MAC Address is the unique identification number (6 bytes in size) for the
card and is assigned to WLAN card during manufacturing.
Network Mode: This describes the topology of the network that a client/user is connected.
The choice is between Infrastructure and Ad-hoc modes.
SSID: SSID is the identification address of the Access Point (AP). This can also be the
ESSID of the Wireless LAN.
Channel: Channel number is the channel available for the communications between the
clients and AP or between the clients only. In case of the Infrastructure Network Mode, the
channel number is scanned automatically (Need not to worry about setting the channel
number), while in case of the Ad-hoc Network Mode; the channel number is set by the client
and can be changed by the client later.
Network Status: Network status explains the properties of the channel currently in use. It
also explains whether the link between the two communicating clients or a client and an AP
is good, adequate or poor.
Link Status: Link Status explains whether the client is connected to ESS or not. It also
shows the identification MAC address of the BSS to which this is connected currently.
Connection Status: This explains whether the connection between communicating entities
22
i.e. AP or Client Stations, is good, adequate or poor.
Link Quality: This is the measure of the radio link. You can also visualize the connection
status by seeing the following three different colors of Link Quality.
• Green Color: The connection status is good. And the clients or AP should be able to
communicate without disturbance.
• Yellow Color: The connection status is adequate. In other words, you may
experience some problems while communicating.
• Red Color: The connection status is poor. You may not communicate with the other
clients or AP.
Signal Level: This is the measure of the signal level. The measured signal level gives the
overall Link Quality and Connection Status.
Noise Level: This is the measure of the noise level.
You can change the configuration by clicking on the Configuration Change. When you click
on the Configuration Change, you see the screen given below.
Configuration Change screen allows you to set the parameters as explained below.
Net Mode: You can set the Network Mode to Infrastructure or Ad-hoc.
SSID: The SSID can be changed to any value. But that should be the same that of AP. In case
of Ad-hoc Mode, the SSID should be same for all clients.
TX Rate: The transmission rate at which the data packets are transmitted by the client or AP.
You can set this to Auto select 1 or 2Mbps, Fixed 1 Mbps, Fixed 2 Mbps, Fixed 5.5 Mbps,
Fixed 11 Mbps or Full Auto (1 to 11 Mbps).
Important: You must know the TX Rate that your AP can support. Failure to which may
23
cause the undesired results.
WEP Required: WEP stands for Wired Equivalent Privacy. WEP is an encryption scheme
that provides the secure wireless data communications to the users. WEP uses a 40-bit key to
control the network access. In order to decode the data transmission, each wireless client on
the network must use the identical 40-bit key. Please see the Security information for details
about the use and generation of the WEP key.
Channel: You can change the channel number. In case of the Ad-hoc Network Mode, the
change in the channel number is effective. In case of the Infrastructure Network Mode,
changing the channel number is of no concern as the channel is scanned automatically. Please
see the table for the requirements of different countries and the channel frequency.
Threshold: You can select either Off or Hidden Stations. Hidden stations are those clients
that are associated with the AP but are not in range with each other.
PS Mode: PS stands for Power Saving Mode. Currently, the PS Mode is disabled.
After changing the settings in the Configuration Change Dialog box, click on OK. It takes a
few seconds to set the changes that you made. Then you can visualize the Connection Status,
Link Quality, Signal and Noise Levels respectively.
WEP Security:
To provide the secure communication over the wireless medium, we have provided the WEP
(Wired Equivalent Privacy) key. There are two ways of generating this key. This key is an
important in protecting the illegal access to the wireless networks.
You have to set the key at the Access Point also. And all the users who want to contact/share
the resources must type the same key. The WEP key works in the infrastructure mode only.
There are two options in case of the WEP. You can select either of Disabled, and mandatory.
If you select Disabled, the communications between clients and clients and AP is not secure.

24
If you select mandatory, you need to setup the AP also and enter the same Key for
communicating other clients associated with the AP or with AP itself.
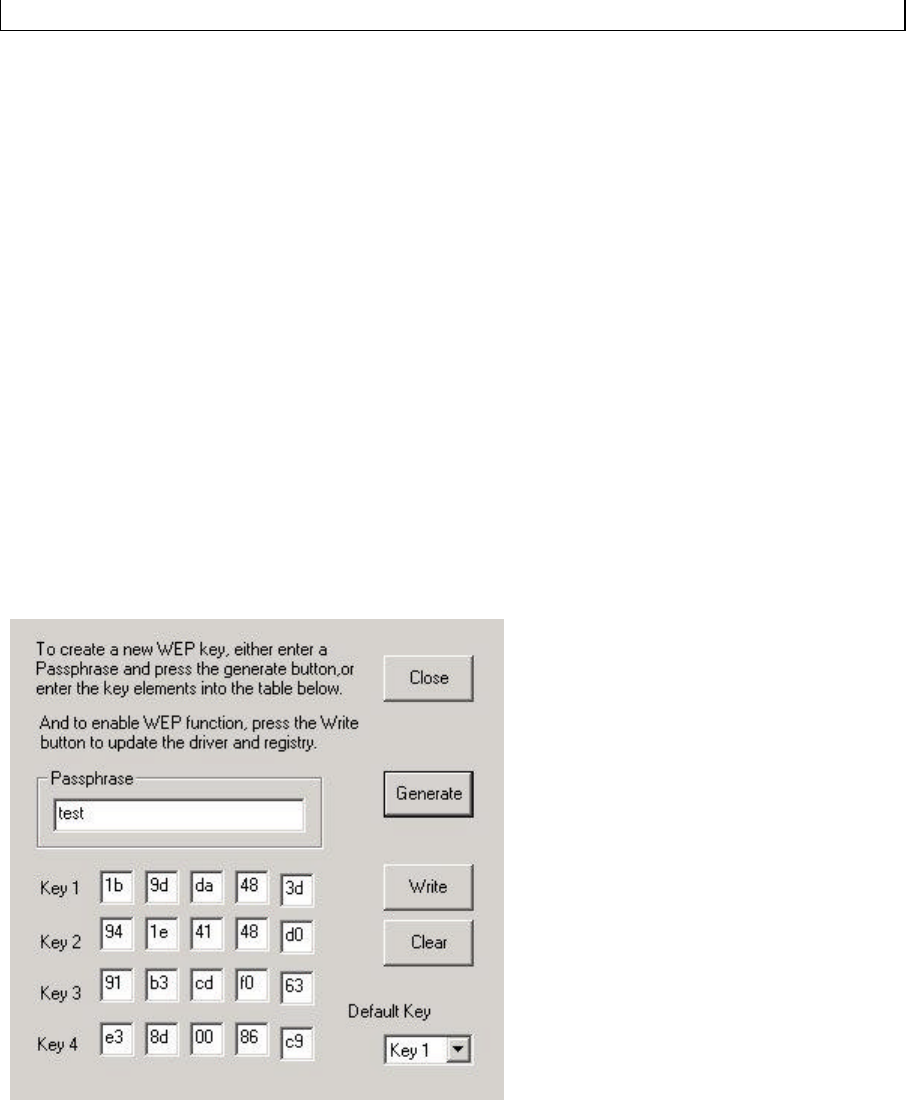
WEP Key Generation:
There are two ways of generating the WEP key. The first is by entering any text in the
Passphrase. And click on Generate. It will generate four WEP keys as Key 1, Key 2, Key 3,
and Key 4. You can select any key for the security. If you do not select any key, Key 1 is
selected, as it is default key. Then click on Write and it will update the registry and driver.
Another WEP key generation method is by inserting the Key values directly from the
keyboard. And click on the Write to update driver and registry. Select the Key number and
use that Key for accessing the Access Point. If the Key is not entered correctly, a client
cannot access the resources. This Key value protects the illegal access to the wireless
network resources. As the wireless channel is more prone to the illegal access, WEP
provides the users safe access.
Warning: Use of the WEP key makes your data secure but there is degradation in the
throughput performance when we employ the WEP key.
Table: Number of Operation Channels
Channel# Frequency FCC Canada ETSI Spain France Japan
1 2412MHz
2 2417MHz
3 2422MHz
4 2427MHz
5 2432MHz

25
6 2437MHz
7 2442MHz
8 2447MHz
9 2452MHz
10 2457MHz
11 2462MHz
12 2467MHz
13 2472MHz
14 2484MHz
For the each Country/Standard mentioned in the Table, the marked
Channels should be supported.
The user must select the Region while installing the Samsung WLAN card and should select
the correct channel number as listed in the above Table. The use of non-listed channel
number is illegal and is prohibited. In case of Windows 95(OSR2)/98, user should select the
country/region using the Install shield while in case of Windows NT, user must select the
user by clicking on the Network Neighborhood while installing the software.
6. Troubleshooting
To make the installation of SAMSUNG Wireless LAN Card more users friendly, we have
suggested following the installation steps one by one as listed in the section 3 and section 4.
Still you encounter some problems while installing the WLAN Card or you want to confirm
whether your card is installed properly or not, we have listed the procedure for checking the
various components after you have installed the card. In first part of Troubleshooting, we
have suggested the users to check the various properties of the card to check the proper
installation. In second section, we have listed the various problems that you may encounter
during the installation and have also listed the possible solution. Check the first part to guess

26
the probable reason of unsuccessful installation.
6.1 Procedure to Check the Various Properties of Card after Installation:
For PCMCIA Card under Windows 95 (OSR2)/98:
Please check the followings if you encounter some problem while installing the PCMCIA
card or your PCMCIA card is non-functional.
1. Click on the Control Panel and then on PC Card. Check whether it has PCMCIA
card in one of the sockets or not. If you find SAMSUNG 11Mbps Wireless
PCMCIA LAN Card in one of the sockets, it means the card is detected properly. If
you see the Yellow sign of Question-mark (?), the resources are conflicting.
2. Right click on My Computer and the select Properties. Select the Device Manager
and click on the Network Adapter. You will find SAMSUNG 11Mbps Wireless
PCMCIA LAN Card if it is installed successfully. If you see the Yellow sign the
resources are conflicting. Click on PCMCIA Card and then on PCMCIA Card
Service, you can see the status of PCMCIA card. If there are yellow sign either on
adapter or PCMCIA card, please check the followings.
i) Check if your Notebook supports 3.3V Card.
ii) Check if your Notebook has a free IRQ. If not, make an IRQ free
by assigning the same IRQ to some devices, for example COM 1,
COM 2 can be assigned same IRQ values.
iii) Check that you have inserted the right card and have installed the
proper driver.
For PCI Card under Windows 95/98:
Please check the following if you encounter some problem while installing the PCMCIA card
or your PCI card is non-functional.
1. Click on the Control Panel and then on PCMCIA Card. Check whether it has PCI
card in one of the sockets or not. If you find SAMSUNG 11Mbps Wireless PCI
LAN Card in one of the sockets, it means the card is detected properly. If you see the

27
Yellow sign of Question-mark (?), the resources are conflicting.
2. Right click on My Computer and the select Properties. Select the Device Manager
and click on the Network Adapter. You will find SAMSUNG 11Mbps Wireless PCI
LAN Card if it is installed successfully. If you see the yellow sign the resources are
conflicting. Click on PCMCIA Socket and then you can see the PCI/PCMCIA
adapter. If there are Yellow signs either on PCI/PCMCIA Adapter or PCI card,
please check the followings.
i) Check whether you have two free IRQs. If the resources are conflicting
between Samsung driver and other devices, change the resources and
make that free for Samsung driver.
ii) Check that you have installed the proper driver.
iii) If the above i) and ii) are already checked and are set properly, uninstall
the driver, remove the PCI card and reinstall the driver.
For PCMCIA Card under Windows NT:
Important: Some notebook computers for Win NT 4.0 operating system that do not
support 3.3V cards will not install your PCMCIA card successfully. You are advised to
install the driver for PCMCIA Controller available from set manufactures or install the
CardWizard program that will enable the notebook computers supporting 5.0V cards to
support 3.3V cards also and will install your PCMCIA card successfully.
Please check the followings if you encounter some problem while installing the PCMCIA
card or your PCMCIA card is non-functional.
1. Check the Windows NT Diagnostics. You should find out whether there is any
conflict in the resource allocation or the I/O address, IRQ allocations. If you
find that the IRQ or I/O addresses are already assigned to some other devices,
you must change that value. I/O address needs 40h byte length.
2. Event viewer will show you about the events such as PCMCIA, swld11 (driver
name) and the status. If you find the Red or Yellow sign, there is some problem.
Please refer to the Troubleshooting at the end of the manual.
3. Click on the Control panel. Double click on the PC Card. You will see

28
SAMSUNG 11Mbps WLAN Card. Double clicking on that will show you the
Card Information, driver name and the driver file. You must confirm the name of
the driver and the driver file as “swld11” and “swld11.sys”. If you do not find the
names as we listed before, there are some problems and the driver is not installed
properly. Reinstall the driver.
Note: Check the PnP BIOS setup menu and select no in case of the Wireless LAN
Card installation.
For PCI Card under Windows NT:
Please check the following if you encounter some problem while installing the PCMCIA card
or your PCI card is non-functional.
1. Check the Windows NT Diagnostics. You should find out whether there is any
conflict in the Resource allocation or the I/O Base address, IRQ allocation. If you
find that the IRQ or I/O port address is already assigned to some other devices, you
must change that.
2. Event Viewer will show you about the events such as PCMCIA Card type i.e.
PCMCIA or PCI, driver file swld11 and the status. If you find the Red or Yellow
sign, there is some problem.
3. Click on the Control panel. Double click on the PC Card. You will see SAMSUNG
11Mbps WLAN Card. Double clicking on that will show you the Card Information,
driver name and the driver file. You must confirm the name of the driver and the
driver file as “swld11” and “swld11.sys”. If you do not find the names as we listed
before, there is some problems and the driver is not installed properly. Reinstall the
driver.
4. Check that your computer has two IRQs free. If not, make two IRQs free.
6.2 Probable Symptoms and their Diagnosis:
This section lists the problems you may encounter during the installation of your PCI or
PCMCIA card.

29
Solving Problems
Symptom Diagnosis
Windows 95/98 locks up after installing PCI card. The installation procedures may not have been
followed exactly. Turn off your PC and remove
the PCI card. Restart your PC and run the
installation program again as instructed in the
installation guide.
The system tray wireless monitor is always red. Make sure that all the clients have the same SSID.
Set all clients to the same wireless channel in case
of Ad-hoc network mode.
Make it sure that you are with in the range of an
Access Point (AP). If your PC can’t be associated
with any AP, it cannot communicate with other
clients.
If you cannot connect to one of the clients in the
network.
Make it sure that all clients are up and are running
with a blue taskbar icon.
Make it sure that the client that you want to
communicate with is within the range of an AP.
Make sure that your TCP/IP is set properly and
correctly.
The NT event log lists the error: “Server Service
terminated. Not enough Server Storage.”
Reinstall the Windows NT service pack.
In Windows NT, there is no wireless monitor icon in
the taskbar or the Samsung Adapter does not
appear in the PC Card Control Panel applet.
Make sure the PCMCIA device is started as
Automatic in the device applet of the Control
Panel.
Double click on the PC Card icon in Control Panel.
Click on Samsung Adapter and then on the
properties button. It should say the driver started
correctly.
Make sure the drivers were installed correctly. If all
else fails, uninstall drivers and software through
Add/Remove Program, remove the WLAN Card
and reinstall the drivers following the manual.

30
You cannot connect to some computers in the
Network Neighborhood.
Make sure a resource is shared among all computers
connected to the same network.
Click on OK on the MS Networking login box and
OK on the following domain error.
If you cannot share a device in NT, you may need to
reinstall the NT service pack.
You may wait for several minutes for all of the PCs
to appear.
In case of the Windows NT, if there is no sound after
you insert the Wireless LAN card.
You must check the resources of the sound card
driver. If the resources are conflicting with
Samsung Wireless (PCI/PCMCIA) LAN Card
driver, you must change the resources.