Samsung Electro Mechanics SWL-2600C MagicLAN SWL-2600C Compact Flash Card User Manual MediaMVP
Samsung Electro Mechanics MagicLAN SWL-2600C Compact Flash Card MediaMVP
Users Manual

Notice 1
USER INFORMATION
Acknowledging Special Precautions and
the FCC Industry Canada Notice
Cautions
Modifications not expressly approved by the party responsible for compliance could
void the user’s authority to operate the equipment.
FCC compliance Information
When used the This device complies with part 15 of FCC Rules.
Operation is subject to the following two conditions:
1. This device may not cause harmful interference, and
2. This device must accept any interference received.
Including interference that may cause undesired operation.
Information to User
This equipment has been tested and found to comply with the limits for a Class B
digital device, Pursuant to part 15 of the FCC Rules. These limits are designed to
provide reasonable protection against harmful interference in a residential installation.
This equipment generates, uses and can radiate radio Frequency energy and, if not
installed and used in accordance with the instructions, may cause harmful interference
to radio communications.
However, there is no guarantee that interference will not occur in a particular
installation. If this equipment does cause harmful interference to radio or television
reception, which can be determined by turning the equipment off and on, the user is
encouraged to try to correct the interference by one or more of the following measures:
? Reorient or relocate the receiving antenna.
? Increase the separation between the equipment and receiver
? Connect the equipment into an outlet on a circuit different from that to which the
receiver is connected.
Consult the dealer or an experienced radio/TV technician for help.

Notice 2
This device(MagicLAN SWL-2600C) is product to supply to Hauppage Computer Works,
Inc (Model : MediaMVP)
Copyright © 1999 - 2005 SAMSUNG Electro-Mechanics Co., Ltd.
All rights reserved.

Notice 3
WARNING
While installing and operating this transmitter and antenna combination the radio frequency
exposure limit of 1mW/cm2 may be exceeded at distances close to the antennas installed.
Therefore, the user must maintain a minimum distance of 20 cm from the antenna.
Important Safety Information
l Read these simple guidelines. Breaking the rules may be dangerous or illegal. SAMSUNG will
not be responsible for any damages caused by breaking the rules.
l WLAN Card described in this document is approved for use in a wireless local area network.
l Remember to make backup copies of important data.
l Only qualified service personnel must repair the equipment.
l All wireless devices may get interference, which could affect performance.
l Use approved accessories only. Do not connect incompatible products.
l Use only accessories approved by the WLAN Card manufacturer for use with this particular W
LAN Card. The use of any other types will invalidate any approval or warranty applying to the
WLAN Card, and may be dangerous.
l Use only the region settings appropriate for the area where the WLAN Card is used at the
present time. Using the card in any other region or with an incorrect region setting is prohibited
and may be illegal.
l Operation of any radio transmitting equipment, including a WLAN Card, may cause
interference with the functionality of inadequately protected medical devices.

Card Standard & Mechanical Spec
1.Card Standard CF+ CompactFlash Specification Revision 2.0
2. Form Factor Type I
3. Operating voltage 3.3 V
4. Dimension 56.4 ㎜×42.8 ㎜×3.3 ㎜
5. Weight 18g
RF Characteristics
1.Specification Compliance IEEE 802.11g Draft 7.1 (CSMA/CA)
ERP-DSSS/CCK 1Mbps(DBPSK) / 2Mbps(DQPSK) / 5.5, 11Mbps(CCK)
2. Data Rate
& Modulation ERP-OFDM 6, 9Mbps(BPSK) / 12, 18Mbps(QPSK) /
24, 36Mbps(16-QAM) / 48, 54Mbps(64-QAM)
ERP-DSSS/CCK 1~11 Mbps 17.5 dBm 3. TX output
power ERP-OFDM 6 ~ 54 Mbps 15 dBm (EVM < 5%)
ERP-DSSS/CCK
11 Mbps
5.5 Mbps
2 Mbps
1 Mbps
-84 dBm
-87 dBm
-90 dBm
-93 dBm
4.RX Sensitivity
ERP-OFDM
6 Mbps
9 Mbps
12 Mbps
18 Mbps
24 Mbps
36 Mbps
48 Mbps
54 Mbps
-88 dBm
-86 dBm
-85 dBm
-83 dBm
-80 dBm
-77 dBm
-72 dBm
-70 dBm
TX Typical 420 mA
5. Current
consumption RX Typical 390 mA
ERP-DSSS/CCK TBD
6. Coverage ERP-OFDM TBD
1
C
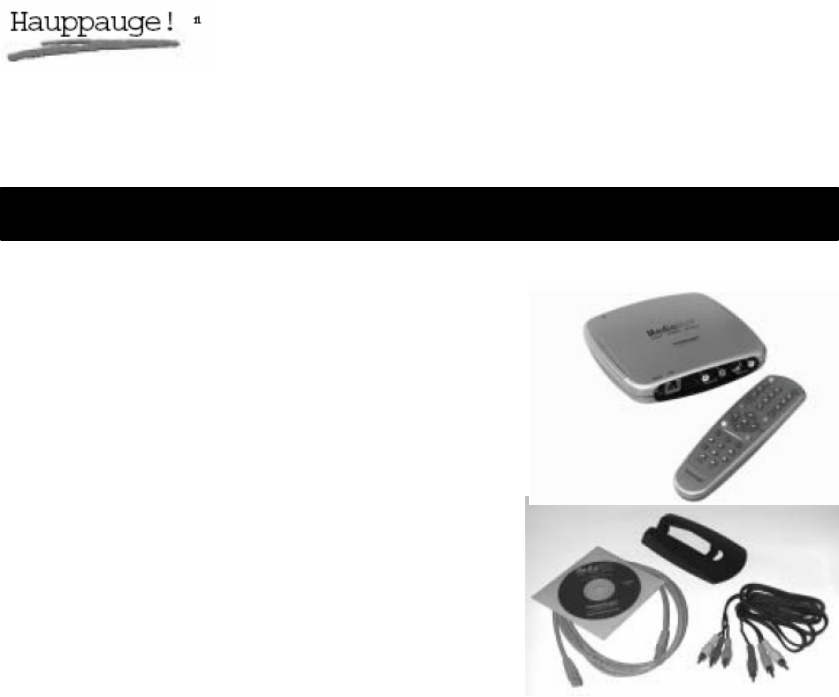
ontents of the MediaMVP package
MediaMVP
Quick Installation Guide M-MediaMVP-v2-ENG 04/11/05
MediaMVP device and stand
Ethernet cable for connection between the
MediaMVP and your Router, Hub or
Switch. This uses RJ-45 connectors and is
1.5 meters long. *
Video cable set to connect the MediaMVP
to your TV set. The cable set includes
Composite video (yellow RCA jack), Left
Audio (white RCA jack), Right Audio (red
RCA jack).
Remote control transmitter with 2 A A A batteries
MediaMVP Installation CD-ROM with:
MediaMVP Server application
MediaMVP Application
Search for Media application
* Note: you can purchase longer ethernet
cables at most computer retail stores. Cat5 cable, as the cabling is commonly called, is
available to lenghts of 300 ft.
2
Overview
of
MediaMVP
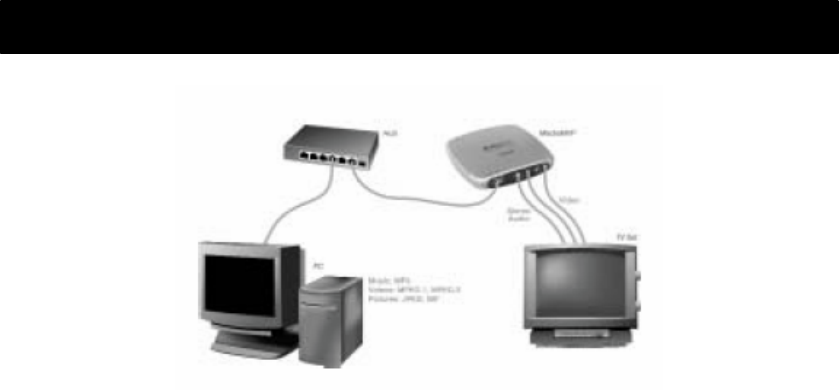
MediaMVP bridges the home PC with television sets. MediaMVP is located at the TV set,
and through your home local area network receives digital audio (MP3, W M A and W AV
music), digital video (MPEG-1, MPEG-2 or DivX video), digital pictures (JPEG, BMP and
GIF digital pictures) and Internet radio from a PC. MediaMVP then decodes the digital media
and displays the decoded media on a TV set, TV monitor or plasma monitor. On your TV set,
MediaMVP lists media which can be played.
MediaMVP can be connected to your local area networks via either its 10/100Mbps Ethernet
connection or the built-in 54Mbps 802.11g wireless adaptor . It can also connect to Ethernet
based LAN adapters such as Home Plug or wireless game adapters. The PC where both the
MediaMVP software is loaded plus where your media files are located needs to be on the same
network node as the MediaMVP. In general, if you have the PC and the MediaMVPs connected to
the same network hub, access point or router, this requirement is satisfied.
Up to 12 MediaMVPs can be connected on a network. This means you can have a
MediaMVP connected to the TV in your bedroom, one to the TV in the living room, one in
the den, etc. The only limitation is that all the MediaMVPs need to be on the same network
segment as the PC where your MediaMVP files are stored.
Internet radio is played by having the PC connect to an Internet radio station and then send
streaming MP3 or W M A audio from the radio station to the MediaMVP. Only internet radio
stations which are directly accessible via the Internet are supported.
DivX video playing is done via a transcode process. When you chose to play a DivX video,
your PCs processor first decodes the DivX video in software, then reencodes the video into
a high bit-rate MPEG-1 format. The PC then transmits the high bit-rate MPEG video over
your network to the MediaMVP, where it is decoded and played on your TV set.

3
Step 1: Connecting MediaMVP to your network or PC
Technically speaking
MediaMVP s CPU engine (a 350 DMIPS PowerPC) runs the Linux operating system, plus
has dedicated multimedia hardware for decoding MPEG video, audio and music.
MediaMVP runs in a client/server system , where the server can be a PC running either
Windows XP Home, XP Professional or Windows 2000. The PC can be used for normal tasks
while acting as the MediaMVP server. The application running on the MediaMVP is loaded
from the PC when you turn on MediaMVPs power, therefore allowing updateable software
via Internet downloads.
MediaMVP decodes full CCIR601 resolution NTSC and PAL encoded MPEG-2 bit streams in
real time, up to and including 720x480 (NTSC) or 720x576 (PAL). MPEG video rates range
from 1.5 Mbps to 10 Mbps (higher in bursts), limited by the LAN bandwidth. MediaMVP will
upscale 320x240 V C D video to full screen. A tunable Anti-Flicker Filter is included to improve
the video quality of media seen on the TV set.
You can connect MediaMVP to your PC through a network or directly to the PC or laptop.
You can use either method.
Connecting MediaMVP through a Network:
l Wired connection
Using a standard Ethernet network cable (the Ethernet cable supplied or any Ethernet cable
less than 300 feet long), plug one end into the LAN port of the MediaMVP, and the other end
of the Ethernet cable into a Ethernet port of a network hub, router or switch. You can use
10Mbit or 100Mbit router/switches. If you are using your own cables, use Category 5
Ethernet cable for best results.
Note: the MediaMVP needs to be on the same network subnet as the PC where you loaded
the MediaMVP Server application. Therefore, plug the MediaMVP into the same router as
you’ve plugged your PC. If you have multiple routers, with the PC on a different router than
the MediaMVP, the MediaMVP will not load the MediaMVP application.
l Wireless connection
When connecting MediaMVP to your network in wireless mode the only thing you need to make
sure is that the wireless access point you are going to connect to is turned on.
Connecting MediaMVP directly to a PC or laptop:
l Wired connection
If you would like to connect MediaMVP directly to a PC or laptop, you will need a
crossover cable. You cannot use a standard Ethernet cable to directly connect the MediaMVP
toa PC or laptop.
Please see the section entitled “Connecting MediaMVP to a PC or laptop”.
l Wireless connection
In order to connect MediaMVP directly to a PC or laptop wirelessly, you will need to have a
wireless adapter installed on your PC or laptop and configure the operating mode to “Ad-Hoc”
mode.
Please see the section entitled “Connecting MediaMVP to a PC or laptop wirelessly”.
4
Step 2: Connecting MediaMVP to your TV set
Step 3: Installing the MediaMVP software on your PC
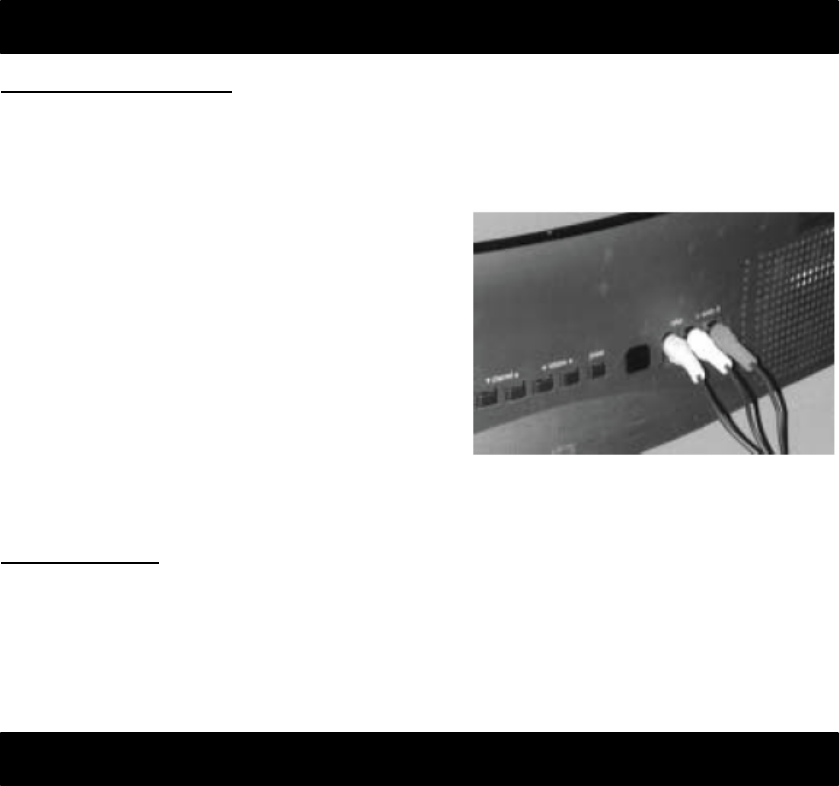
Connecting to a TV set:
Note: Your TV set needs to have A/V input jacks. If your TV only has RF inputs (normally from a
TV antenna), then you will need to use a Video-to-RF modulator, which can be purchased from
RadioShack.
Using the supplied Video cable set, connect one end of the Composite video (yellow RCA jack)
cable to the yellow jack on theMediaMVP and
connect the other end to the Video Input jack on
your TV set.
Connect one end of the Left Audio (white RCA jack)
cable to the white jack on the MediaMVP, and
connect the other end to the Left Audio input on
your TV set.
Connect one end of the Right Audio (red RCA jack)
cable to the red jack on the MediaMVP, and connect
the other end to the Right Audio input on your TV
set.
Note: If your TV set has only one audio input, use just MediaMVPs Left audio cable.
On your TV set:
To use the MediaMVP, you need to select the Video Input on your TV set. Each TV set does this
differently, but many TV sets have a button marked TV/Video . Clicking this button normally
switches from the TV tuner inside your TV set to the Audio/Video inputs being used by MediaMVP.
Some TV sets have a TV/Video button on the remote.
If you cannot find a way to switch to Video Input on your TV set, refer to the TV set manual.
When you have made all your network and TV connections, boot your PC and run the
MediaMVP Setup program from the MediaMVP Installation CD-ROM.
Click the Start button, then Run and then the drive letter of your CD-ROM drive (for example:
D:\), then Setup.EXE
This should take a few minutes and is automatic.
5
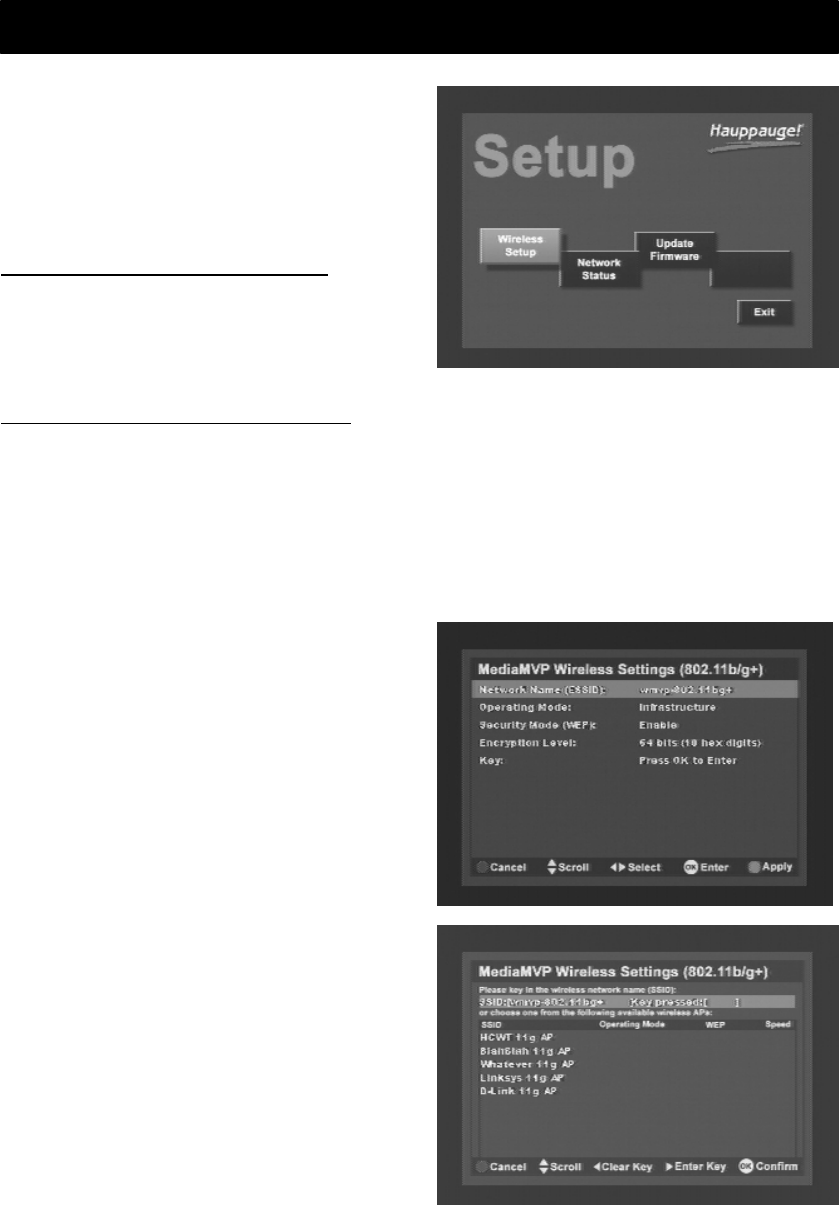
Step 4: Power on the MediaMVP
After the MediaMVP Setup program has been
run, turn on the MediaMVP by plugging in the
power adapter.
By default, MediaMVP will check for your
Ethernet connectivity to decide whether or not
to enter the wireless setup page.
Wired mode (RJ45 cable plugged in):
If MediaMVP detects the Ethernet connection
(RF45 Ethernet cable is plugged in), it will by
pass the wireless setup page and start to load
client application. No configuration required.
Wireless mode (RJ45 cable unplugged):
MediaMVP will enter the “Setup” page automatically if it detects no Ethernet connection is
present.
When operating in wireless mode, MediaMVP automatically connects to the closest, unsecured
(WEP turned off) wireless access point (or one has the strongest signal strength) by default.
Therefore, no other setting is required to get your MediaMVP up and running. You can enter the
“Network Status” page to see if MediaMVP is connected to the desired wireless access point by
checking if the current SSID matches your access point’s SSID.
If MediaMVP does not connect to the desired
wireless access point, you can go to the
“wireless setup” page on the main manual to
change it.
On the wireless setup screen (see left) Press
“OK” on the “Network Name (ESSID)” field to
enter the SSID setting page.
On the SSID setup screen (see left), either use
the remote control to key in the desired SSID or
simply choose a wireless access point you wish
to connect to from the list below.
6
If you have a Firewal
l on your network
Now go back to the main manual and go to “Exit” to start the main application.
MediaMVP will then display the following messages on your TV set:
1. Contacting DHCP Server
2. Contacting MediaMVP
Bootserver
3. Loading application
4. Starting application
5. Contacting server
6. Go menu
You are now ready to experience digital
media on your TV set!
If you cannot get beyond “Contacting DHCP Server”: you are not connected to your hub, router
or access point, or your cabling is defective. If you are directly connecting your MediaMVP to a PC
and you get this message continuously, then you might be either, in wired mode, using a straight
through ethernet cable instead of the crossover cable or, in wireless mode, did not correctly
configure the wireless adaptor on your laptop or PC.
If you cannot get beyond “Contacting MediaMVP Bootserver”: your PC might be protected by a
firewall, or the MediaMVP services have not started on your PC. Turn off your firewall to see if this
is causing this problem, and if so, you need to re-configure your firewall to allow the MediaMVP
to access your PC (see Troubleshooting section).
Note: if you need to reboot MediaMVP, remove the power plug from MediaMVP, wait 5 seconds
and plug it back in.
Step 4: Power on the MediaMVP
Many people install firewalls on PC networks to prevent unauthorized access to data in your PC.
If you have a firewall such as Zone Alarm, you will need to configure the firewall to allow the
MediaMVP to access a server application running on your PC.
ZoneAlarmPro Firewall
There are four firewall alert menus which pop up during the first use of MediaMVP. For each of
these alerts, you should allow access by clicking Yes. Examples of warning messages are in the
Troubleshooting section. To avoid warning messages from popping up each time you use
MediaMVP, select “Remember this answer”.
7
Searching for media on your PC
There are two MediaMVP services which will require access to your network: HcwSMS.exe and
MVPMedia.exe Grant access to both of these programs.
The built-in Windows XP Firewall
Currently you need to disable this firewall for the MediaMVP to work correctly. Instructions to do
this are in the Troubleshooting section. Please check our web site for updates which might allow
the Windows XP Firewall to operate at the same time as the MediaMVP.
After installing the MediaMVP, there are two ways of finding media on your PC. You can ither
manually search for media from the TV set using MediaMVPs Settings menu, or you can
automatically search for media using the MediaMVP Search for Media program on your PC.
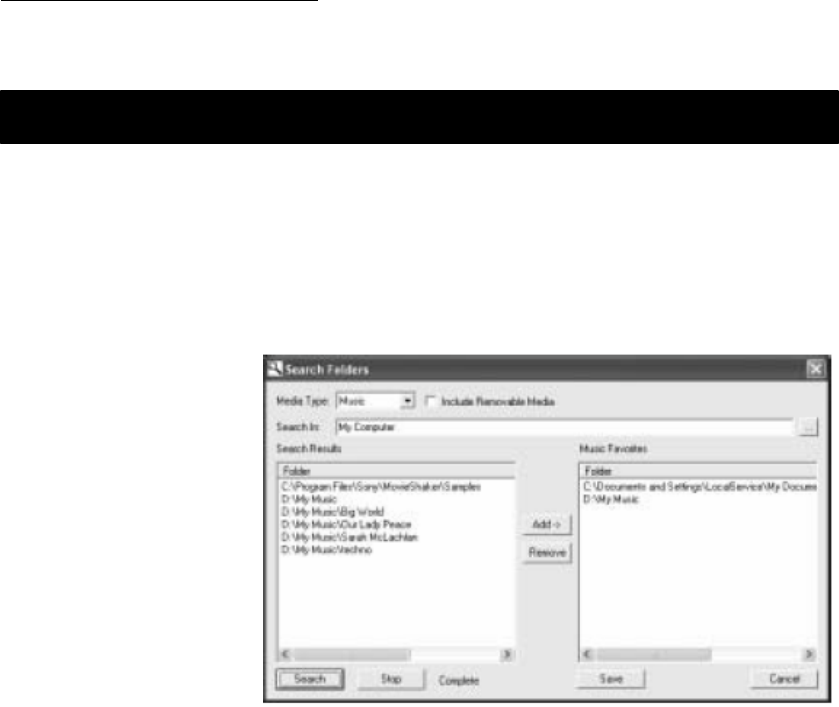
To start the Search Folders program from the PC, click Windows Start, then Program s, and under
Hauppauge MediaMVP run the Search Folders program.
You will see a menu which allows you to select the Media Type (music, videos, pictures) and the
directories to be searched.
Select the Media Type and
the Search In directory
(chose My Computer to look
in all directories) and click
Search.
Once you start the search,
any directory with the
media type selected will
appear in the Search
Results box.
To add a directory, click on
it and then click Add.
Note: right click your
mouse in the Favorites list, then click Add to manually add a specific path (for example: when you
already know where your music is on your disk drive, add that directory). Right click your mouse
on a directory, then click Remove to delete a directory.
When you are finished searching for your media, close the Search application.
8
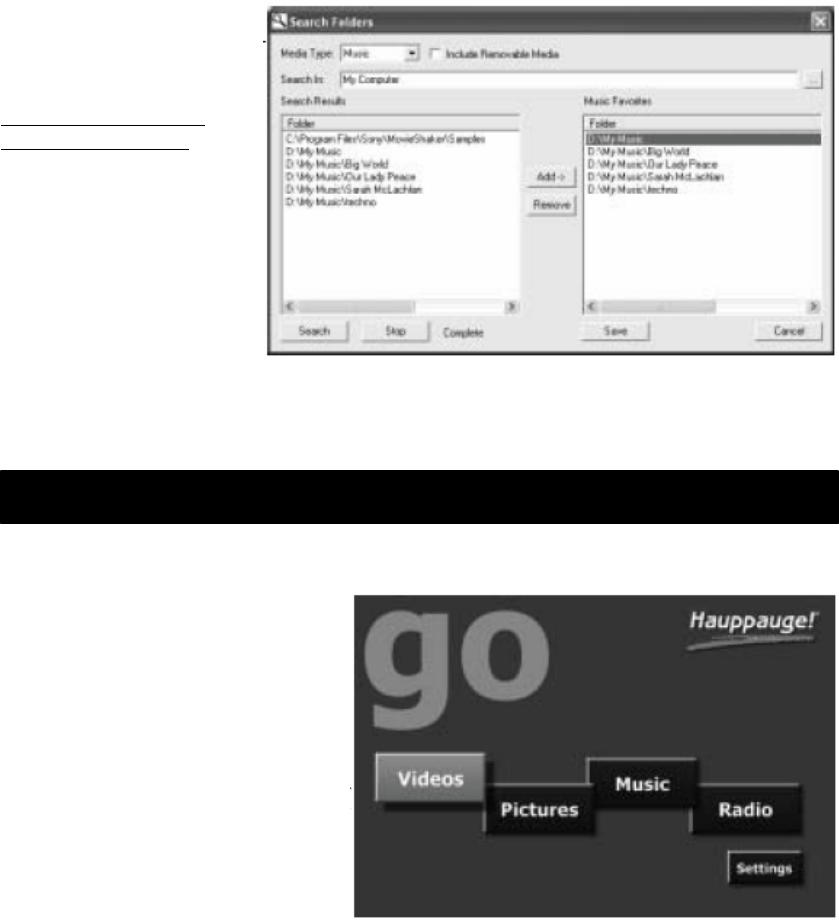
MediaMVP menus
The directories selected will
be listed on the TV set in
MediaMVP s Video, Music,
Pictures menus.
Searching for media
from the MediaMVP
You can also chose
directories for music, digital
pictures and videos from
the MediaMVP Settings
menu. For instructions, in
the section entitled
MediaMVP menus , look at
the Settings menu.
Note: the first time you enter a directory, it takes a long time (as long as several minutes)
while thumbnail images are created. The next time you enter the directory, the response will
be immediate. You can also turn off thumbnailing in the Settings/Configuation menu.
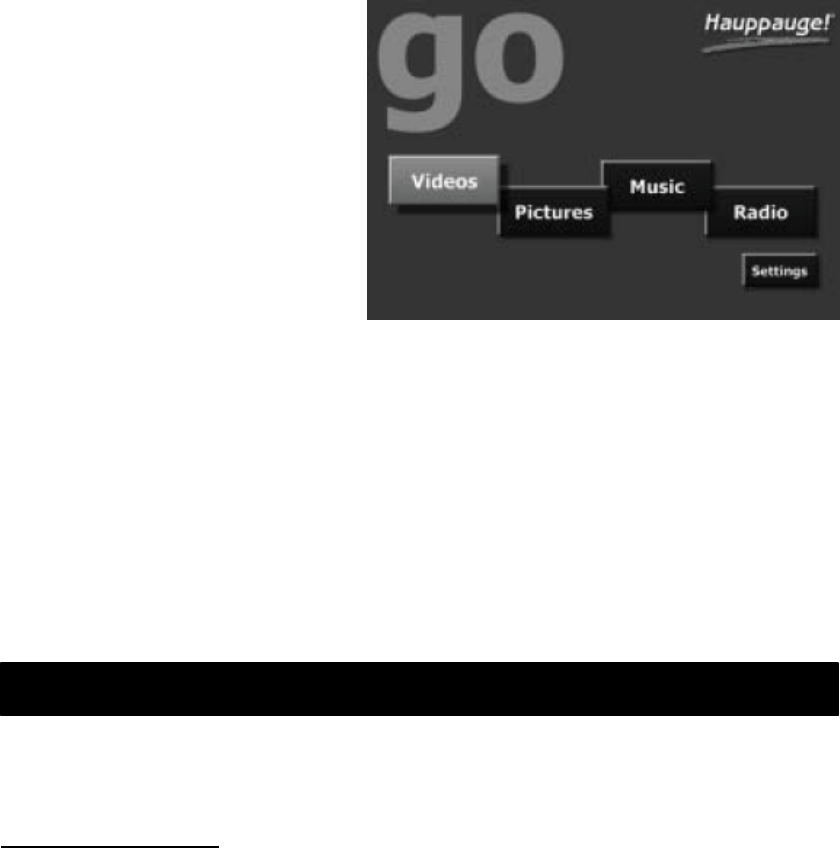
MediaMVP Main menu
MediaMVP s main menu guides you to
Music, Videos and Pictures. Also,
through Settings, the user can
navigate to media stored on their PC.
Note: your PC must be running and
both the PC and MediaMVP must be
connected to the network before the
Main menu will be displayed on your
TV set.
Note: To access the Main menu at any
point, click Go on the remote control.
9
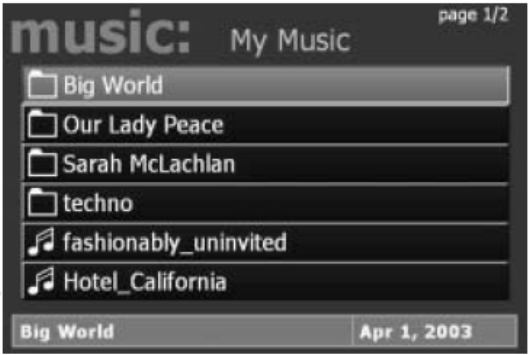
Music menu
The Music menu will show MP3 files, WMA audio or Music Playlists which are located in selected
directories on your PC. You can play a music file (indicated by the music icon next to the file name)
by either clicking the Play button or the O K button on the remote control.
To navigate to a sub menu
(indicated by the folder icon),
cursor to the folder by using the
arrow buttons on the Remote
control and click the OK button
on the remote.
Playlists are indicated by the
playlist icon. To play a playlist,
simply cursor to a playlist and
click OK on the remote control.
Supported playlists are: M3U,
PLS, B4S, and ASX.
If you click the Menu button on the remote control, a pop up menu will appear which will allow the
sorting of the music by date or name, or a random order of music files. A Play all option is
available, which will play all of the music located in the current directory.
To stop music, click the Stop button on the remote control.
To mute music, click the Mute button on the remote control.
Playing WMA audio files
To play WMA files (Windows Media Audio) with the MediaMVP, the installation of Windows Media
Player 9 is required.
Playing a Picture Slideshow while listening to music
After selecting music, either an individual music title, a playlist or by using Play All, you can play
Picture files by clicking the Go button on the remote control, right arrow to Pictures, and then
entering the Pictures menu by clicking the OK button.
To mute the audio while watching a slideshow, click the mute button on the remote.
8
10
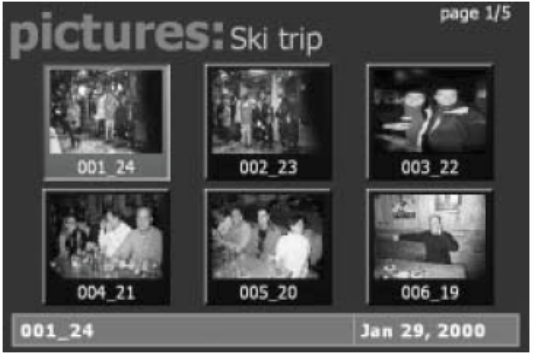
Pictures menu
The Pictures menu will show JPG, JPEG, BMP or GIF files which are located in selected directories
on your PC. You can play a picture
file (indicated by the thumb nail of
the picture) by either clicking the
Play button or the O K button on
the remote control.
To navigate to a sub menu
(indicated by the folder icon),
cursor to the folder by using the
arrow buttons on the Remote
control and click the OK button on
the remote.
If you click the Menu button on
the remote control, a pop up
menu will appear which will allow
the sorting of the pictures by date
or name, or a random order.
Play slideshow will play a slideshow of all of the pictures located in the current directory.
To return to the Pictures menu while viewing a picture, click the Back button on the remote
control.
While running a slideshow, you can hit Pause to pause the slideshow. Hit either Pause again or
Play to resume the slideshow.
When viewing pictures, the Skip ahead button on the remote control will move 6 pictures forward,
while the Skip back button w ill skip back 6 pictures.
9

11
Videos menu
The Videos menu will show MPEG-1, MPEG-2 or DivX videos which are located in selected
directories on the PC. You can play a video file (indicated by the video icon or the video thumbnail)
by either clicking the Play button or the OK button on the remote control.
Types of video files supported are MPEG1 and MPEG2, from less then 1 Mbit/sec up to 10
Mbits/sec, or DivX movies. The maximum data rate might be limited by your local area network
speed.
To navigate to a sub menu
(indicated by the folder icon),
cursor to the folder by using the
arrow buttons on the Remote
control and and click the O K
button on the remote.
If you click the Menu button on
the remote control, a pop up
menu will appear which will
allow the sorting of the videos
by date or name, or a random
order.
To return to the Video menu
while watching a video, click the
Stop button on the remote
control.
To fast forward through a video, click the remotes Fast forward button.
To pause the video while playing, click the Pause button on the remote.
To rewind through the video, click the Rewind button on the remote.
While playing videos, the audio volume can be adjusted through the Vol+ and Vol - keys.
Tips for DivX playback
- Simultaneous playback of DivX videos is not possible from multiple MediaMVPs
- DivX playback requires a minimum 1.8 Gigahertz Pentium4 processor or faster in your PC. If
your processor is not fast enough, you will lose lip synch as you watch your
- Videos
- MediaMVP can scale DivX videos up to full screen, but can only do this on videos of exactly
320x240 or 640x480. If your videos are another format, they will be letter- boxed on your TV
set.
- After using the Fast-Forward and Fast-Rewind buttons a loss of speech synchronization may
occur.

12
Radio menu
MediaMVP allows you to listen to Internet Radio stations through your TV set. MediaMVP
accomplishes this by opening a special link on your PC to the Internet radio station, and then
taking the audio coming from that link and streaming it over the network to the MediaMVP, where
the audio is output to the TV set.
To play an Internet radio station through the MediaMVP, the Internet radio station must do
two things:
- it must transmit audio in either MP3 or in W M A formats. Some radio stations transmit using
Real audio, which the MediaMVP cannot currently play.
- the Internet radio station must be accessible via a direct Internet link. In other words, you
need to be able to put a URL in Internet Explorer and reach the Internet radio station directly
without going through any levels of indirection. An example of a website which has direct
links to Internet radio stations is Shoutcast.
Here is how you can listen to Internet
radio using MediaMVP:
Step 1: Create a link to an Internet
radio station on your PC
Open Internet Explorer and go to a
page with Internet Radio stations.
Shoutcast is one example:
http://www.shoutcast.com
Remember: you must be
selecting Internet radio stations
which can be directly accessed by
your browser (and not via a
redirected URL). There are many
Internet radio stations which do
not allow a direct link to the
station. These
Internet radio stations cannot be played by MediaMVP.
13
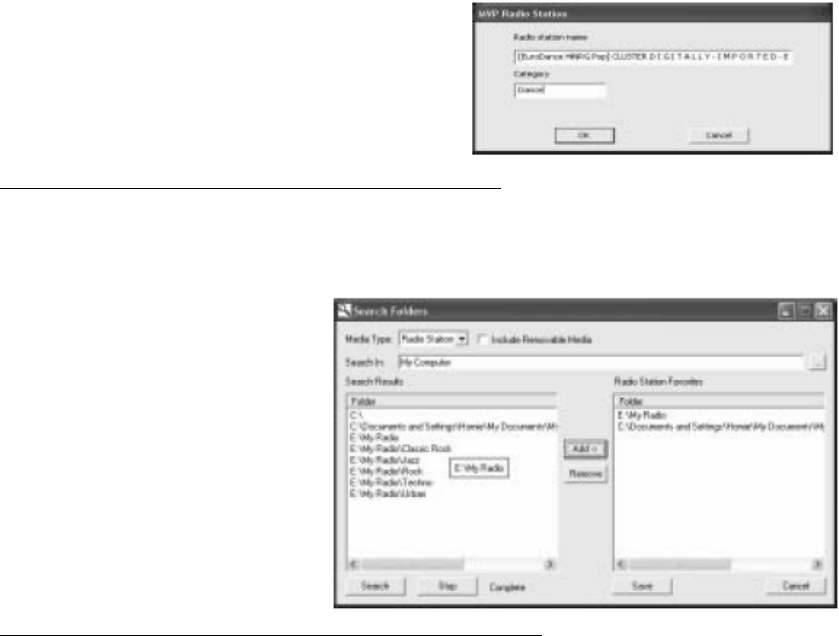
Choose an Internet Radio station or program and use your RIGHT mouse button to click on the
button which allows you to listen to a station (for example, the Tune In button in Shoutcast).
When you click your RIGHT mouse button, a Pop-Up Menu will appear. Choose Add to MVP
Favorite Radio Stations.
A window will pop up entitled MVP Radio Station.
You will be asked to name your added Radio station.
You can do so if you like, or leave the default. You
can also place the radio station in a category (you
will see these categories on your TV set via the
MediaMVP). When you are finished naming your
radio station, click OK.
Step 2: Add radio stations to the MediaMVP media list
Now we need to add the Internet Radio station directory to the MediaMVP media list so that the
MediaMVP can "see" them.
On your Windows screen, click Start / Programs /Hauppauge MediaMVP then Search for Media.
(this program also can be found in
Program Files/Hauppauge
MediaMVP directory) Under Media
Type: choose Radio Stations and
click on Search. After a few
moments, you will see a list of
directories on your local hard disks
which have MediaMVP links to
Internet Radio stations. Click on
those directories you would like to
have MediaMVP list on your TV set,
click Add and then click on Save.
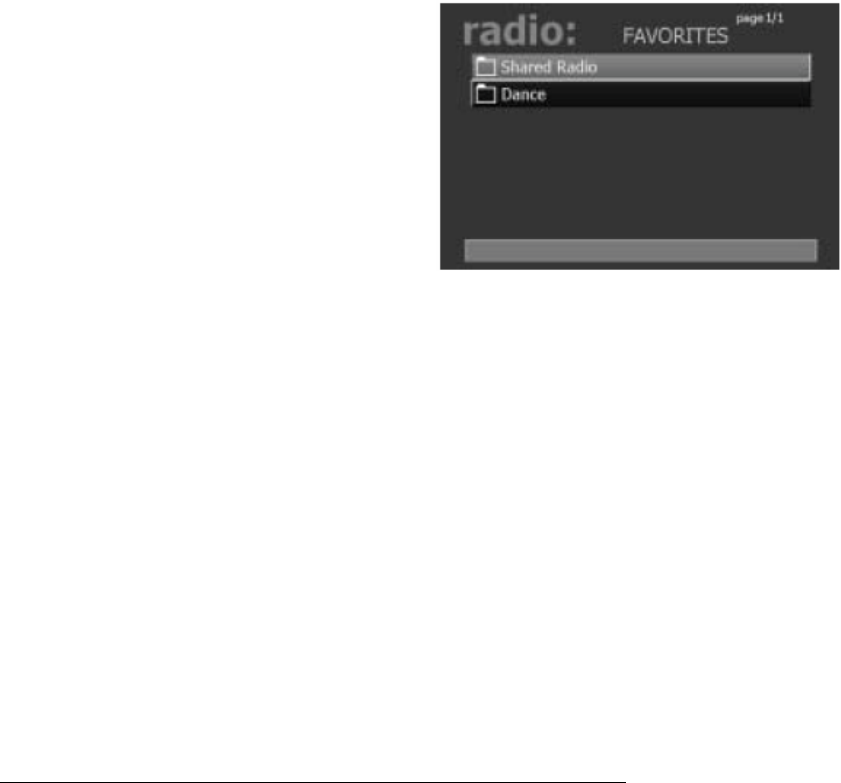
Step 3: Playing an Internet radio station on the MediaMVP
Click the Go button on the MediaMVP remote. Click on the Radio button. If you have set up the
directories (the paragraph above), you will see a MyRadio listing. Go to this directory. In the
directory, you will see a list of Internet radio stations you have made links to.
14
To start playing an Internet radio station, use
your remote control to select the station and
then click the Play button.
Note: If you click on a radio station and
the audio does not start within a few
seconds, the radio station cannot be
accessed by the MediaMVP. One reason for
this is that this station cannot be accessed
directly (it uses redirection to get to the
station). Another reson might be that the
radio station does not transmit audio in one of the formats MediaMVP can play
(currently MP3 and WMA).
How the Internet radio stations are named, stored and played by the MediaMVP:
When you are browsing Internet radio stations while in Internet Explorer, and you right click on
a link to an Internet radio station, the MediaMVP application running on the PC makes a note of
the URL the link is pointing to. The MVP Radio Station pop up menu then is run, allowing you to
name the link and also put the link into a category (for example: Jazz), and then a file is created
in the My Radio directory with that name. The file extension is .MVP, and within the file is the URL
of the radio station.
When you want to play a radio station, the MediaMVP application running on the PC opens that
file, goes to the URL within the file and then streams the audio over your network to the
MediaMVP, where the audio is then played out to your TV set.
If the file holds a link which is not valid (a link which does not directly point to an Internet radio
station), then the MediaMVP radio software waits for about 1 minute before it senses that it
cannot open the URL and find a radio station. MediaMPV will then return to the Radio menu.
Settings menu
Setting directories for Music, Videos, Pictures and Internet radio
The Settings menu is where you can chose the directories on your PC where your Music, Video
and Pictures media are stored. Also, the Settings menu has a Configuration menu where you can
set the video format (NTSC or PAL), video size (4:3 or 16:9), and flicker reduction (none, low,
medium, high) for your TV set.
When you enter the Settings:music, Settings:video or Settings:pictures menus, you will see a
listing of directories (such as My Documents) and drives (disk drives, floppy drives or CDROM
drives) on your PC.
15
To find media within a drive, scroll down to the directory (C:\ for example) and then click the OK
button on your remote control. This will bring the contents of the selected directory onto your TV
screen. To select subdirectories, scroll down to the subdirectory and hit the OK button. You will
see if the media type you are looking for (music, videos, pictures) exists in the directory chosen
by having any existing media listed.
To add a directory, hit the green button on the remote.
If you would like to delete a directory from the list you see when entering Videos, Music or
Pictures from the Main menu, hit the red button on the remote.
Other settings
Thumbnails
In the Configuration menu, you can turn thumbnails on or off. Thumbnails are small images of
your digital pictures or a small image taken from the first frame of a video when browsing
through lists of Videos or Pictures. If your PC slows down when viewing directories of Videos or
Pictures, you should turn Thumbnails off.
Flicker filter
The flicker filter removes flickering which might appear on some TV sets when displaying text.
High end TV sets can use the filicker filter turned off, while normal TV sets might look better if
flicker filter is set to medium or high.
16
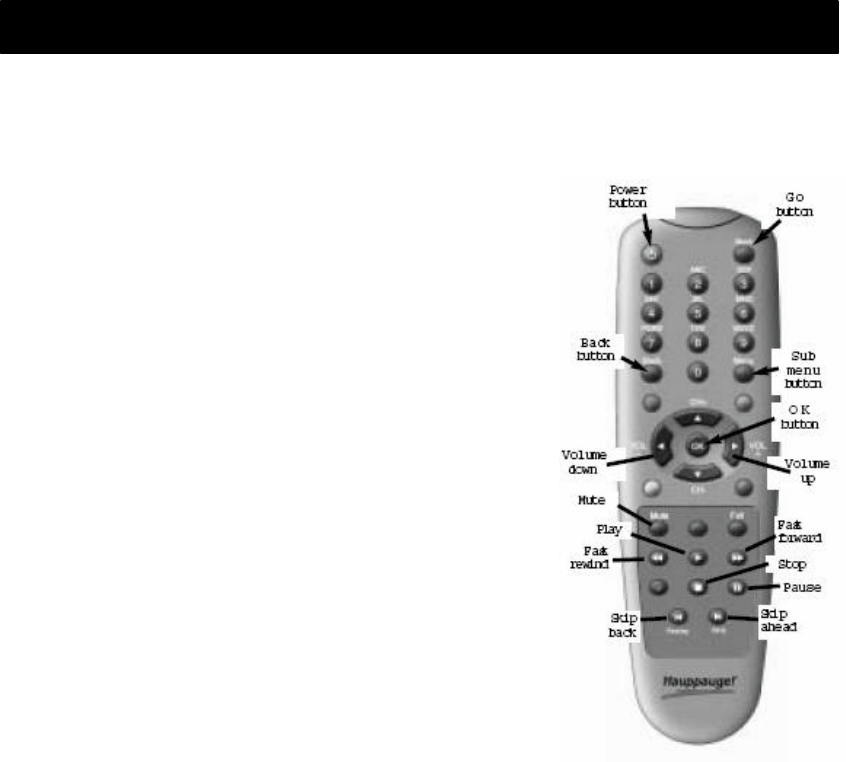
Remote control
Power button: the Power button will bring the MediaMVP into a standby mode and will turn
off the video output. It will not turn off the MediaMVP completely. When you click the Power
button again, the MediaMVP will resume from standby and
turn on its video output.
If you want to reset MediaMVP, you need to remove the
power plug for a few seconds, then reconnect it.
Go button: displays the M ain menu. When in any menu,
clicking the G o button will bring up the Main menu.
OK button: the OK button is similar to the Enter key.
Menu button: brings up the Sub menu. For example,
when in the Music menu, clicking the Menu button will
bring up the sub menu allowing the selection of Play all /
Sort by date / Sort by name / Shuffle.
Back button: goes back to the previous menu. For
example, if you have entered a directory and you d like
to return to the previous directory, click Back.
Pause button: will pause the music, video or slideshow
currently playing. Click Play or Pause again to continue
playing from where you left off.
Vol- and Vol+ buttons: you can control the audio volume
by using internal hardware in the MediaMVP. This means
you can adjust the audio volume without having to use
your TV sets remote control.
Skip ahead and Skip back: the Skip buttons are used to
skip 6 items ahead or backwards when in the media lists
(music, videos and pictures) or when viewing pictures.
When playing videos, Skip advances the video 30 seconds.
Number 0 to 9 buttons: When viewing lists of media, or when playing videos, the number
keys moves you to 10% when you hit the 1 key, 20% when you hit the 2 key, etc.
When viewing lists, the number buttons will move you to positions within the list. For exam -
ple, if you are looking at a list of videos in the Music menu, hitting the 5 button will move
you to 50% of the way through the list.
When watching a video, you can quickly skip through the video by hitting the 0-9 buttons.
When you hit one of these keys, you will skip to, for example, 10% of the video file when
you hit the ’1’ key, 20% of the video file when you hit the ’2’ and so forth.

17
Conne
cting MediaMVP directly to a laptop or PC
Installing MediaMVP software updates
You can download MediaMVP software updates from the Hauppauge website at:
http://www.hauppauge.com/pages/support_mediamvp.html
To install a new version of MediaMVP software:
1. unplug the power to the MediaMVP
2. download and install the new version on your PC
3. re-plug the power to MediaMVP
The new MediaMVP application will then be loaded onto MediaMVP through your network.
You can connect the MediaMVP directly to a PC or laptop. To do this, you will need a
’crossover’ cable, which you can either buy at a computer store or make yourself.
Here is how you connect the MediaMVP directly to your PC or laptop:
1. Purchase or make a cross over Ethernet cable. Examples of a crossover cable are the Belkin
CAT 5e Crossover Cable for computer-to-computer connection.
2. Connect one end of the crossover cable to the LAN port on the MediaMVP, and the other
end to the LAN port on your PC or laptop.
3. Make sure the MediaMVP software is installed on your PC. See Installing the MediaMVP
software section.
4. Set a fixed IP address on your PC when using a crossover cable.
When using a direct connection with a network crossover cable, you need to set a static
IP address on your PC.
To do this, click Start / Settings / Control Panel / Network connections. Double click on
Local Area Connection and then click Properties. Click on Internet Protocol (TCP/IP). Double
click Advanced and you will see the Internet Protocol (TCP/IP) Properties menu.
Uncheck Obtain an IP address automatically.
In the IP address box, enter 192, then 123, then 1, then 1.
When you hit the Tab key, the subnet mask will fill in to 255.255.255.0
Click O K and then O K again to complete the disabling of DHCP.
If you would like to re-enable DHCP, simply click the Obtain an IP address automatically
box, and your system will be configured for use on a network instead of the direct PC to
MediaMVP connection.

18
Connecting MediaMVP directly to a laptop or PC wirelessly
5. Connect the MediaMVP to the TV set, and turn on the MediaMVP. You should see
the ’Searching for PC server’ on the TV set. On the PC, you should see a Windows
massage say ’Ethernet connection found’
Since the direct connection from a MediaMVP to a PC is very fast, you will get maxim u m
performance on all music, video and picture media.
You can also connect the MediaMVP directly to a PC or laptop wirelessly. To do this, you will
need either a 802.11b or 802.11g wireless adaptor which you can purchase at a computer
store.
Here is how you connect the MediaMVP directly to your PC or laptop wirelessly:
1. Make sure the wireless adaptor is installed and operating correctly on you laptop or PC.
Configure the operating mode of your wireless adaptor to “Ad-hoc” mode. For detailed
instruction, please refer to the user manual or installation guide came with the wireless
adaptor you have purchased.
2. Make sure the MediaMVP software is installed on your PC. See “Installing the MediaMVP
software section”.
3. Set a fixed IP address on your PC when connecting wirelessly in “Ad-hoc” mode.
When using a direct wireless connection, you need to set a static IP address on your
PC.
To do this, click Start / Settings / Control Panel / Network connections. Double click on
Local Area Connection and then click Properties. Click on Internet Protocol (TCP/IP).
Double click Advanced and you will see the Internet Protocol (TCP/IP) Properties menu.
Uncheck Obtain an IP address automatically.
In the IP address box, enter 192, then 123, then 1, then 1.
When you hit the Tab key, the subnet mask will fill in to 255.255.255.0
Click O K and then O K again to complete the disabling of DHCP.
If you would like to re-enable DHCP, simply click the Obtain an IP address automatically
box, and your system will be configured for use on a network instead of the direct PC
to MediaMVP connection.
4. Connect the MediaMVP to the TV set, and turn on the MediaMVP. You should see the ’setup’
screen on the TV set.
5. On the “setup” screen you will see the first option “Wireless setup” on the main manual.
Press OK button on your remote control to enter the wireless setup page.
6. Now press OK again to enter the “Network name (ESSID)” setting page in the wireless setup
page.
7. On the ESSID setup page you will see, at the lower section, a list of all the available wireless

19
Troubleshooting
access points or wireless-equipped PCs running on “Ad-hoc” mode. Scroll down the list and
select the PC or laptop you wish to connect to by looking for its SSID name. Press “OK”
button to confirm and it will take you back to the previous wireless setting page.
8. On the main wireless setting page, press the green button on the remote control to save
and apply your settings. Your setting should take effect after a couple of seconds.
MediaMVP does not display the Main menu:
In order to display the Main menu, MediaMVP needs to be able to talk to the PC which
has the MediaMVP software installed. There are several things which might cause the
MediaMVP not to be able to talk to the PC:
- your PC is not turned on. MediaMVP requires the PC to be turned on to operate.
- The network cable is not connected to either the PC or the MediaMVP.
- The network router is not turned on
- Afirewall is running on your PC, and is not allowing the MediaMVP to access the PC.
-
Software updates for MediaMVP:
http://www.hauppauge.com/pages/support_mediamvp.html
Contacting technical support if you experience MediaMVP problems:
e-mail: techsupport@hauppauge.com
telephone: 631-434-3197
20
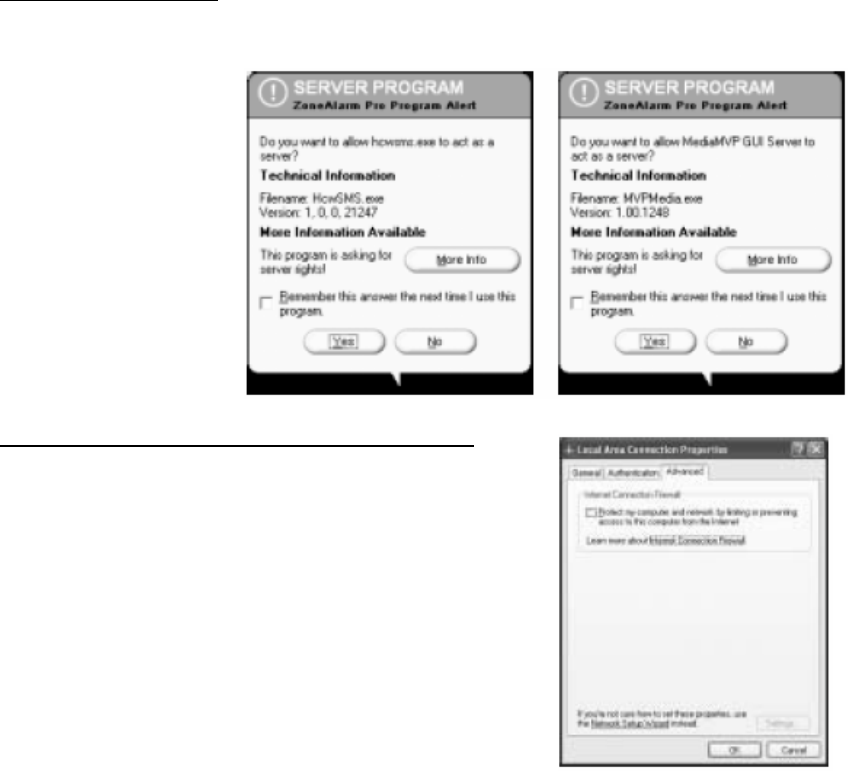
ZoneAlarmPro Firewall
There are four firewall alert menus which pop up during the first use of MediaMVP. For each
of these alerts, you should allow access b y clicking Yes.
To avoid these warning
messages from popping
up each time you use
MediaMVP, select
Remember this answer.
There are three
MediaMVP services which
will require access to your
network: HcwSMS.exe,
MVPMedia.exe and
MVPStart.exe. Grant
access to these
programs.
If you are using the built-in Windows XP Firewall
Currently you need to disable this firewall for the MediaMVP to
work correctly. Please check our web site for updates which
might allow the Windows XP Firewall to operate at the same
time as the MediaMVP.
Disabling Windows XP firewall
To disable the Windows XP firewall, click Start and then go into
Control Panel and then Network Connections. Click on Local
Area Connection. You will see the Local Area Connection
Properties menus. Click on the Advanced tab and unclick
Protect my computer .
Click OK and the Windows XP Firewall will be disabled.